

Page 1

3Com Megahertz
10/100 LAN CardBus
PC Card User Guide
http://www.3com.com/
Part No. 09-1345-001
June 1998
Page 2

3Com Corporation ■ 5400 Bayfront Plaza ■ Santa Clara, California ■ 95052-8145
© 3Com Corporation, 1998. All rights reserved. No part of this documentation may be reproduced in
any form or by any means or used to make any derivative work (such as translation, transformation, or
adaptation) without permission from 3Com Corporation.
3Com Corporation reserves the right to revise this documentation and to make changes in content
from time to time without obligation on the part of 3Com Corporation to provide notification of such
revision or change.
3Com Corporation provides this documentation without warranty of any kind, either implied or
expressed, including, but not limited to, the implied warranties of merchantability and fitness for a
particular purpose. 3Com may make improvements or changes in the product(s) and/or the program(s)
described in this documentation at any time.
UNITED STATES GOVERNMENT LEGENDS:
If you are a United States government agency, then this documentation and the software described
herein are provided to you subject to the following restricted rights:
For units of the Department of Defense:
Restricted Rights Legend: Use, duplication or disclosure by the Government is subject to restrictions
as set forth in subparagraph (c) (1) (ii) for restricted Rights in Technical Data and Computer Software
clause at 48 C.F.R. 52.227-7013. 3Com Corporation, 5400 Bayfront Plaza, Santa Clara, California
95052-8145.
For civilian agencies:
Restricted Rights Legend: Use, reproduction or disclosure is subject to restrictions set forth in
subparagraph (a) through (d) of the Commercial Computer Software - Restricted Rights Clause at 48
C.F.R. 52.227-19 and the limitations set forth in 3Com Corporation’s standard commercial agreement
for the software. Unpublished rights reserved under the copyright laws of the United States.
The software described in this documentation is furnished under a license agreement included with the
product either as a separate document or on the software distribution diskette in a root directory file
named LICENSE.TXT. If you are unable to locate a copy, please contact 3Com and a copy will be
provided to you.
Unless otherwise indicated, 3Com registered trademarks are registered in the United States and may or
may not be registered in other countries.
3Com, Dynamic
Corporation. 3TECH is a trademark of 3Com Corporation. 3ComFacts is a service mark of 3Com
Corporation. AutoLink is a trademark of Data National and is licensed by 3Com Corporation.
Microsoft, Windows, and Windows NT are registered trademarks of Microsoft Corporation. Novell and
NetWare are registered trademarks of Novell, Inc. IBM is a registered trademark of International
Business Machine Corporation. CompuServe is a trademark of CompuServe, Inc. DEC and PATHWORKS
are registered trademarks of Digital Equipment Corporation. Banyan and VINES are registered
trademarks of Banyan Systems Incorporated. Artisoft and LANtastic are registered trademarks of
Artisoft, Inc. Toshiba is a trademark of Toshiba Corporation.
Other brand and product names may be registered trademarks or trademarks of their respective
holders.
Guide written by Jean Anderson. Edited by Chris Dresden. Technical illustration by Tim Buckreus.
Production by Petra Armenta.
Access
, Megahertz, XJACK and NetAge are registered trademarks of 3Com
ii
Page 3

ONTENTS
C
1
I
NSTALLING THE
Before You Begin 1-2
Setting CardBus Mode 1-2
Toshiba Notebooks 1-2
IBM ThinkPad Series 760 Notebooks 1-3
Connecting the 3CCFE575BT CardBus PC Card 1-4
Connecting the 3CXE589ET CardBus PC Card with XJACK
Connector 1-5
2
I
NSTALLING THE NETWORK DRIVER
Before You Install the Network Driver 2-2
Which Driver Installation Instructions Should You Use? 2-2
Which Windows 95 Version Are You Running? 2-2
Windows 95 Version 4.00.950B (OSR 2) 2-3
Windows 95 (Versions 4.00.950 and 4.00.950A) 2-4
Confirming Installation 2-5
Windows NT Version 4.0 2-6
Windows NT 4.0 with Networking Installed 2-6
Confirming Installation 2-8
Windows NT 4.0 without Networking Installed 2-8
Windows NT Version 3.51 2-11
Windows for Workgroups (WFW) 2-12
Installing the DOS Enhanced-Mode Driver for WFW 2-13
AutoLink for Windows 3.x, Windows for Workgroups, and
DOS 2-14
Supported Network Drivers 2-15
PC C
ARD
iii
Page 4

3
T
ROUBLESHOOTING
LEDs 3-2
3Com PC Card Diagnostics Program 3-3
Accessing the CardBus PC Card Help System 3-3
Displaying Release Notes, Frequently Asked Questions, and
KnowledgeBase 3-4
Running the CardBus PC Card Self-Test 3-4
Running the Echo Test 3-7
Troubleshooting Support Services 3-9
Generating a Problem Report 3-11
DOS Diagnostics Program 3-13
Removing the PC Card Diagnostics using Windows 95 and
Windows NT 3-13
Resolving Hardware Resource Conflicts 3-13
Changing the I/O, IRQ, or Memory Range 3-14
Disabling PC Card (PCMCIA) Support for Windows 95 3-14
Re-enabling PC Card Support for Windows 95 3-15
Disabling PC Card (PCMCIA) Support for Windows NT 3-16
Re-enabling PC Card (PCMCIA) Support for Windows
NT 3-16
Frequently Asked Questions 3-17
Troubleshooting Tips 3-20
4
C
HANGING CONFIGURATION
Configuration Settings 4-1
Configuration Setting Descriptions 4-1
Displaying Configuration 4-2
Changing Configuration Settings 4-5
DOS Configuration Program 4-5
iv
Page 5

A
S
PECIFICATIONS
B
T
ECHNICAL SUPPORT
Online Technical Services B-1
World Wide Web Site B-1
3Com Bulletin Board Service B-1
3ComFacts Automated Fax Service B-2
3ComForum on CompuServe Online Service B-3
Support from Your Network Supplier B-3
Returning Products for Repair B-4
I
NDEX
3COM C
FCC C
FCC D
I
NDUSTRY CANADA CLASS
S
TATEMENT
A
VIS DE CONFORMITÉ À LA RÉGLEMENTATION
D’INDUSTRIE CANADA
3COM END U
ORPORATION LIMITED WARRANTY
LASS
B S
TATEMENT
ECLARATION OF CONFORMITY
B E
MMISSION COMPLIANCE
SER SOFTWARE LICENSE AGREEMENT
v
Page 6

vi
Page 7
1
I
NSTALLING THE
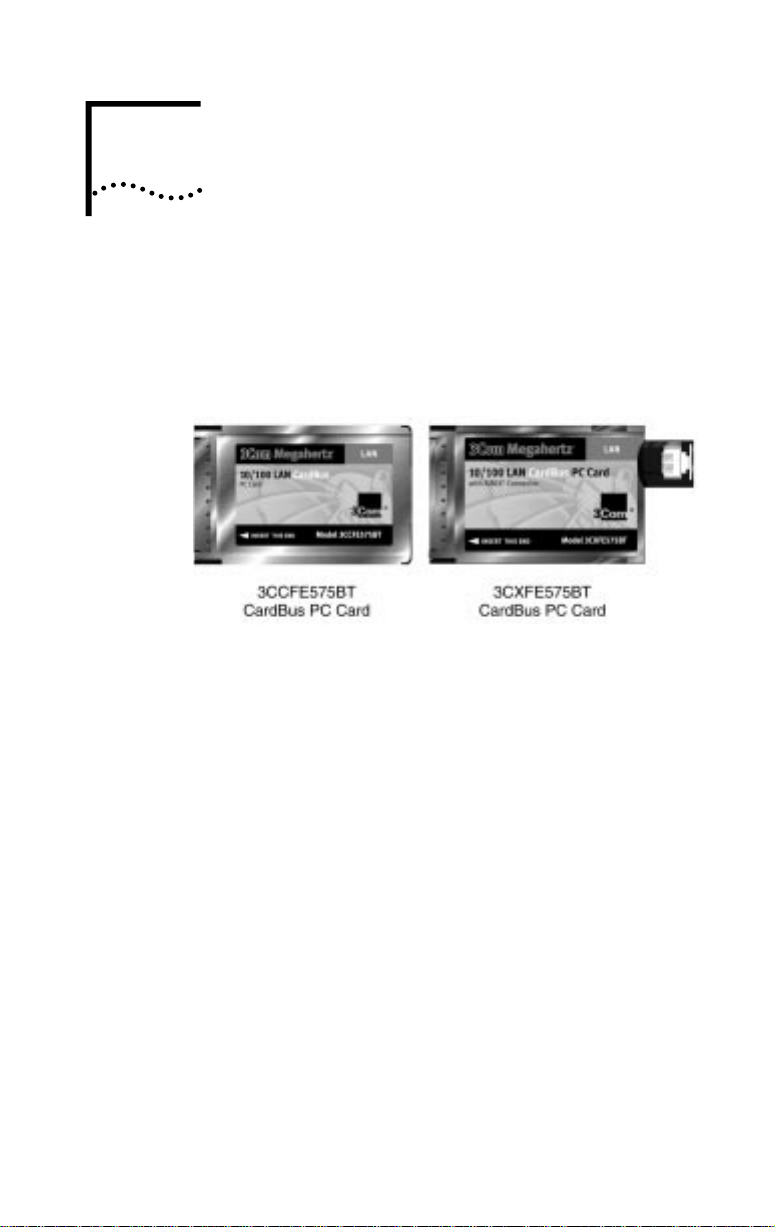
The 3Com Megahertz 10/100 LAN CardBus PC Cards
(models 3CCFE575BT and 3CXFE575BT) connect your
notebook to an Ethernet or Fast Ethernet network. The
only difference between the two models is the connector.
PC C
ARD
Figure 1-1
These CardBus PC Cards automatically operate at 10 Mbps
when connected to a 10BASE-T Ethernet hub and at
100 Mbps when connected to a hub supporting
100BASE-TX Fast Ethernet.
This chapter describes how to install the CardBus PC Cards
in your notebook and connect them to the network.
3Com Megahertz 10/100 CardBus LAN PC Cards
Page 8

1-2
C
HAPTER
1: I
NSTALLING THE
Before You Begin
Make sure that you have a CardBus notebook and these
items:
■
3Com Megahertz 10/100 LAN CardBus PC Card
PC Card cable (6 inches) and network cable (six feet)
■
■
3Com Megahertz 10/100 LAN CardBus PC Card
User Guide
■
LAN Installation Disk
If any of these items are missing from the CardBus PC Car d
package, contact your PC Card supplier.
Setting CardBus Mode
Before you install the CardBus PC Card, you must set Car dBus
mode for T oshiba®, IBM® ThinkPad series 760, and some NEC
notebooks. For NEC notebooks see your NEC notebook
documentation. If you have questions about setting CardBus
mode, refer to your notebook documentation.
Before you install the PC Card in these notebooks, follow
these steps to set the notebook to CardBus mode.
PC C
ARD
Toshiba Notebooks
1 Hold down the Esc key (the button the upper left
hand corner of your notebook keyboard) and turn
the notebook on.
2 Press F1 when the error message appears.
3 On the Controller Mode line (this may be on the
second page) choose CardBus mode.
4 Press end to save changes.
5 Type Y to reboot into Windows 95.
Page 9

6 Using the Start menu, select shutdown the computer
and then click Yes to confirm.
7 Turn the notebook back on.
The notebook is now set up to run in CardBus mode.
IBM ThinkPad Series 760 Notebooks
1 Using the Start Menu, select
>Thinkpad Configurations.
If this menu does not appear, contact your notebook
manufacturer to get the latest BIOS and instructions for
setting CardBus mode.
2 Click the
PC Card Slots
picture.
The PC Card Slots window appears.
3 Enable
CardBus mode
.
The IRQ Conflict warning appears asking if you want to
disable the device in conflict.
4 Click OK.
5 Restart the notebook.
If New Hardware Detected appears, restart again. The
notebook is now set up to run in CardBus mode.
Before You Begin
Programs >Thinkpad
1-3
Page 10
1-4
C
HAPTER
1: I
NSTALLING THE
PC C
ARD
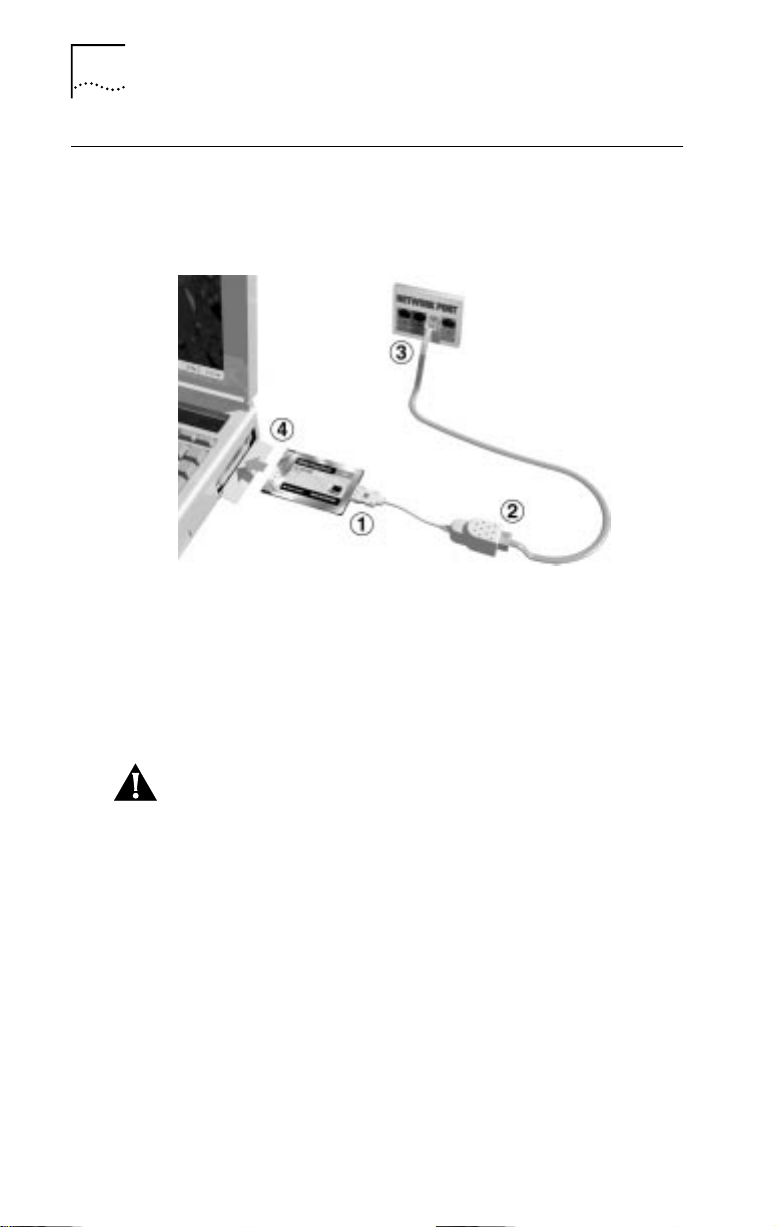
Connecting the 3CCFE575BT CardBus PC Card
1 Remove all PC Cards from your notebook.
2 Connect the PC Card cable to the CardBus PC Card ➀,
and to the network cable ➁.
Figure 1-2
Connecting the CardBus PC Card
3 Connect the RJ-45 connector to the network port ➂.
4 Turn the notebook on.
5 When Windows is ready , insert the PC Car d ➃ into the
CardBus PC Card slot. Slide it all the way in.
CAUTION:
Do not force the CardBus PC Card into the slot
or you may bend the pins inside the slot.
If the CardBus PC Card doesn’t fit into the slot, make sure
that your notebook has a CardBus slot. Refer to your
notebook documentation or contact your notebook
manufacturer.
You may see Windows 95 prompts for driver installation.
The final installation step is to install the network driver
that allows you to login to the network. For instructions
on how to install the network driver, go to Chapter 2.
Page 11
Connecting the 3CXE589ET CardBus PC Card with XJACK Connector
1-5
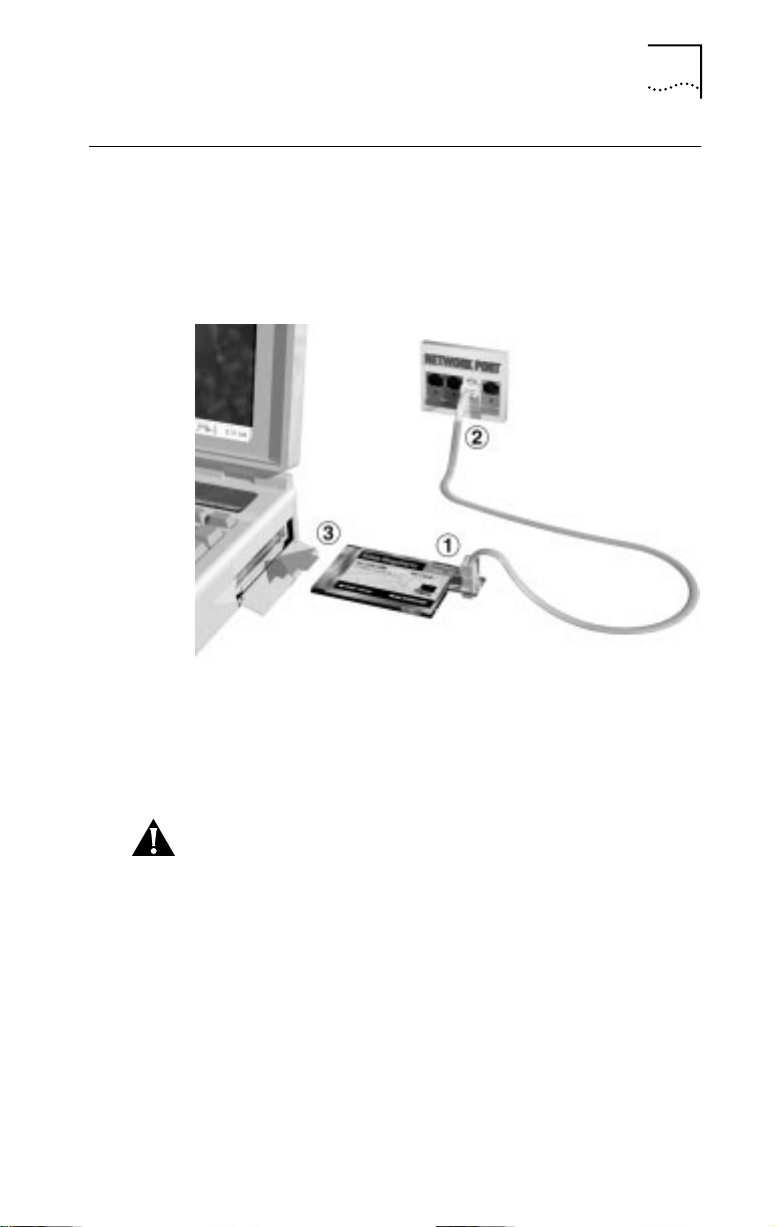
Connecting the 3CXE589ET CardBus PC Card with XJACK
Connector
1 Remove all PC Cards from your notebook and turn
it on.
2 Connect the network cable ➀ to the CardBus PC Card
XJACK connector.
Figure 1-3
Connecting the CardBus PC Card
3 Insert the RJ-45 connector into the network port ➁.
4 Insert the PC Card into the CardBus PC Card slot ➂.
Slide it all the way in.
CAUTION:
Do not force the CardBus PC Card into the slot
or you may bend the pins inside the slot. If the CardBus PC
Card doesn’t fit into the slot, make sure that your
notebook has a CardBus slot. Refer to your notebook
documentation and contact your notebook manufacturer
for more information.
You may see Windows 95 prompts for driver installation.
The final installation step is to install the network driver
that allows you to login to the network. For instructions
on how to install the network driver, go to Chapter 2.
Page 12

Page 13

I
NSTALLING THE
N
ETWORK
2
1 Go to the 3Com web site. Type the 3Com URL into
2 Scroll down to
3 Scroll down to
4 Select the 3Com Megahertz 10/100 LAN CardBus
D
RIVER
This chapter describes how to install the 3Com network
driver that completes your notebook connection to the
network.
Instructions are provided for Windows 95, Windows NT,
Windows for Workgroups, and AutoLink NetWar e network
driver installation.
For information about Banyan Vines, Microsoft LAN Manager ,
IBM LAN Server, Artisoft LANtastic, and DEC PATHWORKS,
see Table 2-1.
The latest network drivers are available on 3Com’s World
Wide Web site. To download the latest drivers:
your browser:
http://www.3com.com/
Software and Drivers
Network Interface Cards
PC Card.
and double-click.
and click.
Page 14

2-2
C
HAPTER
2: I
NSTALLING THE NETWORK DRIVER
Before You Install the Network Driver
Now that the CardBus PC Card is inserted in your notebook
and the network cable is connected to the network port,
the final installation step is to install the network driver.
This section describes the requirements for a successful
driver installation.
Which Driver Installation Instructions Should You Use?
Ask your MIS department which network driver instructions
you should use. Instructions are provided in this chapter for
each of the following environments:
■
Windows 95 version 4.00.950 or 4.00.950a
Windows 95 version 4.00.950b (OSR 2)
■
■
Windows NT version 4.0
■
Windows NT version 3.51
Windows for Workgroups
■
For information about Banyan Vines, Microsoft LAN
Manager, IBM LAN Server, Artisoft LANtastic, and DEC
PATHWORKS, see Table 2-1.
Proceed to the driver installation section in this user guide
that your MIS department recommends.
Which Windows 95 Version Are You Running?
You must determine if you are running Windows 95 OEM
Service Release 2 (OSR 2) or the standard Windows 95
before you install the network driver.
Since standard Windows 95 does not support CardBus
automatically , the driver installation instructions ar e differ ent.
If you already know which version of Windows 95 you are
running, go to the appropriate Windows 95 section to install
the CardBus PC Card network driver on your notebook.
1 Double-click
My Computer and then Control Panel.
2 In the Windows 95 Control Panel, double-click System
to display the System Properties dialog box.
3 Click the General tab to display the Windows 95
version information.
Page 15
Windows 95 Version 4.00.950B (OSR 2) 2-3
If your Windows 95 version is 4.00.950 or 4.00.950A, go
to the appropriate section to install the network driver.
If your Windows 95 version is 4.00.950B (OSR 2), go to the
following section to install the network driver.
Windows 95 Version 4.00.950B (OSR 2)
Install the NDIS network driver when your notebook is
running Windows 95 4.00.950B (also known as OSR 2).
The 3Com software automatically detects which OS your
notebook is running and installs the correct NDIS driver.
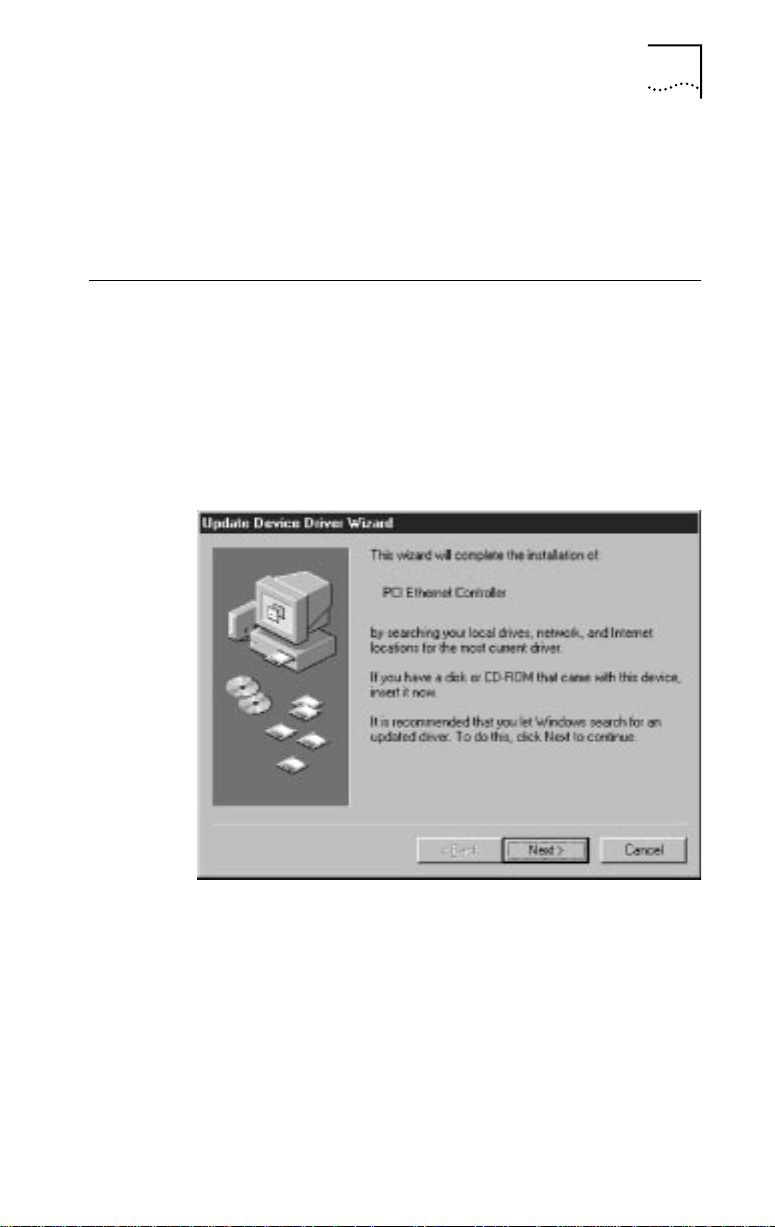
1 Make sure the CardBus PC Card is installed and
connected to the network, as described in Chapter 1.
The Update Device Driver Wizard window appears.
Figure 2-1 Update Device Driver Wizard Window
2 In the Update Device Driver Wizard window,
click Next.
If this window does not appear, click System, click Device
Manager, and then click Refresh.
3 Click Other Locations.
4 Insert the LAN Installation Disk.
5 Type a: and click OK.
Page 16

2-4 CHAPTER 2: INSTALLING THE NETWORK DRIVER
6 In the Update Device Driver Wizard, click Finish.
7 In the Insert Disk window, click OK.
8 In the copying files window, type a: and click OK.
9 If prompted, insert the Windows 95 CD-ROM or type
the directory path to the Windows 95 CAB files on
your notebook and click OK.
10 Remove the LAN Installation Disk and restart the
notebook.
The network driver installation is complete. To confirm
installation, see the section “Confirming Installation.”
If you have problems, go to Chapter 3.
Windows 95 (Versions 4.00.950 and 4.00.950A)
You install the NDIS network driver when your notebook is
running Windows 95. This driver can be used in Microsoft
and NetWare environments.
1 Make sure the CardBus PC Card is inserted and
connected to the network, as described in Chapter 1.
2 Double-click My Computer, Control Panel, and then
double-click Add New Hardware.
3 In the Add New Hardware Wizard window, click Next.
4 Respond to the “Do you want Windows to search for
your new hardware” prompt by clicking “No” and
then click Next.
5 Double-click on Network Adapters in the list that
appears.
6 In the Select Device window, click the Have Disk button.
7 Insert the LAN Installation Disk in the floppy drive
and click OK.
8 Select 3Com Megahertz 10/100 LAN CardBus PC Card
Manual Load and click OK to copy the CardBus PC
Card files to your notebook.
9 In the New Hardware Wizard Window, click Next.
Page 17

Windows 95 (Versions 4.00.950 and 4.00.950A) 2-5
10 Click Finish to complete the driver installation and
remove the LAN Installation Disk.
a If the software prompts for Computer Name and Work
Group Name, type the names as supplied by your MIS
department and click OK.
■ The computer name is the name of your notebook.
Give your notebook a unique name (up to 15
characters, no blank spaces).
■ A workgroup is composed of the computers that you
usually communicate with (like your department) and
contains shared resources (like printers).
■ If you use peer group networking, the workgroup
name is your peer group. Peers can see each other
when they look in the Network Neighborhood.
■ Y our computer description is visible to other members
of your workgroup when they see your notebook in
the Network Neighborhood.
11 If you are prompted for Windows 95 files, enter the
directory path for Windows 95 CAB files or insert the
Windows 95 CD-ROM.
When installation is complete, Windows 95 prompts for
restart.
12 Remove the LAN Installation Disk and click Yes to
restart the notebook to complete driver installation.
Confirming Installation
1 Double-click the My Computer icon.
2 Double-click the Control Panel icon.
3 Double-click the System icon.
The System Properties box appears, detailing your notebook
setup.
4 Click the Device Manager tab.
A list of devices appears, arranged by type.
5 Double-click the Network Adapters icon.
The name of the installed CardBus PC Card appears:
3Com Megahertz 10/100 LAN CardBus PC Card
Manual Load
Page 18
2-6 CHAPTER 2: INSTALLING THE NETWORK DRIVER
6 Double-click 3Com Megahertz 10/100 LAN CardBus PC
Card to display a description of the CardBus PC Card
and its current status.
If the CardBus PC Card is not operational, go to Chapter 3
for troubleshooting information.
Windows NT Version 4.0
This section describes how to install the NDIS network driver
for a notebook running Windows NT 4.0, with Windows NT
networking installed and without Windows NT networking
installed.
Before you begin, obtain the LAN Installation Disk and
Windows NT installation files (on hard disk, floppy diskettes,
or CD-ROM).
Windows NT 4.0 with Networking Installed
1 Make sure the CardBus PC Card is installed and
connected to the network, as described in Chapter 1.
2 Using the Control Panel, double-click Network.
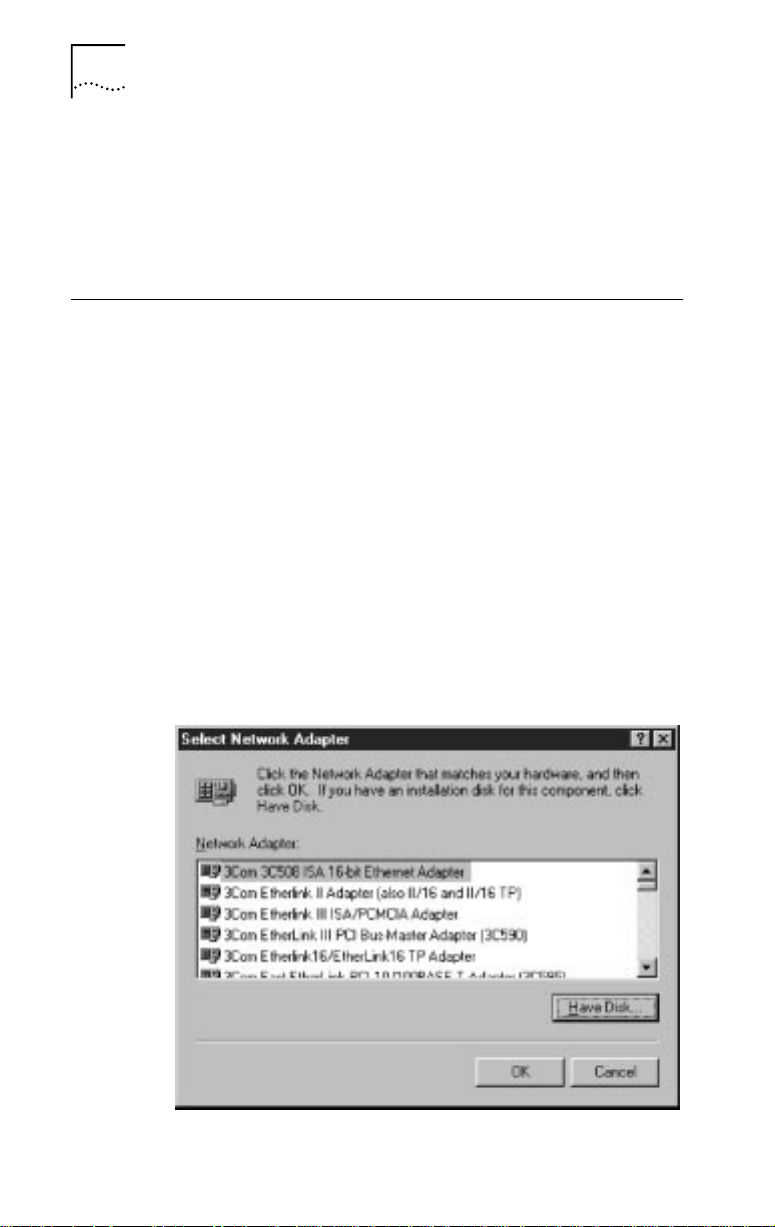
3 Select the Adapters tab and click Add.
4 The Select Network Adapter screen appears.
Figure 2-2 Select Network Adapter Window
Page 19
Windows NT Version 4.0 2-7
5 Click Have Disk.
6 In the Insert Disk dialog box, type: a:
7 Insert the LAN Installation Disk into the floppy drive
and click OK.
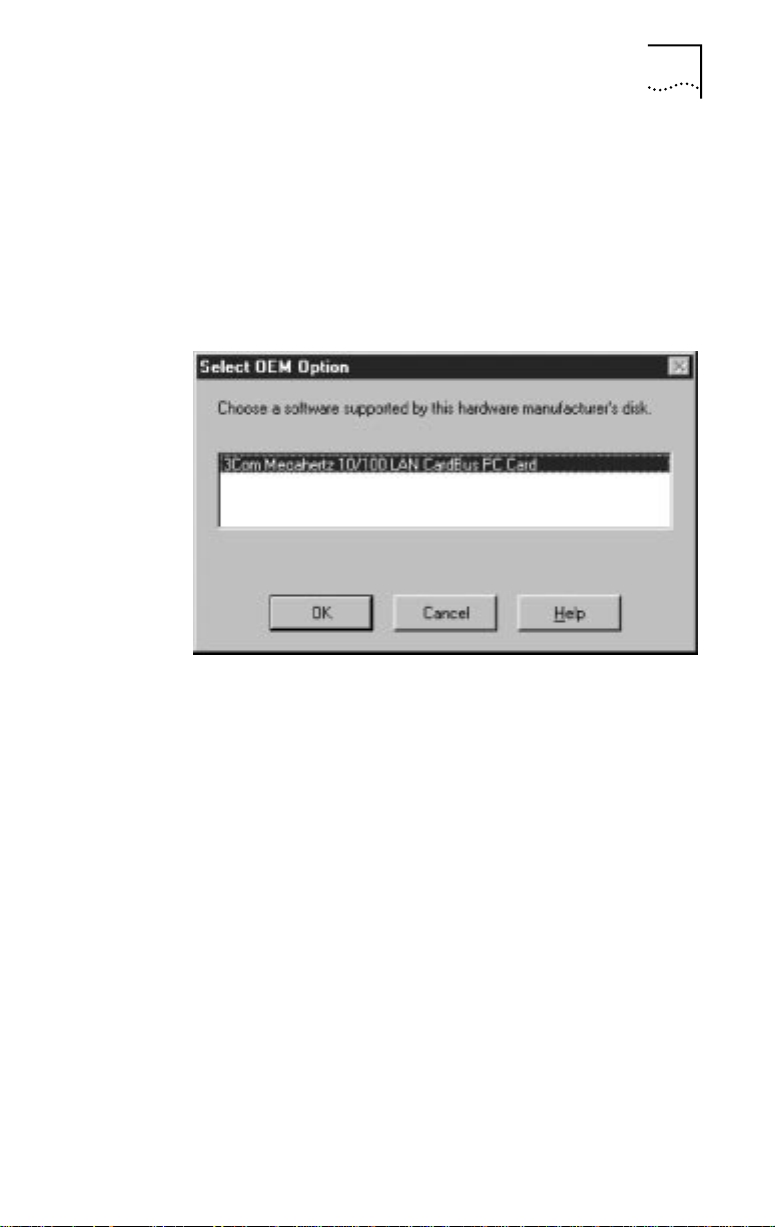
8 On the Select OEM Option screen, highlight
3Com Megahertz 10/100 LAN CardBus PC Card
and click OK.
Figure 2-3 Select OEM Option Window
9 Wait for the CardBus PC Card files to be copied.
The PC Card Setup Network Settings screen appears.
10 Click OK to accept resource allocations or enter new
values.
3Com Megahertz 10/100 LAN CardBus PC Card appears in
the Network window.
11 Click Close. If prompted, enter your IP address and
click OK.
12 Remove the LAN Installation Disk and click Yes to
reboot your notebook.
Installation is complete.
Page 20

2-8 CHAPTER 2: INSTALLING THE NETWORK DRIVER
Confirming Installation
To confirm successful installation, double-click the Network
icon in the Control Panel. Click the Adapters tab. The
3Com Megahertz 10/100 LAN CardBus PC Card should
appear on the list. If it doesn’t appear, see Chapter 3 for
troubleshooting information.
Windows NT 4.0 without Networking Installed
If Windows NT networking is not installed, obtain the
following information from your MIS department.
■ Are you on a local area network or are you using a
modem?
■ Transport and network layer protocol used in the
Microsoft Windows Network
■ Name of the NT Server domain or workgroup you
belong to
■ IP address if you are not using DHCP
1 Make sure the CardBus PC Card is installed and
connected to the network, as described in Chapter 1.
If the CardBus PC Card is automatically detected by
Windows NT , you may have Card Services installed. Refer to
your Card Services documentation to see if it supports the
CardBus PC Card. If it does not support it, consult your
Card Services documentation to remove Card Services.
2 Using the Control Panel, double-click Network.
When Windows NT networking is not installed, you are
asked if you want to install Windows NT networking.
3 Click Yes.
4 Select Wired to the Network and click Next.
5 Click Select from list.
6 Click Have Disk.
7 Insert the LAN Installation Disk.
8 Type a: and click OK.
3Com Megahertz 10/100 LAN CardBus PC Card appears in
the Select OEM Option window.
Page 21

Windows NT Version 4.0 2-9
9 Click OK.
The Network Setup Wizard window appears.
10 Click Next.
The Network Protocols configuration box appears.
11 Select the appropriate network protocol.
If you choose TCP/IP, you will be prompted to set TCP/IP
later in this installation.
12 Click Next.
The Network Services configuration box appears.
13 Select the appropriate network services.
14 Click Next.
The message “Windows NT is ready to install networking
components...” appears.
15 Click Next.
The Windows NT Setup window asks for the location of the
Windows NT installation files.
Figure 2-4 Windows NT Setup Window
16 Type in the directory path to the location of your
Windows NT installation files.
The directory path shown on this screen is only a sample.
17 Click Continue.
Page 22

2-10 CHAPTER 2: INSTALLING THE NETWORK DRIVER
18 When Figure 2-4 appears again and asks for the
location of the files, type a:
19 Click Continue.
20 After Windows NT copies files, select new Network
Settings if required.
Ask your system administrator if you are not sure what
to select.
21 Click Continue to accept the resources.
22 If you are prompted for TCP/IP setup information,
enter it.
Ask your system administrator if you need help.
23 After the final files are copied, click Next, Next, and
then enter the computer name, workgroup, or domain.
■ The computer name is the name of your notebook. Give
your notebook a unique name (up to 15 characters, no
blank spaces).
■ A workgroup is composed of the computers that you
usually communicate with (like your department) and
contains shared resources (like printers).
■ If you use peer group networking, the workgroup name
is your peer group. Peers can see each other when they
look in the Network Neighborhood.
■ Your computer description is visible to other members
of your workgroup when they see your notebook in the
Network Neighborhood.
24 Click Next.
25 Click Finished.
26 Remove the LAN Installation Disk and click Yes to
reboot your notebook.
Installation is complete.
Page 23

Windows NT Version 3.51
Before you begin, obtain the LAN Installation Disk.
If Windows NT networking is not installed, obtain the
following information from your MIS department:
■ Are you on a local area network or are you using
a modem?
■ Transport and network layer protocol used in the
Microsoft Windows Network
■ Name of the NT Server domain or workgroup you
belong to
■ IP address if you are not using DHCP
To install the 3Com network driver on a notebook running
Windows NT version 3.51, follow these steps:
1 Make sure the CardBus PC Card is installed and
connected to the network, as described in Chapter 1.
2 After you reboot, in the Main group, select Control
Panel.
3 On the Control panel, double-click Network.
4 If you have networking already installed, click Add
Adapter. If you do not have networking installed,
follow the prompts to install Windows NT networking.
The Add Network Adapter window appears.
5 On the Add Network Adapter window, choose
<Other> Requires disk from manufacturer from
the list.
6 Click the Continue button.
7 Insert the LAN Installation Disk into in the floppy
drive.
8 Type: a: and click OK.
9 In the Select OEM Option window, click OK.
10 Choose the 3Com Megahertz 10/100 LAN CardBus PC
Card from the list and click OK.
The CardBus PC Card network driver and software are
copied to your notebook. The 3Com CardBus PC Card
dialog box appears.
Windows NT Version 3.51 2-11
Page 24

2-12 CHAPTER 2: INSTALLING THE NETWORK DRIVER
11 Click OK to accept the default settings for the
CardBus PC Card or enter new settings if requested by
your MIS department.
The Network Settings Window appears.
12 Click OK to bring up the TCP/IP configuration window.
13 Enter the IP address.
14 Click OK.
If networking has not been installed, follow the prompts to
complete networking installation.
15 Remove the LAN Installation Disk and click Restart
Now to complete installation.
The network driver installation is complete. To confirm
successful installation use the File Manager to browse
the network.
Windows for Workgroups (WFW)
Before you begin installing the network driver, obtain the
LAN Installation Disk and Windows for Workgroups v3.11
installation files (on hard disk, floppy diskettes, or CD-ROM).
The LAN Installation Disk contains a subdirectory structure
and files that make it an OEM import disk for WFW .
Ask your MIS department for the following information:
■ Which NDIS driver should you install - the NDIS 3 DOS
enhanced-mode driver or the NDIS 2.0 16-bit DOS
real-mode driver?
■ Transport and Network protocol layer used in the
Microsoft Windows Network
■ WFW 3.11 workgroup name
If you installed any other network adapter or network
driver in the notebook, consult your system administrator
for further instructions.
Page 25

Windows for Workgroups (WFW) 2-13
Installing the DOS Enhanced-Mode Driver for WFW
To install the NDIS 3 DOS enhanced-mode driver for WFW,
follow these steps:
1 Using the Windows menu, select Network.
2 Double-click Network Setup.
3 In the Network Setup dialog box, select the
Networks... button.
4 Select Install Microsoft Windows Network and then
click OK.
5 Select the Drivers... button.
6 In the Network Drivers dialog box, click Add Adapter.
A dialog box appears, listing the supported network
adapters on the diskette.
7 From the list of network adapters, select Unlisted Or
Updated Network Adapter, and click OK.
8 Insert the LAN Installation Disk in floppy drive A,
enter a:\, and click OK in the Install Driver dialog box.
9 Select 3Com Megahertz 10/100 LAN CardBus PC Card
and click OK in the Unlisted or Updated Network
Adapter dialog box.
a When prompted for ELPC575.DOS, type a:\ndis2
b When prompted for ELPC575.386, type: a:\WFW311
10 In the Network Drivers dialog box, click Close to accept
the displayed values.
11 In the Network Setup dialog box, click OK.
12 If prompted, supply the information you gathered
before you began the installation. After you enter
the information, click OK.
A message appears, prompting you to restart your
notebook.
13 Click Restart.
The network driver installation is complete. You have
network access when the notebook restarts.
To install the NDIS 2 driver , display the WFWNDIS.TXT file in
the Help directory on the LAN Installation Disk.
Page 26

2-14 CHAPTER 2: INSTALLING THE NETWORK DRIVER
AutoLink for Windows 3.x, Windows for Workgroups,
and DOS
This section describes how to install the network driver for a
notebook running Windows 3.x, Windows for Workgroups,
and DOS using the 3Com AutoLink™ program. The AutoLink
program automatically installs the NetWar e ODI client
software (including the driver), and modifies the CONFIG.SYS
and AUTOEXEC.BA T files.
To use the AutoLink program, the notebook must use the
Novell NetWare 3.12, 4.10, or 4.11 network operating
system, and be a NetWare DOS ODI client.
1 Make sure the CardBus PC Card is installed and
connected to the network, as described in Chapter 1.
2 Boot the notebook under DOS.
3 Insert the LAN Installation Disk in the floppy drive,
and type the following at the DOS prompt:
a:\install [Enter]
4 Choose Auto Install and Config for NetWare (AutoLink).
An OS selection screen appears.
5 Select AutoLink for DOS, Windows 3.x, or WFW 3.11.
Several messages appear while the AutoLink program is
running. A final message indicates successful installation.
6 When prompted, remove the LAN Installation Disk
and reboot the notebook.
7 When prompted, type your user name and password
to complete installation.
Page 27

Supported Network Drivers
Table 2-1 provides the text file names and driver names for
supported network drivers. These text files are located in
the HELP directory on the LAN Installation Disk.
Table 2-1 Network Driver Text File Names
Supported Network Drivers 2-15
Network
Operating System
Windows 95A and OSR 2 W95NDIS.TXT EL575ND3.SYS/EL575ND4.SYS
Windows NT (v 4.0/3.51) WINNT.TXT EL575ND3.SYS/EL575ND4.SYS
Windows for Workgroups
(NetWare)
Windows for Workgroups WFWNDIS.TXT ELPC575.386 with
Windows for Workgroups
(NDIS 2 real mode driver)
NetWare and Windows 3.11 NWDOSODI.TXT ELPC575.COM
NetWare and DOS,
Windows 3.11, and
Windows for Workgroups
Banyan VINES BANYAN.TXT ELPC575.DOS
Microsoft LAN Manager LANMAN.TXT ELPC575.DOS
IBM LAN Server (DOS) LANSRV.TXT ELPC575.DOS
Artisoft LANtastic LANTASTK.TXT ELPC575.DOS
DEC PATHWORKS PATHWORK.TXT ELPC575.DOS
The NDIS 3 driver can be used by both Windows 95 version A and Windows 95 OSR 2
(version B). The NDIS 4 driver can only be used by Windows 95 OSR 2. The 3Com software
automatically selects the correct driver after determining which OS is running.
Text File Name Network Driver Name
WFWNETWR.TXT ELPC575.COM
ELPC575.DOS
WFWNDIS.TXT ELPC575.DOS
AUTOLINK.TXT- this
file is in the
AUTOLINK
directory.
ELPC575.COM
The NDIS 3 driver can be used by both Windows NT versions 4 and 3.51. The NDIS 4 driver
can only be used by Windows NT version 4. The 3Com software automatically selects the
correct driver after determining which OS is running.
Page 28

Page 29

3
TROUBLESHOOTING
This chapter provides the following troubleshooting
information:
■ Checking the CardBus PC Card LEDs
■ Running the 3Com PC Card Diagnostics program
■ Accessing the 3Com CardBus PC Card help system
■ Support services
■ Generating a problem report
■ DOS Diagnostics program
■ Removing the CardBus PC Card software
■ Resolving hardware resource conflicts
■ Disabling and Re-enabling PC Card Support
■ Frequently Asked Questions
■ Troubleshooting tips
The 3Com World Wide Web site (http://www.3com.com/)
offers the latest drivers, troubleshooting information, and
software updates in the Support area.
Page 30

3-2 CHAPTER 3: TROUBLESHOOTING
LEDs
Before the LEDs (Figures 3-1 and 3-2, Table 3-1) can
be used for troubleshooting, the CardBus PC Card
must be connected to the network (see Chapter 1) and
the network drivers must be installed (see Chapter 2).
Figure 3-1 3CCFE575BT CardBus PC Card Cable LEDs
Figure 3-2 3CXFE575BT CardBus PC Card LEDs
Page 31

3Com PC Card Diagnostics Program 3-3
Table 3-1 LED Descriptions
LED Description Steady Off
10 Mbps Green:
100
Mbps
Link integrity
Green:
Link integrity
Good 10BASE-T
connection between
PC Card and hub
Good 100BASE-TX
connection between
PC Card and hub
3Com PC Card Diagnostics Program
The 3Com PC Card Diagnostics program, which is
automatically installed with the Windows 95 and
Windows NT drivers, tests the CardBus PC Card.
To change configuration information, see Chapter 4.
Accessing the CardBus PC Card Help System
The CardBus PC Card help system is a Windows Help
application that was installed with your Windows 95
and Windows NT network driver.
No connection
between PC
Card and hub
No connection
between PC
Card and hub
The help system includes PC Card release notes, frequently
asked questions, and the PC Card KnowledgeBase.
To display the 3Com help system, follow these steps:
1 Install the CardBus PC Card and connect it to the
network as described in Chapter 1.
2 Click the Windows Start menu.
3 Select Programs.
4 Select 3Com PC Card Utilities.
5 Click OK to “Warning! Running diagnostics will
disconnect your computer from the network”.
The 3Com PC Card Diagnostics General Screen appears.
Page 32

3-4 CHAPTER 3: TROUBLESHOOTING
6 Click the Help button.
To display the entire help system, click the Help button on
each PC Card Diagnostics screen. To display information
about any item on each screen, click the ? and drag it to
the item and click. The pop-up box displays information
about the selected item.
7 Click the links and tabs to display information about
each of the 3Com PC Card Diagnostics screens.
Displaying Release Notes, Frequently Asked Questions, and
KnowledgeBase
1 Click the Support tab.
2 Click the Release Notes button on the Support
Screen.
The Release Notes help screen appears.
■ Click the Release Notes button to display tips about
installing and using the CardBus PC Card.
■ Click the Frequently Asked Questions button to display
responses from 3Com support experts to common
customer questions.
■ Click the KnowledgeBase button to display CardBus
PC Card compatibility topics.
Running the CardBus PC Card Self-Test
Run the CardBus PC Card self-test to check the physical
components, connectors, and circuitry on the CardBus
PC Card.
1 Install the CardBus PC Card and connect it to the
network as described in Chapter 1.
2 To start the PC Card Diagnostics program, follow
these steps:
a Click the Windows Start menu.
b Select Programs.
c Select 3Com PC Card Utilities.
d Click 3Com PC Card Diagnostics.
Page 33

3Com PC Card Diagnostics Program 3-5
For Windows NT v3.51, select File>Run, and type
tnicdiag.exe
When you install the network driver (Chapter 2) the
3Com logo appears in the Windows 95 and Windows NT
4.0 tray at the bottom of your screen after you reboot.
You can double-click the logo to run the 3Com PC Card
Diagnostics program.
Close down the PC Card Diagnostics program before you
reboot or remove the CardBus PC Card.
The PC Card Diagnostics general screen appears as shown
in Figure 3-3.
Figure 3-3 PC Card Diagnostics General Screen
If you have disabled the 3Com icon, you can re-enable
the 3Com logo on your Windows 95 and Windows NT
task bar by clicking the box next to Enable Tray Control.
To display the CardBus PC Card help system, click the
Help button on the PC Card Diagnostics General screen.
Page 34

3-6 CHAPTER 3: TROUBLESHOOTING
3 Click the Diagnostics tab to display the diagnostics
screen shown in Figure 3-4.
Figure 3-4 Diagnostics Screen
4 Click Start in the Self Test section to run the self test.
The following tests run in sequence:
■ Register Access
■ EEPROM
■ FIFO
■ Ethernet Core Loopback
■ Encoder/Decoder Loopback
■ Interrupt
Click Stop to stop the tests. Otherwise, the tests run
continuously to completion.
Click the Help button to display help for this screen. Click
the ? at the top of the screen and drag it to a test and
click. The pop-up box displays information about the
selected test and what to do if the test fails.
Page 35

Running the Echo Test
The echo test tests the CardBus PC Card’s ability to
transmit and receive data while on the network.
CAUTION: Running the echo test while connected to an
active network can cause intermittent failures. To avoid this,
connect to a test network on which only the notebook
being tested and the echo server PC are operating.
You need two computers, each with a 3Com network
adapter installed, to run an echo test: one computer to
send data and another to receive data.
This second computer is called the echo server or sending
computer. Make sure it has the same operating system as
the first computer.
Table 3-2 lists the diagnostics programs for the supported
echo server adapters.
Table 3-2 Diagnostics Program and Adapter Names
3Com PC Card Diagnostics Program 3-7
Diagnostics Program Name Echo Server Network Adapter
TC515CFG Fast EtherLink ISA
TC5X9CFG EtherLink III family
TC59XCFG Fast EtherLink or EtherLink III
TC90XCFG Fast EtherLink XL or EtherLink XL PCI
TNICDIAG Fast EtherLink XL family
PCI/EISA
To run the echo test, follow these steps:
1 Install the CardBus PC Card, connect it to the network,
and install the network driver.
2 Install a CardBus PC Card in another computer, connect
it to the network, and install the network driver.
Page 36

3-8 CHAPTER 3: TROUBLESHOOTING
3 On both computers:
a Click the Windows Start menu.
b Click Programs.
c Select 3Com PC Card Utilities.
d Select 3Com PC Card Diagnostics.
For Windows NT v3.51, select File>Run, and type
tnicdiag.exe
The PC Card Diagnostics general screen appears on both
computers, as shown in Figure 3-2.
4 On the Diagnostics screen (Figure 3-3) of the
responding computer, click Respond and Start
on the Echo Test screen.
5 On the Diagnostics screen (Figure 3-4) of the sending
computer, click Send and Start.
The Echo Test Responder screen (Figure 3-5) appears on
the responding computer.
Figure 3-5 Echo Test Responder Screen
Page 37

3Com PC Card Diagnostics Program 3-9
Click the Help button to display help for this screen. Click
the ? at the top of the screen and drag it to a statistic
and click. The pop-up box displays information about the
selected statistic.
6 Click Start.
The statistics for the test appear in the statistics window,
as shown in Figure 3-5.
Click Help for statistics definitions. You can also click the
right mouse and the ? at the top right of the screen and
drag the ? to a statistics name and click.
Troubleshooting Support Services
The support screen (Figure 3-6), provides buttons for the
following 3Com support services:
■ 3Com PC Card Diagnostics program
■ CardBus PC Card Release Notes, including:
■ Release Notes
■ Frequently Asked Questions
■ CardBus PC Card KnowledgeBase
■ 3Com BBS telephone numbers and modem speeds
■ 3Com World Wide Web information
■ 3Com Problem Report Generator
Page 38

3-10 CHAPTER 3: TROUBLESHOOTING
1 To access the 3Com support screen (Figure 3-6), click
the Support tab on the 3Com PC Card Diagnostics
general screen, shown in Figure 3-3.
Figure 3-6 Support Screen
■ Click Diagnostics to run the 3Com PC Card Diagnostics
program. Refer to the beginning of this chapter for
information on how to use the 3Com PC Card
Diagnostics program.
■ Click Release Notes to display the CardBus PC Card
Release Notes, Frequently Asked Questions, or
KnowledgeBase.
■ Click BBS Information to display the BBS telephone
numbers and modem speeds.
■ http... displays the 3Com World Wide Web address.
■ Click Problem Report to generate a 3Com problem
report that you can use to report a problem to 3Com.
Page 39

3Com PC Card Diagnostics Program 3-11
Generating a Problem Report
The problem report generator prompts you for the
information that will help 3Com Customer Support solve
your CardBus PC Card installation and configuration
problems.
You can email the completed report to 3Com Customer
Support and receive an email answer within two business
days.
To generate a problem report, follow these steps:
1 Click Problem Report on the support screen shown
in Figure 3-5 to access the first problem report
screen (Figure 3-7).
Figure 3-7 Problem Report Main Screen
2 Review the screen text and click Next to begin the
problem report.
The Customer Information screen appears.
3 Enter your company name, address, contact name(s),
phone, and email address.
Page 40

3-12 CHAPTER 3: TROUBLESHOOTING
4 Click Next to display the Computer information screen,
shown in Figure 3-8.
Figure 3-8 Computer Information Screen
a Enter your notebook manufacturer and model.
b Identify your notebook as a client, server, or both,
using the pull-down menu.
c Select your CPU type using the pull-down menu.
d Select your notebook operating system using the
pull-down menu.
e Select your network operating system using the
pull-down menu.
f Select your notebook processor speed using the
pull-down menu.
5 Click Next to display the Problem Description screen.
6 Enter your problem description, the 3Com case
number if you have one, and select if you can
reproduce the problem or not.
7 Click Next to display the Save screen.
8 Click Finish to save the report to the c:\3report.txt file.
The Send Report screen appears. The problem report is
completed. To view the report, click View Report.
Page 41

DOS Diagnostics Program 3-13
Use your mail application to mail the report to one of the
addresses on the Send Report screen. If required, contact
your local reseller first.
9 Click OK to bring up the PC Card Diagnostics general
screen.
10 To exit the program, click Cancel.
DOS Diagnostics Program
To run the DOS diagnostics tests, see the INSTRUCT.TXT
file in the HELP directory on the LAN Installation Disk.
Removing the PC Card Diagnostics using Windows 95
and Windows NT
1 In the Control Panel, select Add/Remove Programs.
2 Select 3Com PC Card Diagnostic Utilities.
3 Click the Add/Remove button.
The PC Card Diagnostics Program is removed from your
notebook.
Resolving Hardware Resource Conflicts
Use this procedure to resolve hardware resource conflicts
(I/O Base Address and Interrupt values) using Windows 95.
1 Using the Start Menu, select Help.
2 In the Help window, select the Contents tab.
3 Select Troubleshooting.
4 Double-click “if you have a hardware conflict”
5 Click Start the Conflict Troubleshooter and follow
the instructions.
Use this procedure to resolve hardware resource conflicts
(I/O Base Address and Interrupt values) using Windows NT.
1 Using the Control Panel, double-click Network.
2 Click the Adapter tab.
Page 42

3-14 CHAPTER 3: TROUBLESHOOTING
3 Select 3Com Megahertz 10/100 LAN CardBus PC Card
and click Properties.
4 Change I/O or IRQ value and click Confirm.
Changing the I/O, IRQ, or Memory Range
If you discover resource conflicts, you can change the I/O
Base Address, Interrupt Request (IRQ), or Memory Range
using Windows 95.
1 Double-click the System icon in the Control Panel.
2 In the System Properties window, click Network
Adapters.
3 Double-click 3Com Megahertz 10/100 LAN CardBus
PC Card Manual Load.
4 Select the Resources tab.
5 Select Input/Output Range, Interrupt Request, or
Memory Range.
In Windows 95 OSR2, the memory range value should be
the same as the CardBus socket.
6 Click the Change Settings button.
7 Change the value and click OK.
8 Restart the notebook to change the values.
Disabling PC Card (PCMCIA) Support for Windows 95
If you have a problem using two PC Cards at the same
time, follow these instructions to disable PC Card
support. You cannot use another PC Card while PCMCIA
Support is disabled.
1 Double-click the System icon in the Control Panel.
The System Properties window appears.
2 Click the Device Manager tab.
3 Click Property and place a check mark next to
Disable the Device.
If PCMCIA socket is not listed, PC Card support is already
disabled.
Page 43

Disabling PC Card (PCMCIA) Support for Windows 95 3-15
4 Click OK.
5 Reboot the notebook to disable PC Card Support.
If prompted, select Do Not Install a Driver. Some
notebooks may re-install the PCMCIA sockets (PC Card
Support) without prompting you. Refer to Windows 95
help on disabling devices to disable PCMCIA sockets.
You must re-enable PC Card Support to use another PC
Card. See “Re-enabling PC Card Support for Windows
95” in this chapter for instructions.
Re-enabling PC Card Support for Windows 95
If you disabled PC Card Support to use the CardBus PC
Card, you must re-enable it to use another PC Card.
1 In the Control Panel, double-click System.
2 Double-click Add New Hardware.
3 Click No to detect automatically.
4 On the Hardware Types list, select PCMCIA Socket
and click Next.
5 On the manufacturer’s list, select the PC Card
Support that you disabled in Chapter 2.
6 Click Next.
7 Click Finish.
8 Reboot the notebook.
9 In the Control Panel, double-click System.
10 In the System Properties window, click Device
Manager and then double-click PCMCIA Socket.
11 Click PCIC or compatible PCMCIA controller.
12 Place a check mark in the check box to enable
the device.
13 Click Change Driver.
14 Follow the Enable PCMICA Support Wizard.
15 Restart the notebook to re-enable PC Card Support.
Page 44

3-16 CHAPTER 3: TROUBLESHOOTING
Disabling PC Card (PCMCIA) Support for Windows NT
1 In the Windows NT Control Panel, double-click
Devices.
2 Click PCMCIA on the list that appears.
If no controller is listed, PC Card support is already disabled.
If you select a different PCMCIA controller, write down
the name; you will need it to re-enable PC Card support
to use a different PC Card.
3 Click HW Profiles.
4 Click Disable and then click OK.
5 Reboot the notebook.
You must re-enable PC Card Support to use another PC
Card. See “Re-enabling Windows 95 PC Card Support for
Windows NT” for instructions.
Re-enabling PC Card (PCMCIA) Support for Windows NT
If you disabled PC Card Support to use the CardBus PC
Card, you must re-enable it to use another PC Card.
Follow these instructions to re-enable PC Card support for
Windows NT.
1 In the Windows NT Control Panel, double-click
Devices.
2 Select PCMCIA and click the Startup button.
3 Change the button selection from Disabled to Boot.
4 Click Close.
5 Reboot the notebook to re-enable PC Card Support.
Page 45

Frequently Asked Questions 3-17
Frequently Asked Questions
Table 3-3. Frequently Asked Questions
Question Answer
What is CardBus? CardBus is the new high-speed peripherals
Who supports CardBus? Major notebook manufacturers, Microsoft,
Is the CardBus PC Card FCC B,
CISPR B EMI, C-tick EMI, and VCCI
2 EMI certified?
Which CardBus slot is best for my
CardBus PC Card?
What interrupts should I use? Typically, your network operating system
(continued)
interface for notebooks that includes:
■ 33 MHz, 32-bit performance based on
PCI bus architecture
■ 3.3 volt operation
■ Bus mastering for improved CPU
efficiency
■ Built-in multifunction capabilities
■ Zoomed video to handle multimedia
applications
■ 20 times the throughput of 16-bit
PC Cards
and leading device vendors such as 3Com.
Yes, the CardBus PC Card has passed
these certification tests.
The CardBus PC Card is designed to work
in any CardBus PC Card slot, but in some
notebooks the CardBus PC Card seems to
work best in the top CardBus PC Card slot.
assigns interrupts successfully during the
network driver installation. Some notebooks
require specific interrupts. A list of suggested
interrupts is included in the on-line help
system. To access the help system:
1 Click the 3Com icon in your system tray.
2 Click the Support tab.
3 Click the Help button.
4 Click the Frequently Asked Questions
link.
5 Click Which Interrupts Should I Use?
The interrupts table is displayed. If your
notebook is not listed, try the listed
available interrupts.
Page 46

3-18 CHAPTER 3: TROUBLESHOOTING
Table 3-3. Frequently Asked Questions (continued)
Question Answer
Are my network drivers Microsoft
certified?
Are my network drivers Novell
certified?
How do I remove the 3Com icon
from my system tray?
How can I remove the PC Card
Diagnostics Program?
Does the CardBus PC Card support
full duplex?
What should I do if the CardBus PC
Card installs as a “Generic PCI
Ethernet Controller” under Other
Devices in the Device Manager?
What should I do if a yellow
exclamation point appears next to
the 3Com Megahertz 10/100 LAN
CardBus PC Card name?
(continued)
Yes.
Yes.
1 Double-click the 3Com icon to start the
3Com PC Card Diagnostics program.
2 In the right bottom corner of the main
window, click the Enable Tray Control
check box to remove the check mark.
3 Exit the program and the icon will not
appear anymore.
1 In the Windows 95 Control Panel, select
Add/Remove Programs.
2 Select 3Com PC Card Diagnostic Utilities .
3 Click Add/Remove.
4 The PC Card Diagnostics program is
removed from your notebook.
Yes, the CardBus PC Card supports full
duplex at 10 Mbps and 100 Mbps
operation.
If the CardBus PC Card installs as a generic
PCI Ethernet controller, follow these steps:
1 In the Device Manager, double-click
Other Devices.
2 Click the PCI Ethernet Controller.
3 Click Remove.
4 Restart your notebook.
1 In the Device Manager, double-click
Other Devices.
2 Click the PCI Ethernet Controller or the
duplicate 3Com Megahertz 10/100 LAN
CardBus PC Card entry.
3 Click Remove.
4 Restart your notebook.
Page 47

Frequently Asked Questions 3-19
Table 3-3. Frequently Asked Questions (continued)
Question Answer
What is DynamicAccess® software? DynamicAccess software brings intelligence
What is Fast IP? Fast IP is software that improves
What are the notebook and
network requirements to run
Fast IP?
What are the network configuration
requirements for Fast IP?
What is the performance gain when
using Fast IP?
to the end systems to provide improved
network performance and control. You can
download the latest DynamicAccess
software from the 3Com Web site:
www.3com.com.
performance on switched networks. Fast IP
allows end systems (notebooks and servers)
to discover switched communication paths.
By creating switched short cuts, Fast IP
allows end stations to bypass the router
and transfer data across wire-speed
switched paths. Fast IP is part of 3Com’s
DynamicAccess software.
Client requirements:
Notebook running Windows 95, Windows
NT (versions 4 or 3.51), 3Com Megahertz
10/100 LAN CardBus PC Card, and the
TCP/IP stack.
Network requirements:
Switched path between stations and single
broadcast domain.
Fast IP is designed to bypass the router,
particularly where the router is a
bottleneck, as well as to leverage the
switched infrastructure. For Fast IP to
create short cuts around routers, there
must be a switched path between source
and destination.
Fast IP bypasses the router to provide
increased performance in switched
networks even if there are just a small
number of network nodes using Fast IP.
The performance gain obtained when
deploying Fast IP is directly related to
traffic load on the backbone router. The
more traffic is pumped to it, the bigger the
latency and response time and the higher
the performance gain. Internal tests show
performance increases in the order of
600% when routers are loaded at 70
to 75%.
Page 48

3-20 CHAPTER 3: TROUBLESHOOTING
Troubleshooting Tips
■ Check the CardBus PC Card installation in Chapter 1.
■ Inspect all cables and connections.
■ Make sure you have the latest BIOS for your notebook.
■ Try the notebook at a known working location.
■ Try the CardBus PC Card in a known working notebook.
■ If you removed the CardBus PC Card while the PC Card
Diagnostics Program was running or shut down your
notebook without closing the PC Card Diagnostics
Program, you must remove the PC Card Diagnostics
and driver and reinstall the 3Com network driver.
■ If you think you have resource conflicts (I/O base
address or interrupts) run the Windows 95 conflict
troubleshooter as described in the previous section.
It is normal for the PC Card to conflict with the
CardBus controller.
■ Replace the failed CardBus PC Card with a working
CardBus PC Card and run the diagnostic tests again,
using the same option settings as those used on the
failed CardBus PC Card. If the working CardBus PC
Card passes all tests, the original CardBus PC Card is
probably defective. For information on product repair,
see Appendix B.
■ If you are running a 16-bit modem PC Card and the
CardBus PC Card in the same notebook, and you
experience lockups on boot, try changing the modem
IRQ to the same value as the PCMCIA socket IRQ.
Otherwise, insert the modem PC Card after you reboot.
■ If trouble persists, contact your MIS department or
network manager.
For additional troubleshooting information, see the 3Com
Web site at www.3com.com.
Page 49

CHANGING CONFIGURATION
4
This chapter describes how to display and change
configuration settings for the CardBus PC Card.
Before you change these settings, contact your MIS
department.
Configuration Settings
Table 4-1 lists each configuration option, the default
setting, and the available settings.
Table 4-1 Option Settings
Option Default Setting Available Settings
Duplex Auto Select Auto Select, full duplex
Media Type Auto Select Auto Select
CIS Memory Address 0090h - 00FFh 256 Bytes
I/O Base Address 3000h 3000h, 3040h, 3080h, 30C0h
Interrupt Request Level 9 5, 7, 9, 10, 11, 12
.
3100h, 3140h, 3180h, 31C0h
3200h, 3240h, 3280h, 32C0h
3300h, 3340h, 3380h, 33C0h
3400h, 3440h, 3480h, 34C0h
3500h, 3540h, 3580h, 35C0h
Configuration Setting Descriptions
Duplex
Full duplex allows the CardBus PC Card to send and receive
data between the CardBus PC Card and the switch
connection at the same time. If the switch supports the
NWay feature and full duplex, the CardBus PC Card
automatically runs in full duplex (Auto Select).
Media Type
The Media Type is Auto Select.
Page 50

4-2 CHAPTER 4: CHANGING CONFIGURATION
CIS Memory Address
The CIS Memory requires a 256 B segment of memory.
I/O Base Address
The I/O address space is used by the CardBus PC Card for
communication between the CardBus PC Card and the
notebook. The CardBus PC Card uses 64 bytes of I/O
space, starting at the I/O Base Address.
Make sure that no other device is using the same value.
(the default is 3000h). For more information about
resolving Resource conflicts, see Chapter 3.
Interrupt Request Level
To change the IRQ is used by the CardBus PC Card for
communication between the CardBus PC Card and the
notebook.
The CardBus PC Card can operate on one of six interrupt
levels: 5, 7, 9, 10, 11, or 12.
The preferred interrupt level is 9, but the CardBus PC
Card can operate on the other interrupt levels if
necessary. If a conflict continues, you might have to
change the setting of other adapters or options that are
in the notebook.
For Toshiba notebooks, set the interrupt to 11.
For more information about resolving resource conflicts,
see Chapter 3.
Displaying Configuration
If you are running Windows 95 or Windows NT, use the
3Com PC Card Diagnostics program to display configuration
information.
Otherwise, use the 3Com DOS Configuration program
described in the INSTRUCT.TXT file in the Help directory on
the LAN Installation Disk.
Page 51

Displaying Configuration 4-3
To display the current configuration of the CardBus PC
Card using the 3Com PC Card Diagnostics program, follow
these steps:
1 Install the CardBus PC Card and connect it to the
network as described in Chapter 1 and install the
driver as described in Chapter 2.
2 To start the 3Com PC Card Diagnostics program,
follow these steps:
a Click the Windows Start menu.
b Click Programs.
c Select 3Com PC Card Utilities.
d Select 3Com PC Card Diagnostics.
For Windows NT v3.51, select File>Run, and type
tnicdiag.exe
The 3Com PC Card Diagnostics program General screen
appears as shown in Figure 4-1.
Figure 4-1 PC Card Diagnostics Program General Screen
Page 52

4-4 CHAPTER 4: CHANGING CONFIGURATION
To display the 3Com logo icon on your Windows 95 and
Windows NT task bar for easy access to the 3Com PC Card
Diagnostics program, click the box next to Enable Tray
Control.
You can display the CardBus PC Card help system by
clicking the Help button on the PC Card Diagnostics
General screen.
3 Click PC Card Details to display the PC Card Details
screen shown in Figure 4-2.
Figure 4-2 PC Card Details Screen
Each configuration setting is displayed with the current
status.
Click the ? at the top of the screen, drag it to a value and
click, to display information about the selected value.
Page 53

Changing Configuration Settings 4-5
Changing Configuration Settings
1 Click the Properties tab on the 3Com PC Card
Diagnostics General screen, shown in Figure 4-1.
Figure 4-3 Properties Screen
2 To display the options for a setting, highlight the
setting and use the right pulldown menu.
3 To select a new value, highlight the value and release
the mouse button.
4 Click OK.
The new value is selected.
5 Click OK or Cancel to exit the screen.
Repeat the process to change any configuration setting on
the Properties screen. For more information about r esolving
resource conflicts, see Chapter 3.
DOS Configuration Program
To change the configuration on a DOS notebook, see
the INSTRUCT.TXT file in the HELP directory on the LAN
Installation Disk.
Page 54

4-6 CHAPTER 4: CHANGING CONFIGURATION
Page 55

A
SPECIFICATIONS
Table A-1 CardBus PC Card Specifications
Network Interface
10 Mbps Ethernet
10BASE-T
100 Mbps Ethernet and
100BASE-TX
Physical Dimensions
Length 3.370 in (85.6 mm)
Width 2.126 in (54 mm)
Height Type II, 0.197 in (5.0 mm)
Weight 0.86 oz. (24.4 g)
Environmental Operating Range
Operating temperature (0˚ to 70˚C) 32˚ to 131˚F
Relative humidity 5% to 90% noncondensing
Card Information Structure (CIS) and Memory Size
Drivers 4 KB
Diagnostics 8 KB
CIS 256 K
FIFO 8 KB
Ethernet IEEE 802.3 industry standard
for a 10 Mbps baseband CSMA/CD
local area network
Ethernet IEEE 802.3u industry
standard for a 100 Mbps baseband
CSMA/CD local area network
Page 56

A-2 APPENDIX A: SPECIFICATIONS
Network Cable Specifications
UTP Cable Requirements:
Category 3 LAN and high-speed data cable (10 Mbps) that meets
the requirements of EIA/TIA-568 and EIA/TIA TSB-36
Category 4 extended distance LAN cable that meets the
requirements of EIA/TIA-568 and EIA/TIA TSB-36
Category 5 voice and data transmission LAN cable (100 Mbps)
that meets the requirements of EIA/TIA-568 and EIA/TIA TSB-36
Power Requirements
Operating voltage +3.3 V ± .3V @ 150 mA
Mean Time Between Failures (hours calculated)
70 ˚C (158 ˚F) mobile
environment
25 ˚C (77 ˚F) mobile
environment
FCC Certification Part 15, Class B
128, 694.33 hours
342, 367.70 hours
Page 57

TECHNICAL SUPPORT
B
3Com provides easy access to technical support
information through a variety of services. This appendix
describes these services.
Information contained in this appendix is correct at time of
publication. For the very latest, we recommend that you
access 3Com Corporation’s World Wide Web site.
Online Technical Services
3Com offers worldwide product support 24 hours a day,
7 days a week, through the following online systems:
■ World Wide Web site
■ 3Com Bulletin Board Service (3ComBBS)
■ 3ComFacts
■ 3ComForum on CompuServe online service
SM
automated fax service
World Wide Web Site
Access the latest networking information on 3Com
Corporation’s World Wide Web site by entering our URL
into your Internet browser:
http://www.3com.com/
This service features the latest information about 3Com
solutions and technologies, customer service and support,
news about the company, Net Age
documentation, and more.
3Com Bulletin Board Service
3ComBBS contains patches, software, and drivers for all
3Com products, as well as technical articles. This service is
available through analog modem or digital modem (ISDN)
24 hours a day, 7 days a week.
®
Magazine, technical
Page 58

B-2 APPENDIX B: TECHNICAL SUPPORT
Access by Analog Modem
To reach the service by modem, set your modem to 8 data
bits, no parity, and 1 stop bit. Call the telephone number
nearest you:
Country Data Rate Telephone Number
Australia up to 14400 bps 61 2 9955 2073
Brazil up to 14400 bps 55 11 5181 9666
France up to 14400 bps 33 1 6986 6954
Germany up to 28800 bps 4989 62732 188
Hong Kong up to 14400 bps 852 2537 5601
Italy up to 14400 bps 39 2 27300680
Japan up to 14400 bps 81 3 3345 7266
Mexico up to 28800 bps 52 5 520 7835
P.R. of China up to 14400 bps 86 10 684 92351
Taiwan, R.O.C. up to 14400 bps 886 2 377 5840
U.K. up to 28800 bps 44 1442 438278
U.S.A. up to 28800 bps 1 847 982 5092
Access by Digital Modem
ISDN users can dial in to 3ComBBS using a digital modem
for fast access up to 56 Kbps. To access 3ComBBS using
ISDN, use the following number:
1 408 654 2703
3ComFacts Automated Fax Service
3Com Corporation’s interactive fax service, 3ComFacts,
provides data sheets, technical articles, diagrams, and
troubleshooting instructions on 3Com products 24 hours
a day, 7 days a week.
Call 3ComFacts using your Touch-Tone telephone using
one of these international access numbers:
Country Telephone Number
U.K. 44 1442 438279
U.S.A. 1 408 727 7021
Page 59

Support from Your Network Supplier B-3
Local access numbers are available within the following
countries:
Country
Australia 1800 123 853 Netherlands 0800 0228049
Belgium 0800 71279 Norway 800 11062
Denmark 800 17319 Portugal 0505 442 607
Finland 98 001 4444 Russia (Moscow only) 956 0815
France 0800 908158 Spain 900 964 445
Germany 0130 81 80 63 Sweden 020 792954
Italy 1678 99085 U.K. 0800 626403
Telephone
Number
Country
Telephone
Number
3ComForum on CompuServe Online Service
3ComForum contains patches, software, drivers, and
technical articles about all 3Com products, as well as a
messaging section for peer support. To use 3ComForum,
you need a CompuServe account.
To use 3ComForum:
1 Log on to your CompuServe account.
2 Type go threecom
3 Press [Return] to see the 3ComForum main menu.
Support from Your Network Supplier
If additional assistance is required, contact your network
supplier. Many suppliers are authorized 3Com service
partners who are qualified to provide a variety of services,
including network planning, installation, hardware
maintenance, application training, and support services.
When you contact your network supplier for assistance,
have the following information ready:
■ A list of system hardware and software, including
revision levels
■ Diagnostic error messages
■ Details about recent configuration changes, if applicable
Page 60

B-4 APPENDIX B: TECHNICAL SUPPORT
Returning Products for Repair
Before you send a product directly to 3Com for r epair, you
must first obtain a Return Materials Authorization (RMA)
number. Products sent to 3Com without RMA numbers will
be returned to the sender unopened, at the sender’s expense.
To obtain an RMA number, call or fax:
Country Telephone Number Fax Number
U.S.A. and Canada 1 800 876 3266,
Latin America 1 408 326 2927 408 764 7120
Europe, South Africa,
and Middle East
Elsewhere 1 408 326 2926 1 408 764 7120
option 2
44 1442 435860 44 1442 435822
408 764 7120
Page 61

INDEX
Numbers
3Com Bulletin Board Service
(3ComBBS) B-1
3Com URL B-1
3ComFacts B-2
3ComForum B-3
B
bulletin board service B-1
C
cabling
specifications A-2
troubleshooting 3-20
Card Information Structure (CIS)
memory size A-1
changing I/O, IRQ or memory
range 3-14
CIS Memory Address 4-2
CompuServe B-3
configuration
displaying 4-2
configuration settings 4-1
CIS Memory Address 4-1
duplex 4-1
I/O Base Address 4-1
Interrupt Request Level 4-1
media type 4-1
D
diagnostics programs 3-3
DOS 3-13
Windows 95 and Windows NT 3-3
diagnostics tests
echo test 3-7
PC Card self-test 3-4
program names 3-7
driver installation 2-1
duplex 4-1
E
environmental operating range A-1
F
fax service. See 3ComFacts
FCC certification A-2
frequently asked questions 3-3
H
hardware resource conflicts
resolving 3-13
Help System
accessing 3-3
Frequently Asked Questions 3-3
KnowledgeBase 3-3
Release Notes 3-3
I
I/O Base Address problems
resolving 3-13
installing drivers
AutoLink for NetWare 2-14
Microsoft standard Windows
95 2-4
Microsoft Windows 95 OSR 2 2-6
Microsoft Windows for
Workgroups 2-12
Microsoft Windows NT 4.0 2-6
NetWare and Windows 3.11 2-15
other network drivers 2-15
Windows for Workgroups 2-15
Windows for Workgroups
(NetWare) 2-15
interrupt conflicts
resolving 3-13
Interrupt Request Level setting 4-2
I/O Base Address setting 4-2
IRQ 3-14
Page 62

2 INDEX
K
KnowledgeBase 3-3, 3-9
L
LEDs 3-2
M
mean time between failures A-2
Media Type option description 4-1
memory 3-14
N
network supplier support B-3
O
online technical services B-1
P
PC Card Support
disabling 3-16
re-enabling 3-15
physical dimensions A-1
power requirements A-2
problem report
generating 3-11
Toshiba PCs
setting PC Card mode 1-2
troubleshooting 3-20
U
URL B-1
W
Windows 95
disabling PC Card support 3-14
installing the network driver 2-3
OSR 2 network driver
installation 2-3
re-enabling PC Card support 3-15
standard Windows 95 network
driver installation 2-4
which version are you running 2-2
Windows for Workgroups
network driver installation 2-12
Windows NT
disabling PC Card support 3-16
re-enabling PC Card support 3-16
Windows NT version 3.51
installing the network driver 2-11
Windows NT version 4
installing the network driver 2-6
World Wide Web (WWW) B-1
R
release notes 3-3
returning products for repair B-4
S
software options
changing 4-1
software, removing (Window 95) 3-13
support services 3-9
T
technical support
3Com URL B-1
bulletin board service B-1
CompuServe service B-3
fax service B-2
network suppliers B-3
product repair B-4
Page 63

3Com Corporation LIMITED WARRANTY
HARDWARE
3Com warrants its hardware products to be free from defects in workmanship and materials, under
normal use and service, for the following lengths of time from the date of purchase from 3Com or its
Authorized Reseller:
Network interface cards Lifetime
Other hardware products (unless otherwise specified in the warranty
statement above)
Spare parts and spares kits 90 days
Notebook PC Compatability 1 year from date of purchase
If a product does not operate as warranted above during the applicable warranty period, 3Com shall,
at its option and expense, repair the defective product or part, deliver to Customer an equivalent
product or part to replace the defective item, or refund to Customer the purchase price paid for the
defective product. All products that are replaced will become the property of 3Com. Replacement
products may be new or reconditioned. Any replaced or repaired product or part has a ninety (90) day
warranty or the remainder of the initial warranty period, whichever is longer.
3Com shall not be responsible for any software, firmware, information, or memory data of Customer
contained in, stored on, or integrated with any products returned to 3Com for repair, whether under
warranty or not.
SOFTWARE
3Com warrants that the software programs licensed from it will perform in substantial conformance to
the program specifications therefor for a period of ninety (90) days from the date of purchase from
3Com or its Authorized Reseller. 3Com warrants the media containing software against failure during
the warranty period. No updates are provided. The sole obligation of 3Com with respect to this express
warranty shall be (at the discretion of 3Com) to refund the purchase price paid by Customer for any
defective software products, or to replace any defective media with software which substantially
conforms to applicable 3Com published specifications. Customer assumes responsibility for the
selection of the appropriate applications program and associated reference materials. 3Com makes no
warranty or representation that its software products will work in combination with any hardware or
applications software products provided by third parties, that the operation of the software products
will be uninterrupted or error free, or that all defects in the software products will be corrected. For any
third-party products listed in the 3Com software product documentation or specifications as being
compatible, 3Com will make reasonable efforts to provide compatibility, except where the
noncompatibility is caused by a “bug” or defect in the third party’s product.
1 year
STANDARD WARRANTY SERVICE
Standard warranty service for hardware products may be obtained by delivering the defective product,
accompanied by a copy of the dated proof of purchase, to the 3Com Corporate Service Center or to an
Authorized 3Com Service Center during the applicable warranty period. Standard warranty service for
software products may be obtained by telephoning the 3Com Corporate Service Center or an
Authorized 3Com Service Center, within the warranty period. Products returned to the 3Com
Corporate Service Center must be preauthorized by 3Com with a Return Material Authorization (RMA)
number marked on the outside of the package, and sent prepaid, insured, and packaged appropriately
for safe shipment. The repaired or replaced item will be shipped to Customer, at the expense of 3Com,
not later than thirty (30) days after receipt of the defective product by 3Com.
WARRANTIES EXCLUSIVE
IF A 3COM PRODUCT DOES NOT OPERATE AS WARRANTED ABOVE, CUSTOMER’S SOLE REMEDY FOR
BREACH OF THAT WARRANTY SHALL BE REPAIR, REPLACEMENT, OR REFUND OF THE PURCHASE PRICE
PAID, AT THE OPTION OF 3COM. TO THE FULL EXTENT ALLOWED BY LAW, THE FOREGOING
WARRANTIES AND REMEDIES ARE EXCLUSIVE AND ARE IN LIEU OF ALL OTHER WARRANTIES, TERMS,
OR CONDITIONS, EXPRESS OR IMPLIED, EITHER IN FACT OR BY OPERATION OF LAW, STATUTORY OR
OTHERWISE, INCLUDING WARRANTIES, TERMS, OR CONDITIONS OF MERCHANTABILITY, FITNESS FOR A
PARTICULAR PURPOSE, AND SATISFACTORY QUALITY. 3COM NEITHER ASSUMES NOR AUTHORIZES
Page 64

ANY OTHER PERSON TO ASSUME FOR IT ANY OTHER LIABILITY IN CONNECTION WITH THE SALE,
INSTALLATION, MAINTENANCE, OR USE OF ITS PRODUCTS.
3COM SHALL NOT BE LIABLE UNDER THIS WARRANTY IF ITS TESTING AND EXAMINATION DISCLOSE
THAT THE ALLEGED DEFECT IN THE PRODUCT DOES NOT EXIST OR WAS CAUSED BY CUSTOMER’S OR
ANY THIRD PERSON’S MISUSE, NEGLECT, IMPROPER INSTALLATION OR TESTING, UNAUTHORIZED
ATTEMPTS TO REPAIR OR MODIFY, OR ANY OTHER CAUSE BEYOND THE RANGE OF THE INTENDED
USE, OR BY ACCIDENT, FIRE, LIGHTNING, OR OTHER HAZARD.
LIMITATION OF LIABILITY
TO THE FULL EXTENT ALLOWED BY LAW, 3COM ALSO EXCLUDES FOR ITSELF AND ITS SUPPLIERS ANY
LIABILITY, WHETHER BASED IN CONTRACT OR TORT (INCLUDING NEGLIGENCE), FOR INCIDENTAL,
CONSEQUENTIAL, INDIRECT, SPECIAL, OR PUNITIVE DAMAGES OF ANY KIND, OR FOR LOSS OF
REVENUE OR PROFITS, LOSS OF BUSINESS, LOSS OF INFORMATION OR DATA, OR OTHER FINANCIAL
LOSS ARISING OUT OF OR IN CONNECTION WITH THE SALE, INSTALLATION, MAINTENANCE, USE,
PERFORMANCE, FAILURE, OR INTERRUPTION OF ITS PRODUCTS, EVEN IF 3COM OR ITS AUTHORIZED
RESELLER HAS BEEN ADVISED OF THE POSSIBILITY OF SUCH DAMAGES, AND LIMITS ITS LIABILITY TO
REPAIR, REPLACEMENT, OR REFUND OF THE PURCHASE PRICE PAID, AT THE OPTION OF 3COM. THIS
DISCLAIMER OF LIABILITY FOR DAMAGES WILL NOT BE AFFECTED IF ANY REMEDY PROVIDED HEREIN
SHALL FAIL OF ITS ESSENTIAL PURPOSE.
GOVERNING LAW
This Limited Warranty shall be governed by the laws of the State of California, U.S.A. Some countries,
states, or provinces do not allow the exclusion or limitation of implied warranties or the limitation of
incidental or consequential damages for certain products supplied to consumers or the limitation of
liability for personal injury, so the above limitations and exclusions may be limited in their application to
you. This warranty gives you specific legal rights which may vary depending on local law.
3Com Corporation, 5400 Bayfront Plaza, P.O. Box 58145, Santa Clara, CA 95052-8145.
(408) 326-5000
FCC CLASS B STATEMENT
This device complies with Part 15 of the FCC Rules. Operation is subject to the following two
conditions:
1 This device may not cause harmful interference, and
2 This device must accept any interference received, including interference that may cause undesired
operation.
WARNING: This equipment has been tested and found to comply with the limits for a Class B digital
device, pursuant to Part 15 of the FCC Rules.These limits are designed to provide reasonable protection
against harmful interference in a residential installation. This equipment generates, uses and can
radiate radio frequency energy and, if not installed and used in accordance with the instructions, may
cause harmful interference to radio communications. However, there is no guarantee that interference
will not occur in a particular installation. If this equipment does cause harmful interference to radio or
television reception, which can be determined by turning the equipment off and on, the user is
encouraged to try to correct the interference by one or more of the following measures:
■ Reorient or relocate the receiving antenna.
■ Increase the separation between the equipment and receiver.
■ Connect the equipment into an outlet on a circuit different from the one which the receiver is
connected to.
■ Consult the dealer or an experienced radio/TV technician for help.
The user may find the following booklet prepared by the Federal Communications Commission helpful:
The Interference Handbook
This booklet is available from the U.S. Government Printing Office, Washington, D.C. 20402. Stock No.
004-000-00345-4.
Tested to comply with the FCC Standards for home and office use.
Page 65

NOTE: In order to maintain compliance with the limits of a Class B digital device, 3Com requires that
you use quality interface cables when connecting to this device. Changes or modifications not expressly
approved by 3Com could void the user’s authority to operate this equipment. Refer to the manual for
specifications on cabling types.
FCC DECLARATION OF CONFORMITY
We declare under our sole responsibility that the
Model: Description:
3CCFE575BT, 3CXFE575BT 3Com Megahertz 10/100 LAN CardBus PC Card
to which this declaration relates, is in conformity with the following standards or other normative
documents:
■ ANSI C63.4-1992 Methods of Measurement
■ Federal Communications Commission 47 CFR Part 15, subpart B
15.107 (e) Class B Conducted Limits
15.109 (g) Class B Radiated Emissions Limits
3Com Corporation, 5400 Bayfront Plaza, P.O. Box 58145, Santa Clara, CA 95052-8145.
(408) 326-5000
INDUSTRY CANADA CLASS B EMMISSION COMPLIANCE
S
TATEMENT
This Class B digital apparatus complies with Canadian ICES-003.
AVIS DE CONFORMITÉ À LA RÉGLEMENTATION D’INDUSTRIE
C
ANADA
Cet appareil numérique de la classe B est conform à la norme NMB-003 du Canada.
3COM END USER SOFTWARE LICENSE AGREEMENT
IMPORTANT: Read Before Using This Product
YOU SHOULD CAREFULLY READ THE FOLLOWING TERMS AND CONDITIONS BEFORE USING
THIS PRODUCT. IT CONTAINS SOFTWARE, THE USE OF WHICH IS LICENSED BY 3COM
CORPORATION (“3COM”) TO ITS CUSTOMERS FOR THEIR USE ONLY AS SET FORTH BELOW. IF
YOU DO NOT AGREE TO THE TERMS AND CONDITIONS OF THIS AGREEMENT , DO NOT USE THE
SOFTWARE. USING ANY PART OF THE SOFTWARE INDICATES THAT YOU ACCEPT THESE TERMS.
LICENSE: 3Com grants you a nonexclusive license to use the accompanying software program(s) (the
“Software”) subject to the terms and restrictions set forth in this License Agreement. You are not
permitted to lease, rent, distribute or sublicense the Software or to use the Software in a time-sharing
arrangement or in any other unauthorized manner. Further, no license is granted to you in the human
readable code of the Software (source code). Except as provided below, this License Agreement does
not grant you any rights to patents, copyrights, trade secrets, trademarks, or any other rights in respect
to the Software.
The Software is licensed to be used on any workstation or any network server owned by or leased to
you, provided that the Software is used only in connection with a 3Com adapter. You may reproduce
and provide one (1) copy of the Software and supporting documentation for each such workstation or
network server on which the Software is used as permitted hereunder. Otherwise, the Software and
Page 66

supporting documentation may be copied only as essential for backup or archive purposes in support
of your use of the Software as permitted hereunder. You must reproduce and include all copyright
notices and any other proprietary rights notices appearing on the Software and the supporting
documentation on any copies that you make.
NO ASSIGNMENT; NO REVERSE ENGINEERING: You may not transfer or assign the Software and/or
this License Agreement to another party without the prior written consent of 3Com. If such consent is
given and you transfer or assign the Software and/or this License Agreement, then you must at the
same time either transfer any copies of the Software as well as the supporting documentation to the
same party or destroy any such materials not transferred. Except as set forth above, you may not
transfer or assign the Software or your rights under this License Agreement.
Modification, reverse engineering, reverse compiling, or disassembly of the Software is expressly
prohibited. However, if you are a European Community (“EC”) resident, information necessary to
achieve interoperability of the Software with other programs within the meaning of the EC Directive on
the Legal Protection of Computer Programs is available to you from 3Com upon written request.
EXPORT RESTRICTIONS: You agree that you will not export or re-export the Software or
accompanying documentation (or any copies thereof) or any products utilizing the Software or such
documentation in violation of any applicable laws or regulations of the United States or the country in
which you obtained them.
TRADE SECRETS; TITLE: You acknowledge and agree that the structure, sequence and organization
of the Software are the valuable trade secrets of 3Com and its suppliers. You agree to hold such trade
secrets in confidence. You further acknowledge and agree that ownership of, and title to, the Software
and all subsequent copies thereof regardless of the form or media are held by 3Com and its suppliers.
UNITED STATES GOVERNMENT LEGEND: All technical data and Software are commercial in nature
and developed solely at private expense. The Software is delivered as Commercial Computer Software
as defined in DFARS 252.227-7014 (June 1995) or as a commercial item as defined in FAR 2.101(a) and
as such is provided with only such rights as are provided in this License Agreement, which is 3Com’s
standard commercial license for the Software. Technical data is provided with limited rights only as
provided in DFAR 252.227-7015 (Nov. 1995) or FAR 52.227-14 (June 1987), whichever is applicable.
You agree not to remove or deface any portion of any legend provided on any licensed program or
documentation delivered to you under this License Agreement.
TERM AND TERMINATION: This license will expire fifty (50) years from the date that you first use the
Software, if it is not earlier terminated. You may terminate it at any time by destroying the Software
and documentation together with all copies and merged portions in any form. It will also terminate
immediately if you fail to comply with any term or condition of this License Agreement. Upon such
termination you agree to destroy the Software and documentation, together with all copies and
merged portions in any form.
GOVERNING LAW: This License Agreement shall be governed by the laws of the State of California as
such laws are applied to agreements entered into and to be performed entirely within California
between California residents and by the laws of the United States. You agree that the United Nations
Convention on Contracts for the International Sale of Goods (1980) is hereby excluded in its entirety
from application to this License Agreement.
LIMITED WARRANTY; LIMITATION OF LIABILITY: All warranties and limitations of liability applicable
to the Software are as stated on the Limited Warranty Card or in the product manual accompanying
the Software. Such warranties and limitations of liability are incorporated herein in their entirety by this
reference.
SEVERABILITY: In the event any provision of this License Agreement is found to be invalid, illegal or
unenforceable, the validity, legality and enforceability of any of the remaining provisions shall not in
any way be affected or impaired and a valid, legal and enforceable provision of similar intent and
economic impact shall be substituted therefor.
ENTIRE AGREEMENT: This License Agreement sets forth the entire understanding and agreement
between you and 3Com, supersedes all prior agreements, whether written or oral, with respect to the
Software, and may be amended only in a writing signed by both parties.
3Com is a registered trademark of 3Com Corporation.
3Com Corporation, 5400 Bayfront Plaza, P.O. Box 58145, Santa Clara, CA 95052-8145.
(408) 326-5000
 Loading...