

Page 1

OfficeConnect
®
Network Storage Server 20 (3C19500)
Network Storage Server 40 (3C19501)
User Guide
Page 2

3Com Corporation ■ 5400 Bayfront Plaza ■ Santa Clara, California ■ 95052-8145
Copyright © 2000, 3Com Technologies. All rights reserved.
No part of this documentation may be reproduced in any form or by any means or used to
make any derivative work (such as translation, transformation, or adaptation) without
written permission from 3Com Technologies.
3Com Technologies reserves the right to revise this documentation and to make changes in
content from time to time without obligation on the part of 3Com Technologies to provide
notification of such revision or change.
3Com Technologies provides this documentation without warranty, term, or condition of
any kind, either implied or expressed, including, but not limited to, the implied warranties,
terms or conditions of merchantability, satisfactory quality, and fitness for a particular
purpose. 3Com may make improvements or changes in the product(s) and/or the
program(s) described in this documentation at any time.
If there is any software on removable media described in this documentation, it is furnished
under a license agreement included with the product as a separate document, in the hard
copy documentation, or on the removable media in a directory file named LICENSE.TXT or
!LICENSE.TXT. If you are unable to locate a copy, please contact 3Com and a copy will be
provided to you.
UNITED STATES GOVERNMENT LEGEND
If you are a United States government agency, then this documentation and the software
described herein are provided to you subject to the following:
All technical data and computer software are commercial in nature and developed solely at
private expense. Software is delivered as “Commercial Computer Software” as defined in
DFARS 252.227-7014 (June 1995) or as a “commercial item” as defined in FAR 2.101(a)
and as such is provided with only such rights as are provided in 3Com’s standard
commercial license for the Software. Technical data is provided with limited rights only as
provided in DFAR 252.227-7015 (Nov 1995) or FAR 52.227-14 (June 1987), whichever is
applicable. You agree not to remove or deface any portion of any legend provided on any
licensed program or documentation contained in, or delivered to you in conjunction with,
this User Guide.
Unless otherwise indicated, 3Com registered trademarks are registered in the United States
and may or may not be registered in other countries.
3Com and OfficeConnect are registered trademarks of 3Com Corporation. The 3Com logo
is a trademark of 3Com Corporation.
Microsoft, Windows, and Windows NT are registered trademarks of Microsoft Corporation.
Netscape Navigator is a registered trademark of Netscape Communications. Novell and
NetWare are registered trademarks of Novell, Inc. UNIX is a registered trademark in the
United States and other countries, licensed exclusively through X/Open Company, Ltd.
All other company and product names may be trademarks of the respective companies with
which they are associated.
Environmental Statements
It is the policy of 3Com Corporation to be environmentally- friendly in all operations. To
uphold our policy, we are committed to:
■
Establishing environmental performance standards that comply with national
legislation and regulations.
■
Conserving energy, materials and natural resources in all operations.
■
Reducing the waste generated by all operations. Ensuring that all waste
conforms to recognized environmental standards. Maximizing the recyclable and
reusable content of all products.
■
Ensuring that all products can be recycled, reused and disposed of safely.
■
Ensuring that all products are labelled according to recognized environmental
standards.
■
Improving our environmental record on a continual basis.
End of Life Statement
3Com processes allow for the recovery, reclamation and safe disposal of all end- of- life
electronic components.
Regulated Materials Statement
3Com products do not contain any hazardous or ozone- depleting material.
Environmental Statement about the Documentation
The documentation for this product is printed on paper that comes from sustainable,
managed forests; it is fully biodegradable and recyclable, and is completely chlorine-free.
The varnish is environmentally-friendly, and the inks are vegetable-based with a low
heavy-metal content.
Page 3

3
C
ONTENTS
About this Guide 5
Introducing the OfficeConnect Network Storage Server 7
Positioning the Network Storage Server 12
Choosing a Suitable Site 12
Stacking the Network Storage Server 12
Powering Up and Powering Down 14
Powering Up the Network Storage Server 14
Powering Down the Network Storage Server 14
Using the Network Storage Server 15
Who Can Access the Network Storage Server? 15
Accessing the Network Storage Server 15
Using the Administration System 16
The Administration System 16
Who Can Access the Administration System? 16
Accessing the Administration System 16
Administration System Features 17
Users and Shares 17
Configuration 20
Status 20
Commands 20
Help/Support 20
Failsafe Mode 21
Accessing the Failsafe Mode 21
Failsafe Mode Options 22
Replacing A Faulty Hard Disk 23
Hard Disk Safety Information 23
About the Hard Disk 23
Replacing the Hard Disk 24
Rebooting the Network Storage Server 26
IP Addressing 27
The Internet Protocol Suite 27
Managing the Network Storage Server over the Network 27
How does a Device Obtain an IP Address and Subnet Mask? 29
Troubleshooting 30
Spot Checks 30
Power LED is Off 30
Alert LEDs 30
LAN LEDs are Off 31
Network Appears Slow 31
Cannot Access Files on the Network Storage Server 32
Cannot Access the Administration System 32
Forgotten Administration System Password 32
Installation Problems 32
Cannot Access the Failsafe Mode 33
Page 4

4
Frequently Asked Questions 34
Safety Information 36
Safety Information 36
Wichtige Sicherheitshinweise 36
Consignes importantes de sécurité 37
Technical Specifications 38
Standards 38
System Requirements 39
Ethernet Performance 39
Cable Specifications 39
Technical Support 40
Online Technical Services 40
World Wide Web Site 40
Support from Your Network Supplier 41
Support from 3Com 41
Returning Products for Repair 43
Glossary 44
3Com Corporation Limited Warranty 48
Regulatory Notices 51
Page 5

5
A
BOUT THIS
G
UIDE
This guide provides the information you need to use the two
OfficeConnect
®
Network Storage Server models:
■
OfficeConnect Network Storage Server 20 (3C19500)
■
OfficeConnect Network Storage Server 40 (3C19501)
The OfficeConnect Network Storage Server is compatible with
OfficeConnect Hubs and Switches.
The guide is intended for use by those responsible for installing
and setting up network equipment; consequently, it assumes a
basic working knowledge of LANs (Local Area Networks) and
network storage systems.
If a release note is shipped with this OfficeConnect Network
Storage Server and contains information that differs from the
information in this guide, follow the information in the release
note.
Most user guides and release notes are available in Adobe
Acrobat Reader Portable Document Format (PDF) or HTML on the
3Com World Wide Web site:
http://www.3com.com
Naming Convention
Throughout this guide, the OfficeConnect Network Storage
Server 20 and the OfficeConnect Network Storage Server 40 are
referred to as “the Network Storage Server”.
This guide also makes reference to Category 3 and Category 5
Twisted Pair Cable. For convenience, these cables will be referred
to as Twisted Pair Cable throughout this guide.
Icon Conventions
Ta bl e 1 lists the conventions that are used throughout this guide.
Table 1
Notice Icons
.
Icon Notice Type Description
Information note Information that describes important features or
instructions.
Caution Information that alerts you to potential loss of
data or potential damage to an application,
system, or device.
Warning Information that alerts you to potential personal
injury.
Page 6

6
Feedback about this User Guide
Your suggestions are very important to us. They will help make
our documentation more useful to you. Please e-mail comments
about this document to 3Com at:
pddtechpubs_comments@3com.com
Please include the following information when commenting:
■
Document title
■
Document part number (on the title page)
■
Page number (if appropriate)
Example:
■
OfficeConnect Network Storage Server User Guide
■
Part Number DUA1950-0AAA01
■
Page 24
Do not use this e-mail address for technical support questions.
For information about contacting Technical Support, see
“Technical Support” on page 40
.
Related Documentation
In addition to this guide, each OfficeConnect Network Storage
Server document set includes one Quick Installation Guide. This
poster contains the instructions you need to install and configure
your Network Storage Server.
Year 2000 Compliance
For information on Year 2000 compliance and 3Com products,
visit the 3Com Year 2000 Web page:
http://www.3com.com/products/yr2000.html
Product Registration
You can now register your OfficeConnect Network Storage Server
on the 3Com web site and receive up-to-date information on
your product:
http://support.3com.com/warrantyregistration/
register.pl
Page 7

7
I
NTRODUCING THE
O
FFICECONNECT
N
ETWORK
S
TORAGE
S
ERVER
Welcome to the world of networking with 3Com®. In the
modern business environment, communication and sharing
information is crucial. Computer networks have proved to be one
of the fastest modes of communication but, until recently, only
large businesses could afford the networking advantage. The
OfficeConnect
®
product range from 3Com has changed all this,
bringing networks to the small office.
The Network Storage Server is ideal for adding extra storage
space to your network. It is compact and attractively designed for
desktop use and can be used with other OfficeConnect products.
These products form part of the OfficeConnect range which
neatly stack together with the OfficeConnect stacking clip. The
Network Storage Server provides you with a quick-to-install,
efficient and inexpensive alternative to complex, more-expensive
computer servers.
The Network Storage Server is an ideal solution for users and
groups of people who simply require more storage space for
their data and the ability to share data across the entire network
quickly and easily.
The OfficeConnect Network Storage Server 20 (3C19500) has a
Hard Disk capacity of 20 GB whereas the OfficeConnect Network
Storage Server 40 (3C19501) has a Hard Disk capacity of 40 GB.
This is the only difference between the two models.
Figure 1
The Network Storage Server Operating in a Network
Figure 1 shows how a Network Storage Server adds extra storage
space to your network. The workstations are connected to a Dual
Speed OfficeConnect Hub to form a network. The Network
Storage Server is then connected to the Hub with a Twisted Pair
Cable to give all workstations access to the Network Storage
Server.
Dual Speed
Hub
10 Mbps
100 Mbps
Network
Storage Server
Page 8

8
Summary of Features
The Network Storage Server has the following features:
■
One auto-negotiating Ethernet or Fast Ethernet port so you
can install the Network Storage Server in an Ethernet
(10 Mbps) network, a Fast Ethernet (100 Mbps) network or a
dual-speed (10 or 100 Mbps) network. This port can also
operate in full or half duplex mode.
■
20 GB or 40 GB of storage space.
■
LED status indicators on the front panel.
■
A Web-based Administration System that allows a Network
Administrator to:
■
Configure and manage the Network Storage Server.
■
Create Users, Groups and Shares and impose security
restrictions on the Network Storage Server.
■
A Web-based Failsafe Mode that allows the Network
Administrator to:
■
Upgrade its Operating System.
■
Run Hard Disk checks.
■
Reset the Unit back to its factory defaults.
■
An online help system that gives explanations and instructions
on how to configure the Network Storage Server and use the
Administration System.
■
A replaceable Hard Disk, in the unlikely event the Hard Disk
should fail.
System Requirements
To install your Network Storage Server, refer to the “Quick
Installation Guide” (DIA1950-0AAA0x) that accompanies this
product. In summary, you will need:
■
A functioning Ethernet or Fast Ethernet network.
■
One spare Ethernet or Fast Ethernet port on your Hub or
Switch for each Network Storage Server you wish to install.
■
An Operating System (Windows® 95, Windows 98 or
Windows NT 4.0) with network support configured, running
on your workstations.
■
Microsoft Internet Explorer 4.0 (or above) or Netscape
Navigator 4.5 (or above) as your Web browser to access the
Administration System.
Page 9

9
The Network Storage Server — Front View
20% 40% 60% 80% 90%
Alert
Power
Disk
OfficeConnect Network Storage Server 20
Shutdown
95%
Green = ON
Amber = Standby
Disk Space Used
LAN
10
100
Activity
LAN Status LEDs
The Activity LED indicates t
The 10 Mbps and the 100 Mbps LEDs indicates the
type of connection made.
here is an Ethernet or Fast
Ethernet connection and packets are being transmitted or
received.
Power LED
Green
Amber
indicates that the power supply
to the Network Storage Server is
present.
indicates the unit has either
been shut down or is in Failsafe Mode.
Disk LED
Green
Flashes when there is Hard Disk activity.
Disk Space Used LEDs
Green/Yellow/Amber
Indicates the amount of Hard
Disk space used.
Alert LED
Orange
Alerts you when
there is a
potential error.
Shutdown button
Allows the Network Storage Server
to be powered down or restarted in
Failsafe Mode.
Page 10
10
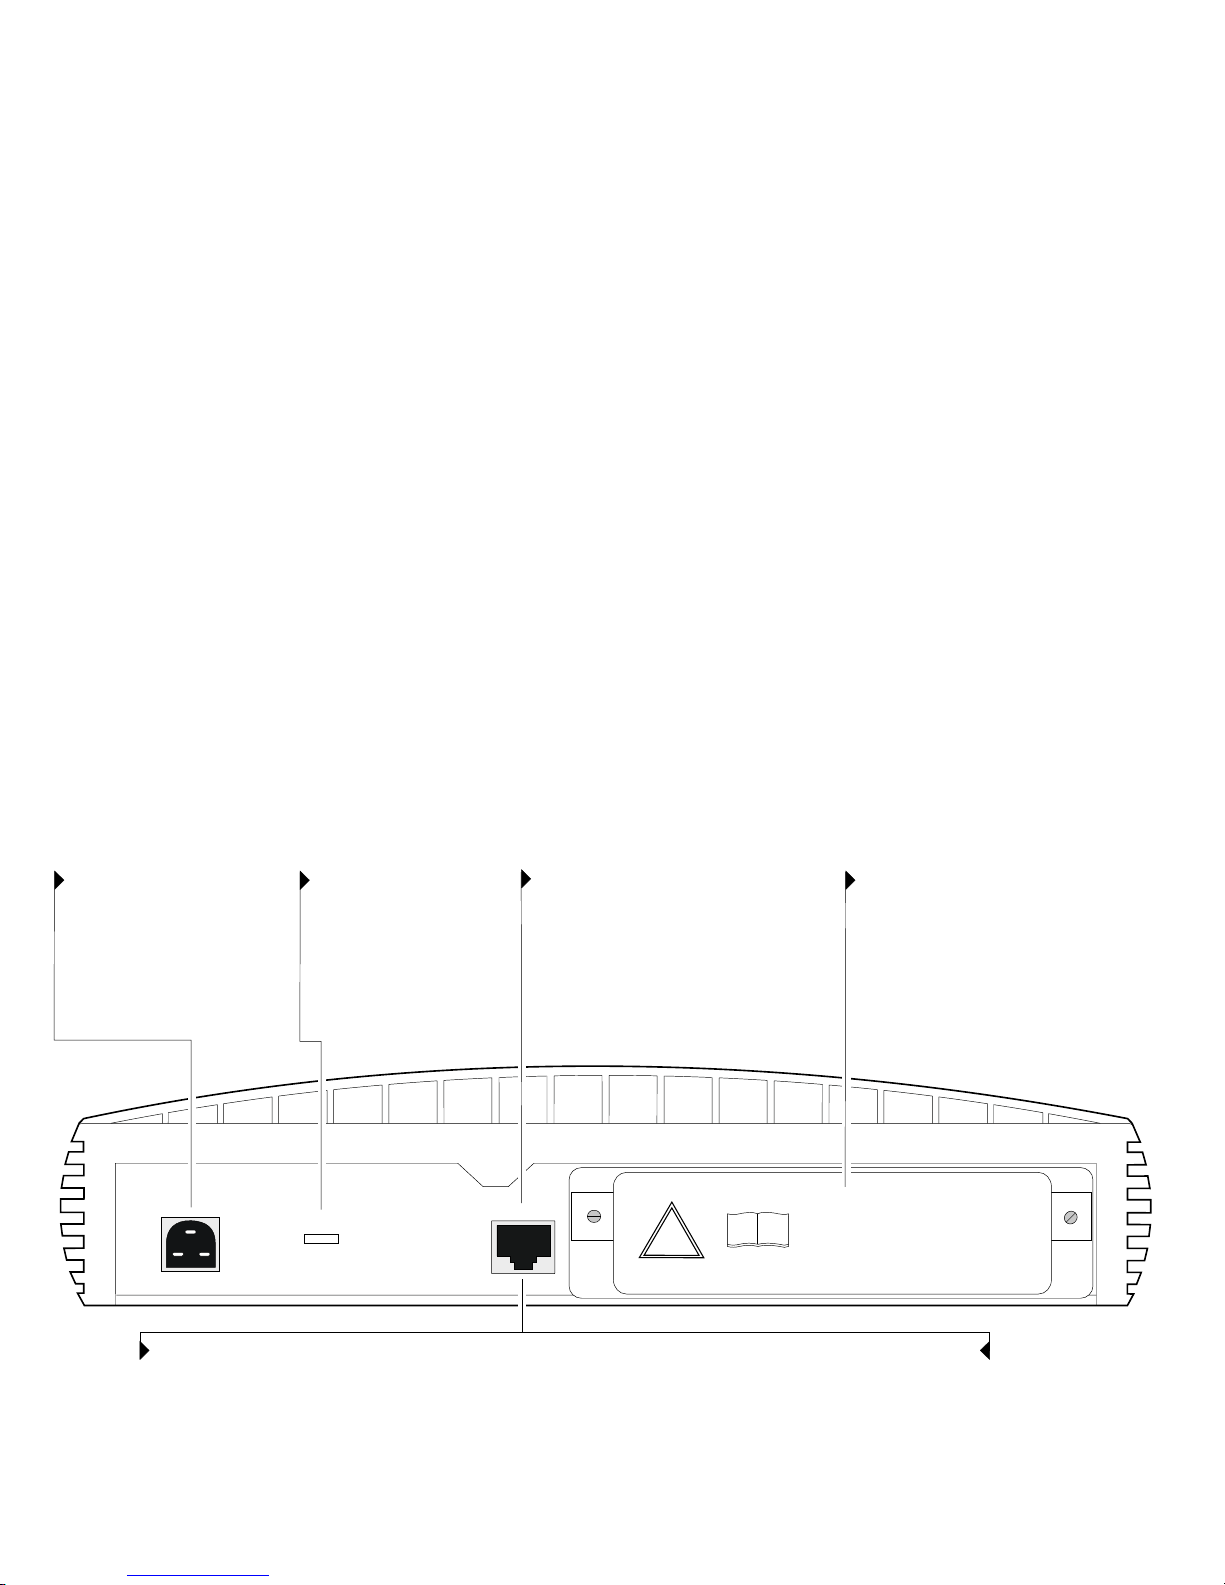
The Network Storage Server — Rear View
Power Adapter Socket
Only use the 12V power
adapter
that is supplied
with this Network Storage
Server. Do not use any other
adapter.
(part number
3C16749)
Hard Disk Blanking Plate
The Hard Disk is fitted behind this
blanking plate. Refer to the section on
‘Replacing A Faulty Hard Disk’, for more
information.
12V DC
2A MAX
WARNHINWEIS: RJ-45-Port.
Hierbei handelt es sich um eine
abgeschirmte RJ-45 Datenbuchse.
Sie darf nicht als Telefonanschluß
verwendet werden. Stecken Sie
ausschließlich einen Datenstecker
des Typs RJ-45 in diese Buchse.
AVERTISSEMENT: port de données RJ-45.
Il s'agit d'une prise de données RJ-45
blindée, qui ne peut pas être utilisée comme
prise téléphonique. Raccordez uniquement
un connecteur de données RJ-45 à cette
prise.
LOCK
Ethernet/Fast Ethernet LAN Port
Use a Twisted Pair cable with RJ-45
connectors. You can connect the Network
Storage Server to a Hub or a Switch that
has a spare Ethernet or Fast Ethernet port.
This port is capable of auto-negotiating for
10 Mbps or 100 Mbps operation and
operates in full or half duplex mode.
Lock Slot
This slot allows you to fit a
security lock (
ecure your
Network Storage Server to
a desk.
not included)
and physically s
LAN
WARNING: RJ-45 port.
This is a shielded RJ-45 data socket.
It cannot be used as a telephone
socket. Only connect an RJ-45 data
connector to this socket.
Please Handle With Care.
This product is sensitive to
mechanical shock. Do not subject
this product to vibration,
or sudden movement.
unnecessary
transit
!
Page 11

11
LED Functions
Ta bl e 2 explains how the LEDs on the front of the Network
Storage Server function:
Table 2
The Network Storage Server LED Function Table
Color Appearance Meaning
Alert LED
Orange On or Flashing There is a potential problem.
None Off The unit is working correctly.
Power LED
Green On The unit is either powering-up or is
working correctly.
Amber On The Shutdown button has been pressed
and the unit has either been shut down or
is operating in Failsafe Mode.
None Off The Network Storage Server has been
unplugged or is powered off.
Disk LED
Green Flashing There is Hard Disk activity.
None Off There is no Hard Disk activity.
Color Appearance Meaning
Activity LED
Green Flashing There is an Ethernet or Fast Ethernet
connection and packets are being
transmitted or received.
None Off There are no packets being transmitted or
received.
10 LED
Yellow On There is a 10 Mbps Link enabled.
None Off There is no 10 Mbps Link.
100 LED
Green On There is a 100 Mbps Link enabled.
None Off There is no 100 Mbps Link.
Disk Space Used LEDs
Green/Yellow/Amber Indicates the amount of Hard Disk space
used.
If you suspect there may be a problem with the Network Storage Server,
consult the “Troubleshooting” section on page 30.
Page 12

12
P
OSITIONING THE
N
ETWORK
S
TORAGE
S
ERVER
Choosing a Suitable Site
When you install your Network Storage Server, ensure:
■
It is out of direct sunlight and away from sources of heat.
■
Cabling is away from power lines, fluorescent lighting fixtures,
and sources of electrical noise such as radios, transmitters and
broadband amplifiers.
■
Water or moisture cannot enter the case of the unit.
■
Air flow around the unit and through the vents on the side of
the case is not restricted. 3Com recommend you provide a
minimum of 25 mm (1 in.) clearance.
■
Cabling is secure and not pulled taut.
CAUTION:
Do not wall-mount the Network Storage Server and
do not wall-mount stacked units.
CAUTION:
The Network Storage Server is not a portable device
and is sensitive to mechanical shock. Do not subject it to
vibration, unnecessary transit or movement.
Stacking the Network Storage Server
Fitting the Rubber Feet
The four self-adhesive rubber feet prevent your Network Storage
Server from moving around on your desk. Only stick the feet to
the marked areas at each corner of the underside of your
Network Storage Server if you intend to place the unit directly on
top of the desk.
Fitting the Stacking Clip
The blue stacking clip allows you to stack your Network Storage
Server with other OfficeConnect Units neatly and securely.
CAUTION:
You can stack up to a maximum of four
OfficeConnect units. Smaller units must be stacked above larger
units.
You must place the Network Storage Server at the bottom of the
stack.
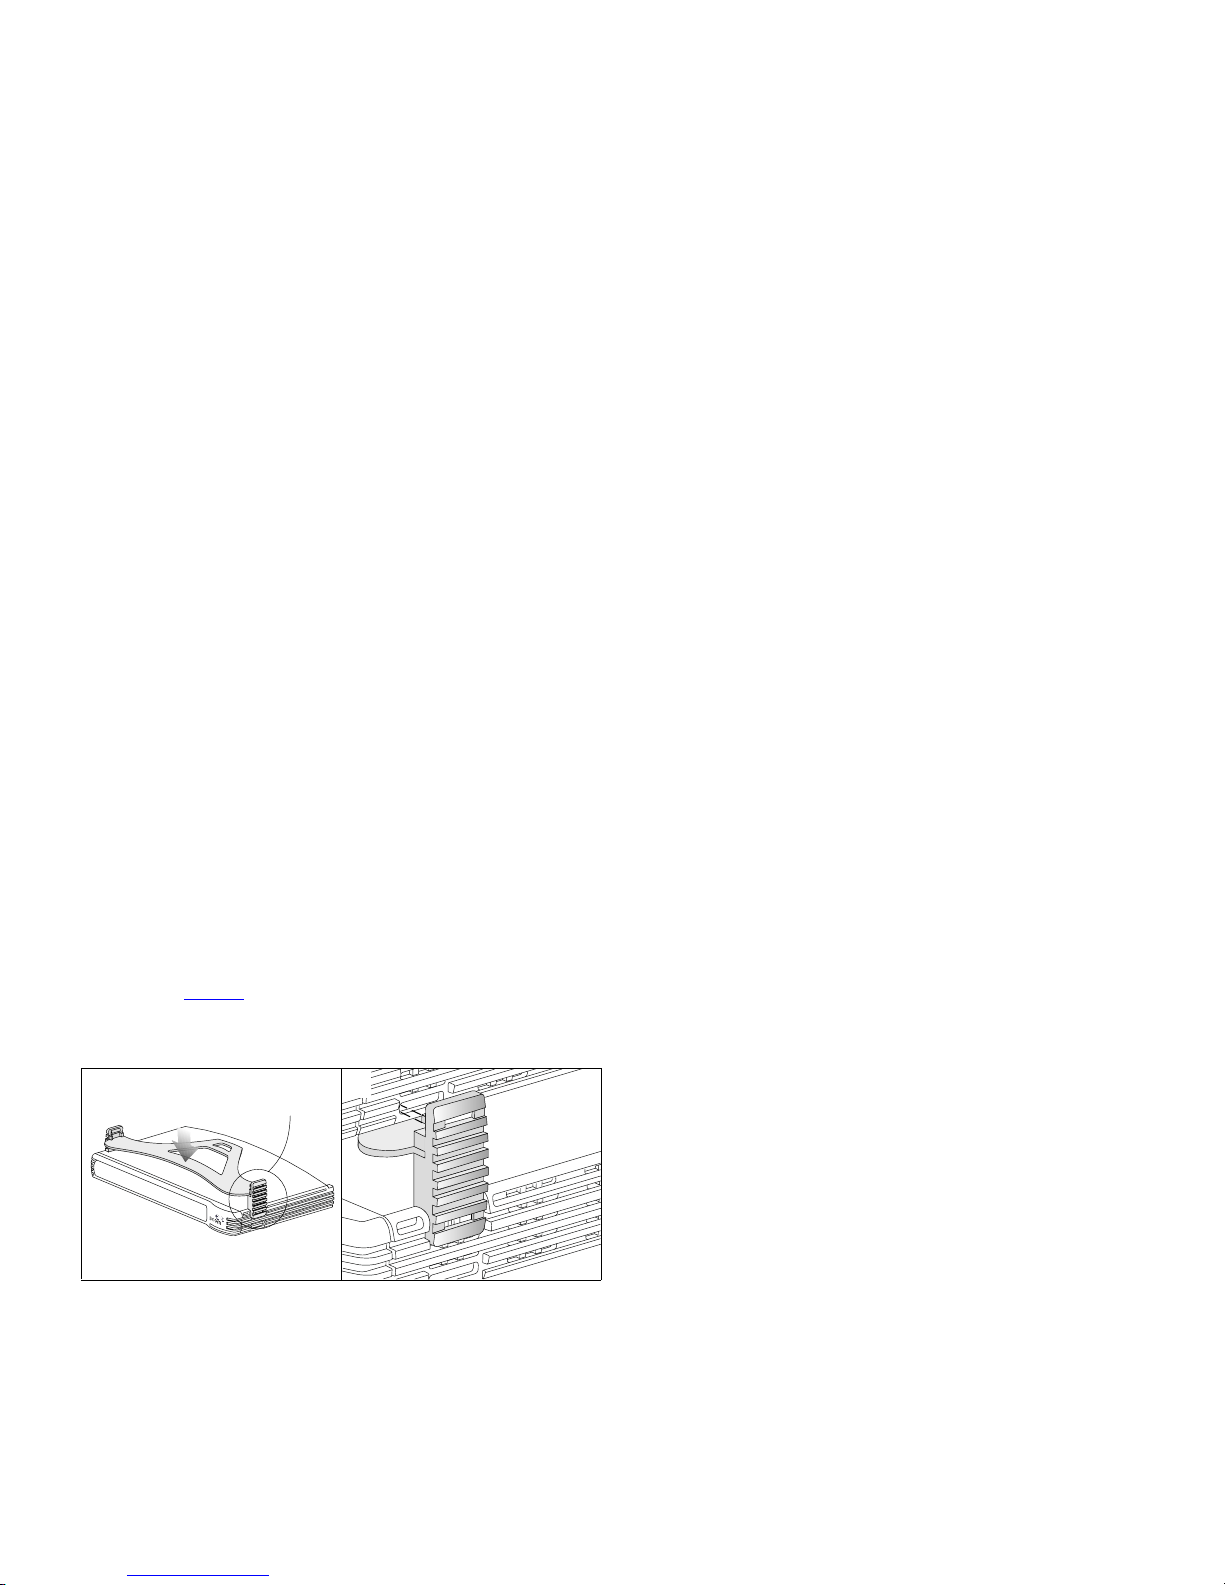
To fit the Stacking Clip:
1
Place your unit on a flat surface.
2
Position the clip across the top of the unit, as shown in Figure 2
(picture 1), ensuring that the longer sections of the fastening
pieces are pointing downwards.
3
Align the fastening pieces over the slots found on each side of
the unit.
4
Push the clip down gently to secure it, ensuring the fastening
pieces snap into the slots on the unit.
Page 13
13
Fitting Another Unit
To fit another unit:
1
Rest the second unit on top of the clip and align it with the front
of the unit below.
2
Press down gently on the unit to secure it onto the clip, ensuring
the fastening pieces fit into the slots on the unit below, as
shown in Figure 2
(picture 2).
Figure 2
Stacking Units Together
Removing The Stacking Clip
To remove the Stacking Clip:
1
Remove the top unit together with the clip. If you hook a finger
around one of the fastening pieces and then pull it gently out of
the slot, the clip should come away with the upper unit attached
to it.
2
Push the clip in the center, so it bends towards the base of the
unit, and then separate once the clip is loose.
1
Fastening
Piece
2
Fastening
Piece
Page 14

14
P
OWERING
UP
AND
P
OWERING
D
OWN
Powering Up the Network Storage Server
To power up the Network Storage Server:
1
Attach the power adapter to the power adapter socket located in
the back of the Network Storage Server.
2
Plug the other end into a power outlet.
When power is supplied, the LEDs on the front of the Network
Storage Server will flicker for approximately two minutes while it
performs a Power On Self Test (POST). The Network Storage
Server will be ready to use when the Power LED is Green; the
Disk LED has finished flickering and the Disk Space Used LEDs
have stopped moving up the LED scale.
See the Network Storage Server LED Function table on page 11
for further LED information.
To power up the Network Storage Server into its Failsafe Mode,
see the section about the “Failsafe Mode” on page 21
.
Powering Down the Network Storage Server
To power down the Network Storage Server, press the Shutdown
button on the front of the unit for between two and four
seconds.
The Network Storage Server will take approximately one minute
to shut down. As the Network Storage Server powers down, the
Disk Space Used LEDs will go to the maximum point on its scale
and then gradually move down the scale until full shut down.
When the Power LED appears Amber and there are no
Disk Space Used LEDs lit, the Network Storage Server has shut
down.
Page 15

15
U
SING THE
N
ETWORK
S
TORAGE
S
ERVER
Who Can Access the Network Storage Server?
The Network Storage Server operates like a typical server as you
can create directories and save, delete, move and copy data
across the network with ease.
Anyone can access the Network Storage Server provided they are
connected to the network. You can connect the Network Storage
Server to your network and allow every User unrestricted access
to the Public Share (or public directory) and the data stored in it.
Network users can also create their own Shares (or directories)
for their personal use.
Although anyone can access the Network Storage Server, you can
restrict a User from accessing specific Shares (or directories) by
setting access restrictions on them. To do this, you must create a
Share on the Administration System and set access restrictions on
it (see page 16
for more information).
Accessing the Network Storage Server
From the task bar at the bottom of your screen, select:
1
Start, Find and then Computer.
2
Enter the name of the Network Storage Server.
3
Click Find Now. An icon for the Network Storage Server should
appear in the search window after a short while.
4
Double-click the Network Storage Server icon. A window will
appear containing all the Shares stored on the Network Storage
Server.
The Public Share is the default area on the Network Storage
Server where all users have unrestricted access to the data
stored. If other Shares have been created, they will appear here
too. Access to these other Shares is determined by the Network
Administrator.
3Com recommends you map a drive letter to the respective
Share. Mapping a drive to the Share will allow you to access it
quickly and reliably from Windows Explorer.
Mapping a Drive to a Share
From the task bar at the bottom of your screen, select:
1
Start, Find and then Computer.
2
Enter the name of the Network Storage Server.
3
Click Find Now. An icon for the Network Storage Server should
appear in the search window after a short while.
4
Double-click the Network Storage Server icon. A window will
appear containing the Shares.
5
Select a Share and click the right-hand button on your mouse.
6
Select Map Network Drive from the list.
7
Select an unused drive from the Drive list.
8
Ensure the Reconnect at logon check-box is turned on.
9
Click OK.
Page 16

16
U
SING THE
A
DMINISTRATION
S
YSTEM
The Administration System
The Administration System is a Web-based utility that allows a
Network Administrator to configure the Network Storage Server
and set up Shares, Users and Groups. The Administration System
can also be used to configure the Network Storage Server itself,
so that it functions efficiently within the network. The Network
Administrator can access the Network Storage Server’s Failsafe
Mode to upgrade its Operating System, run Hard Disk checks
and reset the Unit back to its factory defaults. (See “Failsafe
Mode” on page 21 for more information.)
This Administration System also contains a comprehensive online
help system that gives explanations and instructions on
configuring the Network Storage Server and using the
Administration System.
Who Can Access the Administration System?
Anyone using the Network Storage Server can access the
Administration System, provided they have a Web browser
installed on their PC and are connected to the network.
However, their level of access and, therefore, the tasks they can
carry out on the Administration System is determined by the
access level assigned to them by the Network Administrator.
When a User is created, the Network Administrator can assign
additional managerial privileges that allow the User to create
other Users, Groups and Shares; allocate disk space and impose
security restrictions. A User without these privileges can only
change their Login password when they access the
Administration System.
Accessing the Administration System
To access the Administration System:
1
Open your Web browser.
2
Enter the following URL into your Web browser:
http://<xyz>/
Where
<xyz>
is the IP address or the Host name of your
Network Storage Server. The IP address and Hostname were
assigned to your Network Storage Server when it was installed.
3
Press Return.
The Administration System’s Login screen will appear.
4
Click the Login button.
A dialogue box will appear prompting for a User Name and a
Password.
5
Enter admin for the User Name.
6
Enter admin for the Password.
7
Click OK.
The Administration System’s Welcome Page is displayed on your
screen (see Figure 3
).
CAUTION:
Always use this procedure to access the
Administration System. Do not bypass the logging-in procedure
by creating a ‘bookmark’ to your Network Storage Server in your
Web browser as this may prove unreliable.
Page 17

17
For security reasons, 3Com recommends you change the
Administration System’s default Password when your Network
Storage Server has been configured correctly.
Figure 3
Administration System Welcome Page
Administration System Features
There are five main sections to the Administration System. These
are:
■
Users and Shares
■
Configuration
■
Status
■
Commands
■
Help/Support
Each section can be accessed by selecting the appropriate link in
the left-hand column of the Administration System.
Users and Shares
Shares
A Share is a directory that can be accessed by multiple Users.
When a Share is viewed in Windows Explorer, it will look just like
any Windows folder. However, when viewed in the
Administration System, the Share will exhibit distinctive
characteristics to help you distinguish it from others.
You can control which Users access a Share by using access
control rules. You only need to set up Users on the Network
Storage Server if you want to control the User’s access to a
specific Share.
Using Shares
The following examples show some likely scenarios about
why
and
how
you would set up a Share.
You want every User to be able to access and modify files
in a Share on the Network Storage Server.
Set up a public Share with
full access
, so that everyone can read
and write to it.
The company stores information that all employees need
to access regularly. This information is updated very rarely,
if ever.
Set up a
read only share
. This will enable all staff to read the
information, but will prevent any changes from being made to it.
Page 18

18
The company has sensitive information that only a few
employees in the company can view.
Establish a read only with password Share. This will ensure that
people who do not know the password will not be able to view
the information. People with the password will be able to view it
but not change it.
Various employees in the company require different access
to a Share. Some people need to be able to edit the Share;
others only to read it and a small majority should not be
able to view it at all.
For this configuration use of the depends on user Share is
recommended. With this you can define Groups of Users who
should be able to read and write to the Share; Groups for
read only access and Groups for no access. User accounts for the
employees can be created and moved inside the Groups. Also
individual User configuration can be carried out by specifying
permissions for sole Users, instead of Groups.
Share Icons Explained
This section shows the icons most likely to be seen when
creating a Share.
User
This symbol represents a User set up on the Network
Storage Server.
A User can be assigned a specific amount of personal
Hard Disk space so that only they may use it. Users
can be combined to form a Group.
Group
This symbol represents a Group of Users set up on
the Network Storage Server.
A Group is a quick and simple way for setting up
multiple access rights for a cluster of Users for a
specific Share.
Full Access
All Users have read and write access to this Share
without needing a password. Any User can create,
modify or delete any file or Share. Users do not need
to be set up for this option. This option makes it easy
to share information but provides minimal protection.
Page 19

19
Read Only
All Users have read-only access to the files and
directories in this Share without needing a password,
but they cannot modify or delete any of them. Users
do not need to be set up for this option.
Full Access with Password
This Share is protected by a password set by the
Network Administrator. Any User who knows the
password will obtain full read and write access. Users
do not need to be set up for this option.
Read and Write Access to the Share
This symbol means the User will be granted read and
write access to this Share.
Read-only Access to the Share
This symbol means the User will be granted read-only
access to this Share.
Read Only with Password
This Share is protected by a password set by the
Network Administrator. Any User who knows the
password will be able to obtain read-only access.
Users do not need to be set up for this option.
Depends On User
Users are only allowed to access this type of Share if
they are given permission to access it and can provide
a valid password on connection.
If the User’s Windows Login name exists as a name on
the Network Storage Server, they will connect as that
User and must use the associated password.
However, if the User’s Windows Login name does not
exist on the Network Storage Server, they will connect
as the special User Everyone Else and can use the
associated password whose default is admin.
Users must be set up on the Network Storage Server
to use this option.
No Access to Share
This symbol means the User will not be granted
access to this Share.
Delete Button
If you need to delete a User, Group or a Share,
simply click this button where appropriate.
Page 20

20
Configuration
The Configuration section allows the Network Administrator to
view and adjust the configuration settings of the Network
Storage Server. Properties such as the IP characteristics, the
Hostname and the Workgroup name can be redefined here, too.
Status
The Status section gives detailed information about the condition
of the Network Storage Server. This section details:
■
General information about the Network Storage Server.
■
The amount of Hard Disk space used/available.
■
The PCs currently connected to the Network Storage Server.
■
Any Alerts and their descriptions.
Commands
The Commands section allows you to:
■
Shut down the Network Storage Server.
■
Save its configuration settings.
3Com recommends you make regular backups of your
configuration settings as it may prove useful if you need to
restore them at a later date.
Please note that you can perform these two commands in the
Network Storage Server’s Failsafe Mode. For more information,
see page 21
.
You can restore your configuration settings by accessing the
Network Storage Server’s Failsafe Mode. See page 21
for further
details.
Help/Support
This Administration System contains a comprehensive online help
system that gives explanations and instructions about configuring
the Network Storage Server and the Administration System.
Page 21

21
F
AILSAFE
M
ODE
The Network Storage Server has a Web-based feature called the
Failsafe Mode that allows you to:
■
Upgrade the Operating System
■
Reset the administration password
■
Backup the current configuration settings
■
Restore the previous configuration settings
■
Run a Hard Disk check
■
Erase the Hard Disk
■
Restore the unit to its factory defaults
■
Save the system logs as a single file
■
Shutdown and restart the system
Figure 4
Failsafe Mode Welcome Screen
Accessing the Failsafe Mode
To access the Failsafe Mode:
1
Power down the Network Storage Server by pressing the
Shutdown button on the front of the unit for between two and
four seconds.
The Network Storage Server will take approximately one minute
to shut down. As the Network Storage Server powers down, the
Disk Space Used LEDs will go to the maximum point on its scale
and then gradually move down the scale until full shut down.
When the Power LED appears Amber and there are no
Disk Space Used LEDs lit, the Network Storage Server has shut
down.
2
Disconnect the power supply adapter from the unit only when
the Network Storage Server has completely shut down.
3
Push and hold the Shutdown button, then reconnect the power
supply adapter to the Network Storage Server to power it up.
Keep the shutdown button pressed until the Power LED appears
Amber (approximately 30 seconds).
4
Open your Web browser and enter the following URL into your
Web browser:
http://<xyz>/failsafe.cgi
Where
<xyz>
is the IP address or the name of your Network
Storage Server. The IP address and Hostname were assigned to
your Network Storage Server when it was installed.
5
Press Return.
You should now be able to see and access the Failsafe Mode’s
Welcome screen (see Figure 4
). From here, simply click on one
the features and follow the on-screen instructions.
Page 22

22
Failsafe Mode Options
Upgrading the Operating System
You can download the latest version of the Operating System for
the Network Storage Server from the following 3Com Website:
http://support.3com.com
When you have saved the new Operating System to your PC, you
can upgrade it by selecting this option.
Resetting the Administration Password
If you forget your Login password to the Administration System,
you can reset the password to its default setting by selecting this
option.
Backing Up the Configuration Settings
You can create a backup of the configuration settings for the
Network Storage Server. Creating regular backups will allow you
to restore your settings at a later date, if necessary. The
configuration settings includes information such as the IP
address; the Network Storage Server name; the Workgroup
name; all User account details; any Share details and access
rights.
You cannot backup any data stored by a User on the Network
Storage Server this way. To create a backup of the information
stored on the Network Storage Server, please see the section
“About the Hard Disk” on page 23
.
Restoring the Previous Configuration Settings
You can restore your previous saved configuration settings by
selecting this option.
Running A Hard Disk Check
If you suspect there might be a problem with the Hard Disk you
can check it for errors. There are two types of scan available. A
quick scan will only check the section on the Hard Disk that has
information stored on it, and will take approximately two
minutes. A thorough scan can take up to 30 minutes. If there are
any errors on the Hard Disk, the Network Storage Server will
attempt to repair them.
If the errors cannot be repaired, you might try erasing the entire
Hard Disk. Alternatively, call the Technical Support centre at
3Com. See page 40
for contact details.
Erasing the Hard Disk
This feature will erase everything on the Hard Disk except the
Operating System.
Resetting the Unit Back to its Factory Defaults
The Failsafe Mode has the facility to reset the Network Storage
Server to its original factory defaults. From here, you can reset
the system configuration; the system logs and the Operating
System.
Saving the System Logs as a Single File
The Network Storage Server logs every operation performed on
it. Saving the system logs as a single file is useful because it can
be e-mailed to 3Com Technical Support for analysis as a
.tgz
file
if a problem cannot be resolved.
Shutting Down and Restarting
When you have finished using the Failsafe Mode, select this
option to restart the Network Storage Server and resume normal
operation.
Page 23

23
R
EPLACING
A F
AULTY
H
ARD
D
ISK
Hard Disk Safety Information
W
ARNING:
Installation and removal of the Hard Disk must be
carried out by qualified personnel only. This Hard Disk is not
hot-swappable. Always make sure the Network Storage Server is
powered down and disconnected from the mains before
removing and installing the Hard Disk. For full safety instructions,
see page 36
.
AVERTISSEMENT:
L'installation et la dépose du disque dur sont
à effectuer uniquement par du personnel compétent. Ce disque
dur n'est pas hot swappable (ne peut pas se brancher/débrancher
à chaud). Vérifiez toujours que le serveur de programmes de
mémoire sur réseau est mis hors tension et débranché de la prise
secteur avant de retirer et d'installer le disque dur. Pour des
explications complètes sur la sécurité, reportez-vous page 36
.
WARNHINWEIS:
Der Ein- und Ausbau der Festplatte ist nur von
ausgebildetem Personal auszuführen. Diese Festplatte darf nicht
während des Betriebs ausgetauscht werden. Fahren Sie den
Network Storage Server herunter und trennen Sie ihn von der
Stromversorgung, bevor Sie die Festplatte entfernen
beziehungsweise installieren. Weitere Sicherheitsanweisungen
finden Sie auf Seite 37
.
CAUTION:
A 20 GB Hard Disk will only work with the
OfficeConnect Network Storage Server 20 (3C19500). A 40 GB
Hard Disk will only work with the OfficeConnect Network
Storage Server 40 (3C19501). The Hard Disks are not
interchangeable.
If 3Com Technical Support cannot resolve your Hard Disk
problem, you may have to purchase a replacement Hard Disk.
Replacement Hard Disks are only available from 3Com.
About the Hard Disk
The Network Storage Server has a removable Hard Disk that
allows you to replace it in the unlikely event it should fail.
3Com recommends that you regularly backup the information on
your Network Storage Server. There are two main areas to
consider: the configuration settings of the Network Storage
Server and the actual Hard Disk data saved by the Users and
Groups.
Backing Up the Configuration Settings
You can backup the configuration settings in two ways. You can
make a backup through the Commands section in the
Administration System. Alternatively, you can backup the
configuration settings through the Network Storage Server’s
Failsafe Mode. See page 21
for details on how to access the
Failsafe Mode.
Backing Up the Data
You can backup the Users data by running a backup application
such as Microsoft’s Windows Backup which is normally provided
with Windows 95, Windows 98 and Windows NT 4.0 Operating
Systems.
If you have not backed up your Network Storage Server data and
the Hard Disk fails, you might try a specific data recovery agency
to retrieve the data.
If you have problems with the Hard Disk that cannot be resolved
in the “Troubleshooting”
section on page 30, contact Technical
Support. See page 40
for contact details.
Page 24

24
Replacing the Hard Disk
Once you have received your new Hard Disk, you are ready to
replace the faulty one. The Hard Disk arrives pre-imaged with the
Operating System installed, so there is no need to format the
Hard Disk after installation.
CAUTION:
When you replace the Hard Disk, undo the screws
that secure the blanking plate and the Hard Disk with a suitable
tool. Keep the blanking plate and the screws in a safe place.
After replacing the Hard Disk, replace the blanking plate and
tighten the screws with a suitable tool.
Handling the Hard Disk
The Hard Disk can be easily damaged by electrostatic discharge.
To prevent damage, observe the following:
■
Always wear an anti-static wristband connected to a suitable
earth point.
■
Do not remove the Hard Disk from its packaging until you are
ready to install it into the Network Storage Server.
■
Do not touch any of the pins, connections or components on
the Hard Disk.
■
Handle the Hard Disk only by its edges and its supporting
tray.
■
Always store or transport the Hard Disk in anti-static
packaging.
Removing the Faulty Hard Disk
When you remove the blanking plate on the Network Storage
Server to replace the Hard Disk (see Figure 5
), you will find that
the Hard Disk is attached to a metal supporting tray. Also, the
Hard Disk will have an IDE cable and an internal power supply
connector connected to it. These connections must be removed
before you remove the Hard Disk. Also, when you remove the
Hard Disk, you must remove the supporting tray with it.
Figure 5
Rear of the Network Storage Server
To remove the Hard Disk:
1
Ensure that the Network Storage Server has been powered down
and disconnected from the mains power supply. Ensure that you
are wearing an anti-static wristband connected to a suitable
earth point.
2
Ensure that the Twisted Pair cable has been disconnected from
the LAN port on the Network Storage Server.
12V DC
2A MAX
12V DC
2A MAX
LOCK
LAN
IDE Cable
Internal
Power Supply
Connector
Internal
Power Supply
Connector
Page 25

25
3
Undo the two screws on the Network Storage Server’s blanking
plate and remove it. Keep the blanking plate and the fixings in a
safe place.
4
Disconnect the IDE cable and the internal power supply
connector from the back of the Hard Disk.
5
Undo the four screws that secure the supporting tray and the
Hard Disk to the Network Storage Server from the underside of
the Network Storage Server.
6
Remove the supporting tray containing the Hard Disk from the
Network Storage Server.
Inserting the New Hard Disk
To insert the new Hard Disk:
1
Ensure that the Network Storage Server has been powered down
and disconnected from the mains power supply. Ensure that you
are wearing an anti-static wristband connected to a suitable
earth point.
2
Position the Hard Disk as shown in Figure 6.
3
Push the Hard Disk into the Network Storage Server.
4
Tighten the four screws that secure the supporting tray and the
Hard Disk to the Network Storage Server on the underside of the
Network Storage Server.
5
Reconnect the IDE cable and the internal power supply cable to
the back of the Hard Disk.
6
Secure the blanking plate and the Hard Disk by first positioning
the screws over the screw apertures and then tighten the two
captive screws with a suitable tool screwdriver.
CAUTION:
Keep the IDE cable and the internal power supply
cable away from the Hard Disk as you insert it into the Network
Storage Server (see Figure 6
).
CAUTION:
After replacing the Hard Disk, you must replace the
blanking plate.
Figure 6
Inserting The Hard Disk
12V DC
2A MAX
12V DC
2A MAX
LOCK
LAN
IDE Port
Internal Power Supply Socket
IDE Cable
Internal
Power Supply
Connector
Internal
Power Supply
Connector
Page 26

26
Rebooting the Network Storage Server
There are two ways to reboot your Network Storage Server. The
method used to reboot the Network Storage Server depends on
whether you have previously backed up your configuration
settings or not. The configuration settings includes information
such as the IP address; the Network Storage Server’s name; the
Workgroup name; all User account details; Share details and
access rights.
See page 21
for more details about backing up the configuration
settings through the Network Storage Server’s Failsafe Mode.
Rebooting the Network Storage Server without
Restoring the Configuration Settings
If you have not backed up the configuration settings, you must
completely re-install the Network Storage Server using the
Discovery Application. To do this:
1
Reconnect the Twisted Pair cable between the LAN port on the
Network Storage Server and the network device (Hub or Switch).
2
Power up the Network Storage Server by re-attaching the power
adapter to the power adapter socket.
3
Install and configure the Network Storage Server. See the “Quick
Installation Guide” (DIA1950-0AAA0x) that accompanies this
User Guide for installation instructions.
Your Network Storage Server should now be ready to use.
Rebooting the Network Storage Server and Restoring
the Configuration Settings in Failsafe Mode
If you have backed up your configuration settings and wish to
restore them on your Network Storage Server, you can reinstall
them through the Failsafe Mode.
To reboot the Network Storage Server into its Failsafe Mode:
1
Reconnect the Twisted Pair cable between the LAN port on the
Network Storage Server and the network device (Hub or Switch).
2
Push and hold the Shutdown button, then reconnect the power
supply adapter to the Network Storage Server to power it up.
Keep the shutdown button pressed until the Power LED appears
Amber (approximately 30 seconds).
3
Open your Web browser.
4
Enter the following URL into your Web browser:
http://<xyz>/failsafe.cgi
Where
<xyz>
is the IP address or the name of your Network
Storage Server. The IP address and Hostname were assigned to
your Network Storage Server when it was installed.
5
Press Return.
6
Click Restoring the Previous Configuration Settings and follow
the on-screen instructions.
7
Click the Shutting Down and Restarting option on the Failsafe
Mode menu and follow the onscreen instructions to restart the
Network Storage Server and resume operation.
Page 27

27
IP A
DDRESSING
The Internet Protocol Suite
The Internet protocol suite consists of a well-defined set of
communications protocols and several standard application
protocols. Transmission Control Protocol/Internet Protocol (TCP/IP)
is probably the most widely known and is a combination of two
of the protocols (IP and TCP) working together. TCP/IP is an
internationally adopted and supported networking standard that
provides connectivity between equipment from many vendors
over a wide variety of networking technologies.
Managing the Network Storage Server over the
Network
To manage a device over the network, the Network Storage
Server must be correctly configured with the following IP
information:
■
An IP address
■
A Subnet Mask
IP Addresses and Subnet Masks
Each device on your network must have a unique IP address to
operate correctly. An IP address identifies the address of the
device to which data is being sent and the address of the
destination network. IP addresses have the format n.n.n.x where
n is a decimal number between 0 and 255 and x is a number
between 1 and 254 inclusive.
However, an IP Address alone is not enough to make your device
operate. In addition to the IP address, you need to set a subnet
mask. All networks are divided into smaller sub-networks and a
subnet mask is a number that enables a device to identify the
sub-network to which it is connected.
For your network to work correctly, all devices on the network
must have:
■
The same sub-network address.
■
The same subnet mask.
The only value that will be different is the specific host device
number. This value must always be unique.
Page 28

28
An example IP address is ‘192.168.100.8’. However, the size of
the network determines the structure of this IP Address. In using
the Network Storage Server, you will probably only encounter
two types of IP Address and subnet mask structures.
Typ e O ne
In a small network, the IP address of ‘192.168.100.8’ is split into
two parts:
■
Part one (‘192.168.100’) identifies the network on which the
device resides.
■
Part two (‘.8’) identifies the device within the network.
This type of IP Address operates on a subnet mask of
‘255.255.255.0’.
See Ta bl e 3
for an example about how a network with three PCs
and a Network Storage Server might be configured.
Table 3
IP Addressing and Subnet Masking
Typ e Tw o
In larger networks, where there are more devices, the IP address
of ‘192.168.100.8’ is, again, split into two parts but is structured
differently:
■
Part one (‘192.168’) identifies the network on which the
device resides.
■
Part two (‘.100.8’) identifies the device within the network.
This type of IP Address operates on a subnet mask of
‘255.255.0.0’.
See Ta bl e 4
for an example about how a network (only four PCs
represented) and a Network Storage Server might be configured.
Ta b l e 4
IP Addressing and Subnet Masking
Device IP Address Subnet Mask
PC 1
192.168.100.8 255.255.255.0
PC 2
192.168.100.33 255.255.255.0
PC 3
192.168.100.188 255.255.255.0
Network Storage
Server
192.168.100.72 255.255.255.0
192.168.100 .8
Network
Address
Device
Number
Device IP Address Subnet Mask
PC 1
192.168.100.8 255.255.0.0
PC 2
192.168.201.30 255.255.0.0
PC 3
192.168.113.155 255.255.0.0
PC 4
192.168.002.230 255.255.0.0
Network Storage
Server
192.168.002.72 255.255.0.0
192.168 .100.8
Network
Address
Device
Number
Page 29

29
How does a Device Obtain an IP Address and
Subnet Mask?
There are three different ways to obtain an IP address and the
subnet mask. These are:
■
Dynamic Host Configuration Protocol (DHCP) Addressing
■
Static Addressing
■
Automatic Addressing (Auto-IP Addressing)
DHCP Addressing
If your network contains a DHCP server, the Network Storage
Server will obtain an IP address and subnet mask automatically.
DHCP assigns a temporary IP address and subnet mask which
gets reallocated once you disconnect from the network.
DHCP will work on any client Operating System such as
Windows
®
95, Windows 98 or Windows NT 4.0. Also, using
DHCP means that the same IP address and subnet mask will
never be duplicated for devices on the network. DHCP is
particularly useful for networks with large numbers of users on
them.
Static Addressing
You must enter an IP Address and the subnet mask manually on
every device. Using a static IP and subnet mask means the
address is permanently fixed.
Auto-IP Addressing
Network devices use automatic IP addressing if they are
configured to acquire an address using DHCP but are unable to
contact a DHCP server. Automatic IP addressing is a scheme
where devices allocate themselves an IP address at random from
the industry standard subnet of 169.254.x.x (with a subnet mask
of 255.255.0.0). If two devices allocate themselves the same
address, the conflict is detected and one of the devices allocates
itself a new address.
Automatic IP addressing support was introduced by Microsoft in
the Windows 98 operating system and is also supported in
Windows 2000.
Page 30

30
T
ROUBLESHOOTING
This chapter has been designed to help you detect and solve
possible problems with the Network Storage Server. If you cannot
find the solution to the problem in this chapter, please contact
Technical Support (see page 40
for details).
This section uses the term ‘adapter’ when referring to network
interface cards (NICs), network interface adapters or personal
computer (PC) cards.
Spot Checks
If you have trouble making a connection between a PC and the
Network Storage Server, the first precautionary check is to
examine the connecting cables. It is quite possible that the cable
might be:
■
Disconnected — check that the ends are securely connected
between the computer, the Hub and the Network Storage
Server.
■
The wrong type — one common mistake is to use telephone
cables. Ensure you use straight-through Twisted Pair cables.
■
Broken — replace the cable with one you know to be
working.
If the problem has not been resolved, make sure:
■
That all equipment is switched on.
■
The cable connections between the computer, the Hub and
the Network Storage Server are in order.
■
The adapter card is correctly inserted into your computer.
■
The adapter card is correctly configured on your computer.
■
The adapter drivers are the latest version on your computer.
■
The Network Storage Server has been mapped to a local
drive.
■
The device can actually be found by using the ’Find’ facility.
Once you have made these checks, reboot the Network Storage
Server. See page 14
for details.
Power LED is Off
If there is no power, check your power adapter connection. If
there is still no power, you may have a faulty power adapter that
needs replacing. If you need to replace it, make sure it is with
the model manufactured by 3Com (part number 3C16749). Do
not use any other power adapter with the Network Storage
Server.
Alert LEDs
When the Alert LED is activated, there is a possible problem with
the Network Storage Server. Check the Alert status, on the Status
Section in the Administration System, to determine the problem.
The Alert LED will flash when:
■
The Hard Disk is full. If this happens you will either have to
add another Network Storage Server to your network or
delete some of the data from the Hard Disk.
■
The Network Storage Server is too hot. If this happens, the
Network Storage Server should automatically adjust its
performance and cool down. Check the environmental
surroundings, as the Network Storage Server is designed to
operate at a maximum temperature of 40 °C. If it does not
cool down after this, contact Technical Support.
Page 31

31
The Alert LED will appear permanently on when there is a
problem with the Hard Disk. The Alert LED will be accompanied
by a sequence of LEDs lit on the Disk Space Used LEDs.
If either of the Alerts below occur (see Figure 7
and Figure 8),
contact Technical Support.
Figure 7
Hard Disk Failure
Figure 8
Incorrect Hard Disk Imaging
LAN LEDs are Off
The LAN LED(s) may be off because there is no equipment (cables
or devices) connected to the LAN port or there is a problem with
the connected equipment. Check:
■
The power supply is connected to the Network Storage
Server, the Hubs and computers and check that their power is
on.
■
The cable connection into the LAN port is secure. Also check
that the connections between the Hub and the computers on
the network are secure. If there is still a problem, replace the
cable with a known working cable.
■
The cabling follows the correct specification. See “Ethernet
Performance” on page 39 for more information.
■
The adapter is correctly installed and is not faulty. Refer to the
User Guide that accompanies your adapter for more
information.
Network Appears Slow
If you experience a slow response time on the network, refer to
the “Spot Checks”
section on page 30. If this does not solve
your problem, it is possible that:
■
The computer does not have enough processing or memory
resources for the type of work the User wants to perform.
■
Other Users may also be opening, editing and saving Shared
files on your computer.
■
There is a duplex mismatch. Check that the Network Storage
Server’s Ethernet duplex status (located on the Status page in
the Administration System) is the same as the Hub or Switch
it is plugged into.
20% 40% 60% 80% 90%
Alert
95%
Disk Space Used
= ON
20% 40% 60% 80% 90%
Alert
95%
Disk Space Used
= ON
Page 32

32
Cannot Access Files on the Network Storage
Server
If the Network Storage Server can be seen on the network, but
cannot be accessed, check that:
■
The computer has been mapped to the Network Storage
Server.
■
The Share has been set up for sharing and is not password
protected.
Cannot Access the Administration System
If this happens, check that:
■
The cables connecting the computer, the Hub or the Network
Storage Server are not loose or damaged.
■
You are running Microsoft Internet Explorer 4.0 (or above) or
Netscape Navigator 4.5 (or above) as your Web browser.
■
The IP Address is on the correct subnet by running the
Discovery Application.
Forgotten Administration System Password
If you forget your Login password to the Administration System,
you can reset the password to its default setting. Restart the
Network Storage Server in Failsafe Mode and reset the password
to admin. See the “Failsafe Mode”
section on page 21 for
further information.
Installation Problems
TCP/IP Protocol Required
If during installation, the Discovery Application displays an error
message that reads TCP/IP Protocol Required, TCP/IP must be
installed on your PC. To install TCP/IP, follow the instructions
below.
From the task bar at the bottom of your screen, select:
1
Start, Settings and then Control Panel.
2
Double-click the Network icon from the Control Panel window.
3
Select the Configuration tab when the Network window opens.
4
Click Add.
5
Select Protocol from the list that appears in the window.
6
Click Add.
A window titled Select Network Protocol should appear. There
are two lists inside this window.
7
Select Microsoft from the Manufacturers list.
8
Select TCP/IP from the Network Protocols list.
9
Click OK.
10
Select TCP/IP from the list on the Configuration tab.
11
Click OK.
If you need further information about setting up TCP/IP on your
PC, refer to the ‘Using Your Network’ section contained in the
OfficeConnect Network Assistant CD-ROM that accompanies this
product.
Page 33

33
No Servers Found
If during installation, the Discovery Application displays an error
message that reads ‘No Server Found’, follow the procedure
below to determine the possible cause.
1
Check that the PC running the Discovery Application has access
to the network. Open Network Neighborhood and look for other
computers.
2
Check the basic network requirements as described in the “Spot
Checks” section on page 30.
3
Check that the Network Storage Server is fully powered up and
that the LEDs are in normal status. See the section about the
“LED Functions” on page 11
.
4
Check the Alert LED on the front of the Network Storage Server
is not activated. See the section about the “Alert LEDs” on
page 30.
5
Check that the LAN 10 Mbps or 100 Mbps Link Status LED is ON
and the Hub or Switch at the other end of the cable indicates
the same Link connection speed. If not, see the section called
“LAN LEDs are Off” on page 31
.
6
Check that a Router is not installed between the PC running the
Discovery Application and the Network Storage Server. Remove
the Router if one is installed.
7
Restart the Network Storage Server and check the LEDs are in
normal status. See the section about the “LED Functions” on
page 11.
If the Discovery Application still cannot find the Network Storage
Server, contact Technical Support.
Problems Running the OfficeConnect Server Discovery
Application
Users of Windows 95 and Windows NT, who have not upgraded
from Internet Explorer Version 3, may encounter problems when
running the OfficeConnect Server Discovery Application. These
problems, if they occur, can be fixed by installing Internet
Explorer Version 4 or later. Installing Netscape will not solve these
problems.
Cannot Access the Failsafe Mode
If you cannot access the Failsafe Mode, check that:
■
The correct URL address has been entered into the Web
browser. See page 21
for details.
■
The URL has been entered in lower case into the Web
browser. The URL is case-sensitive and will not accept capital
letters.
■
The Shutdown button has been pressed and held in as you
power up the Network Storage Server. The Shutdown button
should be depressed until the Power LED appears.
Page 34

34
F
REQUENTLY
A
SKED
Q
UESTIONS
Q. Can I connect more than one Network Storage Server in
the same network?
A. Yes. Provided you have a spare Ethernet or Fast Ethernet port
on your Hub or Switch, you can connect as many Network
Storage Servers as required.
Q. Can I connect Network Storage Servers together to
increase storage capacity?
A. No. The Network Storage Server is designed to plug directly
into a Hub or a Switch. However, the number of Network
Storage Servers you can put on the network is unlimited,
provided you have a spare port on your Hub or Switch for each
one.
Q. Can I access the Administration System from any PC on
the network?
A. Yes. Enter the Administration System, as described on
page 16
, and Login as usual. The Network Storage Server will
recognize your Login password and grant you access.
Q. Can Users access a mapped network drive on the
Network Storage Sever across a router?
A. Yes, provided the drive has been mapped to the IP address of
the Network Storage Server (e.g. \\192.168.1.21\Public). To do
this, use Start, Find, Computer to find the Network Storage
Server using its IP address (instead of its name) then map a drive
to one of the Shares. For more information on mapping a drive,
see page 15
.
Q. Can the Network Storage Server’s Administration
System be accessed remotely?
A. Yes, provided the IP address is entered as the URL in the Web
Browser (e.g. http://192.168.1.21/).
Q. Who can access the Administration System?
A. Anyone using the Network Storage Server can access the
Administration System, provided they have a Web browser
installed on their PC and are connected to the network. See the
“Administration System” section on page 16
for more
information.
Q. What happens if the Hard Disk on my Network Storage
Server runs out of space?
A. If the Hard Disk on your Network Storage Server runs out of
space, you must add another Network Storage Server to your
network or remove some of the data from the Hard Disk.
Q. What happens if I forget my admin login password?
A. Reboot the Network Storage Server to Failsafe Mode and reset
the password to its default setting. See page 21
for further
details on the “Failsafe Mode”.
Q. Do I ever need to shutdown my Network Storage
Server?
A. The only time you should shutdown your Network Storage
Server is if you have to replace the Hard Disk or need to relocate
the Unit.
Q. What happens to the network if I reboot the Network
Storage Server?
A. The network remains unaffected, however, the files that Users
may be working on at the time might get corrupted or lost.
Q. What happens to the data on the Network Storage
Server if the Hard Disk fails? Is it backed-up anywhere?
A. If you have not backed up the data on your Hard Disk and it
fails, you might want try and retrieve the data by using a specific
Page 35

35
data recovery agency. 3Com recommends you make regular
backups of the data. See page 23
for further information.
Q. What if the installation process goes wrong?
A. Try reinstalling the Network Storage Server using the
OfficeConnect Server Discovery Application. See the “Quick
Installation Guide” (DIA1950-0AAA0x) that accompanies this
User Guide. If problems persist, see the “Troubleshooting”
section on page 30
.
Q. Does the Network Storage Server permit long file
names?
A. Yes, up to 249 characters.
Q. Can I partition a Network Storage Server’s Hard Disk?
A. No. A Hard Disk cannot be partitioned, however, a Share can
be created for a User with access restrictions imposed on it.
Q. How much storage space does the Network Storage
Server actually have?
A. Although the Network Storage Server has a 20 GB or 40 GB
Hard Disk installed, the actual storage space might be marginally
less than that specified as the Network Storage Server’s
configuration settings and Operating System are stored on the
Hard Disk.
Q. Will the Network Storage Server operate as a
stand-alone storage device?
A. Yes. Although the Network Storage Server is designed to be
used across a network, it can also be used as a stand-alone
storage device for your PC. To use it as a stand-alone, just
connect a crossover cable between the Network Storage Server
and the adapter card installed on your PC.
Q. Why does Windows 95 report the Hard Disk capacity as
1.99 GB?
A. Disk ‘Properties’ reported from Windows Explorer are incorrect
for larger hard drive storage. This is a known limitation of
Windows 95 as it cannot detect hard disk storage greater than
2GB.
Q. Why are the old Share names still visible in Network
Neighborhood even though they have been modified of
deleted?
A. This is due to the Windows machines not correctly refreshing
the display in Network Neighborhood to show the changed state
of the Share. In order to update the display, reboot your PC and
the old Share name should disappear.
Q. Why do my Windows NT PCs appear to copy files
quicker than Windows 95 or Windows 98 PCs?
A. Windows NT appears to make better use of a network’s
capacity than Windows 95 or Windows 98, which explains why
Windows NT is faster at file transfer.
Q. Why does the Network Storage Server take a long time
to restart?
A. It is possible the Network Storage Server lost its power supply
which resulted in the Unit being abnormally terminated. When
the Network Storage Server reboots, it runs an extensive disk
check to ensure that no data corruption occurred as a result of
the power failure.
Page 36

36
S
AFETY INFORMATION
Safety Information
WARNING:
Warnings contain directions that you must follow for
your personal safety. Follow all directions carefully. You must read
the following safety information carefully before you install or
remove the unit:
■
Exceptional care must be taken during installation and
removal of the unit.
■
Only stack the OfficeConnect Network Storage Server with
other OfficeConnect units.
■
To ensure compliance with international safety standards, only
use the power adapter that is supplied with the unit.
■
The socket outlet must be near to the unit and easily
accessible. You can only remove power from the unit by
disconnecting the power adaptor from the outlet.
■
This unit operates under SELV (Safety Extra Low Voltage)
conditions according to IEC 60950. The conditions are only
maintained if the equipment to which it is connected also
operates under SELV conditions.
■
Disconnect the power adapter before moving the unit.
WARNING: RJ-45 port.
This is a shielded RJ-45 data socket. It
cannot be used as a telephone socket. Only connect an RJ-45
data connector to this socket.
Wichtige Sicherheitshinweise
WARNHINWEIS:
Warnhinweise enthalten Anweisungen, die Sie
zu Ihrer eigenen Sicherheit befolgen müssen. Alle Anweisungen
sind sorgfältig zu befolgen. Sie müssen die folgenden
Sicherheitsinformationen sorgfältig durchlesen, bevor Sie das
Geräts installieren oder ausbauen:
■
Bei der Installation und beim Ausbau des Geräts ist mit
höchster Vorsicht vorzugehen.
■
Verwenden Sie den OfficeConnect Network Storage Server
nur mit anderen OfficeConnect-Einheiten.
■
Aufgrund von internationalen Sicherheitsnormen darf das
Gerät nur mit dem mitgelieferten Netzadapter verwendet
werden.
■
Die Netzsteckdose muß in der Nähe des Geräts und leicht
zugänglich sein. Die Stromversorgung des Geräts kann nur
durch Herausziehen des Gerätenetzkabels aus der
Netzsteckdose unterbrochen werden.
■
Der Betrieb dieses Geräts erfolgt unter den SELV-Bedingungen
(Sicherheitskleinstspannung) gemäß IEC 60950. Diese
Bedingungen sind nur gegeben, wenn auch die an das Gerät
angeschlossenen Geräte unter SELV-Bedingungen betrieben
werden.
■
Vor d em Ausbau des Geräts das Netzadapterkabel
herausziehen.
WARNHINWEIS:
RJ-45-port
.
Hierbei handelt es sich um eine
abgeschirmte RJ-45 Datenbuchse. Sie darf nicht als
Telefonanschluß verwendet werden. Stecken Sie ausschließlich
einen Datenstecker des Typs RJ-45 in diese Buchse.
Page 37

37
Consignes importantes de sécurité
AVERTISSEMENT:
Les avertissements présentent des consignes
que vous devez respecter pour garantir votre sécurité
personnelle. Vous devez respecter attentivement toutes les
consignes. Nous vous demandons de lire attentivement les
consignes suivantes de sécurité avant d’installer ou de retirer
l’appareil:
■
Faites très attention lors de l'installation et de la dépose du
groupe.
■
Empilez le serveur de programmes de mémoire sur réseau
OfficeConnect uniquement avec d'autres unités
OfficeConnect.
■
Pour garantir le respect des normes internationales de
sécurité, utilisez uniquement l'adaptateur électrique remis
avec cet appareil.
■
La prise secteur doit se trouver à proximité de l’appareil et son
accès doit être facile. Vous ne pouvez mettre l’appareil hors
circuit qu'en débranchant son cordon électrique au niveau de
cette prise.
■
L’appareil fonctionne à une tension extrêmement basse de
sécurité qui est conforme à la norme CEI 60950. Ces
conditions ne sont maintenues que si l'équipement auquel il
est raccordé fonctionne dans les mêmes conditions.
■
Débranchez l'adaptateur électrique avant de retirer cet
appareil.
AVERTISSEMENT: port de données RJ-45.
Il s'agit d'une prise
de données RJ-45 blindée, qui ne peut pas être utilisée comme
prise téléphonique. Raccordez uniquement un connecteur de
données RJ-45 à cette prise.
Page 38

38
T
ECHNICAL
S
PECIFICATIONS
This section lists the technical specifications for the OfficeConnect
Network Storage Server.
Interfaces
Ethernet/Fast Ethernet — 1 for the Network Storage Server
Operating Temperature
0 °C to 40 °C (32 °F to 105 °F)
Power
12V DC OfficeConnect Power Adapter
Humidity
0 % to 90 % (non-condensing) humidity
Dimensions
■
Width = 228 mm (9.12 in.)
■
Depth = 191 mm (7.64 in.)
■
Height = 55 mm (2.2 in.)
Weight
Approximately 1.75 Kg (3.83 lbs)
Standards
Functional: ISO 8802/3
IEEE 802.3
Safety: UL 1950, EN 60950
CSA 22.2 #950
IEC 60950
EMC: EN 55022 Class B
†
EN 55024
AS/NZS 3548 B
†
FCC Part 15 Class B†*
ICES-003 Class B
†
VCCI Class B
†
CNS 13438 Class A
Environmental: EN 60068 (IEC 68)
†
Category 5 screened cables must be used to ensure compliance
with the Class B requirements of this standard. The use of
unscreened cables (Category 3 or Category 5) complies with the
Class A requirements.
*See “Regulatory Notices” on page 51
on for conditions of
operation.
Page 39

39
System Requirements
Operating Systems
The Network Storage Server will support the following Operating
Systems:
■
Windows 95a
■
Windows 95b
■
Windows 95b Version 2.5
■
Windows 98
■
Windows 98 Second Edition (SE)
■
Windows NT 4.0 (Service Pack 4.0 and later)
Ethernet Performance
The Network Storage Server complies to the IEEE 802.3i, u and x
specifications.
Cable Specifications
The Network Storage Server supports the following cable types
and maximum lengths:
■
Category 3 (Ethernet) or Category 5 (Fast Ethernet or Dual
Speed Ethernet) Twisted Pair — shielded and unshielded cable
types.
■
Maximum cable length of 100m (327.86 ft).
Pinout Diagrams
Figure 9 shows the pinout connections for twisted pair cable.
Figure 9
Twisted Pair Pinouts
1
Normal
port
Pin Pin
Uplink
port
Rx+
Rx-
Tx+
Tx-
Tx+
Tx-
Rx+
Rx-
2
3
4
5
6
7
8
1
2
3
4
5
6
7
8
1
Normal
port
Pin Pin
Normal
port
Rx+
Rx-
Tx+
Tx-
Rx+
Rx-
Tx+
Tx-
2
3
4
5
6
7
8
1
2
3
4
5
6
7
8
Straight-through
Crossover
Page 40

40
T
ECHNICAL
S
UPPORT
3Com provides easy access to technical support information
through a variety of services. This section describes these services.
Information contained in this section is correct at time of
publication. For the most recent information, 3Com recommends
that you access the 3Com Corporation World Wide Web site.
Online Technical Services
3Com offers worldwide product support 24 hours a day, 7 days a
week, through the following online systems:
■
World Wide Web site
■
3Com Knowledgebase Web Services
■
3Com FTP site
World Wide Web Site
To access the latest networking information on the
3Com Corporation World Wide Web site, enter this URL into
your Internet browser:
http://www.3com.com/
This service provides access to online support information such as
technical documentation and software, as well as support
options that range from technical education to maintenance and
professional services.
3Com Knowledgebase Web Services
This interactive tool contains technical product information
compiled by 3Com expert technical engineers around the globe.
Located on the World Wide Web at
http://knowledgebase.3com.com
, this service gives all
3Com customers and partners complementary, round-the-clock
access to technical information on most 3Com products.
3Com FTP Site
Download drivers, patches, software, and MIBs across the
Internet from the 3Com public FTP site. This service is available
24 hours a day, 7 days a week.
To connect to the 3Com FTP site, enter the following information
into your FTP client:
■
Hostname:
ftp.3com.com
■
Username:
anonymous
■
Password:
<your Internet e-mail address>
You do not need a User name and password with Web browser
software such as Netscape Navigator and Internet Explorer.
Page 41

41
Support from Your Network Supplier
If you require additional assistance, contact your network
supplier. Many suppliers are authorized 3Com service partners
who are qualified to provide a variety of services, including
network planning, installation, hardware maintenance,
application training, and support services.
When you contact your network supplier for assistance, have the
following information ready:
■
Product model name, part number, and serial number
■
A list of system hardware and software, including revision
levels
■
Diagnostic error messages
■
Details about recent configuration changes, if applicable
If you are unable to contact your network supplier, see the
following section on how to contact 3Com.
Support from 3Com
If you are unable to obtain assistance from the 3Com online
technical resources or from your network supplier, 3Com offers
technical telephone support services. To find out more about
your support options, call the 3Com technical telephone support
number at the location nearest to you.
When you contact 3Com for assistance, have the following information ready:
■
Product model name, part number, and serial number
■
A list of system hardware and software, including revision
levels
■
Diagnostic error messages
■
Details about recent configuration changes, if applicable
Here is a list of worldwide technical telephone support numbers:
Page 42

42
Table 5
Worldwide Technical Support Telephone Numbers
Country Telephone Number
Asia, Pacific Rim
Australia
Hong Kong
India
Indonesia
Japan
Malaysia
New Zealand
Pakistan
Philippines
P.R . o f C h i n a
Singapore
S. Korea:
From anywhere in
S. Korea:
From Seoul:
Taiw a n, R. O .C.
Thailand
1 800 678 515
800 933 486
+61 2 9937 5085
001 800 61 009
0531 61 6439
1800 801 777
0800 446 398
+61 2 9937 5083
1235 61 266 2602
10800 61 00137 or
021 6350 1590
800 6161 463
82 2 3455 6455
00798 611 2230
00798 611 2230
0080 611 261
001 800 611 2000
Europe
From anywhere in Europe, call:
+31(0)30 6029900 phone
+31(0)30 6054396 fax
Europe, South Africa, and Middle East
From the following countries, you may use the toll-free numbers:
Austria
Belgium
Denmark
Finland
France
Germany
Hungary
Ireland
Israel
Italy
Luxembourg
Middle East
Netherlands
Norway
Poland
Portugal
Russia
South Africa
Spain
Sweden
Switzerland
U.K.
0800 297468
0800 71429
800 17309
0800 113153
0800 917959
0800 1821502
06800 12813
1800 553117
1800 9453794
1678 79489
0800 3625
1800 945 3794
0800 0227788
800 11376
00800 3111206
0800 831416
0800 995014
0800 995014
900 983125
020 795482
0800 55 3072
0800 966197
(continued)
Latin America
Argentina
Brazil
Colombia
Mexico
Puerto Rico
South America
5411 4510 3200
0800 13 3266
517 629 4827
01 800 CARE (01 800 2273)
800 666 5065
1800 666 5065
North America
1 800 NET 3Com (1 800 638 3266)
Enterprise Customers: 1 800 876 3266
Ta b l e 5
Worldwide Technical Support Telephone Numbers (continued)
Country Telephone Number
Page 43

43
Returning Products for Repair
Before you send a product directly to 3Com for repair, you must
first obtain an authorization number. Products sent to 3Com
without authorization numbers will be returned to the sender
unopened, at the sender’s expense.
To obtain an authorization number, call or fax:
Table 6
Obtaining Authorization Numbers
Country Telephone Number Fax Number
Asia, Pacific Rim +65 543 6500 +65 543 6348
Brazil 5511 523 2725
Europe, South Africa,
and Middle East
+ 31 30 6029900 + 31 30 6029999
Central and South
America
525 201 0075
From the following countries, you may call the toll-free numbers; select
option 2 and then option 2:
Austria
Belgium
Denmark
Finland
France
Germany
Hungary
Ireland
Israel
Italy
Netherlands
Norway
Poland
Portugal
South Africa
Spain
Sweden
Switzerland
U.K.
0800 297468
0800 71429
800 17309
0800 113153
0800 917959
0800 1821502
00800 12813
1800 553117
1800 9453794
1678 79489
0800 0227788
800 11376
00800 3111206
0800 831416
0800 995014
900 983125
020 795482
0800 55 3072
0800 966197
U.S.A. and Canada 1 800 NET 3Com
(1 800 638 3266)
Enterprise Customers:
1 800 876 3266
1 408 326 7120
(not toll-free)
Page 44

44
G
LOSSARY
10BASE-T
The IEEE specification for 10 Mbps Ethernet over
Category 3, 4 or 5 twisted pair cable.
100BASE-TX
The IEEE specification for 100 Mbps Fast Ethernet
over Category 5 twisted-pair cable.
Auto-IP (Automatic-IP)
Auto-IP addressing occurs when a
device on the network allocates an IP address to itself.
Auto-negotiation
Some devices in the OfficeConnect range
support auto-negotiation. Auto-negotiation is where two devices
sharing a link, automatically configure to use the best common
speed. The order of preference (best first) is: 100BASE-TX full
duplex, 100BASE-TX half duplex, 10BASE-T full duplex, and
10BASE-T half duplex. Auto-negotiation is defined in the IEEE
802.3 standard for Ethernet and is an operation that takes place
in a few milliseconds.
Bandwidth
The information capacity, measured in bits per
second, that a channel can transmit. The bandwidth of Ethernet
is 10 Mbps, the bandwidth of Fast Ethernet is 100 Mbps.
Bridge
A device that interconnects two LANs of a different type
to form a single logical network that comprises of two network
segments. Bridges learn which endstations are on which network
segment by examining the source addresses of packets. They
then use this information to forward packets based on their
destination address. This process is known as filtering.
Broadcast
A packet sent to all devices on a network.
Category 3 Cables
One of five grades of Twisted Pair (TP)
cabling defined by the EIA/TIA-586 standard. Category 3 is voice
grade cable and can only be used in Ethernet networks
(10BASE-T) to transmit data at speeds of up to 10 Mbps.
Category 5 Cables
One of five grades of Twisted Pair (TP)
cabling defined by the EIA/TIA-586 standard. Category 5 can be
used in Ethernet (10BASE-T) and Fast Ethernet networks
(100BASE-TX) and can transmit data up to speeds of 100 Mbps.
Category 5 cabling is better to use for network cabling than
Category 3, because it supports both Ethernet (10 Mbps) and
Fast Ethernet (100 Mbps) speeds.
Client
A computer, printer or server that is connected to a
network.
DHCP (Dynamic Host Configuration Protocol)
Windows 95,
Windows 98 and Windows NT 4.0 contain software that assigns
IP addresses to workstations on a network. These assignments
are made by the DHCP server software that runs on Windows NT
Server, and Windows 95 and Windows 98 will call the server to
obtain the address. Windows 98 will allocate itself an address if
no DHCP server can be found.
Dual Speed Hub
A dual speed hub is a device that supports
both Ethernet and Fast Ethernet technologies. Each port can be
connected to either an Ethernet or a Fast Ethernet device. Each
port automatically senses the speed of the connected device and
operates at the highest speed possible.
Endstation
See
Client
.
Ethernet
A LAN specification developed jointly by Xerox, Intel
and Digital Equipment Corporation. Ethernet networks use
CSMA/CD to transmit packets at a rate of 10 Mbps over a variety
of cables.
Ethernet Address
See MAC address.
Page 45

45
Fast Ethernet
An Ethernet system that is designed to operate at
100 Mbps.
GB
Gigabyte.
Group
A Group sets up multiple access rights for a cluster of
Users for a specific Share on the Network Storage Server’s
Administration System.
Full Duplex
A system that allows packets to be transmitted and
received at the same time and, in effect, doubles the potential
throughput of a link.
Half Duplex
A system that allows packets to transmitted and
received, but not at the same time. Contrast with full duplex.
Hub
A device that regenerates LAN traffic so that the
transmission distance of that signal can be extended. Hubs are
similar to repeaters, in that they connect LANs of the same type;
however they connect more LANs than a repeater and are
generally more sophisticated.
Hostname
This is the name assigned to the Network Storage
Server upon initial installation.
IEEE (Institute of Electrical and Electronics Engineers)
This
American organization was founded in 1963 and sets standards
for computers and communications.
IETF (Internet Engineering Task Force)
An organization
responsible for providing engineering solutions for TCP/IP
networks. In the network management area, this group is
responsible for the development of the SNMP protocol.
IP (Internet Protocol)
IP is a layer 3 network protocol that is the
standard for sending data through a network. IP is part of the
TCP/IP set of protocols that describe the routing of packets to
addressed devices. An IP address consists of 32 bits divided into
two or three fields: a network number and a host number or a
network number, a subnet number, and a host number.
IP Address (Internet Protocol Address)
A unique identifier for
a device attached to a network using TCP/IP. The address is
written as four octets separated with periods (full-stops), and is
made up of a network section, an optional subnet section and a
host section.
LAN (Local Area Network)
A network of endstations (such as
PCs, printers, servers) and network devices (hubs and switches)
that cover a relatively small geographic area (usually not larger
than a floor or building). LANs are characterized by high
transmission speeds over short distances (up to 1000 metres).
Loop
An event that occurs when two network devices are
connected by more than one path, thereby causing packets to
repeatedly cycle around the network and not reach their
destination.
MAC (Media Access Control)
A protocol specified by the IEEE
for determining which devices have access to a network at any
one time.
MAC Address (Media Access Control Address)
Also called the
hardware or physical address. A layer 2 address associated with a
particular network device. Most devices that connect to a LAN
have a MAC address assigned to them as they are used to
identify other devices in a network. MAC addresses are 6 bytes
long.
Page 46

46
Modem (MOdulator-DEModulator)
A device that adapts a
computer's digital signal into audio frequencies (analog) for
transmission down a telephone line, and changes them back
again. Transmission speeds of modems generally range from
2,400 bps (2.4 Kbps) to 56,000 bps (56 Kbps).
Multicast
A packet sent to a specific group of endstations on a
network.
Network
A Network is a collection of computers and other
computer equipment that are connected for the purpose of
exchanging information or sharing resources. Networks vary in
size, some are within a single room, others span continents.
Network Interface Card (NIC)
A circuit board installed into a
piece of computing equipment, for example, a computer, that
enables you to connect it to the network. A NIC is also known as
an adapter or adapter card.
Network Loops
Your network will not work if it has a network
loop in it. This occurs when two pieces of network equipment
are connected by more than one path, thereby causing packets
to repeatedly cycle round and round the network and not reach
their destination.
PC Card
The Personal Computer Memory Card International
Association (PCMCIA) was set up in 1989 to standardize a
method for connecting equipment to portable computers. The
PCMCIA created a 16-bit socket into which credit card-sized
cards are plugged: these are commonly known as PC cards. The
ports on these cards attach, for example, modems, sound cards
and hard disks to portable computers.
POST (Power On Self Test)
An internal test that a device carries
out when it is powered-up.
Protocol
A set of rules for communication between devices on a
network. The rules dictate format, timing, sequencing and error
control.
RJ-45
A standard connector used to connect Ethernet networks.
The "RJ" stands for "registered jack".
Router
A device that provides WAN links between geographically
separate networks.
Share
A Share is a directory on the Network Storage Server that
can be accessed by multiple Users.
Segment
A section of a LAN that is connected to the rest of the
network using a switch or bridge.
Server
A computer in a network that is shared by multiple
endstations. Servers provide endstations with access to shared
network services such as computer files and printer queues.
SNMP (Simple Network Management Protocol)
The current
IETF standard protocol for managing devices on an TCP/IP
network.
Stack
A group of network devices that are integrated to form a
single logical device.
Subnet Address
An extension of the IP addressing scheme that
allows a site to use a single IP network address for multiple
physical networks.
Page 47

47
Subnet Mask
A subnet mask is a term used to indicate how
much of an IP address is used to identify the network. An IP
address has two parts, the first identifies the network and the
second identifies the machine or PC on the network.
Subnets
A network that is a component of a larger network.
Switch
A device that interconnects several LANs to form a single
logical LAN that comprises of several LAN segments. Switches are
similar to bridges, in that they connect LANs of a different type;
however they connect more LANs than a bridge and are
generally more sophisticated.
TCP/IP (Transmission Control Protocol/Internet Protocol)
This
is the name for two of the most well-known protocols developed
for the interconnection of networks. Originally a UNIX standard,
TCP/IP is now supported on almost all platforms, and is the
protocol of the Internet.
TCP relates to the content of the data travelling through a
network — ensuring that the information sent arrives in one
piece when it reaches its destination. IP relates to the address of
the endstation to which data is being sent, as well as the address
of the destination network.
Tra ffi c
The movement of data packets on a network.
Unicast
A packet sent to a single endstation on a network.
User
A User is a person either connected to the network or
setup on the Network Storage Server’s Administration System.
Wizard
A Windows application that automates a procedure such
as installation or configuration.
Page 48

48
3C
OM
C
ORPORATION LIMITED
W
ARRANTY
This warranty applies to customers located in the United States, Australia, Canada (except
Quebec), Ireland, New Zealand, U.K., and other English language countries, and countries
for which a translation into the local language is not provided.
OfficeConnect Network Storage Server 20 (3C19500)
OfficeConnect Network Storage Server 40 (3C19501)
HARDWARE
3Com warrants to the end user ("Customer") that this hardware product will be free from
defects in workmanship and materials, under normal use and service, for the following
length of time from the date of purchase from 3Com or its authorized reseller:
Lifetime, for as long as the original Customer owns the product (not transferable to a
subsequent end user)
3Com's sole obligation under this express warranty shall be, at 3Com's option and
expense, to repair the defective product or part, deliver to Customer an equivalent
product or part to replace the defective item, or if neither of the two foregoing options is
reasonably available, 3Com may, in its sole discretion, refund to Customer the purchase
price paid for the defective product. All products that are replaced will become the
property of 3Com. Replacement products or parts may be new or reconditioned. 3Com
warrants any replaced or repaired product or part for ninety (90) days from shipment, or
the remainder of the initial warranty period, whichever is longer.
SOFTWARE
3Com warrants to Customer that each software prog ram licensed from it, excep t as noted
below, will perform in substantial conformance to its program specifications, for a period
of ninety (90) days from the date of purchase from 3Com or its authorized reseller. 3Com
warrants the media containing software against failure during the warranty period. No
updates are provided, unless specifically included in the Included Services section. 3Com's
sole obligation under this express warranty shall be, at 3Com's option and expense, to
refund the purchase price paid by Customer for any defective software product, or to
replace any defective media with software which substantially conforms to applicable
3Com published specifications. Customer assumes responsibility for the selection of the
appropriate applications program and associated reference materials. 3Com makes no
warranty or representation that its software products will meet Customer's requirements
or work in combination with any hardware or applications software products provided by
third parties, that the operation of the software products will be uninterrupted or error
free, or that all defects in the software products will be corrected. For any third party
products listed in the 3Com software product documentation or specifications as being
compatible, 3Com will make reasonable efforts to provide compatibility, except where the
non-compatibility is caused by a "bug" or defect in the third party's product or from use
of the software product not in accordance with 3Com's published specifications or user
manual.
THIS 3COM PRODUCT MAY INCLUDE OR BE BUNDLED WITH (1) THIRD PARTY
SOFTWARE, OR (2) 3COM SOFTWARE THAT IS LICENSED "AS IS", THE USE OF WHICH IS
GOVERNED BY A SEPARATE END USER LICENSE AGREEMENT. THIS 3COM WARRANTY
DOES NOT APPLY TO SUCH THIRD PARTY SOFTWARE OR 3COM SOFTWARE LICENSED
"AS IS". FOR THE APPLICABLE WARRANTY, PLEASE REFER TO THE END USER LICENSE
AGREEMENT GOVERNING THE USE OF SUCH SOFTWARE OR THE ACCOMPANYING
DOCUMENTATION RELATING TO SUCH SOFTWARE.
YEAR 2000 WARRANTY
In addition to the Hardware Warranty and Software Warranty stated above, 3Com
warrants that each product sold or licensed to Customer on and after January 1, 1998
that is date sensitive will continue performing properly with regard to such date data on
and after January 1, 2000, provided that all other products used by Customer in
connection or combination with the 3Com product, including hardware, software, and
firmware, accurately exchange date data with the 3Com product, with the exception of
those products identified at 3Com's Web site,
http://www.3com.com/products/yr2000.html, as not meeting this standard. If it appears
that any product that is stated to meet this standard does not perform properly with
regard to such date data on and after January 1, 2000, and Customer notifies 3Com
within ninety (90) days after purchase of the product from 3Com or its authorized reseller,
3Com shall, at its option and expense, provide a software update which would effect the
proper performance of such product, repair such product, deliver to Customer an
equivalent product to replace such product, or if none of the foregoing is feasible, refund
to Customer the purchase price paid for such product.
Any software update or replaced or repaired product will carry a Year 2000 Warranty for
ninety (90) days after purchase.
OBTAINING WARRANTY SERVICE
Customer must contact a 3Com Corporate Service Center or an Authorized 3Com Service
Center within the applicable warranty period to obtain warranty service authorization.
Dated proof of purchase from 3Com or its authorized reseller may be required. Products
returned to 3Com's Corporate Service Center must be pre-authorized by 3Com with a
User Service Order (USO) number (or a Return Material Authorization (RMA) number or a
Service Repair Order (SRO) number, whichever was issued) marked on the outside of the
package, and sent prepaid and packaged appropriately for safe shipment, and it is
recommended that they be insured or sent by a method that provides for tracking of the
package. Responsibility for loss or damage does not transfer to 3Com until the returned
item is received by 3Com. The repaired or replaced item will be shipped to Customer, at
Page 49

49
3Com's expense, not later than thirty (30) days after 3Com receives the defective product,
and 3Com will retain risk of loss or damage until the item is delivered to Customer.
3Com shall not be responsible for any software, firmware, information, or memory data
of Customer contained in, stored on, or integrated with any products returned to 3Com
for repair, whether under warranty or not.
Dead- or Defective-on-Arrival.
In the event a product completely fails to function or
exhibits a defect in materials or workmanship within the first forty-eight (48) hours of
installation but no later than thirty (30) days after the date of purchase, and this is verified
by 3Com, it will be considered dead- or defective-on-arrival (DOA) and a replacement shall
be provided prior to 3Com receiving the defective product, but only if Customer provides
a purchase order number, credit card number, or other method of payment acceptable to
3Com, to be used if 3Com needs to charge Customer for the replacement, as explained
below. The replacement product will normally be shipped not later than three (3) business
days after 3Com's verification of the DOA product, but may be delayed due to export or
import procedures. The shipment of a replacement product prior to 3Com receiving the
defective product is subject to local legal requirements and may not be available in all
locations. When such a replacement is provided and Customer fails to return the original
product to 3Com within fifteen (15) days after shipment of the replacement, 3Com will
charge Customer for the replacement product, at list price.
INCLUDED SERVICES
3Com's Electronic Support Services,
available at no charge, include 3Com
Knowledgebase, information on known bugs, documentation, release notes, and publicly
available software and firmware upgrades. 3Com reserves the right to modify or cancel
this offering at any time, without advance notice.
Telephone Technical Support,
with coverage for basic troubleshooting only, will be
provided at no additional charge for ninety (90) days from the date of purchase, on a
commercially reasonable efforts basis. Telephone support is provided by 3Com only if
Customer purchased this product directly from 3Com, or if Customer's reseller is unable
to provide telephone support. To qualify for this telephone technical support, Customer
must register on the 3Com Web site at http://support.3Com.com/index.htm, and state the
date of purchase, product number, and serial number. 3Com's response to a request for
telephone technical support will be in the form of a return call from a 3Com
representative by close of business the following business day, defined as 9 a.m. to 5
p.m., local time, Monday through Friday, excluding local holidays. Please refer to the
Technical Support appendix in the User Guide for telephone numbers.
Software Updates,
All software and firmware upgrades and the latest code for this
product downloaded through the 3Com Software Library.
WARRANTIES EXCLUSIVE
IF A 3COM PRODUCT DOES NOT OPERATE AS WARRANTED ABOVE, CUSTOMER'S SOLE
REMEDY FOR BREACH OF THAT WARRANTY SHALL BE REPAIR, REPLACEMENT, OR
REFUND OF THE PURCHASE PRICE PAID, AT 3COM'S OPTION. TO THE FULL EXTENT
ALLOWED BY LAW, THE FOREGOING WARRANTIES AND REMEDIES ARE EXCLUSIVE AND
ARE IN LIEU OF ALL OTHER WARRANTIES, TERMS, OR CONDITIONS, EXPRESS OR IMPLIED,
EITHER IN FACT OR BY OPERATION OF LAW, STATUTORY OR OTHERWISE, INCLUDING
WARRANTIES, TERMS, OR CONDITIONS OF MERCHANTABILITY, FITNESS FOR A
PARTICULAR PURPOSE, SATISFACTORY QUALITY, CORRESPONDENCE WITH
DESCRIPTION, AND NON-INFRINGEMENT, ALL OF WHICH ARE EXPRESSLY DISCLAIMED.
3COM NEITHER ASSUMES NOR AUTHORIZES ANY OTHER PERSON TO ASSUME FOR IT
ANY OTHER LIABILITY IN CONNECTION WITH THE SALE, INSTALLATION, MAINTENANCE
OR USE OF ITS PRODUCTS.
3COM SHALL NOT BE LIABLE UNDER THIS WARRANTY IF ITS TESTING AND
EXAMINATION DISCLOSE THAT THE ALLEGED DEFECT OR MALFUNCTION IN THE
PRODUCT DOES NOT EXIST OR WAS CAUSED BY CUSTOMER'S OR ANY THIRD PERSON'S
MISUSE, NEGLECT, IMPROPER INSTALLATION OR TESTING, UNAUTHORIZED ATTEMPTS
TO OPEN, REPAIR OR MODIFY THE PRODUCT, OR ANY OTHER CAUSE BEYOND THE
RANGE OF THE INTENDED USE, OR BY ACCIDENT, FIRE, LIGHTNING, POWER CUTS OR
OUTAGES, OTHER HAZARDS, OR ACTS OF GOD.
LIMITATION OF LIABILITY
TO THE FULL EXTENT ALLOWED BY LAW, 3COM ALSO EXCLUDES FOR ITSELF AND ITS
SUPPLIERS ANY LIABILITY, WHETHER BASED IN CONTRACT OR TORT (INCLUDING
NEGLIGENCE), FOR INCIDENTAL, CONSEQUENTIAL, INDIRECT, SPECIAL, OR PUNITIVE
DAMAGES OF ANY KIND, OR FOR LOSS OF REVENUE OR PROFITS, LOSS OF BUSINESS,
LOSS OF INFORMATION OR DATA, OR OTHER FINANCIAL LOSS ARISING OUT OF OR IN
CONNECTION WITH THE SALE, INSTALLATION, MAINTENANCE, USE, PERFORMANCE,
FAILURE, OR INTERRUPTION OF ITS PRODUCTS, EVEN IF 3COM OR ITS AUTHORIZED
RESELLER HAS BEEN ADVISED OF THE POSSIBILITY OF SUCH DAMAGES, AND LIMITS ITS
LIABILITY TO REPAIR, REPLACEMENT, OR REFUND OF THE PURCHASE PRICE PAID, AT
3COM'S OPTION. THIS DISCLAIMER OF LIABILITY FOR DAMAGES WILL NOT BE AFFECTED
IF ANY REMEDY PROVIDED HEREIN SHALL FAIL OF ITS ESSENTIAL PURPOSE.
DISCLAIMER
Some countries, states, or provinces do not allow the exclusion or limitation of implied
warranties or the limitation of incidental or consequential damages for certain products
supplied to consumers, or the limitation of liability for personal injury, so the above
limitations and exclusions may be limited in their application to you. When the implied
Page 50

50
warranties are not allowed to be excluded in their entirety, they will be limited to the
duration of the applicable written warranty. This warranty gives you specific legal rights
which may vary depending on local law.
GOVERNING LAW
This Limited Warranty shall be governed by the laws of the State of California, U.S.A., and
by the laws of the United States, excluding their conflicts of laws principles. The United
Nations Convention on Contracts for the International Sale of Goods is hereby excluded in
its entirety from application to this Limited Warranty.
3Com Corporation
5400 Bayfront Plaza
P.O. Box 58145
Santa Clara, CA 95052-8145
(408) 326-5000
November, 2000
3Com reserves the right to modify or cancel this offering at any time, without advance
notice. This offering is not available where prohibited or restricted by law.
Page 51

51
R
EGULATORY
N
OTICES
FCC Statement
This equipment has been tested and found to comply with the limits for a Class B digital
device, pursuant to Part 15 of the FCC Rules, and the Canadian Department of
Communications Equipment Standards entitled, “Digital Apparatus,” ICES-003. These
limits are designed to provide reasonable protection against harmful interference in a
residential installation. This equipment generates, uses and can radiate radio frequency
energy and, if not installed and used in accordance with the instructions, may cause
harmful interference to radio communications. However, there is no guarantee that
interference will not occur in a particular installation.
Information to the User
If this equipment does cause interference to radio or television reception, which can be
determined by turning the equipment off and on, the user is encouraged to try to correct
the interference by one or more of the following measures:
■
Reorient the receiving antenna.
■
Relocate the equipment with respect to the receiver.
■
Move the equipment away from the receiver.
■
Plug the equipment into a different outlet so that equipment and receiver are
on different branch circuits.
■
Consult the dealer or an experienced radio/television technician for help.
The user may find the following booklet prepared by the Federal Communications
Commission helpful:
How to Identify and Resolve Radio-TV Interference Problems
This booklet is available from the U.S. Government Printing Office, Washington, DC
20402, Stock No. 004-000-00345-4. In order to meet FCC emissions limits, this
equipment must be used only with cables which comply with IEEE 802.3.
CE Statement (Europe)
This product complies with the European Low Voltage Directive 73/23/EEC and EMC
Directive 89/336/EEC as amended by European Directive 93/68/EEC.
CSA Statement
This Class B digital apparatus meets all requirements of the Canadian
Interference-Causing Equipment Regulations.
Cet appareil numérique de la classe B respecte toutes les exigences du Règlement sur le
matériel brouilleur du Canada.
BSMI Statement
VCCI Statement
Page 52

Part Number: DUA1950-0AAA01
Rev: 01
Published November 2000
 Loading...