

Page 1

Web Management
®
User Guide
For the SuperStack® II Switch 3900 and Switch 9300
http://www.3com.com/
Part No. 10012703
Published August 1999
Page 2

3Com Corporation
5400 Bayfront Plaza
Santa Clara, California
95052-8145
Copyright © 1999, 3Com Corporation. All rights reserved. No part of this documentation may be reproduced
in any form or by any means or used to make any derivative work (such as translation, transformation, or
adaptation) without written permission from 3Com Corporation.
3Com Corpo ration rese rves the right to revise this d ocumentation and to make chan ges in content from time
to time without obligation on the part of 3Com Corporation to provide notification of such revision or change.
3Com Corporation provides this documentation without warranty, term, or condition of any kind, either
implied or expressed, including, but not limited to, the implied warranties, terms, or conditions of
merchantability, satisfactory quality, and fitness for a particular purpose. 3Com may make improvements or
changes in the product(s) and/or the program(s) described in this documentation at any time.
If there is any software on removable media described in this documentation, it is furnished under a license
agreement included with the product as a separate document, in the hard copy documentation, or on the
removable media in a directory file named LICENSE.TXT or !LICENSE.TXT. If you are unable to locate a copy,
please contact 3Com and a copy will be provided to you.
UNITED STATES GOVERNMENT LEGEND
If you are a United States government age ncy, then this documentatio n and the software described herein are
provided to you subject to the following:
All technical data and computer software are commercial in nature and developed solely at private expense.
Software is delivered as “Commercial Computer Software” as defined in DFARS 252.227-7014 (June 1995) or
as a “commercial item” as defined in FAR 2.101(a) and as such is provided with only such rights as are
provided in 3Com’s standard commercial license for the Software. Technical data is provided with limited rights
only as provided in DFAR 252.227-7015 (Nov 1995) or FAR 52.227-14 (June 1987), whichever is applicable.
You agree not to remove or deface any portion of any legend provided on any licensed program or
documentation contained in, or delivered to you in conjunction with, this User Guide.
Unless otherwise indicated, 3Com registered trademarks are registered in the United States and may or may
not be registered in other countries.
3Com, the 3Com logo, SuperStack, and Transcend are registered trademarks of 3Com Corporation.
3Com Facts is a service mark of 3Com Corporation.
Internet Explorer, Microsoft, MS-DOS, Windows, and Windows NT are registered trademarks of Microsoft
Corporation. Netscape, Netscape Communicator, Netscape Navigator, and the Netscape N and Ship’s Wheel
logos are registered trademarks of Netscape Communications Corporation in the United States and other
countries. Java is a registered trademark of Sun Microsystems, Inc. UNIX is a registered trademark in the United
States and other countries, licensed exclusively through X/Open Company, Ltd.
All other company and product names may be trademarks of the respective companies with which they are
associated.
Page 3

C
ONTENTS
BOUT THIS GUIDE
A
Conventions 5
Year 2000 Compliance 6
1
WEB M
Web Management Overview 8
Embedded Web Management Applications 10
Installable Web Management Tools 22
ANAGEMENT OVERVIEW
Browser and Platform Requirements 9
Color Recommendations 9
Browser Support 9
Platform Requirements 10
Interface Description 11
WebConsole Tab 13
Configuration Wizard 14
DeviceView Tab 15
About the Device Image 16
Configuring Parameters in DeviceView 17
Selecting Multiple Ports in DeviceView 17
Using Status Logging 18
Performance Tab 20
Using the Performance Features 20
Customizing Your Performance Monitor 20
Help Tab 22
Using WebManage Framework 23
Using the Form-Specific Help Files 24
Page 4

Launching Web Management Applications 25
Managing a Single Device 25
Launching the Form-Specific Help 25
Launching the WebManage Framework 25
Enabling E-mail Notification for Status Log 25
Logging Out 25
2
NSTALLATION AND SETUP
I
Installing Supplemental Tools 27
Windows Installation 27
UNIX Help Installation 28
Setting Up the Form-Specific Help Files 29
3
ROUBLESHOOTING
T
Browser Issues 31
Web Management and Internet Explorer 31
Improving DeviceView 32
Improving DeviceView Download Speed 32
Enabling Status Log E-Mail Options on Internet Explorer 33
Web Management and Netscape Navigator 35
Troubleshooting the Web Management Software 35
Examples of Good and Problematic CLASSPATH Settings 36
Additional Resources for Solving Problems 36
Page 5
A
BOUT
T
HIS
G
UIDE
Conventions
The Web Management software is a suite of HTML-based applications
that is shipped with the SuperStack
This guide describes the software, including an overview and information
on installation and setup.
This guide is intended for network administrators who are responsible for
managing 3Com switching devices with the Web Management tools.
If the information in the release notes that are shipped with your product
differs from the information in this guide, follow the instructions in the
release notes.
Most user guides and release notes are available in Adobe Acrobat
Reader Portable Document Format (PDF) or HTML on the 3Com
World Wide Web site:
http:/ /www.3com.com/
Table 1 and Table 2 list conventions that are used throughout this guide.
Ta b l e 1
Icon Notice Type Description
Notice Icons
Information note Information that describes important features or
instructions
Caution Information that alerts you to potential loss of data or
potential damage to an application, system, network,
or device
Warning Information that alerts you to potential personal injury
®
II Switch 3900 and Switch 9300.
Page 6

6 A
BOUT THIS GUIDE
Ta b l e 2
Text Conventions
Convention Description
Screen displays This typeface represents information as it appears on the
screen.
Commands The word “command” means that you must enter the
command exactly as shown and then press Return or Enter.
Commands appear in bold. Example:
To remove the IP address, enter the following command:
ip interface remove
The words “enter”
and “type”
When you see the word “enter” in this guide, you must type
something, and then press Return or Enter. Do not press
Return or Enter when an instruction simply says “type.”
Words in italics Italics are used to:
■ Emphasize a point.
■ Denote a new term at the place where it is defined in the
text.
■ Identify menu names, menu commands, and software
button names. Examples:
From the Help menu, select Contents.
Click OK.
Year 2000 Compliance
For information on Year 2000 compliance and 3Com products, visit the
3Com Year 2000 Web page:
http://www.3com.com/products/yr2000.html
Page 7
1
W
EB
M
ANAGEMENT
O
VERVIEW
This chapter describes the components in the Web Management suite of
applications for the SuperStack
chapter covers these topics:
■ Web Management Overview
■ Embedded Web Management Applications
■ Installable Web Management Tools
■ Launching Web Management Applications
■ Logging Out
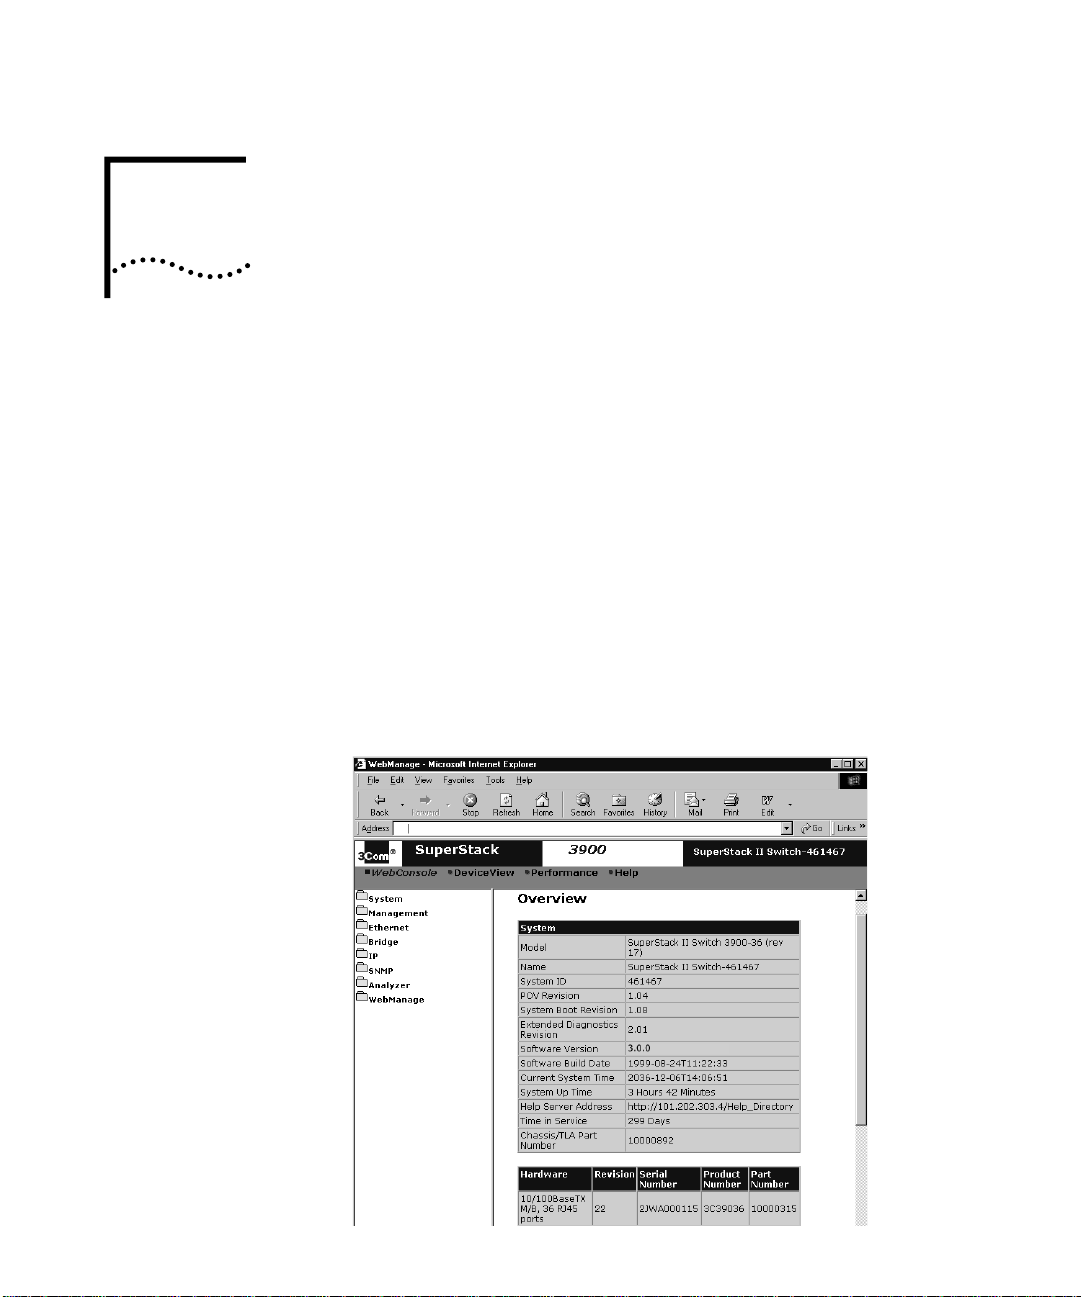
Figure 1 shows the opening Web Management screen.
Figure 1
Opening Screen of Web Management (3900 shown)
®
II Switch 3900 and Switch 9300. The
Page 8

8 C
HAPTER
1: WEB M
ANAGEMENT OVERVIEW
Web Management Overview
The Web Management suite of features consists of embedded Web
Management applications and installable tools:
■
Embedded Web Management applications
— Use the embedded
Web Management applications for most of your device configuration
and management tasks. You can manage a single port or device, or,
using multiple windows, you can manage multiple devices. This
software, which is part of the system software image, contains:
WebConsole
■
— An HTML-based set of configuration forms. See
“WebConsole Tab” on page 13 for details.
DeviceView
■
— A Java-based application that displays a real-time
image of the device. You can manage each port, or the entire
system, by clicking on the part of the image that you want to
manage. See “Browser and Platform Requirements” on page 9
and “DeviceView Tab” on page 15 for details.
Performance features
■
— Dynamic monitoring through graphing
of Ethernet interfaces. See “Performance Tab” on page 20 for
details.
— The configuration form on which you set up the installable
Help
■
Help as well as access to links to support information on the 3Com
Web site. (For how to install Help for the configuration forms, see
Chapter 2.)
■
Installable tools
— Install some or all of these optional tools on your
workstation from the 3Com Web site, as described in Chapter 2.
DeviceView accessories
■
— To set up e-mail notification for
Status Logging.
WebManage Framework
■
— To group your access links to the
devices that you manage.
Form-specific Help
■
— To access hypertext information about the
fields in the WebConsole, DeviceView, and Performance forms.
Page 9
Web Management Overview 9
Browser and Platform
Requirements
The Web Management suite of applications has certain dependencies, as
described in this section.
Color Recommendations
The minimum graphics capability is SVGA (800x600 resolution). For best
performance, use XGA (1024x768 resolution).
Browser Support
Web Management requires Microsoft Internet Explorer 4.01 or later OR
Netscape Navigator 4.03 or later.
If you are using Netscape Navigator 4.03 or 4.04, be sure to install the
Netscape JDK 1.1 Patch. Download the patch from this URL:
http://help.netscape.com/filelib.html#smartupdate
If you are using Internet Explorer, install the latest 4.01 Service Pack 1.
This service pack makes Internet Explorer Year 2000 compliant and fixes
other product support issues. Download the 4.01 Service Pack 1 from the
following URL:
http://www.microsoft.com/msdownload/iebuild/ie4sp1_ win32/en/
ie4sp1_win32.htm
If the link is not available, download the service pack from the Microsoft
home page:
http://www.microsoft.com
See “Web Management and Internet Explorer” and “Web Management
and Netscape Navigator” in Chapter 3 for more details.
Page 10

10 C
HAPTER
1: WEB M
ANAGEMENT OVERVIEW
Platform Requirements
Table 3 lists the platforms that you need for each of the Web
Management features.
Embedded Web Management Applications
Ta b l e 3
Feature PC UNIX
Embedded Web Management Applications
WebConsole ✓ ✓
DeviceView ✓ ✓
Performance ✓ ✓
Configuration form to set up Help,
plus links to 3Com support sites
Installable Tools
Form-specific Help
WebManage Framework, to
customize your access to devices
DeviceView accessories, such as
e-mail notification for Status Log
Platform Support for Web Management Features
✓ ✓
✓ ✓
✓
✓
With the embedded Web Management applications, you can manage
your system using a Web browser.
The embedded Web Management applications, accessed from the Tabs
panel, are WebConsole (including configuration forms and wizards),
DeviceView, Performance monitoring charts, and Help configuration
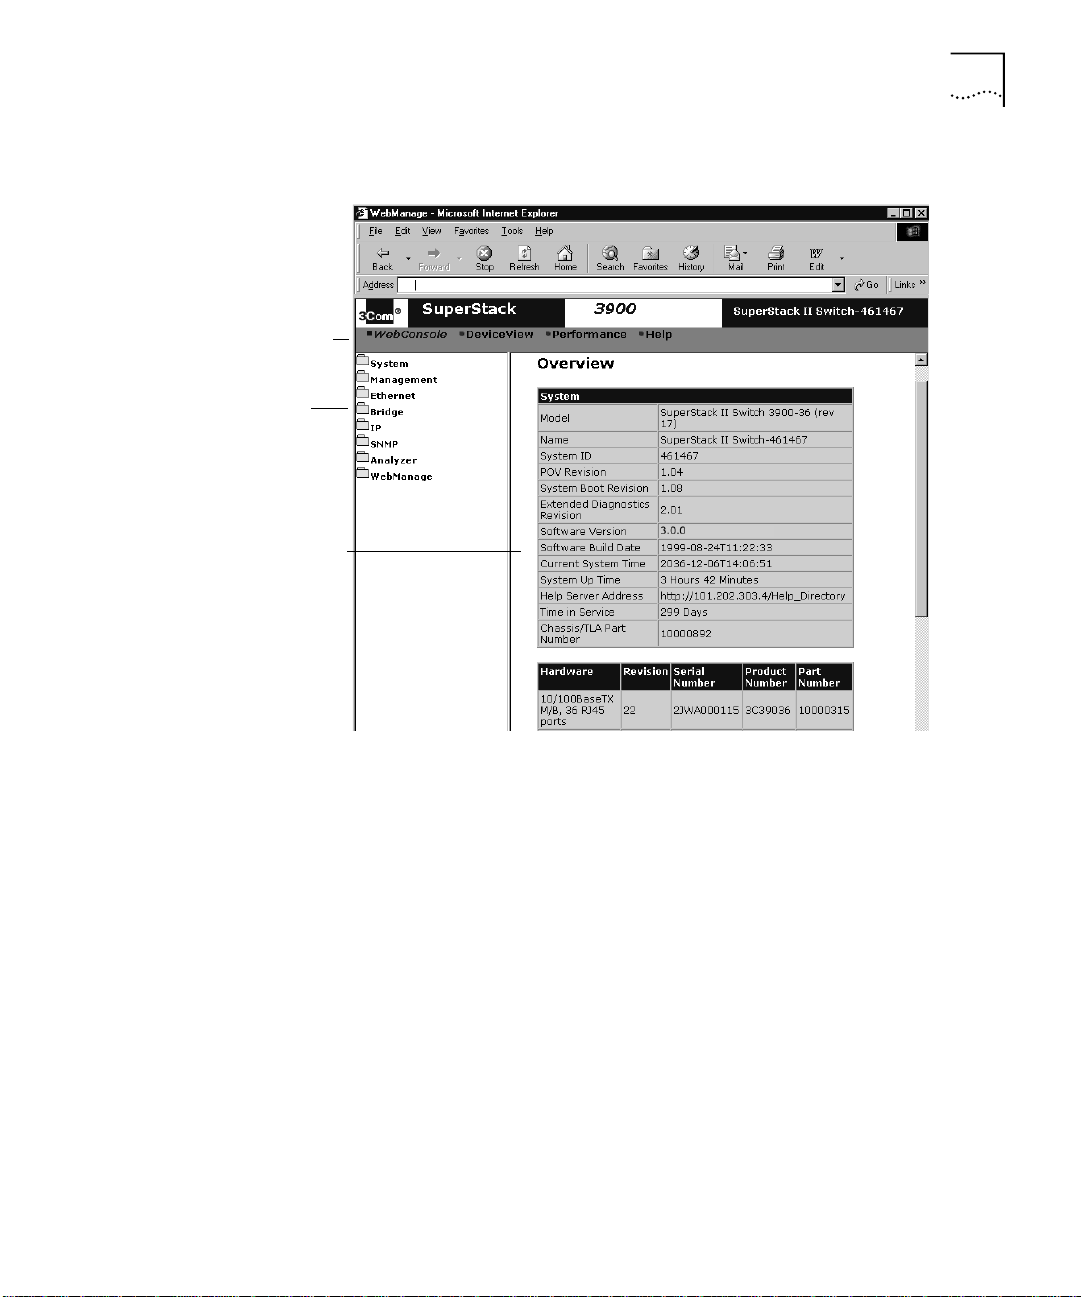
forms and 3Com support links. See Figure 2.
Page 11
Embedded Web Management Applications 11
Tabs panel
Menu tree
Workspace
Figure 2
Parts of the Web Management Opening Screen (3900 shown)
Interface Description
The screen for the embedded Web Management applications is divided
into three areas, shown in Figure 2 and described here:
■
Tabs panel
— At the top of the Web Management screen, the Tabs
panel has four tabs:
WebConsole tab
■
— When you select this tab, the menu tree lists
folders for the parameters that you can configure for the device to
which you are connected. See “WebConsole Tab” on page 13 for
details.
DeviceView tab
■
— When you select this tab, you see an image of
the device. You can configure some system and port parameters
from this view. See “Browser and Platform Requirements” on
page 9 for the required versions of Java-based browsers and
“DeviceView Tab” on page 15 for more details on the functionality
of this view.
Page 12

12 C
HAPTER
1: WEB M
ANAGEMENT OVERVIEW
■
Performance tab
— When you select this tab, the menu tree lists
charts that support dynamic monitoring. See “Performance Tab”
on page 20 for more details.
■
Help tab
— When you select this tab, the menu tree lists the Help
configuration form and links to 3Com support sites. When you
install the Help files, the links to the Contents and Index for Help
become active. (Before you install the Help, these links connect you
to the Help configuration form.) See “Setting Up the Form-Specific
Help Files” on page 29 for Help installation.
To access Help for the configuration forms, install the supplemental Help.
See Chapter 2.
■
Menu tree
— The menu tree frame at the left of the interface lists the
menu options. Many of these options are the same as those found in
the Administration Console command line interface. Click a folder to
view the menu options, shown as configuration form icons. Click a
form icon to view the associated form in the workspace. See Figure 3.
■
Telnet icons
— To configure system parameters that are not
supported through the WebConsole, click a Telnet icon on the
menu tree to launch a Telnet session to the Administration Console
on the device. See Figure 3.
■
Workspace
— The workspace frame of the interface displays the
configuration form for the menu option that you select. See Figure 3.
Telnet icon
Figure 3
Using the WebConsole (3900 Shown)
Page 13

Embedded Web Management Applications 13
WebConsole Tab
Using the
WebConsole
In the WebConsole application, the menu tree of folders contains icons
for options that you can change to manage your device. Click an icon to
view the related configuration form.
To modify many of the parameters and attributes on your system, follow
these steps:
In the menu tree, click the folder of the feature that you want to modify.
1
See the menu tree in Figure 3.
Example: Click
Ethernet.
The expanded Ethernet menu appears in the menu tree, showing the
folders and form icons for the options with which you configure Ethernet
parameters on your system.
Click another folder or the form icon for the feature that you want to
2
configure.
Example: Click
PaceAccess.
The Ethernet System PACE Access configuration form appears.
To fill in the form, type the required information.
3
To get Help on a form and its fields, click the Help button at the bottom
of the form. You must first have installed the form Help; see Chapter 2.
4
Click
Next
or
to finish the configuration.
Apply
■
■
displays an additional form with more fields for you to fill in.
Next
completes the requested configuration.
Apply
For some forms, the system may reset itself before the changes take
effect.
To configure system parameters that are not supported through the
5
WebConsole, click a Telnet icon, for example,
Monitoring
, to launch a
Telnet session to the Administration Console on the device, and then use
the command line interface to configure the parameter.
For details on the commands in the Administration Console, see the
Command Reference Guide
.
Page 14

14 C
HAPTER
1: WEB M
ANAGEMENT OVERVIEW
Configuration Wizard
The WebConsole menu tree also contains an icon called Define Wizard
for the Trunk Definition configuration wizard. Use the wizard to create
valid configurations, modify attributes and parameters, and prevent
common configuration mishaps. See Figure 4. To use the Trunk Definition
wizard, click the wizard icon and follow the instructions.
Wizard icon
Figure 4
Opening Screen for the Trunk Definition Wizard (3900 Shown)
Page 15

Embedded Web Management Applications 15
DeviceView Tab
The DeviceView application actively monitors the device and allows you
to configure system and front-panel port parameters in real-time.
To use the DeviceView application, click the
DeviceView
tab on the Web
Management opening screen to launch the device image. See Figure 5.
Figure 5
If you have installed the supplemental Help, click the
DeviceView Screen (3900 Shown)
Help
button in the
row of buttons at the bottom of the DeviceView image for more
information about the image. See Chapter 2 for Help installation.
Page 16

16 C
HAPTER
1: WEB M
ANAGEMENT OVERVIEW
About the Device Image
As you move your pointer over the image, a blue border outlines the part
of the device image under your pointer. Click an element in the device
image in the DeviceView workspace (shown in Figure 5), a configuration
form appears below the image. See Figure 6 and “Configuring
Parameters in DeviceView” for details.
Figure 6
DeviceView Image (9300 Shown)
As you view the device image, the current state of the system and of each
port is indicated by a color, as described in Table 4.
Ta b l e 4
Color/Shade Indicates this status
Green Enabled, link present
Partial Shading (dark edge) Disabled, link present
Black Enabled, link absent
Gray Shading Disabled, link absent
Red Partitioned, link present
Yellow Resilient, link absent
Status Color Codes
Page 17

Embedded Web Management Applications 17
Configuring Parameters in DeviceView
To configure a parameter:
Click the image of the area that you want to configure:
1
■ To view and modify
system
-level parameters, click anywhere along the
outline of the chassis image.
■ To view and modify
-level parameters, click the image of one or
port
more ports that you want to configure.
To manage the fixed and optional Gigabit Ethernet ports on the back
panel of the SuperStack II Switch 3900, launch a Telnet session to the
Administration Console.
If you have installed the supplemental Help, click the Help button at the
bottom of the configuration form for related information.
On the options list that appears, select the option that you want to
2
configure.
The configuration form appears in the DeviceView workspace.
Selecting Multiple Ports in DeviceView
To select multiple nonconsecutive ports for configuration in DeviceView,
press and hold the Shift key as you click the image of each port that you
want to configure. To select consecutive ports, press and hold the Control
key while you click the first port and the last port in the series.
Page 18

18 C
HAPTER
1: WEB M
ANAGEMENT OVERVIEW
Using Status Logging
DeviceView has a Status Log that monitors system and port changes on
the device and displays the events in a log. See Figure 7.
Figure 7
Status Log in DeviceView (3900 Shown)
For Internet Explorer, you may want to follow the instructions to improve
Status Logging functionality in “Improving DeviceView” in Chapter 3.
You can set the Status Log to monitor the system or the ports in any
combination. To enable Status Logging options:
Select the
1
In the menu tree, click
2
DeviceView
tab and then, in the menu tree, click
Configuration
.
DeviceView
The DeviceView configuration form appears. See Figure 8.
.
Page 19

Embedded Web Management Applications 19
Figure 8
3
In the
options, click
4
Click
5
In the menu tree, click
DeviceView Configuration Form (3900 Shown)
Status Logging
field, select enabled. For information on other
Help.
Apply.
Status Log
and configure the options for e-mailing
system or port changes. For information on the options, click
Help
.
To enable e-mail notices, if you have not yet installed the supplemental
DeviceView accessories, install them now. See Chapter 2.
6
In the Status Log configuration form, click
Apply
.
For the changes to take effect:
■
In Netscape, reload the browser.
■
In Internet Explorer, refresh the browser window.
The Status Log now displays information about your mail server.
Page 20

20 C
HAPTER
1: WEB M
ANAGEMENT OVERVIEW
Performance Tab
You can monitor certain aspects of your network performance with
charts of live activity.
See the Help for information on choosing options that do not affect
network performance. See Chapter 2 for Help installation.
Using the Performance Features
To launch the dynamic monitoring charts for the Performance monitor:
On the Web Management opening screen, select the Performance tab.
1
The menu tree expands to show the Performance charts for Ethernet.
Select the chart that you want to view:
2
■
Ethernet Bandwidth Utilization
— Bytes that are transmitted or
received over specified ports
■
Ethernet Packet Volume
— Packet volume for unicast, broadcast, or
multicast packets over specified ports
■
Ethernet Packet Sizes
— Size of packets passing through the ports
Customizing Your Performance Monitor
To customize your performance features, you can create the ideal chart
size for your desktop environment and establish the refresh rate so that
your network statistics are updated by the hour, minute, or second.
Page 21

Embedded Web Management Applications 21
To customize your Performance monitoring screen:
On the Web Management opening screen, click the
1
Performance
tab. The
Ethernet menu tree appears.
In the menu tree, click the
2
Configuration
option. The Web Monitoring
configuration form appears. See Figure 9.
In the Chart Size field, select the chart size: Large (400 pixels) or Small
3
(200 pixels).
Type the refresh rate in this format: Hours:Minutes:Seconds.
4
Type the item history for moving charts, that is, select how many times
5
items change in a moving chart.
Click
6
Apply.
If you have installed the Help files, click the Help button to read more
information on these options. See Chapter 2 if you have not installed the
Help files.
Figure 9
Web Monitoring Configuration Screen (3900 Shown)
Page 22

22 C
HAPTER
1: WEB M
ANAGEMENT OVERVIEW
Help Tab
Installable Web Management Tools
The fourth tab of the Web Management opening screen contains these
links:
■
The Help configuration form
— After you install the Help files (see
Chapter 2), type the path to the directory in which you installed your
Help files. Click
Apply
to complete the software link. Now you can
access Help from each configuration form.
When you install the Help, the links to the Help Contents and Help
Index become active. If you have not installed the Help, these links
connect you to the Help configuration form.
To use Help, see “Using the Form-Specific Help Files” later in this
chapter.
■
Various 3Com support sites on the Web
— Click a link to view the
3Com contacts list, support page, and home page.
The installable supplemental Web Management tools are available from
the 3Com Web site. See Chapter 2 for downloading and installation
instructions.
Using the installation wizard, you can choose to install one or more of
these tools:
■
WebManage Framework
— To facilitate the way that you group
and access devices and tools. See “Using WebManage Framework”
next.
■
DeviceView Accessories
— To enable e-mail notification for Status
Log on the embedded DeviceView application. See “Enabling E-mail
Notification for Status Log” on page 25 for details.
■
— To learn more about the embedded configuration forms. See
Help
“Setting Up the Form-Specific Help Files” on page 29 for details.
Page 23

Installable Web Management Tools 23
Using WebManage
Framework
Use the WebManage Framework to organize the devices that you
manage into easily accessible groups. You can also create a folder for
each group, as shown in Figure 10 and described next.
For best results, first create the folders, then create the link to the devices.
Figure 10
Integrated Web Management Configuration Form
On the Devices tab:
■
To add a folder
— In the Add a Folder area of the form, type a
meaningful name (such as Engineering-A or AccountingLab-3).
■
To add a device
— In the menu tree, click the folder where you want
to put the device access. In the Add a Device area, in the Name field,
enter a meaningful name (such as 3500-1 or 9K-16slot-1). In the IP
field, type the IP address of the device that you want to manage.
■
To remove a device or folder
— In the menu tree, click the folder or
device name. In the Delete a Device or Folder area, click OK.
Page 24

24 C
HAPTER
1: WEB M
ANAGEMENT OVERVIEW
Using the
Form-Specific
Help Files
Each configuration form has a
Help
button and one or more related Help
topics. See Figure 11.
Many Help forms have additional links in the Help banner and at the
bottom of the page, including a link to the HTML version of the
Implementation Guide.
See Chapter 2 for details on installing the Help
and “Setting Up the Form-Specific Help Files” on page 29 for details on
configuring your system to point to the Help files once they are installed.
Figure 11
Help Page
Help
banner
Additional
links
The banner at the top and the row of links at the bottom of each Help
page provide access to the Start page (containing Web Management
overview information), Contents, Index, 3Com Technical Support, and the
3Com Corporation home page.
Page 25

Launching Web Management Applications 25
Launching Web Management Applications
Managing a
Single Device
Launching the
Form-Specific Help
Launching the
WebManage
Framework
Enabling E-mail
Notification for
Status Log
Depending on which optional files you decide to install, you can manage
a single device, access Help from each form, use WebManage Framework
to organize your access to multiple devices, or enable e-mail notification
of Status Log events.
To use the embedded Web Management applications, you need not
install any of the optional files. Open a new Internet browser window on
your workstation and enter the IP address of the system that you want to
manage. The Web Management opening screen appears, with the
WebConsole, DeviceView, Performance, and Help tabs. (Use the Help tab
to configure the location of your Help files.)
If you have installed and configured Help (see Chapter 2), access Help
from the
the Contents and Index links on the Help tab to search for information on
a topic.
If you have installed WebManage Framework, from the Windows 95 or
NT Start menu, select
WebManage
If you have installed DeviceView Accessories, see “Using Status Logging”
on page 18 for instructions on how to configure your device to send
e-mail notification of Status Log events in the DeviceView application.
button for each form as you manage your device, or use
Help
again.
Programs
, and then
WebManage
, and then
Logging Out
To disconnect a session in Web Management, close the browser window
or enter another IP address.
Page 26

26 C
HAPTER
1: WEB M
ANAGEMENT OVERVIEW
Page 27

2
I
NSTALLATION AND
This chapter covers installation and set up for the additional tools that
you can install on your system:
■ Installing Supplemental Tools
■ Setting Up the Form-Specific Help Files
S
ETUP
Installing Supplemental Tools
Windows Installation
Use the file called webmanagv30.exe to launch the wizard that installs
some or all of the supplemental tools.
If you choose to install the additional Web Management files on a PC,
copy them to a workstation that runs Windows 95 or Windows NT or an
NT server. Follow these steps:
To download the installable supplemental Web Management tools:
Visit this 3Com Web site:
1
http://www.support.3com.com/software/switches.htm
Scroll down to the link for your software (Switch 3900 or Switch 9300).
2
Download the file called
3
PC, or Web server.
Unzip the file and follow the installation instructions next.
4
To install one or more of the installable Web Management tools:
Close all open programs and applications.
1
2
Locate
webmanagev30.exe in the directory on your workstation or server.
webmanagev30.exe to your local workstation,
Page 28

28 C
HAPTER
2: I
NSTALLATION AND SETUP
Double-click the file and follow the instructions in the wizard. Three
3
installation options are provided:
■
Custom
— Installs one or more supplemental Web Management
components.
■
Help Files Install
— Installs only the form-specific Help files for the
Web Management embedded forms.
■
Ty p i c a l
— Installs all supplemental Web Management components,
including the integrated Graphical User Interface (GUI), DeviceView
accessories (such as Status Logging), and form-specific Help files.
If you plan to group multiple devices in easily accessible folders, choose
the
Custom
Decide whether to reboot:
4
■
If you have selected
installation or choose the
Ty p i c a l
installation.
Web Management
Help Files Install
or
Ty pi ca l
and are using
option in the
Windows 95, the wizard prompts you to confirm whether you want to
reboot your system. If you click
Finish
, the system reboots itself to
complete the installation process.
If you are running Windows NT, the system does not need to reboot.
■
If you have selected the
Custom
installation and chosen only the Help
files, you do not need to reboot your system.
The wizard installs the Web Management icon into the directory that you
specified in step 3.
UNIX Help
Installation
Configure your Help files, if you installed them, by following the
5
instructions in “Setting Up the Form-Specific Help Files” later in this
chapter.
To launch your applications, see Chapter 1.
6
TAR
A UNIX .
file containing the Web Management Help system is
available through the 3Com Web site:
http://www.support.3com.com/software/switches.htm
To install Help files on your UNIX workstation:
Go to the 3Com Web site and locate the
1
.TAR
To extract the
2
tar -xvf HELP.TAR
To configure Help, see the next section. To launch your applications, see
3
file into your Web server directory, use this command:
HELP.TAR
file.
Chapter 1.
Page 29

Setting Up the Form-Specific Help Files 29
Setting Up the Form-Specific Help Files
To access Help for the system, install the supplemental Help files on your
workstation or server using Help Files Install or Typical in the installation
wizard. See “Windows Installation” or “UNIX Help Installation” earlier in
this chapter.
To configure the location of the Help files for the first time:
Click the Help tab in the banner of the Web Management start-up
1
screen.
The Help Server configuration form appears.
2
3
Click
In the
and then
Device
Help Installation
Configuration
.
URL field, type the complete URL for the Help files.
Follow the syntax in the examples in the configuration form, shown in
Figure 12.
Do not end the URL with a slash (/).
Figure 12
Help Server Configuration Form
Page 30

30 C
HAPTER
2: I
NSTALLATION AND SETUP
Click
4
The system displays a message that indicates that the Help Server has
been set properly.
To
5
menu tree on the Web Console opening screen. Then click the
button on any form.
Help is now configured for your system.
Apply.
link the form-specific Help to Web Management, select any item in the
Help
To access Help, click the
6
Help
button on any form, or see Figure 11 on
page 24 for the location of links to the Contents list and the Index for the
Help system.
The banner at the top and the row of links at the bottom of each Help
page provide access to the Start page (containing Web Management
overview information), Help Contents, Help Index, 3Com Technical
Support, and the 3Com home page.
Page 31

3
T
ROUBLESHOOTING
This chapter covers the following topics:
■ Browser Issues
■ Troubleshooting the Web Management Software
Browser Issues
Web Management
and Internet Explorer
In addition to the tips in this section, see System Issues and Known
Problems for Web Management in the release notes that are shipped
with your product, or the Web Management readme file.
If you are using Microsoft Internet Explorer, install the latest 4.01 Service
Pack 1. This service pack makes Internet Explorer Year 2000 compliant
and fixes other product support issues. Download the 4.01 Service Pack 1
from the following URL:
http://www.microsoft.com/msdownload/iebuild/ie4sp1_ win32/en/
ie4sp1_win32.htm
If the link is not available, download the service pack from the Microsoft
home page:
http://www.microsoft.com
Page 32

32 C
HAPTER
3: T
ROUBLESHOOTING
Improving
DeviceView
Certain Status Log options allow you to send e-mail messages regarding
system and port status changes to one or more e-mail addresses. To
access these e-mail options, install the additional Web Management files
and enable Status Logging. See Chapter 2 for information on installing
the supplemental files.
Improving DeviceView Download Speed
To improve the download speed for DeviceView image in Internet
Explorer, you change several security settings:
Open an Internet Explorer browser window.
1
From the
2
View
menu, select
Internet Options
.
The Internet Options dialog box appears.
To view security options, click the
3
Figure 13
Security Tab on the Internet Options Dialog Box
Security
tab. See Figure 13.
4
In the
field, select Trusted sites zone.
Zone
The Trusted sites zone dialog box appears. See Figure 14.
Page 33

Browser Issues 33
Figure 14
5
Click the
6
In the
Trusted Sites Zone Dialog Box
Add Sites
button.
Add this Web site to the zone
field, type
http:/ /
plus the IP
address of the device that you want to manage through Web
Management. This information is added in the
Clear the
Require server verification for all sites in this zone
Web sites
field.
check box
when you add device information.
7
When you have added all of the devices that you want to manage, click
OK
.
Enabling Status Log E-Mail Options on Internet Explorer
To ensure that the e-mail option for Status Log is available, follow the
steps in “Improving DeviceView” on page 32 and then take these steps:
1
In the Internet Options dialog box (Figure 13), click the
then click the
Settings
The
Click
Settings
2
Custom
option button to set custom security settings.
button to the right is now available.
.
Security
tab and
The Security Settings dialog box appears (Figure 15).
3
Reset custom settings
In the
drop-down list and click
4
Security Settings
In the
Custom
the
radio button. The
area, select
Reset.
area, scroll down to Java Permissions and select
Java Custom Settings
Low security
button at the bottom
from the
of the dialog box is now available.
Page 34

34 C
HAPTER
3: T
ROUBLESHOOTING
Figure 15
Select
5
Security Settings Dialog Box
Java Custom Settings.
The Internet zone dialog box appears (Figure 16).
Figure 16
Edit Permissions Tab
Page 35

Troubleshooting the Web Management Software 35
Web Management
and Netscape
Navigator
Select the
6
Edit Permissions
If the options listed under
tab.
Unsigned Content
cannot be configured, verify
that you are using the latest version of Internet Explorer.
In the
7
8
Run Unsigned Content
Click OK to close the Internet zone dialog box. Then click OK to close the
choices, click the
Enable
option button.
Security Settings dialog box.
9
In the
Internet Options
dialog box, click
to apply the setting. Then
Apply
click OK to close the Internet Options dialog box.
If you encounter problems accessing Help files from Web Management
applications when you use Netscape, clear the browser memory cache
and disk cache and restart the browser.
To clear the cache in Netscape Navigator:
In the browser window, from the
1
2
In the
Category
menu tree, click
menu, select
Edit
Advanced
Preferences
and then click
Cache
.
in the
Advanced folder.
The browser cache options appear to the right of the menu tree.
Clear the memory and disk cache by clicking the appropriate buttons on
3
the cache options form.
Troubleshooting the Web Management Software
Restart the browser.
4
If the Netscape browser does not shut down, press Ctrl+Alt+Delete and
end the Netscape browser task.
If you are unable to run the Web Management software, verify the
accuracy of your
CLASSPATH environment variable.
By default, the Web Management installation adds two directories above
your existing
CLASSPA TH : C: \3Com
you did not select the default
If your system already has an existing
. Your directories may be different if
C:\3Com
directory during installation.
CLASSPATH before you install the
additional Web Management files, the necessary 3Com directories are
added above yours. As a result, your classpath may look like this:
C:\3Com;C:\java\classes;C:\java\applets\myclasses;
Page 36

36 C
HAPTER
3: T
ROUBLESHOOTING
If you modify your classpath and do not include the 3Com directories
(and possibly if you do not list them before any other directories in your
classpath), the Web Management components may fail to run properly.
Examples of Good
and Problematic
CLASSPATH Settings
In Windows 95, your CLASSPATH is set in the
autoexec.bat
file. It usually
appears in this format:
SET CLAS SPA TH =C:\3Com;
In Windows NT, your
CLASSPATH
is set through the System icon in the
Control Panel. Ask your system administrator if you do not know how to
change your environment variables.
The minimal setting required for Web Management is:
SET CLAS SPA TH =C:\3Com;
The following setting is also acceptable:
SET CLAS SPA TH =C:\3Com;C:\jav a\classes;
This setting can potentially cause problems:
SET CLAS SPA TH =C:\java\classe s;C:\myclasses;C:\3Com;
The next setting results in unspecified behavior, because certain 3Com
Web Management directories are not included. An unspecified
CLASSPATH
has similar results. In either case, the installed Web
Management applications may fail to run:
SET CLASSPATH=C:Local Status Log
Additional Resources
for Solving Problems
If you still encounter problems after you try the tips offered in this
chapter, consult these sources of information:
■
The Web Management System Issues and Web Management Known
Problems, if any, in the release notes that are shipped with your
product
■
Your network supplier
■
The Technical Support appendix in the
Getting Started Guide
for your
system
 Loading...