

Page 1
3B SCIENTIFIC
Bedienungsanleitung
02/08 SP/ALF
®
PHYSICS
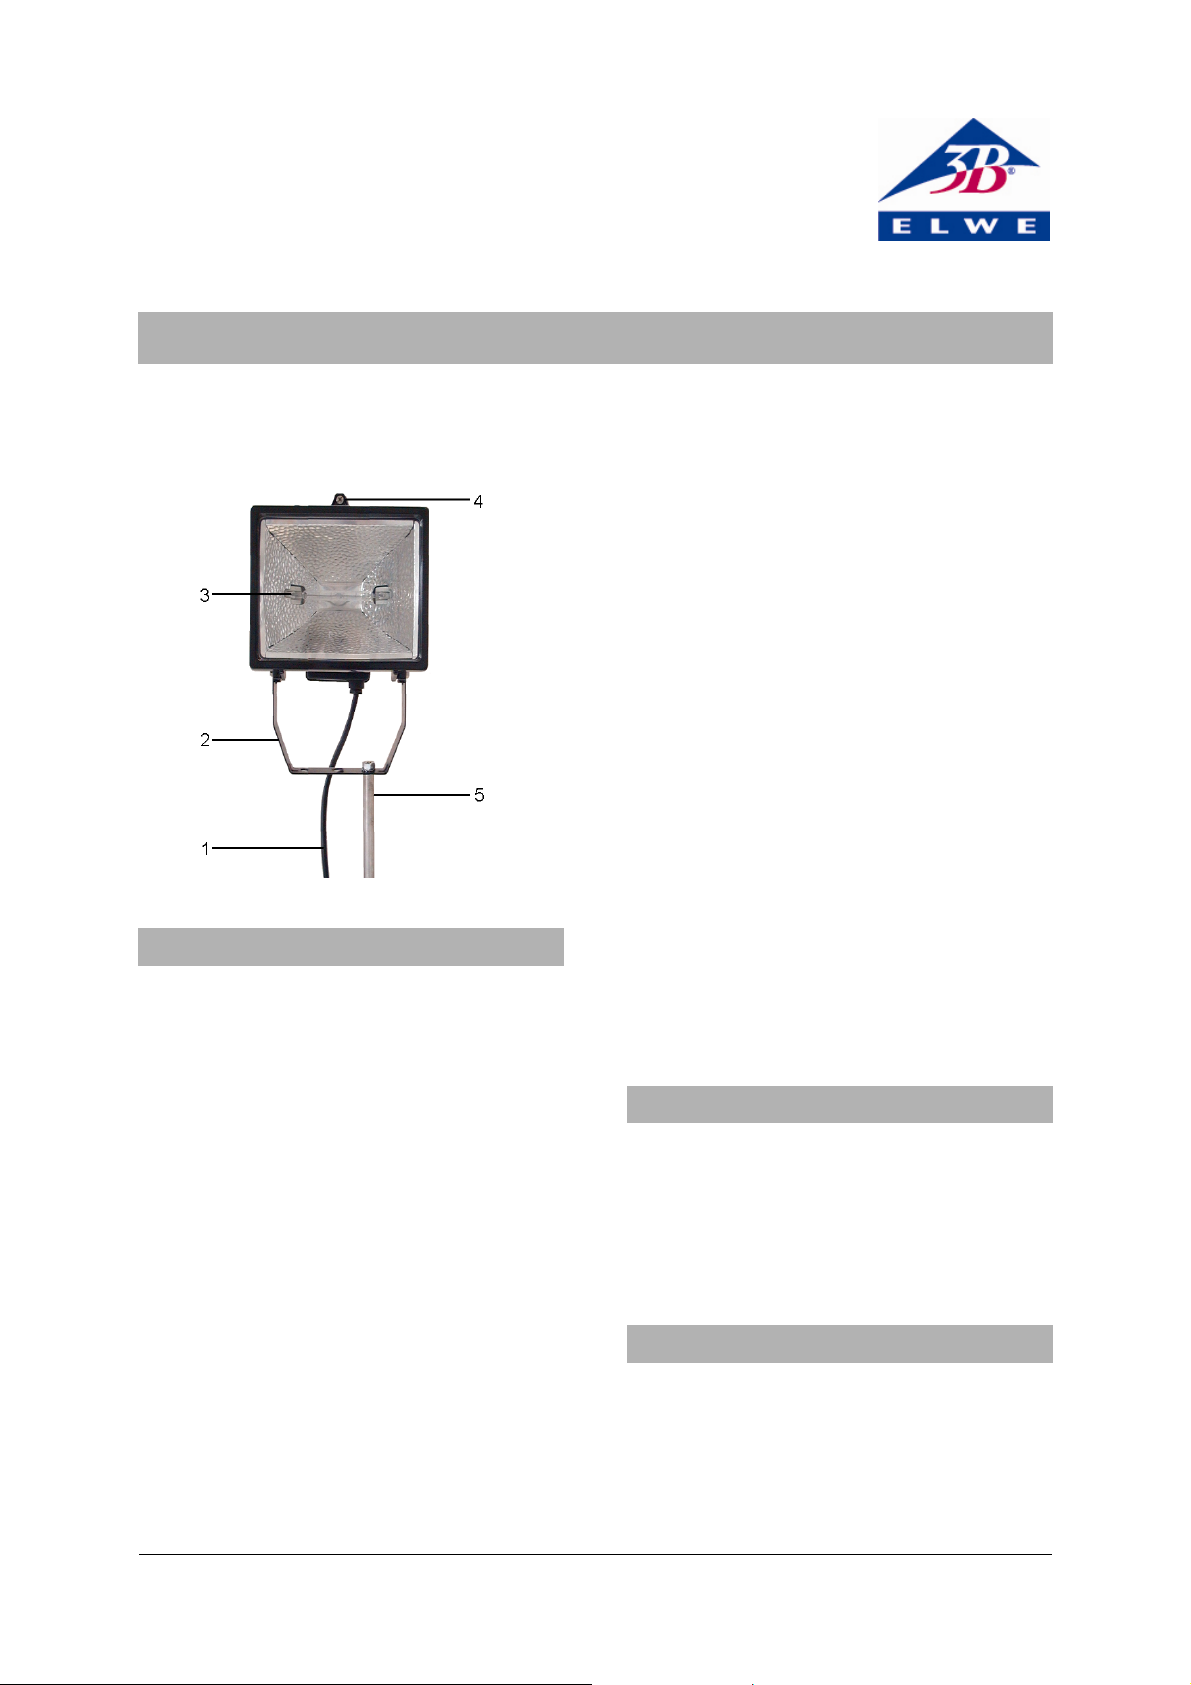
Halogenleuchte U8476713
1 Netzanschlusskabel
2 Haltebügel
3 Röhre
4 Verschlussschraube
5 Stativ
1. Sicherheitshinweise
Bei bestimmungsgemäßem Gebrauch ist der sichere Betrieb des Gerätes gewährleistet. Die Sicherheit
ist jedoch nicht garantiert, wenn das Gerät unsachgemäß bedient oder unachtsam behandelt wird.
Wenn anzunehmen ist, dass ein gefahrloser Betrieb
nicht mehr möglich ist (z.B. bei sichtbaren Schäden), ist das Gerät unverzüglich außer Betrieb zu
setzen.
• Vor Erstinbetriebnahme überprüfen, ob der auf
der Gehäuserückseite aufgedruckte Wert für
die Netzanschlussspannung den örtlichen Anforderungen entspricht.
• Vor Inbetriebnahme das Gehäuse und die Netz-
leitung auf Beschädigungen untersuchen und
bei Funktionsstörungen oder sichtbaren Schäden das Gerät außer Betrieb setzen und gegen
unbeabsichtigten Betrieb sichern.
• Gerät nur an Steckdosen mit geerdetem Null-
leiter anschließen.
Verbrennungsgefahr! Die Leuchte wird nach längerem Gebrauch sehr heiß.
• Gerät nach längerem Gebrauch mind. 20 Minu-
ten abkühlen lassen.
Leuchte scheint sehr hell.
• Nicht direkt in die Leuchte blicken.
2. Beschreibung
Die Halogenleuchte dient als starke Lichtquelle
beispielsweise in Experimenten mit dem SolarGrundlagenset (U8461200).
Die Halogenleuchte U8476713-115 ist für eine
Netzspannung von 115 V (±10 %) ausgelegt,
U8476713-230 für 230 V (±10 %).
3. Technische Daten
Leistung: max. 500 W
Maße: 180 x 140 x 130 mm
Stiel: 250 mm
Haltebügel: 140 x 110 mm²
3
1
Page 2
4. Erstinbetriebnahme
Einsetzen der Halogenlampe
• Schraube der Schutzscheibe lösen, Scheibe
öffnen.
• Halogenlampe mit sauberem, trockenem Tuch
in die gefederte Fassung einsetzen.
• Das andere Ende der Halogenlampe vorsichtig
in die gegenüberliegende Fassung einsetzen.
• Auf sachgemäßen Sitz achten!
• Halterungsabdeckung schließen und mit der
Schraube sichern.
• Auf richtigen Sitz der Dichtung achten.
5. Inbetriebnahme
• Halogenlampe unter Verwendung des Stiels
oder Haltebügels aufbauen.
• Leuchte ans Netz anschließen.
• Zum Ausschalten Netzstecker ziehen.
6. Wechsel der Halogenlampe
Ersatzlampe U8476714
• Netzstecker ziehen.
• Gerät abkühlen lassen.
• Die Schraube der Schutzscheibe lösen, Scheibe
öffnen.
• Zum Abziehen der Halogenlampe einen Lap-
pen oder etwas Ähnliches verwenden. Lampe
nicht mit den Fingern berühren.
• Alte Halogenlampe entfernen und durch neue
ersetzen.
Hinweis:
• Halogenlampe nicht in den Hausmüll werfen.
• Entsorgungsvorschrift des jeweiligen Landes
beachten.
Elwe Didactic GmbH • Steinfelsstr. 6 • 08248 Klingenthal • Deutschland • www.elwedidactic.com
3B Scientific GmbH • Rudorffweg 8 • 21031 Hamburg • Deutschland • www.3bscientific.com
Technische Änderungen vorbehalten
© Copyright 2008 3B Scientific GmbH
Page 3
3B SCIENTIFIC
Instruction sheet
02/08 SP/ALF
®
PHYSICS
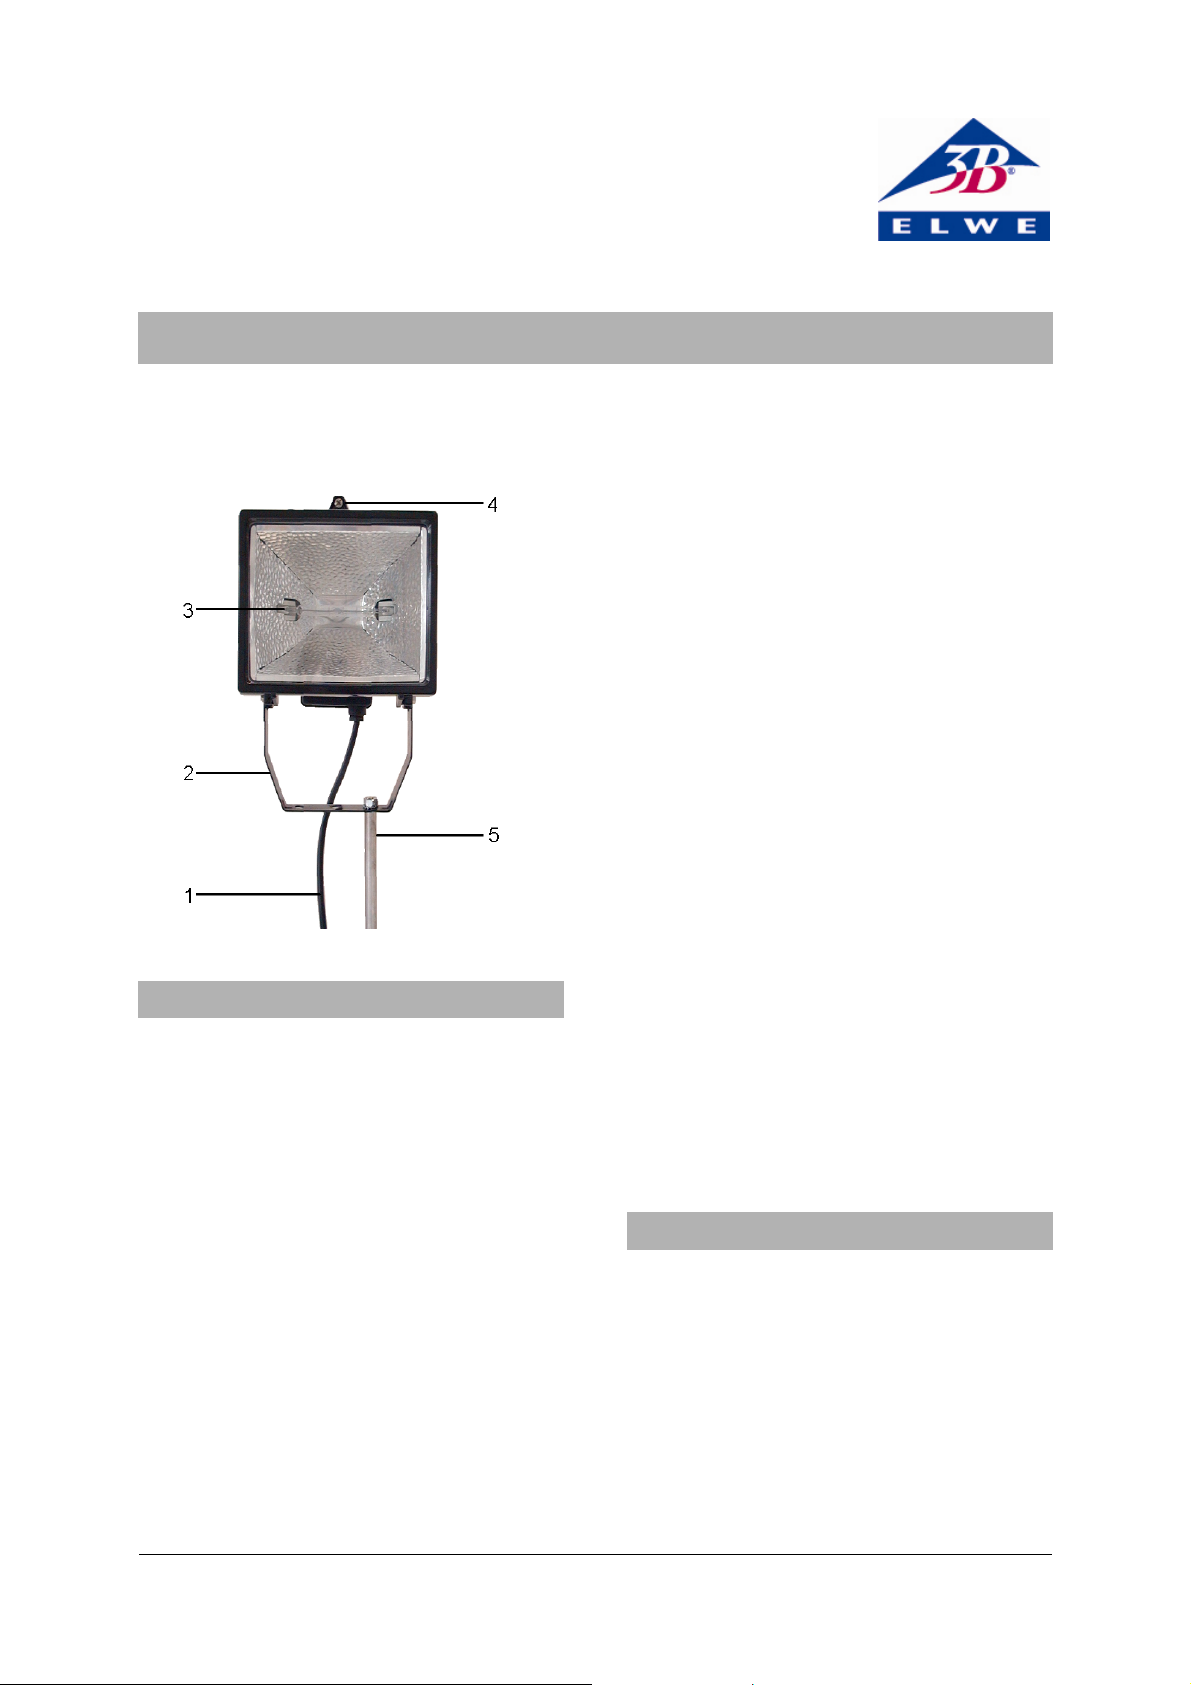
Halogen lamp U8476713
1 Mains lead
2 Holding bracket
3 Tube
4 Locking screw
5 Stand
1. Safety instructions
Safe operation of the equipment is guaranteed,
provided it is used correctly. However, there is no
guarantee of safety if the equipment is used in an
improper or careless manner. If it is deemed that
the equipment can no longer be operated without
risk (e.g. visible damage has occurred), the equipment should be switched off immediately and
secured against any unintended use.
• Before putting the equipment into operation,
confirm that the specifications printed on the
rear side of the housing are compatible with
the local mains voltage.
• Before putting the equipmentinto operation,
check the housing and the mains lead for any
damage. In the event of any malfunction/operational defect or visible damage,
switch off the equipment immediately and secure it from unintentional use.
• The instrument may only be connected to the
mains via a socket that has an earth connection.
Danger of burns! When used for a longer period,
the halogen lamp becomes extremely hot.
• If used for a long period, allow the lamp to
cool for at least 20 minutes.
The light produced by the halogen lamp is extremely bright.
• Do not look directly into the lamp.
2. Description
The halogen lamp can be used as a strong source of
light in experiments using the basic solar set
(U8461200).
The halogen lamp U8476713-115 is for operation
with a mains voltage of 115 V (±10%), and the unit
U8476713-230 is for operation with a mains voltage
of 230 V (±10%).
1
Page 4
3. Technical data
Power: max. 500 W
Dimensions: 180 x 140 x 130 mm
³
Stand: 250 mm
Holding bracket: 140 x 110 mm²
4. Initial commissioning
Fitting the tube
• Remove the screw from the protective glass
cover. Open the glass cover.
• Use a clean, dry cloth to fix the new tube into
the spring loaded connection of the tube
holder.
• Carefully place the unconnected end of the
tube into the opposite holder.
• Make sure that the tube is fitted properly!
• Replace the protective glass cover and secure it
with the screw.
• Make sure that the sealings fit properly.
5. Operation
• Use the stand or the holding bracket to mount
or set up the halogen lamp.
• Connect the lamp to the mains.
• Pull out the plug to switch off the lamp.
6. Replacing the tube
Replacement tube U8476714
• Pull out the mains plug.
• Allow the halogen lamp to cool.
• Remove the screw from the protective glass
cover. Open the glass cover.
• To remove the tube, use a cloth or similar
material. Do not touch the tube with the bare
hand.
• Remove the old tube and replace it with a new
one.
Caution:
• Tubes are not to be disposed of together with
domestic waste.
• Adhere to the waste disposal regulations for
respective countries.
Elwe Didactic GmbH • Steinfelsstr. 6 • 08248 Klingenthal • Germany • www.elwedidactic.com
3B Scientific GmbH • Rudorffweg 8 • 21031 Hamburg • Germany • www.3bscientific.com
Subject to technical amendments.
© Copyright 2008 3B Scientific GmbH
Page 5

3B SCIENTIFIC
Lampe à halogène U8476713
Instructions d’utilisation
02/08 SP/ALF
®
PHYSICS
1 Câble secteur
2 Étrier
3 Tube
4 Bouchon fileté
5 Support
1. Consignes de sécurité
En cas d'utilisation conforme, l'exploitation sûre de
l'appareil est garantie. En revanche, la sécurité
n'est pas garantie si l'appareil n'est pas commandé
dans les règles ou manipulé sans attention.
S'il s'avère qu'une exploitation peu sûre n'est plus
possible (par ex. en présence de dommages apparents), mettez l'appareil immédiatement hors service.
• Avant la première mise en service, assurez-vous
que la valeur imprimée sur le dos du boîtier
pour la tension secteur correspond aux exigences en vigueur sur place.
• Avant la mise en service, vérifiez si le boîtier et
le câble secteur présente des endommagements et, en cas de dysfonctionnement ou de
dommages apparents, mettez l'appareil hors
service et protégez-le contre toute remise en
service.
• Ne branchez l'appareil qu'à des prises de cou-
rant avec mise à la terre du neutre.
Risque de brûlure ! Utilisée longuement, la lampe
devient brûlante.
• Après une utilisation prolongée, laissez refroi-
dir l'appareil pendant au moins vingt minutes.
La lampe brille avec une très grande clarté.
• Ne regardez pas directement dans la lampe.
2. Description
Comme puissante source lumineuse, la lampe à
halogène sert par exemple aux expériences réalisées avec le kit solaire de base (U8461200).
La lampe à halogène U8476713-115 est prévue
pour une tension secteur de 115 V (±10 %) et
U8476713-230 pour une tension secteur de 230 V
(±10 %).
3. Caractéristiques techniques
Puissance : max. 500 W
Dimensions : 180 x 140 x 130 mm
Manche : 250 mm
Étrier : 140 x 110 mm²
3
1
Page 6

4. Première mise en service
Mise en place du tube
• Desserrez la vis de la vitre de protection et
ouvrez la vitre.
• Insérez un tube neuf dans la douille à ressort
en vous servant d'un chiffon propre et sec.
• Introduisez l'autre extrémité du tube avec
prudence dans la douille opposée.
• Veillez à un logement correct.
• Refermez la protection et fixez-la avec la vis.
• Veillez au logement correct du joint.
5. Mise en service
• Montez la lampe à halogène en vous servant
du manche ou de l'étrier.
• Branchez l'appareil au secteur.
• Pour la mise hors tension, retirez la fiche sec-
teur.
6. Remplacement du tube
Tube de rechange U8476714
• Retirez la fiche secteur.
• Laissez refroidir l'appareil.
• Desserrez la vis de la vitre de protection et
ouvrez la vitre.
• Pour retirer le tube halogène, utilisez un chif-
fon ou quelque chose de similaire. Ne pas toucher la lampe avec les doigts.
• Retirez le tube usé et installez-en un neuf.
Note :
• Ne jetez pas le tube avec les ordures ménagè-
res.
• Observez les prescriptions nationales en vi-
gueur sur les déchets.
Elwe Didactic GmbH • Steinfelsstrasse 6 • 08248 Klingenthal • Allemagne • www.elwedidactic.com
3B Scientific GmbH • Rudorffweg 8 • 21031 Hambourg • Allemagne • www.3bscientific.com
Sous réserve de modifications techniques
© Copyright 2008 3B Scientific GmbH
Page 7

3B SCIENTIFIC
Lampada alogena U8476713
Istruzioni per l'uso
02/08 SP/ALF
®
PHYSICS
1 Cavo di allacciamento alla rete
2 Staffa
3 Tubo
4 Vite di chiusura
5 Stativo
1. Norme di sicurezza
Un utilizzo conforme garantisce il funzionamento
sicuro dell'apparecchio. La sicurezza non è tuttavia
garantita se l'apparecchio non viene utilizzato in
modo appropriato o non viene trattato con cura.
Se si ritiene che non sia più possibile un
funzionamento privo di pericoli (ad es. in caso di
danni visibili), l'apparecchio deve essere messo
immediatamente fuori servizio.
• Prima di utilizzare l'apparecchio per la prima
volta, verificare che il valore riportato sul retro
dell'alloggiamento indicante la tensione di
alimentazione corrisponda ai requisiti locali.
• Prima della messa in funzione controllare che
l'alloggiamento e il cavo di alimentazione non
presentino danni; in caso di anomalie nel
funzionamento o di danni visibili mettere
l’apparecchio fuori servizio e al sicuro da ogni
funzionamento accidentale.
• Collegare l'apparecchio solo a prese con
conduttore di protezione collegato a terra.
Pericolo di ustioni! Dopo un utilizzo prolungato la
lampada si surriscalda notevolmente.
• Dopo un utilizzo prolungato lasciare
raffreddare l'apparecchio per almeno 20
minuti.
La lampada risulta estremamente luminosa.
• Non guardare direttamente nella lampada!
2. Descrizione
La lampada alogena serve ad esempio negli
esperimenti con il set principi solari (U8461200)
come potente sorgente luminosa.
L’apparecchio U8476713-115 è progettato per una
tensione di rete di 115 V (±10 %), U8476713-230
per 230 V (±10 %).
3. Dati tecnici
Potenza: max. 500 W
Dimensioni: 180 x 140 x 130 mm
Asta: 250 mm
Staffa: 140 x 110 mm²
3
1
Page 8

4. Prima messa in funzione
Inserimento del tubo
• Allentare la vite del vetro di protezione, aprire
il vetro.
• Inserire nel supporto ammortizzato il tubo
nuovo utilizzando un panno pulito e asciutto.
• Inserire l'altra estremità del tubo con cautela
nel supporto opposto.
• Fare attenzione a un posizionamento
appropriato!
• Chiudere la copertura del supporto e
assicurarla con la vite.
• Fare attenzione a un posizionamento corretto
della guarnizione.
5. Messa in funzione
• Montare la lampadina alogena utilizzando
l'asta o la staffa.
• Collegare l'apparecchio alla rete.
• Per spegnerlo, staccare la spina di rete.
6. Sostituzione del tubo
Tubo sostitutivo U8476714
• Staccare la spina di rete.
• Lasciare raffreddare l'apparecchio.
• Allentare la vite del vetro di protezione, aprire
il vetro.
• Per estrarre il tubo utilizzare un panno o
qualcosa di simile. Non toccare la lampada con
le dita.
• Rimuovere il tubo vecchio e inserire un nuovo.
Nota:
• Non gettare il tubo nei rifiuti domestici.
• Rispettare la norma sullo smaltimento del
relativo paese.
Elwe Didactic GmbH • Steinfelsstr. 6 • 08248 Klingenthal • Germania • www.elwedidactic.com
3B Scientific GmbH • Rudorffweg 8 • 21031 Amburgo • Germania • www.3bscientific.com
Con riserva di modifiche tecniche
© Copyright 2008 3B Scientific GmbH
Page 9

3B SCIENTIFIC
Lámpara de halógeno U8476713
Instrucciones de uso
02/08 SP/ALF
®
PHYSICS
1 Cable de conexión a la red
2 Estribo de sujeción
3 Tubo
4 Tornillo de cierre
5 Soporte
1. Aviso de seguridad
Con el uso correcto y acorde con las disposiciones
se garantiza un seguro funcionamiento del
dispositivo. Sin embargo, la seguridad no está
garantizada si se maneja incorrectamente el
dispositivo o se lo trata sin cuidado.
Si es de suponer que un funcionamiento libre de
peligro ya no es posible (por ejemplo: debido a
daños visibles), el dispositivo se debe poner de
inmediato fuera de servicio.
• Antes de la primera puesta en marcha, se debe
comprobar si el valor impreso en la parte
posterior de la caja, referente a la tensión de
conexión a la red, corresponde a las exigencias
locales.
• Antes de la puesta en marcha, se debe
examinar la caja y la línea de conexión a la red
en lo referente a daños y, en caso de
funcionamiento defectuoso o daños visibles, se
debe poner el dispositivo fuera de servicio,
protegiéndolo además contra un uso
involuntario.
• El aparato se conecta sólo en enchufes con un
conductor de protección conectado a la tierra.
¡Peligro de quemaduras! La lámpara se recalienta
después de un uso muy prolongado.
• Después de un uso muy largo del dispositivo,
permita que se enfríe un mínimo 20 minutos.
La luz es muy brillante.
• No mirar directamente a la luz.
2. Descripción
La lámpara de halógeno sirve como fuente de luz
potente, por ejemplo, para experimentos con el
juego solar básico (U8461200).
La lámpara de halógeno U8476713-115 está
dimensionada para una tensión de red de 115 V
(±10 %) resp. U8476713-230 para 230 V (±10 %).
3. Datos técnicos
Potencia: máx. 500 W
Dimensiones: 180 x 140 x 130 mm
Mango: 250 mm
Estribo de sujeción: 140 x 110 mm²
3
1
Page 10

4. Primera puesta en marcha
Colocación del tubo
• Aflojar el tornillo del vidrio protector, abrir el
vidrio.
• Colocar el tubo nuevo en el portalámparas de
muelle, empleado un paño limpio y seco.
• Colocar el otro extremo del tubo en el
portalámparas opuesto.
• ¡Prestar atención a que la lámpara se
encuentre bien encajada!
• Cerrar la tapa del soporte y asegurarla con el
tornillo.
• Prestar atención al asiento correcto de la junta.
5. Puesta en marcha
• Montar la lámpara de halógeno con el mango
o el estribo de sujeción.
• Conectar el dispositivo a la red.
• Para apagar, desconectar el enchufe.
6. Cambio de medios de iluminación
Tubo de repuesto U8476714
• Desconectar el enchufe.
• Permitir que el dispositivo se enfríe.
• Aflojar el tornillo del vidrio protector, abrir el
vidrio.
• Para retirar el tubo se utiliza un trapo o algo
similar. No toque la lámpara con los dedos.
• Retirar el tubo viejo y se coloca un nuevo.
Nota:
• No tirar los tubos al tacho de basura
doméstico.
• Observar las prescripciones de desechos del
país respectivo.
Elwe Didactic GmbH • Steinfelsstr. 6 • 08248 Klingenthal • Alemania • www.elwedidactic.com
3B Scientific GmbH • Rudorffweg 8 • 21031 Hamburgo • Alemania • www.3bscientific.com
Se reservan las modificaciones técnicas
© Copyright 2008 3B Scientific GmbH
Page 11

3B SCIENTIFIC
Lâmpada de halogêneo U8476713
Instruções para o uso
02/08 SP/ALF
®
PHYSICS
1 Cabo de conexão à rede elétrica
2 Suporte
3 Tubo
4 Parafuso de fechamento
5 Pé de apoio
1. Indicações de segurança
Em caso de um uso adequado aos fins previstos,
está garantida a segurança da operação do
aparelho. A segurança não estará garantida em
caso de utilização indevida ou operação
descuidada.
Se for considerado que uma utilização segura do
aparelho não é mais possível (por exemplo, em
caso de danos visíveis), este deve ser retirado
imediatamente de circulação.
• Antes da primeira inicialização, verificar se os
valores impressos na parte de trás da armação
correspondem aos requerimentos da rede de
tensão local.
• Antes de iniciar a operação, verificar se há
algum dano visível na armação ou nas
conexões elétricas e em caso qualquer
disfunção retirar o aparelho de circulação e
impedir um eventual uso indevido.
• Só conectar o aparelho em tomada com
condutor de proteção aterrado.
Risco de queimaduras! A lâmpada fica muito
quente após uma utilização prolongada.
• Após um uso prolongado deixar o aparelho
esfriar-se por pelo menos 20 minutos.
A lâmpada brilha com muita claridade.
• Nunca olhar diretamente para a lâmpada.
2. Descrição
A lâmpada de halogêneo serve, por exemplo, para
experiências com o kit básico solar (U8461200)
como fonte de luz forte.
A lâmpada de halogêneo U8476713-115 está
equipado para trabalhar com uma tensão de rede
de 115 V (±10 %) U8476713-230 para 230 V (±10 %).
3. Dados técnicos
Desempenho: máx. 500 W
Medidas: 180 x 140 x 130 mm
Vara: 250 mm
Suporte: 140 x 110 mm²
3
1
Page 12

4. Operação inicial
Instalação dos tubos
• Soltar os parafusos do vidro de proteção, abrir
o vidro.
• Colocar um tubo novo no encaixe de mola
usando um pano limpo e seco.
• Inserir a outra ponta do tubo cuidadosamente
no encaixe oposto.
• Certificar-se de que a lâmpada se encontra
bem encaixada!
• Fechar a tampa do suporte e fixar com o
parafuso.
• Certificar-se de que a junta está bem colocada
5. Operação inicial
• Montar a lâmpada com a vara ou o com o
suporte.
• Ligar o aparelho na rede elétrica.
• Para deligar, tirar o plug da tomada.
6. Troca do meio luminescente
Tubo de reposto U8476714
• Puxar o plug da tomada.
• Deixar o aparelho esfriar.
• Soltar o parafuso do vidro de proteção e abri-
lo.
• Para retirar o tubo utilizar um pano ou algo
semelhante. Não toque na lâmpada com os
dedos.
• Retirar o tubo velho e substitua-o com um
novo:
Indicação:
• Não jogar o tubo no lixo caseiro.
• Obedecer a regulamentação de despejo do país
correspondente.
Elwe Didactic GmbH • Steinfelsstr. 6 • 08248 Klingenthal • Alemanha • www.elwedidactic.com
3B Scientific GmbH • Rudorffweg 8 • 21031 Hamburgo • Alemanha • www.3bscientific.com
Sob reserva de alterações técnicas
© Copyright 2008 3B Scientific GmbH
 Loading...