

Page 1
3B SCIENTIFIC® PHYSICS
Electrostatic equipment set U8491500
Instruction sheet
11/07 ALF
®
br
bq
1
2
3
4
5678 9 bl bm
This equipment set can be used in conjunction with
an electrostatic generator such as a Wimshurst machine
(e.g. U15310) or a Van der Graaf generator (e.g. U15300)
to perform a wide variety of experiments investigating
electrostatic phenomena including some historic experiments.
1. Safety instructions
• Discharge experimental equipment before touching.
• Discharge Wimshurst machine and Van der Graaf
generator before touching.
• When using a Van der Graaf generator, attach the
ground terminal to ground.
• Perform experiments only with high-voltage equipment whose short-circuit current is less than 15 µ .
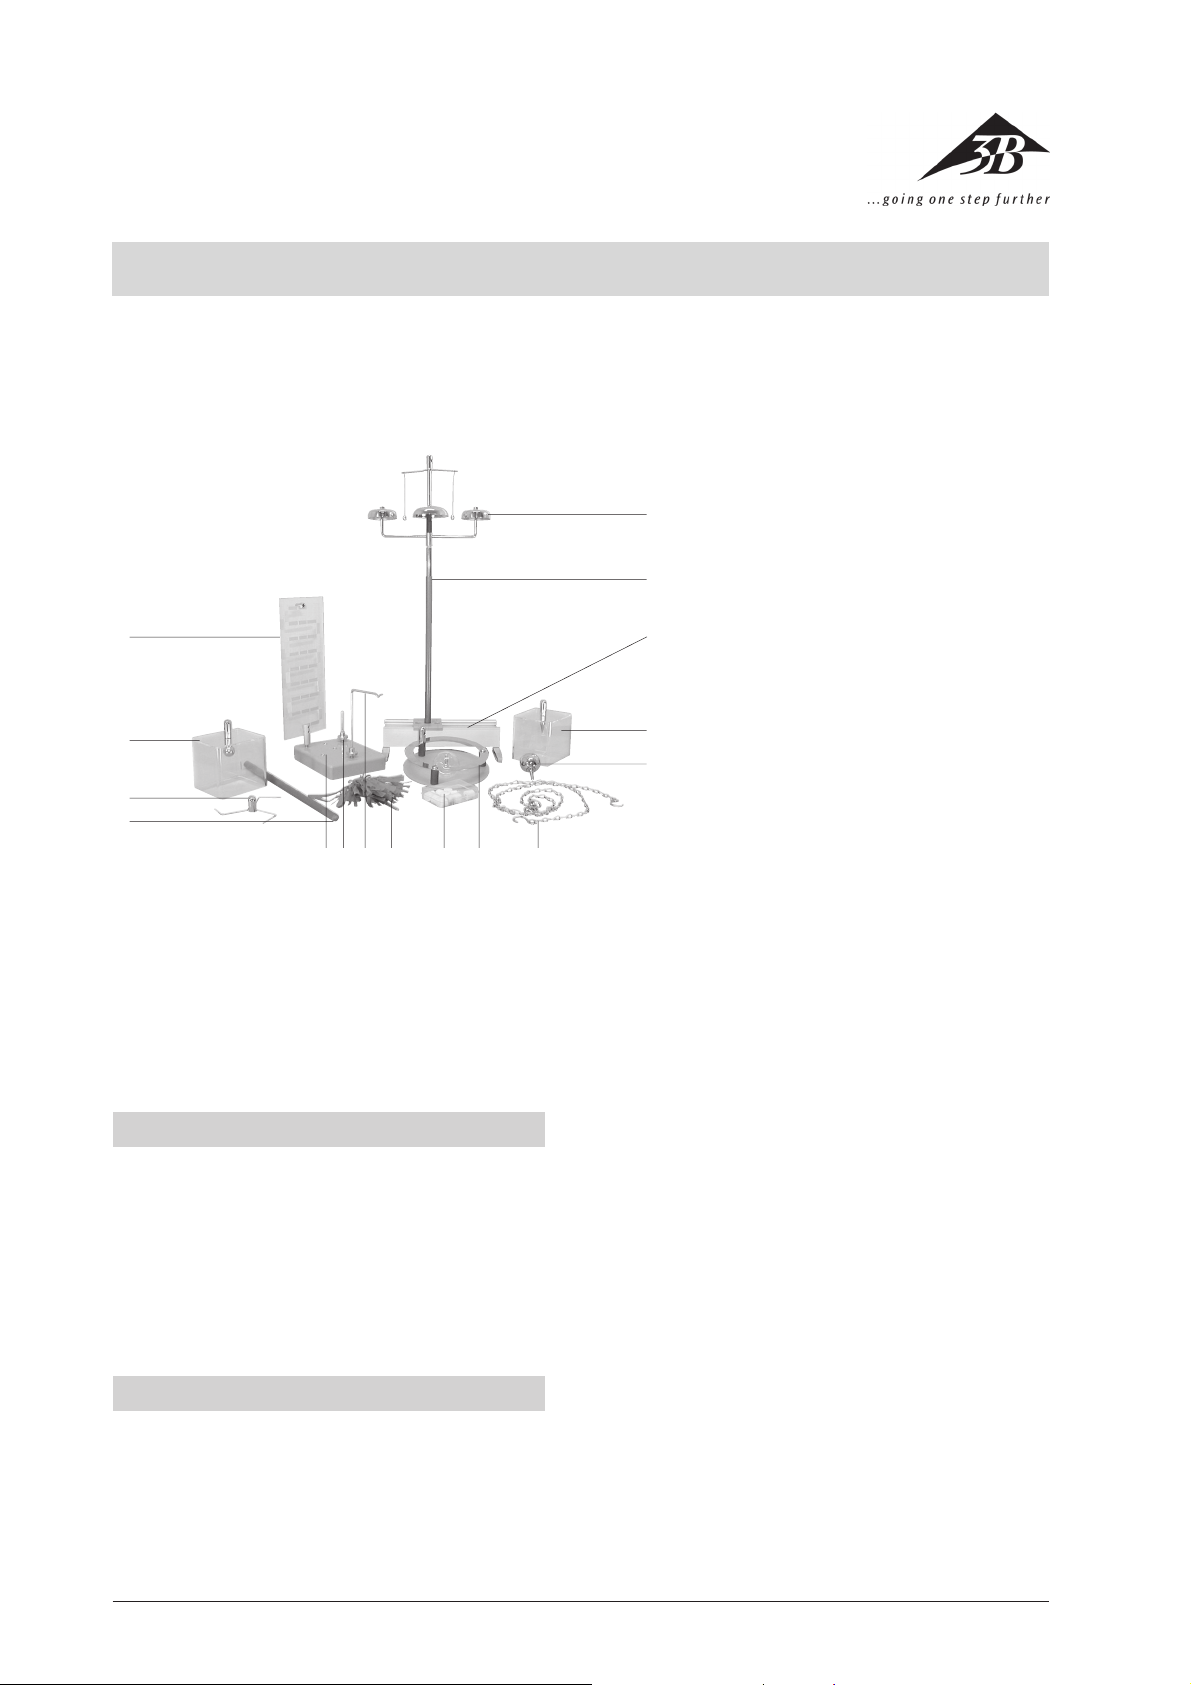
2. Description, technical data
The experiment components are equipped with 4-mm
connector pins so that they may be quickly mounted
on or removed from an insulated stand. Connection
chains are included for connecting sources of charge,
bp
bo
bn
but experiment leads with 4 mm plugs can also be used.
We recommend using the Wimshurst machine U15310
as the source of charge for these experiments.
2.1 Scope of delivery (see illustration)
1 Luminous pane
2 Box with spherical electrode
3 Triskelion wheel
4 Friction rod, plastic with 4 mm plug
5 Storage stands
6 Needle bearing with connector pin
7 Hook stand for elder pith double pendulum
8 Bundle of tissue paper strips on rod
9 Pieces of elder pith (10 in a box)
bl Base plate on connecting pin with rolling sphere
race
bm Connection chains (2 each)
bn Conductor sphere 30 mm Ø, with connector pin
bo Box with pointed electrode
bp Stand base
bq Stand rod, insulated with retaining and
connecting socket
br Bell chimes
4
Page 2
3. Instructions for use
• The equipment only produces satisfactory experi-
mental results if kept clean and dry.
• Discharge experiment components before use.
• When the weather is damp, it is advisable to use a
fan.
• Assemble the experiments on the stand and con-
nect to the Wimshurst machine or Van der Graaf
generator with connection chains.
• Observe safety advice.
4. Example experiments
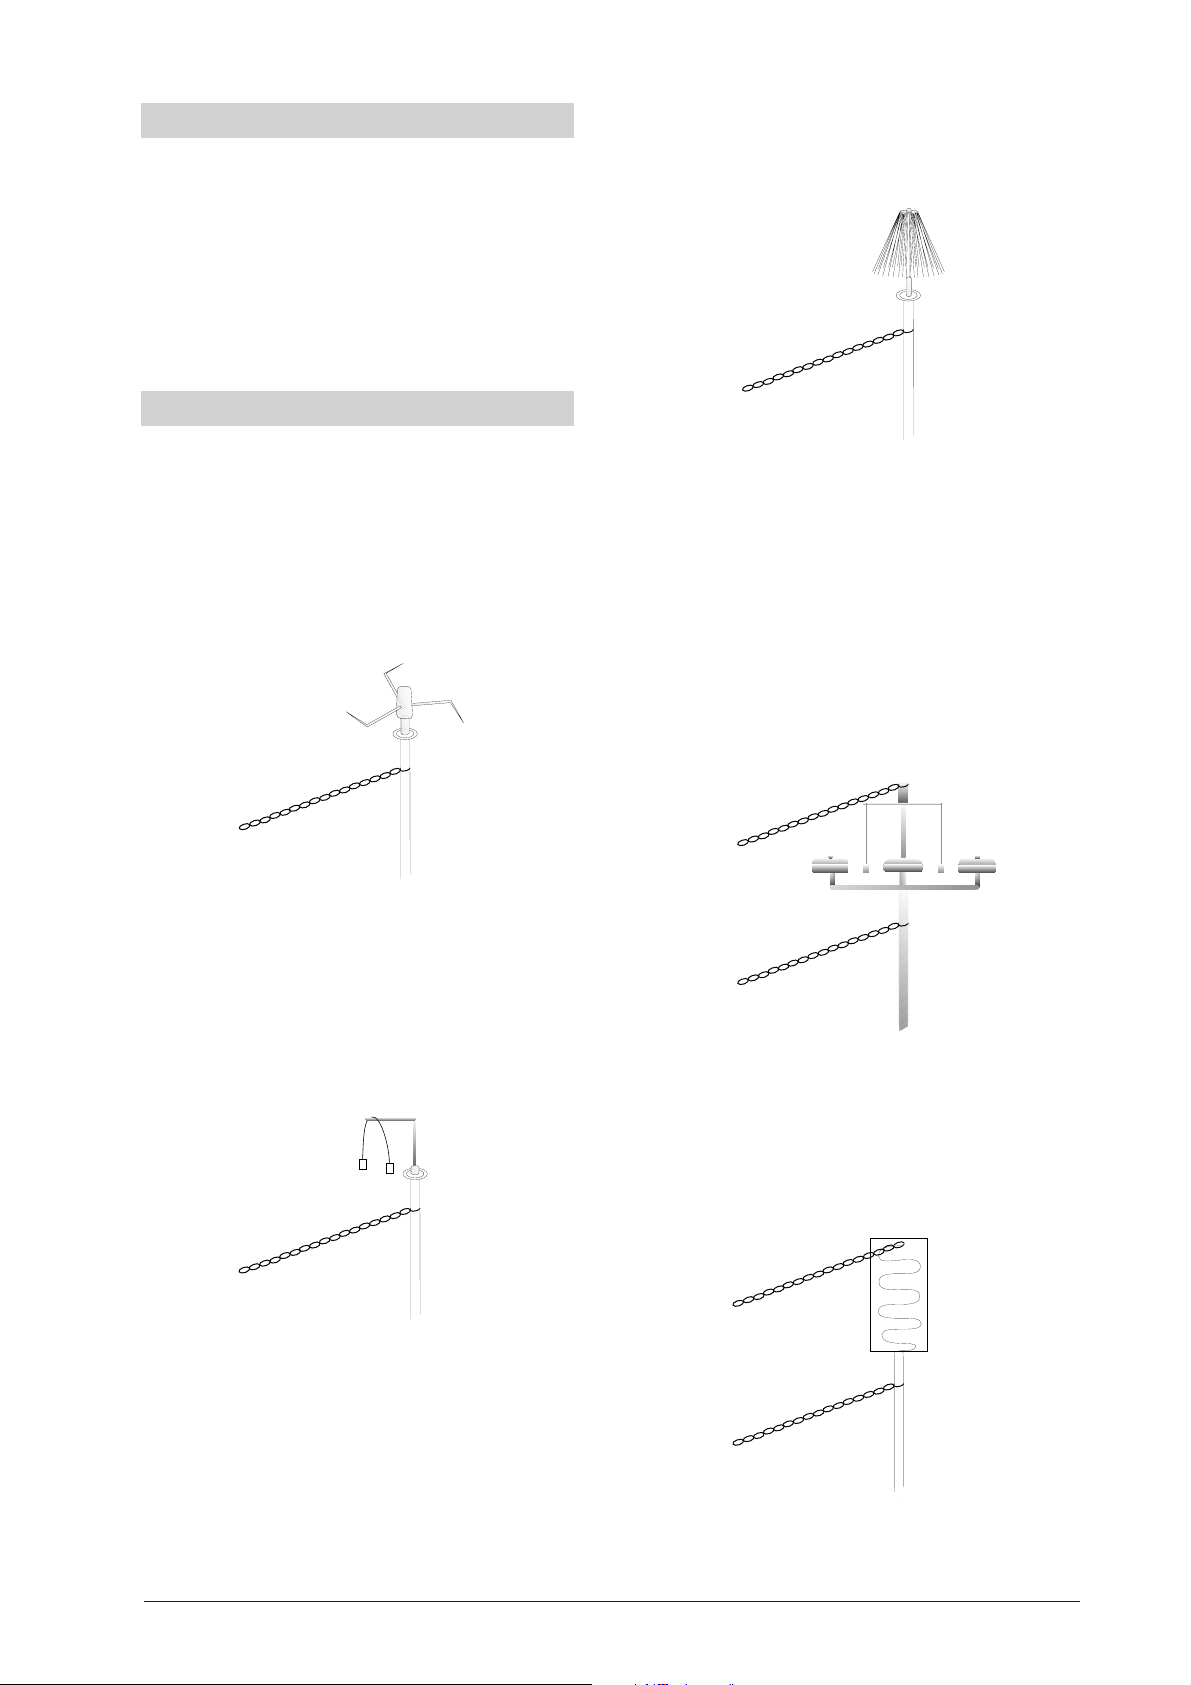
4.1 Discharge from points (Fig.1)
• Place the triskelion wheel (3) on the needle bearing
attached to the stand. Connect to the source of
charge to charge up the wheel.
• The triskelion wheel starts to turn because a jet
of charge flows rapidly out of the points and
propels the wheel.
• Increasing the charge causes the wheel to spin
more quickly.
• The bundle of tissue paper is also a simple electroscope.
(Fig. 3)
4.4 Bell chimes (Fig.4)
• Attach the bell chimes (16) to the stand, connect
to the source of charge and gradually increase the
charge until the hammers strike the bells.
• Be careful. Excessive charge can cause sparks between the mountings.
• The supply of charge causes the hammers to
charge up and be attracted or repelled by the bells.
• When the hammers touch the bells, they discharge
and swing back. The process starts again when
they are loaded with the opposite charge.
(Fig. 1)
4.2 Double pendulum (Fig.2)
• A double pendulum made of elder pith (7) is attached to the hook stand. Connect to the source
of charge to charge up the pendulum.
• Since the pieces of elder pith assume the same
charge, they repel one another.
• The double pendulum is a simple electroscope.
(Fig. 2)
(Fig. 4)
4.5 Luminous pane (Fig.5)
• Attach the luminous plane (1) to the stand, connect
to the source of charge and gradually increase the
charge.
• When the voltage is large sparks cross the spaces
between the conductors of the pane.
4.3 Bundle of tissue paper (Fig.3)
• Attach the bundle of tissue paper (8) to the stand,
connect to the source of charge and gradually increase the charge.
• The strips of paper all repel one another and
spread out to all sides to look like an umbrella
frame.
(Fig. 5)
5
Page 3

4.6 Electrical dances (Fig.6)
• Attach the base plate (from 10) to the stand, put
5-8 pieces of elder pith on it and place the box
with the spherical electrode over the top.
• Connect to the source of charge and gradually increase the charge until the pieces of pith begin to
dance.
• Stop charging and observe what happens.
• Since the pieces are all charged to the same po-
larity as the base plate, they are repelled from it
and either lose their charge or gain an opposite
charge by coming close to the spherical electrode.
They then fall back and the process begins again
even if the flow of charge entering the experiment
is halted, since there will still be sufficient charge
remaining.
(Fig. 6)
4.7 Smoke eater (Fig.7)
• Attach the base plate (from 10) to the stand, place
the box with the pointed electrode over the top
and connect to the source of charge.
• Blow smoke from a cigarette or a smouldering
candle into the box.
• Slowly charge up until the smoke is sucked downwards.
• Repeat the process.
• The smoke particles are charged by the pointed
electrode, repel one another and are attracted
down to the base plate which has the opposite
charge.
(Fig. 7)
4.8 Rolling sphere race (Abb.8)
• Attach the base plate and the rolling sphere race
(10) to the stand. Make sure the spacers of the
sphere race are not inserted crookedly.
• Place the clean dry sphere onto the base plate so
that its circumference touches the edge of the upper circular electrode.
• Connect to the source of charge and gradually increase the charge until the sphere is repelled and
starts to roll. Too much charge only results in
sparks.
• The sphere is charged with one polarity and then
the other and the repeated charging and discharging produces force which causes it to roll.
• If the sphere only spins on its own axis, a slight
push may be required.
(Fig. 8)
3B Scientific GmbH • Rudorffweg 8 • 21031 Hamburg • Germany • www.3bscientific.com • Technical amendments are possible
6
Page 4

 Loading...