


8288 435 000
Eight-Track Digital Recorder
Model


Quick Operation Guide
Welcome to D-108
Thank you for choosing the Fostex D-108.
The D-108 is an eight-track digital multitracker equipped with sixteen additional tracks. It supports E-IDE hard disks and SCSI drive disks (such as a Zip drive, MO drive, or fixed disk) as the recording and playback media. Please read this Quick Operation Guide before using your D-108.
This Quick Operation Guide introduces basic operations and preparation procedure. To make the best use of your D-108, please also read the Owner’s Manual for detailed information.
D-108 Quick Operation Guide
2

D-108 Quick Operation Guide |
|
Table of Contents |
|
Package contents............................................................................................................................ |
4 |
Recordingmedia............................................................................................................................. |
4 |
Using an E-IDE hard disk............................................................................................................... |
5 |
Installing a hard disk in a removable case........................................................................................ |
5 |
Formatting a disk................................................................................................................................... |
8 |
Checking the available recording time (REMAIN) on a formatted disk.................................... |
9 |
Usinga SCSIdrive......................................................................................................................... |
10 |
Connecting a SCSI drive to the D-108............................................................................................. |
10 |
Formatting a SCSI disk........................................................................................................................ |
11 |
Checking the available recording time (REMAIN) on a formatted disk.................................. |
13 |
Using two current drives............................................................................................................ |
15 |
Selectingacurrentdrive............................................................................................................. |
16 |
Connectingamixer...................................................................................................................... |
17 |
Basic recording............................................................................................................................. |
19 |
Initial settings....................................................................................................................................... |
19 |
Setting sampling frequency.............................................................................................................. |
19 |
Basic analog recording....................................................................................................................... |
21 |
Undo and redo recording.................................................................................................................. |
22 |
Multitrack recording using overdubbing.............................................................................. |
23 |
Ping-pong recording................................................................................................................... |
23 |
Mixdown................................................................................................................................................. |
24 |
Recording in a new Program..................................................................................................... |
24 |
BasicLocatefunction................................................................................................................... |
25 |
Playback using the Vari-pitch function.................................................................................. |
26 |
Owner’s Manual reference pages.......................................................................................... |
27 |
<Recording media>
The D-108 is not equipped with recording media for recording and playback. Please read the section from page 4 to prepare the recording media to record, play back, and edit data on the D-108. For more information on a recording media supported by the D-108, refer to the “List of the drives with operation guaranteed” in the main User’s Guide.
<Damages>
Fostex is not responsible for any direct or consequential damages caused by operating the D-108 and/ or a connected E-IDE or SCSI drive and/or disk.
<Copyrights>
It is prohibited by law to use materials recorded on the D-108 from music CDs and/or video tapes for which copyrights belong to a third party for commercial concerts, broadcasts, sales, and/or distribution, except for your personal entertainment.
3
D-108 Quick Operation Guide
Package contents
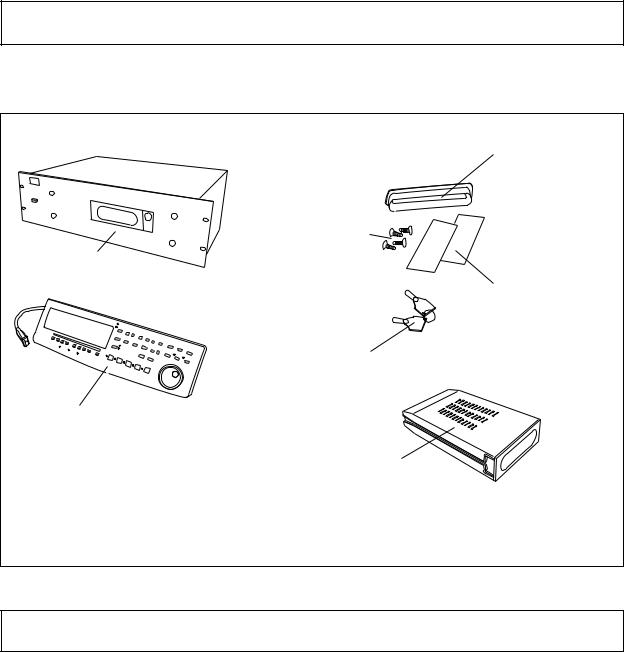
Make sure that the package contains all the items listed below. (The illustrations may not precisely match the appearance of the actual items.) If you find that items are missing, contact your local dealer.
D-108 main unit
Detachable controller
Hard disk fixing screw Use these screws to fix the hard disk to the removable case. (Refer to page 6 for more information.)
Lock-unlock key
Use this key when you install the removable case with the hard disk in the D-108. (Refer to page 7 for more information.)
Removable case
Install a hard disk into this removable case. (Refer to p a g e 5 f o r m o r e information.)
Dust cover
Install this cover over the connectors on the removable case after you install the hard disk. (Refer to page 7 for more information.)
Insulation seals
Use these seals when you install the hard disk into the removable case. (Refer to page 7 for more information.)
Recording media
The D-108 is not equipped with recording media (also called “a current drive” in this Guide), such as a hard disk. You need to prepare a current drive to make a recording.
The D-108 supports an E-IDE hard disk (that can be installed in the included removable case), and an external SCSI drive (MO, Zip, or fixed hard disk drive) (that can be connected to the SCSI connector on the rear panel of the D-108). (Note: Using an MO, Zip, or fixed disk may limit the number of recording tracks, depending on the disk capacity.)
Be sure to use a drive and a disk with operation guaranteed by Fostex. For more information on disks supported by the D-108, refer to the “List of drives with guaranteed operation” in the main Owner’s Mnual. To use an E-IDE hard disk as a current drive, refer to the “Using an E-IDE hard disk” section on the following page. To use an external SCSI drive, refer to the “Using a SCSI drive” section. If you are using both types of drives, refer to the “Using two current drives” and “Selecting a current drive” sections.
4

D-108 Quick Operation Guide
Using an E-IDE hard disk
The D-108 has a slot for an optional hard disk. First you need to install a hard disk into the removable case included in the D-108 package before you install it into the slot.
The following instructions assume that you have already purchased an E-IDE hard disk unit. Prepare the following items for hard disk installation:
Dust cover
Fixing screws
Insulation seals
Removable case |
Hard disk unit |
Lock-unlock key |
<Note>
Be sure to turn off the power to the D-108 (or remove the power cable from the AC outlet) before installing a hard disk.
Installing a hard disk in a removable case
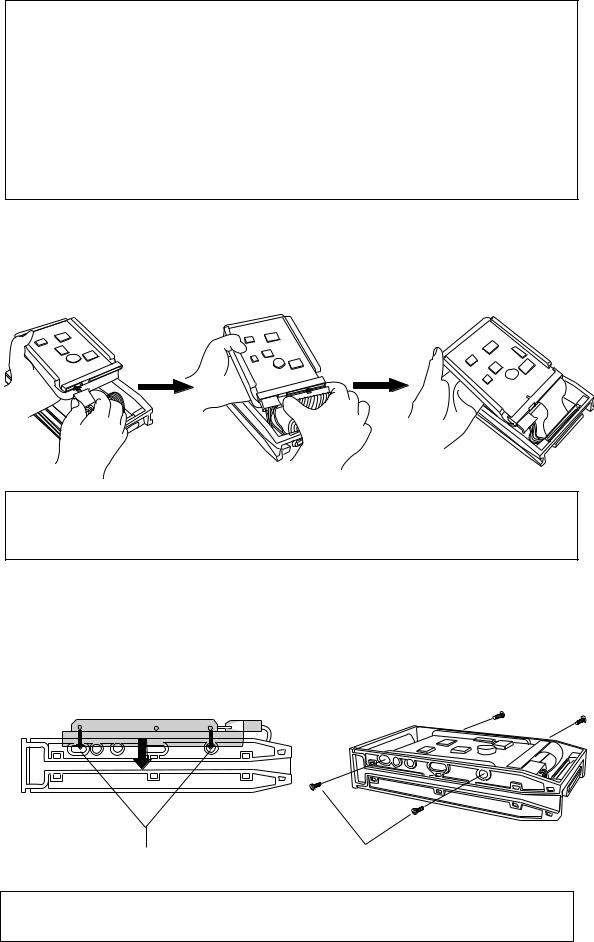
First, you need to disassemble the removable case included in the package so that you can install a hard disk into it.
Disassembling the removable case
1.Apply your thumb to the edge of the case on the connector side as shown in the figure, and slightly pull the cover in the direction of the arrow.
2.Apply your thumbs to the side of the case and open the cover. In the same manner, open the cover on the other side. (Caution: Be careful not to pinch your fingers.)
5
D-108 Quick Operation Guide
<Notes on handling a hard disk>
•A hard disk is a high-precision device. Do not apply any impact to the disk when and after you install it in the case. Do not leave the disk near a device that generates a strong magnetic field. Choose a level and stable surface for installation. Be careful not to injure yourself.
Fostex is not liable for any malfunction or damage to the hard disk caused by mishandling.
•You need to set the DIP (Jumper) switch on the hard disk to “MASTER” before you install it into the removable case. If the switch is set to “SLAVE,” the hard disk will not function correctly.
Refer to the instruction manual that came with your hard disk for more information on the DIP (Jumper) switch setting.
Connecting cables
1.Connect the cables in the removable case to the connectors on the rear of the hard disk.
As shown in the figure, first connect the power supply cable. Make sure that you connect the cables securely in the correct direction.
<Note on the connectors>
Some connectors on the hard disks may be too tight to connect cables easily. Do not apply excessive force to such connectors to avoid injury or damage to the hard disk.
Fixing the hard disk to the case
1.Align the screw holes.
As shown in the figure, align the screw holes on the side of the disk with the holes on the case.
2.Insert four included fixing screws (two screws on each side) and tighten them.
Align the screw holes on the other side of the |
Tighten four screws (two on each side). |
hard disk with the holes on the case.
<Note on tightening the screws>
Do not tighten the screws too much. Otherwise, you may damage the case.
6
D-108 Quick Operation Guide
Assembling the case
<Note>
When you assemble the case, follow the note below:
If a projecting part on the hard disk touches the cover, apply the insulation seal (included in the package) to the surface of the case where the part would touch. If you use the disk with its part touching the cover, a short-circuit may occur, leading to a malfunction.
1.Assemble the case by installing the covers.
After you assemble the case, store the case in a place not subject to magnetic fields. If you remove the case from the D-108 and store or move the unit, cover the connectors on the removable case with the dust cover (included in the package) to protect the hard disk from building up static electricity and dust. Do not touch the connectors with your fingers to avoid static electricity.
Installing the removable case in the D-108
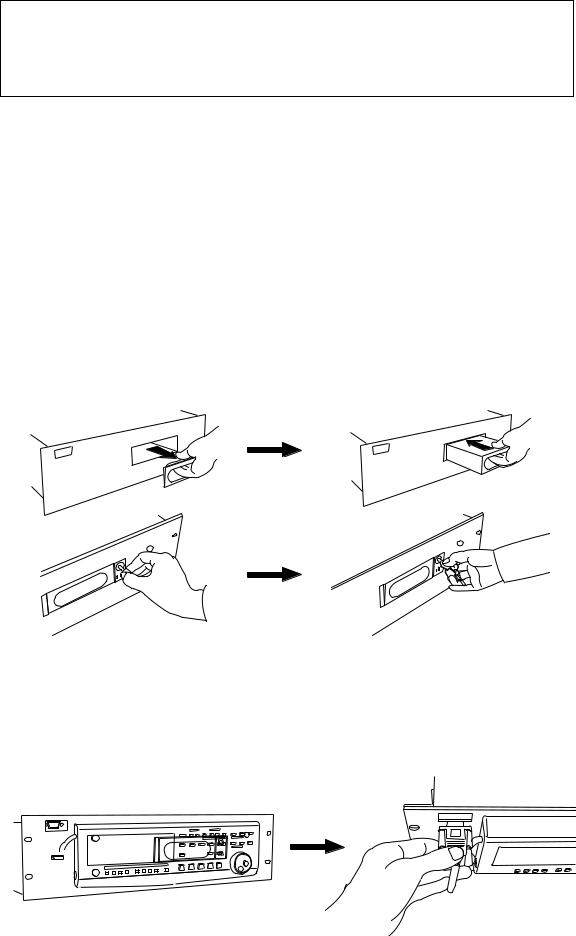
1. Remove the blank panel that covers the slot for the disk on the front panel of the D-108. (Note: Do not insert your fingers into the slot when the slot cover is open. Otherwise, electrical shock or injury may occur.)
2. Install the removable case (containing a hard disk inside) into the slot.
Push in the case with the correct side facing toward you. (Use both hands to push it in so that the surface of the case and the front panel become flush.)
3. Use the included key to lock the removable case.
Connecting a detachable controller
1. Attach a detachable controller (included) to the hooks on the front panel.
2. Securely insert the controller’s connector cable to the connector on the front panel.
Instead of using the controller, you may use an optional extension cable (Model 8551). Consult your dealer for more information.
7
D-108 Quick Operation Guide
Formatting a disk
After installing the hard disk in the D-108, you need to format the hard disk for recording and playback. (This applies to new disks and those that have been used with a computer.)
Connect the D-108’s power cable to the AC outlet.
<Note>
Be sure to connect the power cable to an AC outlet of the voltage specified in the User’s Guide.
Turn on the power to the D-108.
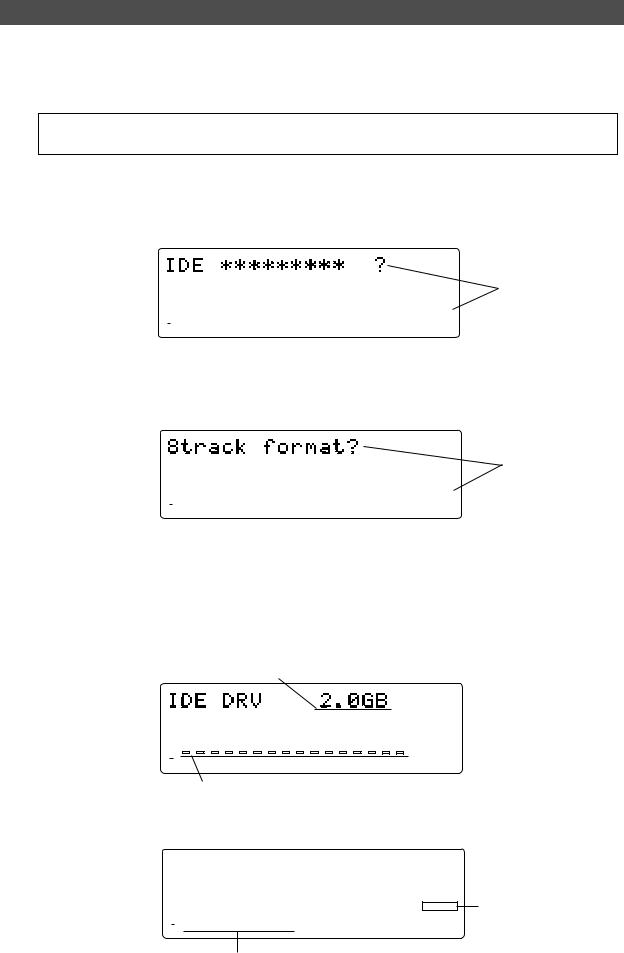
The display indicates the ROM version and date, messages [Initializing...], [Current IDE Drv], [model name], then [Unformat!], and finally indicates the Disk format menu. (“****” represents the name of the hard disk model.)
|
|
|
|
|
|
|
|
|
SETUP |
||
OL |
|
|
|
|
|
|
|
|
FORMAT |
||
|
|
|
|
|
|
|
|
||||
0 |
|
|
|
|
|
|
|
|
|
|
Flashing |
6 |
|
|
|
|
|
|
|
|
|
|
|
3 |
|
|
|
|
|
|
|
|
|
|
|
9 |
|
|
|
|
|
|
|
|
44.1kHz |
||
12 |
|
|
|
|
|
|
|
|
|
|
|
18 |
|
|
|
|
|
|
|
|
|
|
|
24 |
|
|
|
|
|
|
|
|
|
|
|
30 |
|
|
|
|
|
|
|
|
|
SURE? |
|
42 |
|
|
|
|
|
|
|
|
|
|
|
∞ |
|
|
|
|
|
|
|
|
|
|
|
1 |
2 |
3 |
4 |
5 |
6 |
7 |
8 |
|
|
|
|
Press the EXECUTE/YES key.
The Record mode selection appears and the [?] mark and [SURE?] flash on the display. This means that the D-108 is ready to format the installed E-IDE hard disk in [8track format] Record mode.
|
|
|
|
|
|
|
|
|
SETUP |
||
OL |
|
|
|
|
|
|
|
|
FORMAT |
||
|
|
|
|
|
|
|
|
||||
3 |
|
|
|
|
|
|
|
|
|
|
Flashing |
0 |
|
|
|
|
|
|
|
|
|
|
|
6 |
|
|
|
|
|
|
|
|
44.1kHz |
||
9 |
|
|
|
|
|
|
|
|
|||
12 |
|
|
|
|
|
|
|
|
|
|
|
18 |
|
|
|
|
|
|
|
|
|
|
|
24 |
|
|
|
|
|
|
|
|
|
|
|
30 |
|
|
|
|
|
|
|
|
|
SURE? |
|
42 |
|
|
|
|
|
|
|
|
|
|
|
∞ |
|
|
|
5 |
|
|
|
|
|
|
|
|
|
|
|
|
|
|
|
|
|
||
1 |
2 |
3 |
4 |
6 |
7 |
8 |
|
|
|
|
|
Press the EXECUTE/YES while holding down the RECORD button.
The size of unformatted area on the hard disk appears on the display, and counts down as the formatting progresses. (The following example shows a disk with 2.0GB of unformatted space.)
Also, the segments in the “∞” column of the level meters light up, and they turn off one by one starting from the right end. It will take a while to complete formatting, especially if you are formatting a large-capacity disk.
This indicates the size of the unformatted area on the hard disk.
|
|
|
|
|
|
|
|
|
|
|
|
|
|
|
|
|
|
|
|
|
|
|
|
|
|
|
|
|
|
|
|
SETUP |
|
|
|
|
|
|
|
|
|
|
|
|
|
|
|
|
|
|
|
|
|
|
|
|
|
|
|
|
|
|
|
|
REMAIN |
OL |
|
|
|
|
|
|
|
|
|
|
|
|
|
|
|
|
|
|
|
|
|
|
|
|
|
|
|
|
|
|
FORMAT |
|
0 |
|
|
|
|
|
|
|
|
|
|
|
|
|
|
|
|
|
|
|
|
|
|
|
|
|
|
|
|
|
|
|
|
3 |
|
|
|
|
|
|
|
|
|
|
|
|
|
|
|
|
|
|
|
|
|
|
|
|
|
|
|
|
|
|
|
|
6 |
|
|
|
|
|
|
|
|
|
|
|
|
|
|
|
|
|
|
|
|
|
|
|
|
|
|
|
|
|
|
|
44.1kHz |
9 |
|
|
|
|
|
|
|
|
|
|
|
|
|
|
|
|
|
|
|
|
|
|
|
|
|
|
|
|
|
|
|
|
12 |
|
|
|
|
|
|
|
|
|
|
|
|
|
|
|
|
|
|
|
|
|
|
|
|
|
|
|
|
|
|
|
|
18 |
|
|
|
|
|
|
|
|
|
|
|
|
|
|
|
|
|
|
|
|
|
|
|
|
|
|
|
|
|
|
|
|
24 |
|
|
|
|
|
|
|
|
|
|
|
|
|
|
|
|
|
|
|
|
|
|
|
|
|
|
|
|
|
|
|
|
30 |
|
|
|
|
|
|
|
|
|
|
|
|
|
|
|
|
|
|
|
|
|
|
|
|
|
|
|
|
|
|
|
|
42 |
|
|
|
|
|
|
|
|
|
|
|
|
|
|
|
|
|
|
|
|
|
|
|
|
|
|
|
|
|
|
|
|
∞ |
|
|
|
|
|
|
|
|
|
|
|
|
|
|
|
|
|
|
|
|
|
|
|
|
|
|
|
|
|
|
|
|
1 |
2 |
3 |
4 |
5 |
6 |
7 |
8 |
|
|
|
|
|
|
|
|
|
|
|
|
|
|
|
|
|
||||||||
The segments turn off one by one from the right end as the formatting progresses.
When the format operation is complete, the screen changes as follows and disk operation stops.
OL 0 3 6 9 12 18 24 30
42
∞
1 |
2 |
3 |
4 |
5 |
6 |
7 |
8 |
SETUP
FORMAT
44.1kHz
COMPLETED!
When the format operation is complete, [COMPLETED!] appears and the disk stops.
Track indicators 1-8 light up.
8
D-108 Quick Operation Guide
Press the EXIT/NO key or the STOP button.
The screen changes from the format menu in SETUP mode to the ABS Time Base display.
|
|
|
|
|
|
|
ABS |
OL |
|
|
|
|
|
|
|
0 |
|
|
|
|
|
|
|
3 |
|
|
|
|
|
|
|
6 |
|
|
|
|
|
|
44.1kHz |
9 |
|
|
|
|
|
|
|
12 |
|
|
|
|
|
|
|
18 |
|
|
|
|
|
|
|
24 |
|
|
|
|
|
|
|
30 |
|
|
|
|
|
|
|
42 |
|
|
|
|
|
|
|
∞ |
|
|
|
5 |
|
|
|
1 |
2 |
3 |
4 |
6 |
7 |
8 |
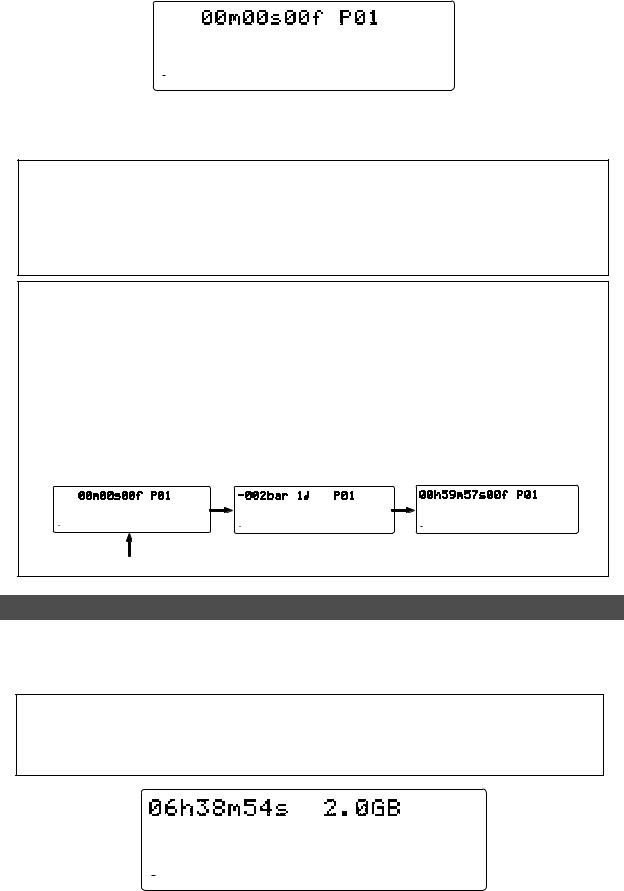
When you format the hard disk one Program (*1) is automatically set up, and “ABS 00m 00s 00f” (ABS Time Base - *2) appears, indicating that the top of the Program is located.
Now, you can start recording, playback, and editing on the D-108 using the installed hard disk.
(*1) Program:
You can set up a maximum of 99 Programs, limited by the available space on your hard disk. You can select any Program to perform recording, playback, and edit (Program Select function). You may also name the Programs to facilitate managing individual songs (Program Title Edit function). You can delete unnecessary Programs (Program Delete function). For more information, refer to the User’s Guide.
(*2) Time Base:
This document and the User’s Guide use the word “Time Base” frequently. This refers to the units to indicate the current transport position of the recorder, in other words, Absolute Time.
The D-108 also uses MTC (MIDI timecode) and BAR/BEAT/CLK (bar/beat/clock). An MTC value is a relative time value calculated by adding an MTC offset value to the ABS time value. BAR/BEAT/ CLK indicates a position within a song of D-108’s tempo map based on the MIDI clock position pointer. You can switch to any of these units as follows. For more information on the Time Base, refer to the User’s Guide.
•When ABS Time Base appears on the display, hold down the DISP SEL key and press the EXECUTE/YES key repeatedly to switch among these units.
|
ABS Time Base |
|
BAR/BEAT/CLK Time Base |
|
MTC Time Base |
||
|
|
|
|
|
|
|
MTC |
|
|
ABS |
|
|
|
|
|
OL |
|
|
OL |
|
OL |
|
|
0 |
|
|
0 |
SIGNATURE |
0 |
|
|
3 |
|
|
3 |
3 |
|
|
|
6 |
|
|
6 |
|
6 |
|
44.1kHz |
9 |
|
44.1kHz |
9 |
44.1kHz |
9 |
|
|
12 |
|
|
12 |
|
12 |
|
|
18 |
|
|
18 |
|
18 |
|
|
24 |
|
|
24 |
|
24 |
|
|
30 |
|
|
30 |
|
30 |
|
|
42 |
|
|
42 |
|
42 |
|
|
∞ 1 2 3 4 |
5 6 7 8 |
|
∞ 1 |
2 3 4 5 6 7 8 |
∞ 1 |
2 3 4 5 6 7 8 |
|
|
|
|
|
|
|
|
|
|
|
|
|
|
|
|
|
Checking the available recording time (REMAIN) on a formatted disk
It is a good idea to check the available recording time after you format the disk. To do so, press the DISP SEL key to display the REMAIN time indication, which indicates the available recording time and recording space in the selected Time Base unit. (The following example shows a disk with 6 hours 38 minutes 54 seconds (06h 38m 54s) of available recording time and 2.0GB of space.)
<Note>
The REMAIN time values are based on a mono track recording. If you wish to record on multiple tracks, you can find out how many minutes of a song you can record by dividing the REMAIN time value by the number of tracks. Check the REMAIN value each time before you make a new recording.
Time remaining |
|
|
|
|
|
|
|
|
|
|
|
|
Space remaining |
|
|
|
|
|
|
|
|
|
|
|
|
|
|
||
|
|
|
|
|
|
|
|
|
|
|
|
|
REMAIN |
|
|
|
|
|
|
|
|
|
|
|
|
|
|
|
|
|
|
OL |
|
|
|
|
|
|
|
|
|
|
|
|
0 |
|
|
|
|
|
|
|
|
|
|
|
|||
3 |
|
|
|
|
|
|
|
|
|
|
|
|||
6 |
|
|
|
|
|
|
|
|
|
44.1kHz |
||||
9 |
|
|
|
|
|
|
|
|
|
|||||
12 |
|
|
|
|
|
|
|
|
|
|
|
|||
18 |
|
|
|
|
|
|
|
|
|
|
|
|||
24 |
|
|
|
|
|
|
|
|
|
|
|
|||
30 |
|
|
|
|
|
|
|
|
|
|
|
|||
42 |
|
|
|
|
|
|
|
|
|
|
|
|||
|
|
∞ |
|
|
|
|
|
|
|
|
|
|
|
|
1 |
2 |
3 |
4 |
5 |
6 |
7 |
8 |
|
|
|
|
|||
Press the DISP SEL key to return to the previous Time Base display.
9
 Loading...