


 Loading...
8588 001 000
(340224)
Owner's manual
Model
Multitracker
|
|
|
L |
R |
|
|
|
STANDBY |
ON |
DC IN |
|
|
|
|
|
|
|
|
|
LINE OUT |
|
|
|
|
POWER |
|
|
|
|
||
|
|
|
|
|
|
|
|
|
|
|
12V |
|
|
|
|
|
1 |
2 |
|
3 |
|
4 |
|
REC TRACK |
|
|
0 0 0 |
|
|
|
|
|
|
|
|
|
|
|
|
|
|
|
|
|
|
|
|
|
PAN |
PAN |
|
PAN |
|
PAN |
|
LINE OUT |
|
|
|
|
|
|
|
|
|
|
|
/PHONES |
|
|
|
|
|
|
|||||
L |
R |
L |
R |
L |
R |
L |
R |
MIN |
MAX |
|
|
|
|
|
|
|
|
|
|
|
|
|
|
|
|
|
|
|
|
||
|
|
|
|
|
|
|
|
METER |
|
|
|
|
|
|
|
|
MAX |
|
|
MAX |
|
MAX |
|
+6 |
+6 |
|
|
|
|
|
|
|
|
|
|
|
|
|
|
|
|
|
|
|
|||
|
|
|
|
|
|
|
|
+3 |
+3 |
|
|
|
|
|
|
|
|
|
|
|
|
|
|
0 |
0 |
|
|
|
|
|
|
|
MIN |
|
|
MIN |
|
MIN |
|
-5 |
-5 |
|
|
|
|
|
|
|
|
|
|
|
|
|
|
|
|
|
|
|
|||
|
|
|
|
|
|
|
|
-10 |
-10 |
|
|
|
|
|
|
|
|
|
|
|
|
|
|
POWER |
|
|
|
|
|
|
|
|
|
|
|
|
|
|
|
|
REC |
|
|
|
|
|
|
|
1 |
2 |
|
3 |
|
4 |
|
|
|
|
|
|
|
|
|
|
|
|
|
|
|
|
|
|
|
REC |
PLAY |
REW |
FF |
STOP |
PAUSE |
LINE |
MIC |
INPUT |
|
|
|
PHONES |
|
|
|
|
|
|
|
|
|
Thank you for purchasing our Fostex Model X-12.
The X-12 is an easy-to-use cassette tape four-track 4 channel multitracker with that great Fostex sound.
Because the X-12 features simple and easily handled functions, anyone operating a multitracker for the first time can create a great recording. Before operating the unit, please read through this manual to understand correct operation procedures and to assure you smooth operation for many years to come.
Model X-12 Owner's Manual
CAUTION
RISK OF ELECTRIC SHOCK
DO NOT OPEN
CAUTION: TO REDUCE THE RISK OF ELECTRIC SHOCK,
DO NOT REMOVE COVER (OR BACK).
NO USER - SERVICEABLE PARTS INSIDE.
REFER SERVICING TO QUALIFIED SERVICE PERSONNEL.
"WARNING"
"TO REDUCE THE RISK OF FIRE OR ELECTRIC
SHOCK, DO NOT EXPOSE THIS APPLIANCE TO RAIN
OR MOISTURE."
SAFETY INSTRUCTIONS
1.Read Instructions - All the safety and operating instructions should be read before the appliance is operated.
2.Retain Instructions - The safety and operating instructions should be retained for future reference.
3.Heed Warnings - All warnings on the appliance and in the operating instructions should be adhered to.
4.Follow Instructions - All operating and use instructions should be followed.
5.Water and Moisture - The appliance should not be used near water - for example, near a bathtub, washbowl, kitchen sink, laundry tub, in a wet basement, or near a swimming pool, and the like.
6.Carts and Stands - The appliance should be used only with a cart or stand that is recommended by the manufacturer.
An appliance and cart combination should be moved with care. Quick stops, excessive force, and uneven surfaces may cause the appliance and cart combination to overturn.
7.Wall or Ceiling Mounting - The appliance should be mounted to a wall or ceiling only as recommended by the manufacturer.
8.Ventilation - The appliance should be situated so that its location or position dose not interfere with its proper ventilation. For example, the appliance should not be situated on a bed, sofa, rug, or similar surface that may block the ventilation openings; or, placed in a built-in installation, such as a bookcase or cabinet that may impede the flow of air through the ventilation openings.
CAUTION:
TO PREVENT ELECTRIC SHOCK, MATCH WIDE BLADE OF PLUG TO WIDE SLOT, FULLY INSERT.
ATTENTION:
P O U R E V I T E R L E S C H O C S E L E C T R I Q U E S , INTRODUIRE LA LAME LA PLUS LARGE DE LA FICHE DANS LA BORNE CORRESPONDANTE DE LA PRISE ET POUSSER JUSQU' AU FOND.
The lightning flash with arrowhead symbol, within an equilateral triangle, is intended to alert the user to the presence of uninsulated "dangerous voltage" within the product's enclosure that may be of sufficient magnitude to constitute a risk of electric shock to persons.
The exclamation point within an equilateral triangle is intended to alert the user to the presence of important operating and maintenance (servicing) instructions in the literature accompanying the appliance.
9.Heat - The appliance should be situated away from heat sources such as radiators, heat registers, stoves, or other appliances (including amplifiers) that produce heat.
10.Power Sources - The appliance should be connected to a power supply only of the type described in the operating instructions or as marked on the appliance.
11.Grounding or Polarization - The precautions that should be taken so that the grounding or polarization means of an appliance is not defeated.
12.Power Cord Protection - Power supply cords should be routed so that they are not likely to be walked on or pinched by items placed upon or against them, paying particular attention to cords at plugs, convenience receptacles, and the point where they exit from the appliance.
13.Cleaning - The appliance should be cleaned only as recommended by the manufacturer.
14.Nonuse Periods - The power cord of the appliance should be unplugged from the outlet when left unused for a long period of time.
15.Object and Liquid Entry - Care should be taken so that objects do not fall and liquids are not spilled into the enclosure through openings.
16.Damage Requiring Service - The appliance should be serviced by qualified service personnel when:
A.The power supply cord or the plug has been damaged; or
B.Objects have fallen, or liquid has been spilled into the appliance; or
C.The appliance has been exposed to rain; or
D.The appliance does not appear to operate normally or exhibits a marked change in performance; or
E.The appliance has been dropped, or the enclosure damaged.
17.Servicing - The user should not attempt to service the appliance beyond that described in the operating instructions.
All other servicing should be referred to qualified service personnel.
2

Table of Contents |
|
Precautions......................................................................... |
3 |
Before Using the X-12........................................................ |
4 |
Important <Let's not use it this way>.............................. |
5 |
Names and Functions....................................................... |
6 |
Basic Operation (recording)......................................... |
9 |
Basic Operation (playback)........................................... |
11 |
Advanced Operation (multiple recording).................. |
12 |
1.Overdubbing......................................................... |
12 |
2.Mixdown................................................................ |
15 |
Using a tape recorded on a |
|
boom box or cassette deck........................................ |
16 |
Troubleshooting........................................................... |
17 |
Maintenance................................................................. |
17 |
Specifications.............................................................. |
18 |
Block Diagram................................................................. |
18 |
Accessories (option)....................................................... |
19 |
Precautions (please read before use)
Power supply
*When unplugging the AC adaptor from the outlet, be sure to grasp the adaptor. Attempting to unplug it by pulling on the AC cable may damage the wiring.
*It is dangerous to use any power cable that is cut or frayed. If the power cable is damaged, immediately stop using it, and have it repaired.
*Do not plug in or unplug the AC adaptor with wet hands. Doing so may result in dangerous electric shock.
*Do not open the unit or touch any parts inside. Doing so may result in a dangerous electric shock, and could damage the X-12.
Model X-12 Owner's Manual
*Do not let water or other liquids, flammable materials, or metal objects such as pins get inside the X-12.
These things may cause electrical shock or short circuit the X-12, and damage it.
If the X-12 should become wet, unplug the AC adaptor from the AC outlet, and contact your authorized service station.
*When turning the power on, turn the X-12 on first before turning on any equipment connected to it. Doing so will avoid possible damage to the other equipment.
Also, when connecting or disconnecting cables to or from the X-12’s input or output jacks, make sure that the [LINE OUT/PHONES] volume is set to “0.”
*When the AC adaptor is connected to an AC outlet, it will continue to draw small amounts of power even if the switch is set to off (STANDBY). If you will not be using the X-12 for an extended period of time, be sure to unplug the AC adaptor from the outlet.
Location
*Avoid using the X-12 in the following locations:
*Locations of extreme low or high temperatures, or extreme changes in temperature.
*Locations with excessive moisture or dust.
*Locations where direct sunlight falls for an extended time, or near a stove or other source of heat.
*Locations where electrical voltage varies.
*Unstable locations or where there is heavy vibration.
*Near strong magnetic fields (on top of a television or speaker).
3

Model X-12 Owner's Manual
Before Using the X-12
<Differences between multitracker and cassette deck recording>
Boom boxes and stereo cassette decks record on both the A and B sides of cassette tape. As shown in Fig. 1, the cassette tape is divided in 4 tracks of which 2 are used for the A side and the remaining 2 for the B side (4 track 2 channel).
<Fig. 1> Boom box / Cassette deck
Bside |
Lch |
||
Rch |
|||
R ch |
|
||
A side |
|||
L ch |
|||
A multi-tracker as shown in Fig. 2, all four tracks can be recorded without turning over the cassette (four track 4 channel). For the X-12, the 4 tracks are recorded one at a time (some multitrackers can record multiple number of tracks in each pass). Also, in multitrackers, since all tracks are recorded in the same direction, if such a cassette tape is played back in a radio cassette or cassette deck, tracks 1 and 2 will be heard correctly but if the tape is turned over, tracks 3 and 4 will be heard in reverse.
<Fig. 2> Multitracker, such as X-12
Track 4 |
|
|
Track 3 |
A side |
|
Track 2 |
||
|
||
Track 1 |
|
Hint!
You can perform multitrack recording using a tape that was recorded on a boom box or a cassette deck. Refer to page 16 for more details.
<Handling cassette tapes>
Cassette tape suitable for recording:
The X-12 is designed to perform best with high-position cassette tape (TYPE II, HIGH). We recommended these or their equivalent.
The tape in C-120 versions (60 minutes each side) is too thin and not suitable for repeated recording or playback. Use C-90 or shorter tapes for stable performance.
Using write-protection tabs:
On the spine of a cassette tape are writeprotection tabs that are used to prevent any recorded data from being erased accidentally.
You may want to break the tab for side A and side B of a cassette tape that you have already recorded, since the X-12 uses all four tracks at the same time.
If you later wish to record data on a tape with broken tabs, apply a piece of scotch tape to cover the tab hole.
Write-protection tabs
** Advice **
Fresh or recorded tapes should not be kept in locations of strong magnetic fields (near speakers and TV sets) and stored in dust free and non-humid locations.
4
Model X-12 Owner's Manual
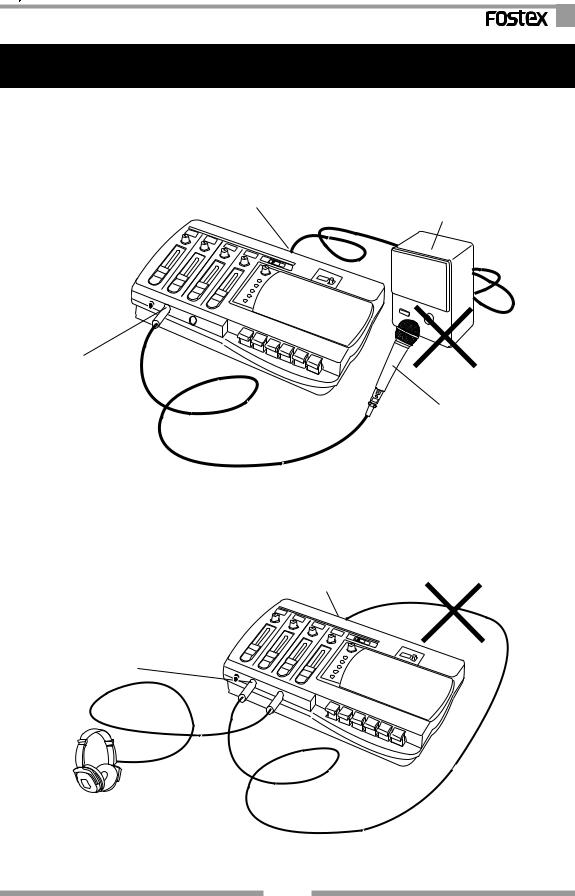
Important <Let's not use it this way>
1.Do not bring the microphone too close to the monitor speakers connected to the [LINE OUT] jack when the [LINE OUT/PHONES] level control knob is raised.
Doing so could cause feedback from the speaker and headphone which could damage your hearing.
[LINE OUT] jack
The amplifier contained monitor speaker
[INPUT] jack
Microphone
2.Do not directly apply an output signal from the [LINE OUT] jack to the [INPUT] jack.
As shown in schematic below, if the [LINE OUT] jack is directly connected to the [INPUT] jack and the [LINE OUT/PHONES] knob is raised, it will cause oscillation. Should you be monitoring by headphone, this could hurt your hearing.
[LINE OUT] jack
[INPUT] jack
5

Model X-12 Owner's Manual
Names and Functions
This section explains the names and functions of the X-12, such as switches, controls, and I/ O jacks. Read this section so that you will understand the functions of the switches and controls.
|
|
|
|
|
|
|
|
|
|
|
|
|
|
|
|
|
|
|
|
|
|
|
|
|
|
|
|
|
|
|
|
|
|
|
|
|
|
|
|
|
|
|
|
|
|
|
|
|
|
|
|
|
|
|
|
|
|
|
|
|
|
|
|
|
|
|
|
|
|
|
|
|
|
|
|
|
|
|
|
|
|
|
|
|
|
|
|
|
|
|
|
|
|
|
|
|
|
|
|
|
|
|
|
|
|
|
|
|
|
|
|
|
|
|
|
|
|
|
|
|
|
1 |
2 |
3 |
|
|
|
|||||||
|
4 |
5 |
|
|
|
|
6 |
|
|
|
|
|
|
|
|
L |
R |
|
STANDBY |
ON |
|
|
|
LINE OUT |
|
POWER |
DC IN |
|
|
|
|
|
|
|
12V |
1 |
2 |
3 |
4 |
REC TRACK |
|
0 0 0 |
|
|
|
|
|
|
|
PAN |
PAN |
PAN |
PAN |
LINE OUT |
/PHONES |
14 |
L |
R |
L |
R |
L |
R |
L |
R |
MIN |
MAX |
|
|
|
|
|
|
|
|
|
|
|
|
|
|
|
|
|
|
|||
|
|
|
|
|
|
|
|
METER |
|
|
|
|
|
||
|
|
MAX |
|
|
MAX |
|
MAX |
|
+6 |
+6 |
|
|
|
|
|
|
|
|
|
|
|
|
|
|
|
|
|
|
|||
|
|
|
|
|
|
|
|
|
+3 |
+3 |
|
|
|
|
|
|
|
|
|
|
|
|
|
|
0 |
0 |
|
|
|
|
|
|
|
MIN |
|
|
MIN |
|
MIN |
|
-5 |
-5 |
|
|
|
|
|
|
|
|
|
|
|
|
|
|
|
|
|
|
|||
|
|
|
|
|
|
|
|
|
-10 |
-10 |
|
|
|
|
|
|
|
|
|
|
|
|
|
|
POWER |
|
|
|
|
|
|
|
|
|
|
|
|
|
|
|
|
REC |
|
|
|
|
|
|
|
1 |
2 |
|
|
3 |
4 |
|
|
|
|
|
|
|
|
|
|
|
|
|
|
|
|
|
|
REC |
PLAY |
REW |
FF |
STOP |
PAUSE |
|
LINE |
MIC |
INPUT |
|
|
|
PHONES |
|
|
|
|
|
|
|
|
7
8
9
|
13 |
12 11 |
10 |
|
||||
|
|
|
|
|
|
|
|
|
|
|
|
|
|
|
|
|
|
|
|
|
|
|
|
|
|
|
|
|
|
|
|
|
|
|
|
|
|
|
|
|
|
|
|
|
|
|
|
|
|
|
|
|
|
17 |
16 |
15 |
6
Loading...