

ZyWALL SSL 10
Integrated SSL-VPN Appliance
Quick Start Guide
Version 1.00
12/2006
Edition 1
Table of Contents
ENGLISH 2
DEUTSCH 12
ESPAÑOL 22
FRANÇAIS 32
ITALIANO 42
日本語 52
简体中文 62
SVENSKA 70
РУССКИЙ 80
繁體中文 90
Copyright © 2006. All rights reserved.

ENGLISH
ENGLISH
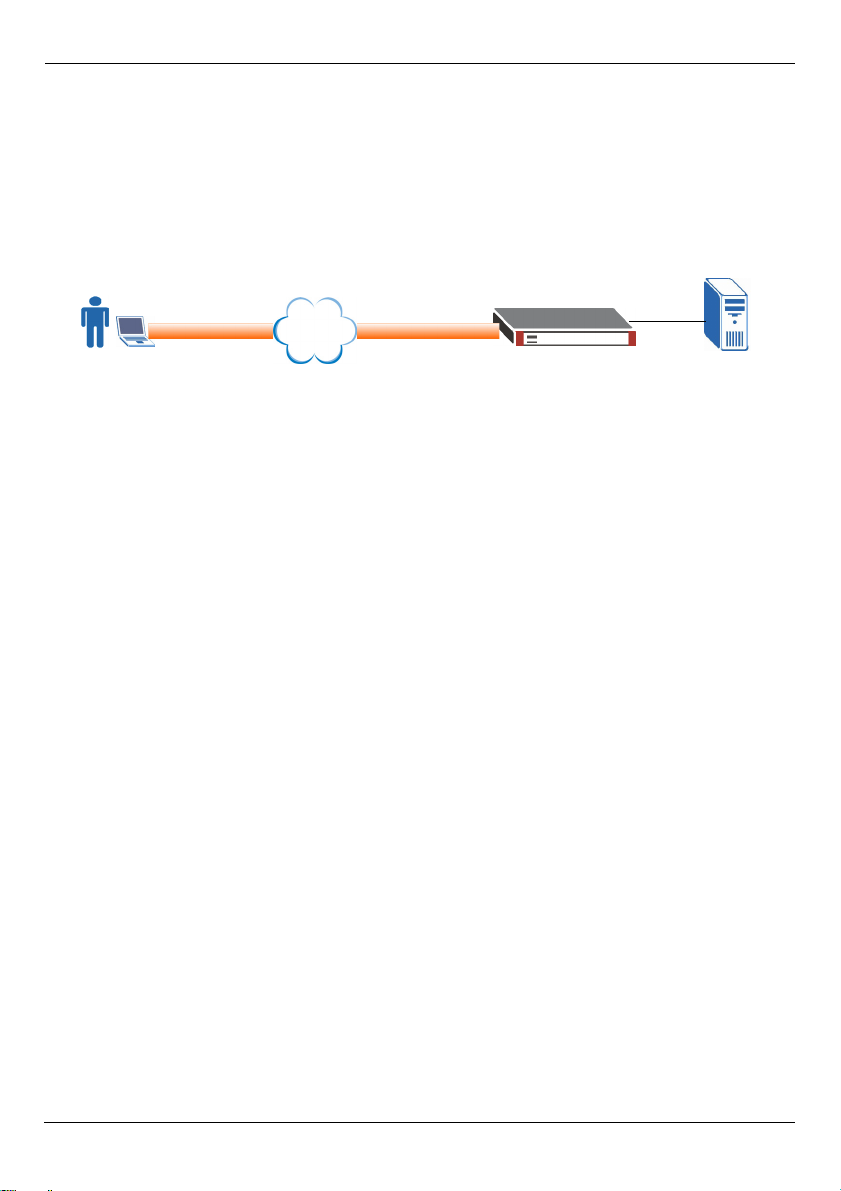
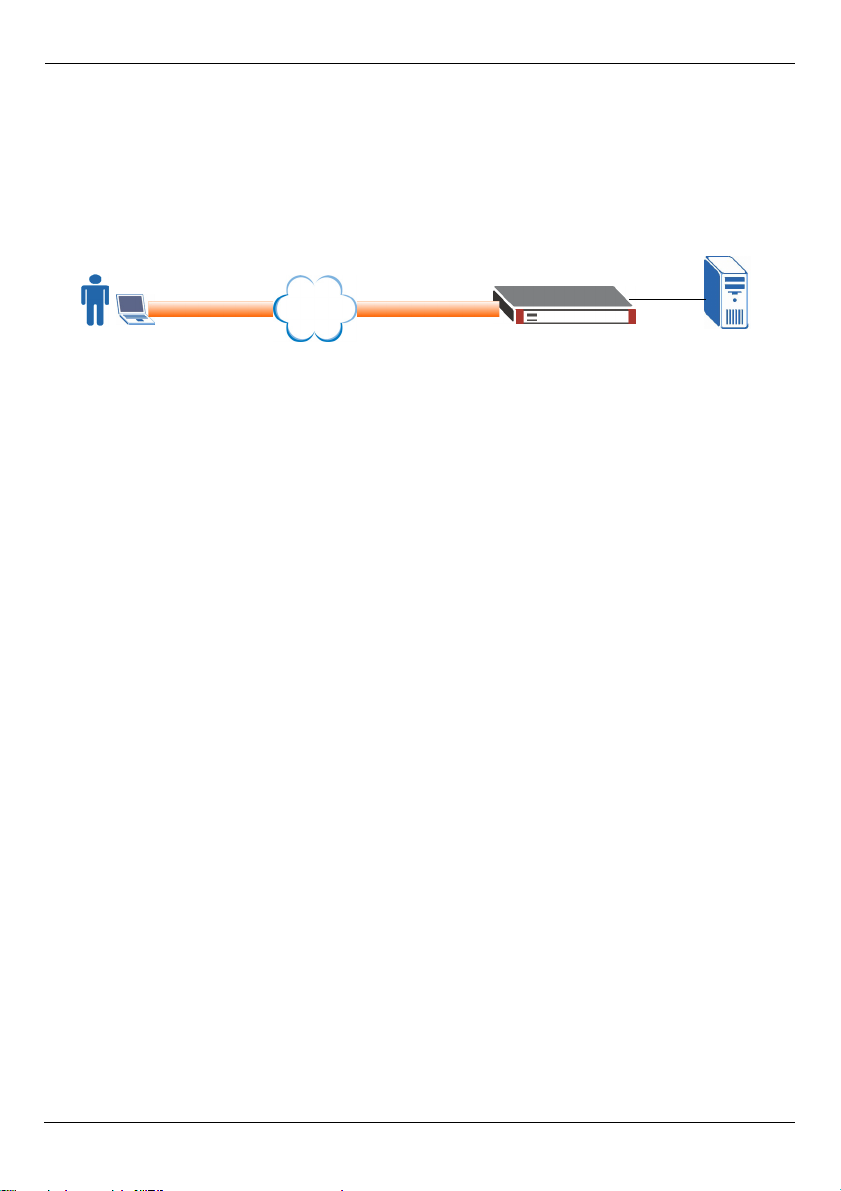
Introduction
The ZyWALL SSL 10 is an SSL VPN gateway that allows you to set up secure remote
network and application access without pre-installing client software. This guide shows you
how to connect and configure the ZyWALL (SSL10) to allow a remote user (A) to access a
web server (WWW) on your local network via an SSL-VPN connection. You may need your
Internet access account information.
https://
Internet
A
SSL10
WWW
Configuration Steps
1 System Requirements
2 Initial Hardware Connection
3 Access the Web Configurator
4 Configure Setup Wizard
5 Create Web Links for Easy Remote Access
6 Test Remote User Connection From the Internet
7 Deploy the ZyWALL in Your Network
1 System Requirements
The following lists the browser and computer system requiremens for remote user login.
• Internet Explorer 5.5 with Microsoft XML (MSXML) service pack installed or 6.0 and above
• Netscape 7.2 and above
• Firefox 1.0 and above
• Mozilla 1.7.3 and above
• Windows 2000 Professional, Windows XP Home/Professional (with service pack 2 and
above) or Linux.
• Sun Java Virtual Machine (JVM) installed with a minimum version of 1.4.2_07 for
Netscape/Mozilla/Firefox and 1.4.2_02 for Internet Explorer and Linux computers.
• Java enabled in Internet Explorer on Windows computers.
2
ENGLISH
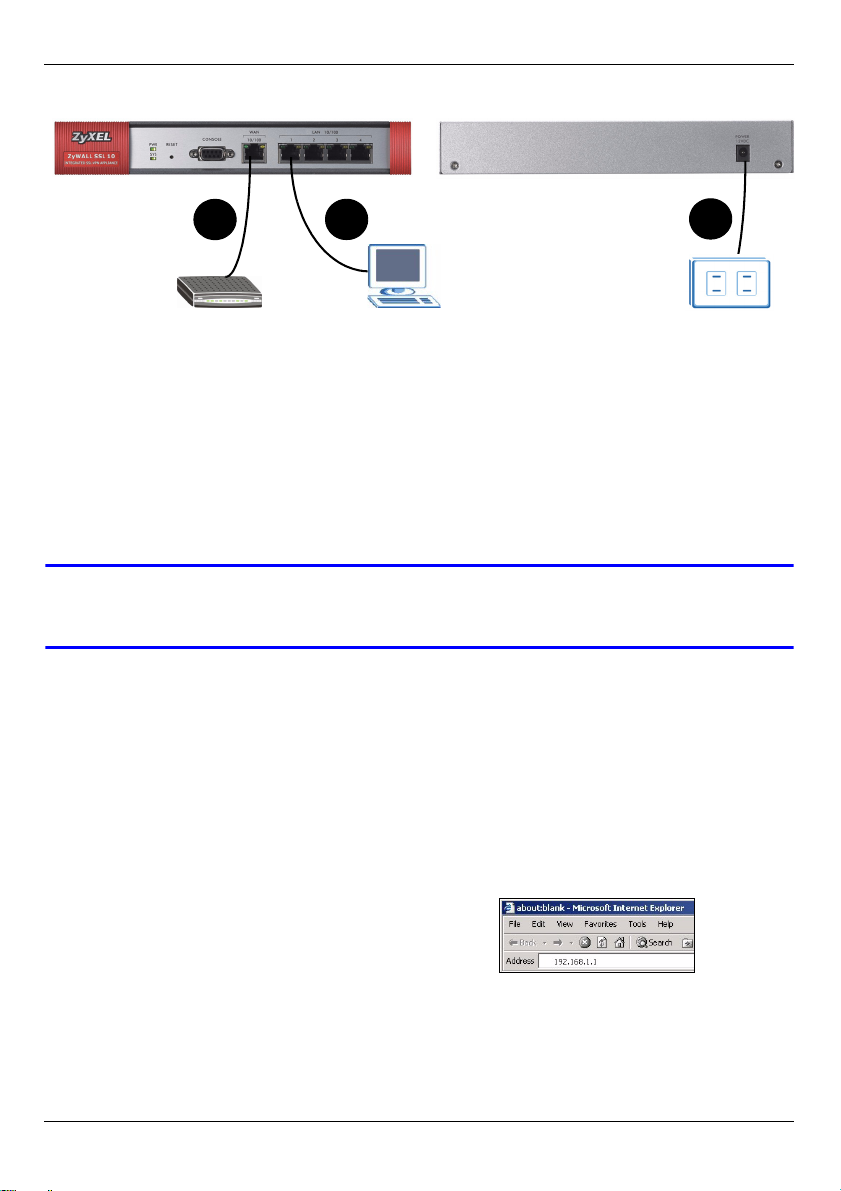
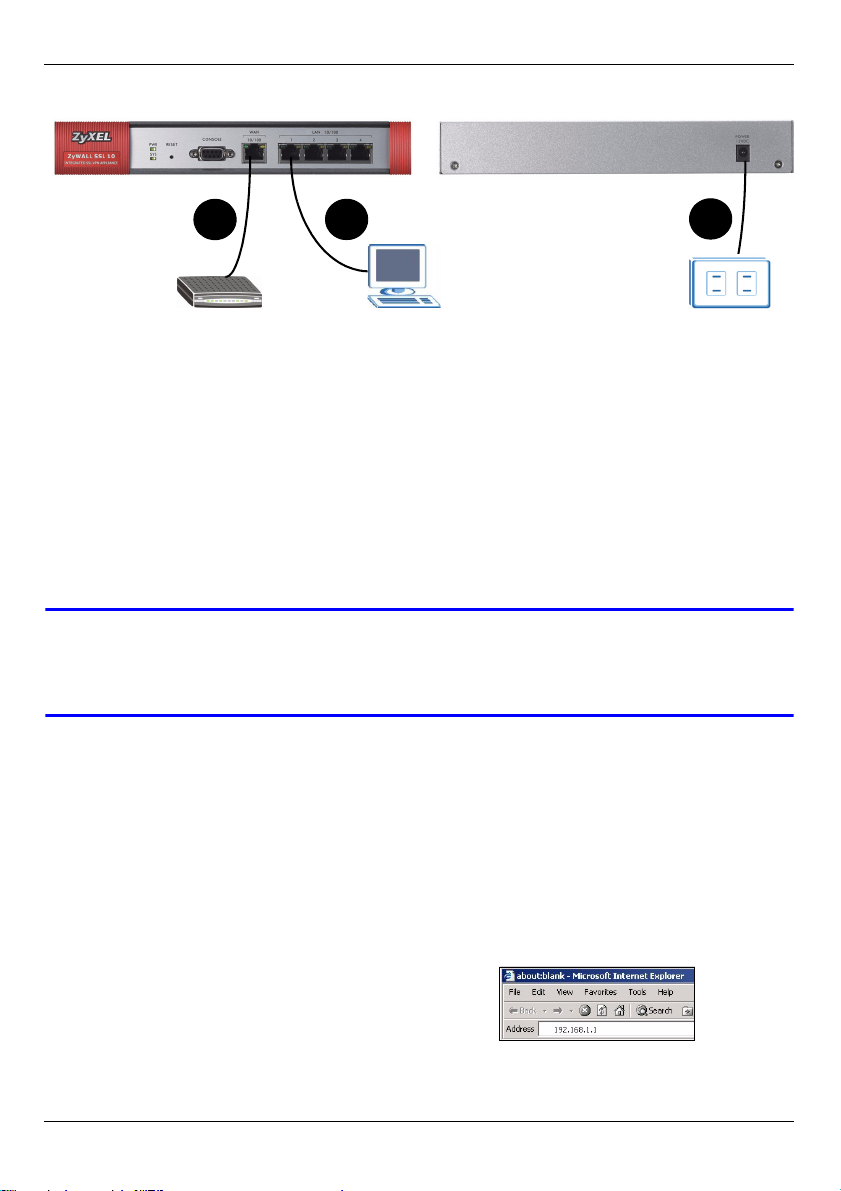
2 Initial Hardware Connection
1
1 Use an Ethernet cable to connect the WAN port to a broadband modem or gateway.
2 Use an Ethernet cable to connect a management computer to a LAN port.
3 Use the included power adaptor to connect the POWER 12V port on the rear panel to a
power source.
After you have connected the power and turned on the power source, check the LEDs. The
PWR LED turns on. The SYS LED blinks while performing system testing and stays on
when the testing is successful. The WAN and LAN LEDs turn on when the corresponding
ports are connected.
2
3
V If none of the LEDs turn on when the power is connected, check the port
connections and make sure the power source is turned on.
3 Access the Web Configurator
Follow the steps below to log into the web configurator through a LAN port and configure
the ZyWALL. You must use Internet Explorer 6.0/Netscape 7.0 or later versions.
1 Make sure your computer is set to receive an IP address from the ZyWALL.
2 Launch your web browser. Enter 192.168.1.1 (the
ZyWALL’s default LAN IP address) as the
address.
3
ENGLISH
3 If you see a security or warning screen, click OK
or Yes to continue.
4 The login screen displays. Enter admin as the
user name and 1234 as the password. For initial
setup, leave the One-Time Password field blank
and click Login.
5 If another certificate screen displays, click Yes to
continue.
6 This is the first time that you log into the ZyWALL.
The initial main screen displays as shown.
Click Setup Wizard.
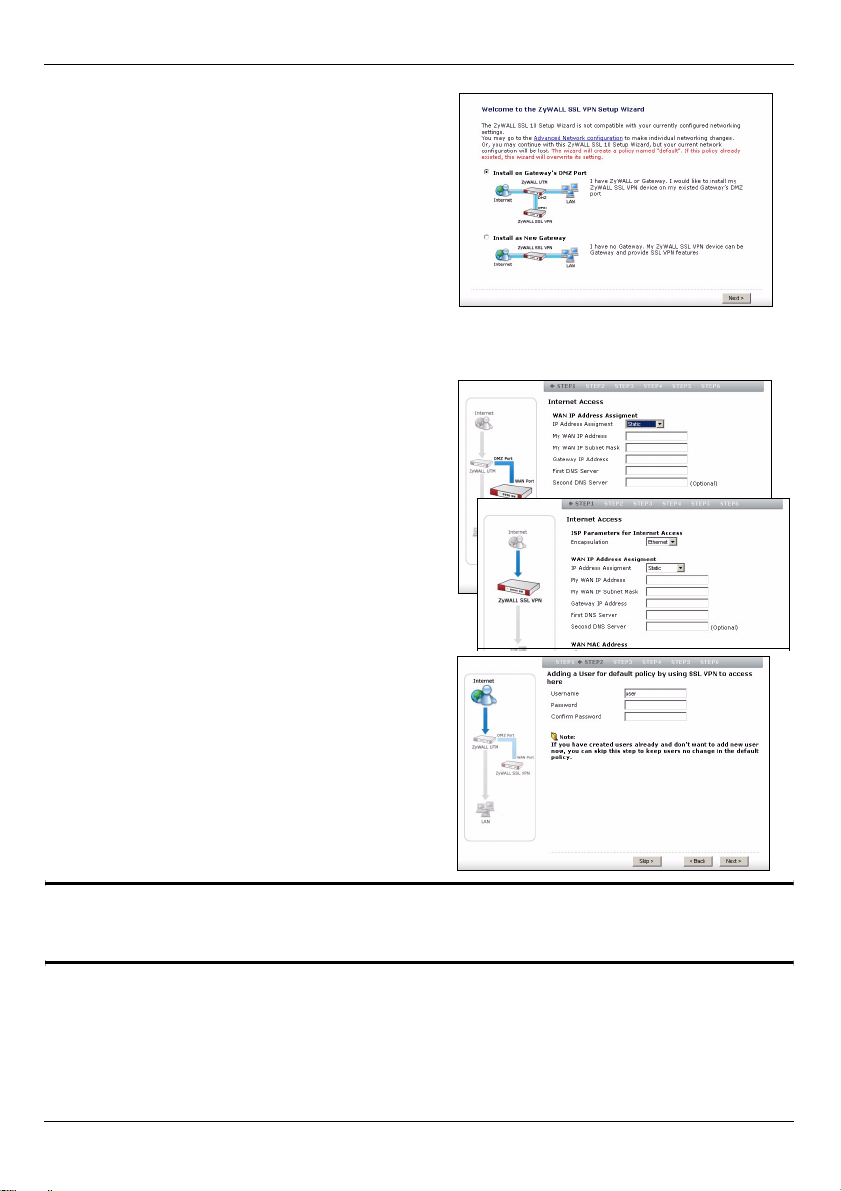
4 Setup Wizard
For initial configuration, use the setup wizard screens to do the following.
• Configure the LAN/WAN settings
• Create a remote user account
• Create an SSL-VPN access policy
•Register the ZyWALL
Follow the steps to configure the wizard screens. Click Next > in each wizard screen to
continue.
4
ENGLISH
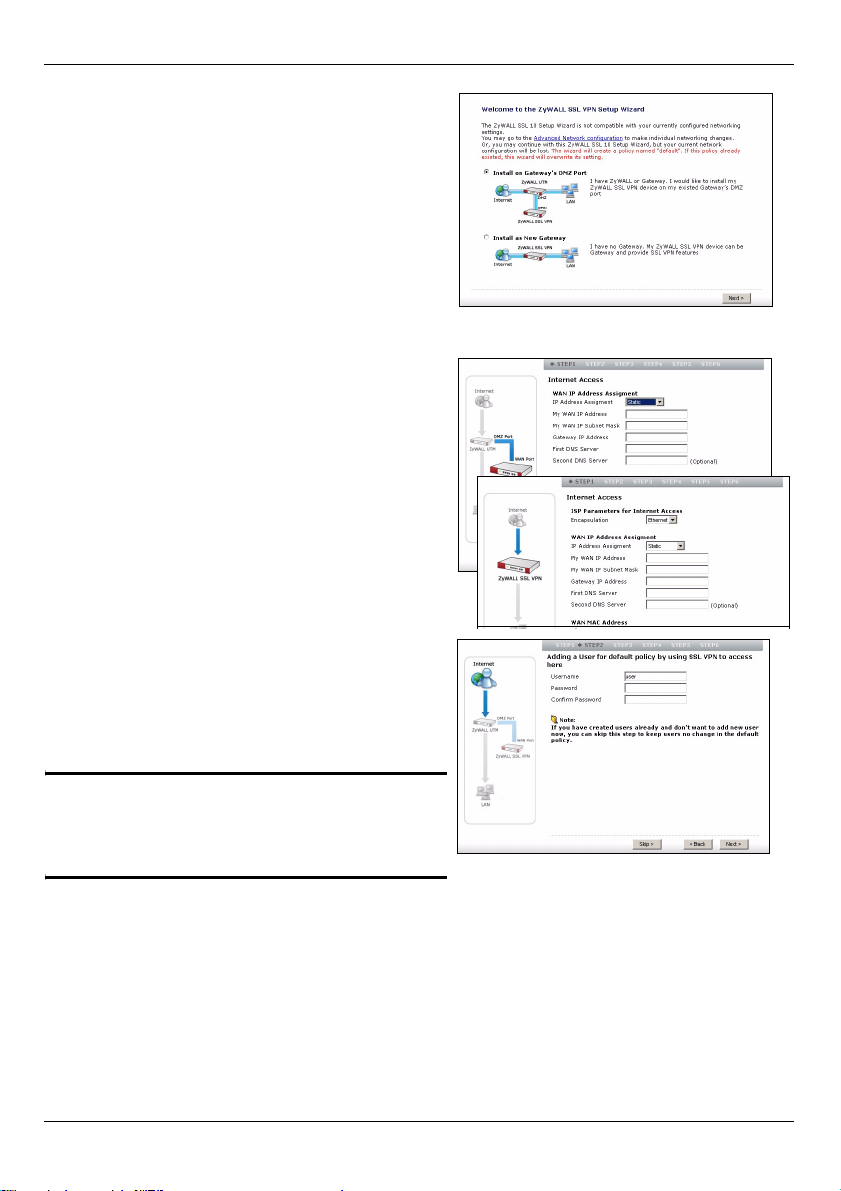
1 To display the setup wizard, click Setup
Wizard in the initial main screen.
•Select Install on Gateway’s DMZ port if you
want to connect the ZyWALL to a gateway in
your network.
•Select Install as a New Gateway if you want
to configure the ZyWALL both as a NAT router
and an SSL VPN gateway in your network.
2 If you install the ZyWALL behind another
gateway, configure the ZyWALL’s IP settings
in the first first wizard screen.
If you install the ZyWALL as a new gateway,
configure Internet settings in the first wizard
screen.
3 Create a new remote user account to allow
a remote user to log into your local network.
Enter a unique user name (up to 31
characters using “0-9”, “a-z” and “A-Z”) and
password (up to 64 characters using “0-9”,
“a-z” and “A-Z”).
" You cannot use the admin account
to access network resources.
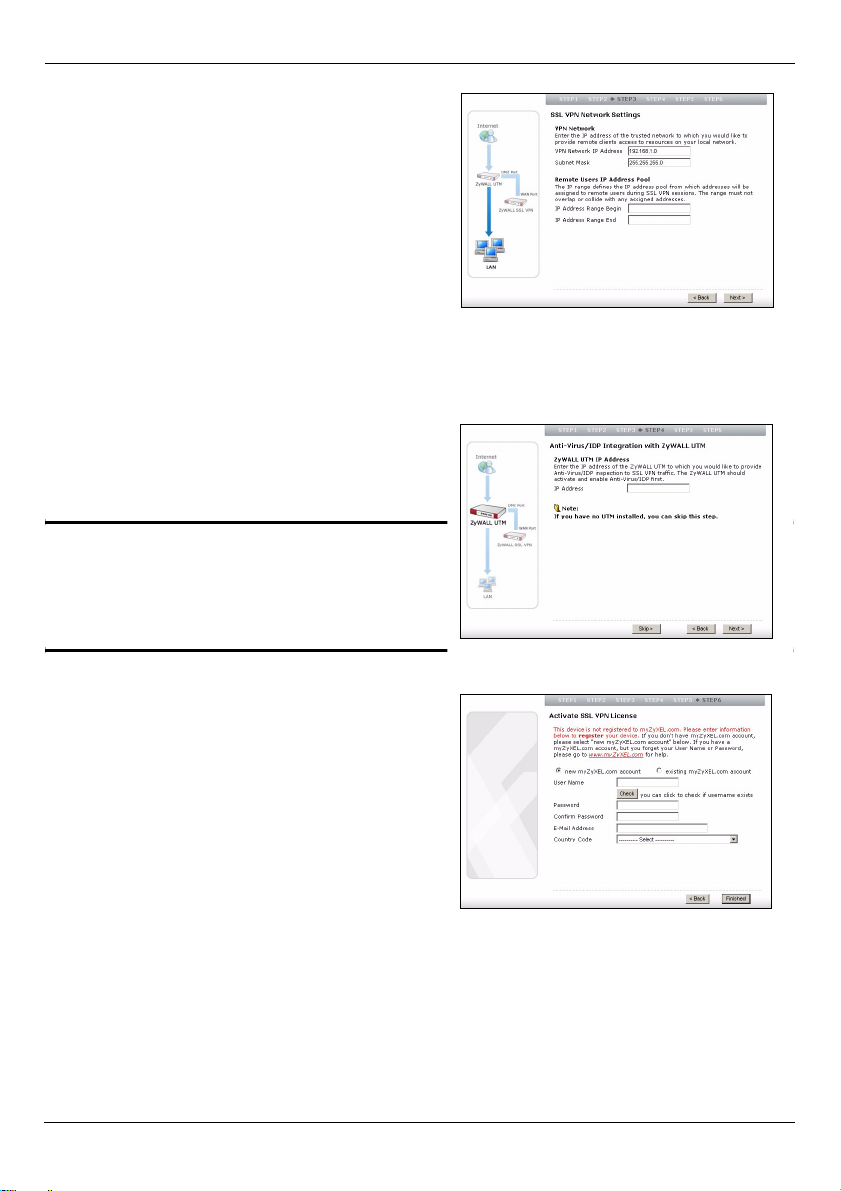
4 Specify the IP address and subnet mask of a
local network behind the ZyWALL you want to
allow SSL-VPN access.
Specify the range of private IP addresses to
assign to the remote users and the ZyWALL.
This is used for establishing an SSL-VPN
connection and allow the remote users to
access resources as if they are on the local
network.
5
ENGLISH
5 Click Next to continue.
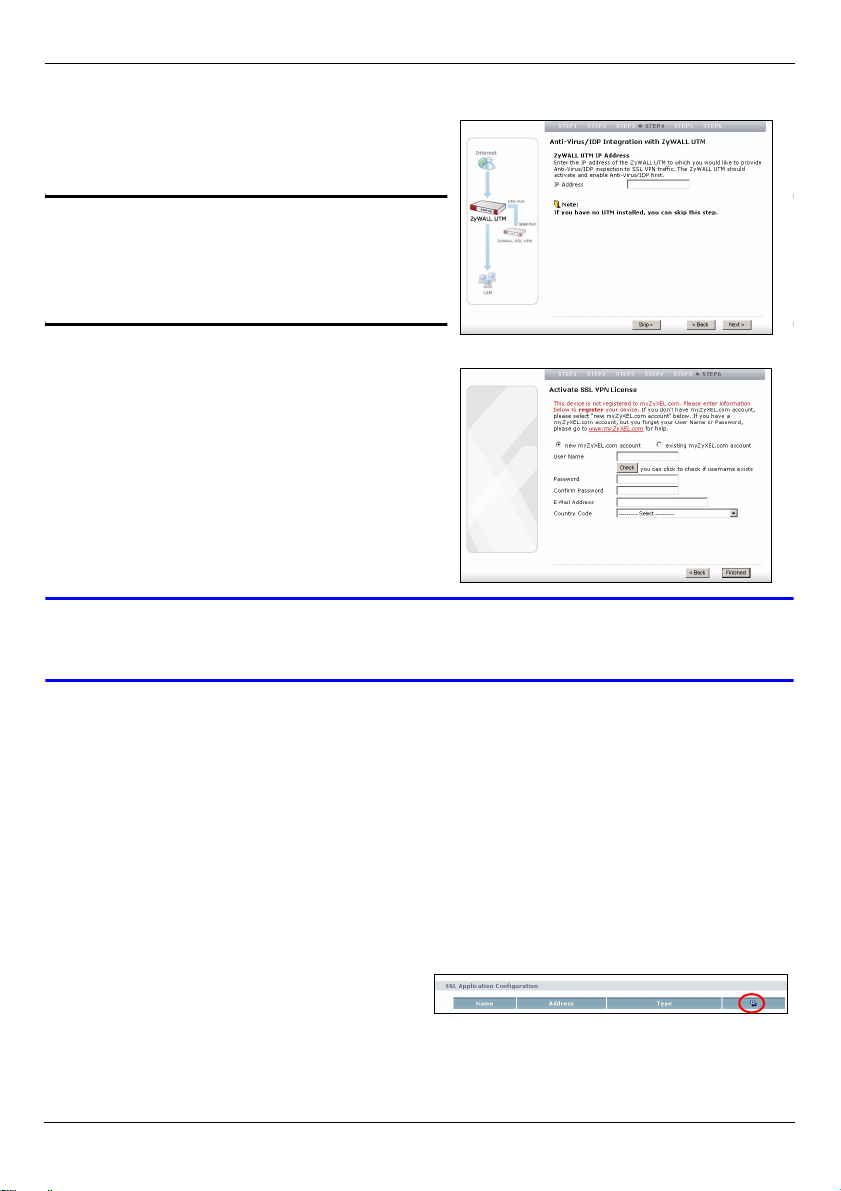
6 Check the network settings in the next
wizard screen and click Activate SSL-VPN
License.
" You must register your ZyWALL at
myZyXEL.com to allow up to 10
remote users to access at the
same time.
7 Follow the on-screen instruction to enter the
myZyXEL.com account information and click
Finished to complete the setup wizard and
start the registration process.
8 After the process is complete, click Close.
V If device registration failed, check that you have entered the account
information correctly and that the ZyWALL can access the Internet.
Now you can log in as a remote user with the user account you have just created. You can
access any resource on the local network (using IP address or domain name). Optionally,
you can create links for the remote user screen to allow one-click access to web-based
applications.
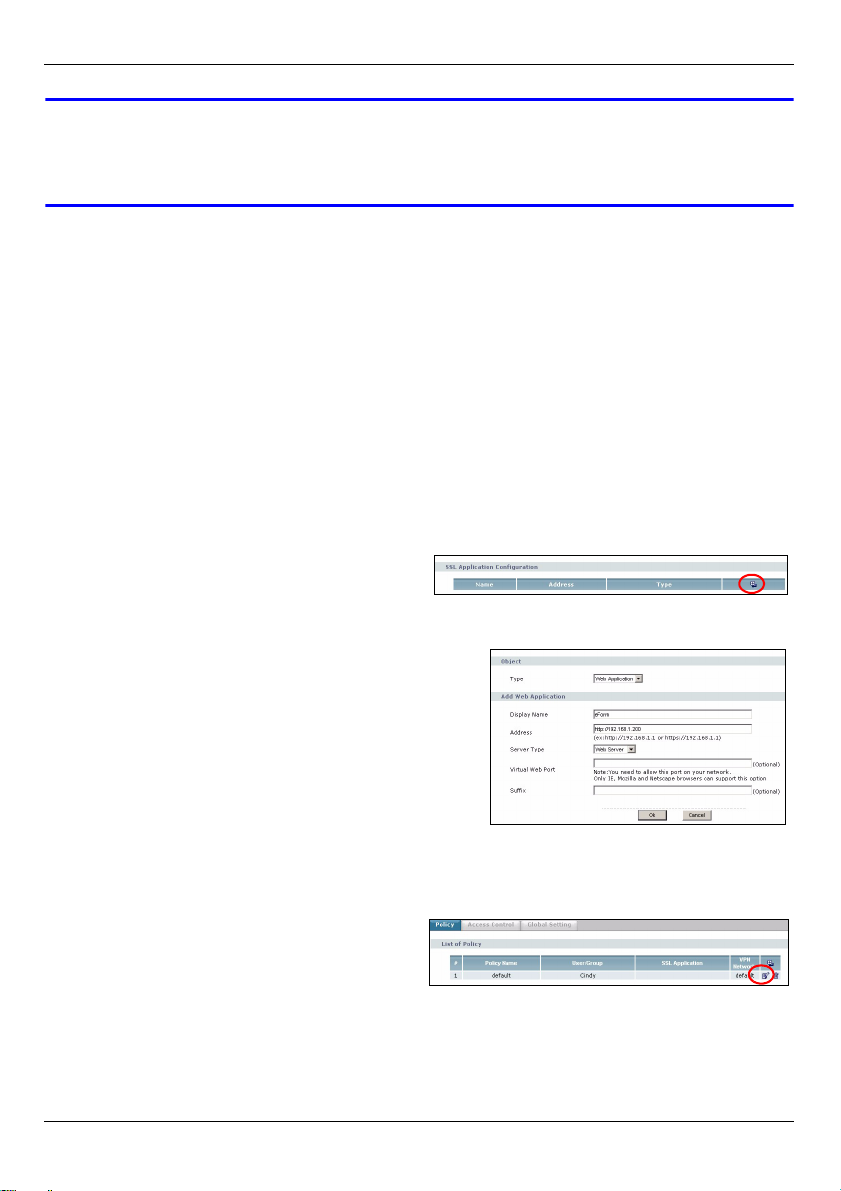
5 Create Web Links for Easy Remote Access
This section shows you how to specify a web-based application and create web links on
the remote user screen.
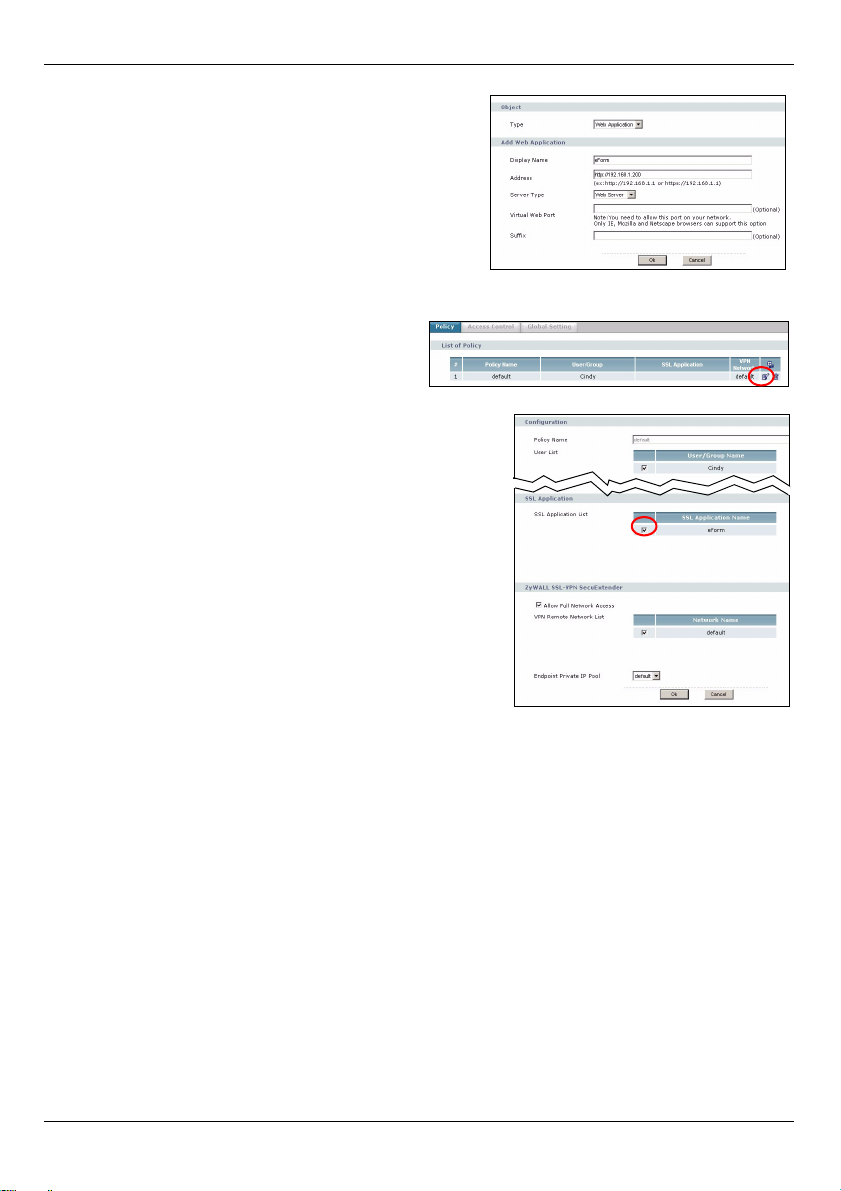
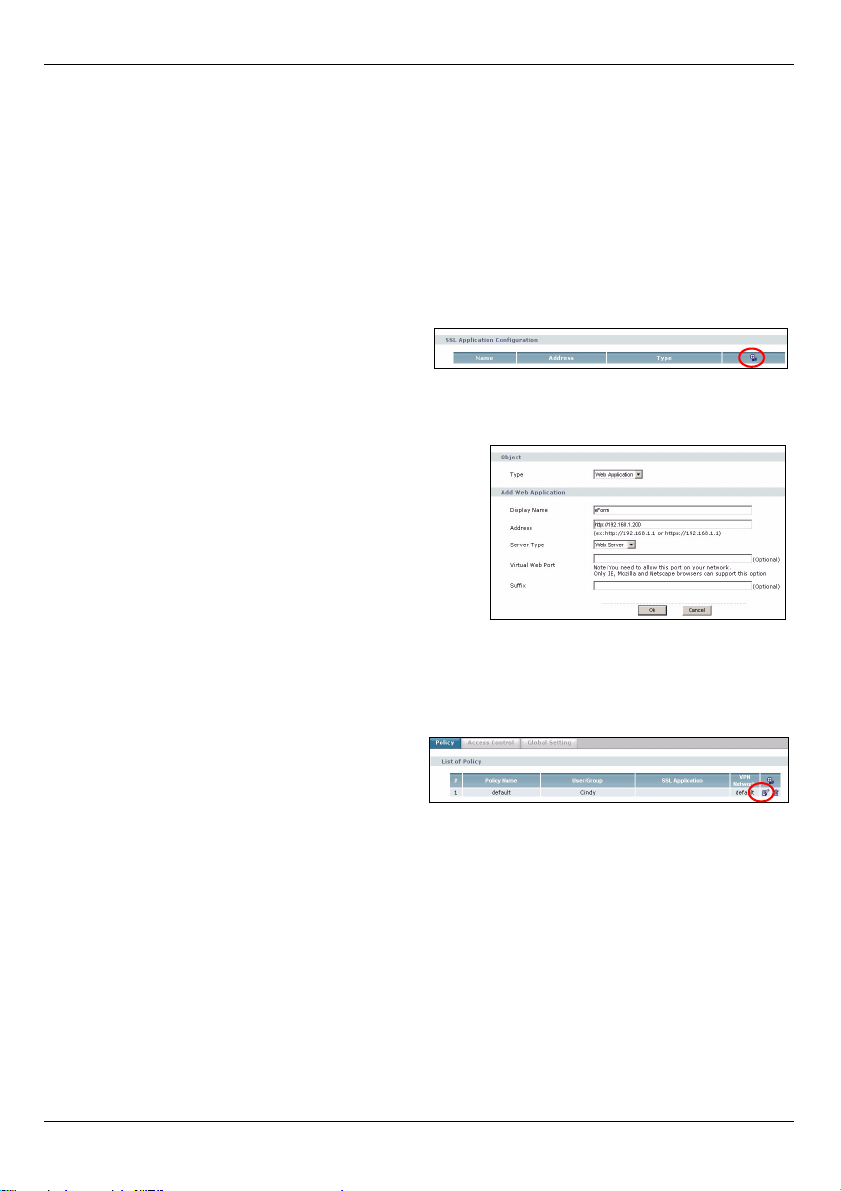
1 Log into the web configurator as an
administrator and click Object > SSL
Application. Click the Add icon.
6
ENGLISH
2 Create a Web Application and enter a
descriptive name in the Service Name field.
3 In the Address field, enter the address of the
server. For example, http://192.168.1.200.
4 Select Web Server in the Server Type field.
5 If you use a non-standard port number (for
example, 8080 instead of 80), enter it in the
Virtual Web Port field.
6 Click Ok to save the settings.
7 Click SSL in the navigation panel and
click the Edit icon to configure the
“default” SSL policy you created using
the setup wizard.
8 In the configuration screen that displays, select
the name of the SSL application you have just
created and click Ok to save the settings.
This applies the application setting to the SSL
policy and allows the remote user to access the
server over an SSL-VPN connection.
9 Make sure the server is configured properly and
connected to the local network.
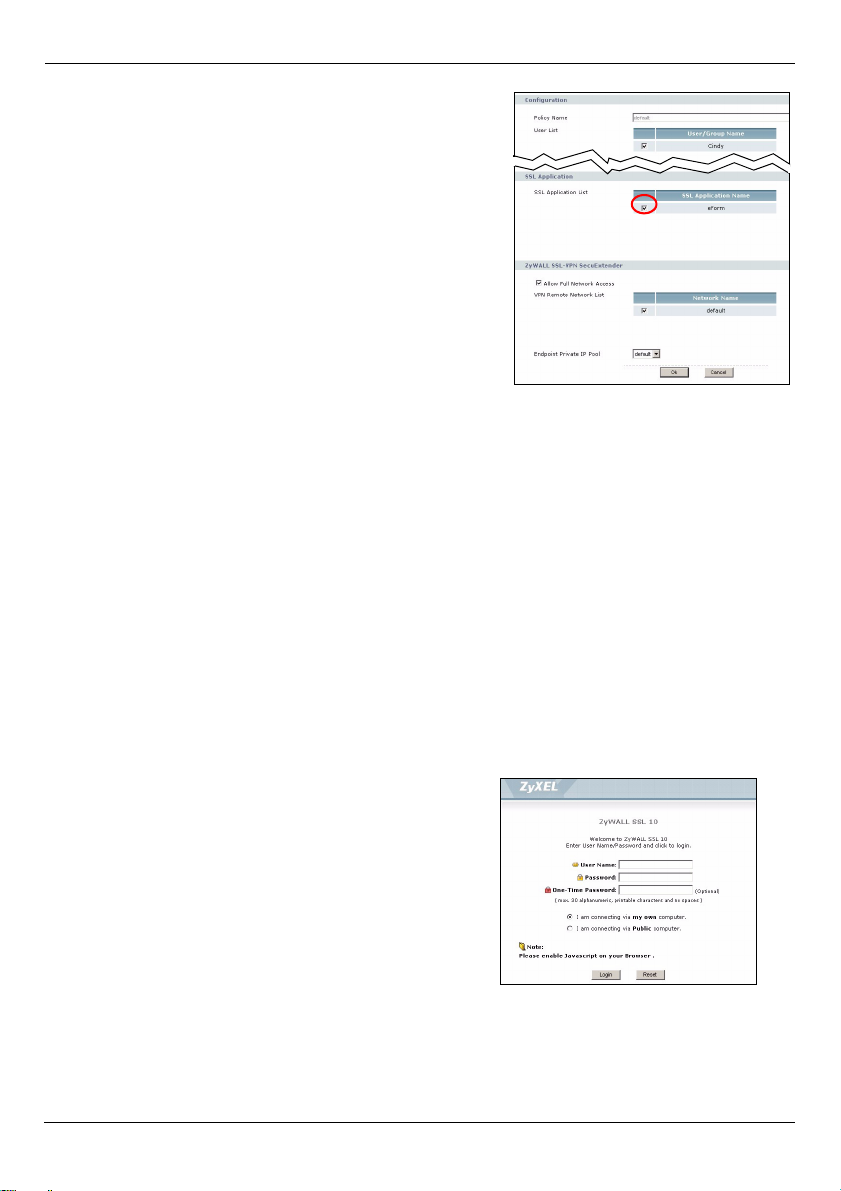
6 Test Remote User Connection From the Internet
Follow the steps below to access the local network as a remote user from the Internet. You
must know the WAN IP address of the ZyWALL (get this information in the Status screen).
1 Connect your computer to a network outside your company firewall.
2 Open your web browser and enter the WAN IP address of the ZyWALL as the URL.
3 Click OK or Yes if a security screen displays.
7
ENGLISH
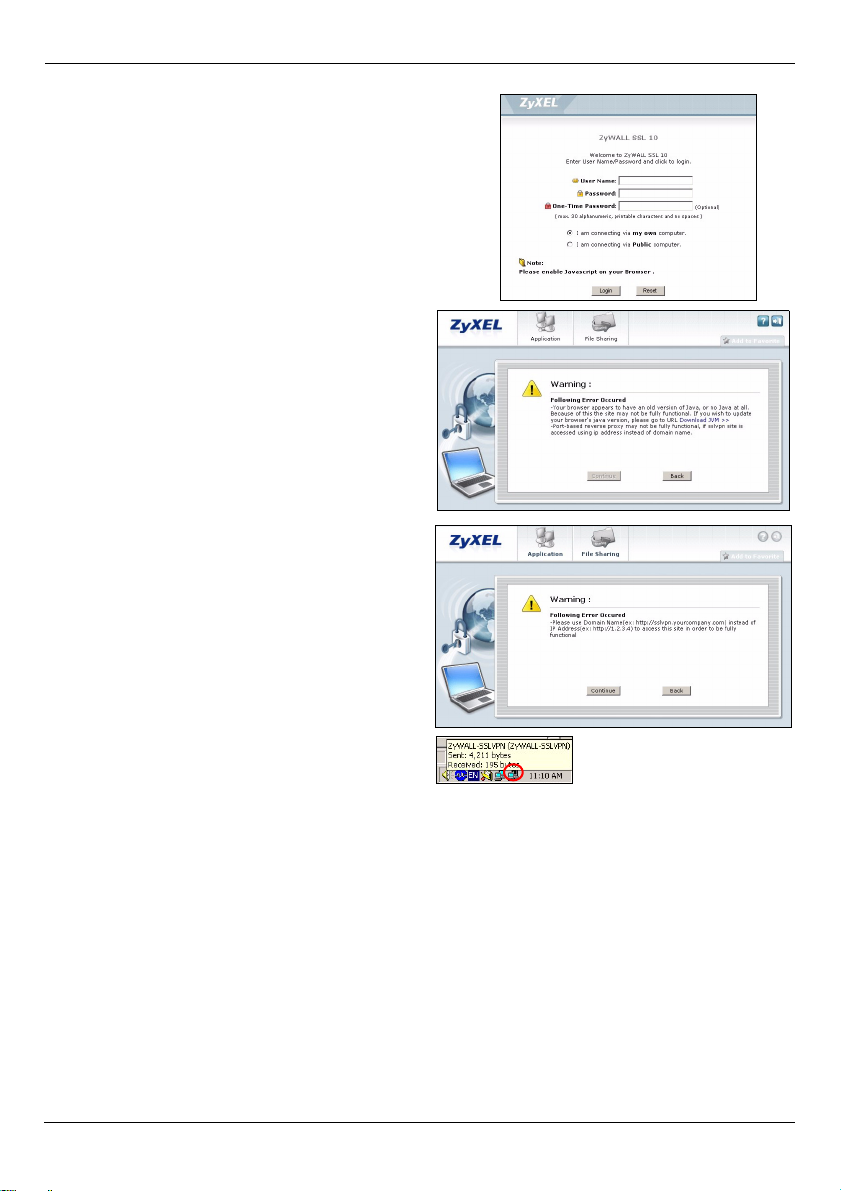
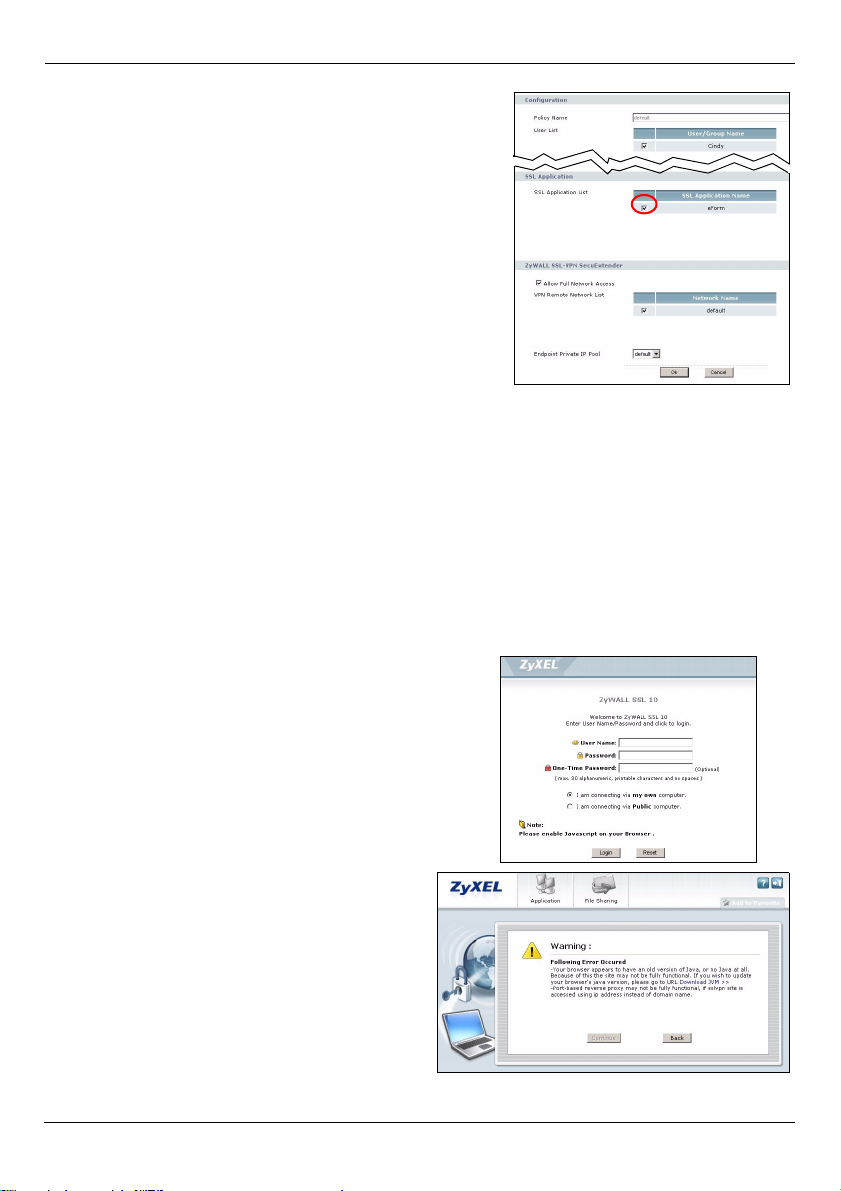
4 A login screen displays. Enter the user name and
password of the remote user account you created
using the setup wizard. Click Login.
5 After the login is successful, your computer starts
establishing a VPN connection to the ZyWALL.
This may take up to two minutes.
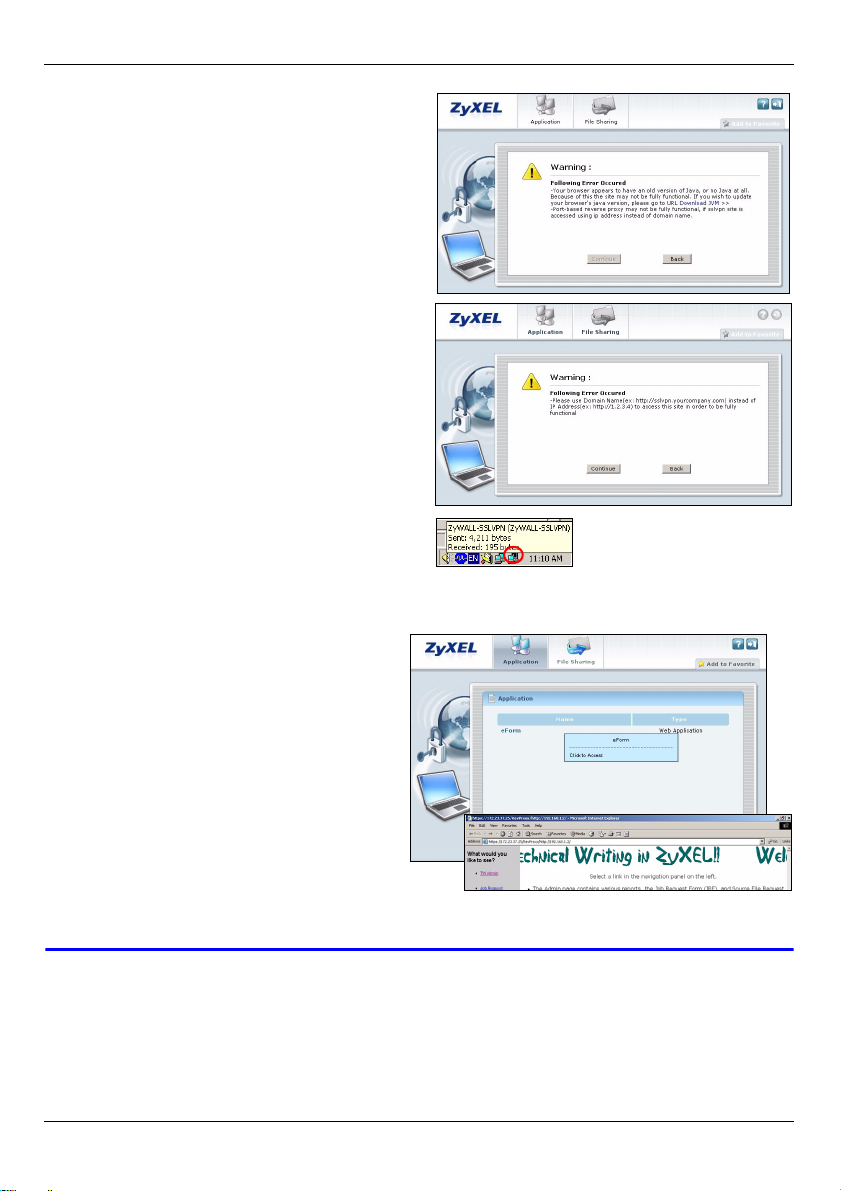
6 Download the installation software if you
are prompted to upgrade the JVM, Click
the link to access the Sun Java software
web site. It is recommended you select
the Offline Installation option.
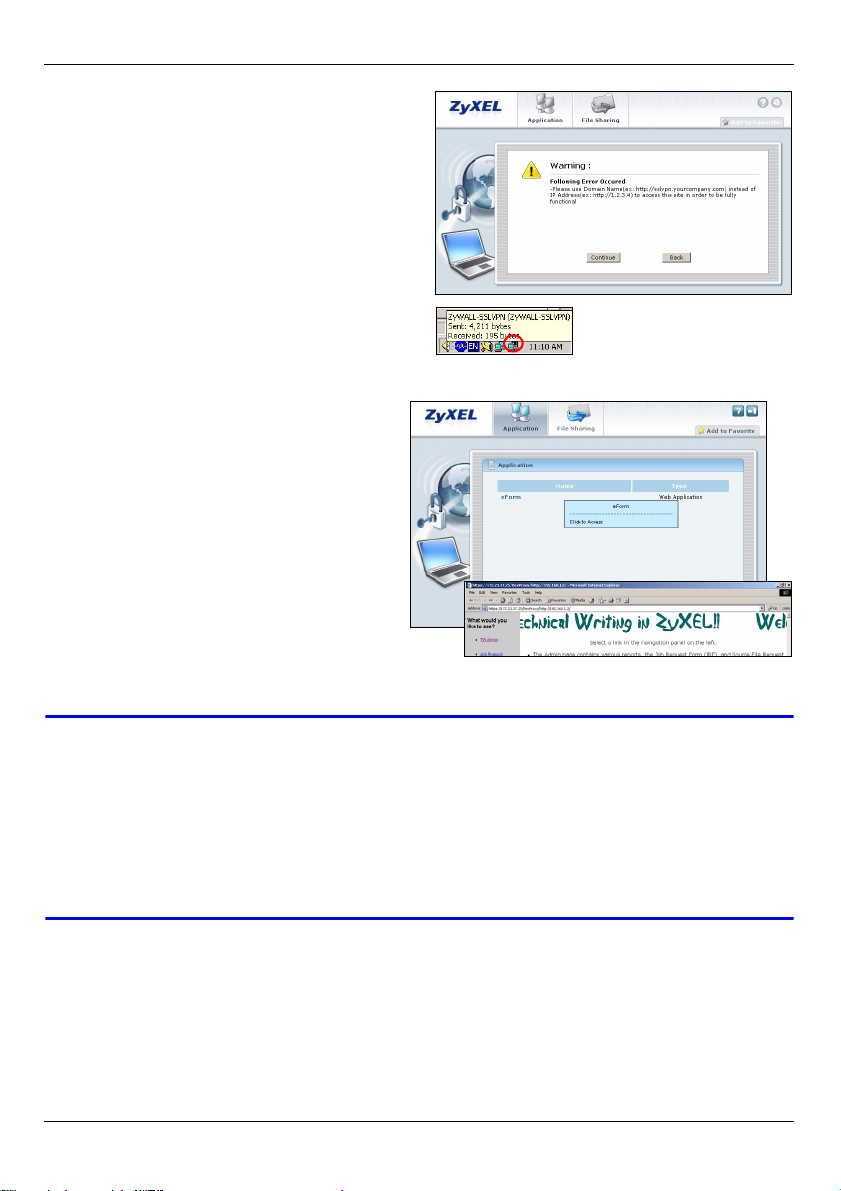
7 If a warning screen displays, click
Continue.
8 A new network icon displays in the system
tray. This indicates that a VPN connection
has been established between your
computer and the ZyWALL.
8
ENGLISH
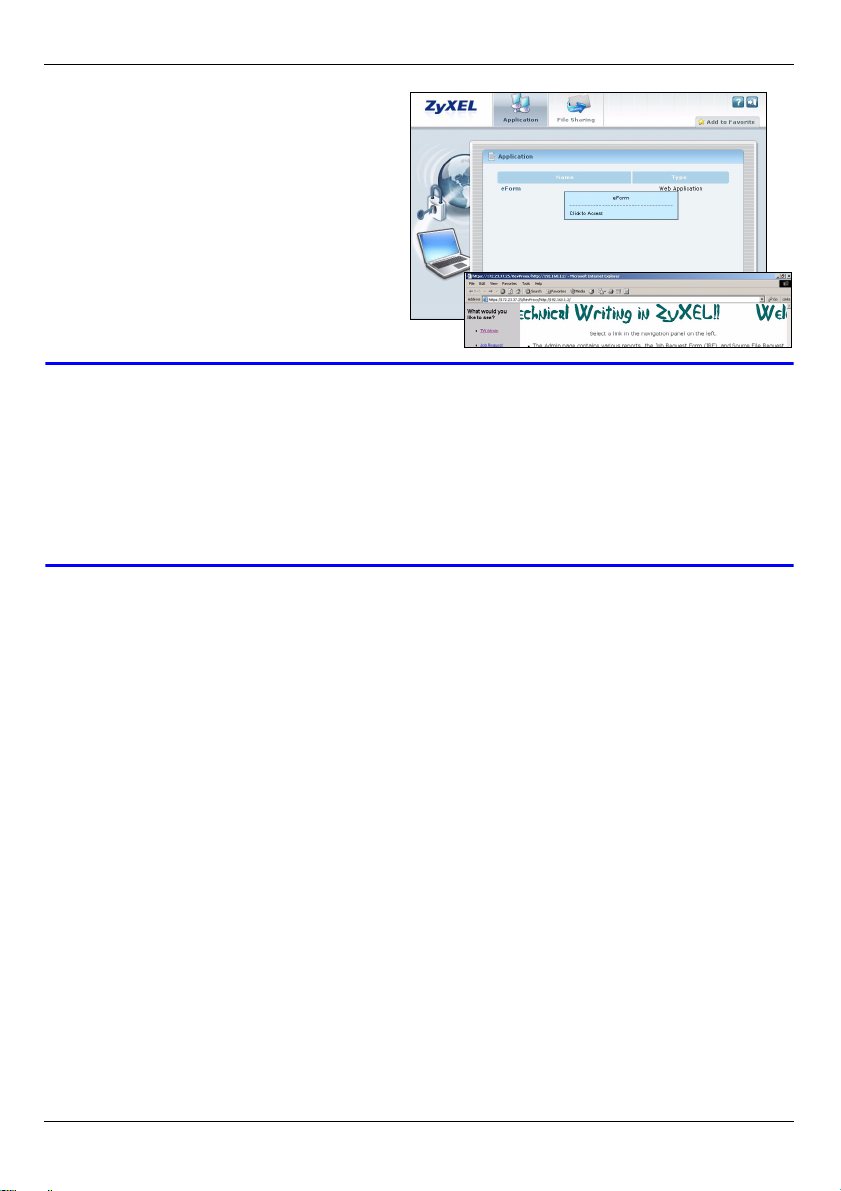
9 The remote user screen displays. You
can click on a link to access the web
site. Or, if you know the site address,
simply open a new web browser
window and enter the site address to
access.
If you can access the web page, you have
successfully set up your ZyWALL. Refer
to the user’s guide for information on
advanced configuration.
V Make sure that you are using a web browser with settings specified in
System Requirements.
If you are prompted to install or upgrade Java Virtual Machine (JVM), click
the link to access the Sun Java software web site and download the
software using the Offline Installation option.
If you cannot access the remote user screen, check that you have
successfully registered your ZyWALL.
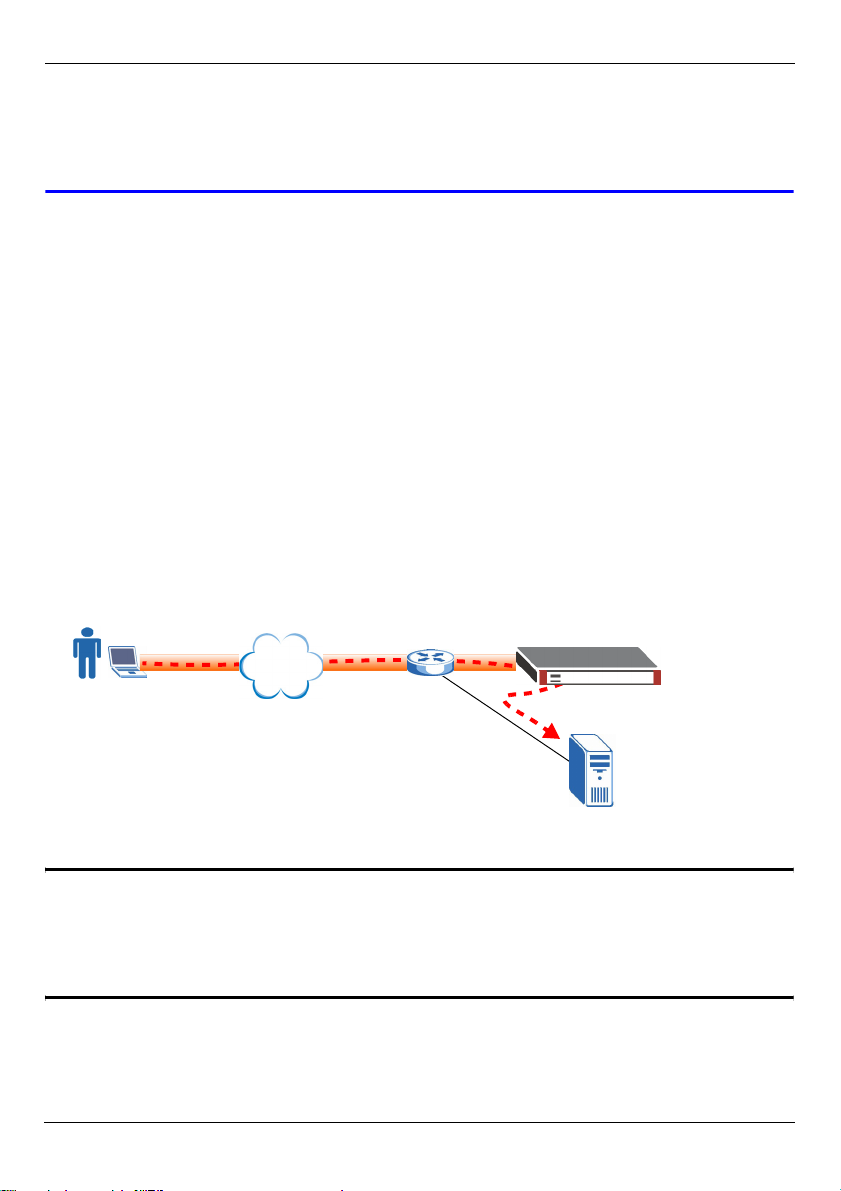
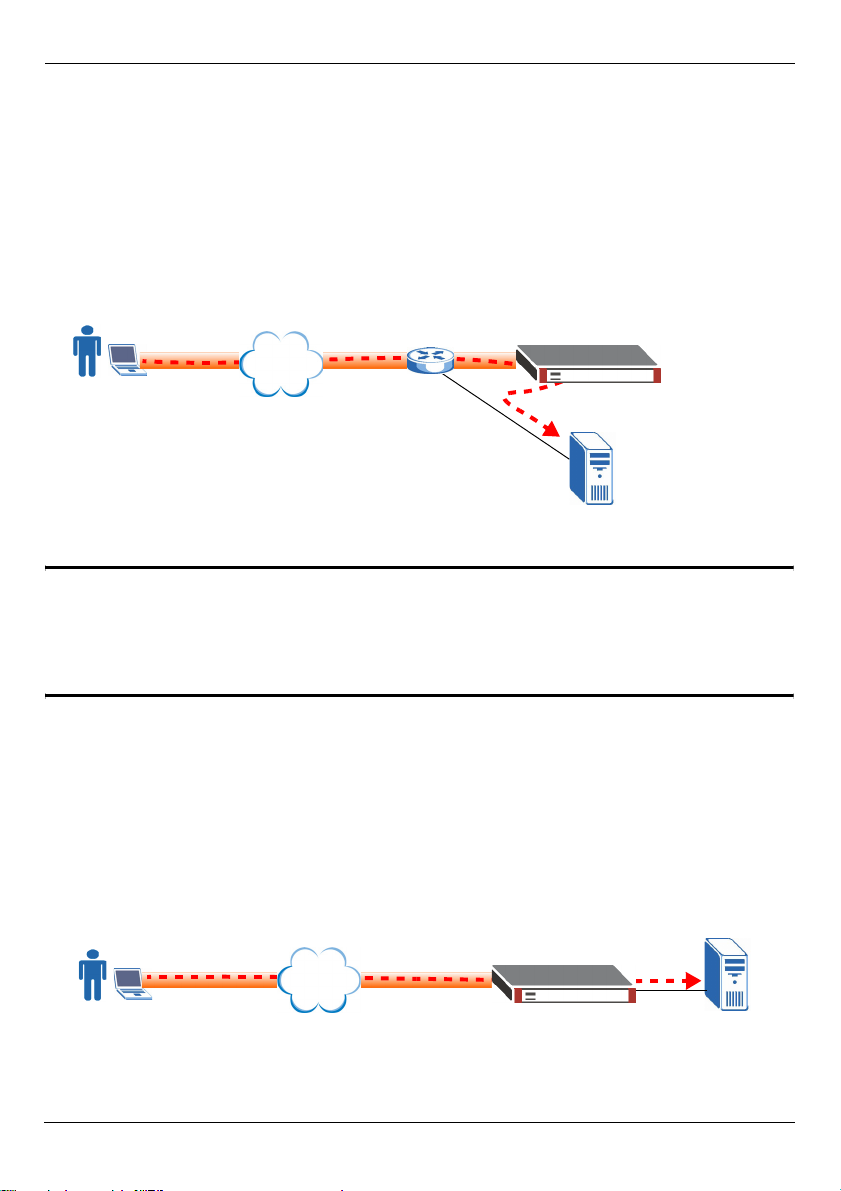
7 Deploy the ZyWALL in Your Network
You can deploy the ZyWALL in one of two ways: behind a gateway or as a new gateway.
7.1 Behind a Gateway
You can connect the ZyWALL to an existing gateway on your network. If the gateway
comes with a DMZ port, connect the ZyWALL to that port for added security. The following
figure shows a network example where the ZyWALL (SSL10) and the web server (WWW)
are connected to the gateway (GW). To access the web server, traffic from the remote user
(A) must go through the VPN tunnel and pass the security checks on the gateway.
9

ENGLISH
https://
Internet
A
GW
SSL10
WWW
" If the ZyWALL is behind a firewall or NAT router, you must configure the
device to allow connection to the ZyWALL on TCP port 443. You can do
this using port forwarding or a firewall rule.
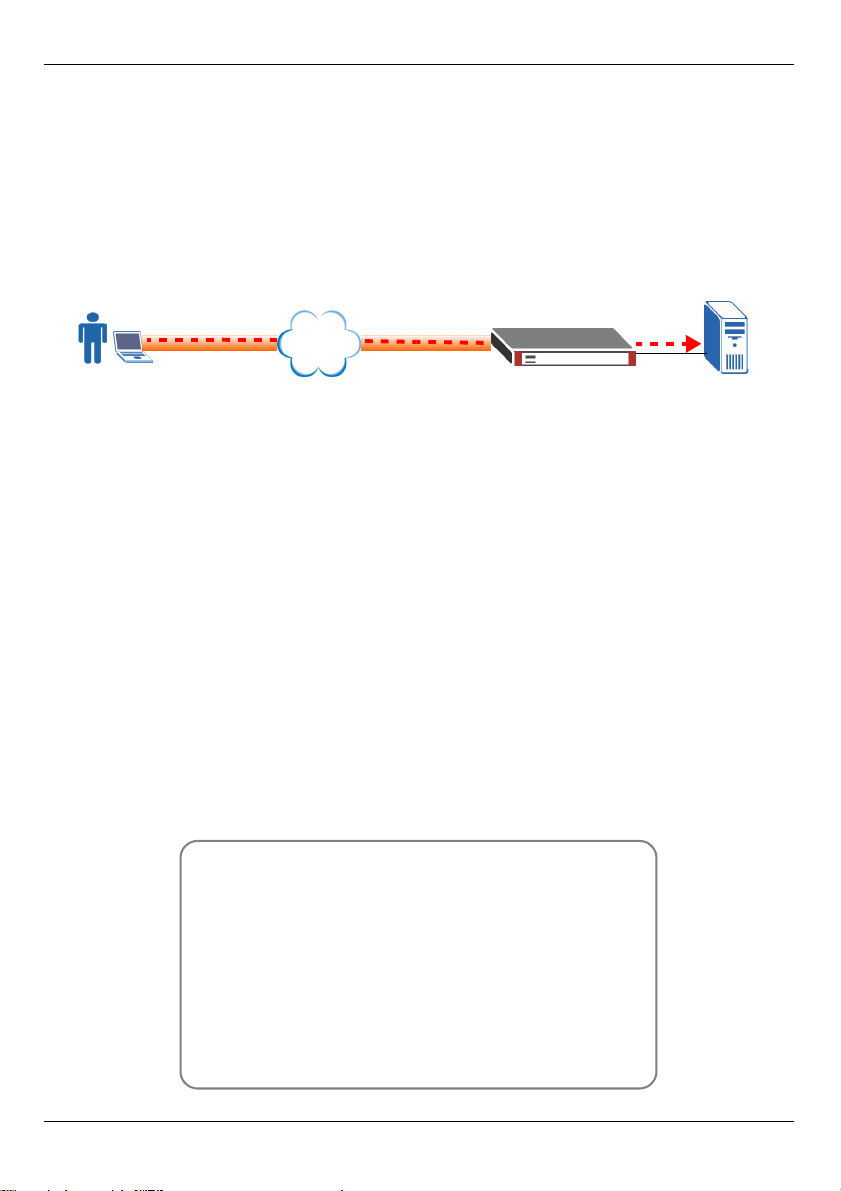
7.2 As a Gateway
If you do not already have a gateway on your network, you can set up the ZyWALL as a
gateway with SSL-VPN access. The following figure shows a network example where the
ZyWALL(SSL10) is connected to a DSL/cable modem for Internet access and the web
server (WWW) is connected to the ZyWALL. To access the web server, traffic from the
remote user (A) is sent through the VPN tunnel. For security, you can configure access
control and end-point control policies on the ZyWALL.
https://
A
Internet
SSL10
Procedure to View a Product’s Certification(s)
1 Go to www.zyxel.com.
2 Select your product from the drop-down list box on
the ZyXEL home page to go to that product's page.
3 Select the certification you wish to view from this
page.
10
WWW
ENGLISH
11
DEUTSCH
DEUTSCH
Einführung
Das ZyWALL SSL 10 ist ein SSL VPN-Gateway, mit dem Sie sichere Remote-Netzwerke
und Programmzugriffe einrichten können, ohne zuvor eine Client-Software installieren zu
müssen. In dieser Anleitung wird beschrieben, wie Sie das ZyWALL (SSL10) installieren
und konfigurieren müssen, damit ein Remote-Benutzer (A) in Ihrem lokalen Netzwerk über
eine SSL-VPN-Verbindung auf einen Web-Server (WWW) zugreifen kann. Halten Sie die
Daten für Ihren Internetzugang bereit
https://
Internet
A
SSL10
WWW
Schritte für die Konfiguration
1 Systemvoraussetzungen
2 Anschließen der Hardware
3 Zugreifen auf den Web-Konfigurator
4 Konfigurieren mit dem Installationsassistenten
5 Erstellen von Internetverknüpfungen für den Schnellzugriff
6 Testen der Remote-Benutzerverbindung über das Internet
7 Benutzen des ZyWALL im Netzwerk
1 Systemvoraussetzungen
Im Folgenden sind die Browser- und Systemanforderungen aufgeführt, die ein RemoteBenutzer erfüllen muss.
• Internet Explorer 5.5 (mit Microsoft Service-Pack (MSXML)) oder 6.0 und höher
• Netscape 7.2 und höher
• Firefox 1.0 und höher
• Mozilla 1.7.3 und höher
• Windows 2000 Professional, Windows XP Home/Professional (mit Service Pack 2 und
höher) oder Linux.
• Sun Java Virtual Machine (JVM) (mindestens Version 1.4.2_07 für Netscape/Mozilla/Firefox und 1.4.2_02 für Internet Explorer- und Linux-Computer).
• Im Internet Explorer aktiviertes Java bei Windows-Computern.
12
DEUTSCH
2 Anschließen der Hardware
1
1 Verbinden Sie den WAN-Anschluss mit einem Ethernet-Kabel mit Ihrem
Breitbandmodem oder Router.
2 Schließen Sie den Management-Computer mit einem Ethernetkabel an den LAN-
Anschluss an.
3 Schließen Sie das mitgelieferte Netzteil an der Rückseite der ZyWALL an.
Während des Systemtests blinkt die SYS-LED. Wurde der Test erfolgreich
abgeschlossen, leuchtet das SYS-LED dauerhaft. Die LED-Anzeigen WAN und LAN
leuchten, wenn die Anschlüsse verbunden sind.
2
3
V Sollte keine der LED-Anzeigen leuchten, prüfen Sie, ob das Gerät
eingeschaltet ist und ob die Kabel richtig angeschlossen wurden.
3 Zugreifen auf den Web-Konfigurator
Führen Sie die folgenden Schritte aus, um über einen LAN-Anschluss auf den WebKonfigurator zuzugreifen und das ZyWALL zu konfigurieren. Verwenden Sie Internet
Explorer 6.0/Netscape 7.0 und neuere Versionen davon.
1 Der Computer muss so eingestellt sein, dass er eine IP-Adresse vom ZyWALL
empfangen kann.
2 Starten Sie Ihren Webbrowser. Geben Sie als
Adresse 192.168.1.1 (die LAN-IP-
Standardadresse des ZyWALL) ein.
13

DEUTSCH
3 Klicken Sie im Sicherheits- oder Warnfenster auf
OK oder Yes (Ja).
4 Das Anmeldefenster wird angezeigt. Geben Sie
admin als den Anwendernamen und 1234 als das
Passwort ein. Klicken Sie auf Login (Anmelden).
5 Wenn ein anderes Zertifikatsfenster angezeigt
wird, klicken Sie zum Fortfahren auf Yes (Ja).
6 Das ist das erste Mal, dass Sie sich beim
ZyWALL anmelden. Das erste Hauptfenster wird
angezeigt (siehe Abbildung).
Klicken Sie auf Setup Wizard
(Installationsassistent).
4 Setup Wizard (Installationsassistent)
Führen Sie für die Erstkonfiguration den Installationsassistenten aus. Die folgenden
Schritte sind notwendig:
• Konfigurieren der LAN/WAN-Einstellungen
• Erstellen eines Remote-Benutzerkontos
• Erstellen einer SSL-VPN-Zugriffsregel
• Registrieren der ZyWALL
Führen Sie die Schritte des Assistenten aus. Klicken Sie in jedem Fenster des Assistenten
auf Next (Weiter) >.
14
DEUTSCH
1 Um den Installationsassistenten aufzurufen,
klicken Sie im Hauptfenster auf Setup
Wizard (Installationsassistent).
• Wählen Sie die Option Install on Gateway's
DMZ port (An DMZ-Anschluss des Gateways
installieren), wenn die ZyWALL an ein-Gate-
way im Netzwerk angeschlossen werden soll.
• Wählen Sie Install as a New Gateway (Als
neues Gateway installieren), wenn das
ZyWALL im Netzwerk sowohl als NAT-Router
als auch als SSL VPN-Gateway installiert werden soll.
2 Wenn das ZyWALL hinter einem anderen
Gateway installiert wird, müssen die IPEinstellungen des ZyWALL im ersten
Fenster des Assistenten konfiguriert werden.
Wenn das ZyWALL als neues Gateway
installiert wird, müssen die InternetEinstellungen im ersten Fenster des
Assistenten konfiguriert werden.
3 Erstellen Sie ein neues Remote-
Benutzerkonto, damit sich ein RemoteBenutzer im lokalen Netzwerk anmelden
kann. Geben Sie dem Konto einen
einmaligen Namen (bis zu 31 Zeichen,
wobei die Zeichen "0-9" "a-z" und "A-Z"
verwendet werden können) und ein
Kennwort (bis zu 64 Zeichen, wobei die
Zeichen "0-9" "a-z" und "A-Z" verwendet
werden können).
" Mit dem Administratorkonto können Sie nicht auf die Netzwerkressourcen
zugreifen.
15
DEUTSCH
4 Geben Sie die IP-Adresse und die
Subnetzmaske Ihres lokalen Netzwerks
hinter dem ZyWALL ein, auf das mit dem SSL
VPN erreichbar sein soll.
Geben Sie den Bereich der privaten IPAdressen ein, die den Remote-Benutzern und
dem ZyWALL zugewiesen werden sollen.
Dieser wird für den Aufbau einer SSL-VPNVerbindung verwendet und ermöglicht es den
Remote-Benutzern, so auf die Ressourcen
zuzugreifen, als wären sie Teil des lokalen
Netzwerks.
5 Klicken Sie zum Fortfahren auf Next (Weiter).
6 Prüfen Sie im nächsten Fenster die
Netzwerkeinstellungen, und klicken Sie auf
Activate SSL-VPN License (SSL-VPNLizenz aktivieren).
" Registrieren Sie das ZyWALL
unter myZyXEL.com, damit bis zu
10 Remote-Benutzer gleichzeitig
zugreifen können.
7 Geben Sie die Kontoinformationen
entsprechend der Anweisungen bei
myZyXEL.com ein, und klicken Sie auf
Finished (Fertig), um den
Installationsassistenten zu beenden und die
Registrierung zu starten.
8 Klicken Sie abschließend auf Close
(Schließen).
16
DEUTSCH
V Wenn die Registrierung fehlgeschlagen ist, prüfen Sie, ob die
eingegebenen Kontoinformationen richtig sind und ob die ZyWALL Zugriff
auf das Internet hat.
Jetzt können Sie sich mit dem gerade erzeugten Benutzerkonto als Remote-Benutzer
anmelden. Sie haben Zugriff auf jede Ressource des lokalen Netzwerks (mit IP-Adresse
oder Domainnamen). Sie haben auch die Möglichkeit, für das Remote-Benutzerfenster link
zu erzeugen, sodass Internetanwendungen durch einfaches Anklicken angewählt werden
können.
5 Erstellen von Internetverknüpfungen für den Schnellzugriff
In diesem Abschnitt wird beschrieben, wie Sie eine Internetanwendung festlegen und dazu
auf dem Remote-Benutzerfenster einen Link erzeugen können.
1 Melden Sie sich beim Web-Konfigurator
als Administrator an, und klicken Sie auf
Object > SSL Application. Klicken Sie
auf die Schaltfläche Add (Hinzufügen).
2 Erstellen Sie eine Web Application, und geben
Sie im Feld Service Name einen Namen ein.
3 Geben Sie im Feld Address die Adresse des
Servers ein, z. B. http://192.168.1.200.
4 Wählen Sie im Feld Server Type die Option
Web Server.
5 Wenn Sie eine nicht standardmäßige
Portnummer verwenden (z. B. 8080 anstelle von
80), müssen Sie diese im Feld Virtual Web Port
eingeben.
6 Klicken Sie auf Ok, um die Einstellungen zu speichern.
7 Klicken Sie im Navigationsfeld auf SSL
und dann auf die Schaltfläche Edit
(Bearbeiten), um die SSL-Standardregel
zu konfigurieren, die Sie mit dem
Installationsassistenten festgelegt
haben.
17
DEUTSCH
8 Wählen Sie im nächsten Konfigurationsfenster
den Namen der SSL-Anwendung ein, die Sie
gerade erstellt haben, und klicken Sie auf Ok,
um die Einstellungen zu speichern.
Mit diesem Schritt werden die Einstellungen für
die SSL-Regel übernommen. Gleichzeitig wird
den Remote-Benutzern der Zugriff auf den Server
über eine SSL-VPN-Verbindung gewährt.
9 Stellen Sie sicher, dass der Server richtig
konfiguriert und mit dem lokalen Netzwerk
verbunden ist.
6 Testen der Remote-Benutzerverbindung über das Internet
Führen Sie die folgenden Schritte aus, um als Remote-Benutzer über das Internet auf das
lokale Netzwerk zuzugreifen. Dazu benötigen Sie die WAN IP-Adresse der ZyWALL (diese
erhalten Sie im Status-Fenster).
1 Schließen Sie Ihren Computer an ein Netzwerk außerhalb der Firewall Ihres
Unternehmens an.
2 Öffnen Sie Ihren Internetbrowser, und geben Sie als URL die WAN IP-Adresse der
ZyWALL ein.
3 Klicken Sie im nächsten Sicherheitsfenster auf OK oder Yes.
4 Das Anmeldefenster wird angezeigt. Geben Sie
den Benutzernamen und das Kennwort des
Remote-Benutzerkontos ein, das Sie mit dem
Installationsassistenten konfiguriert haben.
Klicken Sie auf Login (Anmelden).
5 Wenn der Computer erfolgreich angemeldet
wurde, beginnt er, eine VPN-Verbindung mit dem
ZyWALL herzustellen. Dieser Vorgang kann bis
zu zwei Minuten dauern.
18
DEUTSCH
6 Laden Sie sich die Installationssoftware
zur Aktualisierung von JVM aufgefordert
werden. Klicken Sie auf den Link, um auf
die Website von Sun Java zu gelangen.
Es wird empfohlen, die Option Offline
Installation (Offline installieren) zu
wählen.
7 Klicken Sie im Warnfenster auf Continue
(Fortfahren).
8 Im Systembereich der Taskleiste wird ein
zweites Netzwerksymbol angezeigt.
Dieses zeigt an, dass zwischen dem
Computer und dem ZyWALL eine
Verbindung besteht.
9 Das Remote-Benutzerfenster wird
angezeigt. Klicken Sie auf einen Link,
um die entsprechende Website
aufzurufen. Wenn Sie die Adresse der
Website kennen, können Sie auch
einfach ein neues Browserfenster
öffnen und diese Adresse eingeben.
Das ZyWALL ist richtig installiert, wenn
Sie Zugriff auf die Website haben. Weitere
Informationen über die erweiterte
Konfiguration finden Sie im
Benutzerhandbuch.
V Stellen Sie sicher, dass der Internetbrowser die unter
Systemvoraussetzungen aufgeführten Anforderungen erfüllt.
Wenn Sie dazu aufgefordert werden, Java Virtual Machine (JVM) zu
installieren oder aktualisieren, klicken Sie auf die Verknüpfung, um die
19
DEUTSCH
Website von Sun Java aufzurufen und dort die Software mit der Option
Offline Installation (Offline installieren) herunterzuladen.
Wenn Sie das Remote-Benutzerfenster nicht aufrufen können, prüfen Sie,
ob die ZyWALL erfolgreich registriert wurde.
7 Benutzen der ZyWALL im Netzwerk
Sie können den ZyWALL auf zwei Arten benutzen: hinter einem-Gateway oder als ein
neues Gateway.
7.1 Hinter einem Gateway
Sie können den ZyWALL an ein vorhandenes Gateway im Netzwerk anschließen. Wenn
das Gateway mit einem DMZ-Anschluss ausgestattet ist, sollte das ZyWALL zur Sicherheit
an diesen Anschluss angeschlossen werden. Die folgende Abbildung zeigt ein
Netzwerkbeispiel, bei dem das ZyWALL (SSL10) und der Internetserver (WWW) an das
Gateway (GW) angeschlossen sind. Um auf den Webserver zuzugreifen, müssen die
Daten vom Remote-Benutzer (A) den VPN-Tunnel passieren und die
Sicherheitsprüfungen am Gateway bestehen.
https://
Internet
A
GW
SSL10
WWW
" Wenn sich das ZyWALL hinter einer Firewall oder einem NAT-Router
befindet, müssen Sie das Gerät so konfigurieren, dass das Gerät eine
Verbindung zum ZyWALL über TCP-Port 443 zulässt. Das kann mit Hilfe
einer Port-Weiterleitung oder einer Firewall-Regel erfolgen.
20
DEUTSCH
7.2 Als Gateway
Wenn Sie noch kein Gateway im Netzwerk haben, können Sie das ZyWALL als Gateway
mit SSL-VPN-Zugriff benutzen. Die folgende Abbildung zeigt ein Netzwerkbeispiel, bei
dem das ZyWALL(SSL10) für den Internetzugriff mit einem DSL-/Kabelmodem und der
Internetserver (WWW) mit der ZyWALL verbunden ist. Um auf den Internetserver
zuzugreifen, werden die Daten des Remote-Benutzers (A) durch den VPN-Tunnel
gesendet. Aus Sicherheitsgründen können Sie zusätzliche Regeln für den Zugriff und für den
Schutz des angebotenen Services konfigurieren.
https://
Internet
A
SSL10
WWW
Schritte zum Ansehen von
Produktzertifizierung(en)
1 Zu www.zyxel.com.
2 Wählen Sie auf der ZyXEL-Startseite aus der Drop-
down-Liste Ihr Produkt aus, um die Seite des
Produkts aufzurufen.
3 Wählen Sie auf dieser die Zertifizierung aus, die
angezeigt werden soll.
21
ESPAÑOL
ESPAÑOL
Introducción
El ZyWALL SSL 10 es una puerta de enlace SSL VPN que le permite configurar el acceso
a una red remota segura y a la aplicación sin preinstalación del software cliente. Esta guía
le muestra cómo conectar y configurar el ZyWALL (SSL10) para que el usuario remoto (A)
pueda acceder al servidor web (WWW) en su red local a través de una conexión SSLVPN. Puede que necesite la información de su cuenta de acceso a Internet.
https://
Internet
A
SSL10
WWW
Pasos para la configuración
1 Requisitos del sistema
2 Conexión inicial del hardware
3 Acceder al Configurador Web
4 Configurar el Asistente para la instalación
5 Crear enlaces Web para un acceso remoto fácil
6 Probar la conexión del usuario remoto desde Internet
7 Desplegar el ZyWALL en su red
1 Requisitos del sistema
A continuación se muestra la lista de los requisitos del explorador y del sistema del
ordenador para el acceso del usuario remoto.
• Internet Explorer 5.5 con paquete de servicios Microsoft XML (MSXML) instalado o 6.0 y
posteriores
• Netscape 7.2 y posteriores
• Firefox 1.0 y posteriores
• Mozilla 1.7.3 y posteriores
• Windows 2000 Professional, Windows XP Home/Professional (con paquete de servicios 2
y posteriores) o Linux.
• Sun Java Virtual Machine (JVM) instalada con la versión mínima 1.4.2_07 para Netscape/
Mozilla/Firefox y 1.4.2_02 para ordenadores con Internet Explorer y Linux.
• Java habilitado en Internet Explorer en ordenadores con Windows.
22
ESPAÑOL
2 Conexión inicial del hardware
1
1 Utilice un cable Ethernet para conectar el puerto WAN a un módem de banda ancha o
puerta de enlace.
2 Utilice un cable Ethernet para conectar un ordenador de administración a un puerto
LAN.
3 Utilice el adaptador de alimentación incluido para conectar el puerto POWER 12V del
panel posterior a una fuente de alimentación.
Tras conectar la alimentación y encender la fuente de alimentación, compruebe los LEDs.
El LED PWR se encenderá. El LED SYS parpadea mientras realiza la prueba del sistema y
se queda fijo si la prueba tiene éxito. Los LEDs WAN y LAN se encienden cuando los
puertos correspondientes están conectados.
2
3
V Si no se enciende ninguno de los LEDs con la alimentación conectada,
compruebe las conexiones de los puertos y asegúrese de que la
alimentación esté encendida.
3 Acceder al Configurador Web
Siga los pasos siguientes para acceder al configurador web a través de un puerto LAN y
configurar el ZyWALL. Debe utilizar Internet Explorer 6.0/Netscape 7.0 o versiones
posteriores.
1 Compruebe que el ordenador esté configurado para recibir una dirección IP desde el
ZyWALL.
2 Abra su explorador de web. Escriba 192.168.1.1
(la dirección IP de la LAN predeterminada del
ZyWALL) como dirección.
23

ESPAÑOL
3 Si ve una pantalla de seguridad o aviso, haga clic
en OK (Aceptar) o Yes (Sí) para continuar.
4 Aparecerá la pantalla de acceso. Escriba admin
como nombre de usuario y 1234 como
contraseña. Haga clic en Login (Entrar).
5 Si aparece otra pantalla de certificado, haga clic
en Yes (Sí) para continuar.
6 Esta es la primera vez que accede al ZyWALL. La
pantalla inicial aparecerá como se muestra.
Haga clic en Setup Wizard (Asistente para la
instalación)
4 Asistente para la instalación
Para la configuración inicial, utilice las pantallas del asistente para la instalación para
realizar lo siguiente.
• Ajustar la configuración LAN/WAN
• Crear una cuenta de usuario remoto
• Crear una política de acceso SSL-VPN
• Registrar el ZyWALL
Siga los pasos para configurar las pantallas del asistente. Haga clic en Next > (Siguiente >)
en cada pantalla del asistente para continuar.
24
ESPAÑOL
1 Para mostrar el asistente para la instalación,
haga clic en Setup Wizard (Asistente para la
instalación) en la pantalla principal inicial.
• Seleccione Install on Gateway's DMZ port
(Instalar en el puerto DMZ de la puerta de
enlace) si desea conectar el ZyWALL a una
puerta de enlace en su red.
• Seleccione Install as a New Gateway (Instalar como puerta de enlace nueva) si desea
configurar el ZyWALL como router NAT y
como puerta de enlace SSL VPN en su red.
2 Si instala el ZyWALL detrás de otra puerta
de enlace, ajuste la configuración IP del
ZyWALL en la primera pantalla del asistente.
Si instala el ZyWALL como una nueva puerta
de enlace, ajuste la configuración de Internet
en la primera pantalla del asistente.
3 Cree una nueva cuenta de usuario remoto
para permitir que un usuario remoto acceda
a su red local. Escriba un único nombre de
usuario (hasta 31 caracteres utilizando "09" "a-z" "A-Z" ) y una contraseña (hasta 64
caracteres utilizando"0-9" "a-z" "A-Z").
" No puede utilizar la cuenta de
administrador para acceder a los
recursos de red.
25

ESPAÑOL
4 Especifique la dirección IP y máscara de
subred de una red local detrás del ZyWALL a
la que desee permitir el acceso SSL-VPN.
Especifique el rango de direcciones IP
privadas para asignar a los usuarios remotos y
al ZyWALL. Esto se utiliza para establecer una
conexión SSL-VPN y permitir que los usuarios
remotos accedan a los recursos como si
estuvieran en la red local.
5 Haga clic en Next (Siguiente) para continuar.
6 Compruebe la configuración de red en la
siguiente pantalla del asistente y haga clic
en Activate SSL-VPN License (Activar
licencia SSL-VPN).
" Debe registrar su ZyWALL en
myZyXEL.com para permitir que
hasta 10 usuarios remotos
puedan acceder al mismo tiempo.
7 Siga las instrucciones en pantalla para
introducir la información de la cuenta en
myZyXEL.com y haga clic en Finished
(Finalizar) para completar el asistente para la
instalación e iniciar el proceso de registro.
8 Tras completar el proceso, haga clic en
Close (Cerrar).
V Si falla el registro del dispositivo, compruebe si ha introducido
correctamente la información de la cuenta y si el ZyWALL puede acceder a
Internet.
26
ESPAÑOL
Ahora puede acceder como usuario remoto con la cuenta de usuario que acaba de crear.
Puede acceder a cualquier recurso en la red local (utilizando la dirección IP o nombre de
dominio). Opcionalmente, puede crear enlaces para la pantalla del usuario remoto y así
permitir el acceso con un clic a las aplicaciones basadas en web.
5 Crear enlaces Web para un acceso remoto fácil
Esta sección le muestra cómo especificar una aplicación basada en web y crear enlaces
web en la pantalla del usuario remoto.
1 Acceda al configurador web como
administrador y haga clic en Object
(Objeto) > SSL Application (Aplicación
SSL). Haga clic en el icono Add
(Agregar).
2 Cree una Web Application (Aplicación web) y
escriba un nombre descriptivo en el campo
Service Name (Nombre del servicio).
3 En el campo Address (Dirección), escriba la
dirección del servidor. Por ejemplo, http://
192.168.1.200.
4 Seleccione Web Server (Servidor web) en el
campo Server Type (Tipo de servidor).
5 Si utiliza un número de puerto no estándar (por
ejemplo, 8080 en lugar de 80), escríbalo en el campo Virtual Web Port (Puerto Web
virtual).
6 Haga clic en OK (Aceptar) para guardar la configuración.
7 Haga clic en SSL en el panel de
navegación y haga clic en el icono Edit
(Editar) para configurar la política SSL
predeterminada creada utilizando el
asistente para la instalación.
27
ESPAÑOL
8 En la pantalla de configuración que aparece,
seleccione el nombre de la aplicación SSL que
acaba de crear y haga clic en Ok (Aceptar) para
guardar la configuración.
Esto aplica la configuración de la aplicación a la
política SSL y permite al usuario remoto acceder
al servidor sobre una conexión SSL-VPN.
9 Compruebe que el servidor esté configurado
correctamente y conectado a la red local.
6 Probar la conexión del usuario remoto desde Internet
Siga los pasos siguientes para acceder a la red local como usuario remoto desde Internet.
Debe conocer la dirección WAN IP del ZyWALL (obtenga esta información en la pantalla
Status (Estado).
1 Conecte su ordenador a una red fuera del cortafuegos de su compañía.
2 Abra su explorador de web y escriba la dirección WAN IP del ZyWALL como URL.
3 Haga clic en OK (Aceptar) o Yes (Sí) si aparece una pantalla de seguridad.
4 Aparecerá una pantalla de acceso. Escriba el
nombre de usuario y contraseña de la cuenta del
usuario remoto creada con el asistente para la
instalación. Haga clic en Login (Entrar).
5 Cuando haya entrado, su ordenador iniciará el
establecimiento de una conexión VPN al
ZyWALL. Esto puede tardar hasta dos minutos.
6 Descargue el software de instalación si se
le pide que actualice JVM, haga clic en el
enlace para acceder al sitio web del
software Sun Java. Se recomienda que
seleccione la opción Offline Installation
(Instalación sin conexión).
28
7 Si aparece una pantalla de aviso, haga
clic en Continue (Continuar).
8 Aparecerá un icono de red nuevo en la
bandeja del sistema. Éste indica que se
ha establecido una conexión VPN entre
su ordenador y el ZyWALL.
9 Aparecerá la pantalla del usuario
remoto. Puede hacer clic en un enlace
para acceder al sitio web. O si sabe la
dirección del sitio, simplemente abra
una ventana nueva de explorador y
escriba la dirección del sitio para
acceder.
Si puede acceder a la página web, ha
configurado correctamente su ZyWALL.
Consulte la guía del usuario para
información sobre la configuración
avanzada.
ESPAÑOL
V Asegúrese de estar utilizando un explorador de web con la configuración
especificada en Requisitos del sistema.
Si se le pide que instale o actualice Java Virtual Machine (JVM), haga clic
en el enlace para acceder al sitio web del software Sun Java y descargar el
software utilizando la opción Offline Installation (Instalación sin conexión).
Si no puede acceder a la pantalla del usuario remoto, compruebe si ha
registrado con éxito su ZyWALL.
7 Desplegar el ZyWALL en su red
Puede desplegar el ZyWALL de dos maneras: detrás de una puerta de enlace o como una
puerta de enlace nueva.
29
ESPAÑOL
7.1 Detrás de una puerta de enlace
Puede conectar el ZyWALL en una puerta de enlace existente en su red. Si la puerta de
enlace viene con un puerto DMZ, conecte el ZyWALL a ese puerto para una seguridad
añadida. La siguiente figura muestra un ejemplo de red donde ZyWALL (SSL10) y el
servidor (WWW) están conectados a la puerta de enlace (GW). Para acceder al servidor
web, el tráfico desde el usuario remoto (A) debe ir desde el túnel VPN y pasar las
verificaciones de seguridad en la puerta de enlace.
https://
Internet
A
GW
SSL10
WWW
" Si el ZyWALL está detrás de un cortafuegos o router NAT, debe configurar
el dispositivo para que permita la conexión al ZyWALL en el puerto TCP
443. Puede hacerlo utilizando el redireccionamiento de puertos o una regla
de cortafuegos.
7.2 Como una puerta de enlace
Si no ha tiene todavía una puerta de enlace en su red, puede configurar el ZyWALL como
puerta de enlace con acceso SSL-VPN. La siguiente figura muestra un ejemplo de red
donde ZyWALL(SSL10) es conectado a un módem DSL/cable para acceso a Internet y el
servidor de web (WWW) es conectado al ZyWALL. Para acceder al servidor de web, el
tráfico desde el usuario remoto (A) se envía a través del túnel VPN. Por seguridad, puede
configurar las políticas de control de acceso y control de punto final en el ZyWALL.
https://
Internet
A
30
SSL10
WWW

ESPAÑOL
Procedimiento para ver la(s) certificación(es)
del producto
1 Vaya a www.zyxel.com.
2 Seleccione su producto de la lista desplegable en
la página inicial de ZyXEL para ir a la página de
ese producto.
31

FRANÇAIS
FRANÇAIS
Introduction
Le ZyWALL SSL 10 est une passerelle VPN SSL vous permettant d'établir et de sécuriser
un accès à des réseaux et des applications sans préinstaller de logiciel client. Ce guide
vous indique comment connecter et configurer le ZyWALL (SSL10) afin de permettre à un
utilisateur distant (A) d'accéder à un serveur web (WWW) sur votre réseau local via une
connexion VPN-SSL. Préparez les informations concernant votre accès à Internet, vous
pourriez en avoir besoin.
https://
Internet
A
SSL10
WWW
Etapes de la configuration
1 Configuration requise
2 Connexion matérielle initiale
3 Accéder au configurateur Web.
4 Configurer l'assistant d'installation
5 Créer des liens web pour permettre un accès distant facile
6 Tester la connexion de l'utilisateur distant depuis Internet
7 Déployez le dans votre réseau ZyWALL
1 Configuration requise
Vous trouverez ci-dessous les configurations requises pour le navigateur et l'ordinateur
pour l'ouverture de session de l'utilisateur distant.
• Votre système doit comporter Internet Explorer 5.5 avec le service pack Microsoft XML
(MSXML) ou 6.0 et version plus récente
• Netscape 7.2 et version plus récente
• Firefox 1.0 et version plus récente
• Mozilla 1.7.3 et version plus récente
• Windows 2000 Professionnel, Windows XP Familial/Professionnel (avec service pack 2 et
version plus récente) ou Linux.
• Sun Java Virtual Machine (JVM) installé avec comme version minimum 1.4.2_07 pour
Netscape/Mozilla/Firefox et 1.4.2_02 pour Internet Explorer et les ordinateurs sous Linux.
• Java activé dans Internet Explorer sur les ordinateurs travaillant sous Windows.
32

FRANÇAIS
2 Connexion matérielle initiale
1
1 Utilisez un câble Ethernet pour connecter le port WAN à un modem large bande ou une
passerelle.
2 Utilisez un câble Ethernet pour connecter un ordinateur de gestion à un port LAN.
3 Utilisez l'adaptateur d'alimentation inclus pour connecter le port POWER 12V
(ALIMENTATION 12V) sur le panneau arrière à une source d'alimentation.
Après avoir connecté l'alimentation et mis sous tension, examinez les LED. La LED PWR
s'allume. La LED SYS clignote lors du test du système et reste allumée si le test a réussi.
Les LED WAN et LAN s'allument quand les ports correspondants sont connectés.
2
3
V Si aucune LED ne s'allume lors de la mise sous tension, vérifiez les
connexions des ports et assurez-vous que la source d'alimentation est
sous tension.
3 Accéder au configurateur web.
Suivez les étapes ci-dessous pour ouvrir une session dans le configurateur web à travers
un port LAN et configurer le ZyWALL. Vous devez utiliser Internet Explorer 6.0/Netscape
7.0 ou des versions plus récentes.
1 Vérifiez que votre ordinateur est configuré pour recevoir une adresse IP du ZyWALL.
2 Lancez votre navigateur web. Entrez 192.168.1.1
(l'adresse IP LAN par défaut du ZyWALL) comme
adresse.
33

FRANÇAIS
3 Si vous voyez apparaître un écran de sécurité ou
d'avertissement, cliquez sur OK ou sur Yes (Oui)
pour continuer.
4 L’écran d'ouverture de session apparaît. Entrez
admin comme nom d'utilisateur et 1234 comme
mot de passe. Cliquez sur Login (Ouvrir une
session).
5 Si un autre écran de certificat apparaît, cliquez
sur Yes (Oui) pour continuer.
6 C'est la première fois que vous ouvrez une
session sur le ZyWALL. L'écran principal initial
s'affiche comme indiqué.
Cliquez sur Setup Wizard (Assistant d’installation).
4 Setup Wizard (Assistant d’installation)
Pour la configuration initiale, utilisez les écrans de l'assistant d'installation pour effectuer
les opérations suivantes.
• Configurer les paramètres LAN/WAN
• Créer un compte d'utilisateur distant
• Créer une stratégie d'accès VPN-SSL
• Enregistrer le ZyWALL
Suivez les étapes pour configurer les écrans de l'assistant. Cliquez sur Next > (Suivant >)
dans chaque écran de l'assistant pour continuer.
34

FRANÇAIS
1 Pour afficher l'assistant d'installation, cliquez
sur Setup Wizard (Assistant d'installation)
dans l'écran principal initial.
• Sélectionnez Install on Gateway's DMZ port
(Installer sur le port DMZ de la passerelle) si
vous voulez connecter le ZyWALL à une
passerelle dans votre réseau.
• Sélectionnez Install as a New Gateway
(Installer une nouvelle passerelle) si vous
voulez configurer le ZyWALL à la fois comme
un routeur NAT et une passerelle VPN SSL
dans votre réseau.
2 Si vous installez le ZyWALL derrière une
autre passerelle, configurez les paramètres
IP du ZyWALL dans le premier écran de
l'assistant.
Si vous installez le ZyWALL comme une
nouvelle passerelle, configurez les paramètres
Internet dans le premier écran de l'assistant.
3 Créez un nouveau compte d'utilisateur
distant pour permettre à un utilisateur
distant d'ouvrir une session sur votre
réseau local. Entrez un nom d'utilisateur
unique (jusqu'à 31 caractères parmi (0-9)
(a-z) et (A-Z) et un mot de passe (jusqu'à
64 caractères parmi (0-9) (a-z) et (A-Z).
" Vous ne pouvez pas utiliser le
compte d'administration pour
accéder aux ressources du
réseau.
35

FRANÇAIS
4 Spécifiez l'adresse IP et le masque de sous-
réseau d'un réseau local derrière le ZyWALL
auquel vous voulez permettre l'accès VPNSSL.
Spécifiez la plage d'adresses IP privées à
attribuer aux utilisateurs distants et au
ZyWALL. Ceci est utilisé pour établir une
connexion VPN-SSL et permettre aux
utilisateurs distants d'accéder aux ressources
comme s'ils se trouvaient sur le réseau local.
5 Cliquez sur Next (Suivant) pour continuer.
6 Consultez les paramètres réseau dans le
prochain écran de l'assistant et cliquez sur
Activate SSL-VPN License (Activer la
licence VPN-SSL).
" Vous devez enregistrer votre
ZyWALL à myZyXEL.com pour
permettre jusqu'à 10 utilisateurs
distants d'accéder simultanément.
7 Suivez les instructions à l'écran pour accéder
aux informations du compte myZyXEL.com et
cliquez sur Finished (Terminé) pour terminer
l'assistant d'installation et lancer
l'enregistrement.
8 Une fois que le processus est terminé,
cliquez sur Close (Fermer).
V Si l'enregistrement du périphérique échoue, vérifiez que vous avez
correctement entré les informations sur le compte et que le ZyWALL peut
accéder à Internet.
36

FRANÇAIS
Vous pouvez maintenant ouvrir une session comme utilisateur distant avec le compte
utilisateur que vous venez de créer. Vous pouvez accéder à toutes les ressources sur le
réseau local (en utilisant l'adresse IP ou le nom de domaine). Vous pouvez aussi créer des
liens pour l'écran de l'utilisateur distant pour permettre l'accès en un clic aux applications
web.
5 Créer des liens web pour un accès distant facile
Cette section vous permet de spécifier une application web et de créer des liens web sur
l'écran de l'utilisateur distant.
1 Ouvrez une session dans le
configurateur web comme administrateur
et cliquez sur Object > SSL Application
(Objet > Application SSL) Cliquez sur
l'icône Add (Ajouter).
2 Créez une application web et entrez un nom
descriptif dans le champ Service Name (Nom du
service).
3 Dans le champ Address (Adresse), entrez
l'adresse du serveur. Par exemple, http://
192.168.1.200.
4 Sélectionnez Web Server (Serveur web) dans le
champ Server Type (Type de serveur).
5 Si vous utilisez un numéro de port non-standard
(par exemple, 8080 à la place de 80), entrez-le dans le champ Virtual Web Port (Port
web virtuel).
6 Cliquez sur OK pour enregistrer les paramètres.
7 Cliquez sur SSL dans le panneau de
navigation et cliquez sur l'icône Edit
(Editer) pour configurer la stratégie SSL
(par défaut) que vous avez crée à l'aide
de l'assistant d'installation.
37

FRANÇAIS
8 Dans l'écran de configuration qui apparaît,
sélectionnez le nom de l'application SSL que
vous venez de créer et cliquez sur Ok pour
enregistrer les paramètres.
Cela applique le paramètre de l'application à la
stratégie SSL et permet à l'utilisateur distant
d'accéder au serveur à l'aide d'une connexion
SSL-VPN.
9 Assurez-vous que le serveur est correctement
configuré et connecté au réseau local.
6 Tester la connexion de l'utilisateur distant depuis Internet
Suivez les étapes ci-dessous pour accéder au réseau local comme utilisateur distant par
Internet. Vous devez connaître l'adresse IP WAN du ZyWALL (accédez à l'écran Status
(Etat) pour obtenir cette information).
1 Connectez votre ordinateur à un réseau à l'extérieur de votre pare feu d'entreprise.
2 Ouvrez votre navigateur web et entrez l'adresse IP WAN du ZyWALL comme URL.
3 Cliquez sur OK ou Yes (Oui) si un écran de sécurité apparaît.
4 Un écran d'ouverture de session apparaît. Entrez
le nom d'utilisateur et le mot de passe du compte
de l'utilisateur distant que vous avez créé à l'aide
de l'assistant d'installation. Cliquez sur Login
(Ouvrir une session).
5 Après l'ouverture de la session, votre ordinateur
commence à établir une connexion VPN au
ZyWALL. Cela peut prendre jusqu'à deux
minutes.
38

FRANÇAIS
6 Téléchargez le logiciel d'installation si
vous êtes invité à mettre à niveau le JVM,
cliquez sur le lien pour accéder au site
web du logiciel Sun Java. Il est
recommandé de sélectionner l'option
Offline Installation (Installation hors
connexion).
7 Si un écran d'avertissement apparaît,
cliquez sur Continue (Continuer).
8 Une nouvelle icône de réseau apparaît
dans la barre d'état. Cela indique qu'une
connexion VPN a été établie entre votre
ordinateur et le ZyWALL.
9 L'écran de l'utilisateur distant apparaît.
Vous pouvez cliquer sur un lien pour
accéder au site web. Ou, si vous
connaissez l'adresse du site, ouvrez
simplement une nouvelle fenêtre du
navigateur et entrez l'adresse du site
pour y accéder.
Si vous pouvez accéder à la page web,
vous avez correctement installé votre
ZyWALL. Reportez-vous au guide de
l'utilisateur pour les informations
concernant la configuration avancée.
V Assurez-vous que vous utilisez un navigateur web avec les paramètres
spécifiés dans Configuration requise.
Si vous êtes invité à installer ou à mettre à niveau Java Virtual Machine
(JVM), cliquez sur le lien pour accéder au site web du logiciel Sun Java et
39

FRANÇAIS
téléchargez le logiciel en utilisant l'option Offline Installation (Installation
hors connexion).
Si vous ne pouvez pas accéder à l'écran de l'utilisateur distant, vérifiez que
vous avez correctement enregistré votre ZyWALL.
7 Déployez le ZyWALL dans votre réseau
Vous pouvez déployer le ZyWALL de l’une des deux manières suivantes : derrière une
passerelle ou comme nouvelle passerelle.
7.1 Derrière une passerelle
Vous pouvez connecter leZyWALL à une passerelle existante sur votre réseau. Si la
passerelle comporte un port DMZ, connectez le ZyWALL à ce port pour plus de sécurité.
La figure suivante vous donne un exemple de réseau où le ZyWALL (SSL10) et le serveur
web (WWW) sont connectés à la passerelle (GW). Pour accéder au serveur web, le trafic
provenant de l'utilisateur distant (A) doit passer par le tunnel VPN et passer les contrôles
de sécurité sur la passerelle.
https://
Internet
A
GW
SSL10
WWW
" Si le ZyWALL se trouve derrière un pare feu ou un routeur NAT, vous
devez configurer le périphérique de manière à permettre la connexion au
ZyWALL sur le port TCP 443. Pour cela utilisez le réacheminement de port
ou une règle de pare feu.
40

FRANÇAIS
7.2 Comme passerelle
Si vous n'avez pas déjà une passerelle sur votre réseau, vous pouvez installer le ZyWALL
comme une passerelle avec accès VPN-SSL. La figure suivante montre un exemple de
réseau où le ZyWALL(SSL10) est connecté à un modem DSL/câble pour l'accès à Internet
et le serveur web (WWW) connecté au ZyWALL. Pour accéder au serveur web, le trafic
provenant de l'utilisateur distant (A) est envoyé par le tunnel VPN. Pour la sécurité, vous
pouvez configurer les stratégies de contrôle d'accès et de contrôle de point de fin sur le
ZyWALL.
https://
Internet
A
SSL10
WWW
Procédure pour afficher la (les) certification(s)
d'un produit
1 Allez à www.zyxel.com.
2 Sélectionnez votre produit dans la liste déroulante
dans la page d'accueil du ZyXEL pour aller à la
page de ce produit.
3 Sélectionnez la certification que vous désirez
consulter dans cette page.
41

ITALIANO
ITALIANO
Introduzione
Lo ZyWALL SSL 10 è un gateway SSL VPN che consente di configurare un accesso sicuro
a una rete e ad applicazioni remote, senza la necessità di preinstallare software client. In
questa guida viene mostrato come collegare e configurare lo ZyWALL (SSL10) per
consentire a un utente remoto (A) di accedere a un server Web (WWW) sulla rete locale
tramite una connessione SSL-VPN. È possibile che occorra reperire le informazioni sul
proprio accesso a Internet.
https://
Internet
A
SSL10
WWW
Procedura di configurazione
1 Requisiti di sistema
2 Collegamento iniziale dell'hardware
3 Accesso allo strumento di configurazione Web
4 Configurazione guidata
5 Creazione di link Web per semplificare l'accesso remoto
6 Test della connessione utente remota da Internet
7 Implementazione dello ZyWALL nella propria rete
1 Requisiti di sistema
Di seguito vengono elencati il browser e i requisiti minimi del computer per consentire
l'accesso remoto dell'utente.
• Internet Explorer 5.5 con Microsoft XML (MSXML) Service Pack installato oppure versione
6.0 e successive
• Netscape 7.2 o versione successiva
• Firefox 1.0 o versione successiva
• Mozilla 1.7.3 o versione successiva
• Windows 2000 Professional, Windows XP Home/Professional (con Service Pack 2 o successivo) oppure Linux.
• Sun JVM (Java Virtual Machine) installata con versione minima 1.4.2_07 per Netscape/
Mozilla/Firefox e 1.4.2_02 per computer Internet Explorer e Linux.
• Java abilitato in Internet Explorer sui computer Windows.
42

ITALIANO
2 Collegamento iniziale dell'hardware
1
1 Utilizzare un cavo Ethernet per collegare la porta WAN a un modem broadband o a un
gateway.
2 Utilizzare un cavo Ethernet per collegare un computer di gestione a una porta LAN.
3 Utilizzare l'alimentatore fornito a corredo per collegare la porta POWER 12V situata sul
pannello posteriore a una sorgente di alimentazione.
Dopo aver collegato l'alimentazione e acceso l'unità, controllare lo stato dei LED. Il LED
PWR si accende. Il LED SYS lampeggia mentre viene eseguito il test del sistema e quindi
resta acceso in caso di test riuscito. Quando le porte corrispondenti vengono collegate, i
LED WAN LAN si accendono.
2
3
V Se quando viene collegata l'alimentazione non si accende alcun LED,
controllare i collegamenti delle porte e verificare che l'unità sia accesa.
3 Accesso allo strumento di configurazione Web
Attenersi alla procedura seguente per eseguire il login dallo strumento di configurazione
Web tramite una porta LAN e configurare lo ZyWALL. È necessario utilizzare Internet
Explorer 6.0/Netscape 7.0 o versioni successive.
1 Verificare che il computer sia configurato per ricevere un indirizzo IP dallo ZyWALL.
2 Avviare il browser. Immettere l'indirizzo
192.168.1.1 (l'indirizzo IP LAN predefinito dello
ZyWALL).
43

ITALIANO
3 Se viene visualizzata una schermata di
protezione o attenzione, fare clic su OK oppure Sì
per continuare.
4 Viene visualizzata la schermata di login.
Immettere admin come nome utente e 1234 come
password. Fare clic su Login.
5 Se viene visualizzata una schermata relativa ai
certificati, fare clic su Sì per continuare.
6 Questa è la prima volta che si esegue il login
nello ZyWALL. La schermata principale iniziale
visualizzata è quella illustrata di seguito.
Fare clic su Setup Wizard (configurazione guidata).
4 Configurazione guidata
Per la configurazione iniziale, utilizzare la configurazione guidata per eseguire le
operazioni seguenti.
• Configurare le impostazioni LAN/WAN
• Creare un account utente remoto
• Creare un criterio di accesso SSL-VPN
• Registrare lo ZyWALL
Attenersi alla procedura per configurare le schermate della procedura guidata. Fare clic su
Next > (avanti >) in ogni schermata per poter continuare.
44

ITALIANO
1 Per visualizzare la configurazione guidata,
fare clic su Setup Wizard nella schermata
principale iniziale.
• Selezionare Install on Gateway’s DMZ port
(installa sulla porta DMZ del gateway) per collegare lo ZyWALL a un gateway nella rete.
• Selezionare Install as a New Gateway
(installa come nuovo gateway) per configurare
lo ZyWALL sia come router NAT e sia come
gateway SSL VPN nella rete.
2 Se si installa lo ZyWALL dietro un altro
gateway, configurare le impostazioni IP dello
ZyWALL nella prima schermata della
procedura guidata.
Se si installa lo ZyWALL come nuovo gateway,
configurare le impostazioni Internet nella prima
schermata della procedura guidata.
3 Creare un nuovo account utente remoto per
consentire a un utente remoto di eseguire il
login nella rete locale. Immettere un nome
utente univoco (lungo massimo 31 caratteri,
tra quelli consentiti "0-9" "a-z"e "A-Z" e
una password (lunga massimo 64 caratteri,
tra quelli consentiti "0-9" "a-z"e "A-Z".
" Non è possibile utilizzare l'account
admin per accedere alle risorse
della rete.
45

ITALIANO
4 Specificare l'indirizzo IP e la maschera di
subnet della rete locale dietro lo ZyWALL a
cui si desidera consentire l'accesso SSL-VPN.
Specificare l'intervallo di indirizzi IP privati da
assegnare agli utenti remoti e allo ZyWALL.
Utilizzato per stabilire una connessione SSLVPN e consentire agli utenti remoti di
accedere alle risorse come se si trovassero
sulla rete locale.
5 Fare clic su Next (successivo) per continuare.
6 Controllare le impostazioni di rete nella
schermata successiva della procedura
guidata e fare clic su Activate SSL-VPN
License (attiva licenza SSL-VPN).
" È necessario registrare lo
ZyWALL su myZyXEL.com per
consentire a un massimo di 10
utenti remoti di accedere
contemporaneamente.
7 Seguire le istruzioni visualizzate a schermo
per immettere le informazioni sull'account
myZyXEL.com e fare clic su Finished (fine)
per completare la configurazione guidata e
avviare il processo di registrazione.
8 Una volta completato il processo, fare clic su
Close (chiudi).
V Se la registrazione del dispositivo non riesce, verificare di aver immesso
correttamente le informazioni sull'account e che lo ZyWALL possa
accedere a Internet.
46

ITALIANO
A questo punto è possibile eseguire il login come utente remoto utilizzando l'account
utente appena creato. È possibile accedere a qualsiasi risorsa sulla rete locale (utilizzando
l'indirizzo IP o il nome di dominio). In alternativa, è possibile creare link per gli utenti remoti
per la schermata dell'utente remoto al fine di consentire allo stesso di accedere alle
applicazioni Web con un semplice clic del mouse.
5 Creazione di link Web per semplificare l'accesso remoto
Nella presente sezione viene illustrato come specificare un'applicazione Web e creare link
Web sulla schermata dell'utente remoto.
1 Eseguire il login nello strumento di
configurazione Web in qualità di
amministratore e quindi fare clic su
Object (oggetto) > SSL Application
(applicazione SSL). Fare clic sull'icona Add (aggiungi).
2 Creare un'applicazione Web e immettere un
nome descrittivo nel campo Service Name
(nome servizio).
3 Nel campo Address (indirizzo), immettere
l'indirizzo del server. Ad esempio http://
192.168.1.200.
4 Selezionare Web Server nel campo Server
Type (tipo di server).
5 Se si utilizza un numero di porta non standard
(ad esempio 8080 invece di 80), immetterlo nel campo Virtual Web Port (porta Web
virtuale).
6 Fare clic su Ok per salvare le impostazioni.
7 Fare clic su SSL nel pannello di
navigazione e fare clic sull'icona Edit
(modifica) per configurare il criterio SSL
predefinito creato utilizzando la
configurazione guidata.
47

ITALIANO
8 Nella schermata di configurazione visualizzata,
scegliere il nome dell'applicazione SSL appena
creata e fare clic su Ok per salvare le
impostazioni.
In questo modo la configurazione
dell'applicazione al criterio SSL e consente
all'utente remoto di accedere al server su una
connessione SSL-VPN.
9 Verificare che il server sia correttamente
configurato e collegato alla rete locale.
6 Test della connessione utente remota da Internet
Attenersi alla procedura seguente per accedere alla rete locale da Internet come utente
remoto. È necessario conoscere l'indirizzo IP della WAN dello ZyWALL (tali informazioni
possono essere lette nella schermata Status (stato)).
1 Collegare il computer a una rete esterna al firewall dell'azienda.
2 Aprire il browser e inserire l'indirizzo IP della WAN dello ZyWALL come URL.
3 Fare clic su OK o su Sì nel caso venga visualizzata una schermata di protezione.
4 Viene visualizzata una schermata di login.
Immettere il nome utente e la password
dell'account utente remoto creato tramite la
configurazione guidata. Fare clic su Login.
5 Una volta eseguito il login con successo, il
computer inizia a stabilire una connessione VPN
allo ZyWALL. L'operazione può richiedere fino a
due minuti.
6 Se viene richiesto di aggiornare la JVM,
scaricare il software di installazione. Fare
clic sul link per accedere al sito Web del
software Sun Java. Si consiglia di
selezionare l'opzione Offline Installation
(installazione offline).
48

7 Se viene visualizzata una schermata di
avviso, fare clic su Continue (continua).
8 Nell'area di notifica del sistema viene
visualizzata una nuova icona di rete.
Questa indica che è stata stabilita una
connessione VPN tra il computer e lo
ZyWALL.
9 Viene visualizzata la schermata
dell'utente remoto. È possibile fare clic
su un link per accedere al sito Web. O
in alternativa, se si conosce l'indirizzo
del sito, è sufficiente aprire una nuova
finestra del browser e immettere
l'indirizzo del sito a cui accedere.
Se è possibile accedere alla pagina Web,
lo ZyWALL è stato correttamente
configurato. Consultare la guida
dell'utente per le informazioni sulla
configurazione avanzata.
ITALIANO
V Assicurarsi di utilizzare un browser con le impostazioni specificate in
Requisiti di sistema.
Se viene richiesto di installare o aggiornare la JVM (Java Virtual Machine),
fare clic sul link per accedere al sito Web del software Sun Java e scaricare
il software tramite l'opzione Offline Installation (installazione offline).
Se non è possibile accedere alla schermata dell'utente remoto, verificare di
aver correttamente eseguito la registrazione dello ZyWALL.
7 Implementazione dello ZyWALL nella propria rete
Lo ZyWALL può essere installato in due modi: dietro un gateway o come nuovo gateway.
49

ITALIANO
7.1 Dietro un gateway
Non è possibile collegare lo ZyWALL a un gateway esistente sulla rete. Se il gateway è
dotato di una porta DMZ, collegare lo ZyWALL a tale porta per avere maggiore protezione.
Nella figura che segue viene mostrato un esempio di rete in cui lo ZyWALL (SSL10) e il
server Web (WWW) sono collegati a un gateway (GW). Per accedere al server Web, il
traffico proveniente dall'utente remoto (A) deve passare attraverso il tunnel VPN e passare
i controlli di sicurezza sul gateway.
https://
Internet
A
GW
SSL10
WWW
" Se lo ZyWALL si trova dietro un firewall o un router NAT, è necessario
configurare il dispositivo per consentire la connessione allo ZyWALL sulla
porta TCP numero 443. Questa operazione può essere eseguita
utilizzando il port forwarding o una regola di firewall.
7.2 Come nuovo gateway
Se nella rete non è già presente un gateway, è possibile configurare lo ZyWALL come
gateway con accesso SSL-VPN. La figura seguente mostra un esempio di rete in cui lo
ZyWALL(SSL10) è collegato a un modem DSL/via cavo per l'accesso a Internet e il server
Web (WWW) è connesso allo ZyWALL. Per accedere al server Web, il traffico proveniente
dall'utente remoto (A) viene inviato tramite il tunnel VPN. Per motivi di sicurezza, è
possibile configurare il controllo di accesso e i criteri di controllo dell'end-point sullo
ZyWALL.
https://
Internet
A
50
SSL10
WWW

ITALIANO
Procedura per visualizzare le certificazioni di un
prodotto
1 Aprire la pagina www.zyxel.com.
2 Selezionare il prodotto dall'elenco di riepilogo a
discesa nella Home Page di ZyXEL per passare
alla pagina del prodotto in questione.
3 Selezionare da questa pagina la certificazione che
si desidera visualizzare.
51

日本語
はじめに
ZyWALL SSL 10 は、あらかじめクライアントソフトウェアをインストールしなくても、安
全なリモートネットワークとアプリケーションアクセスを設定できる SSL VPN です。この
ガイドでは、リモートユーザ (A) が SSL-VPN 接続を通してローカルネットワークの Web
サーバ (WWW) にアクセスするため、 ZyWALL (SSL10) に接続し、設定する方法について説
明しています。設定の際には、インターネットアカウント情報が必要となる場合がありま
す。
https://
インターネット
A
SSL10
WWW
設定手順
1 システム要件
2 初回ハードウェア接続
3 Web コンフィグレータへのアクセス
4 セットアップウィザードの設定
5 イージーリモートアクセスのための Web リンクの作成
6 インターネットからのリモートユーザ接続テスト
7 ネットワークでの ZyWALL 導入
1 システム要件
以下はリモートユーザがログインするために必要なブラウザおよびコンピュータのシステ
ム要件です。
・ Internet Explorer 5.5 と Microsoft XML (MSXML) SP、または IE 6.0 以上
・ Netscape 7.2 以上
・ Firefox 1.0 以上
・ Mozilla 1.7.3 以上
・ Windows 2000 Professional、Windows XP Home/Professional (SP2 以上搭載 ) または
Linux
・ Netscape/Mozilla/Firefox の場合は Sun Java Virtual Machine (JVM) の最低 1.4.2_07
バージョン、Internet Explorer および Linux の場合は 1.4.2_02 バージョン
・ Windows コンピュータにインストールされた Java サポートの Internet Explorer
52

2 初回ハードウェア接続
日本語
1
1 Ethernet ケーブルを使い、WAN ポートとブロードバンドモデムまたはゲートウェイを
接続します。
2 Ethernet ケーブルを使い、管理下のコンピュータを LAN ポートに接続します。
3 付属の電源アダプタを使い、パネル背面の POWER 12V ポートから電源に接続します。
電源コードを接続し、電源を入れたら、LED を確認してください。PWR LED が点灯します。
システムテスト実行中は SYS LED が点滅し、テストが完了すると点灯に変わります。ポー
トの接続が確立されると、WAN と LAN LED がそれぞれ点灯します。
2
3
V 電源を接続しても LED が一切点灯しない場合は、ポートの接続を点検し、
また電源が入っていることを確認してください。
3 Web コンフィグレータへのアクセス
以下の手順で LAN ポートから Web コンフィグレータにアクセスし、ZyWALL を設定しま
す。Internet Explorer 6.0/Netscape 7.0 以上が必要となります。
1 のコンピュータが ZyWALL から IP アドレスを受信できるよう設定されていることを確
認します。
2 Web ブラウザを起動します。アドレスに
192.168.1.1 (ZyWALL の既定の LAN IP アドレス
) を入力します。
53

日本語
3 セキュリティまたは警告メッセージが表示された
場合は、OK または Yes ( はい ) をクリックして
続けてください。
4 ログイン画面が表示されます。ユーザ名として
admin と入力し、パスワードとして 1234 と入力
します。Login ( ログイン ) をクリックします。
5 別の認証画面が表示されたら、Yes ( はい ) をク
リックして続けます。
6 最初の ZyWALL へのログインが完了しました。右
のようなメイン画面が表示されます。
Setup Wizard ( セットアップウィザード ) をク
リックします。
4 セットアップウィザード
初期設定ではセットアップウィザードを使って次のことを設定していきます。
・ LAN/WAN の設定
・ リモートユーザアカウントの作成
・ SSL-VPN アクセスポリシーの作成
・ ZyWALL の登録 ZyWALL
画面の手順に従い、ウィザードでの設定を進めます。ウィザード画面で Next ( 次へ )> を
クリックして画面を進めます。
54

日本語
1 セットアップウィザードを表示するには、初
期画面で Setup Wizard ( セットアップウィ
ザード ) をクリックします。
・ ZyWALL をネットワークのゲートウェイに接
続したい場合は、Install on Gateway's DMZ
port ( ゲートウェイの DMZ ポートにインス
トールする ) を選択してください。
・ ZyWALL を NAT ルータおよび SSL VPN ゲー
トウェイの両方として設定する場合は、
Install as a New Gateway( 新しいゲートウェ
イとしてインストールする ) を選択してくだ
さい。
2 ZyWALL を他のゲートウェイの後ろにインス
トールする場合は、最初のウィザード画面で
ZyWALL の IP 設定を変更してください。
ZyWALL を新しいゲートウェイとしてインス
トールする場合、最初のウィザード画面でイ
ンターネット設定を行ってください。
3 新規リモートユーザアカウントを作成し、
リモートユーザがローカルネットワークに
アクセスできるようにします。ユーザ名 (
最長 31 文字の英数字 "0-9"、"a-z"、"AZ" を使用可 ) とパスワード ( 最長 64 文
字の英数字 "0-9"、"a-z"、"A-Z" を使用
可 ) を設定します。
" ネットワークリソースにアクセス
するには、admin アカウントは使
用できません。
55

日本語
4 ZyWALL の背景にある、SSL-VPN アクセスを
許可するローカルネットワークの IP アドレ
スとサブネットマスクを指定します。
リモートユーザと ZyWALL に割り当てるプラ
イベート IP アドレスの範囲を指定します。
これは、SSL-VPN 接続を確立し、リモート
ユーザがローカルネットワークにいるかのよ
うにリソースにアクセス可能にするための設
定です。
5 Next ( 次へ ) をクリックして続けます。
6 次のウィザード画面でネットワーク設定を
確認し、Activate SSL-VPN License (SSLVPN ライセンスの有効化 ) をクリックしま
す。
" myZyXEL.com でお買い上げの
ZyWALL を登録すると、10 人のリ
モートユーザまでが同時アクセス
することができます。
7 画面の指示に従って myZyXEL.com アカウント
情報へアクセスし、Finished ( 完了 ) をク
リックしてセットアップウィザードを完了し、
登録を始めます。
8 登録プロセスが完了した r、Close ( 閉じる
) をクリックします。
V デバイスの登録ができなかった場合は、正しいアカウント情報を入力した
かどうか、そして ZyWALL がインターネットに接続されているかどうかを
確認してください。
56

日本語
これで先ほど作成したユーザアカウントを使い、リモートユーザとしてログインすること
ができます。ローカルネットワークのすべてのデータにアクセスすることができます (IP
アドレスまたはドメイン名を使用 s ます )。リモートユーザ画面用のリンクを作成すると、
Web ベースアプリケーションへの 1 クリックアクセスが可能となります。
5 イージーリモートアクセスのための Web リンクの作成
ここでは Web ベースアプリケーションの設定方法とリモートユーザ画面での Web リンク
作成方法を説明しています。
1 管理者として Web コンフィグレータにア
クセスし、Object ( オブジェクト ) >
SSL Application (SSL アプリケーション
) をクリックします。Add ( 追加 ) アイ
コンをクリックします。
2 Web Application (Web アプリケーション ) を作
成し、Service Name ( サービス名 ) の欄で分か
りやすい名前をつけます。
3 Address ( アドレス ) 欄でサーバアドレスを入力
します。例 : http://192.168.1.200
4 Server Type ( サーバタイプ ) の欄で Web
Server (Web サーバ ) を選択します。
5 非標準的なポート番号 ( たとえば 80 ではなく
8080 など ) を使用する場合は、Virtual Web
Port ( 仮想 Web ポート ) 欄に入力します。
6OK をクリックして設定を保存します。
7 ナビゲーションパネルの SSL をクリック
し、Edit ( 編集 ) アイコンをクリックす
ると、セットアップウィザードで作成し
た " 既定 " の SSL ポリシーを変更する
ことができます。
57

日本語
8 表示された設定画面で作成した SSL アプリケー
ションの名前を選択し、OK をクリックして設定
を保存します。
これでアプリケーション設定が SSL ポリシーに
適用され、リモートユーザは SSL-VPN 接続を通
してサーバにアクセスできるようになります。
9 サーバが正しく設定されており、ローカルネッ
トワークに接続されていることを確認してくだ
さい。
6 インターネットからのリモートユーザ接続テスト
次のステップに従い、インターネットからリモートユーザとしてローカルネットワークに
アクセスします。 ZyWALL の WAN IP アドレスが必要です ( この情報は Status ( ステー
タス ) 画面に記載されています )。
1 コンピュータを会社のファイアウォール外のネットワークに接続します。
2 Web ブラウザを開いたら、ZyWALL の WAN IP アドレスを URL として入力します。
3 セキュリティ画面が表示されたら、OK または Yes ( はい ) をクリックします。
4 ログイン画面が表示されます。セットアップウィ
ザードで設定したリモートユーザアカウントの
ユーザ名とパスワードを入力します。Login ( ロ
グイン ) をクリックします。
5 正常にログインすると、コンピュータは ZyWALL
との間に VPN 接続を確立しようとします。この
作業には 2 分ほどかかります。
6 JVM をアップグレードするよう指示が表
示された場合は、インストールソフトを
ダウンロードし、リンクをクリックして
Sun Java ソフトウェアの Web サイトにア
クセスしてください。Offline
Installation ( オフラインインストール )
のオプションを選択することをお勧めし
ます。
58

7 警告画面が表示されたら、Continue ( 続
ける ) をクリックします。
8 システムトレイに新しいネットワークア
イコンが表示されます。これは、コン
ピュータと ZyWALL との間に VPN 接続が
確立されたことを意味します。
9 リモートユーザの画面が表示されま
す。リンクをクリックすると、Web サ
イトにアクセスできます。または、サ
イトのアドレスが分かっている場合
は、新たに Web ブラウザを立ち上げ、
アドレスバーにサイトのアドレスを入
力してください。
Web ページにアクセスできれば、ZyWALL
が正常に設定されたことを意味します。高
度な設定についてはユーザガイドを参照し
てください。
日本語
V システム要件 で指定された設定で Web ブラウザを使用してください。
Java Virtual Machine (JVM) のインストールやアップグレードを指示さ
れた場合は、リンクをクリックして Sun Java ソフトウェアの Web サイ
トにアクセスし、Offline Installation ( オフラインインストール ) オ
プションでソフトウェアをダウンロードしてください。
リモートユーザ画面にアクセスできない場合は、ご利用の ZyWALL が正し
く登録されているかどうか確認してください。
7 ネットワークでの ZyWALL 導入
ZyWALL の導入方法には、ゲートウェイの背後で導入する方法と、新しいゲートウェイと
して導入する方法の 2 種類があります。
59

日本語
7.1 ゲートウェイの背後
ZyWALL をネットワークの既存のゲートウェイに接続します。ゲートウェイに DMZ ポート
がある場合、ZyWALL をこのポートに接続すると安全性を高めることができます。下図は
ZyWALL(SSL10) と Web サーバ (WWW) がゲートウェイ (GW) に接続されているところを示し
ています。Web サーバにアクセスするには、リモートユーザ (A) からのトラフィックは
VPN トンネルを通り、ゲートウェイのセキュリティチェックを通過する必要があります。
https://
インターネット
A
GW
SSL10
WWW
" ZyWALL がファイアウォールや NAT ルータの背後にある場合、デバイス
が TCP ポート 443 の ZyWALL との接続を許可するよう設定する必要があ
ります。ポート転送機能やファイアウォールルールを使ってこの設定を行
うことができます。
7.2 ゲートウェイとして
ネットワークにゲートウェイがない場合、SSL-VPN アクセスを利用し、ZyWALL をゲート
ウェイとして設定することができます。下図は ZyWALL (SSL10) が DSL/ ケーブルモデムを
通してインターネットに接続され、Web サーバ (WWW) が ZyWALL に接続されているネット
ワーク例を示しています。Web サーバにアクセスするには、リモートユーザ (A) からのト
ラフィックが VPN トンネルを通して送信されます。安全上のため、ZyWALL でアクセス制
御やエンドポイント制御ポリシーを設定することができます。
https://
インターネット
A
60
SSL10
WWW

日本語
製品の認証を表示するための手順
1 www.zyxel.com へアクセスします。
2 ZyXEL ホームページのドロップダウンリストから製
品を選択し、その製品のページへアクセスします。
3 このページから閲覧したい認証を選択します。
61

简体中文
简体中文
简介
ZyWALL SSL 10 是 SSL VPN 网关,不需预先安装客户端软件,即可建立安全的远程网络及应
用程序访问。本使用手册说明如何连接及配置 ZyWALL (SSL10),使远程用户 (A) 得以通过
SSL-VPN 连接访问局域网上的 Web 服务器 (WWW)。请准备好您的因特网帐户信息。
https://
Internet
A
SSL10
WWW
配置步骤
1 系统需求
2 初始硬件连接
3 使用网络配置器
4 配置设置向导
5 创建可轻松进行远程访问的 Web 链接
6 从因特网测试远程用户连接
7 将 ZyWALL 部署于网络
1 系统需求
以下列出远程用户登录的浏览器及计算机系统需求。
• Internet Explorer 5.5 ( 安装 Microsoft XML (MSXML) Service Pack) 或 Internet
Explorer 6.0 以上版本
• Netscape 7.2 以上版本
• Firefox 1.0 以上版本
• Mozilla 1.7.3 以上版本
• Windows 2000 Professional、Windows XP Home/Professional ( 安装 Service Pack 2 以
上版本 ) 或 Linux。
• 安装 Sun Java Virtual Machine (JVM) 且 1.4.2_07 以上版本的 Netscape/Mozilla/
Firefox 计算机以及 1.4.2_02 以上版本的 Internet Explorer 与 Linux 计算机。
• Windows 计算机上的 Internet Explorer 须启用 Java 功能。
62

2 初始硬件连接
简体中文
1
1 使用以太网线将 WAN 端口连接至宽带调制解调器或网关。
2 使用以太网线将管理计算机连接至 LAN 端口。
3 使用包装内附的电源转接器将后方面板上的 POWER 12V 端口连接至电源。
连接并开启电源之后,检查 LED 指示灯状态。PWR LED 指示灯亮起。SYS LED 指示灯在执行
系统测试时会一直闪烁,测试成功之后指示灯就会持续亮着。如果连接了对应的端口,WAN
及 LAN LED 指示灯会亮起。
2
3
V 如果已经连接电源但却没有任何 LED 指示灯亮起,请检查端口连接并确认
电源是否已经开启。
3 使用网络配置器
请依照下列步骤,经由 LAN 端口登录至网络配置器,设定 ZyWALL。您必须使用 Internet
Explorer 6.0/Netscape 7.0 或更新版本。
1 确认计算机已经设置为接受 ZyWALL 提供的 IP 地址。
2 启动您的网页浏览器 输入地址 192.168.1.1
(ZyWALL 的默认 LAN IP 地址 )。
3 如果出现安全或警告屏幕,单击 OK ( 确定 ) 或
Yes ( 是 ) 继续进行下个步骤。
63

简体中文
4 显示登录屏幕。输入 admin 作为用户名,密码是
1234。单击 Login ( 登录 )。
5 如果显示其他证书屏幕,单击 Yes ( 是 ) 继续进行
下个步骤。
6 这是您第一次登录至 ZyWALL。初始主屏幕如图所
示。
单击 Setup Wizard ( 设置向导 )。
4 设置向导
若是初始配置,请使用设置向导进行下列操作。
• 配置 LAN/WAN 设置
• 创建远程用户帐户
• 创建 SSL-VPN 访问策略
• 注册 ZyWALL
请依照下列步骤设置向导屏幕。在各向导屏幕单击 Next > ( 下一步 ) 以继续进行下个步骤。
1 如果要显示设置向导,单击初始主屏幕中的
Setup Wizard ( 设置向导 )。
• 如果要将 ZyWALL 连接至网络网关,选择
Install on Gateway's DMZ port ( 安装在网关
的 DMZ 端口上 )。
• 如果要将 ZyWALL 同时配置为网络上的 NAT 路
由器及 SSL VPN 网关,选择 Install as a
New Gateway ( 安装为新网关 )。
64

简体中文
2 如果您将 ZyWALL 安装在另一台网关之后,请
在第一个向导屏幕配置 ZyWALL 的 IP 设置。
如果您将 ZyWALL 安装为新的网关,请在第一
个向导屏幕配置因特网设置。
3 创建新的远程用户帐户,让远程用户可以登
录至您的局域网。输入唯一的用户名 ( 最多
31 个字符,使用 "0-9""a-z" 及 "A-Z" 以及
密码 ( 最多 64 个字符,使用 "0-9""a-z"
及 "A-Z"。
" 您不能使用管理员帐户访问网络资
源。
4 选择您要允许 SSL-VPN 访问的 ZyWALL,在其
后方指定局域网的 IP 地址及子网掩码。
指定私人 IP 地址的范围,以分配给远程用户
和 ZyWALL。此项操作的作用是建立 SSL-VPN
连接,远程用户只要连接至局域网就可以访问
资源。
5 单击 Next ( 下一步 ) 继续进行下个步骤。
6 检查下个向导屏幕中的网络设置,再单击
Activate SSL-VPN License ( 启动 SSL-VPN
许可 )。
" 您必须到 myZyXEL.com 网页为您
的 ZyWALL 注册,才能让远程用户
( 最多 10 位 ) 同时进行访问。
65

简体中文
7 遵照屏幕上的指示输入 myZyXEL.com 帐户信
息,再单击 Finished ( 完成 ),结束设置向
导,启动注册过程。
8 完成注册之后,单击 Close ( 关闭 )。
V 如果设备注册失败,请检查您输入
的帐户信息是否正确以及 ZyWALL
是否能访问因特网。
现在您可以远程用户的身份,使用刚才创建的用户帐户登录。您可以访问局域网上的任何资
源 ( 使用 IP 地址或域名 )。或者,您也可以选择在远程用户屏幕中创建链接,远程用户只
要单击一下,就可以访问基于网络的应用程序。
5 创建可轻松进行远程访问的 Web 链接
本节说明如何指定基于网络的应用程序,以及如何在远程用户屏幕上创建 Web 链接。
1 以管理员的身份登录至网络配置器,再单
击 Object > SSL Application ( 对象 >
SSL 应用程序 )。单击 Add ( 添加 ) 图
标。
2 创建一个 Web Application (Web 应用程序 ),并
于 Service Name ( 服务名称 ) 栏输入描述性名
称。
3 在 Address ( 地址 ) 栏,输入服务器的地址。例
如:http://192.168.1.200。
4 在 Server Type ( 服务器类型 ) 栏选择 Web
Server (Web 服务器 )。
5 如果您使用的是非标准端口号 ( 例如 8080 而非
80),请在 Virtual Web Port ( 虚拟 Web 端口 )
栏输入端口号。
6 单击 Ok ( 确定 ) 保存设置。
7 单击导航面板中的 SSL,再单击 Edit (
编辑 ) 图标,以配置您之前使用设置向导
创建的默认 SSL 策略。
66

简体中文
8 在显示的配置屏幕中,选择刚才所创建的 SSL 应
用程序的名称,再单击 Ok ( 确定 ) 保存设置。
此动作可将应用程序设置应用至 SSL 策略,让远
程用户可以通过 SSL-VPN 连接访问服务器。
9 确认服务器配置正确而且已经连接至局域网。
6 从因特网测试远程用户连接
请依照下列步骤,以远程用户的身份从因特网访问局
域网。您必须知道 ZyWALL 的 WAN IP 地址 ( 可从 Status ( 状态 ) 屏幕获得此信息 )。
1 将计算机连接至公司防火墙之外的网络。
2 打开 Web 浏览器,在 URL 栏输入 ZyWALL 的 WAN IP 地址。
3 如果显示安全屏幕,单击 OK ( 确定 ) 或 Yes (是)。
4 显示登录屏幕。输入远程用户帐户 ( 您之前使用设
置向导所创建的 ) 的用户名和密码。单击 Login (
登录 )。
5 成功登录之后,计算机就会开始建立连至 ZyWALL
的 VPN 连接。此项操作最多耗时两分钟。
6 如果屏幕出现提示要您升级 JVM,则请下
载安装程序。单击连接访问 Sun Java 软件
网站。建议选择 Offline Installation (
脱机安装 ) 选项。
67

7 如果显示警告屏幕,单击 Continue ( 继续
)。
8 系统托盘会显示新的网络图标; 这表示您
的计算机与 ZyWALL 之间已经成功建立 VPN
连接。
9 远程用户屏幕显示。您可以单击链接访
问该网站。或者,如果您知道网站地
址,则只要打开新的 Web 浏览器窗口,
再输入网站地址即可进行访问。
如果可以访问该网站的网页,表示您已经成
功设置 ZyWALL。请参阅 《使用手册》,获
得更多关于高级配置的信息。
简体中文
V 确保您使用的 Web 浏览器中设置与 系统需求 中所指定的相同。
如果屏幕出现提示要您安装或升级 Java Virtual Machine (JVM),请单击
链接访问 Sun Java 网站,并使用 Offline Installation ( 脱机安装 ) 选
项下载软件。
如果无法访问远程用户屏幕,请检查您的 ZyWALL 是否已经注册成功。
7 将 ZyWALL 部署于网络
您可以利用下列两种方式的其中一种部署 ZyWALL。
7.1 部署在网关之后
您可以将 ZyWALL 连接至网络上现有的网关。如果网关附带 DMZ 端口,请将 ZyWALL 连接至
该端口以加强安全。下图为网络示例,其中 ZyWALL (SSL10) 与 Web 服务器 (WWW) 连接至网
关 (GW)。若要访问 Web 服务器,来自远程用户 (A) 的传输流量必须经过 VPN 通道,通过
网关的安全检查。
68

简体中文
https://
Internet
A
GW
SSL10
WWW
" 如果 ZyWALL 位于防火墙或 NAT 路由器之后,您必须将设备配置为允许通
过 TCP 端口 443 连接至 ZyWALL。您可以使用端口转发或防火墙规则进行
此操作。
7.2 作为网关
如果网络尚未设置网关,则可将 ZyWALL 设置为具备 SSL-VPN 访问功能的网关。下图为网络
示例,其中 ZyWALL(SSL10) 连接至 DSL/Cable 调制解调器以访问网络,Web 服务器 (WWW)
则连接至 ZyWALL。若要访问 Web 服务器,来自远程用户 (A) 的传输流量会通过 VPN 通道
传送。为安全起见,您可以在 ZyWALL 配置访问控制及端点控制策略。
https://
A
Internet
SSL10
何查看产品证书
1 前往 www.zyxel.com。
2 在 ZyXEL 首页的下拉列表框选择您的产品,进入该
产品的网页。
3 在此页选择您想查看的证书。
69
WWW

SVENSKA
SVENSKA
Introduktion
ZyWALL SSL 10 är en SSL VPN-gateway som låter dig installera ett säkert fjärrnätverk
och applikationsåtkomst utan förinstallerad klientprogramvara. Denna guide visar hur du
ansluter och konfigurerar ZyWALL (SSL10) så att en fjärranvändare (A) kan få åtkomst till
en webbserver (WWW) på ditt lokala nätverk via an SSL-VPN-anslutning. Eventuellt
behöver du anslutningsinformationen för ditt Internet-konto.
https://
Internet
A
SSL10
WWW
Konfigurationssteg
1 Systemkrav
2 Inledande maskinvaruanslutning
3 Få åtkomst till webbkonfigurator
4 Konfigurera installationsguide
5 Skapa webblänkar för enkel fjärråtkomst
6 Testa fjärranvändaranslutning från Internet
7 Använda ZyWALL i ditt nätverk
1 Systemkrav
Följande listar webbläsare och datorsystemkrav för fjärranvändarinloggning.
• Internet Explorer 5.5 med Microsoft XML (MSXML) servicepaket installerat eller 6.0 och
högre
• Netscape 7.2 och högre
• Firefox 1.0 och högre
• Mozilla 1.7.3 och högre
• Windows 2000 Professional, Windows XP Home/Professional (med servicepaket 2 och
högre) eller Linux.
• Sun Java Virtual Machine (JVM) installerat med en minimiversion på 1.4.2_07 för
Netscape/Mozilla/Firefox och 1.4.2_02 för Internet Explorer- och Linux-datorer.
• Java aktiverat i Internet Explorer på Windows-datorer.
70

SVENSKA
2 Inledande maskinvaruanslutning
1
1 Använd en Ethernet-kabel för att ansluta WAN-porten till ett bredbandsmodem eller
gateway.
2 Använd en Ethernet-kabel för att ansluta en administrationsdator till en LAN-port.
3 Använd den medföljande strömadaptern för att ansluta POWER 12V-porten på
bakpanelen till en strömkälla.
När du har anslutit strömmen och satt på strömkällan, kontrollera indikatorlamporna.
Indikatorlampan PWR tänds. Indikatorlampan SYS blinkar medan systemtest utförs och
förblir därefter tänd om testet lyckats. Indikatorlamporna WAN och LAN tänds när
motsvarande portar är anslutna.
2
3
V Om ingen av indikatorlamporna tänds när strömmen är ansluten,
kontrollera portanslutningarna och säkerställ att strömkällan är påslagen.
3 Få åtkomst till webbkonfigurator
Följ stegen nedan för att logga in i webbkonfiguratorn genom en LAN-port och konfigurera
ZyWALL. Du måste använda Internet Explorer 6.0/Netscape 7.0 eller senare versioner.
1 Kontrollera att din dator är inställd på att ta emot en IP-adress från ZyWALL.
2 Starta din webbläsare. Ange 192.168.1.1
(ZyWALL:s standard-IP-adress) som adress.
71

SVENSKA
3 Om du ser en säkerhets- eller varningsskärm,
klicka på OK eller Yes (ja) för att fortsätta.
4 Inloggningsskärmen visas. Ange admin som
användarnamn och 1234 som lösenord. Klicka på
Login (inloggning).
5 Om en annan certifikatskärm visas, klicka på Yes
(ja) för att fortsätta.
6 Detta gäller första gången du logger in i ZyWALL.
Den inledande huvudskärmen visas enligt
exemplet.
Klicka på Setup Wizard (installationsguide).
4 Installationsguide
För inledande konfiguration, använd inställningsguidens skärmar för att göra följande.
• Konfigurera LAN/WAN-inställningar
• Skapa ett fjärranvändarkonto
• Skapa en SSL-VPN-åtkomstpolicy
• Registrera ZyWALL
Följ stegen för att konfigurera guideskärmarna. Klicka på Next > (nästa) på varje guideskärm
för att fortsätta.
72

SVENSKA
1 Du startar inställningsguiden genom att
klicka påSetup Wizard (inställningsguide) på
den inledande huvudskärmen.
•Välj Install on Gateway’s DMZ port
(installera på gatewayens DMZ-port) om du vill
ansluta ZyWALL till en gateway i ditt nätverk.
•Välj Install as a New Gateway (installera som
ny gateway) om du vill konfigurera ZyWALL
både som en NAT-router och en SSL VPNgateway i ditt nätverk.
2 Om du installerar ZyWALL bakom en annan
gateway, konfigurera ZyWALL:s IPinställningar på den första guideskärmen.
Om du installerar ZyWALL som en ny
gateway, konfigurera Internet-inställningarna
på den första guideskärmen.
3 Skapa ett nytt fjärranvändarkonto för att
låta en fjärranvändare logga in i ditt lokala
nätverk. Ange ett unikt användarnamn (upp
till 31 tecken med “0-9”, “a-z” och “A-Z”)
och lösenord (upp till 64 tecken med “0-9”,
“a-z” och “A-Z”).
" Du kan inte använda
administrationskontot för att få
åtkomst till nätverksresurser.
73

SVENSKA
4 Specificera IP-adress och subnetmask för
ett lokalt nätverk bakom den ZyWALL som du
vill ge SSL-VPN-åtkomst.
Specificera räckvidden av privata IP-adresser
som ska tilldelas fjärranvändare och ZyWALL.
Detta används för att upprätta en SSL-VPNanslutning och låta fjärranvändare få åtkomst
till resurser på samma sätt som om de befann
sig i det lokala nätverket.
5 Klicka på Next (nästa) för att fortsätta.
6 Kontrollera nätverksinställningarna på
nästa guideskärm och klicka på Activate
SSL-VPN License(aktivera SSL-VPN-
licens).
" Du måste registrera din ZyWALL
på myZyXEL.com för att göra det
möjligt för upp till 10
fjärranvändare att få åtkomst
samtidigt.
7 Följ instruktionerna på skärmen för att ange
myZyXEL.com-kontoinformation och klicka på
Finished (slutförd) för att slutföra
installationsguiden och starta
registreringsprocessen.
8 När processen är slutförd, klicka på Close
(stäng).
V Om enhetsregistreringen misslyckades, kontrollera att du har angett rätt
kontoinformation och att ZyWALL kan ansluta till Internet.
74

SVENSKA
Nu kan du logga in som fjärranvändare med det användarkonto du just skapade. Du kan få
åtkomst till valfri resurs i det lokala nätverket (med användning av IP-adress eller
domännamn). Om du vill kan du skapa länkar för fjärranvändarskärmen som tillåter
åtkomst med ett klick till webbaserade applikationer.
5 Skapa webblänkar för enkel fjärråtkomst
I detta avsnitt beskrivs hur du specificerar en webbaserad applikation och skapar
webblänkar på fjärranvändarskärmen.
1 Logga in i webbkonfiguratorn som
administratör och klicka på Object > SSL
Application (objekt: SSL-applikation).
Klicka på ikonen Add (lägg till).
2 Skapa en webbapplikation och ange ett
beskrivande namn i fältet Service Name
(tjänstenamn).
3 Ange serveradress i fältet Address (address).
Till exempel http://192.168.1.200.
4 Välj Web Server (webbserver) i fältet Server
Type (servertyp).
5 Om du använder ett icke-standard portnummer
(t.ex. 8080 i stället för 80), ange detta nummer i
fältet Virtual Web Port (virtuell webbport).
6 Klicka på OK för att spara inställningarna.
7 Klicka på SSL i navigationspanelen och
klicka på ikonen Edit (redigera) för att
konfigurera den “standard” SSL-policy
som du skapade med hjälp av
installationsguiden.
75

SVENSKA
8 På konfigurationsskärmen som visas ska du
välja namnet på den SSL-applikation som du
just skapat och klicka på OK för att spara
inställningarna.
Detta tillämpar applikationsinställningen på SSLpolicyn och låter fjärranvändaren få åtkomst till
servern över en SSL-VPN-anslutning.
9 Kontrollera att servern är rätt konfigurerad och
ansluten till det lokala nätverket.
6 Testa fjärranvändaranslutning från Internet
Följ stegen nedan för att få åtkomst till det lokala nätverket som en fjärranvändare från
Internet. Du måste känna till WAN IP-adressen för ZyWALL (hämta denna information på
skärmen Status).
1 Anslut din dator till ett nätverk utanför din företagsbrandvägg.
2 Öppna din webbläsare och ange WAN IP-adress för ZyWALL som URL.
3 Klicka på OK eller Yes (ja) om en säkerhetsskärm visas.
4 En varningsskärm visas. Ange användarnamn
och lösenord för det fjärranvändarkonto som du
skapade med hjälp av installationsguiden. Klicka
på Login (inloggning).
5 När inloggningen är klar börjar din dator upprätta
en VPN-anslutning till ZyWALL. Detta kan ta upp
till två minuter.
6 Ladda ner installationsprogramvaran om
du uppmanas att uppgradera JVM. Klicka
på länken för att komma till webbplatsen
med Sun Java-programvara. Du
rekommenderas att välja alternativet
Offline Installation.
76

SVENSKA
7 Om en varningsskärm visas, klicka på
Continue (fortsätt).
8 En ny nätverksikon visas i aktivitetsfältet.
Detta indikerar att en VPN-anslutning har
upprättats mellan din dator och ZyWALL.
9 Fjärranvändarskärmen visas. Du kan
klicka på en länk för att komma till
webbplatsen. Eller om du känner till
webbplatsadressen, kan du helt enkelt
öppna ett nytt webbläsarfönster och
ange webbplatsadressen för att
komma dit.
Om du kan få åtkomst till webbsidan är du
färdig med inställningen av ZyWALL. Se
bruksanvisningen för information om
avancerad konfiguration.
V Kontrollera att du använder en webbläsare med inställningar som är
specificerade under avsnittet Systemkrav.
Om du uppmanas att installera eller uppgradera Java Virtual Machine
(JVM), klicka på länken för att komma till webbplatsen för Sun Javaprogramvara och ladda ner programvaran med alternativet Offline
Installation.
Om du inte kan få åtkomst till fjärranvändarskärmen, kontrollera att du har
slutfört registreringen av ZyWALL.
7 Använda ZyWALL i ditt nätverk
Du kan använda ZyWALL på ett av två sätt: bakom en gateway eller som en ny gateway.
77

SVENSKA
7.1 Bakom en gateway
Du kan ansluta ZyWALL till en befintlig gateway i ditt nätverk. Om en gateway har en DMZport, anslut ZyWALL till denna port för ökad säkerhet. Följande figur visar ett
nätverksexempel i vilket ZyWALL (SSL10) och webbservern (WWW) är anslutna till en
gateway (GW). För att få åtkomst till webbservern måste trafiken från fjärranvändaren (A)
gå genom VPN-tunneln och passera säkerhetskontrollerna i denna gateway.
https://
Internet
A
GW
SSL10
WWW
" Om ZyWALL finns bakom en brandvägg eller en NAT-router, måste du
konfigurera enheten att tillåta anslutning till ZyWALL på TCP-port 443. Du
kan göra detta med hjälp av portforwarding eller en brandväggsregel.
7.2 Som gateway
Om du inte redan har en gateway i ditt nätverk, kan du ställa in ZyWALL som en gateway
med SSL-VPN-åtkomst. Följande figur visar ett näätverksexempel i vilket ZyWALL(SSL10)
är ansluten till ett DSL/kabelmodem för Internet-åtkomst och webbservern (WWW) är
ansluten till ZyWALL. För att få åtkomst till webbservern skickas trafiken från
fjärranvändaren (A) genom VPN.tunneln. För säkerhets skull kan du konfigurera
åtkomstkontroll och policy för ändpunktskontroll i ZyWALL.
https://
Internet
A
78
SSL10
WWW

SVENSKA
Kundsupport
Ha följande information tillhands när du kontaktar kundsupporten.
• Produktmodell och serienummer.
• Garantiinformation.
• Datum då du tog emot din enhet.
• En kortfattad beskrivning av problemet och de åtgärder du vidtagit för att lösa det.
• Se www.support.zyxel.se <http://www.support.zyxel.se> för ytterligare guider.
Procedur för att visa en produkts certifikat
1 Gå till www.zyxel.com.
2 Välj din produkt från rullgardinslistrutan på ZyXEL:s
hemsida för att gå till denna produkts sida.
3 Välj det certifikat du vill titta på från denna sida.
79

РУССКИЙ
РУССКИЙ
Введение
ZyWALL SSL 10 – это шлюз виртуальных частных сетей (VPN) с поддержкой SSL,
позволяющий организовать безопасный удаленный доступ к сетям и приложениям без
предварительной установки клиентского программного обеспечения. Данное руководство
поможет вам подключить и настроить ZyWALL (SSL10) таким образом, чтобы позволить
удаленному пользователю (A) получить доступ к web-серверу (WWW) в вашей локальной
сети через VPN-соединение с поддержкой SSL-шифрования. Вам могут понадобиться
данные учетной записи, которую вы используете для выхода в Интернет.
https://
Интернет
A
SSL10
WWW
Этапы настройки
1 Системные требования
2 Первоначальное подключение оборудования
3 Доступ к Web-конфигуратору
4 Мастер настройки
5 Создание гиперссылок для облегчения удаленного доступа
6 Тестирование подключения удаленного пользователя через Интернет
7 Использование ZyWALL в сети
1 Системные требования
Ниже перечислены требования к компьютеру и браузеру для удаленных пользователей.
• Internet Explorer 5.5 с установленным пакетом обновления Microsoft XML (MSXML), либо
Internet Explorer 6.0 или более новая версия
• Netscape 7.2 или более новая версия
• Firefox 1.0 или более новая версия
• Mozilla 1.7.3 или более новая версия
• Windows 2000 Professional, Windows XP Home/Professional (с установленным Service Pack
2 или более поздним пакетом обновлений) или Linux.
• Установленная Sun Java Virtual Machine (JVM) не младше версии 1.4.2_07 для браузеров
Netscape/Mozilla/Firefox либо версии 1.4.2_02 для Internet Explorer или компьютеров с
Linux.
• Включенная поддержка Java в Internet Explorer на компьютерах с Windows.
80

РУССКИЙ
2 Первоначальное подключение оборудования
1 2
1 При помощи кабеля Ethernet подключите порт WAN к широкополосному модему или
шлюзу.
2 При помощи кабеля Ethernet подключите управляющий компьютер к порту LAN.
3 Подключите к разъему POWER 12V на задней панели устройства входящий в комплект
поставки адаптер питания. Подключите адаптер к источнику питания.
После подключения питания проверьте светодиоды на устройстве. Индикатор PWR
должен гореть. Индикатор SYS мигает во время тестирования системы. Если
тестирование прошло успешно, индикатор продолжает гореть непрерывно. Индикаторы
WAN и LAN загораются при подключении устройств к соответствующим портам.
3
V Если при подключении питания ни один индикатор не загорелся,
проверьте соединения на всех разъемах, а также работу источника
питания.
3 Доступ к Web-конфигуратору
Чтобы войти в Web-конфигуратор через порт LAN и настроить ZyWALL, выполните
следующие действия. Необходимо использовать Internet Explorer 6.0/Netscape 7.0 или
более позднюю версию.
1 Убедитесь, что компьютер настроен таким образом, чтобы получать IP-адрес от
ZyWALL.
2 Запустите Web-браузер. Введите в адресную
строку браузера 192.168.1.1 (локальный IP-адрес
ZyWALL по умолчанию).
81

РУССКИЙ
3 В случае появления окна предупреждения
системы безопасности, нажмите OK или Yes для
продолжения.
4 Появится окно входа в систему. Введите admin в
качестве имени пользователя (user name) и 1234
в качестве пароля (password). Нажмите Login.
5 В случае появления еще одного предупреждения
о сертификатах безопасности, нажмите Yes для
продолжения работы.
6 Ваш первый вход в систему настройки ZyWALL
выполнен. Отобразится главная страница,
показанная на иллюстрации.
Нажмите Setup Wizard.
4 Мастер настройки (Setup Wizard)
Для первоначальной настройки необходимо выполнить следующие действия на
страницах мастера настройки:
• Выполнить настройку локальной и распределенной сетей (LAN/WAN Settings)
• Создать учетную запись удаленного пользователя
• Создать политику доступа для VPN-соединений с поддержкой SSL
• Зарегистрировать ZyWALL
Для настройки с помощью мастера выполните описанные ниже действия. Для
продолжения нажмите Next > на каждой странице.
82

РУССКИЙ
1 Для открытия мастера настройки нажмите
Setup Wizard на главной странице системы
настройки.
• Если вы хотите подключить ZyWALL к уже
существующему в вашей сети шлюзу,
нажмите Install on Gateway’s DMZ port.
• Если вы хотите, чтобы ZyWALL выполнял в
вашей сети функции как маршрутизатора с
трансляцией сетевых адресов, так и шлюза
виртуальной частной сети с поддержкой SSL,
нажмите Install as a New Gateway.
2 При установке ZyWALL за другим шлюзом
необходимо выполнить настройку IPадресов ZyWALL на первой странице
мастера настройки.
Если же вы устанавливаете ZyWALL как
новый шлюз, на первой странице мастера
настройки необходимо выполнить настройку
подключения к Интернету.
3
Чтобы позволить удаленным пользователям
войти в вашу локальную сеть, создайте учетную
запись удаленного пользователя. Введите
уникальные имя пользователя (до 31 знаков,
используя “0-9”, “a-z” и “A-Z”) и пароль (до 64
знаков, используя “0-9”, “a-z” и “A-Z”).
" Использование учетной записи
администратора для доступа к
сетевым ресурсам невозможно.
4 Укажите IP-адрес и маску подсети для
локальной сети за ZyWALL, доступ к которой
через SSL-VPN вы хотите разрешить.
Укажите диапазон частных IP-адресов,
которые будут назначаться удаленным
пользователям и ZyWALL. Эти адреса
используются, чтобы установить VPNсоединение с поддержкой SSL и предоставить
удаленным пользователям доступ к ресурсам,
как если бы они находились в локальной сети.
83

РУССКИЙ
5 Нажмите Next для продолжения.
6 Проверьте настройки сети на следующей
странице мастера и нажмите Activate SSLVPN License.
" Чтобы разрешить одновременное
подключение к сети до 10 удаленных пользователей, необходимо
зарегистрировать ZyWALL на
web-сайте myZyXEL.com.
7 Следуя инструкциям на экране, введите
данные учетной записи на myZyXEL.com и
нажмите Finished для окончания работы
мастера и начала процесса регистрации.
8 После окончания регистрации нажмите
Close.
V В случае неудачной регистрации устройства проверьте правильность
ввода данных учетной записи, а также соединение ZyWALL с Интернетом.
Теперь вы можете войти в сеть как удаленный пользователь, используя только что
созданную учетную запись. Вы можете получить доступ ко всем ресурсам в локальной
сети (используйте IP-адрес сети или имя домена). При желании вы можете создать для
удаленных пользователей гиперссылки, которые позволят им получить доступ к webприложениям при помощи всего одного щелчка мыши.
5 Создание гиперссылок для облегчения удаленного доступа
В данном разделе описано, как при помощи гиперссылок можно облегчить доступ
удаленных пользователей к web-приложениям.
1 Войдите в Web-конфигуратор, используя
учетную запись администратора, и
нажмите Object > SSL Application.
Нажмите пиктограмму Add.
84

РУССКИЙ
2 Создайте Web Application и введите имя-
описание в поле Service Name.
3 В поле Address введите адрес сервера.
Например, http://192.168.1.200.
4 В поле Server Type выберите Web Server.
5 Если вы используете нестандартный порт
(например, 8080 вместо 80), введите номер
порта в поле Virtual Web Port.
6 Нажмите Ok, чтобы сохранить настройки.
7 Нажмите SSL на панели навигации, а
затем нажмите пиктограмму Edit, чтобы
настроить политику SSL “по умолчанию”,
созданную вами при помощи мастера
настройки.
8 На появившейся странице настройки выберите
имя только что созданного вами SSLприложения и нажмите Ok для сохранения
настроек.
Это позволяет применить настройки приложения
к политике SSL, а также обеспечивает доступ
удаленных пользователей через VPNсоединение с поддержкой SSL.
9 Убедитесь, что сервер правильно настроен и
подключен к локальной сети.
6 Тестирование подключения удаленного пользователя через
Интернет
Следуйте описанным ниже инструкциям для доступа к локальной сети через Интернет в
качестве удаленного пользователя. Вам понадобится внешний IP-адрес (WAN IP address)
ZyWALL (его можно узнать на странице Status).
1 Подключите ваш компьютер к сети, находящейся вне корпоративного межсетевого
экрана.
2 Откройте web-браузер и введите в его адресную строку внешний IP-адрес ZyWALL.
3 В случае появления предупреждения системы безопасности нажмите OK или Yes.
85

РУССКИЙ
4 Появится окно входа в систему. Введите имя и
пароль созданной вами учетной записи
удаленного пользователя. Нажмите Login.
5 После успешного входа в систему ваш компьютер
начнет устанавливать VPN-соединение с
ZyWALL. Этот процесс занимает до двух минут.
6 В случае появления сообщения о
необходимости обновления Java Virtual
Machine (JVM), нажмите на
предложенную ссылку, зайдите на webсайт Sun Java и скачайте необходимое
ПО. Рекомендуется выбрать вариант
установки Offline Installation.
7 В случае появления окна
предупреждения нажмите Continue.
8 В системной области отобразится
пиктограмма нового сетевого
подключения. Это означает, что между
вашим компьютером и ZyWALL
установлено VPN-соединение.
86

РУССКИЙ
9 Отобразится страница удаленного
пользователя. Нажав на одну из
ссылок, вы сможете перейти на
соответствующий web-сайт. Или, если
вы знаете адрес web-сайта, просто
откройте новое окно браузера и
введите адрес в соответствующую
строку.
Если вы смогли открыть web-страницу,
ZyWALL настроен правильно.
Информацию о расширенных настройках
можно найти в руководстве пользователя.
V Убедитесь, что настройки вашего браузера соответствуют указанным в
разделе Системные требования.
В случае появления сообщения о необходимости установки или
обновления Java Virtual Machine (JVM), нажмите на предложенную ссылку,
зайдите на web-сайт Sun Java и скачайте необходимое ПО. Выберите
вариант установки Offline Installation.
Если вы не можете открыть страницу удаленного пользователя,
проверьте, зарегистрирован ли ZyWALL.
7 Использование ZyWALL в сети
ZyWALL можно использовать в сети двумя способами: за существующим шлюзом либо в
качестве нового шлюза.
7.1 Подключение за шлюзом
ZyWALL можно подключить к уже существующему в вашей сети шлюзу. Если шлюз
оборудован портом DMZ, подключите ZyWALL к этому порту. Таким образом можно
повысить уровень безопасности. На следующей иллюстрации показан пример сети, в
которой ZyWALL (SSL10) и web-сервер (WWW) подключены к шлюзу (GW). Чтобы
удаленный пользователь (A) получил доступ к web-серверу, трафик должен пройти через
VPN-туннель. При этом шлюз выполняет необходимую проверку безопасности.
87

РУССКИЙ
https://
Интернет
A
GW
SSL10
WWW
" Если ZyWALL находится за шлюзом или маршрутизатором с трансляцией
сетевых адресов, в настройках этого устройства необходимо разрешить
соединение ZyWALL через TCP-порт 443. Сделать это можно при помощи
настройки перенаправления портов или правила межсетевого экрана.
7.2 Использование в качестве нового шлюза
Если в вашей сети еще не установлен шлюз, вы можете использовать ZyWALL в качестве
шлюза с поддержкой SSL-VPN. На следующей иллюстрации показан пример сети, в
которой ZyWALL (SSL10) подключен к модему DSL или кабельному модему,
обеспечивающему соединение с Интернетом, а web-сервер (WWW) подключен к ZyWALL.
Трафик от web-сервера к удаленному пользователю (A) проходит через VPN-туннель. Для
повышения уровня безопасности вы можете настроить на ZyWALL контроль доступа и
политики контроля конечных точек.
https://
A
Интернет
SSL10
Как посмотреть сертификаты продукта
1 Зайдите на web-сайт www.zyxel.ru
2 Выберите нужный продукт в ниспадающем списке
на домашней странице ZyXEL и перейдите на
страницу этого продукта
3 Выберите нужный сертификат на странице
продукта.
88
WWW

РУССКИЙ
89

繁體中文
繁體中文
簡介
ZyWALL SSL 10 是 SSL VPN 閘道器,不需預先安裝用戶端軟體,即可建立安全的遠端網路及
應用程式存取。本使用手冊說明如何連接及設定 ZyWALL (SSL10),使遠端使用者 (A) 得以
透過 SSL-VPN 連線存取區域網路上的 Web 伺服器 (WWW)。請備妥您的網際網路帳號資訊。
https://
Internet
A
SSL10
WWW
設定步驟
1 系統需求
2 初始硬體連接
3 使用網頁設定介面
4 設定設定精靈
5 建立可輕鬆進行遠端存取的 Web 連結
6 自網際網路測試遠端使用者連線
7 將 ZyWALL 部署於網路
1 系統需求
以下列出遠端使用者登入的瀏覽器及電腦系統需求。
• Internet Explorer 5.5 ( 安裝 Microsoft XML (MSXML) Service Pack) 或 Internet
Explorer 6.0 以上版本
• Netscape 7.2 以上版本
• Firefox 1.0 以上版本
• Mozilla 1.7.3 以上版本
• Windows 2000 Professional、Windows XP Home/Professional ( 安裝 Service Pack 2 以
上版本 ) 或 Linux。
• 安裝 Sun Java Virtual Machine (JVM) 且 1.4.2_07 以上版本的 Netscape/Mozilla/
Firefox 電腦以及 1.4.2_02 以上版本的 Internet Explorer 與 Linux 電腦。
• Windows 電腦上的 Internet Explorer 須啟用 Java 功能。
90

2 初始硬體連接
繁體中文
1
1 使用乙太網路線將 WAN 埠連接至寬頻數據機或閘道器。
2 使用乙太網路線將管理電腦連接至 LAN 埠。
3 使用包裝內附的電源轉接器將後方面板上的 POWER 12V 埠連結至電源。
連接並開啟電源之後,檢查 LED 指示燈狀態。PWR LED 指示燈亮起。SYS LED 指示燈會在執
行系統測試時會一直閃爍,測試成功之後指示燈就會持續亮著。如果有連接對應的連接埠,
WAN 及 LAN LED 指示燈會亮起。
2
3
V 如果已經連接電源但卻沒有任何 LED 指示燈亮起,請檢查連接埠連線並確
認電源是否已經開啟。
3 使用網頁設定介面
請依照下列步驟,經由 LAN 埠登入至網頁設定介面,設定 ZyWALL。您必須使用 Internet
Explorer 6.0/Netscape 7.0 或更新版本。
1 確認電腦已經設定為接受 ZyWALL 提供的 IP 位址。
2 啟動您的網頁瀏覽器 輸入位址 192.168.1.1
(ZyWALL 的預設 LAN IP 位址 )。
3 如果出現安全或警告畫面,按一下 OK ( 確定 ) 或
Yes ( 是 ) 繼續進行下個步驟。
91

繁體中文
4 顯示登入畫面。輸入 admin 作為使用者名稱,密碼
是 1234。按一下 Login ( 登入 )。
5 如果顯示其他憑證畫面,按一下 Yes ( 是 ) 繼續進
行下個步驟。
6 這是您第一次登入至 ZyWALL。初始主畫面如圖所
示。
按一下 Setup Wizard ( 設定精靈 )。
4 設定精靈
若是初始設定,請使用設定精靈進行下列作業。
• 設定 LAN/WAN 設定
• 建立遠端使用者帳號
• 建立 SSL-VPN 存取政策
• 註冊 ZyWALL
請依照下列步驟設定精靈畫面。在各精靈畫面按一下 Next > ( 下一步 ) 以繼續進行下個步
驟。
1 如果要顯示設定精靈,按一下初始主畫面中的
Setup Wizard ( 設定精靈 )。
• 如果要將 ZyWALL 連接至網路閘道器,選取
Install on Gateway's DMZ port ( 安裝在閘道
器的 DMZ 埠上 )。
• 如果要將 ZyWALL 同時設定為網路上的 NAT 路
由器及 SSL VPN 閘道器,選取 Install as a
New Gateway ( 安裝為新閘道器 )。
92

繁體中文
2 如果您將 ZyWALL 安裝在另一台閘道器之後,
請在第一個精靈畫面設定 ZyWALL 的 IP 設
定。
如果您將 ZyWALL 安裝為新的閘道器,請在第
一個精靈畫面設定網際網路設定。
3 建立新的遠端使用者帳號,讓遠端使用者可
以登入至您的區域網路。輸入唯一的使用者
名稱 ( 最多 31 個字元,使用 "0-9""a-z"
及 "A-Z" 以及密碼 ( 最多 64 個字元,使用
"0-9""a-z" 及 "A-Z"。
" 您不能使用管理員帳號存取網路資
源。
4 選擇您要允許 SSL-VPN 存取的 ZyWALL,在其
後方指定區域網路的 IP 位址及子網路遮罩。
指定私人 IP 位址的範圍,以配置給遠端使用
者和 ZyWALL。此程序的作用是在建立 SSL-VPN
連線,遠端使用者只要連接至區域網路就可以
存取資源。
5 按一下 Next ( 下一步 ) 繼續進行下個步驟。
6 檢查下個精靈畫面中的網路設定,再按一下
Activate SSL-VPN License ( 啟動 SSL-VPN
授權 )。
" 您必須到 myZyXEL.com 網頁為您
的 ZyWALL 註冊,才能讓遠端使用
者 ( 最多 10 位 ) 同時進行存取。
93

繁體中文
7 遵照畫面上的指示輸入 myZyXEL.com 帳號資
訊,再按一下 Finished ( 完成 ),結束設定
精靈,啟動註冊程序。
8 完成註冊之後,按一下 Close ( 結束 )。
V 如果裝置註冊失敗,請檢查您輸入
的帳號資訊是否正確以及 ZyWALL
是否能接取網際網路。
現在您可以遠端使用者的身分,使用剛才建立的使用者帳號登入。您可以存取區域網路上的
任何資源 ( 使用 IP 位址或網域名稱 )。或者,您也可以選擇在遠端使用者畫面中建立連結,
遠端使用者只要按一下,就可以存取以網路為基礎的應用程式。
5 建立可輕鬆進行遠端存取的 Web 連結
本節說明如何指定以網路為基礎的應用程式,以及如何在遠端使用者畫面上建立 Web 連結。
1 以管理員的身分登入至網頁設定介面,再
按一下 Object > SSL Application (物件
> SSL 應用程式 )。按一下 Add ( 新增 )
圖示。
2 建立一個 Web Application (Web 應用程式 ),並
於 Service Name ( 服務名稱 ) 欄位輸入描述性名
稱。
3 在 Address ( 位址 ) 欄位,輸入伺服器的位址。
例如:http://192.168.1.200。
4 在 Server Type ( 伺服器類型 ) 欄位選取 Web
Server (Web 伺服器 )。
5 如果您使用的是非標準埠號 ( 例如 8080 而非
80),請將在 Virtual Web Port ( 虛擬 Web 連
接埠 ) 欄位輸入埠號。
6 按一下 Ok ( 確定 ) 儲存設定。
7 按一下導覽面板中的 SSL,再按一下 Edit
( 編輯 ) 圖示,以設定您之前使用設定精
靈建立的預設 SSL 政策。
94

繁體中文
8 在顯示的設定畫面中,選取剛才所建立的 SSL 應
用程式的名稱,再按一下 Ok ( 確定 ) 儲存設定。
此動作可將應用程式設定套用至 SSL 政策,讓遠
端使用者可以透過 SSL-VPN 連線存取伺服器。
9 確認伺服器設定正確而且已經連接至區域網路。
6 自網際網路測試遠端使用者連線
請依照下列步驟,以遠端使用者的身份自網際網路接
取區域網路。您必須知道 ZyWALL 的 WAN IP 位址 ( 可從 Status ( 狀態 ) 畫面取得此資訊
)。
1 將電腦連接至公司防火牆之外的網路。
2 開啟 Web 瀏覽器,在 URL 欄位輸入 ZyWALL 的 WAN IP 位址。
3 如果顯示安全畫面,按一下 OK ( 確定 ) 或 Yes (是)。
4 顯示登入畫面。輸入遠端使用者帳號 ( 您之前使用
設定精靈所建立的 ) 的使用者名稱和密碼。按一下
Login ( 登入 )。
5 成功登入之後,電腦就會開始建立連至 ZyWALL 的
VPN 連線。此程序最多耗時兩分鐘。
6 如果畫面出現提示要您升級 JVM,則請下
載安裝程式。按一下連結存取 Sun Java 軟
體網站。建議選取 Offline Installation
( 離線安裝 ) 選項。
95

7 如果顯示警告畫面,按一下 Continue ( 繼
續)。
8 系統工具列會顯示新的網路圖示; 這代表
您的電腦與 ZyWALL 之間已經成功建立 VPN
連線。
9 遠端使用者畫面顯示。您可以按一下連
結存取該網站。或者,如果您知道網站
位址,則只要開啟新的 Web 瀏覽器視
窗,再輸入網站位址即可進行存取。
如果可以存取該網站的網頁,代表您已經成
功設定 ZyWALL。請參閱 《使用手冊》,取
得更多關於進階設定的資訊。
繁體中文
V 確認您使用的 Web 瀏覽器其中設定與 系統需求 中所指定的相同。
如果畫面出現提示要您安裝或升級 Java Virtual Machine (JVM),請按一
下連結存取 Sun Java 網站,並使用 Offline Installation ( 離線安裝 )
選項下載軟體。
如果無法存取遠端使用者畫面,請檢查您的 ZyWALL 是否已經註冊成功。
7 將 ZyWALL 部署於網路
您可以利用下列兩種方式的其中一種部署 ZyWALL。
96

繁體中文
7.1 部署在閘道器之後
您可以將 ZyWALL 連接至網路上現有的閘道器。如果閘道器附 DMZ 埠,請將 ZyWALL 連接至
該埠以加強安全。下圖為網路範例,其中 ZyWALL (SSL10) 與 Web 伺服器 (WWW) 連接至閘道
器 (GW)。若要存取 Web 伺服器,來自遠端使用者 (A) 的傳輸流量必須行經 VPN 通道,通
過閘道器的安全檢查。
https://
Internet
A
GW
SSL10
WWW
" 如果 ZyWALL 位在防火牆或 NAT 路由器之後,您必須將裝置設定為允許透
過 TCP 埠 443 連接至 ZyWALL。您可以使用連接埠轉遞或防火牆規則進行
此作業。
7.2 作為閘道器
如果網路尚未設置閘道器,則可將 ZyWALL 設定為具備 SSL-VPN 存取功能的閘道器。下圖為
網路範例,其中 ZyWALL(SSL10) 連接至 DSL/Cable 數據機以接取網路,Web 伺服器 (WWW)
則連接至 ZyWALL。若要存取 Web 伺服器,來自遠端使用者 (A) 的傳輸流量會透過 VPN 通
道傳送。為安全起見,您可以在 ZyWALL 設定存取控制及端對端控制政策。
https://
Internet
A
如何查看產品認證資料
1 前往 www.zyxel.com。
2 在 ZyXEL 首頁的下拉式清單方塊選取您的產品,進
入該產品的網頁。
3 在此頁選取您想查看的認證資料。
97
SSL10
WWW
 Loading...