

Page 1

Quick Start Guide
NWD2705
Dual-Band Wireless N450 USB Adapter
Version 1.00
Edition 1, 09/2012
User’s Guide
www.zyxel.com
Copyright © 2012 ZyXEL Communications Corporation
Page 2

IMPORTANT!
READ CAREFULLY BEFORE USE.
KEEP THIS GUIDE FOR FUTURE REFERENCE.
Screenshots and graphics in this book may differ slightly from your product due to differences in
your product firmware or your computer operating system. Every effort has been made to ensure
that the information in this manual is accurate.
Related Documentation
•Quick Start Guide
The Quick Start Guide shows how to connect the NWD2705 and set up your network.
• Online Help
Embedded web help for descriptions of individual screens and supplementary information.
NWD2705 User’s Guide2
Page 3

Contents Overview
Contents Overview
Introduction and Configuration ..........................................................................................................9
Getting Started ........................................................................................................................................11
Tutorial ....................................................................................................................................................16
Wireless LANs ..................................................................................... ... ... ..............................................25
ZyXEL Utility: Station Mode .....................................................................................................................35
Maintenance .................................... ....... ...... ...... ....... ...... ....... ...... ....... ...... ....... ... ...... ..............................51
Troubleshooting .................................................................................................................................55
Troubleshooting ......................................................................................................................................57
NWD2705 User’s Guide
3
Page 4

Contents Overview
4
NWD2705 User’s Guide
Page 5

Table of Contents
Table of Contents
Contents Overview ..............................................................................................................................3
Table of Contents .................................................................................................................................5
Part I: Introduction and Configuration ............................................................9
Chapter 1
Getting Started....................................................................................................................................11
1.1 Overview .......................................................................... ... ... .... .......................................................11
1.1.1 What You Need to Know .................................. .... ... ... ... .... ... ... ... ... .... .......................................1 1
1.1.2 Before You Begin ....... ... ... ... ....................................................... ... .... ... ... ... .... ... .......................11
1.2 About Your NWD2705 .....................................................................................................................12
1.2.1 Hardware ...... ... ....................................................... ... ... ...........................................................12
1.3 Application Overview .............................. ... ... .... ....................................................... ... ... ....................13
1.3.1 Infrastructure ...................... .... ... ... ....................................................... ... ... ..............................13
1.4 Hardware and Utility Installation ........................................................................................................13
1.4.1 ZyXEL Utility Icon ....................................................................................................................13
1.5 Configuration Methods .......................... ... ... .... ... ... ... .... ... .................................................................14
1.5.1 Enabling Windows Wireless Configuration ..............................................................................14
1.5.2 Accessing the ZyXEL Utility ....................................................................................................15
Chapter 2
Tutorial.................................................................................................................................................16
2.1 Overview ................................ ....................................................... ... ... ... ...........................................16
2.1.1 What You Can Do in This Tutorial ............................................................................................16
2.1.2 What You Need to Know .................................. .... ... ... ... .... ... ... ... ... .... .......................................16
2.1.3 Before You Begin ....... ... ... ... ....................................................... ... .... ... ... ... .... ... .......................16
2.2 Connecting to an AP using Wi-Fi Protected Setup (WPS) ................................................................17
2.2.1 Push Button Configuration (PBC) ................................. .... ... ... ... ... .... ... ... .................................17
2.2.2 PIN Configuration ............ ... ....................................................... ... .... ... ... ... .... ... .......................18
2.3 Connecting to an AP Without Using WPS .........................................................................................20
2.3.1 Manually Connecting to a Wireless LAN ................................................................................20
2.3.2 Creating and Using a Profile ............... .... ... ... ... .... ....................................................................22
Chapter 3
Wireless LANs.....................................................................................................................................25
3.1 Overview ................................ ....................................................... ... ... ... ...........................................25
3.1.1 What Yo u Can Do in This Section ...........................................................................................25
NWD2705 User’s Guide
5
Page 6

Table of Contents
3.1.2 What You Need to Know .................................. .... ... ... ... .... ... ... ... ... .... .......................................25
3.1.3 Before You Begin ....... ... ... ... ....................................................... ... .... ... ... ... .... ... .......................25
3.2 Wireless LAN Overview ...................................................................................................................26
3.3 Wireless LAN Security ....... ..............................................................................................................26
3.3.1 WEP .......................... ....................................................... .......................................................27
3.3.2 WPA-PSK and WPA2-PSK ......................................................................................................27
3.4 Wi-Fi Protected Setup ...................... ... ... ... ... .... ....................................................... ... ... ....................28
3.4.1 Push Button Configuration ...... ... ... ... ... ....................................................... .... ... ... ... ... .... ..........28
3.4.2 PIN Configuration ............ ... ....................................................... ... .... ... ... ... .... ... .......................29
3.4.3 How WPS Works .....................................................................................................................30
3.4.4 Limitations of WPS ....... ... ....................................................... ... ... .... .......................................33
Chapter 4
ZyXEL Utility: Station Mode...............................................................................................................35
4.1 Overview ................................ ....................................................... ... ... ... ...........................................35
4.1.1 What Yo u Can Do in This Section ...........................................................................................35
4.1.2 What You Need to Know .................................. .... ... ... ... .... ... ... ... ... .... .......................................35
4.1.3 Before You Begin ....... ... ... ... ....................................................... ... .... ... ... ... .... ... .......................36
4.2 ZyXEL Utility Screen Summary .........................................................................................................36
4.3 The Link Info Screen ........................................................................................................................37
4.3.1 Trend Chart ......................................... .... ... ... ... .... ... .................................................................38
4.4 The Site Survey Screen ..................................................................................................................39
4.4.1 Security Settings ....... ... ....................................................... ... ... ... ...........................................40
4.4.2 Summary Screen ................................ .... ... ... ... .... ... .................................................................43
4.5 The Profile Screen ...........................................................................................................................43
4.5.1 Adding a New Profile ...............................................................................................................45
4.6 The Adapter Screen .............................. ... ... .... ... ... ... .... ... ... ... ...........................................................48
4.6.1 WPS: PBC (Push Button Configuration) ..................................................................................49
4.6.2 WPS: PIN - Use this Device’s PIN ...........................................................................................49
4.6.3 WPS: PIN - Use the PIN from the AP or Wireless Router .......................................................50
Chapter 5
Maintenance........................................................................................................................................51
5.1 Overview ................................ ....................................................... ... ... ... ...........................................51
5.1.1 What Yo u Can Do in This Section ...........................................................................................51
5.1.2 What You Need to Know .................................. .... ... ... ... .... ... ... ... ... .... .......................................51
5.1.3 Before You Begin ....... ... ... ... ....................................................... ... .... ... ... ... .... ... .......................51
5.2 The About Screen . ... ....................................................... ... ... .... ... ... ... ... ...........................................52
5.3 Uninstalling the ZyXEL Utility ................... ... .... ... ... ... .... ... ... ... .... ... ....................................................52
5.4 Upgrading the ZyXEL Utility ..............................................................................................................53
Part II: Troubleshooting ..................................................................................55
6
NWD2705 User’s Guide
Page 7

Table of Contents
Chapter 6
Troubleshooting..................................................................................................................................57
6.1 Power, Hardware Connections, and LEDs ........................................................................................57
6.2 Accessing the ZyXEL Utility ..............................................................................................................58
6.3 Link Quality ......................................... ... ... ....................................................... .................................58
6.4 Problems Communicating with Other Computers .............................................................................58
Appendix A Legal Information............................................................................................................61
Index ....................................................................................................................................................65
NWD2705 User’s Guide
7
Page 8

Table of Contents
8
NWD2705 User’s Guide
Page 9

PART I
Introduction and
Configuration
9
Page 10

10
Page 11

1.1 Overview
The ZyXEL NWD2705 is a dual-band wireless USB adapter, which can connect to a 2.4 G network or
a 5G netowrk and bring you a better Internet experience over existing 802.11 networks. With data
rates of up to 450 Mbps, you can enjoy a breathtaking high-speed connection at home or in the
office. It is an excellent solution for daily activities such as file transfers, music downloading, video
streaming and online gaming.
This section includes:
• About Your NWD2705 on page 12
• Application Overview on page 13
• Hardware and Utility Installation on page 13
• Configuration Methods on page 14
CHAPTER 1
Getting Started
1.1.1 What You Need to Know
The following terms and concepts may help as you read through this section, and subsequently as
you read through the rest of the User’s Guide.
Access Point
An Access Point (AP) is a network device that acts as a bridge between a wired and a wireless
network. Outside of the home or office, APs can most often be found in coffee shops, bookstores
and other businesses that offer wireless Internet connectivity to their customers.
Infrastructure
An infrastructure network is one that seamlessly combines both wireless and wired components.
One or more APs often serve as the bridge between wireless and wired LANs.
1.1.2 Before You Begin
Read the Quick Start Guide for information on making hardware connections and using the ZyXEL
utility to connect your NWD2705 to a network.
NWD2705 User’s Guide 11
Page 12
Chapter 1 Getting Started
A
B
1.2 About Your NWD2705
Your NWD2705 is an IEEE 802.11n compliant wireless LAN adapter. It can also connect to IEEE
802.11b/g wireless networks. The NWD2705 is WPS (Wi-Fi Protected Setup) compliant. WPS allows
you to easily connect to another WPS-enabled device.
The NWD2705 is a USB adapter which connects to an empty USB port on your computer.
See your NWD2705’s Quick Start Guide for installation instructions, and see the section on product
specifications in this User’s Guide for detailed information.
1.2.1 Hardware
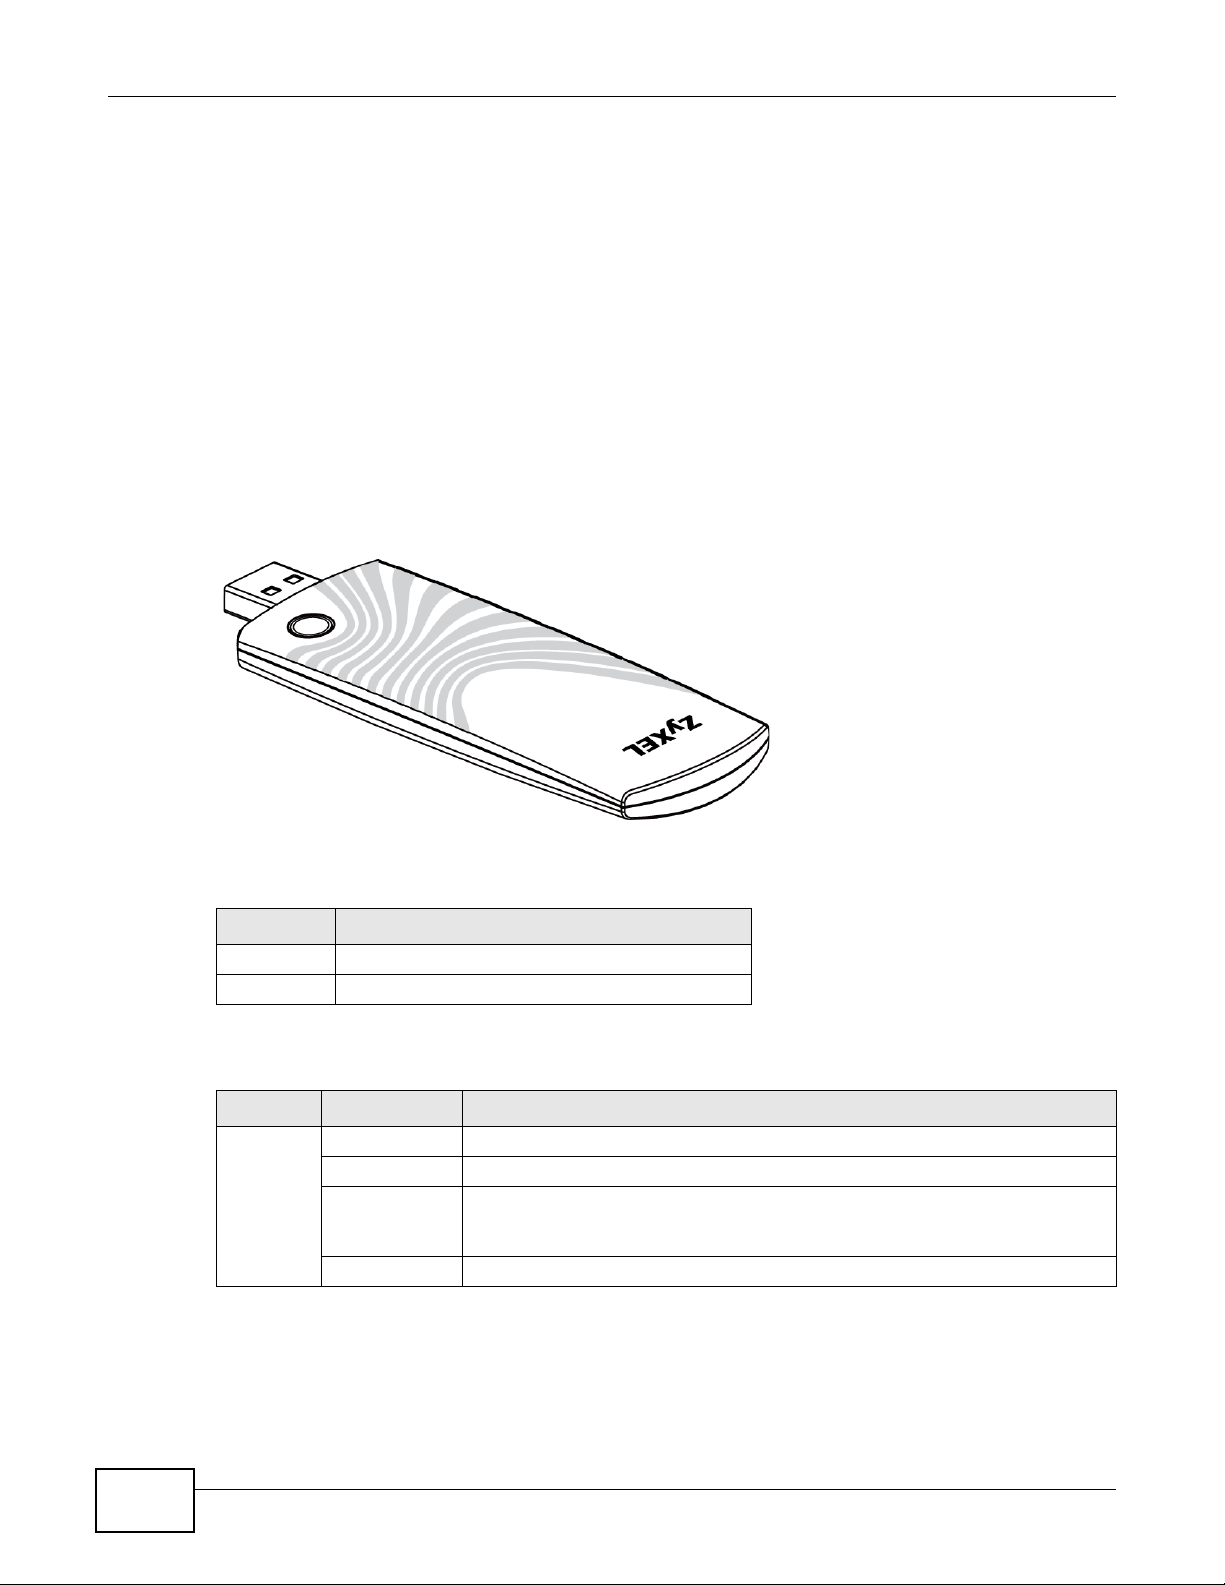
This section describes the NWD2705’s physical appearance.
Figure 1 The NWD2705
The following table describes the NWD2705.
Table 1 NWD2705 External View
LABEL DESCRIPTION
AWPS button
BLED
The following table describes the operation of the NWD2705’s LED.
Table 2 NWD2705 LED
COLOR STATUS DESCRIPTION
Blue On The NWD2705 is turned on and the driver is installed.
Slow Blinking The NWD2705 is searching for available wireless device.
Rapid Blinking The NWD2705 is turned on, connected to a wireless device, and is transmitting
or receiving data. It also blinks when the WPS feature is being used or a WPS
connection is being initiated.
Off The NWD2705 is turned off or the driver is not installed.
12
NWD2705 User’s Guide
Page 13
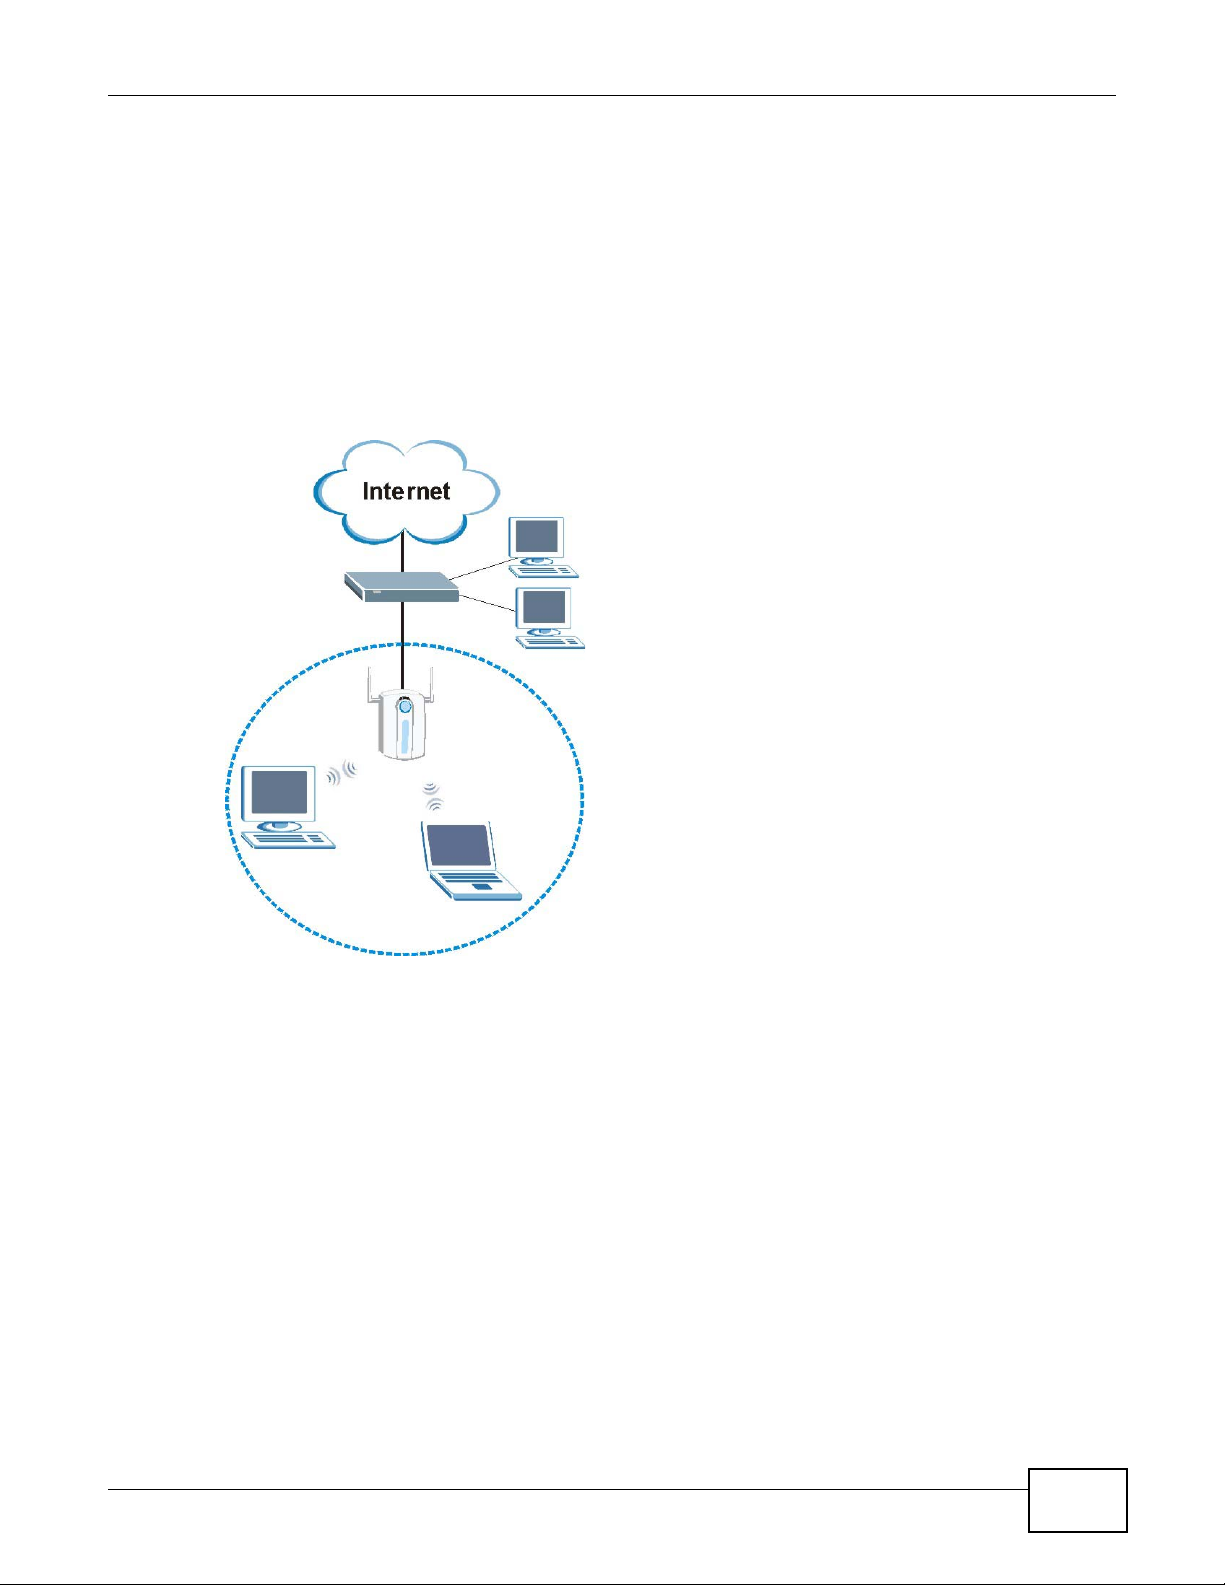
1.3 Application Overview
This section describes some network applications for the NWD2705.
1.3.1 Infrastructure
To connect to a network via an access point (AP), set the NWD2705 network type to
Infrastructure (see Chapter 4 on page 43). Through the AP, you can access the Internet or the
wired network behind the AP.
Figure 2 Application: Infrastructure
Chapter 1 Getting Started
1.4 Hardware and Utility Installation
Follow the instructions in the Quick Start Guide to install the ZyXEL utility and make hardware
connections.
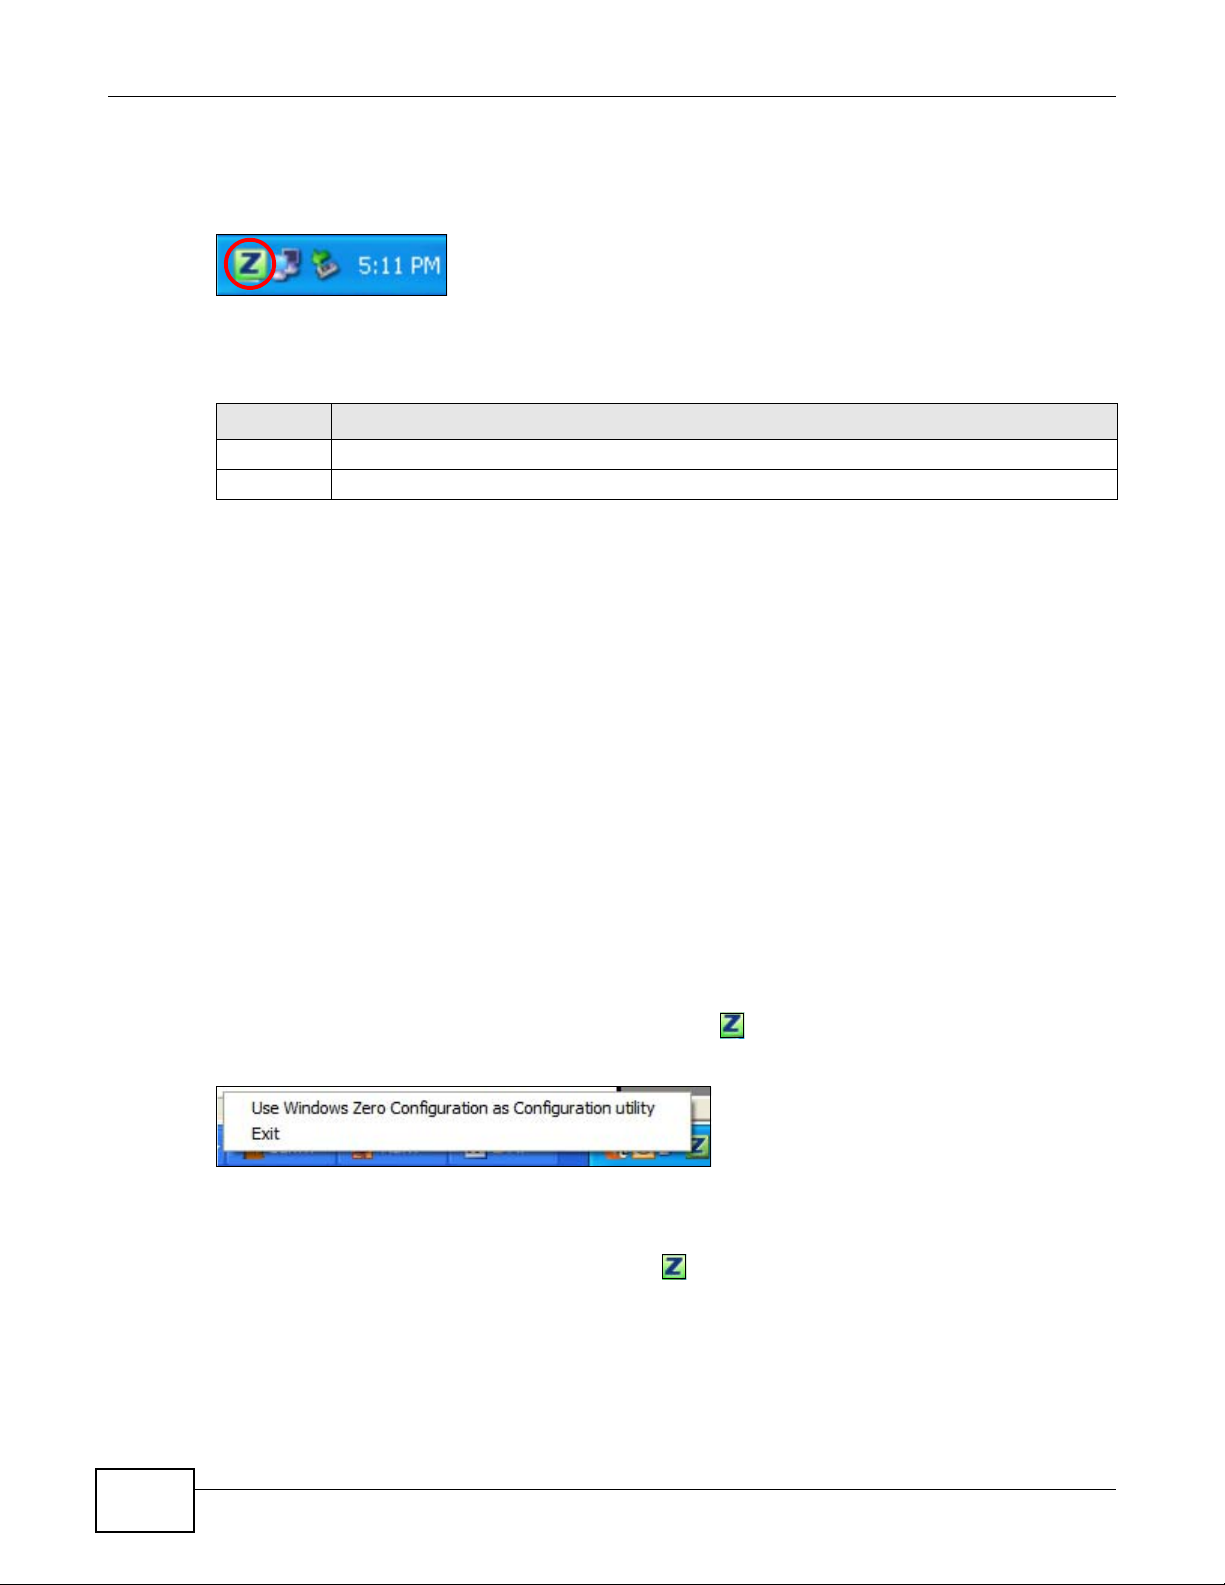
1.4.1 ZyXEL Utility Icon
After you install and start the ZyXEL utility, an icon for the ZyXEL utility appears in the system tray.
Note: The ZyXEL utility system tray icon displays only when the NWD2705 is installed
properly.
NWD2705 User’s Guide
13
Page 14
Chapter 1 Getting Started
Note: When you use the ZyXEL utility, it automatically disables Wireless Zero
Configuration (WZC) in Windows XP.
Figure 3 ZyXEL Utility: System Tray Icon
The color of the ZyXEL utility system tray icon indicates the status of the NWD2705. Refer to the
following table for details.
Table 3 ZyXEL Utility: System Tray Icon
COLOR DESCRIPTION
Red The NWD2705 is not connected to a wireless network.
Green The NWD2705 is connected to a wireless network.
1.5 Configuration Methods
To configure your NWD2705, use one of the following applications:
• Wireless Zero Configuration (WZC, the Windows XP wireless configuration tool) or WLAN
AutoConfig (the Windows Vista wireless configuration tool).
• The ZyXEL utility.
Note: Do NOT use Windows XP’s Wireless Zero Configuration tool at the same time you
use the ZyXEL utility.
1.5.1 Enabling Windows Wireless Configuration
Note: When you use the ZyXEL utility, it automatically disables Windows XP’s wireless
configuration tool.
If you want to use the Windows XP wireless configuration tool to configure the NWD2705, you need
to disable the ZyXEL utility. Right-click the utility icon ( ) in the system tray and select Exit.
Figure 4 Enable WZC
Refer to the appendices for information on how to use the Windows wireless configuration tool to
manage the NWD2705.
To reactivate the ZyXEL utility, double-click the ( ) icon on your desktop or click Start > (All)
Programs > ZyXEL Dual-Band Wireless N450 USB Adapter > ZyXEL Dual-Band Wireless
N450 USB Adapter.
14
NWD2705 User’s Guide
Page 15

1.5.2 Accessing the ZyXEL Utility
Double-click on the ZyXEL wireless LAN utility icon in the system tray to open the ZyXEL utility.
The ZyXEL utility screens are similar in all Microsoft Windows versions. Screens for Windows XP are
shown in this User’s Guide.
Note: Click the icon (located in the top right corner) to display the online help window.
Chapter 1 Getting Started
NWD2705 User’s Guide
15
Page 16
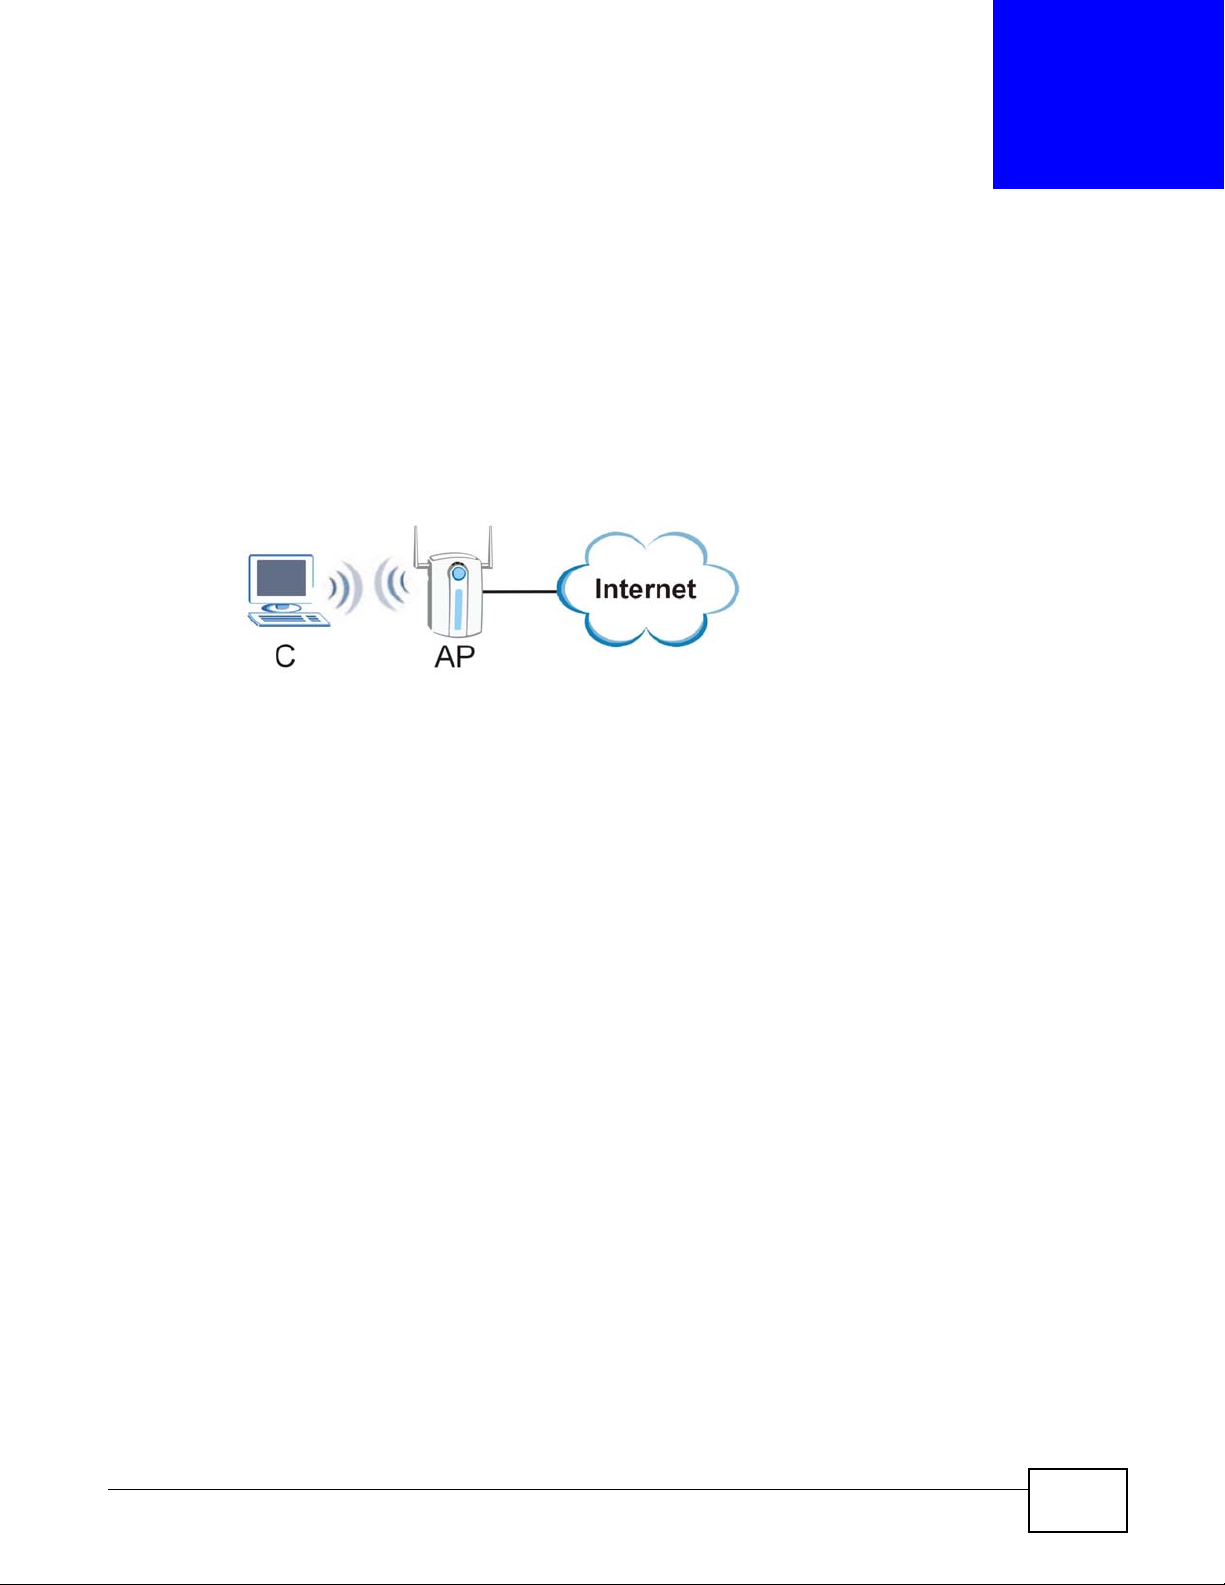
2.1 Overview
This tutorial shows you how to join a wireless infrastructure network using the ZyXEL utility. The
wireless client is labeled C and the Access Point is labeled AP.
Figure 5 Infrastructure Network
CHAPTER 2
Tutorial
2.1.1 What You Can Do in This Tutorial
• Connect securely either to an infrastructure AP using the WPS protocol. See Section 2.2 on page
17 for details.
• Connect securely to an infrastructure AP using many of the strongest and most common
encryption protocols. See Section 2.3 on page 20 for details.
• Save a your settings so that you can later connect again to an infrastructure AP with a single
click. See Section 2.3.2 on page 22 for details.
2.1.2 What You Need to Know
The following term may help as you read through this section.
WPS
Wi-Fi Protected Setup (WPS) is a security protocol that lets two or more devices connect securely to
one another with a minimum amount of hassle on your part. It most cases, establishing a secure
connection with another WPS device is as easy as pushing a button.
2.1.3 Before You Begin
• Make sure that you have already familiarized yourself with the NWD2705’s features and
hardware, as described in Chapter 1 on page 11.
• You should have valid login information for an existing network Access Point, otherwise you may
not be able to make a network connection right away.
NWD2705 User’s Guide 16
Page 17

Chapter 2 Tutorial
2.2 Connecting to an AP using Wi-Fi Protected Setup (WPS)
This section gives you an example of how to set up your wireless network using WPS. This example
uses the NWD2705 as the wireless client, and ZyXEL’s NBG4615 v2 as the Access Point (AP).
Note: The Access Point must be a WPS-aware device.
There are two WPS methods for creating a secure connection. This tutorial shows you both.
• Push Button Configuration (PBC) - create a secure wireless network simply by pressing a
button. See Section 2.2.1 on page 17.This is the easier method.
• PIN Configuration - create a secure wireless network simply by entering a wireless client's PIN
(Personal Identification Number) in the NWD2705’s interface. See Section 2.2.2 on page 18. This
is the more secure method, since one device can authenticate the other.
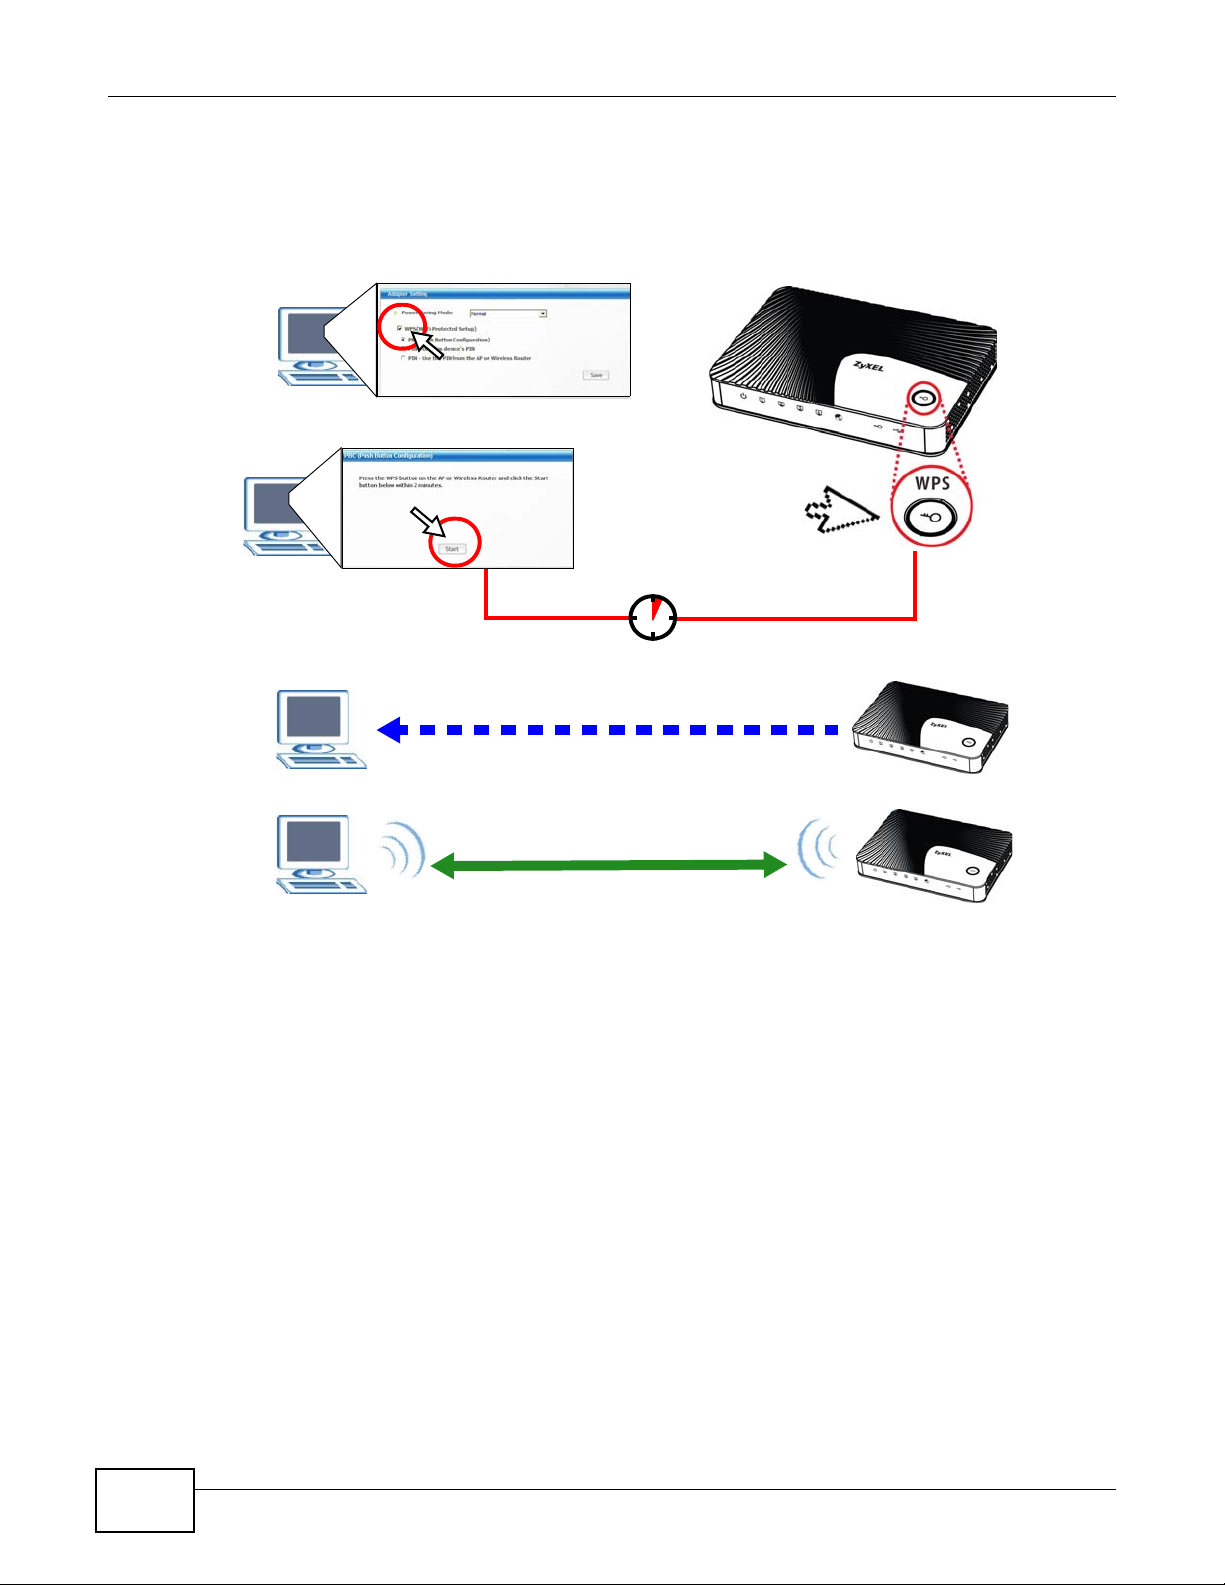
2.2.1 Push Button Configuration (PBC)
1 Make sure that your access point is turned on and that it is within range of the computer with the
NWD2705 installed.
2 Make sure that you have installed the NWD2705’s driver and utility on your computer.
3 In the NWD2705’s utility, click the Adapter tab, enable WPS and select PBC (Push Button
Configuration). In the screen that appears, click Start.
4 Log into the AP’s web configurator and locate its WPS settings section. On the NBG4615 v2, press
the Push Button button in the Network > Wireless LAN > WPS Station screen.
Note: It doesn’t matter which button is pressed first. You must press the second button
within two minutes of pressing the first one.
The AP sends the proper configuration settings to the NWD2705. This may take up to two minutes.
Then the NWD2705 is able to communicate with the AP securely.
NWD2705 User’s Guide
17
Page 18
Chapter 2 Tutorial
You
AP
SECURITY INFO
COMMUNICATION
WITHIN 2 MINUTES
The following figure shows you an example to set up wireless network and security by pressing a
button on both the AP (the NBG4615 v2 in this example) and the NWD2705.
Figure 6 Example WPS Process: PBC Method
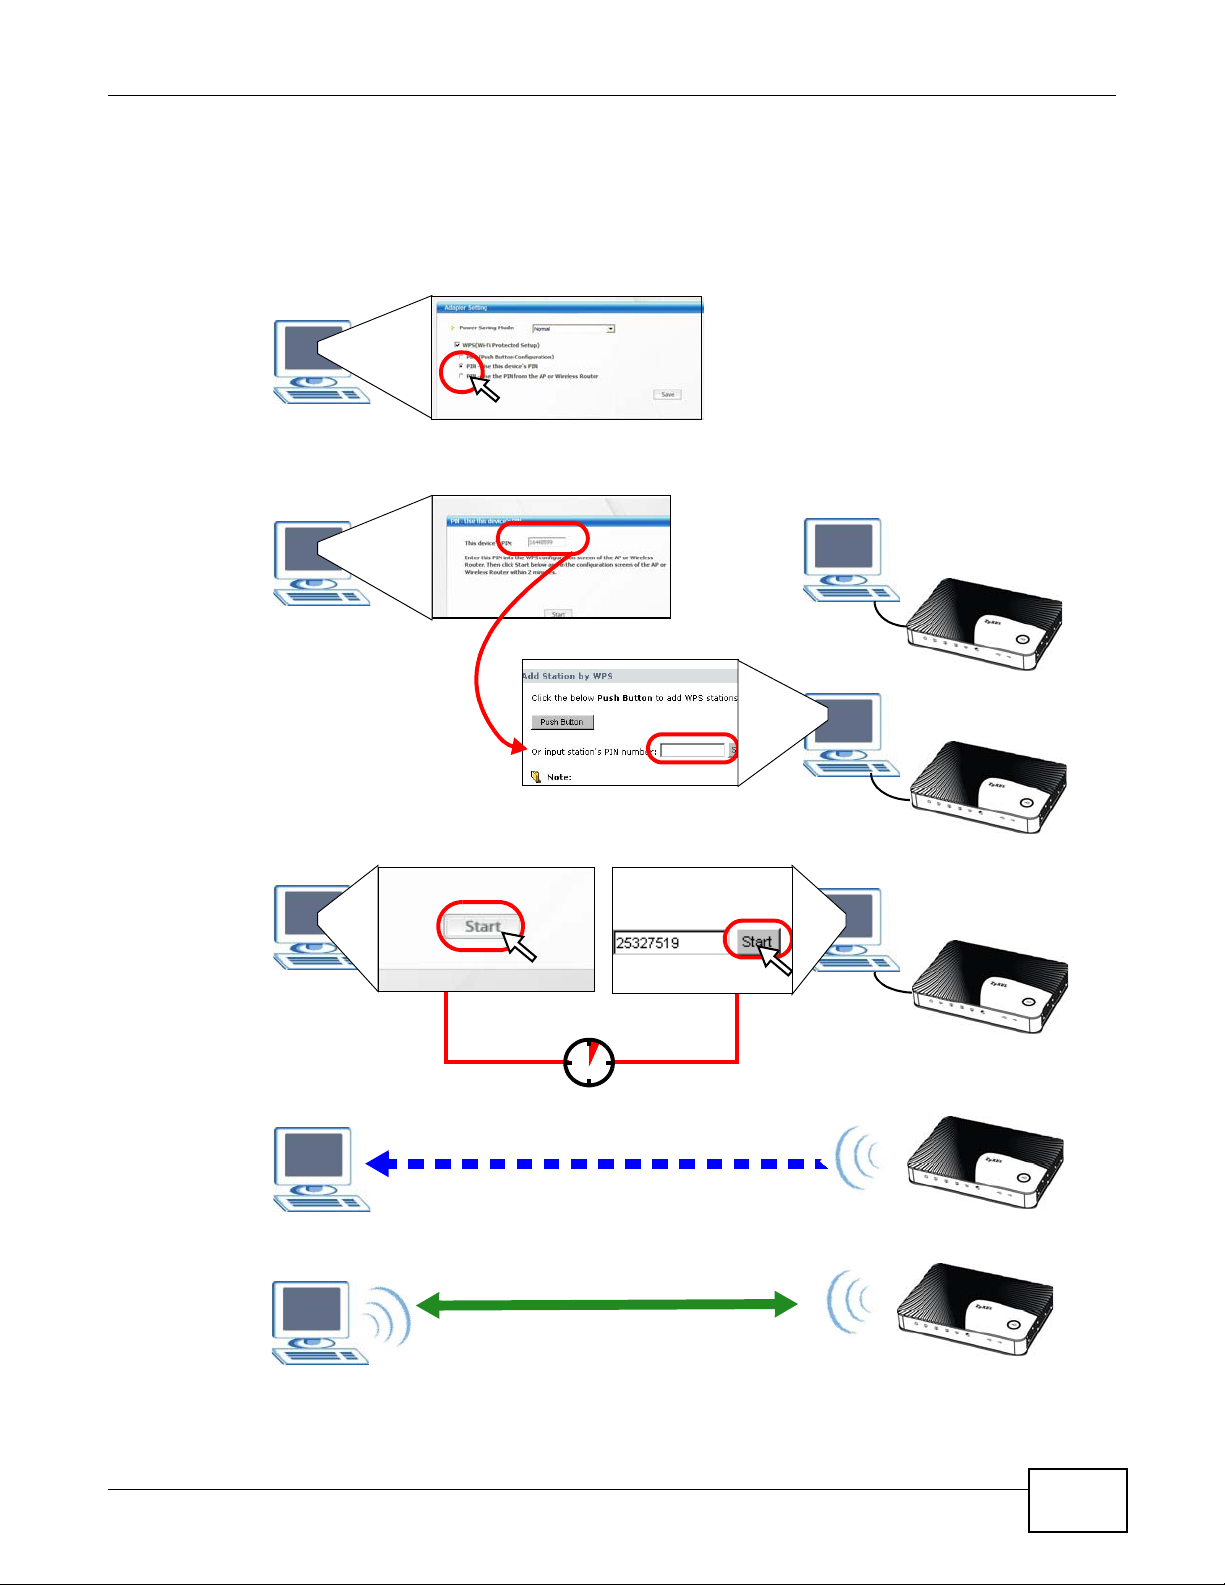
2.2.2 PIN Configuration
When you use the PIN configuration method, you need to use both the NWD2705’s utility and the
AP’s configuration interface.
1 In the NWD2705’s Adapter tab, select WPS and PIN - Use this device’s PIN. Note down the PIN
in the screen that appears.
2 Enter the PIN number in the AP’s configuration interface. In the NBG4615 v2, use the PIN field in
the Network > Wireless LAN > WPS Station screen.
3 Click the Start buttons on both the NWD2705 utility screen and the AP’s configuration utility (the
WPS Station screen on the NBG4615 v2) within two minutes.
The NBG4615 v2 authenticates the wireless client and sends the proper configuration settings to
the wireless client. This may take up to two minutes. Then the wireless client is able to
communicate with the NBG4615 v2 securely.
18
NWD2705 User’s Guide
Page 19
Chapter 2 Tutorial
Authentication by PIN
SECURITY INFO
WITHIN 2 MINUTES
COMMUNICATION
You
AP
The following figure shows you the example of configuring the wireless network and security on the
NWD2705 and the AP (ZyXEL’s NBG4615 v2 in this example) by using the PIN method.
Figure 7 Example WPS Process: PIN Method
NWD2705 User’s Guide
19
Page 20
Chapter 2 Tutorial
2.3 Connecting to an AP Without Using WPS
There are three ways to connect the wireless client (the NWD2705) to a network without using
WPS.
• Configure nothing and leave the wireless client to automatically scan for and connect to any
available network that has no wireless security configured.
• Manually connect to a network (see Section 2.3.1 on page 20).
• Configure a profile to have the wireless client automatically connect to a specific network or peer
computer (see Section 2.3.2 on page 22).
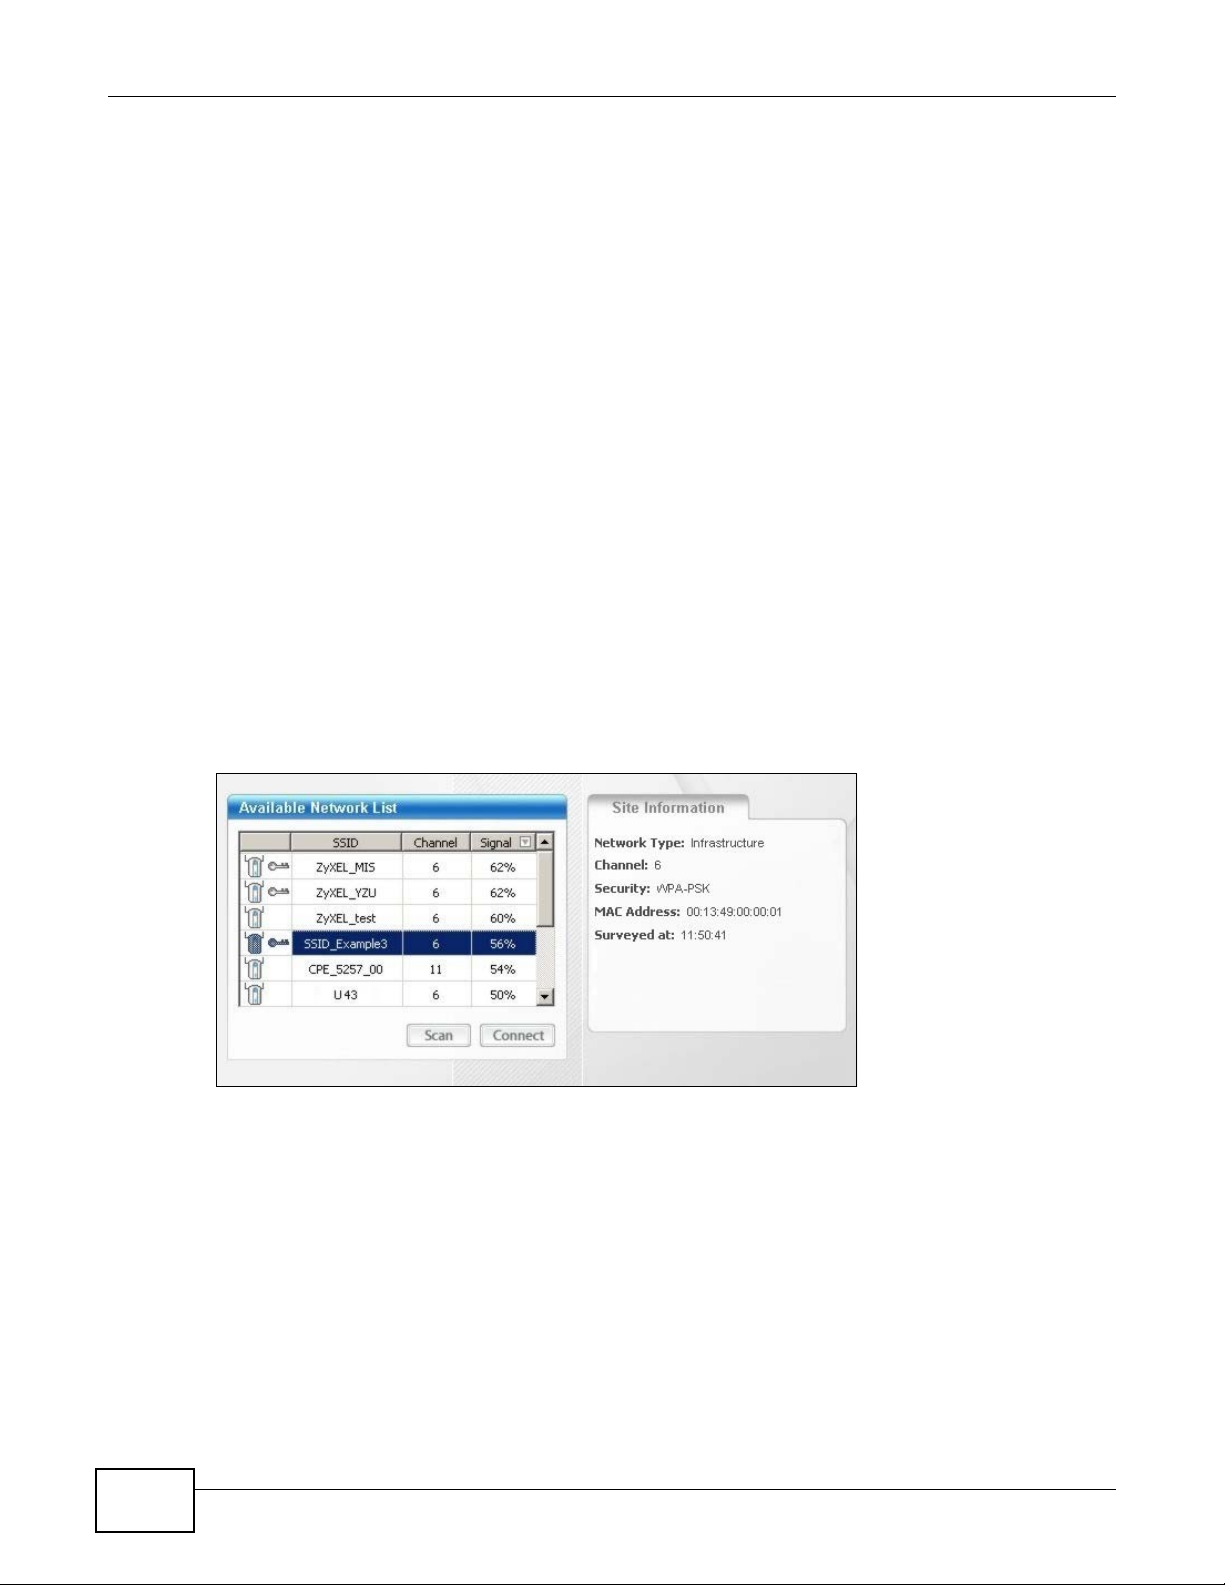
2.3.1 Manually Connecting to a Wireless LAN
This example illustrates how to manually connect your wireless client to an access point (AP)
configured for WPA-PSK security and connected to the Internet. Before you connect to the access
point, you must know its Service Set IDentity (SSID) and WPA-PSK pre-shared key. In this
example, the AP’s SSID is “SSID_Example3” and its pre-shared key is “ThisismyWPA-PSKpresharedkey”.
After you install the ZyXEL utility and then insert the wireless client, follow the steps below to
connect to a network using the Site Survey screen.
1 Open the ZyXEL utility and click the Site Survey tab to open the screen shown next.
Figure 8 ZyXEL Utility: Site Survey
2 The wireless client automatically searches for available wireless networks. Click Scan if you want to
search again. If no entry displays in the Available Network List, that means there is no wireless
network available within range. Make sure the AP or peer computer is turned on, or move the
wireless client closer to the AP or peer computer. See Table 4.4 on page 39 for detailed field
descriptions.
3 To connect to an AP or peer computer, either click an entry in the list and then click Connect or
double-click an entry (SSID_Example3 in this example).
20
NWD2705 User’s Guide
Page 21
Chapter 2 Tutorial
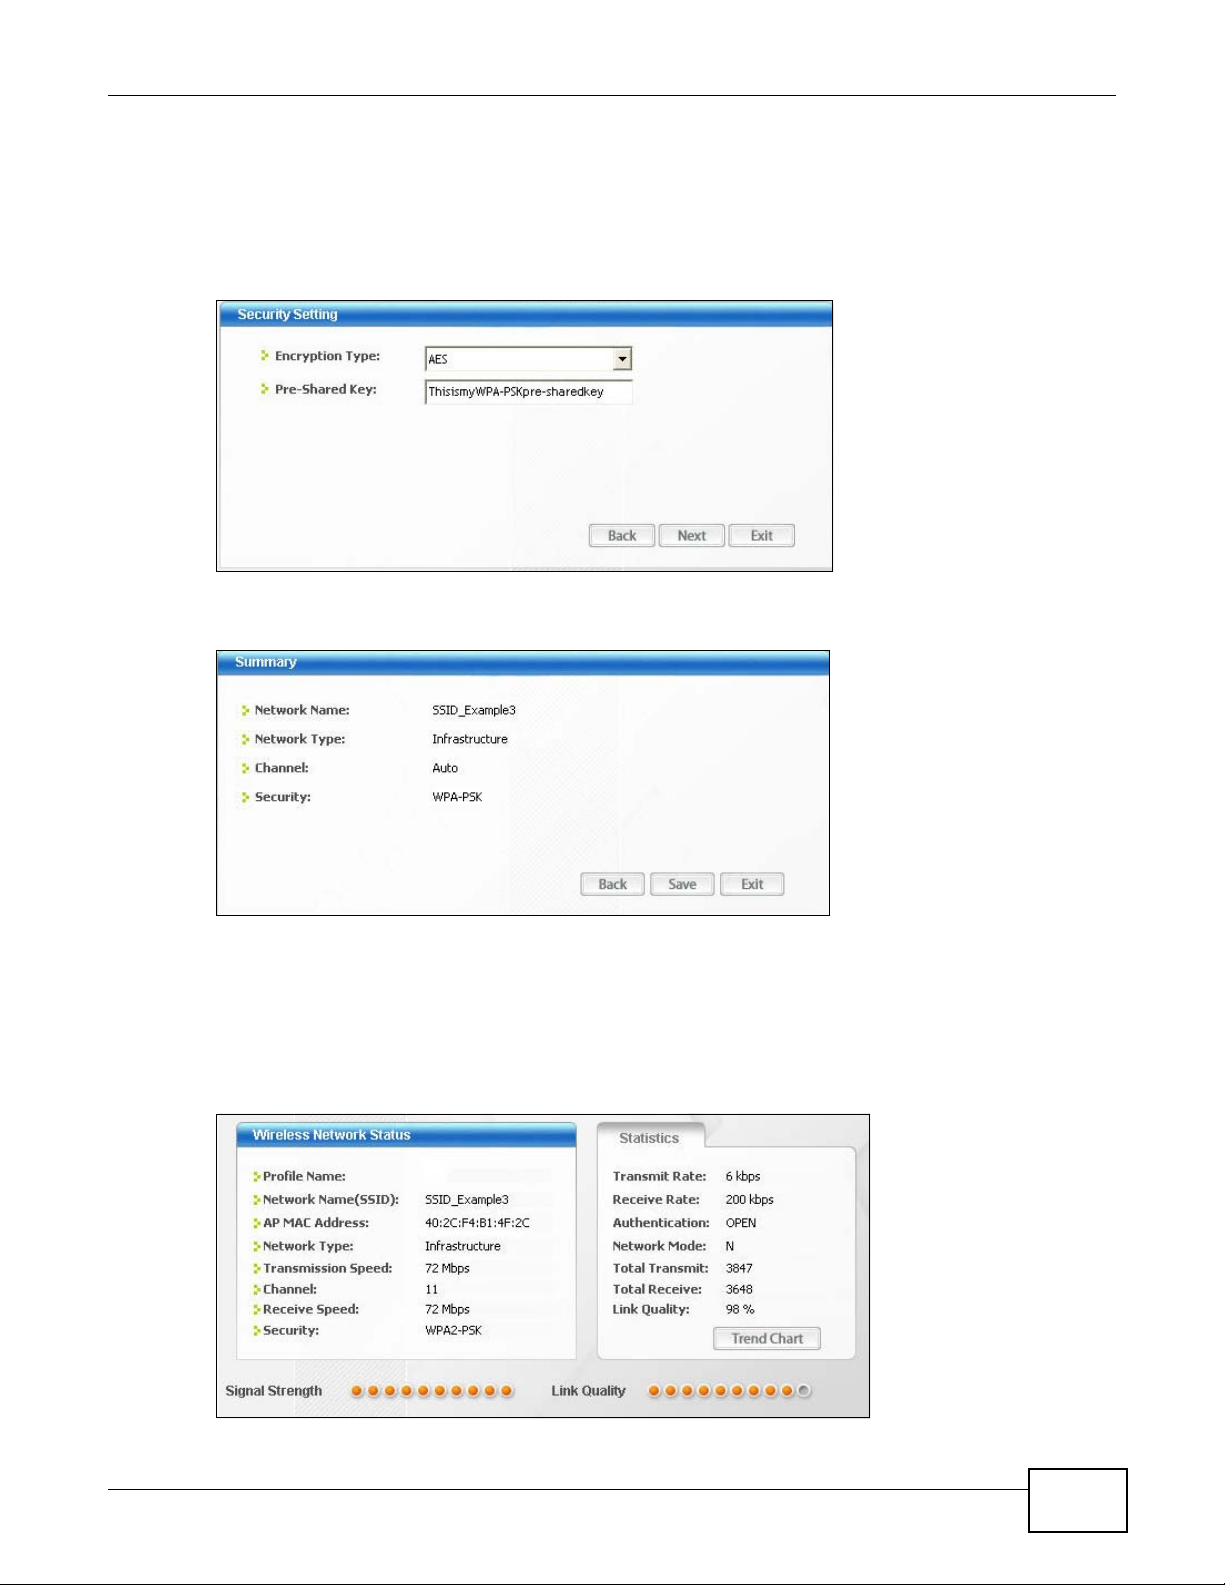
4 When you try to connect to an AP with security configured, a window will pop up prompting you to
specify the security settings. Enter the pre-shared key and leave the encryption type at the default
setting.
Use the Next button to move on to the next screen. You can use the Back button at any time to
return to the previous screen, or the Exit button to return to the Site Survey screen.
Figure 9 ZyXEL Utility: Security Settings
5 The Summary window appears. Check your settings and click Save to continue.
Figure 10 ZyXEL Utility: Summary
6 The ZyXEL utility returns to the Link Info screen while it connects to the wireless network using
your settings. When the wireless link is established, the ZyXEL utility icon in the system tray turns
green and the Link Info screen displays details of the active connection. Check the network
information in the Link Info screen to verify that you have successfully connected to the selected
network. If the wireless client is not connected to a network, the fields in this screen remain blank.
See Table 4.3 on page 37 for detailed field descriptions.
Figure 11 ZyXEL Utility: Link Info
NWD2705 User’s Guide
21
Page 22

Chapter 2 Tutorial
7 Open your Internet browser and enter http://www.zyxel.com or the URL of any other web site in
the address bar. If you are able to access the web site, your wireless connection is successfully
configured. If you cannot access the web site, check the Troubleshooting section of this User's
Guide or contact your network administrator if necessary.
2.3.2 Creating and Using a Profile
A profile lets you automatically connect to the same wireless network every time you use the ZyXEL
utility. You can also configure different profiles for different networks, for example if you connect a
notebook computer to wireless networks at home and at work.
This example illustrates how to set up a profile and connect the wireless client to an access point
configured for WPA-PSK security. In this example, the AP’s SSID is “SSID_Example3” and its preshared key is “ThisismyWPA-PSKpre-sharedkey”. You have chosen the profile name “PN_Example3”.
1 Open the ZyXEL utility and click the Profile tab to open the screen as shown. Click Add to
configure a new profile.
Figure 12 ZyXEL Utility: Profile
2 The Add New Profile screen appears. The wireless client automatically searches for available
wireless networks, which are displayed in the Scan Info box. You can also configure your profile for
a wireless network that is not in the list.
Figure 13 ZyXEL Utility: Add New Profile
3 Give the profile a descriptive name (of up to 32 printable ASCII characters). Select Infrastructure
and either manually enter or select the AP's SSID in the Scan Info table and click Select.
22
NWD2705 User’s Guide
Page 23

Chapter 2 Tutorial
4 Choose the same encryption method as the AP to which you want to connect (In this example,
WPA-PSK).
Figure 14 ZyXEL Utility: Profile Security
5 This screen varies depending on the encryption method you selected in the previous screen. In this
example, enter the pre-shared key and leave the encryption type at the default setting.
Figure 15 ZyXEL Utility: Profile Encryption
6 Verify the profile settings in the ready-only screen. Click Save to save and go to the next screen.
Figure 16 ZyXEL Utility: Profile Summary
7 Click Activate Now to use the new profile immediately. Otherwise, click the Activate Later button
to go back to the Profile List screen.
If you clicked Activate Later you can select the profile from the list in the Profile screen and click
Connect to activate it.
NWD2705 User’s Guide
23
Page 24

Chapter 2 Tutorial
Note: Only one profile can be activated and used at any given time.
Figure 17 ZyXEL Utility: Profile Activate
8 When you activate the new profile, the ZyXEL utility goes to the Link Info screen while it connects
to the AP using your settings. When the wireless link is established, the ZyXEL utility icon in the
system tray turns green and the Link Info screen displays details of the active connection.
9 Make sure the selected AP in the active profile is on and connected to the Internet. Open your
Internet browser, enter http://www.zyxel.com or the URL of any other web site in the address bar
and press ENTER. If you are able to access the web site, your new profile is successfully configured.
10 If you cannot access the Internet, go back to the Profile screen. Select the profile you are using
and click Edit. Check the details you entered previously. Also, refer to the Troubleshooting section
of this User's Guide or contact your network administrator if necessary.
24
NWD2705 User’s Guide
Page 25

3.1 Overview
This section provides background information on wireless Local Area Networks.
3.1.1 What You Can Do in This Section
• Connect securely to an AP using many of the strongest and most common encryption protocols.
See Section 3.3 on page 26 for details.
• Connect securely either to an AP or computer-to-computer using WPS. See Section 3.4 on page
28 for details.
3.1.2 What You Need to Know
CHAPTER 3
Wireless LANs
The following terms and concepts may help as you read through this section.
Server
When two or more devices are connected digitally to form a network, the one that distributes data
to the other devices is known as the “server”. A RADIUS (Remote Authentication Dial-In User
Service) is a kind of server that manages logins and logout, among other things, for the network to
which it is connected.
Client
When two or more devices are connected digitally to form a network, the one that contacts and
obtains data from a server is known as the “client”. Each client is designed to work with one or
more specific kinds of servers, and each server requires a specific kind of client. Wireless adapters
are clients that connect to a network server through an AP.
3.1.3 Before You Begin
• You should have valid login information for an existing network Access Point, otherwise you may
not be able to make a network connection right away.
NWD2705 User’s Guide 25
Page 26

Chapter 3 Wireless LANs
3.2 Wireless LAN Overview
The following figure provides an example of a wireless network with an AP.
Figure 18 Example of a Wireless Network
The wireless network is the part in the blue circle. In this wireless network, devices A and B are
called wireless clients. The wireless clients use the access point (AP) to interact with other devices
(such as the printer) or with the Internet
Every wireless network must follow these basic guidelines.
• Every device in the same wireless network must use the same SSID.
The SSID is the name of the wireless network. It stands for Service Set IDentity.
• If two wireless networks overlap, they should use a different channel.
Like radio stations or television channels, each wireless network uses a specific channel, or
frequency, to send and receive information.
• Every device in the same wireless network must use security compatible with the AP or peer
computer.
Security stops unauthorized devices from using the wireless network. It can also protect the
information that is sent in the wireless network.
3.3 Wireless LAN Security
Wireless LAN security is vital to your network to protect wireless communications.
If you do not enable any wireless security on your NWD2705, the NWD2705’s wireless
communications are accessible to any wireless networking device that is in the coverage area.
26
NWD2705 User’s Guide
Page 27

3.3.1 WEP
3.3.1.1 Data Encryption
WEP (Wired Equivalent Privacy) encryption scrambles all data packets transmitted between the
NWD2705 and the AP or other wireless stations to keep network communications private. Both the
wireless stations and the access points must use the same WEP key for data encryption and
decryption.
There are two ways to create WEP keys in your NWD2705.
• Automatic WEP key generation based on a “password phrase” called a passphrase. The
passphrase is case sensitive. You must use the same passphrase for all WLAN adapters with this
feature in the same WLAN.
For WLAN adapters without the passphrase feature, you can still take advantage of this feature
by writing down the four automatically generated WEP keys from the Security Settings screen
of the ZyXEL utility and entering them manually as the WEP keys in the other WLAN adapter(s).
• Enter the WEP keys manually.
Your NWD2705 allows you to configure up to four 64-bit or 128-bit WEP keys. Only one key is
used as the default key at any one time.
Chapter 3 Wireless LANs
3.3.1.2 Authentication Type
The IEEE 802.11b/g/n standard describes a simple authentication method between the wireless
stations and AP. Three authentication types are defined: Auto, Open and Shared.
• Open mode is implemented for ease-of-use and when security is not an issue. The wireless
station and the AP or peer computer do not share a secret key. Thus the wireless stations can
associate with any AP or peer computer and listen to any transmitted data that is not encrypted.
• Shared mode involves a shared secret key to authenticate the wireless station to the AP or peer
computer. This requires you to enable the wireless LAN security and use same settings on both
the wireless station and the AP or peer computer.
• Auto authentication mode allows the NWD2705 to switch between the open system and shared
key modes automatically. Use the auto mode if you do not know the authentication mode of the
other wireless stations.
3.3.2 WPA-PSK and WPA2-PSK
Wi-Fi Protected Access (WPA) is a subset of the IEEE 802.11i standard. WPA2 (IEEE 802.11i) is a
wireless security standard that defines stronger encryption, authentication and key management
than WPA.
Key differences between WPA(2) and WEP are improved data encryption and user authentication.
Both WPA and WPA2 improve data encryption by using Temporal Key Integrity Protocol (TKIP),
Message Integrity Check (MIC) and IEEE 802.1x. WPA and WPA2 use Advanced Encryption
Standard (AES) in the Counter mode with Cipher block chaining Message authentication code
Protocol (CCMP) to offer stronger encryption than TKIP.
The encryption mechanisms used for WPA(2) and WPA(2)-PSK are the same. The only difference
between the two is that WPA(2)-PSK uses a simple common password, instead of user-specific
credentials. The common-password approach makes WPA(2)-PSK susceptible to brute-force
password-guessing attacks but it’s still an improvement over WEP as it employs a consistent,
NWD2705 User’s Guide
27
Page 28

Chapter 3 Wireless LANs
single, alphanumeric password to derive a PMK which is used to generate unique temporal
encryption keys. This prevent all wireless devices sharing the same encryption keys. (a weakness of
WEP)
If both an AP and the wireless clients support WPA2-PSK, use WPA2-PSK for stronger data
encryption. If the AP or the wireless clients do not support WPA2-PSK, just use WPA-PSK. Select
WEP only when the AP and/or wireless clients do not support WPA-PSK or WPA2-PSK. WEP is less
secure than WPA-PSK or WPA2-PSK.
3.4 Wi-Fi Protected Setup
Your NWD2705 supports WiFi Protected Setup (WPS), which is an easy way to set up a secure
wireless network. WPS is an industry standard specification, defined by the Wi-Fi Alliance.
WPS allows you to quickly set up a wireless network with strong security, without having to
configure security settings manually. Each WPS connection works between two devices. Both
devices must support WPS (check each device’s documentation to make sure).
Depending on the devices you have, you can either press a button (on the device itself, or in its
configuration utility) or enter a PIN (a unique Personal Identification Number that allows one device
to authenticate the other) in each of the two devices. When WPS is activated on a device, it has two
minutes to find another device that also has WPS activated. Then, the two devices connect and set
up a secure network by themselves.
3.4.1 Push Button Configuration
WPS Push Button Configuration (PBC) is initiated by pressing a button on each WPS-enabled
device, and allowing them to connect automatically. You do not need to enter any information.
Not every WPS-enabled device has a physical WPS button. Some may have a WPS PBC button in
their configuration utilities instead of or in addition to the physical button.
Take the following steps to set up WPS using the button.
1 Ensure that the two devices you want to set up are within wireless range of one another.
2 Look for a WPS button on each device. If the device does not have one, log into its configuration
utility and locate the button (see the device’s User’s Guide for how to do this - for the NWD2705,
see Section 4.6.1 on page 49).
3 Press the button on one of the devices (it doesn’t matter which).
4 Within two minutes, press the button on the other device. The registrar sends the network name
(SSID) and security key through an secure connection to the enrollee.
If you need to make sure that WPS worked, check the list of associated wireless clients in the AP’s
configuration utility. If you see the wireless client in the list, WPS was successful.
28
NWD2705 User’s Guide
Page 29

3.4.2 PIN Configuration
Each WPS-enabled device has its own PIN (Personal Identification Number). This may either be
static (it cannot be changed) or dynamic (in some devices you can generate a new PIN by clicking
on a button in the configuration interface).
Use the PIN method instead of the push-button configuration (PBC) method if you want to ensure
that the connection is established between the devices you specify, not just the first two devices to
activate WPS in range of each other. However, you need to log into the configuration interfaces of
both devices to use the PIN method.
When you use the PIN method, you must enter the PIN from one device (usually the wireless client)
into the second device (usually the Access Point or wireless router). Then, when WPS is activated
on the first device, it presents its PIN to the second device. If the PIN matches, one device sends
the network and security information to the other, allowing it to join the network.
Take the following steps to set up a WPS connection between an access point or wireless router
(referred to here as the AP) and a client device using the PIN method.
1 Ensure WPS is enabled on both devices.
Chapter 3 Wireless LANs
2 Access the WPS section of the AP’s configuration interface. See the device’s User’s Guide for how to
do this.
3 Look for the client’s WPS PIN; it will be displayed either on the device, or in the WPS section of the
client’s configuration interface (see the device’s User’s Guide for how to find the WPS PIN - for the
NWD2705, see Section 4.6 on page 48).
4 Enter the client’s PIN in the AP’s configuration interface.
Note: If the client device’s configuration interface has an area for entering another
device’s PIN, you can either enter the client’s PIN in the AP, or enter the AP’s PIN in
the client - it does not matter which.
5 Start WPS on both devices within two minutes.
Note: Use the configuration utility to activate WPS, not the push-button on the device
itself.
6 On a computer connected to the wireless client, try to connect to the Internet. If you can connect,
WPS was successful.
If you cannot connect, check the list of associated wireless clients in the AP’s configuration utility. If
you see the wireless client in the list, WPS was successful.
NWD2705 User’s Guide
29
Page 30

Chapter 3 Wireless LANs
ENROLLEE
SECURE EAP TUNNEL
SSID
WPA(2)-PSK
WITHIN 2 MINUTES
COMMUNICATION
This device’s
WPS
Enter WPS PIN
WPS
from other device:
WPS PIN: 123456
WPS
START
WPS
START
REGISTRAR
The following figure shows a WPS-enabled wireless client (installed in a notebook computer)
connecting to the WPS-enabled AP via the PIN method.
Figure 19 Example WPS Process: PIN Method
3.4.3 How WPS Works
When two WPS-enabled devices connect, each device must assume a specific role. One device acts
as the registrar (the device that supplies network and security settings) and the other device acts
as the enrollee (the device that receives network and security settings. The registrar creates a
secure EAP (Extensible Authentication Protocol) tunnel and sends the network name (SSID) and the
WPA-PSK or WPA2-PSK pre-shared key to the enrollee. Whether WPA-PSK or WPA2-PSK is used
depends on the standards supported by the devices. If the registrar is already part of a network, it
sends the existing information. If not, it generates the SSID and WPA(2)-PSK randomly.
30
NWD2705 User’s Guide
Page 31

Chapter 3 Wireless LANs
SECURE TUNNEL
SECURITY INFO
WITHIN 2 MINUTES
COMMUNICATION
ACTIVATE
WPS
ACTIVATE
WPS
WPS HANDSHAKE
REGISTRARENROLLEE
The following figure shows a WPS-enabled client (installed in a notebook computer) connecting to a
WPS-enabled access point.
Figure 20 How WPS works
3.4.3.1 Example WPS Network Setup
The roles of registrar and enrollee last only as long as the WPS setup process is active (two
minutes). The next time you use WPS, a different device can be the registrar if necessary.
The WPS connection process is like a handshake; only two devices participate in each WPS
transaction. If you want to add more devices you should repeat the process with one of the existing
networked devices and the new device.
Note that the access point (AP) is not always the registrar, and the wireless client is not always the
enrollee. All WPS-certified APs can be a registrar, and so can some WPS-enabled wireless clients.
By default, a WPS devices is “unconfigured”. This means that it is not part of an existing network
and can act as either enrollee or registrar (if it supports both functions). If the registrar is
unconfigured, the security settings it transmits to the enrollee are randomly-generated. Once a
WPS-enabled device has connected to another device using WPS, it becomes “configured”. A
configured wireless client can still act as enrollee or registrar in subsequent WPS connections, but a
configured access point can no longer act as enrollee. It will be the registrar in all subsequent WPS
connections in which it is involved. If you want a configured AP to act as an enrollee, you must reset
it to its factory defaults.
This section shows how security settings are distributed in an example WPS setup.
The following figure shows an example network. In step 1, both AP1 and Client 1 are
unconfigured. When WPS is activated on both, they perform the handshake. In this example, AP1
NWD2705 User’s Guide
31
Page 32

Chapter 3 Wireless LANs
REGISTRARENROLLEE
SECURITY INFO
CLIENT 1
AP1
REGISTRAR
CLIENT 1
AP1
ENROLLEE
CLIENT 2
EXISTING CONNECTION
S
E
C
U
R
I
T
Y
I
N
F
O
is the registrar, and Client 1 is the enrollee. The registrar randomly generates the security
information to set up the network, since it is unconfigured and has no existing information.
Figure 21 WPS: Example Network Step 1
In step 2, you add another wireless client to the network. You know that Client 1 supports registrar
mode, but it is better to use AP1 for the WPS handshake with the new client since you must
connect to the access point anyway in order to use the network. In this case, AP1 must be the
registrar, since it is configured (it already has security information for the network). AP1 supplies
the existing security information to Client 2.
Figure 22 WPS: Example Network Step 2
32
NWD2705 User’s Guide
Page 33

Chapter 3 Wireless LANs
CLIENT 1
AP1
REGISTRAR
CLIENT 2
EXISTING CONNECTION
S
E
C
U
R
I
T
Y
I
N
F
O
ENROLLEE
AP1
E
X
I
S
T
I
N
G
C
O
N
N
E
C
T
I
O
N
In step 3, you add another access point (AP2) to your network. AP2 is out of range of AP1, so you
cannot use AP1 for the WPS handshake with the new access point. However, you know that Client
2 supports the registrar function, so you use it to perform the WPS handshake instead.
Figure 23 WPS: Example Network Step 3
3.4.4 Limitations of WPS
WPS has some limitations of which you should be aware.
• When you use WPS, it works between two devices only. You cannot enroll multiple devices
simultaneously, you must enroll one after the other.
For instance, if you have two enrollees and one registrar you must set up the first enrollee (by
pressing the WPS button on the registrar and the first enrollee, for example), then check that it
successfully enrolled, then set up the second device in the same way.
• WPS works only with other WPS-enabled devices. However, you can still add non-WPS devices to
a network you already set up using WPS.
WPS works by automatically issuing a randomly-generated WPA-PSK or WPA2-PSK pre-shared
key from the registrar device to the enrollee devices (see Section 4.4.1.3 on page 42 for
information on pre-shared keys). Whether the network uses WPA-PSK or WPA2-PSK depends on
the device. You can check the configuration interface of the registrar device to discover the key
the network is using (if the device supports this feature). Then, you can enter the key into the
non-WPS device and join the network as normal (the non-WPS device must also support WPAPSK or WPA2-PSK).
NWD2705 User’s Guide
33
Page 34

Chapter 3 Wireless LANs
• When you use the PBC method, there is a short period (from the moment you press the button
on one device to the moment you press the button on the other device) when any WPS-enabled
device could join the network. This is because the registrar has no way of identifying the
“correct” enrollee, and cannot differentiate between your enrollee and a rogue device. This is a
possible way for a hacker to gain access to a network.
You can easily check to see if this has happened. WPS works between only two devices
simultaneously, so if another device has enrolled your device will be unable to enroll, and will not
have access to the network. If this happens, open the access point’s configuration interface and
look at the list of associated clients (usually displayed by MAC address). It does not matter if the
access point is the WPS registrar, the enrollee, or was not involved in the WPS handshake; a
rogue device must still associate with the access point to gain access to the network. Check the
MAC addresses of your wireless clients (usually printed on a label on the bottom of the device). If
there is an unknown MAC address you can remove it or reset the AP.
34
NWD2705 User’s Guide
Page 35

ZyXEL Utility: Station Mode
4.1 Overview
This section shows you how to configure your NWD2705 using the ZyXEL utility in Windows.
4.1.1 What You Can Do in This Section
•On the Link Info screen, you can see your current connection details, monitor signal strength
and quality, and more. See Section 4.3 on page 37 for details.
•On the Site Survey screen, you can connect to any available unsecured wireless network in
range of the NWD2705, or open the security settings screen for any secured wireless network in
range. See Section 4.4 on page 39 for details.
•On the Profile screen, you can create, delete and manage your wireless network profiles. See
Section 4.5 on page 43 for details.
•On the Adapter screen, you can select the frequency bands that the NWD2705 uses and enable
WPS to set up a wireless network automatically. See Section 4.6 on page 48 for details.
CHAPTER 4
4.1.2 What You Need to Know
The following terms and concepts may help as you read through this section.
Wired Equivalent Privacy (WEP)
WEP (Wired Equivalent Privacy) encrypts data transmitted between wired and wireless networks to
keep the transmission private. Although one of the original wireless encryption protocols, WEP is
also the weakest. Many people use it strictly to deter unintentional usage of their wireless network
by outsiders.
Wi-Fi Protected Access (WPA)
Wi-Fi Protected Access (WPA) is a subset of the IEEE 802.11i standard. It improves data encryption
by using Temporal Key Integrity Protocol (TKIP), Message Integrity Check (MIC) and IEEE 802.1x.
WPA uses Advanced Encryption Standard (AES) in the Counter mode with Cipher block chaining
Message authentication code Protocol (CCMP) to offer stronger encryption than TKIP. WPA applies
IEEE 802.1x and Extensible Authentication Protocol (EAP) to authenticate wireless clients using an
external RADIUS database. The WPA protocol affords users with vastly stronger security than the
WEP protocol. It comes in two different varieties: WPA and WPA2. Always try to use WPA2 as it
implements the full version of the security standard while WPA does not.
NWD2705 User’s Guide 35
Page 36

Chapter 4 ZyXEL Utility: Station Mode
Pre-Shared Key (PSK)
A pre-shared key is a password shared between the server and the client that unlocks the algorithm
used to encrypt the data traffic between them. Without the proper password, the client and the
server cannot communicate.
Extensible Authentication Protocol (EAP)
An enhanced security framework designed to improve an existing security protocol, such as WPAPSK or WPA2-PSK.
4.1.3 Before You Begin
• Make sure the ZyXEL utility is already installed. See the Quick Start Guide for more.
4.2 ZyXEL Utility Screen Summary
This section describes the ZyXEL utility screens.
Figure 24 ZyXEL Utility Menu Summary
The following table describes the menus.
Table 4 ZyXEL Utility Menu Summary
TAB DESCRIPTION
Link Info Use this screen to see your current connection status, configuration and data rate
Site Survey Use this screen to:
Profile Use this screen to add, delete, edit or activate a profile with a set of wireless and security
Adapter Use this screen to select the frequency bands in which the NWD2705 operates and use
statistics.
• scan for a wireless network.
• configure wireless security (if activated on the selected network).
• connect to a wireless network.
settings.
Wi-Fi Protected Setup (WPS).
36
NWD2705 User’s Guide
Page 37

4.3 The Link Info Screen
When the ZyXEL utility starts, the Link Info screen displays, showing the current configuration and
connection status of your NWD2705.
Figure 25 Link Info
Chapter 4 ZyXEL Utility: Station Mode
The following table describes the labels in this screen.
Table 5 Link Info
LABEL DESCRIPTION
Wireless Network
Status
Profile Name This is the name of the profile you are currently using.
Network
Name (SSID)
AP MAC
Address
Network Type This field displays the network type (Infrastructure) of the wireless network.
Tra nsmis sion
Speed
Channel This field displays the radio channel the NWD2705 is currently using.
Receive Speed This field displays the current receiving speed of the NWD2705 in megabits per second
Security This field displays whether data encryption is activated (WEP / WPA-PSK / WPA2-PSK)
Statistics
Transmit Rate This field displays the current data transmission rate in kilobits per second (Kbps).
Receive Rate This field displays the current data receiving rate in kilobits per second (Kbps).
Authentication This field displays the authentication method of the NWD2705.
Network Mode This field displays the wireless standard used by the selected wireless device. It shows B
Total Transmit This field displays the total number of data frames transmitted.
Total Receive This field displays the total number of data frames received.
The SSID identifies the wireless network to which a wireless station is associated. This
field displays the name of the wireless device to which the NWD2705 is associated.
This field displays the MAC address of the AP or peer computer to which the NWD2705 is
associated.
This field displays the current transmission link speed of the NWD2705 in megabits per
second (Mbps).
(Mbps).
or inactive (DISABLE).
for 802.11b, G for 802.11g, N for 802.11n over 2.4GHz or A for 802.11n over 5GHz.
NWD2705 User’s Guide
37
Page 38

Chapter 4 ZyXEL Utility: Station Mode
Table 5 Link Info (continued)
LABEL DESCRIPTION
Link Quality This field displays the signal strength of the NWD2705.
Trend Chart Click this button to display the real-time statistics of the data rate in kilobits per second
(Kbps).
Signal Strength The status bar shows the strength of the signal. The signal strength mainly depends on
the antenna output power and the distance between your NWD2705 and the AP or peer
computer.
Link Quality The status bar shows the quality of wireless connection. This refers to the percentage of
packets transmitted successfully. If there are too many wireless stations in a wireless
network, collisions may occur which could result in a loss of messages even though you
have high signal strength.
4.3.1 Trend Chart
Click Trend Chart in the Link Info screen to display a screen as shown below. Use this screen to
view real-time data traffic statistics.
Figure 26 Link Info: Trend Chart
38
The following table describes the labels in this screen.
Table 6 Link Info: Trend Chart
LABEL DESCRIPTION
Transmit This field displays the current data transmission rate in kilobits per second (Kbps).
Receive This field displays the current data reception rate in kilobits per second (Kbps).
NWD2705 User’s Guide
Page 39

4.4 The Site Survey Screen
Use the Site Survey screen to scan for and connect to a wireless network automatically.
Figure 27 Site Survey
Chapter 4 ZyXEL Utility: Station Mode
The following table describes the labels in this screen.
Table 7 Site Survey
LABEL DESCRIPTION
Available Network
List
or
,
SSID This field displays the SSID (Service Set IDentifier) of each wireless device.
Signal This field displays the signal strength of each wireless device.
Channel This field displays the channel number used by each wireless device.
Scan Click Scan to search for available wireless devices within transmission range.
Connect Click Connect to associate to the selected wireless device.
Site Information Click an entry in the Available Network List table to display the information of the
Network Type This field displays the network type (Infrastructure) of the wireless device.
Channel This field displays the channel number used by each wireless device.
Security This field shows whether data encryption is activated (WEP, WPA-PSK, or WPA2-PSK)
MAC address This field displays the MAC address of the wireless device.
Surveyed at This field displays the time when the wireless device was scanned.
Click a column heading to sort the entries.
denotes that the wireless device is in infrastructure mode and the wireless
security is activated.
denotes that the wireless device is in infrastructure mode but the wireless security
is deactivated.
selected wireless device.
or inactive (DISABLE).
NWD2705 User’s Guide
39
Page 40

Chapter 4 ZyXEL Utility: Station Mode
4.4.1 Security Settings
When you configure the NWD2705 to connect to a network with wireless security activated and the
security settings are disabled on the NWD2705, the screen varies according to the encryption
method used by the selected network.
4.4.1.1 Security Type Selection
When you choose to connect to a network that has security, you are presented with a security
selection screen. Choose the security of the network you are attempting to join.
Figure 28 Security Setting Selection
The following table describes the labels in this screen.
Table 8 Security Setting: WEP
LABEL DESCRIPTION
Security Type Select the security type that matches the security setting of the network you’re trying to
join.
The options are: DISABLE, WEP, WPA-PSK, and WPA2-PSK.
Back Click Back to go to the Site Survey screen to select and connect to another network.
Next Click Next to confirm your selections and advance to the Security Settings screen that
corresponds to the one you select here.
Exit Click Exit to return to the Site Survey screen without saving.
40
NWD2705 User’s Guide
Page 41

4.4.1.2 WEP Encryption
Configure WEP security in this screen.
Figure 29 Security Setting: WEP
The following table describes the labels in this screen.
Table 9 Security Setting: WEP
LABEL DESCRIPTION
Security Settings
WEP Select 64 bits or 128 bits to activate WEP encryption and then fill in the related fields.
Authentication
Type
Pass Phrase Enter a passphrase of up to 32 case-sensitive printable characters. As you enter the
Transmit Key Select a default WEP key to use for data encryption. The key displays in the adjacent field.
Key x (where x is
a number
between 1 and 4)
Chapter 4 ZyXEL Utility: Station Mode
Select an authentication method. Choices are OPEN and SHARED.
Refer to Section 3.3.1.2 on page 27 for more information.
passphrase, the NWD2705 automatically generates four different WEP keys and displays
the first in the key field below.
Select this option if you want to manually enter the WEP keys. Enter the WEP key in the
field provided.
If you select 64 bits in the WEP field.
Back Click Back to go to the Site Survey screen to select and connect to another network.
Next Click Next to confirm your selections and advance to the Summary screen. Refer to
Exit Click Exit to return to the Site Survey screen without saving.
NWD2705 User’s Guide
Enter either 10 hexadecimal digits in the range of “A-F”, “a-f” and “0-9” (for example,
11AA22BB33) for HEX key type.
or
Enter 5 ASCII characters (case sensitive) ranging from “a-z”, “A-Z” and “0-9” (for
example, MyKey) for ASCII key type.
If you select 128 bits in the WEP field,
Enter either 26 hexadecimal digits in the range of “A-F”, “a-f” and “0-9” (for example,
00112233445566778899AABBCC) for HEX key type
or
Enter 13 ASCII characters (case sensitive) ranging from “a-z”, “A-Z” and “0-9” (for
example, MyKey12345678) for ASCII key type.
Note: The values for the WEP keys must be set up exactly the same on all wireless devices
in the same wireless LAN. ASCII WEP keys are case sensitive.
Section 4.4.2 on page 43.
41
Page 42

Chapter 4 ZyXEL Utility: Station Mode
4.4.1.3 WPA-PSK/WPA2-PSK
Configure WPA-PSK/WPA2-PSK security in this screen.
Figure 30 Security Setting: WPA-PSK/WPA2-PSK
The following table describes the labels in this screen.
Table 10 Security Setting: WPA-PSK/WPA2-PSK
LABEL DESCRIPTION
Encryption Type The encryption mechanisms used for WPA/WPA2 and WPA-PSK/WPA2-PSK are the same.
The only difference between the two is that WPA-PSK/WPA2-PSK uses a simple common
password, instead of user-specific credentials.
Select the encryption type (TKIP or AES) for data encryption.
Refer to Section 3.3.2 on page 27 for more information.
Pre-Shared Key Type a pre-shared key (same as the AP or peer device) of between 8 and 63 case-
Back Click Back to go to the Site Survey screen to select and connect to another network.
Next Click Next to confirm your selections and advance to the Summary screen. Refer to
Exit Click Exit to return to the Site Survey screen without saving.
sensitive ASCII characters (including spaces and symbols) or 64 hexadecimal characters.
Section 4.4.2 on page 43.
42
NWD2705 User’s Guide
Page 43

4.4.2 Summary Screen
Use this screen to confirm and save the security settings.
Figure 31 Summary Screen
Chapter 4 ZyXEL Utility: Station Mode
The following table describes the labels in this screen.
Table 11 Summary Screen
LABEL DESCRIPTION
Network Name
(SSID)
Network Type This field displays the network type (Infrastructure) of the wireless device.
Channel This field displays the channel number used by the profile.
Security This field shows whether data encryption is activated (WEP, WPA-PSK, or WPA2-PSK) or
Back Click Back to return to the previous screen.
Save Click Save to save the changes back to the NWD2705 and display the Link Info screen.
Exit Click Exit to discard changes and return to the Site Survey screen.
This field displays the SSID previously entered.
inactive (DISABLE).
4.5 The Profile Screen
A profile is a set of wireless parameters that you need to connect to a wireless network. With a
profile activated, each time you start the NWD2705, it automatically scans for the specific SSID and
joins that network with the pre-defined wireless security settings. If the specified network is not
available, the NWD2705 cannot connect to a network.
If you do not configure and activate a profile, each time you start the NWD2705, the NWD2705
uses the default profile to connect to any available network that has no security enabled.
The default profile is a profile that allows you to connect to any SSID that has no security enabled.
Click the Profile tab in the ZyXEL utility program to display the Profile screen as shown next.
NWD2705 User’s Guide
43
Page 44

Chapter 4 ZyXEL Utility: Station Mode
The profile function allows you to save the wireless network settings in this screen, or use one of
the pre-configured network profiles.
Figure 32 Profile
The following table describes the labels in this screen.
Table 12 Profile
LABEL DESCRIPTION
Profile List Click a column heading to sort the entries.
denotes that the wireless device is in infrastructure mode and the wireless
, or
Profile Name This is the name of the pre-configured profile.
SSID This is the SSID of the wireless network to which the selected profile associate.
Connect To use and activate a previously saved network profile, select a pre-configured profile
name in the table and click Connect.
Add To add a new profile into the table, click Add.
Delete To delete an existing wireless network configuration, select a profile in the table and click
Delete.
Edit To edit an existing wireless network configuration, select a profile in the table and click
Edit.
Profile Info The following fields display detailed information of the selected profile in the Profile List
table.
Network Type This field displays the network type (Infrastructure) of the profile.
SSID This field displays the network’s Service Set IDentity (the name of the network).
Channel This field displays the channel number used by the profile.
Security This field shows whether data encryption is activated (WEP, WPA-PSK, or WPA2-PSK)
or inactive (DISABLE).
Transmit Rate This field displays the transmission speed of the selected profile in megabits per second
(Mbps).
security is activated.
denotes that the wireless device is in infrastructure mode but the wireless security
is deactivated.
44
NWD2705 User’s Guide
Page 45

4.5.1 Adding a New Profile
Follow the steps below to add a new profile.
1 Click Add in the Profile screen. An Add New Profile screen displays as shown next.
Figure 33 Profile: Add a New Profile
Chapter 4 ZyXEL Utility: Station Mode
The following table describes the labels in this screen.
Table 13 Profile: Add a New Profile
LABEL DESCRIPTION
Add New Profile
Profile Name Enter a descriptive name in this field.
SSID Select an available wireless device in the Scan Info table and click Select, or enter the
SSID of the wireless device to which you want to associate in this field manually.
Otherwise, enter Any to have the NWD2705 associate to any AP or roam between any
infrastructure wireless networks.
Network Type Select Infrastructure to associate to an AP.
Next Click Next to go to the next screen.
Exit Click Exit to go back to the previous screen without saving.
Scan Info This table displays the information of the available wireless networks within the
transmission range.
denotes that the wireless device is in infrastructure mode and the wireless
or
SSID This field displays the SSID (Service Set IDentifier) of each AP or peer device.
Scan Click Scan to search for available wireless devices within transmission range.
Select Select an available wireless device in the table and click Select to add it to this profile.
Whenever you activate this profile, the NWD2705 associates to the selected wireless
network only.
security is activated.
denotes that the wireless device is in infrastructure mode but the wireless security
is deactivated.
NWD2705 User’s Guide
45
Page 46

Chapter 4 ZyXEL Utility: Station Mode
2 Select WEP, WPA-PSK or WPA2-PSK from the drop-down list box to enable data encryption.
Otherwise, select DISABLE to allow the NWD2705 to communicate with the access points or other
peer wireless computers without any data encryption, and skip to step 5.
Figure 34 Profile: Wireless Settings
3 The screen varies depending on the encryption method you select in the previous screen. The
settings must be exactly the same on the AP or other peer wireless computers as they are on the
NWD2705. Refer to Section 4.4.1 on page 40 for detailed information on wireless security
configuration.
Figure 35 Profile: Security Settings
46
NWD2705 User’s Guide
Page 47

Chapter 4 ZyXEL Utility: Station Mode
4 This read-only screen shows a summary of the new profile settings. Verify that the settings are
correct. Click Save to save and go to the next screen. Click Back to return to the previous screen.
Otherwise, click Exit to go back to the Profile screen without saving.
Figure 36 Profile: Confirm New Settings
5 To use this network profile, click the Activate Now button. Otherwise, click the Activate Later
button. You can activate only one profile at a time.
Note: Once you activate a profile, the ZyXEL utility will use that profile the next time it is
started.
Figure 37 Profile: Activate the Profile
NWD2705 User’s Guide
47
Page 48

Chapter 4 ZyXEL Utility: Station Mode
4.6 The Adapter Screen
To set the other advanced features on the NWD2705, click the Adapter tab.
Figure 38 Adapter
The following table describes the labels in this screen.
Table 14 Adapter
LABEL DESCRIPTION
Adapter Setting
Wireless Mode Select 2.4+5G to have the NWD2705 utilize either the 2.4 GHz band or the 5 GHz band.
Select 2.4G to have the NWD2705 operate in the 2.4 GHz band and connect to a 2.4 GHz
wireless network (802.11b, 802.11g or 802.11n) only.
Select 5G to have the NWD2705 operate in the 5 GHz band and connect to a 5 GHz
wireless network (802.11a or 802.11n) only.
WPS (WiFi
Protected Setup)
PBC (Push
Button
Configuration)
PIN - Use This
Device’s PIN
PIN - Use the
PIN from the
AP or Wireless
Router
Save Click Save to save the changes to the NWD2705 and return to the Link Info screen.
Select this to enable Wi-fi Protected Setup on the NWD2705.
Select this to use the PBC (Push-Button Configuration) WPS mode. When you use the PBC
mode you do not use a PIN.
When you select this, the PBC (Push Button Configuration) screen appears (see
Section 4.6.1 on page 49).
Select this to use the PIN (Personal Identification Number) WPS mode. Use this option
when you want to enter the NWD2705’s PIN in another WPS-enabled device.
When you select this, the PIN - Use this Device’s PIN screen appears (see Section
4.6.2 on page 49).
Select this to use the PIN (Personal Identification Number) WPS mode. Use this option
when you want to enter the PIN from another WPS-enabled device in the NWD2705.
When you select this, the PIN - Use the PIN from the AP or Wireless Router screen
appears (see Section 4.6.3 on page 50).
48
NWD2705 User’s Guide
Page 49

4.6.1 WPS: PBC (Push Button Configuration)
This screen allows you to use the WPS Push Button Configuration mode. See Section 3.4.1 on page
28 for more information. Select WPS and PBC (Push Button Configuration) in the Adapter
screen. The following screen displays.
Figure 39 WPS: PBC (Push Button Configuration)
Press Start when you want to begin the WPS process. You must also press the button on the other
device within two minutes.
Chapter 4 ZyXEL Utility: Station Mode
4.6.2 WPS: PIN - Use this Device’s PIN
This screen allows you to use the WPS Personal Identification Number mode, by entering the
NWD2705’s unique PIN in the configuration utility of the other WPS-enabled device. See Section
3.4.2 on page 29 for more information. Select WPS and PIN - Use this Device’s PIN in the
Adapter screen. The following screen displays.
Figure 40 WPS: PIN - Use this Device’s PIN
NWD2705 User’s Guide
49
Page 50

Chapter 4 ZyXEL Utility: Station Mode
The following table describes the labels in this screen.
Table 15 WPS: PIN - Use this Device’s PIN
LABEL DESCRIPTION
This device’s PIN This is the NWD2705’s Personal Identification Number (PIN). This field is read-only.
Start Click this to start WPS. You must start WPS on the other WPS-enabled device within
Enter the number that displays in this field into the configuration interface of the
other WPS-enabled device.
Note: Each time this screen displays, the PIN is different. The PIN is valid for only one
WPS transaction.
two minutes.
4.6.3 WPS: PIN - Use the PIN from the AP or Wireless Router
This screen allows you to use the WPS Personal Identification Number mode, by entering the PIN
from another WPS-enabled device into the NWD2705’s utility. See Section 3.4.2 on page 29 for
more information. Select WPS and PIN - Use the PIN from the AP or Wireless Router in the
Adapter screen. The following screen displays.
Figure 41 WPS: PIN - Use the PIN from the AP or Wireless Router
50
The following table describes the labels in this screen.
Table 16 WPS: PIN - Use the PIN from the AP or Wireless Router
LABEL DESCRIPTION
AP or Router’s PIN Enter the PIN from your AP or wireless router in this field before you click Start.
Start Click this to start WPS. You must start WPS on the other WPS-enabled device within
two minutes.
NWD2705 User’s Guide
Page 51

5.1 Overview
This section describes how to uninstall or upgrade the ZyXEL utility.
5.1.1 What You Can Do in This Section
• Learn which version of the ZyXEL utility and device driver you’re currently using. See Section 5.2
on page 52 for details.
• Remove the ZyXEL utility from your computer. See Section 5.3 on page 52 for details.
• Upgrade the ZyXEL utility. See Section 5.4 on page 53 for details.
5.1.2 What You Need to Know
CHAPTER 5
Maintenance
The following term may help as you read through this section.
Device driver
A system file that lets other programs interact with a piece of hardware, or “device.” You should
never try to locate and install or uninstall device drivers yourself since they are modifications to an
operating system at the core (or “kernel”) level. Doing so could irreparably damage your
installation.
5.1.3 Before You Begin
• Disconnect the NWD2705 if you are going to uninstall or upgrade the ZyXEL utility, save your
work in any other open programs, and then close them.
NWD2705 User’s Guide 51
Page 52

Chapter 5 Maintenance
5.2 The About Screen
The About screen displays driver and utility version numbers of the NWD2705. To display the
screen as shown below, click the About ( ) button.
Figure 42 About
The following table describes the read-only fields in this screen.
Table 17 About
LABEL DESCRIPTION
Driver Version This field displays the version number of the NWD2705 driver.
Utility Version This field displays the version number of the ZyXEL utility.
5.3 Uninstalling the ZyXEL Utility
Follow the steps below to remove (or uninstall) the ZyXEL utility from your computer.
Note: Before you uninstall the ZyXEL utility, take note of your current wireless
configurations.
1 Click Start > (All) Programs > ZyXEL Dual-Band Wireless N450 USB Adapter > ZyXEL
Dual-Band Wireless N450 USB Adapter.
2 When prompted, click OK or Yes to remove the driver and the utility software.
Figure 43 Uninstall: Confirm
52
NWD2705 User’s Guide
Page 53

3 Click OK to complete uninstalling the software.
Figure 44 Uninstall: Complete
5.4 Upgrading the ZyXEL Utility
Note: Before you uninstall the ZyXEL utility, take note of your current wireless
configurations.
To perform the upgrade, follow the steps below.
1 Download the latest version of the utility from the ZyXEL web site and save the file on your
computer.
Chapter 5 Maintenance
2 Follow the steps in Section 5.3 on page 52 to remove the current ZyXEL utility from your computer.
3 Restart your computer when prompted.
4 Disconnect the NWD2705 from your computer.
5 Double-click on the setup program for the new utility to start the ZyXEL utility installation.
6 Insert the NWD2705 and check the version numbers in the About screen to make sure the new
utility is installed properly.
NWD2705 User’s Guide
53
Page 54

Chapter 5 Maintenance
54
NWD2705 User’s Guide
Page 55

PART II
Troubleshooting
55
Page 56

56
Page 57

CHAPTER 6
Troubleshooting
This chapter offers some suggestions to solve problems you might encounter. The potential
problems are divided into the following categories.
• Power, Hardware Connections, and LEDs
• Accessing the ZyXEL Utility
• Link Quality
• Problems Communicating with Other Computers
6.1 Power, Hardware Connections, and LEDs
The NWD2705 does not turn on. None of the LEDs turn on.
1 Make sure the NWD2705 is correctly installed (refer to your Quick Start Guide).
2 Restart the computer to which the NWD2705 is attached.
3 If the problem continues, contact the vendor.
One of the LEDs does not behave as expected.
1 Make sure you understand the normal behavior of the LED. See Section 1.2 on page 12.
2 Check the hardware connection. See the Quick Start Guide and Section 1.2 on page 12.
3 Restart the computer to which the NWD2705 is attached.
4 If the problem continues, contact the vendor.
NWD2705 User’s Guide 57
Page 58

Chapter 6 Troubleshooting
6.2 Accessing the ZyXEL Utility
I cannot access the ZyXEL Utility
1 Make sure the NWD2705 is properly inserted and the LEDs are on. Refer to the Quick Start Guide
for information on how to properly connect the NWD2705.
2 Use the Device Manager to check for possible hardware conflicts. Click Start > Settings >
Control Panel > System > Hardware > Device Manager. Verify the status of the NWD2705
under Network Adapter (steps may vary depending on the version of Windows).
3 Install the NWD2705 on another computer.
4 If the error persists, you may have a hardware problem. In this case, you should contact your
vendor.
6.3 Link Quality
The link quality and/or signal strength is poor.
1 Scan for and connect to another AP with a better link quality using the Site Survey screen.
2 Move your computer closer to the AP or the peer computer(s) within the transmission range.
3 There may be too much radio interference (for example from a microwave oven, or another AP
using the same channel) around your wireless network. Lower the output power of each AP.
4 Make sure there are not too many wireless stations connected to a wireless network.
6.4 Problems Communicating with Other Computers
The computer with the NWD2705 installed cannot communicate with the other computer(s).
58
In Infrastructure Mode
• Make sure that the AP and the associated computers are turned on and working properly.
• Make sure the NWD2705 computer and the associated AP use the same SSID.
• Change the AP and the associated wireless clients to use another radio channel if interference is
high.
NWD2705 User’s Guide
Page 59

Chapter 6 Troubleshooting
• Make sure that the computer and the AP share the same security option and key. Verify the
settings in the Profile Security Setting screen.
• If you are using WPA(2)-PSK security, try changing your encryption type from TKIP to AES or vice
versa.
NWD2705 User’s Guide
59
Page 60

Chapter 6 Troubleshooting
60
NWD2705 User’s Guide
Page 61

Copyright
Copyright © 2012 by ZyXEL Communications Corporation.
The contents of this publication may not be reproduced in any part or as a whole, transcribed, stored in a retrieval system, translated into
any language, or transmitted in any form or by any means, electronic, mechanical, magnetic, optical, chemical, photocopying, manual, or
otherwise, without the prior written permission of ZyXEL Communications Corporation.
Published by ZyXEL Communications Corporation. All rights reserved.
Disclaimer
ZyXEL does not assume any liability arising out of the application or use of any products, or software described herein. Neither does it
convey any license under its patent rights nor the patent rights of others. ZyXEL further reserves the right to make changes in any
products described herein without notice. This publication is subject to change without notice.
Trademarks
Trademarks mentioned in this publication are used for identification purposes only and may be properties of their respective owners.
Certifications
注意 !
APPENDIX A
Legal Information
依據 低功率電波輻射性電機管理辦法
Notices
Changes or modifications not expressly approved by the party responsible for compliance could void the user's authority to operate the
equipment.
This device has been designed for the WLAN 2.4 GHz network throughout the EC region and Switzerland, with restrictions in France.
This Class B digital apparatus complies with Canadian ICES-003. Operation is subject to the following two conditions: (1) this device may
not cause interference, and (2) this device must accept any interference, including interference that may cause undesired operation of the
device.
Cet appareil numérique de la classe B est conforme à la norme NMB-003 du Canada.
Viewing Certifications
Go to http://www.zyxel.com to view this product’s documentation and certifications.
ZyXEL Limited Warranty
ZyXEL warrants to the original end user (purchaser) that this product is free from any defects in material or workmanship for a specific
period (the Warranty Period) from the date of purchase. The Warranty Period varies by region. Check with your vendor and/or the
authorized ZyXEL local distributor for details about the Warranty Period of this product. During the warranty period, and upon proof of
purchase, should the product have indications of failure due to faulty workmanship and/or materials, ZyXEL will, at its discretion, repair or
replace the defective products or components without charge for either parts or labor, and to whatever extent it shall deem necessary to
restore the product or components to proper operating condition. Any replacement will consist of a new or re-manufactured functionally
equivalent product of equal or higher value, and will be solely at the discretion of ZyXEL. This warranty shall not apply if the product has
been modified, misused, tampered with, damaged by an act of God, or subjected to abnormal working conditions.
Note
Repair or replacement, as provided under this warranty, is the exclusive remedy of the purchaser. This warranty is in lieu of all other
warranties, express or implied, including any implied warranty of merchantability or fitness for a particular use or purpose. ZyXEL shall in
no event be held liable for indirect or consequential damages of any kind to the purchaser.
To obtain the services of this warranty, contact your vendor. You may also refer to the warranty policy for the region in which you bought
the device at http://www.zyxel.com/web/support_warranty_info.php.
第十二條 經型式認證合格之低功率射頻電機,非經許可,公司、商號或使用
者均不得擅自變更頻率、加大功率或變更原設計之特性及功能。
第十四條 低功率射頻電機之使用不得影響飛航安全及干擾合法通信;經發現
有干擾現象時,應立即停用,並改善至無干擾時方得繼續使用。
前項合法通信,指依電信規定作業之無線電信。低功率射頻電機須忍
受合法通信或工業、科學及醫療用電波輻射性電機設備之干擾。
本機限在不干擾合法電臺與不受被干擾保障條件下於室內使用。
減少電磁波影響,請妥適使用。
NWD2705 User’s Guide 61
Page 62

Appendix A Legal Information
Registration
Register your product online to receive e-mail notices of firmware upgrades and information at www.zyxel.com.
Open Source Licenses
This product contains in part some free software distributed under GPL license terms and/or GPL like licenses. Open source licenses are
provided with the firmware package. You can download the latest firmware at www.zyxel.com. To obtain the source code covered under
those Licenses, please contact support@zyxel.com.tw to get it.
Regulatory Information
European Union
The following information applies if you use the product within the European Union.
Declaration of Conformity with Regard to EU Directive 1999/5/EC (R&TTE Directive)
Compliance Information for 2.4GHz and 5GHz Wireless Products Relevant to the EU and Other Countries Following the EU Directive 1999/5/EC
(R&TTE Directive)
[Czech] ZyXEL tímto prohlašuje, že tento zařízení je ve shodě se základními požadavky a dalšími příslušnými ustanoveními
[Danish] Undertegnede ZyXEL erklærer herved, at følgende udstyr udstyr overholder de væsentlige krav og øvrige relevante
[German] Hiermit erklärt ZyXEL, dass sich das Gerät Ausstattung in Übereinstimmung mit den grundlegenden Anforderungen
[Estonian] Käesolevaga kinnitab ZyXEL seadme seadmed vastavust direktiivi 1999/5/EÜ põhinõuetele ja nimetatud direktiivist
English Hereby, ZyXEL declares that this equipment is in compliance with the essential requirements and other relevant
[Spanish] Por medio de la presente ZyXEL declara que el equipo cumple con los requisitos esenciales y cualesquiera otras
[Greek] ΜΕ ΤΗΝ ΠΑΡΟΥΣΑ ZyXEL ΔΗΛΩΝΕΙ ΟΤΙ εξοπλισμός ΣΥΜΜΟΡΦΩΝΕΤΑΙ ΠΡΟΣ ΤΙΣ ΟΥΣΙΩΔΕΙΣ ΑΠΑΙΤΗΣΕΙΣ ΚΑΙ ΤΙΣ
[French] Par la présente ZyXEL déclare que l'appareil équipements est conforme aux exigences essentielles et aux autres
[Italian] Con la presente ZyXEL dichiara che questo attrezzatura è conforme ai requisiti essenziali ed alle altre disposizioni
[Latvian] Ar šo ZyXEL deklarē, ka iekārtas atbilst Direktīvas 1999/5/EK būtiskajām prasībām un citiem ar to saistītajiem
[Lithuanian] Šiuo ZyXEL deklaruoja, kad šis įranga atitinka esminius reikalavimus ir kitas 1999/5/EB Direktyvos nuostatas.
[Dutch] Hierbij verklaart ZyXEL dat het toestel uitrusting in overeenstemming is met de essentiële eisen en de andere
[Maltese] Hawnhekk, ZyXEL, jiddikjara li dan tagħmir jikkonforma mal-ħtiġijiet essenzjali u ma provvedimenti oħrajn relevanti li
[Hungarian] Alulírott, ZyXEL nyilatkozom, hogy a berendezés megfelel a vonatkozó alapvetõ követelményeknek és az 1999/5/EK
[Polish] Niniejszym ZyXEL oświadcza, że sprzęt jest zgodny z zasadniczymi wymogami oraz pozostałymi stosownymi
[Portuguese] ZyXEL declara que este equipamento está conforme com os requisitos essenciais e outras disposições da Directiva
[Slovenian] ZyXEL izjavlja, da je ta oprema v skladu z bistvenimi zahtevami in ostalimi relevantnimi določili direktive 1999/5/EC.
[Slovak] ZyXEL týmto vyhlasuje, že zariadenia spĺňa základné požiadavky a všetky príslušné ustanovenia Smernice 1999/5/EC.
[Finnish] ZyXEL vakuuttaa täten että laitteet tyyppinen laite on direktiivin 1999/5/EY oleellisten vaatimusten ja sitä koskevien
[Swedish] Härmed intygar ZyXEL att denna utrustning står I överensstämmelse med de väsentliga egenskapskrav och övriga
[Bulgarian] С настоящото ZyXEL декларира, че това оборудване е в съответствие със съществените изисквания и другите
[Icelandic] Hér með lýsir, ZyXEL því yfir að þessi búnaður er í samræmi við grunnkröfur og önnur viðeigandi ákvæði tilskipunar
směrnice 1999/5/EC.
krav i direktiv 1999/5/EF.
und den übrigen einschlägigen Bestimmungen der Richtlinie 1999/5/EU befindet.
tulenevatele teistele asjakohastele sätetele.
provisions of Directive 1999/5/EC.
disposiciones aplicables o exigibles de la Directiva 1999/5/CE.
ΛΟΙΠΕΣ ΣΧΕΤΙΚΕΣ ΔΙΑΤΑΞΕΙΣ ΤΗΣ ΟΔΗΓΙΑΣ 1999/5/ΕC.
dispositions pertinentes de la directive 1999/5/EC.
pertinenti stabilite dalla direttiva 1999/5/CE.
noteikumiem.
relevante bepalingen van richtlijn 1999/5/EC.
hemm fid-Dirrettiva 1999/5/EC.
irányelv egyéb elõírásainak.
postanowieniami Dyrektywy 1999/5/EC.
1999/5/EC.
direktiivin muiden ehtojen mukainen.
relevanta bestämmelser som framgår av direktiv 1999/5/EC.
приложими разпоредбите на Директива 1999/5/ЕC.
1999/5/EC.
62
NWD2705 User’s Guide
Page 63

Appendix A Legal Information
[Norwegian] Erklærer herved ZyXEL at dette utstyret er I samsvar med de grunnleggende kravene og andre relevante
[Romanian] Prin prezenta, ZyXEL declară că acest echipament este în conformitate cu cerinţele esenţiale şi alte prevederi
bestemmelser I direktiv 1999/5/EF.
relevante ale Directivei 1999/5/EC.
National Restrictions
This product may be used in all EU countries (and other countries following the EU directive 1999/5/EC) without any limitation except for
the countries mentioned below:
Ce produit peut être utilisé dans tous les pays de l’UE (et dans tous les pays ayant transposés la directive 1999/5/CE) sans aucune
limitation, excepté pour les pays mentionnés ci-dessous:
Questo prodotto è utilizzabile in tutte i paesi EU (ed in tutti gli altri paesi che seguono le direttive EU 1999/5/EC) senza nessuna
limitazione, eccetto per i paesii menzionati di seguito:
Das Produkt kann in allen EU Staaten ohne Einschränkungen eingesetzt werden (sowie in anderen Staaten die der EU Direktive 1995/5/CE
folgen) mit Außnahme der folgenden aufgeführten Staaten:
In the majority of the EU and other European countries, the 2, 4- and 5-GHz bands have been made available for the use of wireless local
area networks (LANs). Later in this document you will find an overview of countries inwhich additional restrictions or requirements or both
are applicable.
The requirements for any country may evolve. ZyXEL recommends that you check with the local authorities for the latest status of their
national regulations for both the 2,4- and 5-GHz wireless LANs.
The following countries have restrictions and/or requirements in addition to those given in the table labeled “Overview of Regulatory
Requirements for Wireless LANs”:.
Overview of Regulatory Requirements for Wireless LANs
Frequency Band (MHz) Max Power Level
2400-2483.5 100 V
5150-5350 200 V
5470-5725 1000 V
Belgium
The Belgian Institute for Postal Services and Telecommunications (BIPT) must be notified of any outdoor wireless link having a range
exceeding 300 meters. Please check http://www.bipt.be for more details.
Draadloze verbindingen voor buitengebruik en met een reikwijdte van meer dan 300 meter dienen aangemeld te worden bij het Belgisch
Instituut voor postdiensten en telecommunicatie (BIPT). Zie http://www.bipt.be voor meer gegevens.
Les liaisons sans fil pour une utilisation en extérieur d’une distance supérieure à 300 mètres doivent être notifiées à l’Institut Belge des
services Postaux et des Télécommunications (IBPT). Visitez http://www.ibpt.be pour de plus amples détails.
Denmark
In Denmark, the band 5150 - 5350 MHz is also allowed for outdoor usage.
I Danmark må frekvensbåndet 5150 - 5350 også anvendes udendørs.
France
For 2.4 GHz, the output power is restricted to 10 mW EIRP when the product is used outdoors in the band 2454 - 2483.5 MHz. There are
no restrictions when used indoors or in other parts of the 2.4 GHz band. Check http://www.arcep.fr/ for more details.
Pour la bande 2.4 GHz, la puissance est limitée à 10 mW en p.i.r.e. pour les équipements utilisés en extérieur dans la bande 2454 -
2483.5 MHz. Il n'y a pas de restrictions pour des utilisations en intérieur ou dans d'autres parties de la bande 2.4 GHz. Consultez http://
www.arcep.fr/ pour de plus amples détails.
R&TTE 1999/5/EC
WLAN 2.4 – 2.4835 GHz
IEEE 802.11 b/g/n
Location Frequency Range (GHz) Power (EIRP)
Indoor (No restrictions) 2.4 – 2.4835 100mW (20dBm)
Outdoor 2.4 – 2.454 100mW (20dBm)
Italy
This product meets the National Radio Interface and the requirements specified in the National Frequency Allocation Table for Italy. Unless
this wireless LAN product is operating within the boundaries of the owner's property, its use requires a “general authorization.” Plea se
check http://www.sviluppoeconomico.gov.it/ for more details.
Questo prodotto è conforme alla specifiche di Interfaccia Radio Nazionali e rispetta il Piano Nazionale di ripartizione delle frequenze in
Italia. Se non viene installato all 'interno del proprio fondo, l'utilizzo di prodotti Wireless LAN richiede una “Autorizzazione Generale”.
Consultare http://www.sviluppoeconomico.gov.it/ per maggiori dettagli.
Latvia
1
(mW)
(EIRP)
2.454 – 2.4835 10mW (10dBm)
Indoor ONLY Indoor and Outdoor
NWD2705 User’s Guide
63
Page 64

Appendix A Legal Information
The outdoor usage of the 2.4 GHz band requires an authorization from the Electronic Communications Office. Please check http://
www.esd.lv for more details.
2.4 GHz frekvenèu joslas izmantoðanai ârpus telpâm nepiecieðama atïauja no Elektronisko sakaru direkcijas. Vairâk informâcijas: http://www.esd.lv.
Notes:
1. Although Norway, Switzerland and Liechtenstein are not EU member states, the EU Directive 1999/5/EC has also been implemented in
those countries.
2. The regulatory limits for maximum output power are specified in EIRP. The EIRP level (in dBm) of a device can be calculated by adding
the gain of the antenna used(specified in dBi) to the output power available at the connector (specified in dBm).
List of national codes
COUNTRY ISO 3166 2 LETTER CODE COUNTRY ISO 3166 2 LETTER CODE
Austria AT Malta MT
Belgium BE Netherlands NL
Cyprus CY Poland PL
Czech Republic CR Portugal PT
Denmark DK Slovakia SK
Estonia EE Slovenia SI
Finland FI Spain ES
France FR Sweden SE
Germany DE United Kingdom GB
Greece GR Iceland IS
Hungary HU Liechtenstein LI
Ireland IE Norway NO
Italy IT Switzerland CH
Latvia LV Bulgaria BG
Lithuania LT Romania RO
Luxembourg LU Turkey TR
Safety Warnings
• Do NOT use this product near water, for example, in a wet basement or near a swimming pool.
• Do NOT expose your device to dampness, dust or corrosive liquids.
• Do NOT store things on the device.
• Do NOT install, use, or service this device during a thunderstorm. There is a remote risk of electric shock from lightning.
• Connect ONLY suitable accessories to the device.
• Ground yourself (by properly using an anti-static wrist strap, for example) whenever working with the device’s hardware or
connections.
• ONLY qualified service personnel should service or disassemble this device.
• Antenna Warning! This device meets ETSI and FCC certification requirements when using the included antenna(s). Only use the
included antenna(s).
Your product is marked with this symbol, which is known as the WEEE mark. WEEE stands for Waste Electronics and
Electrical Equipment. It means that used electrical and electronic products should not be mixed with general waste. Used
electrical and electronic equipment should be treated separately.
64
NWD2705 User’s Guide
Page 65

Index
Index
A
About 52
about your ZyXEL Device 12
Access Point (AP) 26
Access point (AP) 26
Access Point. See also AP.
ACT LED 12
activating a profile 47
adapter 48
Advanced Encryption Standard 27
advanced settings 48
AP
See also access point.
AP MAC address 37
authentication 37
authentication type 27
auto 27
open system 27
shared key 27
auto authentication 27
automatic connection 39
automatic network scan 20, 43
creating a new profile 45
current configuration 37
current connection status 37
D
data encryption 39
disclaimer 61
documentation
related 2
download 53
driver version 52
E
encryption type 27
F
frequency 26
C
CCMP 27
certifications 61
notices 61
viewing 61
channel 26, 37, 39
configuration method 14
important note 14
Wireless Zero Configuration (WZC) 14
ZyXEL utility 14
configuration status 37
connection status 37
copyright 61
NWD2705 User’s Guide 65
G
getting started 11
Guide
Quick Start 2
H
hardware connections 13
help 15
Page 66

Index
I
infrastructure 13
installation 13
Internet access 13
L
LEDs 12
lights 12
link information 37
LINK LED 12
link quality 38
M
manual network connection 20
Message Integrity Check (MIC) 27
N
network mode 37
network name 37
network overlap 26
network scan 43
network type 37, 39
Profile 43
profile 37, 44
activation 47
add new 45
configure 20, 22
default 43
delete 44
edit 44
information 44
new 44, 45
PSK 27
Q
Quick Start Guide 2, 13, 58
R
radio interference 58
real-time data traffic statistics 38
receive rate 37
receive speed 37
registration
product 62
related documentation 2
S
O
online help 15
other documentation 2
P
packet collisions 38
passphrase 27, 41
password 27
product registration 62
scan 39
scan info 45
search 39
security 26, 27, 37
data encryption 27
Service Set Identity (SSID) 20, 26
signal strength 38, 39
site information 39
site survey 39
scan 39
security settings 40
SSID 20, 26, 37, 39, 58
statistics 37
system tray 13
NWD2705 User’s Guide66
Page 67

Index
T
Temporal Key Integrity Protocol (TKIP) 27
total receive 37
total transmit 37
trademarks 61
transmission rate 44
transmission speed 37
transmit key 41
transmit rate 37
trend chart 38
U
uninstalling the ZyXEL utility 52
upgrading the ZyXEL utility 53
important step 53
utility installation 13
utility version 52
W
warranty 61
note 61
WEP 27, 41
automatic setup 27
manual setup 27, 41
passphrase 27, 41
WEP (Wired Equivalent Privacy) 27
WEP Encryption 41
WEP key generation 27
Wi-Fi Protected Access 27
Wi-Fi Protected Setup 36
Windows XP 14
wireless client 26
wireless LAN
introduction 25
security 26
wireless LAN (WLAN) 25
wireless network 26
Wireless station mode
profile 43
wireless station mode
adapter 48
security settings 40
site survey 39
trend chart 38
wireless tutorial 17
WPA 27
vs WPA-PSK 27
WPA2 27
vs WPA2-PSK 27
WPA2-PSK 27, 42
WPA-PSK 27, 28, 42
WPS
see also Wi-Fi Protected Setup 36
WZC (Wireless Zero Configuration) 14
Z
ZyXEL Utility
accessing 15
ZyXEL utility 14
accessing 15
driver version number 52
exiting 14
help 15
reactivating 14
status 14
system tray icon 13
upgrading 53
version number 52
NWD2705 User’s Guide 67
Page 68

Index
NWD2705 User’s Guide68
 Loading...