


NBG6617
AC1300 MU-MIMO Dual-Band Wireless
Gigabit Router
Version 1.00
Edition 2, 06/2016
Quick Start Guide
User’s Guide
Default Login Details
LAN IP
Address
www.zyxel.com
Password 1234
http://192.168.1.1
(Router Mode)
http://192.168.1.2
(Access Point Mode)
Copyright © 2016 ZyXEL Communications Corporation

IMPORTANT!
READ CAREFULLY BEFORE USE.
KEEP THIS GUIDE FOR FUTURE REFERENCE.
Screenshots and graphics in this book may differ slightly from your product due to differences in
your product firmware or your computer operating system. Every effort has been made to ensure
that the information in this manual is accurate.
Related Documentation
• Quick Start Guide
The Quick Start Guide shows how to connect the NBG6617 and access the Web Configurator
wizards. It contains information on setting up your network and configuring for Internet access.
• More Information
Go to support.zyxel.com to find other information on the NBG6617
.
NBG6617 User’s Guide
2

Contents Overview
Contents Overview
User’s Guide .........................................................................................................................................9
Introduction .............................................................................................................................................10
Introducing the Web Configurator ........................................................................................................... 15
eaZy 123 Wizard ..................................................................................................................................... 18
NBG6617 Modes .....................................................................................................................................27
Easy Mode ..............................................................................................................................................28
Router Mode ...........................................................................................................................................36
Access Point Mode .................................................................................................................................42
Tutorials ..................................................................................................................................................49
Technical Reference ..........................................................................................................................59
Status ...................................................................................................................................................... 60
WAN ........................................................................................................................................................62
Wireless LAN .......................................................................................................................................... 80
LAN ......................................................................................................................................................... 99
Applications ...........................................................................................................................................104
Security .................................................................................................................................................129
Maintenance ..........................................................................................................................................135
Troubleshooting ....................................................................................................................................149
NBG6617 User’s Guide
3

Table of Contents
Table of Contents
Contents Overview ..............................................................................................................................3
Table of Contents .................................................................................................................................4
Part I: User’s Guide ........................................................................................... 9
Chapter 1
Introduction.........................................................................................................................................10
1.1 Overview ...........................................................................................................................................10
1.2 Applications .......................................................................................................................................10
1.3 Ways to Manage the NBG6617 ........................................................................................................ 10
1.4 Good Habits for Managing the NBG6617 ......................................................................................... 11
1.5 Resetting the NBG6617 .................................................................................................................... 11
1.5.1 How to Use the RESET Button ................................................................................................ 11
1.6 The WPS Button ............................................................................................................................... 11
1.7 LEDs ................................................................................................................................................. 12
1.8 Wall Mounting ...................................................................................................................................13
Chapter 2
Introducing the Web Configurator ....................................................................................................15
2.1 Overview ...........................................................................................................................................15
2.2 Accessing the Web Configurator .......................................................................................................15
2.2.1 Login Screen ...........................................................................................................................16
2.2.2 Change Default Password Screen ..........................................................................................16
Chapter 3
eaZy 123 Wizard..................................................................................................................................18
3.1 Overview ...........................................................................................................................................18
3.2 Accessing the eaZy 123 Wizard ........................................................................................................18
3.3 Internet Type .....................................................................................................................................20
3.3.1 WAN Selection Type: Automatic - DHCP ................................................................................ 21
3.3.2 WAN Selection Type: PPPoE ..................................................................................................21
3.3.3 WAN Selection Type: Static .....................................................................................................22
3.4 Wireless Network ..............................................................................................................................23
Chapter 4
NBG6617 Modes .................................................................................................................................27
4.1 Overview ...........................................................................................................................................27
NBG6617 User’s Guide
4

Table of Contents
4.1.1 Web Configurator Modes .........................................................................................................27
4.1.2 Device Modes ..........................................................................................................................27
Chapter 5
Easy Mode ...........................................................................................................................................28
5.1 Overview ...........................................................................................................................................28
5.2 What You Can Do .............................................................................................................................28
5.3 What You Need to Know ...................................................................................................................29
5.4 Navigation Panel ...............................................................................................................................29
5.5 Network Map .....................................................................................................................................29
5.6 Control Panel ....................................................................................................................................31
5.6.1 Wi-Fi ........................................................................................................................................32
5.6.2 Guest Wi-Fi .............................................................................................................................. 33
5.6.3 Parental Control .......................................................................................................................34
5.6.4 Notification ...............................................................................................................................34
Chapter 6
Router Mode........................................................................................................................................36
6.1 Overview ...........................................................................................................................................36
6.2 Router Mode Status Screen .............................................................................................................. 36
6.2.1 Navigation Panel .....................................................................................................................39
Chapter 7
Access Point Mode.............................................................................................................................42
7.1 Overview ...........................................................................................................................................42
7.2 What You Can Do .............................................................................................................................42
7.3 What You Need to Know ...................................................................................................................42
7.3.1 Setting your NBG6617 to AP Mode .........................................................................................43
7.3.2 Accessing the Web Configurator in Access Point Mode ..........................................................43
7.3.3 Configuring your WLAN and Maintenance Settings ................................................................44
7.4 AP Mode Status Screen .................................................................................................................... 44
7.4.1 Navigation Panel .....................................................................................................................46
7.5 LAN Screen .......................................................................................................................................46
Chapter 8
Tutorials...............................................................................................................................................49
8.1 Overview ...........................................................................................................................................49
8.2 Set Up a Wireless Network Using WPS ............................................................................................ 49
8.2.1 Push Button Configuration (PBC) ............................................................................................49
8.2.2 PIN Configuration .................................................................................................................... 50
8.3 Connect to NBG6617 Wireless Network without WPS .....................................................................51
8.3.1 Configure Your Notebook ........................................................................................................53
8.4 Using Guest SSIDs on the NBG6617 ...............................................................................................55
NBG6617 User’s Guide
5

Table of Contents
8.4.1 Configuring Security Settings of Guest SSIDs ........................................................................56
Part II: Technical Reference............................................................................ 59
Chapter 9
Status...................................................................................................................................................60
9.1 Overview ...........................................................................................................................................60
9.1.1 What You Can Do ....................................................................................................................60
9.2 Client Tables Screen ......................................................................................................................... 60
Chapter 10
WAN .....................................................................................................................................................62
10.1 Overview .........................................................................................................................................62
10.2 What You Can Do ...........................................................................................................................62
10.3 What You Need To Know ................................................................................................................62
10.3.1 Configuring Your Internet Connection ....................................................................................63
10.4 Internet Connection Screen ............................................................................................................65
10.4.1 IPoE Encapsulation ...............................................................................................................65
10.4.2 PPPoE Encapsulation ...........................................................................................................70
10.5 NAT ................................................................................................................................................. 74
10.5.1 General Screen .....................................................................................................................74
10.5.2 Port Trigger Screen ...............................................................................................................76
10.5.3 Passthrough Screen ..............................................................................................................77
10.6 Dynamic DNS Screen ..................................................................................................................... 78
Chapter 11
Wireless LAN.......................................................................................................................................80
11.1 Overview .........................................................................................................................................80
11.1.1 What You Can Do ..................................................................................................................81
11.1.2 What You Should Know .........................................................................................................81
11.2 Wireless Screen .............................................................................................................................85
11.3 Wireless Security .............................................................................................................................87
11.3.1 No Security ............................................................................................................................87
11.3.2 WPA-PSK/WPA2-PSK ...........................................................................................................88
11.3.3 WPA/WPA2 ............................................................................................................................ 89
11.4 Guest Wireless Screen ....................................................................................................................91
11.4.1 Guest Wireless Edit ...............................................................................................................92
11.5 MAC Filter Screen ..........................................................................................................................93
11.6 Advanced Screen ............................................................................................................................94
11.7 WPS Screen ....................................................................................................................................96
11.8 Scheduling Screen .......................................................................................................................... 97
NBG6617 User’s Guide
6

Table of Contents
Chapter 12
LAN ......................................................................................................................................................99
12.1 Overview .........................................................................................................................................99
12.2 What You Can Do ...........................................................................................................................99
12.3 What You Need To Know ................................................................................................................99
12.4 LAN IP Screen ..............................................................................................................................100
12.5 Static DHCP Screen ......................................................................................................................101
12.6 IPv6 LAN Screen ...........................................................................................................................102
Chapter 13
Applications ......................................................................................................................................104
13.1 Overview .......................................................................................................................................104
13.1.1 What You Can Do ................................................................................................................104
13.1.2 What You Need To Know .....................................................................................................104
13.1.3 Before You Begin .................................................................................................................106
13.2 Parental Control ............................................................................................................................106
13.2.1 General Screen ...................................................................................................................106
13.2.2 Notification Screen .............................................................................................................. 110
13.3 Bandwidth Management ............................................................................................................... 112
13.3.1 General Screen ................................................................................................................... 113
13.3.2 Advanced Screen ................................................................................................................ 113
13.4 USB Media Sharing Screen .......................................................................................................... 117
13.5 UPnP Screen ................................................................................................................................ 118
13.6 File Sharing ................................................................................................................................... 119
13.6.1 SAMBA Server Screen ........................................................................................................120
13.6.2 FTP Server Screen ..............................................................................................................121
13.6.3 Example of Accessing Your Shared Files From a Computer ...............................................123
13.7 ONE Connect Screen ....................................................................................................................126
13.8 Technical Reference ......................................................................................................................127
Chapter 14
Security..............................................................................................................................................129
14.1 Overview .....................................................................................................................................129
14.1.1 What You Can Do ................................................................................................................129
14.1.2 What You Need To Know .....................................................................................................129
14.2 IPv4 Firewall Screen ....................................................................................................................130
14.3 IPv6 Firewall Screen .....................................................................................................................132
Chapter 15
Maintenance ......................................................................................................................................135
15.1 Overview .......................................................................................................................................135
15.2 What You Can Do ......................................................................................................................... 135
15.3 General Screen .............................................................................................................................135
NBG6617 User’s Guide
7

Table of Contents
15.4 Password Screen ..........................................................................................................................136
15.5 Time Screen ..................................................................................................................................137
15.6 Firmware Upgrade Screen ............................................................................................................139
15.7 Backup/Restore Screen ................................................................................................................140
15.8 Restart Screen ..............................................................................................................................141
15.9 Language Screen ..........................................................................................................................141
15.10 Remote Management Screen .....................................................................................................142
15.10.1 Remote Access .................................................................................................................142
15.10.2 Wake On LAN ....................................................................................................................144
15.11 Log Screen ..................................................................................................................................145
15.12 System Operation Mode Overview .............................................................................................146
15.13 Operation Mode Screen ..............................................................................................................147
Chapter 16
Troubleshooting................................................................................................................................149
16.1 Overview .......................................................................................................................................149
16.2 Power, Hardware Connections, and LEDs ....................................................................................149
16.3 NBG6617 Access and Login .........................................................................................................150
16.4 Internet Access .............................................................................................................................151
16.5 Resetting the NBG6617 to Its Factory Defaults ............................................................................153
16.6 Wireless Connections ...................................................................................................................153
16.7 USB Device Problems ...................................................................................................................155
Appendix A Customer Support ........................................................................................................156
Appendix B Setting Up Your Computer’s IP Address ......................................................................162
Appendix C Common Services........................................................................................................188
Appendix D Legal Information .........................................................................................................191
Index ..................................................................................................................................................200
NBG6617 User’s Guide
8

PART I
User’s Guide
9

1.1 Overview
This chapter introduces the main features and applications of the NBG6617.
The NBG6617 extends the range of your existing wired network without additional wiring, providing
easy network access to mobile users. You can set up a wireless network with other IEEE 802.11a/b/
g/n/ac compatible devices. The NBG6617 is able to function both 2.4GHz and 5GHz networks at the
same time.
A range of services such as a firewall and content filtering are also available for secure Internet
computing.
There is one USB 3.0 port on the side panel of your NBG6617. You can connect USB (version 3.0 or
lower) memory sticks, USB hard drives, or USB devices for file sharing. The NBG6617 automatically
detects the USB devices.
CHAPTER 1
Introduction
1.2 Applications
Your can have the following networks with the NBG6617:
• Wired. You can connect network devices via the Ethernet ports of the NBG6617 so that they can
communicate with each other and access the Internet.
• Wireless. Wireless clients can connect to the NBG6617 to access network resources. You can
use WPS (Wi-Fi Protected Setup) to create an instant network connection with another WPScompatible device.
• WAN. Connect to a broadband modem/router for Internet access.
1.3 Ways to Manage the NBG6617
Use any of the following methods to manage the NBG6617.
• WPS (Wi-Fi Protected Setup). You can use the WPS button or the WPS section of the Web
Configurator to set up a wireless network with your NBG6617.
• Web Configurator. This is recommended for everyday management of the NBG6617 using a
(supported) web browser.
NBG6617 User’s Guide
10

Chapter 1 Introduction
1.4 Good Habits for Managing the NBG6617
Do the following things regularly to make the NBG6617 more secure and to manage the NBG6617
more effectively.
• Change the password. Use a password that’s not easy to guess and that consists of different
types of characters, such as numbers and letters.
• Write down the password and put it in a safe place.
• Back up the configuration (and make sure you know how to restore it). Restoring an earlier
working configuration may be useful if the device becomes unstable or even crashes. If you
forget your password, you will have to reset the NBG6617 to its factory default settings. If you
backed up an earlier configuration file, you would not have to totally re-configure the NBG6617.
You could simply restore your last configuration.
1.5 Resetting the NBG6617
If you forget your password or IP address, or you cannot access the Web Configurator, you will need
to use the RESET button at the back of the NBG6617 to reload the factory-default configuration
file. This means that you will lose all configurations that you had previously saved, the password
will be reset to “1234” and the IP address will be reset to “192.168.1.1”.
1.5.1 How to Use the RESET Button
1 Make sure the power LED is on.
2 Press the RESET button for one to four seconds to restart/reboot the NBG6617.
3 Press the RESET button for longer than five seconds to set the NBG6617 back to its factory-default
configurations.
1.6 The WPS Button
Your NBG6617 supports Wi-Fi Protected Setup (WPS), which is an easy way to set up a secure
wireless network. WPS is an industry standard specification, defined by the Wi-Fi Alliance.
WPS allows you to quickly set up a wireless network with strong security, without having to
configure security settings manually. Each WPS connection works between two devices. Both
devices must support WPS (check each device’s documentation to make sure).
Depending on the devices you have, you can either press a button (on the device itself, or in its
configuration utility) or enter a PIN (a unique Personal Identification Number that allows one device
to authenticate the other) in each of the two devices. When WPS is activated on a device, it has two
minutes to find another device that also has WPS activated. Then, the two devices connect and set
up a secure network by themselves.
You can use the WPS button ( ) on the top panel of the NBG6617 to activate WPS in order to
quickly set up a wireless network with strong security.
NBG6617 User’s Guide
11
1 Make sure the power LED is on (not blinking).
WLAN 2.4GHz
WLAN 5GHz
Power
WAN
LAN 1-4
WPS
USB Slot
WPS Button
USB
2 Press the WPS button for more than three seconds and release it. Press the WPS button on another
WPS-enabled device within range of the NBG6617.
Note: You must activate WPS in the NBG6617 and in another wireless device within two
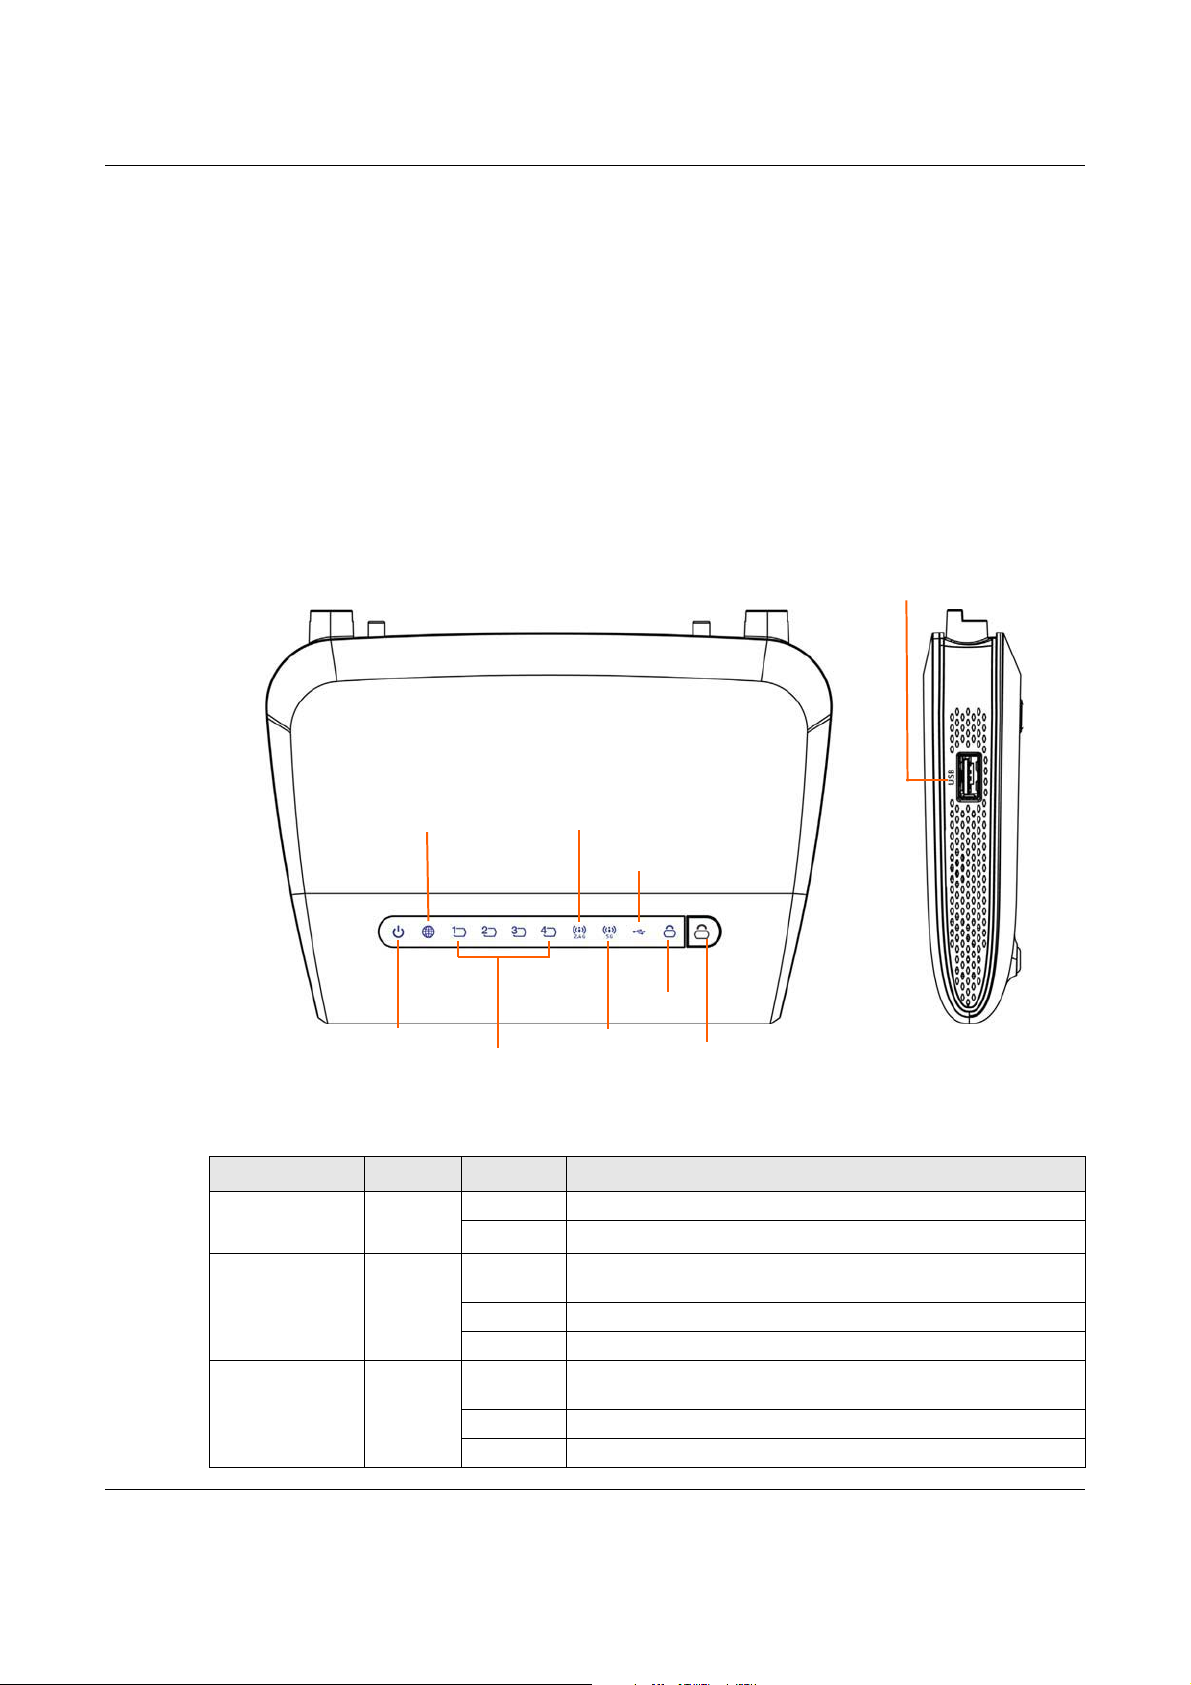
1.7 LEDs
Figure 1 Top Panel, WPS Button and USB Slot
Chapter 1 Introduction
minutes of each other.
For more information on using WPS, see Section 8.2 on page 49.
The following table describes the top panel LEDs.
Table 1 Top Panel LEDs
LED COLOR STATUS DESCRIPTION
Power Green On The NBG6617 is receiving power and functioning properly.
Off The NBG6617 is not receiving power.
WAN Green On The NBG6617 has a successful 10/100/1000MB WAN
Blinking The NBG6617 is sending/receiving data through the WAN.
Off The WAN connection is not ready, or has failed.
LAN 1-4 Green On The NBG6617 has a successful 10/100/1000MB Ethernet
Blinking The NBG6617 is sending/receiving data through the LAN.
Off The LAN is not connected.
NBG6617 User’s Guide
connection.
connection.
12

Chapter 1 Introduction
Table 1 Top Panel LEDs (continued)
LED COLOR STATUS DESCRIPTION
WLAN 2.4GHz Green On The NBG6617 is ready, but is not sending/receiving data
Blinking The NBG6617 is sending/receiving data through the wireless
Off The wireless LAN 2.4 GHz band is not ready or has failed.
WLAN 5GHz Green On The NBG6617 is ready, but is not sending/receiving data
Blinking The NBG6617 is sending/receiving data through the wireless
Off The wireless LAN 5 GHz band is not ready or has failed.
USB Green On The NBG6617 has a USB device installed.
Blinking
Off There is no USB device connected to the NBG6617.
WPS Green On WPS is enabled.
Blinking The NBG6617 is negotiating a WPS connection with a wireless
Off WPS is disabled.
through the wireless LAN 2.4 GHz band.
LAN 2.4 GHz band.
through the wireless LAN 5 GHz band.
LAN 5 GHz band.
The NBG6617 is transmitting and/or receiving data from routers
through an installed USB device.
client.
Figure 2 Rear Panel
RESET Button
WIFI Button
1.8 Wall Mounting
You may need screw anchors if mounting on a concrete or brick wall.
Table 2 Wall Mounting Information
Distance between holes 12.356 cm
M4 Screws Two
Screw anchors (optional) Two
LAN Ports 1-4
Power Input
WAN Port
Power Button
1 Select a position free of obstructions on a wall strong enough to hold the weight of the device.
NBG6617 User’s Guide
13

Chapter 1 Introduction
2 Mark two holes on the wall at the appropriate distance apart for the screws.
Be careful to avoid damaging pipes or cables located inside the wall
when drilling holes for the screws.
3 If using screw anchors, drill two holes for the screw anchors into the wall. Push the anchors into the
full depth of the holes, then insert the screws into the anchors. Do not insert the screws all the way
in - leave a small gap of about 0.5 cm.
If not using screw anchors, use a screwdriver to insert the screws into the wall. Do not insert the
screws all the way in - leave a gap of about 0.5 cm.
4 Make sure the screws are fastened well enough to hold the weight of the NBG6617 with the
connection cables.
5 Align the holes on the back of the NBG6617 with the screws on the wall. Hang the NBG6617 on the
screws.
Figure 3 Wall Mounting Example
NBG6617 User’s Guide
14

2.1 Overview
This chapter describes how to access the NBG6617 Web Configurator and provides an overview of
its screens.
The Web Configurator is an HTML-based management interface that allows easy setup and
management of the NBG6617 via Internet browser. Use a browser that supports HTML5, such as
Internet Explorer 9.0 and later versions, Mozilla Firefox 21 and later versions, Safari 6.0 and later
versions or Google Chrome 26.0 and later versions. The recommended screen resolution is 1024 by
768 pixels.
In order to use the Web Configurator you need to allow:
• Web browser pop-up windows from your device. Web pop-up blocking is enabled by default in
Windows XP SP (Service Pack) 2.
• JavaScript (enabled by default).
• Java permissions (enabled by default).
CHAPTER 2
Introducing the Web Configurator
Refer to the Troubleshooting chapter (Chapter 16 on page 149) to see how to make sure these
functions are allowed in Internet Explorer.
2.2 Accessing the Web Configurator
1 Make sure your NBG6617 hardware is properly connected and prepare your computer or computer
network to connect to the NBG6617 (refer to the Quick Start Guide).
2 Launch your web browser.
3 The NBG6617 is in router mode by default. Type "http://192.168.1.1" as the website address. If the
NBG6617 obtains a WAN IP address or a DNS server IP address in the same subnet as the LAN IP
address 192.168.1.1, the default LAN IP address will be changed to 10.0.0.1 automatically. See
Auto-IP Change on page 64 for more information.
If the NBG6617 is in access point, the IP address is 192.168.1.2. See Chapter 4 on page 27 for
more information about the modes of the NBG6617.
Your computer must be in the same subnet in order to access this website address.
NBG6617 User’s Guide
15

2.2.1 Login Screen
Note: If this is the first time you are accessing the Web Configurator, you may be
redirected to the eaZy123 wizard. Refer to Chapter 3 on page 18
setup screens.
The Web Configurator initially displays the following login screen.
Figure 4 Login screen
Chapter 2 Introducing the Web Configurator
for the eaZy123
The following table describes the labels in this screen.
Table 3 Login screen
LABEL DESCRIPTION
Please enter the
device’s
administrator
password
Type "1234" (default) as the password. Click Login.
2.2.2 Change Default Password Screen
You should see a screen asking you to change your password (highly recommended) as shown
next.
NBG6617 User’s Guide
16

Chapter 2 Introducing the Web Configurator
Figure 5 Change Default Password Screen
The following table describes the labels in this screen.
Table 4 Change Default Password Screen
LABEL DESCRIPTION
Enter your new
password here
Confirm password Retype the password for confirmation.
Change Click Change to save your changes back to the NBG6617.
Skip Click Skip if you do not want to change the password this time.
Type a new password.
Note: The management session automatically times out when the time period set in the
Administrator Inactivity Timer field expires (default five minutes; go to Chapter
15 on page 135 to change this). Simpl
y log back into the NBG6617 if this happens.
NBG6617 User’s Guide
17

CHAPTER 3
3.1 Overview
This chapter provides information on the eaZy 123 setup screens in the Web Configurator.
The Web Configurator’s eaZy 123 setup wizard helps you configure your device to access the
Internet. Refer to your ISP for your Internet account information. Leave a field blank if you don’t
have that information.
3.2 Accessing the eaZy 123 Wizard
Launch your web browser and type "http://192.168.1.1" as the website address. Type "1234"
(default) as the password and click Login.
eaZy 123 Wizard
Note: The eaZy 123 wizard appears automatically when the NBG6617 is accessed for the
first time or when you reset the NBG6617 to its default factory settings. If you
didn’t configure the wizard screens, you will be redirected to the login page when
you connect to the Internet.
If you have already configured the wizard screens and want to open it again, click on the
upper right corner of any Web Configurator screen. The eaZy 123 wizard attempts to detect which
WAN connection type you are using.
If the eaZy 123 wizard does not detect a connection type, you must select one from the drop-down
list box. Check with your ISP to make sure you use the correct type.
If you do not have the Internet connection, the following screen opens.
NBG6617 User’s Guide
18
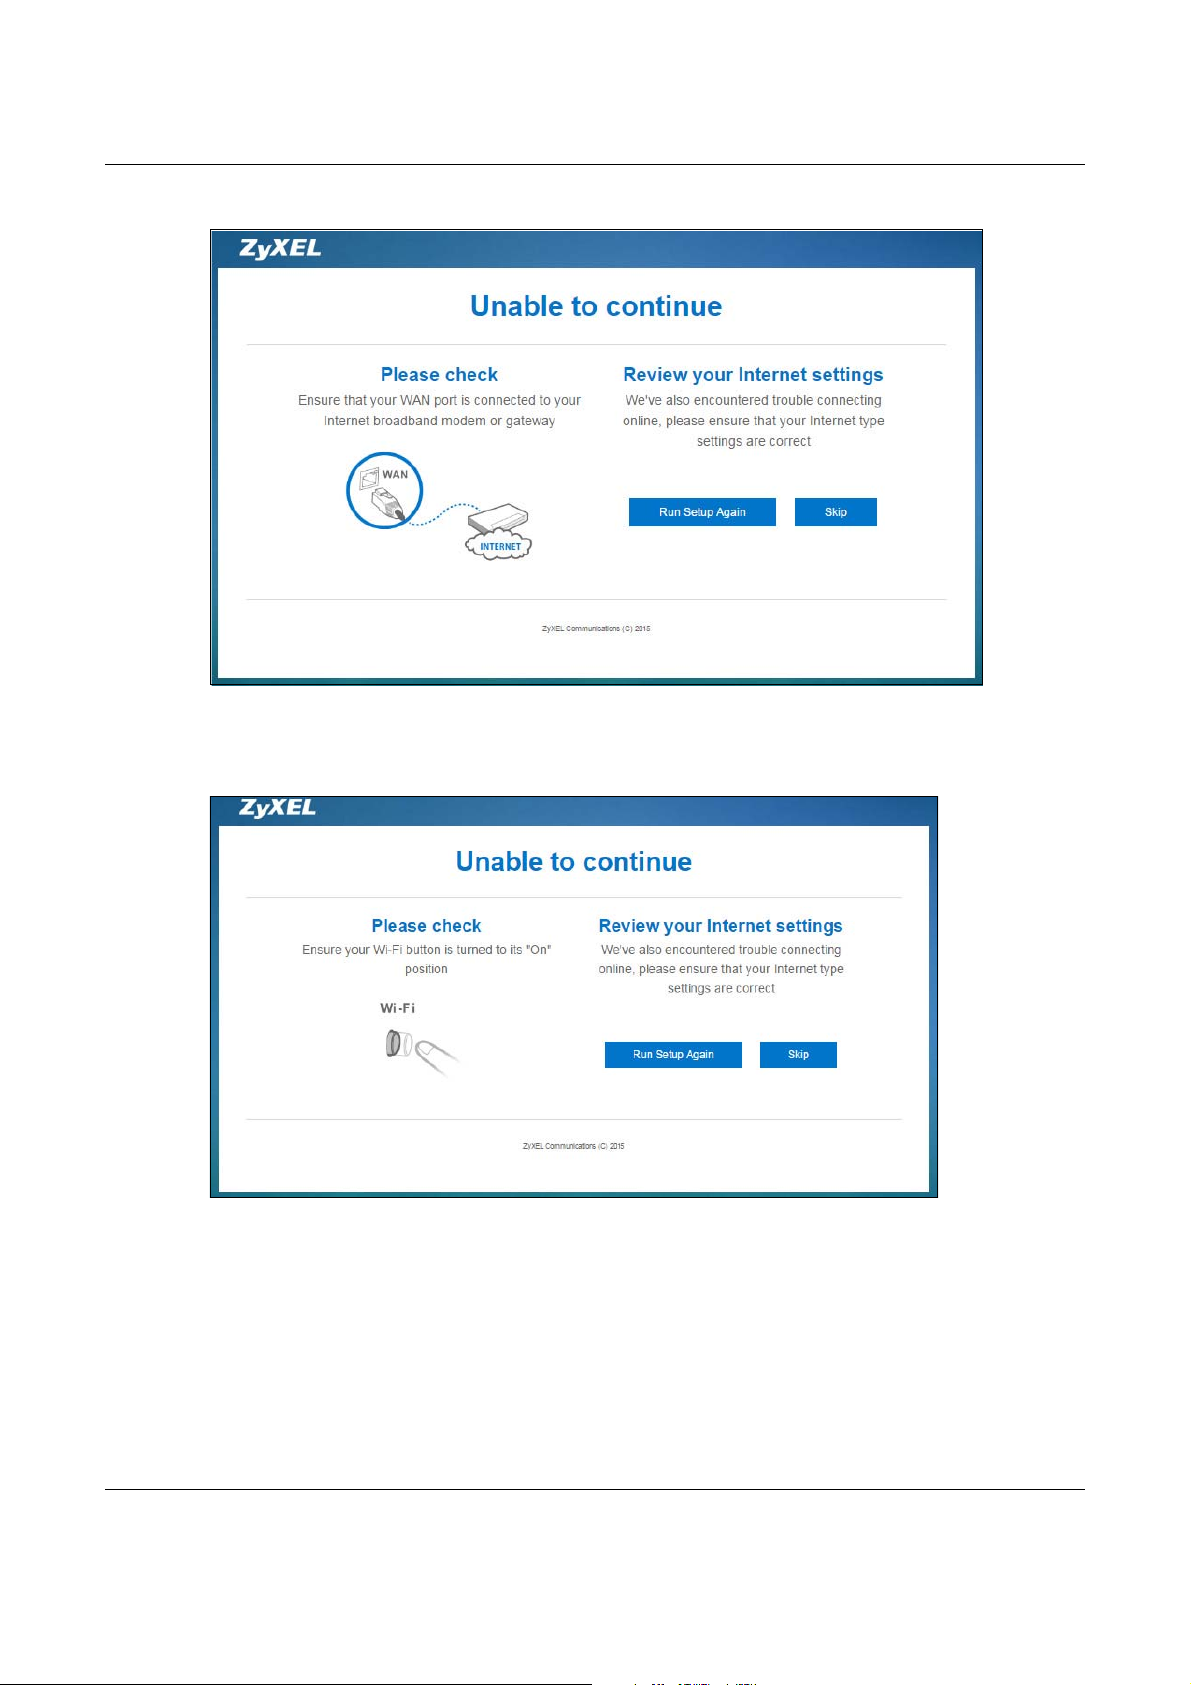
Chapter 3 eaZy 123 Wizard
Figure 6 Unable to continue: WAN
If you do not press the Wi-Fi button located on the NBG6617’s rear panel, the following screen
opens.
Figure 7 Unable to continue: Wi-Fi
Note: If you get an error message, check your hardware connections. Make sure your
Internet connection is up and running.
The wizard screen opens.
NBG6617 User’s Guide
19

Chapter 3 eaZy 123 Wizard
Figure 8 Detecting your Internet Connection Type
Figure 9 eaZy 123 Setup
3.3 Internet Type
The NBG6617 offers three WAN selection types. They are Automatic - DHCP, PPPoE or Static.
Configure the Internet type settings on your NBG6617 in the first part. The following screen
depends on your Internet connection type. Enter the details provided by your Internet Service
Provider (ISP) in the fields (if any).
Check with your ISP to make sure you use the correct type. This wizard screen varies according to
the connection type that you select.
NBG6617 User’s Guide
20

Chapter 3 eaZy 123 Wizard
3.3.1 WAN Selection Type: Automatic - DHCP
Select the Automatic - DHCP option if your ISP did not assign you a fixed IP address.
Figure 10 WAN Selection Type: Automatic - DHCP
3.3.2 WAN Selection Type: PPPoE
Point-to-Point Protocol over Ethernet (PPPoE) functions as a dial-up connection. PPPoE is an IETF
(Internet Engineering Task Force) standard specifying how a host personal computer interacts with
a broadband modem (for example DSL, cable, wireless, etc.) to achieve access to high-speed data
networks.
For the service provider, PPPoE offers an access and authentication method that works with existing
access control systems (for instance, RADIUS).
One of the benefits of PPPoE is the ability to let end users access one of multiple network services,
a function known as dynamic service selection. This enables the service provider to easily create
and offer new IP services for specific users.
Operationally, PPPoE saves significant effort for both the subscriber and the ISP/carrier, as it
requires no specific configuration of the broadband modem at the subscriber's site.
By implementing PPPoE directly on the NBG6617 (rather than individual computers), the computers
on the LAN do not need PPPoE software installed, since the NBG6617 does that part of the task.
Furthermore, with NAT, all of the LAN's computers will have Internet access.
NBG6617 User’s Guide
21

Chapter 3 eaZy 123 Wizard
Figure 11 WAN Selection Type: PPPoE
The following table describes the labels in this screen.
Table 5 WAN Selection Type: PPPoE
LABEL DESCRIPTION
WAN Selection Select the PPPoE (Point-to-Point Protocol over Ethernet) option for a dial-up
PPPoE Username Type the user name given to you by your ISP.
PPPoE Password Type the password associated with the user name above.
Static IP (Optional) Enter the WAN IP address assigned by your ISP.
connection.
Note: If you get an error message, make sure you have entered the correct information
provided by your ISP.
3.3.3 WAN Selection Type: Static
Choose Static as the WAN Selection Type when the WAN port is used as a regular Ethernet. Click
Next.
NBG6617 User’s Guide
22

Chapter 3 eaZy 123 Wizard
Figure 12 WAN Selection Type: Static
The following table describes the labels in this screen.
Table 6 WAN Selection Type: Static
LABEL DESCRIPTION
WAN Selection Select the Static option when the WAN port is using a fixed IP address.
IP Address Enter the IP address provided by your ISP.
Subnet Mask Enter the IP subnet mask in this field.
Gateway IP Address
(Optional)
Enter the gateway IP address in this field.
Note: If you get an error screen, make sure your Internet connection is working and
select the right WAN Selection Type. Contact your ISP if you are not sure of your
Internet Connection type.
3.4 Wireless Network
Configure the wireless network settings on your NBG6617 in the second part. The default wireless
security setting is WPA2-PSK.
NBG6617 User’s Guide
23

Figure 13 Wireless Network
Chapter 3 eaZy 123 Wizard
The following table describes the labels in this screen.
Table 7 Wireless Network
LABEL DESCRIPTION
Wireless Name
(SSID)
Enter a descriptive name for the wireless LAN.
Note: The setting here applies to 2.4 GHz wireless radios.
If you change this field on the NBG6617, make sure all wireless stations use the same SSID
in order to access the network.
Wireless
Password
(WPA2)
Edit 5 GHz
wireless
network
5GHz Wireless
Name (SSID)
5GHz Wireless
Password
(WPA2)
Type from 8 to 63 case-sensitive ASCII characters. You can set up the most secure wireless
connection by configuring WPA in the wireless LAN screens.
Select this check box to configure different SSID and wireless security settings for the
NBG6617’s 5 GHz wireless network.
If you do not select this option, the NBG6617 uses the same SSID and Wi-Fi key (you
configured above) for the 5 GHz wireless network.
Enter a descriptive name for the wireless LAN.
If you change this field on the NBG6617, make sure all wireless stations use the same SSID
in order to access the network.
Type from 8 to 63 case-sensitive ASCII characters. You can set up the most secure wireless
connection by configuring WPA in the wireless LAN screens.
Click the Apply button in the third part to save your settings.
NBG6617 User’s Guide
24
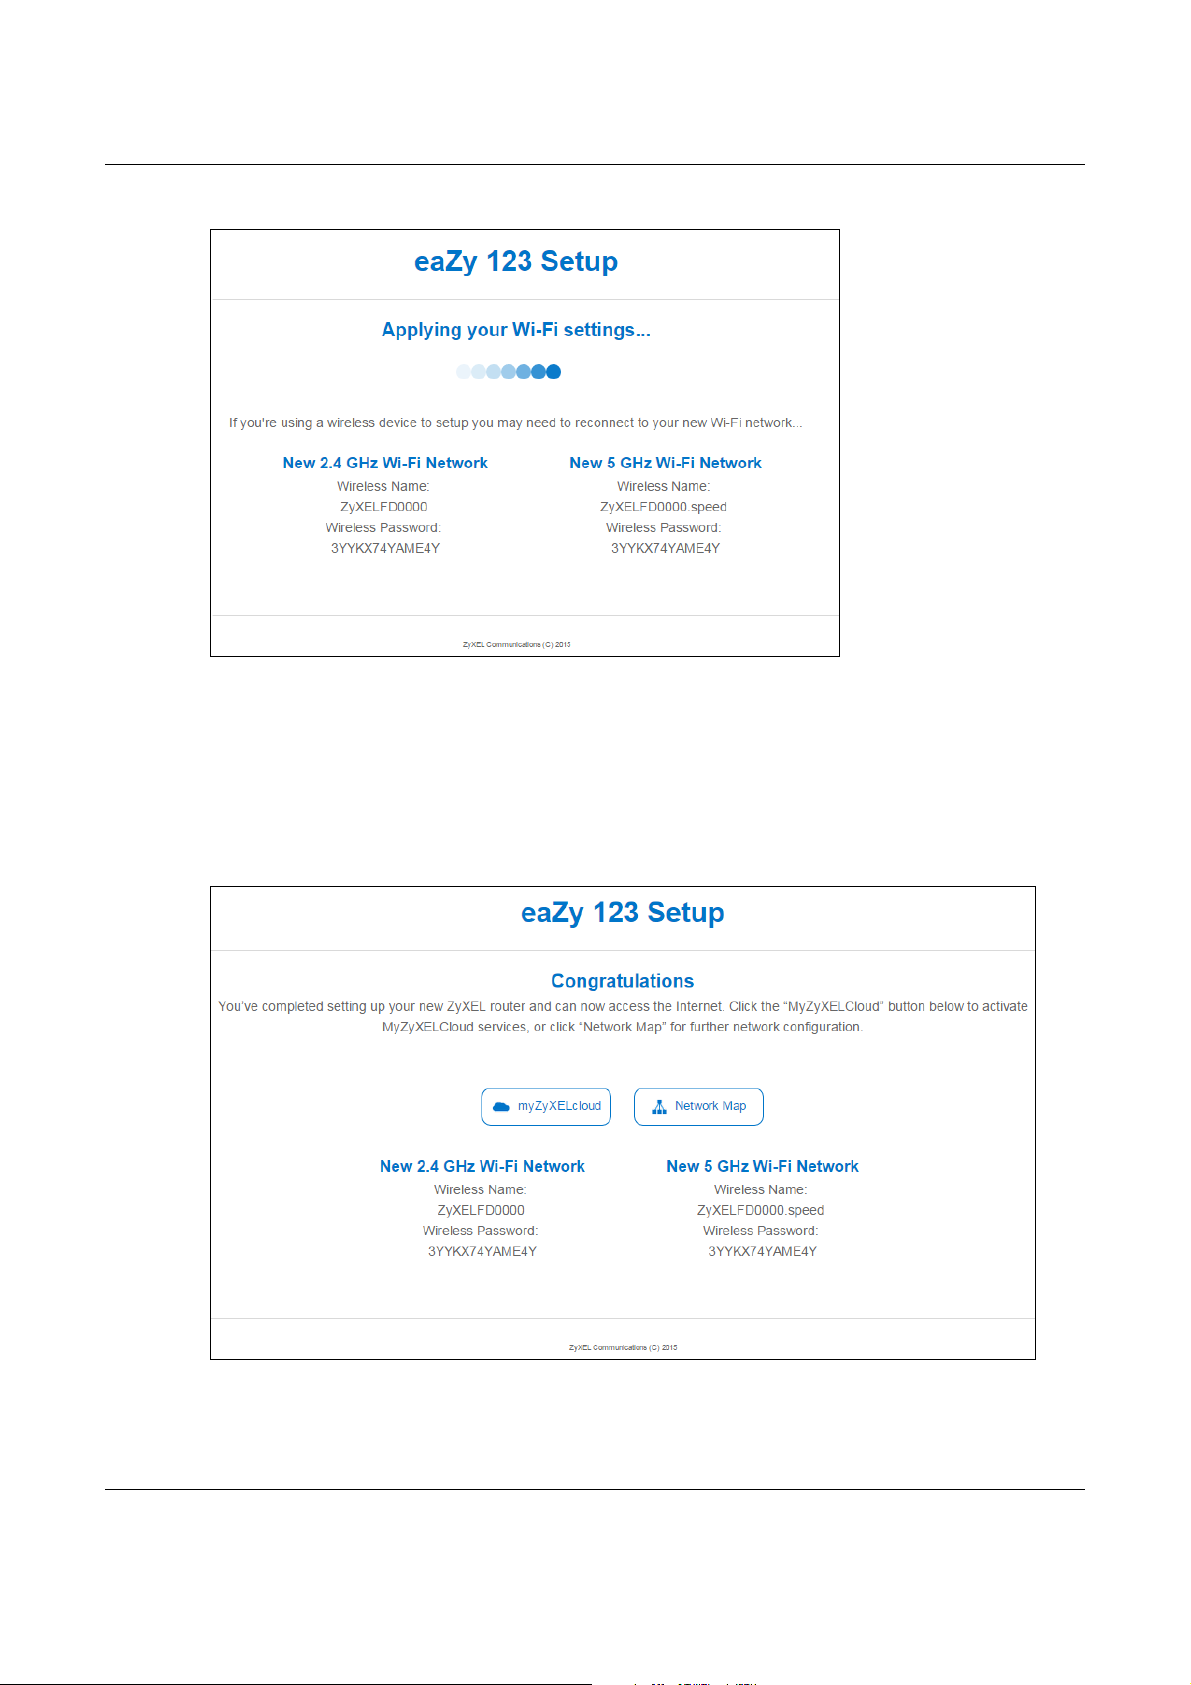
Chapter 3 eaZy 123 Wizard
Figure 14 Apply your Wi-Fi settings
Congratulations! Open a web browser, such as Internet Explorer, to visit your favorite website.
Note: If you cannot access the Internet when your computer is connected to one of the
NBG6617’s LAN ports, check your connections. Then turn the NBG6617 off, wait for
a few seconds then turn it back on. If that does not work, log in to the web
configurator again and check you have typed all information correctly. See the
User’s Guide for more suggestions.
Figure 15 Congratulations
You can click the My ZyXEL Cloud Service button to go to https://mycloud.zyxel.com, where you
can create an account and register your NBG6617. At the time of writing, you can have free DDNS
NBG6617 User’s Guide
25

Chapter 3 eaZy 123 Wizard
service to get a domain name mapped to the NBG6617’s dynamic IP address. With DDNS, you can
use the domain name to remotely access the NBG6617’s Web Configurator through the Internet.
You have successfully set up your NBG6617 to operate on your network and access the Internet.
NBG6617 User’s Guide
26

4.1 Overview
This chapter introduces the different modes available on your NBG6617. First, the term “mode”
refers to two things in this User’s Guide.
• Web Configurator mode. This refers to the Web Configurator interface you want to use for
editing NBG6617 features.
• Device mode. This is the operating mode of your NBG6617, or simply how the NBG6617 is
being used in the network.
4.1.1 Web Configurator Modes
This refers to the configuration interface of the Web Configurator, which has two modes:
CHAPTER 4
NBG6617 Modes
• Easy: The Web Configurator shows this mode by default. Refer to Chapter 5 on page 28 for more
information on the screens in this mode. This interface may be sufficient for users who just want
to use the device.
• Expert: Advanced users can change to this mode to customize all the functions of the NBG6617.
Click > Expert Mode after logging into the Web Configurator. The User’s Guide Chapter 9 on
page 60 through Chapter 15 on page 147 discusses the screens in this mode.
4.1.2 Device Modes
This refers to the operating mode of the NBG6617, which can act as a:
• Router: This is the default device mode of the NBG6617. Use this mode to connect the local
network to another network, like the Internet. Go to Section 6.2 on page 36 to view the Status
screen in this mode.
• Access Point: Use this mode if you want to extend your network by allowing network devices to
connect to the NBG6617 wirelessly. Go to Section 7.4 on page 44 to view the Status screen in
this mode.
For more information on these modes and to change the mode of your NBG6617, refer to Chapter
15 on page 147.
The menu for changing device modes is available in Expert Mode only.
Note: Choose your device mode carefully to avoid having to change it later.
When changing to another mode, the IP address of the NBG6617 changes. The running applications
and services of the network devices connected to the NBG6617 can be interrupted.
NBG6617 User’s Guide
27

5.1 Overview
Network Map
Navigation Panel
Control Panel
Go to
Status
Screen
(Expert
Mode)
The Web Configurator is set to Easy Mode by default. You can configure several key features of the
NBG6617 in this mode. This mode is useful to users who are not fully familiar with some features
that are usually intended for network administrators.
When you log in to the Web Configurator, the following screen opens.
Figure 16 Easy Mode
CHAPTER 5
Easy Mode
5.2 What You Can Do
You can do the following in this mode:
• Use this Navigation Panel to open the eaZy123 wizard or log out the NBG6617 (Section 5.4 on
page 29).
•Use the Network Map screen to check if your NBG6617 is connected to the Internet (Section 5.5
on page 29).
•Use the Control Panel to configure and enable NBG6617 features, including guest Wi-Fi,
wireless security, parental control and so on (Section 5.6 on page 31).
NBG6617 User’s Guide
28

Chapter 5 Easy Mode
5.3 What You Need to Know
Between the different device modes, the Control Panel (Section 5.6 on page 31) changes
depending on which features are applicable to the mode:
• Router Mode: All Control Panel features are available.
• Access Point Mode: Parental Control and Notification are not available.
5.4 Navigation Panel
Use this navigation panel to opt out of the Easy mode.
Figure 17 Easy Mode: Navigation Panel
The following table describes the labels in this screen.
Table 8 Easy Mode: Navigation Panel
ITEM DESCRIPTION
Click this icon to open a screen where you can click Check here to redirect your
Firmware Notification
Wizard Click this icon to open the eaZy123 wizard for the NBG6617.
screen to the firmware upgrade page.
This icon only displays when new firmware is released.
Logout Click this to end the Web Configurator session.
Figure 18 Easy Mode: Navigation Panel: Firmware Notification
5.5 Network Map
When you log into the Web Configurator, the Network Map is shown as follows.
NBG6617 User’s Guide
29

Chapter 5 Easy Mode
Figure 19 Easy Mode: Network Map
This screen displays whether the NBG6617 connects to the Internet. It also shows the devices
connected to the NBG6617, including those connecting wirelessly. Click the Refresh button to
refresh the network map.
The following table describes the icons in this screen.
Table 9 Easy Mode: Network Map
ITEM DESCRIPTION
This icon shows the NBG6617’s connection status.
This icon is grayed out if the user is unable to access the Internet.
Click this button to refresh the NBG6617’s connection status and the network map.
Info Click this to view the device’s information that is currently connected to the
Block Click this to block the device from accessing the Internet through the NBG6617.
Rename / Icon Click this to rename the device or change the device’s icon.
NBG6617.
Figure 20 Easy Mode: Network Map: Info
NBG6617 User’s Guide
30
 Loading...