

Page 1

ZyXEL
T
OTAL INTERNET ACCESS SOLUTION
omni.net LCD series
ISDN Terminal Adapter
With LCD Display
(with omni.net USB-based TA Driver)
Quick Start Guide
Page 2

Page 3

omni.net LCD series Quick Start Guide
Table of Contents
1. Introduction.............................................................................................................. 1-1
Front Panel Description ..................................................................................................... 1-2
Front Panel LEDs ............................................................................................................... 1-3
Back Panel Connections for omni.net LCD+M/LCD...................................................... 1-4
Back Panel Connections for omni.net LCD Plus ............................................................. 1-5
Back Panel Switch and Connectors Description.............................................................. 1-6
2. Install Drivers for Your omni.net LCD PLUS (USB-TA) ......................................2-1
Install Drivers for Windows 98.......................................................................................... 2-1
Install Drivers for Windows 2000...................................................................................... 2-5
3. Install INF file for your omni.net LCD+M/LCD.................................................... 3-1
Before installation............................................................................................................... 3-1
Install INF File .................................................................................................................... 3-2
4. Install ZyXEL ISDN Configuration Manager for Windows..................................4-1
Install ZyXEL ISDN Configuration Manager for Windows .......................................... 4-1
5. PPP Setup for Windows ........................................................................................... 5-1
Install TCP/IP ..................................................................................................................... 5-1
Configure TCP/IP............................................................................................................... 5-2
PPP Setup by ZyXEL ISDN Configuration Manager..................................................... 5-3
Create a PPP Connection ................................................................................................... 5-6
6. Install Driver and PPP Setup for MacOS ............................................................... 6-1
Install Driver for MacOS ................................................................................................... 6-1
OT/PPP Setup for MacOS ................................................................................................. 6-4
7. Customer Support........................................................................................................A
i
Page 4

Page 5

omni.net LCD series Quick Start Guide
1.
Thank you for choosing the ZyXEL ISDN Terminal Adapter (ISDN TA). This section is designed
to guide you through a quick and easy installation of the ZyXEL omni.net LCD series devices.
This series consists of:
1.
2.
3.
omni.net LCD
The
LCD+M
PLUS
following diagram shows the front panel of the
Introduction
omni.net LCD
The
omni.net LCD+M
The
omni.net LCD PLUS
The
is a TA (Terminal Adapter) device with a serial port interface. The
is TA or Modem (hence “+M”) device with a serial port interface. The
is a TA device with a USB (Universal Serial Bus) and a serial port interface. The
.
.
.
omni.net LCD
omni.net LCD
.
omni.net
1-1
Page 6
omni.net LCD series Quick Start Guide
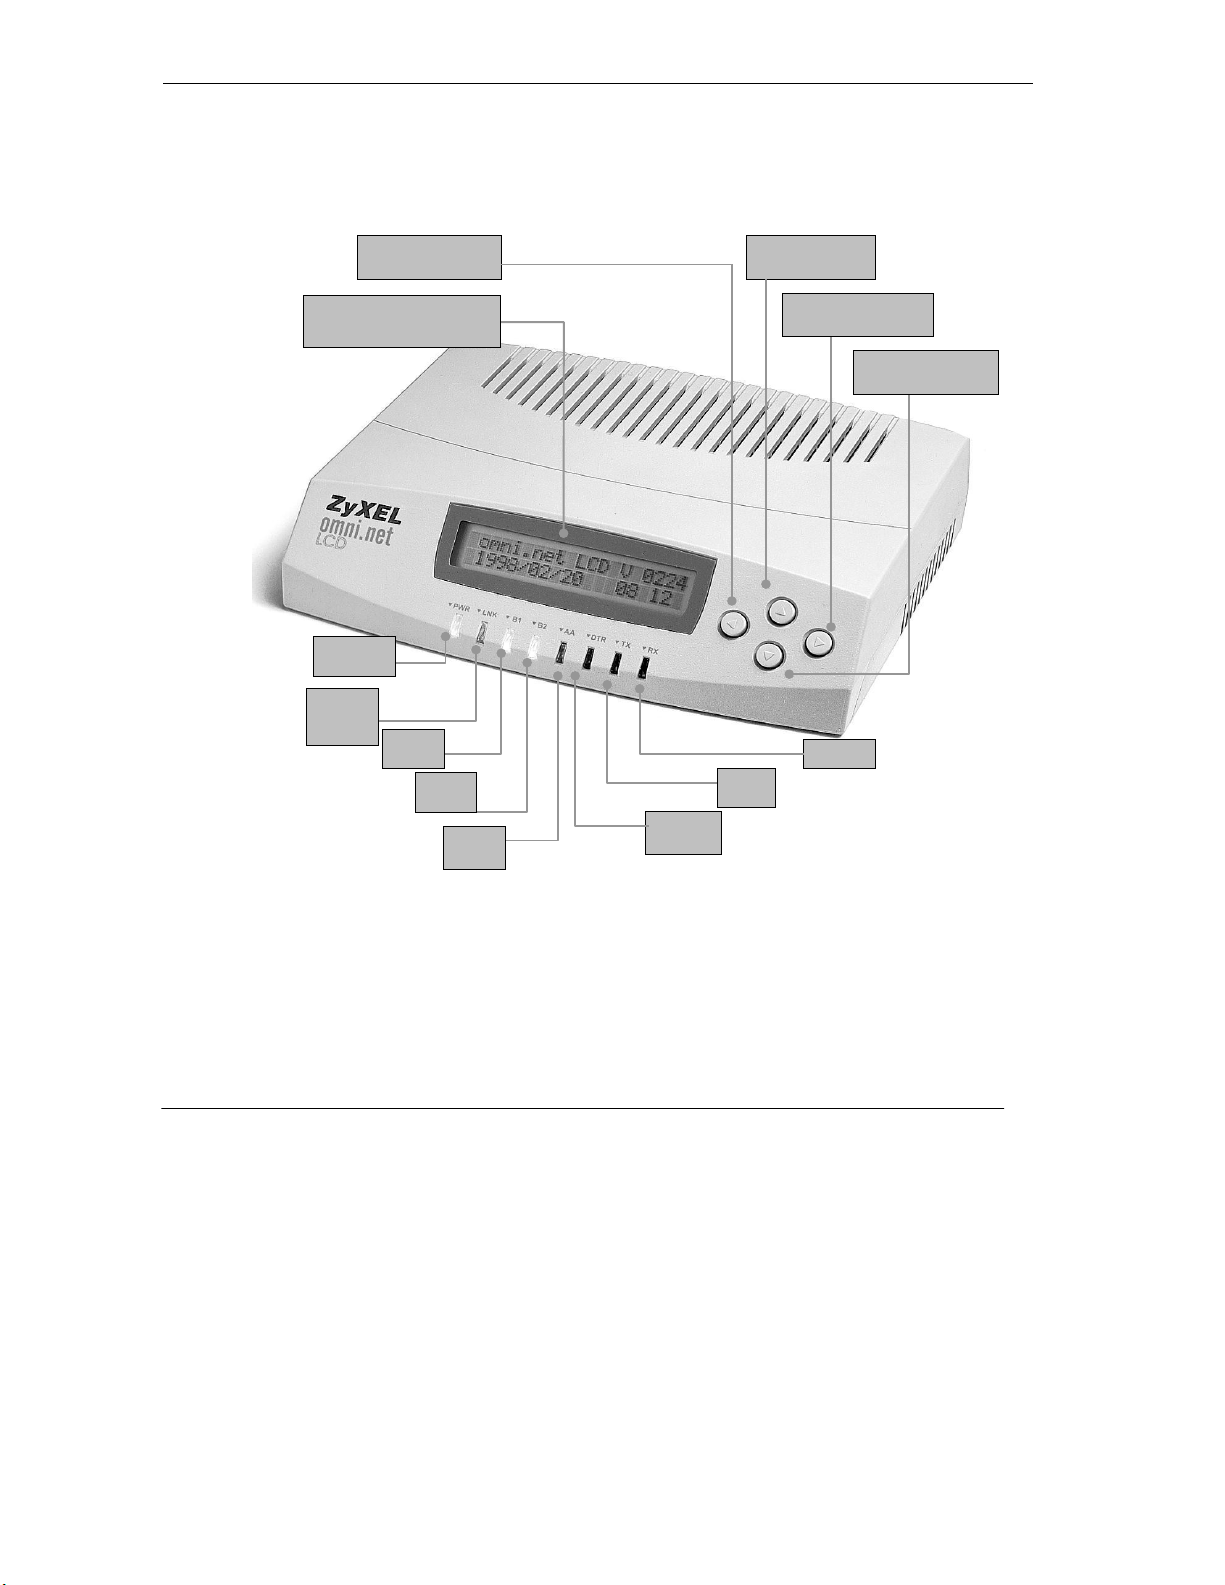
Front Panel Description
LEFT KEY.
20 X 2 LCD Display.
PWR
LNK
B1
B2
UP KEY.
RIGHT KEY.
DOWN KEY.
RX
TX
AA
DTR
1-2
Page 7

omni.net LCD series Quick Start Guide
Front Panel LEDs
LED
PWR
LNK
B1
B2
AA
DTR
TX
RX
Function Active Description
Power On The
ON.
Link On
Blinking
B1 Channel On The
B2 Channel On The
Auto-Answer On
Blinking
Data Terminal
Ready
Transmit Data On When the TX LED is on your DTE/Computer
Receive Data On When the RX LED is on your DTE/Computer
DTE (Data Terminal Equipment) is the source or destination of data in a
communication connection that is connected to your TA or modem.
On The
The
ISDN switch is active.
This LED blinks when attempting to make a
connection.
the
the
The AA LED lights up when your TA is ready to
automatically answer your calls.
This LED blinks when your ISDN TA rings.
the TA/Modem has established a link and is ready
for communication.
transmits data to the DTE port.
receives data from the DTE port.
LED lights up when the power is turned
PWR
LED lights up when a link with the local
LNK
Channel connection LED lights up when
B1
Channel is established.
B1
Channel connection LED lights up when
B2
Channel is established.
B2
LED is on when the device connected to
DTR
Control Panel
The four arrow keys allow intuitive menu-tree operation and the LCD panel displays the status of
your omni.net LCD PLUS/LCD+M/LCD ISDN terminal adapter.
1-3
Page 8
omni.net LCD series Quick Start Guide
b
j
b
j
b
j
b
j
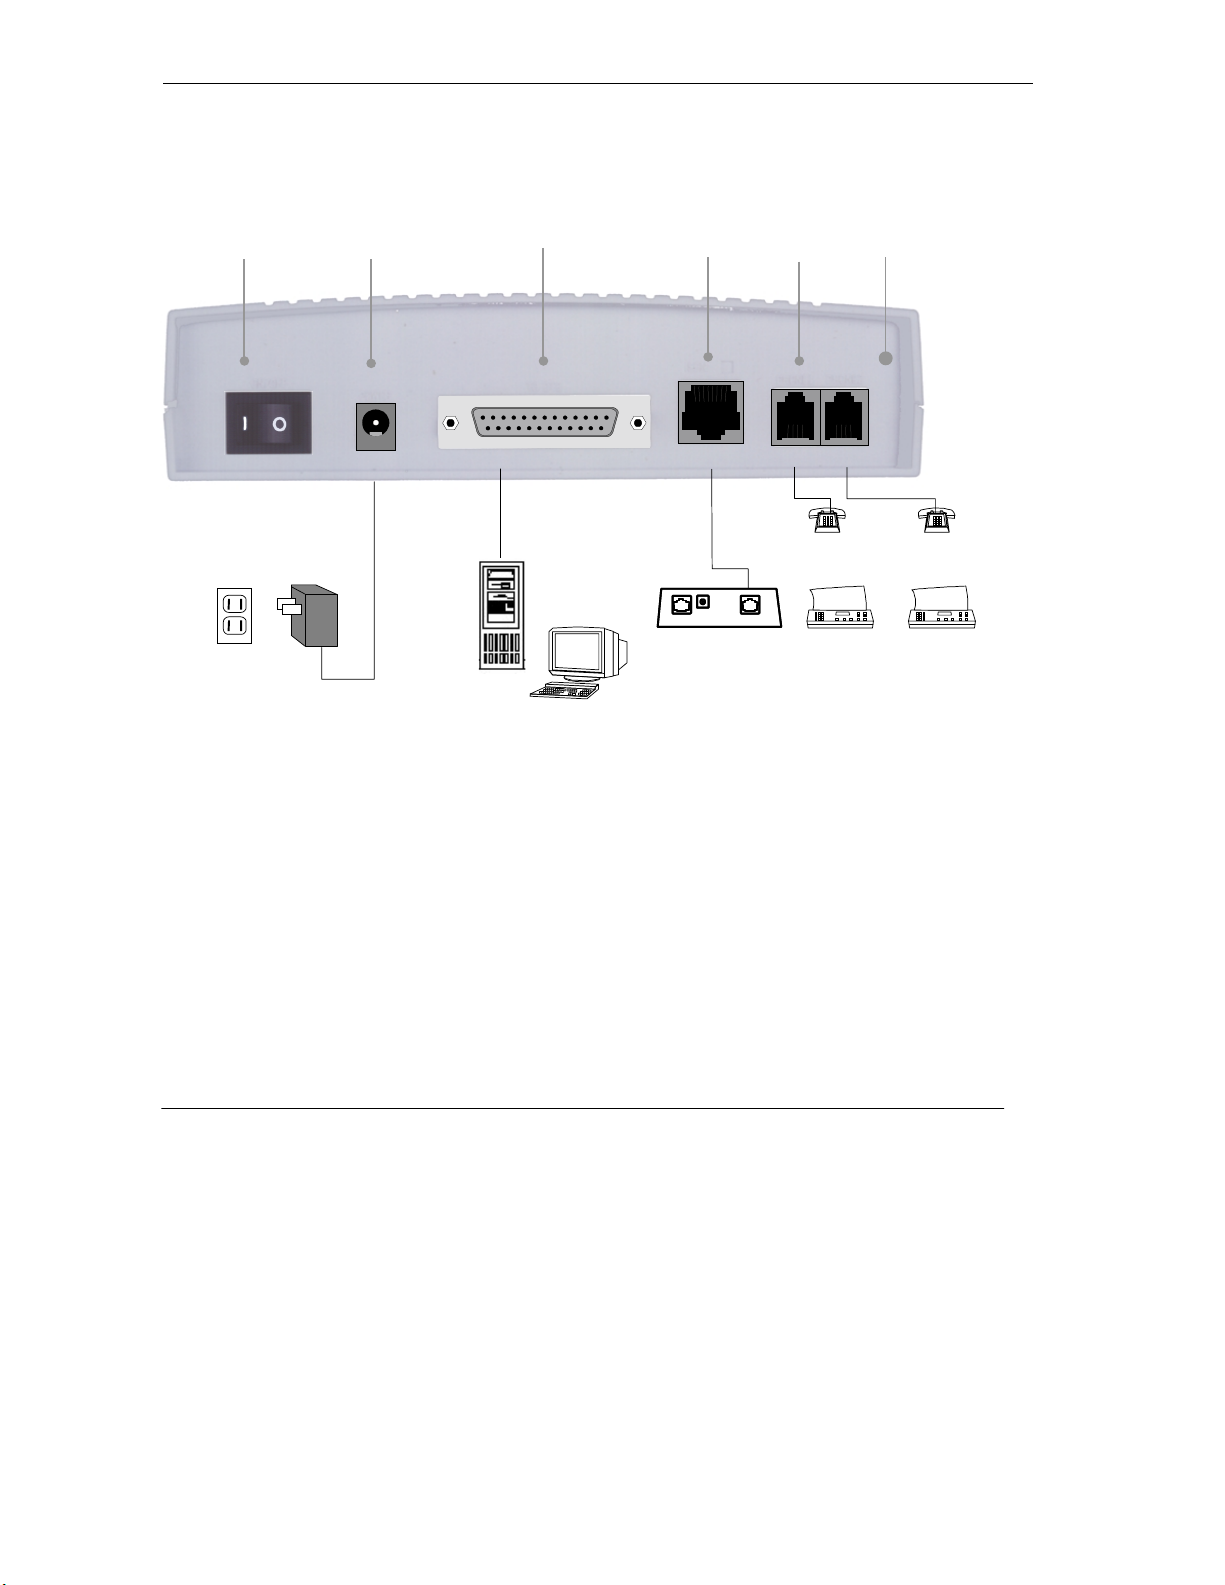
Back Panel Connections for omni.net LCD+M/LCD
Power ON/OFF
Switch
Power
Outlet
Power
Adapter
Power
Input
To DTE Phone 2
ISDN
Phone 1
Tel
Abcdefg ghijkl mmn opqr
NT-1 Device
stuvw xy zasdsad aa s
dddd . rrrr ttttttbbb
hhhhhh ffffbbbbb
bbbbbbbjjjjjjjj.jjjjjjjjj
jjjjjjj. Ee sdasd dsasad
dsad sasad asdas ereqr q r
fg h fghfg hf ghf ghf h fgh
fgh fgh fh ffffgh ffffafd
erweeew rerqer qerqer
qer .
Fax
Abcdefg ghijkl mmn opqr
stuvw xy zasdsad aa s
dddd . rrrr ttttttbbb
hhhhhh ffffbbbbb
bbbbbbbjjjjjjjj.jjjjjjjjj
jjjjjjj. Ee sdasd d sasad
dsad sasad asdas er eqr q r
fg h fghfg hf ghf ghf h fgh
fgh fgh fh ffffgh ffffafd
erweeew rerqer qerqer
qer .
Abcdefg ghijkl mmn opqr
stuvw xyzasdsad aa s
dddd . rrrr ttttttbbb
hhhhhh ffffbbbbb
bbbbbbbjjjjjjjj.jjjjjjjjj
jjjjjjj. Ee sdasd dsasad
dsad sasad asdas er e qr q r
fg h fghfg hf ghf ghf h fgh
fgh fgh fh ffffgh ffffafd
erweeew rerqer qerqer
qer .
Fax
Computer
Tel
Abcdefg ghijkl mmn opqr
stuvw xy zasdsad aa s
dddd . rrrr ttttttbbb
hhhhhh ffffbbbbb
bbbbbbbjjjjjjjj.jjjjjjjjj
jjjjjjj. Ee sdasd dsasad
dsad sasad asdas ereqr q r
fg h fghfg hf ghf ghf h fgh
fgh fgh fh ffffgh ffffafd
erweeew rerqer qerqer
qer .
1-4
Page 9
omni.net LCD series Quick Start Guide
hhhhhh
ffff
bbbbb
b
j
fg h
fghfghfghfghf h
fgh
hhhhhh
ffff
bbbbb
b
j
fg h
fghfghfghfghf h
fgh
hhhhhh
ffff
bbbbb
b
j
fg h
fghfghfghfghf h
fgh
hhhhhh
ffff
bbbbb
b
j
fg h
fghfghfghfghf h
fgh
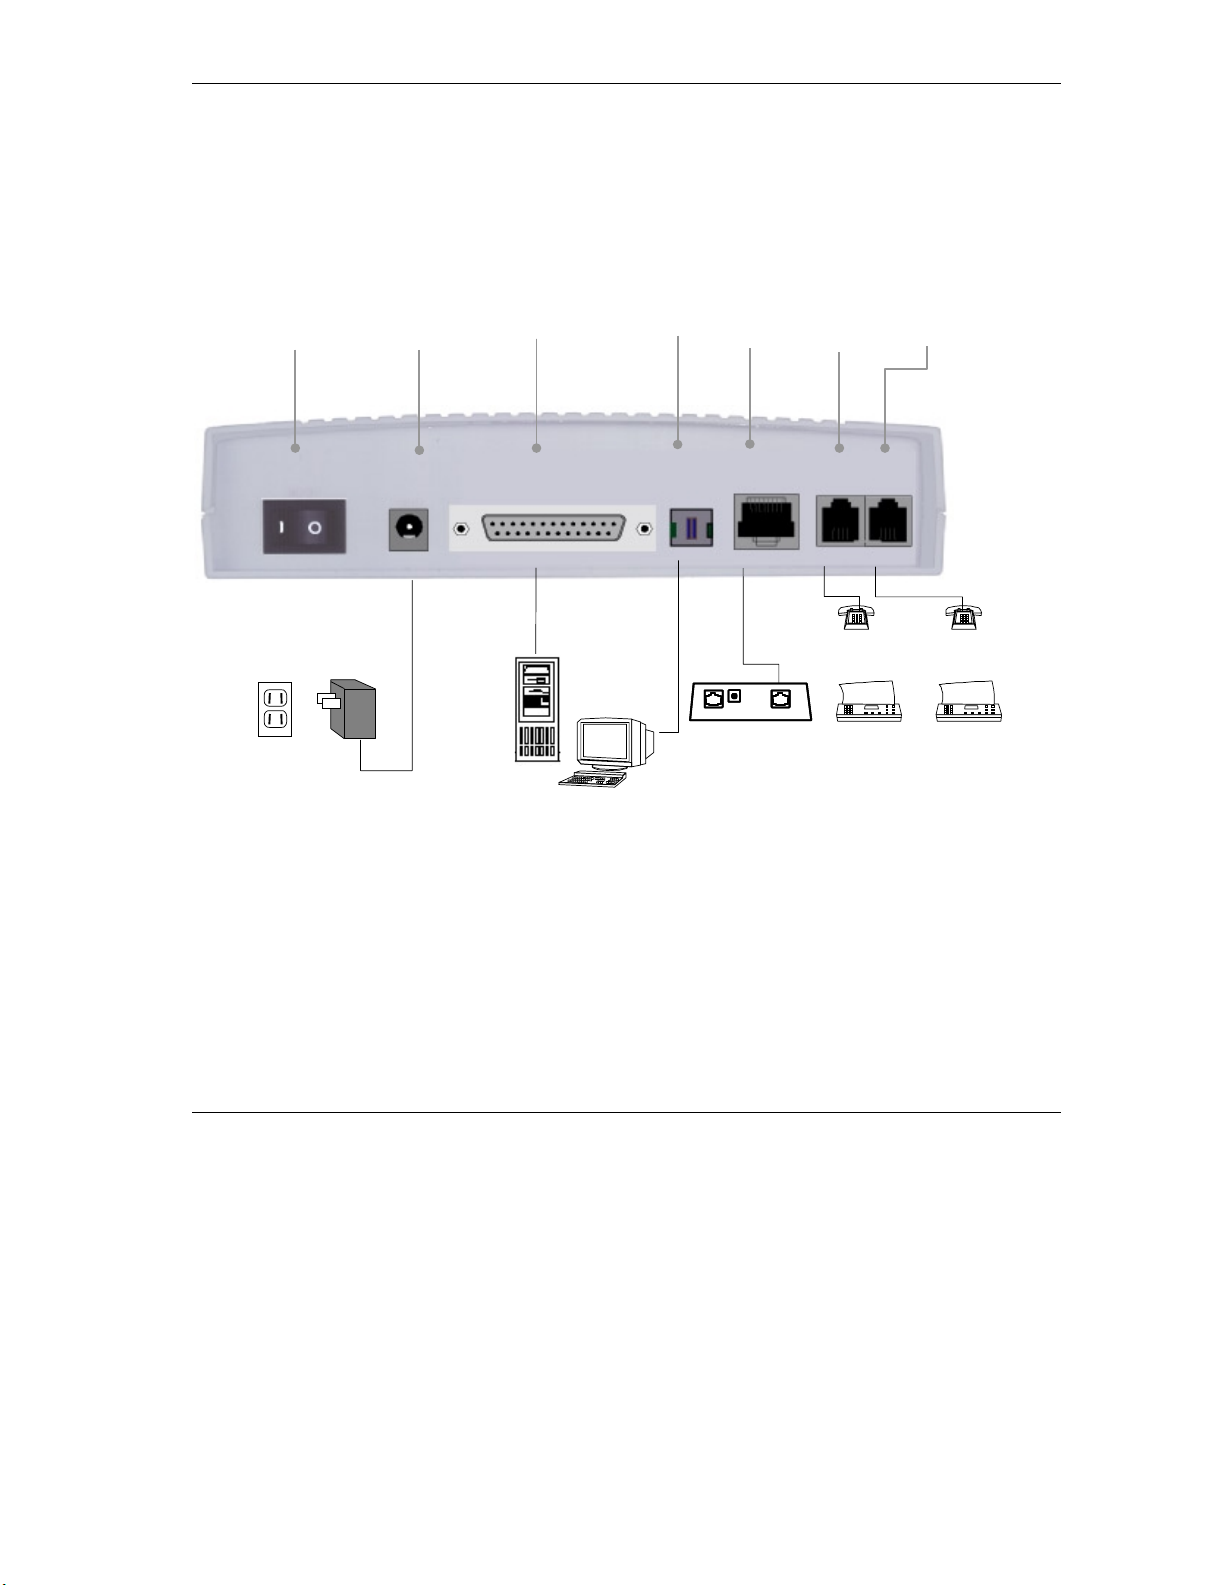
Back Panel Connections for omni.net LCD Plus
Power ON/OFF
Switch
Power
Outlet
Power
Adapter
Power
Input
To DTE Phone 2
USB
ISDN
Phone 1
USB port
RS-232
port
NT-1 Device
Computer
Tel
Abcdefg ghijkl mmn opqr
stuvw xyzasdsad aa s
dddd . rrrr ttttttbbb
bbbbbbbjjjjjjjj.jjjjjjjjj
jjjjjjj. Ee sdasd dsa sad
dsad sasad asdas ereqr q r
fgh fgh fh ffffgh ffffafd
erweeew rerqer qerqer
qer.
Fax
Abcdefg ghijkl m mn opqr
stuvw xyzasdsa d a a s
dddd . rrrr ttttttbbb
bbbbbbbjjjjjjjj.jjjjjjjjj
jjjjjjj. Ee sdasd dsasad
dsad sasad asdas e r eqr q r
fgh fgh fh ffffgh ffffafd
erweeew rerqer qerqer
qer .
Tel
Abcdefg ghijkl m mn opqr
stuvw xyzasdsad aa s
dddd . rrrr ttttttbbb
bbbbbbbjjjjjjjj.jjjjjjjjj
jjjjjjj. Ee sdasd dsasad
dsad sasad asdas ereqr q r
fgh fgh fh ffffgh ffffafd
erweeew rerqer qerqer
qer .
Fax
Abcdefg ghijkl m mn opqr
stuvw xyzasdsad aa s
dddd . rrrr ttttttbbb
bbbbbbbjjjjjjjj.jjjjjjjjj
jjjjjjj. Ee sdasd dsasad
dsad sasad asdas er eqr q r
fgh fgh fh ffffgh ffffafd
erweeew rerqer qerqer
qer .
1-5
Page 10

omni.net LCD series Quick Start Guide
Back Panel Switch and Connectors Description
ON/OFF
POWER
To DTE
USB
ISDN
PHONE 1
PHONE 2
This is the ON/OFF switch.
This is the 16V-AC power input socket. Plug your AC power adapter into
this socket.
This is your serial port RS-232 cable interface. Connect your serial port
cable to this interface.
This is a USB (Universal Serial Bus) interface. Connect your USB cable
to this interface.
This is an ISDN RJ-45 terminal interface. Connect your ISDN cable to
this interface.
This is an analog port #1 RJ-11 terminal jack interface. Connect your
telephone, fax, answering machine or analog line to this interface.
This is an analog port #2 RJ-11 terminal jack interface. Connect your
telephone, fax, answering machine or analog line to this interface.
1-6
Page 11

omni.net LCD series Quick Start Guide
Use ISDN U Interface to Connect your omni.net LCD Plus (North America only)
In North America, we provide an "ISDN U" jack for you to connect your omni.net LCD PLUS
with your computer. Simply connect one end of a RJ-45 connector to your device, and the other
end to the wall jack, as shown in the illustration below.
RJ-45 Cable
1-7
Page 12

Page 13

omni.net LCD series Quick Start Guide
2.
Install Drivers for Your omni.net LCD
PLUS (USB-TA)
This section provides step by step instructions on how to install drivers needed for the omni.net
USB-TA on your Windows 98 or 2000 operating system. If you have MacOS then please
proceed to
Install Drivers for Windows 98
Step 1.
Step 2.
Step 3.
Section 6
Be sure your omni.net LCD PLUS is on.
Plug your USB cable from your TA into your computer. If your TA has not already
been installed then Windows will detect it.
Click
for installation instructions.
Next >
to search for new drivers.
2-1
Click
Next >
.
Page 14
omni.net LCD series Quick Start Guide
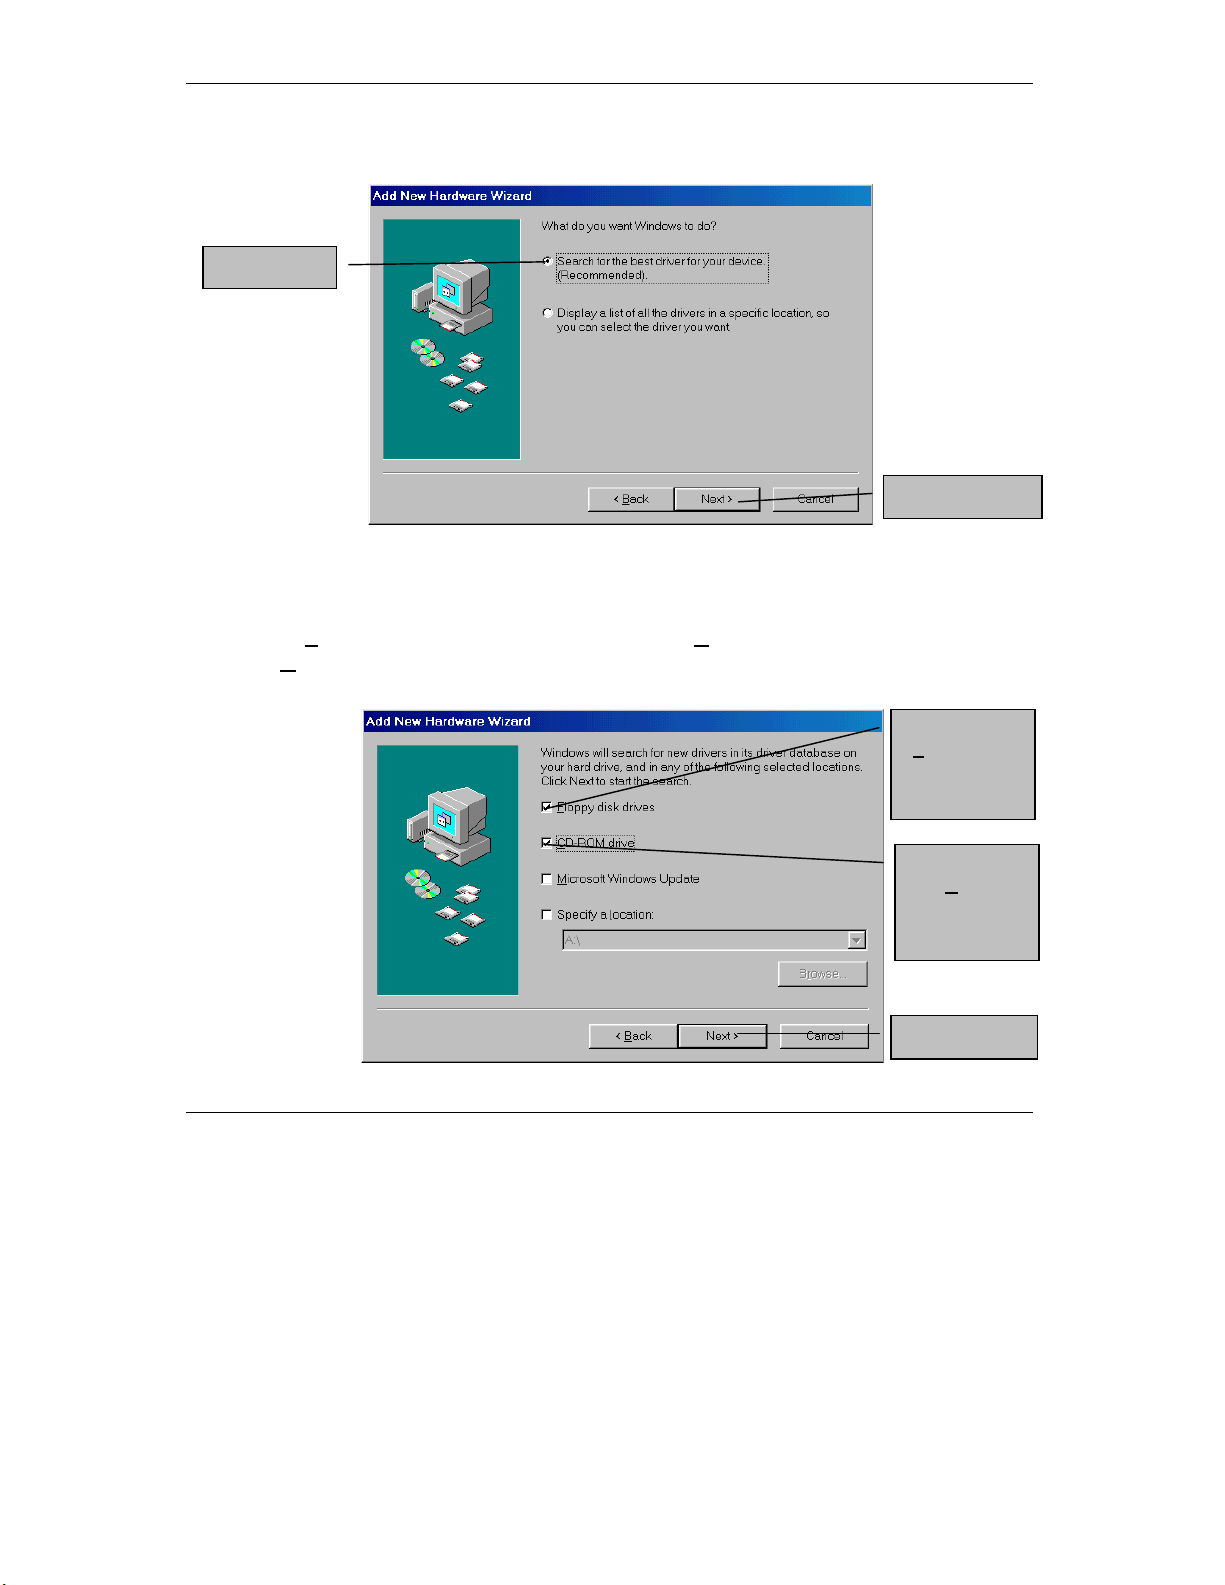
Step 4.
Step 5.
This window gives the choice of displaying all drivers or searching for the best drivers.
Search for the best driver for your device
Click
Click here.
Your system will show the screen below. Insert the
TA device into your CD-ROM.
Uncheck the
then click
Floppy disk drive
Next >
to install.
option button, check the
option button and then click
Click
BONUS CD
D-ROM drive
C
that comes with your
option button and
Next >
Next >
.
.
2-2
Uncheck the
Floppy disk
drives
option
button.
Click to check
CD-ROM
the
drive
option
button.
Next >
Click
.
Page 15
omni.net LCD series Quick Start Guide
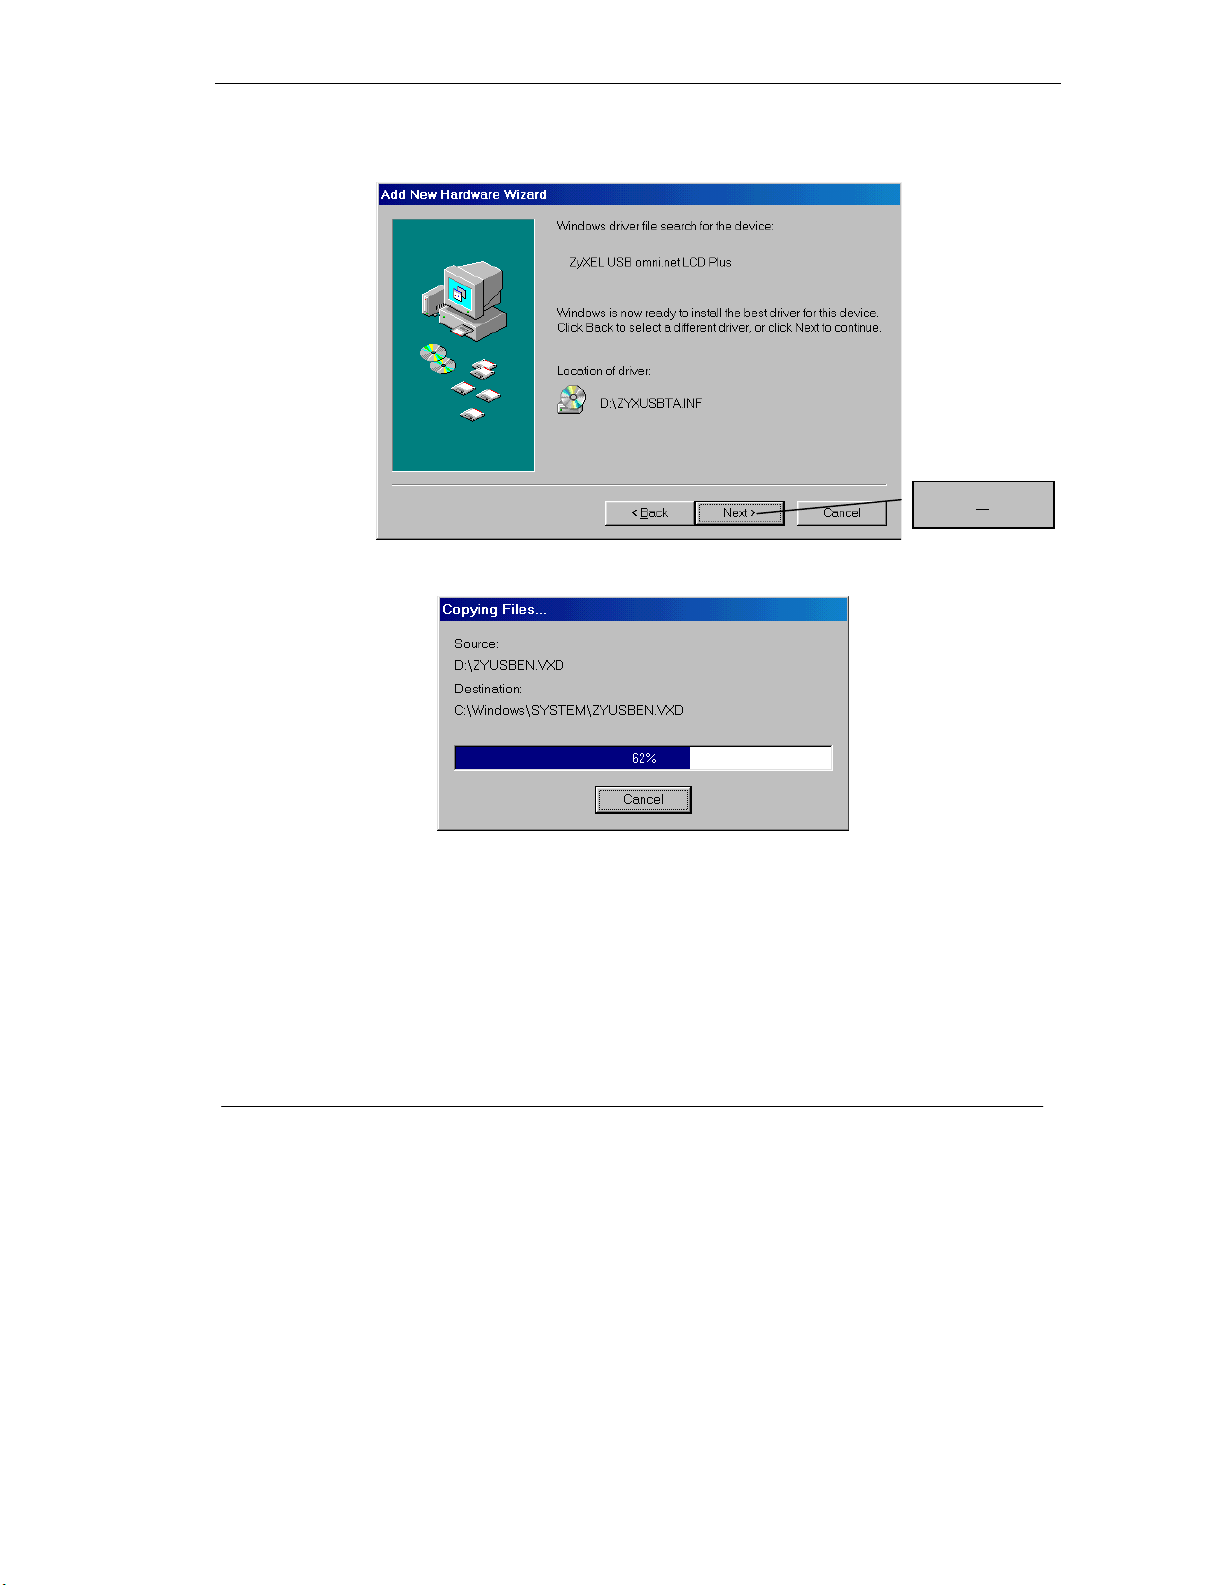
Step 6.
BONUS CD
Windows has found the
. Click
Next >
INF
folder associated with USB device driver from your
to install the best driver for this device.
Click
Next >
.
2-3
Page 16
omni.net LCD series Quick Start Guide
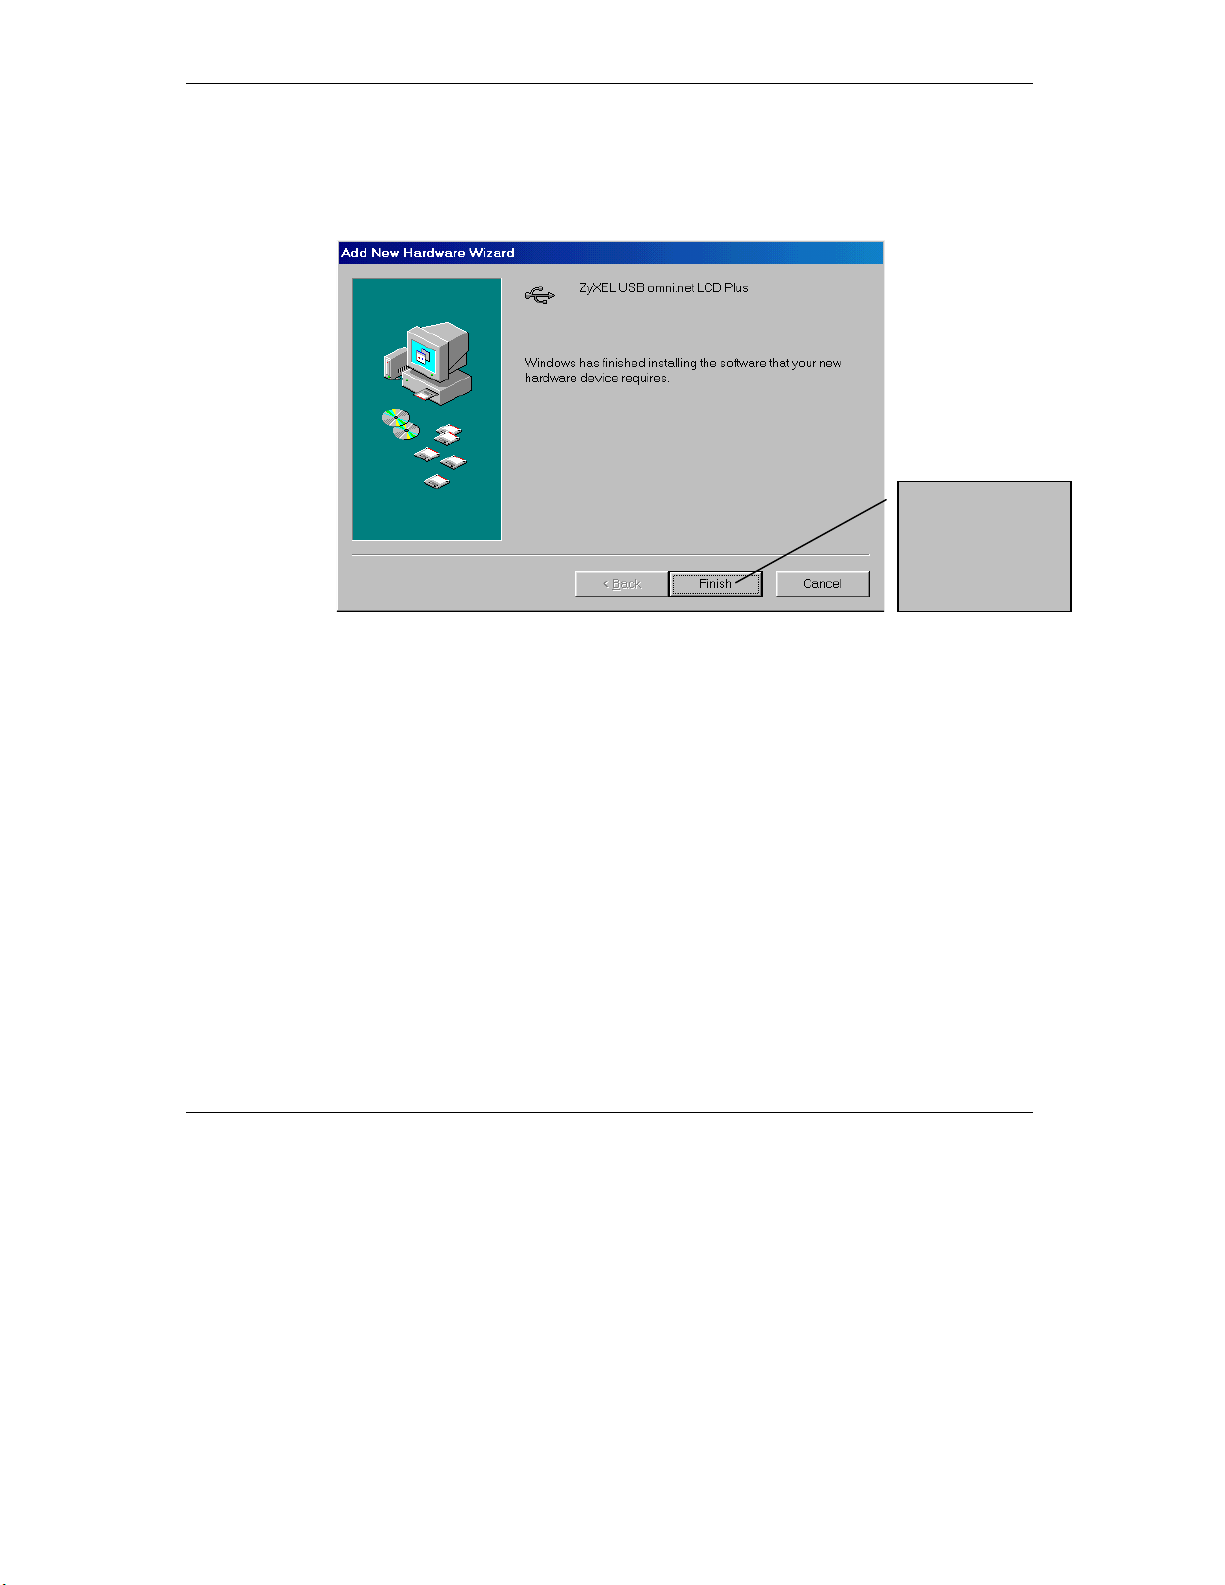
Step 7.
The USB driver installation is complete. Click
After installation is complete, please go to
Configuration Manager
on your computer.
Section 4
Finish
.
to install the
ZyXEL ISDN
Finish
Click
Congratulations,
you have just
installed your
new TA!
.
2-4
Page 17

omni.net LCD series Quick Start Guide
Install Drivers for Windows 2000
This section provides step by step procedures to install drivers needed for the omni.net USB
Terminal Adapter (TA) in Windows 2000. Install your TA via a USB interface or a serial port
(RS-232) interface.
1.
Install your TA via a USB Interface
.
This is the most typical installation.
2.
Install your TA via a Serial Port (RS-232) Interface
.
This installation requires you to restart your computer.
1. Install your TA via a USB Interface.
Step 1.
Step 2.
Step 3.
Connect your USB cable to your omni.net LCD PLUS and computer. Make sure your
TA is on. Windows should automatically detect that you have a new device and will give
you the following Wizard window.
If you see the
continue by following the instructions in
Hardware Wizard
click the
Add New Hardware
Found New Hardware Wizard
Step 3
. If you do not see the
window below then click
Start, Settings, Control Panel
icon and follow your computers’ prompts until your TA is
window shown below then please
Found New
, double
detected by your computer.
Follow the instructions below.
2-5
Next >
Click
start the
Hardware
Wizard
to
.
Page 18

omni.net LCD series Quick Start Guide
Step 4.
This window gives you the choice to either search for a suitable driver or display a list
of know drivers for your TA.
Step 5.
This screen asks you where the driver located.
Click this
option button
to search for
a suitable
driver and
then click
Next >
.
2-6
Click
Specify a
location
followed by
Next >
continue.
to
Page 19

omni.net LCD series Quick Start Guide
Step 6.
Step 7.
Insert your installation CD and follow the instructions below.
Click the
button and, from
your CD-ROM, find
the
(for installation via
USB Interface) or the
installation via Serial
Afterwards, click OK.
“D:” refers to your CD-ROM drive.
Browse
LP_usb2k
Inf
folder (for
Port RS-232
Interface).
This screen gives you a description of the driver and driver files that were found.
folder
2-7
Next >
Click
to continue
with this
installation.
Page 20

omni.net LCD series Quick Start Guide
Step 8.
Step 9.
This is the end of the installation wizard.
This software does not have a Microsoft digital signature but it has been tested with
Windows in ZyXEL laboratories.
Finish
Click
complete your
installation.
Congratulations,
you have
successfully
installed your
new Terminal
Adapter via a
USB Interface!
to
A digital signature is not required.
Step 10.
You can now access the Internet using your new TA! To test your connection and
find out more about ZyXEL’s exciting products visit www.zyxel.com.
2-8
Yes
Click
return to
your
computer
desktop.
to
Page 21

omni.net LCD series Quick Start Guide
2. Install your TA via a Serial Port (RS-232) Interface
This section instructs you to install the TA using the serial port (RS-232) interface with autodetect or manual installation.
Step 1.
Connect the serial port (RS-232) interface to your computer. Make sure your TA is
on.
Step 2.
heading
Did Windows detect your TA automatically? If yes, then go back to
1. Install your TA via USB Port
and follow the instructions. If Windows did
Step 3
not detect your TA automatically then you must install your TA manually. For manual
installation, follow the instructions below.
Step 3.
Double-click on the
then double-click on the
Step 4.
This screen shows you what modems are installed on your computer.
My Computer
icon, double-click on the
Phone and Modem
icon. Proceed to the next step.
Control Panel
Click the
Modems
and then click
“
select from a
list of devices.
Add…
tab
” to
under the
icon and
2-9
Page 22

omni.net LCD series Quick Start Guide
Step 5.
Step 6.
This screen asks if you want Windows to detect your modem.
This screen shows you common drivers and manufacturers of common kinds of
drivers. Click “
Have Disk…
” to find a specific driver required for your TA.
Check this
option box
and then click
Next >
.
2-10
Click “
Disk…
continue.
Have
” to
Page 23

omni.net LCD series Quick Start Guide
Step 7.
“D:” in the “Copy manufacturer’s files from:” field refers to your CD-ROM drive.
Step 8.
Insert the installation disk into your CD-ROM Drive.
Browse
Click
find the file
in your CD-
ROM drive
and then click
OK
This screen shows you where to find the folder the contains your driver.
,
Inf
.
2-11
Highlight the
folder.
Inf
Page 24

omni.net LCD series Quick Start Guide
Step 9.
Step 10.
These are the files in the
INF
folder.
Select the manufacturer and model of your TA or modem.
Click
Open
.
2-12
Highlight
ZyXEL
the
omni.net
LCD Plus
(COM
DSS1)
and
then click
Next >
.
Page 25

omni.net LCD series Quick Start Guide
Step 11.
Step 12.
Select the port(s) that you want to install your TA or modem on.
“COM2” refers to the port connected to your terminal adapter.
This software does not have a Microsoft digital signature but it has been tested with
Windows in ZyXEL laboratories.
Click the
ports
highlight the port(s)
connected to your
TA and then click
Next >
Selected
option button,
to install.
A digital signature is not required.
2-13
Yes
Click
return to
your
computer
desktop.
to
Page 26

omni.net LCD series Quick Start Guide
Step 13.
Step 14.
This is the end of the installation wizard.
This screen shows you what modems are installed.
Click
Finish
.
Step 15.
You can now access the Internet using your new TA! To test your connection and find
out more about ZyXEL’s exciting products visit www.zyxel.com.
2-14
Click OK to finish the
procedure.
Congratulations, you
have just installed
ZyXEL’s Terminal
Adapter via RS-232!
Page 27

omni.net LCD series Quick Start Guide
3.
Install INF file for your omni.net
LCD+M/LCD
This section provides step by step procedures to install INF drivers that are needed for your
omni.net LCD+M/LCD devices in your Windows 95/98/NT operating system(s).
Click here for a
complete
installation and
setup guide.
Before installation
Insert the
Readme files
on
BONUS CD
Note: The RVS-COM Lite software provided varies from country to country. For further
that comes with your TA device package into your CD-ROM drive. Click
, to view the complete installation and setup guide.
information, please contact your local distributor.
3-1
Page 28

omni.net LCD series Quick Start Guide
Install INF File
Please note that the omni.net LCD and omni.net M/LCD both lack a USB interface.
Please be aware that these products must be installed via a serial port (RS-232)
interface. The procedure for this installation is listed in the previous section.
If your computer supports Plug & Play, be sure your omni.net LCD+M/LCD is on before starting
your computer. If you are using a non-PnP protocol, then follow the steps below to perform the
installation:
Step 1.
on the “
Step 2.
box. Click
Start, Settings, Control Panel
Click
Add…
” button.
In the screen below click the
Next >
to continue.
and then double-click on the
Modems
icon. Click
Don't detect my modem; I will select it from a list
Check this
option button
by clicking
here.
Next >
Click
.
option
3-2
Page 29

omni.net LCD series Quick Start Guide
Step 3.
Click “
Have Disk…”
and then follow the instructions below.
Make sure this BONUS CD is in
your CD-ROM drive.
Click “
Disk…
Have
”.
3-3
Browse
Click
to find the
location of the
updated
Inf
file.
Page 30

omni.net LCD series Quick Start Guide
lick on the letter that represents your CD-Rom drive.
C
If you do not
have Windows
NT3.51 then click
here.
If you have
Windows NT 3.51
then click here.
Lastly, click
OK
.
Step 4.
Click OK to install either the
INF
file or the
3-4
winnt.3.31
file from your
BONUS CD
Click OK.
.
Page 31

omni.net LCD series Quick Start Guide
Step 5.
Step 6.
port
This screen asks you to choose the manufacturer and model of your TA or modem.
Highlight
LCD+M
find
Click
This screen displays the TA or modem selected above and asks you to select
Zyxel omni.net LCD
OR
Highlight
ZyXEL omni.net
device (if you cannot
ZyXEL omni.net LCD
Next >
.
the
(COM)
that you are using.
Highlight the port that your
Terminal Adapter (TA) is
connected with. Highlight one
selection only and then click
.
Next >
).
3-5
Page 32

omni.net LCD series Quick Start Guide
Step 7.
Step 8.
Please wait…
Finish
Click
Follow the
prompts of your
computer.
to complete INF files installation.
3-6
Finish
Click
Congratulations, you have
set up your TA successfully!
.
Page 33

omni.net LCD series Quick Start Guide
Step 9.
Click
Close
to exit the INF files installation.
Click
Close
.
3-7
Page 34

Page 35

omni.net LCD series Quick Start Guide
4.
Install ZyXEL ISDN Configuration
Manager for Windows
This section shows you how to install the ZyXEL ISDN Configuration Manager (ZyICM) using
Windows.
Install ZyXEL ISDN Configuration Manager for Windows
ZyXEL ISDN Configuration Manager helps you set up a PPP connection. Configuration of PPP
is mandatory because it assists your TA in accessing the Internet. Before you can configure PPP
you must first install the ZyXEL ISDN Configuration Manager. Complete this installation by
following the instructions below.
Step 1.
Step 2.
Be sure
double-click the
From the
Windows system. As setup is starting, you will see the following display:
BONUS CD
startup.exe
Setup
window choose the ISDN Configuration Manager matched for your
is in your
CD-ROM
to activate the
device and the
Setup
window.
Setup
display is active. If not,
4-1
Follow the
prompts of
your
computer.
Page 36

omni.net LCD series Quick Start Guide
Step 3.
Step 4.
Information about ZyXEL ISDN Configuration Manager Setup program.
Click
Information about ZyXEL ISDN Configuration Manager (ZylCM).
Next >
.
4-2
Click
Next >
.
Page 37

omni.net LCD series Quick Start Guide
Step 5.
Step 6.
Determine the general location of your TA.
Click here if your TA is
located in North America.
Click here if your TA is
located outside of North
Next >
Click
Choose a destination folder in which to save the Configuration Manager.
America.
.
4-3
Click
Next >
.
Page 38

omni.net LCD series Quick Start Guide
Step 7.
Choose a destination Program Folder in which to save the Configuration Manager.
Follow the prompts of your computer.
Step 8.
Start copying files by clicking
Next >
Highlight a folder from this list.
Highlight one folder only.
Next >
Click
.
.
4-4
Click
Next >
.
Page 39

omni.net LCD series Quick Start Guide
Step 9. Click OK to finish the installation of ZyXEL ISDN Configuration Manager.
Click OK.
Step 10.
Once the installation is complete, your computer will create the program group called
ZyXEL ISDN Configuration Manager
appear on your
ISDN Configuration Manager
desktop
. You can now go to
to set up a PPP connection for Internet access.
on your
Start Menu
Section 5
and a
ZyICM
icon will
and learn how to use the
ZyXEL
4-5
Page 40

Page 41

omni.net LCD series Quick Start Guide
5.
This chapter shows you how to set up a PPP connection by using ZyXEL’s ISDN Configuration
Manager with the Windows operating system.
To access the Internet, you must first install TCP/IP on your computer and then configure TCP/IP.
After TCP/IP configuration, you may set up PPP by using ZyXEL’s ISDN Configuration
Manager and create a PPP connection to access the Internet.
PPP Setup for Windows
Install TCP/IP
If TCP/IP is already installed in your computer then you may go to the next section entitled
Configure TCP/IP
Step 1.
Step 2.
Step 3.
Click
Click
Highlight
. If not, follow the steps below:
Start, Settings, Control Panel
Add.
Protocol
and then click on “
and then double-click on the
Add…
”.
Highlight
Protocol
then click
Add…
“
Network
and
”.
icon.
5-1
Page 42

omni.net LCD series Quick Start Guide
Step 4.
Highlight
Microsoft, TCP/IP
and then click OK.
Highlight
Microsoft
Highlight
TCP/IP
Click OK.
.
.
Configure TCP/IP
If TCP/IP is already installed in your computer then you may go to the next section entitled
Setup by ZyXel ISDN Configuration Manager
Step 1.
Start, Settings, Control Panel
Click
. If not, follow the steps below:
and then double-click on
Network
icon.
PPP
Step 2.
Step 3.
Select
Press on
automatically.
address
TCP/IP
IP Address
and then click
tab. In most cases, you have to select
Properties
.
If you have an assigned IP address from your ISP, select
then enter your IP address and subnet mask.
5-2
Obtain an IP address
Specify an IP
Page 43

omni.net LCD series Quick Start Guide
Step 4.
Domain
Click the
name,
DNS Configuration
Host
name and then click OK.
tab, click the
Enable DNS
Configuration
option button, enter your
DNS
Click
Enable DNS
clicking here.
Enter your
Domain
name.
Enter your
name.
Finally, click OK.
PPP Setup by ZyXEL ISDN Configuration Manager
file.
by
Host
If you have not yet installed the
4
and follow the instructions. Follow the instructions below only if you have the
Configuration Manager
Step 1.
From the
Manager.
Start
Or, you may click on
currently installed.
menu select
The Configuration Manager then searches for your TA. Look for the
Setting
window as shown next:
ZyXEL Configuration Manager
Programs
ZyICM
to choose
icon from your desktop, as shown below:
5-3
ZyXEL ISDN Configuration
then please go back to
Country Code
Section
ZyXEL
Page 44

omni.net LCD series Quick Start Guide
Step 2.
Select the country where your TA is located and then click OK. If you can not find your
country location on this list then please select
Others
which is located at the end of this list.
Highlight the
country where
your TA is
currently
located.
Click OK.
5-4
Page 45

omni.net LCD series Quick Start Guide
Step 3.
Step 4.
Click on configuration icon as shown below.
Use the drop-down list to select
PPP
and then click OK.
Click here.
5-5
Highlight
the drop down
PPP
menu.
Click OK.
in
Page 46

omni.net LCD series Quick Start Guide
Click the
that is connected to
your TA. Select one
Click OK.
COM Port
COM Port
only.
Create a PPP Connection
At this point, you very close to accessing the Internet. Follow the instructions below to create a
Dial-up Connection
new
Step 1.
Double-click on the
then double-click on
Step 2.
Give a name to this Dial-up Connection, for example, “omni.net LCD TA” for
identification purposes. Double-click on your new TA icon as the device to connect to the
Internet and then click
Step 3.
Step 4.
Enter your ISP's phone number and then click
Click
Finish
.
My Computer
icon, double-click on the
Add New Dial-up Connection
Next
.
Next
.
.
Dial-up Network
. Click on your recently created icon to connect to the Internet.
icon and
Step 5.
Congratulations, you have completed PPP setup and can now access the Internet using
your new TA! To test your connection and find out more about ZyXEL’s exciting products
visit www.zyxel.com .
5-6
Page 47

omni.net LCD series Quick Start Guide
6.
Install Driver and PPP Setup for
MacOS
This section provides step by step procedures to install the USB driver and set up PPP on MacOS.
Install Driver for MacOS
ZyXEL_USB_Installer, a MindVision VISE Installer, is used to install ZyXEL USB omni.net LCD
Plus SUB driver on your Macintosh computer. Follow the instructions below.
Step 1.
Step 2.
Step 3.
Be sure your omni.net LCD Plus is on.
Insert the
see the icon as shown below.
Plug the USB connector that is attached to your USB-TA into any one of your computer
devices with USB port, (such as your monitor, keyboard, etc).
BONUS CD
attached with your TA device into your
CD-ROM
drive. You will
Step 4.
Note: If you have used the USB connector to connect your USB-TA with another USB
device before you have inserted the BONUS CD into your CD-ROM drive, then your
Double click on the
computer will show an error message.
ZyXEL_USB_Installer
icon and then click
6-1
Continue
.
Page 48

omni.net LCD series Quick Start Guide
Step 5.
Click on
Install
folder of the system folder.
Step 6.
Installation is almost complete. You must restart your Macintosh to activate the USB device
driver. Click
Continue.
button. The ZyXEL USB device driver will be installed in the extension
Click here.
6-2
Click here.
Page 49

Step 7.
Click on
Restart
omni.net LCD series Quick Start Guide
to reboot your Macintosh.
Click
Step 8.
Congratulations, you have finished the USB driver installation for your MacOS. Please
follow the information, in the following section, and set up a PPP connection for Internet
access.
Restart
.
6-3
Page 50

omni.net LCD series Quick Start Guide
OT/PPP Setup for MacOS
Before using OT/PPP, you must first use
Access (or PPP).
Set up the Modem Control Panel
Step 1.
should see the
Step 2.
pop-up menu.
Step 3.
up menu.
Step 4.
Choose
Control Panels
Modem
window shown below:
Choose the port connected to the ZyXEL USB omni.net LCD PLUS from the “Connect via”
Choose
ZyXEL ISDN PPP 64K
Close and save.
from
Apple Menu
Control Panels
ZyXEL ISDN MP/PPP 128K
or
to set up a TCP/IP, Modem and Remote
and open the
Modem control panel
. You
from the “Modem” pop-
6-4
Click here.
Page 51

Set up TCP/IP for PPP
omni.net LCD series Quick Start Guide
Step 1.
see the
Step 2.
Choose Control Panels from
TCP/IP
Choose
window shown below:
PPP
from the “
Connect via
Apple Menu
” pop-up menu.
and open the TCP/IP control panel. You should
Select
Select your
configuration
method.
Enter your
name server
addr
Close and
save.
PPP
ess(es).
.
Step 3.
Step 4.
Choose your configuration method from the “
PPP Server
.
The most common selection is
address from the server when it connects.
Step 5.
Step 6.
Enter name server addresses.
Close and save.
Configure
Using PPP Server
6-5
” pop-up menu. For example,
which causes OT/PPP to request IP
Using
Page 52

omni.net LCD series Quick Start Guide
Set up Remote Access (or PPP)
Step 1.
control panel
Step 2.
Choose
Click here.
Click
Setup
Control Panels
from
. You should see the
to show this panel’s screen.
Apple Menu
Remote Access
and then open the
window shown below:
Remote Access(or PPP
Click on the
appropriate
button.
Type in your
PPP
Type in your
Password
Type in your
ISP’s
Telelphone
Number
Click here.
Name
.
.
.
)
Step 3.
Step 4.
Step 5.
Step 6.
Step 7.
Guest
Click
Enter your PPP user
Enter your ISP's telephone number in the
Connect.
Click
Congratulations, you have successfully set up OT/PPP for MacOS. Be sure to visit
Registered User
or
Name
and
.
Password
in the required fields.
Number
field.
This will start to dial up and make an OT/PPP connection.
www.zyxel.com to test your connection and find out more about ZyXEL’s exciting products.
6-6
Page 53

omni.net LCD series Quick Start Guide
7.
ZyXEL
Customer Support
ISDN Terminal Adapter
If you have any questions about your ZyXEL product or desire customer assistance, contact ZyXEL
in one of the following ways.
Method
Region
Worldwide
North
America
Scandinavia
Austria
Germany
EMAIL – Support Telephone Web Site
EMAIL – Sales Fax FTP Site
support@zyxel.com.tw
support@europe.zyxel.com
sales@zyxel.com.tw
support@zyxel.com
sales@zyxel.com
support@zyxel.dk
sales@zyxel.dk
support@zyxel.at
sales@zyxel.at
support@zyxel.de
sales@zyxel.de
+886-3-578-3942
+886-3-578-2439
+1-714-632-0882
800-255-4101
+1-714-632-0858
+45-3955-0700
+45-3955-0707
+43-1-4948677-0
0810-1-ZyXEL
0810-1-99935
+43-1-4948678
+49-2405-6909-0
0180-5213247
Tech Support hotline
0180-5099935
RMA/Repair hotline
+49-2405-6909-99
www.zyxel.com
www.europe.zyxel.com
ftp.europe.zyxel.com
www.zyxel.com
ftp.zyxel.com
www.zyxel.dk
ftp.zyxel.dk
www.zyxel.at
ftp.zyxel.at
Note: for Austrian users with *.at
domain only!
www.zyxel.de
ftp.europe.zyxel.com
Regular Mail
ZyXEL Communications
Corp., 6 Innovation Road II,
Science-Based Industrial
Park, HsinChu, Taiwan.
ZyXEL Communications Inc.,
1650 Miraloma Avenue,
Placentia, CA 92870, U.S.A.
ZyXEL Communications A/S,
Columbusvej 5, 2860
Soeborg, Denmark.
ZyXEL Communications
Services GmbH.,
Thaliastrasse 125a/2/2/4,
A-1160 Vienna, Austria
ZyXEL Deutschland GmbH.,
Adenauerstr. 20/A4, D-52146
Wuerselen, Germany.
ZyXEL
T
OTAL INTERNET ACCESS SOLUTION
A
 Loading...