

Page 1

GS-105A/108A
Gigabit Switch
User’s Guide
Version 3.00
Edition 1
v
9/2006
Table of Contents
ENGLISH 1
DEUTSCH 13
ESPAÑOL 19
FRANÇAIS 25
ITALIANO 31
SVENSKA 37
繁體中文 41
Copyright © 2006. All rights reserved.
Page 2

ENGLISH
ENGLISH
1 Introduction
The switch is a multi-port switch that can be used to build
high-performance switched networks. The switch is a
store-and-forward device that offers low latency for highspeed networking. The switch is designed for SOHO
(Small Office Home Office) businesses.
The switch can be used as a standalone switch to which
computers, servers and print server are directly
connected to form a small workgroup.
2 Hardware Installation
The switch is suitable for an office environment where it
can be placed on a desktop.
1 Make sure the switch is clean and dry.
2 Set the switch on a smooth, level flat space strong
enough to support the weight of the switch and the
connected cables. Make sure there is a power outlet
nearby.
3 Use only the supplied power adaptor to connect your
switch to a power source. Refer to the label on the
power adapter for more information.
1
Page 3
ENGLISH
" Do not block the ventilation holes.
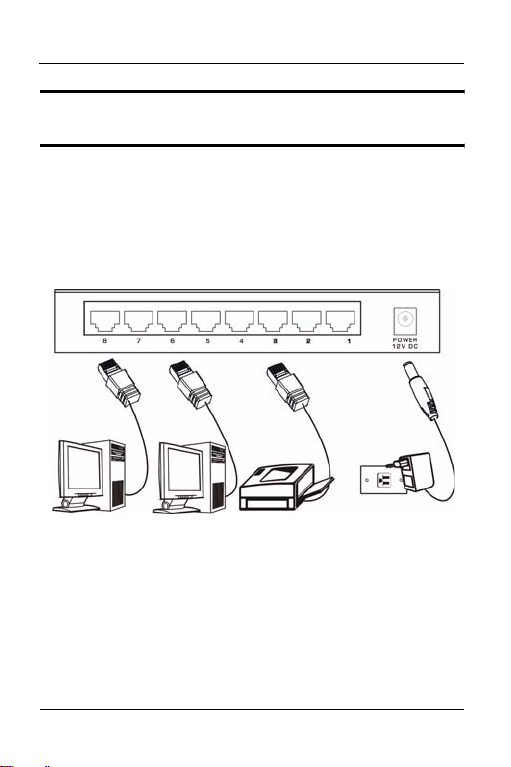
3 Hardware Connection
The power and the Ethernet ports are located on the rear
panel.
3.1 Power Connection
Connect one end of the supplied power adaptor to the
power port on the rear panel of the switch and the other
end to the appropriate power source. The PWR LED turns
on.
2
Page 4

ENGLISH
3.2 RJ-45 Auto-negotiating Ports
The switch comes with 5 or 8 10/100/1000M RJ-45 ports
depending on the model of your switch. The autonegotiation feature allows the switch to detect the speed
of incoming transmission and adjust appropriately without
manual intervention. It allows data transfers of 10 Mbps,
100 Mbps or 1000 Mbps in either half-duplex or fullduplex mode depending on your Ethernet network.
3.3 Auto-crossover Ethernet Ports
All ports are auto-crossover, that is auto-MDIX ports
(Media Dependent Interface Crossover), so you may use
either a straight-through Ethernet cable or crossover
Ethernet cable for all Ethernet port connections. Autocrossover ports automatically sense whether they need to
function as crossover or straight ports, so crossover
cables can connect both computers and switches/hubs.
Refer to the Product Specifications section for the types
of network cable used for the different connection
speeds.
3
Page 5
ENGLISH
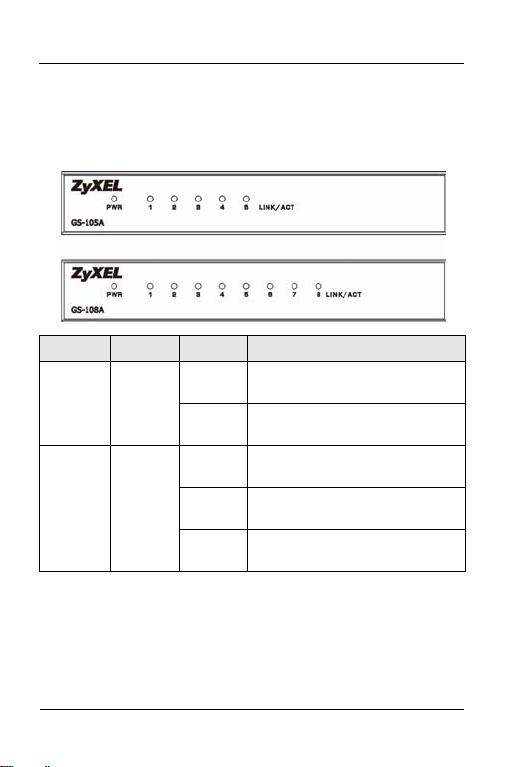
3.4 Front Panel LEDs
The LEDs on the front panel indicate the real-time status
of the switch.
LED COLOR STATUS DESCRIPTION
PWR Green On The switch is on and receiving
Off The switch is not receiving
LNK/
ACT
Green On The port is connected to an
Blinking The port is receiving or
Off The port is not connected to an
power.
power.
Ethernet network.
transmitting data.
Ethernet network.
4
Page 6

ENGLISH
4 Product Specification
Standard IEEE 802.3 10BASE-T Ethernet
Protocol CSMA/CD
Technology Store-and-Forward switching architecture
Transfer Rate 14,880 pps for 10Mbps
Connector 5/8 Gigabit Copper: RJ-45
MAC Address 8K MAC address table
Memory Buffer GS-105A: 112K byte
Network Cable
(Up to 100m or
328ft)
Backplane GS-105A: 10Gbps
LED Per port: LNK/ACT
Power Supply External power DC 12V/1A
Power
Consumption
IEEE 802.3u 100BASE-TX Fast Ethernet
IEEE 802.3ab Gigabit Ethernet
IEEE802.3x Full Duplex Operation and Flow
Control
148,800 pps for 100Mbps
488,000 pps for 1000Mbps
Auto-MDIX on all ports
GS-108A: 144K byte
10BASE-T: 100W 2-pair UTP/STP Cat. 3, 4, 5
100BASE-TX: 100W 2-pair UTP/STP Cat. 5
Gigabit Copper: 100W 4-pair UTP/STP Cat. 5
GS-108A: 16Gbps
Per unit: PWR
GS-105A: 3.96 Watt (maximum)
GS-108A: 6.60 Watt (maximum)
5
Page 7

ENGLISH
Operation
Temperature
Operation
Humidity
Dimension 160 x 110 x 26 mm (L x W x H)
EMI & Safety FCC Class B, CE
0º C to 45º C (32º F to 113º F)
10% to 90% (Non-condensing)
Certifications
Federal Communications Commission (FCC)
Interference Statement
This device complies with Part 15 of FCC rules. Operation
is subject to the following two conditions:
• This device may not cause harmful interference.
• This device must accept any interference received,
including interference that may cause undesired operations.
FCC Warning
This device has been tested and found to comply with the
limits for a Class A digital switch, pursuant to Part 15 of
the FCC Rules. These limits are designed to provide
reasonable protection against harmful interference in a
commercial environment. This device generates, uses,
and can radiate radio frequency energy and, if not
6
Page 8

ENGLISH
installed and used in accordance with the instruction
manual, may cause harmful interference to radio
communications. Operation of this device in a residential
area is likely to cause harmful interference in which case
the user will be required to correct the interference at his
own expense.
CE Mark Warning
This is a class A product. In a domestic environment this
product may cause radio interference in which case the
user may be required to take adequate measures.
Notices
Changes or modifications not expressly approved by the
party responsible for compliance could void the user's
authority to operate the equipment.
This Class A digital apparatus complies with Canadian
ICES-003.
Cet appareil numérique de la classe A est conforme à la
norme NMB-003 du Canada.
7
Page 9

ENGLISH
Taiwanese BSMI (Bureau of Standards, Metrology
and Inspection) A Warning:
Viewing Certifications
Refer to the product page at www.zyxel.com.
Safety Warnings
" For your safety, be sure to read and follow
all warning notices and instructions.
• Do NOT use this product near water, for example, in a
wet basement or near a swimming pool.
• Do NOT expose your device to dampness, dust or corrosive liquids.
• Do NOT store things on the device.
8
Page 10

ENGLISH
• Do NOT install, use, or service this device during a thunderstorm. There is a remote risk of electric shock from
lightning.
• Connect ONLY suitable accessories to the device.
• Do NOT open the device or unit. Opening or removing
covers can expose you to dangerous high voltage points
or other risks. ONLY qualified service personnel should
service or disassemble this device. Please contact your
vendor for further information.
• Make sure to connect the cables to the correct ports.
• Place connecting cables carefully so that no one will
step on them or stumble over them.
• Always disconnect all cables from this device before
servicing or disassembling.
• Use ONLY an appropriate power adaptor or cord for
your device.
• Connect the power adaptor or cord to the right supply
voltage (for example, 110V AC in North America or
230V AC in Europe).
• Do NOT allow anything to rest on the power adaptor or
cord and do NOT place the product where anyone can
walk on the power adaptor or cord.
• Do NOT use the device if the power adaptor or cord is
damaged as it might cause electrocution.
• If the power adaptor or cord is damaged, remove it from
the power outlet.
9
Page 11

ENGLISH
• Do NOT attempt to repair the power adaptor or cord.
Contact your local vendor to order a new one.
• Do not use the device outside, and make sure all the
connections are indoors. There is a remote risk of electric shock from lightning.
• Do NOT obstruct the device ventilation slots, as insufficient airflow may harm your device.
• If you wall mount your device, make sure that no electrical lines, gas or water pipes will be damaged.
This product is recyclable. Dispose of it properly.
10
Page 12

ENGLISH
Warranty
ZyXEL Limited Warranty
ZyXEL warrants to the original end user (purchaser) that
this product is free from any defects in materials or
workmanship for a period of up to two years from the date
of purchase. During the warranty period, and upon proof
of purchase, should the product have indications of failure
due to faulty workmanship and/or materials, ZyXEL will,
at its discretion, repair or replace the defective products
or components without charge for either parts or labor,
and to whatever extent it shall deem necessary to restore
the product or components to proper operating condition.
Any replacement will consist of a new or re-manufactured
functionally equivalent product of equal or higher value,
and will be solely at the discretion of ZyXEL. This
warranty shall not apply if the product has been modified,
misused, tampered with, damaged by an act of God, or
subjected to abnormal working conditions.
11
Page 13

ENGLISH
Note
Repair or replacement, as provided under this warranty, is
the exclusive remedy of the purchaser. This warranty is in
lieu of all other warranties, express or implied, including
any implied warranty of merchantability or fitness for a
particular use or purpose. ZyXEL shall in no event be held
liable for indirect or consequential damages of any kind to
the purchaser.
To obtain the services of this warranty, contact ZyXEL's
Service Center for your Return Material Authorization
number (RMA). Products must be returned Postage
Prepaid. It is recommended that the unit be insured when
shipped. Any returned products without proof of purchase
or those with an out-dated warranty will be repaired or
replaced (at the discretion of ZyXEL) and the customer
will be billed for parts and labor. All repaired or replaced
products will be shipped by ZyXEL to the corresponding
return address, Postage Paid. This warranty gives you
specific legal rights, and you may also have other rights
that vary from country to country.
12
Page 14

DEUTSCH
DEUTSCH
1 Einleitung
Der Switch ist ein Multiport-Switch, der zum Aufbau
geschalteter Hochleistungsnetzwerke eingesetzt werden
kann. Der Switch ist ein Teilstrecken-Gerät („Store and
forward“) der geringe Latenz für
Hochgeschwindigkeitsnetzwerkanwendungen bietet. Der
Switch wurde für SOHO-Anwendungen (kleine Büro- und
Heimanwendungen) entwickelt.
Der Switch kann als selbständiger Switch eingesetzt
werden, an den Computer, Server und Druckserver zur
Bildung einer kleinen Arbeitsgruppe direkt angeschlossen
werden.
2 Hardware-Installation
Der Switch eignet sich für Büroumgebungen und kann auf
einem Schreibtisch platziert werden.
1 Vergewissern Sie sich, dass der Switch sauber und
trocken ist.
2 Setzen Sie den Switch auf eine glatte, waagerechte
Oberfläche, die stabil genug ist, den Switch und die
angeschlossenen Kabel zu tragen. Vergewissern Sie
sich, dass sich eine Steckdose in der Nähe befindet.
3 Verwenden Sie nur das mitgelieferte Netzteil, um
Ihren Switch mit einer Stromquelle zu verbinden. Das
Typenschild des Netzteils bietet Ihnen weitere
Informationen.
13
Page 15

DEUTSCH
" Blockieren Sie nicht die
Belüftungsöffnungen.
3 Hardware-Anschluss
Die Stromversorgungs- und Ethernet-Anschlüsse befinden sich auf
der Rückseite.
3.1 Stromanschluss
Verbinden Sie ein Ende des mitgelieferten Netzteils mit dem
Stromanschluss auf der Rückseite des Switches, das andere Ende
mit einer geeigneten Stromquelle. Die PWR-LED leuchtet auf.
14
Page 16

DEUTSCH
3.2 RJ-45 Auto-negotiating-Ports
Der Switch wird mit 5 oder 8 10/100/1000M RJ45-Ports
geliefert, je nach Modell Ihres Switchs. Die Autonegotiation-Funktion ermöglicht dem Switch, die
Geschwindigkeit ankommender Übertragungen zu
erkennen und sich ohne manuellen Eingriff darauf
einzustellen. Sie erlaubt Datenübertragung mit 10 Mbps,
100 Mbps oder 1000 Mbps im Halb- oder
Vollduplexmodus, abhängig von Ihrem EthernetNetzwerk.
3.3 Auto-crossover-Ethernetports
Sämtliche Ports sind als Auto-crossover-Ports , nämlich
als Auto-MDIX-Ports (Media Dependent Interface
Crossover) ausgelegt - also können Sie entweder
durchkontaktierte oder gekreuzte (Crossover)
Ethernetkabel für alle Ethernetportverbindungen
benutzen. Auto-crossover-Ports erkennen automatisch,
ob sie als Crossover- oder als Direkt-Ports arbeiten
müssen, daher können Sie Crossover-Kabel sowohl zum
Anschluss von Computern als auch zum Anschluss von
Switches / Hubs verwenden.
Eine Übersicht über die für verschiedene
Verbindungsgeschwindigkeiten einsetzbaren Kabeltypen
finden Sie im Abschnitt Produktspezifikationen.
15
Page 17

DEUTSCH
4 Frontplatten-LEDs
Die LEDs an der Frontplatte zeigen den Echtzeit-Staus
des Switchs an.
LED FARBE STATUS BESCHREIBUNG
PWR Grün An Der Switch ist eingeschaltet und wird
Aus Der Switch wird nicht mit Strom
LNK/
Grün An Der Port ist mit einem Ethernet-
ACT
Blinken Der Port empfängt oder sendet
Aus Der Port ist nicht mit einem Ethernet-
mit Strom versorgt.
versorgt.
Netzwerk verbunden.
Daten.
Netzwerk verbunden.
16
Page 18

DEUTSCH
5 Produktspezifikationen
Standard IEEE 802.3 10BASE-T Ethernet,
IEEE 802.3u 100BASE-TX Fast Ethernet
IEEE 802.3ab Gigabit Ethernet
IEEE802.3x mit Vollduplexbetrieb und
Protokoll CSMA/CD
Technologie Store-and-Forward switching-Architektur
Transferrate 14.880 pps bei 10 Mbps
Anschluss 5/8 Gigabit-Kupfer: RJ-45 ; Auto-MDIX an
MAC-Adresse 8K Mac-Adresstabelle
Speicherpuffer GS-105A: 112 KB
Netzwerkkabel
(bis 100 m)
Bus-Leiterplatte GS-105A: 10 Gbps
LED Pro Port: LNK/ACT
Stromversorgung Externe Stromversorgung, 12 V Gleichstrom
Stromverbrauch GS-105A: 3,96 Watt (maximal)
Flusskontrolle
148.800 pps bei 100 Mbps
1.488.000 pps bei 1000 Mbps
allen Ports
GS-108A: 144 KB
10BASE-T: 100 Ω 2-adrig UTP / STP Cat. 3,
4, 5
100BASE-TX: 100 Ω 2-adrig UTP / STP Cat.
5
Gigabit-Kupfer: 100 Ω 4-adrig UTP / STP
Cat. 5
GS-108A: 16 Gbps
Pro Gerät: PWR
/ 1 A
GS-108A: 6,60 Watt (maximal)
17
Page 19

DEUTSCH
Betriebstemperatur 0 °C bis 45 °C
Betriebsluftfeuchtigk
eit
Abmessungen 160 x 110 x 26 mm (L x B x H)
EMI & Sicherheit FCC Klasse B, CE
10 % bis 90 % (nicht kondensierend)
18
Page 20

ESPAÑOL
ESPAÑOL
1 Introducción
El switch es un switch multipuerto que puede utilizarse
para construir redes conmutadas de alto rendimiento. El
switch es un dispositivo de almacenamiento y reenvío
que ofrece baja latencia para redes de alta velocidad El
switch se ha diseñado para negocios SOHO (pequeñas
oficinas).
El switch puede utilizarse como un switch independiente
al que ordenadores, servidores y servidores de impresión
pueden conectarse directamente para formar un pequeño
grupo de trabajo.
2 Instalación de hardware
El switch es adecuado para el entorno de una oficina
donde puede ser colocado en un escritorio.
1 Asegúrese de que el switch está limpio y seco.
2 Coloque el switch en un espacio plano y suave, lo
suficientemente robusto como para soportar el peso
del switch y los cables conectados. Asegúrese de que
hay un enchufe de alimentación cercano.
3 Use solo el adaptador de alimentación suministrado
para conectar su switch a una fuente de alimentación.
Consulte la etiqueta que hay en el adaptador de
alimentación para más información.
19
Page 21

ESPAÑOL
" No bloquee las aberturas de ventilación.
3 Conexión de hardware
Los puertos de alimentación y Ethernet se encuentran en
el panel posterior.
3.1 Conexión de alimentación
Conecte un extremo del adaptador de alimentación
suministrado al puerto de alimentación en el panel
posterior del switch y el otro extremo a la fuente de
alimentación apropiada. El LED PWR se encenderá.
20
Page 22

ESPAÑOL
3.2 Puertos RJ-45 autonegociantes
El switch viene con 5 u 8 puertos 10/100/1000M RJ-45
según el modelo de su switch. La función de
autonegociación permite al switch detectar la velocidad
de la transmisión entran y ajustarse adecuadamente sin
intervención manual. Permite transferencias de datos de
10 Mbps, 100 Mbps o 1000 Mbps en modo half duplex o
full duplex dependiendo de su red Ethernet.
3.3 Puertos ethernet Auto-cruce
Todos los puertos son auto-cruce, que son puertos autoMDIX, de modo que puede user cables ethernet directos
o cruzados para todas las conexiones de puerto. Los
puertos de auto-cruce notan automáticamente si
necesitan funcionar como puertos de cruce o directos, de
modo que puedan conectarse cables cruzados tanto a
ordenadores como a swtiches/hubs.
Consulte las Especificaciones de producto para conocer
los tipos de cable de red utilizados para las diferentes
velocidades de conexión.
21
Page 23

ESPAÑOL
4 LEDs de Panel Frontal
Los LEDs del panel frontal indican el estado del switch en
tiempo real.
LED COLOR ESTADO DESCRIPCIÓN
PWR Verde Activado El switch está encendido y
Desactivado El switch no está recibiendo
LNK/
Verde Activado El puerto está conectado a una red
ACT
ParpadeandoEl puerto está recibiendo o
Desactivado El puerto está conectado a una red
recibiendo alimentación.
alimentación.
Ethernet.
transmitiendo datos.
Ethernet.
22
Page 24

ESPAÑOL
5 Especificaciones de producto
Estándar IEEE 802.3 10BASE-T Ethernet,
IEEE 802.3u 100BASE-TX Fast Ethernet
IEEE 802.3ab Gigabit Ethernet
Operación y control de flujo IEEE802.3x
Protocolo CSMA/CD
Tecnología Arquitectura Store-and-Forward
Velocidad de
transferencia
Conector 5/8 Gigabit Copper: RJ-45 ; Auto-MDIX en
Dirección MAC Tabla de direcciones Mac de 8K
Búfer de memoria GS-105A: 112K bytes
Cable de red
(Hasta 100m o 328ft)
Placa base GS-105A: 10Gbps
LED Por puerto: LNK/ACT
Fuente de
alimentación
Consumo de
alimentación
Temperatura de
funcionamiento
Full Duplex
14,880 pps para 10Mbps
148,800 pps para 100Mbps
1,488,000 pps para 1000Mbps
todos los puertos
GS-108A: 144K bytes
10BASE-T: 100Ω 2 pares UTP/STP. 3, 4, 5
100BASE-TX: 100Ω 2 pares UTP/STP. 5
Gigabit Copper: 100Ω 4 pares UTP/STP. 5
GS-108A: 16Gbps
Por unidad: PWR
Alimentación externa DC 12V/1A
GS-105A: 3.96 Watios (máximo)
GS-108A: 6.60 Watios (máximo)
0ºC a 45ºC (32ºF a 113ºF)
23
Page 25

ESPAÑOL
Humedad de
funcionamiento
Dimensiones 160 x 110 x 26 mm (L x A x H)
EMI y Seguridad FCC Clase B, CE
10% a 90% (Sin condensación)
24
Page 26

FRANÇAIS
FRANÇAIS
1 Introduction
Ce commutateur est un commutateur multi-port qui peut
être utilisé pour mettre en place des réseaux commutés à
hautes performances. Ce commutateur est un
périphérique de stockage et de retransmission qui offre
un faible temps de latence pour des réseaux grand
vitesse. Ce commutateur a été conçu pour les entreprises
de type petits bureaux/bureaux à la maison.
Ce commutateur peut être utilisé comme un commutateur
autonome auquel les ordinateurs, serveurs et serveurs
d'impression sont directement connectés pour former un
petit groupe de travail.
2 Installation de l'équipement
Ce commutateur convient dans un environnement de
bureau où il est placé sur un bureau.
1 Assurez-vous que le commutateur est bien propre et
sec.
2 Installez le commutateur sur une surface douce,
plane et de niveau, suffisamment solide pour
supporter le poids du commutateur et des câbles
connectés. Assurez-vous qu'il y a bien une prise
électrique à proximité.
3 Utilisez exclusivement l'adaptateur d'alimentation
fourni pour brancher votre commutateur sur une
source d'alimentation. Veuillez vous reporter à
25
Page 27

FRANÇAIS
l'étiquette de l'adaptateur d'alimentation pour de plus
amples informations.
" Ne pas obstruer les orifices de ventilation.
3 Connexion de l'équipement
Les ports alimentation et Ethernet sont situés sur le
panneau arrière.
26
Page 28

FRANÇAIS
3.1 Connexion de l'alimentation
Connectez l'une des extrémités de l'adaptateur
d'alimentation fourni sur le port alimentation sur le
panneau arrière du commutateur et l'autre extrémité sur
la source d'alimentation appropriée. Le voyant DEL PWR
s'allume.
3.2 Ports à négociation automatique RJ-45
Le commutateur s'accompagne de 5 ou 8 ports RJ-45 10/
100/1000M selon le modèle que vous avez choisi. Le
fonction de négociation automatique permet au
commutateur de détecter la vitesse de la transmission en
réception et de s'ajuster en conséquence sans
intervention manuelle. Il permet les transferts de données
jusqu'à 10 Mbps, 100 Mbps ou 1000 Mbps en mode soit
demi-duplex, soit duplex intégral selon votre réseau
Ethernet.
3.3 Ports Ethernet Auto-crossover
Tous les ports sont auto-crossover, c'est-à-dire que ce
sont des ports auto-MDIX (Media Dependant Interface
Crossover), si bien que vous pouvez utiliser soit un câble
Ethernet intermédiaire ou un câble Ethernet crossover
pour la connexion de tous les ports Ethernet. Les ports
auto-crossover déterminent automatiquement s'ils
27
Page 29

FRANÇAIS
doivent fonctionner comme ports crossover ou comme
ports intermédiaires, de sorte que les câbles crossover
permettent de connecter à la fois les ordinateurs et les
interrupteurs/hubs.
Veuillez vous reporter à la section Spécifications du
produit pour les types de câble réseau utilisés pour les
différentes vitesses de connexion.
4 Voyants DEL du panneau avant
Les voyants DEL sur le panneau avant indiquent l'état en
temps réel du commutateur.
VOYANT
DEL
PWR Vert Allumé Le commutateur est allumé et
COULEUR ETAT DESCRIPTION
alimenté.
Eteint Le commutateur n'est pas
alimenté.
28
Page 30

FRANÇAIS
VOYANT
DEL
LNK/ACT Vert Allumé Le port est connecté à un réseau
COULEUR ETAT DESCRIPTION
Ethernet.
ClignotantLe port est en train de recevoir
Eteint Le port n'est pas connecté à un
ou d'émettre des données.
réseau Ethernet.
5 Spécifications du produit
Norme IEEE 802.3 10BASE-T Ethernet,
IEEE 802.3u 100BASE-TX Fast Ethernet
IEEE 802.3ab Gigabit Ethernet
Fonctionnement IEEE802.3x Duplex intégral
et contrôle de flux
Protocole CSMA/CD
Technologie Architecture de commutation stockage et
Taux de transfert 14,880 pps pour 10Mbps
Connecteur Cuivre 5/8 Gigabit : RJ-45 ; Auto-MDIX sur
Adresse MAC Table d'adresses 8K Mac
Tampon mémoire GS-105A: 112K Koctets
Câble réseau
(Jusqu'à 100m ou
328 pieds)
retransmission
148,800 pps pour 100Mbps
1,488,000 pps pour 1000Mbps
tous les ports
GS-108A: 144K Koctets
10BASE-T : 100Ω 2-paires UTP/STP Cat. 3,
4, 5
100BASE-TX : 100Ω 2-paires UTP/STP Cat. 5
Cuivre Gigabit : 100Ω 4-paires UTP/STP Cat.
5
29
Page 31

FRANÇAIS
Plaque arrière GS-105A: 10Gbps
Voyant DEL Par port : LNK/ACTION
Alimentation
électrique
Consommation
électrique
Température de
mise en oeuvre
Humidité de mise
en oeuvre
Dimensions 160 x 110 x 26 mm (Long x Larg x Haut)
EMI & Sécurité FCC Classe B, CE
GS-108A: 16Gbps
Par unité : PWR
Alimentation externe CC 12V/1A
GS-105A : 3,96 Watt (maximum)
GS-108A : 6,60 Watt (maximum)
0º C à 45º C (32º F à 113º F)
10% à 90% (Sans condensation)
30
Page 32

ITALIANO
ITALIANO
1 Introduzione
Il commutatore è un commutatore a più porte che può
essere utilizzato per costruire reti commutate ad alte
prestazioni. Il commutatore è un dispositivo di
memorizzazione e ritrasmissione che offre bassa latenza
per reti ad alta velocità. Il commutatore è progettato per
imprese (domestiche ed i piccoli uffici) SOHO.
Il commutatore può essere utilizzato come commutatore
autonomo al quale sono collegati computer, server e
server di stampa direttamente da un piccolo gruppo di
lavoro.
2 Installazione dell’hardware
Il commutatore è adatto per ambienti in cui può essere
collocato su di una scrivania.
1 Assicurarsi che il commutatore sia pulito ed asciutto.
2 Collocare il commutatore su di una superficie liscia,
piatta e solida in grado di sopportare il peso del
commutatore e dei cavi collegati. Assicurarsi che
nelle vicinanze ci sia una presa di corrente.
3 Utilizzare solamente l’adattatore di corrente fornito
per collegare il commutatore alla presa di corrente.
Fare riferimento all’etichetta sull’adattatore di
corrente per maggiori informazioni.
31
Page 33

ITALIANO
" Non bloccare le aperture di ventilazione.
3 Collegamento dell’hardware
La porta d’alimentazione e le porte Ethernet si trovano
sul pannello posteriore.
3.1 Collegamento dell’alimentazione
Collegare una estremità dell’adattatore di corrente fornito
nella porta d’alimentazione sul pannello posteriore del
commutatore, e l’altra estremità nella presa di corrente
appropriata. Il LED d’alimentazione (PWR) si accende.
32
Page 34

ITALIANO
3.2 Porte auto-negozianti RJ-45
Il commutatore è dotato di 5 o 8 porte 10/100/1.000M RJ45, in base al modello. La funzione di auto-negoziazione
consente al commutatore di rilevare la velocità della
trasmissione in entrata e di regolarsi in modo appropriato
senza interventi manuali. Consente velocità di
trasferimento dati di 10 Mbps, 100 Mbps o 1.000 Mbps in
modalità sia Half Duplex sia Full Duplex, in base alla rete
Ethernet.
3.3 Porte auto-permutanti Ethernet
Tutte le porte sono auto-permutanti, cioè porte MDIX (Media
Dependent Interface Crossover); quindi si può utilizzare sia un cavo
Ethernet diretto, sia un cavo Ethernet incrociato per il collegamento
di tutte le porte Ethernet.
Le porte auto-permutanti rilevano automaticamente se
devono funzionare come porte d’incrocio o porte dirette,
quindi i cavi incrociati possono collegare sia i computer
sia i commutatori / hub.
Fare riferimento alla sezione Specifiche del prodotto per
quanto riguarda i tipi di cavi di rete utilizzati per le varie
velocità dei collegamenti.
33
Page 35

ITALIANO
4 LED del pannello frontale
I LED sul pannello frontale indicano lo stato in tempo
reale del commutatore.
LED COLORE STATO DESCRIZIONE
PWR Verde Acceso Il commutatore è attivo e riceve
Spento Il commutatore non riceve
LNK/
Verde Acceso La porta è collegata ad una rete
ACT
Lampeggia
nte
Spento La porta non è collegata ad una
alimentazione.
alimentazione.
Ethernet.
La porta sta ricevendo o
trasmettendo dati.
rete Ethernet.
34
Page 36

ITALIANO
5 Specifiche del prodotto
Standard Ethernet 10BASE-T IEEE 802.3,
Fast Ethernet IEEE 802.3u 100BASE-TX
Ethernet Gigabit IEEE 802.3ab
Funzionamento IEEE 802.3x in Full Duplex e
Protocollo CSMA/CD
Tecnologia Architettura di commutazione a
Velocità di
trasferimento
Connettore Gigabit Copper 5/8: RJ-45; Auto-MDIX su
Indirizzo MAC Tavola indirizzo MAC 8K
Buffer di memoria GS-105A: 112 KB
Cavo di rete
(fino a 100m o 328
piedi)
Backplane GS-105A: 10Gbps
LED Per le porte: LNK/ACT
Alimentazione Alimentazione esterna CD 12V/1A°
Consumo energetico GS-105A: 3,96 Watt (massimo)
Controllo del flusso
memorizzazione e ritrasmissione
14.880 pps per 10Mbps
148.800 pps per 100Mbps
1.488.000 pps per 1000Mbps
tutte le porte
GS-108A: 144 KB
10BASE-T: 100Ω 2 coppie UTP/STP;
categoria 3, 4, 5
100BASE-TX: 100Ω 2 coppie UTP/STP;
categoria 5
Gigabit Copper: 100Ω 4 coppie UTP/STP;
categoria 5
GS-108A: 16Gbps
Per l’unità: PWR
GS-108A: 6,60 Watt (massimo)
35
Page 37

ITALIANO
Temperatura
operativa
Umidità operativa dal 10% al 90% (senza condensa)
Dimensioni 160 x 110 x 26 mm (larghezza x profondità x
EMI e Sicurezza FCC Class B, CE
da 0º C a 45º C (da 32º F a 113º F)
altezza)
36
Page 38

SVENSKA
SVENSKA
1 Introduktion
Switchen är en flerportars switch som kan användas för
att bygga högpresterande switch-nätverk. Switchen är en
lagrings-och-vidarebefordringsenhet som erbjuder låg
latens för höghastighetsnätverk. Switchen är avsedd för
SOHO-företag (små hemmakontor).
Switchen kan användas som en fristående switch till
dator, server och skrivare för att skapa en arbetsgrupp.
2 Skrivbordsinstallation
Switchen lämpar sig för kontorsmiljö där den kan placeras
på ett skrivbord.
1 Kontrollera att switchen är ren och torr.
2 Placera switchen på ett slätt och stadigt underlag som
är tillräckligt bärkraftigt för att hålla uppe vikten av
switchen och de anslutna sladdarna. Se till att det
finns eluttag i närheten.
3 Använd den medföljande strömadaptern för att
ansluta switchen till en strömkälla. Se märkplåten på
strömadaptern för mer information.
" Ventilationshålen får INTE blockeras.
37
Page 39

SVENSKA
3 Anslutning på bakpanel
RJ-45-portarna och strömporten sitter på bakpanelen.
3.1 RJ-45 autoförhandlande portar
10Base-T/100Base-TX RJ-45-portarna är autoförhandlande och
auto-crossover.
En autoförhandlande port kan detektera och justera till optimal
Ethernet-hastighet (10/100Mpbs) och duplex-läge (full duplex eller
halv duplex) för den anslutna enheten.
En auto-crossover (auto-MDI/MDI-X) port fungerar automatiskt med
en rak (straight-through) eller korsad (crossover) Ethernet-sladd.
" Se till att sladdlängden mellan
anslutningarna inte överstiger 100 meter.
38
Page 40

SVENSKA
3.2 Ström
Använd den medföljande strömsladden för att ansluta
switchen till en strömkälla.
4 Indikatorlampor
Indikatorlamporna på frontpanelen indikerar switchens
realtidsstatus.
INDIKATORLA
MPA
PWR Grön På Switchen är påslagen och tar
LINK/ ACT Grön På Porten är ansluten till ett
COLOR STATUS BESKRIVNING
emot ström.
Av Switch tar inte emot ström.
Ethernetnätverk.
Blinkar Porten tar emot eller överför
Av Porten är inte ansluten till ett
data.
Ethernet-nätverk.
39
Page 41

SVENSKA
5 Produktspecifikationer
Standard IEEE802.3 10BASE-T Ethernet
IEEE802.3u 100BASE-TX Fast Ethernet
IEEE802.3ab Gigabit Ethernet
IEEE802.3x full duplex-drift och flödeskontroll
Protokoll CSMA/CD
Teknologi Lagrings-och-vidarebefordings-
Datavidarebefodrin
gs- hastighet
Anslutning RJ-45; Auto-MDIX på alla portar
MAC-adress 8K MAC-adresstabell
Minnesbuffert GS-105A: 112 KB
Nätverkssladd (upp
till 100 m)
Bakplan GS-105A: 10 Gbps
Indikatorlampa Per port: LINK/ACT
Strömkälla Extern DC 12V/1A
Temperatur Drift: 0 C till 45 C
Luftfuktighet Drift: 10 % till 90 % (icke-kondens)
Mått
L x B x H (mm)
EMI & Säkerhet FCC-klass B, CE
switcharkitektur
14880 pps för 10Base-T (Ethernet)
1488000 pps för 100Base-T (Fast Ethernet)
148800 pps för 1000Base-T (Gigabit
Ethernet)
GS-108A: 144 KB
10BASE-T: 100Ω 2-parig UTP/STP kat. 3, 4, 5
100BASE-TX: 100Ω 2-parig UTP/STP kat. 5
Gigabit koppar: 100W 4-parig UTP/STP kat. 5
GS-108A: 16 Gbps
Per enhet: PWR
160 x 110 x 26
40
Page 42

繁體中文
1 介紹
此為可被用來建立高效能網路之多埠數交換器,為一儲存及
轉寄的設備,可對高速網路可提供低 latency,專為小型公
司及家庭用戶之需求所設計。
此交換器可直接連接電腦、伺服器及印表機伺服器而形成小
型網路。相當適合有桌上型電腦之辦公環境使用。
2 安裝硬體
此交換器相當適合有桌上型電腦之辦公環境使用。
1 確定交換器是乾淨並是乾燥的。
2 將交換器放置於平緩、平坦並足夠堅固可支撐設備及連
接線材的平台 ,且確定附近有電源插座。
3 確定交換器周圍有足夠的空氣流動空隙,且可來放置連
接線及電源線。
"千萬不可阻隔散熱孔,當堆疊放置時,交換器
間應留一定空間。
41
Page 43

繁體中文
3 後背板之連接
RJ-45 網路埠及電源輸入孔位於交換器之背板。
3.1 電源之連接
將電源轉接器一端接至市電插座,另一端接至交換器之後背
板。此時,電源指示燈會正常顯示。
3.2 RJ-45 埠自動偵測
依你所購買的交換器而有 5 埠或 8 埠 10/100/1000M RJ-45
連接埠。而自動偵測的功能讓交換器在不需要手動設定下,
能針對所連接之傳輸速率自動更換至相對應之速率。不論是
在全雙工或半雙工下 ,它將依你的乙太網路環境自動調整
至 10Mbps、100Mbps 或 1000Mbps 資料傳輸速率。
42
Page 44

繁體中文
3.3 自動跳線埠
當連接至電腦或 hub 時,不論你使用何種網路線,每埠均
支援 Auto MDI/MDIX 自動偵測直跳線功能。
4 前面板燈號
你可由前面板上燈號之指示,得知交換器現況。
燈號 顏色 狀態 定義
PWR 綠色 恆亮 交換器是啟動的且正在接收資料
LK/ACT 綠色 恆亮 此埠有連接乙太網路
不亮 交換器電源未開
閃爍 此埠正在接收或傳送資料
不亮 此埠未連接乙太網路
43
Page 45

繁體中文
5 產品規格
標準 IEEE 802.3 10BASE-T Ethernet
通信協定 CSMA/CD
技術 儲存再轉遞交換架構
傳輸速率 10Mbps 可達 14,880 pps
接頭 5/8 Gigabit Copper: RJ-45 ; 所有的埠均支
MAC 位址 8K MAC 位址表
緩衝記憶體 GS-105A: 112K 位元組
網路線
( 最長可至 100 公尺
或 328 英呎)
背板 GS-105A: 10Gbps
燈號 每埠 : LNK/ACT
電源供應 電源 DC 12V/1A
功率消耗 GS-105A: 3.96 瓦 ( 最大 )
工作溫度 0º C to 45º C (32º F to 113º F)
工作濕度 10% to 90% (Non-condensing)
IEEE 802.3u 100BASE-TX Fast Ethernet
IEEE 802.3ab Gigabit Ethernet
IEEE802.3x 全雙工流量控制
100Mbps 可達 148,800 pps
1000Mbps 可達 1,488,000 pps
援 Auto-MDIX
GS-108A: 144K 位元組
10BASE-T: 100Ω 2 對雙絞線 UTP/STP
Cat. 3, 4, 5
100BASE-TX: 100Ω 2 對雙絞線 UTP/STP
Cat. 5
Gigabit 銅線:100Ω 4 對雙絞線 UTP/
STP Cat. 5
GS-108A: 16Gbps
每單位 : PWR
GS-108A: 6.60 瓦 ( 最大 )
44
Page 46

繁體中文
外觀尺寸 160 x 110 x 26 mm (長 x 寬 x 高 )
安規 FCC Class B, CE
45
 Loading...