

Page 1

X6004
IP PBX
Default Login Details
LAN IP https://192.168.1.12
WAN IP https://172.16.1.1
User Name admin
Password 1234
Firmware Version 1.20
Edition 1, 06/2010
www.zyxel.com
www.zyxel.com
Copyright © 2010
ZyXEL Communications Corporation
Page 2

Page 3

About This User's Guide
About This User's Guide
Intended Audience
This manual is intended for people who want to configure the X6004 using the
web configurator. You should have at least a basic knowledge of TCP/IP
networking concepts and topology.
Related Documentation
•Quick Start Guide
The Quick Start Guide is designed to help you get up and running right away. It
contains information on setting up your hardware connections.
• Web Configurator Online Help
Embedded web help for descriptions of individual screens and supplementary
information.
• Command Reference Guide
The Command Reference Guide explains how to use the Command-Line
Interface (CLI) and CLI commands to configure the X6004.
• Support Disc
Refer to the included CD for support documents.
• ZyXEL Web Site
Please refer to www.zyxel.com
product certifications.
for additional support documentation and
Documentation Feedback
Send your comments, questions or suggestions to: techwriters@zyxel.com.tw
Thank you!
The Technical Writing Team, ZyXEL Communications Corp.,
6 Innovation Road II, Science-Based Industrial Park, Hsinchu, 30099, Taiwan.
X6004 User’s Guide
3
Page 4
About This User's Guide
Need More Help?
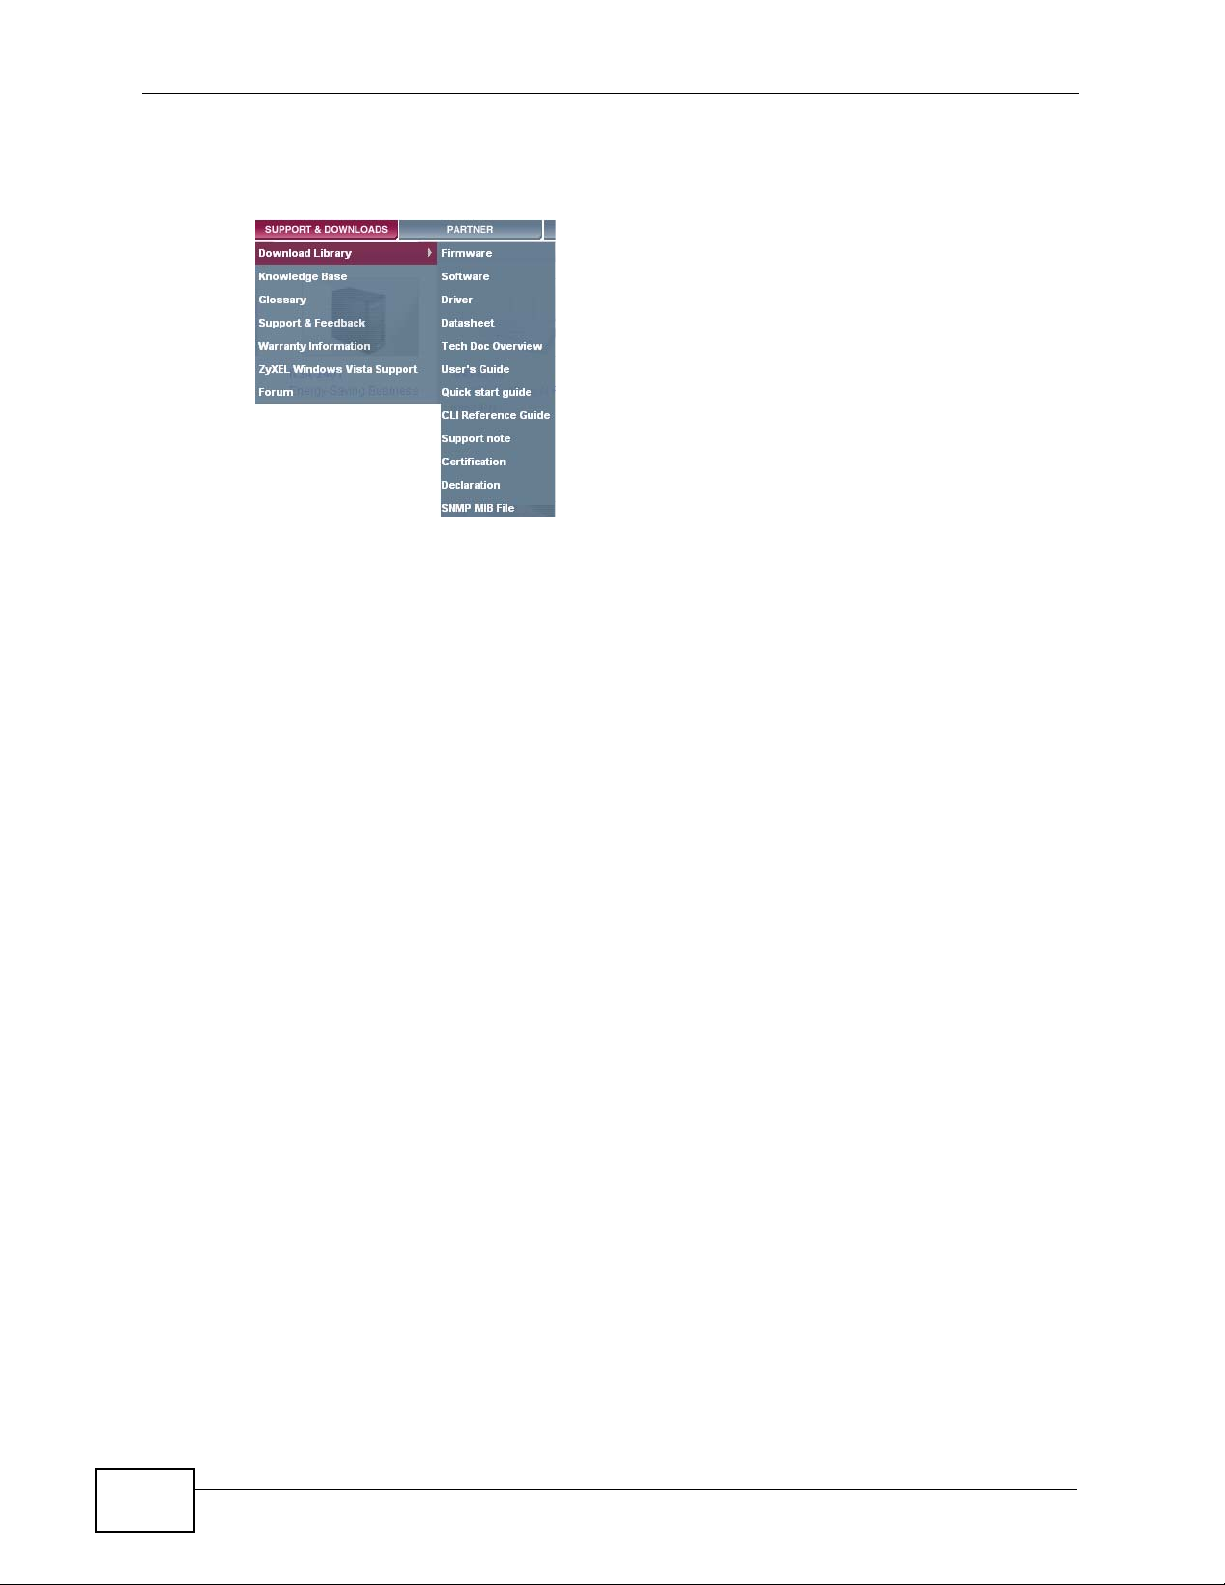
More help is available at www.zyx el.com.
• Download Library
Search for the latest product updates and documentation from this link. Read
the Tech Doc Overview to find out how to efficiently use the documentation in
order to better understand how to use your product.
• Knowledge Base
If you have a specific question abou t your product, the answer may be here.
This is a collection of answers to previously asked questions about ZyXEL
products.
•Forum
This contains discussions on ZyXEL prod ucts. Learn from others who use ZyXEL
products and share your experiences as well.
Customer Support
Should problems arise that cannot be solved by the methods listed above, you
should conta ct your vendor. If you cannot contact your vendor, then contact a
ZyXEL office for the region in which you bought the device.
See http://www.zyxel.com/web/contact_us.php for contact information. Please
have the following informatio n ready when you contact an office.
• Product model and serial number.
•Warranty Information.
• Date that you received your device.
4
• Brief description of the problem and the steps you took to solve it.
X6004 User’s Guide
Page 5

Document Conventions
Document Conventions
Warnings and Notes
These are how warnings and notes are shown in this User’s Guide.
Warnings tell you about things that could harm you or your device.
Note: Notes tell you other important information (for example, other things you may
need to configure or helpful tips) or recommendations.
Syntax Conventions
• The X6004 may be referred to as the “X6004”, the “device” or the “system” in
this User’s Guide.
• Product labels, screen names, field labels and field choices are all in bold font.
• A key stroke is denoted by square brackets and uppercase text, for example,
[ENTER] means the “enter” or “return” key on your keyboard.
• “Enter” means for you to type one or more characters and then press the
[ENTER] key. “Select” or “choose” means for you to use one of the predefined
choices.
• A right angle bracket ( > ) within a screen name denotes a mouse click. For
example, Maintenance > Log > Log Setting means you first click
Maintenance in the navigation panel, then the Log sub menu and finally the
Log Setting tab to get to that screen.
• Units of measurement may denote the “metric” value or the “scientific” value.
For example, “k” for kilo may denote “1000” or “1024”, “M” for mega may
denote “1000000” or “1048576” and so on.
• “e.g.,” is a shorthand for “for instance”, and “i.e.,” means “that is” or “in other
words”.
X6004 User’s Guide
5
Page 6
Document Conventions
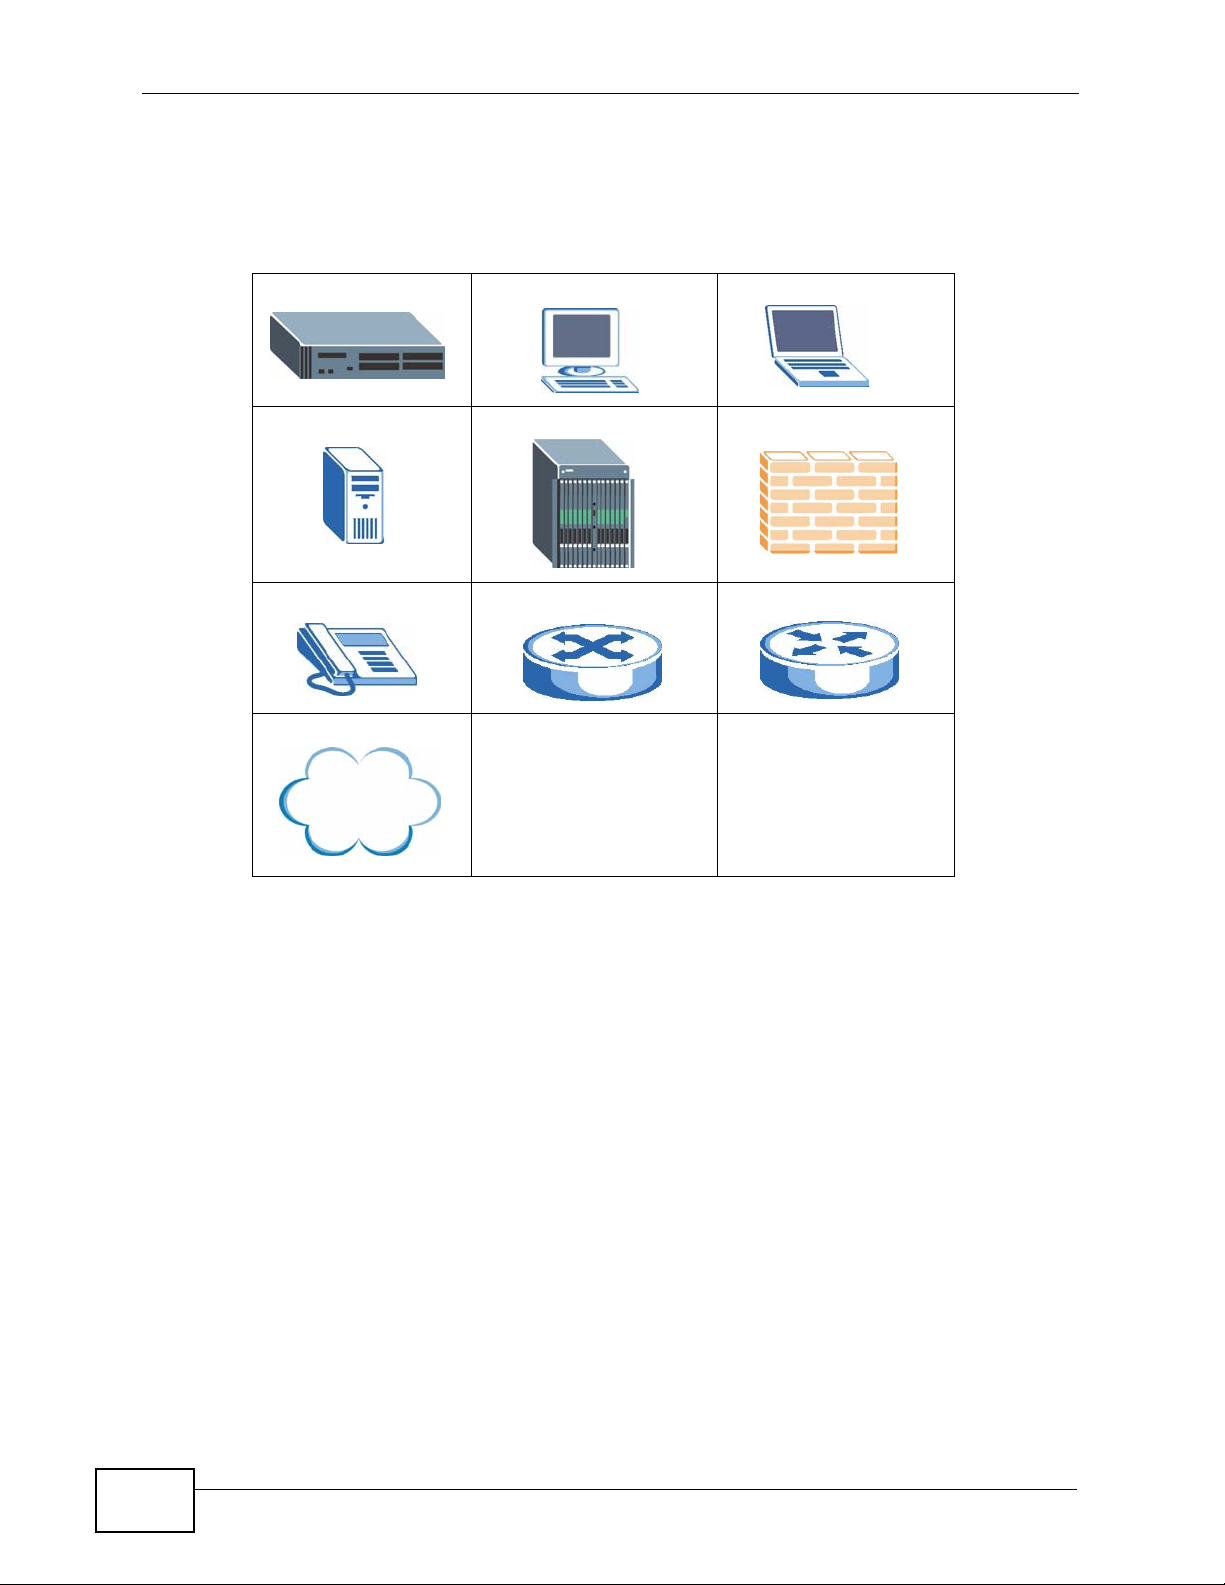
Icons Used in Figures
Figures in this User’s Guide may use the following generic icons. The X6004 icon is
not an exact representation of your device.
The X6004 Computer Notebook computer
Server DSLAM Firewall
Telephone Switch Router
Internet
6
X6004 User’s Guide
Page 7

Safety Warnings
Safety Warnings
For your safety, be sure to read and follow all warning notices and
instructions.
• Do NOT use this product near water, for example, in a wet basement or near a
swimming pool.
• Caution: Risk of explosion if battery (on the motherboard) is replaced by an
incorrect type. Dispose of used batteries according to the instructions. Dispose
them at the applicable collection point for the recycling of electrical and
electronic equipment. For detailed information about recycling of this product,
please contact your local city office, your household waste disposal service or
the store where you purchased the product.
• Do NOT expose your device to dampness, dust or corrosive liquids.
• Do NOT store things on the device.
• Do NOT install, use, or service this device during a thunderstorm. There is a
remote risk of electric shock from lightning.
• Connect ONLY suitable accessories to the device.
• ONLY qualified service personnel should service or disassemble this device.
• Make sure to connect the cables to the correct ports.
• Place connecting cables carefully so that no one will step on them or stumble
over them.
• Always disconnect all cables from this device before servicing or disassembling.
• Use ONLY an appropriate power adaptor or cord for your device. Connect it to
the right supply voltage (for example, 110V AC in North America or 230V AC in
Europe).
• Do NOT allow anything to rest on the power adaptor or cord and do NOT place
the product where anyone can walk on the power adaptor or cord.
• Do NOT use the device if the power adaptor or cord is damaged as it might
cause electrocution.
• If the power adaptor or cord is damaged, remove it from the device and the
power source.
• Do NOT attempt to repair the power adaptor or cord. Contact your local vendor
to order a new one.
• Do not use the device outside, and make sure all the connections are indoors.
There is a remote risk of electric shock from lightning.
• Do NOT obstruct the device ventilation slots, as insufficient airflow may harm
your device.
• Use only No. 26 AWG (American Wire Gauge) or larger telecommunication line
cord.
X6004 User’s Guide
7
Page 8
Safety Warnings
• Warning! To avoid risk of electric shock, remove only one card at a time and do
not place fingers or objects inside the chassis. Cover empty slots with slot
covers.
This product is recyclable. Dispose of it properly.
8
X6004 User’s Guide
Page 9

Contents Overview
Contents Overview
User’s Guide .............................................................................................. .......... ...................25
Introduction .................................. .................................................... .......................................... 27
How It Works ............................................................................................................................. 35
Tutorials ..................................................................................................... ................................41
Technical Reference ..............................................................................................................99
The Web Configurator .............................................................................................................101
Network Deployment ................................................................................................................111
Server ......................................................................................................................................125
Auto Provision ............................................. .... ... ... ... .... ................................................ ........... 153
QoS ......................................................................................................................................... 169
Voice Mail ........................................ ... ... ................................................ .... .............................. 173
Phonebook .............................................................................................................................. 179
DSP Management .......... .... ... ... ... .... ................................................ ... ... .... ... ........................... 187
Office Hours ............................................................................................................................. 193
Authority Group ....................................................................................................................... 197
Ring Group ............... ... ... .... ... ... ................................................. ... ... ... ... .................................. 229
Pickup Group ........................................................................................................................... 239
Click-To-Talk Group ................................................................................................................. 243
Group Access Code ................................................................................................................ 253
Outbound Line Group ..... .... ... ... ... .... ... ................................................ ... .... ... ... ... .... ... ... ... ... ..... 257
Auto-Attendant .................................... ...................... ....................... ....................... ................. 291
LCR .........................................................................................................................................309
Group Management .................................................................................................................317
Call Services ............................................................................................................................ 327
ZyStack ..................................................................... ............................................................... 355
ACD ......................................................................................................................................... 365
Monitor ...................................... ....................... ...................... ....................... ........................... 379
Status Observation .................................................................................................................. 385
System Log ............... ................................................ .... ................................................ ........... 401
Call Detail Record (CDR) .................................... ... ... .............................................. ... ... ... ... ..... 413
ACD Logs .............. ... ... ... ................................................. ... ..................................................... 423
Administrator Accounts ............................................................................................................431
Diagnostics .............................................................................................................................. 437
Inactivity Timer ......................................................................................................................... 445
..................................... .................... ................ ................... ................... ..................................446
Remote Management ..............................................................................................................447
TFTP Management ................ ... ... ................................................. ... ... ... .... .............................. 467
X6004 User’s Guide
9
Page 10

Contents Overview
System File Maintenance ............ .... ... ... ... ... .... ... ... ... .... ... ................................................ ... .....469
License Control ........................................................................................................................477
Web Portal .......................... ... ... ... .... ... ... ... ... ................................................. ... ........................483
IVR System .............................................................................................................................. 503
Troubleshooting ..................................................... .................................................................. 509
Product Specifications ............................................................................................................. 521
10
X6004 User’s Guide
Page 11

Table of Contents
Table of Contents
About This User's Guide..........................................................................................................3
Document Conventions............................................................................................................5
Safety Warnings ........................................................................................................................7
Contents Overview ...................................................................................................................9
Table of Contents....................................................................................................................11
Part I: User’s Guide................................................................................ 25
Chapter 1
Introduction.............................................................................................................................27
1.1 Overview ............. ................................................ ................................................. ... ............. 27
1.1.1 Voice over Internet Protocol (VoIP) Implementation .................................................. 28
1.1.2 PBX Telephony Features ...........................................................................................29
1.1.3 Scalable Design .................. ... ... ... .... ................................................ ... ....................... 30
1.1.4 Automatic Call Distribution ......................................... ... ... ... ... .................................... 30
1.1.5 Click-To-Talk .............. ... .............................................................................................. 30
1.1.6 Mobile Phone Extensions ............. .... ... ... ... .... ... ... ... ................................................. ... 31
1.2 Ways to Manage the X6004 ...... ... ................................................ ... .................................... 31
1.3 Good Habits for Managing the X6004 ................................................................................. 31
1.4 LEDs ......................... .... ... ... ... .............................................................................................. 32
Chapter 2
How It Works...........................................................................................................................35
2.1 Call Routing ............................................... ... ... ... .... ................................................ ............. 35
2.1.1 Call Routing Terms ....................................................................................................35
2.2 Internal Call Routing ..................................... ... ... .... ... ... ... .... ... ... .......................................... 37
2.3 Outbound Call Routing .... ... ... .... ... ... ................................................ .... ... ... ... ....................... 38
Chapter 3
Tutorials...................................................................................................................................41
3.1 Making Internal Calls .... ... ....................................................................................................43
3.1.1 Configure SIP Extensions .......................................................................................... 43
3.1.2 Connect IP Phones ....................................................................................................46
3.1.3 Register IP Phones .................................................................................................... 47
X6004 User’s Guide
11
Page 12

Table of Contents
3.1.4 Auto Provisioning ................ ... ... ... .... ... ... ... .... ... ................................................ ... .... ... 48
3.2 Making PSTN Calls ............................................................................................................. 50
3.2.1 The PSTN Connection ................. .... ... ... ... .... ... ... ... .... ... ............................................. 50
3.2.2 Creating a Dialing Rule for PSTN ....................................................... .... ... ... ... ... .... ... 53
3.2.3 Assigning an LCR to an Authority Group .. ................................................................. 55
3.3 Making ITSP Calls ........................................... ................................................. ... ... ... ... ....... 56
3.3.1 The ITSP Connection ....................................... ... ... .... ... ............................................. 57
3.3.2 Creating a Dialing Rule for ITSP ...... ... ... ... .... ... ... ... .... ... ... ... ... .... ... ... .......................... 61
3.3.3 Assigning an LCR to an Authority Group .. ................................................................. 64
3.4 Making ISDN Calls .............................................................................................................. 65
3.4.1 The ISDN Connection ................................................................................................ 66
3.4.2 Creating a Dialing Rule for ISDN ..................................................... ... .... ... ... ... ..........69
3.4.3 Assigning an LCR to an Authority Group .. ................................................................. 71
3.5 ISDN Network Configuration Examples ............................................................................... 73
3.5.1 Example 1: Small/Medium Business ...................................................................... 74
3.5.2 Example 2: Company with Existing PBX ............................................................... 75
3.5.3 Example 3: Company with Existing PBX and Expanding Employees ................. 76
3.6 Using Call Features ................................................ ... ... ... .... ................................................ 76
3.6.1 Customizing Feature Codes ...................... ............. ............. .......... ............. ............. ... 77
3.6.2 Using the Voicemail Feature ........ ................................................. ... ... .... ... ... ... ... .... ... 77
3.7 Using Your Web Portal ........................................................... ... ... ... .... ... ... ... .... ... ... ... ... ....... 78
3.7.1 Your Information ........................... .... ... ... ... ................................................. ... ... ... .... ...78
3.7.2 Accessing the Web Portal .......................................................................................... 79
3.7.3 Changing Your Security Information ........................................................................... 80
3.7.4 Personalizing Your Settings ................................................................ .... ... ... ... ... .... ... 81
3.7.5 Setting Up Voicemail ............................................................................... ... ................ 84
3.7.6 Using the Web Phone (IP Phone Users Only) ........................................................... 85
3.8 Capturing Packets Using the Web Configurator .................................................................. 86
3.9 Creating an Automated Menu System ................................................................................. 89
3.9.1 Menu Design and Call Routing ..................................................... ... ... .... ... ... ... ... .... ... 89
3.9.2 Create an Agent Identity ............................................................................................91
3.9.3 Create a Skill .......................................... ... ................................................. ... .............92
3.9.4 Create an Auto-Attendant .......................................................................................... 95
Part II: Technical Reference.................................................................. 99
Chapter 4
The Web Configurator..........................................................................................................101
4.1 Introduction ............................ ................................................. ........................................... 101
4.2 System Login ..................................................................................................................101
4.3 The System Screen ........................................ ... .... ... ... ... .... ... ... ... ..................................... 103
12
X6004 User’s Guide
Page 13

Table of Contents
4.3.1 The Navigation Panel ............................................................................................... 104
4.4 Dashboard - System Information ...................................................................................... 107
4.5 Saving Your Configuration ................................................................................................. 108
4.6 Icons in the Web Configurator ........................................................................................... 108
4.7 Resetting the X6004 .................................................. ... .... ... ... ........................................ 109
4.8 Rebooting the X6004 .................................................................................................... 109
4.9 Logging Out of the Web Configurator ................................................................................110
4.10 Help .................................................................................................................................110
Chapter 5
Network Deployment............................................................................................................ 111
5.1 Overview ............. ................................................ ................................................. ... ............111
5.1.1 What Yo u Can Do in this Chapter .............................................................................111
5.1.2 What You Need to Know ..................................... ... .... ... ... ... ... .... ...............................112
5.1.3 Before You Begin ......... .... ... ... ................................................ .... ... ... ... ......................113
5.2 The LAN Screen ................................................................................................................114
5.2.1 The Static LAN IP Address Screen .........................................................................115
5.3 The WAN Screen ............. ... ... ................................................. ... ... ... .... ...............................116
5.4 The DDNS (Dynamic DNS) Screen ...................................................................................117
5.4.1 DYNDNS Wildcard ....... .... .........................................................................................117
5.4.2 Configuring the DDNS Screen ............... ... .... ... ... ... .... ... ... ... ... ...................................118
5.5 The NTP (Network Time Protocol) Screen .........................................................................119
5.6 The Static Route Screen ............................................... ... .... ... ... ... ... .... ..............................120
5.6.1 Configuring the Static Route Screen ............................................. ... ... .... ... .............. 121
5.6.2 Adding a Static Route ............................................................................................... 121
5.7 The VLAN Screen ..............................................................................................................122
5.8 Network Technical Reference ............................................................................................ 123
Chapter 6
Server.....................................................................................................................................125
6.1 Overview ............. ................................................ ................................................. ... ........... 125
6.1.1 What Yo u Can Do in this Chapter ............................................................................ 126
6.1.2 What You Need to Know ..................................... ... .... ... ... ... ... .... .............................. 126
6.1.3 Before You Begin ......... .... ... ... ................................................ .... ... ... ... ..................... 129
6.2 The IP-PBX Server Global Screen .................................................................................... 130
6.3 The FXO Screen ...............................................................................................................132
6.4 The FXS Screen ............................................................................................................... 133
6.5 The BRI Screen ................................................................................................................. 134
6.6 The PRI Screen ................................................................................................................. 136
6.7 The Call Block Screen ...................................................................................................... 139
6.7.1 The Call Blacklist Screen ........................................................................................ 140
6.8 The Feature Code Screen ................................................................................................ 141
6.9 The E-Mail Screen ............................................................................................................. 144
X6004 User’s Guide
13
Page 14

Table of Contents
6.10 The Fake IP Screen ........................................................................................................145
6.11 The Peer to Peer Screen ............................................................................................... 146
6.11.1 How the Peer-to-Peer SIP Connection Works .......................... .............................. 147
6.11.2 Add Peer-to-Peer Local Net ................................................................................... 148
6.11.3 How Local Net and Peer-to-Peer Work Together ...................................................148
6.12 Network Technical Reference ..........................................................................................150
Chapter 7
Auto Provision ......................................................................................................................153
7.1 Overview ............. ................................................ ................................................. ... ........... 153
7.1.1 What Yo u Can Do in this Chapter ............................................................................ 153
7.1.2 What You Need to Know ..................................... ... .... ... ... ... ... .... .............................. 154
7.1.3 Before You Begin ......... .... ... ... ................................................ .... ... ... ... ..................... 155
7.2 Auto Provision Screen .. ... ... ... .... ... ... ................................................ .... ... ... ... .... ... ... ... ... ..... 155
7.2.1 Batch File Format ...................................... .... ... ... ... ................................................. . 156
7.2.2 Auto Provision Edit Settings .................................................................................... 157
7.2.3 Auto Provision View SPTGEN ................................................................................. 158
7.3 snom Profile Setup ....... ... ... ... .... ... ... ... ... ................................................. ... ... .... ... ..............159
7.3.1 What is snom? .................................................... ... .... ... ... ........................................ 160
7.3.2 snom Batch Configuration XML File ......................................................................... 161
7.3.3 snom Profile Setup: Edit ..................... ... ... .... ... ................................................ ... .....161
7.3.4 snom Profile Setup: View SPTGEN ......... .... ................................................ ... ... .... . 162
7.3.5 snom Feature Key Setting .................. ... ... .... ... ... ... .... .............................................. 163
7.3.6 snom Firmware Upgrade ........................ ... .... ... ... ... .... ... ........................................... 164
7.4 Auto Firmware Upgrade Screen .......................................................................................165
7.5 EZ Provision ..................................................................................................................... 167
Chapter 8
QoS.........................................................................................................................................169
8.1 Overview ............. ................................................ ................................................. ... ........... 169
8.1.1 What Yo u Can Do in this Chapter ............................................................................ 169
8.1.2 What You Need to Know ..................................... ... .... ... ... ... ... .... .............................. 169
8.1.3 Before You Begin ......... .... ... ... ................................................ .... ... ... ... ..................... 171
8.2 The QoS Screen .............................. ... ... .... ... ... ... ................................................. ... ... ... ..... 171
Chapter 9
Voice Mail...............................................................................................................................173
9.1 Overview ............. ................................................ ................................................. ... ........... 173
9.1.1 What Yo u Can Do in this Chapter ............................................................................ 173
9.1.2 What You Need to Know ..................................... ... .... ... ... ... ... .... .............................. 173
9.2 The Voice Mail Screen ......................................................................................... ... ... ... ..... 174
9.3 Accessing Voice Mail .........................................................................................................175
14
X6004 User’s Guide
Page 15

Table of Contents
Chapter 10
Phonebook ............................................................................................................................179
10.1 Overview .......................................................................................................................... 179
10.1.1 What You Can Do in this Chapter .......................................................................... 179
10.1.2 What You Need to Know ........................................................................................ 179
10.1.3 Before You Begin ...................................................................................................180
10.2 The Phonebook Configuration Screen ......................................... .... ... ........................... 181
10.2.1 The Import Phonebook Screen .............................................................................. 182
10.3 The LDAP Phonebook Screen ....................................................................................... 183
10.4 The Local Phonebook Screen ........................................................................................ 184
10.4.1 Local Phonebook Add/Edit Screen ............................................................ ... ... .... . 185
Chapter 11
DSP Management..................................................................................................................187
11.1 Overview .......................................................................................................................... 187
11.1.1 What You Can Do in this Chapter ......................... .... ... ... ... ..................................... 187
11.1.2 What You Need To Know ........................................................................................187
11.1.3 Before You Begin .................................................................................................... 188
11.2 Installing and Removing DSP Modules ............................................................................188
11.2.1 How to Install a DSP Module ................................................ ............................. ..... 188
11.2.2 How to Remove a DSP Module ......................... ....................... ...................... ........ 189
11.3 The DSP Management Screen ........................................................................................ 190
Chapter 12
Office Hours ..........................................................................................................................193
12.1 Overview .......................................................................................................................... 193
12.1.1 What You Can Do in this Chapter .......................................................................... 193
12.1.2 What You Need To Know ....................................................................................... 193
12.1.3 Before You Begin ...................................................................................................193
12.2 Office Hour Screen .......................................................................................................... 194
Chapter 13
Authority Group....................................................................................................................197
13.1 Overview .......................................................................................................................... 197
13.1.1 What You Can Do in this Chapter .......................................................................... 198
13.1.2 What You Need to Know ........................................................................................ 199
13.2 The Authority Group Screen ............................................................................................ 200
13.2.1 The Extension Query Result Screen .....................................................................201
13.2.2 The Add/Edit Authority Group Screen .................................................................... 202
13.2.3 The Authority Group Configuration Screen ........................................................... 203
13.3 Extension Features ..........................................................................................................204
13.3.1 The Batch Add Screen .......................................................................................... 205
13.3.2 Add a SIP Extension: The Basic Screen .... ................................................ ... ... .... . 207
X6004 User’s Guide
15
Page 16

Table of Contents
13.3.3 Configure SIP Extensions: The Basic Screen ....................................................... 208
13.3.4 The SIP Extension Call Forward Screen ................. ... ... ... ... .... ... ... ... .... ... ... ... ........209
13.3.5 The DND White List Screen .................................................................................. 213
13.3.6 The Find Me List Screen .......................................................................................214
13.3.7 The Blacklist Screen ............................................................................................. 215
13.3.8 The SIP Extension Voice Mail Settings Screen ..................................................... 216
13.3.9 The SIP Extension Advanced Screen ................................................................... 217
13.3.10 The Auto Provision Screen ................................................................................. 219
13.3.11 The Add an FXS Extension Screen ..................................................................... 220
13.3.12 Configure FXS Extensions: the Basic Screen ..................................................... 221
13.3.13 The FXS Extension Call Forward Screen ............................................................ 222
13.3.14 The FXS Extension Voice Mail Screen ................................................................222
13.3.15 The FXS Extension Advanced Screen ................................................................ 223
13.3.16 The Add a BRI Extension Screen ..... ... .... ... ... ... .... ... ... ... ... .... ... ... ... .... ... ... ... ... .... . 223
13.3.17 Configure BRI Extensions: the Basic Screen ...................................................... 225
13.3.18 The BRI Extension Call Forward Screen ............................................................. 226
13.3.19 The BRI Extension Voice Mail Screen .................................................................226
13.3.20 The BRI Extension Advanced Screen ................................................................. 226
13.4 Authority Group Technical Reference ................................... ........................................... 227
Chapter 14
Ring Group............................................................................................................................229
14.1 Overview .......................................................................................................................... 229
14.1.1 What You Can Do in this Chapter .......................................................................... 229
14.1.2 What You Need to Know ........................................................................................ 229
14.1.3 Before You Begin ...................................................................................................230
14.2 The Ring Group Screen ................................................................................................... 233
14.2.1 The New Ring Group Screen ................................................................................ 233
14.2.2 The Edit Ring Group Screen ................................................................................. 234
14.2.3 The Configure Ring Group Screen ........................................................................235
14.2.4 The Add/Edit Page Group Screen ......................................................................... 236
14.2.5 The Add/Edit Hunt Group Screen ......................................................................... 237
Chapter 15
Pickup Group ........................................................................................................................239
15.1 Overview .......................................................................................................................... 239
15.1.1 What You Can Do in this Chapter .......................................................................... 239
15.1.2 Before You Begin ...................................................................................................240
15.1.3 Pickup Group Example .......................................................................................... 240
15.2 The Pickup Group Screen ............................................................................................... 241
15.2.1 Add/Edit Pickup Groups ...... ... ... .... ... ... ............................................. .... ... ... ... ... .... . 242
Chapter 16
Click-To-Talk Group..............................................................................................................243
16
X6004 User’s Guide
Page 17

Table of Contents
16.1 Overview .......................................................................................................................... 243
16.1.1 What You Can Do in this Chapter .......................................................................... 244
16.1.2 Before You Begin ...................................................................................................244
16.2 The Click-To-Talk Group Screen .............................................................. ....................... . 246
16.2.1 Add a Click-To-Talk Group .....................................................................................247
16.2.2 Edit a Click-To-Talk Group ........................................................ ... ... ... .... ... .............. 248
16.2.3 Manage Click-To-Talk Group Extensions .............................................................. . 249
16.2.4 Click-To-Talk Extension Settings ............................................................................251
Chapter 17
Group Access Code..............................................................................................................253
17.1 Overview .......................................................................................................................... 253
17.1.1 What You Can Do in this Chapter .......................................................................... 254
17.1.2 What You Need to Know ........................................................................................ 254
17.2 The Group Access Code Screen ..................................................................................... 254
17.2.1 The Group Access Code Screen .......................................................................... 255
Chapter 18
Outbound Line Group...........................................................................................................257
18.1 Overview .......................................................................................................................... 257
18.1.1 What You Can Do in this Chapter .......................................................................... 258
18.1.2 What You Need to Know ........................................................................................ 258
18.1.3 Before You Begin ...................................................................................................261
18.2 Outbound Line Group Screen .......................................................................................... 262
18.2.1 Add/Edit FXO Trunk .............................................................................................. 263
18.2.2 Configure an FXO Trunk ....................................................................................... 264
18.2.3 Auto-Attendant for Incoming Analog Calls ............................................................. 265
18.3 Add/Edit PRI Trunk ......................................................................................................... 266
18.3.1 Configure a PRI Trunk ...................................................... ... .... ... ... ... ..................... 267
18.3.2 Auto-Attendant for Incoming PRI Calls ................................................................. 270
18.4 Add/Edit BRI Trunk ......................................................................................................... 271
18.4.1 Configure a BRI Trunk ...................................................... ... .... ... ... ... ..................... 272
18.4.2 Auto-Attendant for Incoming BRI Calls ................................................................. 276
18.5 Add/Edit SIP Trunk .......................................................................................................... 276
18.5.1 Configure a SIP Trunk ........................................................................................... 277
18.5.2 Auto-Attendant for SIP Trunks ............... .... ... ... ................................................ .... . 282
18.6 Add/Edit Trusted Peer .....................................................................................................284
18.6.1 Configure a Trusted Peer ....................................................................................... 285
18.6.2 Auto-Attendant for Trusted Peer ............................................................................289
Chapter 19
Auto-Attendant......................................................................................................................291
19.1 Overview .......................................................................................................................... 291
X6004 User’s Guide
17
Page 18

Table of Contents
19.1.1 What You Can Do in this Chapter .......................................................................... 291
19.1.2 What You Need to Know ........................................................................................ 292
19.2 The Default Screen ..................... ... ... ... .... ... ................................................ .... ... ... ... ... ..... 294
19.3 The Customized Screen .................................................................................................. 295
19.3.1 The Add/Edit Auto-Attendant Screen ..................................................................... 296
19.3.2 Advanced Settings: Office Hours .......................................................................... 297
19.3.3 The Add/Edit Office Hours Auto-Attendant Screen ........... ... .... ... ... ... .... ... ... ... ... .... . 299
19.3.4 The Auto-Attendant Sub Menu Screen .................................................................. 300
19.3.5 Advanced Settings: Night Service ..........................................................................301
19.3.6 Advanced Settings: Greetings .............................. .......... .......... ......... .......... .......... . 303
19.4 Technical Reference ........................................................................................................305
Chapter 20
LCR.........................................................................................................................................309
20.1 Overview .......................................................................................................................... 309
20.1.1 What You Can Do in this Chapter .......................................................................... 310
20.1.2 What You Need to Know ........................................................................................ 310
20.1.3 Before You Begin ....................................................................................................311
20.2 LCR List ............................................................................................................................311
20.2.1 LCR Configuration .................. ... .... ... ... ... .............................................. ... ... ... ... .... . 312
20.2.2 Add/Edit LCR Dial Condition ................................................................................. 314
Chapter 21
Group Management..............................................................................................................317
21.1 Overview .......................................................................................................................... 317
21.1.1 What You Can Do in this Chapter .......................................................................... 318
21.1.2 What You Need to Know ........................................................................................ 318
21.1.3 Before You Begin ...................................................................................................322
21.2 Group Management Screen ............................................................................................ 322
21.2.1 The Overview Screen .......................................................................................... 324
21.2.2 Edit Group Management Associations ................................ .... ... ... ... .... ... .............. 326
Chapter 22
Call Services..........................................................................................................................327
22.1 Overview .......................................................................................................................... 327
22.1.1 What You Can Do in this Chapter .......................................................................... 327
22.1.2 What You Need to Know ........................................................................................ 328
22.1.3 Before You Begin ...................................................................................................328
22.2 The Emergency Call Screen ................... ...................... ....................... ...................... ..... 329
22.2.1 Configuring the Emergency Call Screen ................................................................329
22.3 The Conference Calling Screen .....................................................................................331
22.3.1 Configuring the Conference Calling Screen ........................................................... 331
22.3.2 The Conference Calling Edit and Add Screen ................................................. .... . 332
18
X6004 User’s Guide
Page 19

Table of Contents
22.4 The Music on Hold Screen ............................................................................................. 333
22.4.1 Global Setting Screen ............................................................................................ 334
22.4.2 Custom Music On Hold .......................................................................................... 334
22.4.3 Add or Edit a Music On Hold Profile ....................................................................... 335
22.4.4 Upload a Music On Hold Profile ..................................................... ........................ 336
22.5 The Distinctive Ring Screen ........................................................................................... 337
22.6 The Auto Callback Screen ................................... ... ... ... .... ... ... ... ... .... ... ... ........................ 338
22.7 The Call Park Screen ......................................................................................................339
22.7.1 Configuring the Call Parking Screen ...................................................................... 340
22.8 The Call Waiting Screen .................................................................................................. 341
22.8.1 Configuring the Call Waiting Screen ......................................................................343
22.8.2 Call Waiting Example - 1 ........................................................................................344
22.8.3 Call Waiting Example - 2 ........................................................................................344
22.9 The Call Transfer Screen .................................................................................................345
22.9.1 Configuring the Call Transfer Screen ..................................................................... 345
22.10 Call Recording ............................................................................................................... 345
22.10.1 Configuring the Call Recording Screen ................................................................ 347
22.10.2 Quering Call Recordings ................................. ..................................................... 348
22.10.3 Call Recordings File List ...................................................................................... 349
22.11 TAPI ................ ... ... .... ................................................ ... .................................................. 349
22.11.1 Setting Up the TAPI Server Driver ................................... ... .... ... ... ........................ 350
22.11.2 Sending Call Invites from Microsoft Outlook ......................................................... 352
Chapter 23
ZyStack..................................................................................................................................355
23.1 Overview .......................................................................................................................... 355
23.1.1 What You Can Do in this Chapter .......................................................................... 355
23.1.2 What You Need to Know ........................................................................................ 355
23.1.3 Before You Begin ...................................................................................................357
23.2 ZyStack Configuration .....................................................................................................357
23.2.1 ZyStack Add Screen .............................................................................................. 358
23.2.2 ZyStack Edit Screen .............................................................................................. 359
23.3 ZyStack Intranet Setup ...................................................................................................360
23.3.1 ZyStack Add Intranet ............................................................................................. 361
23.4 ZyStack Status ................................................................................................................ 362
Chapter 24
ACD........................................................................................................................................365
24.1 Overview .......................................................................................................................... 365
24.1.1 What You Can Do in this Chapter .......................................................................... 366
24.1.2 What You Need to Know ........................................................................................ 366
24.2 The ACD Global Screen ................................................................................................ 368
24.3 The Agent Screen ..........................................................................................................369
X6004 User’s Guide
19
Page 20

Table of Contents
24.3.1 The Agent Settings Screen .................................................................................. 370
24.4 The Skill Screen ............................................................................................................ 371
24.4.1 The Skill Settings Screen .....................................................................................372
24.5 The Skill Menu Screen .................................................................................................. 377
24.5.1 The Skill Menu Settings Screen ............................................................................ 378
Chapter 25
Monitor...................................................................................................................................379
25.1 Overview .......................................................................................................................... 379
25.2 The System Information Screen ......................................................................................379
25.3 SNMP ............................................................................................................................. 382
25.3.1 Supported MIBs ..................................................................................................... 383
25.3.2 SNMP Traps ........................................................................................................... 383
25.3.3 Configuring SNMP .................................................................................................384
Chapter 26
Status Observation...............................................................................................................385
26.1 Overview .......................................................................................................................... 385
26.2 What You Can Do in this Chapter ..... ... ................................................. ... ... .... ... ... ... ... .... . 385
26.2.1 What You Need to Know ........................................................................................ 385
26.3 The SIP Peer Screen .......................................................................................................386
26.4 The FXS Peer Status Screen .......................................................................................... 388
26.5 The BRI Peer Status Screen ............ ... .... ................................................ ... .... ... ... ... ... .... . 389
26.6 The CTI Peer Status Screen .......................................................................................... 390
26.7 The FXO Trunk Status Screen ......................................................................................... 391
26.8 The SIP Trunk Status Screen .......................................................................................... 392
26.9 The BRI Trunk Status Screen .................. ... ... ... .... ... ... ... ................................................. . 393
26.10 The PRI Trunk Status Screen ........................................................................................ 394
26.11 The ACD Queue Screen ............................................................................................. 396
Chapter 27
System Log............................................................................................................................401
27.1 Overview .......................................................................................................................... 401
27.1.1 What You Can Do in this Chapter .......................................................................... 401
27.1.2 What You Need to Know ........................................................................................ 401
27.2 The View Log Screen ...................................................................................................... 402
27.2.1 Filter Log Results Screen .................................. ................................................ .....404
27.3 The Log Setting Screen ................................................................................................... 405
27.3.1 Active Log Summary Screen ................................ ............. .......... ............. ............. . 406
27.3.2 System Log Configuration Screen ......................................................................... 408
27.3.3 Edit Syslog Server Settings Screen ........................................................................411
Chapter 28
Call Detail Record (CDR)......................................................................................................413
20
X6004 User’s Guide
Page 21

Table of Contents
28.1 Overview .......................................................................................................................... 413
28.1.1 What You Can Do in this Chapter .......................................................................... 413
28.1.2 What You Need to Know ........................................................................................ 413
28.2 The Configuration Screen ................................................................................................ 414
28.2.1 Configure your remote server ................................................................................ 416
28.3 The Backup Screen ... ... ... ... .... ... ... ... ... .... ................................................ ... .... ... ... ... ... .....417
28.4 The Query Screen .......................................................................................................... 418
28.4.1 The Report Screen................................................................................................ 420
28.5 CDR Technical Reference ............................................................................................... 421
Chapter 29
ACD Logs...............................................................................................................................423
29.1 Overview .......................................................................................................................... 423
29.1.1 What You Can Do in this Chapter .......................................................................... 423
29.1.2 Before You Begin ...................................................................................................423
29.2 The Configuration Screen .............................................................................................. 423
29.2.1 Configure your remote server ................................................................................ 425
29.3 The Backup Screen ..... ... ... .... ... ... ... ... .... ... ... ................................................. ... ... ... ... .....426
29.4 The Query Screen ......................................................................................................... 427
29.4.1 ACD Report Screen .............................................................................................. 428
Chapter 30
Administrator Accounts.......................................................................................................431
30.1 Overview .......................................................................................................................... 431
30.1.1 What You Can Do in this Chapter .......................................................................... 431
30.1.2 What You Need to Know ........................................................................................ 431
30.2 The Logged-In Administrator Screen ... .... ... ... ... .... ... ................................................ ... .....432
30.3 The Administrator List Screen ......................................................................................... 433
30.3.1 Add an Administrator ............................................................................................. 434
30.3.2 Edit an Administrator Account .................................... ... ........................................ 435
Chapter 31
Diagnostics............................................................................................................................437
31.1 Overview .......................................................................................................................... 437
31.1.1 What You Can Do in this Chapter .......................................................................... 437
31.1.2 What You Need to Know ........................................................................................ 437
31.2 The Information Collect Screen .............................................................................. ... .....438
31.3 The Packet Capture Screen ............................................................................................ 440
31.4 The Voice Sniffer Screen ................................................................................................. 442
Chapter 32
Inactivity Timer......................................................................................................................445
32.1 Overview .......................................................................................................................... 445
X6004 User’s Guide
21
Page 22

Table of Contents
32.2 The Inactivity Timer Screen .............................................................................................445
................................................................................................................................................446
Chapter 33
Remote Management............................................................................................................447
33.1 Overview .......................................................................................................................... 447
33.1.1 What You Can Do in this Chapter .......................................................................... 447
33.1.2 What You Need to Know ........................................................................................ 448
33.2 The WWW Screen .......................................................................................................... 449
33.3 The WWW > Add/Edit Screen .........................................................................................450
33.4 The SSH Screen ..............................................................................................................451
33.5 The SSH > Add/Edit Screen .................... ................................................................... ..... 452
33.6 The FTP Screen ............... ... .... ... ... ... ... .... ... ................................................ .... ... ... ... ... ..... 453
33.7 The FTP > Add/Edit Screen ..................... ...... ....... ...... ... ....... ...... ....... ...... ....... ...... ...... .... . 454
33.8 The ICMP Screen ............................................................................................................ 455
33.9 The ICMP > Add/Edit Screen .......................................................................................... 456
33.10 The CTI Screen .............................................................................................................457
33.10.1 The CTI Add/Edit Screen ..................................................................................... 458
33.11 Remote Management Techni cal Reference ...................................................................459
Chapter 34
TFTP Management................................................................................................................467
34.1 TFTP Management ..........................................................................................................467
Chapter 35
System File Maintenance.....................................................................................................469
35.1 Overview .......................................................................................................................... 469
35.1.1 What You Can Do in this Chapter .......................................................................... 469
35.1.2 What You Need to Know ........................................................................................ 469
35.2 The Backup & Restore Screen ........................................................................................ 471
35.2.1 Batch Add SIP Extensions Template File ............................................................... 473
35.3 The Firmware Upgrade Screen ....................................................................................... 473
35.4 Technical Reference ........................................................................................................474
Chapter 36
License Control.....................................................................................................................477
36.1 Overview .......................................................................................................................... 477
36.1.1 What You Can Do in this Chapter .......................................................................... 477
36.1.2 What You Need to Know ........................................................................................ 477
36.1.3 Before You Begin ...................................................................................................478
36.2 The Registration Screen .................................................................................................. 479
36.3 The Service Screen ......................................................................................................... 480
36.4 The License Status Screen .............................................................................................. 481
22
X6004 User’s Guide
Page 23

Table of Contents
Chapter 37
Web Portal.............................................................................................................................483
37.1 Overview .......................................................................................................................... 483
37.1.1 What You Can Do in this Chapter .......................................................................... 484
37.1.2 What You Need to Know ........................................................................................ 484
37.2 Account Settings ..............................................................................................................485
37.3 Call Forwarding and Blocking ......................................................................................... 487
37.3.1 Office Hours ...........................................................................................................489
37.3.2 DND White List ....................................................................................................... 491
37.3.3 Find Me List ...........................................................................................................491
37.3.4 Blacklist ................................................................................................................. 492
37.4 Voice Mail Settings ......................................................................................................... 493
37.5 Web Phone ..................................................................................................................... 494
37.6 Utility Download ............................................................................................................... 495
37.6.1 The Outlook Plugin ................................................................................................. 496
37.6.2 TAPI Client Driver .............. ... ... ... .... ... ... ... ................................................. ... ... ... .... . 498
37.6.3 Sending Call Invites from Microsoft Outlook ............ ... ... ... ... .... ... ... ... .... ... .............. 501
Chapter 38
IVR System............................................................................................................................503
38.1 Overview .......................................................................................................................... 503
38.1.1 What You Need to Know About IVR ....................................................................... 503
Chapter 39
Troubleshooting....................................................................................................................509
39.1 Power, Hardware Connections, and LEDs .................................... .... ... ........................... 509
39.2 X6004 Access and Login ................................................................................................. 510
39.3 Internet Access ................................................................................................................ 513
39.4 Advanced Features .........................................................................................................514
39.5 Reset the X6004 to Its Factory Defaults .......................................................................... 515
39.6 The Console Port .............................................................................................................516
39.6.1 Use the Console Port to Access the CLI .................. ...................................... ........ 516
39.6.2 The Login Screen ....................... ....................................... ..................................... 516
39.6.3 The Initrd Screens .................................................................................................. 517
Chapter 40
Product Specifications.........................................................................................................521
Appendix A IP Addresses and Subnetting ...........................................................................529
Appendix B Open Software Announcements.......................................................................541
Appendix C Legal Information..............................................................................................565
Index.......................................................................................................................................569
X6004 User’s Guide
23
Page 24

Table of Contents
24
X6004 User’s Guide
Page 25

PART I
User’s Guide
25
Page 26

26
Page 27

CHAPTER 1
Introduction
This chapter introduces the main features and applications of the X6004.
1.1 Overview
An IP PBX is a telephone exchange device located at a company site which allows
an organization to set up and control calls. IP stands for Internet Protocol, and
PBX stands for Private Branch Exchange. A regular company telephone
switchboard is an example of a PBX. The company’s telephones are conne c ted to
the IP PBX. The IP PBX is then connected to the outside world via connections to
any combination of the following net works:
• A traditional Public Switched Telephone Network (PSTN)
• A broadband Internet connection to an Internet Telephony Service Provider
(ITSP)
• An Integrated Services Digital Network/Basic Rate Interface Network (ISDN
BRI)
• An Integrated Services Digital Network/Primary Rate Interface Network (ISDN
PRI T1/E1)
Each telephone connected to an IP PBX has an extension assigned to it. An
extension is a unique telephone number within an organization typically consisting
of only a few digits. People inside the company can call each other by dialing
extensions. Calls to the outside world go through the IP PBX to the PSTN, ITSP or
ISDN.
X6004 User’s Guide
27
Page 28
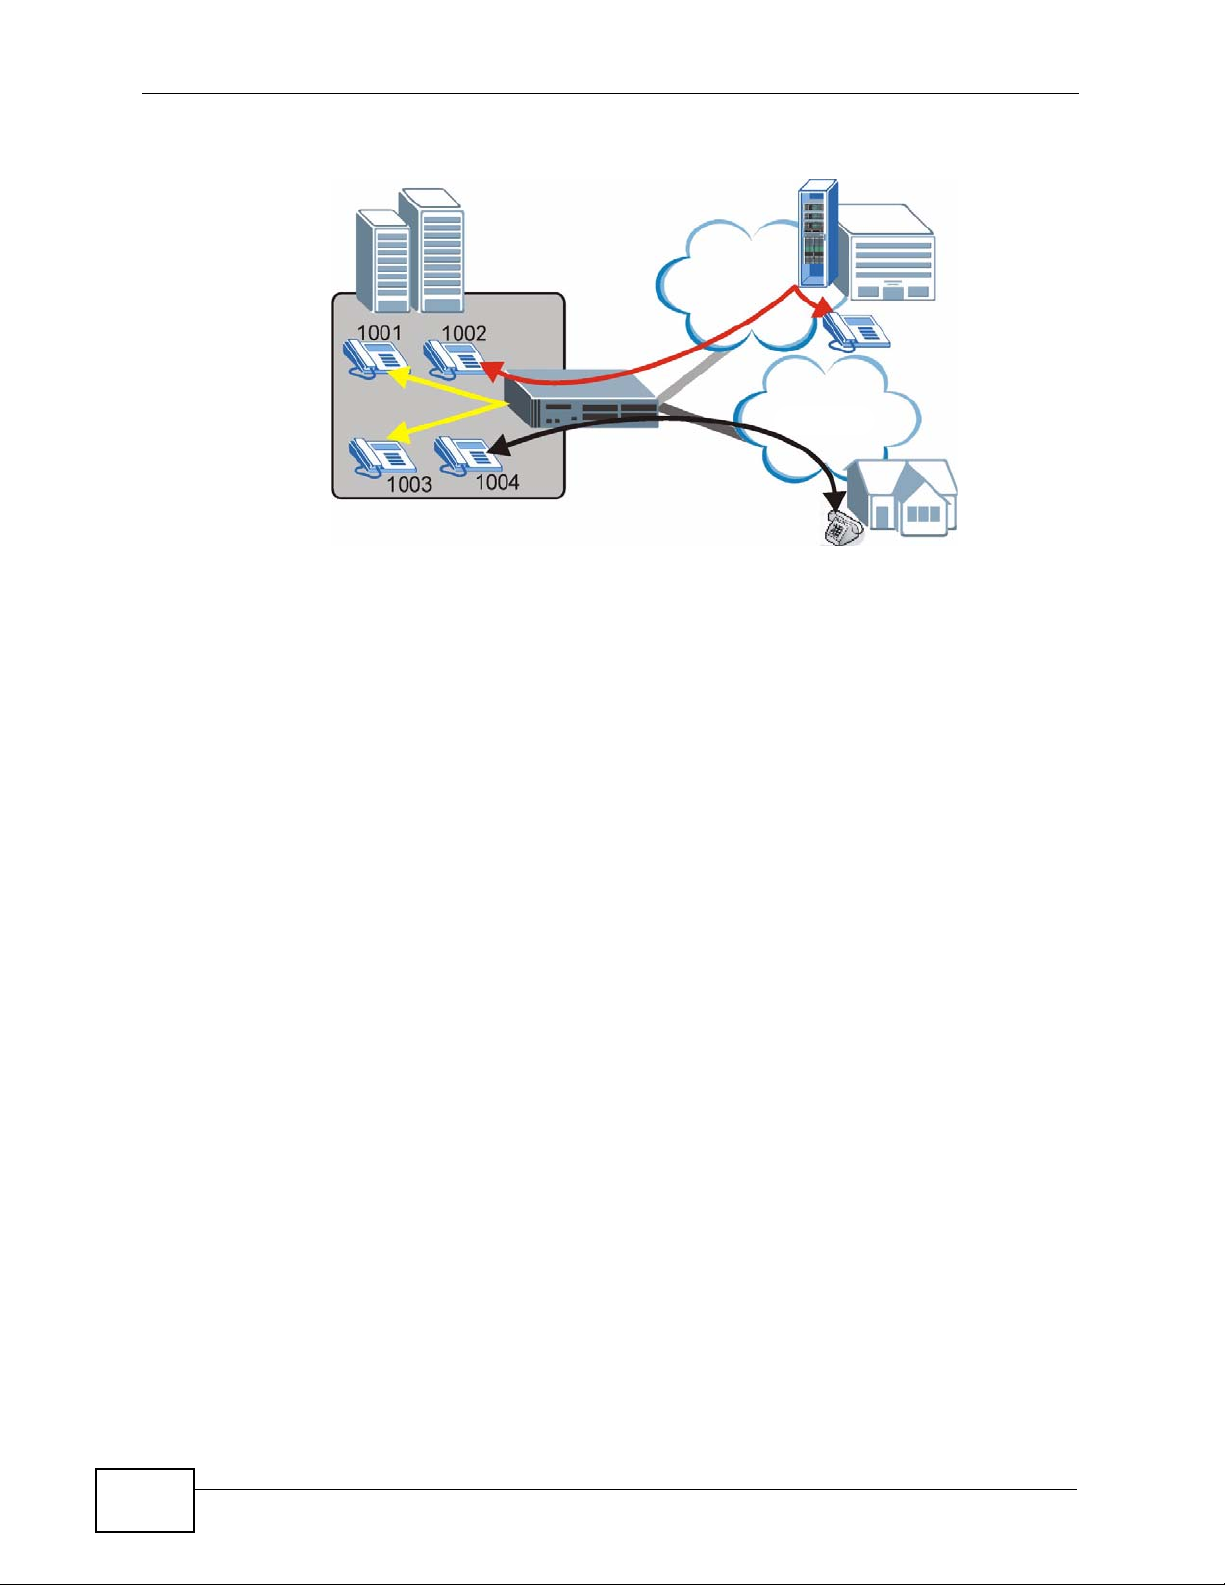
Chapter 1 Introduction
Figure 1 IP PBX Example
The X6004 can function as a stand alone telephone switchboard for a small
organization. It can also supplement a legacy PBX within an organization by
providing Vo IP telephony features.
Internet
ITSP
PSTN/ISDN
PSTN
1.1.1 Voice over Internet Protocol (VoIP) Implementation
The X6004 uses SIP (Session Initiation Protocol) to communicate with other SIP
devices. SIP is an internationally-recognized standard for implementing V oice over
Internet Protocol (VoIP).
The following figure shows SIP devices communicating with the X6004.
A: IP Phones - Telephones that convert voice into IP packets and vice versa (for
example ZyXEL’s V-500).
B: Softphones - Software-based phones installed on PCs.
C: VoIP Gateways - Devices (for example ZyXEL’s P-2302HWUDL) with built in
SIP processing which allow traditional analog phones or cordless phones to use
them as a link to the IP PBX.
D: ATAs - Analog Telephone Adapters (for example ZyXEL’s P-2024) aggregate a
large number of analog phones and convert their signal into IP packets.
E: Peer IP PBXs - Other SIP based IP PBXs with which you communicate over an
IP network. This allows you to call the telephones connected to the peer IP PBX
without going through a telephone service provider.
28
X6004 User’s Guide
Page 29
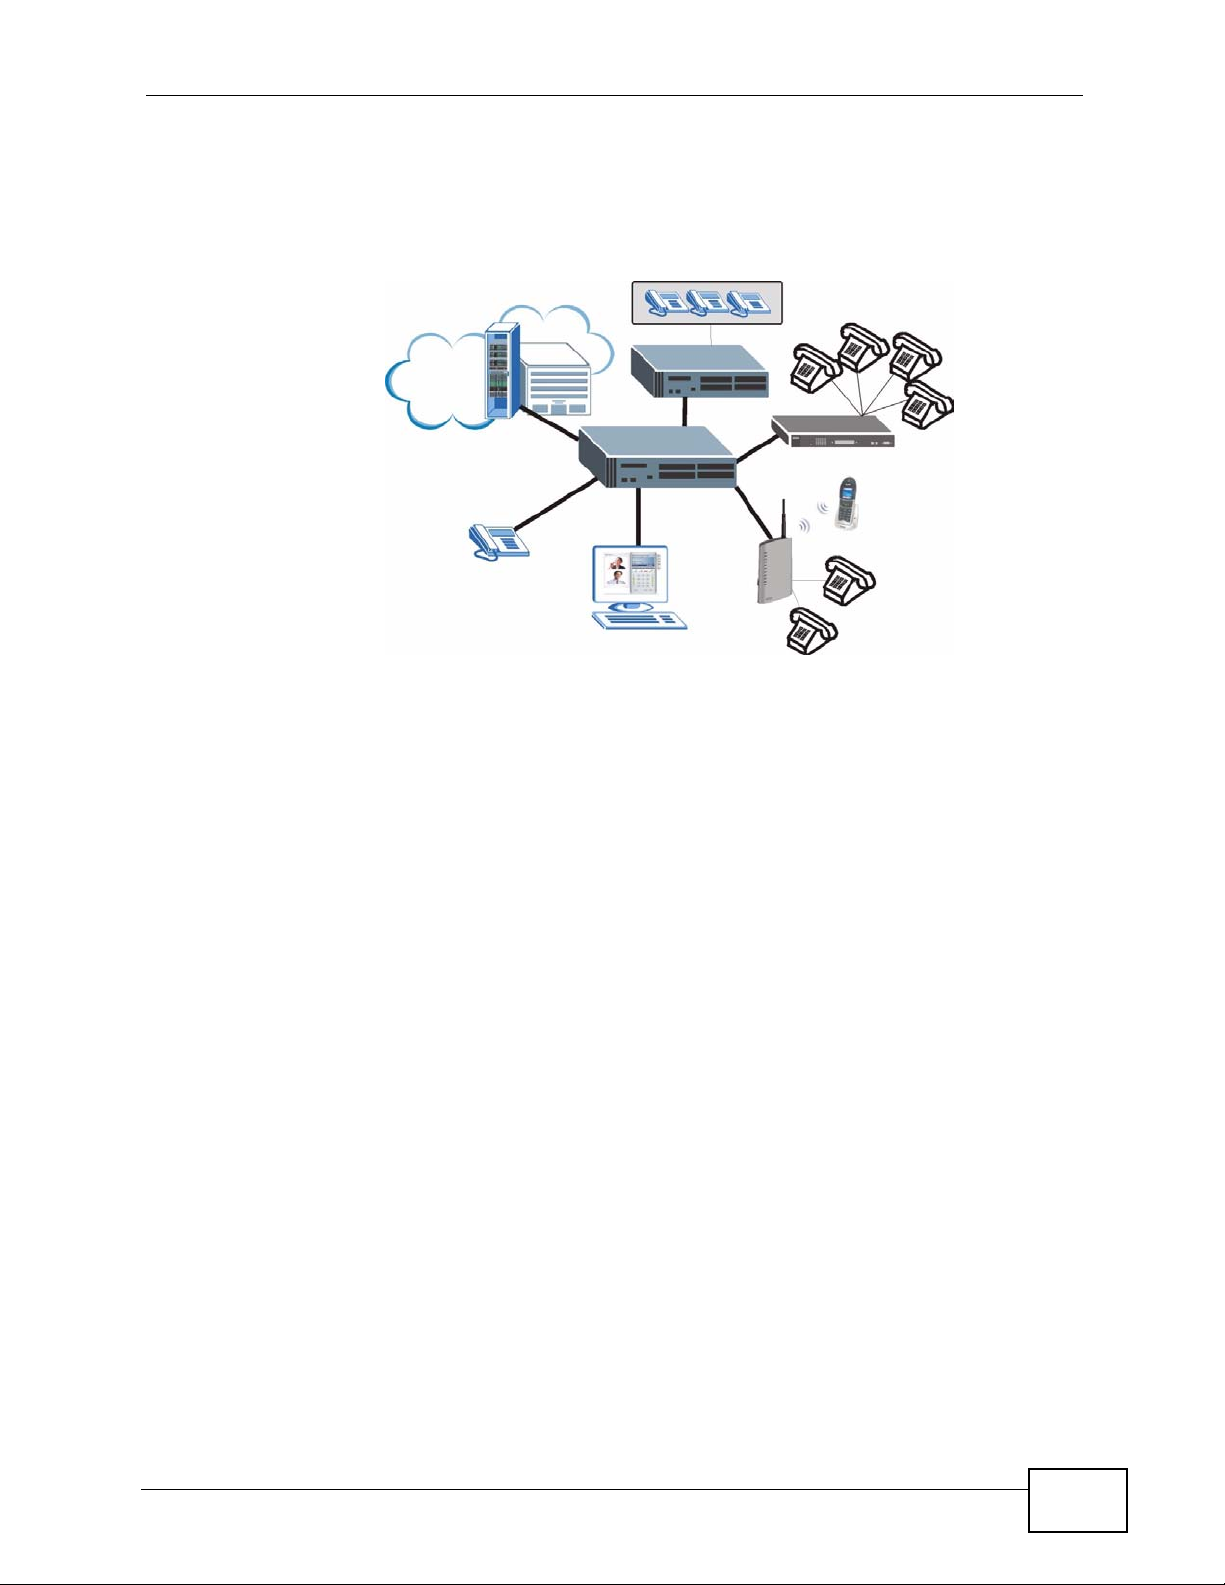
Chapter 1 Introduction
F: SIP Servers - Servers (D) located at your Internet Telephony Service Provider
(ITSP) which process outgoing calls from the X6004 and direc t them to IP phones
on the Internet or traditional phones on the PSTN.
Figure 2 SIP Devices and the X6004
ITSP
PSTN
F
A
B
1.1.2 PBX Telephony Features
The X6004 allows you to set up and manage features on an internal telephone
network without relying on your telephone service provider . The following are just
a few examples:
•Conference calls
•Voicemail
• Call Forwarding
E
D
C
The X6004 integrates with your IP network. For example you can:
• Import an LDAP-based (Lightweight Directory Access Protocol) contact list to
serve as the phonebook for the IP phones on your network.
• Set up the X6004 to send users email notifications or complete voice messages
as attachments when they receive voicemail.
X6004 User’s Guide
29
Page 30
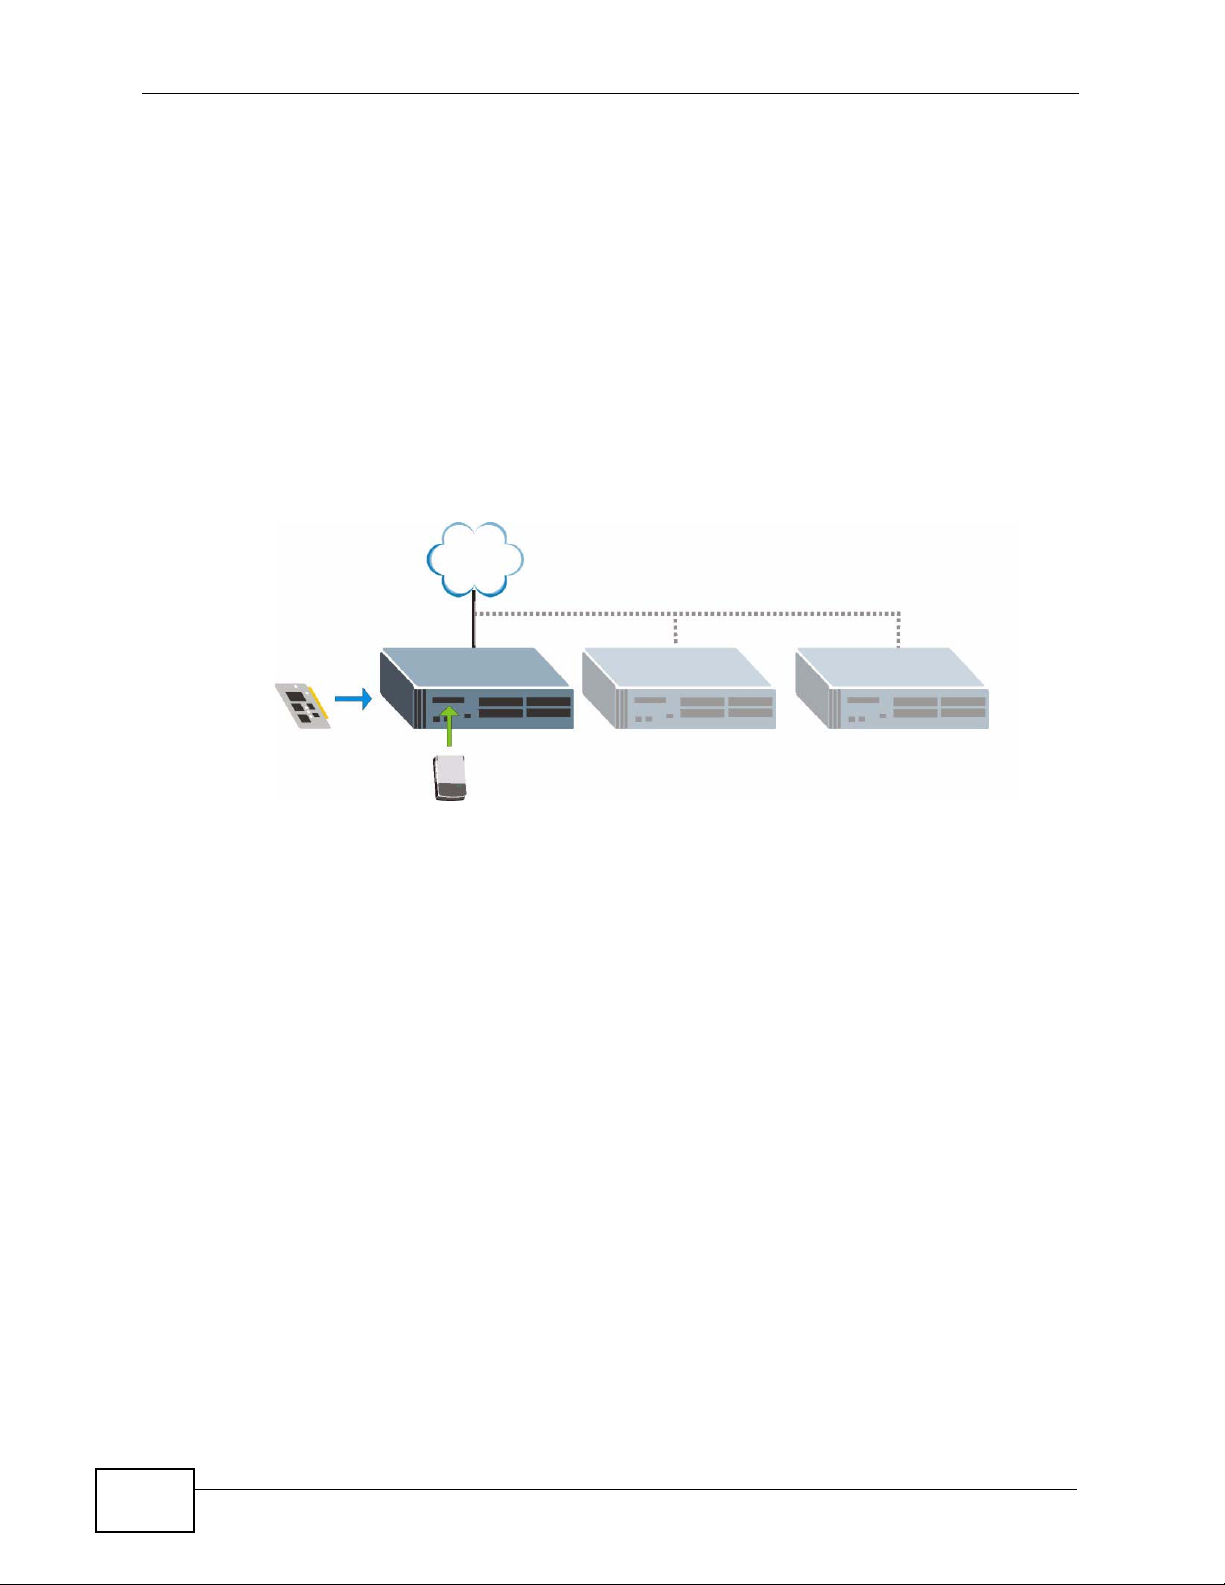
Chapter 1 Introduction
1.1.3 Scalable Design
The X6004 can be used stand alone to provide intercom (calling by extension) and
VoIP features in a small business environment. The X6004’s capability can be
expanded by:
• A - Adding DSP (Digital Signal Processing) modules in the device’s bottom to
handle more concurrent telephone connections. DSP modules are chips which
convert analog information into digital data and vice versa.
• B - Adding a hard disk to store a greater volume of voice messages and call
records.
• C - Connecting several X6004s together to manage a larger telephone network.
Figure 3 Scalable Design
ITSP
A
B
1.1.4 Automatic Call Distribution
Automatic Call Distribution (ACD) allows you to distribute inco ming calls to specific
groups of phones connected to your telephone network. Distributed calls can then
be sent to individual people based on assigned skill sets. This is known as SkillBased Routing (SBR). When the X6004 receives an incoming call, it categorizes
the call by “skill”. Next, it assigns the call to the one of the agents associated with
that skill. Skills are defined by the X6004 administrator and consititute a set of
rules that work in tandem with the auto-attendant to assign incoming calls to
groups of agents.
1.1.5 Click-To-Talk
The Click-To-Talk (CTT) feature allows you to create an HTML link that you can
embed on a Web page; a person visiting that web page can click it to connect
directly to a phone on the other end. This W eb-b ased communication uses the SIP
voice protocol, with an Adobe Flash-based client on one side, an IP phone on the
other, and the managing X6004 in the middle.
C
30
X6004 User’s Guide
Page 31

1.1.6 Mobile Phone Extensions
This feature gives users the freedom to access their telephone extensions
anywhere in the world, regardless of the type of telecommunications device they
are using: cell phone, VoIP, or landline. The “mobile” aspect that the end user can
always be on the move and still receive calls sent to their telephone extension.
1.2 Ways to Manage the X6004
Use any of the following methods to manage the X6004.
• Web Confi gurator. This is recommended for everyday management of t he X6004
using a (supported) web browser. You can also use the web configurator for
firmware upgrades and configuration backup/restore.
• Command Line Interface. Line commands offer an alternative to the web
configurator and in some cases are necessary to configure advanced features.
Chapter 1 Introduction
• FTP. Use FTP for firmware upgrades.
1.3 Good Habits for Managing the X6004
Do the following things regularly to make the X6004 more secure and to manage
the X6004 more effectively.
• Change the administrator password. Use a password that’s not easy to guess
and that consists of different types of characters, such as numbers and letters.
• Write down the administrator password and put it in a safe place.
• Back up the configuration (and make sure you know how to restore it).
Restoring an earlier working configuration may be useful if the device becomes
unstable or even crashes. If you forget y our password, you will hav e to reset the
X6004 to its factory default settings. If you backed up an earlier configuration
file, you would not have to totally re-configure the X6004. You could simply
restore your last configuration.
X6004 User’s Guide
31
Page 32

Chapter 1 Introduction
1.4 LEDs
The figure below shows the LEDs on the X6004.
Figure 4 LEDs
LAN
WAN
PWR ALM
SYS HDD
The following table describes the LEDs.
Table 1 LEDs
LED
PWR Green On The X6004 is turned on.
SYS Green Blinking The X6004 is rebooting and performing self-
ALM Red On There is a hardware failure.
HDD Orange Blinking The X6004 is writing to the hard disk.
FXS, FXO, FXS/FXO, ISDN BRI Interface Card LEDs
SYS Green On The interface card is functioning properly.
FXS 1~4,
FXS S1~S2
FXO 1~4,
FXO O1~O2
ISDN BRI
1~4
ISDN PRI Interface Card LEDs
LOS (Loss
of Signal)
SYS
1
2
3
COLO
R
SYS
1
FXS
2
3
STATUS DESCRIPTION
FXO
4
Off The X6004 is off.
diagnostic tests.
On The X6004 is on and functioning properly.
Off The power is off or the X6004 is not ready/
malfunctioning.
Off The X6004 is functioning normally.
Off The X6004 is not writing to the hard disk or does not
have a hard disk installed.
Off The interface card is off or is not recognized by the
X6004.
Green On The line is in use.
Off The line is not in use.
Green On The line is connected and receiving a signal.
Off The line is not connected.
Green On The line is connected and receiving a signal.
Off The line is not connected.
Blinking At least one ISDN connection is active.
Red On The line is down or not connected.
Off The line is operating properly.
4
32
X6004 User’s Guide
Page 33

Chapter 1 Introduction
Table 1 LEDs (continued)
LED
RAI
(Remote
Alarm
Indication)
AIS (Alarm
Indication
Signal)
L2 (Layer 2) Green On The link is connected and able to receive signals.
All 4 LED Blinking System fails.
COLO
R
Yellow On The remote device receives the ISDN physical layer
Yellow On The X6004 detects an ISDN physical layer issue and
STATUS DESCRIPTION
alarm from the X6004 and responds with this alarm.
Off The ISDN physical layer is operating properly without
any remote alarms.
sends this local alarm.
Off The ISDN physical layer is operating properly without
any local alarms.
Off The link is down.
Blinking The system is booting up or at least one voice
connection is active.
Off There is a system configuration error.
X6004 User’s Guide
33
Page 34

Chapter 1 Introduction
34
X6004 User’s Guide
Page 35

CHAPTER 2
How It Works
This chapter is an overview of different logical components and how they work
together to route calls on the X6004.
2.1 Call Routing
The two main functions of any IP-PBX are routing internal calls and handling calls
to and from the outside world.
The following sections explain how these functions are performed on the X6004.
2.1.1 Call Routing Terms
The following are some terms related to ZyXEL’s IP-PBX implementation.
• Extension - This is a unique number assigned to each telephone connected to
the X6004. Extensions are used to make calls between phones connected to the
X6004 and to route calls from the outside world to their correct target.
Extensions fall into the following two groups:
• SIP Extension - This is an extension assigned to a SIP (Session Initiation
Protocol) based IP phone connected to the X6004. Alternatively this could be
an extension assigned to an analog phone which connects to the X6004 via a
VoIP gateway device.
•FXS (Foreign Exchange Subscriber) Extension - This is an extension
assigned to an analog phone directly connected to a port on an FXS interface
card installed on the X6004 (See Figure 5 on page 36.) The FXS ports on the
X6004 work the same way as the phone sockets in your home. In your home
you are a subscriber to the telephone services of your local telephone
company and when you connect an analog phone to the X6004 you s ubscribe
to the telephone services of the X6004.
• ISDN BRI (Basic Rate Interface) Extension - This is an extension
assigned to an ISDN phone directly connected to the X6004.
• Authority Group - This is a set of extensions. Each extension can only belong
to one authority group. Authority groups manage extensions by allowing them
to make only certain types of calls. For example, if you create two authority
groups, you can allow one group to make local calls and long distance calls and
the second authority group to make local calls only.
X6004 User’s Guide
35
Page 36

Chapter 2 How It Works
• Outbound Line Group - This is a set of connections or lines going to the
outside world.
• SIP Trunk - This is a connection to your ITSP (Internet Telephony Service
Provider).
• ISDN BRI/PRI Trunk - This is a connection to your ISDN Service Provider.
• Trusted Peer - This is a connection to another IP PBX or SIP server. The
trusted peer device must also specify your X6004 as a trusted peer.
• FXO (Foreign Exchange Office) Trunk - This type of outbound line group
consists of telephone cables connected to ports on an FXO interface card on
the X6004. The telephone cables lead to the PSTN (Publi c Switched Telephone
Network), or in other words your traditional (non-VoIP) telephone company.
FXO ports always point in the direction of the telephone services.
The figure below shows the relationship between FXS and FXO ports.
Figure 5 FXS and FXO Ports
FXS
FXO
PSTN
FXS
FXO
• LCR (Least Cost Routing) - This is a rule which specifies which outbound line
group is used when making an outbound call. It consists of a dialing condition,
for example dial 0 to make a call via a specific FXO trunk or dial 1 for calls via a
SIP trunk. LCRs also set priority to which outbound line group should be tried
first, second, third and so on when making outbound calls with the same dialing
condition.
• Auto-Attendant - This is a feature which routes incoming calls to their proper
extension. An auto-attendant is assigned to each outbound line group and it
services incoming calls on those lines. If your organization has two outbound
line groups, each with a specific telephone number for incoming calls, then you
36
X6004 User’s Guide
Page 37

Chapter 2 How It Works
can assign a different auto-attendant for each incoming line. Assign one autoattendant for general calls to the extensions in your organization (for example
AA1) and one auto-attendant for direct routing to a FAX machine (for example
FAX).
Figure 6 Auto-Attendant
555-0002
FAX
2001
2.2 Internal Call Routing
Internal call routing refers to calls between extensions on the X6004. People
simply dial the extension they want to call. The X6004 checks to see if the number
dialed is an existing extension and forwards the call to that extension. The X6004
by default allows people with extensions from one authority group to call
extensions in another authority group. You can, however, block calls between
authority groups if your organization requires such a setting.
1001
555-0001
AA1
1002
Please dial the
extension you
would like to
reach.
1003
The configuration requirement for setting up internal call routing are:
1 Create an authority group.
2 Create extensions in the authority group.
X6004 User’s Guide
37
Page 38

Chapter 2 How It Works
2.3 Outbound Call Routing
Outbound call routing refers to calls originating from an extension on the X6004,
going via an outbound line group to a telephone outside your organization.
Outbound call routing requires that an authority group is linked to an outbound
line group. The link between the two is an LCR (Least Cost Routing). LCRs contain
the dialing rules for outbound line groups. Authority groups need to be associat ed
to LCRs to gain access to the outbound line groups.
In the most basic setup example an organization has one authority group (with all
of the company’s extensions), one outbound line group and an LCR which grants
the authority group access to outbound lines. Everyone in the organization has the
same rights to use outbound lines .
Figure 7 Outbound Call Routing - Basic
Authority
Group
In a more advanced example, you can create two authority groups, still have one
outbound line group and two different LCRs. You can now control the types of
outbound calls that can be made by each authority group.
In the figure below, the SALES authority group has a local c a ll LCR a nd a lo ng
distance LCR associated to it. This allows its group members to make both local
and long distance calls via the outbound line group. R&D authorit y group only has
the local LCR associated to it so its group members can only make local calls via
the outbound line group.
LCR
Outbound
Line
Group
Figure 8 Outbound Call Routing - Advanced
Authority
Group
SALES
LCR - Local
LCR - Long Distance
Outbound
Line Group
38
Authority
Group
R&D
LCR - Local
X6004 User’s Guide
Page 39

Chapter 2 How It Works
The configuration requirement for setting up outbound call routing are:
1 Create an authority group.
2 Create extensions in the authority group.
3 Create an outbound line group.
4 Create LCRs and add outbound line groups to them.
5 Associate LCRs to authority groups.
X6004 User’s Guide
39
Page 40

Chapter 2 How It Works
40
X6004 User’s Guide
Page 41

CHAPTER 3
Tutorials
This chapter provides some examples of using the web configurator to set up and
use the X6004. Specifically, the tutorials will show you how to set up the X6004
for a telephone network as shown in the following figure.
Figure 9 Tutorial Overview
PSTN
/ ISDN
The tutorials include:
Table 2 Tutorials Overview
TUTORIAL GOAL STEPS
Making Internal Calls • Configure SIP Extensions
• Connect IP Phones
• Register IP Phones
• Auto Provisioning
Making PSTN Calls • The PSTN Connection
• Creating a Dialing Rule for PSTN
• Assigning an LCR to an Authority
Group
Making ITSP Calls • The ITSP Connection
• Creating a Dialing Rule for ITSP
• Assigning an LCR to an Authority
Group
ITSP
X6004 User’s Guide
41
Page 42

Chapter 3 Tutorials
Table 2 Tutorials Overview
TUTORIAL GOAL STEPS
Making ISDN Calls • The ISDN Connection
ISDN Network
Configuration Examples
Using Call Features •Customizing Feature Codes
Using Your Web Portal • Your Information
Capturing Packets Using
the Web Configurator
Creating an Automated
Menu System
• Creating a Dialing Rule for ISDN
• Assigning an LCR to an Authority
Group
• Example 1: Small/Medium Business
• Example 2: Company with Existing
PBX
• Example 3: Company with Existing
PBX and Expanding Employees
• Using the Voicemail Feature
• Accessing th e Web Portal
• Changing Your Security Information
• Personalizing Your Settings
• Setting Up Voicemail
• Using the Web Phone (IP Phone Users
Only)
• Create an Agent Identity
• Create a Skill
• Create an Auto-Attendant
Note: This chapter assumes that you have already configured your network settings.
See the Network Wizard section in the QSG or Chapter 5 on page 111 for more
information.
42
X6004 User’s Guide
Page 43

3.1 Making Internal Calls
This tutorial sets up the internal telephone extensions on your network. At the end
of this tutorial you should be able to call between extensions. The next figure
shows the telephone extensions (1001 - 1010) configured in this tutorial. All of
the extensions are members of an authority group called Basic (you need to
create an authority group before configuring extensions, see Chapter 2 on page
35 for more information). The figure also shows an internal call between
extensions 1001 and 1009.
Figure 10 Internal Calls
Basic
Chapter 3 Tutorials
1001
1006
1002
1007
1003
1008
1004 1005
1009 1010
3.1.1 Configure SIP Extensions
The following section introduces how to create the authority group called Basic
and ten SIP extensions 1001 to 1010 on the X6004. The number of extensions
you can create is limited by your service subscription (see Section 36.1.2 on page
477 for more information).
1 In the web configurator, click Configuration > PBX > Extension Management
> Authority Group to open the following screen.
X6004 User’s Guide
43
Page 44

Chapter 3 Tutorials
2 Click the Add icon to open the following screen. Enter the name of the group
(Basic in this example) and click Add. The Machine ID field is a name
automatically assigned to the X6004.
3 The new authority group displays in the following screen. Now you will add SIP
extensions to the authority group. Click the new authority group’s Advanced icon.
4 The following screen displays. Click Batch Add to configure multiple SIP accounts
at the same time.
5 Configure the screen as shown next. The SIP extension number and any
configured SIP Auth. Password prefi x and/or postfix make up the SIP password.
The SIP password must be at least four digits. This example uses ten four-digit
SIP extensions 1001 - 1010 that are also used as the SIP usernames. The SIP
passwords are comprised of the combination of Prefix + Extension + Postfix. In
this example, the SIP Auth. Password Prefix value is 11 and the Postfix value
44
X6004 User’s Guide
Page 45

Chapter 3 Tutorials
is 99. The SIP username for extension 1001 is 1001 and the SIP password for
this extension is 11100199. You do not need to configure the Prefix and Postfix
values as long as the SIP password length is at least four digits long. Click Apply
and wait for the X6004 to create the ten extensions.
6 The SIP extensions display as shown here.
X6004 User’s Guide
45
Page 46

Chapter 3 Tutorials
7 Keep a list of the SIP passwords (the Prefix + Extension Number + Postfix
combinations in this example). When you deploy the network’s IP phones, you will
need this information for SIP registration. See Section 3.1.2 on page 46 for
information on configuring your IP phones.
The extension number serves as the password the user uses to log into the X6004
to configure his extension’s call forwarding, call blocking, phonebook, voice mail,
and other settings. See Chapter 37 on page 483 for more information.
8 If the IP phone is from ZyXEL and supports auto pro visioni ng, use s ection Section
3.1.4 on page 48 to map the SIP extensions to your network’s SIP devices.
3.1.2 Connect IP Phones
You can now set up your IP phones. The next figure shows the network
connections of the IP phones and the X6004. In this example, all of the IP phones
and the X6004 are connected to an Ethernet switch and are all assigned IP
addresses in the same subnet.
Figure 11 Connect IP Phones
IP = 172.23.37.101
1001
1006
1002
1007
1003
1008
1004
1009
IP = 172.23.37.201
1005
1010
46
X6004 User’s Guide
Page 47
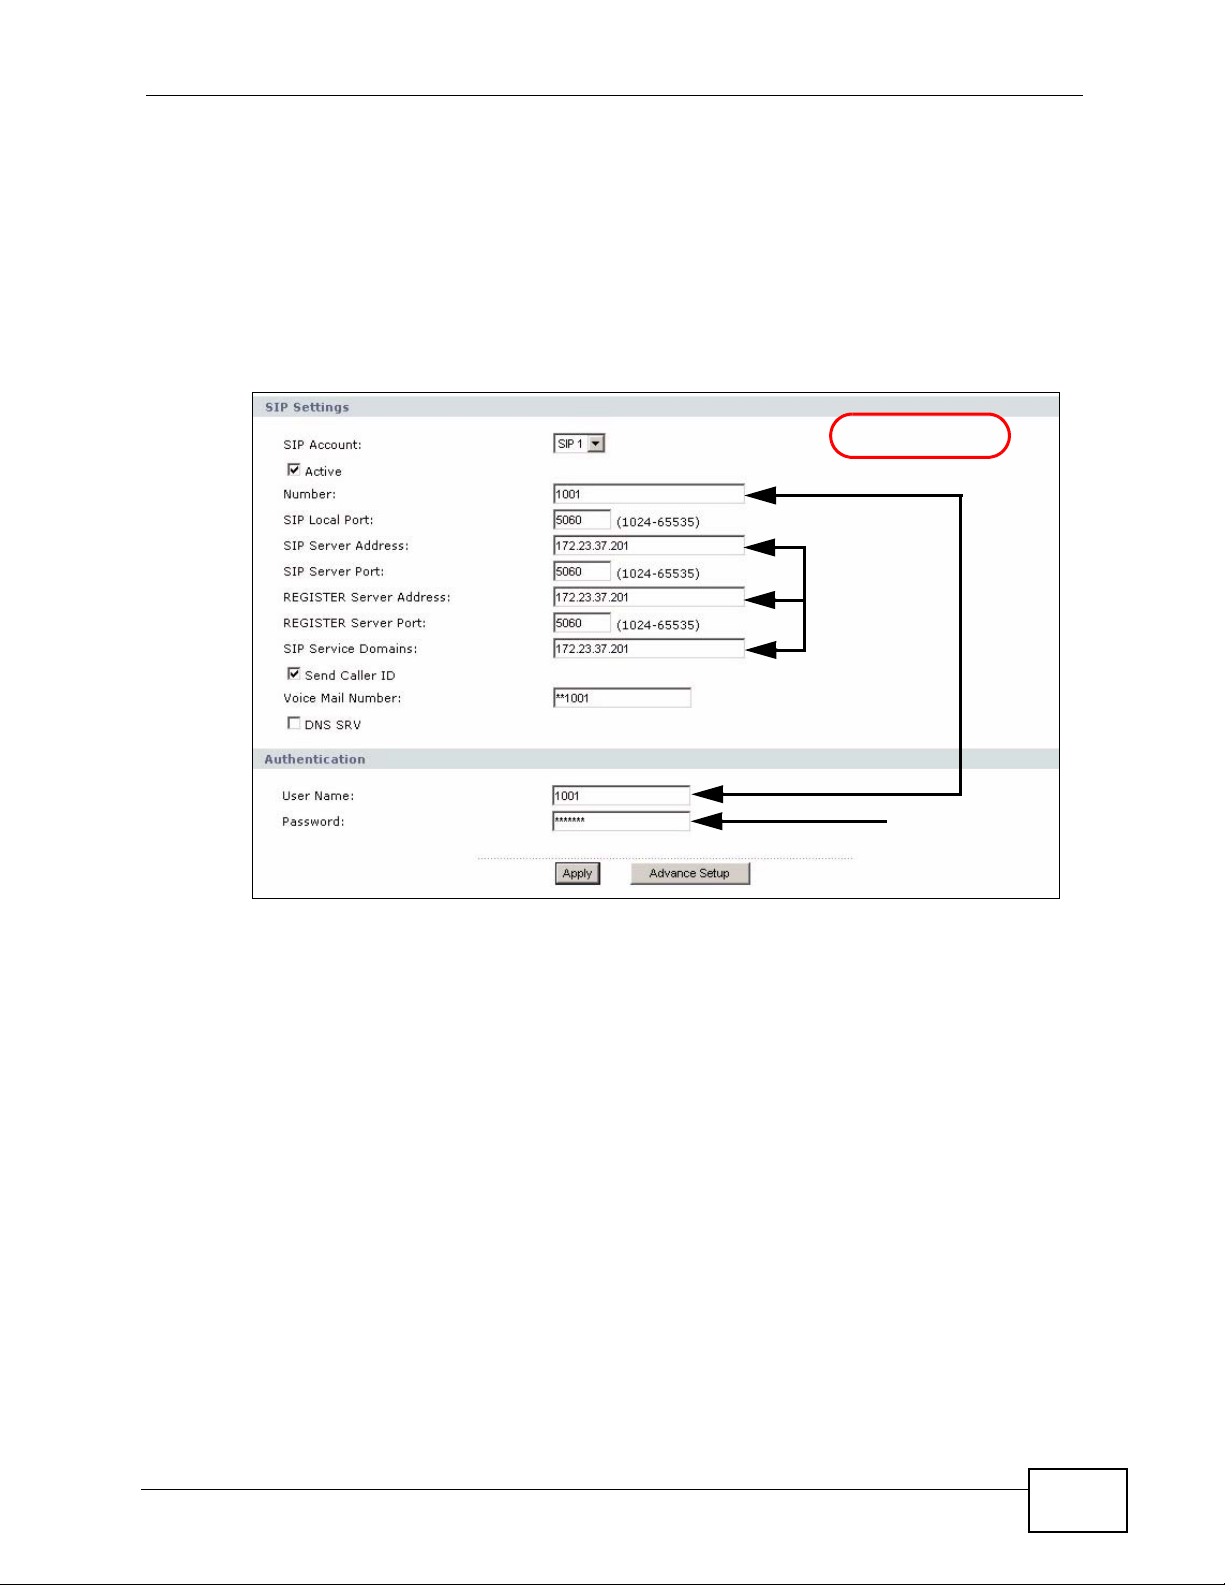
3.1.3 Register IP Phones
After your network connections have been made, you can proceed with the SIP
registration of the IP phones on your network. The next figure shows a typical SIP
registration screen of a ZyXEL IP phone. This is a sample screen only, but it
includes all the key fields necessary to complete a SIP registration. It shows the
SIP registration of an IP phone with the extension 1001.
Figure 12 Example IP Phone SIP Registration Screen
Chapter 3 Tutorials
EXAMPLE
Extension Number of IP Phone
IP Address
of the X6004
SIP Password
(Prefix + Extension + Postfix)
Complete the SIP registration for all the IP phones on your network. When all the
phones are registered, you can make internal calls by dialing the extension
number assigned to each phone.
X6004 User’s Guide
47
Page 48

Chapter 3 Tutorials
3.1.4 Auto Provisioning
A ZyXEL IP phone that supports auto provisioni ng can get a configuration text file
from the X6004 (see Appendix on page 521 for supported IP phones). The
configuration file contains the SIP s et ti ng s that the SIP device uses to register
with the X6004. The following graphic shows an IP phone (A), softphone (B), V oIP
gateway (C), and ATA (D) downloading configuration text files from the X6004.
Figure 13 Auto Provisioning
After you configure the SIP extensions (see Section 3.1.1 on page 43) and make
your network connections (see Figure 11 on page 46), use the following directions
to map each SIP extension to the appropriate SIP device. You need the MAC
address of each SIP device (or the serial number if it is a softphone).
1 Click Configuration > PBX > Server Configuration > Auto Provision. Then
click a SIP extension’s Edit icon.
48
X6004 User’s Guide
Page 49

Chapter 3 Tutorials
2 Enter the SIP device’s MAC address (or serial number if it is a ZyXEL softp hone).
This example is for a softphone with a serial number of 1234567890. Click Set
Profile.
3 The serial number of the softphone that is to use the SIP extension displays in the
summary screen.
4 Repeat these steps to map each SIP extension to a SIP device’s MAC address or
serial number.
3.1.4.1 Configuring the IP Phones for Auto Provisioning
Configure the ZyXEL IP pho nes to receive configuration information from the
X6004. This typically involves enabling auto provisioning and specifying the
protocol to use (HTTP at the time of writing). See the documentation that came
with your ZyXEL IP phone for information on how to do this.
Once the IP phones receive their configuration information via auto provisioning,
they will automatically register with the X6004. You can make internal calls by
dialing the extension number assigned to each phone.
X6004 User’s Guide
49
Page 50

Chapter 3 Tutorials
3.2 Making PSTN Calls
The following section shows you how to make and recei ve calls via a connection to
the PSTN. This example covers:
• The PSTN Connection - configuring the outbound line group (connection
settings) from the FXO interface card to the PST N .
• Creating a Dialing Rule for PSTN - creating a rule which tells the X6004
when to use the PSTN connection when completing outbound calls.
• Assigning an LCR to an Authority Group - giving extensions the right to
make outbound calls via the PSTN connection.
Figure 14 Making a PSTN Call
The X6004
matches this number
with an LCR, applies an
offset (strips off the 0)
Caller dials
05555555
and routes the call to
PSTN.
PSTN
5555555
FXO
1001
3.2.1 The PSTN Connection
This example assumes that the X6004 has an FXO interface card already installed
(refer to the Quick Start Guide) and that you have connected your telephone
cables to the outlets that connect to your local telephone company. The front of
your X6004 should look as shown in the following figure.
In this example, the FXO interface card is installed in slot B and ports 1-4 are
used for the connections. You will use this information in a web configurator
screen later.
Figure 15 FXO Interface Card Connection
SYS
B
FXO
1
23
PSTN
4
50
D
X6004 User’s Guide
Page 51

Chapter 3 Tutorials
1 In the web configurator, click Configuration > PBX > Outbound Line
Management > Outbound Line Group to open the following screen.
2 Click the Add icon in the FXO Trunk section to open the following screen. Enter
the name of the group (PSTN1 in this example) and click Apply. Note the
Machine ID field (this is a name automatically assigned to the X6004). In some
web configurator screens, the outbound line group is identified in the following
format Machine ID:Group Name, so in our example it is IPPBX_001:PSTN1.
3 The new outbound line group displays in the following screen. Now you will add
the FXO connections to the outbound line group. Click the outbound line group’s
Advanced icon.
X6004 User’s Guide
51
Page 52

Chapter 3 Tutorials
4 The following screen displays. Select the FXO interfaces that you want to add to
this outbound line group and click the Right icon to move them to the Used
Interface column. Click Apply when you are done.
5 The Outbound Line Group screen displays again. Click the Auto-Attendant
icon. Auto-Attendant routes incoming calls (see Chapter 19 on page 291 for
details).
6 Make sure the Default AA option is selected (FAX is used to forward calls to a
single extension, such as your FAX machine’s extension) and click Apply.
7 People from the outside world can now call the X6004 using the PSTN numbers
provided by your local telephone company. The Default AA prompts the callers to
dial the extension they would like to reach. See Section 3.2.2 on page 53 for
information on how to set up a dialing rule so that the extensions on your network
can connect to the PSTN.
52
X6004 User’s Guide
Page 53

3.2.2 Creating a Dialing Rule for PSTN
The following sections show you how to create outbound dialing rules (also
referred to as Least Cost Routing or LCR).
The LCRs determine which outside line the X6004 should use to complete
outbound calls. In our example we want to use the PSTN1 outbound line group to
complete local calls.
Figure 16 Outbound Calls via PSTN
Chapter 3 Tutorials
local_call
1001
1 In the web configurator, click Configuration > PBX > Outbound Line
Management > LCR to open the following screen.
FXO
PSTN
X6004 User’s Guide
53
Page 54

Chapter 3 Tutorials
2 Click the Edit icon in the local_call section to open the following screen. Select
the outbound line group from the pool column that y ou want t o add to this LCR ( in
our example this is IPPBX_001:PSTN1 as configured in Section 3.2.1 on page
50), then click the Right icon to move them to the Selected column. Click Apply
to save the outbound line group in the LCR and then click the Add icon to
configure a dial condition. l
3 The Dial Condition screen appears as shown.
•Type 0 followed by a period (.) in the Dial Condition field. This means that
this LCR will be used when callers dial any number that begins with a 0. The
period (.) is a wildcard character, meaning anything can follow the zero.
• Test the dial condition. In our example, we tested the number 05555555 to
see if it matches our dial cond it i o n. You can test any number by typing it in
the Number Pattern Test field and clicking the Right icon; an O appears, if
the number typed in matches the dial condition and an X appears if it does not
match the dial condition.
• Specify an offset value. In our example, we configure an offset value of 1. The
offset value tells the X6004 how many init ial digits (if any) it shoul d strip off of
the dialed number before routing the call to the external line. See Figure 3 on
page 56 for an example.
54
X6004 User’s Guide
Page 55

•Click Apply to save your settin gs.
4 You are done configuring the LCR. However, before it can be used by any of the
phones connected to the X6004, the LCR needs to be assigned to an appropriate
authority group.
3.2.3 Assigning an LCR to an Authority Group
Chapter 3 Tutorials
The Group Management screen allows you to give an authority group (and the
extensions in that group) the right to use an LCR (outbound dial condition). In our
example, we give the authority group Basic the right to call out using the LCR
local_call.
Procedure:
1 Click Configuration > PBX > Group Management to view the following screen.
X6004 User’s Guide
55
Page 56

Chapter 3 Tutorials
2 Click the Advanced icon in the Authority Group section (in this example there is
only one authority group - Basic) of the screen to view the screen as shown.
Select the checkbox in the Advanced column of the local_call LCR as shown
below. Click Apply.
3 You can now use the telephones that are part of the Basic authority group to
make outbound calls using the PSTN connection. The following figure summarizes
the outbound call process for this example.
The X6004
matches this number
with the local_call
LCR, applies the
Caller dials
05555555
1001
offset (strips off the 0)
and routes the call to
PSTN.
3.3 Making ITSP Calls
The following section shows you how to make and recei ve calls via a connection to
the PSTN. This example covers:
• The ITSP Connection - configuring the outbound line group (connection
settings) from the X6004 to the ITSP.
• Creating a Dialing Rule for ITSP - creating a rule which the tells the X6004
when to use the ITSP connection when completing outbound calls.
The X6004
sends the call
to 5555555.
FXO
PSTN
5555555
56
X6004 User’s Guide
Page 57
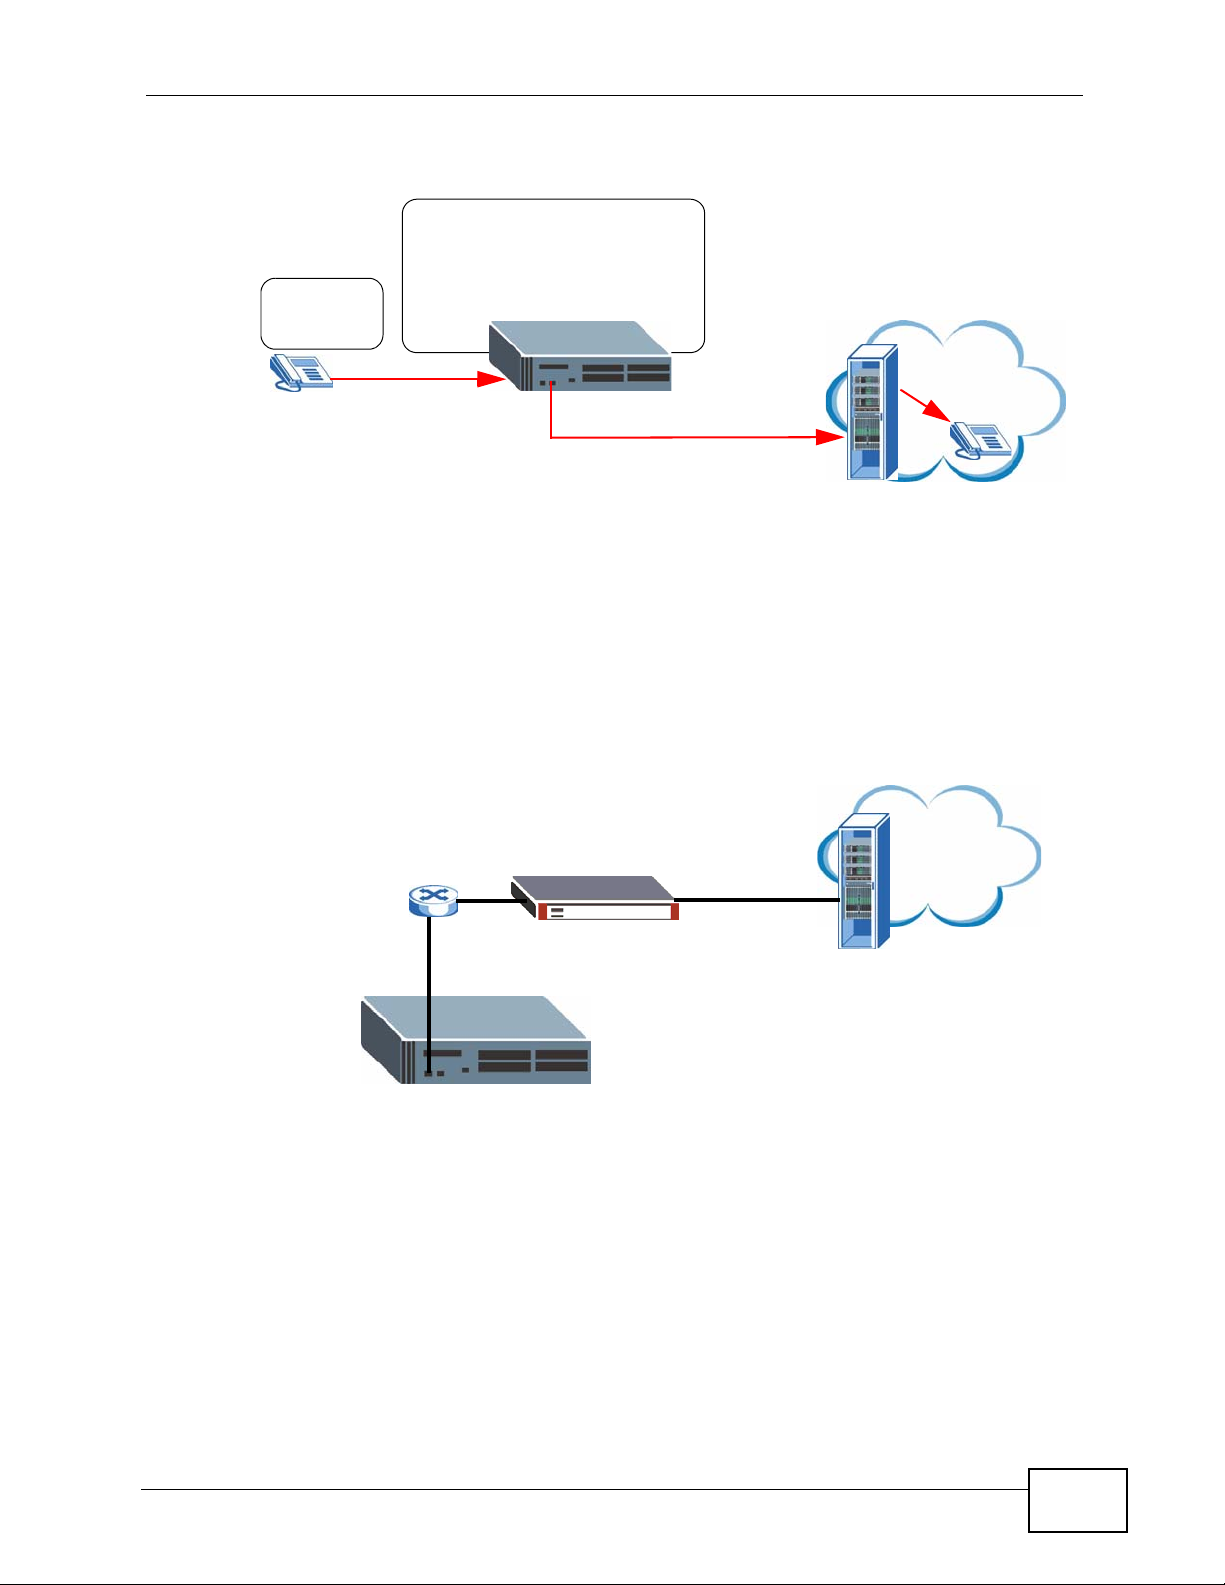
Chapter 3 Tutorials
• Assigning an LCR to an Authority Group - giving extensions the right to
make outbound calls via the ITSP connection.
The X6004 matches this number
with an LCR, applies an offset
(strips off the 1), add a dial plan
prefix 016 to the start of the number
Caller dials
1212555555
and routes the call to ITSP.
1001
3.3.1 The ITSP Connection
The following section introduces how to configure a connection to the ITSP. This
example assumes that the X6004 has a network connection to the SIP server at
your ITSP. The following figure shows the network configuration used in this
example.
Figure 17 Network Connection to ITSP
DMZ
FXO
ITSP
212555555
ITSP
X6004 User’s Guide
127.23.37.22
WAN
57
Page 58

Chapter 3 Tutorials
The following table describes sample account information as provided by the ITSP:
Table 3 Sample VoIP Account Information
INFO VALUES INFO VALUES
SIP Number 5551122 SIP Service
SIP Server Address 127.23.37.22 DTMF Mode SIP-INFO
SIP Server Port 5060 SIP Username 5551122
Register Server
Address
Register Server Port 5060 Codecs supported G.726, G.729A
1 In the web configurator, click Configuration > PBX > Outbound Line
Management > Outbound Line Group to open the following screen.
127.23.37.22
Domain
127.23.37.22 SIP Password 1234
58
2 Click the Add icon in the SIP Trunk section to open the following screen. Enter
the name of the group (“ITSP1” in this example) and click Apply. Note the
Machine ID field (this is a name automatically assigned to the X6004), in some
management screens the outbound line group is identified in the following format
Machine ID:Group Name, so in our example it is IPPBX_001:ITSP1.
X6004 User’s Guide
Page 59

Chapter 3 Tutorials
3 The new outbound line group displays in the following screen. Now you will
configure the connection to your ITSP. Click the outbound line group’s Advanced
icon.
X6004 User’s Guide
59
Page 60

Chapter 3 Tutorials
4 The following screen displays. Fill in the fields with the information provided by
your ITSP (in our example we use the sample information as shown in Table 3 on
page 58). Click Apply when you are done.
5 The Outbound Line Group screen displays again. Click the Auto-Attendant icon
in the SIP Trunk section of the screen.
60
X6004 User’s Guide
Page 61

Chapter 3 Tutorials
6 Make sure the Default AA option is selected (FAX is used to forward calls to a
single extension, such as your FAX machine’s extension) and click Apply.
7 People from the outside world can now call the X6004 using the numbers provided
by your ITSP. The Default AA prompts the callers to dial the extension they would
like to reach. See Section 3.3.2 on page 61 for information on how to set up a
dialing rule so that the extensions on your network can make calls via your ITSP.
3.3.2 Creating a Dialing Rule for ITSP
In our example we want to use the ITSP1 outbound line group to complete long
distance calls. This is done by configuring the long_distance_call LCR. This
figure also shows the local_call LCR we created in Section 3.2.2 on page 53.
Figure 18 Outbound Calls via ITSP
local_call
1001
long_distance_call
FXO
PSTN
ITSP
X6004 User’s Guide
61
Page 62

Chapter 3 Tutorials
1 In the web configurator, click Configuration > PBX > Outbound Line
Management > LCR to open the following screen.
2 Click the Edit icon in the long_distance_call section to open the following
screen. Select the outbound line group from the pool column that you want to add
to this LCR (in our example this is IPPBX_001:ITSP1 as configured in Section
3.3.1 on page 57), then click the Right icon to move it to the Selected column.
Click Apply to save the outbound line group in the LCR and then click the Add
icon to configure a dial condit ion.
62
3 The Dial Condition screen appears as shown.
•Type 1XXXXX followed by a period (.) in the Dial Condition field. This
means that this LCR will be used when callers dial any 7 or greater digit
number that begins with a 1. The X stands for any digit 0 to 9 and is used to
create a minimum length condition. The period (.) is a wildcard indicating that
any number can follow the 1XXXXX condition.
• Test the dial condition. In our example, we tested the number 1212555555
to see if it matches our dial condition. You can test any number by typing it in
the Number Pattern Test field and clicking the Right icon; an O appears if
the number typed in matches the dial condition and an X appears if it does not
match the dial condition.
X6004 User’s Guide
Page 63

Chapter 3 Tutorials
• Specify an offset value. In our example, we configure an offset value of 1. The
offset value tells the X6004 how many init ial digits (if any) it shoul d strip off of
the dialed number before routing the call to the external line.
• Specify a prefix number. In this example, our ITSP has a special dial plan for
long distance calls. A caller must dial 016 in order to take advantage of the
dial plan. By adding 016 in the Prefix field, the X6004 automatically adds
016 to calls that match this dial condition. See Figure 3 on page 65 for an
example.
•Click Apply to save your settin gs.
4 You are done configuring the LCR. However, before it can be used by any of the
phones connected to the X6004, the LCR needs to be assigned to an appropriate
authority group.
X6004 User’s Guide
63
Page 64

Chapter 3 Tutorials
3.3.3 Assigning an LCR to an Authority Group
The Group Management screen allows you to give an authority group (and the
extensions in that group) the right to use an LCR (outbound dial condition). In our
example, we give the authority group Basic the right to call out using the LCR
long_distance_call.
1 Click Configuration > PBX > Group Management to view the following screen.
2 Click the Advanced icon in the Authority Group section (in this example there is
only one authority group - Basic) of the screen to view the screen as shown.
Select the checkbox in the Advanced column of the long_distance_call LCR as
shown below. Click Apply.
64
X6004 User’s Guide
Page 65

Chapter 3 Tutorials
3 You can now use the telephones that are part of the Basic authority group to
make long distance calls using the ITSP connection. The following figure
summarizes the outbound call process for this example.
The X6004 matches this number
with the long_distance_call LCR,
applies the offset (strips off the 1),
Caller dials
1212555555
1001
adds the prefix 016 to the start of
of the number and routes the call
to ITSP.
The X6004
sends the call
016212555555.
The ITSP applies
the dialing plan rate
and sends the call
to 212555555.
ITSP
212-555-555
3.4 Making ISDN Calls
The following section shows you how to make and recei ve calls via a connection to
the ISDN. This example covers:
• The ISDN Connection - configuring the outbound line group’s connection
settings from the BRI/PRI interface card to the ISDN.
• Creating a Dialing Rule for ISDN - creating a rule which tells the X6004 when
to use the ISDN connection when completing outbound calls.
• Assigning an LCR to an Authority Group - giving extensions the right to
make outbound calls via the ISDN connection.
Figure 19 Making an ISDN Call
The X6004
matches this number
with an LCR, routes the
call to ISDN.
Caller dials
8005555555
1000
ISDN
8005555555
BRI/PRI
X6004 User’s Guide
65
Page 66

Chapter 3 Tutorials
3.4.1 The ISDN Connection
/This example assumes that the X6004 has an ISDN PRI interface card already
installed (refer to the Quick Start Guide) and that you have connected your
telephone cables to the outlets that connect to your local telephone company. The
front of your X6004 should look as shown in the following figure.
Note: In this example, a PRI interface card is installed in slot B and port 1 is used for
the connection. You will use this information in a web configurator screen later.
Figure 20 PRI Interface Card Connection
ISDN
The following table describes our sample PRI information as provided by the
telephone service provider:
Table 4 Sample PRI Information
SWITCH TYPE NT/TE MODE LINEBUILDOUT FRAMING CODING
NET5 NT 120 CRC4 HDB3
66
X6004 User’s Guide
Page 67

Chapter 3 Tutorials
1 In the web configurator, click Configuration > PBX > Server Configuration >
Server > PRI to open the following screen.
Specify which PRI interface card you want to configure in the Slot and Port fiel ds.
Then configure the Switch Type, NT/TE Mode, LineBuildOut, Framing and
Coding fields according to the settings on the peer end of PRI device or on the set
up information provided by your telephone service provider. See Section 6.6 on
page 136 for more information.
Click Apply to save your changes.
2 Click Configuration > PBX > Outbound Line Management > Outbound Line
Group to open the following screen.
X6004 User’s Guide
67
Page 68

Chapter 3 Tutorials
3 Click the Add icon in the PRI Trunk section to open the following screen. Enter
the name of the group (OG_PRI1 in this examp le) and click Apply. Note the
Machine ID field (this is a name automatically assigned to the X6004). In some
web configurator screens, the outbound line group is identified in the following
format Machine ID:Group Name, so in our example it is
IPPBX_001:OG_PRI1.
4 The new outbound line group displays in the following screen. Now you will add
the FXO connections to the outbound line group. Click the outbound line group’s
Advanced icon.
68
5 The following screen displays. Assume that you want calls on Slot B and P o rt 1 to
be answered by the Auto-Attendant, so select AA and the correct slot and port.
Click the Right icon to move the slot and port to the Used Interface column.
Click Apply when you are done.
X6004 User’s Guide
Page 69

Chapter 3 Tutorials
6 The Outbound Line Group screen displays again. Click the Auto-Attendant
icon. Auto-Attendant routes incoming calls (see Chapter 19 on page 291 for
details).
7 Select the Default AA option and click Apply.
8 People from the outside world can now call the X6004 using the ISDN numbers
provided by your local telephone company. The Default AA prompts the callers to
dial the extension they would like to reach. See Section 3.4.2 on page 69 for
information on how to set up a dialing rule so that the extensions on your network
can connect to the ISDN.
3.4.2 Creating a Dialing Rule for ISDN
The following sections show you how to create outbound dialing rules (also
referred to as Least Cost Routing or LCR).
The LCRs determine which outside line the X6004 should use to complete
outbound calls. In our example we want to use the OG_PRI1 outbound line group
to complete local calls.
Figure 21 Outbound Calls via ISDN
ISDN_call
ISDN
1000
X6004 User’s Guide
BRI/PRI
69
Page 70

Chapter 3 Tutorials
1 In the web configurator, click Configuration > PBX > Outbound Line
Management > LCR to open the following screen.
2 Click the Add icon to open the following screen. Select the outbound line group
from the pool column that you want to add to this LCR (in our example this is
IPPBX_001:OG_PRI1 as configured in Section 3.4.1 on page 66), then click the
Right icon to move them to the Selected column. Click Apply to save the
outbound line group in the LCR and then click the Add icon to configure a dial
condition.
70
3 The Dial Condition screen appears as shown.
•Type 800 followed by a period (.) in the Dial Condition field. This means that
this LCR will be used when callers dial any number that begins with 800. The
period (.) is a wildcard character, meaning anything can follow the 800.
• Test the dial condition. In our example, we test the number 8005555555 to
see if it matches our dial cond it i o n. You can test any number by typing it in
the Number Pattern Test field and clicking the Right icon; an O appears, if
the number typed in matches the dial condition and an X appears if it does not
match the dial condition.
• Leave the offset value empty. In our example, we do not need to configure
the offset value. See Figure 21 on page 69 for an example.
X6004 User’s Guide
Page 71

Chapter 3 Tutorials
•Click Apply to save your settin gs.
4 You are done configuring the LCR. However, before it can be used by any of the
phones connected to the X6004, the LCR needs to be assigned to an appropriate
authority group.
3.4.3 Assigning an LCR to an Authority Group
The Group Management screen allows you to give an authority group (and the
extensions in that group) the right to use an LCR (outbound dial condition). In our
example, we give the authority group Basic the right to call out using the LCR
ISDN_call.
1 Click Configuration > PBX > Group Management to view the following screen.
X6004 User’s Guide
71
Page 72

Chapter 3 Tutorials
2 Click the Advanced icon in the Authority Group section (in this example there is
only one authority group - Basic) of the screen to view the screen as shown.
Select the checkbox in the Advanced column of the ISDN_call LCR as shown
below. Click Apply.
3 You can now use the telephones that are part of the Basic authority group to
make outbound calls using the ISDN connection. The following figure summarizes
the outbound call process for this example.
Caller dials
8005555555
1001
The X6004
matches this number
with the ISDN_call
LCR, routes the call to
ISDN.
The X6004
sends the call
to 8005555555.
BRI/PRI
ISDN
8005555555
72
X6004 User’s Guide
Page 73

Chapter 3 Tutorials
3.5 ISDN Network Configuration Examples
The following section shows you some examples of deploying the X6004 using
ISDN in organizations of various sizes.
The following figure shows the three examples (1 ~ 3).
Figure 22 ISDN Network Configuration
B
1
C
D
A
ISDN Line
PBX
E
PBX
F
23
X6004 User’s Guide
73
Page 74

Chapter 3 Tutorials
3.5.1 Example 1: Small/Medium Business
For a small/medium company, the X6004 is the only device that forwards ISDN
calls between the company and the telephone service provider.
• For an example of configuring ISDN settings, see Section 3.4 on page 65.
• If you want outsiders to dialing in directly to extensions without going through
the Auto-Attendant, follow the instruction until step 5, select DDI/DID and
configure the settings as following.
Figure 23 ISDN Network Configuration
74
In the DDI/DID Mapping, define DDI/DID Mask (the digits of the Directory
Number on the right) for extension mappings. For example, you define 4 for
the DDI/DID Mask and add 1001 to 1001 for the mapping rule. So an incoming
call 8005551001 will be forwarded to the extension.
X6004 User’s Guide
Page 75

3.5.2 Example 2: Company with Existing PBX
For a company which already has a PBX. The X6004 is deployed between the PBX
and the telephone service provider. You can connect the X6004 to the telephone
service provider using PSTN connection (see Section 3.2 on page 50). Comparing
to use the FXO interface cards, the number of simultaneous calls supported is
greater and the cost is lower. In this example, we use one PRI line between the
X6004 and the PBX to support up to 23 (using T1) or up to 30 (using E1) voice
channels. The capacity and cost for call number support is greater than using FXO
interface cards. (Using 4 FXO interface cards supports only 16 simultaneous calls.)
• See an example of configuring ISDN settings in Section 3.4 on page 65.
• If you want the callers from the PBX’s extensions not to go through the AutoAttendant, follow the instruction until step 5, select one of the following settings
and continue the other settings according the instruction.
• If you don’t want incoming calls to go through the Auto-Attendant, select
Direct and configure settings as following (leave the Calling Party Number
section empty except you want to define the trusted callers). Then click
Apply.
Chapter 3 Tutorials
Figure 24 Example: Direct
X6004 User’s Guide
75
Page 76
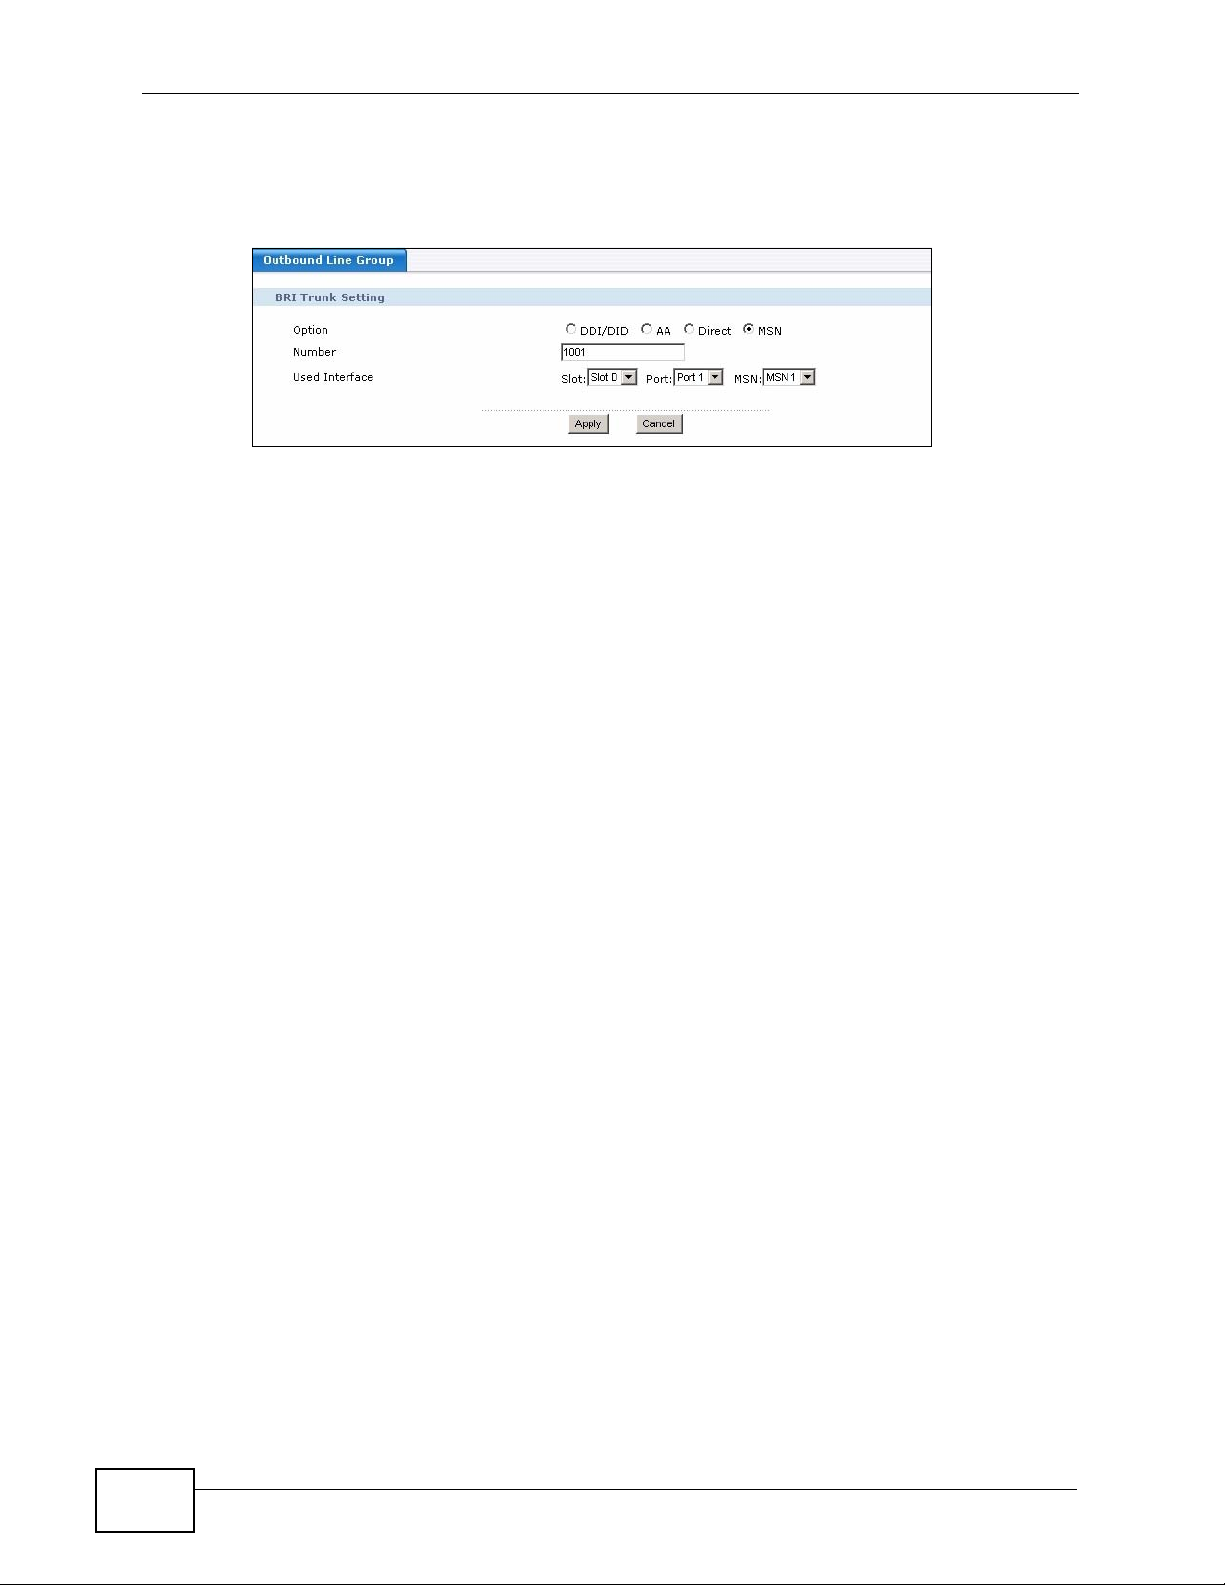
Chapter 3 Tutorials
• If you are using BRI line(s) and you want to have multiple subscriber numbers
on one port, select MSN and configure the settings as following. Then click
Apply.
Figure 25 Example: MSN
Note: We don’t use DDI/DID in this type of example because DDI/DID is mainly used
for outsiders to call extensions.
3.5.3 Example 3: Company with Existing PBX and Expanding Employees
For a company which has a PBX, and is expanding to include more employees, or
a new branch office (for example). The X6004 is behind the PBX system connected
using a PRI line.
• See an example of configuring ISDN settings in Section 3.4 on page 65.
• Like Example 2, you can also select Direct (if you want the callers from the
PBX’s extensions to the X6004’s not to go through the Auto-Attendant) or MSN
(if you are using BRI line(s) and you want to have multiple subscriber numbers
on one port).
Note: Like Example 2, we don’t use DDI/DID in this type of example because DDI/
DID is mainly used for outsiders to call extensions.
3.6 Using Call Features
The X6004 has built-in call features for functions such as call forwarding, call
blocking, voicemail and so on. These features can be activated or accessed by
dialing specific numbers from the phones connected to the X6004. The numbers
used to access call features are called call feature codes. This section shows you
how to customize call features. It also describes how to configure a ZyXEL IP
phone (V300 is used in our example) to access voicemail by using the voicemail
feature code. See Section 6.8 on page 141 for more information on all call
features.
76
X6004 User’s Guide
Page 77

3.6.1 Customizing Feature Codes
Click Configuration > PBX > Server Configuration > Server > Feature Code
to display the codes used for the X6004’s call features. You can change the codes
in this screen. Provide the users with a list of the features and corresponding
codes. Users on your network can then dial a code from their telephone to activate
a specific feature. For example, dialing *96 transfers a call.
Figure 26 Server > Feature Code
Chapter 3 Tutorials
3.6.2 Using the Voicemail Feature
The voicemail feature code as assigned in Section 3.6.1 on page 77 is **. Users
can dial ** followed by their extension number to access their voicemail. For
example, a caller from extension 1001 can dial **1001 to access voicemail
messages.
Some IP phones allow you to configure automatic dialing of feature codes to
perform common tasks. The following figure shows the web configurator screen of
ZyXEL’s V300 IP phone. ZyXEL ’ s V300 IP ph one can be configured to automatically
X6004 User’s Guide
77
Page 78

Chapter 3 Tutorials
access voicemail by pressing the VOICE MAIL button located on its keypad. This
is done by typing the call feature number into the Voice Mail Number: field.
Figure 27 ZyXEL V300 Voicemail Configuration
EXAMPLE
3.7 Using Your Web Portal
Every phone user has a personal web portal on the X6004. You can log in and
make changes to your account setup, and IP phone users also use the web phone.
The web phone is just like the telephone you usually use to make calls from this
extension; you can call all the same numbers in th e s a m e way.
The following sections show examples of how to access the X6004’s web portal,
configure your own personal settings, and use the web phone.
3.7.1 Your Information
In this example, your network administrator has given you some information, as
shown in the following table. You can also use this table to note down your own
personal information, if you like.
Table 5 Your Information
EXAMPLE INFORMA TION YOUR INFORMATION
Extension Number 1001
PIN Code 5678
Web Portal IP
Address
https://192.168.1.12
78
X6004 User’s Guide
Page 79

3.7.2 Accessing the Web Portal
Take the following steps to access your phone account’s web portal.
Open a web browser (like Internet Explorer) and enter the IP address you were
given.
Figure 28 Tutorial: Web Portal IP Address
E
L
P
M
A
X
E
Note: Don’t forget the “s” in “https://” - this “s” indicates a secure IP address, which
means that communication between your computer and the X6004 (including
your phone calls) cannot be intercepted by anyone else.
The following screen displays.
Figure 29 Tutorial: Log In
Chapter 3 Tutorials
Enter your extension number (“1001”) in the Extension field, and enter y our PIN
code (“5678”) in the PIN Code field. Click Login.
X6004 User’s Guide
79
Page 80

Chapter 3 Tutorials
3.7.3 Changing Your Security Information
It is very important that you change your security information as soon as possible,
since it could be guessed by others if it was generated automatically.
The Peer Info screen displays when you log in. It allows you to change the
password for your VoIP account (di splayed as SIP Auth Password) and the PIN
code you use to access the web portal, voicemail and the IVR (Interactive Voice
Response) system (displayed as Web/IVR/VM PIN Code).
Note: The SIP Auth Password field does not display if you connect to the X6004
using a regular analog telephone system.
Figure 30 Tutorial: Changing Security Information
• Enter the new SIP Auth Password in the field on the left, and enter it again in
the field on the right. Click Apply.
• Enter the new Web/IVR/VM PIN Code in the field on the left, and enter it
again in the field on the right. Click Apply.
80
X6004 User’s Guide
Page 81

3.7.4 Personalizing Your Settings
Next, configure your extension’ s call settings. Click the Forward/Block tab at the
top of the screen.
The following screen displays.
Figure 31 Tutorial: Configuring Call Settings
Chapter 3 Tutorials
The following table shows the example call setting information. You can also use
this table to make a note of the call settings you want to configure, if you like.
Table 6 Tutorial: Call Settings
EXAMPLE INFORMA TION YOUR INFORMATION
Office Hours Monday ~ Friday, 09:00 ~
17:30
Do Not Disturb
(no-one can call you, except for
people on the White List)
White List
(people who can still call you when
Do Not Disturb is on)
Disable
555 123456
555 234567
555 345678
EX
A
M
P
E
L
X6004 User’s Guide
555 456789
81
Page 82

Chapter 3 Tutorials
Table 6 Tutorial: Call Settings
Call Forwarding
EXAMPLE INFORMA TION YOUR INFORMATION
Blind Forward: Disable
(whether or not incoming calls are
redirected, and where they are
sent)
Find Me List
(other extensions where you might
be found)
Black List
(people you don’t want to call you
at all)
Block Calls Without Caller ID Disable
Take the following steps to configure this screen.
1 Office Hours: Ensure that the Mon through Fri boxes are checked in the office
hours sub-screen. Clear the Sat and Sun boxes. (You can access the office hours
sub-screen by clicking the Office Hours button.)
In the Time field, use the drop-down lists to enter 09 : 00 ~ 17 : 30.
Busy Forward: Voicemail
No Answer Forward: Find
Me List
After Office Hours:
Voicemail
987
654
321
555 999888
555 888777
2 Do Not Disturb: Ensure that Disable is selected. You can turn this on later if you
want.
3 White List: Click the White List button. In the screen that displays, enter each
phone number in the Number field and click Add after each one. Click Apply
when you are finished.
E
L
P
EXAM
82
X6004 User’s Guide
Page 83

Chapter 3 Tutorials
4 Call Forwarding: Ensure that Blind Forward is set to Disable. In the Busy
Forward row, select Voice Mail. In the No Answer Forward row, select Enable
and click Find Me List.
In the screen that displays, enter each phone number in the Number field and
click Add after each one. Click Apply when you are finished.
E
L
AMP
X
E
In the After Office Hours row, select Voice Mail.
5 Black List: Select Enable and click the Black List button. In the screen that
displays, enter each phone number in the Number field and click Add after each
one. Click Apply when you are finished.
E
L
P
M
A
EX
6 Block Calls Without Caller ID: Ensure that Disable is selected.
7 Click Apply. Your call settings are successfully configured!
X6004 User’s Guide
83
Page 84

Chapter 3 Tutorials
3.7.5 Setting Up Voicemail
Next, you can set up your voicemail inbox to automatically send your received
messages as audio files to your email inbox. It is recommended that you do this
so that your voicemail inbox does not fill up (if it fills up , no new messages can be
recorded).
Click the Voice Mail tab at the top of the screen.
The following screen displays.
Figure 32 Tutorial: Setting Up Voicemail
EXAMPLE
The following table shows the example voicemail settings. You can also use this
table to make a note of the voicemail se ttings you want to configure, if you like.
Table 7 Tutorial: Voicemail Settings
EXAMPLE INFORMATION YOUR INFORMATION
Received E-mail Address
(the address to which you want
the voicemail sent)
Attached Voice File
(send the audio file to your
email account)
Delete Voice Message After
Mailed
To configure this screen, enter your email address in the Received E-mail
Address field, select Attached Voice File and select Delete Voice Message
After Mailed. Click Apply.
user_abcd@examplecorp.c
om
Yes
Yes
84
X6004 User’s Guide
Page 85

3.7.6 Using the Web Phone (IP Phone Users Only)
Click the Web Phone tab at the top of the screen. If a screen similar to the
following displays, click Yes.
Figure 33 Tutorial: Security Pop-Up
The following screen displays.
Figure 34 Tutorial: The Web Phone
Chapter 3 Tutorials
Note: Make sure you have a headset (or speakers and a microphone) connected to
The following table describes how to use the web phone to perform some basic
phone functions.
Table 8 Tutorial: Basic Web Phone Call Features
FEATURE PROCEDURE
Dial a number Click each numeral using the mouse pointer . The number displays
Make a call Dial the number, then press the “Dial/Pick up” ( ) button.
Receive a call When a call is incoming, press the “Dial/Pick up” ( ) button.
End a call Press the “Hang up” ( ) button.
Adjust the speaker
volume
X6004 User’s Guide
your computer, and that your sound card is working correctly (try listening to an
audio file or recording a voice note to check, if there is a problem).
on the screen. Use the “Clear” ( ) button to delete a numeral.
Use the slider on the left of the keypad.
85
Page 86

Chapter 3 Tutorials
Table 8 Tutorial: Basic Web Phone Call Features
FEATURE PROCEDURE
Adjust the
microphone volume
Mute the speakers
and the microphone
Use the phone book Click the Phone Book tab to the right of the web phone. The
Use the slider on the right of the keypad.
Click the Mute button below the keypad.
phone book appears, displaying your contact list. Select what you
want to search for (a name or extension number, for instance)
from the drop-down list, enter the search term in the box and
click on the magnifying glass ( ) to search.
You can also arr ange the contact list entries by clicking on one of
the headings.
3.8 Capturing Packets Using the Web Configurator
The following section shows you how to capture packets using the X6004 web
configurator. You ma y need to do this if there are problems.In this example, a SIP
phone (P) fails to register to the X6004.
Figure 35 Tutorial: Basic Troubleshooting Using Packet Capture
192.168.1.12
P
192.168.1.150
Do the following to capture packets between P and the X6004:
1 First create a Debug admin administrator account. Go to Maintenance >
Administration > Administrator List, click Add and the following screen
appears. In this example, we use the settings as follows
•Username: debug
• Password: 1234
86
X6004 User’s Guide
Page 87

Chapter 3 Tutorials
• Rank Level: Select Debug admin
Then click Apply.
2 Open another browser and log into the X6004 using the newly created debug
admin account.
3 Go to Maintenance > Administration > Diagnostics > Packet Capture and
fill in the following information.
•Interface: LAN
• Host: 192.168.1.150
•Protocol: All
• Stop capture after: 3000 packets
• Stop capture after: 600 seconds
Then click Capture Now.
4 Re-initialize the SIP phone. This helps to get a complete packet capturing.
X6004 User’s Guide
87
Page 88

Chapter 3 Tutorials
5 Wait sever al seconds, clic k Stop Ca pture , Download and then Save to save the
capturing file on your computer.
6 Use a packet capturing tool (such as Ethereal) to open the file and analyze the
possible root cause.
In this example, registration fails because the SIP username must be a number
and not letters (bob in this example) for the X6004.
If you cannot solve the problem, you should contact customer support and send
this file.
You may be asked to provide another file containing more real-time system
information. Select Maintenance > Administration > Diagnostics >
Information Collect and click Collect Now. Wait several seconds, then click
Download and Save to save the file on your computer.
88
X6004 User’s Guide
Page 89

Chapter 3 Tutorials
3.9 Creating an Automated Menu System
The Automatic Call Distribution (ACD) system allows you to set up automated
audio menus and the connections between them which will allow incoming phone
calls to be routed to the best available people to recei ve them. Fo r example, if the
Acme Widget company sells its products in two different countries (the United
States and Mexico), then it would probably w ant to set up a c ustomer service l ine
that can direct callers based on their language preference.
Before getting started, there are a few ACD-specific terms with which you should
familiarize yourself first:
• Agent - An agent is a callee, or the person who ultimately receives an incoming
call. Agents are grouped according to skills.
• Skill - A skill is a specific function that an agent performs. For example, in the
Acme Widget company’s customer support department, some of the agents are
fluent in English while others are fluent in Spanish. Both English and Spanish
are labled as skills for the purpose of routing calls through the ACD system.
• Auto-Attendant (AA) - The auto attendant is the crux of the automated menu
system. It functions as a kind of automated switch board operator. When
properly configured, the X6004 auto-attendant can be the foundation of any
automatic menu system, replete with custom the audio recordings which the
caller hears when first dialing in and keypad-responsive menus which guide
them to their intended recipients.
For a full description of all available ACD and Auto-Attendant features on the
X6004, see Chapter 24 on page 365 and Chapter 19 on page 291, respectively.
3.9.1 Menu Design and Call Routing
First, you want to design your call center’s automated audi o menu “map”. Start by
asking yourself a few key questions, such as: How are calls going to be routed
once a person dials the phone number assigned to the system? What is the first
level of menus the caller encounters? After the call makes his selecti on, then what
is the second level of menus? After the second level of menus, are calls then sent
to an agent?
For the Acme Widget company, the company manger decides he wants to divide
the menus up by languages first (English and Spanish), and then skills (Order
Status, Technical Support, and Operator) for each language, each of which
contains its own set of agents.
X6004 User’s Guide
89
Page 90

Chapter 3 Tutorials
In order to do this, he must map his connections:
Table 9 Tutorial: Example Automated Menu Design
1ST MENU SUBMENUS SKILLS AGENTS
Language
Selection
English Order Status Tom
Pam
Steven
Technical Support Steven
George
Accounts and Billing George
Spanish Estado del Pedido Eddie
Susan
Maria
Apoyo Técnico Maria
Alejandro
Cuentas y Facturación Alejandro
• The first menu and the submenus both utilize an auto-attendant. Autoattendants are set up in the Configuration > PBX > Outbound Line
Management > Auto-Attendant > Customized screen. This portion of the
tutorial is described in Section 3.9.4 on page 95.
• The skills are the intermediaries between the AA submenu and the agents. Skills
are set up in the Configuration > ACD > Skill screen. This portion of the
tutorial is in Section 3.9.3 on page 92.
• The agents associated are the ultimate destination for incoming calls to the
system. Agents are set up in the Configuration > ACD > Agent screen. This
portion of the tutorial can be found in Section 3.9.2 on page 91.
Although the usage order is 1st Menu - Submenus - Skills - Agents, we have to
build our system in reverse order by starting with the ACD-based agents and skills
and then work our backwards toward the auto-attendant-based menus. This is
because the auto-attendant menus require the skills to already be defined when
setting them up as part of an automated menu system, while skills require agents
to be pre-defined as they are set up.
90
X6004 User’s Guide
Page 91
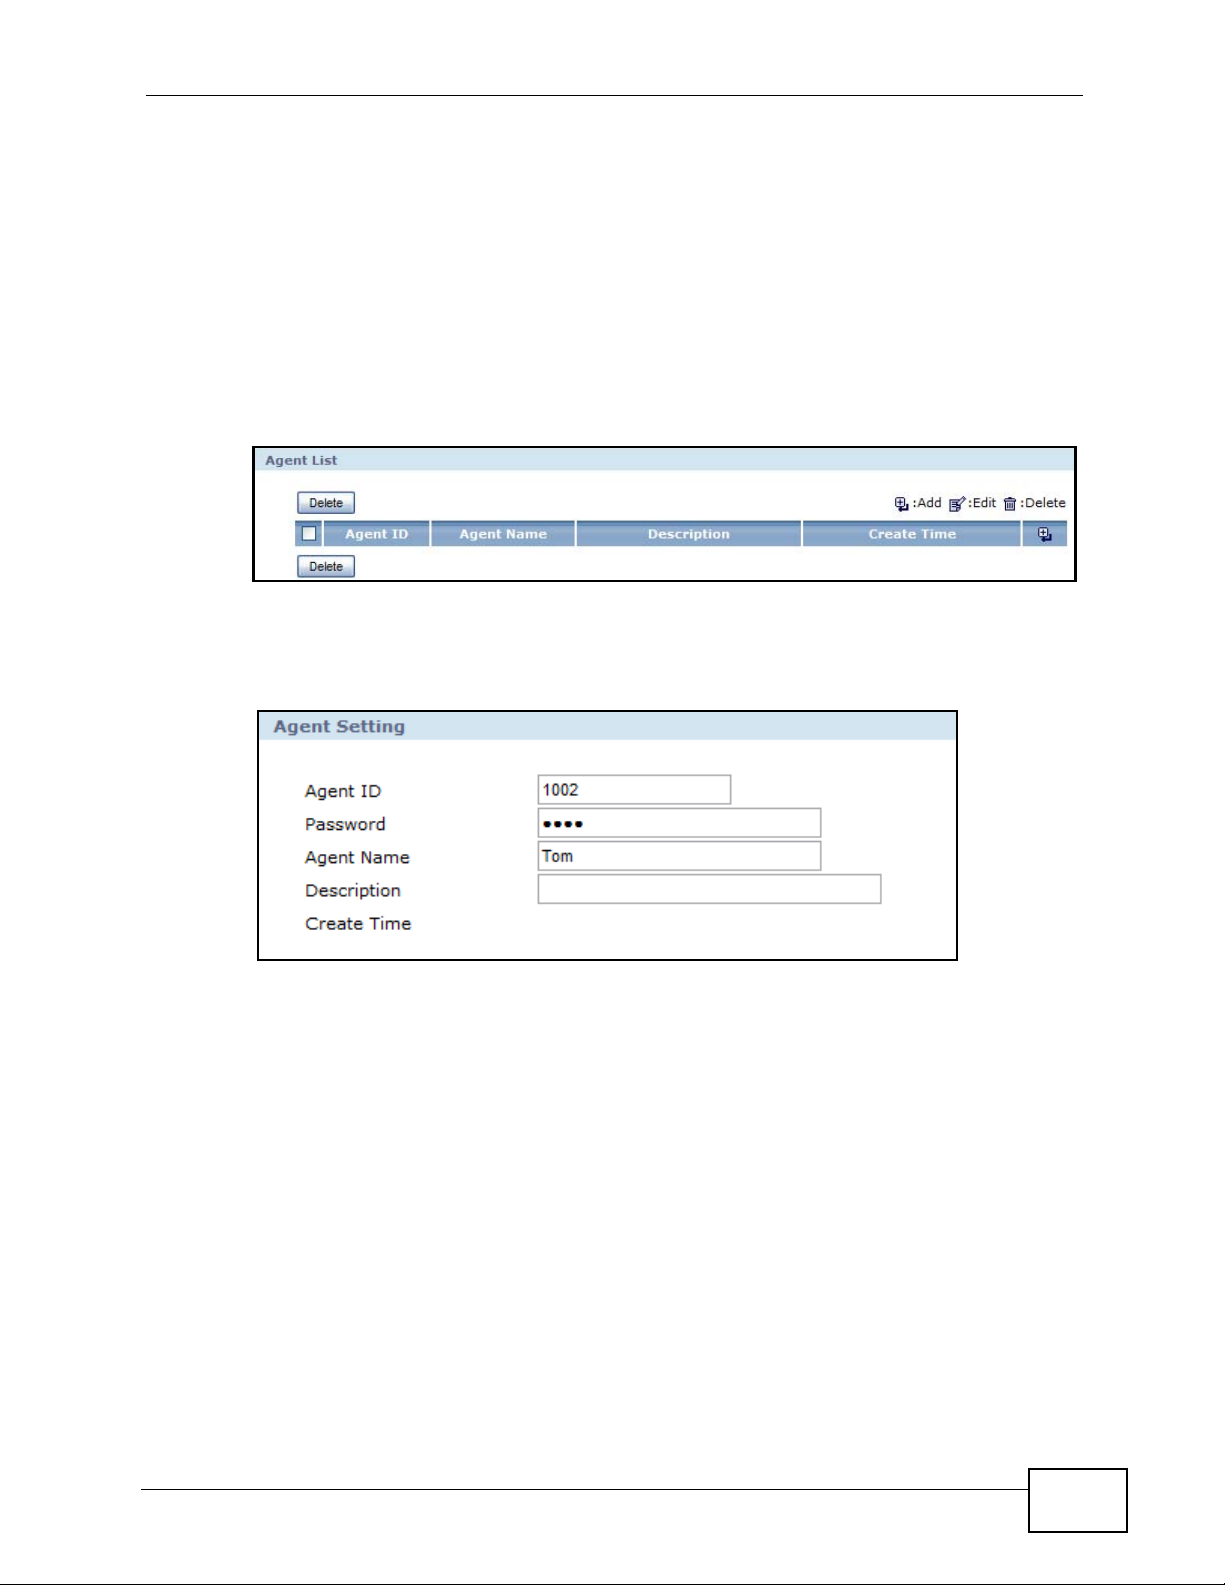
3.9.2 Create an Agent Identity
Now that you have more or less mapped out your automated menus and call
routes, it’s time to actually start building them on the X6004. The first thing we’re
going to do is create our agent identities. This allows us to assign the agents
immediately to skills as we create them in the next section.
To create an agent identity:
1 Log into the X6004, then go to the Configuration > ACD > Agent screen.
2 For each of your agents, click the Add button to open the Agent Settings screen,
and configure the following items:
Chapter 3 Tutorials
Agent ID: Enter between 3 and 20 digits to serve as the agent’s identification
number. This number has no relation to any other number or account ID in other
features on the X6004, but it is required for the agent to log into the ACD system
from his telephone.
Password: Enter between 1 and 32 digits for the agent’s password. As with the
Agent ID, this is required to log into the ACD system from an agent’s telephone.
Agent Name: Enter between 1 and 32 alphanumeric characters here that will be
associated with the skills and skill menus in subsequent sections. While you can
use an agent’s real name, it is certainly not necessary. In fact, if multiple people
log in on the same agent ID, it is recommended you use a more neutral name to
identify them (such as ‘Accounting’ for a team as opposed to ‘Julia’, who happens
to be one accountant on the team).
X6004 User’s Guide
91
Page 92

Chapter 3 Tutorials
Description: This field is optional, allowing you to add supplementary information
to the agent. This only appears on the Configuration > ACD > Agent screen.
Enter up to 64 alphanumeric characters.
3 Click Apply when you are done.
After you have created all your agents, your agent list should look similar to this:
3.9.3 Create a Skill
The next step is to define our skills. Doing this second allows us to link the agents
we created in the previous section to the skills we’re going to create in this
section. It also allows us to later assign these very same skills to the auto
attendant menus when they are, in turn, created.
In the context of the X6004, a skill is a set of rules that define how incoming calls
are sent to the agents who are associated with that skill. For example, if the Acme
Widget company defines “Technical Support” as a skill, then any caller who
presses the key for that skill is immediately forwarded to the f irst avai lable person
whose agent identity appears on that skill’s rule list.
To create a new skill:
1 Go to the Configuration > ACD > Skill screen.
92
X6004 User’s Guide
Page 93

Chapter 3 Tutorials
2 For each of skill, click the Add button to open the Skill Settings screen, and
assign configure the following items:
Number: Enter an identification number of this skill. This is required to link the
skill to a skill menu in the next section. You can use between 3 and 20 digits.
Skill Name: Enter a descriptive name for this skill. For example, “Order Status”
since this will be the skill that forwards all calls requesting order status
information to the appropriate people.
Ring Strategy: This option allows you to choose how a call is forwarded to the
agents associated with this skill. When a call comes in, it is not logistically possible
for the X6004 to forward the call to every associated agent. Therefore, a ring
strategy must be employed. For example, let’s say we’re configuring the “Order
Status” skill. We know from part I that the company manager intends on having
two agents linked to this skill (Pam and Steven). He decides that the person who
X6004 User’s Guide
93
Page 94

Chapter 3 Tutorials
has received the fewest number of incoming calls since logging in should always
be the first to answer the next incoming call. He therefore sets the Ring Strategy
option to Fewest Calls. For more information about this option, see Section
24.4.1 on page 372.
No Login Action: This option determines how the X6004 handles incoming calls
to the agents associated with this skill when none of them have logged on yet. The
company manager decides to let voice mail pick up missed calls when neither of
the agents logs in, and enters the actual telephone extension for Pam.
No Available Action: This is similar to the previous option, but tells the X6004
how to handle incoming calls to the agents associated with this skill when they are
all already engaged in conversation. The company manager knows that not every
agent in every skill will be occupied all of the time, and so he chooses Backup
Skill as the setting for this field. However, until he creates additional skills he will
not be able to choose which backup skill takes over in the event all agents
associated with this one are busy.
Timeout Action: This is similar to the preceeding two options, determining how
the X6004 handles incoming calls when an agent does not answer or pick up after
a certain amount of time.
Max Waiting Calls: Enter the maximum number of calls that will be allowed to
queue up if the agents are already engaged in conversation. The company
manager chooses to let the default of 64 calls remain as it is. In a small office
environment, it seems unlikely that they will have an issue with a call backlog.
Priority/Member: This is where you select the agents whom you want to link to
this skill. The Priority determines which people receive calls first (followed by
Ring Strategy); if two people are set for priority 1 and the third set for priority 2,
then the calls are first directed to the priority 1 agents. Only when both of those
agents are unavailable do calls get directed to priority 2 agents. In this example,
the company manager assigns priority 1 to Tom and Pam and priority 2 to Steven,
because Steven also fields call for Technical Support. This way, he won’t receive as
many calls for Order Status as the other two, giving him more time to field calls
for his primary skill.
3 Click Apply when you are done.
Note: After you create a number of skills, you may want to edit them again to update
the No Logon Action, No Available Action and Timeout Action fields if they
use the Backup Skill setting.
94
X6004 User’s Guide
Page 95
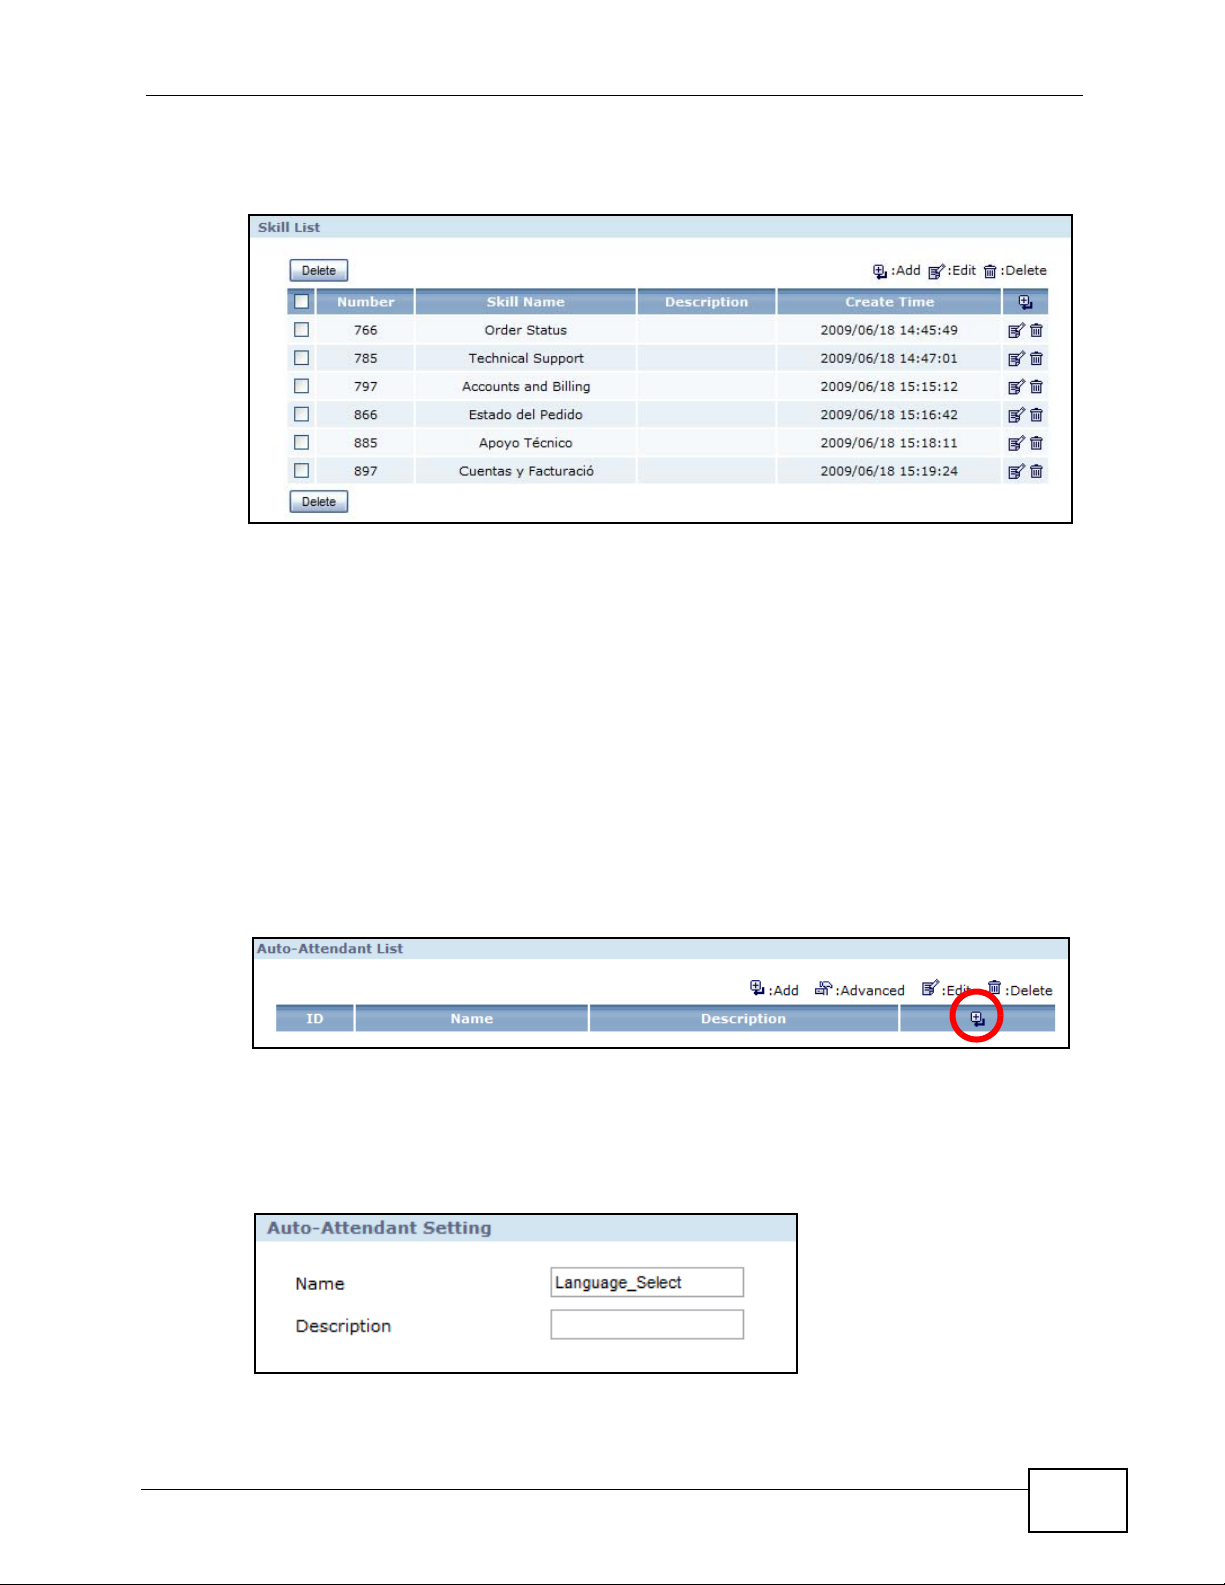
After you have created all your skills, your skill list should look similar to this:
3.9.4 Create an Auto-Attendant
The final step in building our automated menu system is to configure our autoattendant. For the Acme Widget company, we require two auto-attendants: one to
handle the first menu tier (English / Spanish) and another to handle the submenu
tier (Skills). Once a caller gets to the submenu, his call can then be forw arded to a
live person, or in otherwords, an agent.
Chapter 3 Tutorials
1 Go to the Configuration > PBX > Outbound Line Management > Auto-
Attendant screen then select the Customized tab.
2 Click the Add button.
3 On the Auto Attendant Setting screen, enter a Name and a Description
(optional) for your first auto-attendant. The company manager of the Acme
Widget company enters Language_Select, since this will be the first automated
menu where callers choose either English or Spanish.
X6004 User’s Guide
95
Page 96

Chapter 3 Tutorials
4 After the creating your first auto-attendant, click the Advanced button.
5 On the Office Hour Settings screen, we’re going to first configure our menu
Options; click the Add button.
96
6 On the Option Settings screen, enter a keypad number and action for your auto-
attendant. Because this is the language selection auto-attendant for the Acme
Widget company, the company manager enters “1” for Key, “English” for
Description, and selects “Forward to next menu” for Action. The action selected
here is quite important because it allows us to open up the second tier submenu.
X6004 User’s Guide
Page 97

Chapter 3 Tutorials
7 Click Apply to save these settings, then repeat this process for any other menu
options (such as “Spanish” for th e Ac m e Widget company). The final screen may
look something like this:
Note: Don’t forget to upload the actual audio file that you want to play when a caller
accesses this menu. For example, “Press 1 for English or 2 for Spanish”. You
can do that using the Audio Upload option on this screen. See Section 19.3.2
on page 297 for details on this.
8 Click the Next Menu button for the first menu choice. In this case, it would be for
English under the Options category. This is where you will configure the option’s
submenu, which will connect to all of our skills.
Then click the Add button to add the first submenu item, such as “Order Status”.
X6004 User’s Guide
97
Page 98

Chapter 3 Tutorials
9 On the Option Settings screen, enter the keypad number and action for the
submenu item. The company manager for the Acme Widget company enters “1”
for Key, “Order Status” for Description, selects “Forward to a skill” for Action,
and finally selects “766/Order Status” for the Extension. The extensions available
on this list correspond directly to the ACD skills created earlier.
10 Click Apply to save these settings, then repeat this process for any other menu
options (such as “Technical Support” and “Accounts and Billing” for the Acme
Widget company). The final screen may look something like this:
98
Note: Don’t forget to upload the actual audio file that you want to play when a caller
accesses this menu. For example, “Press 1 for English or 2 for Spanish”. You
can do that using the Audio Upload option on this screen. See Section 19.3.2
on page 297 for details on this.
11 Repeats steps 5 through 10 to create a second submenu, such as the Spanish
submenu for the Acme Widget company.
Congratulations! If you followed each of the steps described in this tutorial, then
you should have the barebones structure of an automated menu system for your
telephone network.
X6004 User’s Guide
Page 99

PART II
Technical Reference
99
Page 100

100
 Loading...