

Page 1

X550N Series
Wireless N Gigabit Router
Quick Start Guide
Version 3.60
3/2008
Edition 1
DEFAULT LOGIN
IP Address http://192.168.1.1
Password 1234
Copyright © 2008. All rights reserved.
Page 2
X550N Series Quick Start Guide
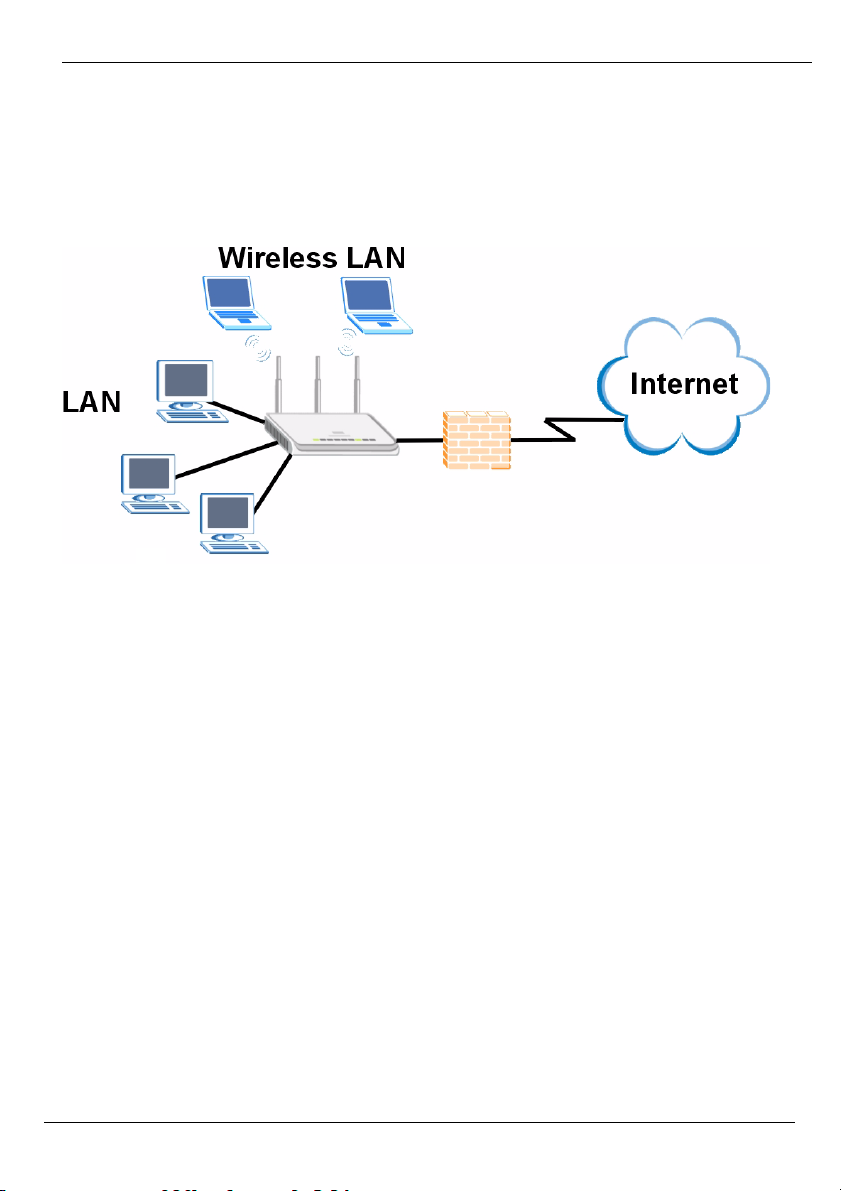
Overview
The X550N is an IEEE 802.11b/g/n wireless broadband router or access point (AP). As a
router, the X550N directs traffic between your wireless network and another network such
as the Internet as shown below, providing services such as content filtering, bandwidth
management and a firewall.
This Quick Start Guide shows you how to do the following with your X550N in router mode:
1 Connecting Your Hardware
2 Accessing the Web Configurator
3 Connecting to the Internet with the Wizard
4 Set Up a Wireless Network Manually or with WPS
See your User’s Guide on the CD in the package on how to set up the X550N as an AP
and for more information on all features.
To read the User’s Guide insert the CD that came in the box into your CD-ROM drive. A
screen should pop up. Navigate to the User’s Guide from this screen. If a screen does not
pop up, open Windows Explorer (click My Computer), click on the CD-ROM drive (usually
drive D:) and navigate to it from there.
2
Page 3
X550N Series Quick Start Guide
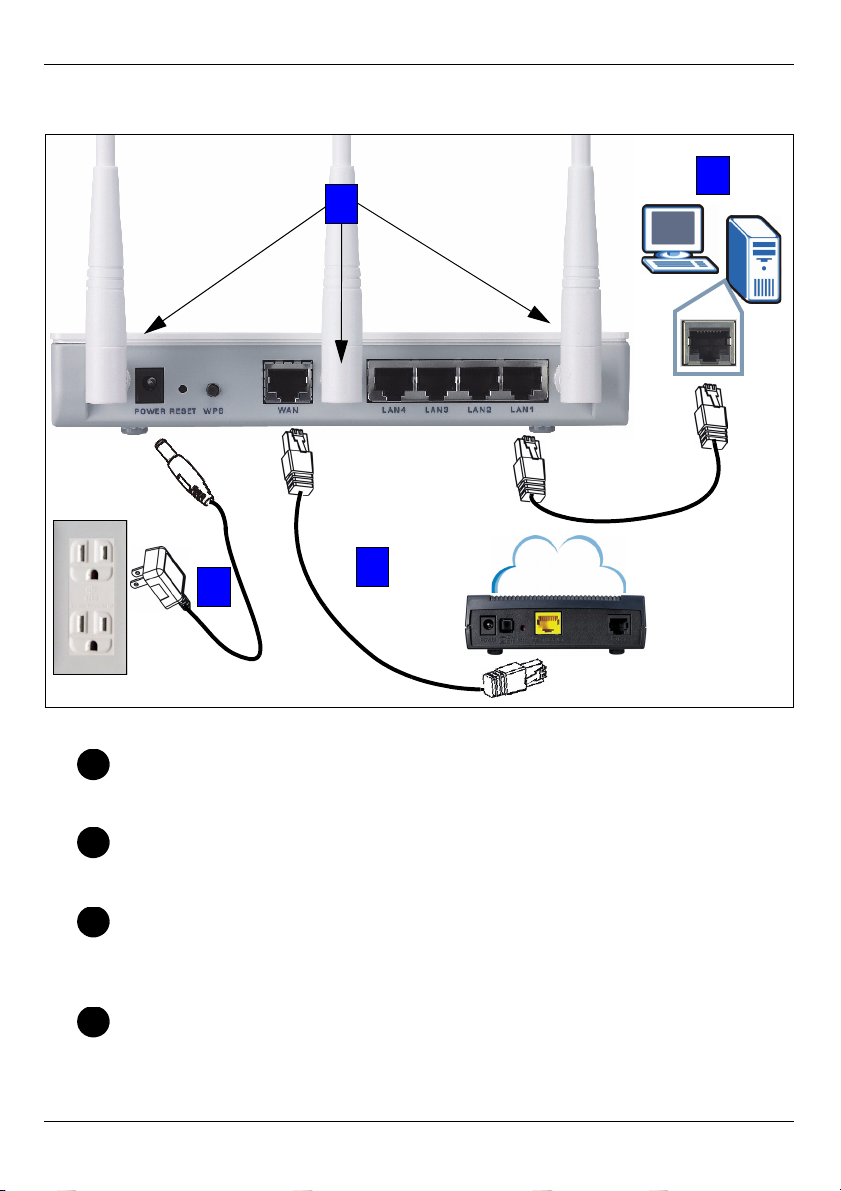
1 Hardware Connections
1
2
3
4
Do the following to make hardware connections for initial setup.
Antennas
1
Connect each antenna to an antenna socket, ensuring the antennas are screwed
in firmly and angled upwards.
LAN
2
Connect the Ethernet port on your computer to a LAN port on the X550N using the
included Ethernet cable.
WAN
3
Connect the WAN port on your X550N to the Ethernet port on the device with which
you are accessing the Internet (for example, a router or modem) using an Ethernet
cable.
POWER Connection
4
Use the power adapter from the package to connect the POWER socket to an
appropriate power source.
3
Internet
Page 4
X550N Series Quick Start Guide
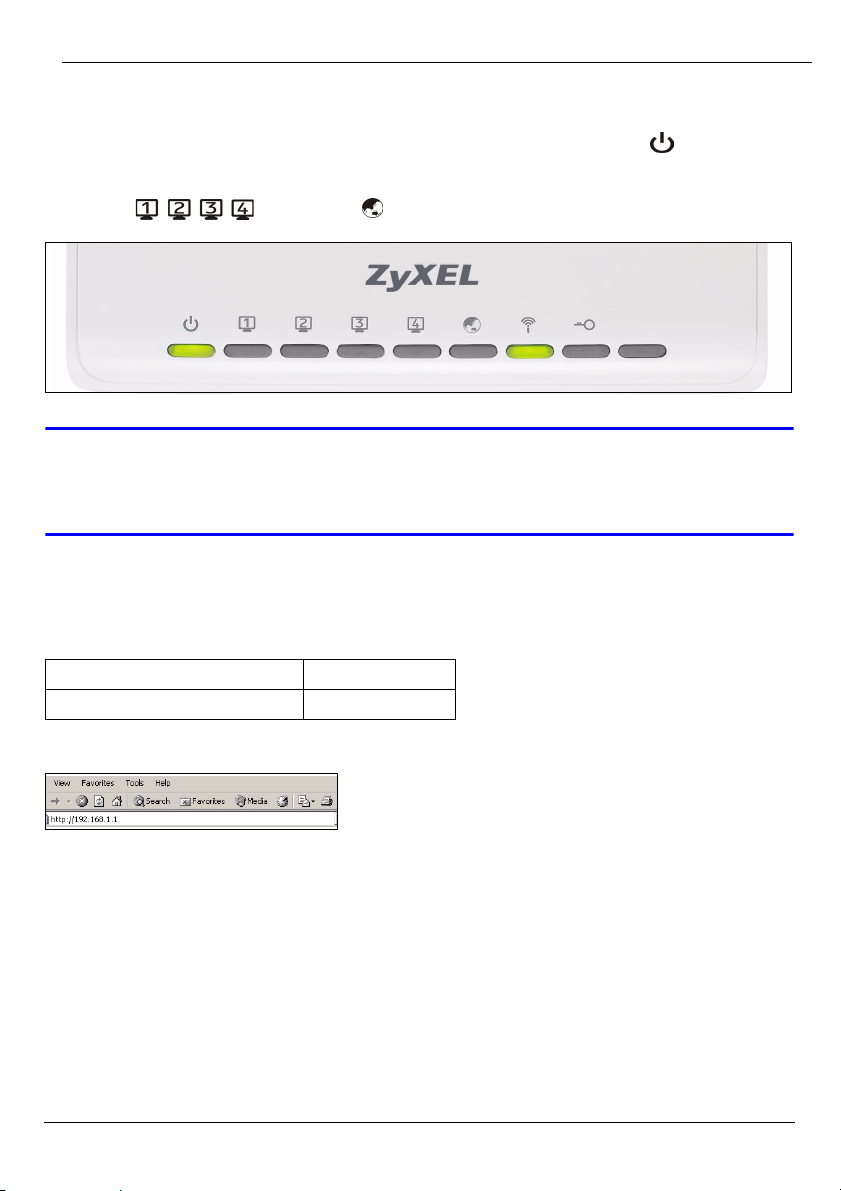
The LEDs
Look at the LEDs (lights). When you connect the power, the power LED ( ) blinks and
stays on once the device is ready.
The LAN ( ) and WAN ( ) LEDs turn on if the corresponding connections
are properly made.
V If an LED does not turn on, check your connections. If this doesn’t help,
disconnect the X550N from its power source, wait for a few seconds and
turn it back on.
2 Accessing the Web Configurator
Default Login Information
IP address http://192.168.1.1
administrator password 1234
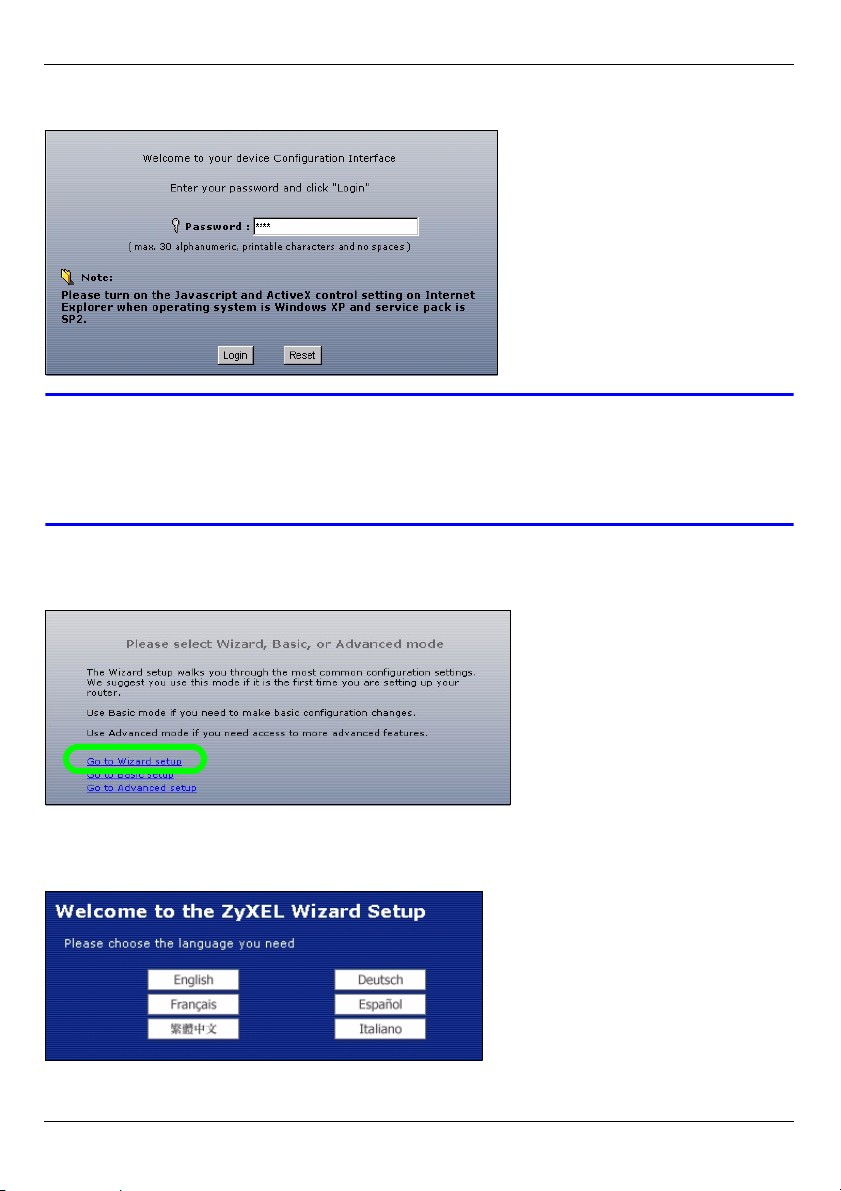
1 Launch an Internet browser such as Internet Explorer. Enter “http://192.168.1.1” as
shown below.
4
Page 5
X550N Series Quick Start Guide
2 The Password window displays. Enter the password (“1234” is the default) and click
Login.
V If the login screen does not display, make sure your computer is set to
receive an IP address dynamically. If that doesn’t help, check your web
browser’s security settings (see the appendix in the User’s Guide for
information on both suggestions).
3 Change the password in the screen that follows and click Apply.
4 Click Go to Wizard setup to set up your X550N for the first time
3 Connection Wizard Setup
1 Select a language. Click Next.
5
Page 6

X550N Series Quick Start Guide
2 Click Next in the following screen to proceed with the Connection Wizard.
" Enter the Internet access information exactly as given to you by your ISP in
each wizard screen. Click Next to continue or click Back to return to the
previous screen. Current screen information will be lost if you click Back.
3.1 System Information
This screen is optional. You can just click Next.
3.2 Wireless LAN
Configure your X550N to support a wireless network by following these steps.
1 Enter a unique Name (SSID) to identify the X550N on the wireless LAN.
2 Select Auto to automatically use WPA-PSK which provides a high level of security. See
your User’s Guide for information on other kinds of security. Click Next.
6
Page 7

X550N Series Quick Start Guide
3 Write down the security key that displays in the pop-up screen. Computers on the wireless
network will need this security key to access the X550N. The security key is case-sensitive
so “ABCD” is not the same as “abcd”.
" Write down the security key, Name (SSID), Security and Channel
Selection for later use as the X550N and other devices on your wireless
network must use the same settings.
4 Click OK to continue.
3.3 WAN Connection
You may need to wait several minutes while the wizard attempts to detect which WAN
connection type (Ethernet, PPP over Ethernet or PPTP) you are using.
• If the wizard detects your connection type, follow the steps for your connection type as
given below.
• If the wizard cannot detect a connection type, you must select your connection type from
the drop-down list box in the screen below. If you do not know what connection type to use,
check with your Internet Service Provider (ISP).
" If you were given Internet access settings, type them in the following fields.
Otherwise leave the default settings and click Next.
7
Page 8

X550N Series Quick Start Guide
Ethernet Connection
Select Ethernet as your WAN connection type and click Next to go to section 3.4.
PPP over Ethernet Connection
1 Select PPP over Ethernet as your WAN connection type
2 Type a Service Name (if your ISP gave you one), User Name and Password. Click Next
to go to section 3.4.
PPTP Connection
1 Select PPTP as your WAN connection type.
2 Type a User Name and Password.
3 Type a PPTP Server IP Address.
4 Type a Connection ID/Name (if provided by your ISP).
5 If your ISP did not assign you a fixed PPTP IP address, select Get automatically from
ISP.
6 If your ISP assigned you a fixed PPTP IP address, select Use fixed IP address to give
the X550N a fixed, unique PPTP IP address and subnet mask.
8
Page 9

X550N Series Quick Start Guide
7 Click Next to go to section 3.4.
3.4 WAN IP Address
• If your ISP did not assign you a fixed IP address, select Get automatically from your ISP
and click Next to go to section 3.5.
• If your ISP gave you a fixed IP address:
1 Select Use fixed IP address provided by your ISP. Click Next.
2 In the next screen type the WAN IP address, WAN IP Subnet Mask and the gateway IP
address given by your ISP.
If you were given DNS server settings, type them in the fields. Otherwise leave the default
settings and click Next.
3.5 WAN MAC Address
A MAC address is a number which uniquely identifies a device on any network. Set the
WAN port’s MAC address by either using your device’s factory assigned default MAC
address or cloning the MAC address of a computer on your LAN. By default, the X550N
uses the factory assigned MAC address to identify itself on the WAN.
9
Page 10

X550N Series Quick Start Guide
•Select Factory Default to use the factory-assigned, default MAC address.
•Select Clone the Computer’s MAC Address to clone the MAC address from a computer
on your LAN. Type the IP address of the computer with the MAC address you are cloning. It
is advisable to clone the MAC address from a computer on your LAN even if your ISP does
not presently require MAC address authentication.
•Select Set WAN MAC Address if you know the MAC address you want to use.
3.6 Bandwidth Management
Select Enable BM for all traffic automatically to have the X550N prioritize data traffic
according to the its use. For example, video streaming may have higher priority than email.
Leave unchecked if unsure. Click Next.
3.7 Setup Complete
1 Click Apply to save your changes in the next screen that appears in the wizard.
2 Click Finish in the screen below to complete the wizard setup.
3 Congratulations. Open a web browser, such as Internet Explorer, to visit your favorite
website.
10
Page 11

X550N Series Quick Start Guide
V If you cannot access the Internet when your computer is connected to one
of the X550N’s LAN ports, check your connections. Then turn the X550N
off, wait for a few seconds and turn it back on. If this doesn’t work run the
wizard again, making sure you type the information correctly. Also, if you
are using a new Internet account, contact your ISP to make sure it is active.
See Troubleshooting in the User’s Guide for more suggestions.
4 Set Up a Wireless Network
You can use Wi-Fi Protected Setup (WPS) to add wireless devices to your wireless
network. The other wireless devices must also support WPS.
If your wireless devices display the WPS logo as shown, go to
section 4.1 to use WPS to set up your wireless network.
If your wireless devices do not display the WPS logo, go to section
4.2 to manually set up a wireless network.
4.1 Set up Your Wireless Network with WPS
Follow these steps to set up your wireless network using WPS.
1 Place a WPS-enabled device within range of the X550N.
2 Press the WPS button on both devices. It doesn’t matter which button is pressed first.
You must press the second button within two minutes of pressing the first one.
2 minutes
11
Page 12

X550N Series Quick Start Guide
" Your X550N has a WPS button located on its housing, as well as a WPS
button available in the web configurator used to manage the X550N. Other
WPS-enabled devices should have at least one similar WPS button.
3 The WPS LED ( ) on the X550N blinks for a few seconds, then shines steadily.
4 Check if your devices are connected by trying to connect to the Internet using the
device you connected to the X550N. If you can do this, then your WPS connection is
successful.
5 To add another WPS enabled device to your wireless network, press the WPS buttons
on your X550N and your next WPS-enabled device.
Congratulations! You are now ready to connect to the Internet wirelessly through your
X550N.
4.2 Set up a Wireless Network Manually
You can now connect wirelessly to your X550N from your computer and access the
Internet. You will need the Network Name (SSID) and also the Security Key (Pre-Shared
Key) if you set up security in the previous section. The connection procedure is shown
here using Windows XP as an example.
1 Right-click the wireless adapter icon which appears
in the bottom right of your computer monitor. Click
View Available Wireless Networks.
12
Page 13

X550N Series Quick Start Guide
2 Select the SSID name you gave the
X550N and click Connect (A). The
SSID “SecureWirelessNetwork” is
given here as an example.
3 If you have set up wireless security,
you are prompted to enter a
password. Enter the Pre-Shared Key
you set up in the previous section
and click Connect (B).
4 You may have to wait several minutes
while your computer connects to the
wireless network.
5 You should now be securely connected wirelessly to the X550N.
A
B
Congratulations! You are now ready to connect to the Internet wirelessly
through your X550N.
V If you cannot connect wirelessly to the X550N, check you have selected the
correct SSID and entered the correct security key. If that does not work,
ensure your network adapter is enabled by clicking on the wireless adapter
icon and clicking Enable. See the User’s Guide for more suggestions.
13
Page 14

X550N Series Quick Start Guide
Procedure to View a Product’s Certification(s)
1 Go to www.zyxel.com.
2 Select your product from the drop-down list box on the ZyXEL home
page to go to that product's page.
3 Select the certification you wish to view from this page.
Customer Service
Please have the following information ready when you contact customer support:
• Product model and serial number
• Warranty information
• Date that you received the product
• Brief description of the problem and the steps you took to solve it.
Support E-mail support@zyxel.com
Telephone 1-800-978-7222
Website
Postal Mailing Address 1130 N. Miller Street,
www.us.zyxel.com
Anaheim
CA 92806-2001
U.S.A.
14
Page 15

X550N Series Quick Start Guide
15
 Loading...