

Page 1

X2002
IP-PBX
User’s Guide
Version 1.00
12/2008
Edition 1
www.zyxel.com
Page 2

Page 3

About This User's Guide
About This User's Guide
Intended Audience
This manual is intended for people who want to configure the X2002 using the web
configurator. You should have at least a basic knowledge of TCP/IP networking concepts and
topology.
Related Documentation
• Quick Start Guide
The Quick Start Guide is designed to help you get up and running right away. It contains
information on setting up your hardware connections.
• Web Configurator Online Help
Embedded web help for descriptions of individual screens and supplementary
information.
• Command Reference Guide
The Command Reference Guide explains how to use the Command-Line Interface (CLI)
and CLI commands to configure the X2002.
• Support Disc
Refer to the included CD for support documents.
• ZyXEL Web Site
Please refer to www.zyxel.com
certifications.
for additional support documentation and product
User Guide Feedback
Help us help you. Send all documentation-related comments, questions or suggestions for
improvement to the following address, or use e-mail instead. Thank you!
The Technical Writing Team,
ZyXEL Communications Corp.,
6 Innovation Road II,
Science-Based Industrial Park,
Hsinchu, 300, Taiwan.
E-mail: techwriters@zyxel.com.tw
X2002 User’s Guide
3
Page 4

Document Conventions
Document Conventions
Warnings and Notes
These are how warnings and notes are shown in this User’s Guide.
1 Warnings tell you about things that could harm you or your device.
" Notes tell you other important information (for example, other things you may
need to configure or helpful tips) or recommendations.
Syntax Conventions
• The X2002 may be referred to as the “X2002”, the “device” or the “system” in this User’s
Guide.
• Product labels, screen names, field labels and field choices are all in bold font.
• A key stroke is denoted by square brackets and uppercase text, for example, [ENTER]
means the “enter” or “return” key on your keyboard.
• “Enter” means for you to type one or more characters and then press the [ENTER] key.
“Select” or “choose” means for you to use one of the predefined choices.
• A right angle bracket ( > ) within a screen name denotes a mouse click. For example,
Maintenance > Log > Log Setting means you first click Maintenance in the navigation
panel, then the Log sub menu and finally the Log Setting tab to get to that screen.
• Units of measurement may denote the “metric” value or the “scientific” value. For
example, “k” for kilo may denote “1000” or “1024”, “M” for mega may denote “1000000”
or “1048576” and so on.
• “e.g.,” is a shorthand for “for instance”, and “i.e.,” means “that is” or “in other words”.
4
X2002 User’s Guide
Page 5
Document Conventions
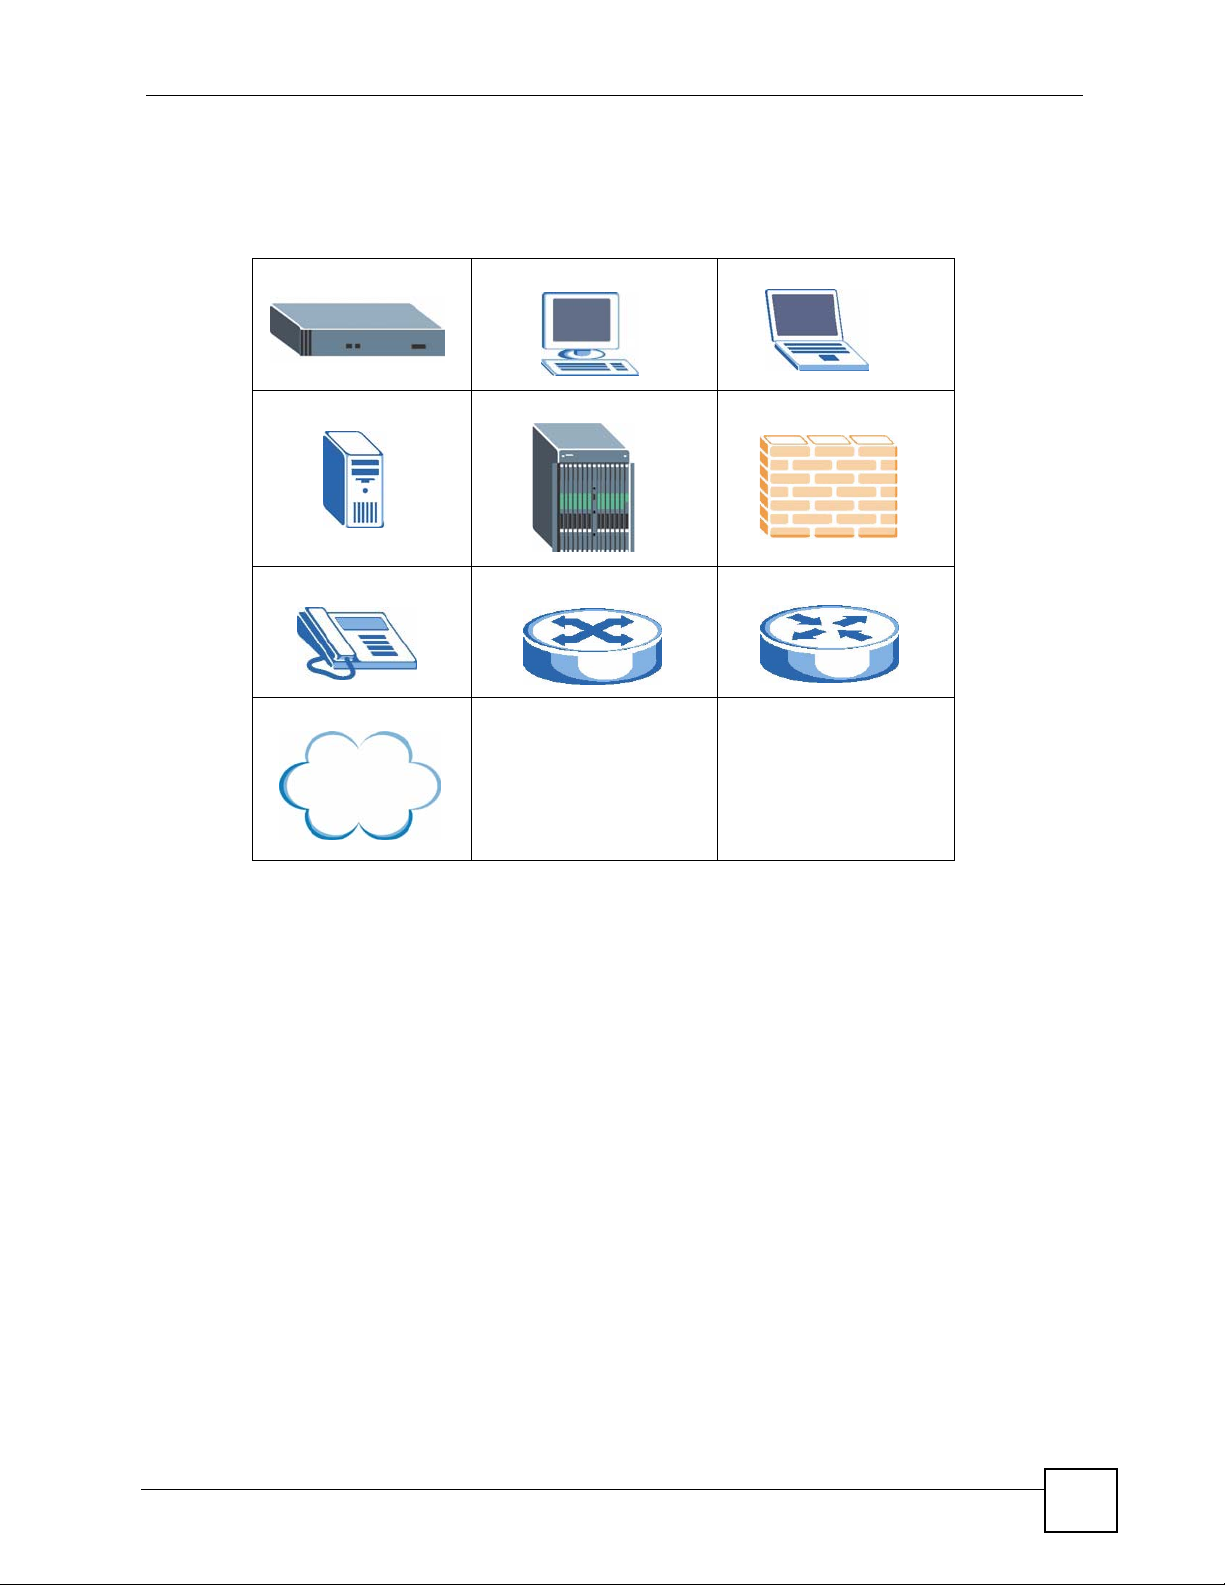
Icons Used in Figures
Figures in this User’s Guide may use the following generic icons. The X2002 icon is not an
exact representation of your device.
The X2002 Computer Notebook computer
Server DSLAM Firewall
Telephone Switch Router
Internet
X2002 User’s Guide
5
Page 6

Safety Warnings
Safety Warnings
1 For your safety, be sure to read and follow all warning notices and instructions.
• Do NOT use this product near water, for example, in a wet basement or near a swimming
pool.
• Caution: Risk of explosion if battery (on the motherboard) is replaced by an incorrect
type. Dispose of used batteries according to the instructions. Dispose them at the
applicable collection point for the recycling of electrical and electronic equipment. For
detailed information about recycling of this product, please contact your local city office,
your household waste disposal service or the store where you purchased the product.
• Do NOT expose your device to dampness, dust or corrosive liquids.
• Do NOT store things on the device.
• Do NOT install, use, or service this device during a thunderstorm. There is a remote risk
of electric shock from lightning.
• Connect ONLY suitable accessories to the device.
• ONLY qualified service personnel should service or disassemble this device. (some parts
may be opened or removed by user, e.g., fan module in IP DSLAM or the cap for a USB
adapter)
• Make sure to connect the cables to the correct ports.
• Place connecting cables carefully so that no one will step on them or stumble over them.
• Always disconnect all cables from this device before servicing or disassembling.
• Use ONLY an appropria t e power adaptor or cord for your device. Connect it to the right
supply voltage (for example, 110V AC in North America or 230V AC in Europe).
• Do NOT allow anything to rest on the power adaptor or cord and do NOT place the
product where anyone can walk on the power adaptor or cord.
• Do NOT use the device if the power adaptor or cord is damaged as it might cause
electrocution.
• If the power adaptor or cord is damaged, remove it from the device and the power source.
• Do NOT attempt to repair the power adaptor or cord. Contact your local vendor to order a
new one.
• Do not use the device outside, and make sure all the connections are indoors. There is a
remote risk of electric shock from lightning. (not for outdoor products)
• Do NOT obstruct the device ventilation slots, as insufficient airflow may harm your
device. (has ventilation slots)
• Use only No. 26 AWG (American Wire Gauge) or larger telecommunication line cord.
(uses telephone wires, such as IP DSLAM, DSL or ISDN products, a product has lifeline
or connected to the PSTN network (a modem or has a built-in modem for example))
6
X2002 User’s Guide
Page 7

Safety Warnings
• Warning! To avoid risk of electric shock, remove only one card at a time and do not place
fingers or objects inside the chassis. Cover empty slots with slot covers. (has line cards,
e.g., IP DSLAM)
Your product is marked with this symbol, which is known as the WEEE mark.
WEEE stands for Waste Electronics and Electrical Equipment. It means that used electrical
and electronic products should not be mixed with general waste. Used electrical and electronic
equipment should be treated separately.
X2002 User’s Guide
7
Page 8

Safety Warnings
8
X2002 User’s Guide
Page 9

Contents Overview
Contents Overview
Introduction and Tutorials .....................................................................................................37
Getting to Know Your X2002 .....................................................................................................39
How It Works ............................................................................................................................. 47
Tutorials .....................................................................................................................................51
Phone User Tutorial ............... ... ... .... ... ... ... ... .... .......................................................... ... ... .......... 83
Web Configurator & Network Setup .....................................................................................91
The Web Configurator ...............................................................................................................93
Network Deployment ............................................................................................................... 103
IP PBX ..................................................................................................................................113
Server .......................................................................................................................................115
Auto Provision ............................................. .... ... ... ... .... ........................................................... 131
QoS ......................................................................................................................................... 139
Voice Mail .......... ........................................................... ... ... ... .... .............................................. 143
Phonebook .............................................................................................................................. 149
DSP Management .............................. ... ... ... .... ... ... ... .... ... ... ..................................................... 157
Office Hours ............................................................................................................................. 161
Authority Group .......................................................................................................................163
Ring Group .................................. .... ... ... ... ... .... ... ... ... .... ........................................................... 191
Pickup Group ...........................................................................................................................201
Call Access Code .................................................................................................................... 205
Outbound Line Group ............... ... .... ... ... ... ... .... ... ... ... .... ... ... ... .... ... ........................................... 209
Auto-Attendant .................................... ...................... ....................... ....................... ................. 233
LCR ......................................................................................................................................... 247
Group Management ................................................................................................................. 253
Call Services ............................................................................................................................ 261
Monitor, Log & Maintenance ...............................................................................................277
System Information ......... .... ... .......................................................... ... ... .... ... ... ... .... ... ... ...........279
Status Observation .................................................................................................................. 281
System Log ............... .......................................................... ... .... ... ... ........................................ 291
Call Detail Record (CDR) .................................... ... ... .......................................................... ..... 301
Administrator Accounts ............................................................................................................ 309
Diagnostics .............................................................................................................................. 313
Inactivity Timer .........................................................................................................................317
..................................... .................... ................ ................... ................... ..................................318
X2002 User’s Guide
9
Page 10

Contents Overview
Remote Management ..............................................................................................................319
System File Maintenance ................................... ... ... .... ... ........................................................335
License Control ........................................................................................................................ 341
Web Portal ............................................................................................................................345
Web Portal ....................................... ... ... .......................................................... ... .... ... .............. 347
Appendices & Index .............................................................................................................357
Product Specifications ............................................................................................................. 359
10
X2002 User’s Guide
Page 11

About This User's Guide..........................................................................................................3
Document Conventions............................................................................................................4
Safety Warnings ........................................................................................................................6
Contents Overview ...................................................................................................................9
Part I: Introduction and Tutorials ......................................................... 37
Chapter 1
Getting to Know Your X2002..................................................................................................39
1.1 Introduction ...................................... ... ... .... .......................................................... ... .............39
1.1.1 Voice over Internet Protocol (VoIP) Implementation .................................................. 40
1.1.2 PBX Telephony Features ........................................................................................... 41
1.1.3 Scalable Design ..................................... ... .... ... ... ... .... ... ............................................. 41
1.2 Ways to Manage the X2002 ......................... ... ... .... ... .......................................................... 42
1.3 Good Habits for Managing the X2002 .................................................................................42
1.4 LEDs ............................................................................................. ... .................................... 43
Chapter 2
How It Works...........................................................................................................................47
2.1 Call Routing ........... ... .... ... ... .......................................................... ... .... ... ... ... .... ... ... ............. 47
2.1.1 Call Routing Terms .................................................................................................... 47
2.2 Internal Call Routing ........ ... ... .... ... .......................................................... ... ... .... ... ... ... .......... 49
2.3 Outbound Call Routing ....................... ... .... ... ... ... .... ... ... ... .................................................... 49
Chapter 3
Tutorials...................................................................................................................................51
3.1 Making Internal Calls ........................................................................................................... 52
3.1.1 Configure SIP Extensions ..........................................................................................52
3.1.2 Connect IP Phones ....................................................................................................55
3.1.3 Register IP Phones .................................................................................................... 56
3.1.4 Auto Provisioning ......................................................................................................56
3.2 Making PSTN Calls .............................................................................................................58
3.2.1 The PSTN Connection ........................................ ... .... ... ............................................. 59
3.2.2 Creating a Dialing Rule for PSTN .......... ... .... ... .......................................................... 61
3.2.3 Assigning an LCR to an Authority Group ................................................................... 63
3.3 Making ITSP Calls ........... ... ... .... ... ... ............................................................. .... ... ................64
3.3.1 The ITSP Connection ................................................. ... ... ... ... .... ... ... ... .... ...................64
3.3.2 Creating a Dialing Rule for ITSP ................... ... ... ... .... ... ... .......................................... 68
3.3.3 Assigning an LCR to an Authority Group ................................................................... 70
3.4 Making ISDN Calls ..............................................................................................................71
X2002 User’s Guide
11
Page 12

3.4.1 The ISDN Connection ................................................................................................71
3.4.2 Creating a Dialing Rule for ISDN ........ ............................................................. ... .......75
3.4.3 Assigning an LCR to an Authority Group ................................................................... 77
3.5 ISDN Network Configuration Examples ............................................................................... 78
3.5.1 Example 1: Small/Medium Business .......................................................................... 78
3.5.2 Example 2: Company with Existing PBX .................................................................... 79
3.5.3 Example 3: Company with Existing PBX and Expanding Employees ........................ 80
3.6 Using Call Features ............ ... .... ... ... .......................................................... ... .... ... ... ... ... ....... 81
3.6.1 Customizing Feature Codes ...................... ............. ............. .......... ............. ............. ... 81
3.6.2 Using the Voicemail Feature .................. ... .... ... ... ... .... ... ............................................. 82
Chapter 4
Phone User Tutorial................................................................................................................83
4.1 Using Your Web Portal .................... ... ... .... ... ............................................................. ... ....... 83
4.1.1 Your Information ............................................ ... ... ... .... ... ... ..........................................83
4.1.2 Accessing the Web Portal .......................................................................................... 83
4.1.3 Changing Your Security Information ........................................................................... 84
4.1.4 Personalizing Your Settings .......................... ... ... ... .... ................................................ 85
4.1.5 Setting Up Voicemail ........................................... ... .... ................................................ 87
4.1.6 Using the Web Phone (IP Phone Users Only) ........................................................... 88
Part II: Web Configurator & Network Setup......................................... 91
Chapter 5
The Web Configurator............................................................................................................93
5.1 Overview ............. .......................................................... ... .... ... ... .......................................... 93
5.1.1 What You Can Do in This Chapter ............................................................................. 93
5.2 System Login ......................................... .... ... ... ... ........................................................ .........93
5.3 The System Screen ........... ... .... ... .......................................................... ... ... .... ... ... ... ... ....... 95
5.3.1 The Navigation Panel ................................................................................................. 96
5.4 Dashboard - System Information ........................................................................................ 98
5.5 Saving Your Configuration .................................................................................................100
5.6 Icons in the Web Configurator ........................................................................................... 100
5.7 Resetting the X2002 ........ ... ... .... .......................................................... ... ... ... .... ... ... ... ... ..... 101
5.8 Rebooting the X2002 ........................................................................................................101
5.9 Logging Out of the Web Configurator ..................................... ........................................... 101
5.10 Help ................................................................................................................................. 102
Chapter 6
Network Deployment............................................................................................................103
12
6.1 Overview ............. .......................................................... ... .... ... ... ........................................ 103
X2002 User’s Guide
Page 13

6.1.1 What You Can Do in the Network Screens .............................................................. 103
6.1.2 What You Need to Know About Network Deployment ............................... ... ... ... .... . 104
6.1.3 Before You Begin ................................... ... .... ... ... ..................................................... 104
6.2 The LAN Screen ...............................................................................................................105
6.3 The WAN Screen ..................... ... ... ... .......................................................... .... ... ... ... ... ..... 106
6.4 The DDNS (Dynamic DNS) Screen ..................................................................................107
6.4.1 DYNDNS Wildcard ................. ... ... .... ... .....................................................................107
6.4.2 Configuring the DDNS Screen ...................................... ... ... ..................................... 107
6.5 The NTP (Network Time Protocol) Screen ...................................................................... 108
6.6 The Static Route Screen ..................................................................................................109
6.6.1 Configuring the Static Route Screen ....................................................... ... ... ... ... .... ..110
6.6.2 Adding a Static Route ..............................................................................................110
6.7 The VLAN Screen ...............................................................................................................111
6.8 Te chnical R eference .............................. ........................................................... ... ... ... ... ......112
Part III: IP PBX......................................................................................113
Chapter 7
Server.....................................................................................................................................115
7.1 Overview ............. .......................................................... ... .... ... ... .........................................115
7.1.1 What You Can Do in the Server Screens ..................................................................115
7.1.2 What You Need to Know About SIP Servers ................................................. ... ... .... .. 116
7.1.3 Before You Begin ................................... ... .... ... ... ...................................................... 118
7.2 The SIP Server Global Screen ................................... ... .... ... ... ... ... .... ... ... ... .... ..................119
7.3 The FXO Screen ............................................................................................................... 120
7.4 The FXS Screen ............................................................................................................... 121
7.5 The BRI Screen ................................................................................................................ 121
7.6 The PRI Screen ............................................................................................................... 123
7.7 The Call Block Screen ...................................................................................................... 126
7.7.1 The Call Blacklist Screen ........................................................................................127
7.8 The Feature Code Screen ................................................................................................ 128
7.9 The E-Mail Screen ............................................................................................................129
7.10 Technical Reference ........................................................................................................130
Chapter 8
Auto Provision ......................................................................................................................131
8.1 Overview ............. .......................................................... ... .... ... ... ........................................ 131
8.1.1 What You Can Do in the Auto Provision Screen ...................................................... 131
8.1.2 What You Need to Know About Auto Provision ....................................................... . 131
8.1.3 Before You Begin ................................... ... .... ... ... ..................................................... 132
8.2 Auto Provision Screen .......... .... ... ... ... ... .... ... ... ... .... ... ... ... .... ... ........................................... 133
X2002 User’s Guide
13
Page 14

8.2.1 Auto Provision Edit Settings .................................................................................... 134
8.2.2 Auto Provision View SPTGEN ................................................................................. 135
8.3 IVR PIN Code ........... .... ... .......................................................... ... ... .... ... ... ........................136
8.3.1 EZ Provision .................................................. ... ... ... .... ... ... ... ... .... ..............................136
Chapter 9
QoS.........................................................................................................................................139
9.1 Overview ............. .......................................................... ... .... ... ... ........................................ 139
9.1.1 What You Can Do in the QoS Screens .................................................................... 139
9.1.2 What You Need to Know About QoS .. ............................................................. ... .... . 139
9.1.3 Before You Begin ................................... ... .... ... ........................................................ 141
9.2 The QoS Screen ............................................... .......................................................... ..... 141
Chapter 10
Voice Mail...............................................................................................................................143
10.1 Overview .......................................................................................................................... 143
10.1.1 What You Can Do in the Voice Mail Screen ........................................................... 143
10.1.2 What You Need to Know about Voice Mail ............................................................. 143
10.2 The Voice Mail Screen ....................................................................................................144
10.2.1 Accessing Voice Mail .............................................................................................144
Chapter 11
Phonebook ............................................................................................................................149
11.1 Overview .......................................................................................................................... 149
11.1.1 What You Can Do in the Phonebook Screens ............................................. ........... 149
11.1.2 What You Need to Know About the Phonebook .....................................................149
11.1.3 Before You Begin ....................................................................................................150
11.2 The Phonebook Configuration Screen ............................................................................. 150
11.2.1 The Import Phonebook Screen .............................................................................. 151
11.3 The LDAP Phonebook Screen ........................................................................................ 152
11.4 The Local Phonebook Screen .........................................................................................153
11.4.1 Local Phonebook Add/Edit Screen ........................................................................154
Chapter 12
DSP Management..................................................................................................................157
12.1 Overview .......................................................................................................................... 157
12.1.1 What You Can Do in the DSP Management Screen ............................................. . 157
12.1.2 What You Need To Know About DSP .....................................................................157
12.1.3 Before You Begin ...................................................................................................158
12.2 Installing and Removing the DSP Module ..... ... .... ... ........................................................ 158
12.2.1 How to Install a DSP Module ................................................................................. 158
12.2.2 How to Remove a DSP Module ............................................................................. 158
12.3 The DSP Management Screen ........................................................................................ 159
14
X2002 User’s Guide
Page 15

Chapter 13
Office Hours ..........................................................................................................................161
13.1 Overview .......................................................................................................................... 161
13.1.1 What You Can Do in the Office Hour Screen ......................................................... 161
13.1.2 What You Need To Know About Office Hours ........................................................161
13.1.3 Before You Begin ...................................................................................................161
13.2 Office Hour Screen .......................................................................................................... 162
Chapter 14
Authority Group....................................................................................................................163
14.1 Overview .......................................................................................................................... 163
14.1.1 What You Can Do in the Authority Group Screens ................................................ 164
14.1.2 What You Need to Know About Authority Groups .................................................. 165
14.2 The Authority Group Screen ............................................................................................165
14.2.1 The Extension Query Result Screen ..................................................................... 166
14.2.2 The Add/Edit Authority Group Screen ................................................................... 167
14.2.3 The Authority Group Configuration Screen ........................................................... 168
14.2.4 Extension Features ................................................................................................ 169
14.2.5 The Add SIP Peers Screen .................... .... .......................................................... . 170
14.2.6 The Add a SIP Extension Screen .......................................................................... 172
14.2.7 The SIP Extension Basic Screen .......................................................................... 173
14.2.8 The SIP Extension Call Forward Screen ................. ... ... ... ... .... ... ... ... .... ... ... ... ........174
14.2.9 The DND White List Screen ..................................................................................176
14.2.10 The Find Me List Screen .....................................................................................176
14.2.11 The Blacklist Screen ............................................................................................ 177
14.2.12 The SIP Extension Voice Mail Screen ................................................................. 178
14.2.13 The SIP Extension Advanced Screen ................................................................. 179
14.2.14 The SIP Extension Auto Provision Screen ..........................................................180
14.2.15 The Add an FXS Extension Screen ....................................................................181
14.2.16 The FXS Extension Basic Screen ....................................................................... 182
14.2.17 The FXS Extension Call Forward Screen ............................................................ 183
14.2.18 The FXS Extension Voice Mail Screen ................................................................ 184
14.2.19 The FXS Extension Advanced Screen ................................................................ 184
14.2.20 The Add a BRI Extension Screen ............................ ... ... ... .... ... ... ... .... ... ... ... ... .... . 185
14.2.21 The BRI Extensions Basic Screen ...................................................................... 186
14.2.22 The BRI Extension Call Forward Screen ............................................................. 187
14.2.23 The BRI Extension Voice Mail Screen ................................................................. 188
14.2.24 The BRI Extension Advanced Screen ................................................................. 188
14.3 Technical Reference ........................................................................................................ 189
Chapter 15
Ring Group............................................................................................................................191
15.1 Overview .......................................................................................................................... 191
X2002 User’s Guide
15
Page 16

15.1.1 What You Can Do in the Ring Group Screen ......................................................... 191
15.1.2 What You Need to Know about Ring Groups ......................................................... 191
15.1.3 Before You Begin ...................................................................................................192
15.1.4 Paging Group Example .......................................................................................... 192
15.2 The Ring Group Screen ................................................................................................... 195
15.2.1 The New Ring Group Screen ................................................................................196
15.2.2 The Edit Ring Group Screen .................................................................................196
15.2.3 The Configure Ring Group Screen ........................................................................ 197
15.2.4 The Add/Edit Page Group Screen ......................................................................... 198
15.2.5 The Add/Edit Hunt Group Screen .........................................................................199
Chapter 16
Pickup Group ........................................................................................................................201
16.1 Overview .......................................................................................................................... 201
16.1.1 What You Can Do in the Pickup Group Screen ......................................................201
16.1.2 Before You Begin ...................................................................................................201
16.1.3 Pickup Group Example .......................................................................................... 202
16.2 The Pickup Group Screen ...............................................................................................202
16.2.1 Add/Edit Pickup Groups .......................................................................... ... ...........203
Chapter 17
Call Access Code ..................................................................................................................205
17.1 Overview .......................................................................................................................... 205
17.1.1 What You Need to Know About Call Access .......................................................... 206
17.1.2 What You Can Do in the Extension Management Screens .................................... 206
17.2 The Call Access Screen ..................................................................................................206
17.2.1 The Set Call Access Code Screen ........................................................................ 207
Chapter 18
Outbound Line Group...........................................................................................................209
18.1 Overview .......................................................................................................................... 209
18.1.1 What You Can Do in the Outbound Line Group Screen ......................................... 210
18.1.2 What You Need to Know About Outbound Line Groups ........................................210
18.2 The Outbound Line Group Screen ............. .....................................................................213
18.3 Add/Edit FXO Trunk ........................................................................................................214
18.3.1 Configure an FXO Trunk ....................................................................................... 215
18.3.2 Auto-Attendant for Incoming Analog Calls ............................................................. 216
18.4 Add/Edit PRI Trunk .........................................................................................................216
18.4.1 Configure a PRI Trunk ...................................................... ... .... ... ... ... .....................217
18.4.2 Auto-Attendant for Incoming PRI Calls ...... ... ... ... .... ... ... ... ... .... .............................. 219
18.5 Add/Edit BRI Trunk .........................................................................................................220
18.5.1 Configure a BRI Trunk ...................................................... ... .... ... ... ... .....................220
18.5.2 Auto-Attendant for Incoming BRI Calls ...... ... ... ... .... ... ... ... ... .... .............................. 222
16
X2002 User’s Guide
Page 17

18.6 Add/Edit SIP Trunk .......................................................................................................... 222
18.6.1 Configure a SIP Trunk ...........................................................................................224
18.6.2 Auto-Attendant for SIP Trunks ................................... ... ... ... .... ... ... ........................ 227
18.7 Add/Edit Trusted Peer .....................................................................................................228
18.7.1 Configure a Trusted Peer ....................................................................................... 229
18.7.2 Auto-Attendant for Trusted Peer ............................................................................ 231
Chapter 19
Auto-Attendant......................................................................................................................233
19.1 Overview .......................................................................................................................... 233
19.2 What You Can Do in the Auto-Attendant Screens ...........................................................234
19.2.1 What You Need to Know About Auto-Attendants ...................................................234
19.3 The Auto-Attendant Management Screen ..... ... .... ... ... ... .... ... ... ... ... .................................. 236
19.3.1 The Add/Edit Auto-Attendant Screen ..................................................................... 237
19.3.2 The Auto-Attendant Menu Settings Screen ........................................................... 237
19.3.3 The Add/Edit Auto-Attendant Option Screen ......................................................... 239
19.3.4 The Night Service Screen ...................................................................................... 240
19.4 IVR PIN Code ..................................................................................................................242
19.4.1 IVR AA Recording .................................................................................................. 243
19.5 Auto-Attendant Technical Reference ............................................................................... 245
Chapter 20
LCR.........................................................................................................................................247
20.1 Overview .......................................................................................................................... 247
20.1.1 What You Can Do in the LCR Screen .................................................................... 248
20.1.2 What You Need to Know About LCR ...................................................................... 248
20.1.3 Before You Begin ...................................................................................................248
20.2 The LCR List Screen .......................................................................................................249
20.2.1 The LCR Configuration Screen .............................................................................249
20.2.2 The Add/Edit LCR Dial Condition Screen ............................................................. 251
Chapter 21
Group Management..............................................................................................................253
21.1 Overview .......................................................................................................................... 253
21.1.1 What You Can Do in the Group Management Screen ...........................................254
21.1.2 What You Need to Know About Group Management ..................................... ........ 254
21.1.3 Before You Begin ...................................................................................................257
21.2 The Group Management Screen ..................................................................................... 258
21.2.1 The Edit Group Management Associations Screens ............................................259
Chapter 22
Call Services..........................................................................................................................261
22.1 Overview .......................................................................................................................... 261
X2002 User’s Guide
17
Page 18

22.1.1 What You Can Do in the Call Services Screens ................................................ .... . 261
22.1.2 What You Need to Know About Call Services ........................................................262
22.1.3 Before You Begin ...................................................................................................262
22.2 The Emergency Call Screen ................... ...................... ....................... ...................... ..... 263
22.2.1 Configuring the Emergency Call Screen ................................................................ 263
22.3 The Conference Calling Screen ..................................................................................... 264
22.3.1 Configuring the Conference Calling Screen ...........................................................265
22.3.2 The Conference Calling Edit and Add Screen .... .... ... ... ... ..................................... 266
22.4 The Music on Hold Screen ............................................................................................. 267
22.4.1 Configuring the Music on Hold Screen ............................. ............. ............. ........... 267
22.5 The Distinctive Ring Screen ...........................................................................................268
22.6 The Auto Callback Screen ................................................ ... ... ... ... .................................. 269
22.7 The Call Parking Screen ..................................................................................................269
22.7.1 Configuring the Call Parking Screen ...................................................................... 270
22.8 The Call Waiting Screen .................................................................................................. 271
22.8.1 Configuring the Call Waiting Screen ...................................................................... 273
22.8.2 Call Waiting Example - 1 ........................................................................................ 274
22.8.3 Call Waiting Example - 2 ........................................................................................ 274
22.9 The Call Transfer Screen .................................................................................................274
22.9.1 Configuring the Call Transfer Screen ..................................................................... 275
Part IV: Monitor, Log & Maintenance.................................................. 277
Chapter 23
System Information ..............................................................................................................279
23.1 Overview .......................................................................................................................... 279
23.2 The System Information Screen ...................................................................................... 279
Chapter 24
Status Observation...............................................................................................................281
24.1 Overview .......................................................................................................................... 281
24.2 What You Can Do in the Status Observation Screens ..................................................... 281
24.2.1 What You Need to Know About Status Observation .............................................. 281
24.3 The SIP Peer Status Screen ............................................................................................282
24.4 The FXS Peer Status Screen .......................................................................................... 283
24.5 The BRI Peer Status Screen ................................ ... ... ... .... ... ... ... ... .... .............................. 284
24.6 The FXO Trunk Status Screen .........................................................................................285
24.7 The SIP Trunk Status Screen .......................................................................................... 286
24.8 The BRI Trunk Status Screen .................................. ... ... .... ... ... ... ... .... ... ... ........................ 287
24.9 The PRI Trunk Status Screen .................................. ... ... .... ... ... ... ... .... ... ... ........................ 288
18
X2002 User’s Guide
Page 19

Chapter 25
System Log............................................................................................................................291
25.1 Overview .......................................................................................................................... 291
25.1.1 What You Can Do in the System Log Screen ........................................................ 291
25.1.2 What You Need to Know About System Log ..... ... .... ... ... ........................................ 292
25.2 The View Log Screen ......................................................................................................292
25.2.1 The Filter Log Results Screen ..................... ... ........................................................ 294
25.3 The Log Setting Screen ...................................................................................................295
25.3.1 The Active Log Summary Screen ..........................................................................296
25.3.2 The System Log Configuration Screen .................................................................. 297
25.3.3 The Edit Syslog Server Settings Screen ................................................................299
Chapter 26
Call Detail Record (CDR)......................................................................................................301
26.1 Overview .......................................................................................................................... 301
26.1.1 What You Can Do in the CDR Screen .................................................................... 301
26.1.2 What You Need to Know About CDR ..................................................................... 301
26.2 The CDR Management Screen ....................................................................................... 302
26.2.1 Configure your remote server ................................................................................ 303
26.3 The Backup List Screen .................................................................................................304
26.4 The CDR Query Screen ..... .... ... ... ... ... .... ... ... ............................................................. .... . 305
26.4.1 The CDR Report Screen...................................................................................... 307
Chapter 27
Administrator Accounts.......................................................................................................309
27.1 Overview .......................................................................................................................... 309
27.1.1 What You Can Do in the Administrator Accounts Screens ..................................... 309
27.1.2 What You Need to Know About Administrator Accounts ........................................ 309
27.2 The Administrator Username/Password Screen ............................................................. 310
27.3 The Administrator List Screen .........................................................................................310
27.3.1 Add an Administrator ..............................................................................................311
27.3.2 Edit an Administrator Account ............................................. .... ... ... ... .... ... ..............312
Chapter 28
Diagnostics............................................................................................................................313
28.1 Overview .......................................................................................................................... 313
28.1.1 What You Can Do in the Diagnostics Screen .............................................. ........... 313
28.1.2 What You Need to Know About Diagnostics .......................................................... 313
28.2 The Information Collect Screen . ... ... ... .... ... ... .......................................................... ... .... . 314
28.3 The Packet Capture Screen ............................................................................................315
Chapter 29
Inactivity Timer......................................................................................................................317
X2002 User’s Guide
19
Page 20

29.1 Overview .......................................................................................................................... 317
29.1.1 What You Can Do in the Inactivity Timer Screen ........... ... ... .... ... ... ... .... ... ... ... ... .... . 317
29.1.2 What You Need to Know About the Inactivity Timer ............................................... 317
29.2 The Inactivity Timer Screen ............................................................................................. 317
................................................................................................................................................318
Chapter 30
Remote Management............................................................................................................319
30.1 Overview .......................................................................................................................... 319
30.1.1 What You Can Do in the Remote Management Screens .......................................319
30.1.2 What You Need to Know About Remote Management .......................................... 320
30.2 The WWW Screen ..........................................................................................................321
30.3 The WWW > Add/Edit Screen ......................................................................................... 322
30.4 The SSH Screen .............................................................................................................. 323
30.5 The SSH > Add/Edit Screen .................... ................................................................... ..... 324
30.6 The FTP Screen ...................................... ... ............................................................. ... ..... 324
30.7 The FTP > Add/Edit Screen ..................... ...... ....... ...... ... ....... ...... ....... ...... ....... ...... ...... .... . 325
30.8 The ICMP Screen ............................................................................................................ 326
30.9 The ICMP > Add/Edit Screen .......................................................................................... 327
30.10 The V200 Screen ........................................................................................................... 328
30.11 The V200 > Add/Edit Screen ....................................... .... ... ... ... ..................................... 329
30.12 Remote Management Technical Reference .......... ... ... .... ... ........................................... 329
Chapter 31
System File Maintenance.....................................................................................................335
31.1 Overview .......................................................................................................................... 335
31.1.1 What You Can Do in the System File Maintenance Screen ................................... 335
31.1.2 What You Need to Know About System File Maintenance ......................... ... ... .... . 335
31.2 The Backup & Restore Screen ........................................................................................ 336
31.3 The Firmware Upgrade Screen ....................................................................................... 338
31.4 System File Maintenance Technical Reference ....................... ... ... .... ... ... ... .... ... ... ... ... .... . 339
Chapter 32
License Control.....................................................................................................................341
32.1 Overview .......................................................................................................................... 341
32.1.1 What You Can Do in the License Control Screens .................................................341
32.1.2 What You Need to Know About the License Control Screens ................................341
32.1.3 Before You Begin ...................................................................................................342
32.2 The Registration Screen ..................................................................................................342
32.3 The Service Screen ......................................................................................................... 343
32.4 The License Status Screen ..............................................................................................344
20
X2002 User’s Guide
Page 21

Part V: Web Port al................................................................................ 345
Chapter 33
Web Portal.............................................................................................................................347
33.1 Overview .......................................................................................................................... 347
33.1.1 What You Can Do in the Web Portal Screens ........................................................ 347
33.1.2 What You Need to Know About the Web Portal ..................................................... 348
33.2 The Account Settings Screen ..........................................................................................348
33.3 The Call Forwarding and Blocking Screen ......................................................................350
33.3.1 The DND White List Screen ................................................................................351
33.3.2 The Find Me List Screen ...................................................................................... 352
33.3.3 The Black List Screen .. ... ... ... ... ............................................................................353
33.4 The Voice Mail Settings Screen ...................................................................................... 353
33.5 The Web Phone Screen ................................................................................................. 354
Part VI: Appendices & Index............................................................... 357
Chapter 34
Product Specifications.........................................................................................................359
Appendix A Personal IVR.....................................................................................................365
Appendix B IP Addresses and Subnetting ...........................................................................369
Appendix C Open Software Announcements.......................................................................379
Appendix D Legal Information..............................................................................................399
Appendix E Customer Support.............................................................................................403
Index.......................................................................................................................................409
X2002 User’s Guide
21
Page 22

22
X2002 User’s Guide
Page 23

Figure 1 IP PBX Example ...................................................................................................................... 39
Figure 2 SIP Devices and the X2002 .................................................................................................... 40
Figure 3 Scalable Design ......................................................................................................................41
Figure 4 LEDs ........................................................................................................................................ 43
Figure 5 FXS and FXO Ports ................................................................................................................. 48
Figure 6 Auto-Attendant ........................................................................................................................48
Figure 7 Outbound Call Routing - Basic ................................................................................................ 49
Figure 8 Outbound Call Routing - Advanced ......................................................................................... 50
Figure 9 Tutorial Overview ......................................................................................................................51
Figure 10 Internal Calls .......................................................................................................................... 52
Figure 11 Configuration > PBX > Extension Management > Authority Group ........................................ 53
Figure 12 Add/Edit Authority Group ................. ... ............................................................. .... ... ... .............53
Figure 13 Configuration > PBX > Extension Management > Authority Group ........................................ 53
Figure 14 Authority Group Configuration ................................................................................................54
Figure 15 Add Multiple SIP Extensions ..................................................................................................54
Figure 16 Authority Group Configuration ................................................................................................55
Figure 17 Connect IP Phones ................................................................................................................55
Figure 18 Example IP Phone SIP Registration Screen .......................................................................... 56
Figure 19 Auto Provisioning .............. ... ... .............................................................. ... ... ... .... ...................57
Figure 20 Configuration > PBX > Server Configuration > Auto Provision ..............................................57
Figure 21 Configuration > PBX > Server Configuration > Auto Provision > Edit .................................... 57
Figure 22 Configuration > PBX > Server Configuration > Auto Provision ..............................................58
Figure 23 Making a PSTN Call ............................................................................................................... 58
Figure 24 FXO Interface Card Connection ............................................................................................. 59
Figure 25 Configuration > PBX > Outbound Line Management > Outbound Line Group ...................... 59
Figure 26 Add FXO Trunk .......................................................................................................................59
Figure 27 Configuration > PBX > Outbound Line Management > Outbound Line Group ...................... 60
Figure 28 FXO Connection Configuration .............................................................................................. 60
Figure 29 Configuration > PBX > Outbound Line Management > Outbound Line Group ...................... 60
Figure 30 Confirm AA Setting .................................................................................................................60
Figure 31 Outbound Calls via PSTN ...................................................................................................... 61
Figure 32 Configuration > PBX > Outbound Line Management > LCR .................................................. 61
Figure 33 local_call LCR ........................................................................................................................62
Figure 34 Dial Condition for local_call LCR ............................................................................................ 62
Figure 35 Configuration > PBX > Group Management .... ............................................................. ... .... ... 63
Figure 36 Assigning an LCR to an Authority Group ...............................................................................63
Figure 37 Outbound Calls via PSTN ...................................................................................................... 63
Figure 38 Making ITSP Calls ..................................................................................................................64
Figure 39 Network Connection to ITSP .................................................................................................. 64
Figure 40 Configuration > PBX > Outbound Line Management > Outbound Line Group ...................... 65
Figure 41 Add SIP Trunk ........................................................................................................................ 65
Figure 42 Configuration > PBX > Outbound Line Management > Outbound Line Group ...................... 66
Figure 43 SIP Connection Configuration .................. .... ... ... ... .... ... ... ... .... ... ... ... ... .... ... ... ... .... ... ... ... ..........66
X2002 User’s Guide
23
Page 24

Figure 44 Configuration > PBX > Outbound Line Management > Outbound Line Group ...................... 67
Figure 45 Confirm AA Setting .................................................................................................................67
Figure 46 Outbound Calls via ITSP ........................................................................................................ 68
Figure 47 Configuration > PBX > Outbound Line Management > LCR .................................................. 68
Figure 48 long_distance_call LCR .......................................................................................................... 69
Figure 49 Dial Condition for long_distance_call LCR .............................................................................69
Figure 50 Configuration > PBX > Group Management .... ............................................................. ... .... ... 70
Figure 51 Assigning an LCR to an Authority Group ...............................................................................70
Figure 52 Outbound Calls via ITSP ........................................................................................................ 71
Figure 53 Making an ISDN Call .......................... ... ... .... ... ... ... .... ... ... ... .... ... ... ... ... .... ... ... ... .... ... ................71
Figure 54 PRI Interface Card Connection ....... ... ... ... .... ... ... ... .... ... ... ... .... ... ... ... ... .... ... ... ... .... ... ... .............72
Figure 55 Configuration > PBX > Server Configuration > Server > PRI ................................................. 72
Figure 56 Configuration > PBX > Outbound Line Management > Outbound Line Group ...................... 73
Figure 57 Add PRI Trunk ........................................................................................................................73
Figure 58 Configuration > PBX > Outbound Line Management > Outbound Line Group ...................... 73
Figure 59 PRI Connection Configuration ................................................................................................ 74
Figure 60 Configuration > PBX > Outbound Line Management > Outbound Line Group ...................... 74
Figure 61 Confirm AA Setting .................................................................................................................74
Figure 62 Outbound Calls via ISDN ....................................................................................................... 75
Figure 63 Configuration > PBX > Outbound Line Management > LCR .................................................. 75
Figure 64 LCR Example: ISDN_call ....................................................................................................... 76
Figure 65 Dial Condition for ISDN_call LCR ........................................................................................... 76
Figure 66 Configuration > PBX > Group Management .... ............................................................. ... .... ... 77
Figure 67 Assigning an LCR to an Authority Group ...............................................................................77
Figure 68 Outbound Calls via ISDN ....................................................................................................... 77
Figure 69 ISDN Network Configuration ..................................................................................................78
Figure 70 ISDN Network Configuration ..................................................................................................79
Figure 71 Example: Direct ...................................................................................................................... 80
Figure 72 Example: MSN .......................................................................................................................80
Figure 73 Configuration > PBX > Server Configuration > Server > Feature Code .................................81
Figure 74 ZyXEL V300 Voicemail Configuration ...................................................................................82
Figure 75 Tutorial: Web Portal IP Address ............................................................................................. 83
Figure 76 Tutorial: Log In ........................................................................................................................ 84
Figure 77 Tutorial: Peer Info Tab ............................................................................................................ 84
Figure 78 Tutorial: Changing Security Information .................................................................................85
Figure 79 Tutorial: Forward / Block Tab .................................................................................................. 85
Figure 80 Tutorial: Configuring Call Settings ............................................. ... ... ... .................................... 85
Figure 81 Tutorial: DND White List ......................................................................................................... 86
Figure 82 Tutorial: Find Me List ....................................................... ... .................................................... 87
Figure 83 Tutorial: Black List .................... .... ............................................................. ... .......................... 87
Figure 84 Tutorial: Voicemail Tab ...........................................................................................................87
Figure 85 Tutorial: Setting Up Voicemail ................................................................................................88
Figure 86 Tutorial: Web Phone Tab ........................................................................................................ 88
24
X2002 User’s Guide
Page 25

Figure 87 Tutorial: Security Pop-Up ................................... ... .... ... .......................................................... 88
Figure 88 Tutorial: The Web Phone .................................................... .... ... ... ... ... .... ... ... ... .... ... ... .............89
Figure 89 Web Configurator: Login ......... .... ... ... ... ... .... ... ... ... .... ............................................................. 94
Figure 90 Web Configurator Home Screen (System) ............................................................................ 95
Figure 91 Dashboard ..............................................................................................................................98
Figure 92 Maintenance > Reboot ......... ... .... ... ... ... ... .... ... ... ..................................................................101
Figure 93 Web Configurator: Logout button ................................................... ... .... .............................. 101
Figure 94 Web Configurator: Help button ....................................................... ... .... ... ... ... .... ... ... ... ........102
Figure 95 Network Deployment Overview ............................................................................................103
Figure 96 Configuration > Network > LAN ............................................................................................ 105
Figure 97 Configuration > Network > WAN ..........................................................................................106
Figure 98 Configuration > Network > DDNS ........................................................................................ 107
Figure 99 Configuration > Network > NTP ........................................................................................... 108
Figure 100 Example of Static Routing Topology ................................................................................... 109
Figure 101 Configuration > Network > Static Route ..............................................................................110
Figure 102 Configuration > Network > Static Route > Add ........................................................ ............110
Figure 103 Configuration > Network > VLAN ........................................................................................111
Figure 104 SIP Devices and the X2002 ...............................................................................................115
Figure 105 Q.SIG Configuration Example .............................................................................................117
Figure 106 Avoid Voice Channel Collision in Q.SIG ..............................................................................118
Figure 107 Configuration > PBX > Server Configuration > Server > Global .........................................119
Figure 108 Configuration > PBX > Server Configuration > Server > FXO ...........................................120
Figure 109 Configuration > PBX > Server Configuration > Server > FXS ............................................ 121
Figure 110 Configuration > PBX > Server Configuration > Server > BRI ............................................. 122
Figure 111 Settings for BRI Switch Types ............................................................................................. 122
Figure 112 Configuration > PBX > Server Configuration > Server > PRI ............................................. 123
Figure 113 Settings for PRI Switch Types ............................................................................................ 124
Figure 114 Configuration > PBX > Server Configuration > Server > Call Block ...................................126
Figure 115 Configuration > PBX > Server Configuration > Server > Call Block > Black List ...............127
Figure 116 Configuration > PBX > Server Configuration > Server > Feature Code ............................. 128
Figure 117 Configuration > PBX > Server Configuration > Server > E-Mail ......................................... 129
Figure 118 Configuration > PBX > Server Configuration > Auto Provision ........................................... 133
Figure 119 Configuration > PBX > Server Configuration > Auto Provision > Edit ................................ 134
Figure 120 Configuration > PBX > Server Configuration > Auto Provision > Advanced ...................... 135
Figure 121 Auto Provision > IVR PIN code ..........................................................................................136
Figure 122 The EZ Provision System ................................................................................................... 137
Figure 123 Configuration > PBX > Server Configuration > QoS ..........................................................141
Figure 124 Configuration > PBX > Server Configuration > Voice Mail ................................................. 144
Figure 125 Personal Voice Mail Flow ................................................................................................... 145
Figure 126 Personal Voice Mail: Voice Message Menu .................................... .... ... ... ... .... ... ... ... ... .... . 146
Figure 127 Personal Voice Mail: Change Folder Menu ....................................................................... 146
Figure 128 Personal Voice Mail: Mail Box Options Menu .................................................................... 147
Figure 129 Configuration > PBX > Server Configuration > Phonebook ...............................................150
X2002 User’s Guide
25
Page 26

Figure 130 Import Phonebook Screen ..................................................................................................151
Figure 131 Configuration > PBX > Server Configuration > Phonebook > LDAP Phonebook ............... 152
Figure 132 Configuration > PBX > Server Configuration > Phonebook > Local Phonebook ............... 153
Figure 133 Local Phonebook Add/Edit Screen .....................................................................................154
Figure 134 Installing a DSP module .....................................................................................................158
Figure 135 Removing a DSP Module ................................................................................................... 159
Figure 136 Configuration > PBX > Server Configuration > DSP Management .................................... 159
Figure 137 Configuration > PBX > Server Configuration > Office Hour ...............................................162
Figure 138 Authority Group Overview ..................................................................................................163
Figure 139 Configuration > PBX > Extension Management > Authority Group .................................... 165
Figure 140 Extension Query Result ...................................................................................................... 166
Figure 141 Add/Edit Authority Group ....................................................................................................167
Figure 142 Authority Group Query Failure ........................................................................................... 168
Figure 143 Authority Group Configuration ............................................................................................ 168
Figure 144 Add Multiple SIP Extensions .............................................................................................. 170
Figure 145 Add a SIP Extension .......................................................................................................... 172
Figure 146 SIP Extension: Basic .......................................................................................................... 173
Figure 147 SIP Extension: Call Forward .............................................................................................. 174
Figure 148 DND White List ...................................................................................................................176
Figure 149 Find Me List ........................................................................................................................176
Figure 150 Black List ............................................................................................................................ 177
Figure 151 SIP Extension: Voice Mail ..................................................................................................178
Figure 152 SIP Extension: Advanced Screen ......................................................................................179
Figure 153 SIP Extension: Auto Provision ............................. .................... ................... ........................180
Figure 154 Add an FXS Extension .......................................................................................................181
Figure 155 FXS Extension: Basic .........................................................................................................182
Figure 156 FXS Extension: Call Forward ............................................................................................. 183
Figure 157 FXS Extension: Voice Mail ................................................................................................. 184
Figure 158 FXS Extension: Advanced Screen ..................................................................................... 184
Figure 159 Add a BRI Extension ..........................................................................................................185
Figure 160 Using MSNs for Extensions ................................................................................................ 186
Figure 161 BRI Extension: Basic ..........................................................................................................186
Figure 162 BRI Extension: Call Forward ..............................................................................................187
Figure 163 BRI Extension: Voice Mail .................................................................................................. 188
Figure 164 BRI Extension: Advanced Screen ......................................................................................188
Figure 165 Ring Group Overview ......................................................................................................... 191
Figure 166 Paging Group Example ......................................................................................................192
Figure 167 Configuration > PBX > Extension Management > Ring Group .......................................... 192
Figure 168 Add Ring Group .................................................................................................................. 193
Figure 169 Ring Group for Marketing ................................................................................................... 193
Figure 170 Ring Group for Marketing ................................................................................................... 193
Figure 171 Ring Group for Marketing ................................................................................................... 194
Figure 172 Configuration > PBX > Group Management ....................................................................... 194
26
X2002 User’s Guide
Page 27

Figure 173 Page Group to Authority Group Assignment .............. ... ... .... ... ... ... ... .... ... ... ... .....................195
Figure 174 Configuration > PBX > Extension Management > Ring Group .......................................... 195
Figure 175 Configuration > PBX > Extension Management > Ring Group > Add ................................ 196
Figure 176 Configuration > PBX > Extension Management > Ring Group > Edit ................................ 196
Figure 177 Configuration > PBX > Extension Management > Ring Group > Advanced ...................... 197
Figure 178 Add/Edit Page Group ......................................................................................................... 198
Figure 179 Add/Edit Hunt Group ..........................................................................................................199
Figure 180 Group Pickup Overview ...................................................................................................... 201
Figure 181 Pickup Group Overview ...................................................................................................... 202
Figure 182 Configuration > PBX > Extension Management > Pickup Group ....................................... 202
Figure 183 Configuration > PBX > Extension Management > Pickup Group: Add/Edit .. ..................... 203
Figure 184 Configuration > PBX > Extension Management > Call Access .......................................... 206
Figure 185 Configuration > PBX > Extension Management > Call Access Code: Edit/Add ................. 207
Figure 186 Outbound Line Overview ....................................................................................................209
Figure 187 Auto Attendant (AA) Example .............................................................................................211
Figure 188 DDI Example .......................................................................................................................211
Figure 189 Direct Example ................................................................................................................... 212
Figure 190 MSN Example .................................................................................................................... 212
Figure 191 Configuration > PBX > Outbound Line Management > Outbound Line Group .................. 213
Figure 192 Add/Edit FXO Trunk ...........................................................................................................214
Figure 193 Configure an FXO Trunk ....................................................................................................215
Figure 194 AA for FXO Trunks ............................................................................................................. 216
Figure 195 Add/Edit PRI Trunk ............................................................................................................. 216
Figure 196 Configure a PRI Trunk - DDI/DID ....................................................................................... 217
Figure 197 Configure a PRI Trunk - AA ................................................................................................ 218
Figure 198 Configure a PRI Trunk - Direct ........................................................................................... 218
Figure 199 AA for Incoming PRI Calls ..................................................................................................219
Figure 200 Add/Edit BRI Trunk ............................................................................................................. 220
Figure 201 Configure a BRI Trunk - MSN ............................................................................................. 220
Figure 202 AA for Incoming BRI Calls ..................................................................................................222
Figure 203 Add/Edit SIP Trunk .............................................................................................................222
Figure 204 Configure a SIP Trunk ........................................................................................................224
Figure 205 AA for SIP Trunks ............................................................................................................... 227
Figure 206 Add/Edit Trusted Peer ........................................................................................................ 228
Figure 207 Trusted Peer Configuration ................................................................................................229
Figure 208 AA for Incoming Trusted Peer Calls ...................................................................................231
Figure 209 Auto-Attendant Overview .................................................................................................. 233
Figure 210 Example: Auto-Attendant Default Structure ............................... ... ... .... ... ........................... 234
Figure 211 Example: Auto-Attendant Custom Structure ................................................. .... ... ... ... ........235
Figure 212 Auto-Attendant Menus ........................................................................................................ 235
Figure 213 Configuration > PBX > Outbound Line Management > Auto-Attendant ............................. 236
Figure 214 Add/Edit Auto-Attendant ............................. ............................................. ........................... 237
Figure 215 Auto-Attendant Menu Settings ........................................................................................... 238
X2002 User’s Guide
27
Page 28

Figure 216 Add/Edit Auto-Attendant Option .........................................................................................239
Figure 217 Auto-Attendant Menu Settings - Night Service ................................................................... 240
Figure 218 Auto-Attendant > IVR PIN Code ......................................................................................... 242
Figure 219 The IVR AA Recording System ..........................................................................................244
Figure 220 Sound Recorder .................................................................................................................245
Figure 221 Recording Audio .................................................................................................................245
Figure 222 Saving Audio Files .............................................................................................................. 246
Figure 223 Audio File Settings .............................................................................................................246
Figure 224 Confirm File Settings .......................................................................................................... 246
Figure 225 LCR Components Example ................................................................................................ 247
Figure 226 LCR Components Example ............................................................................................... 248
Figure 227 Configuration > PBX > Outbound Line Management > LCR ..............................................249
Figure 228 LCR Configuration ..............................................................................................................250
Figure 229 LCR: Dial Condition ............................................................................................................251
Figure 230 Group Management Example ............................................................................................253
Figure 231 Group Management - Authority Group to Authority Group ........................................... .....254
Figure 232 Group Management - Authority Group to LCR .................................................................. 255
Figure 233 Group Management - Authority Group to Ring Group ............... ... ... .... ... ... ... .... ... ..............255
Figure 234 Group Management - Outbound Line Group to Authority Group ......................................256
Figure 235 Group Management - Outbound Line Group to LCR ........................................................257
Figure 236 Group Management - Outbound Line Group to Ring Group ............................................. 257
Figure 237 Configuration > PBX > Group Management ....................................................................... 258
Figure 238 Configuration > PBX > Group Management > Advanced ................................................... 259
Figure 239 Emergency Call Configuration ...........................................................................................263
Figure 240 Conference Room List ....................................................................................................... 265
Figure 241 Conference Room Add ...................................................................................................... 266
Figure 242 Music on Hold .................................................................................................................... 267
Figure 243 Distinctive Ring .................................................................................................................. 268
Figure 244 Auto Callback ..................................................................................................................... 269
Figure 245 Call Parking Overview ........................................................................................................ 269
Figure 246 Call Parking Configuration .................................................................................................. 270
Figure 247 Call Waiting Overview ........................................................................................................271
Figure 248 The Flow to Check Whether The Receiver Is Busy Or Not ...............................................272
Figure 249 Call Waiting Setting ............................................................................................................ 273
Figure 250 Call Waiting Example1 .......................................................................................................274
Figure 251 Call Waiting Example2 .......................................................................................................274
Figure 252 Call Transfer Settings .........................................................................................................275
Figure 253 Monitor > System Information ............................................................................................279
Figure 254 Monitor > Status Observation > SIP Peer ......................................................................... 282
Figure 255 Monitor > Status Observation > FXS Peer ........................................................................ 283
Figure 256 Monitor > Status Observation > BRI Peer ......................................................................... 284
Figure 257 Monitor > Status Observation > FXO Trunk ....... .......................................................... .... . 285
Figure 258 Monitor > Status Observation > SIP Trunk ................... ..................................................... 286
28
X2002 User’s Guide
Page 29

Figure 259 Monitor > Status Observation > BRI Trunk .......................................................... ... ... ........287
Figure 260 Monitor > Status Observation > PRI Trunk .......................................................... ... ... ........288
Figure 261 Report > LOGS > System Log > View Log ........................................................................293
Figure 262 Report > LOGS > System Log > View Log: Show Filter ..................................................... 294
Figure 263 Report > LOGS > System Log > Log Setting ..................................................................... 295
Figure 264 Report > LOGS > System Log > Log Setting > Active Log Summary ................................296
Figure 265 Report > LOGS > System Log > Log Setting > Edit Internal Log ........................ ... ... ... .....297
Figure 266 Report > LOGS > System Log > Log Setting > Edit Remote Log .....................................299
Figure 267 Report > LOGS > CDR > Management .............................................................................302
Figure 268 Report > LOGS > CDR > Backup List ................................................................................304
Figure 269 Report > LOGS > CDR > CDR Query ................................................................................305
Figure 270 Report > LOGS > CDR > CDR Query > Report ................................................................. 307
Figure 271 Maintenance > Administrator Username/Password ............................... ... ... .... .................310
Figure 272 Maintenance > Administrator List .......................................................................................310
Figure 273 Maintenance > Administrator List > Add .............................................................................311
Figure 274 Maintenance > Administrator List > Edit .............................................................................312
Figure 275 Maintenance > Administration > Diagnostic > Information Collect .................... ................. 314
Figure 276 Maintenance > Administration > Diagnostic > Packet Capture ..........................................315
Figure 277 Maintenance > Administration > Inactivity Timer ................................................................317
Figure 278 Secure and Insecure Remote Management From the WAN ..............................................319
Figure 279 Remote Management: WWW ............................................................................................. 321
Figure 280 WWW: Add/Edit .................................................................................................................. 322
Figure 281 Remote Management: SSH .............................................................................................. 323
Figure 282 SSH: Add/Edit ....................................................................................................................324
Figure 283 Remote Management: FTP ................................................................................................324
Figure 284 FTP: Add/Edit ..................................................................................................................... 325
Figure 285 Remote Management: ICMP ............................ .................................................... ..............326
Figure 286 ICMP: Add/Edit ...................................................................................................................327
Figure 287 Remote Management: V200 .............................................................................................. 328
Figure 288 V200: Add/Edit ...................................................................................................................329
Figure 289 Security Alert Dialog Box (Internet Explorer) ......................................................................330
Figure 290 Example: Lock Denoting a Secure Connection ............................. ..................................... 330
Figure 291 How SSH Works ................................................................................................................. 331
Figure 292 SSH Example 1: Store Host Key ........................................................................................ 332
Figure 293 SSH Example 2: Test ........................................................................................................ 332
Figure 294 SSH Example 2: Log in ......................................................................................................333
Figure 295 Secure FTP: Firmware Upload Example ............................................................................ 333
Figure 296 Maintenance > Backup & Restore ......................................................................................337
Figure 297 Maintenance > Firmware Upgrade .....................................................................................338
Figure 298 Maintenance > License Control > Registration ................................................................. 342
Figure 299 Maintenance > License Control > Service ........... .... ... ... ... .... ... ... ... ... .................................. 343
Figure 300 Maintenance > License Control > License Status ..............................................................344
Figure 301 Web Portal Overview .......................................................................................................... 347
X2002 User’s Guide
29
Page 30

Figure 302 Web Portal: Login ..............................................................................................................348
Figure 303 Peer Info. ............................................................................................................................349
Figure 304 Forward/Block ....................................................................................................................350
Figure 305 Forward/Block > DND White List ........................................................................................ 351
Figure 306 Forward/Block > Find Me List ............................................................................................. 352
Figure 307 Forward/Block > Black List ................................................................................................. 353
Figure 308 Voice Mail ...........................................................................................................................353
Figure 309 Web Phone ......................................................................................................................... 354
Figure 310 ISDN PRI Cable Pin Assignments ......................................................................................362
Figure 311 ISDN BRI Cable Pin Assignments ......................................................................................363
Figure 312 Personal IVR Flow .............................................................................................................. 366
Figure 313 IVR: PIN Menu ............. ... ... ... .... ... ............................................................. ... .....................366
Figure 314 IVR: Call Forward & Blacklist ............................................................................................ 367
Figure 315 IVR: Voicemail ...................................................................................................................368
Figure 316 Network Number and Host ID ............................................................................................ 370
Figure 317 Subnetting Example: Before Subnetting ....................................... ... .... ... ... ... .....................372
Figure 318 Subnetting Example: After Subnetting ....................................... ... ... .... ... ... ... .....................373
Figure 319 Conflicting Computer IP Addresses Example .................................................................... 377
Figure 320 Conflicting Computer IP Addresses Example .................................................................... 377
Figure 321 Conflicting Computer and Router IP Addresses Example .................................................. 378
30
X2002 User’s Guide
Page 31

Table 1 LEDs .........................................................................................................................................44
Table 2 Tutorials Overview ....................................................................................................................51
Table 3 Sample VoIP Account Information ............................................................................................65
Table 4 Sample PRI Information ............................................................................................................ 72
Table 5 Your Information ........................................................................................................................ 83
Table 6 Tutorial: Call Settings ................................................................................................................ 86
Table 7 Tutorial: Voicemail Settings ....................................................................................................... 88
Table 8 Tutorial: Basic Web Phone Call Features .................................................................................89
Table 9 Navigation Buttons Sub-links Overview ....................................................................................96
Table 10 Navigation Panel Links ........................................................................................................... 96
Table 11 Dashboard .................... ........................................................... ... ... ... ... .... ... ... ... .......................98
Table 12 Icon Explanation Table ..........................................................................................................100
Table 13 Configuration > Network > LAN ............................................................................................ 105
Table 14 Configuration > Network > WAN ........................................................................................... 106
Table 15 Configuration > Network > DDNS .........................................................................................107
Table 16 Configuration > Net work > NTP ....................................... ... .... ... ... ... ... .... ... ........................... 108
Table 17 Configuration > Net work > Static Route .............................................. .... ... ... ... ......................110
Table 18 Configuration > Network > Static Route > Add ................... ...................................................111
Table 19 Configuration > Net work > VLAN .................. ... ... ... .... ... ... ... .... ... ... ... ... .... ... ... .........................111
Table 20 ISDN NT/TE Configuration Example ......................................................................................117
Table 21 Configuration > PBX > Server Configuration > Server > Global ............................................119
Table 22 Configuration > PBX > Server Configuration > Server > FXO .............................................. 120
Table 23 Configuration > PBX > Server Configuration > Server > FXS ..............................................121
Table 24 Configuration > PBX > Server Configuration > Server > BRI ...............................................122
Table 25 Configuration > PBX > Server Configuration > Server > PRI ...............................................124
Table 26 Configuration > PBX > Server Configuration > Server > Call Block .....................................126
Table 27 Configuration > PBX > Server Configuration > Server > Call Block > Black List ..................127
Table 28 Configuration > PBX > Server Configuration > Server > Feature Code ............................... 128
Table 29 Configuration > PBX > Server Configuration > Server > E-Mail ...........................................130
Table 30 Configuration > PBX > Server Configuration > Auto Provision .............................................133
Table 31 Configuration > PBX > Server Configuration > Auto Provision > Edit ................................... 134
Table 32 Auto Provision > IVR PIN Code .......................... ... .... ... ... ... .... ... ... ... ... .................................. 136
Table 33 Configuration > PBX > Server Configuration > QoS ............................................................. 141
Table 34 Configuration > PBX > Server Configuration > Voice Mail ....................................................144
Table 35 Configuration > PBX > Server Configuration > Phonebook ..................................................150
Table 36 Configuration > PBX > Server Configuration > Phonebook > LDAP Phonebook ................. 152
Table 37 Configuration > PBX > Server Configuration > Phonebook > Local Phonebook ..................153
Table 38 Local Phonebook Add/Edit Screen .......................................................................................154
Table 39 Configuration > PBX > Server Configuration > DSP Management ....................................... 160
Table 40 Configuration > PBX > Server Configuration > Office Hour .................................................. 162
Table 41 Configuration > PBX > Extension Management > Authority Group ...................................... 165
Table 42 Extension Query Result ........................................................................................................ 166
Table 43 Add/Edit Authority Group .... ............................................................. ... .... ... ... ... .... ... ... ...........167
X2002 User’s Guide
31
Page 32

Table 44 Authority Group Configuration ..............................................................................................169
Table 45 Add Multiple SIP Extensions ................................................................................................. 170
Table 46 Add a SIP Extension .............................................................................................................172
Table 47 SIP Extension: Basic .................................................. ... ... ... .... ... ... ........................................ 173
Table 48 SIP Extension: Call Forward ............................................... .... ... ... ... ... .... ... ... ... .... ... ... ...........174
Table 49 DND White List ..................................................................................................................... 176
Table 50 Find Me List .......................................................................................................................... 177
Table 51 Black List ............................................................................................................................... 178
Table 52 SIP Extension: Voice Mail ................... ... ... .... ... ... ... .... ... ... ... .... ... ... ... ..................................... 178
Table 53 SIP Extension: Advanced Screen ....................................... .... ... ... ... ... .... ... ... ... .... ... ... ... ... ..... 179
Table 54 SIP Extension: Auto Provision ......... ... ... ... .... ... ... ... .... ... ... ... .... ... ... ... ... .... ... ... ... .... ... ... ... ........ 181
Table 55 Add an FXS Extension .......................................................................................................... 182
Table 56 FXS Extension: Basic ...........................................................................................................182
Table 57 Add a BRI Extension ............................................................................................................. 185
Table 58 MSN Example ....................................................................................................................... 185
Table 59 BRI Extension: Basic ............................................................................................................ 186
Table 60 Voice Codecs Supported . ... ... ... .... ... ... ... ... .... ... ... ... ............................................................... 189
Table 61 Video Codecs Supported ......................................................................................................190
Table 62 Configuration > PBX > Extension Management > Ring Group .............................................195
Table 63 Configuration > PBX > Extension Management > Ring Group > Add .................................. 196
Table 64 Configuration > PBX > Extension Management > Ring Group > Edit ...................................196
Table 65 Configuration > PBX > Extension Management > Ring Group > Advanced ......................... 197
Table 66 Add/Edit Page Group ............................................................................................................198
Table 67 Add/Edit Hunt Group ............................................................................................................. 199
Table 68 Configuration > PBX > Extension Management > Pickup Group ..........................................202
Table 69 Configuration > PBX > Extension Management > Pickup Group: Add/Edit .......................... 203
Table 70 Configuration > PBX > Extension Management > Call Access .............................................206
Table 71 Configuration > PBX > Extension Management > Call Access Code: Edit/Add ........... ........207
Table 72 Configuration > PBX > Outbound Line Management > Outbound Line Group ..................... 214
Table 73 Add/E dit FXO Trunk .................. .............................................................. ... ...........................214
Table 74 Configure an FXO Trunk .................. ... ... ... .... ... ... ... .... ... ........................................................ 215
Table 75 AA for FXO Trunks ................................................................................................................216
Table 76 Add/E dit PRI Trunk ...... .............................................................. ... ... ..................................... 217
Table 77 Configure a PRI Trunk .......................................................................................................... 218
Table 78 AA for Incoming PRI Calls ....................................................................................................219
Table 79 Add/E dit BRI Trunk ...... .............................................................. ... ... ..................................... 220
Table 80 Configure a BRI Trunk .......................................................................................................... 221
Table 81 AA for Incoming BRI Calls ....................................................................................................222
Table 82 Add/E dit SIP Trunk .................................................................................. ... ...........................223
Table 83 Configure a SIP Trunk ........................................................................................................... 225
Table 84 AA for SIP Trunks .................................................................................................................227
Table 85 Add/E dit Trusted Peer ............................................ ............................................................... 228
Table 86 Trusted Peer Configuration ........... ... ... ............................................................. .... .................229
32
X2002 User’s Guide
Page 33

Table 87 AA for Incoming Trusted Peer Calls ...................................................................................... 232
Table 88 Configuration > PBX > Outbound Line Management > Auto-Attendant ................................ 236
Table 89 Add/Edit Auto-Att endant ..................... ... ... .... ... ... ... .... ... ... ... .... .............................................. 237
Table 90 Auto-Attendant Menu Settings ..............................................................................................238
Table 91 Add/Edit Auto-Attendant Option ............................................................................................ 239
Table 92 Auto-Attendant Menu Settings - Night Service ..................................................................... 241
Table 93 Auto-Attendant > IVR PIN Code ...........................................................................................242
Table 94 Configuration > PBX > Outbound Line Management > LCR ................................................249
Table 95 LCR Configuration ................................................................................................................ 250
Table 96 LCR: Dial Condition .................. .... ... ... ... .............................................................. ... ..............251
Table 97 Configuration > PBX > Group Management ......................................................................... 258
Table 98 Configuration > PBX > Group Management > Advanced ..................................................... 259
Table 99 Emergency Call Configuration ......... ..................................................................................... 263
Table 100 Conference Room List ........................................................................................................ 265
Table 101 Conference Room Add .......................................................................................................266
Table 102 Music on Hold File Guidelines ............................................................................................267
Table 103 Music on Hold ..................................................................................................................... 267
Table 104 Distinctive Ring ...................................................................................................................268
Table 105 Auto Callback ...................................................................................................................... 269
Table 106 Call Parking Progression ........................ .... ... .....................................................................270
Table 107 Call Parking Configuration .......... ... ... ............................................................. .... ... ... ...........270
Table 108 Call Waiting Example .......................................................................................................... 271
Table 109 No Call Waiting Example .................................................................................................... 272
Table 110 Call Waiting Setting .............................................................................................................273
Table 111 Call Transfer Settings .......................................................................................................... 275
Table 112 Monitor > System Information ............................................................................................. 280
Table 113 Monitor > Status Observation > SIP Peer ........................................................................... 283
Table 114 Monitor > Status Observation > FXS Peer .......................................................................... 284
Table 115 Monitor > Status Observation > BRI Peer ................ ... ... ... .... ... ... ... ... .... ... ... ... .... ... ... ... ... .... . 284
Table 116 Monitor > Status Observation > FXO Trunk ........................................................................ 285
Table 117 Monitor > Status Observation > SIP Trunk ..........................................................................286
Table 118 Monitor > Status Observation > BRI Trunk .......................................................................... 287
Table 119 Monitor > Status Observation > PRI Trunk .......................................................................... 288
Table 120 Log Severity ........................................................................................................................ 292
Table 121 Report > LOGS > System Log > View Log ......................................................................... 293
Table 122 Report > LOGS > System Log > View Log: Show Filter .....................................................294
Table 123 Report > LOGS > System Log > Log Setting ..................................................................... 295
Table 124 Report > LOGS > System Log > Log Setting > Active Log Summary ............................... 296
Table 125 Report > LOGS > System Log > Log Setting > Edit Internal Log ...................................... 297
Table 126 Report > LOGS > System Log > Log Setting > Edit Remote Log ...................................... 299
Table 127 Report > LOGS > CDR > Management .............................................................................. 303
Table 128 Report > LOGS > CDR > Backup List ................................................................................. 304
Table 129 Report > LOGS > CDR > CDR Query ................................................................................. 305
X2002 User’s Guide
33
Page 34

Table 130 Report > LOGS > CDR > CDR Query > Report .................................................................. 307
Table 131 Maintenance > Administrator Username/Password .............. ... ... ........................................ 310
Table 132 Maintenance > Administrator List .........................................................................................311
Table 133 Maintenance > Administrator List > Add ..............................................................................311
Table 134 Maintenance > Administrator List > Edit .............................................................................312
Table 135 Maintenance > Administration > Diagnostic > Information Collect ...................................... 314
Table 136 Maintenance > Administration > Diagnostic > Packet Capture ........................................... 315
Table 137 Maintenance > Administration > Inactivity Timer ................................................................318
Table 138 Remote Management: WWW .............................................................................................321
Table 139 WWW: Add/Edit ..................................................................................................................322
Table 140 Remote Management: SSH ................................................................................................ 323
Table 141 SSH: Add/Edit ..................................................................................................................... 324
Table 142 Remote Management: FTP .................................................................................................325
Table 143 FTP: Add/Edit ......................................................................................................................326
Table 144 Remote Management: ICMP ..............................................................................................326
Table 145 ICMP: Add/Edit ................................................................................................................... 327
Table 146 Remote Management: V200 ............................................................................................... 328
Table 147 V200: Add/Edit .................................................................................................................... 329
Table 148 Maintenance > Backup & Restore ......................................................................................337
Table 149 Maintenance > Firmware Upgrade ......................................................................................338
Table 150 General Commands for GUI-based FTP Clients ................................................................ 340
Table 151 Maintenance > License Control > Registration ................................................................... 342
Table 152 Maintenance > License Control > Service .......................................................................... 343
Table 153 Maintenance > License Control > License St atus ............................................................... 344
Table 154 Peer Info. ............................................................................................................................ 349
Table 155 Forward/Block ..................................................................................................................... 350
Table 156 Forward/Block > DND White List ........................................................................................352
Table 157 Forward/Block > Find Me List .............................................................................................352
Table 158 Forward/Block > Black List .................................................................................................. 353
Table 159 Voice Mail ............................................................................................................................ 354
Table 160 Web Phone .........................................................................................................................354
Table 161 Hardware Specifications ..................................................................................................... 359
Table 162 Firmware Specifications ......................................................................................................359
Table 163 Standards Supported ..........................................................................................................361
Table 164 ISDN PRI Cable Pin Assignments ......................................................................................362
Table 165 ISDN BRI Cable Pin Assignments ......................................................................................363
Table 166 IP Address Network Number and Host ID Example ...........................................................370
Table 167 Subnet Masks .....................................................................................................................371
Table 168 Maximum Host Numbers ....................................................................................................371
Table 169 Alternative Subnet Mask Notation .......................................................................................371
Table 170 Subnet 1 .............................................................................................................................. 373
Table 171 Subnet 2 .............................................................................................................................. 374
Table 172 Subnet 3 .............................................................................................................................. 374
34
X2002 User’s Guide
Page 35

Table 173 Subnet 4 .............................................................................................................................. 374
Table 174 Eight Subnets ......................................................................................................................374
Table 175 24-bit Network Number Subnet Planning ............................................................................ 375
Table 176 16-bit Network Number Subnet Planning ............................................................................ 375
X2002 User’s Guide
35
Page 36

36
X2002 User’s Guide
Page 37

PART I
Introduction and
Tutorials
Getting to Know Your X2002 (39)
How It Works (47)
Tutorials (51)
Phone User Tutorial (83)
37
Page 38

38
Page 39

CHAPTER 1
Getting to Know Your X2002
This chapter introduces the main features and applications of the X2002.
1.1 Introduction
An IP PBX is a telephone exchange device located at a company site which allows an
organization to set up and control calls. IP stands for Internet Protocol, and PBX stands for
Private Branch eXchange. A regular company telephone switchboard is an example of a PBX.
The company’s telephones are connected to the IP PBX. The IP PBX is then connected to the
outside world via connections to any combination of the following networks.
• A traditional Public Switched Telephone Network (PSTN)
• A broadband Internet connection to an Internet Telephony Service Provider (ITSP)
• An Integrated Services Digital Network/Basic Rate Interface Network (ISDN BRI)
• An Integrated Services Digital Network/Primary Rate Interface Network (ISDN PRI T1/
E1)
Each telephone connected to an IP PBX has an extension assigned to it. An extension is a
unique telephone number within an organization typically consisting of only a few digits.
People inside the company can call each other by dialing extensions. Calls to the outside world
go through the IP PBX to the PSTN, ITSP or ISDN.
Figure 1 IP PBX Example
ITSP
Internet
PSTN/ISDN
PSTN
X2002 User’s Guide
39
Page 40

Chapter 1 Getting to Know Your X2002
The X2002 can function as a stand alone telephone switchboard for a small organization. It
can also supplement a legacy PBX within an organization by providing VoIP telephony
features.
1.1.1 Voice over Internet Protocol (VoIP) Implementation
The X2002 uses SIP (Session Initiation Protocol) to communicate with other SIP devices. SIP
is an internationally-recognized standard for implementing Voice over Internet Protocol
(VoIP).
The following figure shows SIP devices communicating with the X2002.
A: IP Phones - Telephones that convert voice into IP packets and vice versa (for example
ZyXEL’s V-500).
B: Softphones - Software-based phones installed on PCs.
C: VoIP Gateways - Devices (for example ZyXEL’s P-2302HWUDL) with built in SIP
processing which allow traditional analog phones or cordless phones to use them as a link to
the IP PBX.
D: ATAs - Analog Telephone Adapters (for example ZyXEL’s P-2024) aggregate a large
number of analog phones and convert their signal into IP packets.
E: Peer IP PBXs - Other SIP based IP PBXs with which you communicate over an IP
network. This allows you to call the telephones connected to the peer IP PBX without going
through a telephone service provider.
F: SIP Servers - Servers (D) located at your Internet Telephony Service Provider (ITSP)
which process outgoing calls from the X2002 and direct them to IP phones on the Internet or
traditional phones on the PSTN.
Figure 2 SIP Devices and the X2002
ITSP
PSTN
E
F
D
A
C
B
40
X2002 User’s Guide
Page 41

1.1.2 PBX Telephony Features
The X2002 allows you to set up and manage features on an internal telep hone network without
relying on your telephone service provider. The following are just a few examples:
• Conference calls
• Voicemail
• Call Forwarding
The X2002 integrates with your IP network. For example you can:
• Import an LDAP-based (Lightweight Directory Access Protocol) contact list to serve as
the phonebook for the IP phones on your network.
• Set up the X2002 to send users email notifications or complete voice messages as
attachments when they receive voicemail.
1.1.3 Scalable Design
The X2002 can be used stand alone to provide intercom (calling by extension) and VoIP
features in a small business environment. The X2002’s capability can be expanded by:
• A - Adding DSP (Digital Signal Processing) modules in the device’s bottom to handle
more concurrent telephone connections. DSP modules are chips which convert analog
information into digital data and vice versa.
• B - Connecting several X2002s together to manage a larger telephone network.
Chapter 1 Getting to Know Your X2002
Figure 3 Scalable Design
ITSP
A
B
X2002 User’s Guide
41
Page 42

Chapter 1 Getting to Know Your X2002
1.2 Ways to Manage the X2002
Use any of the following methods to manage the X2002.
• Web Configurator. This is recommended for everyday management of the X2002 using a
web browser. You can also use the web configurator for firmware upgrades and
configuration backup/restore.
• Command Line Interface. Line commands offer an alternative to the web configurator and
in some cases are necessary to configure advanced features.
• FTP. Use FTP for firmware upgrades.
1.3 Good Habits for Managing the X2002
Do the following things regularly to make the X2002 more secure and to manage the X2002
more effectively.
• Change the administrator password. Use a password that’s not easy to guess and that
consists of different types of characters, such as numbers and letters.
• Write down the administrator password and put it in a safe place.
• Back up the configuration (and make sure you know how to restore it). Restoring an
earlier working configuration may be useful if the device becomes unstable or even
crashes. If you forget your password, you will have to reset the X2002 to its factory
default settings. If you backed up an earlier configuration file, you would not have to
totally re-configure the X2002. You could simply restore your last configuration.
42
X2002 User’s Guide
Page 43

1.4 LEDs
The following figure shows the LEDs on the X2002 and its associated interface cards.
Figure 4 LEDs
PWR ALM
SYS
FXS
Chapter 1 Getting to Know Your X2002
SYS
1
FXO
LAN
WAN
SYS
1
FXS
2
4
3
2
4
3
FXO
FXO/FXS
BRI
PRI
X2002 User’s Guide
43
Page 44

Chapter 1 Getting to Know Your X2002
The following table describes the LEDs.
Table 1 LEDs
LED COLOR STA TUS DESCRIPTION
PWR Green On The X2002 is turned on.
Off The X2002 is off.
Red On There is a self-test failure during boot up.
SYS Green On The X2002 is on and functioning properly.
Off The power is off or the X2002 is not ready/malfunctioning.
Blinking The X2002 is booting up and performing self-diagnostic
ALM Red On There is a system malfunction.
Off The X2002 is functioning normally.
FAN Green On The fan is functioning normally.
Off The fan is off.
FXS, FXO, FXS/FXO, ISDN BRI Interface Card LEDs
SYS Green On The interface card is functioning properly.
Off The interface card is off or is not recognized by the X2002.
Blinking There is a self-test failure during boot up.
FXS 1~4,
FXS S1~S2
FXO 1~4,
FXO O1~O2
ISDN BRI 1~4 Green On The line is connected and receiving a signal.
ISDN PRI Interface Card LEDs
LOS (Lose of
Signal)
RAI (Remote
Alarm
Indication)
AIS (Alarm
Indication
Signal)
L2 (Layer 2) Green On The link is connected and able to receive signals.
Green On The line is in use.
Off The line is not in use or there is a malfunction.
Blinking There is an incoming call.
Green On The line is connected and receiving a signal.
Off The line is not connected.
Blinking There is an incoming call.
Off The line is not connected.
Blinking At least one ISDN connection is active.
Red On The line is down or not connected.
Off The line is operating properly.
Yellow On The ISDN physical layer is in T1 mode.
Off The ISDN physical layer is operating properly without any
Blinking The remote device receives the ISDN physical layer alarm
Yellow On The X2002 detects an ISDN physical layer issue and sends
Off The ISDN physical layer is operating properly without any
Off The link is down.
Blinking The system is booting up or at least one voice connection is
tests.
remote alarms.
from the X2002 and responds with this alarm.
this local alarm.
local alarms.
active.
44
X2002 User’s Guide
Page 45

Table 1 LEDs (continued)
LED COLOR STA TUS DESCRIPTION
All 4 LEDs Blinking System fails.
Off There is a system configuration error.
Chapter 1 Getting to Know Your X2002
X2002 User’s Guide
45
Page 46

Chapter 1 Getting to Know Your X2002
46
X2002 User’s Guide
Page 47

CHAPTER 2
How It Works
This chapter is an overview of different logical components and how they work together to
route calls on the X2002.
2.1 Call Routing
The two main functions of any IP-PBX are routing internal calls, and handling calls to and
from the outside world.
The following sections explain how these functions are performed on the X2002.
2.1.1 Call Routing Terms
The following are some terms related to ZyXEL’s IP-PBX implementation.
• Extension - This is a unique number assigned to each telephone connected to the X2002.
Extensions are used to make calls between phones connected to the X2002 and to route
calls from the outside world to their correct target. Extensions fall into the following two
groups:
• SIP Extension - This is an extension assigned to a SIP (Session Initiation Protocol)
based IP phone connected to the X2002. Alternatively this could be an extension
assigned to an analog phone which connects to the X2002 via a VoIP gateway device.
• FXS (Foreign Exchange Subscriber) Extension - This is an extension assigned to an
analog phone directly connected to a port on an FXS interface card installed on the
X2002 (See Figure 5 on page 48.) The FXS ports on the X2002 work the same way as
the phone sockets in your home. In your home you are a subscriber to the telephone
services of your local telephone company and when you connect an analog phone to
the X2002 you subscribe to the telephone services of the X2002.
• ISDN BRI (Basic Rate Interface) Extension - This is an extension assigned to an
ISDN phone directly connected to the X2002.
• Authority Group - This is a set of extensions. Each extension can belong to only one
authority group. Authority groups manage extensions by allowing them to make only
certain types of calls. For example, if you create two authority groups, you can allow one
group to make local calls and long distance calls and the second authority group to make
local calls only.
• Outbound Line Group - This is a set of connections or lines going to the outside world.
• SIP Trunk - This is a connection to your ITSP (Internet Telephony Service Provider).
• ISDN BRI/PRI Trunk - This is a connection to your ISDN Service Provider.
X2002 User’s Guide
47
Page 48

Chapter 2 How It Works
• Trusted Peer - This is a connection to another IP PBX or SIP server. The trusted peer
device must also specify your X2002 as a trusted peer.
• FXO (Foreign Exchange Office) Trunk - This type of outbou nd line group consists
of telephone cables connected to ports on an FXO interface card on the X2002. The
telephone cables lead to the PSTN (Public Switched Telephone Network), or in other
words your traditional (non-VoIP) telephone company. FXO ports always point in the
direction of the telephone services.
The figure below shows the relationship between FXS and FXO ports.
Figure 5 FXS and FXO Ports
PSTN
FXO
FXS
FXO
FXS
• LCR (Least Cost Routing) - This is a rule which specifies which outbound line group is
used when making an outbound call. It consists of a dialing condition, for example dial 0
to make a call via a specific FXO trunk or dial 1 for calls via a SIP trunk. LCRs also set
priority to which outbound line group should be tried first, second, third and so on when
making outbound calls with the same dialing condition.
• Auto-Attendant - This is a feature which routes incoming calls to their proper extension.
An auto-attendant is assigned to each outbound line group and it services incoming calls
on those lines. If your organization has two outbound line groups, each with a specific
telephone number for incoming calls, then you can assign a different auto-attendant for
each incoming line. Assign one auto-attendant for general calls to the extensions in your
organization (for example AA1) and one auto-attendant for direct routing to a FAX
machine (for example FAX).
Figure 6 Auto-Attendant
48
555-0002
2001
FAX
1001
555-0001
AA1
1002
Please dial the
extension you
would like to
reach.
1003
X2002 User’s Guide
Page 49

2.2 Internal Call Routing
Internal call routing refers to calls between extensions on the X2002. People simply dial the
extension they want to call. The X2002 checks to see if the number dialed is an existing
extension and forwards the call to that extension. The X2002 by default allows people with
extensions from one authority group to call extensions in another authority group. You can,
however, block calls between authority groups if your organization requires such a setting.
The configuration requirement for setting up internal call routing are:
1 Create an authority group.
2 Create extensions in the authority group.
2.3 Outbound Call Routing
Outbound call routing refers to calls originating from an extension on the X2002, going via an
outbound line group to a telephone outside your organization. Outbound call routing requires
that an authority group is linked to an outbound line group. The link between the two is an
LCR (Least Cost Routing). LCRs contain the dialing rules for outbound line groups. Authority
groups need to be associated to LCRs to gain access to the outbound line groups.
Chapter 2 How It Works
In the most basic setup example an organization has one authority group (with all of the
company’s exten sions), one outbound line group and an LCR which grants the authority group
access to outbound lines. Everyone in the organization has the same rights to use outbound
lines.
Figure 7 Outbound Call Routing - Basic
Authority
Group
In a more advanced example, you can create two authority groups, still have one outbound line
group and two different LCRs. You can now control the types of outbound calls that can be
made by each authority group.
In the figure below , the SALES authority group has a local call LCR and a long distance LCR
associated to it. This allows its group members to make both local and long distance calls via
the outbound line group. R&D authority group only has the local LCR associated to it so its
group members can only make local calls via the outbound line group.
LCR
Outbound
Line
Group
X2002 User’s Guide
49
Page 50

Chapter 2 How It Works
Figure 8 Outbound Call Routing - Advanced
Authority
Group
SALES
Authority
Group
R&D
LCR - Local
LCR - Long Distance
LCR - Local
Outbound
Line Group
The configuration requirement for setting up outbound call routing are:
1 Create an authority group.
2 Create extensions in the authority group.
3 Create an outbound line group.
4 Create LCRs and add outbound line groups to them.
5 Associate LCRs to authority groups.
50
X2002 User’s Guide
Page 51

CHAPTER 3
Tutorials
This chapter provides some examples of using the web configurator to set up and use the
X2002. Specifically, the tutorials will show you how to set up the X2002 for a telephone
network as shown in the following figure.
Figure 9 Tutorial Overview
PSTN
/ ISDN
The tutorials include:
Table 2 Tutorials Overview
T UTORIAL GOAL STEPS
Making Internal Calls • Configure SIP Extensions
• Connect IP Phones
• Register IP Phones
• Auto Provisioning
Making PSTN Calls • The PSTN Connection
• Creating a Dialing Rule for PSTN
• Assigning an LCR to an Authority Group
Making ITSP Calls • The ITSP Connection
• Creating a Dialin g Rule for ITSP
• Assigning an LCR to an Authority Group
Making ISDN Calls • The ISDN Connection
• Creating a Dialing Rule for ISDN
• Assigning an LCR to an Authority Group
ITSP
X2002 User’s Guide
51
Page 52

Chapter 3 Tutorials
Table 2 Tutorials Overview
T UTORIAL GOAL STEPS
ISDN Network Configuration
Examples
Using Call Features •Customizing Feature Codes
• Example 1: Small/Medium Business
• Example 2: Company with Existing PBX
• Example 3: Company with Existing PBX and
Expanding Employees
• Using the Voicemail Feature
" This chapter assumes that you have already configured your network settings.
See the Network Wizard section in the Quick St art Guide or Chapter 6 on page
103 for more information.
3.1 Making Internal Calls
This tutorial sets up the internal telephone extensions on your network. At the end of this
tutorial you should be able to call between extensions. The next figure shows the telephone
extensions (1001 - 1010) configured in this tutorial. All of the extensions are members of an
authority group called Basic (you need to create an authority group before configuring
extensions, see Chapter 2 on page 47 for more information). The figure also shows an internal
call between extensions 1001 and 1009.
Figure 10 Internal Calls
Basic
1001
1006
1002
1007
1003
1008
1004 1005
1009 1010
3.1.1 Configure SIP Extensions
The following section introduces how to create the authority group called Basic and ten SIP
extensions 1001 to 1010 on th e X2 002. The number of ext ensi ons yo u can create is limited by
your service subscription (see Section 32.1.2 on page 341).
Procedure:
1 In the web configurator, click Configuration > PBX > Extension Management >
Authority Group.
2 Click the Add icon.
52
X2002 User’s Guide
Page 53

Chapter 3 Tutorials
Figure 11 Configuration > PBX > Extension Management > Authority Group
3 In the Add/Edit Authority Group screen, enter the Group Name (“Basic,” in this
example) and the Group ID. The Description field is optional.
Figure 12 Add/Edit Authority Group
When you’re finished, click the Add button. The new authority group appears in the
original screen.
4 Now let’s add SIP extensions to the authority group. Click the new authority group’s
Advanced icon.
Figure 13 Configuration > PBX > Extension Management > Authority Group
X2002 User’s Guide
53
Page 54

Chapter 3 Tutorials
5 In the Peer List screen, click Add SIP Peers to configure multiple SIP accounts at the
Figure 14 Authority Group Configuration
6 Configure the screen as shown next.
same time.
The SIP extension number and any configured SIP Auth. Password prefix and/or
postfix make up the SIP password. The SIP password must be at least four digits.
This example uses ten four-digit SIP extensions 1001 - 1010. These are also used as the
SIP usernames. The SIP passwords are comprised of the combination of Prefix +
Extension + Postfix. In this example, the SIP Auth. Password Prefix value is 11 and
the Postfix value is 99. If the SIP username for extension 1001 is 1001 then SIP
password for this extension is 11100199. You do not need to configure the Prefix and
Postfix values as long as the SIP password length is at least four digits long.
Click Apply and wait for the X2002 to create the ten extensions.
Figure 15 Add Multiple SIP Extensions
54
X2002 User’s Guide
Page 55

Chapter 3 Tutorials
7 The SIP extensions appear as follows.
Figure 16 Authority Group Configuration
8 Keep a list of the SIP passwords (the Prefix + Extension Number + Postfix
combinations in this example). When you deploy the network’ s IP phones, you will need
this information for SIP registration. See Section 3.1.2 on page 55 for information on
configuring your IP phones.
The extension number serves as the password the user uses to log into the X2002 to
configure his extension’s call forwarding, call blocking, phonebook, voice mail, and
other settings. See Chapter 33 on page 347 for more information.
9 If the IP phone is from ZyXEL and supports auto provisioning, use section Section 3.1.4
on page 56 to map the SIP extensions to your network’s SIP devices.
3.1.2 Connect IP Phones
You can now set up your IP phones. The next figure shows the network connections of the IP
phones and the X2002. In this example, all of the IP phones and the X2002 are connected to an
Ethernet switch and are all assigned IP addresses in the same subnet.
Figure 17 Connect IP Phones
IP = 172.23.37.101
1001
1006
1002
1007
1003
1008
1004
1009
IP = 172.23.37.201
1005
1010
X2002 User’s Guide
55
Page 56

Chapter 3 Tutorials
3.1.3 Register IP Phones
After your network connections have been made, you can proceed with the SIP registration of
the IP phones on your network. The next figure shows a typical SIP registration screen on a
ZyXEL IP phone. This is a sample screen only, but it includes all the key fields necessary to
complete a SIP registration. It shows the SIP registration of an IP phone with the extension
1001.
Figure 18 Example IP Phone SIP Registration Screen
Extension Number of IP Phone
IP Address
of the X2002
Complete the SIP registration for all the IP phones on your network. When all the phones are
registered, you can make internal calls by dialing the extension number assigned to each
phone.
3.1.4 Auto Provisioning
A ZyXEL IP phone that supports auto provisioning can get a configuration text file from the
X2002 (see Appendix on page 359 for supported IP phones). The configuration file contains
the SIP settings that the SIP device uses to register with the X2002. The following graphic
shows an IP phone (A), softphone (B), VoIP gateway (C), and ATA (D) downloading
configuration text files from the X2002.
SIP Password
(Prefix + Extension + Postfix)
56
X2002 User’s Guide
Page 57

Chapter 3 Tutorials
Figure 19 Auto Provisioning
After you configure the SIP extensions (see Section 3.1.1 on page 52) and make your network
connections (see Figure 17 on page 55), use the following directions to map each SIP
extension to the appropriate SIP device. You need the MAC address of each SIP device (or the
serial number if it is a softphone).
1 Click Configuration > PBX > Server Configuration > Auto Provision. Then click a
SIP extension’s Edit icon.
Figure 20 Configuration > PBX > Server Configuration > Auto Provision
2 Enter the SIP device’s MAC address (or serial number if it is a ZyXEL softphone). This
example is for a softphone with a serial number of 1234567890. Click Set Profile.
Figure 21 Configuration > PBX > Server Configuration > Auto Provision > Edit
X2002 User’s Guide
57
Page 58

Chapter 3 Tutorials
3 The serial number of the softphone that is to use the SIP extension displays in the
summary screen.
Figure 22 Configuration > PBX > Server Configuration > Auto Provision
4 Repeat these steps to map each SIP extension to a SIP device’s MAC address or serial
number.
3.1.4.1 Configuring the IP Phones for Auto Provisioning
Configure the ZyXEL IP phones to receive configuration information from the X2002. This
typically involves enabling auto provisioning and specifying the protocol to use (HTTP at the
time of writing). See the documentation that came with your ZyXEL IP phone for information
on how to do this.
Once the IP phones receive their configuration information via auto provisioning, they will
automatically register with the X2002. You can make internal calls by dialing the extension
number assigned to each phone.
3.2 Making PSTN Calls
The following section shows you how to make and receive calls via a connection to the PSTN.
This example covers:
• The PSTN Connection - configuring the outbound line group (connection settings) from
the FXO interface card to the PSTN.
• Creating a Dialing Rule for PSTN - creating a rule which tells the X2002 when to use
the PSTN connection when completing outbound calls.
• Assigning an LCR to an Authority Group - giving extensions the right to make
outbound calls via the PSTN connection.
Figure 23 Making a PSTN Call
The IPPBX
matches this number
with an LCR, applies an
offset (strips off the 0)
Caller dials
05555555
and routes the call to
PSTN.
PSTN
5555555
FXO
58
1001
X2002 User’s Guide
Page 59

3.2.1 The PSTN Connection
This example assumes that the X2002 has an FXO interface card already installed (refer to the
Quick Start Guide) and that you have connected your telephone cables to the outlets that
connect to your local telephone company.
Figure 24 FXO Interface Card Connection
SYS
Chapter 3 Tutorials
PSTN
FXO
1
23
4
Procedure:
1 In the web configurator, click Configuration > PBX > Outbound Line Management >
Outbound Line Group.
2 Click the Add icon in the FXO Trunk category.
Figure 25 Configuration > PBX > Outbound Line Management > Outbound Line Group
3 In the FXO Trunk > Add screen, enter the Group Name (PSTN1 in this example) and
click Apply.
Figure 26 Add FXO Trunk
Note the Machine ID field. This name is automatically assigned to the X2002. In some
web configurator screens, the outbound line group is identified in the following format
Machine ID:Group Name, so in our example it is IPPBX_01:PSTN1.
X2002 User’s Guide
59
Page 60

Chapter 3 Tutorials
4 The new outb ound line group displays in the following screen. Now you will add the
Figure 27 Configuration > PBX > Outbound Line Management > Outbound Line Group
5 In the FXO Interface Setting screen, select the FXO interfaces that you want to add to
Figure 28 FXO Connection Configuration
FXO connections to the outbound line group.
Click the outbound line group’s Advanced icon.
this outbound line group and click the Right arrow to move them to the Used Interface
column. Click Apply when you are done.
6 Back in the Outbound Line Group screen, click the Auto-Attendant icon, which
allows you to route incoming calls (see Chapter 19 on page 233 for details).
Figure 29 Configuration > PBX > Outbound Line Management > Outbound Line Group
7 In the Auto Attendant Setting screen, make sure the Default AA option is selected
(FAX is used to forward calls to a single extension, such as your FAX machine’s
extension) and click Apply.
Figure 30 Confirm AA Setting
8 People from the outside world can now call the X2002 using the PSTN numbers
provided by your local telephone company. The Default AA prompts the callers to dial
the extension they would like to reach.
60
X2002 User’s Guide
Page 61

3.2.2 Creating a Dialing Rule for PSTN
The following sections show you how to create outbound dialing rules, also known as Least
Cost Routing rules or LCRs.
The LCRs determine which outside line the X2002 should use to complete outbound calls. In
this example we want to use the PSTN1 outbound line group to complete local calls.
Figure 31 Outbound Calls via PSTN
Chapter 3 Tutorials
local_call
FXO
1001
PSTN
To create a dialing rule for PSTN:
1 In the web configurator, click Configuration > PBX > Outbound Line Management >
LCR to open the LCR List screen.
2 Click the Edit icon in the local_call category.
Figure 32 Configuration > PBX > Outbound Line Management > LCR
3 In the LCR List/LCR Item screen, select the outbound line group from the pool column
that you want to add to this LCR (in our example this is IPPBX_001:PSTN1 as
configured in Section 3.2.1 on page 59), then click the Right arrow to move them to the
Selected column. Click Apply to save the outbound line group in the LCR.
X2002 User’s Guide
61
Page 62

Chapter 3 Tutorials
Figure 33 local_call LCR
4 On the same screen, click the Add icon in the Dial Condition List category in order to
5 Test the dial condition. In this example, we tested the number 05555555 to see if it
6 Specify an offset value. In our example, we configure an offset value of 1. The offset
7 Click Apply to save your settings and return to the previous screen.
configure a dial condition. When the LCR List / LCR Item / Dial Condition screen
opens, enter a 0 followed by a period (.) in the Dial Condition field. This means that this
LCR will be used when callers dial any number that begins with a 0. The period (.) is a
wildcard character, meaning anything can follow the zero.
matches our dial condition. You can test any number by typing it in the Number
Pattern Test field and clicking the Right icon; an O appears, if the number typed in
matches the dial condition and an X appears if it does not match the dial condition.
value tells the X2002 how many initial digits (if any) it should strip off of the dialed
number before routing the call to the external line. See Figure 37 on page 63 for an
example.
62
Figure 34 Dial Condition for local_call LCR
8 You are done configuring the LCR. However , before it can be used by any of the phones
connected to the X2002, the LCR needs to be assigned to an appropriate authority group.
X2002 User’s Guide
Page 63

3.2.3 Assigning an LCR to an Authority Group
The Group Management screen allows you to give an authority group (and the extensions in
that group) the right to use an LCR (outbound dial condition). In our example, we give the
authority group Basic the right to call out using the LCR local_call.
To assign an LCR to an authority group:
1 Click Configuration > PBX > Group Management.
2 Click the Advanced icon in the Authority Group category. (In this example there is
only one authority group - Basic).
Figure 35 Configuration > PBX > Group Management
Chapter 3 Tutorials
3 In the Group Management screen, select the checkbox in the Associations column of
the local_call LCR as shown below. Click Apply.
Figure 36 Assigning an LCR to an Authority Group
4 You can now use the telephones that are part of the Basic authority group to make
outbound calls using the PSTN connection. The following figure summarizes the
outbound call process for this example.
Figure 37 Outbound Calls via PSTN
Caller dials
05555555
The IPPBX
matches this number
with the local_call
LCR, applies the
offset (strips off the 0)
and routes the call to
PSTN.
The IPPBX
sends the call
to 5555555.
FXO
PSTN
5555555
1001
X2002 User’s Guide
63
Page 64

Chapter 3 Tutorials
3.3 Making ITSP Calls
The following section shows you how to make and receive calls via a connection to the PSTN.
This example covers:
• The ITSP Connection - configuring the outbound line group (connection settings) from
the X2002 to the ITSP.
• Creating a Dialing Rule for ITSP - creating a rule which the tells the X2002 when to use
the ITSP connection when completing outbound calls.
• Assigning an LCR to an Authority Group - giving extensions the right to make
outbound calls via the ITSP connection.
Figure 38 Making ITSP Calls
The IPPBX matches this number
with an LCR, applies an offset
(strips off the 1), add a dial plan
prefix 016 to the start of the number
Caller dials
1212555555
and routes the call to ITSP.
ITSP
1001
3.3.1 The ITSP Connection
The following section introduces how to configure a connection to the ITSP. This example
assumes that the X2002 has a network connection to the SIP server at your ITSP. The
following figure shows the network configuration used in this example.
Figure 39 Network Connection to ITSP
DMZ
212555555
ITSP
127.23.37.22
64
WAN
X2002 User’s Guide
Page 65

Chapter 3 Tutorials
The following table describes our sample account information as provided by the ITSP.
Table 3 Sample VoIP Account Information
INFO VALUES INFO VALUES
SIP Number 5551122 SIP Service Domain 127.23.37.22
SIP Server Address 127.23.37.22 DTMF Mode SIP-INFO
SIP Server Port 5060 SIP Username 5551122
Register Server
Address
Register Server Port 5060 Codecs supported G.726, G.729A
127.23.37.22 SIP Password 1234
To configure a connection to the ITSP:
1 In the web configurator, click Configuration > PBX > Outbound Line Management >
Outbound Line Group.
2 Click the Add icon in the SIP Trunk category.
Figure 40 Configuration > PBX > Outbound Line Management > Outbound Line Group
3 Enter the Group Name (“ITSP1” in this example). Note the Machine ID field (this is a
name automatically assigned to the X2002); in some management screens the outbound
line group is identified in the following format Machine ID:Group Name, so in our
example it is IPPBX_01:ITSP1.
Click Apply.
Figure 41 Add SIP Trunk
X2002 User’s Guide
65
Page 66

Chapter 3 Tutorials
4 The new outbound line group appears in the Management Group screen. Now you will
Figure 42 Configuration > PBX > Outbound Line Management > Outbound Line Group
5 In the Outbound Line Group screen, fill in the fields with the information provided by
configure the connection to your ITSP. Click the outbound line group’s Advanced icon.
your ITSP (in our example we use the sample information as shown in Table 3 on page
65). Click Apply when you are done.
Figure 43 SIP Connection Configuration
66
X2002 User’s Guide
Page 67

Chapter 3 Tutorials
6 Back in the main Outbound Line Group screen, click the Auto-Attendant icon in the
SIP Trunk section of the screen.
Figure 44 Configuration > PBX > Outbound Line Management > Outbound Line Group
7 Make sure the Default AA option is selected (FAX is used to forward calls to a single
extension, such as your FAX machine’s extension) and click Apply.
Figure 45 Confirm AA Setting
8 People from the outside world can now call the X2002 using the numbers provided by
your ITSP. The Default AA prompts the callers to dial the extension they would like to
reach. See Section 3.3.2 on page 68 for information on how to set up a dialing rule so
that the extensions on your network can make calls via your ITSP.
X2002 User’s Guide
67
Page 68

Chapter 3 Tutorials
3.3.2 Creating a Dialing Rule for ITSP
In our example we want to use the ITSP1 outbound line group to complete long distance calls.
This is done by configuring the long_distance_call LCR. This figure also shows the
local_call LCR we created in Section 3.2.2 on page 61.
Figure 46 Outbound Calls via ITSP
local_call
FXO
1001
PSTN
ITSP
long_distance_call
To create a dialing rule for ITSP:
1 In the web configurator, click Configuration > PBX > Outbound Line Management >
LCR to open the LCR List screen.
2 Click the Edit icon in the long_distance_call section.
Figure 47 Configuration > PBX > Outbound Line Management > LCR
68
X2002 User’s Guide
Page 69

Chapter 3 Tutorials
3 Select the outbound line group from the pool column that you want to add to this LCR
(in our example this is IPPBX_001:ITSP1 as configured in Section 3.3.1 on page 64),
then click the Right icon to move it to the Selected column. Click Apply to save the
outbound line group in the LCR.
Figure 48 long_distance_call LCR
4 On the same screen, click the Add icon in the Dial Condition List category in order to
configure a dial condition.
5 When the LCR List / LCR Item / Dial Condition screen opens, type 1XXXXX
followed by a period (.) in the Dial Condition field. This means that this LCR will be
used when callers dial any 7 or greater digit number that begins with a 1. The X stands
for any digit 0 to 9 and is used to create a minimum length condition. The period (.) is a
wildcard indicating that any number can follow the 1XXXXX condition.
Figure 49 Dial Condition for long_distance_call LCR
6 Test the dial condition. In our example, we tested the number 1212555555 to see if it
matches our dial condition. You can test any number by typing it in the Number
Pattern Test field and clicking the Right icon; an O appears if the number typed in
matches the dial condition and an X appears if it does not match the dial condition.
7 Specify an offset value. In our example, we configure an offset value of 1. The offset
value tells the X2002 how many initial digits (if any) it should strip off of the dialed
number before routing the call to the external line.
X2002 User’s Guide
69
Page 70

Chapter 3 Tutorials
8 Specify a prefix number. In this example, our ITSP has a special dial plan for long
distance calls. A caller must dial 016 in order to take advantage of the dial plan. By
adding 016 in the Prefix field, the X2002 automatically adds 016 to calls that match this
dial condition. See Figure 52 on page 71 for an example.
9 Click Apply to save your settings.
10You are done configuring the LCR. However, before it can be used by any of the phones
connected to the X2002, the LCR needs to be assigned to an appropriate authority group.
3.3.3 Assigning an LCR to an Authority Group
The Group Management screen allows you to give an authority group (and the extensions in
that group) the right to use an LCR (outbound dial condition). In our example, we give the
authority group Basic the right to call out using the LCR long_distance_call.
Procedure:
1 Click Configuration > PBX > Group Management.
2 Click the Advanced icon in the Authority Group section (in this example there is only
one authority group - Basic).
Figure 50 Configuration > PBX > Group Management
3 In the Edit screen, select the checkbox in the Associations column of the
long_distance_call LCR as shown below, then click Apply.
Figure 51 Assigning an LCR to an Authority Group
4 You can now use the telephones that are part of the Basic authority group to make long
distance calls using the ITSP connection. The following figure summarizes the outbound
call process for this example.
70
X2002 User’s Guide
Page 71

Figure 52 Outbound Calls via ITSP
The IPPBX matches this number
with the long_distance_call LCR,
applies the offset (strips off the 1),
adds the prefix 016 to the start of
Caller dials
1212555555
1001
of the number and routes the call
to ITSP.
3.4 Making ISDN Calls
The following section shows you how to make and receive calls via a connection to the ISDN.
This example covers:
The X2001
sends the call
016212555555.
Chapter 3 Tutorials
The ITSP applies
the dialing plan rate
and sends the call
to 212555555.
ITSP
212-555-555
• The ISDN Connection - configuring the outbound line group’s connection settings from
the BRI/PRI interface card to the ISDN.
• Creating a Dialing Rule for ISDN - creating a rule whi ch tells the X2002 when to use the
ISDN connection when completing outbound calls.
• Assigning an LCR to an Authority Group - giving extensions the right to make
outbound calls via the ISDN connection.
Figure 53 Making an ISDN Call
The IPPBX
matches this number
with an LCR, routes the
call to ISDN.
Caller dials
8005555555
1000
3.4.1 The ISDN Connection
This example assumes that the X2002 has an ISDN PRI interface card already installed (refer
to the Quick Start Guide) and that you have connected your tele phone cables to the outlets that
connect to your local telephone company. Your X2002 should look as shown in the following
figure.
ISDN
8005555555
BRI/PRI
X2002 User’s Guide
71
Page 72

Chapter 3 Tutorials
" In this example, a PRI interface card is installed in the X2002, and port 1 is
used for the connection. You will use these information in a web configurator
screen later .
Figure 54 PRI Interface Card Connection
ISDN
The following table describes our sample PRI information as provided by the telephone
service provider:
Table 4 Sample PRI Information
SWITCH TYPE NT/TE MODE LINEBUILDOUT FRAMING CODING
NET5 NT 120 CRC4 HDB3
To configure an ISDN connection:
1 In the web configurator, click Configuration > PBX > Server Configuration > Server
> PRI to open the PRI Configuration screen.
Figure 55 Configuration > PBX > Server Configuration > Server > PRI
72
X2002 User’s Guide
Page 73

Chapter 3 Tutorials
Configure the Switch T ype, NT/TE Mode, LineBuildOut, Framing and Coding fields
according to the settings on the peer end of PRI device or on the set up information
provided by your telephone service provider. See Section 7.6 on page 123 for more
information.
2 Click this to save your changes.
3 Click Configuration > PBX > Outbound Line Management > Outbound Line
Group to open the screen of the same name.
4 Click the Add icon in the PRI Trunk category.
Figure 56 Configuration > PBX > Outbound Line Management > Outbound Line Group
5 Enter the Group Name (OG_PRI1 in this example) and click Apply. Note the Machine
ID field (this is a name automatically assigned to the X2002). In some web co nfig urator
screens, the outbound line group is identified in the following format Machine
ID:Group Name, so in our example it is IPPBX_01:OG_PRI1.
Figure 57 Add PRI Trunk
6 The new outb ound line group displays in the following screen. Now you will add
connections to the outbound line group. Click the group’s Advanced icon.
Figure 58 Configuration > PBX > Outbound Line Management > Outbound Line Group
7 n this example, you want calls on Port 1 to be answered by the Auto-Attendant, so select
AA and the correct port. Click the Right arrow to move the port to the Used Interface
column. Click Apply when you are done.
X2002 User’s Guide
73
Page 74

Chapter 3 Tutorials
Figure 59 PRI Connection Configuration
8 The Outbound Line Group screen displays again. Click the Auto-Attendant icon.
Figure 60 Configuration > PBX > Outbound Line Management > Outbound Line Group
Auto-Attendant routes incoming calls (see Chapter 19 on page 233 for details).
9 Select the Default AA option and click Apply.
Figure 61 Confirm AA Setting
10People from the outside world can now call the X2002 using the ISDN numbers
provided by your local telephone company. The Default AA prompts the callers to dial
the extension they would like to reach. See Section 3.4.2 on page 75 for information on
how to set up a dialing rule so that the extensions on your network can co nnect to the
ISDN.
74
X2002 User’s Guide
Page 75

3.4.2 Creating a Dialing Rule for ISDN
The following sections show you how to create outbound dialing rules, also called Least Cost
Routing rules or LCRs.
The LCRs determine which outside line the X2002 should use to complete outbound calls. In
our example we want to use the OG_PRI1 outbound line group to complete local calls.
Figure 62 Outbound Calls via ISDN
Chapter 3 Tutorials
ISDN_call
BRI/PRI
1000
ISDN
To create a dialung rule for ISDN:
1 In the web configurator, click Configuration > PBX > Outbound Line Management >
LCR to open the LCR List screen.
2 Click the Add icon.
Figure 63 Configuration > PBX > Outbound Line Management > LCR
X2002 User’s Guide
75
Page 76

Chapter 3 Tutorials
3 When the LCR List/LCR Item screen opens, select the outbound line group from the
Figure 64 LCR Example: ISDN_call
pool column that you want to add to this LCR (in our example this is
IPPBX_001:OG_PRI1 as configured in Section 3.4.1 on page 71), then click the Right
icon to move them to the Selected column. Click Apply to save the outbound line group
in the LCR and then click the Add icon to configure a dial condition.
4 On the same screen, click the Add icon in the Dial Condition List category in order to
configure a dial condition.
5 When the LCR List / LCR Item / Dial Condition screen opens, ty pe 800 fol lowed by a
period (.) in the Dial Condition field. This means that this LCR will be used when
callers dial any number that begins with 800. The period (.) is a wildcard character,
meaning anything can follow the 800.
Figure 65 Dial Condition for ISDN_call LCR
6 Test the dial condition. In our example, we test the number 8005555555 to see if it
matches our dial condition. You can test any number by typing it in the Number
Pattern Test field and clicking the Right icon; an O appears, if the number typed in
matches the dial condition and an X appears if it does not match the dial condition.
7 Leave the offset value empty. In our example, we do not need to configure the offset
value. See Figure 62 on page 75 for an example.
8 Click Apply to save your settings.
76
X2002 User’s Guide
Page 77

9 You are done configuring the LCR. However , before it can be used by any of the phones
connected to the X2002, the LCR needs to be assigned to an appropriate authority group.
3.4.3 Assigning an LCR to an Authority Group
The Group Management screen allows you to give an authority group (and the extensions in
that group) the right to use an LCR (outbound dial condition). In our example, we give the
authority group Basic the right to call out using the LCR ISDN_call.
Procedure:
1 Click Configuration > PBX > Group Management.
2 Click the Advanced icon in the Authority Group section (in this example there is only
one authority group - Basic).
Figure 66 Configuration > PBX > Group Management
Chapter 3 Tutorials
3 Select the Association checkbox for the ISDN_call LCR, then click the Apply button.
Figure 67 Assigning an LCR to an Authority Group
4 You can now use the telephones that are part of the Basic authority group to make
outbound calls using the ISDN connection. The following figure summarizes the
outbound call process for this example.
Figure 68 Outbound Calls via ISDN
The IPPBX
matches this number
with the ISDN_call
LCR, routes the call to
ISDN.
Caller dials
8005555555
The IPPBX
sends the call
to 8005555555.
BRI/PRI
ISDN
8005555555
1001
X2002 User’s Guide
77
Page 78

Chapter 3 Tutorials
3.5 ISDN Network Configuration Examples
The following section shows you some examples of deploying the X2002 using ISDN in
organizations of various sizes.
The following figure shows the three examples (1 ~ 3).
Figure 69 ISDN Network Configuration
A
PBX
B
C
E
ISDN Line
PBX
D
1
23
F
3.5.1 Example 1: Small/Medium Business
For a small/medium company , the X2002 is the only devi ce that forwards ISDN calls between
the company and the telephone service provider.
• For an example of configuring ISDN settings, see Section 3.4 on page 71.
• If you want outsiders to dialing in directly to extensions without going through the AutoAttendant, follow the instruction until step 7, select DDI/DID and configure the settings as
follows.
78
X2002 User’s Guide
Page 79

Figure 70 ISDN Network Configuration
Chapter 3 Tutorials
In the DDI/DID Mapping, define DDI/DID Mask (the digits of the Directory Number on
the right) for extension mappings. For example, you define 4 for the DDI/DID Mask and
add 1001 to 1001 for the mapping rule. So an incoming call 8005551001 will be
forwarded to the extension.
3.5.2 Example 2: Company with Existing PBX
For a company which already has a PBX. The X2002 is deployed between the PBX and the
telephone service provider. You can connect the X2002 to the telephone service provider
using PSTN connection (see Section 3.2 on page 58). In comparison with the FXO interface
cards, the number of simultaneous calls supported is greater and the cost is lower. In this
example, we use one PRI line between the X2002 and the PBX to support up to 23 (using T1)
or up to 30 (using E1) voice channels. The capacity and cost for call number support is greater
than using FXO interface cards.
• See an example of configuring ISDN settings in Section 3.4 on page 71.
• If you want the callers from the PBX’s extensions not to go through the Auto-Attendant,
follow the instruction until step 7, select one of the following settings and continue the
other settings according the instruction.
• If you don’t want incoming calls to go through the Auto-Attendant, select Direct and
configure settings as following (leave the Calling Party Number section empty except
you want to define the trusted callers). Then click Apply.
X2002 User’s Guide
79
Page 80

Chapter 3 Tutorials
Figure 71 Example: Direct
• If you are using BRI line(s) and you want to have multiple subscribe r nu mbers on one
port, select MSN and configure the settings as following. Then click Apply.
Figure 72 Example: MSN
" We don’t use DDI/DID in this type of example because DDI/DID is mainly used
for outsiders to call extensions.
3.5.3 Example 3: Company with Existing PBX and Expanding Employees
For a company which has a PBX, and is expanding to include more employees, or a new
branch office (for example). The X2002 is behind the PBX system connected using a PRI line.
• See an example of configuring ISDN settings in Section 3.4 on page 71.
• Like Example 2, you can also select Direct (if you want the callers from the PBX’s
extensions to the X2002’s not to go through the Auto-Attendant) or MSN (if you are using
BRI line(s) and you want to have multiple subscriber numbers on on e port).
80
X2002 User’s Guide
Page 81

Chapter 3 Tutorials
" Like Example 2, we don’t use DDI/DID in this type of example because DDI/
DID is mainly used for outsiders to call extensions.
3.6 Using Call Features
The X2002 has built-in call features for functions such as call forwarding, call blocking,
voicemail and so on. These features can be activated or accessed by dialing specific numbers
from the phones connected to the X2002. The numbers used to access call features are called
call feature codes. This section shows you how to customize call features. It also describes
how to configure a ZyXEL IP phone (V300 is used in our example) to access voicemail by
using the voicemail feature code. See Section 7.8 on page 128 for more information on all call
features.
3.6.1 Customizing Feature Codes
Click Configuration > PBX > Server Configuration > Server > Feature Code to display
the codes used for the X2002’s call features. You can change the codes in this screen. Provide
the users with a list of the features and corresponding codes. Users on your network can then
dial a code from their telephone to activate a specific feature. For example, dialing *96
transfers a call.
Figure 73 Configuration > PBX > Server Configuration > Server > Feature Code
X2002 User’s Guide
81
Page 82

Chapter 3 Tutorials
3.6.2 Using the Voicemail Feature
The voicemail feature code as assigned in Section 3.6.1 on page 81 is **. Users can dial **
followed by their extension number to access their voicemail. For example, a caller from
extension 1001 can dial **1001 to access voicemail messages.
Some IP phones allow you to configure automatic dialing of feature codes to perform common
tasks. The following figure shows the web configurator screen of ZyXEL’s V300 IP phone.
ZyXEL’s V300 IP phone can be configured to automatically access voicemail by pressing the
VOICE MAIL button located on its keypad. This is done by typing the call feature number
into the Voice Mail Number: field.
Figure 74 ZyXEL V300 Voicemail Configuration
82
X2002 User’s Guide
Page 83

CHAPTER 4
Phone User Tutorial
4.1 Using Your Web Portal
Every phone user has a personal web portal on the X2002. You can log in and make changes to
your account setup, and IP phone users also use the web phone. The web phone is just like the
telephone you usually use to make calls from this extension; you can call all the same numbers
in the same way.
The following sections show examples of how to access the X2002’s web portal, configure
your own personal settings, and use the web phone.
4.1.1 Your Information
In this example, your network administrator has given you some information, as shown in the
following table. You can also use this table to note down your own personal information, if
you like.
Table 5 Your Information
EXAMPLE INFORMATION YOUR INFORMATION
Extension Number 1001
PIN Code 5678
Web Portal IP Address https://192.168.1.12
4.1.2 Accessing the Web Portal
Take the following steps to access your phone account’s web portal.
Open a web browser (like Internet Explorer) and enter the IP address you were given.
Figure 75 Tutorial: Web Portal IP Address
LE
P
EXAM
X2002 User’s Guide
83
Page 84

Chapter 4 Phone User Tutorial
" Don’t forget the “s” in “https://” - this “s” indicates a secure IP address, which
means that communication between your computer and the X2002 (including
your phone calls) cannot be intercepted by anyone else.
The following screen displays.
Figure 76 Tutorial: Log In
Enter your extension number (“1001”) in the Extension field, and enter your PIN code
(“5678”) in the PIN Code field. Click Login.
4.1.3 Changing Your Security Information
It is very important that you change your security information as soon as possible, since it
could be guessed by others if it was generated automatically.
Figure 77 Tutorial: Peer Info Tab
The Peer Info screen displays when you log in. It allows you to chan ge the password for yo ur
VoIP account (displayed as SIP Auth Password) and the PIN code you use to access the web
portal, voicemail and the IVR (Interactive Voice Response) system (displayed as Web/IVR/
VM PIN Code).
EX
A
PLE
M
" The SIP Auth Password field does not display if you connect to the X2002
using a regular analog telephone system.
84
X2002 User’s Guide
Page 85

Figure 78 Tutorial: Changing Security Information
•Enter the new SIP Auth Password in the field on the left, and enter it again in the field on
the right. Click Apply.
• Enter the new Web/IVR/VM PIN Code in the field on the left, and enter it again in the
field on the right. Click Apply.
4.1.4 Personalizing Your Settings
Next, configure your extension’s call settings. Click the Forward/Block tab at the top of the
screen.
Chapter 4 Phone User Tutorial
E
L
EXAMP
Figure 79 Tutorial: Forward / Block Tab
The following screen displays.
Figure 80 Tutorial: Configuring Call Settings
X2002 User’s Guide
EX
MPLE
A
85
Page 86

Chapter 4 Phone User Tutorial
The following table shows the example call setting information. You can also use this table to
make a note of the call settings you want to configure, if you like.
Table 6 Tutorial: Call Settings
Office Hours Monday ~ Friday, 09:00 ~
Do Not Disturb
(no-one can call you, except
for people on the White List)
White List
(people who can still call you
when Do Not Disturb is on)
Call Forwarding
(whether or not incoming calls
are redirected, and where they
are sent)
Find Me List
(other extensions where you
might be found)
Black List
(people you don’t want to call
you at all)
Block Calls Without Caller ID Disable
EXAMPLE INFORMATION YOUR INFORMATION
17:30
Disable
555 123456
555 234567
555 345678
555 456789
Blind Forward: Disable
Busy Forward: Voicemai l
No Answer Forward: Find
Me List
After Office Hours:
Voicemail
987
654
321
555 999888
555 888777
Take the following steps to configure this screen:
1 Office Hours: Ensure that the Mon through Fri boxes are checked. Clear the Sat and
Sun boxes.
In the Time field, use the drop-down lists to enter 09 : 00 ~ 17 : 30.
2 Do Not Disturb: Ensure that Disable is selected. You can turn this on later if you want.
3 White List: Click the White List button. In the screen that displays, enter each phone
number in the Number field and click Add after each one. Click Apply when you are
finished.
Figure 81 Tutorial: DND White List
PLE
M
A
EX
4 Call Forwarding: Ensure that Blind Forward is set to Disable. In the Busy Forward
row, select Voice Mail. In the No Answer Forward row, select Enable and click Find
Me List.
86
X2002 User’s Guide
Page 87

Chapter 4 Phone User Tutorial
In the screen that displays, enter each phone number in the Number field and click Add
after each one. Click Apply when you are finished.
Figure 82 Tutorial: Find Me List
PLE
M
EXA
In the After Office Hours row, select Voice Mail.
5 Black List: Select Enable and click the Black List button. In the screen that displays,
enter each phone number in the Number field and click Add after each one. Click
Apply when you are finished.
Figure 83 Tutorial: Black List
6 Block Calls Without Caller ID: Ensure that Disable is selected.
7 Click Apply. Your call settings are successfully configured!
4.1.5 Setting Up Voicemail
Next, you can set up your voicemail inbox to automatically send your received messages as
audio files to your email inbox. It is recommended that you do this so that your voicemail
inbox does not fill up (if it fills up, no new messages can be recorded).
Click the Voice Mail tab at the top of the screen.
Figure 84 Tutorial: Voicemail Tab
The following screen displays.
EX
A
M
P
E
L
X2002 User’s Guide
87
Page 88

Chapter 4 Phone User Tutorial
Figure 85 Tutorial: Setting Up Voicemail
The following table shows the example voicemail settings. You can also use this table to make
a note of the voicemail settings you want to configure, if you like.
Table 7 Tutorial: Voicemail Settings
Received E-mail Address
(the address to which you want the
voicemail sent)
Attached Voice File
(send the audio file to your email
account)
Delete Voice Message After Mailed Yes
MPLE
A
EX
EXAMPLE INFORMATION YOUR INFORMATION
user_abcd@examplecorp.com
Yes
To configure this screen, enter your email address in the Received E-mail Address field,
select Attached Voice File and select Delete Voice Message After Mailed. Click Apply.
4.1.6 Using the Web Phone (IP Phone Users Only)
Click the Web Phone tab at the top of the screen.
Figure 86 Tutorial: Web Phone Tab
If a screen similar to the following displays, click Yes.
Figure 87 Tutorial: Security Pop-Up
The following screen displays.
88
X2002 User’s Guide
Page 89

Chapter 4 Phone User Tutorial
Figure 88 Tutorial: The Web Phone
" Make sure you have a headset (or speakers and a microphone) connected to
your computer, and that your soundcard is working correctly (if there is a
problem, try listening to an audio file or recording a voice note to check).
The following table describes how to use the web phone to perform some basic phone
functions.
Table 8 Tutorial: Basic Web Phone Call Features
FEATURE PROCEDURE
Dial a number Click each numeral using the mouse pointer. The number displays on the
Make a call Dial the number, then press the “Dial/Pick up” ( ) button.
Receive a call When a call is incoming, press the “Dial/Pick up” ( ) button.
End a call Pres s the “Hang up” ( ) button.
Adjust the speaker
volume
Adjust the microphone
volume
Mute the speakers and
the microphone
Use the phone book Click the Phone Book tab to the right of the web phone. The phone book
screen. Use the “Clear” ( ) button to delete a numeral.
Use the slider on the left of the keypad.
Use the slider on the right of the keypad.
Click the Mute button below the keypad.
appears, displaying your contact list. Select what you want to search for (a
name or extension number, for instance) from the drop-down list, enter the
search term in the box and click on the magnifying glass ( ) to search.
You can also arrange the contact list entries by clicking on one of the
headings.
X2002 User’s Guide
89
Page 90

Chapter 4 Phone User Tutorial
90
X2002 User’s Guide
Page 91

PART II
Web Configurator &
Network Setup
The Web Configurator (93)
Network Deployment (103)
91
Page 92

92
Page 93

CHAPTER 5
The Web Configurator
5.1 Overview
This section introduces the functions of the web configurator.
The web configurator is an HTML-based management interface that allows easy X2002 setup
and management via an Internet browser. Use Internet Explorer 6.0 and later or Netscape
Navigator 7.0 and later versions. The recommended screen resolution is 1024 by 768 pixels.
In order to use the web configurator you need to allow:
• Web browser pop-up windows from your device. Web pop-up blocking is enabled by
default in Windows XP SP (Service Pack) 2.
• JavaScript (enabled by default).
• Java permissions (enabled by default).
5.1.1 What You Can Do in This Chapter
• Log into the web configurator (Section 5.2 on page 93).
• Orient yourself inside the main web configurator interface (Section 5.3 on page 95).
• Learn how to use the Dashboard feature (Section 5.4 on page 98).
• Save your configuration (Section 5.5 on page 100).
• Reset and reboot the X2002 (Section 5.7 on page 101).
• Log out of the web configurator (Section 5.9 on page 101).
5.2 System Login
1 Start your web browser.
2 Type “https://” and the IP address of the X2002 (for example, the default LAN IP
address is 192.168.1.12 and the default WAN IP address is 172.16.1.1) in the Location
or Address field. Press [ENTER].
3 The login screen appe ars. The default username is admin and associated default
password is 1234. Enter your login credentials and click Login.
X2002 User’s Guide
93
Page 94

Chapter 5 The Web Configurator
" The upper part of the login screen is for logins into the web phone feature. See
Chapter 33 on page 347.
Figure 89 Web Configurator: Login
4 A screen opens prompting you to change the default user name and password. Change
the default password, note it down and put it in a safe place. Click Apply to go to the
status screen of the web configurator.
94
X2002 User’s Guide
Page 95

Chapter 5 The Web Configurator
" The first time you log in to the X2002 a wizard guides you through initial
network configuration. See the Quick Start Guide for an initial setup example.
5.3 The System Screen
The System screen is the first screen that displays when you access the web configurator.
The following figure shows the navigating components of the web configurator screen.
Figure 90 Web Configurator Home Screen (System)
A
B
C
D
A - The navigation buttons link you to configuration menus of the X2002, the quick keys
allow you to view built-in help files, access the wizard, view the about screen and logout. Use
the Dashboard button to go to the main status page from any web configurator screen.
B - The main area displays general information about the X2002 into which you are logged.
X2002 User’s Guide
95
Page 96

Chapter 5 The Web Configurator
C - The device monitor is a graphical representation of the X2002 status. You can quickly
view LED status, voice interface card status and peer X2002 status. Alternatively, mouse over
the ZyXEL logo or the individual ports to view more detailed status information. Click on the
ZyXEL logo to go to the status screen of the X2002 or click on the individual ports to go to
their configuration screens.
D - The bottom part of the screen shows you the amount of flash memory used as well as the
extension capacity for the FXS ports and SIP accounts.
5.3.1 The Navigation Panel
Go to individual feature configuration screens via the navigation buttons. The following table
shows you the submenus (navigation panels) associated with each navigation button.
Table 9 Navigation Buttons Sub-links Overview
CONFIGURATION MONITOR REPORT MAINTENANCE
The following table describes the links in the navigation panels.
Table 10 Navigation Panel Links
LINK DESCRIPTION
Network Configures network settings on the X2002.
LAN Configures the LAN IP address of the X2002.
WAN Configures the WAN IP address of the X2002.
DDNS Specifies DNS servers that the X2002 uses for domain name to IP address
mappings.
NTP Configures the time settings on the X2002.
Static Route Specifies any static routes for the X2002.
VLAN Configures the WAN and LAN VLAN settings of the X2002.
PBX Configures related to the telephony functions of the X2002.
Server
Configuration
Extension
Management
Outbound Line
Management
Configures the SIP server, auto-provision, quality of service, voice mail,
phonebook, DSP (Digital Signal Processing) and office hour settings.
Creates and manages extension numbers for the IP and FXS (analog) phones
connected to the X2002.
Configures outbound line configurations to FXO, ITSP and SIP peer connections.
96
X2002 User’s Guide
Page 97

Chapter 5 The Web Configurator
Table 10 Navigation Panel Links (continued)
LINK DESCRIPTION
Group
Management
Call Services Configures emergency call settings, conference calling, music on hold settings,
Monitor Allows you to view the status of your X2002.
System
Information
Status
Observation
SIP Peer Displays status information about configured SIP extensions.
FXS Peer Displays status information about configured FXS extensions.
BRI Peer Displays status information about BRI (ISDN) configured extensions.
FXO Trunk Displays status information about configured FXO outbound line groups.
SIP Trunk Displays status information about configured SIP outbound line groups.
BRI Trunk Displays status information about configured BRI (ISDN) outbound line groups.
PRI Trunk Displays status information about configured PRI (ISDN) outbound line groups.
Logs Displays system logs, configures log settings and searches the CDR (Call Detail
System Logs Displays and configures system logs.
CDR Manages the CDR collection and queries the CDR database.
Administration Manages administrator accounts and provides diagnostic features.
Administrator
Username/
Password
Administrator
List
Diagnostics Configures data capture of VoIP packets for analysis.
Inactivity
Timer
Remote
Management
Backup & Restore Backs up and restores the configuration or resets the X2002 to its factory defaults.
Firmware
Upgrade
License Control Ensures that your X2002 is registered with myZyXEL.com.
Registration Registers your X2002 with myZyXEL.com. If you don’t have an account with
Reboot Reboots the X2002.
Associates groups with dialing rules. This specifies which outbound lines
members of a department can use.
distinctive ring settings, auto callback and call parking.
Displays network configuration, hardware information, line and license settings.
Displays status details about extensions and outbound line groups configured.
Record) database.
Changes the password of the currently logged in administrator account.
Manages administrator accounts on the X2002.
Configures how long the X2002 remains idle before logging off administrators.
Defines how the X2002 can be managed over the LAN and WAN.
Performs firmware upgrades on the X2002.
myZyXEL.com, follow the directions in this screen to set one up.
X2002 User’s Guide
97
Page 98

Chapter 5 The Web Configurator
5.4 Dashboard - System Information
The Dashboard screen contains system information about the X2002. It is also a graphical
representation of the X2002. Click the Dashboard button in any of the web configurator
screens to view the screen as shown.
Figure 91 Dashboard
98
The following table describes the labels in this screen.
Table 11 Dashboard
LABEL DESCRIPTION
Refresh Interval
System Information
IP Address These two fields display the IP addresses of the of the WAN and LAN interfaces
F/W Version
Hardware Information
CPU(MIPS)
Select how often you want to update the information in the Dashboard screen and
click Refresh Now to apply your setting. You can also click Refresh Now to
update the screen immediately.
on the X2002.
This field displays the firmware version currently installed on the X2002.
This field displays the speed of the processing chip on the X2002 in MIPS (Millions
of Instructions Per Second).
X2002 User’s Guide
Page 99

Chapter 5 The Web Configurator
Table 11 Dashboard (continued)
LABEL DESCRIPTION
Memory(MB) This field displays the total RAM memory available on the X2002. This is the
memory available for processing functions on the X2002.
File System
Trunk(port#)
DSP This field displays the capacity of the DSP (Digital Signal Processing) modules
IPPBX Information
Outbound Line
License These fields display the number of licenses you have for subscription services via
Device Monitor
File System
Extension
This field displays the total memory available for the files system on the X2002.
The file system stores information such as configuration settings, CDR and
voicemail.
These fields display the number of FXO ports (ports leading to the PSTN) and the
number of FXS ports (ports leading to analog phones on your network) installed
on the X2002.
installed on the X2002. The capacity is displayed in the number of channels the
X2002 can process at any one time.
These fields display the number of outside lines configured on the X2002. They
are divided into the following categories:
• FXO Trunk - connections via the FXO ports to your local telephone company.
• SIP Trunk - connections to a SIP server at your VoIP provider.
• Trusted Peer lines - connections to a peer SIP device. A peer SIP device
could be another X2002 or another SIP server that allows you to use its
services.
• PRI - outbound or inbound connections from your ISDN service provider.
• BRI - inbound connection from yuor ISDN service provider.
myZyXEL.com website. The services are divided into the following categories:
• Extension - This is the number of SIP extensions you can configure on the
X2002.
• softphone - This is the number of ZyXEL’s V100 softphones you can register
with the X2002.
This section is a graphical representation of the X2002’s status. You can quickly
view LED status and voice interface card status. You can also view additional
basic information by moving your mouse pointer over the ZyXEL logo or the port
graphics in the display. Click on the on the ZyXEL logo to go to the status screen
of the X2002 or click on the individual ports (WAN, LAN or interface card ports) to
go to their configuration screens.
These fields display the current utilization of the available (built in) memory on the
X2002.
These fields display the utiliz a ti o n pe rcentage of your available SIP extensions
and FXS extension. An extension is considered to be utilized as soon as it is
created.
The number of SIP extensions you are allowed to create on the X2002 is limited
by the subscription service on the X2002.
The number of FXS extensions you are allowed to create on the X2002 is limited
by the number of FXS ports you have installed on the X2002. The FXS ports are
used to connect analog phones to the X2002.
X2002 User’s Guide
99
Page 100

Chapter 5 The Web Configurator
5.5 Saving Your Configuration
When you are done modifying the settings in a screen, click Apply to save your changes.
5.6 Icons in the Web Configurator
The following table describes the icons used in the configuration screens of the X2002.
Table 12 Icon Explanation Table
ICON NAME DESCRIPTION
Add This icons is used to create new components, such as
Edit This icon takes you to a screen where you can perform basic
extensions or groups.
configuration changes.
Advanced This icon takes you to the main configuration screen of most
Delete This icon removes components, such as extensions or groups.
Auto Attendant This icon takes you to a screen where you can select an auto
Reboot This icon reboots the X2002.
Up This icon moves items to a higher priority.
Down This icon moves items to a lower priority.
Left This icon moves selected items from right to left in a screen.
Right This icon moves selected items from left to right in a screen.
Wizard This icon opens the X2002 Wizard.
Help This icon opens the X2002 online help.
About This icon opens th e X2002 about page.
features.
attendant.
100
Exit This icon logs you out of the X2002.
Dashboard This icon opens the X2002 Dashboard in the main screen.
X2002 User’s Guide
 Loading...