

Page 1

WPA-1000
802.11b/g Wireless Projector Adapter
User’s Guide
Version 2.0
08/2008
Edition 1
www.zyxel.com
Page 2

Page 3

About This User's Guide
About This User's Guide
Intended Audience
This guide is intended for people who want to configure the WPA-1000 using the web
configurator. You should have at least a basic knowledge of using your computer to connect
wirelessly to a network.
How To Use This Guide
•Read Chapter 1 on page 21 chapter for an overview of how you can use the WPA-1000.
•Read Chapter 2 on page 25 chapter for information on the WPA-1000’s ports and LEDs.
•Refer to Chapter 5 on page 53 chapter if you experience problems using the WPA-1000. If
you cannot find a solution there, the Customer Support appendix shows you how to
contact any of our offices worldwide.
• The other chapters in this User’s Guide are arranged according to the web configurator’s
structure. Each chapter describes web configurator screens related to a feature, as well as
background information on that and related features.
• Read the appendices if you want more detailed technical information on a feature.
• Refer to the product specifications chapter for a list of features the WPA-1000 supports.
• To find specific information in this guide, use the Contents Overview, the Tab l e o f
Contents, the Index, or search the PDF file. E-mail techwriters@zyxel.com.tw if you
cannot find the information you require.
Related Documentation
• Quick Start Guide
The Quick Start Guide is designed to help you set up and use the WPA-1000 as quickly as
possible.
• Supporting Disk
Refer to the included CD for support documents.
• ZyXEL Web Site
Please refer to www.zyxel.com
of networking terms and product certifications.
User Guide Feedback
Help us help you. Send all User Guide-related comments, questions or suggestions for
improvement to the following address, or use e-mail instead. Thank you!
The Technical Writing Team,
ZyXEL Communications Corp.,
6 Innovation Road II,
Science-Based Industrial Park,
Hsinchu, 300, Taiwan.
E-mail: techwriters@zyxel.com.tw
for additional support documentation, including a glossary
WPA-1000 User’s Guide
3
Page 4

Document Conventions
Document Conventions
Warnings and Notes
These are how warnings and notes are shown in this User’s Guide.
1 Warnings tell you about things that could harm you or your device.
" Notes tell you other important information (for example, other things you may
need to configure or helpful tips) or recommendations.
Syntax Conventions
• The WPA-1000 may be referred to as the “WPA-1000”, the “device”, the “system” or the
“product” in this User’s Guide.
• Product labels, screen names, field labels and field choices are all in bold font.
• A key stroke is denoted by square brackets and uppercase text, for example, [ENTER]
means the “enter” or “return” key on your keyboard.
• “Enter” means for you to type one or more characters and then press the [ENTER] key.
“Select” or “choose” means for you to use one of the predefined choices.
• A right angle bracket (>) within a screen name denotes a mouse click. For example,
Maintenance > Log > Log Setting means you first click Maintenance in the navigation
panel, then the Log sub menu and finally the Log Setting tab to get to that screen.
• Units of measurement may denote the “metric” value or the “scientific” value. For
example, “k” for kilo may denote “1000” or “1024”, “M” for mega may denote “1000000”
or “1048576” and so on.
• “e.g.,” is a shorthand for “for instance”, and “i.e.,” means “that is” or “in other words”.
4
WPA-1000 User’s Guide
Page 5
Document Conventions
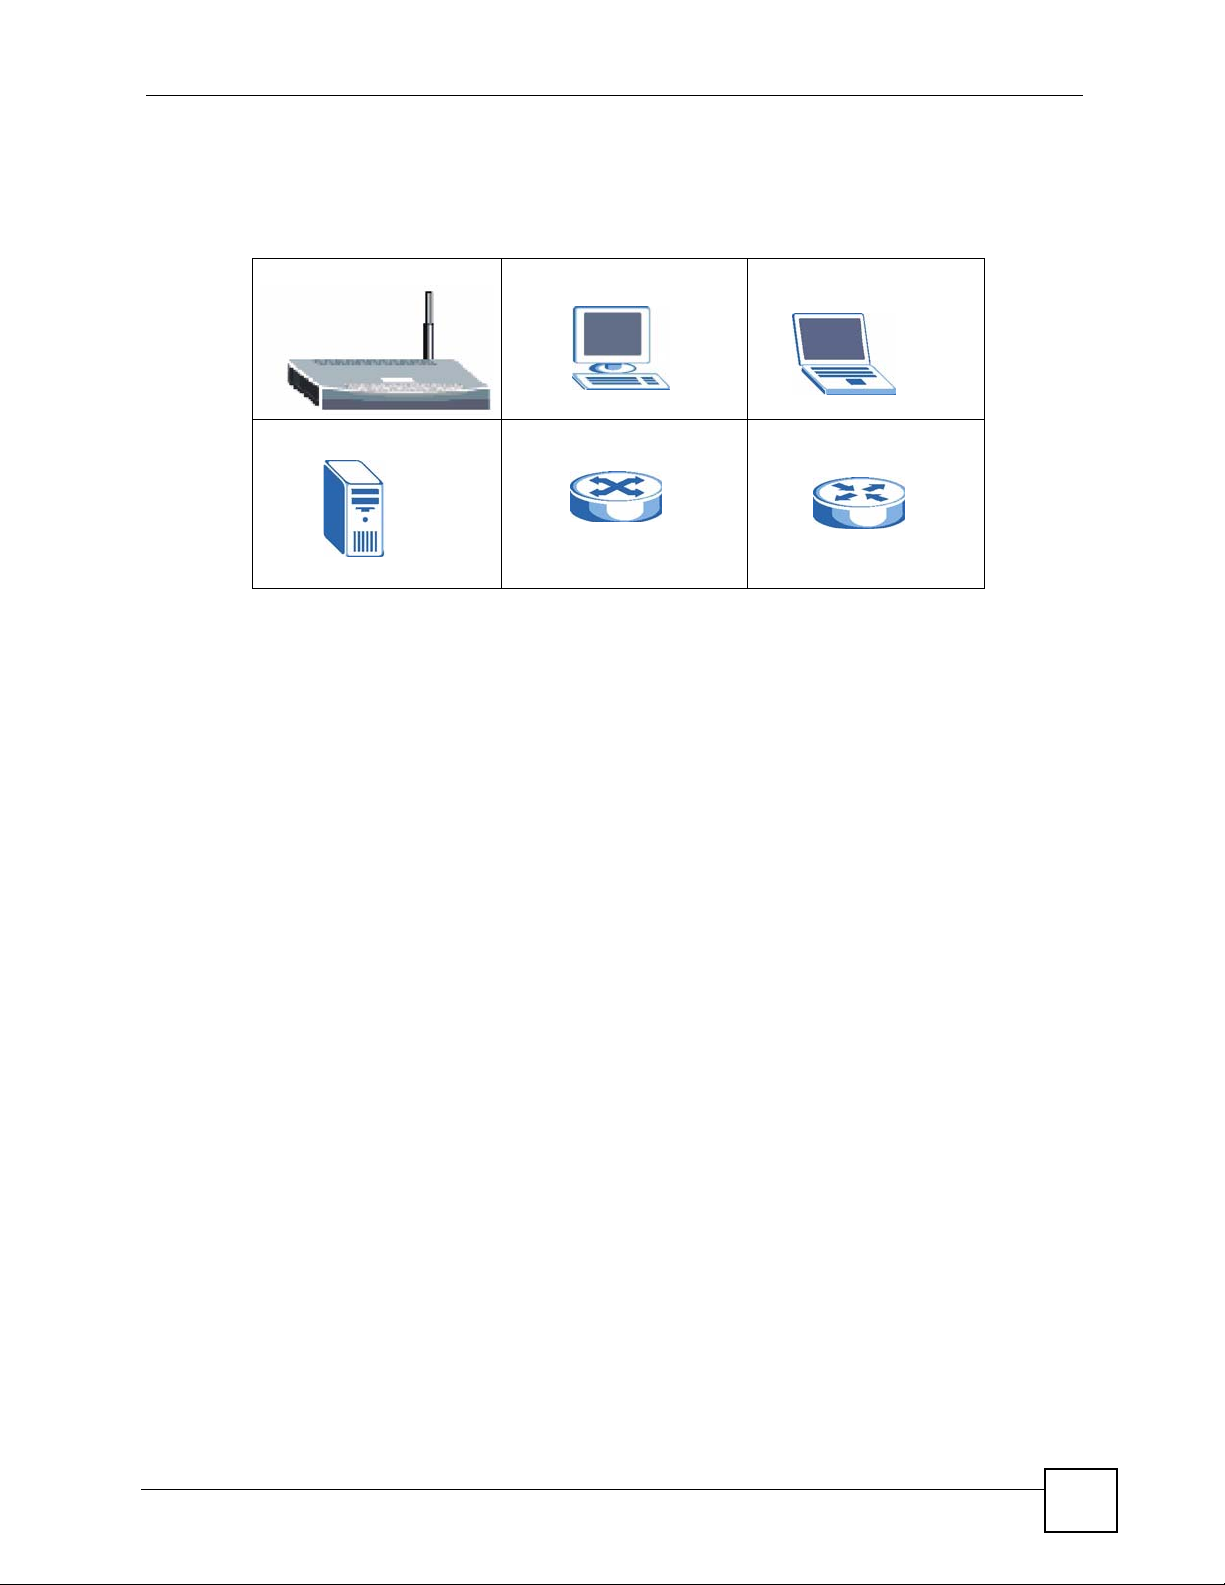
Icons Used in Figures
Figures in this User’s Guide may use the following generic icons. The WPA-1000 icon is not
an exact representation of your device.
WPA-1000 Computer Notebook computer
Server Switch Router
WPA-1000 User’s Guide
5
Page 6

Safety Warnings
Safety Warnings
1 For your safety, be sure to read and follow all warning notices and instructions.
• Do NOT use this product near water, for example, in a wet basement or near a swimming
pool.
• Do NOT expose your device to dampness, dust or corrosive liquids.
• Do NOT store things on the device.
• Do NOT install, use, or service this device during a thunderstorm. There is a remote risk
of electric shock from lightning.
• Connect ONLY suitable accessories to the device.
• Do NOT open the device or unit. Opening or removing covers can expose you to
dangerous high voltage points or other risks. ONLY qualified service personnel should
service or disassemble this device. Please contact your vendor for further information.
• Make sure to connect the cables to the correct ports.
• Place connecting cables carefully so that no one will step on them or stumble over them.
• Always disconnect all cables from this device before servicing or disassembling.
• Use ONLY an appropriate power adaptor or cord for your device. Connect it to the right
supply voltage (for example, 110V AC in North America or 230V AC in Europe).
• Do NOT allow anything to rest on the power adaptor or cord and do NOT place the
product where anyone can walk on the power adaptor or cord.
• Do NOT use the device if the power adaptor or cord is damaged as it might cause
electrocution.
• If the power adaptor or cord is damaged, remove it from the device and the power source.
• Do NOT attempt to repair the power adaptor or cord. Contact your local vendor to order a
new one.)
• Do not use the device outside, and make sure all the connections are indoors. There is a
remote risk of electric shock from lightening.
• Do NOT obstruct the device ventilation slots, as insufficient airflow may harm your
device.
• Antenna Warning! This device meets ETSI and FCC certification requirements when
using the included antenna(s). Only use the included antenna(s).
• If you wall mount your device, make sure that no electrical lines, gas or water pipes will
be damaged.
6
This product is recyclable. Dispose of it properly.
WPA-1000 User’s Guide
Page 7

Safety Warnings
WPA-1000 User’s Guide
7
Page 8

Safety Warnings
8
WPA-1000 User’s Guide
Page 9

Contents Overview
Contents Overview
Introduction ............................................................................................................................ 19
Introducing the WPA-1000 ......................................................................................................... 21
WPA-1000 Hardware ................................................................................................................. 25
Managing and Using the WPA-1000 .....................................................................................29
WPA-1000 Utility ........................................................................................................................ 31
The Web Configurator Screens ................................................................................................. 37
Troubleshooting and Appendices ........................................................................................51
Troubleshooting ......................................................................................................................... 53
Product Specifications ............................................................................................................... 59
WPA-1000 User’s Guide
9
Page 10

Contents Overview
10
WPA-1000 User’s Guide
Page 11

Table of Contents
Table of Contents
About This User's Guide ..........................................................................................................3
Document Conventions............................................................................................................4
Safety Warnings........................................................................................................................6
Contents Overview ...................................................................................................................9
Table of Contents.................................................................................................................... 11
List of Figures ......................................................................................................................... 15
List of Tables...........................................................................................................................17
Part I: Introduction................................................................................. 19
Chapter 1
Introducing the WPA-1000 .....................................................................................................21
1.1 Overview .............................................................................................................................. 21
1.1.1 Wireless Direct ........................................................................................................... 21
1.1.2 Wireless Connection Via Another AP ......................................................................... 22
1.1.3 Wired Direct ............................................................................................................... 22
1.2 Managing the WPA-1000 ..................................................................................................... 22
1.3 Good Habits for Managing the WPA-1000 ........................................................................... 23
Chapter 2
WPA-1000 Hardware ...............................................................................................................25
2.1 Rear Panel ........................................................................................................................... 25
2.2 Front Panel LEDs ................................................................................................................ 26
2.3 Standby Screen ................................................................................................................... 27
2.4 Main Web Configurator Screen ........................................................................................... 28
Part II: Managing and Using the WPA-1000 ......................................... 29
Chapter 3
WPA-1000 Utility......................................................................................................................31
3.1 Introducing the WPA-1000 Utility ......................................................................................... 31
WPA-1000 User’s Guide
11
Page 12

Table of Contents
3.2 Utility Menus ........................................................................................................................ 33
3.2.1 USB PnS Token ......................................................................................................... 34
3.2.2 Uninstalling The WPA-1000 Utility ............................................................................. 35
Chapter 4
The Web Configurator Screens .............................................................................................37
4.1 Main Web Configurator Screen ........................................................................................... 37
4.2 The Conference Control Screen .......................................................................................... 37
4.3 The Administrator Screens ..................................................................................................39
4.4 Status ................................................................................................................................... 39
4.5 Device Setup ....................................................................................................................... 40
4.5.1 Device Config ............................................................................................................. 40
4.5.2 Resolutions ................................................................................................................ 40
4.5.3 The Change Password Screen .................................................................................. 42
4.6 Network Screen ................................................................................................................... 43
4.6.1 Deployment Scenarios ............................................................................................... 43
4.6.2 Gatekeeper ................................................................................................................ 43
4.6.3 Network Screen Configuration ................................................................................... 44
4.6.4 Example Network Configuration ................................................................................. 46
4.7 System Setup ...................................................................................................................... 48
4.7.1 Reset to Default .........................................................................................................48
4.7.2 Firmware Upgrade ..................................................................................................... 48
4.7.3 Reboot System ........................................................................................................... 49
Part III: Troubleshooting and Appendices ........................................... 51
Chapter 5
Troubleshooting...................................................................................................................... 53
5.1 Power, Hardware Connections, and LEDs .......................................................................... 53
5.2 WPA-1000 Access and Login .............................................................................................. 54
5.3 Projection Problems ............................................................................................................ 56
5.4 Internet Access Via the WPA-1000 ...................................................................................... 57
5.5 Resetting the WPA-1000 to Its Factory Defaults ................................................................. 58
Chapter 6
Product Specifications...........................................................................................................59
6.1 Hardware ............................................................................................................................. 59
6.2 Firmware .............................................................................................................................. 59
6.3 System Requirements ......................................................................................................... 60
6.4 Standards Supported ........................................................................................................... 60
6.5 Wall-mounting Instructions .................................................................................................. 61
12
WPA-1000 User’s Guide
Page 13

Table of Contents
Appendix A Pop-up Windows, JavaScripts and Java Permissions ........................................ 63
Appendix B Setting up Your Computer’s IP Address.............................................................. 71
Appendix C Open Source Licences .......................................................................................93
Appendix D Legal Information ..............................................................................................147
Appendix E Customer Support .............................................................................................151
Index....................................................................................................................................... 157
WPA-1000 User’s Guide
13
Page 14

Table of Contents
14
WPA-1000 User’s Guide
Page 15

List of Figures
List of Figures
Figure 1 Wireless Direct ........................................................................................................................ 21
Figure 2 Wireless Indirect ...................................................................................................................... 22
Figure 3 Wired ....................................................................................................................................... 22
Figure 4 Rear Panel Connections .......................................................................................................... 25
Figure 5 Front Panel LEDs ..................................................................................................................... 26
Figure 6 Standby Screen ........................................................................................................................ 27
Figure 7 Main Web Configurator Screen ............................................................................................... 28
Figure 8 Main Screen: Download and Install the Utility .......................................................................... 31
Figure 9 No WPA-1000 Found ............................................................................................................... 31
Figure 10 Firewall Blocking WPA-1000 .................................................................................................. 32
Figure 11 WPA-1000 Found: Login ......................................................................................................... 32
Figure 12 Utility Control Panel ............................................................................................................... 32
Figure 13 Utility Menus ........................................................................................................................... 33
Figure 14 USB PnS Token Wizard 1 ...................................................................................................... 34
Figure 15 Insert the USB Memory Stick ................................................................................................. 35
Figure 16 USB PnS Token Wizard 2 ...................................................................................................... 35
Figure 17 Main Web Configurator Screen ............................................................................................. 37
Figure 18 Conference Control Host ........................................................................................................ 38
Figure 19 Conference Control Host Panel ............................................................................................. 38
Figure 20 Administrator Password ......................................................................................................... 39
Figure 21 Status .................................................................................................................................... 39
Figure 22 Device Setup > Device Config ............................................................................................... 41
Figure 23 Device Setup > Change Password ........................................................................................ 42
Figure 24 Wireless Connection Via Another AP .................................................................................... 43
Figure 25 Gatekeeper ............................................................................................................................ 44
Figure 26 Network ................................................................................................................................. 45
Figure 27 Wireless Direct ...................................................................................................................... 46
Figure 28 Network ................................................................................................................................. 47
Figure 29 Example Notebook Network IP Addresses ........................................................................... 47
Figure 30 System Setup > Reset to Default .......................................................................................... 48
Figure 31 System Setup > Firmware Upgrade ...................................................................................... 49
Figure 32 System Setup > Reboot System ........................................................................................... 50
Figure 33 Wall-mounting Example .......................................................................................................... 61
Figure 34 Masonry Plug and M4 Tap Screw ........................................................................................... 62
Figure 35 Pop-up Blocker ....................................................................................................................... 63
Figure 36 Internet Options: Privacy ........................................................................................................ 64
Figure 37 Internet Options: Privacy ........................................................................................................ 65
Figure 38 Pop-up Blocker Settings ......................................................................................................... 65
WPA-1000 User’s Guide
15
Page 16

List of Figures
Figure 39 Internet Options: Security ....................................................................................................... 66
Figure 40 Security Settings - Java Scripting ........................................................................................... 67
Figure 41 Security Settings - Java .......................................................................................................... 67
Figure 42 Java (Sun) .............................................................................................................................. 68
Figure 43 Mozilla Firefox: Tools > Options ............................................................................................. 69
Figure 44 Mozilla Firefox Content Security ............................................................................................. 69
Figure 45 WIndows 95/98/Me: Network: Configuration .......................................................................... 72
Figure 46 Windows 95/98/Me: TCP/IP Properties: IP Address .............................................................. 73
Figure 47 Windows 95/98/Me: TCP/IP Properties: DNS Configuration .................................................. 74
Figure 48 Windows XP: Start Menu ........................................................................................................ 75
Figure 49 Windows XP: Control Panel ................................................................................................... 75
Figure 50 Windows XP: Control Panel: Network Connections: Properties ............................................. 76
Figure 51 Windows XP: Local Area Connection Properties ................................................................... 76
Figure 52 Windows XP: Internet Protocol (TCP/IP) Properties .............................................................. 77
Figure 53 Windows XP: Advanced TCP/IP Properties ........................................................................... 78
Figure 54 Windows XP: Internet Protocol (TCP/IP) Properties .............................................................. 79
Figure 55 Windows Vista: Start Menu ..................................................................................................... 80
Figure 56 Windows Vista: Control Panel ................................................................................................ 80
Figure 57 Windows Vista: Network And Internet .................................................................................... 80
Figure 58 Windows Vista: Network and Sharing Center ......................................................................... 80
Figure 59 Windows Vista: Network and Sharing Center ......................................................................... 81
Figure 60 Windows Vista: Local Area Connection Properties ................................................................ 81
Figure 61 Windows Vista: Internet Protocol Version 4 (TCP/IPv4) Properties ....................................... 82
Figure 62 Windows Vista: Advanced TCP/IP Properties ........................................................................ 83
Figure 63 Windows Vista: Internet Protocol Version 4 (TCP/IPv4) Properties ....................................... 84
Figure 64 Macintosh OS 8/9: Apple Menu .............................................................................................. 85
Figure 65 Macintosh OS 8/9: TCP/IP ..................................................................................................... 85
Figure 66 Macintosh OS X: Apple Menu ................................................................................................ 86
Figure 67 Macintosh OS X: Network ...................................................................................................... 87
Figure 68 Red Hat 9.0: KDE: Network Configuration: Devices ............................................................. 88
Figure 69 Red Hat 9.0: KDE: Ethernet Device: General ...................................................................... 88
Figure 70 Red Hat 9.0: KDE: Network Configuration: DNS ................................................................... 89
Figure 71 Red Hat 9.0: KDE: Network Configuration: Activate ............................................................ 89
Figure 72 Red Hat 9.0: Dynamic IP Address Setting in ifconfig-eth0 ................................................... 90
Figure 73 Red Hat 9.0: Static IP Address Setting in ifconfig-eth0 ....................................................... 90
Figure 74 Red Hat 9.0: DNS Settings in resolv.conf ............................................................................ 90
Figure 75 Red Hat 9.0: Restart Ethernet Card ..................................................................................... 90
Figure 76 Red Hat 9.0: Checking TCP/IP Properties ........................................................................... 91
16
WPA-1000 User’s Guide
Page 17

List of Tables
List of Tables
Table 1 Rear Panel Connections ........................................................................................................... 26
Table 2 Front Panel LEDs ...................................................................................................................... 26
Table 3 Standby Screen ......................................................................................................................... 27
Table 4 Main Web Configurator Screen ................................................................................................. 28
Table 5 Utility Control Panel .................................................................................................................. 32
Table 6 Utility Control Panel .................................................................................................................. 33
Table 7 Conference Control Host Panel ............................................................................................... 38
Table 8 Status ........................................................................................................................................ 40
Table 9 Resolutions ............................................................................................................................... 41
Table 10 Device Setup > Device Config ................................................................................................ 41
Table 11 Device Setup > Change Password ......................................................................................... 42
Table 12 Network > Network ................................................................................................................. 45
Table 13 System Setup > Firmware Upgrade ........................................................................................ 49
Table 14 Hardware Specifications ......................................................................................................... 59
Table 15 Firmware Specifications .......................................................................................................... 59
Table 16 System Requirements ............................................................................................................. 60
Table 17 Standards Supported .............................................................................................................. 60
WPA-1000 User’s Guide
17
Page 18

List of Tables
18
WPA-1000 User’s Guide
Page 19

PART I
Introduction
Introducing the WPA-1000 (21)
WPA-1000 Hardware (25)
19
Page 20

20
Page 21
CHAPTER 1
Introducing the WPA-1000
This chapter introduces the main applications of the WPA-1000. It also introduces the ways
you can manage the WPA-1000.
1.1 Overview
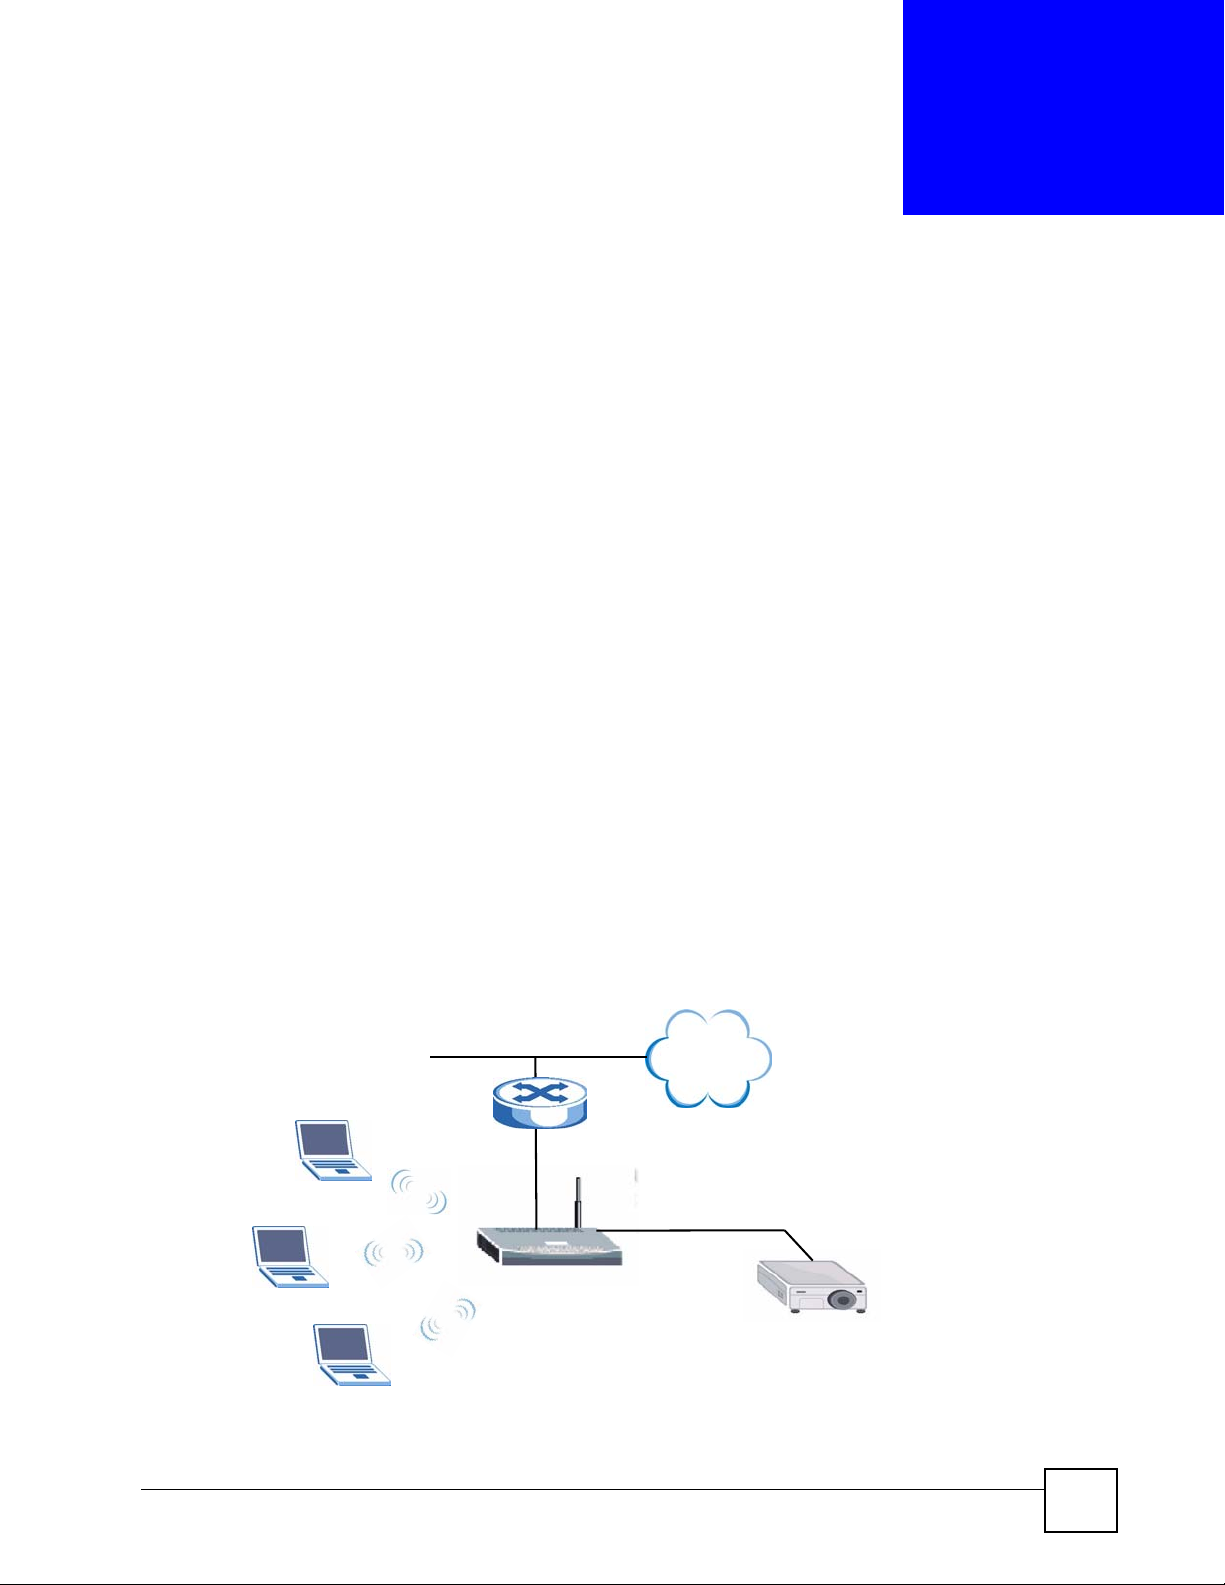
Multiple meeting participants connect to the WPA-1000 allowing them to take turns giving
presentations without having to change connections to the projector. Meeting participants can
also use the WPA-1000 to connect to the Internet or access the company network.
You can deploy the WPA-1000 in a number of different ways.
• Wireless Direct
• Wireless Indirect
•Wired
1.1.1 Wireless Direct
Meeting participants can access the WPA-1000 (W) via direct wireless connection, as shown
in the next figure. IEEE 802.11b/g standards are supported and wireless connections can be
secured with WEP security. You can also choose to allow users to access the company network
(N) or just access the Internet via the WPA-1000 and a switch (S).
Figure 1 Wireless Direct
N
INTERNET
S
W
P
WPA-1000 User’s Guide
21
Page 22
Chapter 1 Introducing the WPA-1000
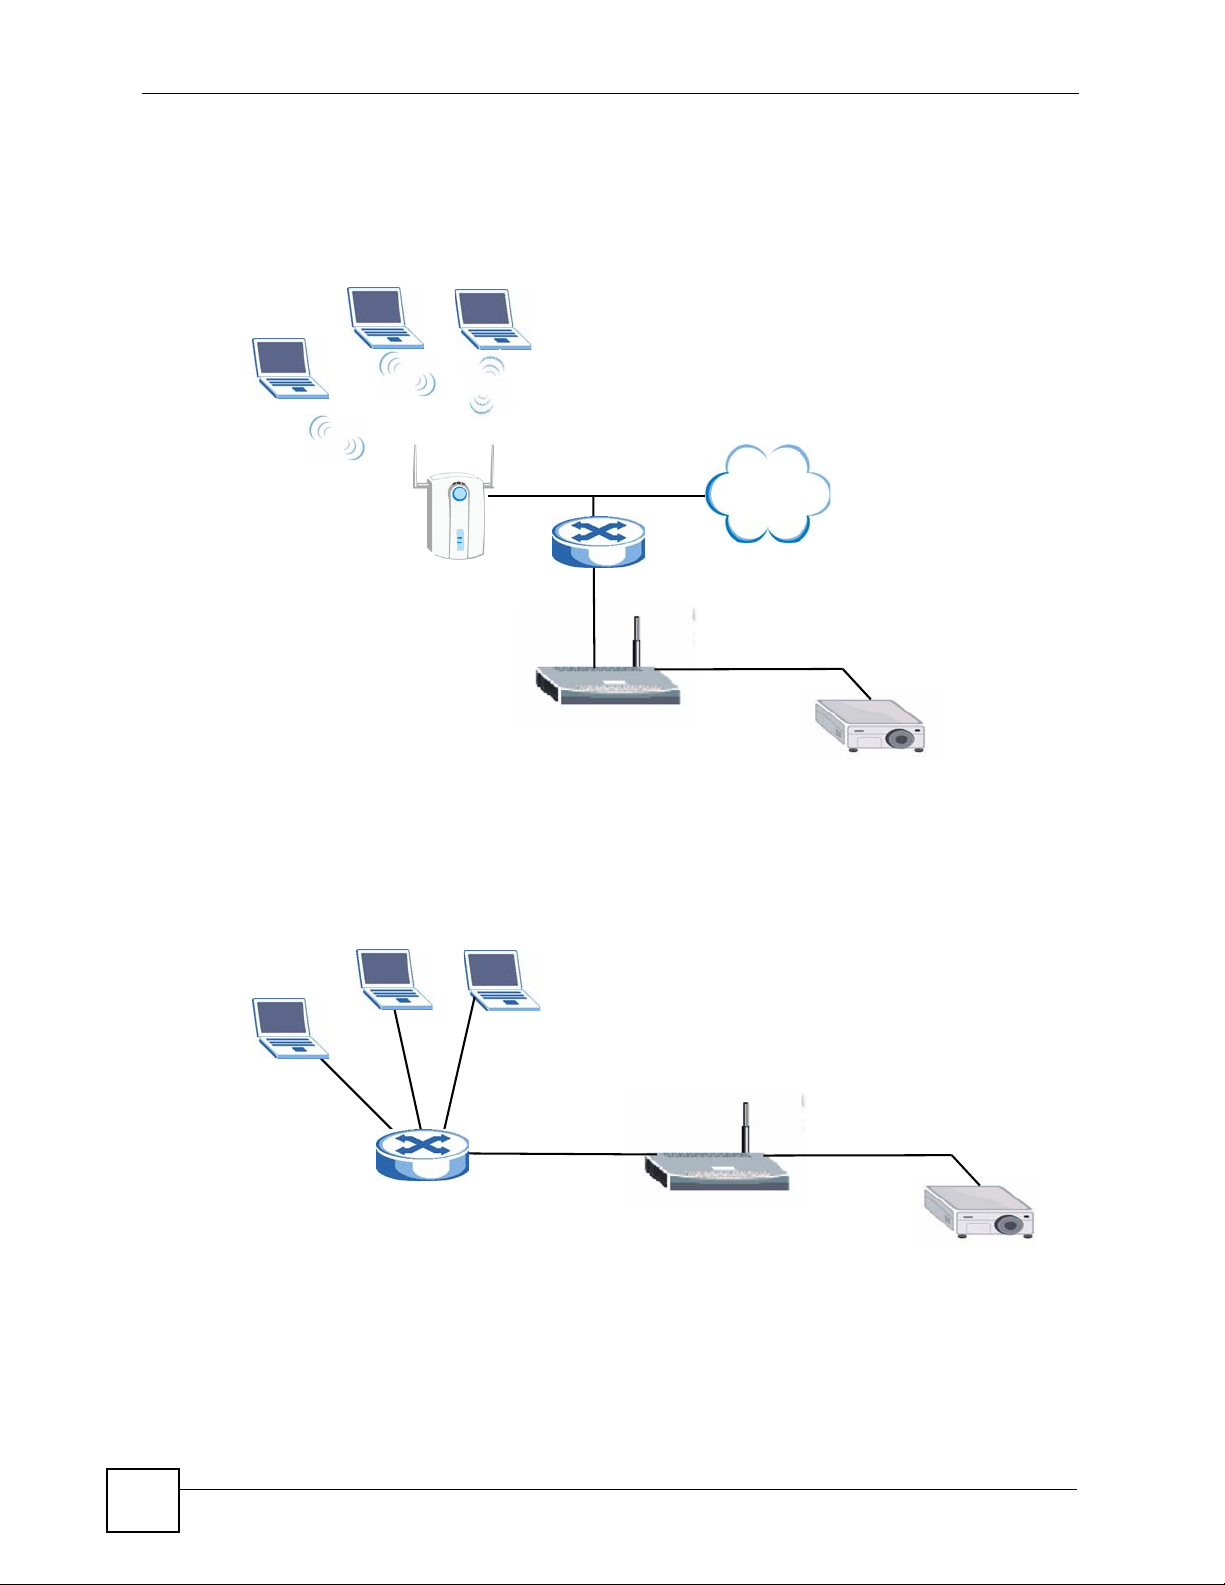
1.1.2 Wireless Connection Via Another AP
Meeting participants can wirelessly access the WPA-1000 (W) via an AP (A) as shown in the
next figure. The AP can be connected to the WPA-1000 directly or via a switch (S).
Figure 2 Wireless Indirect
A
S
W
INTERNET
1.1.3 Wired Direct
Meeting participants can directly access the WPA-1000 (W) via a switch (S) as shown in the
next figure.
Figure 3 Wired
S
1.2 Managing the WPA-1000
Web Configurator. This is recommended for everyday management of the WPA-1000 using a
(supported) web browser. See Section 2.4 on page 28.
W
22
WPA-1000 User’s Guide
Page 23

Chapter 1 Introducing the WPA-1000
1.3 Good Habits for Managing the WPA-1000
Do the following things regularly to make the WPA-1000 more secure and to manage the
WPA-1000 more effectively.
• Change the passwords and keep a record of the passwords in a safe place. Use a password
that’s not easy to guess and that consists of different types of characters, such as numbers
and letters.
• Configure wireless settings before enabling wireless. Write down the wireless settings.
• Change your wireless settings, such as SSID and WEP key, regularly and keep a record of
them in a safe place. Use settings that are not easy to guess and that consist of different
types of characters, such as numbers and letters.
WPA-1000 User’s Guide
23
Page 24

Chapter 1 Introducing the WPA-1000
24
WPA-1000 User’s Guide
Page 25
CHAPTER 2
WPA-1000 Hardware
This chapter introduces the rear panel, front panel, standby screen and main web configurator
screen.
2.1 Rear Panel
See the Quick start Guide for details on how to make rear panel connections.
Figure 4 Rear Panel Connections
POWER ON|OFF VGA RESET LAN
WPA-1000 User’s Guide
25
Page 26
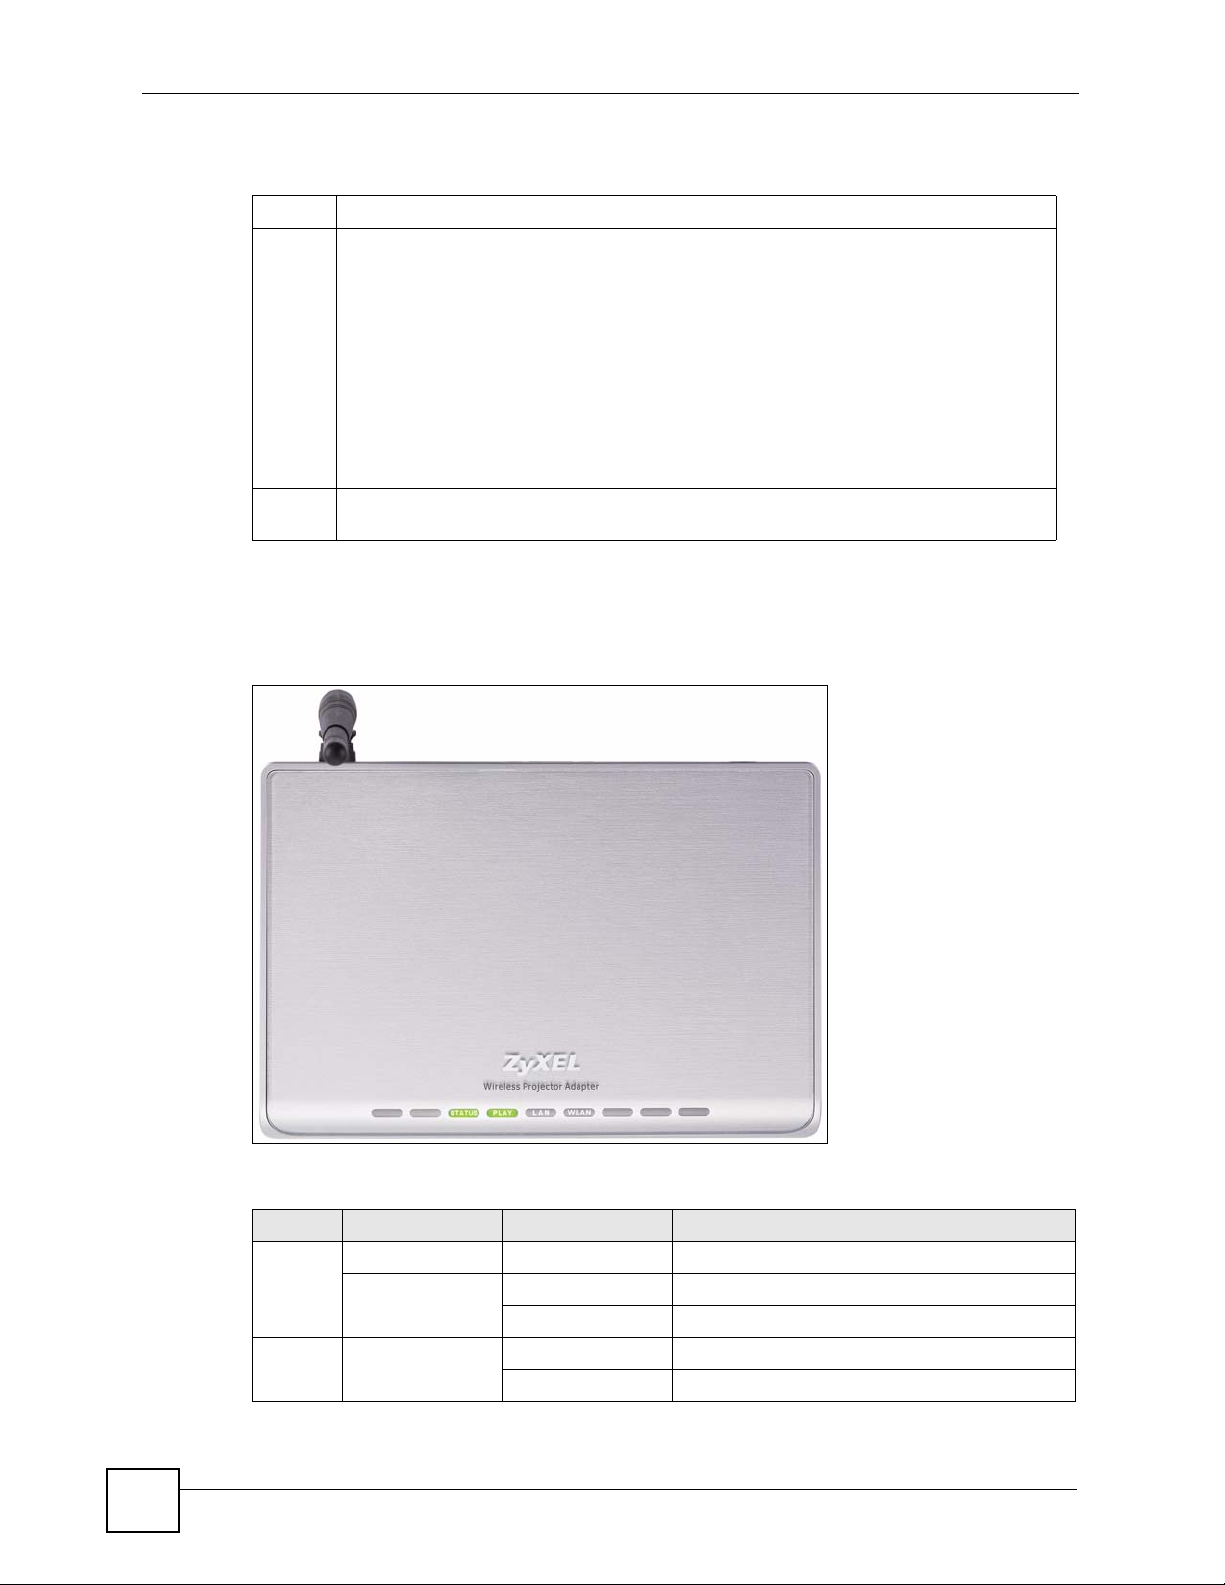
Chapter 2 WPA-1000 Hardware
The following table describes the rear panel labels.
Table 1 Rear Panel Connections
VGA Use the gray VGA cable from the package to connect your WPA-1000 to a projector.
RESET To reset the WPA-1000 to its default settings, use a pointed device such as a pen to
press the RESET button in for more than 30 seconds. While pressing RESET, turn your
device off and then on again.
Default settings include:
• Password of conference control host and administrator: 1234
• SSID: ZyXEL
• Server IP: 192.168.1.10
• WEP: disabled
• Gatekeeper: All Block
• Resolution: 1024 by 768
• Color depth: 32bit
• Refresh rate: 60Hz
LAN Connect your computer to the LAN port using the red LAN cable that came with the
package.
2.2 Front Panel LEDs
Figure 5 Front Panel LEDs
The table below describes the labels in the screen.
Table 2 Front Panel LEDs
LED COLOR STATUS DESCRIPTION
STATUS Green On The WPA-1000 is ready to project.
Orange On The device is starting.
Off The device is not starting.
PLAY
(N/A)
Green Blinking The device is projecting.
Off The device is not projecting.
26
WPA-1000 User’s Guide
Page 27
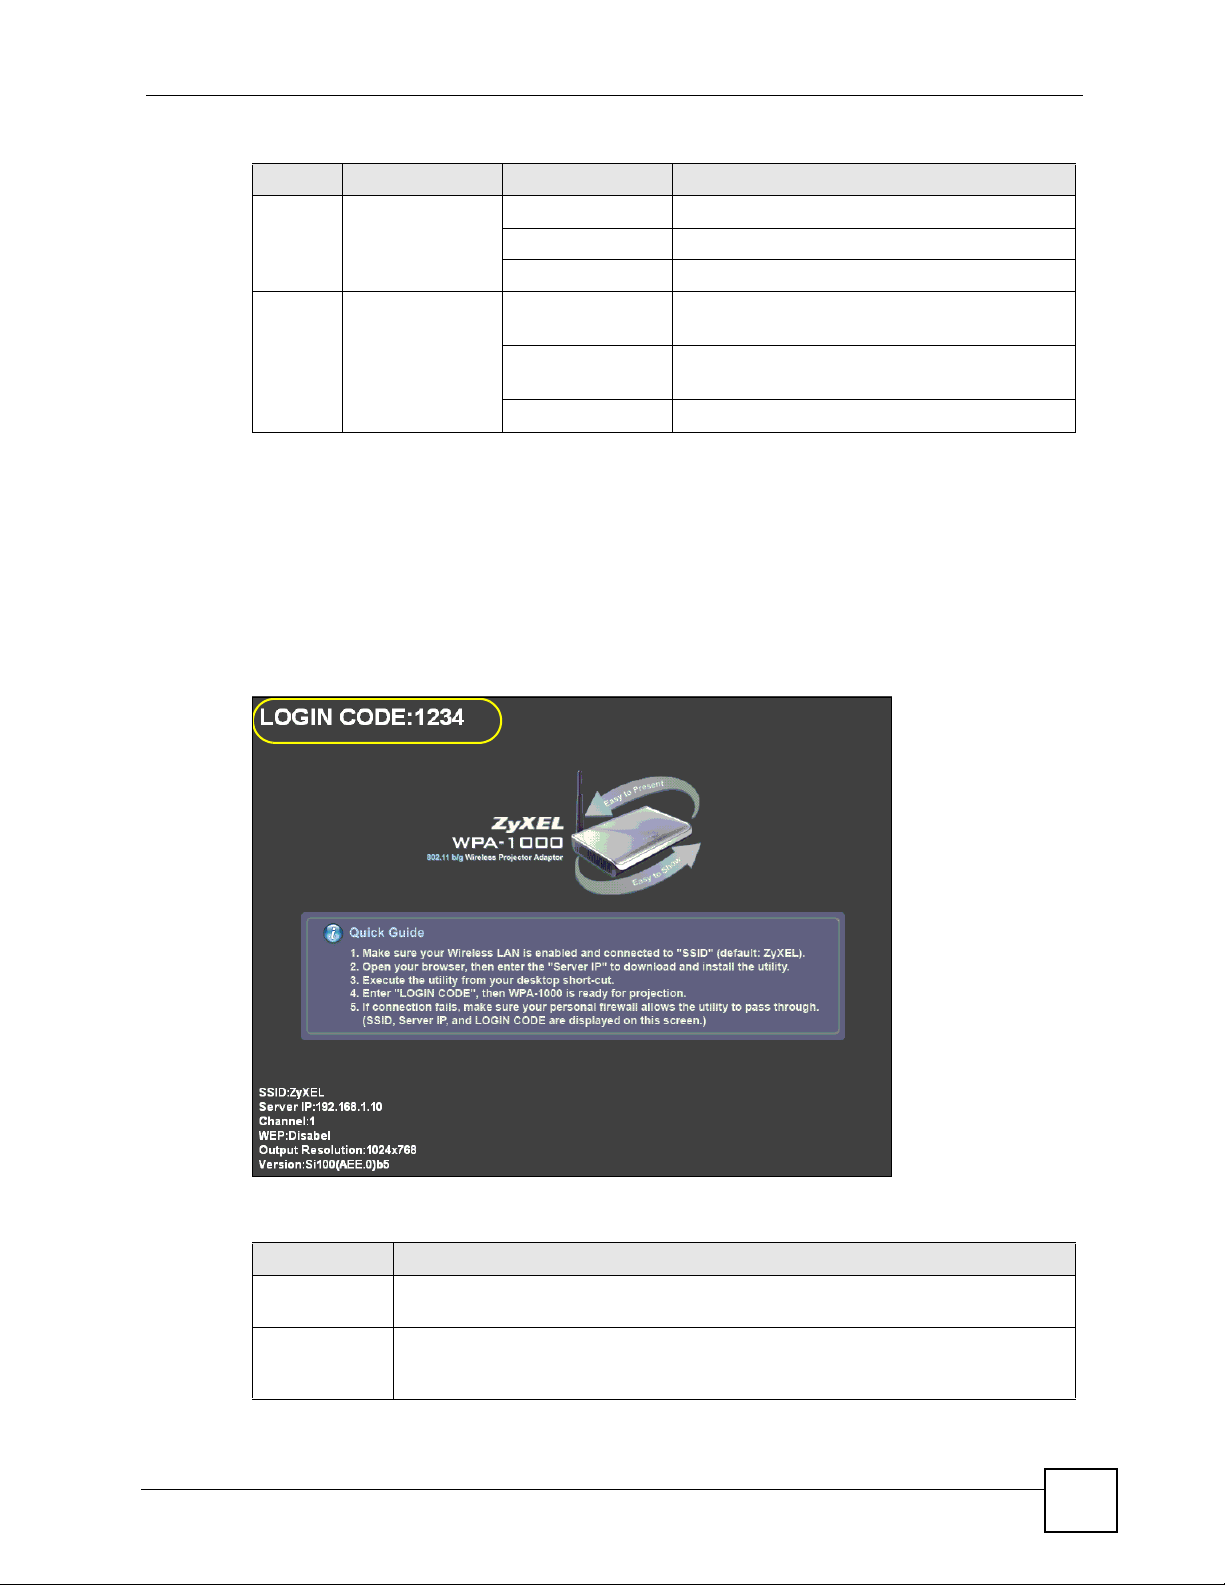
Table 2 Front Panel LEDs (continued)
LED COLOR STATUS DESCRIPTION
LAN Green On The device has a successful LAN connection.
WLAN Green On The device has a successful wireless
2.3 Standby Screen
Connect the WPA-1000 to the projector (see the Quick Start Guide for instructions). The next
screen appears on your projector screen when your WPA-1000 is successfully connected to the
projector. It contains important information that you should write down. You will need this
information later.
Chapter 2 WPA-1000 Hardware
Blinking The WPA-1000 is sending/receiving data.
Off The LAN is not connected.
connection.
Blinking The device is sending/receiving data through the
wireless LAN.
Off The device has no wireless connection.
Figure 6 Standby Screen
The table below describes the labels on the screen.
Table 3 Standby Screen
LABEL DESCRIPTION
LOGIN CODE You need to enter this number after you install the projection sharing utility in order
to log into it.
SSID This is the name that identifies the WPA-1000 wireless network. Computers must
use the same SSID, channel and WEP as the WPA-1000 in order to connect
wirelessly to it.
WPA-1000 User’s Guide
27
Page 28
Chapter 2 WPA-1000 Hardware
Table 3 Standby Screen (continued)
LABEL DESCRIPTION
Server IP This is the IP address of the WPA-1000. 192.168.1.10 is the default IP address. If
the WPA-1000 is connected to your network and is set to receive an IP address
automatically, then it will show the IP address it received here. This IP address is
also displayed as the IP Address in the Status screen.
Note: This is the IP address you use to access the WPA-1000 web
configurator.
Channel This is the wireless channel that the WPA-1000 is using.
WEP This shows WPA-1000 wireless network security settings. Disable means anyone
Resolution This is the projection resolution the WPA-1000 is currently using.
Version This is the WPA-1000 firmware version number.
within range can connect wirelessly to the WPA-1000 without need of a password.
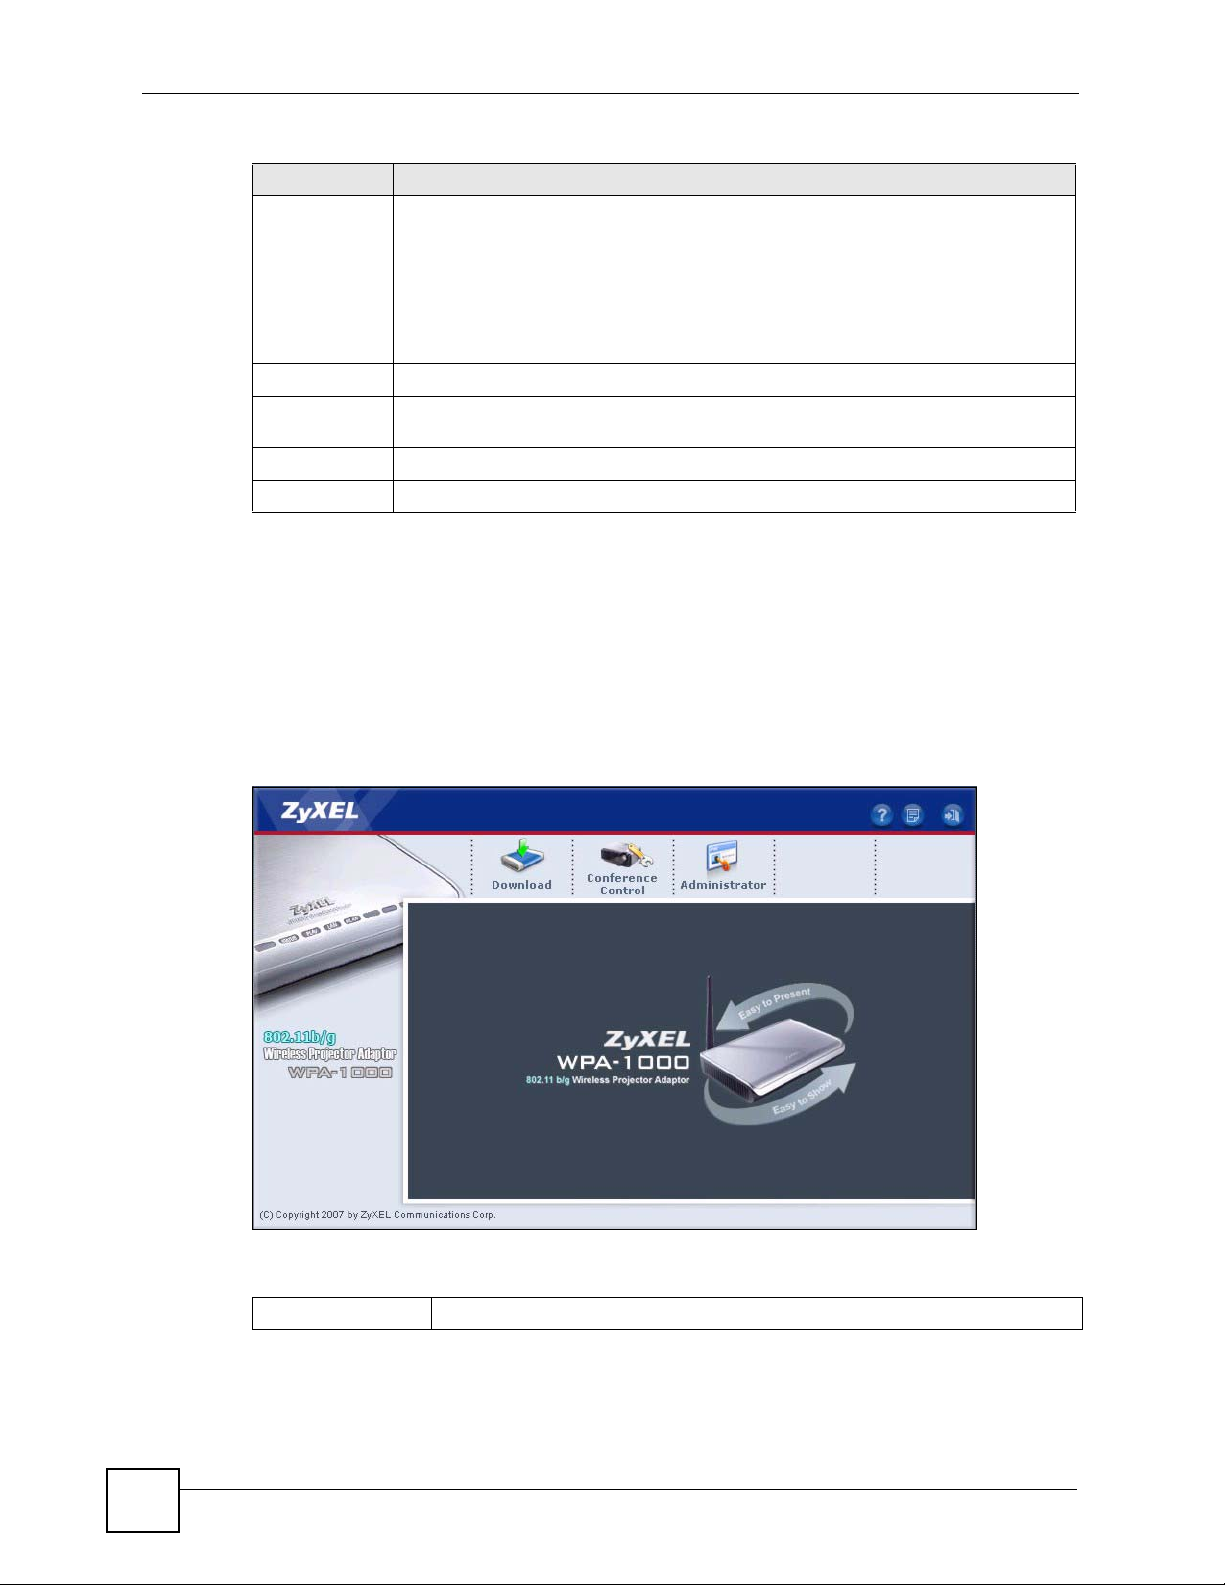
2.4 Main Web Configurator Screen
Connect your computer to the WPA-1000 and open the web configurator (see the Quick Start
Guide for instructions). Enter the Server IP as displayed in the Status screen.
The main web configurator screen appears. Use this screen to download the WPA-1000 utility
and to configure administrator settings.
Figure 7 Main Web Configurator Screen
The next chapters will show you how to use these screens.
Table 4 Main Web Configurator Screen
Administrator Click Administrator and enter a password to enter the web configurator menus.
28
WPA-1000 User’s Guide
Page 29

PART II
Managing and Using
the WPA-1000
WPA-1000 Utility (31)
The Web Configurator Screens (37)
29
Page 30

30
Page 31

CHAPTER 3
WPA-1000 Utility
3.1 Introducing the WPA-1000 Utility
Each meeting participant who wants to display presentations on the projector via the WPA1000 must install the WPA-1000 utility. Follow the instructions in the Quick Start Guide to
connect wirelessly to the WPA-1000 and then download and install the WPA-1000 utility on
your computer.
Figure 8 Main Screen: Download and Install the Utility
After installation completes, a shortcut( ) appears on your desktop. Double-click the
shortcut ( ) on your desktop or click Start > Programs > WPA-1000 to start the WPA-1000
utility.
1 The WPA-1000 utility searches for available projectors. If none are found, then the
following screen appears.
Figure 9 No WPA-1000 Found
Check that a WPA-1000 is within range and turned on and then use the utility to
find it again. Check also that your firewall is not blocking access to the WPA-1000.
WPA-1000 User’s Guide
31
Page 32

Chapter 3 WPA-1000 Utility
Figure 10 Firewall Blocking WPA-1000
2 A login screen appears.Type the Login Code that appeared in the standby screen (see
Figure 6 on page 27). Then press [ENTER].
Figure 11 WPA-1000 Found: Login
3 After a successful login, the projector projects the content from your computer. The
PLAY LED blinks when your WPA-1000 is successfully projecting.
4 Control your presentation using the WPA-1000 control panel described next.
Figure 12 Utility Control Panel
DFGE
ABC
A
The following table describes the elements in the utility control panel.
Table 5 Utility Control Panel
BUTTON DESCRIPTION
A. Play/Pause Use this button to search for available projectors and to project content
from your computer after one has been selected.
B. Stop Use this button to stop projection.
C. Refresh Use this button to refresh the screen.
D. Login Code This is the login code being used for this projection session.
E. Menus Click here to access a range of menus.
32
WPA-1000 User’s Guide
Page 33

Table 5 Utility Control Panel
BUTTON DESCRIPTION
F. Minimize Use this button to minimize this utility to the system tray at the bottom right
G. Exit Use this button to close and exit the utility.
3.2 Utility Menus
Click the menus item (E in Figure 12 on page 32) to see a range of menus available.
Figure 13 Utility Menus
Chapter 3 WPA-1000 Utility
of your screen.
The following table describes the utility menus.
Table 6 Utility Control Panel
BUTTON DESCRIPTION
Web Admin Clicking this is the same as clicking Administrator in Figure 8 on page 31. You
need to know the administrator password in order to access the administrator
web configurator screens. You can configure passwords, projection settings,
WPA-1000 IP address, WPA-1000 wireless settings and upload new firmware in
these screens
Search Server Use this menu item to search for available projector(s).
Make PnS Token Use the PnS (Plug and Show) feature when you want to make a presentation
via the WPA-1000 on a computer that does now have the WPA-1000 utility
installed. You will need a USB memory stick. See Section 3.2.1 on page 34.
Info Click this menu option to see the WPA-1000 SSID, IP address and login code.
About Click this menu option to see the following information about the utility.
Exit Click this menu option to close and exit the utility
WPA-1000 User’s Guide
33
Page 34

Chapter 3 WPA-1000 Utility
3.2.1 USB PnS Token
A WPA-1000 USB PnS (Plug and Show) token is a USB storage device (such as a USB
memory stick) containing WPA-1000 utility files. Use a USB PnS token when you don’t want
to install the WPA-1000 utility on a computer but you want to make a presentation via the
WPA-1000 from it. You simply insert the USB storage device into that computer and it can
then connect to the WPA-1000 in order to make a presentation.
Use the USB PnS wizard to create a USB PnS token. The wizard copies a wps.ini file and a
WPA-1000 folder onto the USB storage device. The WPA-1000 folder contains the following
utility files:
• Token.exe • WPA-1000.exe
• ConnectAP.dll • DLCapPP.dll
• uninstall.bat • PseudoWebServer.dll
• VideoDuration.dll • WiFiMan.dll
(Delete these files from your USB storage device if you no longer want it to act as a WPA1000 USB PnS token.)
Follow this procedure to make the token.
1 Select Make PnS Token in the utility control panel menus (see Figure 12 on page 32).
2 Select Next.
Figure 14 USB PnS Token Wizard 1
3 Insert the USB storage device into an available USB port on a computer that is
connecting to the WPA-1000. Then select the Flash Drive (the drive where you inserted
the USB storage device) in the next screen.
34
WPA-1000 User’s Guide
Page 35

Figure 15 Insert the USB Memory Stick
4 Click Finish.
Figure 16 USB PnS Token Wizard 2
Chapter 3 WPA-1000 Utility
5 Remove the USB storage device from your computer. All key WPA-1000 utility files are
now copied onto the USB storage device.
6 Insert the USB storage device into another computer that does not have the utility
installed. That computer can now connect to the WPA-1000 in order to make a
presentation.
3.2.2 Uninstalling The WPA-1000 Utility
Follow this procedure to uninstall the USB PnS Token.
1 Double-click uninstall.bat in C:program Files\ZyXEL\WPA-1000, where C is the drive
on your computer where you installed the utility.
2 Restart your computer.
WPA-1000 User’s Guide
35
Page 36

Chapter 3 WPA-1000 Utility
36
WPA-1000 User’s Guide
Page 37

CHAPTER 4
The Web Configurator Screens
4.1 Main Web Configurator Screen
Connect your computer to the WPA-1000 and open the web configurator (see the Quick Start
Guide for instructions). The main web configurator screen appears. Use this screen to
download the WPA-1000 utility and to configure administrator settings.
Figure 17 Main Web Configurator Screen
4.2 The Conference Control Screen
The conference control host controls who can project presentations via the WPA-1000. Click
Conference Control and enter a conference host password. The default password is ‘1234’.
WPA-1000 User’s Guide
37
Page 38

Chapter 4 The Web Configurator Screens
Figure 18 Conference Control Host
The conference control host manages users connected to the WPA-1000 using the conference
control host panel.
Figure 19 Conference Control Host Panel
The table below describes the labels on the conference control host panel.
Table 7 Conference Control Host Panel
LABEL DESCRIPTION
Conference Control
User Name This list shows the computer name of each computer logged on to the WPA-
IP Address This list shows the IP addresses of each computer logged on to the WPA-1000.
Projection Control This screens shows Stop for the person who is logged into the WPA-1000 (using
1000.
the utility) and is making a presentation. It shows Play for people who are logged
into the WPA-1000 (using the utility) and are not making a presentation.
• Click Stop to end a user’s presentation.
• Click Play to begin or resume a user’s presentation.
38
WPA-1000 User’s Guide
Page 39

4.3 The Administrator Screens
Click Administrator and enter a password to enter the administrator web configurator menus.
The default password is ‘1234’.
Figure 20 Administrator Password
Chapter 4 The Web Configurator Screens
After a successful login you see the Status screen.
4.4 Status
Use this screen to see current WPA-1000 information.
Figure 21 Status
WPA-1000 User’s Guide
39
Page 40

Chapter 4 The Web Configurator Screens
The table below describes the labels on the screen.
Table 8 Status
LABEL DESCRIPTION
Device Information
Model Name The model name is WPA-1000. This cannot be changed and is different to the
SSID which identifies your device in a wireless network.
Firmware Version This shows the current WPA-1000 firmware version.
Network Status
IP Address This is the current IP address of the WPA-1000. 192.168.1.10 is the default IP
address. If the WPA-1000 is connected to your network and is set to receive an
IP address automatically, then it will show the IP address it received here. This IP
address is also displayed as the Server IP in the Standby screen.
Subnet Mask This is the subnet mask for WPA-1000.
Default Gateway This is the IP address of the gateway. The gateway is an immediate neighbor of
Wireless MAC
Address
Wired MAC
Address
Device Status
Projecting Status This is the status of the connected projector. It can be either Waiting for
Users This shows how many people are logged into the WPA-1000. The maximum
your WPA-1000.
This is the MAC address of the built-in WPA-1000 wireless adapter.
This is the MAC address of the WPA-1000 Ethernet port.
Projecting or Projecting.
number of meeting participants allowed to log in at one time is 128.
4.5 Device Setup
Use these screens to change projection settings and passwords.
4.5.1 Device Config
Click on Device Config. Use this screen to change projection settings.
4.5.2 Resolutions
Resolution is the number of pixels that the projector is capable of displaying. Pixels are the
individual dots that make up the image on your computer.
SVGA, XGA, and WXGA are the standards of resolution supported by the WPA-1000 at the
time of writing. SVGA and XGA are terms that describe standard (4:3 aspect ratio) resolutions
used by computers and projectors. WXGA is a term that describes widescreen (16:9 aspect
ratio) resolutions used by home cinema projectors.
40
WPA-1000 User’s Guide
Page 41

Chapter 4 The Web Configurator Screens
The following table shows you the number of pixels that are displayed in each resolution.
Table 9 Resolutions
RESOLUTION
SVGA 800 600 480
XGA 1024 768 786
WXGA 1280 720 922
PIXELS
HORIZONTALLY
PIXELS
VERTICALLY
APPROX. TOTAL PIXELS
(THOUSANDS)
The total number of pixels a projector can project depends on its resolution. For example, an
SVGA projector can display 480,000 pixels at a time.
Resolution affects how sharp your image is and the compatibility of your projector with your
WPA-1000. If the WPA-1000 is sending a signal to the projector that is XGA, and your
projector has SVGA resolution, there may be display or hardware problems, so it’s best to
select the resolution on the WPA-1000 that your projector supports.
Figure 22 Device Setup > Device Config
The table below describes the labels on the screen.
Table 10 Device Setup > Device Config
LABEL DESCRIPTION
Projection Setup
Output Resolution Resolution is the number of pixels that the projector is capable of displaying.
Color Depth Color depth is the number of bits used for each pixel on a screen. Select the
Screen Refresh
Rate
WPA-1000 User’s Guide
Select the resolution that your projector supports and displays best.
color depth that your projector supports.
The refresh rate is the number of times that the image on the screen is drawn
each second. If your projector has a refresh rate of 72 Hertz (Hz), then it cycles
through all the pixels from top to bottom 72 times a second.
A higher refresh rate reduces screen flicker and reduces eye strain. However, if
you specify a refresh rate that is too high for your projector, you may damage it.
Also, there is a trade-off between refresh rate and resolution. Select the refresh
rate that your projector supports.
41
Page 42

Chapter 4 The Web Configurator Screens
Table 10 Device Setup > Device Config (continued)
LABEL DESCRIPTION
Apply Click Apply to save your settings.
Cancel Click Cancel to return to the previous settings.
4.5.3 The Change Password Screen
It is highly recommended you change the default conference control host and administrator’s
passwords. Both default passwords are ‘1234’.The conference control host manages who can
project via the WPA-1000. The administrator has access to these configuration menus.
Figure 23 Device Setup > Change Password
42
The table below describes the labels on the screen.
Tabl e 11 Device Setup > Change Password
LABEL DESCRIPTION
Conference Control
Enter New
Password
Confirm New
Password
Administrator
Enter New
Password
Confirm New
Password
Apply Click Apply to save your settings.
Cancel Click Cancel to return to the previous settings.
Type a new password here. Use a combination of letters and numbers (0~9,
A~Z, a~z, no spaces allowed) up to 8 characters long.
Type exactly the same password here to confirm your password
Type a new password here. Use a combination of letters and numbers (0~9,
A~Z, a~z, no spaces allowed) up to 8 characters long.
Type exactly the same password here to confirm your password
WPA-1000 User’s Guide
Page 43

4.6 Network Screen
4.6.1 Deployment Scenarios
How you configure this screen depends on how you deploy the WPA-1000 in your network.
See Figure 1 on page 21, Figure 2 on page 22 and Figure 3 on page 22 for example
deployments.
The WPA-1000 can act as a DHCP server if you do not already have one in your network. A
DHCP server can assign private IP addresses to connected computers in your network. You
should disable DHCP server functionality on your WPA-1000 if another DHCP server, such as
one at your ISP, assigns IP addresses to computers on your network.
As shown in Figure 2 on page 22, you can also connect to the WPA-1000 via an access point
(A). The AP may have connections to more than one WPA-1000, (W1) and (W2) via a switch
or router (S) as shown in the next example. Once connected to the AP, a user (U) can use
projectors (P1) and (P2), that are connected to (W1) and (W2), without having to join a new
wireless network.
Figure 24 Wireless Connection Via Another AP
Chapter 4 The Web Configurator Screens
W1
U
A
S
W2
" The AP (A) cannot connect wirelessly to the WPA-1000.
P1
INTERNET
P2
4.6.2 Gatekeeper
You can also choose to allow users to access the company network (N) and Internet or just
access the Internet via the WPA-1000. Choose one of these Gatekeeper options:
WPA-1000 User’s Guide
43
Page 44

Chapter 4 The Web Configurator Screens
• All Block: Only DHCP ports (UDP 67, UDP 68) are allowed through to WPA-1000 users
(U) via the WPA-1000 (W) from the company network (N) or the Internet. This means that
a DHCP server on the company network or the Internet can still assign IP addresses to
users but all other traffic is blocked between the company network or the Internet and
WPA-1000 users via the WPA-1000.
• All Pass: All traffic (ports) is allowed between the company network or the Internet and
WPA-1000 users via the WPA-1000.
• Internet Only: Only primary UDP/TCP connections are allowed between the company
network or the Internet and WPA-1000 users via the WPA-1000.
UDP Ports Allowed: 67, 68, 53
TCP Ports Allowed: 20, 21, 25, 70, 80, 81, 82, 83, 110, 443, 554, 1040, 1047, 1080, 8080,
8088, 3128
Figure 25 Gatekeeper
INTERNET
U
S
W
4.6.3 Network Screen Configuration
Click Network from the main web configurator screen.
P
44
WPA-1000 User’s Guide
Page 45

Figure 26 Network
Chapter 4 The Web Configurator Screens
The following table describes the labels in the Network screen.
Table 12 Network > Network
LABEL DESCRIPTION
IP Setup
Obtain an IP
address
automatically
IP Address Select Use the following IP address if you want to assign a static IP address to
Subnet Mask Type a subnet mask for the WPA-1000 here. The default subnet mask is
Default Gateway The default gateway is the immediate neighbor of your WPA-1000 that will
DHCP Server
Setup
Auto Select Auto to enable DHCP server so the WPA-1000 can assign TCP/IP
Start IP Type the first IP address in the range of contiguous addresses that the WPA-
End IP Type the last IP address in the range of contiguous addresses that the WPA-
Select this option if a DHCP server either in your network or at your ISP will
assign an IP address to the WPA-1000. The WPA-1000 utility can find WPA1000s in your network and also display their IP addresses.
the WPA-1000. Type the IP address in the IP address field. The default IP
address is 192.168.1.10.
255.255.255.0. For more information on IP addresses and subnet masks, see
Appendix D on page 83.
forward traffic to the destination. Type the IP address of the gateway.
DHCP (Dynamic Host Configuration Protocol, RFC 2131 and RFC 2132) allows
computers to obtain TCP/IP configuration at startup from a server.
information (IP addresses and subnet masks) to network devices in your
network.
1000 will assign to network devices in your network. To avoid an IP address
conflict, the IP address range should not include your WPA-1000’s IP address
but it should be in the same subnet.
1000 will assign to network devices in your network. To avoid an IP address
conflict, the IP address range should not include your WPA-1000’s IP address
but it should be in the same subnet.
WPA-1000 User’s Guide
45
Page 46

Chapter 4 The Web Configurator Screens
LABEL DESCRIPTION
Disable Disable DHCP service if you have another DHCP server in your network, or you
want to manually configure computers in your network with TCP/IP information.
Wireless Setup
SSID The SSID identifies this WPA-1000 in the list of available wireless uncorks. The
default SSID is ZyXEL. It is recommended you change this to a unique SSID in
order to identify your WPA-1000 in the wireless network list.
Channel Set the WPA-1000’s wireless connection channel. All devices that want to be in
WEP Select an WEP security mode to encrypt data you send over the network. 128-bit
Key This is the key used to encrypt data wireless communicated between the WPA-
Gatekeeper Select All Block if you only want DHCP information to be allowed through to
Apply Click Apply to save your settings.
Cancel Click Cancel to return to the previous settings.
the WPA-1000’s wireless network must be use the same channel. Select a
channel that is not being used by other APs in the vicinity.
is more secure than 64-bit, but may have slower throughput. If you select
Disable, then anyone within range nay connect to the WPA-1000 without need of
a password.
1000 and wireless clients. If you choose 128-bit WEP, then enter 13 ASCII
characters or 26 hexadecimal digits here.
If you choose 64-bit WEP, then enter 5 ASCII characters or 10 hexadecimal
digits here.
users connected to the WPA-1000 from the company network or the Internet.
Select All Pass if you only want all traffic to be allowed through to users
connected to the WPA-1000 from the company network or the Internet.
Select Internet Only if you only want ‘Internet-related traffic’, such as HTTP, FTP
and so on to be allowed through to users connected to the WPA-1000 from the
company network or the Internet. See Section 4.6.2 on page 43 for more details.
4.6.4 Example Network Configuration
In this example, your notebook has a wired connection to the company network (N) and
receives an IP address automatically from the company DHCP server. It has a wireless
connection to the WPA-1000. The WPA-1000 is set to use its default IP address and is also set
to be a DHCP server.
Figure 27 Wireless Direct
N
INTERNET
S
U
These are the screen configurations.
W
P
46
WPA-1000 User’s Guide
Page 47

Figure 28 Network
Chapter 4 The Web Configurator Screens
View the IP address on your notebook by typing ‘ipconfig’ in the command line window. The
following sample display appears.
Figure 29 Example Notebook Network IP Addresses
Ethernet adapter Local Area Connection:
Connection-specific DNS Suffix . : zyxel.com
IP Address. . . . . . . . . . . . : 172.16.10.10
Subnet Mask . . . . . . . . . . . : 255.255.255.0
Default Gateway . . . . . . . . . : 172.16.10.254
Ethernet adapter ZyXEL:
Connection-specific DNS Suffix . :
IP Address. . . . . . . . . . . . : 192.168.1.11
Subnet Mask . . . . . . . . . . . : 255.255.255.0
Default Gateway . . . . . . . . . : 192.168.1.10
The top IP address is the IP address your notebook received from your company’s DHCP
server via its wired connection to (S).
The bottom IP address is the IP address your notebook received from the WPA-1000’s DHCP
server via its wireless connection to (W).
WPA-1000 User’s Guide
47
Page 48

Chapter 4 The Web Configurator Screens
4.7 System Setup
Use these screens to reset the WPA-1000 to its factory defaults, upload new firmware and
restart the device.
4.7.1 Reset to Default
To reset the WPA-1000 to its default settings, use the hardware RESET button or click Reset
in this screen.
Default settings include:
• Password of conference control host and administrator: 1234
•SSID: ZyXEL
• Server IP: 192.168.1.10
• WEP: disabled
• Gatekeeper: All Block
• Resolution: 1024 by 768
• Color depth: 32bit
• Refresh rate: 60Hz
Figure 30 System Setup > Reset to Default
4.7.2 Firmware Upgrade
Use this screen to upload new firmware to the WPA-1000. You should first have downloaded
the latest firmware file from the ZyXEL website.
" Make sure you upload the correct firmware to the WPA-1000.
48
WPA-1000 User’s Guide
Page 49

Figure 31 System Setup > Firmware Upgrade
Chapter 4 The Web Configurator Screens
The table below describes the labels in the System Setup > Firmware Upgrade screen.
Table 13 System Setup > Firmware Upgrade
LABEL DESCRIPTION
Firmware Version This field displays the current firmware version on the WPA-1000.
Release Date This field displays the date (in year-month-date format) the firmware on
Check Sum This number helps a technician know if the firmware was uploaded
File Path Type the location of the firmware file you want to upload or click Browse
Upgrade Click Upgrade to upload the new firmware. The WPA-1000 automatically
Reset
4.7.3 Reboot System
Click Reboot in this screen to turn off the WPA-1000 and perform a software restart. You need
to restart the WPA-1000 when you make certain configuration changes to it and you want to
apply the changes. A software restart is faster than turning the WPA-1000 off and then turning
it on again. Before shutting down or restarting, make sure that no one is connected to the
WPA-1000.
the WPA-1000 was released.
correctly when troubleshooting.
to find the file on your computer. The WPA-1000 firmware file should have
an *.awd file name extension, for example, ‘WPA-1000.awd.’
restarts after you upgrade. Wait until the restart completes before
accessing the WPA-1000 again. If you interrupt the upgrade, then the
WPA-1000 may become unusable.
Click Reset to erase content in the File Path field.
WPA-1000 User’s Guide
49
Page 50

Chapter 4 The Web Configurator Screens
Figure 32 System Setup > Reboot System
50
WPA-1000 User’s Guide
Page 51

PART III
Troubleshooting
and Appendices
Troubleshooting (53)
Product Specifications (59)
IP Addresses and Subnetting (83)
Open Source Licences (93)
Legal Information (147)
Customer Support (151)
51
Page 52

52
Page 53

CHAPTER 5
Troubleshooting
This chapter offers some suggestions to solve problems you might encounter. The potential
problems are divided into the following categories.
• Power, Hardware Connections, and LEDs
• WPA-1000 Access and Login
• Projection Problems
• Internet Access Via the WPA-1000
• Resetting the WPA-1000 to Its Factory Defaults
5.1 Power, Hardware Connections, and LEDs
V The WPA-1000 does not turn on. None of the LEDs turn on.
1 Make sure the WPA-1000 is turned on.
2 Make sure you are using the power cord included with the WPA-1000.
3 Make sure the power cord is connected to the WPA-1000 and plugged in to an
appropriate power source. Make sure the power source is turned on.
4 Turn the WPA-1000 off and on.
5 If the problem continues, contact the vendor.
V One of the LEDs does not behave as expected.
1 Make sure you understand the normal behavior of the LED. See Section 2.2 on page 26.
2 Check the hardware connections. See the Quick Start Guide and Section 2.1 on page 25.
3 Inspect your cables for damage. Contact the vendor to replace any damaged cables.
4 Turn the WPA-1000 off and on.
5 If the problem continues, contact the vendor.
WPA-1000 User’s Guide
53
Page 54

Chapter 5 Troubleshooting
V My WPA-1000 cannot connect to a projector. The standby screen does not
appear.
1 Check the projector is turned on and working properly.
2 Check your gray VGA cable is securely attached to the WPA-1000 and to the projector.
3 Turn the projector off and then on.
5.2 WPA-1000 Access and Login
V I forgot the IP address for the WPA-1000.
1 The default IP address is 192.168.1.10.
2 If you changed the IP address and have forgotten it, you might get the IP address of the
WPA-1000 by looking up the IP address of the default gateway. To do this in most
Windows computers, click Start > Run, enter cmd, and then enter ipconfig. The IP
address of the Default Gateway might be the IP address of the WPA-1000 (it depends
on the network), so enter this IP address in your Internet browser.
3 If this does not work, you have to reset the device to its factory defaults. See Section 5.5
on page 58.
V I forgot the password.
1 The default password is 1234.
2 If this does not work, you have to reset the device to its factory defaults. See Section 5.5
on page 58.
V I cannot see or access the Login screen in the web configurator.
1 Make sure you are using the correct IP address.
• The default IP address is 192.168.1.10.
• If you changed the IP address (Section 5.1 on page 53), use the new IP address.
• If you changed the IP address and have forgotten it, see the troubleshooting
suggestions for I forgot the IP address for the WPA-1000.
2 Check the hardware connections, and make sure the LEDs are behaving as expected. See
the Quick Start Guide and Section 2.1 on page 25.
54
WPA-1000 User’s Guide
Page 55

3 Make sure your Internet browser does not block pop-up windows and has JavaScripts
and Java enabled. See Appendix A on page 63.
4 Make sure your computer is in the same subnet as the WPA-1000. (If you know that
there are routers between your computer and the WPA-1000, skip this step.)
• If there is a DHCP server on your network, make sure your computer and the WPA1000 are set to receive dynamic IP addresses. See Section 4.6.3 on page 44 and
Appendix B on page 71.
• If there is no DHCP server on your network, make sure your computer’s IP address is
in the same subnet as the WPA-1000. See Appendix B on page 71.
5 Reset the device to its factory defaults, and try to access the WPA-1000 with the default
IP address. See section Section 5.5 on page 58.
6 If the problem continues, contact the network administrator or vendor, or try one of the
advanced suggestions.
V I cannot make an Ethernet connection to the WPA-1000.
Chapter 5 Troubleshooting
1 Check you have typed the correct IP address in the address bar of your Internet browser.
2 The IP address of your computer and the WPA-1000 must be in the same subnet.
3 Check you are using the correct cable. The LAN port is not autocrossover so you have to
use a crossover cable (included in the package) when connecting directly to your
computer or a straight-through cable if connecting via a switch.
4 Make sure that Gatekeeper is not set to All Block or Internet Only if you are
connecting to the WPA-1000 via a switch -see Section 4.6.3 on page 44.
V I cannot access the WPA-1000 wirelessly.
1 Make sure the wireless adapter on your computer is working properly.
2 Make sure the wireless adapter installed on your computer is IEEE 802.11 compatible
and supports the same wireless standard as the WPA-1000.
3 Make sure your computer (with a wireless adapter installed) is within the transmission
range of the WPA-1000.
4 Check that both the WPA-1000 and your wireless station are using the same wireless
(SSID and channel) and wireless security (WEP) settings.
V The link quality and/or signal strength is poor all the time.
1 Move your computer closer to the AP or the peer computer(s) within the transmission
range.
WPA-1000 User’s Guide
55
Page 56

Chapter 5 Troubleshooting
2 There may be too much radio interference (for example microwave or another AP using
the same channel) around your wireless network. Lower the output power of the AP if
your AP has this option.
3 Make sure there are not too many computers connected to the WPA-1000.
V I cannot log in to the WPA-1000 Administrator screens.
1 Make sure you have entered the password correctly. The default password is 1234.
2 Turn the WPA-1000 off and on.
3 Disconnect and re-connect the power adaptor or cord to the WPA-1000.
4 If this does not work, you have to reset the device to its factory defaults. See section
Section 5.5 on page 58.
5.3 Projection Problems
V I cannot install the projection utility from my web browser.
1 Insert the support CD in the package into your CD-ROM.
2 Click Setup, or you can find the setup.exe file in the directory of your CD-ROM and
then double-click it.
3 The installation wizard appears.
4 After the successful installation and reboot of your computer, double click the WPA-
1000 shortcut ( ) on your desktop.
V The projection is unclear.
1 Click Refresh in the projection utility.
2 Check the resolution settings and refresh rate for your projector. Make sure the WPA-
1000 has the same settings - see Section 4.5.2 on page 40.
V I cannot use the WPA-1000 utility to project my presentation.
56
1 Uninstall the WPA-1000 utility and reinstall it.
2 Check you have permission to join the network. For example, check you are not kicked
out. See Chapter 4 on page 37 for more information.
WPA-1000 User’s Guide
Page 57

3 Check your operating system. The WPA-1000 utility is compatible with Microsoft
Windows XP Service Pack 2 or later, or Windows Vista.
5.4 Internet Access Via the WPA-1000
V I cannot access the Internet via the WPA-1000.
1 Check the hardware connections, and make sure the LEDs are behaving as expected. See
the Quick Start Guide and Section 2.1 on page 25.
2 If you are trying to access the Internet wirelessly, make sure your wireless settings are
the same as the settings in the AP through which you are trying to access the Internet.
3 Disconnect all the cables from your device, and reconnect them following the directions
in the Quick Start Guide.
4 Make sure that Gatekeeper is not set to All Block or Internet Only if you are
connecting to the WPA-1000 via a switch - see Section 4.6.3 on page 44.
5 If the problem continues, contact your ISP.
Chapter 5 Troubleshooting
V I cannot access the Internet anymore. I had access to the Internet (with the
WPA-1000), but my Internet connection is not available anymore.
1 Check the WPA-1000’s hardware connections, and make sure the LEDs are behaving as
expected. See the Quick Start Guide and Section 2.1 on page 25.
2 Restart the WPA-1000.
3 If the problem continues, contact your ISP.
V The Internet connection is slow or intermittent.
1 There might be a lot of traffic on the network. Try closing some programs that use the
Internet, especially peer-to-peer applications.
2 Check the signal strength. If the signal strength is low, try moving the WPA-1000 closer
to the AP if possible, and look around to see if there are any devices that might be
interfering with the wireless network (for example, microwaves, other wireless
networks, and so on).
3 Reboot the WPA-1000.
4 If the problem continues, contact the network administrator or vendor.
WPA-1000 User’s Guide
57
Page 58

Chapter 5 Troubleshooting
5.5 Resetting the WPA-1000 to Its Factory Defaults
If you reset the WPA-1000, you lose all of the changes you have made. The WPA-1000 reloads its default settings. Default settings include:
• Password of conference control host and administrator: 1234
•SSID: ZyXEL
• Server IP: 192.168.1.10
• WEP: disabled
• Gatekeeper: All Block
• Resolution: 1024 by 768
• Color depth: 32bit
• Refresh rate: 60Hz
" You will lose all of your changes when you push the RESET button.
To reset the WPA-1000,
1 Make sure the STATUS LED is on and not blinking.
2 Use a pointed device such as a pen to press the RESET button in for 30 seconds. Turn the
device on and off.
3 Release the RESET button when the STATUS LED begins to blink.
4 When the WPA-1000 restarts automatically, wait for the WPA-1000 to finish restarting,
and log in to the web configurator. The default settings have been restored.
If the WPA-1000 does not restart automatically,
power. Then, follow the directions above again.
disconnect and reconnect the WPA-1000’s
58
WPA-1000 User’s Guide
Page 59

CHAPTER 6
Product Specifications
6.1 Hardware
The following table summarizes the WPA-1000’s hardware features.
Table 14 Hardware Specifications
Dimensions (W x D x H) 190 x 130 x 33 mm
Device Weight 0.4kg
Power Specification 5 V DC 2A
Ethernet Ports Auto-negotiating: 10 Mbps or 100 Mbps in either half-duplex or full-duplex
mode.
Use crossover Ethernet cables.
Ports One 10/100 Ethernet LAN port with RJ-45 jack
Connector One VGA (D-sub 15 pin)
Antenna One external 2.95dBi antenna
Transmission Rate Up to 20 frames per second
Frame size 320 x 240
Operating Temperature 5º C ~ 40º C
Storage Temperature 0º C ~ 65º C
Operating Humidity 20% ~ 80% RH
Storage Humidity 5% ~ 95% RH
Distance between the
centers of the holes (for
wall mounting) on the
device’s back.
Recommended type of
screws for wall-mounting
137 mm
M4 Tap Screw, see Figure 34 on page 62.
6.2 Firmware
The following table summarizes the WPA-1000’s firmware features
Table 15 Firmware Specifications
FEATURE DESCRIPTION
Default IP Address 192.168.1.10
Default Subnet Mask 255.255.255.0 (24 bits)
Default Passwords 1234
WPA-1000 User’s Guide
59
Page 60

Chapter 6 Product Specifications
Table 15 Firmware Specifications
FEATURE DESCRIPTION
DHCP Pool 192.168.1.1 to 192.168.1.254
Device Management Use the web configurator to easily configure the rich range of features on
Wireless Functionality Allow the IEEE 802.11b and/or IEEE 802.11g wireless clients to connect
Firmware Upgrade Download new firmware (when available) from the ZyXEL web site and
DHCP (Dynamic Host
Configuration Protocol)
Utility operating system
support
Concurrent logins Up to 128 users can log into the WPA-1000 at the same time.
the WPA-1000.
to the WPA-1000 wirelessly. Enable wireless security (WEP) to protect
your wireless network.
use the web configurator to put it on the WPA-1000.
Note: Only upload firmware for your specific model!
Use this feature to have the WPA-1000 assign IP addresses to
computers on your network.
Microsoft Windows XP Service Pack 2 or later, or Windows Vista 32-bit
6.3 System Requirements
Your computer should have the following in order to install the WPA-1000 utility and connect
to the WPA-1000.
Table 16 System Requirements
Intel Pentium III 800MHz or faster processor
256 MB RAM required; 512 MB, or more recommended
10 MB free hard-disk space
Microsoft Windows XP Service Pack 2 or later, or Windows Vista 32 bit
Microsoft Internet Explorer 6.0 or 7.0 (recommended); Firefox 1.5 or 2.0
Ethernet adapter for direct Ethernet connection to the WPA-1000
IEEE 802.11b/g wireless adapter for wireless connection to the WPA-1000
6.4 Standards Supported
The following list, which is not exhaustive, illustrates the standards supported in the WPA-
1000.
Table 17 Standards Supported
STANDARD DESCRIPTION
RFC 1112 IGMP v1
RFC 2236 Internet Group Management Protocol, Version 2.
IEEE 802.11 Also known by the brand Wi-Fi, denotes a set of Wireless LAN/WLAN
standards developed by working group 11 of the IEEE LAN/MAN
Standards Committee (IEEE 802).
60
WPA-1000 User’s Guide
Page 61

Chapter 6 Product Specifications
Table 17 Standards Supported (continued)
STANDARD DESCRIPTION
IEEE 802.11b Uses the 2.4 gigahertz (GHz) band
IEEE 802.11g Uses the 2.4 gigahertz (GHz) band
6.5 Wall-mounting Instructions
Complete the following steps to hang your WPA-1000 on a wall.
" See Table 14 on page 59 for the size of screws to use and how far apart to place
them.
1 Select a position free of obstructions on a sturdy wall.
2 Drill two holes for the screws.
1 Be careful to avoid damaging pipes or cables located inside the wall when
drilling holes for the screws.
3 Do not insert the screws all the way into the wall. Leave a small gap of about 0.5 cm
between the heads of the screws and the wall.
4 Make sure the screws are snugly fastened to the wall. They need to hold the weight of
the WPA-1000 with the connection cables.
5 Align the holes on the back of the WPA-1000 with the screws on the wall. Hang the
WPA-1000 on the screws.
Figure 33 Wall-mounting Example
The following are dimensions of an M4 tap screw and masonry plug used for wall mounting.
All measurements are in millimeters (mm).
WPA-1000 User’s Guide
61
Page 62

Chapter 6 Product Specifications
Figure 34 Masonry Plug and M4 Tap Screw
62
WPA-1000 User’s Guide
Page 63

APPENDIX A
Pop-up Windows, JavaScripts
and Java Permissions
In order to use the web configurator you need to allow:
• Web browser pop-up windows from your device.
• JavaScripts (enabled by default).
• Java permissions (enabled by default).
" Internet Explorer 6 screens are used here. Screens for other Internet Explorer
versions may vary.
Internet Explorer Pop-up Blockers
You may have to disable pop-up blocking to log into your device.
Either disable pop-up blocking (enabled by default in Windows XP SP (Service Pack) 2) or
allow pop-up blocking and create an exception for your device’s IP address.
Disable Pop-up Blockers
1 In Internet Explorer, select Tools, Pop-up Blocker and then select Turn Off Pop-up
Blocker.
Figure 35 Pop-up Blocker
You can also check if pop-up blocking is disabled in the Pop-up Blocker section in the
Privacy tab.
1 In Internet Explorer, select Tools, Internet Options, Privacy.
[Document Title]
63
Page 64

Appendix A Pop-up Windows, JavaScripts and Java Permissions
2 Clear the Block pop-ups check box in the Pop-up Blocker section of the screen. This
disables any web pop-up blockers you may have enabled.
Figure 36 Internet Options: Privacy
3 Click Apply to save this setting.
Enable Pop-up Blockers with Exceptions
Alternatively, if you only want to allow pop-up windows from your device, see the following
steps.
1 In Internet Explorer, select Tools, Internet Options and then the Privacy tab.
2 Select Settings…to open the Pop-up Blocker Settings screen.
64
[Document Title]
Page 65

Appendix A Pop-up Windows, JavaScripts and Java Permissions
Figure 37 Internet Options: Privacy
3 Type the IP address of your device (the web page that you do not want to have blocked)
with the prefix “http://”. For example, http://192.168.167.1.
4 Click Add to move the IP address to the list of Allowed sites.
Figure 38 Pop-up Blocker Settings
[Document Title]
65
Page 66

Appendix A Pop-up Windows, JavaScripts and Java Permissions
5 Click Close to return to the Privacy screen.
6 Click Apply to save this setting.
JavaScripts
If pages of the web configurator do not display properly in Internet Explorer, check that
JavaScripts are allowed.
1 In Internet Explorer, click Tools, Internet Options and then the Security tab.
Figure 39 Internet Options: Security
66
2 Click the Custom Level... button.
3 Scroll down to Scripting.
4 Under Active scripting make sure that Enable is selected (the default).
5 Under Scripting of Java applets make sure that Enable is selected (the default).
6 Click OK to close the window.
[Document Title]
Page 67

Appendix A Pop-up Windows, JavaScripts and Java Permissions
Figure 40 Security Settings - Java Scripting
Java Permissions
1 From Internet Explorer, click Too ls , Internet Options and then the Security tab.
2 Click the Custom Level... button.
3 Scroll down to Microsoft VM.
4 Under Java permissions make sure that a safety level is selected.
5 Click OK to close the window.
Figure 41 Security Settings - Java
[Document Title]
67
Page 68

Appendix A Pop-up Windows, JavaScripts and Java Permissions
JAVA (Sun)
1 From Internet Explorer, click Too ls , Internet Options and then the Advanced tab.
2 Make sure that Use Java 2 for <applet> under Java (Sun) is selected.
3 Click OK to close the window.
Figure 42 Java (Sun)
Mozilla Firefox
Mozilla Firefox 2.0 screens are used here. Screens for other versions may vary.
You can enable Java, Javascripts and pop-ups in one screen. Click Tools, then click Options in
the screen that appears.
68
[Document Title]
Page 69

Appendix A Pop-up Windows, JavaScripts and Java Permissions
Figure 43 Mozilla Firefox: Tools > Options
Click Content.to show the screen below. Select the check boxes as shown in the following
screen.
Figure 44 Mozilla Firefox Content Security
[Document Title]
69
Page 70

Appendix A Pop-up Windows, JavaScripts and Java Permissions
70
[Document Title]
Page 71

APPENDIX B
Setting up Your Computer’s IP
Address
" The purpose of this appendix is to show you how to configure an IP address
on your computer depending on what operating system you have. It does NOT
mean that your WPA-1000 supports all these operating systems. To see what
operating systems your WPA-1000 supports, refer to Chapter 6 on page 59.
All computers must have a 10M or 100M Ethernet adapter card and TCP/IP installed.
Windows 95/98/Me/NT/2000/XP/Vista, Macintosh OS 7 and later operating systems and all
versions of UNIX/LINUX include the software components you need to install and use TCP/
IP on your computer. Windows 3.1 requires the purchase of a third-party TCP/IP application
package.
TCP/IP should already be installed on computers using Windows NT/2000/XP, Macintosh OS
7 and later operating systems.
After the appropriate TCP/IP components are installed, configure the TCP/IP settings in order
to "communicate" with your network.
If you manually assign IP information instead of using dynamic assignment, make sure that
your computers have IP addresses that place them in the same subnet as the WPA-1000’s LAN
port.
Windows 95/98/Me
Click Start, Settings, Control Panel and double-click the Network icon to open the Network
window.
WPA-1000 User’s Guide
71
Page 72

Appendix B Setting up Your Computer’s IP Address
Figure 45 WIndows 95/98/Me: Network: Configuration
Installing Components
The Network window Configuration tab displays a list of installed components. You need a
network adapter, the TCP/IP protocol and Client for Microsoft Networks.
If you need the adapter:
1 In the Network window, click Add.
2 Select Adapter and then click Add.
3 Select the manufacturer and model of your network adapter and then click OK.
If you need TCP/IP:
1 In the Network window, click Add.
2 Select Protocol and then click Add.
3 Select Microsoft from the list of manufacturers.
4 Select TCP/IP from the list of network protocols and then click OK.
If you need Client for Microsoft Networks:
1 Click Add.
2 Select Client and then click Add.
3 Select Microsoft from the list of manufacturers.
4 Select Client for Microsoft Networks from the list of network clients and then click
OK.
5 Restart your computer so the changes you made take effect.
72
WPA-1000 User’s Guide
Page 73

Configuring
Figure 46 Windows 95/98/Me: TCP/IP Properties: IP Address
Appendix B Setting up Your Computer’s IP Address
1 In the Network window Configuration tab, select your network adapter's TCP/IP entry
and click Properties
2 Click the IP Address tab.
• If your IP address is dynamic, select Obtain an IP address automatically.
• If you have a static IP address, select Specify an IP address and type your
information into the IP Address and Subnet Mask fields.
3 Click the DNS Configuration tab.
• If you do not know your DNS information, select Disable DNS.
• If you know your DNS information, select Enable DNS and type the information in
the fields below (you may not need to fill them all in).
WPA-1000 User’s Guide
73
Page 74

Appendix B Setting up Your Computer’s IP Address
Figure 47 Windows 95/98/Me: TCP/IP Properties: DNS Configuration
4 Click the Gateway tab.
• If you do not know your gateway’s IP address, remove previously installed gateways.
• If you have a gateway IP address, type it in the New gateway field and click Add.
5 Click OK to save and close the TCP/IP Properties window.
6 Click OK to close the Network window. Insert the Windows CD if prompted.
7 Turn on your WPA-1000 and restart your computer when prompted.
Verifying Settings
1 Click Start and then Run.
2 In the Run window, type "winipcfg" and then click OK to open the IP Configuration
window.
3 Select your network adapter. You should see your computer's IP address, subnet mask
and default gateway.
Windows 2000/NT/XP
The following example figures use the default Windows XP GUI theme.
1 Click start (Start in Windows 2000/NT), Settings, Control Panel.
74
WPA-1000 User’s Guide
Page 75

Figure 48 Windows XP: Start Menu
Appendix B Setting up Your Computer’s IP Address
2 In the Control Panel, double-click Network Connections (Network and Dial-up
Connections in Windows 2000/NT).
Figure 49 Windows XP: Control Panel
3 Right-click Local Area Connection and then click Properties.
WPA-1000 User’s Guide
75
Page 76

Appendix B Setting up Your Computer’s IP Address
Figure 50 Windows XP: Control Panel: Network Connections: Properties
4 Select Internet Protocol (TCP/IP) (under the General tab in Win XP) and then click
Properties.
Figure 51 Windows XP: Local Area Connection Properties
5 The Internet Protocol TCP/IP Properties window opens (the General tab in Windows
XP).
• If you have a dynamic IP address click Obtain an IP address automatically.
• If you have a static IP address click Use the following IP Address and fill in the IP
address, Subnet mask, and Default gateway fields.
• Click Advanced.
76
WPA-1000 User’s Guide
Page 77

Appendix B Setting up Your Computer’s IP Address
Figure 52 Windows XP: Internet Protocol (TCP/IP) Properties
6 If you do not know your gateway's IP address, remove any previously installed
gateways in the IP Settings tab and click OK.
Do one or more of the following if you want to configure additional IP addresses:
•In the IP Settings tab, in IP addresses, click Add.
•In TCP/IP Address, type an IP address in IP address and a subnet mask in Subnet
mask, and then click Add.
• Repeat the above two steps for each IP address you want to add.
• Configure additional default gateways in the IP Settings tab by clicking Add in
Default gateways.
•In TCP/IP Gateway Address, type the IP address of the default gateway in Gateway.
To manually configure a default metric (the number of transmission hops), clear the
Automatic metric check box and type a metric in Metric.
• Click Add.
• Repeat the previous three steps for each default gateway you want to add.
• Click OK when finished.
WPA-1000 User’s Guide
77
Page 78

Appendix B Setting up Your Computer’s IP Address
Figure 53 Windows XP: Advanced TCP/IP Properties
7 In the Internet Protocol TCP/IP Properties window (the General tab in Windows
XP):
• Click Obtain DNS server address automatically if you do not know your DNS
server IP address(es).
• If you know your DNS server IP address(es), click Use the following DNS server
addresses, and type them in the Preferred DNS server and Alternate DNS server
fields.
If you have previously configured DNS servers, click Advanced and then the DNS
tab to order them.
78
WPA-1000 User’s Guide
Page 79

Appendix B Setting up Your Computer’s IP Address
Figure 54 Windows XP: Internet Protocol (TCP/IP) Properties
8 Click OK to close the Internet Protocol (TCP/IP) Properties window.
9 Click Close (OK in Windows 2000/NT) to close the Local Area Connection
Properties window.
10 Close the Network Connections window (Network and Dial-up Connections in
Windows 2000/NT).
11 Turn on your WPA-1000 and restart your computer (if prompted).
Verifying Settings
1 Click Start, All Programs, Accessories and then Command Prompt.
2 In the Command Prompt window, type "ipconfig" and then press [ENTER]. You can
also open Network Connections, right-click a network connection, click Status and
then click the Support tab.
Windows Vista
This section shows screens from Windows Vista Enterprise Version 6.0.
1 Click the Start icon, Control Panel.
WPA-1000 User’s Guide
79
Page 80

Appendix B Setting up Your Computer’s IP Address
Figure 55 Windows Vista: Start Menu
2 In the Control Panel, double-click Network and Internet.
Figure 56 Windows Vista: Control Panel
3 Click Network and Sharing Center.
Figure 57 Windows Vista: Network And Internet
4 Click Manage network connections.
Figure 58 Windows Vista: Network and Sharing Center
80
WPA-1000 User’s Guide
Page 81

Appendix B Setting up Your Computer’s IP Address
5 Right-click Local Area Connection and then click Properties.
" During this procedure, click Continue whenever Windows displays a screen
saying that it needs your permission to continue.
Figure 59 Windows Vista: Network and Sharing Center
6 Select Internet Protocol Version 4 (TCP/IPv4) and click Properties.
Figure 60 Windows Vista: Local Area Connection Properties
WPA-1000 User’s Guide
81
Page 82

Appendix B Setting up Your Computer’s IP Address
7 The Internet Protocol Version 4 (TCP/IPv4) Properties window opens (the General
tab).
• If you have a dynamic IP address click Obtain an IP address automatically.
• If you have a static IP address click Use the following IP address and fill in the IP
address, Subnet mask, and Default gateway fields.
• Click Advanced.
Figure 61 Windows Vista: Internet Protocol Version 4 (TCP/IPv4) Properties
8 If you do not know your gateway's IP address, remove any previously installed
gateways in the IP Settings tab and click OK.
Do one or more of the following if you want to configure additional IP addresses:
•In the IP Settings tab, in IP addresses, click Add.
•In TCP/IP Address, type an IP address in IP address and a subnet mask in Subnet
mask, and then click Add.
• Repeat the above two steps for each IP address you want to add.
• Configure additional default gateways in the IP Settings tab by clicking Add in
Default gateways.
•In TCP/IP Gateway Address, type the IP address of the default gateway in Gateway.
To manually configure a default metric (the number of transmission hops), clear the
Automatic metric check box and type a metric in Metric.
• Click Add.
• Repeat the previous three steps for each default gateway you want to add.
• Click OK when finished.
82
WPA-1000 User’s Guide
Page 83

Appendix B Setting up Your Computer’s IP Address
Figure 62 Windows Vista: Advanced TCP/IP Properties
9 In the Internet Protocol Version 4 (TCP/IPv4) Properties window, (the General tab):
• Click Obtain DNS server address automatically if you do not know your DNS
server IP address(es).
• If you know your DNS server IP address(es), click Use the following DNS server
addresses, and type them in the Preferred DNS server and Alternate DNS server
fields.
If you have previously configured DNS servers, click Advanced and then the DNS
tab to order them.
WPA-1000 User’s Guide
83
Page 84

Appendix B Setting up Your Computer’s IP Address
Figure 63 Windows Vista: Internet Protocol Version 4 (TCP/IPv4) Properties
10 Click OK to close the Internet Protocol Version 4 (TCP/IPv4) Properties window.
11 Click Close to close the Local Area Connection Properties window.
12 Close the Network Connections window.
13 Turn on your WPA-1000 and restart your computer (if prompted).
Verifying Settings
1 Click Start, All Programs, Accessories and then Command Prompt.
2 In the Command Prompt window, type "ipconfig" and then press [ENTER]. You can
also open Network Connections, right-click a network connection, click Status and
then click the Support tab.
Macintosh OS 8/9
1 Click the Apple menu, Control Panel and double-click TCP/IP to open the TCP/IP
Control Panel.
84
WPA-1000 User’s Guide
Page 85

Appendix B Setting up Your Computer’s IP Address
Figure 64 Macintosh OS 8/9: Apple Menu
2 Select Ethernet built-in from the Connect via list.
Figure 65 Macintosh OS 8/9: TCP/IP
3 For dynamically assigned settings, select Using DHCP Server from the Configure: list.
4 For statically assigned settings, do the following:
•From the Configure box, select Manually.
WPA-1000 User’s Guide
85
Page 86

Appendix B Setting up Your Computer’s IP Address
• Type your IP address in the IP Address box.
• Type your subnet mask in the Subnet mask box.
• Type the IP address of your WPA-1000 in the Router address box.
5 Close the TCP/IP Control Panel.
6 Click Save if prompted, to save changes to your configuration.
7 Turn on your WPA-1000 and restart your computer (if prompted).
Verifying Settings
Check your TCP/IP properties in the TCP/IP Control Panel window.
Macintosh OS X
1 Click the Apple menu, and click System Preferences to open the System Preferences
window.
Figure 66 Macintosh OS X: Apple Menu
2 Click Network in the icon bar.
• Select Automatic from the Location list.
• Select Built-in Ethernet from the Show list.
• Click the TCP/IP tab.
3 For dynamically assigned settings, select Using DHCP from the Configure list.
86
WPA-1000 User’s Guide
Page 87

Figure 67 Macintosh OS X: Network
Appendix B Setting up Your Computer’s IP Address
4 For statically assigned settings, do the following:
•From the Configure box, select Manually.
• Type your IP address in the IP Address box.
• Type your subnet mask in the Subnet mask box.
• Type the IP address of your WPA-1000 in the Router address box.
5 Click Apply Now and close the window.
6 Turn on your WPA-1000 and restart your computer (if prompted).
Verifying Settings
Check your TCP/IP properties in the Network window.
Linux
This section shows you how to configure your computer’s TCP/IP settings in Red Hat Linux
9.0. Procedure, screens and file location may vary depending on your Linux distribution and
release version.
WPA-1000 User’s Guide
87
Page 88

Appendix B Setting up Your Computer’s IP Address
" Make sure you are logged in as the root administrator.
Using the K Desktop Environment (KDE)
Follow the steps below to configure your computer IP address using the KDE.
1 Click the Red Hat button (located on the bottom left corner), select System Setting and
click Network.
Figure 68 Red Hat 9.0: KDE: Network Configuration: Devices
2 Double-click on the profile of the network card you wish to configure. The Ethernet
Device General screen displays as shown.
Figure 69 Red Hat 9.0: KDE: Ethernet Device: General
88
WPA-1000 User’s Guide
Page 89

Appendix B Setting up Your Computer’s IP Address
• If you have a dynamic IP address, click Automatically obtain IP address settings
with and select dhcp from the drop down list.
• If you have a static IP address, click Statically set IP Addresses and fill in the
Address, Subnet mask, and Default Gateway Address fields.
3 Click OK to save the changes and close the Ethernet Device General screen.
4 If you know your DNS server IP address(es), click the DNS tab in the Network
Configuration screen. Enter the DNS server information in the fields provided.
Figure 70 Red Hat 9.0: KDE: Network Configuration: DNS
5 Click the Devices tab.
6 Click the Activate button to apply the changes. The following screen displays. Click Yes
to save the changes in all screens.
Figure 71 Red Hat 9.0: KDE: Network Configuration: Activate
7 After the network card restart process is complete, make sure the Status is Active in the
Network Configuration screen.
Using Configuration Files
Follow the steps below to edit the network configuration files and set your computer IP
address.
1 Assuming that you have only one network card on the computer, locate the
eth0
configuration file (where eth0 is the name of the Ethernet card). Open the
configuration file with any plain text editor.
• If you have a dynamic IP address, enter
following figure shows an example.
ifconfig-
dhcp in the BOOTPROTO= field. The
WPA-1000 User’s Guide
89
Page 90

Appendix B Setting up Your Computer’s IP Address
Figure 72 Red Hat 9.0: Dynamic IP Address Setting in ifconfig-eth0
DEVICE=eth0
ONBOOT=yes
BOOTPROTO=dhcp
USERCTL=no
PEERDNS=yes
TYPE=Ethernet
• If you have a static IP address, enter static in the BOOTPROTO= field. Type
IPADDR= followed by the IP address (in dotted decimal notation) and type NETMASK=
followed by the subnet mask. The following example shows an example where the
static IP address is 192.168.1.10 and the subnet mask is 255.255.255.0.
Figure 73 Red Hat 9.0: Static IP Address Setting in ifconfig-eth0
DEVICE=eth0
ONBOOT=yes
BOOTPROTO=static
IPADDR=192.168.1.10
NETMASK=255.255.255.0
USERCTL=no
PEERDNS=yes
TYPE=Ethernet
2 If you know your DNS server IP address(es), enter the DNS server information in the
resolv.conf file in the /etc directory. The following figure shows an example where
two DNS server IP addresses are specified.
Figure 74 Red Hat 9.0: DNS Settings in resolv.conf
nameserver 172.23.5.1
nameserver 172.23.5.2
3 After you edit and save the configuration files, you must restart the network card. Enter
./network restart in the /etc/rc.d/init.d directory. The following figure
shows an example.
Figure 75 Red Hat 9.0: Restart Ethernet Card
[root@localhost init.d]# network restart
Shutting down interface eth0: [OK]
Shutting down loopback interface: [OK]
Setting network parameters: [OK]
Bringing up loopback interface: [OK]
Bringing up interface eth0: [OK]
90
WPA-1000 User’s Guide
Page 91

Verifying Settings
Enter ifconfig in a terminal screen to check your TCP/IP properties.
Figure 76 Red Hat 9.0: Checking TCP/IP Properties
[root@localhost]# ifconfig
eth0 Link encap:Ethernet HWaddr 00:50:BA:72:5B:44
inet addr:172.23.19.129 Bcast:172.23.19.255 Mask:255.255.255.0
UP BROADCAST RUNNING MULTICAST MTU:1500 Metric:1
RX packets:717 errors:0 dropped:0 overruns:0 frame:0
TX packets:13 errors:0 dropped:0 overruns:0 carrier:0
collisions:0 txqueuelen:100
RX bytes:730412 (713.2 Kb) TX bytes:1570 (1.5 Kb)
Interrupt:10 Base address:0x1000
[root@localhost]#
Appendix B Setting up Your Computer’s IP Address
WPA-1000 User’s Guide
91
Page 92

Appendix B Setting up Your Computer’s IP Address
92
WPA-1000 User’s Guide
Page 93

APPENDIX C
Open Source Licences
Notice
Information herein is subject to change without notice. Companies, names, and data used in
examples herein are fictitious unless otherwise noted. No part may be reproduced or
transmitted in any form or by any means, electronic or mechanical, for any purpose, except the
express written permission of ZyXEL Communications Corporation.
" This Product includes busybox 1.1.0, boa 0.94, bridge-utils 1.2, wireless_tools
2.6, iptables software under GPL license.
GNU GENERAL PUBLIC LICENSE
Version 2, June 1991
Copyright (C) 1989, 1991 Free Software Foundation, Inc., 59 Temple Place - Suite 330,
Boston, MA 02111-1307, USA
Everyone is permitted to copy and distribute verbatim copies of this license document, but
changing it is not allowed.
Preamble
The licenses for most software are designed to take away your freedom to share and change it.
By contrast, the GNU General Public License is intended to guarantee your freedom to share
and change free software--to make sure the software is free for all its users. This General
Public License applies to most of the Free Software Foundation's software and to any other
program whose authors commit to using it. (Some other Free Software Foundation software is
covered by the GNU Library General Public License instead.) You can apply it to your
programs, too.
When we speak of free software, we are referring to freedom, not price. Our General Public
Licenses are designed to make sure that you have the freedom to distribute copies of free
software (and charge for this service if you wish), that you receive source code or can get it if
you want it, that you can change the software or use pieces of it in new free programs; and that
you know you can do these things.
WPA-1000 User’s Guide
93
Page 94

Appendix C Open Source Licences
To protect your rights, we need to make restrictions that forbid anyone to deny you these rights
or to ask you to surrender the rights. These restrictions translate to certain responsibilities for
you if you distribute copies of the software, or if you modify it. For example, if you distribute
copies of such a program, whether gratis or for a fee, you must give the recipients all the rights
that you have. You must make sure that they, too, receive or can get the source code. And you
must show them these terms so they know their rights.
We protect your rights with two steps: (1) copyright the software, and (2) offer you this license
which gives you legal permission to copy, distribute and/or modify the software. Also, for
each author's protection and ours, we want to make certain that everyone understands that
there is no warranty for this free software. If the software is modified by someone else and
passed on, we want its recipients to know that what they have is not the original, so that any
problems introduced by others will not reflect on the original authors' reputations.
Finally, any free program is threatened constantly by software patents. We wish to avoid the
danger that redistributors of a free program will individually obtain patent licenses, in effect
making the program proprietary. To prevent this, we have made it clear that any patent must be
licensed for everyone's free use or not licensed at all.
The precise terms and conditions for copying, distribution and modification follow.
TERMS AND CONDITIONS FOR COPYING, DISTRIBUTION AND MODIFICATION
0. This License applies to any program or other work which contains a notice placed by the
copyright holder saying it may be distributed under the terms of this General Public License.
The "Program", below, refers to any such program or work, and a "work based on the
Program" means either the Program or any derivative work under copyright law: that is to say,
a work containing the Program or a portion of it, either verbatim or with modifications and/or
translated into another language. (Hereinafter, translation is included without limitation in the
term "modification".) Each licensee is addressed as "you". Activities other than copying,
distribution and modification are not covered by this License; they are outside its scope. The
act of running the Program is not restricted, and the output from the Program is covered only if
its contents constitute a work based on the Program (independent of having been made by
running the Program). Whether that is true depends on what the Program does.
1. You may copy and distribute verbatim copies of the Program's source code as you receive it,
in any medium, provided that you conspicuously and appropriately publish on each copy an
appropriate copyright notice and disclaimer of warranty; keep intact all the notices that refer to
this License and to the absence of any warranty; and give any other recipients of the Program a
copy of this License along with the Program. You may charge a fee for the physical act of
transferring a copy, and you may at your option offer warranty protection in exchange for a
fee.
2. You may modify your copy or copies of the Program or any portion of it, thus forming a
work based on the Program, and copy and distribute such modifications or work under the
terms of Section 1 above, provided that you also meet all of these conditions:
94
a) You must cause the modified files to carry prominent notices stating that you changed the
files and the date of any change.
b) You must cause any work that you distribute or publish, that in whole or in part contains or
is derived from the Program or any part thereof, to be licensed as a whole at no charge to all
third parties under the terms of this License.
WPA-1000 User’s Guide
Page 95

Appendix C Open Source Licences
c) If the modified program normally reads commands interactively when run, you must cause
it, when started running for such interactive use in the most ordinary way, to print or display an
announcement including an appropriate copyright notice and a notice that there is no warranty
(or else, saying that you provide a warranty) and that users may redistribute the program under
these conditions, and telling the user how to view a copy of this License. (Exception: if the
Program itself is interactive but does not normally print such an announcement, your work
based on the Program is not required to print an announcement.)
These requirements apply to the modified work as a whole. If identifiable sections of that work
are not derived from the Program, and can be reasonably considered independent and separate
works in themselves, then this License, and its terms, do not apply to those sections when you
distribute them as separate works. But when you distribute the same sections as part of a whole
which is a work based on the Program, the distribution of the whole must be on the terms of
this License, whose permissions for other licensees extend to the entire whole, and thus to
each and every part regardless of who wrote it. Thus, it is not the intent of this section to claim
rights or contest your rights to work written entirely by you; rather, the intent is to exercise the
right to control the distribution of derivative or collective works based on the Program. In
addition, mere aggregation of another work not based on the Program with the Program (or
with a work based on the Program) on a volume of a storage or distribution medium does not
bring the other work under the scope of this License.
3. You may copy and distribute the Program (or a work based on it, under Section 2) in object
code or executable form under the terms of Sections 1 and 2 above provided that you also do
one of the following:
a) Accompany it with the complete corresponding machine-readable source code, which must
be distributed under the terms of Sections 1 and 2 above on a medium customarily used for
software interchange; or,
b) Accompany it with a written offer, valid for at least three years, to give any third party, for a
charge no more than your cost of physically performing source distribution, a complete
machine-readable copy of the corresponding source code, to be distributed under the terms of
Sections 1 and 2 above on a medium customarily used for software interchange; or, c)
Accompany it with the information you received as to the offer to distribute corresponding
source code. (This alternative is allowed only for noncommercial distribution and only if you
received the program in object code or executable form with such an offer, in accord with
Subsection b above.) The source code for a work means the preferred form of the work for
making modifications to it. For an executable work, complete source code means all the
source code for all modules it contains, plus any associated interface definition files, plus the
scripts used to control compilation and installation of the executable. However, as a special
exception, the source code distributed need not include anything that is normally distributed
(in either source or binary form) with the major components (compiler, kernel, and so on) of
the operating system on which the executable runs, unless that component itself accompanies
the executable. If distribution of executable or object code is made by offering access to copy
from a designated place, then offering equivalent access to copy the source code from the
same place counts as distribution of the source code, even though third parties are not
compelled to copy the source along with the object code.
WPA-1000 User’s Guide
95
Page 96

Appendix C Open Source Licences
4. You may not copy, modify, sublicense, or distribute the Program except as expressly
provided under this License. Any attempt otherwise to copy, modify, sublicense or distribute
the Program is void, and will automatically terminate your rights under this License. However,
parties who have received copies, or rights, from you under this License will not have their
licenses terminated so long as such parties remain in full compliance.
5. You are not required to accept this License, since you have not signed it. However, nothing
else grants you permission to modify or distribute the Program or its derivative works. These
actions are prohibited by law if you do not accept this License. Therefore, by modifying or
distributing the Program (or any work based on the Program), you indicate your acceptance of
this License to do so, and all its terms and conditions for copying, distributing or modifying
the Program or works based on it.
6. Each time you redistribute the Program (or any work based on the Program), the recipient
automatically receives a license from the original licensor to copy, distribute or modify the
Program subject to these terms and conditions. You may not impose any further restrictions on
the recipients' exercise of the rights granted herein. You are not responsible for enforcing
compliance by third parties to this License.
7. If, as a consequence of a court judgment or allegation of patent infringement or for any
other reason (not limited to patent issues), conditions are imposed on you (whether by court
order, agreement or otherwise) that contradict the conditions of this License, they do not
excuse you from the conditions of this License. If you cannot distribute so as to satisfy
simultaneously your obligations under this License and any other pertinent obligations, then as
a consequence you may not distribute the Program at all. For example, if a patent license
would not permit royalty-free redistribution of the Program by all those who receive copies
directly or indirectly through you, then the only way you could satisfy both it and this License
would be to refrain entirely from distribution of the Program. If any portion of this section is
held invalid or unenforceable under any particular circumstance, the balance of the section is
intended to apply and the section as a whole is intended to apply in other circumstances. It is
not the purpose of this section to induce you to infringe any patents or other property right
claims or to contest validity of any such claims; this section has the sole purpose of protecting
the integrity of the free software distribution system, which is implemented by public license
practices. Many people have made generous contributions to the wide range of software
distributed through that system in reliance on consistent application of that system; it is up to
the author/donor to decide if he or she is willing to distribute software through any other
system and a licensee cannot impose that choice. This section is intended to make thoroughly
clear what is believed to be a consequence of the rest of this License.
96
8. If the distribution and/or use of the Program is restricted in certain countries either by
patents or by copyrighted interfaces, the original copyright holder who places the Program
under this License may add an explicit geographical distribution limitation excluding those
countries, so that distribution is permitted only in or among countries not thus excluded. In
such case, this License incorporates the limitation as if written in the body of this License.
9. The Free Software Foundation may publish revised and/or new versions of the General
Public License from time to time. Such new versions will be similar in spirit to the present
version, but may differ in detail to address new problems or concerns. Each version is given a
distinguishing version number. If the Program specifies a version number of this License
which applies to it and "any later version", you have the option of following the terms and
conditions either of that version or of any later version published by the Free Software
Foundation. If the Program does not specify a version number of this License, you may choose
any version ever published by the Free Software Foundation.
WPA-1000 User’s Guide
Page 97

Appendix C Open Source Licences
10. If you wish to incorporate parts of the Program into other free programs whose distribution
conditions are different, write to the author to ask for permission. For software which is
copyrighted by the Free Software Foundation, write to the Free Software Foundation; we
sometimes make exceptions for this. Our decision will be guided by the two goals of
preserving the free status of all derivatives of our free software and of promoting the sharing
and reuse of software generally.
NO WARRANTY
11. BECAUSE THE PROGRAM IS LICENSED FREE OF CHARGE, THERE IS NO
WARRANTY FOR THE PROGRAM, TO THE EXTENT PERMITTED BY APPLICABLE
LAW. EXCEPT WHEN OTHERWISE STATED IN WRITING THE COPYRIGHT
HOLDERS AND/OR OTHER PARTIES PROVIDE THE PROGRAM "AS IS" WITHOUT
WARRANTY OF ANY KIND, EITHER EXPRESSED OR IMPLIED, INCLUDING, BUT
NOT LIMITED TO, THE IMPLIED WARRANTIES OF MERCHANTABILITY AND
FITNESS FOR A PARTICULAR PURPOSE. THE ENTIRE RISK AS TO THE QUALITY
AND PERFORMANCE OF THE PROGRAM IS WITH YOU. SHOULD THE PROGRAM
PROVE DEFECTIVE, YOU ASSUME THE COST OF ALL NECESSARY SERVICING,
REPAIR OR CORRECTION.
12. IN NO EVENT UNLESS REQUIRED BY APPLICABLE LAW OR AGREED TO IN
WRITING WILL ANY COPYRIGHT HOLDER, OR ANY OTHER PARTY WHO MAY
MODIFY AND/OR REDISTRIBUTE THE PROGRAM AS PERMITTED ABOVE, BE
LIABLE TO YOU FOR DAMAGES, INCLUDING ANY GENERAL, SPECIAL,
INCIDENTAL OR CONSEQUENTIAL DAMAGES ARISING OUT OF THE USE OR
INABILITY TO USE THE PROGRAM (INCLUDING BUT NOT LIMITED TO LOSS OF
DATA OR DATA BEING RENDERED INACCURATE OR LOSSES SUSTAINED BY YOU
OR THIRD PARTIES OR A FAILURE OF THE PROGRAM TO OPERATE WITH ANY
OTHER PROGRAMS), EVEN IF SUCH HOLDER OR OTHER PARTY HAS BEEN
ADVISED OF THE POSSIBILITY OF SUCH DAMAGES.
END OF TERMS AND CONDITIONS
All other trademarks or trade names mentioned herein, if any, are the property of their
respective owners.
" This Product includes uClibc 0.9.26 and Log for C++ 0.3.5rc3 software under
LGPL license.
GNU LESSER GENERAL PUBLIC LICENSE
Version 2.1, February 1999
Copyright (C) 1991, 1999 Free Software Foundation, Inc.
59 Temple Place, Suite 330, Boston, MA 02111-1307 USA
Everyone is permitted to copy and distribute verbatim copies of this license document, but
changing it is not allowed. [This is the first released version of the Lesser GPL. It also counts
as the successor of the GNU Library Public License, version 2, hence the version number 2.1.
WPA-1000 User’s Guide
97
Page 98

Appendix C Open Source Licences
Preamble
The licenses for most software are designed to take away your freedom to share and change it.
By contrast, the GNU General Public Licenses are intended to guarantee your freedom to
share and change free software--to make sure the software is free for all its users.
This license, the Lesser General Public License, applies to some specially designated software
packages--typically libraries--of the Free Software Foundation and other authors who decide
to use it. You can use it too, but we suggest you first think carefully about whether this license
or the ordinary General Public License is the better strategy to use in any particular case, based
on the explanations below.
When we speak of free software, we are referring to freedom of use, not price. Our General
Public Licenses are designed to make sure that you have the freedom to distribute copies of
free software (and charge for this service if you wish); that you receive source code or can get
it if you want it; that you can change the software and use pieces of it in new free programs;
and that you are informed that you can do these things.
To protect your rights, we need to make restrictions that forbid distributors to deny you these
rights or to ask you to surrender these rights. These restrictions translate to certain
responsibilities for you if you distribute copies of the library or if you modify it.
For example, if you distribute copies of the library, whether gratis or for a fee, you must give
the recipients all the rights that we gave you. You must make sure that they, too, receive or can
get the source code. If you link other code with the library, you must provide complete object
files to the recipients, so that they can relink them with the library after making changes to the
library and recompiling it. And you must show them these terms so they know their rights.
We protect your rights with a two-step method: (1) we copyright the library, and (2) we offer
you this license, which gives you legal permission to copy, distribute and/or modify the
library.
To protect each distributor, we want to make it very clear that there is no warranty for the free
library. Also, if the library is modified by someone else and passed on, the recipients should
know that what they have is not the original version, so that the original author's reputation
will not be affected by problems that might be introduced by others.
Finally, software patents pose a constant threat to the existence of any free program. We wish
to make sure that a company cannot effectively restrict the users of a free program by
obtaining a restrictive license from a patent holder. Therefore, we insist that any patent license
obtained for a version of the library must be consistent with the full freedom of use specified
in this license.
Most GNU software, including some libraries, is covered by the ordinary GNU General Public
License. This license, the GNU Lesser General Public License, applies to certain designated
libraries, and is quite different from the ordinary General Public License. We use this license
for certain libraries in order to permit linking those libraries into non-free programs.
When a program is linked with a library, whether statically or using a shared library, the
combination of the two is legally speaking a combined work, a derivative of the original
library. The ordinary General Public License therefore permits such linking only if the entire
combination fits its criteria of freedom. The Lesser General Public License permits more lax
criteria for linking other code with the library.
98
WPA-1000 User’s Guide
Page 99

Appendix C Open Source Licences
We call this license the "Lesser" General Public License because it does Less to protect the
user's freedom than the ordinary General Public License. It also provides other free software
developers Less of an advantage over competing non-free programs. These disadvantages are
the reason we use the ordinary General Public License for many libraries. However, the Lesser
license provides advantages in certain special circumstances.
For example, on rare occasions, there may be a special need to encourage the widest possible
use of a certain library, so that it becomes a de-facto standard. To achieve this, non-free
programs must be allowed to use the library. A more frequent case is that a free library does
the same job as widely used non-free libraries. In this case, there is little to gain by limiting the
free library to free software only, so we use the Lesser General Public License. In other cases,
permission to use a particular library in non-free programs enables a greater number of people
to use a large body of free software. For example, permission to use the GNU C Library in
non-free programs enables many more people to use the whole GNU operating system, as well
as its variant, the GNU/Linux operating system.
Although the Lesser General Public License is Less protective of the users' freedom, it does
ensure that the user of a program that is linked with the Library has the freedom and the
wherewithal to run that program using a modified version of the Library.
The precise terms and conditions for copying, distribution and modification follow. Pay close
attention to the difference between a "work based on the library" and a "work that uses the
library". The former contains code derived from the library, whereas the latter must be
combined with the library in order to run.
GNU LESSER GENERAL PUBLIC LICENSE TERMS AND CONDITIONS FOR
COPYING, DISTRIBUTION AND MODIFICATION
0. This License Agreement applies to any software library or other program which contains a
notice placed by the copyright holder or other authorized party saying it may be distributed
under the terms of this Lesser General Public License (also called "this License").
Each licensee is addressed as "you".
A "library" means a collection of software functions and/or data prepared so as to be
conveniently linked with application programs (which use some of those functions and data)
to form executables. The "Library", below, refers to any such software library or work which
has been distributed under these terms. A "work based on the Library" means either the
Library or any derivative work under copyright law: that is to say, a work containing the
Library or a portion of it, either verbatim or with modifications and/or translated
straightforwardly into another language. (Hereinafter, translation is included without
limitation in the term "modification".)
"Source code" for a work means the preferred form of the work for making modifications to it.
For a library, complete source code means all the source code for all modules it contains, plus
any associated interface definition files, plus the scripts used to control compilation and
installation of the library. Activities other than copying, distribution and modification are not
covered by this License; they are outside its scope. The act of running a program using the
Library is not restricted, and output from such a program is covered only if its contents
constitute a work based on the Library (independent of the use of the Library in a tool for
writing it). Whether that is true depends on what the Library does and what the program that
uses the Library does.
WPA-1000 User’s Guide
99
Page 100

Appendix C Open Source Licences
1. You may copy and distribute verbatim copies of the Library's complete source code as you
receive it, in any medium, provided that you conspicuously and appropriately publish on each
copy an appropriate copyright notice and disclaimer of warranty; keep intact all the notices
that refer to this License and to the absence of any warranty; and distribute a copy of this
License along with the Library. You may charge a fee for the physical act of transferring a
copy, and you may at your option offer warranty protection in exchange for a fee.
2. You may modify your copy or copies of the Library or any portion of it, thus forming a work
based on the Library, and copy and distribute such modifications or work under the terms of
Section 1 above, provided that you also meet all of these conditions: a) The modified work
must itself be a software library. b) You must cause the files modified to carry prominent
notices stating that you changed the files and the date of any change. c) You must cause the
whole of the work to be licensed at no charge to all third parties under the terms of this
License. d) If a facility in the modified Library refers to a function or a table of data to be
supplied by an application program that uses the facility, other than as an argument passed
when the facility is invoked, then you must make a good faith effort to ensure that, in the event
an application does not supply such function or table, the facility still operates, and performs
whatever part of its purpose remains meaningful. (For example, a function in a library to
compute square roots has a purpose that is entirely well-defined independent of the
application. Therefore, Subsection 2d requires that any application-supplied function or table
used by this function must be optional: if the application does not supply it, the square root
function must still compute square roots.) These requirements apply to the modified work as a
whole. If identifiable sections of that work are not derived from the Library, and can be
reasonably considered independent and separate works in themselves, then this License, and
its terms, do not apply to those sections when you distribute them as separate works. But when
you distribute the same sections as part of a whole which is a work based on the Library, the
distribution of the whole must be on the terms of this License, whose permissions for other
licensees extend to the entire whole, and thus to each and every part regardless of who wrote
it. Thus, it is not the intent of this section to claim rights or contest your rights to work written
entirely by you; rather, the intent is to exercise the right to control the distribution of derivative
or collective works based on the Library. In addition, mere aggregation of another work not
based on the Library with the Library (or with a work based on the Library) on a volume of a
storage or distribution medium does not bring the other work under the scope of this License.
100
3. You may opt to apply the terms of the ordinary GNU General Public License instead of this
License to a given copy of the Library. To do this, you must alter all the notices that refer to
this License, so that they refer to the ordinary GNU General Public License, version 2, instead
of to this License. (If a newer version than version 2 of the ordinary GNU General Public
License has appeared, then you can specify that version instead if you wish.) Do not make any
other change in these notices. Once this change is made in a given copy, it is irreversible for
that copy, so the ordinary GNU General Public License applies to all subsequent copies and
derivative works made from that copy. This option is useful when you wish to copy part of the
code of the Library into a program that is not a library.
4. You may copy and distribute the Library (or a portion or derivative of it, under Section 2) in
object code or executable form under the terms of Sections 1 and 2 above provided that you
accompany it with the complete corresponding machine-readable source code, which must be
distributed under the terms of Sections 1 and 2 above on a medium customarily used for
WPA-1000 User’s Guide
 Loading...