

ZyXEL WAP6405 User Manual

Quick Start Guide
WAP6405
5GHz AC1750 Gigabit Wireless Bridge
Version 1.00
Edition 1, 06/2016
User’s Guide
Default Login Details
LAN IP Address http://192.168.1.2 (AP Mode)
www.zyxel.com
Password 1234
http://192.168.1.5 (Repeater Mode)
http://192.168.1.10 (Client Mode)
Copyright © 2016 ZyXEL Communications Corporation

IMPORTANT!
READ CAREFULLY BEFORE USE.
KEEP THIS GUIDE FOR FUTURE REFERENCE.
Screenshots and graphics in this book may differ slightly from your product due to differences in
your product firmware or your computer operating system. Every effort has been made to ensure
that the information in this manual is accurate.
Related Documentation
•Quick Start Guide
The Quick Start Guide shows how to connect the WAP6405 and access the Web Configurator.
•More Information
Go to support.zyxel.com to find other information on the WAP6405.
WAP6405 User’s Guide
2

Contents Overview
Contents Overview
User’s Guide .........................................................................................................................................8
Getting to Know Your WAP6405 ............................................................................................................... 9
Introducing the Web Configurator ...........................................................................................................13
WAP6405 Modes ....................................................................................................................................16
Easy Mode .............................................................................................................................................. 18
Access Point Mode ................................................................................................................................. 22
Client Mode .............................................................................................................................................27
Universal Repeater Mode .......................................................................................................................30
Tutorials ..................................................................................................................................................34
Technical Reference ..........................................................................................................................47
Monitor .................................................................................................................................................... 48
Network ................................................................................................................................................... 53
Wireless Network ....................................................................................................................................56
AP Connection ........................................................................................................................................ 66
Maintenance ............................................................................................................................................71
Troubleshooting ......................................................................................................................................76
WAP6405 User’s Guide
3

Table of Contents
Table of Contents
Contents Overview ..............................................................................................................................3
Table of Contents .................................................................................................................................4
Part I: User’s Guide ...........................................................................................8
Chapter 1
Getting to Know Your WAP6405..........................................................................................................9
1.1 Overview ............................................................................................................................................. 9
1.2 Applications .........................................................................................................................................9
1.3 Ways to Manage the WAP6405 ..........................................................................................................9
1.4 Good Habits for Managing the WAP6405 ......................................................................................... 10
1.5 Resetting the WAP6405 ....................................................................................................................10
1.5.1 Procedure to Use the Reset Button .........................................................................................10
1.6 The WPS Button ...............................................................................................................................10
1.7 LEDs ................................................................................................................................................. 11
Chapter 2
Introducing the Web Configurator ....................................................................................................13
2.1 Overview ........................................................................................................................................... 13
2.2 Accessing the Web Configurator .......................................................................................................13
2.2.1 Login Screen ...........................................................................................................................13
2.2.2 Password Screen ....................................................................................................................14
Chapter 3
WAP6405 Modes .................................................................................................................................16
3.1 Overview ........................................................................................................................................... 16
3.1.1 Web Configurator Modes .........................................................................................................16
3.1.2 Device Modes ..........................................................................................................................16
Chapter 4
Easy Mode...........................................................................................................................................18
4.1 Overview ........................................................................................................................................... 18
4.2 What You Can Do .............................................................................................................................19
4.3 Navigation Panel ............................................................................................................................... 19
4.4 Network Map .....................................................................................................................................20
4.5 Status Screen in Easy Mode .............................................................................................................20
WAP6405 User’s Guide
4

Table of Contents
Chapter 5
Access Point Mode.............................................................................................................................22
5.1 Overview ........................................................................................................................................... 22
5.2 What You Can Do .............................................................................................................................22
5.3 What You Need to Know ................................................................................................................... 23
5.4 Setting your WAP6405 to AP Mode ..................................................................................................23
5.4.1 Configuring your WLAN, LAN and Maintenance Settings .......................................................23
5.5 AP Mode Status Screen ....................................................................................................................23
5.5.1 Navigation Panel .....................................................................................................................25
Chapter 6
Client Mode .........................................................................................................................................27
6.1 Overview ........................................................................................................................................... 27
6.2 What You Can Do .............................................................................................................................27
6.3 What You Need to Know ................................................................................................................... 28
6.4 Setting your WAP6405 to Client Mode ..............................................................................................28
6.5 Client Mode Status Screen ................................................................................................................28
Chapter 7
Universal Repeater Mode...................................................................................................................30
7.1 Overview ........................................................................................................................................... 30
7.2 What You Can Do .............................................................................................................................30
7.3 What You Need to Know ................................................................................................................... 31
7.4 Setting your WAP6405 to Universal Repeater Mode ........................................................................31
7.5 Universal Repeater Mode Status Screen ..........................................................................................31
Chapter 8
Tutorials...............................................................................................................................................34
8.1 Overview ........................................................................................................................................... 34
8.2 Connecting to the Internet from an Access Point ..............................................................................34
8.3 Configuring Wireless Security Using WPS ........................................................................................34
8.3.1 Push Button Configuration (PBC) ............................................................................................ 35
8.3.2 PIN Configuration .................................................................................................................... 36
8.4 Enabling and Configuring Wireless Security (No WPS) ....................................................................37
8.4.1 Configure Your Notebook ........................................................................................................39
8.5 Using Multiple SSIDs on the WAP6405 ............................................................................................41
8.5.1 Configuring Security Settings of Multiple SSIDs ......................................................................41
8.6 Connecting the WAP6405 (in Universal Repeater Mode) to an AP or Wireless Router ...................43
8.7 Connecting the WAP6405 (in Client Mode) to an AP or Wireless Router ......................................... 45
8.7.1 Connecting to a Wireless Network Using AP List ....................................................................45
8.7.2 Connecting to a Wireless Network Using a Profile ..................................................................46
8.7.3 Deploying the WAP6405 in your Network ................................................................................46
WAP6405 User’s Guide
5

Table of Contents
Part II: Technical Reference............................................................................47
Chapter 9
Monitor.................................................................................................................................................48
9.1 Overview ........................................................................................................................................... 48
9.2 What You Can Do .............................................................................................................................48
9.3 Log ....................................................................................................................................................48
9.4 Wireless Monitor ...........................................................................................................................49
9.5 WDS Monitor .....................................................................................................................................50
9.6 MBSS Monitor ...................................................................................................................................51
Chapter 10
Network................................................................................................................................................53
10.1 Overview .........................................................................................................................................53
10.2 What You Can Do ...........................................................................................................................53
10.3 What You Need To Know ................................................................................................................53
10.3.1 LAN TCP/IP ...........................................................................................................................54
10.4 Networking Screen ..........................................................................................................................54
Chapter 11
Wireless Network................................................................................................................................56
11.1 Overview .........................................................................................................................................56
11.2 What You Can Do ............................................................................................................................56
11.3 What You Should Know ...................................................................................................................57
11.3.1 Wireless Security Overview ................................................................................................... 57
11.4 Basic Wireless Network Screen .....................................................................................................59
11.5 Advanced Wireless Network Screen ...............................................................................................60
11.6 WPS Screen ....................................................................................................................................61
11.7 MAC Filter ....................................................................................................................................... 62
11.8 WDS Screen .................................................................................................................................... 63
11.9 MBSS Screen ..................................................................................................................................64
Chapter 12
AP Connection....................................................................................................................................66
12.1 Overview .........................................................................................................................................66
12.2 What You Can Do ...........................................................................................................................66
12.3 Basic AP Connection Screen ..........................................................................................................67
12.4 Advanced AP Connection Screen ...................................................................................................68
12.5 AP List Screen ................................................................................................................................ 68
12.6 WPS AP Connection Screen ...........................................................................................................70
Chapter 13
Maintenance........................................................................................................................................71
WAP6405 User’s Guide
6

Table of Contents
13.1 Overview .........................................................................................................................................71
13.2 What You Can Do ...........................................................................................................................71
13.3 Password Screen ............................................................................................................................ 71
13.4 Firmware Upgrade Screen ..............................................................................................................72
13.5 Telnet ...............................................................................................................................................73
13.6 Restore Screen ...............................................................................................................................73
13.7 Restart Screen ................................................................................................................................75
Chapter 14
Troubleshooting..................................................................................................................................76
14.1 Power, Hardware Connections, and LEDs ......................................................................................76
14.2 WAP6405 Access and Login ...........................................................................................................77
14.3 Internet Access ............................................................................................................................... 78
14.4 Resetting the WAP6405 to Its Factory Defaults ..............................................................................79
14.5 Wireless Router/AP Troubleshooting ..............................................................................................80
Appendix A Pop-up Windows, JavaScripts and Java Permissions....................................................81
Appendix B IP Addresses and Subnetting.........................................................................................90
Appendix C Setting Up Your Computer’s IP Address ......................................................................100
Appendix D Wireless LANs..............................................................................................................128
Appendix E Common Services ........................................................................................................141
Appendix F Customer Support ........................................................................................................144
Appendix G Legal Information .........................................................................................................151
Index ..................................................................................................................................................159
WAP6405 User’s Guide
7

PART I
User’s Guide
8
1.1 Overview
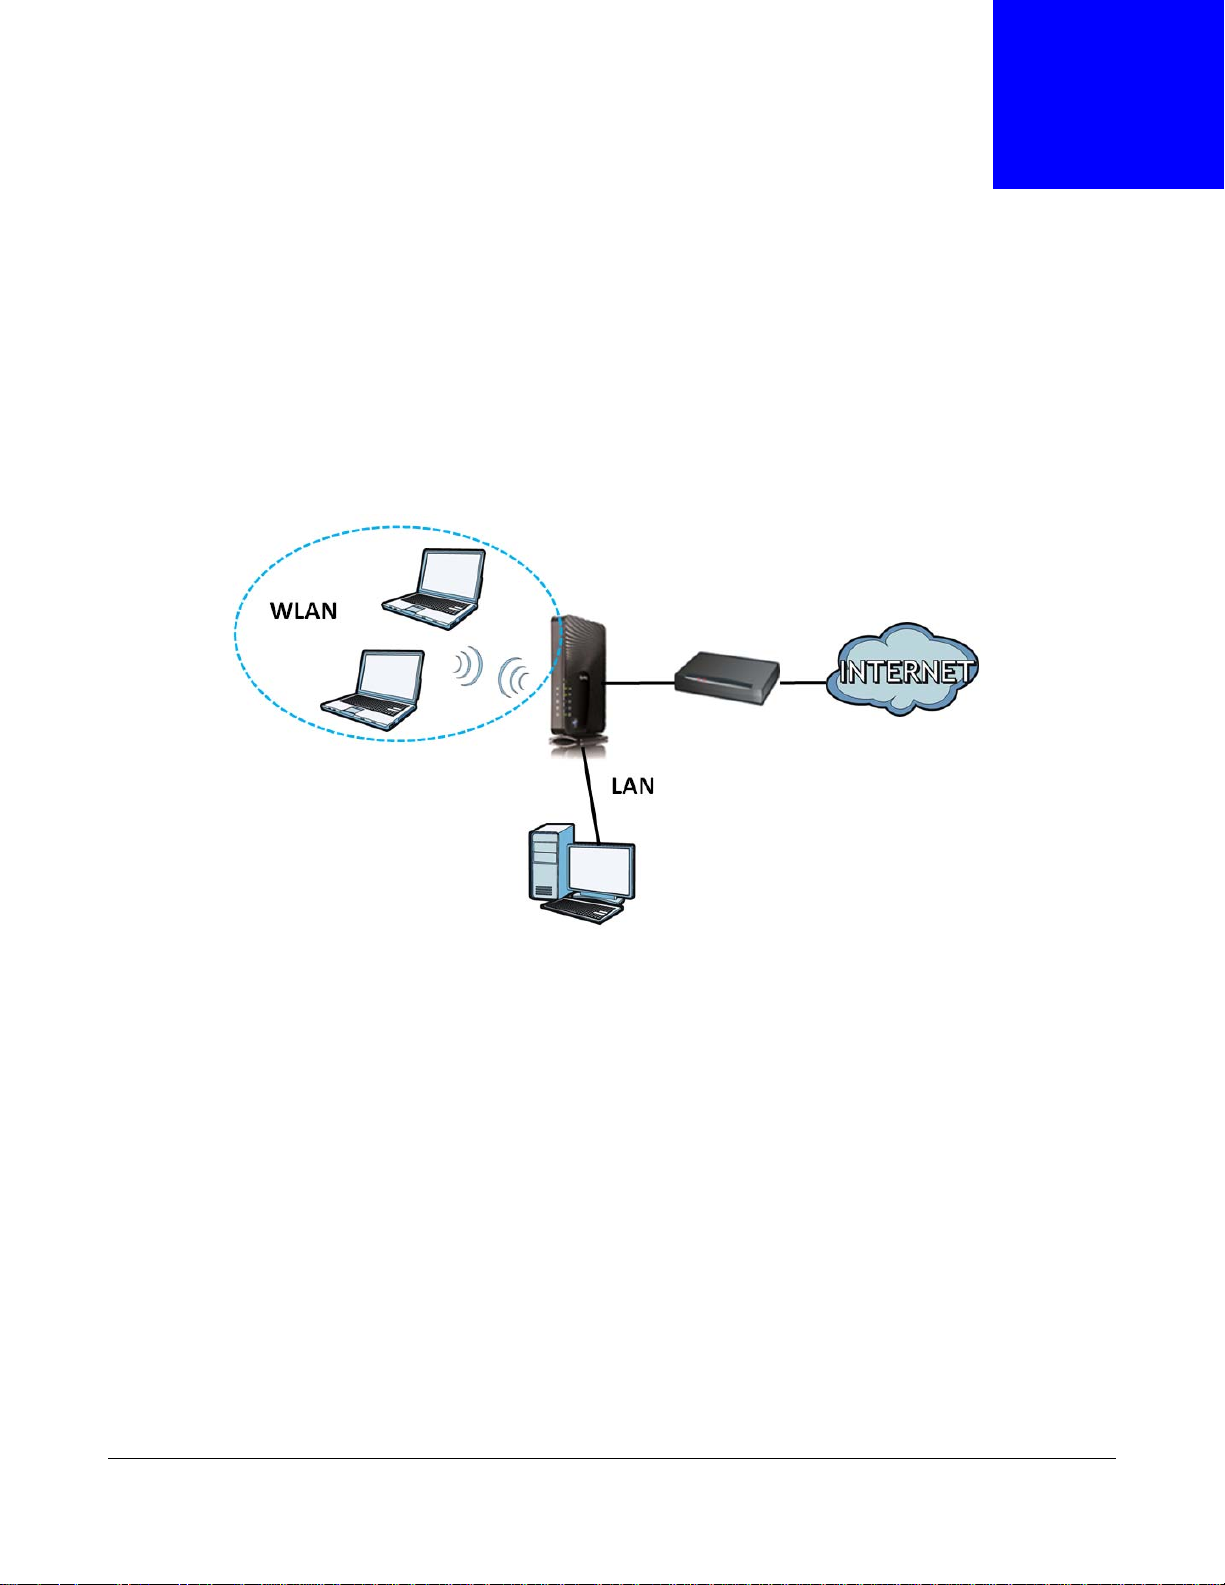
This chapter introduces the main features and applications of the WAP6405.
The Zyxel WAP6405 5GHz AC1750 Gigabit Wireless Bridge extends the range of your existing wired
network without additional wiring, providing a high-performance wireless bridge. You can set up a
wireless network with other IEEE 802.11a/n/ac 5GHz compatible devices. Multiple HD videos can be
streamed over interference-free 5GHz radio band across the network with no frame loss. The
WAP6405’s video-grade QoS and Smart Range optimize stable HD video streaming.
1.2 Applications
CHAPTER 1
Getting to Know Your WAP6405
Your can have the following networks on the WAP6405:
• Wired. You can connect to a broadband modem/router for Internet access and/or connect
network devices via the Ethernet ports of the WAP6405 so that they can communicate with each
other and access the Internet.
• Wireless. Wireless clients can connect to the WAP6405 to access network resources.
Figure 1 WAP6405 Network
1.3 Ways to Manage the WAP6405
Use any of the following methods to manage the WAP6405.
• Web Configurator. This is recommended for everyday management of the WAP6405 using a
(supported) web browser.
WAP6405 User’s Guide
9

Chapter 1 Getting to Know Your WAP6405
• WPS (Wi-Fi Protected Setup) button. You can use the WPS button or the WPS section of the Web
Configurator to set up a wireless network with your WAP6405.
1.4 Good Habits for Managing the WAP6405
Do the following things regularly to make the WAP6405 more secure and to manage the WAP6405
more effectively.
• Change the password. Use a password that’s not easy to guess and that consists of different
types of characters, such as numbers and letters.
• Write down the password and put it in a safe place.
• Back up the configuration (and make sure you know how to restore it). Restoring an earlier
working configuration may be useful if the device becomes unstable or even crashes. If you
forget your password, you will have to reset the WAP6405 to its factory default settings. If you
backed up an earlier configuration file, you would not have to totally re-configure the WAP6405.
You could simply restore your last configuration.
1.5 Resetting the WAP6405
If you forget your password or IP address, or you cannot access the Web Configurator, you will need
to use the RESET button at the back of the WAP6405 to reload the factory-default configuration
file. This means that you will lose all configurations that you had previously saved, the password
will be reset to “1234” and the WAP6405 will be reset to obtain an IP address from a DHCP server.
1.5.1 Procedure to Use the Reset Button
1 Make sure the power LED is on.
2 Press the RESET button for one to five seconds to reboot the WAP6405.
3 Press the RESET button for longer than five seconds to set the WAP6405 back to its factory-default
configurations.
1.6 The WPS Button
You can use the WPS button on the back panel of the WAP6405 as a push button, to activate WPS
in order to quickly set up a wireless network with strong security.
1 Make sure the power LED is on (not blinking).
2 Press the WPS button for more than three seconds and release it. Press the WPS button on another
WPS-enabled device within range of the WAP6405.
WAP6405 User’s Guide
10

Note: For AP mode press the WPS button once, within 3 seconds both 5G Primary SSID
1.7 LEDs
Figure 2 Front Panel
Chapter 1 Getting to Know Your WAP6405
will trigger to route the AP. For Client mode press the WPS button once, within 3
seconds the uplink 5G WPS will trigger to route the AP. For Universal Repeater
mode press WPS button, and within 3 seconds the uplink WPS will trigger to route
the AP. The uplink SSID/security is cloned to the downlink (primary) SSID
automatically. Press the WPS button 2 times and within 3 seconds the downlink
will be triggered to end the connection with the client.
WAP6405 User’s Guide
11
Chapter 1 Getting to Know Your WAP6405
The following table describes the LEDs and the WPS button.
Table 1 Front Panel LEDs and WPS Button
LED COLOR STATUS DESCRIPTION
Power Green On The WAP6405 is receiving power and starts up.
Off The WAP6405 is not receiving power.
LAN 1-2 Green On The WAP6405 has a successful 10/1000 Mbps Ethernet
connection.
Blinking The WAP6405 is sending/receiving data through the LAN.
Off The LAN is not connected.
WLAN Green On The WAP6405 is ready, but is not sending/receiving data
through the wireless LAN.
Blinking The WAP6405 is sending/receiving data through the wireless
Off The wireless LAN is not ready or has failed.
Link Quality Green On On AP Mode Link Quality is always on.
Amber On On Client Mode, the WAP6405 has a data transfer rate
Red On On Client Mode, the WAP6405 has a data transfer rate is less
Off The WAP6405 has no wireless connection.
Mode Green On The WAP6405 is on the AP Mode.
Blinking The WAP6405 is on the Repeater Mode.
Amber On The WAP6405 is on the Clie nt Mo de.
Off The WAP6405 has no activity.
WPS Green On WPS is enabled.
Blinking The WAP6405 is negotiating a WPS connection with a wireless
Off WPS is disabled.
Red On WPS process fails.
LAN.
On Client Mode, the WAP6405 has a data transfer rate
>65Mbps.
between 19.5Mbps-65Mbps.
than 19.5Mbps.
device.
WAP6405 User’s Guide
12

2.1 Overview
This chapter describes how to access the WAP6405 Web Configurator and provides an overview of
its screens.
The Web Configurator is an HTML-based management interface that allows easy setup and
management of the WAP6405 via Internet browser. Use Internet Explorer 8.0 and later or Safari 2.0
or later versions. The recommended screen resolution is 1024 by 768 pixels.
In order to use the Web Configurator you need to allow:
• Web browser pop-up windows from your device.
• JavaScripts (enabled by default).
• Java permissions (enabled by default).
CHAPTER 2
Introducing the Web Configurator
Refer to the Troubleshooting chapter (Chapter 14 on page 76) to see how to make sure these
functions are allowed in Internet Explorer.
2.2 Accessing the Web Configurator
1 Connect your computer to the LAN port of the WAP6405.
2 Open a web browser such as Internet Explorer. To access AP Mode type “http://192.168.1.2” as
the web address in your web browser. To access Client Mode type “http://192.168.1.10” as the
web address in your web browser. To access Universal Repeater Mode type “http://192.168.1.5”
as the web address in your web browser. You may also type “http://wap6405.setup” to access any
of the modes.
2.2.1 Login Screen
The Web Configurator initially displays the following login screen.
WAP6405 User’s Guide
13
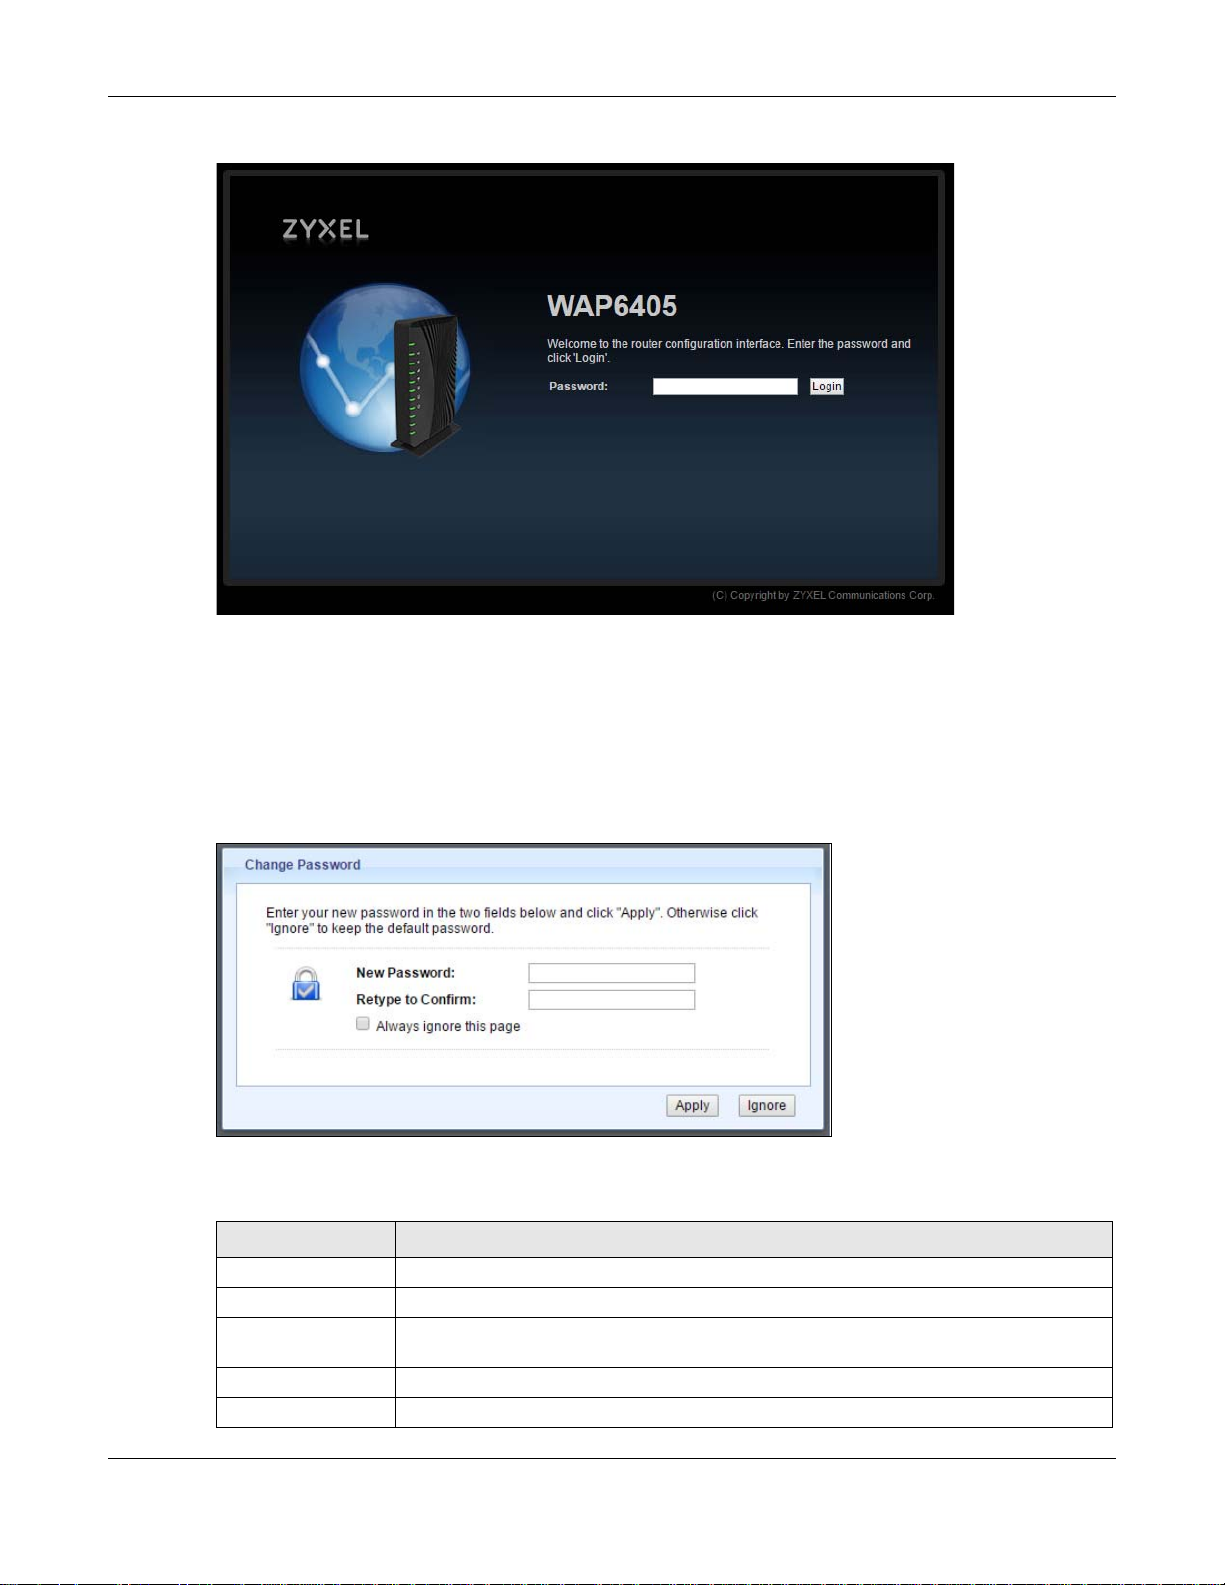
Chapter 2 Introducing the Web Configurator
Figure 3 Login screen
Type “1234” (default) as the password.
2.2.2 Password Screen
You should see a screen asking you to change your password (highly recommended) as shown
next.
Figure 4 Change Password Screen
The following table describes the labels in this screen.
Table 2 Change Password Screen
LABEL DESCRIPTION
New Password Type a new password.
Retype to Confirm Retype the password for confirmation.
Always ignore this
page
Apply Click Apply to save your changes back to the WAP6405.
Ignore Click Ignore if you do not want to change the password this time.
Click on the check box if you do not want this box to reappear.
WAP6405 User’s Guide
14

Chapter 2 Introducing the Web Configurator
Note: For security reasons, the WAP6405 automatically logs you out if you do not use the
web configurator for five minutes (Default). Simply log back into the WAP6405 if
this happens.
WAP6405 User’s Guide
15

3.1 Overview
This chapter introduces the different modes available on your WAP6405.
• Device mode. This is the operating mode of your WAP6405, or simply how the WAP6405 is
being used in the network.
3.1.1 Web Configurator Modes
This refers to the configuration interface if the Web Configurator, which has two modes:
•Easy: The Web Configurator shows this mode by default. Refer Chapter 4 on page 18 to for more
information on the screens in this mode. This interface shows how the WAP6405’s network is
currently laid out.
•Expert: Advanced users can change to this mode to customize all the functions of the WAP6405.
Click Expert Mode after logging into the Web Configurator. The User’s Guide Chapter 2 on page
13 to Chapter 13 on page 71 discusses the screens in this mode.
CHAPTER 3
WAP6405 Modes
3.1.2 Device Modes
This refers to the operating mode of the WAP6405, which can act as a:
• Access Point. Use this mode if you want to extend your network by allowing network devices to
connect to the WAP6405 wirelessly. Go to Section 5.5 on page 23 to view the Status screen in
this mode.
In this mode, you can also set the WAP6405 to work as an AP only, a wireless bridge to establish
wireless links with other APs (WDS bridge), or an AP and bridge simultaneously (WDS repeater).
See Section 11.8 on page 63 for more information.
• Client. Use this mode if there is an existing wireless router or access point in the network to
which you want to connect your local network. Go to Section 6.5 on page 28 to view the Status
screen in this mode. In Client mode, you should know the SSID and wireless security details of
the access point to which you want to connect.
• Universal Repeater. In this mode, the WAP6405 can be an access point and a wireless client at
the same time. Use this mode if there is an existing wireless router or access point in your
network and you also want to allow clients to connect to the WAP6405 wirelessly. Go to Section
6.5 on page 28 to view the Status screen in this mode.
The following figure is a simple illustration of the device operating modes of the WAP6405.
WAP6405 User’s Guide
16
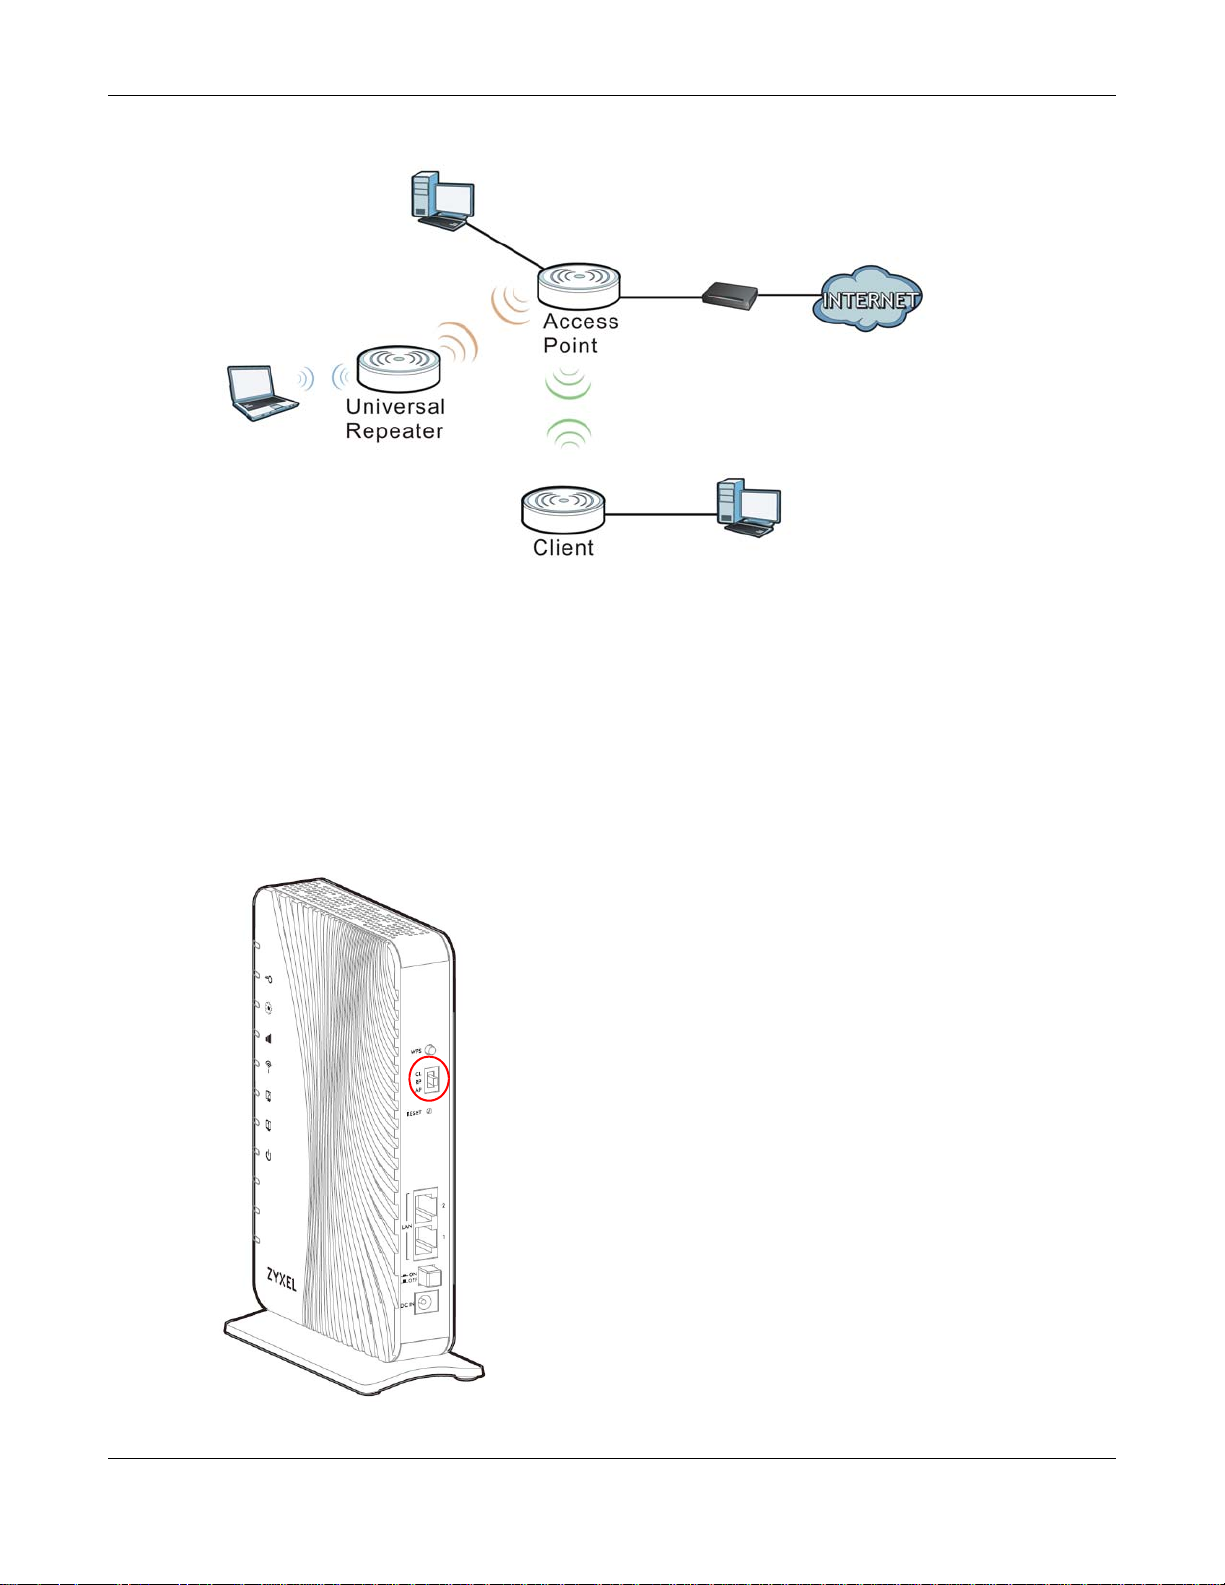
Figure 5 Device Operating Mode Example
Note: Choose your device mode carefully to avoid having to change it later.
3.1.2.1 Changing Operating Mode
Chapter 3 WAP6405 Modes
Push the AP RP CL hardware switch on the WAP6405’s back panel to the AP position to have the
WAP6405 act as an access point. Push the switch to the RP position to have the WAP6405 work as
a universal repeater. Otherwise, push the switch to the CL position to have the WAP6405 work as a
wireless client.
The WAP6405 restarts automatically after you change operating modes.
Rear Panel
WAP6405 User’s Guide
17
4.1 Overview
Navigation Panel
Network Map
Go to
Status
Screen
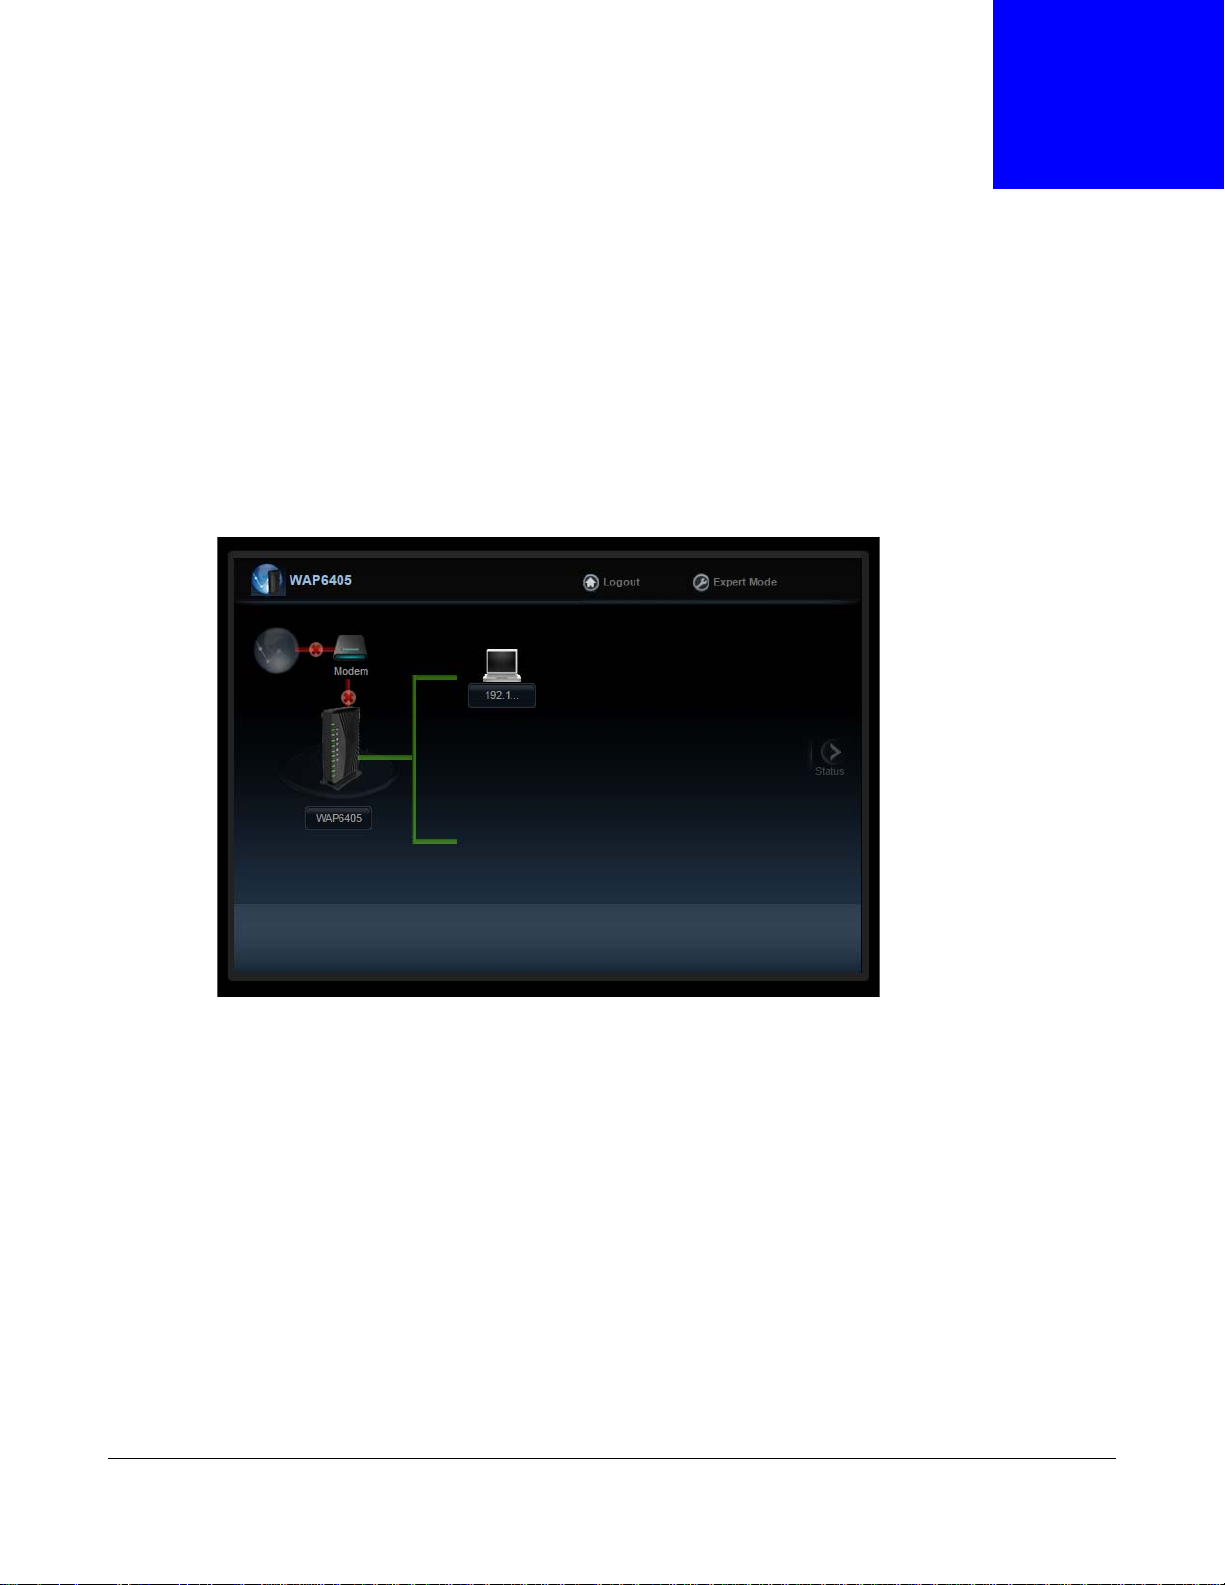
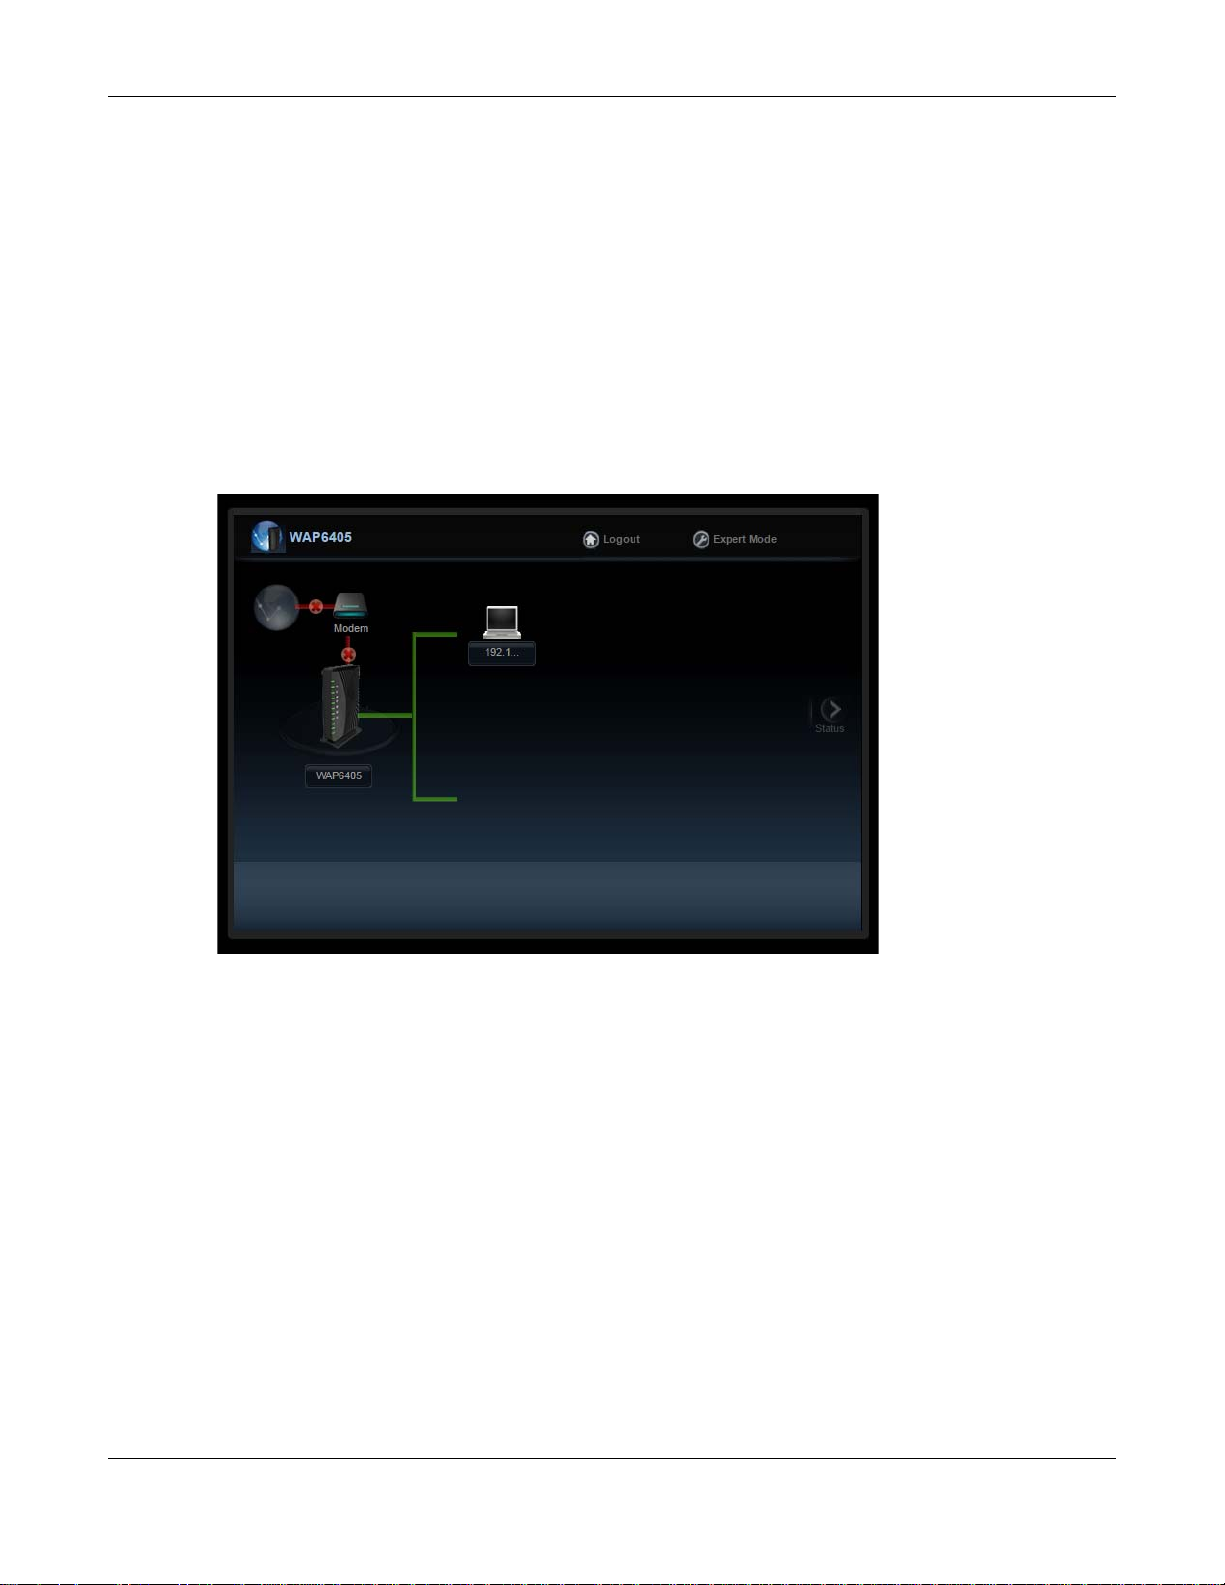
The Web Configurator is set to Easy Mode by default. This mode is useful to users visualize their
networks’ layout. You can view details about the devices connected to your WAP6405 and their
status. When you log in to the Web Configurator, the following screen opens.
Figure 6 Easy Mode: Network Map
CHAPTER 4
Easy Mode
Click Status to open the following screen.
WAP6405 User’s Guide
18
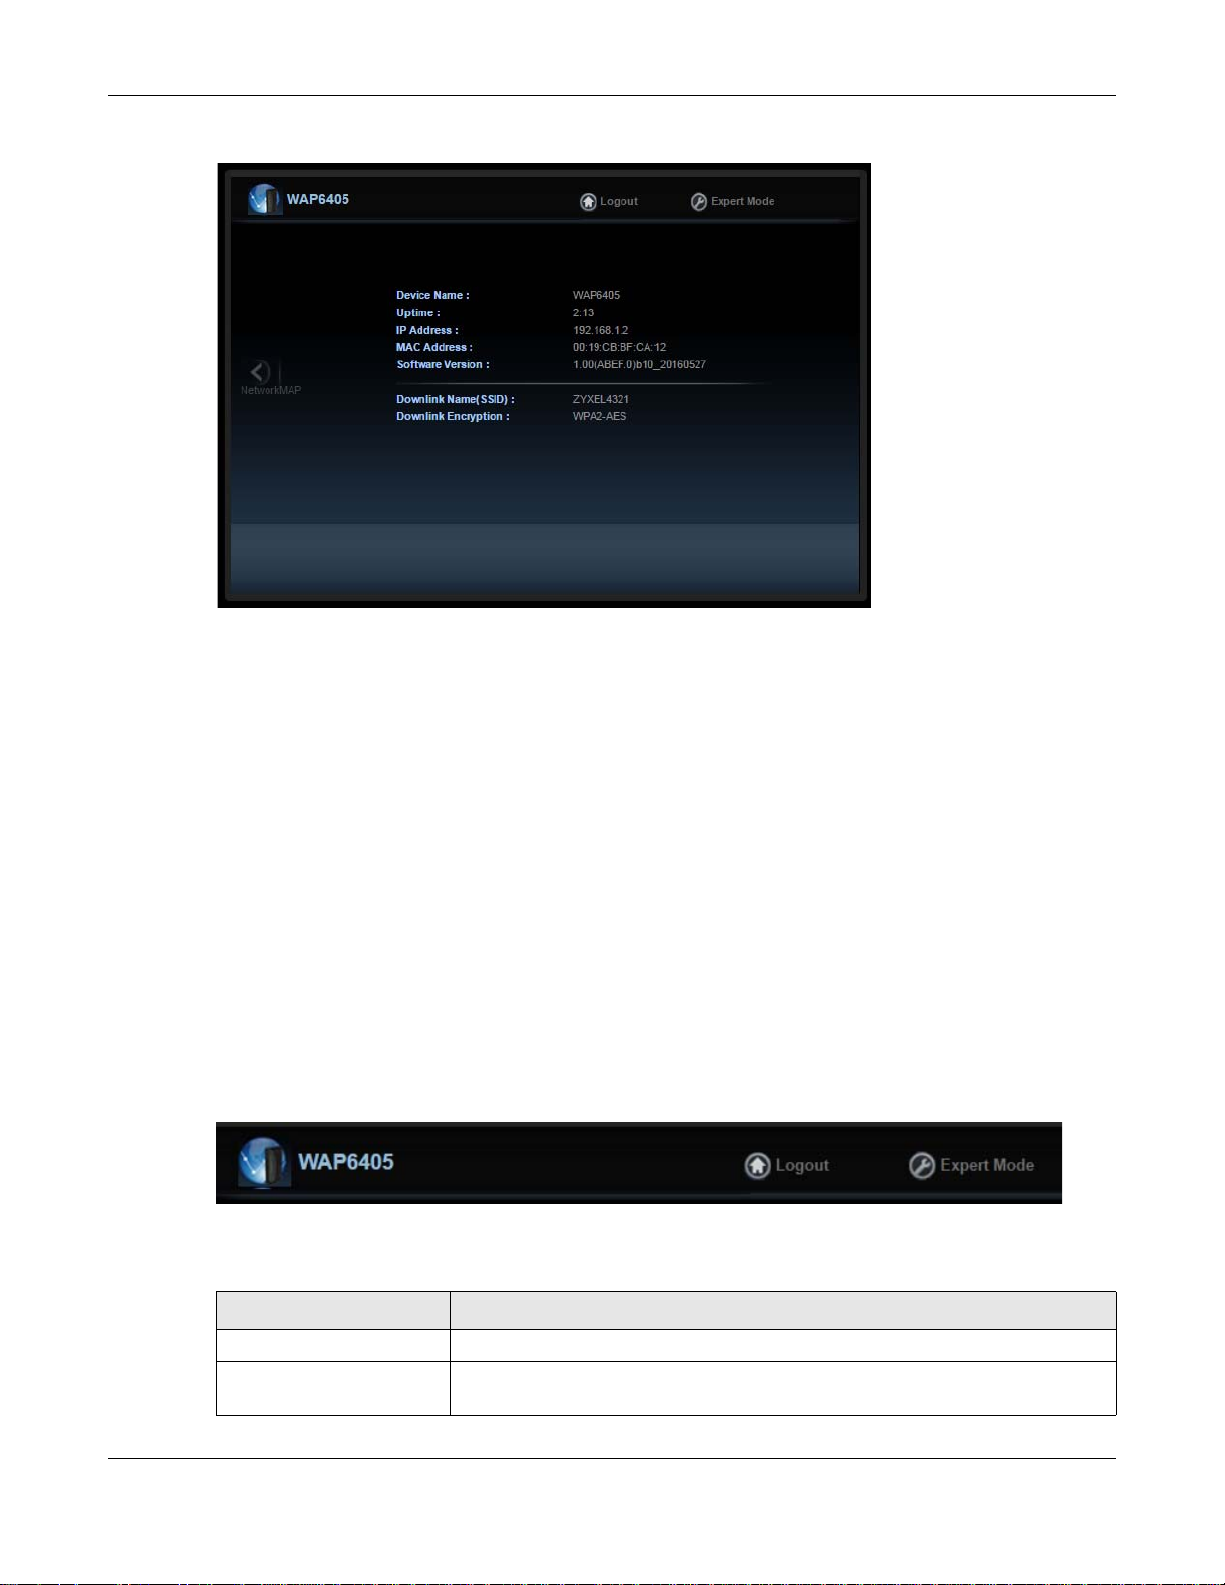
Figure 7 Easy Mode: Status Screen
Navigation Panel
Status Screen
Go to
Network
Map Screen
Chapter 4 Easy Mode
4.2 What You Can Do
You can do the following in this mode:
•Use the Navigation Panel to opt out of the Easy mode.
•Use the Network Map screen to check if your WAP6405 can ping the gateway and whether it is
connected to the internet.
•Use the Status screen to view read-only information about the WAP6405, including the WAN IP,
MAC address of the WAP6405 and the software version.
4.3 Navigation Panel
Use this navigation panel to opt out of the Easy mode.
Figure 8 Control Panel
The following table describes the labels in this screen.
Table 3 Control Panel
LABEL DESCRIPTION
Logout Click this to end the Web Configurator session.
Expert Mode Click this to change to Expert Mode and customize features of the
WAP6405.
WAP6405 User’s Guide
19
4.4 Network Map
Note: The Network MAP is viewable by Windows XP (need to install patch), Windows Vista
and Windows 7 users only. For Windows XP (Service Pack 2) users, you can see the
network devices connected to the WAP6405 by downloading the LLTD (Link Layer
Topology Discovery) patch from the Microsoft Website.
Note: Don’t worry if the Network Map does not display in your web browser. This feature
may not be supported by your system. You can still configure your WAP6405’s
features in the Expert Mode.
When you log in to the Web Configurator, the Network Map is shown as follows.
Figure 9 Network Map
Chapter 4 Easy Mode
The line connecting the WAP6405 to the gateway becomes green when the WAP6405 is able to ping
the gateway. It becomes red when the ping initiating from the WAP6405 does not get a response
from the gateway. The same rule applies to the line connecting the gateway to the Internet.
You can also view the devices (represented by icons indicating the kind of network device, such as
android device, apple device or Windows OS) connected to the WAP6405, including those
connecting wirelessly. Right-click on the Refresh button located on the WAP6405 icon to refresh
the network map. Click on a device and select to view information about the device, block or allow
the device’s access to the WAP6405, or view the parental control rules.
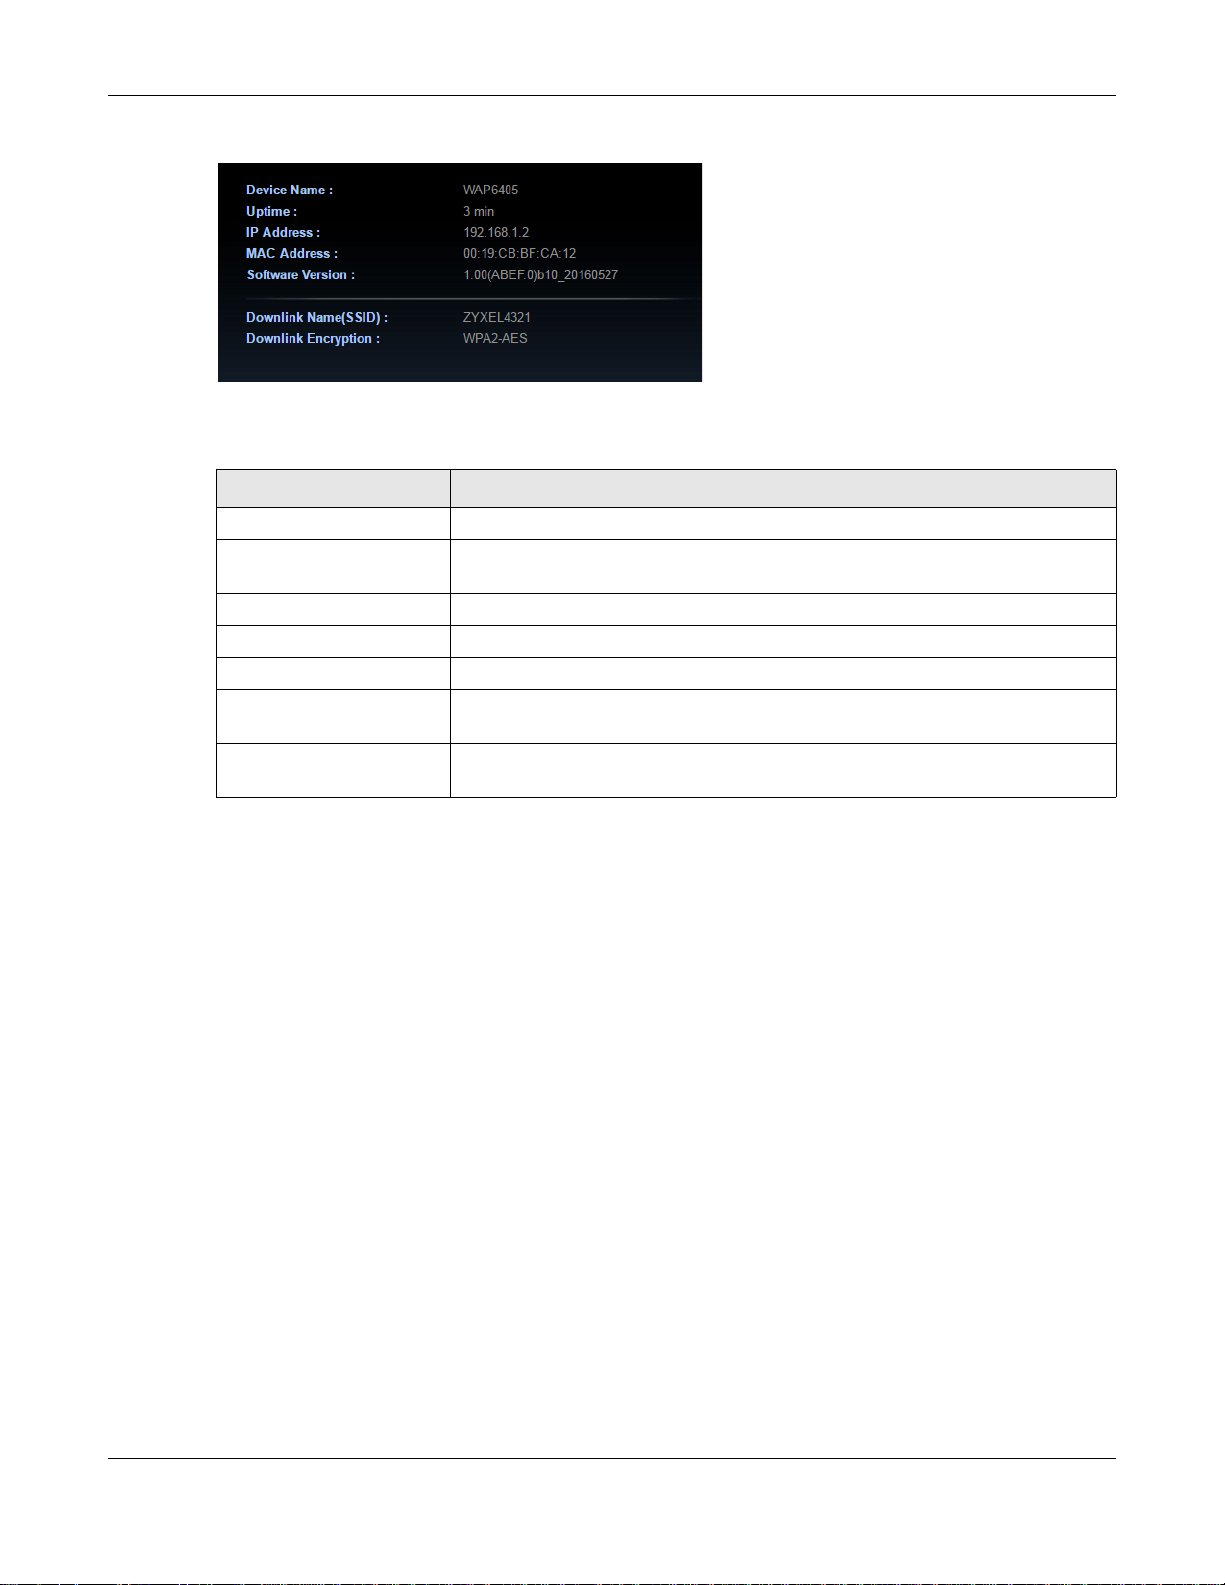
4.5 Status Screen in Easy Mode
In the Network Map, click Status to view read-only information about the WAP6405.
WAP6405 User’s Guide
20
Chapter 4 Easy Mode
Figure 10 Status Screen in Easy Mode
The following table describes the labels in this screen.
Table 4 Status Screen in Easy Mode
LABEL DESCRIPTION
Device Name This is the WAP6405’s model name.
Uptime This displays the time in minutes the WAP6405’s system has been
working.
IP Address This shows the LAN port’s IP address.
MAC Address This shows the MAC address of the WAP6405’s wireless interface.
Software Version This is the firmware version and the date created.
Downlink Name (SSID) This shows a descriptive name used to identify the WAP6405 in the
wireless LAN.
Downlink Encryption This shows the data encryption method the WAP6405 uses for the
wireless connection.
Note: The Status Screen displayed on the Easy Mode varies according to each operating
mode on your WAP6405 (AP, Client or Universal Repeater). Refer to Section
3.1.2 on page 16, for more information about the operating modes on your
WAP6405
.
WAP6405 User’s Guide
21
5.1 Overview
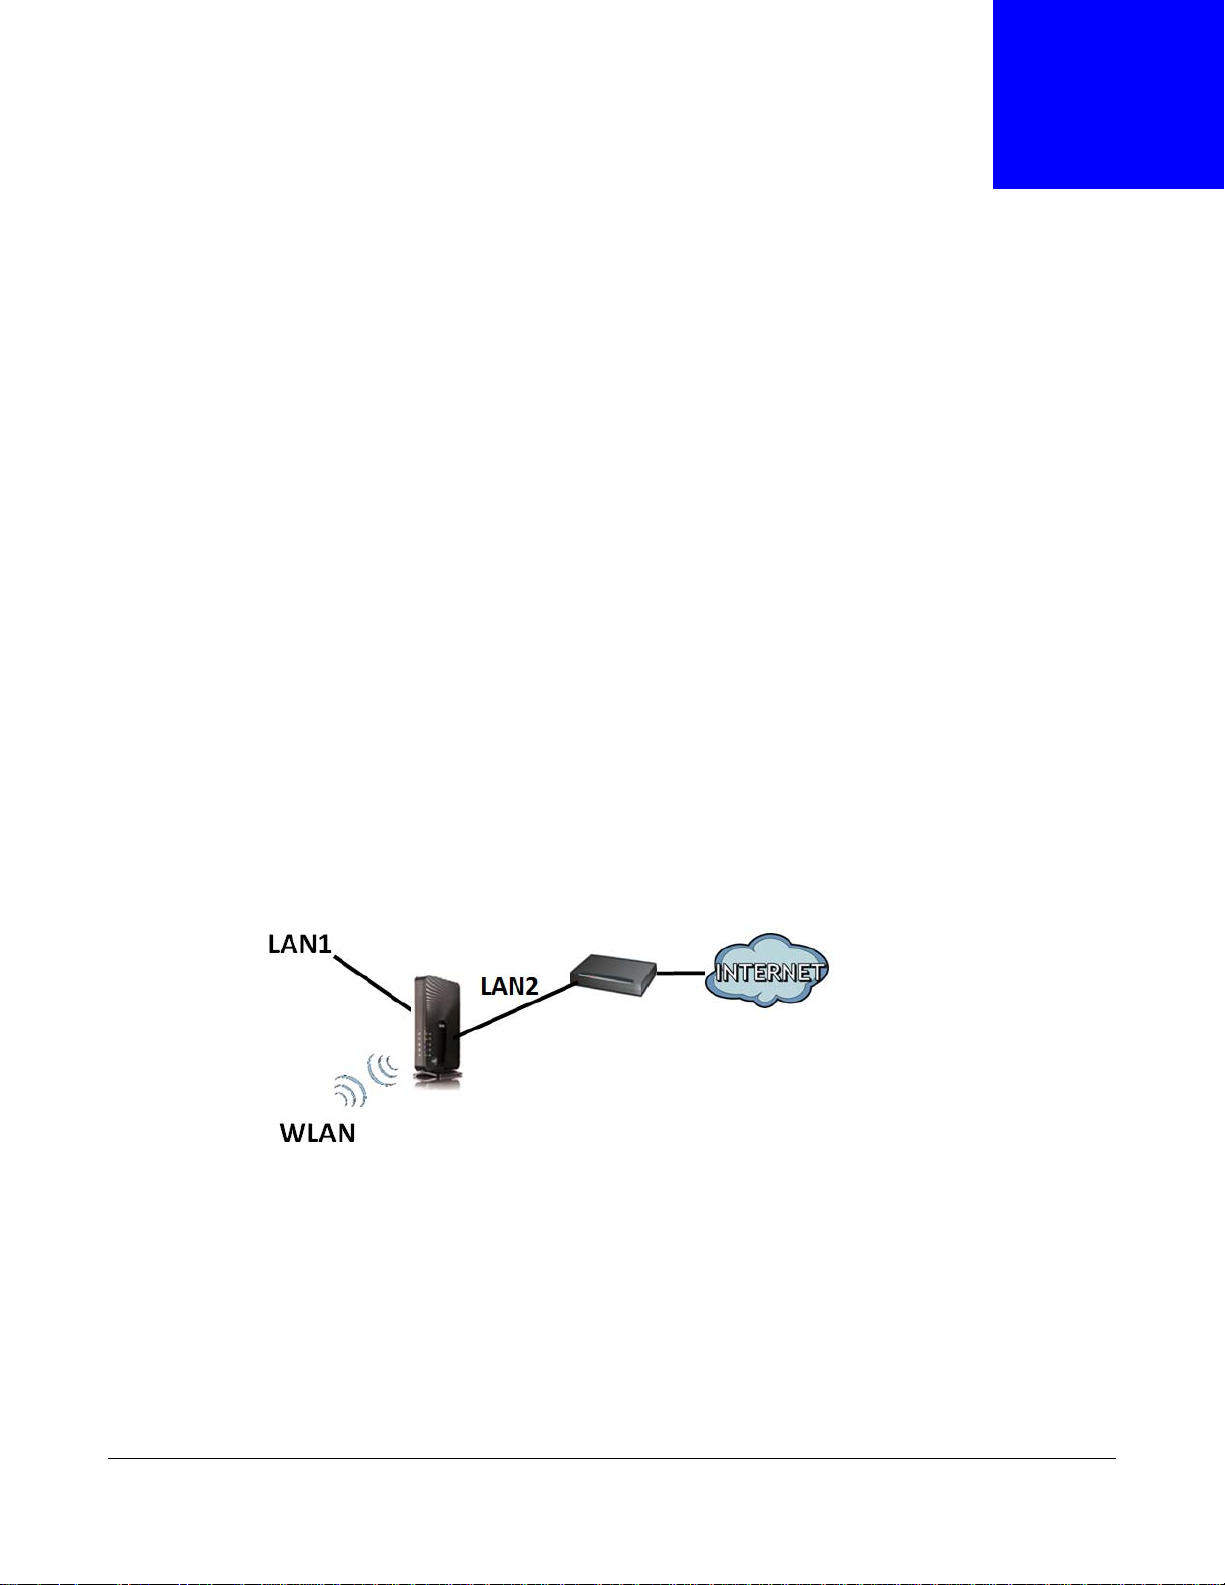
The WAP6405 is set to access point mode by default. In this mode your WAP6405 bridges a wired
network (LAN) and wireless LAN (WLAN) in the same subnet. See the figure below for an example.
Figure 11 Wireless Internet Access in Access Point Mode
CHAPTER 5
Access Point Mode
Note: See Chapter 8 on page 34 for an example of setting up a wireless network in
Access Point mode.
5.2 What You Can Do
•Use the Status screen (Section 5.5 on page 23) to view read-only information about your
WAP6405.
•Use the Network > Networking screen (Chapter 10 on page 53) to set the IP address for your
WAP6405 acting as an access point.
•Use the Wireless Network screens (Chapter 11 on page 56) to configure the wireless settings
and wireless security between the wireless clients and the WAP6405.
WAP6405 User’s Guide
22

Chapter 5 Access Point Mode
5.3 What You Need to Know
See Chapter 8 on page 34 for a tutorial on setting up a network with the WAP6405 as an access
point.
5.4 Setting your WAP6405 to AP Mode
1 To use your WAP6405 as an access point, see Section 3.1.2.1 on page 17.
2 Connect your computer to the LAN port of the WAP6405.
3 Open a web browser such as Internet Explorer and type “http://192.168.1.2” as the web address in
your web browser.
Note: If you use the static LAN IP address to access the WAP6405’s web configurator,
make sure your computer’s IP address is in the range between “192.168.1.3” and
“192.168.1.254”.
4 Enter “1234” (default) as the password and click Login.
5 Type a new password and retype it to confirm, then click Apply. Otherwise, click Ignore.
5.4.1 Configuring your WLAN, LAN and Maintenance Settings
•See Chapter 11 on page 56 and Chapter 10 on page 53 for information on the configuring your
wireless network and LAN settings.
•See Chapter 13 on page 71 for information on configuring your Maintenance settings.
5.5 AP Mode Status Screen
Click to open the Status screen.
WAP6405 User’s Guide
23
Chapter 5 Access Point Mode
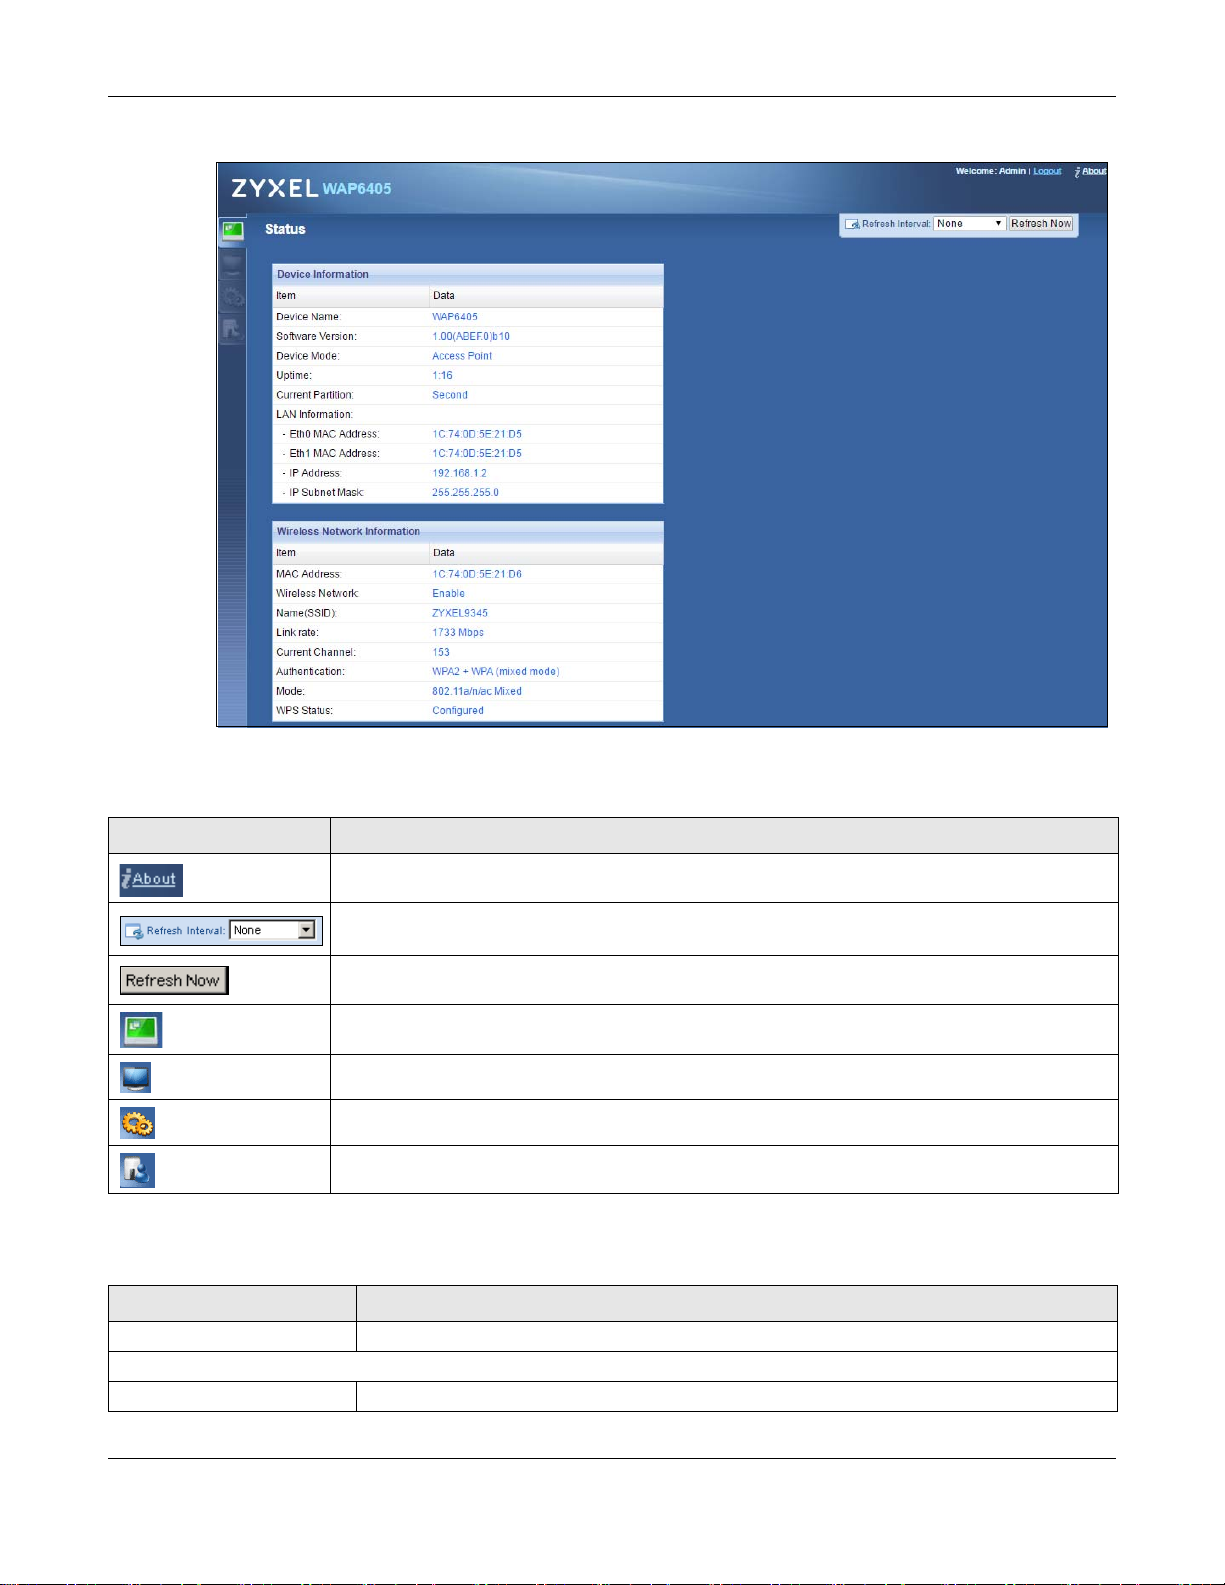
Figure 12 Status Screen: Access Point Mode
The following table describes the icons shown in the Status screen.
Table 5 Status Screen Icon Key: Access Point Mode
ICON DESCRIPTION
Click this icon to view copyright and a link for related product information.
Select a number of seconds or None from the drop-down list box to refresh all screen statistics
automatically at the end of every time interval or to not refresh the screen statistics.
Click this button to refresh the status screen statistics.
Click this icon to see the Status page. The information in this screen depends on the device
mode you select.
Click this icon to see the Monitor navigation menu.
Click this icon to see the Configuration navigation menu.
Click this icon to see the Maintenance navigation menu.
The following table describes the labels shown in the Status screen.
Table 6 Status Screen: Access Point Mode
LABEL DESCRIPTION
Logout Click this at any time to exit the Web Configurator.
Device Information
Device Name This is the WAP6405’s model name.
WAP6405 User’s Guide
24
Chapter 5 Access Point Mode
Table 6 Status Screen: Access Point Mode
LABEL DESCRIPTION
Software Version This is the firmware version and the date created.
Device Mode This is the device mode (Section 3.1.2.1 on page 17) to which the WAP6405 is set - Access
Point Mode.
Uptime (Min) This displays the time in minutes the WAP6405’s system has been working.
Current Partition This shows which partition the WAP6405 uses. The WAP6405 has two partitions and supports
dual image function.
LAN Information
Eth0 MAC Address This shows the MAC Address of the WAP6405’s first Ethernet LAN port.
Eth1 MAC Address This shows the MAC Address of the WAP6405’s second Ethernet LAN port.
IP Address This shows the LAN port’s IP address.
IP Subnet Mask This shows the LAN port’s subnet mask.
Wireless Network Information
MAC Address This shows the MAC address of the WAP6405’s wireless interface.
Wireless Network This shows if the wireless network is enabled or disabled.
Name (SSID) This shows a descriptive name used to identify the WAP6405 in the wireless LAN.
Link Rate (Mbps) This shows the rate at which data is transferred across the wireless network.
Current Channel
Authentication This shows the data encryption method the WAP6405 uses for the wireless connection.
Mode This shows the wireless standard the WAP6405 uses.
WPS Status This displays Configured when the WPS has been set up.
This shows the channel number which you select manually or the WAP6405 automatically
scans and selects.
This displays Unconfigured if the WPS has not been set up.
5.5.1 Navigation Panel
Use the menu in the navigation panel to configure WAP6405 features in Access Point mode.
The following screen and table show the features you can configure in Access Point mode.
Figure 13 Menu: Access Point Mode
WAP6405 User’s Guide
25

Chapter 5 Access Point Mode
The following table describes the sub-menus.
Table 7 Navigation Panel: Access Point Mode
LINK TAB FUNCTION
Status This screen shows the WAP6405’s general device, system and interface
MONITOR
Log Use this screen to view the list of activities recorded by your WAP6405.
Wireless Monitor Use this screen to view the wireless summary currently associated to the
WDS Monitor Use this screen to view the Wireless Distribution System (WDS) summary.
MBSS Monitor This screen shows a summary of the Multiple Basic Server Sets (MBSS)
CONFIGURATION
Networking
Network Networking Use this screen to configure the WAP6405’s LAN IP address.
Wireless
Network
MAINTENANCE
Password Password
Firmware
Upgrade
Teln et Use this screen to enable or disable Telnet. Telnet allows you to access the
Restore Use this screen to backup and restore the configuration or reset your
Restart System
Basic Use this screen to configure general wireless LAN settings.
Advanced This screen allows you to configure advanced wireless settings.
WPS Use this screen to configure WPS on your WAP6405.
MAC Filter This screen allows you to apply a MAC Filter whereby you allow or reject an
WDS Use this screen to set up Wireless Distribution System (WDS) on your
MBSS Use this screen to activate and set the parameters for a BSS. You can
Setup
Restart
status information.
WAP6405.
available on the WAP6405. The MBSS allows you to use one access point to
provide several Basic Serve Sets (BSS) simultaneously.
inputted MAC address(es).
WAP6405.
activate up to 3 BSSs on the WAP6405.
Use this screen to change the WAP6405’s password.
Use this screen to upload firmware to your WAP6405.
WAP6405’s command line interface.
WAP6405 to the factory defaults.
This screen allows you to reboot the WAP6405 without turning the power
off.
WAP6405 User’s Guide
26
6.1 Overview
Your WAP6405 can act as a wireless client. In wireless client mode, it can connect to an existing
network via an access point. Use this mode if you already have an access point or wireless router in
your network.
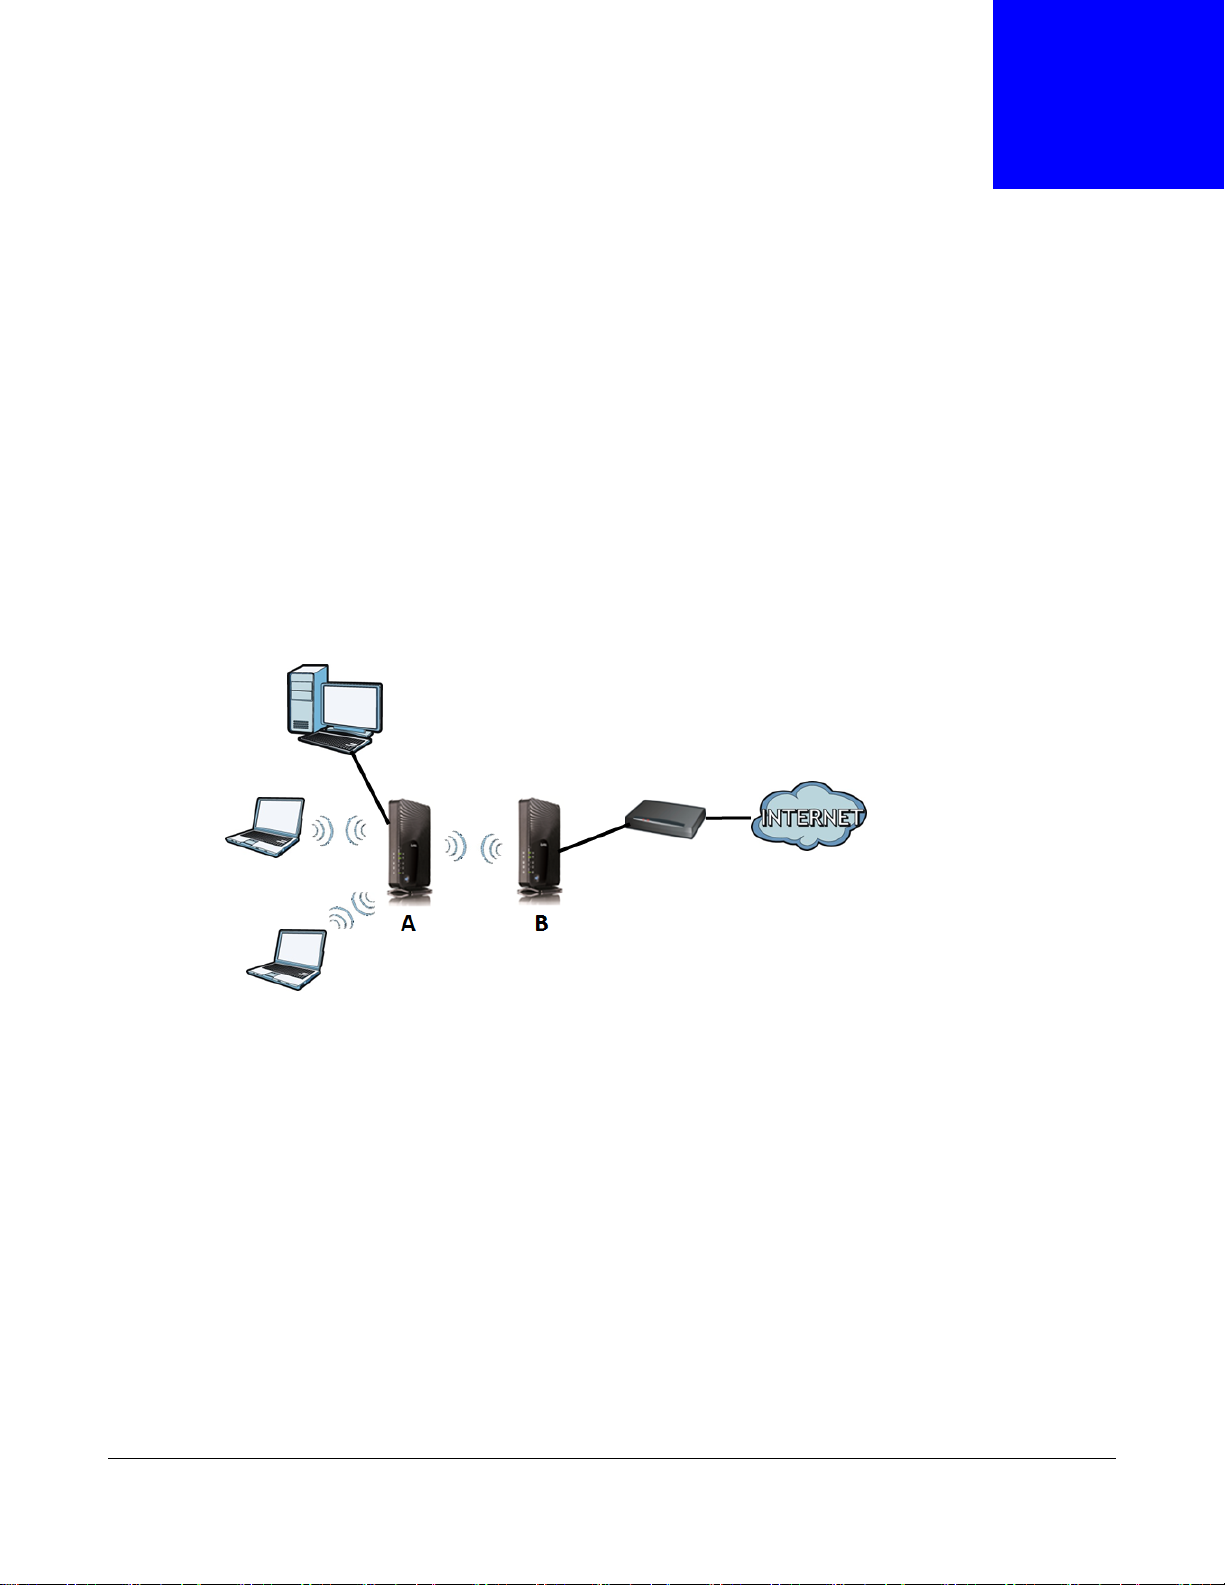
In the example below, one WAP6405 (A) is configured as a wireless client and another is used as an
access point (B). The WAP6405 has two clients that need to connect to the Internet. The WAP6405
wirelessly connects to the available access point (B).
Figure 14 Wireless Client Mode
CHAPTER 6
Client Mode
After the WAP6405 and the access point connect, the WAP6405 acquires its WAN IP address from
the access point. The clients of the WAP6405 can now surf the Internet.
6.2 What You Can Do
•Use the Status screen (Section 6.5 on page 28) to view read-only information about your
WAP6405.
•Use the Network > Networking screen (Chapter 10 on page 53) to set the IP address for your
WAP6405.
•Use the AP Connection screens (Chapter 12 on page 66) to associate your WAP6405 (acting as
a wireless client) with an existing access point.
WAP6405 User’s Guide
27

Chapter 6 Client Mode
6.3 What You Need to Know
With the exception of the Wireless Network screens, the LAN, Monitor, Configuration and
Maintenance screens in Client mode are similar to the ones in Access Point Mode. See Chapter 10
on page 53 through Chapter 13 on page 71 of this User’s Guide.
6.4 Setting your WAP6405 to Client Mode
1 To use your WAP6405 as a wireless client, see Section 3.1.2.1 on page 17.
2 Connect your computer to the LAN port of the WAP6405.
3 Open a web browser such as Internet Explorer and type “http://192.168.1.10” as the web address
in your web browser.
Note: If you use the static LAN IP address to access the WAP6405’s web configurator,
make sure your computer’s IP address is in the range between “192.168.1.11” and
“192.168.1.254”.
4 Enter “1234” (default) as the password and click Login.
5 Type a new password and retype it to confirm, then click Apply. Otherwise, click Ignore.
Note: You have to log into the Web Configurator again when you change modes. As soon
as you do, your WAP6405 is already in Client mode.
6.5 Client Mode Status Screen
Click to open the status screen.
WAP6405 User’s Guide
28
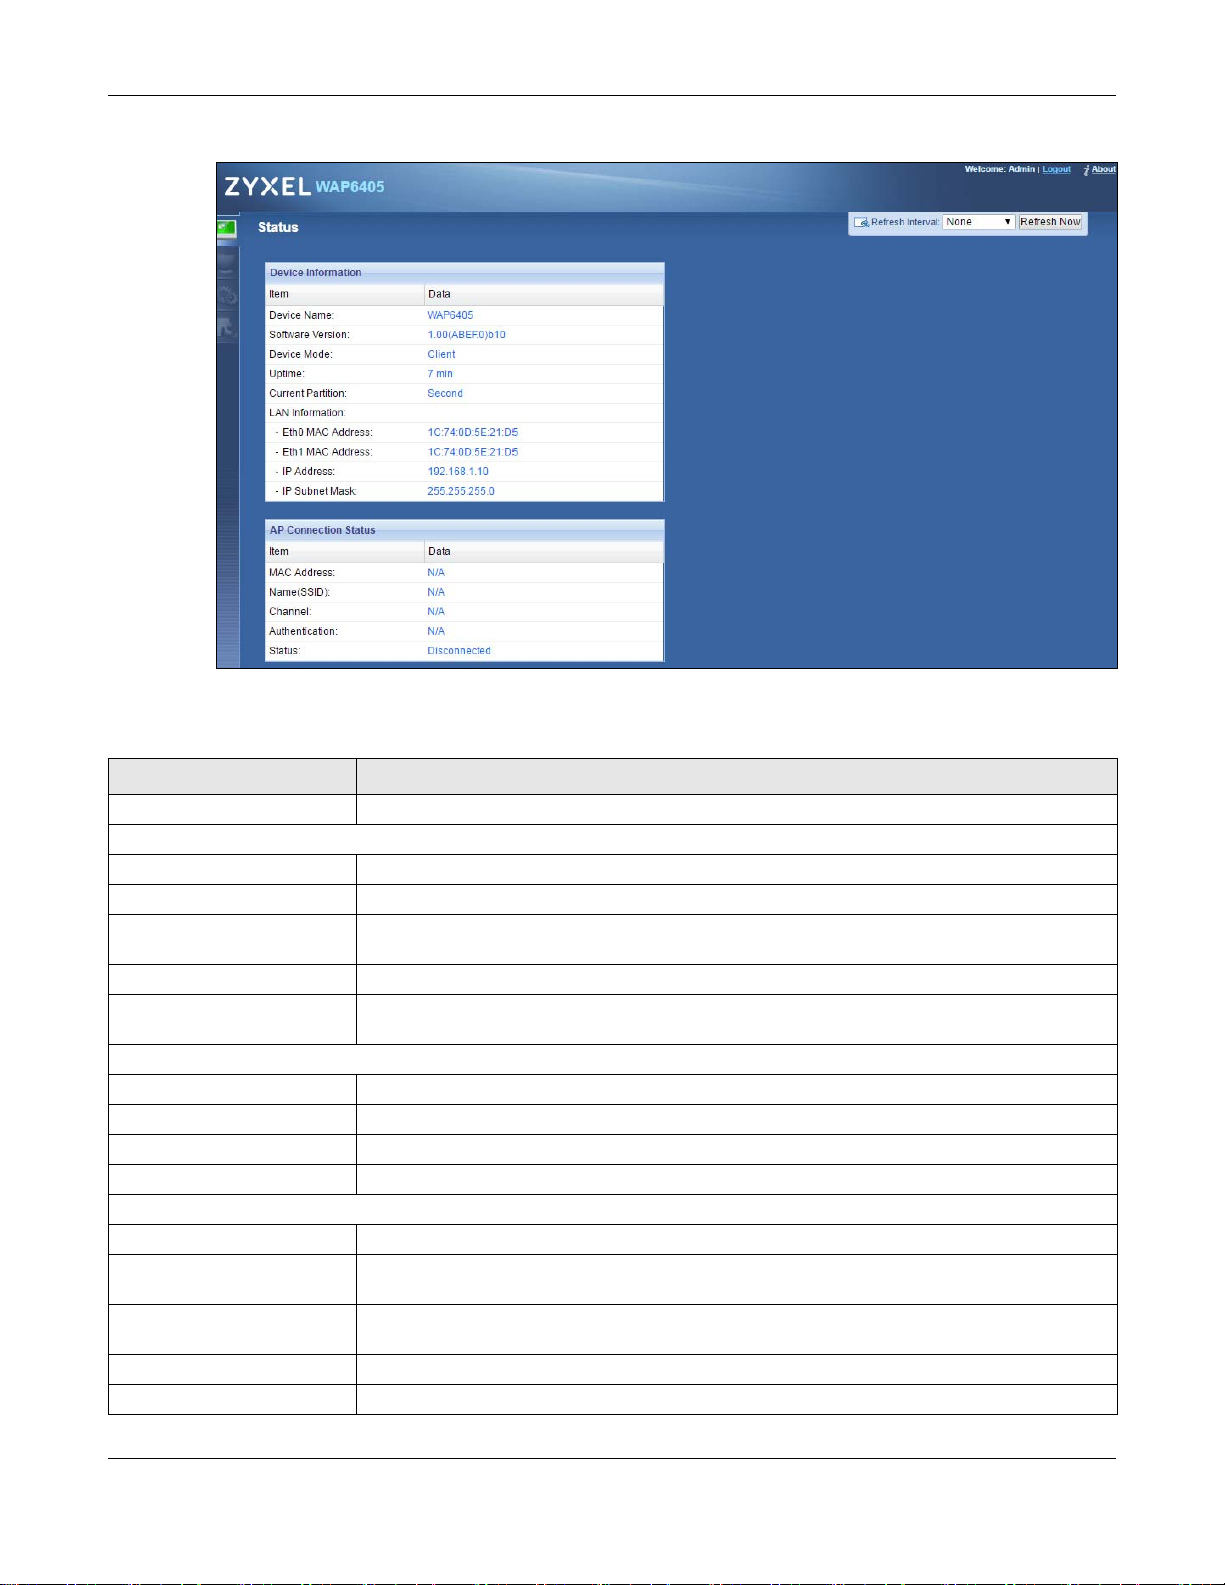
Figure 15 Status: Client Mode
Chapter 6 Client Mode
The following table describes the labels shown in the Status screen.
Table 8 Status Screen: Client Mode
LABEL DESCRIPTION
Logout Click this at any time to exit the Web Configurator.
Device Information
Device Name This is the WAP6405’s model name.
Software Version This is the firmware version and the date created.
Device Mode This is the device mode (Section 3.1.2.1 on page 17) to which the WAP6405 is set - Client
Mode.
Uptime This displays the time in minutes the WAP6405 system has been working.
Current Partition This shows which partition the WAP6405 uses. The WAP6405 has two partitions and supports
LAN Information
Eth0 MAC Address This shows the MAC address of the WAP6405’s first Ethernet LAN Port.
Eth1 MAC Address This shows the MAC address of the WAP6405’s second Ethernet LAN Port.
IP Address This shows the LAN port’s IP address.
IP Subnet Mask This shows the LAN port’s subnet mask.
AP Connection Status
MAC Address This shows the MAC address of the WAP6405’s wireless interface.
Name (SSID) This shows the descriptive name of the wireless network to which the WAP6405 is
Channel This shows the channel number which you select manually or the WAP6405 automatically
Authentication This shows the data encryption method the WAP6405 uses for the wireless connection.
Status This shows if the WAP6405 is connected or disconnected to an access point.
dual image function.
connected.
scans and selects.
WAP6405 User’s Guide
29
7.1 Overview
In universal repeater mode, your WAP6405 can act as an access point and wireless client at the
same time. The WAP6405 can connect to an existing network through another access point and also
lets wireless clients connect to the network through it. This helps you expand wireless coverage
when you have an access point or wireless router already in your network.
In the example below, the WAP6405 (A) is configured as a universal repeater. It has three clients
that want to connect to the Internet. The WAP6405 wirelessly connects to the available access point
(B).
Figure 16 Universal Repeater Mode
CHAPTER 7
Universal Repeater Mode
After the WAP6405 and the access point connect, the WAP6405 acquires its IP address from the
access point. The clients of the WAP6405 can now surf the Internet.
7.2 What You Can Do
•Use the Status screen (Section 6.5 on page 28) to view read-only information about your
WAP6405.
•Use the Network > Networking screen (Chapter 10 on page 53) to set the IP address for your
WAP6405.
•Use other Wireless Network screens (Chapter 11 on page 56) to configure the wireless settings
and wireless security between the wireless clients and the WAP6405.
•Use the Wireless Network > WPS screen (Section 11.6 on page 61) to configure WPS on the
WAP6405 to set up a WPS connection between the WAP6405 and its client.
WAP6405 User’s Guide
30
 Loading...