

Page 1
Wireless N Access PointWireless N Access Point
Quick Start Guide
Version: 1.00
WAP3205
Wireless N Access Point
Page 2

Page 3
WAP3205
Wireless N Access Point
Version 1.00
Edition 1, 6/2009
DEFAULT LOGIN DETAILS
LAN Port: LAN ~ LAN 2
IP Address http://192.168.1.2
Password: 1234
CONTENTS
ENGLISH 5
DEUTSCH 15
ESPAÑOL 25
FRANÇAIS 35
ITALIANO 45
SVENSKA 55
NEDERLANDS 65
www.zyxel.com
C
2009 ZyXEL Communications Corporation
Page 4
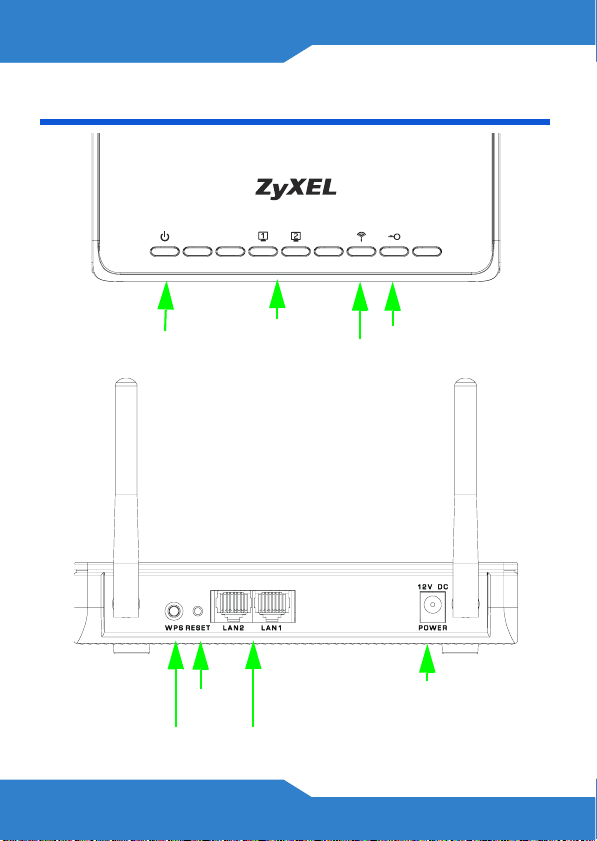
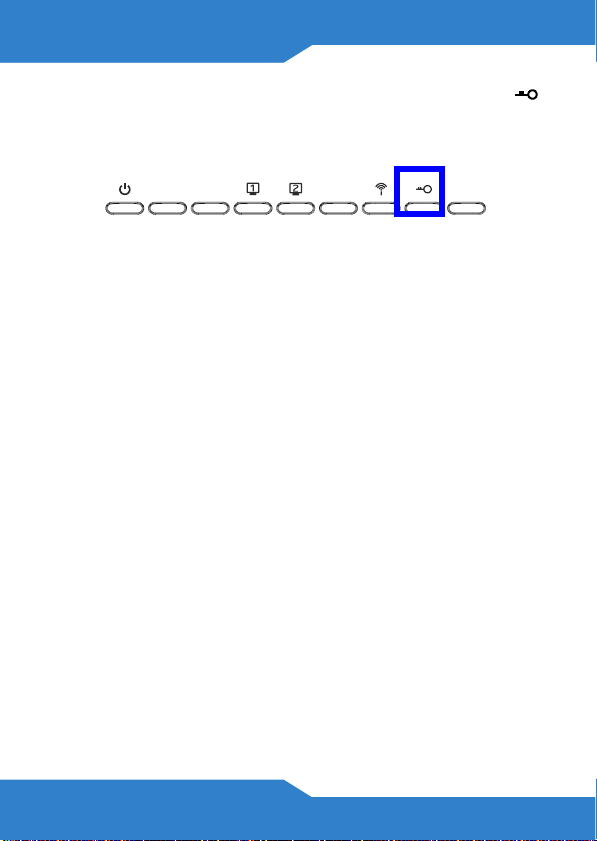
Device Panels
ENGLISH
POWER
WPS
LAN 1 ~ LAN 2
RESET
LAN 1 ~ LAN 2
WLAN
WPS
POWER
4
Page 5
ENGLISH
ENGLISH
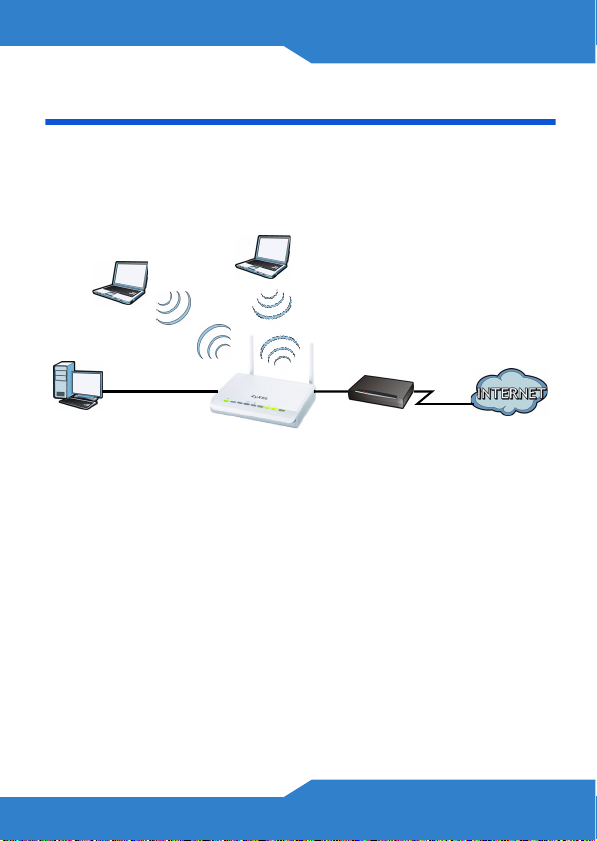
Overview
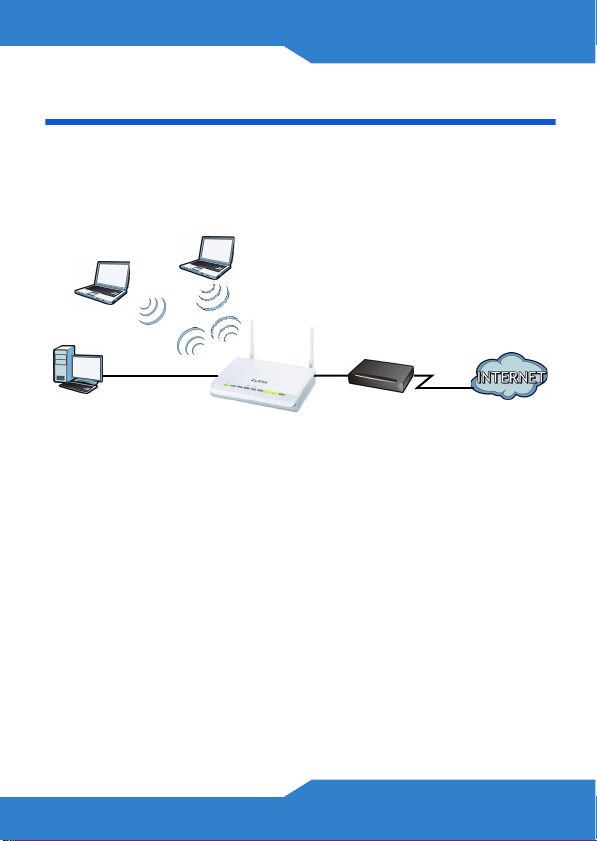
The WAP3205 is a wireless access point (AP) that
allows wireless clients to connect to a wired network
and the Internet.
The WAP3205 can act as a repeater or bridge to extend
your wireless network. It can also work as a wireless
client to access the wired network through another AP.
See your User’s Guide for detailed information.
The Quick Start Guide shows you how to:
• Set Up a Wired Network with Internet Access
• Set Up a Wireless Network with WPS
• Set Up Your Wireless Network using the Web
Configurator
5
Page 6
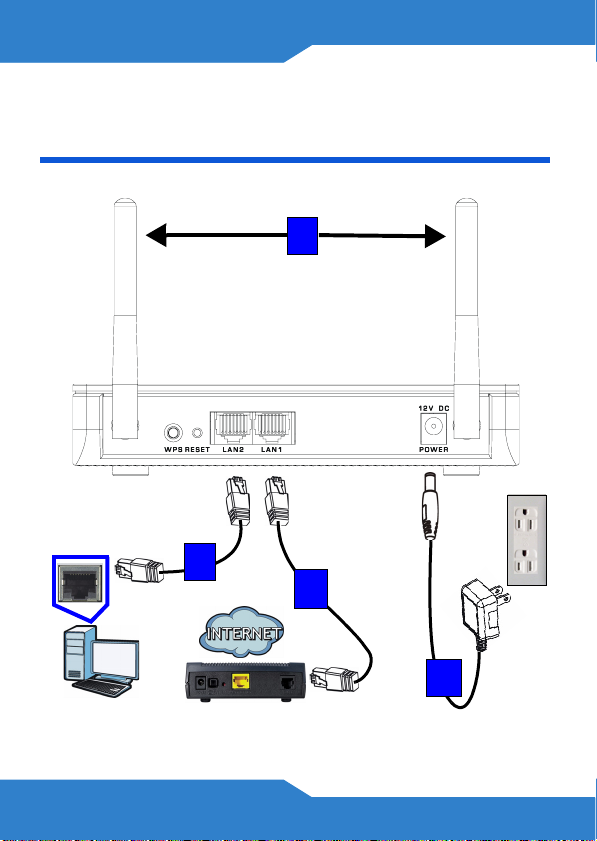
Set Up a Wired Network with
Internet Access
A
B
C
D
6
Page 7

ENGLISH
1. Make the following hardware connections to set up
your WAP3205:
• Connect the antennas (A) to the antenna sockets,
ensuring they are screwed in firmly and angled
upwards.
• Connect the Ethernet port on your computer to a LAN
port (B) on the WAP3205 using an Ethernet cable.
• Connect another LAN port (C) on your WAP3205 to
the Ethernet port on the device with which you are
accessing the Internet (for example, a modem) using
an Ethernet cable.
• Use the power adapter (D) from the package to
connect the POWER socket to an appropriate power
source.
2. Check your Internet connection. Open a web
browser on your computer and enter www.zyxel.com
in the address bar.
If you cannot access the Internet, make sure the
WAP3205’s IP address is in the same subnet as
your broadband modem or router and restart your
WAP3205. See the User’s Guide for information
on setting up the WAP3205’s IP address.
7
Page 8
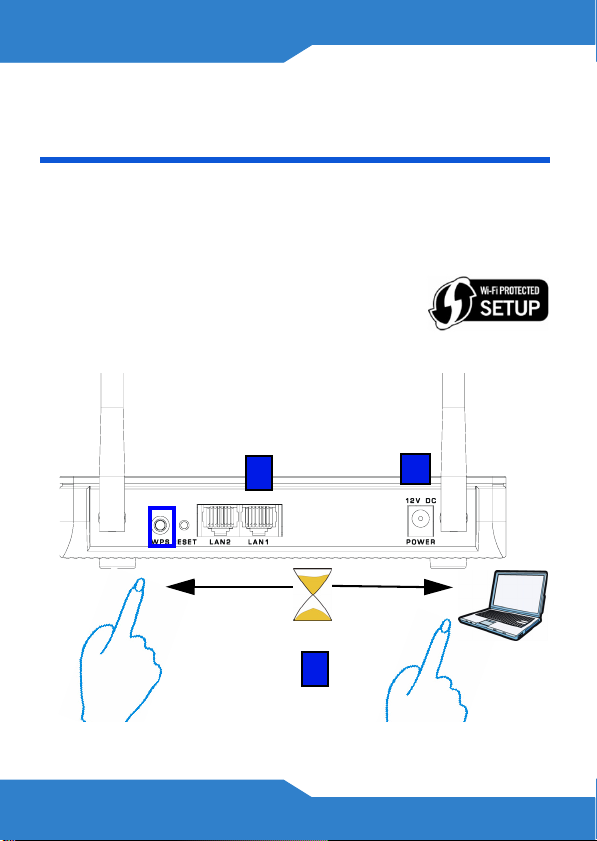
Set Up a Wireless Network with
WPS
Use Wi-Fi Protected Setup (WPS) to let WPS-enabled
wireless devices securely access the WAP3205.
Check if your wireless device has the
WPS logo and follow these steps to set
up your wireless network using WPS.
C
A
2 minutes
B
8
Page 9
ENGLISH
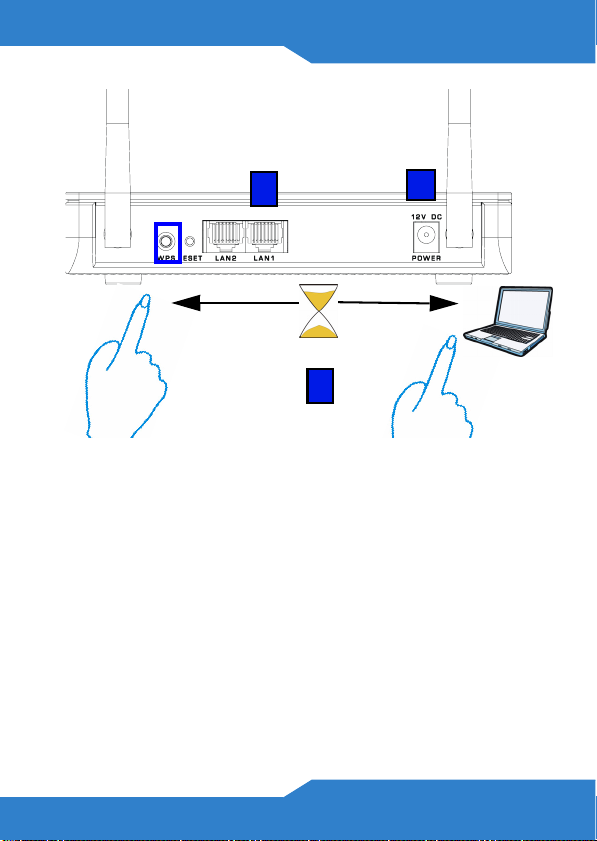
1. Make sure your WAP3205 is turned on (A). Place
your wireless device within range of the WAP3205.
2. Press the WPS button for two to three seconds on
the WAP3205 as well as the WPS button on the
wireless adapter connected to your notebook (B). It
doesn’t matter which button is pressed first. You
must press the second button within two minutes of
pressing the first one.
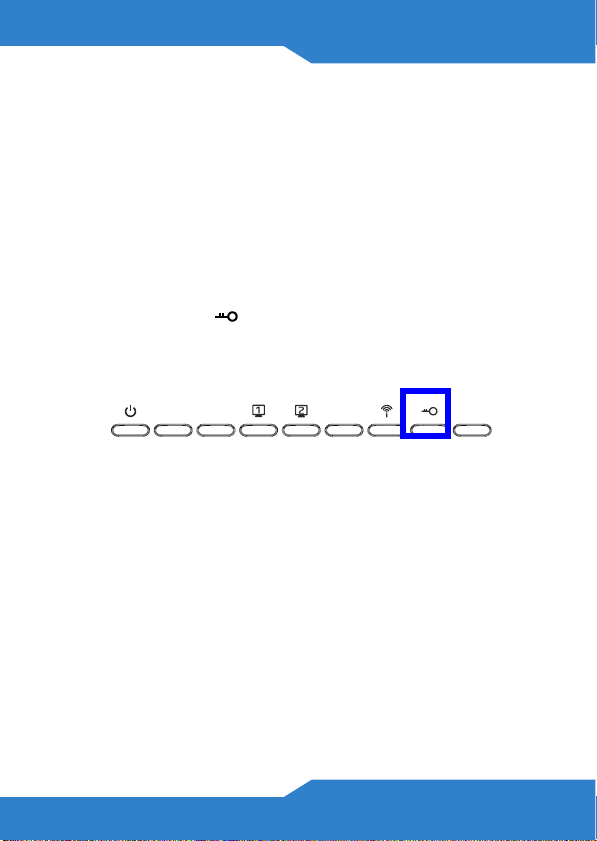
The WPS LED ( ) on the WAP3205 blinks during the
WPS process, then shines steadily when the WPS
process is finished.
If your WPS connection is successful, you should
now be able to access the WAP3205.
3. Connect a LAN port (C) on your WAP3205 to your
broadband modem. You are now ready to connect to
the Internet wirelessly through your WAP3205.
If your wired Internet connection is fine but your
wireless connection is not, repeat step 3. If WPS
is not working or your wireless device does not
support WPS, go to the next section.
9
Page 10
Set Up Your Wireless Network
using the Web Configurator
1. Set your computer’s IP address to be between
192.168.1.3 and 192.168.1.254 with subnet mask
255.255.255.0. Connect the computer to the
WAP3205.
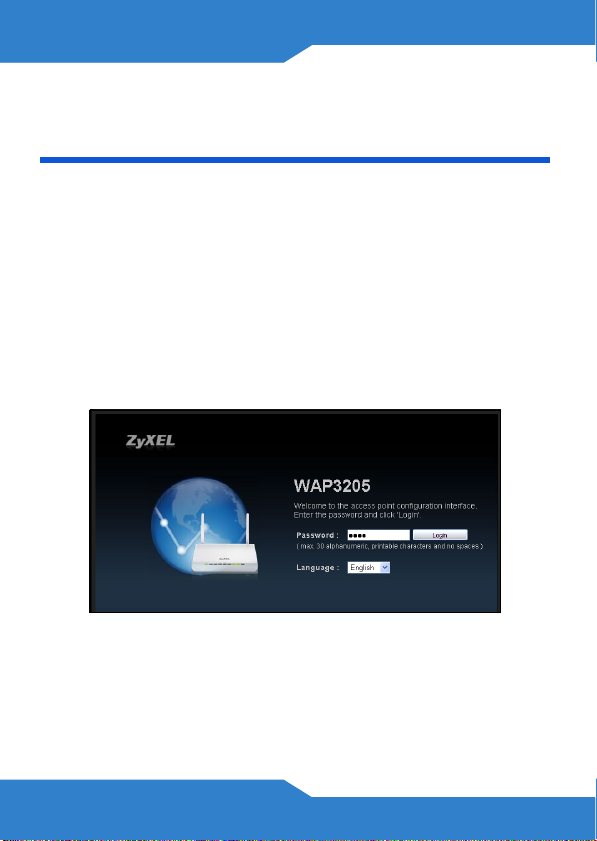
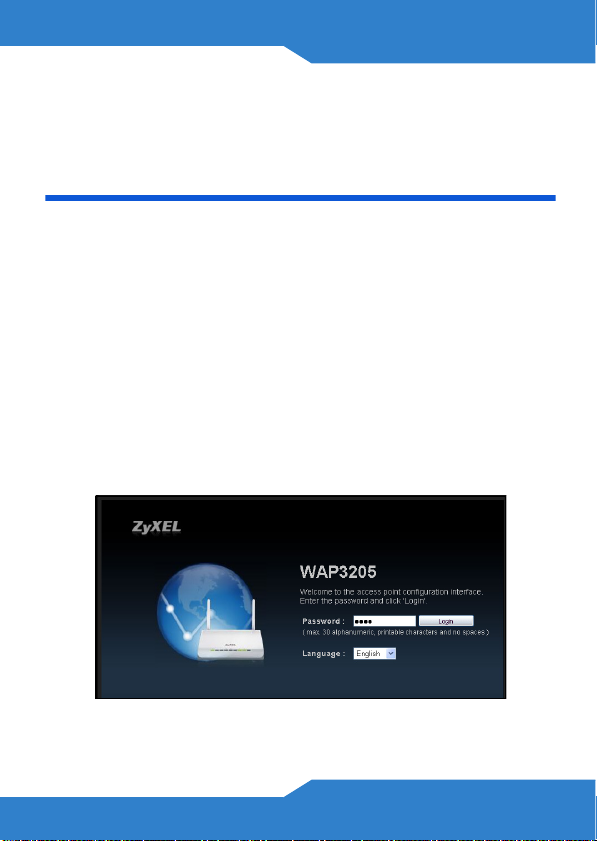
2. Open a web browser on the computer connected to
the WAP3205. Type "http://192.168.1.2" as the
website address. Enter "1234" (default) as the
password, choose your Language and click Login.
10
Page 11
ENGLISH
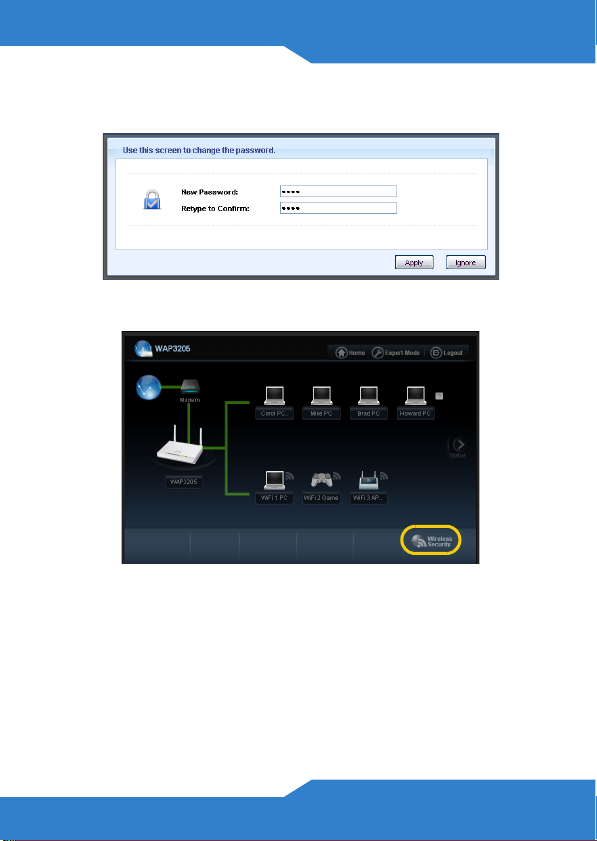
3. Enter a new password (retype it to confirm) and click
Apply.
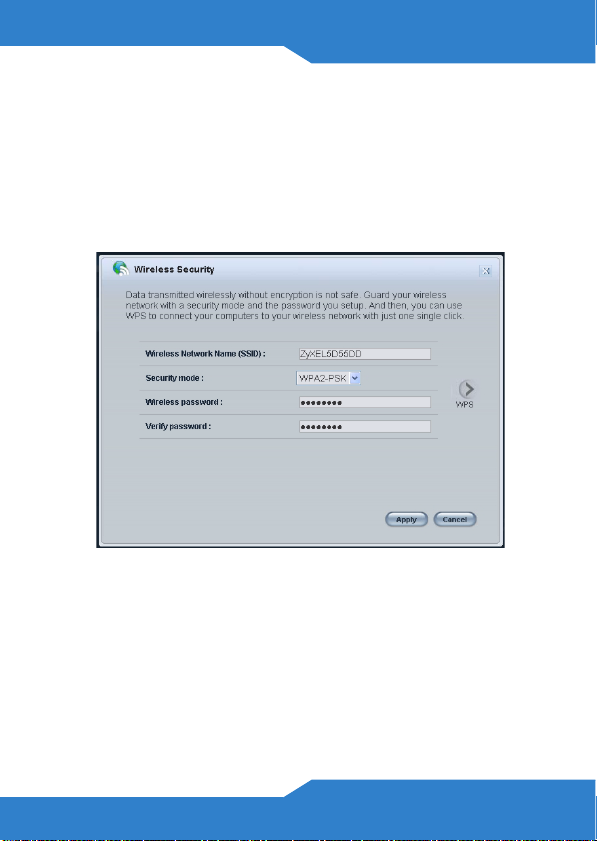
4. Click Wireless Security in the control panel.
11
Page 12

5. Specify a network name (SSID) to identify your
wireless network. Choose the most secure security
option that all wireless devices in your network can
support. For WPA-PSK/WPA2-PSK, type in the
password for your wireless network. Click Apply.
6. Your wireless clients now can use the same SSID
and password to connect wirelessly to the
WAP3205.
Refer to the User’s Guide for complete
descriptions of each screen and for instructions
on configuring the advanced features of your
WAP3205 using the Web Configurator.
12
Page 13
Procedure to View a Product’s Certification(s)
• Go to www.zyxel.com.
• Select your product from the drop-down list box
on the ZyXEL home page to go to that product's
page.
• Select the certification you wish to view from this
page.
ENGLISH
13
Page 14

14
Page 15
DEUTSCH
DEUTSCH
Übersicht
Der WAP3205 ist ein drahtloser AP(Access Point), mit
dem Wireless-Clients auf kabelgebundene Netzwerke
und auf das Internet zugreifen können.
Der WAP3205 kann Ihr Drahtlosnetzwerk als Repeater
oder Bridge erweitern. Er kann auch als Wireless-Client
über einen anderen AP auf das kabelgebundene
Netzwerk zugreifen. Ausführliche Informationen dazu
finden Sie im Benutzerhandbuch.
Diese Kurzanleitung enthält die folgenden Anleitungen:
• Einrichten eines kabelgebundenen Netzwerks mit
Internetzugriff
• Einrichten eines Drahtlosnetzwerks mittels WPS
• Einrichten des Drahtlosnetzwerks mit dem Web-
Konfigurator
15
Page 16

Einrichten eines
kabelgebundenen Netzwerks mit
Internetzugriff
A
B
C
16
D
Page 17

DEUTSCH
1. Nehmen Sie für die Installation des WAP3205
folgende Hardwareverbindungen vor:
• Schließen Sie die Antennen (A) an die
Antennenanschlüsse an. Stellen Sie sicher, dass diese
fest eingedreht und möglichst senkrecht ausgerichtet
sind.
• Schließen Sie ein Ethernet-Kabel an den Computer
und an den LAN-Port (B) des WAP3205 an.
• Verbinden Sie einen anderen LAN-Port (C) des
WAP3205 mit einem Ethernet-Kabel mit dem Ethernet
Port des Geräts, mit dem Sie auf das Internet
zugreifen möchten (z.B. einem DSL Modem).
• Schließen Sie den Netzadapter (D) des Geräts an die
Netzanschlussbuchse POWER und an eine geeignete
Stromquelle an.
2. Prüfen Sie Ihre Internetverbindung. Öffnen Sie auf
Ihrem Computer einen Internetbrowser, und geben
Sie in die Adresszeile die Adresse www.zyxel.de
ein.
17
Page 18

Wenn Sie nicht auf das Internet zugreifen
können, stellen Sie sicher, dass die IP-Adresse
des WAP3205 im selben Subnetz liegt wie Ihr
Breitbandmodem oder Router, und starten Sie
Ihren WAP3205 neu. Informationen zum
Einrichten der IP-Adresse des WAP3205 finden
Sie im Benutzerhandbuch.
Einrichten eines
Drahtlosnetzwerks mittels WPS
Verwenden Sie WPS (Wi-Fi Protected Setup), damit
WPS-fähige Drahtlosgeräte sicher auf den WAP3205
zugreifen können.
Wenn auf Ihrem vorhandenen
Drahtlosgerät das WPS-Logo zu
sehen ist, können Sie Ihr
Drahtlosnetzwerk einfach mittels WPS
Tastendruck einrichten.
18
Page 19
DEUTSCH
C
A
2 minutes
B
1. Stellen Sie sicher, dass der WAP3205 eingeschaltet
ist (A). Stellen Sie das Drahtlosgerät in Reichweite
des WAP3205 auf.
2. Drücken Sie zwei bis drei Sekunden lang die WPS-
Taste des WAP3205 und danach die WPS-Taste des
Drahtlos-Adapters, der an Ihr Notebook (B)
angeschlossen ist. Dabei ist es egal, welche Taste
zuerst gedrückt wird. Drücken Sie innerhalb von
zwei Minuten, nachdem Sie auf die erste Taste
gedrückt haben, auf die zweite Taste.
19
Page 20
Während des WPS-Vorgangs blinkt die WPS LED ()
am WAP3205. Sobald der WPS-Vorgang
abgeschlossen ist, leuchtet diese dauerhaft.
Sobald die WPS-Verbindung erfolgreich hergestellt
wurde, haben Sie Zugriff auf den WAP3205.
3. Schließen Sie Ihr Breitbandmodem an einen LANPort (C) Ihres WAP3205 an. Sie können jetzt über
den WAP3205 drahtlos eine Verbindung zum
Internet herstellen.
Funktioniert die kabelgebundene
Internetverbindung einwandfrei, die
Drahtlosverbindung dagegen nicht, wiederholen
Sie Schritt 3. Wenn WPS auf Ihrem Drahtlosgerät
nicht funktioniert, oder wenn Ihr bereits
vorhandenes Gerät WPS nicht unterstützt, gehen
Sie zum nächsten Abschnitt.
20
Page 21
DEUTSCH
Einrichten des
Drahtlosnetzwerks mit dem WebKonfigurator
1. Wählen Sie für Ihren Computer eine IP-Adresse
zwischen 192.168.1.3 und 192.168.1.254 und die
Subnetz-Maske 255.255.255.0. Schließen Sie Ihren
Computer an den WAP3205 an.
2. Öffnen Sie auf dem Computer, der an den WAP3205
angeschlossen ist, einen Internetbrowser. Geben
Sie als Websiteadresse "http://192.168.1.2" ein.
Geben Sie als Kennwort "1234" (Standard) ein,
wählen Sie Ihre Language (Sprache), und klicken
Sie auf Login (Anmelden).
21
Page 22

3. Geben Sie zu Ihrer Sicherheit umgehend ein neues
Kennwort ein (wiederholen Sie die Eingabe zur
Bestätigung), und klicken Sie auf Apply
(Übernehmen).
4. Klicken Sie im Fenster auf Wireless Security
(Drahtlossicherheit).
22
Page 23
DEUTSCH
5. Geben Sie einen Netzwerknamen (SSID) ein, um Ihr
Drahtlosnetzwerk zu identifizieren. Wählen Sie die
höchstmögliche Sicherheitsoption, die alle
Drahtlosgeräte Ihres Netzwerks unterstützen.
Geben Sie bei WPA-PSK/WPA2-PSK das Kennwort
für Ihr Drahtlosnetzwerk ein. Klicken Sie auf Apply
(Übernehmen).
6. Ihre Wireless-Clients können nun mit derselben
SSID und dem selben Kennwort drahtlos auf den
WAP3205 zugreifen.
Eine ausführliche Beschreibung der Fenster und
eine Anleitung zum Konfigurieren der erweiterten
Funktionen des WAP3205 mit dem WebKonfigurator finden Sie im Benutzerhandbuch.
23
Page 24
Vorgehensweise zum Aufrufen einer
Produktzertifizierung
1. Gehen Sie auf www.zyxel.com.
2. Wählen Sie Ihr Produkt aus der Auswahlliste auf
der ZyXEL Homepage aus, um die Seite des
entsprechenden Produkts aufzurufen.
3. Wählen Sie die Zertifizierung, die Sie von dieser
Seite aus aufrufen möchten.
24
Page 25

ESPAÑOL
ESPAÑOL
Vista general
El WAP3205 es un punto de acceso (PA) inalámbrico
que permite a los clientes inalámbricos conectarse
tanto a una red Ethernet cableada como a internet.
El WAP3205 puede actuar como repetidor o bridge
para ampliar su red inalámbrica. También puede
funcionar como cliente inalámbrico para acceder a la
red Ethernet a través de otro PA. Consulte su Guía del
usuario para información más detallada.
La Guía de instalación rápida le muestra cómo:
• Configurar una red cableada con acceso a internet
• Configurar una red inalámbrica con WPS
• Configurar su red inalámbrica con el Configurador
Web
25
Page 26

Configurar una red cableada con
acceso a internet
A
B
C
D
26
Page 27

ESPAÑOL
1. Realice las siguientes conexiones de hardware para
instalar su WAP3205:
• Conecte las antenas (A) en los zócalos de las
antenas, asegurándose de atornillarlas bien y
colocarlas hacia arriba.
• Conecte el puerto Ethernet de su ordenador a un
puerto LAN (B) del WAP3205 utilizando un cable
Ethernet.
• Conecte otro puerto LAN (C) de su WAP3205 al
puerto Ethernet del dispositivo con el que está
accediendo a Internet (por ejemplo, un módem)
utilizando un cable Ethernet.
• Utilice el adaptador de alimentación (D) del paquete
para enchufar el conector POWER a una toma de
corriente.
2. Compruebe su conexión a Internet. Abra un
explorador web en su ordenador y escriba
www.zyxel.com en la barra de direcciones.
Si no puede acceder a Internet, asegúrese de
que la dirección IP del WAP3205 esté en la
misma subred que el módem de banda ancha o
router y reinicie su WAP3205. Consulte la Guía
del usuario para información sobre la
configuración de la dirección IP del WAP3205.
27
Page 28

Configurar una red inalámbrica
con WPS
Utilice Wi-Fi Protected Setup (WPS) para permitir que
los dispositivos inalámbricos con WPS accedan de
forma segura al WAP3205.
Compruebe si su dispositivo
inalámbrico tiene el logotipo WPS y
siga estos pasos para configurar su
red inalámbrica usando WPS.
28
C
2 minutes
B
A
Page 29

ESPAÑOL
1. Asegúrese de que su WAP3205 esté encendido (A).
Coloque su dispositivo inalámbrico dentro del rango
del WAP3205.
2. Presione el botón WPS durante dos o tres segundos
en el WAP3205 y el botón WPS del adaptador
inalámbrico conectado a su portátil (B). No importa
el botón que presione antes. Debe presionar el
segundo botón en dos minutos tras presionar el
primero.
El LED WPS ( ) del WAP3205 parpadeará durante el
proceso WPS, luego se encenderá fijo cuando el
proceso WPS haya finalizado.
Si su conexión WPS tiene éxito, debería poder
acceder al WAP3205.
3. Conecte el puerto LAN (C) de su WAP3205 a su
módem de banda ancha. Ahora ya puede
conectarse a Internet sin cables a través de su
WAP3205.
Si su conexión a Internet con cables está bien y
su conexión inalámbrica no, repita el paso 3. Si
WPS no funciona o si su dispositivo inalámbrico
no soporta WPS, vaya a la sección siguiente.
29
Page 30

Configurar su red inalámbrica
con el Configurador Web
1. Configure su dirección IP entre 192.168.1.3 y
192.168.1.254 con la máscara de subred
255.255.255.0. Conecte el ordenador al WAP3205.
2. Abra el navegador web en el ordenador conectado
al WAP3205. Escriba "http://192.168.1.2" como la
dirección del sitio web. Escriba "1234"
(predeterminado) como contraseña, elija su
Language (Idioma) y haga clic en Login (Iniciar
sesión).
30
Page 31

ESPAÑOL
3. Escriba una contraseña nueva (vuelva a escribirla
para confirmar) y haga clic en Apply (Aplicar).
4. Haga clic en Wireless Security (Seguridad
inalámbrica) en el panel de control.
31
Page 32

5. Especifique un nombre de red (SSID) para
identificar su red inalámbrica. Elija la opción de
seguridad más segura soportada por todos los
dispositivos inalámbricos de su red. Para WPA-PSK/
WPA2-PSK, escriba la contraseña para su red
inalámbrica. Haga clic en Apply (Aplicar).
6. Los clientes de su red inalámbrica ahora pueden
usar el mismo SSID y contraseña para conectarse
de forma inalámbrica al WAP3205.
Consulte la Guía del usuario para una
descripción completa de cada pantalla y para
instrucciones sobre cómo configurar las
características avanzadas de su WAP3205
usando el Configurador Web.
32
Page 33

ESPAÑOL
Procedimiento para ver las certificaciones de un
producto
1. Vaya a www.zyxel.com.
2. Seleccione el producto que desea en el cuadro
de lista desplegable que se encuentra en la
pagina principal de ZyXEL para obtener acceso
a la pagina de dicho producto.
3. Seleccione la certificación que desea ver en esta
página.
33
Page 34

34
Page 35

FRANÇAIS
FRANÇAIS
Présentation
Le WAP3205 est un point d'accès (AP) sans fil
permettant aux clients sans fil de se connecter à un
réseau câblé et à Internet.
Le WAP3205 peut faire office de répéteur ou de pont
pour étendre votre réseau sans fil. Il peut aussi
fonctionner comme un client sans fil pour accéder au
réseau câblé via un autre AP. Consultez votre guide de
l'utilisateur pour les informations détaillées.
Le guide de mise en route rapide vous indique
comment:
• Installer un réseau câblé avec accès à Internet
• Installer un réseau sans fil avec WPS
• Paramétrez votre réseau sans fil en utilisant le
Configurateur web
35
Page 36

Installer un réseau câblé avec
accès à Internet
A
B
C
D
36
Page 37

FRANÇAIS
1. Effectuez les connexions matérielles suivantes pour
installer votre WAP3205:
• Connectez les antennes (A) aux prises d'antenne, en
vous assurant qu'elles sont fermement vissées et en
angle vers le haut.
• Connectez le port Ethernet de votre ordinateur à un
port LAN (B) du WAP3205 à l'aide d'un cable Ethernet.
• Connectez un autre port LAN (C) sur votre WAP3205
vers un port Ethernet sur l'appareil avec lequel vous
accédez à Internet (par exemple un modem) à l'aide
d'un câble Ethernet.
• Utilisez l'adaptateur d'alimentation (D) qui se trouve
dans l'emballage pour connecter la prise POWER
(Alimentation) à une source d'alimentation appropriée.
2. Vérifiez votre connexion Internet. Ouvrez un
navigateur web et entrez www.zyxel.com dans la
barre d'adresse.
Si vous n'avez pas accès à Internet, assurez-
vous que l'adresse IP du WAP3205 est dans le
même sous-réseau que votre modem ou routeur
large bande et redémarrez votre WAP3205. Voir
le guide de l'utilisateur pour les informations
concernant le paramétrage de l'adresse IP du
WAP3205.
37
Page 38

Installer un réseau sans fil avec
WPS
Utilisez WPS (Wi-Fi Protected Setup) pour permettre
aux périphériques sans fil équipés WPS d'accéder de
façon sécurisée au WAP3205.
Vérifiez si votre périphérique sans fil
a le logo WPS et suivant les étapes
suivantes pour installer votre réseau
sans fil à l'aide de WPS.
38
C
2 minutes
B
A
Page 39

FRANÇAIS
1. Assurez-vous que votre WAP3205 est allumé (A).
Placez votre périphérique sans fil à portée du
WAP3205.
2. Appuyez sur le bouton WPS pendant deux à trois
secondes sur le WAP3205 ainsi que sur le bouton
WPS sur l'adaptateur sans fil connecté à votre
notebook (B). L'ordre de pression des boutons n'a
pas d'importance. Vous devez appuyer sur le
second bouton en l'espace de deux minutes après
avoir appuyé sur le premier.
La LED WPS ( ) sur le WAP3205 clignote pendant le
processus de synchronisation WPS, puis reste
allumée de manière fixe quand le processus de
synchronisation WPS est terminé.
Si votre connexion WPS a réussi, vous devez
maintenant pouvoir accéder àu WAP3205.
3. Connectez un port LAN (C) sur votre WAP3205 à
votre modem large bande. Vous êtes maintenant
prêt à vous connecter sans fil à Internet à travers
votre WAP3205.
39
Page 40

Si votre connexion câblée fonctionne
correctement mais pas votre connexion sans fil,
répétez l'étape 3. Si la fonction WPS ne
fonctionne pas ou si votre périphérique WiFi ne
prend pas en charge le WPS, allez à la section
suivante.
Paramétrez votre réseau sans fil
en utilisant le Configurateur web
1. Définissez l'adresse IP de votre ordinateur sur une
valeur située entre 192.168.1.3 et 192.168.1.254
avec un masque de sous-réseau de 255.255.255.0.
Connectez l'ordinateur au WAP3205.
2. Ouvrez un navigateur web sur l'ordinateur connecté
au WAP3205. Tapez "http://192.168.1.2" comme
adresse de site web. Saisissez "1234" (défaut)
comme mot de passe, choisissez votre Language
(Langue) et cliquez sur Login (Connexion).
40
Page 41

FRANÇAIS
3. Saisissez un nouveau mot de passe (retapez-le pour
confirmer) et cliquez sur Apply (Appliquer).
4. Cliquez sur Wireless Security (Sécurité sans fil)
dans le panneau de configuration.
41
Page 42

5. Spécifiez un nom de réseau (SSID) pour identifier
votre réseau sans fil. Choisissez l'option de sécurité
la plus sécurisée prise en charge par tous les
périphériques WiFi de votre réseau. Pour le mode
de sécurité WPA-PSK/WPA2-PSK, entrez le mot de
passe de votre réseau sans fil. Cliquez sur Apply
(Appliquer).
6. Vos clients sans fil peuvent maintenant utiliser le
même SSID et mot de passe pour se connecter
sans fil au WAP3205.
Consultez le guide de l'utilisateur pour les
descriptions complètes de chaque écran et pour
les instructions sur la configuration des
fonctionnalités avancées de votre WAP3205 à
l'aide du configurateur web.
42
Page 43

FRANÇAIS
Procedure permettant de consulter une(les)
Certification(s) du Produit
1. Connectez vous sur www.zyxel.com.
2. Sélectionnez votre produit dans la liste
déroulante se trouvant sur la page d'accueil
ZyXEL pour accéder à la page du produit
concerné.
3. Sélectionnez sur cette page la certification que
vous voulez consulter.
43
Page 44

44
Page 45

ITALIANO
ITALIANO
Cenni generali
Il WAP3205 è un Access Point (AP) wireless che
consente ai clienti wireless di connettersi a una rete
cablata e a Internet.
WAP3205 può operare come ripetitore o come bridge
per estendere la rete wireless. Esso può anche
funzionare come client wireless per accedere alla rete
cablata tramite un altro AP. Vedere la Guida utente per
maggiori dettagli.
La Guida introduttiva illustrata come:
• Configurare una rete cablata con accesso a Internet
• Configurare una rete wireless con WPS
• Configurazione della rete Wireless tramite lo
strumento di configurazione Web
45
Page 46

Configurare una rete cablata con
accesso a Internet
A
B
C
D
46
Page 47

ITALIANO
1. Fare i collegamenti hardware seguenti per
configurare WAP3205:
• Collegare le antenne (A) alle prese apposite,
assicurandosi che siano saldamente avvitate e rivolte
verso l'alto.
• Collegare la porta Ethernet del computer a una porta
LAN (B) dell'WAP3205 utilizzando un cavo Ethernet.
• Collegare un'altra porta LAN (C) alla porta
WAP3205Ethernet del dispositivo con il quale si
accede a Internet (ad esempio un modem) utilizzando
un cavo Ethernet.
• Utilizzare l'alimentatore (D) fornito a corredo per
collegare l'ingresso POWER a una sorgente di
alimentazione appropriata.
2. Controllare la connessione a Internet. Aprire un
browser sul computer e digitare l'indirizzo
www.zyxel.com.
Se non è possibile accedere a Internet, verificare
che l'indirizzo IP di WAP3205 sia nella stessa
sottorete del modem broadband o del router e
quindi riavviarlo WAP3205. Vedere la Guida
dell'utente per ulteriori informazioni
sull'impostazione dell'indirizzo IP di WAP3205.
47
Page 48

Configurare una rete wireless
con WPS
Utilizzare WPS (Wi-Fi Protected Setup) per consentire
ai dispositivi wireless WPS di accedere in modo sicuro
a WAP3205.
Controllare se il dispositivo wireless
ha il logo WPS e seguire queste
istruzioni per configurare la rete
wireless utilizzando WPS.
48
C
2 minutes
B
A
Page 49

ITALIANO
1. Verificare che l' WAP3205 sia acceso (A). Mettere il
dispositivo wireless all'interno del campo d'azione
dell'WAP3205.
2. Tenere premuto il pulsante WPS per 2/3 secondi sul
WAP3205 così come il pulsante WPS sull'adattatore
wireless collegato al notebook (B). Non importa
quale dei pulsanti viene premuto prima, occorre solo
fare attenzione a premere il secondo pulsante entro
due minuti dalla pressione del primo.
Il LED WPS ( ) sull'WAP3205 lampeggia durante la
procedura WPS, quindi si accende in modo fisso
quando il processo WPS è finito.
Se la connessione WPS avviene con successo, a
questo punto è possibile accedere all'WAP3205.
3. Collegare una porta LAN (C) al modem WAP3205
broadband. Siete pronti per collegarvi a Internet
wireless tramite l'WAP3205.
Se la connessione a Internet cablata funziona
bene ma la connessione wireless no, ripetere il
passo 3. Se il sistema WPS non funziona o se il
dispositivo wireless non supporta WPS, passare
alla sezione seguente.
49
Page 50

Configurazione della rete
Wireless tramite lo strumento di
configurazione Web
1. Impostare l'indirizzo IP del computer includendolo
nell'intervallo 192.168.1.3 e 192.168.1.254 con
maschera di subnet 255.255.255.0. Collegare il
computer a WAP3205.
2. Aprire il browser sul computer connesso
all'WAP3205. Digitare "http://192.168.1.2" come
indirizzo del sito Web. Immettere "1234"
(predefinita) come password, scegliere la Language
(lingua) e fare clic su Login (accedi).
50
Page 51

ITALIANO
3. Immettere una nuova password (digitarla di nuovo
per confermarla) e fare clic su Apply (applica).
4. Fare clic su Wireless Security (sicurezza
wireless)?nel pannello di controllo.
51
Page 52

5. Specificare un nome di rete (SSID) per identificare la
rete wireless. Scegliere l'opzione di protezione più
sicura che tutti i dispositivi wireless sono in grado di
supportare. Per WPA-PSK/WPA2-PSK, immettere la
password per la rete wireless. Scegliere Apply
(applica).
6. I client wireless ora possono utilizzare lo stesso
SSID e la stessa password per connettersi senza fili
a WAP3205.
Consultare la Guida per l'utente per le descrizioni
complete di tutte le schermate, nonché per le
istruzioni necessarie per configurare le
funzionalità avanzate dell'WAP3205 utilizzando lo
strumento di configurazione Web.
52
Page 53

ITALIANO
Procedura per visualizzare le certificazioni di un
prodotto
1. Andare alla pagina www.zyxel.com
2. Nel sito ZyXEL, selezionare il proprio prodotto
dall'elenco a discesa per andare alla pagina di
quel prodotto.
3. Da questa pagina selezionare la certificazione
che si vuole vedere.
53
Page 54

“INFORMAZIONI AGLI UTENTI”
Ai sensi dell’art. 13 del Decreto Legislativo 25 luglio 2005,
n.151”Attuazione delle Direttive 2002/95/CE, 2002/96/CE e
2003/108/CE, relative alla riduzione dell’uso di sostanze
pericolose nelle apparecchiature elettriche ed elettroniche,
nonché allo smaltimento dei rifiuti”
ll simbolo del cassonetto barrato riportato
sull'apparecchiatura o sulla sua confezione
indica che il prodotto alla fine della propria vita
utile deve essere raccolto separatamente dagli
altri rifiuti.
La raccolta differenziata della presente
apparecchiatura giunta a fine vita è organizzata
e gestita dal produttore. L’utente che vorrà
disfarsi della presente apparecchiatura dovrà
quindi contattare il produttore e seguire il sistema
che questo ha adottato per consentire la raccolta
separata dell’apparecchiatura giunta a fine vita.
L’adeguata raccolta differenziata per l’avvio
successivo dell’apparecchiatura dismessa al
riciclaggio, al trattamento e allo smaltimento
ambientalmente compatibile contribuisce ad
evitare possibili effetti negativi sull’ambiente e
sulla salute e favorisce il reimpiego e/o riciclo dei
materiali di cui è composta l’apparecchiatura.
Lo smaltimento abusivo del prodotto da parte del
detentore comporta l’applicazione delle sanzioni
amministrative previste dalla normativa vigente.”
54
Page 55

SVENSKA
SVENSKA
Översikt
WAP3205 är en trådlös åtkomstpunkt (AP) som låter
trådlösa klienter ansluta till ett kabelanslutet nätverk
och Internet.
WAP3205 kan fungera som en repeater eller brygga för
att utöka ditt trådlösa nätverk. Den kan ven fungera
som en trdls klient fr att f tkomst till det kabelanslutna
ntverket genom en annan AP. Se bruksanvisningen fr
mer utfrlig information.
Snabbstartguiden visar hur du:
• Installerar ett kabelbundet nätverk med Internet-
åtkomst
• Ställa in ett trådlöst nätverk med WPS
• Ställa in ditt trådlösa nätverk med hjälp av
webbkonfiguratorn
55
Page 56

Installerar ett kabelbundet
nätverk med Internet-åtkomst
A
B
C
D
56
Page 57

SVENSKA
1. Gr fljande maskinvaruanslutningar fr att installera
din WAP3205:
• Anslut antennerna (A) till antennuttagen och
kontrollera att de skruvas in ordentligt och att de är
vinklade uppåt.
• Anslut Ethernet-porten på din dator till en LAN-port (B)
på WAP3205 med en Ethernet-kabel.
• Anslut en annan LAN-port (C) på din WAP3205 till
Ethernet-porten på enheten med vilken du får åtkomst
till Internet (t.ex. ett modem) med en Ethernet-sladd.
• Använd strömadaptern (D) från förpackningen för att
ansluta uttaget POWER (ström) till en lämplig
strömkälla.
2. Kontrollera din Internet-anslutning. Öppna en
webbläsare på din dator och ange www.zyxel.com i
adressfältet.
Om du inte lyckas få åtkomst till Internet,
kontrollera att WAP3205:s IP-adress finns i
samma subnet som ditt bredbandsmodem eller
router och starta om WAP3205. Se
bruksanvisningen för information om inställning
av WAP3205:s IP-adress.
57
Page 58

Ställa in ett trådlöst nätverk med
WPS
Använd WPS (Wi-Fi Protected Setup) för att låta WPSaktiverade trådlösa enheter få säker åtkomst till
WAP3205.
Kontrollera om din trådlösa enhet är
försedd med WPS-logotypen och följ
dessa steg för att installera ditt
trådlösa nätverk med WPS.
58
C
2 minutes
B
A
Page 59

SVENSKA
1. Kontrollera att din WAP3205 är påslagen (A). Placera
din trådlösa enhet inom räckvidden för WAP3205.
2. Tryck på WPS i 2-3 sekunder på WAP3205 samt
WPS-knappen på den trådlösa adapter som är
ansluten till din bärbara dator (B). Det spelar ingen
roll vilken knapp du trycker på först. Du måste trycka
på den andra knappen inom två minuter efter det att
du tryckt på den första.
WPS-lampan ( ) på WAP3205 blinkar under WPSprocessen, och lyser därefter stadigt när WPSprocessen är slutförd.
Om din WPS-anslutning har lyckats, ska du nu kunna
få åtkomst till WAP3205.
3. Anslut en LAN-port (C) på WAP3205 till ditt
bredbandsmodem. Nu är du redo att ansluta trådlöst
till Internet genom WAP3205.
Om din stationära Internet-anslutning fungerar
bra men din trådlösa anslutning inte fungerar,
upprepa steg 3. Om WPS inte fungerar eller om
din trådlösa enhet inte stöder WPS, gå till nästa
avsnitt.
59
Page 60

Ställa in ditt trådlösa nätverk med
hjälp av webbkonfiguratorn
1. Stll in datorns IP-adress mellan 192.168.1.3 och
192.168.1.254 med subnetmask 255.255.255.0.
Anslut datorn till WAP3205.
2. Öppna en webbläsare på datorn som är ansluten till
WAP3205. Skriv in "http://192.168.1.2" som
webbplatsadress. Skriv in ”1234” (standard) som
lösenord och klicka på Language (språk) och klicka
på Login (logga in).
60
Page 61

SVENSKA
3. Ange ett nytt lösenord (skriv in det en andra gång för
att bekräfta) och klicka på Apply (tillämpa).
4. Klicka på Wireless Security (trådlös säkerhet) i
kontrollpanelen.
61
Page 62

5. Specificera ett ntverksnamn (SSID) som ska
identifiera ditt trdlsa ntverk. Välj det säkraste
säkerhetsalternativet som stöds av alla trådlösa
enheter i ditt nätverk. För WPA-PSK/WPA2-PSK,
skriv in lösenordet för ditt trådlösa nätverk. Klicka på
Apply (tillämpa).
6. Nu kan dina trådlösa klienter använda samma SSID
och lösenord för att ansluta trådlöst till WAP3205.
Se bruksanvisningen för fullständiga
beskrivningar av alla skärmar och för instruktioner
om hur du konfigurerar de acvanceade
funktionerna hos din WAP3205 med hjälp av
webbkonfiguratorn.
62
Page 63

SVENSKA
Procedur for att visa en produkts certifikat
1. Gå till www.zyxel.com
2. Välj din produkt från rullgardinslistrutan på
ZyXEL:s hemsida för att gå till denna produkts
sida.
3. Välj det certifikat du vill titta på från denna sida.
63
Page 64

64
Page 65

NEDERLANDS
NEDERLANDS
Overzicht
De WAP3205 is een draadloos access point (AP)
waarmee draadloze cliënten verbonden kunnen worden
met een bedraad netwerk en het Internet.
De WAP3205 kan worden gebruikt als repeater of als
bridge om uw draadloze netwerk te uit te breiden. Het
kan ook worden gebruikt als een draadloze cliënt voor
toegang naar het bedraadde netwerk via een andere
AP. Kijk in de Gebruikershandleiding voor meer
informatie.
Met de Quick Start Guide kunt u zien hoe:
• Een bedraad netwerk opgezet moet worden met
Internet Toegang
• Uw draadloze netwerk instellen met WPS
• Instellen van het draadloze netwerk met behulp van de
Web Configurator
65
Page 66

Een bedraad netwerk opgezet
moet worden met Internet
Toegang
A
B
C
66
D
Page 67

NEDERLANDS
1. De volgende hardwareverbindingen zijn nodig voor
het instellen van uw WAP3205:
• Verbindt de antennes (A) aan de antenne-uitgangen,
en zorg ervoor dat de stevig worden ingedraaid en
omhoog gericht zijn.
• Sluit de Ethernetpoort op uw computer aan op de LAN
poort (B) van de WAP3205 met gebruik van de
bijgeleverde Ethernet kabel.
• Verbindt een andere LAN poort (C) op uw WAP3205
aan de Ethernetpoort op het apparaat waarmee u
toegang tot Internet heeft (bijvoorbeeld een modem)
met behulp van een Ethernetkabel.
• Gebruik de stroomadapter (D) uit het pakket om de
POWER (STROOM) aansluiting aan te sluiten aan een
geschikte stroombron.
2. Controleer uw Internetverbinding. Open een
webbrowser op uw computer en typ www.zyxel.com
in de adresbalk.
Als u geen toegang tot Internet heeft, zorg er dan
voor dat het IP adres van de WAP3205 in
hetzelfde subnet als uw breedbandmodem of
router is en herstart dan uw WAP3205. Zie de
Gebruikerhandleiding voor informatie over het
instellen van het IP adres van uw WAP3205.
67
Page 68

Uw draadloze netwerk instellen
met WPS
Gebruik Wi-Fi Protected Setup (WPS) om WPSbeveiligde draadloze apparaten toegang te geven tot
de WAP3205.
Controleer of uw draadloze apparaat
een WPS logo heeft en volg deze
stappen om uw draadloze netwerk in
te stellen met gebruik van WPS.
68
C
2 minutes
B
A
Page 69

NEDERLANDS
1. Zorg ervoor dat uw WAP3205 is ingesteld op (A).
Plaats uw draadloze apparaat binnen het bereik van
de WAP3205.
2. Druk op de WPS knop gedurende twee tot drie
seconden op de WAP3205 alsmede de WPS knop
op de draadloze adapter die met uw notebook
verbonden is (B). Het maakt niet uit welk apparaat
als eerste wordt ingedrukt. De tweede knop moet
binnen twee minuten na de eerste worden ingedrukt.
De WPS LED ( ) op de WAP3205 knippert tijdens
het WPS proces, en blijft dan constant branden als het
WPS proces gereed is.
Als uw WPS verbinding succesvol is, dan zou u nu in
staat moeten zijn om toegang te krijgen tot de
WAP3205.
3. Verbind een LAN poort (C) op uw WAP3205 aan uw
breedbandmodem. U bent nu gereed voor een
draadloze verbinding met Internet via uw WAP3205.
69
Page 70

Als de bedraadde Internet verbinding in orde is,
maar de draadloze niet, herhaal dan stap 3. Als
de WPS niet werkt of uw draadloze apparaat
ondersteunt geen WPS, ga dan naar het
volgende deel.
Instellen van het draadloze
netwerk met behulp van de Web
Configurator
1. Stel het IP adres van uw computer in tussen
192.168.1.3 en 192.168.1.254 met een subnet mask
van 255.255.255.0. Verbind de computer aan de
WAP3205.
2. Open een webbrowser op de computer die
verbonden is met de WAP3205. Type "http://
192,168.1,1" in als website-adres. Voer "1234"
(fabrieksinstelling) als het wachtwoord, kies uw
Language (Taal) en klik op Login (Inloggen).
70
Page 71

NEDERLANDS
3. Voer een nieuw wachtwoord in (nogmaals ter
bevestiging) en klik op Apply (Toepassen).
4. Klik op Wireless Security (Draadloze beveiliging) in
het bedieningscherm.
71
Page 72

5. Kies een netwerknaam (SSID) om uw draadloze
netwerk te herkennen. Kies de meest veilige optie
die door alle draadloze apparaten in uw netwerk
worden ondersteunt. Voor WPA-PSK/WPA2-PSK,
voert u het wachtwoord in van uw draadloze
netwerk. Klik op Apply (Toepassen).
6. Uw draadloze cliënten kunnen nu hetzelfde SSID en
wachtwoord gebruiken om draadloos verbonden te
worden met de WAP3205.
Zie de Gebruikerhandleiding voor een complete
beschrijving van elk van de schermen en voor
instructies om de geavanceerde opties van uw
WAP3205 in te stellen met behulp van de Web
Configurator.
72
Page 73

NEDERLANDS
Procedure voor het bekijken van een Product
Certificatie
1. Ga naar www.zyxel.com.
2. Selecteer uw product in het meerkeuzemenu op
de ZyXEL homepage om naar de pagina voor dat
product te gaan.
3. Selecteer de certificatie die u op deze pagina wilt
zien.
73
Page 74

74
Page 75

ENGLISH DEUTSCH
Green Product Declaration
RoHS Directive 2002/95/EC
WEEE Directive 2002/96/EC
(WEEE: Waste Electrical and Electronic
Equipment)
2003/108/EC
Green Product Declaration
RoHS Directive 2002/95/EC
WEEE Directive 2002/96/EC
(WEEE: Waste Electrical and Electronic
Equipment)
2003/108/EC
Declaration Signature:
Name/Title: Alan Cho / Quality Assurance Director
Date (yyyy/mm/dd): 2009/3/24
ESPAÑOL FRANÇAIS
Declaración de Producto Ecológico
Directiva RoHS 2002/95/EC
Directiva REEE 2002/96/EC
(REEE : Residuos de Equipos
Eléctricos y Electrónicos)
2003/108/EC
Firma de declaración:
Nombre/Título: Alan Cho / Quality Assurance
Director
Fecha (aaaa/mm/dd): 2009/3/24
Unterschrift des Erklärenden:
Name/Titel: Alan Cho / Quality Assurance Director
Datum (JJJJ/MM/TT): 2009/3/24
Déclaration de Produit Green
Directive RoHS 2002/95/EC
Directive DEEE 2002/96/EC
(DEEE : Déchets des Equipements
Electriques et Electroniques)
2003/108/EC
Signature de la déclaration :
Nom/Titre : Alan Cho / Quality Assurance Director
Date (aaaa/mm/jj) : 2009/3/24
75
Page 76

ITALIANO NEDERLANDS
Dichiarazione Green Product
Direttiva RoHS 2002/95/CE
Direttiva RAEE 2002/96/CE
(RAEE: Rifiuti di Apparecchiature
Elettriche ed Elettroniche)
2003/108/CE
Productmilieuverklaring
RoHS-richtlijn 2002/95/EC
AEEA-richtlijn 2002/96/EC
(AEEA: Afgedankte Elektrische en
Elektronische Apparaten)
2003/108/EC
Firma dichiarazione:
Nome/titolo: Alan Cho / Quality Assurance Director
Data (aaaa/mm/gg): 2009/3/24
SVENSKA
Miljödeklaration
RoHS Direktiv 2002/95/EC
WEEE Direktiv 2002/96/EC
(WEEE: hantering av elektriskt och
elektroniskt avfall)
2003/108/EC
Deklaration undertecknad av:
Namn/Titel: Alan Cho / Quality Assurance Director
Datum (åååå/mm/dd): 2009/3/24
Verklaringshandtekening:
Naam/titel: Alan Cho / Quality Assurance Director
Datum(jjjj/mm/dd): 2009/3/24
76
Page 77

www.zyxel.com
Declaration of Conformity
We, ZyXEL Communications Corp., located at No.6, Innovation Rd II, Science-Park, Hsin-Chu, 300,
Taiwan, declare under our sole responsibility that the product:
Product information
Product Name : Wireless N Access Point
Model Number : WAP3205
Produced by
Company Name : ZyXEL Communications Corporation
Company Add. : No. 6, Innovation Road II, Science-Park, Hsin-Chu, 300, Taiwan
to which this declaration relates, is in conformity with the following standards or other normative
documents:
EN 301489-17 V1.3.2 (2008-04) EN 55022:2006+A1: 2007
EN 301489-1 V1.8.1 (2008-04) EN 61000-3-2: 2006
EN 300 328 V1.7.1 (2006-10) EN 61000-3-3: 1995+A1: 2001+A2: 2005
EN 50385:2002
Safety EN 60950-1: 2006
Following the provisions of 2004/108/EC; 92/31/EEC Directive; 93/68/EEC, 99/5/EEC and LVD
2006/95/EC.
In accordance with Annex III of the Directive 1999/5/EC.
The TCF-File is located at:
Company Name : ZyXEL Communications UK Limited
Company Address : 11 The Courtyard, Eastern Road, Bracknell, Berkshire, RG12
Person is responsible for marking this declaration:
Hung-Chun Kuo
Name (Full Name) Position/ Title
2009-05-20
Date Legal Signature
2XB United Kingdom
Managing Director
77
Page 78

This product is designed for the 2.4 GHz WLAN network throughout the EC region.
http://www.zyxel.com/index.php
Copyright © 2009 ZyXEL Communications Corp. All rights reserved. ZyXEL, ZyXEL logo are registered
trademarks of ZyXEL Communications Corp. All other brands, product names, or trademarks mentioned
are the property of their respective owners. All specifications are subject to change without notice.
 Loading...