

Page 1

Vantage Report
Quick Start Guide
Version 2.3
2/2006
Table of Contents
ENGLISH 1
DEUTSCH 17
ESPAÑOL 33
FRANÇAIS 51
ITALIANO 69
繁體中文 87
РУССКИЙ 103
Page 2

ENGLISH
ENGLISH
Vantage Report
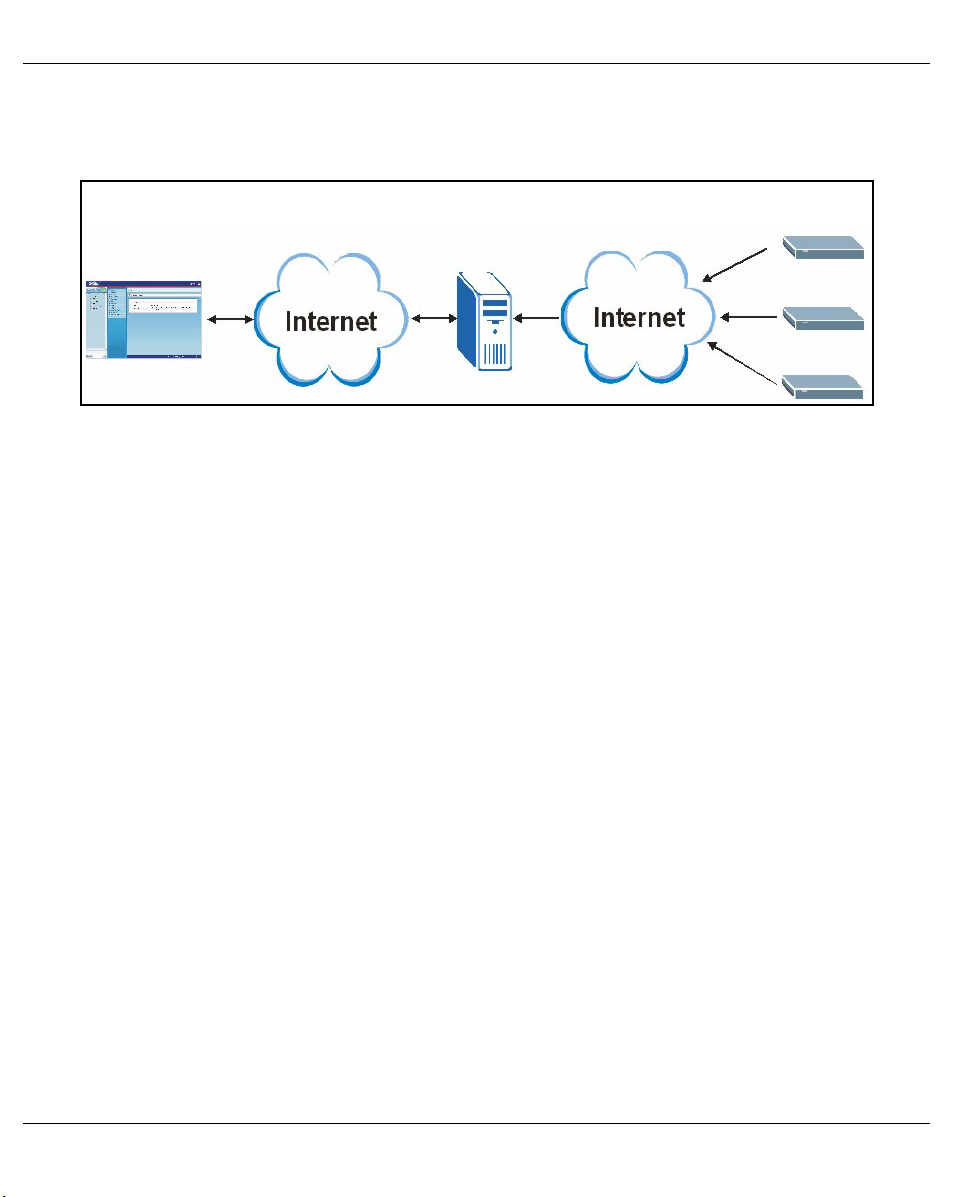
Vantage Report collects log entries and traffic statistics from ZyXEL devices and then generates graphical and
tabular reports about network performance and events.
C
A
Install Vantage Report on the Vantage Report server (B). Then, use the web configurator (A) to configure it.
(The web configurator can run on a remote computer or on the Vantage Report server.) Finally, configure the
ZyXEL devices (C) to send their log entries and traffic statistics to the Vantage Report Server. The Vantage
Report server collects this information and builds statistical reports about the network. You and others can
look at these reports any time in the web configurator or in regular e-mail messages.
B
Overview
1 Preparation - Make sure the Vantage Report server meets the minimum requirements, and get the
Vantage Report server ready for installation.
2 Installation - Install Vantage Report on the Vantage Report server.
3 Login - Use the web configurator to access the Vantage Report server.
4 E-mail Setup - Set up the administrator e-mail address and SMTP mail server settings in Vantage Report,
and test the SMTP settings.
5 Registration - When you install Vantage Report, you get the standard version. You do not have to register
Vantage Report unless you want to get the trial version or upgrade to the professional version. (See
section 5 for more information about versions.)
6 Device Setup - Set up the ZyXEL devices, and add them in the Vantage Report server.
1
Page 3

ENGLISH
1 Preparation
Check these things before you install Vantage Report.
1.1 Check Minimum Requirements
If your Vantage Report server does not meet the minimum requirements, you should upgrade it or use a
different server that does meet the minimum requirements.
CPU Pentium IV 2.6 GHz or faster recommended
RAM 1024 MB or more (for good performance with 25 devices)
Hard Disk 80 GB or more
Operating System Windows XP Professional, Windows 2000/2003 Server
Browser
(Running on Server
or Other Computer)
Other
Requirements for
Featured Services
1.2 Save Device List (Vantage Report v2.2 only)
If you currently use Vantage Report v2.2, you should save the list of devices in Vantage Report before you
uninstall it. Then, in section 6.2, you can load this file, instead of adding each device manually to Vantage
Report.
Internet Explorer 6.0 (Service Pack 1) or later on Windows
Mozilla 1.7.12 or later on Windows
Firefox 1.07 or later on Windows
1024 by 768 resolution
SMTP daemon
TCP port 3316 and UDP port 514
Note: You cannot load this file in section 6.2 if it adds more devices than the Vantage Report version
and license allows. See section 5 for more details.
1 On the included CD, click Documents > Upgrade Notes.
2 Follow the directions to copy the migration folder (and all its contents) from the included CD to the
Vantage Report v2.2 installation directory (for example, C:\Program Files\ZyXEL\Vantage Report).
3 Start Vantage Report v2.2, if it is not already running.
4 In the migration folder in the Vantage Report v2.2 installation directory, run exportDeviceList.bat. This
program creates a file called Devices.xml in the same folder.
5 Copy Devices.xml to a different folder, where it will not be deleted when you uninstall Vantage Report v2.2
in section 1.3.
2
Page 4
ENGLISH
1.3 Uninstall Old Versions of Vantage Report
1 If an old version of Vantage Report is running, stop it.
2 In Windows 2000, click Start > Settings > Control Panel > Add/Remove Programs > Vantage Report >
Change/Remove. Follow the prompts to remove Vantage Report.
In Windows XP, click start > Control Panel > Add/Remove Programs > Vantage Report > Change/
Remove. Follow the prompts to remove Vantage Report.
1.4 Close MySQL and Tomcat
When you install Vantage Report, you also install MySQL and Tomcat. If these applications run on the Vantage
Report server, make sure these applications are closed before you install Vantage Report. Follow these steps
to check whether or not these applications are running and to stop them.
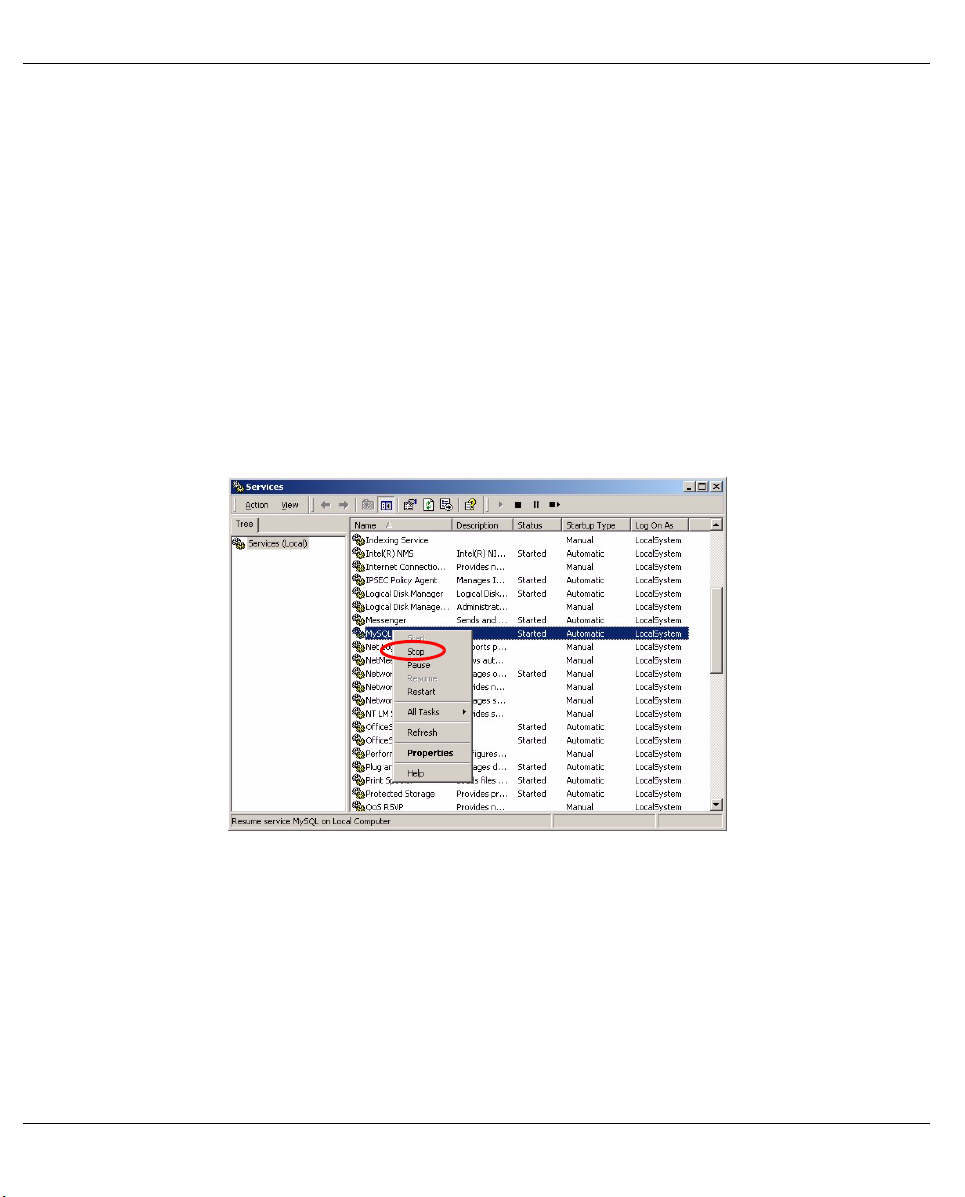
1 In Windows 2000, click Start > Settings > Control Panel > Administrative Tools > Services. The
Services screen opens.
In Windows XP, click start > Control Panel > Performance and Maintenance > Administrative Tools >
Services. The Services screen opens.
2 If there are no MySQL or Tomcat services running on the Vantage Report server, go to the next section.
Otherwise, right-click on any MySQL or Tomcat service that is running. The menu that you see above
appears.
3 Select Stop in the menu. Repeat steps 2 and 3 if other MySQL or Tomcat services are still running on the
Vantage Report server.
3
Page 5
ENGLISH
2 Installation
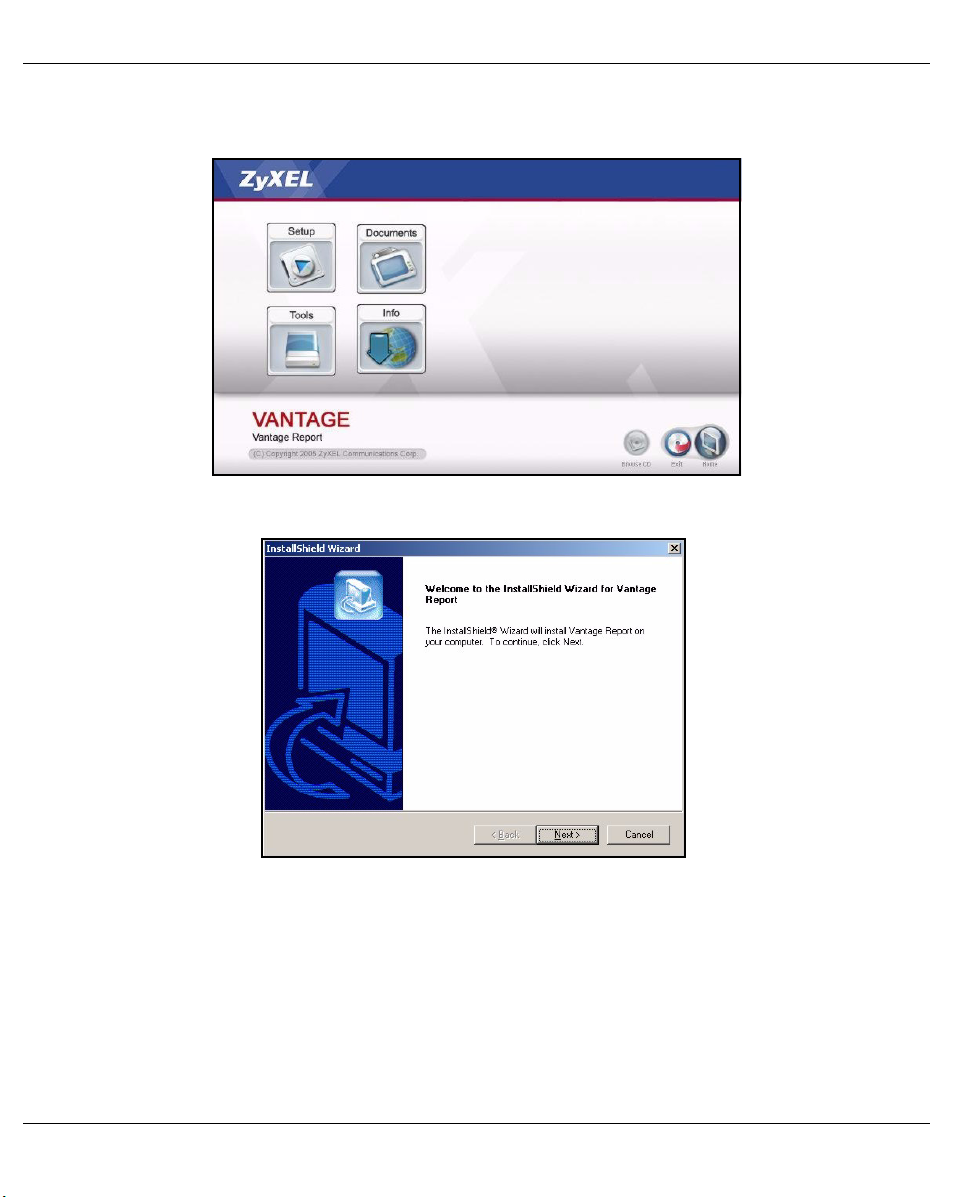
Put the CD into your CD-ROM. The following screen appears.
Click Setup > Vantage Report to start installing Vantage Report. The CD may first extract some files. Then,
the Vantage Report installation wizard appears.
4
Page 6
ENGLISH
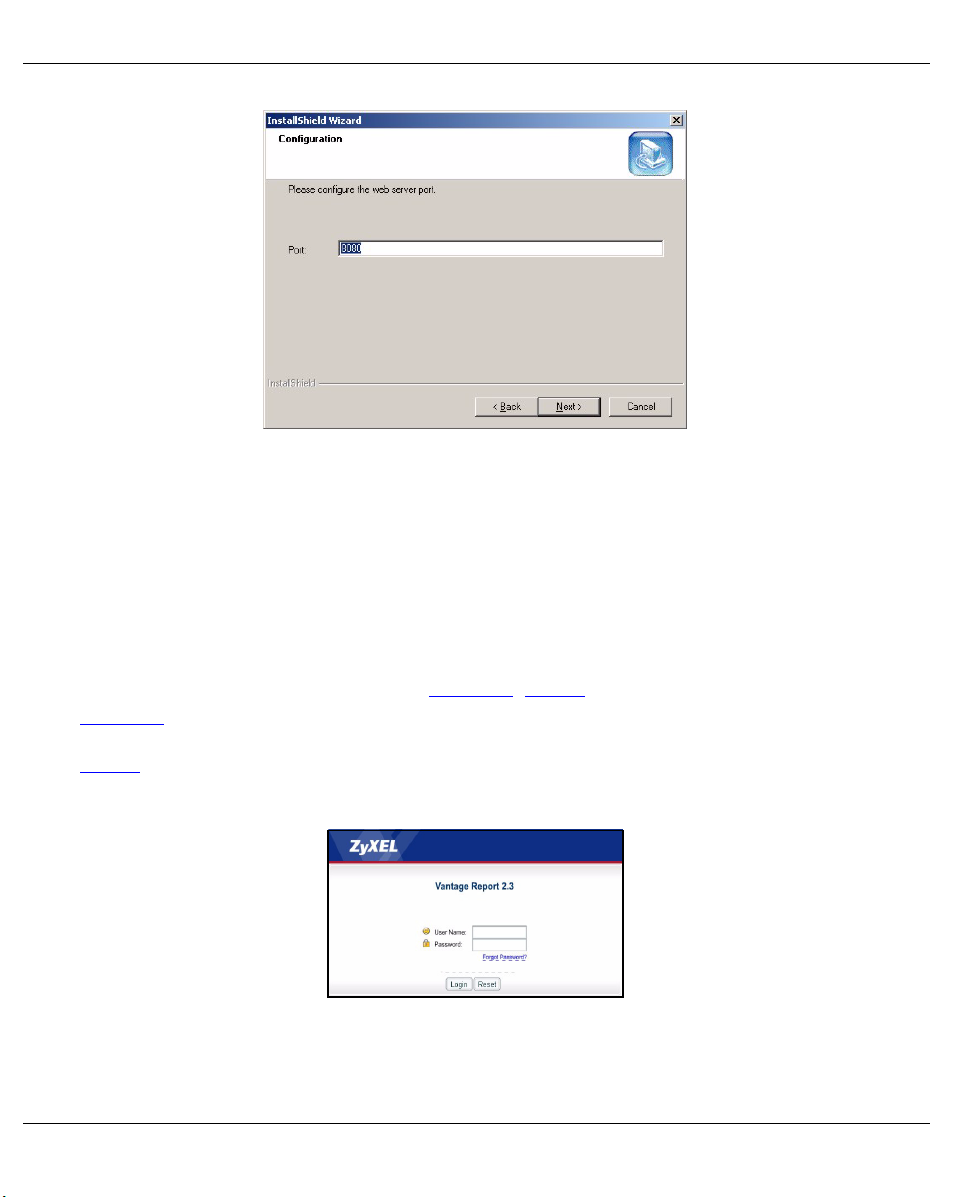
Click Next. Follow the prompts. Before you finish, the following screen appears.
Enter the port number you want Vantage Report to use for web services. You cannot change this later without
re-installing Vantage Report. Make sure this port number does not conflict with other services in your network.
Click Next when you are ready.
When you finish installing Vantage Report, restart the Vantage Report server.
3 Login
By default, the Vantage Report server starts automatically when you log in to the Vantage Report server. To
access the Vantage Report server,
1 Open a browser window, and go to
• a.b.c.d is the IP address of the Vantage Report server. If you open the web configurator on the
same computer on which you installed Vantage Report, enter localhost.
xxxxx is the port number you entered during installation. (See section 2.)
•
For example, http://localhost:8080/vrpt or http://212.100.9.161:9090/vrpt.
The Login screen appears. If it does not appear, see Troubleshooting.
2 In the login screen, enter your user name and password, and click Login.
• Default user name:
• Default password: root
root
http://a.b.c.d:xxxxx/vrpt, where
5
Page 7

ENGLISH
The main screen appears. It is divided into three parts.
A
Use the device window (A) to select a device. Right-click to add and remove devices.
Use the function window (B) to select a report.
Use the report window (C) to look at and adjust the selected report for the selected device.
B
C
4 E-mail Setup
You should have an e-mail account on a SMTP mail server for Vantage Report. You can use an existing
account or create a new one. In either case, you must have the SMTP mail server (IP or domain name), e-mail
address, user name (if required), and password (if required).
4.1 Set Up Administrator E-mail Address
You should set up the e-mail address for the Vantage Report administrator first. This e-mail address is used to
test the SMTP settings in section 4.2. It is also used for system notifications or if you forget the password for
the root account. (If you forget the password, click Forget Password? in the Login screen.) See the User’s
Guide for more detail.
1 Log in to the Vantage Report server. (See section 3.)
2 In the function window, click System > User Maintenance. The User List screen appears.
6
Page 8
ENGLISH
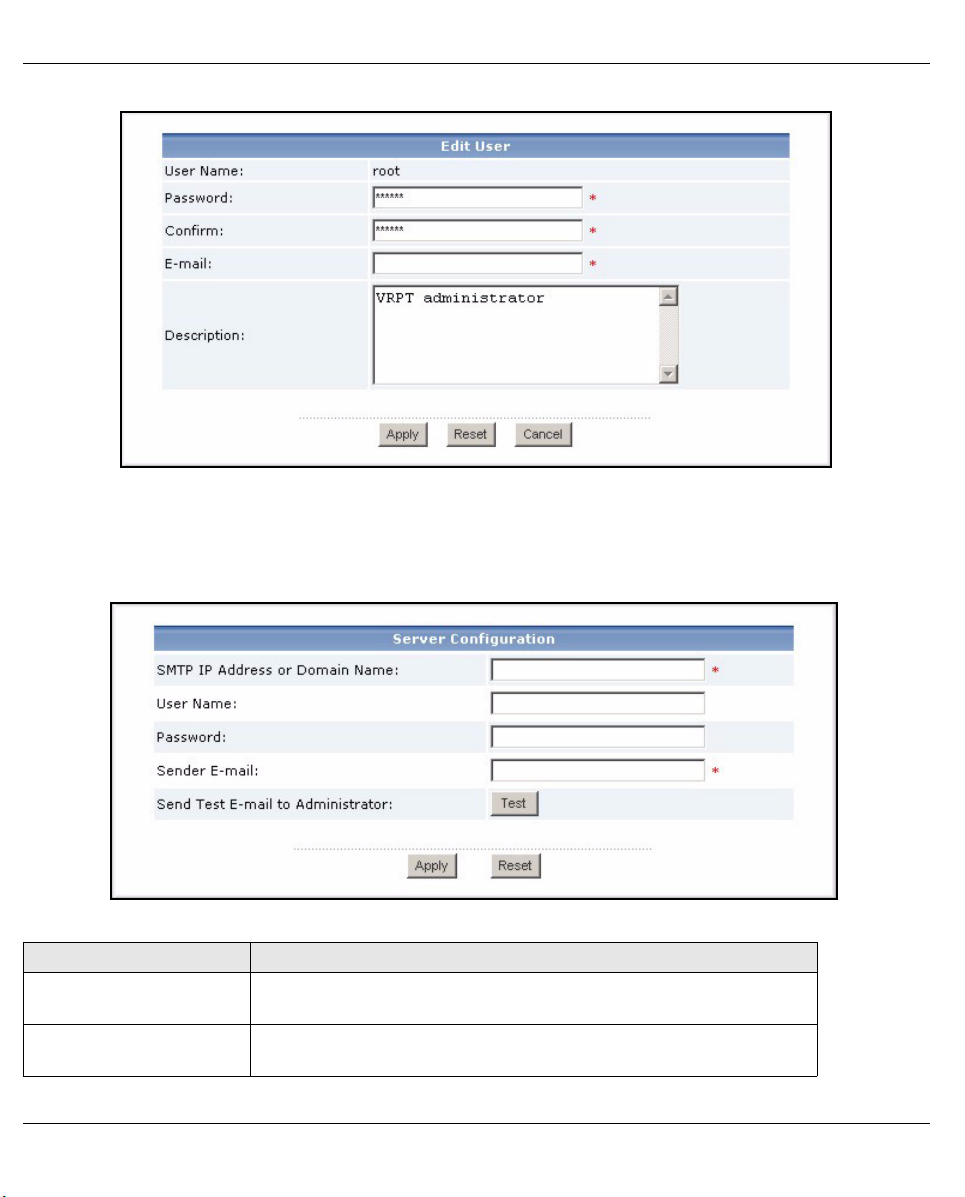
3 Click root. The Edit User screens appears.
4 Type the e-mail address for the Vantage Report administrator in the E-mail field.
5 Click Apply.
4.2 Set Up SMTP Mail Server
1 In the function window, click System > Server Configuration. The Server Configuration screen appears.
2 Follow the directions in the table below to fill in the Server Configuration screen.
LABEL DESCRIPTION
SMTP IP Address or
Domain Name
User Name Enter the user name required by the SMTP mail server. If the user
Enter the IP address or domain name of the SMTP mail server on
which Vantage Report has an account.
name is not required, leave this field blank.
7
Page 9
ENGLISH
LABEL DESCRIPTION
Password Enter the password required by the SMTP mail server. If the password
is not required, leave this field blank.
Sender E-mail Enter the e-mail address you want to be the sender when Vantage
Report sends e-mail. This is the e-mail address from which Vantage
Report e-mail appears to be sent.
3 Click Apply. (You must save these settings before you can test them in the next step.)
4 Click Test. Vantage Report sends a test message to the e-mail address you specified in section 4.1.
5 Confirm that the specified e-mail account received the message from Vantage Report. If it did not receive
the e-mail, see Troubleshooting.
5 Registration
You only have to register Vantage Report if you want to get the trial version or upgrade to the professional
version.
•The standard version provides a variety of statistical and scheduled reports for one device.
•The professional version supports more reports, more features, and more devices than the standard version.
•The trial version is a limited-time, free trial of the professional version. It does not support as many devices as
the professional version, however.
The Vantage Report server must have access to http://www.myZyXEL.com during registration. In addition,
some information may also be required for setup.
If you have a myZyXEL.com account, you need your ...
• myZyXEL.com user name
• myZyXEL.com password
If you want to upgrade to the professional version, you need your ...
• license key (iCard in the folder you received when you purchased the professional version)
1 Log in to the Vantage Report server. (See section 3.)
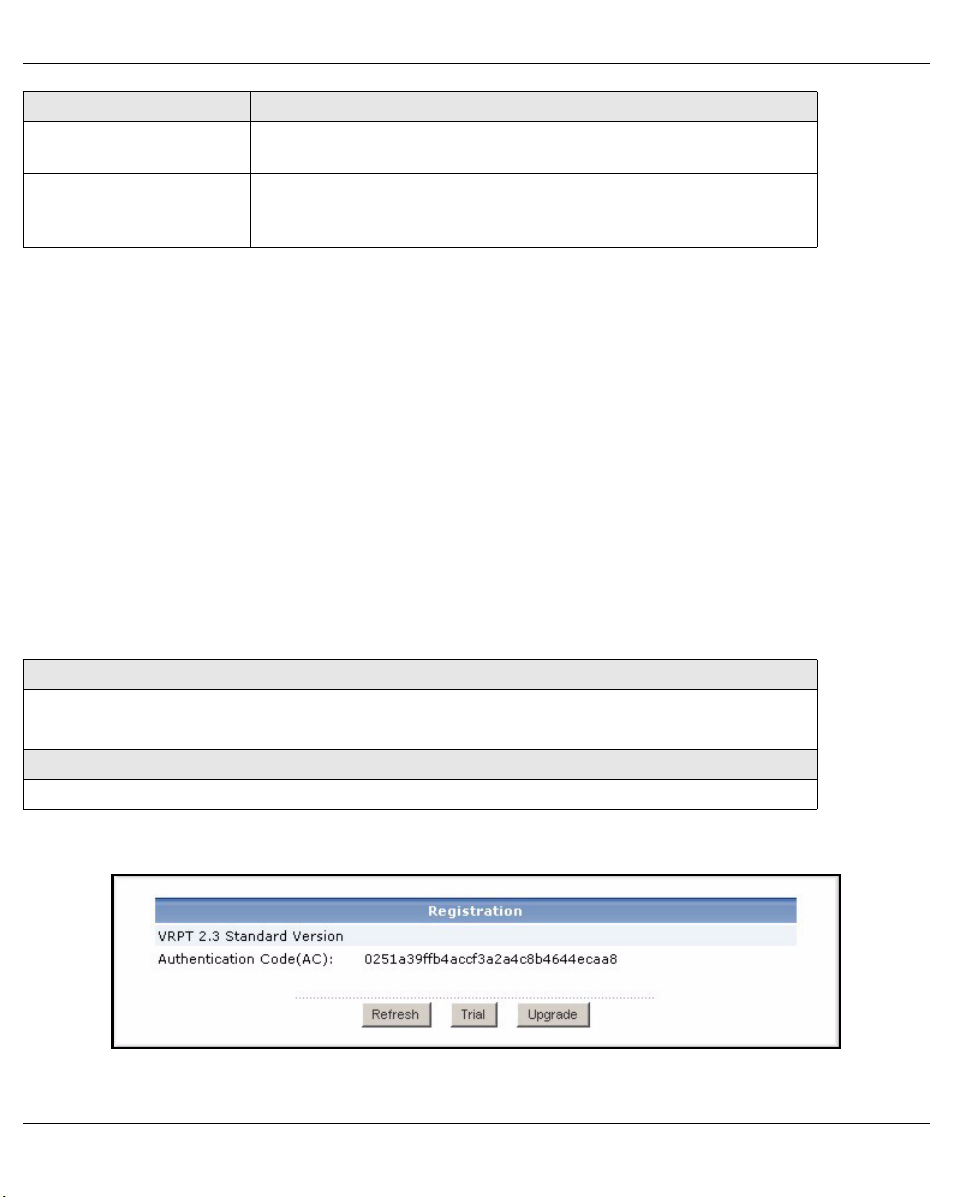
2 In the function window, click System > Registration. The Registration screen appears.
3 If you want to get the trial version, click Trial.
8
Page 10
ENGLISH
If you want to upgrade to the professional version, click Upgrade.
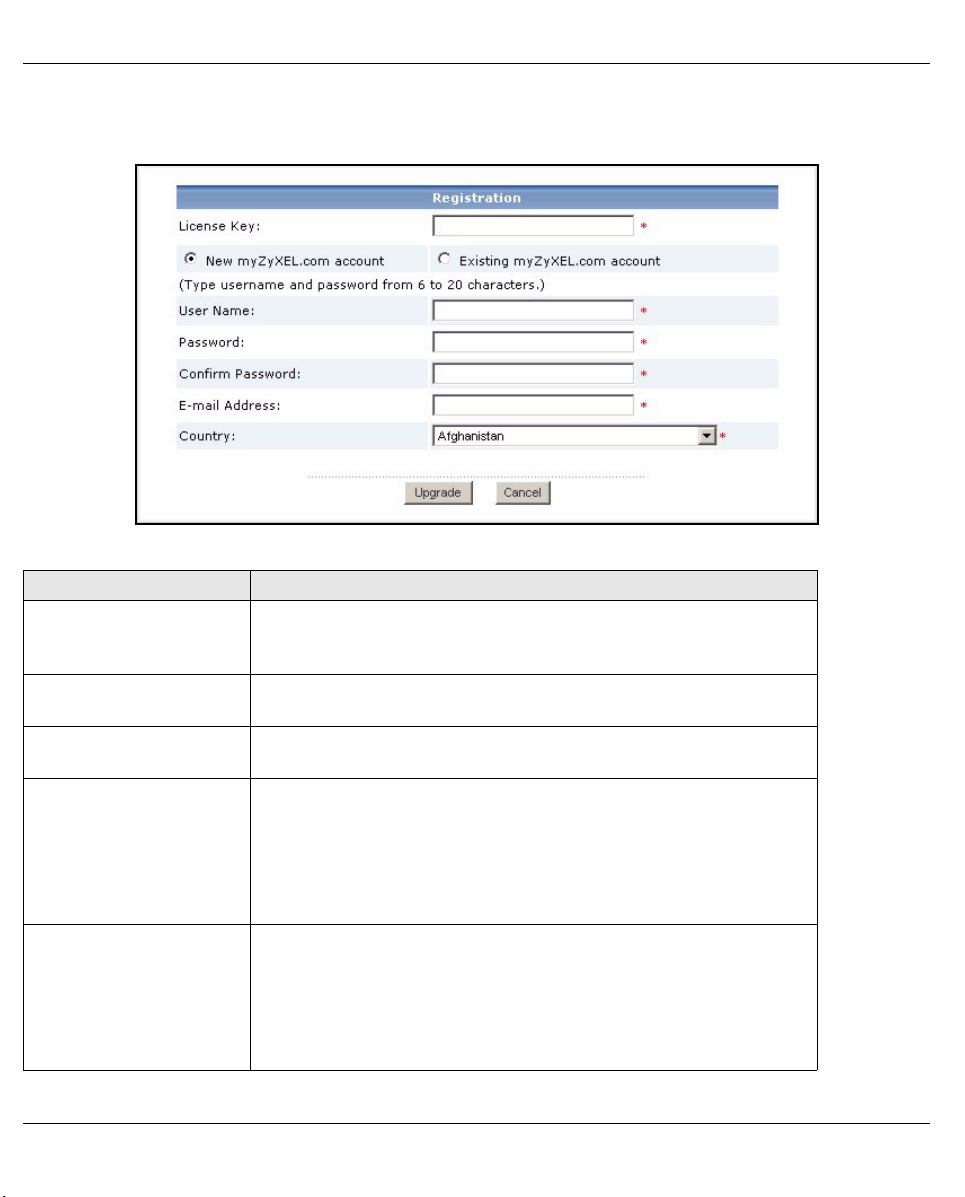
In either case, the following screen appears. Some fields do not appear in your screen if you already have a
myZyXEL.com account or if you are getting the trial version.
4 Follow the directions in the table below to fill in this screen.
LABEL DESCRIPTION
License Key Enter the license key on the iCard if you are upgrading to the
professional version. The iCard is in the folder you receive when
you purchase the professional version.
New myZyXEL.com
account
Existing myZyXEL.com
account
User Name If you do not have a myZyXEL.com account, enter the user name that
Password If you do not have a myZyXEL.com account, enter the password that
Select this if you do not have a myZyXEL.com account. Vantage
Report creates the account for you.
Select this if you already have a myZyXEL.com account.
you would like to use for your new myZyXEL.com account. Your user
name can consist of alphanumeric characters and underscores (_)
and must be 6 - 20 characters long.
If you already have a myZyXEL.com account, enter the user name for
that account.
you would like to use for your new myZyXEL.com account. Your
password can consist of alphanumeric characters and underscores
(_) and must be 6 - 20 characters long.
If you already have a myZyXEL.com account, enter the password for
that account.
9
Page 11

ENGLISH
LABEL DESCRIPTION
Confirm Password Retype your password.
E-mail Address Enter the e-mail address where you would like to be notified about
your new myZyXEL.com account.
Country Select the place where you work.
5 Click Upgrade. The updated Registration screen appears. If it does not, see Troubleshooting.
6 Device Setup
Check the release notes for each of your ZyXEL devices to find out if the current firmware supports Vantage
Report. Make sure you check the release notes for the exact version; for example, check the release notes for
v3.64(XV.5), not just v3.64. Some models and some firmware versions only support some reports. Generally,
the following firmware versions support some or all reports in Vantage Report.
• ZyWALL 2/10W version 3.62 or later
• ZyWALL 5/35/70 version 3.63 or later
• IDP 10 version 2.0 or later
• Prestige(P-) DSL version 3.40 or later
You have to configure each ZyXEL device to send its log entries and traffic statistics to the Vantage Report
server, and you have to add each device to Vantage Report.
6.1 Configure ZyXEL Devices
These steps may vary for different devices. If you already set up devices for previous versions of Vantage
Report, check this section to make sure the device configuration has not changed.
10
Page 12
ENGLISH
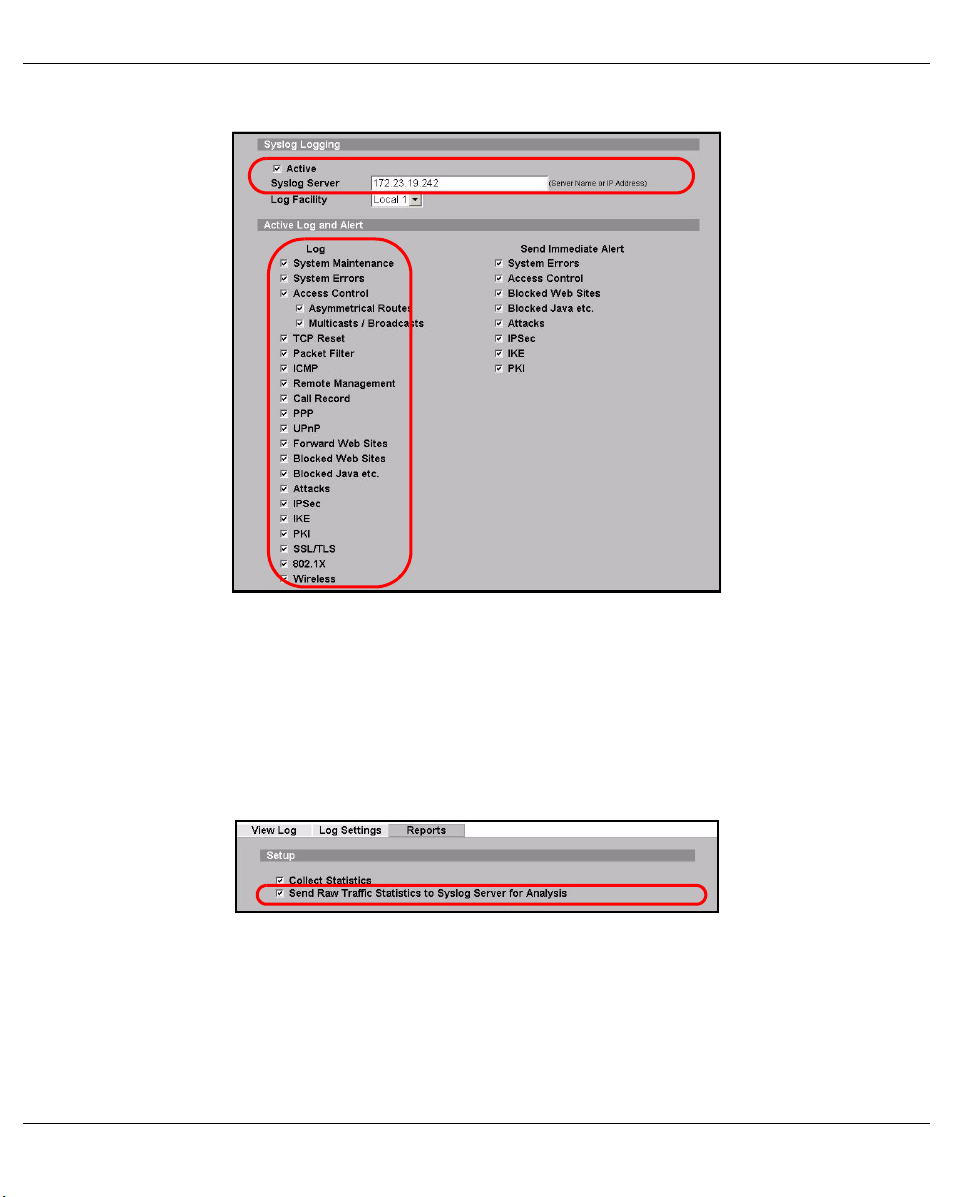
1 Log in to the web configurator for the device, and click Logs > Log Settings. The top part of a typical
screen is shown below.
2 In the System Logging section, select the Active check box.
3 Type the IP address or name of the Vantage Report server in the Syslog Server field.
4 In the Log column, select the categories you want to see in Vantage Report. System Maintenance,
Forward Web Sites, Blocked Web Sites, Attacks, IPSec, IDP, Anti-Virus, and Anti-Spam are required for
various reports in Vantage Report. (Some of these are not available in every device.) You can only look at
log messages for other categories.
5 Click Apply to save your changes.
6 Click Logs > Reports. If the device does not have this screen, skip steps 6 - 8. The top section of a typical
screen is shown below.
7 In the Setup section, select the Send Raw Traffic Statistics to Syslog Server for Analysis check box.
8 Click Apply to save your changes.
9 If the ZyXEL device provides IDP, go to IDP > Signature (in most ZyXEL devices). Make sure the device
records log entries for the attack types you want to see in Vantage Report.
11
Page 13
ENGLISH
10If the ZyXEL device provides anti-virus protection, go to Anti-Virus > General (in most ZyXEL devices).
Make sure the device records log entries for viruses the services (in which the device found the virus) you
want to see in Vantage Report.
6.2 Add ZyXEL Devices to Vantage Report
If you followed the directions in section 1.2 (for Vantage Report v2.2), follow the directions in section 6.2.2.
Otherwise, follow the directions in section 6.2.1.
6.2.1 Add Devices Manually
You must have the LAN MAC address and model type of the device.
1 Log in to the Vantage Report server. (See section 3.)
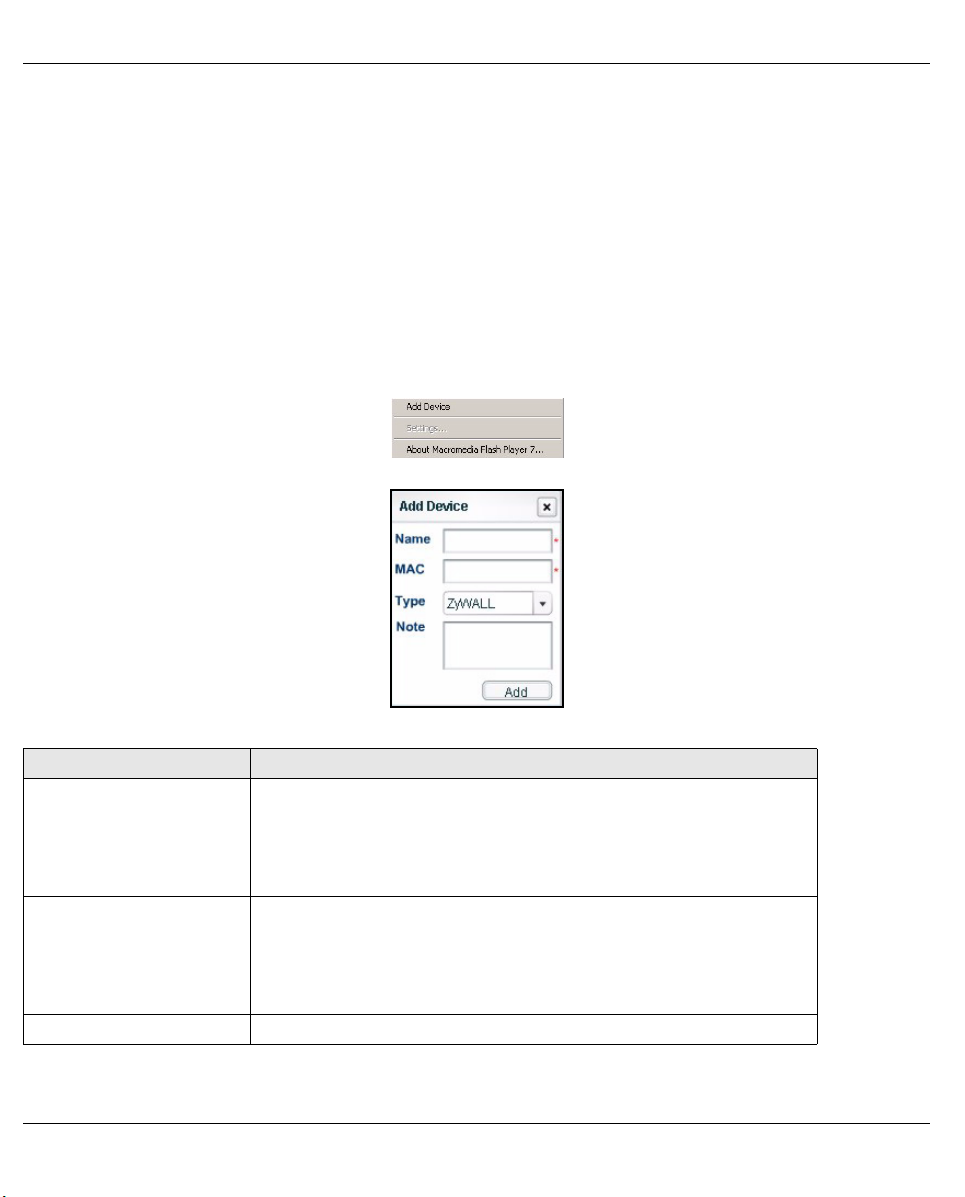
2 In the device window, right-click on root. The following menu appears.
3 Select Add Device. The Add Device screen appears.
4 Follow the directions in the table below to fill in the Add Device screen.
LABEL DESCRIPTION
Name Enter the name of the device you want to add to Vantage Report. The
name can consist of alphanumeric characters or underscores (_) and
may be 1 - 28 characters long. This name is used to refer to the
device in Vantage Report, and it has to be unique in Vantage Report.
In some cases, the device’s System Name might be appropriate.
MAC Enter the LAN MAC address of the device you want to add. You must
enter 12 hexadecimal numbers (0 - 9, A - F). Do not use colons (:).
This address is usually located on a label that is on the bottom of the
device. If there are two addresses on the label, the LAN MAC address
is usually on the top.
Type Select the model type of the device you want to add.
12
Page 14
ENGLISH
LABEL DESCRIPTION
Note Enter any additional notes you want to make here. You can enter up to
50 printable ASCII characters. You can also leave this field blank.
5 Click the Add button. The device should now appear in the device window. You can select it (for example,
if you want to generate a statistical report for it) by clicking on it once. See the User’s Guide for more
information.
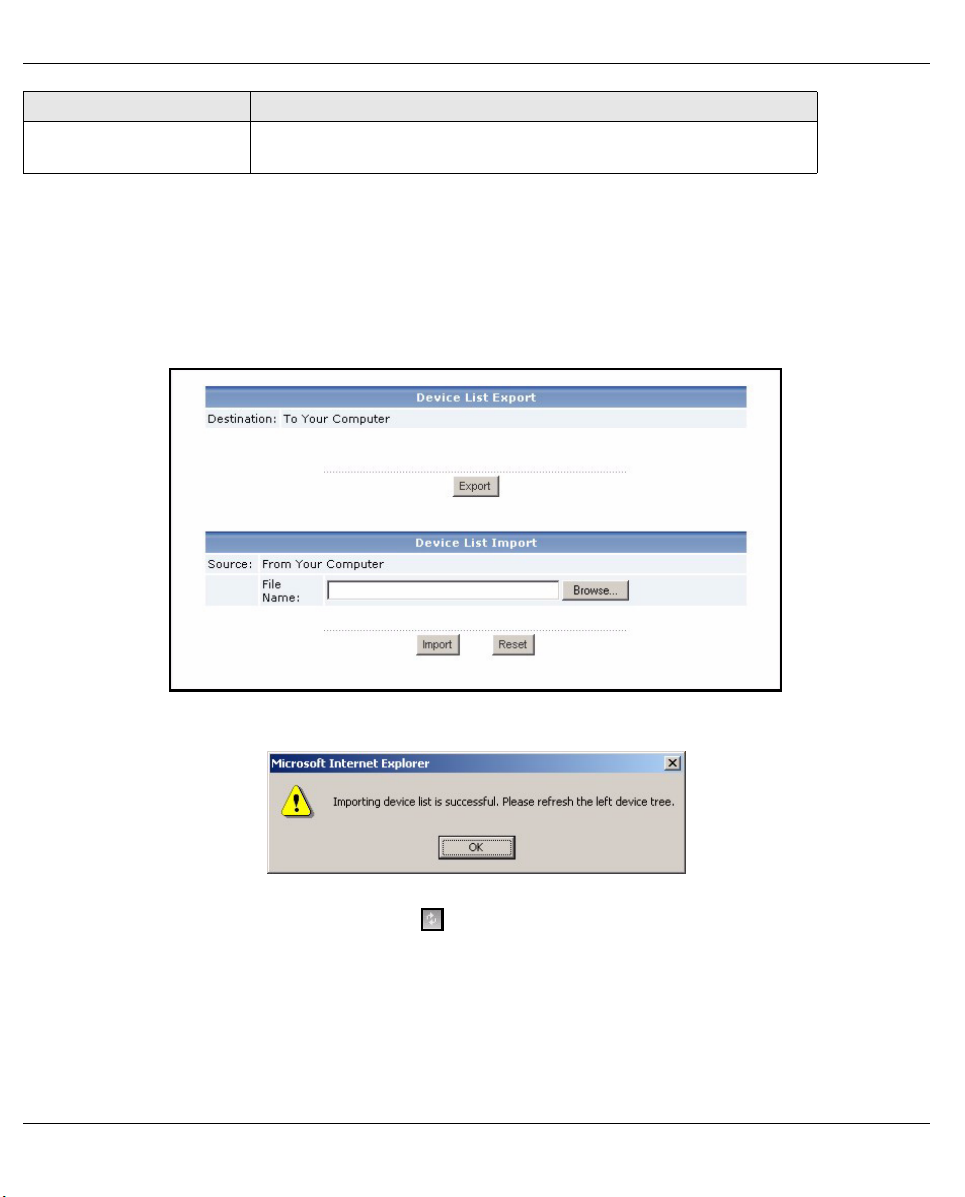
6.2.2 Import a Device List
1 Log in to the Vantage Report server. (See section 3.)
2 In the function window, click System > Data Maintenance > Device List Import & Export. The Device List
Export / Import screen appears.
3 Enter the name and location of the file you saved in section 1.2, or click Browse... to look for it.
4 Click Import. The following message appears.
5 Click OK to close the message.
6 In the device window, click the Refresh icon in the upper right corner. The devices you had in Vantage
Report v2.2 should appear.
Follow the directions in section 6.2.1 to add additional devices manually.
13
Page 15

ENGLISH
Troubleshooting
See the User’s Guide for additional troubleshooting.
PROBLEM CORRECTIVE ACTION
The web configurator is not
connecting to the Vantage
Report server.
The Vantage Report server
does not start up automatically.
The web configurator returns
to the Login screen when I try
to do something.
Make sure you are using the correct URL. Enter
vrpt
, where
a.b.c.d is the IP address of the Vantage Report server. If you open the
•
web configurator on the same computer on which you installed Vantage
Report, enter localhost.
xxxxx is the port number you entered during installation. (See section 2.)
•
For example, you might enter http://localhost:8080/vrpt or http://
212.100.9.161:9090/vrpt.
Make sure packets on TCP port 3316, UDP port 514, and the port number you
specified during installation are forwarded to the Vantage Report server,
especially if the Vantage Report server runs behind a NAT or firewall.
Make sure the Vantage Report server is running.
• The Vantage Report server runs as a service. Follow the directions in section
1.4 to check it.
• Make sure the following system variables are defined.
PATH=C:\WINNT\system32;C:\WINNT;C:\WINNT\System32\W
bem
The drive letter and names of folders depend on your Vantage Report server.
To check these variables in Windows 2000, click Start > Settings > Control
Panel > System > Advanced > Environment Variables. In Windows XP,
click start > Control Panel > System > Advanced > Environment Vari-
ables. Make sure the variables are in the System Variables box.
• Delete
• The Vantage Report server does not start automatically if there is a port con-
If the problem continues, contact your local vendor.
For security reasons, the web configurator times out in fifteen minutes. Log in
again.
vrpt\conf\lastLogTime.txt in the Vantage Report installa-
tion directory. Then, restart the server.
flict on the port number you specified during installation. Click Start > Run,
and enter
netstat -a to find out if there is a port conflict.
http://a.b.c.d:xxxxx/
14
Page 16

ENGLISH
PROBLEM CORRECTIVE ACTION
Vantage Report did not send
the test e-mail to the
administrator’s e-mail account.
I cannot register (get the trial
version or upgrade to the
professional version).
Make sure the SMTP settings and e-mail account are correct. If your SMTP mail
server requires authentication, make sure you entered the user name and
password correctly. See section 4.
Make sure the Vantage Report server can connect to the SMTP mail server.
If the problem continues, contact your local vendor.
Make sure you have the right license key, and make sure you enter the requested
information correctly. See section 5.
Make sure the Vantage Report server can connect to http://www.myzyxel.com.
The Vantage Report server interacts with this site during registration.
If the problem continues, contact your local vendor.
Viewing Your Product’s Certifications
Go to www.zyxel.com, select your product from the drop-down list box on the ZyXEL home page, and select
the certification you wish to view.
15
Page 17

ENGLISH
16
Page 18
DEUTSCH
DEUTSCH
Vantage Report
Vantage Report sammelt Log-Einträge und Datenverkehrsstatistiken von ZyXEL-Geräten und generiert dann
grafische und tabellarische Berichte über Netzwerkleistung und Ereignisse.
C
A
Installieren Sie Vantage Report auf dem Vantage Report-Server (B). Konfigurieren Sie ihn dann mit dem WebKonfigurator (A). (Der Web-Konfigurator kann auf einem Remote-Computer oder auf dem Vantage ReportServer laufen.) Konfigurieren Sie abschließend die ZyXEL-Geräte (C) so, dass sie ihre Log-Einträge und
Datenverkehrsstatistiken an den Vantage Report-Server senden. Der Vantage Report-Server sammelt diese
Daten und erzeugt dann statistische Berichte über das Netzwerk. Diese Berichte können dann von jedem
jederzeit im Web-Konfigurator eingesehen oder als E-Mail versendet werden.
B
Übersicht
1 Vorbereitung - Stellen Sie sicher, dass der Vantage Report-Server die Mindestanforderungen erfüllt und
bereiten Sie ihn für die Installation vor.
2 Installation - Installieren Sie Vantage Report auf dem Vantage Report-Server.
3 Anmeldung - Greifen Sie mit dem Web-Konfigurator auf den Vantage Report-Server zu.
4 E-Mail-Setup - Richten Sie in Vantage Report die E-Mail-Adresse des Administrators und die SMTP-
Mailservereinstellungen ein und prüfen Sie die SMTP-Einstellungen.
5 Registrierung - Wenn Sie Vantage Report installieren, erhalten Sie die Standardversion. Sie müssen
Vantage Report nur dann registrieren, wenn Sie die Testversion oder ein Upgrade für die ProfessionalVersion erhalten möchten. (Weitere Informationen über die Versionen finden Sie in Abschnitt 5.)
6 Geräte-Setup - Richten Sie die ZyXEL-Geräte ein und fügen Sie sie zum Vantage Report-Server hinzu.
17
Page 19

DEUTSCH
1 Vorbereitung
Prüfen Sie folgende Punkte, bevor Sie Vantage Report installieren.
1.1 Prüfen der Mindestanforderungen
Wenn Ihr Vantage Report-Server nicht die Mindestanforderungen erfüllt, muss er aufgerüstet werden, oder
Sie müssen einen anderen Server verwenden, der diese Anforderungen erfüllt.
CPU Pentium IV 2.6 GHz oder schneller empfohlen
RAM 1024 MB oder mehr (für eine gute Leistung mit 25 Geräten)
Festplatte 80 GB oder größer
Betriebssystem Windows XP Professional, Windows 2000/2003 Server
Browser
(auf Server oder
anderem
Computer)
Weitere
Anforderungen für
unterstützte
Dienste
Internet Explorer 6.0 (Service Pack 1) oder neuere Version auf Windows
Mozilla 1.7.12 oder neuere Version auf Windows
Firefox 1.07 oder neuere Version auf Windows
Auflösung 1024 x 768
SMTP-Daemon
TCP-Port 3316 und UDP-Port 514
1.2 Save Device List (nur Vantage Report v2.2)
Wenn Sie gegenwärtig mit Vantage Report v2.2 arbeiten, sollten Sie die Liste der in Vantage Report
enthaltenen Geräte speichern, bevor Sie diese Version deinstallieren. Bei section 6.2 können Sei diese Datei
dann laden anstelle jedes einzelne Gerät manuell bei Vantage Report hinzuzufügen.
Hinweis: Die Datei kann bei section 6.2 nicht geladen werden, wenn mehr Geräte hinzugefügt werden,
als die Version und Lizenz von Vantage Report zulässt. Ausführliche Informationen dazu finden
Sie unter section 5.
1 Klicken Sie auf der mitgelieferten CD auf Documents > Upgrade Notes.
2 Führen Sie die Anweisungen aus, um den Ordner Migration (mit dem gesamten Inhalt) der mitgelieferten
CD in das Vantage Report v2.2-Installationsverzeichnis (z.B. C:\Programme\ZyXEL\Vantage Report) zu
kopieren.
3 Starten Sie Vantage Report v2.2.
4 Starten Sei aus dem Ordner Migration des Vantage Report v2.2-Installationsverzeichnisses die Datei
exportDeviceList.bat. Dieses Programm erzeugt im selben Ordner eine Datei mit der Bezeichnung
Devices.xml.
5 Kopieren Sie die Datei Devices.xml in einen anderen Ordner, sodass sie nicht gelöscht wird, wenn Sie
Vantage Report v2.2 bei section 1.3 deinstallieren.
18
Page 20

DEUTSCH
1.3 Deinstallieren älterer Versionen von Vantage Report
1 Stoppen Sie die ältere Version von Vantage Report.
2 Klicken Sie bei Windows 2000 auf Start > Einstellungen > Systemsteuerung > Programme
hinzufügen/entfernen > Vantage Report > Ändern/Entfernen. Führen Sie die Anweisungen aus, um
Vantage Report zu entfernen.
Klicken Sie bei Windows XP auf Start > Systemsteuerung > Programme hinzufügen/entfernen >
Vantage Report > Ändern/Entfernen. Führen Sie die Anweisungen aus, um Vantage Report zu entfernen.
1.4 Schließen von MySQL und Tomcat
Wenn Sie Vantage Report installieren, installieren Sie gleichzeitig MySQL und Tomcat. Wenn diese
Anwendungen auf dem Vantage Report-laufen, müssen diese vor der Installation von Vantage Report
geschlossen werden. Führen Sie die folgenden Schritte aus, um zu prüfen, ob diese Programme laufen und
um sie zu stoppen.
1 Klicken Sie bei Windows 2000 auf Start > Einstellungen > Systemsteuerung > Verwaltung > Dienste.
Das Fenster Dienste wird aufgerufen.
Klicken Sie bei Windows XP auf Start > Systemsteuerung > Leistung und Wartung > Verwaltung >
Dienste.Das Fenster Dienste wird aufgerufen.
2 Wenn auf dem Vantage Report-Server keine MySQL- oder Tomcat-Dienste laufen, gehen Sie weiter zum
nächsten Abschnitt. Anderenfalls klicken Sie auf alle MySQL- oder Tomcat-Dienste, die gerade laufen. Das
oben abgebildete Menü erscheint.
3 Wählen Sie in diesem Menü die Option Stop. Wiederholen Sie die Schritte 2 und 3 für alle weiteren
MySQL- und Tomcat-Dienste, die noch auf dem Vantage Report-Server laufen.
19
Page 21

DEUTSCH
2 Installieren
Legen Sie die CD in das CD-ROM-Laufwerk. Das folgende Fenster erscheint.
Klicken Sie auf Setup > Vantage Report, um die Installation von Vantage Report zu starten. Zunächst werden
einige Dateien der CD extrahiert. Dann erscheint der Installationsassistent von Vantage Report.
20
Page 22

DEUTSCH
Klicken Sie auf Next. Führen Sie die Anweisungen aus. Bevor die Installation abgeschlossen ist, erscheint
das folgende Fenster.
Geben Sie die Port-Nummer an, die Vantage Report für Webdienste verwenden soll. Diese Einstellung kann
später nur bei einer Neuinstallation von Vantage Report geändert werden. Stellen Sie sicher, dass diese PortNummer nicht mit anderen Diensten im Netzwerk zusammenfällt. Klicken Sie auf Next, wenn Sie fertig sind.
Wenn Sie die Installation von Vantage Report abgeschlossen haben, muss der Vantage Report-Server neu
gestartet werden.
3 Anmeldung
Standardmäßig startet der Vantage Report-Server automatisch, wenn Sie sich beim Vantage Report-Server
anmelden. So greifen Sie auf den Vantage Report-Server zu:
1 Öffnen Sie ein Browserfenster und rufen Sie die Seite http://a.b.c.d:xxxxx/vrpt auf, wobei
a.b.c.d die IP-Adresse des Vantage Report-Servers ist. Wenn Sie auf demselben Computer, auf
•
dem Sie Vantage Report installiert haben, den Web-Konfigurator öffnen, geben Sie
xxxx ist die Port-Nummer, die Sie während der Installation eingegeben haben. (Siehe Abschnitt 2.)
•
Zum Beispiel http://localhost:8080/vrpt oder http://212.100.9.161:9090/vrpt.
Das Fenster Login erscheint. Sollte es nicht erscheinen, lesen Sie nach unter Problembeseitigung.
2 Geben Sie im Fenster Login Ihren Benutzernamen und Ihr Kennwort ein und klicken Sie auf Login.
21
localhost ein.
Page 23

DEUTSCH
• Standardbenutzername: root
• Standardkennwort: root
Das Hauptfenster erscheint. Es ist in drei Bereiche unterteilt.
A
Im Gerätefenster (A) wird ein Gerät ausgewählt. Klicken Sie mit der rechten Maustaste darauf, um Geräte
hinzuzufügen oder zu entfernen.
Im Funktionsfenster (B) wird ein Bericht ausgewählt.
Im Berichtfenster (C) können Sie sich die ausgewählten Berichte für das ausgewählte Gerät ansehen und
anpassen.
B
C
4 E-Mail-Setup
Sie benötigen für Vantage Report ein E-Mail-Konto auf einem SMTP-Mailserver. Sie können ein bestehendes
Konto verwenden oder ein neues erstellen. In jedem Fall benötigen Sie den SMTP-Mailserver (IP oder
Domain-Name), E-Mail-Adresse, Benutzername (wenn erforderlich) und Kennwort (wenn erforderlich).
4.1 E-Mail-Adresse des Administrators einrichten
Zuerst muss die E-Mail-Adresse für den Vantage Report-Administrator eingerichtet werden. Mit dieser E-MailAdresse werden bei section 4.2 die SMTP-Einstellungen geprüft. Sie wird außerdem für
Systembenachrichtigungen verwendet oder wenn Sie das Kennwort für das Root-Verzeichnis vergessen
haben sollten. (Wenn Sie das Kennwort vergessen haben, klicken Sie auf Forget Password? im Fenster
Login.) Ausführliche Informationen dazu finden Sie im Benutzerhandbuch.
1 Melden Sie sich beim Vantage Report-Server an. (Siehe section 3.)
22
Page 24

DEUTSCH
2 Klicken Sie im Funktionsfenster auf System > User Maintenance. Das Fenster User List erscheint.
3 Klicken Sie auf root. Das Fenster Edit User erscheint.
4 Geben Sie die E-Mail-Adresse für den Vantage Report-Administrator in das Feld E-mail ein.
5 Klicken Sie auf Apply.
23
Page 25

DEUTSCH
4.2 Einrichten des SMTP-Mailservers
1 Klicken Sie im Funktionsfenster auf System > Server Configuration. Das Fenster Server Configuration
erscheint.
2 Führen Sie die Anweisungen in der nachfolgenden Tabelle aus, um die Felder im Fenster Server
Configuration auszufüllen.
KENNZEICHNUNG BESCHREIBUNG
SMTP IP Address or
Domain Name
User Name Geben Sie den Benutzernamen ein, wenn der SMTP-Mailserver ihn
Password Geben Sie das Kennwort ein, wenn der SMTP-Mailserver es benötigt.
Sender E-mail Geben Sie die E-Mail-Adresse, die als Versandadresse verwendet
Geben Sie die IP-Adresse oder den Domain-Namen des SMTPMailservers ein, auf dem Vantage Report ein Konto hat.
benötigt. Wenn der Benutzername nicht gefragt wird, lassen Sie
dieses Feld frei.
Wenn das Kennwort nicht abgefragt wird, lassen Sie dieses Feld frei.
werden soll, wenn Vantage Report E-Mails versendet. Dieses ist die
E-Mail-Adresse, die erscheint, wenn Vantage Report E-Mails
versendet.
3 Klicken Sie auf Apply. (Sie müssen diese Einstellungen speichern, bevor Sie sie im nächsten Schritt
prüfen können.)
4 Klicken Sie auf Test. Vantage Report sendet an die bei section 4.1 angegebene E-Mail-Adresse eine
Testnachricht.
5 Prüfen Sie, ob das angegebene E-Mail-Konto die Meldung von Vantage Report erhalten hat. Wenn die E-
Mail nicht empfangen wurde, lesen Sie nach bei Problembeseitigung.
24
Page 26

DEUTSCH
5 Registrierung
Sie müssen Vantage Report nur dann registrieren, wenn Sie die Testversion oder ein Upgrade für die
Professional-Version erhalten möchten.
• Die Standardversion bietet eine Reihe statistischer und programmierter Berichte für ein Gerät.
• Die Professional-Version unterstützt mehr Berichte, Funktionen und Geräte als die Standardversion.
• Die Testversion ist eine zeitlich begrenzte, kostenlose Version der Professional-Version. Sie unterstützt jedoch
nicht so viele Geräte wie die Professional-Version.
Der Vantage Report-Server muss während der Registrierung auf http://www.myZyXEL.com zugreifen.
Zusätzlich benötigen Sie bestimmte Daten für das Setup.
Wenn Sie ein myZyXEL.com-Konto haben, benötigen Sie...
• den myZyXEL.com-Benutzernamen
• das myZyXEL.com-Kennwort
Wenn Sie ein Upgrade für die Professional-Version installieren möchten, benötigen Sie...
• den Lizenzschlüssel (iCard im Ordner, den Sie beim Kauf der Professional-Version erhalten
haben)
1 Melden Sie sich beim Vantage Report-Server an. (Siehe section 3.)
2 Klicken Sie im Funktionsfenster auf System > Registration. Das Fenster Registration erscheint.
3 Wenn Sie die Testversion erhalten möchten, klicken Sie auf Trial.
Wenn Sie ein Upgrade für die Professional-Version benötigen, klicken Sie auf Upgrade.
25
Page 27

DEUTSCH
In beiden Fällen erscheint das folgende Fenster. Einige dieser Felder erscheinen nicht, wenn Sie bereits ein
myZyXEL.com-Konto haben oder die Testversion anfordern.
4 Führen Sie die Anweisungen in der nachfolgenden Tabelle aus, um die Felder im Fenster Server
Configuration auszufüllen.
KENNZEICHNUNG BESCHREIBUNG
License Key Geben Sie den Lizenzschlüssel der iCard ein, wenn Sie ein Upgrade
für die Professional-Version benötigen. Die iCard befinden sich im
Ordner, den Sie beim Kauf der Professional-Version erhalten
haben.
New myZyXEL.com
account
Existing myZyXEL.com
account
User Name Wenn Sie noch kein myZyXEL.com-Konto haben, geben Sie einen
Wählen Sie diese Option, wenn Sie noch kein myZyXEL.com-Konto
haben. Vantage Report erzeugt das Konto für Sie.
Wählen Sie diese Option, wenn Sie bereits ein myZyXEL.com-Konto
haben.
Benutzernamen ein, den Sie für das neue myZyXEL.com-Konto
verwenden möchten. Der Benutzername kann aus alphanumerischen
Zeichen und Unterstrichen (_) bestehen und muss zwischen 6 und 20
Zeichen lang sein.
Wenn Sie bereits ein myZyXEL.com-Konto haben, geben Sie hier den
Benutzernamen für das Konto ein.
26
Page 28

DEUTSCH
KENNZEICHNUNG BESCHREIBUNG
Password Wenn Sie noch kein myZyXEL.com-Konto haben, geben Sie ein
Kennwort ein, das Sie für das neue myZyXEL.com-Konto verwenden
möchten. Das Kennwort kann aus alphanumerischen Zeichen und
Unterstrichen (_) bestehen und muss zwischen 6 und 20 Zeichen lang
sein.
Wenn Sie bereits ein myZyXEL.com-Konto haben, geben Sie hier das
Kennwort für das Konto ein.
Confirm Password Geben Sie noch einmal das Kennwort ein.
E-mail Address Geben Sie die E-Mail-Adresse ein, an die die Bestätigung des neuen
myZyXEL.com-Kontos gesendet werden soll.
Country Wählen Sie das Land aus, in dem Sie arbeiten.
5 Klicken Sie auf Upgrade. Das aktualisierte Fenster Registration erscheint. Sollte es nicht erscheinen, lesen
Sie nach unter Problembeseitigung.
6 Geräte-Setup
Prüfen Sie die Release-Notes zu allen ZyXEL-Geräten, um festzustellen, ob die aktuelle Firmware Vantage
Report unterstützt. Stellen Sie sicher, dass Sie die Release-Notes für genau die richtige Version prüfen, z.B.
v3.64(XV.5), nicht nur v3.64. Einige Modelle und Firmware-Versionen unterstützen nur einige Berichte. Im
Allgemeinen unterstützen die folgenden Firmware-Versionen einige oder alle Berichte in Vantage Report.
• ZyWALL 2/10W Version 3.62 und neuere Versionen
• ZyWALL 5/35/70 Version 3.63 und neuere Versionen
• IDP 10 Version 2.0 und neuere Versionen
• Prestige(P-) DSL Version 3.40 und neuere Versionen
Sie müssen jedes ZyXEL-Gerät so konfigurieren, dass es seine Log-Einträge und Datenverkehrsstatistiken an
den Vantage ReportServer sendet, und jedes Gerät muss zu Vantage Report hinzugefügt werden.
6.1 Konfigurieren der ZyXEL-Geräte
Diese Schritte können bei den einzelnen Geräten unterschiedlich sein. Wenn Sie bereits Geräte für frühere
Versionen von Vantage Report eingerichtet haben, lesen Sie sich diesen Abschnitt durch, um sicherzustellen,
dass sich die Gerätekonfiguration nicht geändert hat.
27
Page 29

DEUTSCH
1 Melden Sie sich für das Gerät beim Web-Konfigurator an und klicken Sie auf Logs > Log Settings. Der
obere Bereich des typischen Fensters ist unten abgebildet.
2 Markieren Sie im Bereich System Logging das Kontrollfeld Active.
3 Geben Sie im Feld Syslog Server die IP-Adresse oder den Namen des Vantage Report-Servers ein.
4 Markieren Sie in der Spalte Log die Kategorien, die bei Vantage Report angezeigt werden sollen. System
Maintenance, Forward Web Sites, Blocked Web Sites, Attacks, IPSec, IDP, Anti-Virus und Anti-Spam
sind für verschiedene Berichte in Vantage Report erforderlich. (Bei einigen Geräten sind nicht alle diese
Optionen verfügbar.) Sie können sich nur Log-Meldungen für andere Kategorien ansehen.
5 Klicken Sie auf Apply, um die Änderungen zu speichern.
6 Klicken Sie auf Logs > Reports. Wenn dieses Fenster nicht angezeigt wird, überspringen Sie die Schritte
6 - 8. Der obere Bereich des typischen Fensters ist unten abgebildet.
7 Markieren Sie im Bereich Setup das Kontrollfeld Send Raw Traffic Statistics to Syslog Server for
Analysis.
8 Klicken Sie auf Apply, um die Änderungen zu speichern.
9 Wenn das ZyXEL-Gerät eine IDP hat, wechseln Sie zu IDP > Signature (betrifft die meisten ZyXEL-
Geräte). Stellen Sie sicher, dass das Gerät Log-Einträge für die Angriffsarten aufzeichnet, die Sie in
Vantage Report sehen möchten.
28
Page 30

DEUTSCH
10Wenn das ZyXEL-Gerät einen Antivirusschutz hat, wechseln Sie zu to Anti-Virus > General (betrifft die
meisten ZyXEL-Geräte). Stellen Sie sicher, dass das Gerät Log-Einträge für die Viren in den Diensten (in
denen das Gerät die Viren gefunden hat) aufzeichnet, die Sie in Vantage Report sehen möchten.
6.2 Hinzufügen von ZyXEL-Geräten zu Vantage Report
Wenn Sei die Anweisungen bei section 1.2 ausgeführt haben (für Vantage Report v2.2), führen Sie nun die bei
section 6.2.2 aus. Anderenfalls gehen Sie zu section 6.2.1.
6.2.1 Manuelles Hinzufügen von Geräten
Sie benötigen die LAN MAC-Adresse und den Modelltyp des Geräts.
1 Melden Sie sich beim Vantage Report-Server an. (Siehe section 3.)
2 Klicken Sie im Gerätefenster mit der rechten Maustaste auf root. Das folgende Menü erscheint.
3 Wählen Sie Add Device. Das Fenster Add Device erscheint.
4 Führen Sie die Anweisungen in der nachfolgenden Tabelle aus, um die Felder im Fenster Add Device
auszufüllen.
KENNZEICHNUNG BESCHREIBUNG
Name Geben Sie den Namen des Geräts ein, das bei Vantage Report
hinzugefügt werden soll. Der Name kann aus alphanumerischen
Zeichen und Unterstrichen (_) bestehen und muss zwischen 1 und 28
Zeichen lang sein. Mit diesem Namen wird in Vantage Report das
Gerät bezeichnet. Er darf in Vantage Report nur einmal vorkommen.
In einigen Fällen ist der System Name des Geräts geeignet.
MAC Geben Sie die LAN MAC-Adresse des Geräts ein, das hinzugefügt
werden soll. Sie müssen 12 Hexadezimalzahlen (0 - 9, A - F)
eingeben. Verwenden Sie keine Doppelpunkte (:). Diese Adresse
befindet sich normalerweise auf einem Etikett an der Unterseite des
Geräts. Sind dort zwei Adressen, ist die LAN MAC-Adresse
normalerweise die obere.
29
Page 31

DEUTSCH
KENNZEICHNUNG BESCHREIBUNG
Type Wählen Sie den Modelltyp des Geräts, das Sie hinzufügen möchten.
Note Geben Sie hier zusätzliche Kommentare ein. Sie können bis zu 50
druckbare ASCII-Zeichen eingeben. Dieses Feld kann aber auch frei
bleiben.
5 Klicken Sie auf die Taste Add. Das Gerät erscheint jetzt im Gerätefenster. Es wird markiert (wenn dafür
z.B. einen statistischer Bericht generiert werden soll), indem Sie einmal darauf klicken. Weitere
Informationen finden Sie im Benutzerhandbuch.
6.2.2 Importieren einer Geräteliste
1 Melden Sie sich beim Vantage Report-Server an. (Siehe section 3.)
2 Klicken Sie im Funktionsfenster auf System > Data Maintenance > Device List Import & Export. Das
Fenster Device List Export / Import erscheint.
3 Geben Sie den Namen und die Position der Datei ein, die Sie bei section 1.2 gespeichert haben oder
navigieren Sie mit der Funktion Browse... dorthin.
4 Klicken Sie auf Import. Die folgende Meldung erscheint.
5 Klicken Sie auf OK, um die Meldung zu schließen.
6 Klicken Sie im Gerätefenster auf das Aktualisieren-Symbol in der rechten oberen Ecke. Nun
erscheinen die Geräte, die bei Vantage Report v2.2 enthalten waren.
Führen Sie die Anweisungen unter section 6.2.1 aus, um weitere Geräte manuell hinzuzufügen.
30
Page 32

DEUTSCH
Problembeseitigung
Weitere Informationen zur Problembeseitigung finden Sie im Benutzerhandbuch.
PROBLEM LÖSUNGSMÖGLICHKEIT
Der Web-Konfigurator stellt
keine Verbindung zum Vantage
Report-Server her
Der Vantage Report-Server
startet nicht automatisch.
Stellen Sie sicher, dass die URL richtig ist. Geben Sie
a.b.c.d:xxxxx/vrpt ein, wobei
a.b.c.d die IP-Adresse des Vantage Report-Servers ist. Wenn Sie auf
•
demselben Computer, auf dem Sie Vantage Report installiert haben, den
Web-Konfigurator öffnen, geben Sie localhost ein.
xxxx ist die Port-Nummer, die Sie während der Installation eingegeben
•
haben. (Siehe Abschnitt 2.)
Sie können zum Beispiel http://localhost:8080/vrpt oder http://
212.100.9.161:9090/vrpt eingeben.
Stellen Sie sicher, dass die Pakete am TCP-Port 3316 und am UDP-Port 514 und
die Port-Nummer, die Sie bei der Installation angegeben haben, an den Vantage
Report-Server weitergeleitet werden, insbesondere dann, wenn der Vantage
Report-Server hinter einer NAT oder Firewall läuft.
Stellen Sie sicher, dass der Vantage Report-Server läuft.
• Der Vantage Report-Server läuft als ein Dienst. Führen Sie die Anweisungen
unter section 1.4 aus, um das zu überprüfen.
• Stellen Sie sicher, dass die folgenden Systemvariablen definiert sind.
PATH=C:\WINNT\system32;C:\WINNT;C:\WINNT\System32\W
bem
Der Laufwerksname und die Bezeichnung der Ordner hängen von Ihrem Vantage Report-Server ab. Um diese Variablen bei Windows 2000 zu prüfen,
klicken Sie auf Start > Einstellungen > Systemsteuerung > System >
Erweitert > Umgebungsvariablen. Bei Windows XP klicken Sie auf Start >
Systemsteuerung > System > Erweitert > Umgebungsvariablen. Stellen
Sie sicher, dass die Variablen im Feld System Variables aufgeführt werden.
• Löschen Sie die Datei
tage Report-Installationsverzeichnis. Starten Sie den Server neu.
• Der Vantage Report-Server wird nicht automatisch gestartet, wenn an der
Port-Nummer, die Sie während der Installation angegeben haben, ein PortKonflikt auftritt. Klicken Sie auf Start > Run und geben Sie
ein, um herauszufinden, ob ein Port-Konflikt aufgetreten ist.
Wenn das Problem weiterhin bestehen bleibt, wenden Sie sich an Ihren
Fachhändler.
vrpt\conf\lastLogTime.txt aus dem Van-
http://
netstat -a
31
Page 33

DEUTSCH
PROBLEM LÖSUNGSMÖGLICHKEIT
Der Web-Konfigurator kehrt bei
jeder Eingabe zum Login-
Fenster zurück.
Vantage Report hat die Test-EMail nicht an das E-Mail-Konto
des Administrators gesendet.
Sie können sich nicht
registrieren (um die
Testversion oder ein Upgrade
für die Professional-Version zu
erhalten).
Aus Sicherheitsgründen schaltet sich der Web-Konfigurator nach 15 Minuten aus.
Melden Sie sich erneut an.
Stellen Sie sicher, dass die SMTP-Einstellungen und das E-Mail-Konto richtig
sind. Wenn Ihr SMTP-Mailserver eine Authentifizierung benötigt, stellen Sie
sicher, dass Sie den Benutzernamen und das Kennwort richtig eingegeben
haben. Siehe section 4.
Stellen Sie sicher, dass der Vantage Report-Server eine Verbindung zum SMTPMailserver herstellen kann.
Wenn das Problem weiterhin bestehen bleibt, wenden Sie sich an Ihren
Fachhändler.
Stellen Sie sicher, dass Sie den richtigen Lizenzschlüssel verwenden und dass
die erforderlichen Daten richtig eingegeben wurden. Siehe section 5.
Stellen Sie sicher, dass der Vantage Report-Server eine Verbindung zur Website
http://www.myzyxel.com herstellen kann. tauscht während der Registrierung
Daten mit dieser Webseite aus.
Wenn das Problem weiterhin bestehen bleibt, wenden Sie sich an Ihren
Fachhändler.
Ansehen der Produktzertifizierungen
Gehen Sie zur Website www.zyxel.com, wählen Sie aus der Liste der ZyXEL-Homepage Ihr Produkt aus und
wählen Sie die Zertifizierung, die Sie angezeigt haben möchten.
32
Page 34

ESPAÑOL
ESPAÑOL
Vantage Report
Vantage Report recopila entradas de registro y estadísticas de tráfico de los dispositivos ZyXEL y luego
genera informes gráficos y tablas sobre el rendimiento de la red y eventos.
C
A
Instale Vantage Report en el servidor Vantage Report (B). Luego, utilice el configurador Web (A) para
configurarlo. (El configurador Web puede ejecutarse en un ordenador remoto o en el servidor Vantage
Report). Finalmente, configure los dispositivos ZyXEL (C) para enviar sus entradas de registro y estadísticas
de tráfico al servidor Vantage Report. El servidor Vantage Report recopila esta información y genera informes
estadísticos sobre la red. Usted y otros podrán ver estos informes en cualquier momento en el configurador
Web o en mensajes de correo electrónico normales.
B
Vista previa
1 Preparación - Compruebe si el servidor Vantage Report cumple con los requisitos mínimos y prepárelo
para la instalación.
2Instalación - Instale Vantage Report en el servidor Vantage Report.
3 Iniciar sesión - Utilice el configurador Web para acceder al servidor Vantage Report.
4 Configuración de correo electrónico - Configure la dirección de correo electrónico del administrador y la
configuración del servidor de correo SMTP en Vantage Report y pruebe la configuración SMTP.
5Registro - Cuando instale Vantage Report, obtendrá la versión estándar. No necesitará registrar Vantage
Report a menos que desee obtener la versión de prueba o actualizar a la versión profesional. (Consulte la
sección 5 para más información sobre las versiones).
6 Instalación de dispositivos - Instale los dispositivos ZyXEL y agréguelos al servidor Vantage Report.
33
Page 35

ESPAÑOL
1 Preparación
Compruebe esto antes de instalar Vantage Report.
1.1 Compruebe los requisitos mínimos
Si su servidor Vantage Report no cumple con los requisitos mínimos, debería actualizarlo o utilizar un servidor
distinto que cumpla con los requisitos.
CPU Pentium IV 2.6 GHz o mayor recomendado
RAM 1024 MB o más (para un buen rendimiento con 25 dispositivos)
Disco duro 80 GB o más
Sistema operativo Windows XP Professional, Servidor Windows 2000/2003
Explorador
(Ejecutándose en
el servidor o en
otro ordenador)
Otros requisitos
para los servicios
incluidos
1.2 Guardar lista de dispositivos (sólo Vantage Report v2.2)
Si está utilizando Vantage Report v2.2, debería guardar la lista de dispositivos de Vangage Report antes de
desinstalarlo. Luego, en section 6.2, puede cargar este archivo en lugar de agregar cada dispositivo
manualmente a Vantage Report.
Internet Explorer 6.0 (Service Pack 1) o posterior en Windows
Mozilla 1.7.12 o posterior en Windows
Firefox 1,07 o posterior en Windows
Resolución 1024 por 768
SMTP daemon
Puerto TCP 3316 y puerto UDP 514
Nota: No puede cargar este archivo en section 6.2 si agrega más dispositivos de los permitidos por la
versión y licencia de Vantage Report. Consulte section 5 para más detalles.
1 En el CD incluido, haga clic en Documents (Documentos) > Upgrade Notes (Notas de actualización).
2 Siga las instrucciones para copiar la carpeta migration (migración) (y todos sus contenidos) del CD
incluido en el directorio de instalación de Vantage Report v2.2 (por ejemplo, C:\Archivos de
programa\ZyXEL\Vantage Report).
3 Inicie Vantage Report v2.2, si no se está ejecutando ya.
4 En la carpeta migration (migración) en el directorio de instalación de Vantage Report v2.2, ejecute
exportDeviceList.bat. Este programa crea un archivo llamado Devices.xml en la misma carpeta.
5 Copie Devices.xml en una carpeta diferente, donde no sea eliminada cuando desinstale Vantage Report
v2.2 en section 1.3.
34
Page 36

ESPAÑOL
1.3 Desinstalar las versiones antiguas de Vantage Report
1 Si se está ejecutando una versión antigua de Vantage Report, deténgala.
2 En Windows 2000, haga clic en Inicio > Configuración > Panel de control > Agregar o quitar
programas > Vantage Report > Cambiar o quitar. Siga los pasos para quitar Vantage Report.
En Windows XP, haga clic en Inicio > Panel de control > Agregar o quitar programas > Vantage Report
> Cambiar o quitar. Siga los pasos para quitar Vantage Report.
1.4 Cierre MySQL y Tomcat
Cuando instale Vantage Report, también se instala MySQL y Tomcat. Si estas aplicaciones se ejecutan en el
servidor Vantage Report, asegúrese de que estén cerradas antes de instalar Vantage Report. Siga estos
pasos para comprobar si estas aplicaciones se están ejecutando o no y deténgalas.
1 En Windows 2000, haga clic en Inicio > Configuración > Panel de control > Herramientas
administrativas > Servicios. Se abrirá la pantalla Servicios.
En Windows XP, haga clic en Inicio > Panel de control > Rendimiento y mantenimiento > Herramientas
administrativas > Servicios. Se abrirá la pantalla Servicios.
2 Si no hay servicios MySQL o Tomcat ejecutándose en el servidor Vantage Report, vaya a la siguiente
sección. De lo contrario, haga clic con el botón derecho en cualquier servicio MySQL o Tomcat que se
esté ejecutando. Aparecerá el menú que ve arriba.
3 Seleccione Detener en el menú. Repita los pasos 2 y 3 si se están ejecutando otros servicios MySQL o
Tomcat en el servidor Vantage Report.
35
Page 37

ESPAÑOL
2 Instalación
Coloque el CD e su CD-ROM. Aparecerá la siguiente pantalla.
Haga clic en Setup (Instalación) > Vantage Report para iniciar la instalación de Vantage Report. El CD puede
extraer primero algunos archivos. Luego aparecerá el asistente para la instalación de Vantage Report.
36
Page 38

ESPAÑOL
Haga clic en Next (Siguiente). Siga los pasos. Antes de finalizar, aparecerá la siguiente pantalla.
Escriba el número de puerto que desee que Vantage Report utilice para usar los servicios web. No podrá
cambiar esto más tarde sin volver a instalar Vantage Report. Compruebe que este número de puerto no tiene
conflictos con otros servicios en su red. Haga clic en Siguiente cuando esté listo.
Cuando termine la instalación de Vantage Report, reinicie el servidor Vantage Report.
3 Acceso
Por defecto, el servidor Vantage Report se inicia automáticamente cuando accede al servidor Vantage Report.
Para acceder al servidor Vantage Report,
1 Abra la ventana del explorador y vaya a
• a.b.c.d es la dirección IP del servidor Vantage Report. Si abre el configurador Web en el mismo
ordenador en el que ha instalado Vantage Report, introduzca localhost.
xxxxx es el número de puerto introducido durante la instalación. (Consulte la sección 2).
•
Por ejemplo, http://localhost:8080/vrpt o http://212.100.9.161:9090/vrpt.
Aparecerá la pantalla Login (Iniciar sesión). Si no aparece, consulte Solución de problemas.
2 En la pantalla de acceso, escriba su nombre de usuario y contraseña y haga clic en Login (Iniciar sesión).
• Nombre de usuario predeterminado:
• Contraseña predeterminada: root
http://a.b.c.d:xxxxx/vrpt, donde
root
37
Page 39

ESPAÑOL
Aparecerá la pantalla principal. Está dividida en tres partes.
A
Utilice la ventana del dispositivo (A) para seleccionar un dispositivo. Haga clic con el botón derecho para
agregar o quitar dispositivos.
Utilice la ventana de funciones (B) para seleccionar un informe.
Utilice la ventana de informes (C) para mirar y ajustar el informe seleccionado para el dispositivo seleccionado.
B
C
4 Configuración del correo electrónico
Debería tener una cuenta de correo electrónico en un servidor de correo SMTP para Vantage Report. Puede
utilizar una cuenta existente o crear una nueva. En ambos casos, deberá tener un servidor de correo SMTP
(IP o nombre de dominio), dirección de correo electrónico, nombre de usuario (si es necesario) y contraseña
(si es necesaria).
4.1 Configurar la dirección de correo electrónico del administrador
Primero debería configurar la dirección de correo electrónico para el administrador Vantage Report. Esta
dirección de correo electrónico se utiliza para probar la configuración SMTP en section 4.2. También se utiliza
para notificaciones del sistema o si olvida la contraseña para la cuenta root (raíz). (Si olvida la contraseña,
haga clic en Forget Password? (¿Ha olvidado la contraseña?) en la pantalla Login (Iniciar sesión)).
Consulte la Guía del usuario para más detalles.
1 Iniciar sesión en el servidor Vantage Report. (Consulte section 3).
38
Page 40

ESPAÑOL
2 En la ventana de funciones, haga clic en System (Sistema) > User Maintenance (Mantenimiento de
usuarios). Aparecerá la pantalla User List (Lista de usuarios).
3 Haga clic en root (raíz). Aparecerá la pantalla Edit User (Editar usuario).
4 Escriba la dirección de correo electrónico para el administrador de Vantage Report en el campo E-mail
(Correo electrónico).
5 Haga clic en Apply (aplicar).
39
Page 41

ESPAÑOL
4.2 Configurar el servidor de correo SMTP
1 En la ventana de funciones, haga clic en System (Sistema) > Server Configuration (Configuración del
servidor). Aparecerá la pantalla Server Configuration (Configuración del servidor).
2 Siga las instrucciones de la siguiente tabla para rellenar la pantalla Server Configuration (Configuración
del servidor).
ETIQUETA DESCRIPCIÓN
SMTP IP Address
(Dirección IP SMTP) o
Domain Name (Nombre de
dominio)
User Name (Nombre de
usuario)
Password (Contraseña) Escriba la contraseña requerida por el servidor de correo SMTP. Si no
Sender E-mail (Correo
electrónico del remitente)
Escriba la dirección IP o nombre de dominio del servidor de correo
SMTP en el que Vantage Report tiene una cuenta.
Escriba el nombre de usuario requerido por el servidor de correo
SMTP. Si no se necesita el nombre de usuario, deje el campo vacío.
se necesita contraseña, deje el campo vacío.
Escriba la dirección de correo electrónico que desea para el remitente
cuando Vantage Report envíe un correo electrónico. Esta es la
dirección de correo electrónico desde la que el correo electrónico de
Vantage Report parece ser enviado.
3 Haga clic en Apply (Aplicar). (Debe guardar esta configuración antes de poder probarla en el siguiente
paso).
4 Haga clic en Test (Probar). Vantage Report envía un mensaje de prueba a la dirección de correo
electrónico especificada section 4.1.
5 Confirme si la cuenta de correo electrónico especificada ha recibido el mensaje de Vantage Report. Si no
ha recibido el correo electrónico, consulte Solución de problemas.
40
Page 42

ESPAÑOL
5 Registro
Sólo necesitará registrar Vantage Report si desea obtener la versión de prueba o actualizar a la versión
profesional.
•La versión estándar ofrece una variedad de informes estadísticos y programados sobre un dispositivo.
•La versión profesional soporta más informes, más características y más dispositivos que la versión estándar.
•La versión de prueba es una versión de prueba gratuita durante un tiempo limitado de la versión profesional.
Sin embargo, no soporta tantos dispositivos como la versión profesional.
El servidor Vantage Report debe tener acceso a http://www.myZyXEL.com durante el registro. Además, puede
que también necesite cierta información para la instalación.
Si tiene una cuenta myZyXEL.com, necesitará su...
• nombre de usuario de myZyXEL.com
• contraseña de myZyXEL.com
Si desea actualizar a la versión profesional, necesitará su...
• clave de licencia (iCard en la carpeta recibida cuando compró la versión profesional)
1 Iniciar sesión en el servidor Vantage Report. (Consulte section 3).
2 En la ventana de funciones, haga clic en System (Sistema) > Registration (Registro). Aparecerá la
pantalla Registration (Registro).
3 Si desea obtener la versión de prueba, haga clic en Trial (Prueba).
Si desea actualizar a la versión profesional, haga clic en Upgrade (Actualizar).
41
Page 43

ESPAÑOL
En ambos casos, aparecerá la siguiente pantalla. Algunos campos no aparecerán en su pantalla si ya tiene
una cuenta myZyXEL.com o si va a obtener la versión de prueba.
4 Siga las instrucciones de la siguiente tabla para rellenar esta pantalla.
ETIQUETA DESCRIPCIÓN
License Key (Clave de
licencia)
New myZyXEL.com
account (Nueva cuenta
myZyXEL.com)
Existing myZyXEL.com
account (Cuenta
myZyXEL.com existente)
User Name (Nombre de
usuario)
Escriba la clave de la licencia de la iCard si va a actualizar a la
versión profesional. La iCard está en la carpeta que recibe cuando
compra la versión profesional.
Seleccione esto si no tiene una cuenta myZyXEL.com. Vantage
Report creará la cuenta por usted.
Seleccione esto si ya tiene una cuenta myZyXEL.com.
Si no tiene una cuenta myZyXEL.com, escriba el nombre de usuario
que desea utilizar para su nueva cuenta myZyXEL.com. Su nombre
de usuario puede contener caracteres alfanuméricos y guiones bajos
(_) y debe tener entre 6 y 20 caracteres de longitud.
Si ya tiene una cuenta myZyXEL.com, escriba el nombre de usuario
para esa cuenta.
42
Page 44

ESPAÑOL
ETIQUETA DESCRIPCIÓN
Password (Contraseña) Si no tiene una cuenta myZyXEL.com, escriba la contraseña que
desea utilizar para su nueva cuenta myZyXEL.com. Su contraseña
puede contener caracteres alfanuméricos y guiones bajos (_) y debe
tener entre 6 y 20 caracteres de longitud.
Si ya tiene una cuenta myZyXEL.com, escriba la contraseña para esa
cuenta.
Confirm Password
(Confirmar contraseña)
E-mail Address (Dirección
de correo electrónico)
Country (País) Seleccione su lugar de trabajo.
5 Haga clic en Upgrade (Actualizar). Aparecerá la pantalla Registration (Registro) actualizada. Si no aparece,
consulte Solución de problemas.
Vuelva a escribir su contraseña.
Escriba la dirección de correo electrónico en la que desee ser
notificado sobre su nueva cuenta myZyXEL.com.
6 Instalación de dispositivos
Compruebe las notas de publicación de cada dispositivo ZyXEL para averiguar si el firmware actual soporta
Vantage Report. Asegúrese de comprobar las notas de publicación para la versión exacta; por ejemplo,
compruebe las notas de publicación para v3.64(XV.5), no sólo v3.64. Ciertos modelos y versiones de
firmware sólo soportan algunos informes. Generalmente, las siguientes versiones de firmware soportan
algunos o todos los informes en Vantage Report.
• ZyWALL 2/10W versión 3.62 o posterior
• ZyWALL 5/35/70 versión 3.63 o posterior
• IDP 10 versión 2.0 o posterior
• Prestige(P-) DSL versión 3.40 o posterior
Debe configurar cada dispositivo ZyXEL para enviar sus entradas de registro y estadísticas de tráfico al
servidor Vantage Report y tiene que agregar cada dispositivo a Vantage Report.
6.1 Configurar los dispositivos ZyXEL
Estos pasos pueden variar según los diferentes dispositivos. Si ya ha configurado los dispositivos para
versiones anteriores de Vantage Report, compruebe esta sección para asegurarse de que la configuración del
dispositivo no ha cambiado.
43
Page 45

ESPAÑOL
1 Inicie sesión en el configurador Web para el dispositivo y haga clic en Logs (Registros) > Log Settings
(Configuración de registro). A continuación se muestra la parte superior de una pantalla normal.
2 En la sección System Logging (Inicio de sesión en el sistema), seleccione la casilla de verificación
Active (Activo).
3 Escriba la dirección IP o el nombre del servidor Vantage Report en el campo Syslog Server (Servidor
Syslog).
4 En la columna Log (Registro), seleccione las categorías que desee ver en Vantage Report. System
Maintenance (Mantenimiento del sistema), Forward Web Sites (Reenviar sitios Web), Blocked Web
Sites (Sitios Web bloqueados), Attacks (Ataques), IPSec, IDP, Anti-Virus y Anti-Spam son requeridos
para varios informes en Vantage Report. (Algunos de estos no se encuentran en cada dispositivo). Sólo
puede buscar mensajes de registro para otras categorías.
5 Haga clic en Apply (Aplicar) para guardar sus cambios.
6 Haga clic en Logs (Registros) > Reports (Informes). Si el dispositivo no tiene esta pantalla, omita los
pasos 6 - 8. A continuación se muestra la sección superior de una pantalla normal.
7 En la sección Setup (Configuración), seleccione la casilla de verificación Send Raw Traffic Statistics to
Syslog Server for Analysis (Enviar estadísticas de tráfico en bruto al servidor Syslog para su análisis).
8 Haga clic en Apply (Aplicar) para guardar sus cambios.
44
Page 46

ESPAÑOL
9 Si el dispositivo ZyXEL ofrece IDP, vaya a IDP > Signature (Firma) (en la mayoría de dispositivos
ZyXEL). Compruebe que el dispositivo graba las entradas de registro para los tipos de ataque que desea
ver en Vantage Report.
10Si el dispositivo ZyXEL ofrece protección antivirus, vaya a Anti-Virus > General (en la mayoría de
dispositivos ZyXEL). Compruebe que el dispositivo graba las entradas de registros para virus de servicios
(en los que el dispositivo ha encontrado un virus) que desee ver en Vantage Report.
6.2 Agregar dispositivos ZyXEL a Vantage Report
Si ha seguido las instrucciones en section 1.2 (para Vantage Report v2.2), siga las instrucciones en section
6.2.2. De lo contrario, siga las instrucciones en section 6.2.1.
6.2.1 Agregar dispositivos manualmente
Debe tener la dirección MAC de la LAN y el tipo de modelo del dispositivo.
1 Iniciar sesión en el servidor Vantage Report. (Consulte section 3).
2 En la ventana del dispositivo, haga clic con el botón derecho en root (raíz). Aparecerá el siguiente menú.
3 Seleccione Add Device (Agregar dispositivo). Aparecerá la pantalla Add Device (Agregar dispositivo).
4 Siga las instrucciones de la siguiente tabla para rellenar la pantalla Add Device (Agregar dispositivo).
ETIQUETA DESCRIPCIÓN
Name (Nombre) Escriba el nombre del dispositivo que desea agregar a Vantage
Report. El nombre puede contener caracteres alfanuméricos o
guiones bajos (_) y debe tener entre 1 y 28 caracteres de longitud.
Este nombre se utiliza para referirse al dispositivo en Vantage Report
y tiene que ser único en Vantage Report. En algunos casos el System
Name (Nombre del sistema) del dispositivo puede ser el apropiado.
45
Page 47

ESPAÑOL
ETIQUETA DESCRIPCIÓN
MAC Escriba la dirección MAC de la LAN del dispositivo que desea
agregar. Debe escribir 12 números hexadecimales (0 - 9, A - F). No
utilice dos puntos (:). Esta dirección está ubicada normalmente en
una etiqueta en la parte inferior del dispositivo. Si hay dos direcciones
en la etiqueta, la dirección MAC de la LAN normalmente está en la
parte superior.
Type (Tipo) Seleccione el tipo de modelo del dispositivo que desee agregar.
Note (Nota) Escriba aquí cualquier nota adicional que desee. Puede escribir hasta
50 caracteres imprimibles ASCII. También puede dejar este campo
vacío.
5 Haga clic en el botón Add (Agregar). El dispositivo debería aparecer ahora en la ventana de dispositivos.
Puede seleccionarlo (por ejemplo, si desea generar un informe estadístico) haciendo clic en él una vez.
Consulte la Guía del usuario para más información.
6.2.2 Importar una lista de dispositivos
1 Iniciar sesión en el servidor Vantage Report. (Consulte section 3).
2 En la ventana de funciones, haga clic en System (Sistema) > Data Maintenance (Mantenimiento de
datos) > Device List Import & Export (Importar o exportar lista de dispositivos). Aparecerá la pantalla
Device List Export / Import (Importar o exportar lista de dispositivos.
3 Escriba el nombre y la ubicación del archivo que guardó en section 1.2 o haga clic en Browse...
(Examinar...) para buscarlo.
46
Page 48

ESPAÑOL
4 Haga clic en Import (Importar). Aparecerá el siguiente mensaje.
5 Haga clic en OK (Aceptar) para cerrar el mensaje.
6 En la ventana de dispositivos, haga clic en el icono Refresh (Actualizar) en la esquina superior
derecha. Deberían aparecer los dispositivos que tenía en Vantage Report v2.2.
Siga las instrucciones en section 6.2.1 para agregar más dispositivos manualmente.
47
Page 49

ESPAÑOL
Solución de problemas
Consulte la Guía del usuario para más soluciones de problemas.
PROBLEMA SOLUCIÓN
El configurador Web no se
conecta al servidor Vantage
Report.
El servidor Vantage Report no
se inicia automáticamente.
Compruebe si utiliza la URL correcta. Escriba
donde
a.b.c.d es la dirección IP del servidor Vantage Report. Si abre el config-
•
urador Web en el mismo ordenador en el que ha instalado Vantage
Report, introduzca localhost.
xxxxx es el número de puerto introducido durante la instalación. (Con-
•
sulte la sección 2).
Por ejemplo, podría escribir http://localhost:8080/vrpt o http://
212.100.9.161:9090/vrpt.
Compruebe que los paquetes del puerto TCP 3316, puerto UDP 514 y el número
de puerto especificado durante la instalación son reenviados al servidor Vantage
Report, especialmente si el servidor Vantage Report funciona bajo NAT o
cortafuegos.
Compruebe si el servidor Vantage Report se está ejecutando.
• El servidor Vantage Report funciona como un servicio. Siga las instrucciones
en section 1.4 para comprobarlo.
• Compruebe si han sido definidas las siguientes variables del sistema.
PATH=C:\WINNT\system32;C:\WINNT;C:\WINNT\System32\W
bem
La letra de la unidad y los nombres de las carpetas dependen de su servidor
Vantage Report. Para comprobar estas variables en Windows 2000, haga clic
en Inicio > Configuración > Panel de control > Sistema > Opciones avan-
zadas > Variables de entorno. En Windows XP, haga clic en Inicio > Panel
de control > Sistema > Opciones avanzadas > Variables de entorno.
Compruebe que las variables estén en el cuadro Variables del sistema.
• Elimine
de Vantage Report. Luego reinicie el servidor.
• El servidor Vantage Report no se inicia automáticamente si hay un conflicto
de puertos en el número de puerto especificado durante la instalación. Haga
clic en Inicio > Ejecutar y escriba
conflicto de puertos.
Si el problema persiste, contacte con su vendedor local.
vrpt\conf\lastLogTime.txt en el directorio de instalación
http://a.b.c.d:xxxxx/vrpt,
netstat -a para averiguar si hay un
48
Page 50

ESPAÑOL
PROBLEMA SOLUCIÓN
El configurador Web vuelve a
la pantalla Login (Iniciar
sesión) cuando intento hacer
algo.
Vantage Report no ha enviado
el correo electrónico de prueba
a la cuenta de correo
electrónico del administrador.
No puedo registrarme (obtener
la versión de prueba o
actualizar a la versión
profesional).
Por razones de seguridad, el configurador Web se apaga tras quince minutos.
Vuelva a iniciar sesión.
Compruebe que la configuración SMTP y de la cuenta de correo electrónico sean
correctas. Si su servidor de correo SMTP requiere autenticación, asegúrese de
haber introducido el nombre de usuario y la contraseña correctamente. Consulte
section 4.
Compruebe si el servidor Vantage Report puede conectarse al servidor de correo
SMTP.
Si el problema persiste, contacte con su vendedor local.
Asegúrese de tener la clave de licencia correcta y compruebe si ha introducido la
información requerida correctamente. Consulte section 5.
Compruebe si el servidor Vantage Report puede conectarse a http://
www.myzyxel.com. El servidor Vantage Report interactúa con este sitio durante
el registro.
Si el problema persiste, contacte con su vendedor local.
Ver los certificados de su producto
Vay a a www.zyxel.com, seleccione su producto del cuadro de la lista desplegable en la página inicial de
ZyXEL y seleccione el certificado que desea ver.
49
Page 51

ESPAÑOL
50
Page 52

FRANÇAIS
FRANÇAIS
Vantage Report
Vantage Report collecte les journaux et les statistiques sur le trafic des équipements ZyXEL et génère ensuite
des rapports sous forme de graphiques et de tableaux sur les performances et les évènements du réseau.
C
A
Installez Vantage Report sur le serveur Vantage Report (B). Puis, utilisez le configurateur web (A) pour le
configurer. (Le configurateur web peut tourner sur un ordinateur distant ou sur le serveur Vantage Report.)
Enfin, configurez les équipements ZyXEL (C) pour envoyer les journaux et les statistiques de trafic au
serveur Vantage Report. Le serveur Vantage Report rassemble ces informations et établit des rapports
statistiques concernant le réseau. Vous et d'autres personnes peuvent voir ces rapports à tout moment dans
le configurateur web ou par l'intermédiaire des courriers électroniques.
B
Présentation
1 Préparation – Assurez-vous que le serveur Vantage Report répond à la configuration requise, et préparez
le serveur Vantage Report pour l'installation.
2 Installation - Installez Vantage Report sur le serveur Vantage Report.
3 Ouvrir une session – Utilisez le configurateur web pour accéder au serveur Vantage Report.
4 Configuration de la messagerie – Configurez l'adresse e-mail de l'administrateur et les paramètres du
serveur de messagerie SMTP dans Vantage Report, et testez les paramètres SMTP.
5 Enregistrement – Quand vous installez Vantage Report, vous obtenez la version standard. Il n'est pas
nécessaire d'enregistrer Vantage Report à moins que vous ne vouliez obtenir la version d'évaluation ou
mettre à niveau à la version professionnelle. (Voir la section 5 pour plus d'informations sur les versions.)
6 Installation des périphériques – Installez les périphériques ZyXEL, et ajoutez-les au serveur Vantage
Report.
51
Page 53

FRANÇAIS
1 Préparation
Vérifiez les points suivants avant d'installer Vantage Report.
1.1 Vérifiez la configuration requise
Si votre serveur Vantage Report ne répond pas à la configuration requise, vous devez le mettre à niveau ou
utiliser un serveur différent répondant à la configuration requise.
CPU Pentium IV 2,6 GHz ou plus rapide recommandé
RAM 1024 Mo ou plus (pour de bonnes performances avec 25 périphériques)
Disque dur 80 Go ou plus
Système
d’exploitation
Navigateur
(s'exécutant sur le
serveur ou sur un
autre ordinateur)
Autres exigences
pour les services
présents
Windows XP Professionnel, Windows 2000/2003 Server
Internet Explorer 6.0 (Service Pack 1) ou plus récent sur Windows
Mozilla 1.7.12 ou plus récent sur Windows
Firefox 1.07 ou plus récent sur Windows
Résolution de 1024 par 768
Démon SMTP
Port TCP 3316 et port UDP 514
1.2 Enregistrer la liste de périphériques (Vantage Report v2.2 seulement)
Si vous utilisez actuellement Vantage Report v2.2, vous devez enregistrer la liste des périphériques dans
Vantage Report avant de le désinstaller. Puis, dans section 6.2, vous pouvez télécharger ce fichier, au lieu
d'ajouter chaque périphérique manuellement à Vantage Report.
Remarque : Vous ne pouvez pas télécharger ce fichier dans section 6.2s'il ajoute plus d'équipements
que la version Vantage Report et la licence ne le permettent. Voir section 5 pour plus de détails.
1 Sur le CD joint, cliquez sur Documents > Upgrade Notes(Notes de mise à niveau) .
2 Suivez les directives pour copier le dossier de migration (et tout son contenu) dans le CD joint dans le
répertoire d'installation de Vantage Report v2.2 (par exemple, C:\Program Files\ZyXEL\Vantage Report).
3 Démarrez Vantage Report v2.2, s'il n'est pas encore en cours d'exécution.
4 Dans le dossier "migration" du répertoire d'installation de Vantage Report v2.2, exécutez le fichier
exportDeviceList.bat. Ce programme crée un fichier appelé Devices.xml dans le même dossier.
5 Copiez Devices.xml dans un dossier différent, où il ne sera pas supprimé quand vous désinstallez
Vantage Report v2.2 dans section 1.3.
52
Page 54

FRANÇAIS
1.3 Désinstallez les anciennes versions de Vantage Report
1 Si une ancienne version de Vantage Report est en cours d'exécution, arrêtez-la.
2 Dans Windows 2000, cliquez sur Start(Démarrer) > Settings(Paramètres) > Control Panel(Panneau de
configuration) > Add/Remove Programs(Ajout/Suppression de programmes) > Vantage Report >
Change/Remove(Modifier/Supprimer). Suivez les instructions pour supprimer Vantage Report.
Dans Windows XP, cliquez sur start(Démarrer) > Control Panel(Panneau de configuration) (> Add/
Remove Programs(Ajout/Suppression de programmes) > Vantage Report > Change/
Remove(Modifier/Supprimer). Suivez les instructions pour supprimer Vantage Report.
1.4 Fermez MySQL et Tomcat
Quand vous installez Vantage Report, vous installez aussi MySQL et Tomcat. Si ces applications sont
exécutées sur le serveur Vantage Report, assurez-vous que ces applications sont fermées avant d'installer
Vantage Report. Suivez ces étapes pour vérifier si ces applications sont ou non en cours d'exécution , pour
les arrêter le cas écheant.
1 Dans Windows 2000, cliquez sur Démarrer(Start) > Settings(Paramètres) > Control Panel(Panneau de
configuration) > Administrative Tools(Outils d'administration) > Services. L'écran Services s'ouvre.
Dans Windows XP, cliquez sur start(Démarrer) > Control Panel(Panneau de configuration) > Performance
and Maintenance(Performances et maintenance) > Administrative Tools(Outils d'administration) >
Services. L'écran Services s'ouvre.
2 Si les services MySQL ou Tomcat ne sont pas en cours d'exécution sur le serveur Vantage Report, allez à
la section suivante. Autrement, faites un clic droit sur le service MySQL ou Tomcat qui sont en cours
d'exécution. Le menu affiché plus haut apparaît.
3 Sélectionnez Stop(Arrêter) dans le menu. Répétez les étapes 2 et 3 si les autres services MySQL ou
Tomcat sont encore en cours d'exécution sur le serveur Vantage Report.
53
Page 55

FRANÇAIS
2 Installation
Placez le CD dans votre lecteur de CD-ROM. L’écran suivant apparaît.
Cliquez sur Setup(Installer) > Vantage Report pour démarrer l'installation de Vantage Report. Le CD peut
d'abord extraire des fichiers. Puis, l'assistant d'installation de Vantage Report apparaîtra.
54
Page 56

FRANÇAIS
Cliquez sur Next(Suivant). Suivez les instructions. Avant de terminer, l'écran suivant apparaît.
Entrer le numéro du port que vous voulez que Vantage Report utilise pour les services web. Vous ne pourrez
pas modifier cela par la suite sans réinstaller Vantage Report. Vérifiez que ce numéro de port n'est pas en
conflit avec d'autres services dans votre réseau. Cliquez sur Next(Suivant) quand vous êtes prêt.
Quand vous avez terminé d'installer Vantage Report, redémarrez le serveur Vantage Report.
3 Ouvrir une session
Par défaut, le serveur Vantage Report démarre automatiquement quand vous ouvrez une session dans le
serveur Vantage Report. Pour accéder au serveur Vantage Report,
1 Ouvrez une fenêtre de navigateur et allez à
• a.b.c.d est l'adresse IP du serveur Vantage Report. Si vous ouvrez le configurateur web sur le
même ordinateur que sur celui où vous avez installé Vantage Report, entrez localhost.
xxxxx est le numéro de port que vous avez entré pendant l'installation. (Voir la section 2.)
•
Par exemple, http://localhost:8080/vrpt ou http://212.100.9.161:9090/vrpt.
L’écran Login(Ouvrir une session) apparaît. S'il n'apparaît pas, voir Dépannage.
2 Dans l'écran Ouvrir une session, entrez votre nom d'utilisateur et votre mot de passe, et cliquez sur
Login(Ouvrir une session).
• Nom d'utilisateur par défaut :
root.
http://a.b.c.d:xxxxx/vrpt, où
55
Page 57

FRANÇAIS
• Mot de passe par défaut : root.
L’écran principal apparaît. Il est divisé en trois parties.
A
Utilisez la fenêtre périphérique (A) pour sélectionner un périphérique. Faites un clic droit pour ajouter et retirer
des périphériques.
Utilisez la fenêtre de fonctions (B) pour sélectionner un rapport.
Utilisez la fenêtre de rapport (C) pour afficher et ajuster le rapport sélectionné pour le périphérique sélectionné.
B
C
4 Configuration de la messagerie
Vous devez avoir un compte de messagerie sur un serveur de messagerie SMTP pour Vantage Report. Vous
pouvez utiliser un compte existant ou en créer un nouveau. Dans tous les cas, vous devez avoir un serveur de
messagerie SMTP (IP ou nom de domaine), adresse e-mail, nom d'utilisateur (si requis), et le mot de passe
(si requis).
4.1 Configurer l'adresse e-mail d'administrateur
Vous devez d'abord configurer l'adresse e-mail pour l'administrateur de Vantage Report. Cette adresse e-mail
est utilisée pour tester les paramètres SMTP dans section 4.2. Elle est aussi utilisée pour les notifications du
système ou si vous avez oublié le mot de passe pour le compte root. (Si vous avez oublié le mot de passe,
cliquez sur Forget Password?(Mot de passe oublié?) dans l'écran Login(Ouvrir une session).) Voir le guide
de l'utilisateur pour plus de détails.
1 Ouvrir une session dans le serveur Vantage Report. (Voir section 3.)
56
Page 58

FRANÇAIS
2 Dans la fenêtre de fonction, cliquez sur System(Système) > User Maintenance(Maintenance de
l'utilisateur). L'écran User List(Liste des utilisateurs) apparaît.
3 Cliquez sur root(racine). L'écran Edit User(Editer les utilisateurs) apparaît.
4 Tapez l'adresse e-mail de l'administrateur de Vantage Report dans le champ E-mail.
5 Cliquez sur Apply(Appliquer).
57
Page 59

FRANÇAIS
4.2 Configurer le serveur de messagerie SMTP
1 Dans la fenêtre de fonction, cliquez sur System(Système) > Server Configuration(Configuration du
serveur). L'écran Server Configuration(Configuration du serveur) apparaît.
2 Suivez les instructions dans le tableau ci-dessous pour remplir l'écran Configuration du serveur.
ETIQUETTE DESCRIPTION
Adresse IP SMTP ou Nom
de domaine
Nom d'utilisateur Entrez le nom d'utilisateur requis par le serveur de messagerie SMTP.
Mot de passe Entrez le mot de passe requis par le serveur de messagerie SMTP. Si
E-mail d'expéditeur Entrez l'adresse e-mail que vous avez choisie comme expéditeur
Entrez l'adresse IP ou le nom de domaine du serveur de messagerie
SMTP sur lequel Vantage Report a un compte.
Si le nom d'utilisateur n'est pas requis, laissez ce champ vide.
le mot de passe n'est pas requis, laissez ce champ vide.
quand Vantage Report envoie un e-mail. C'est l'adresse e-mail à partir
de laquelle un e-mail de Vantage Report est envoyé.
3 Cliquez sur Apply(Appliquer). (Vous devez enregistrer ces paramètres avant de pouvoir les tester à
l'étape suivante.)
4 Cliquez sur Test(Tester). Vantage Report envoie un message de test à l'adresse e-mail que vous avez
spécifiée dans section 4.1.
5 Confirmez que le compte de messagerie spécifié a reçu le message de Vantage Report. S'il n'a pas reçu
l'e-mail, voir Dépannage.
58
 Loading...