

ZyXEL STB-1001S User Manual

STB-1001S
IP Set-Top Box
User’s Guide
Version 1.0
12/2007
Edition 1
LANGUAGE
ENGLISH: Using the STB page 21
РУССКИЙ: Использование
устройства STB
DEFAULT LOGIN
Password 123456
page 55
www.zyxel.com


About This User's Guide
About This User's Guide
Intended Audience
This manual is intended for people who want to configure the STB using the menu system.
You should have at least a basic knowledge of TCP/IP networking concepts and topology.
Related Documentation
• Quick Start Guide
The Quick Start Guide is designed to help you get up and running right away. It contains
information on setting up your network and configuring for Internet access.
• Supporting Disk
Refer to the included CD for support documents.
• ZyXEL Web Site
Please refer to www.zyxel.com
certifications.
for additional support documentation and product
User Guide Feedback
Help us help you. Send all User Guide-related comments, questions or suggestions for
improvement to the following address, or use e-mail instead. Thank you!
The Technical Writing Team,
ZyXEL Communications Corp.,
6 Innovation Road II,
Science-Based Industrial Park,
Hsinchu, 300, Taiwan.
E-mail: techwriters@zyxel.com.tw
STB-1001S User’s Guide
3

Document Conventions
Document Conventions
Warnings and Notes
These are how warnings and notes are shown in this User’s Guide.
1 Warnings tell you about things that could harm you or your STB.
" Notes tell you other important information (for example, other things you may
need to configure or helpful tips) or recommendations.
Syntax Conventions
• The STB-1001S may be referred to as the “STB”, the “device”, the “system” or the
“product” in this User’s Guide.
• Product labels, screen names, field labels and field choices are all in bold font.
• A key stroke is denoted by square brackets and uppercase text, for example, [ENTER]
means the “enter” or “return” key on your keyboard.
• “Enter” means for you to type one or more characters and then press the [ENTER] key.
“Select” or “choose” means for you to use one of the predefined choices.
• A right angle bracket ( > ) within a screen name denotes a mouse click. For example,
Maintenance > Log > Log Setting means you first click Maintenance in the navigation
panel, then the Log sub menu and finally the Log Setting tab to get to that screen.
• Units of measurement may denote the “metric” value or the “scientific” value. For
example, “k” for kilo may denote “1000” or “1024”, “M” for mega may denote “1000000”
or “1048576” and so on.
• “e.g.,” is a shorthand for “for instance”, and “i.e.,” means “that is” or “in other words”.
4
STB-1001S User’s Guide
Document Conventions
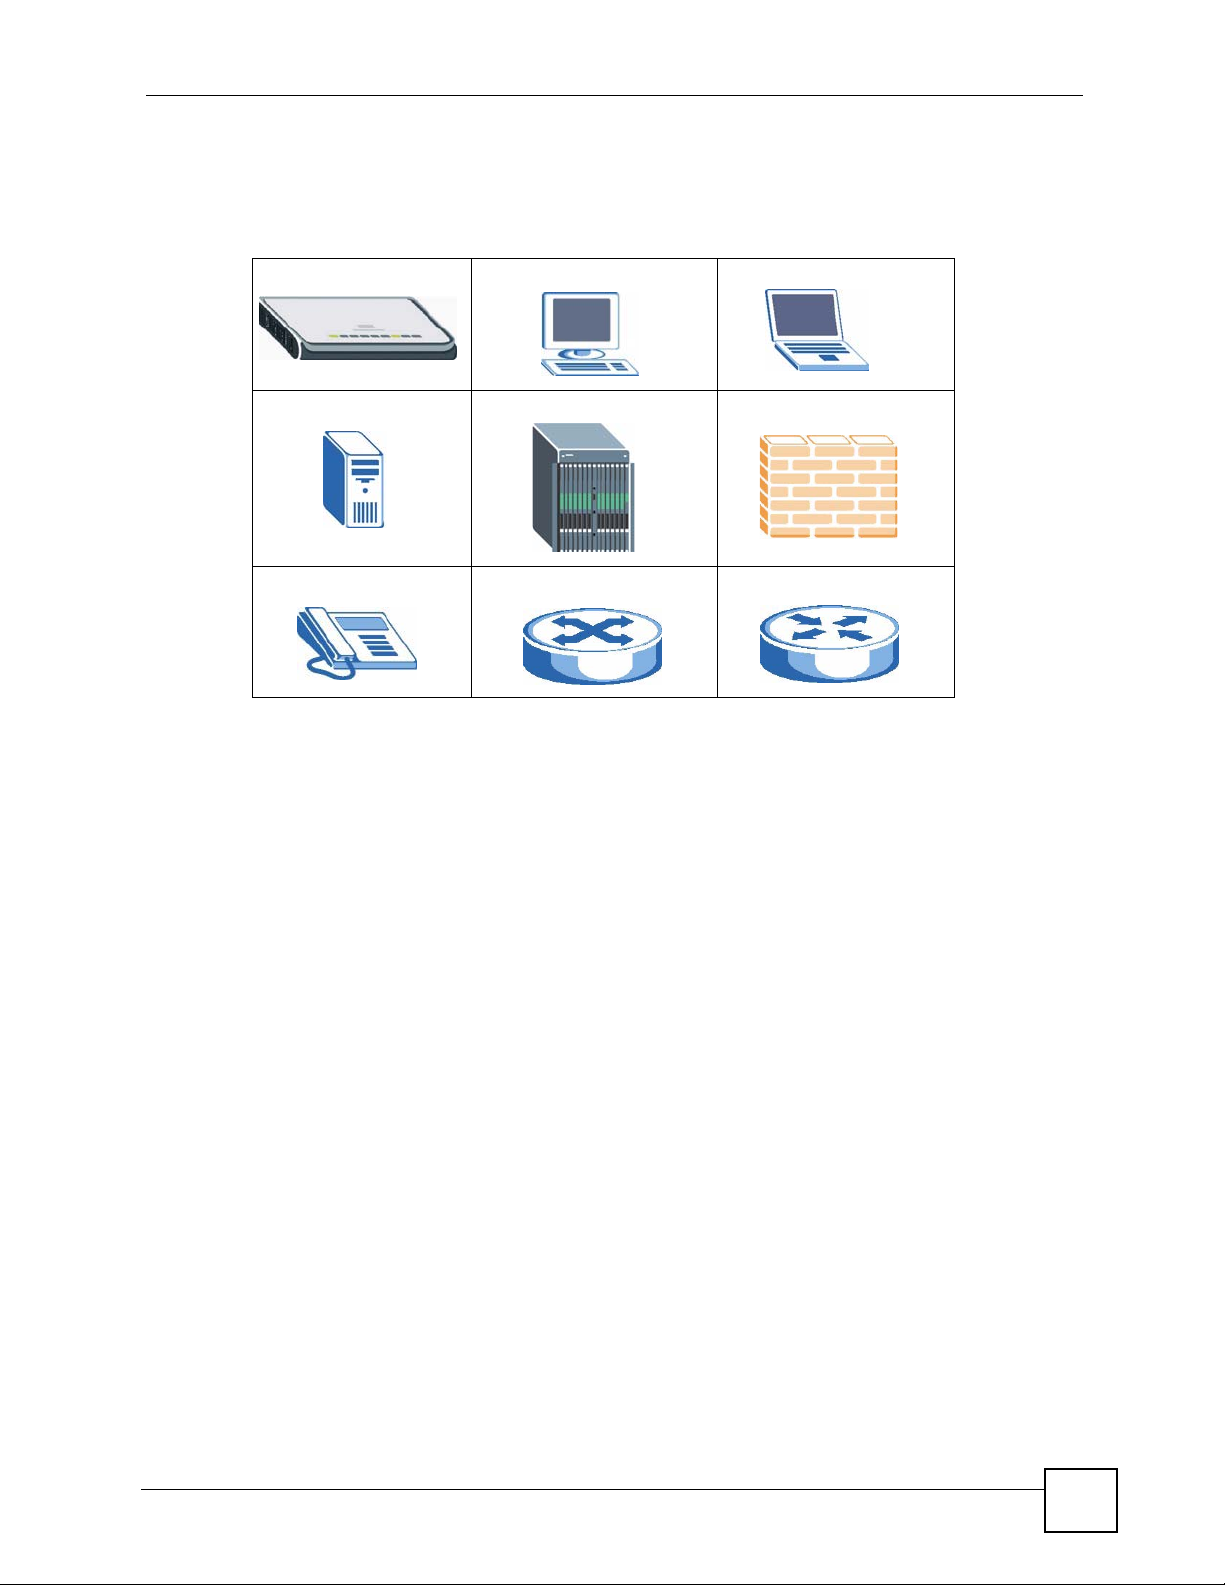
Icons Used in Figures
Figures in this User’s Guide may use the following generic icons. The STB icon is not an exact
representation of your STB.
STB Computer Notebook computer
Server DSLAM Firewall
Telephone Switch Router
STB-1001S User’s Guide
5

Safety Warnings
Safety Warnings
1 For your safety, be sure to read and follow all warning notices and instructions.
• Do NOT use this product near water, for example, in a wet basement or near a swimming
pool.
• Do NOT expose your device to dampness, dust or corrosive liquids.
• Do NOT store things on the device.
• Do NOT install, use, or service this device during a thunderstorm. There is a remote risk
of electric shock from lightning.
• Connect ONLY suitable accessories to the device.
• Do NOT open the device or unit. Opening or removing covers can expose you to
dangerous high voltage points or other risks. ONLY qualified service personnel should
service or disassemble this device. Please contact your vendor for further information.
• Make sure to connect the cables to the correct ports.
• Place connecting cables carefully so that no one will step on them or stumble over them.
• Always disconnect all cables from this device before servicing or disassembling.
• Use ONLY an appropriate power adaptor or cord for your device. Connect it to the right
supply voltage (for example, 110V AC in North America or 230V AC in Europe).
• Do NOT allow anything to rest on the power adaptor or cord and do NOT place the
product where anyone can walk on the power adaptor or cord.
• Do NOT use the device if the power adaptor or cord is damaged as it might cause
electrocution.
• If the power adaptor or cord is damaged, remove it from the device and the power source.
• Do NOT attempt to repair the power adaptor or cord. Contact your local vendor to order a
new one.
• Do not use the device outside, and make sure all the connections are indoors. There is a
remote risk of electric shock from lightning.
• Do NOT obstruct the device ventilation slots, as insufficient airflow may harm your
device.
6
This product is recyclable. Dispose of it properly.
STB-1001S User’s Guide
Safety Warnings
STB-1001S User’s Guide
7

Safety Warnings
8
STB-1001S User’s Guide

Contents Overview
Contents Overview
Using the STB (English) ........................................................................................................21
Introducing the STB ................................................................................................................... 23
The Menu System ..................................................................................................................... 27
Demo Server Setup ................................................................................................................... 37
Troubleshooting ......................................................................................................................... 47
Product Specifications ............................................................................................................... 51
Using the STB (Russian) .......................................................................................................55
Краткий обзор STB ................................................................................................................... 57
Система меню .......................................................................................................................... 61
Настройка демонстрационного сервера ................................................................................ 73
Поиск и устранение неисправностей ..................................................................................... 83
Техниче ские характеристики изделия .................................................................................... 87
Appendices and Index ...........................................................................................................91
STB-1001S User’s Guide
9

Contents Overview
10
STB-1001S User’s Guide

Table of Contents
Table of Contents
About This User's Guide ..........................................................................................................3
Document Conventions............................................................................................................4
Safety Warnings........................................................................................................................6
Contents Overview ...................................................................................................................9
Table of Contents.................................................................................................................... 11
List of Figures .........................................................................................................................15
List of Tables...........................................................................................................................19
Part I: Using the STB (English)............................................................. 21
Chapter 1
Introducing the STB................................................................................................................ 23
1.1 Overview .............................................................................................................................. 23
1.2 LEDs .................................................................................................................................... 24
1.3 Rear Panel Connections ...................................................................................................... 24
1.4 Resetting the STB ............................................................................................................... 25
Chapter 2
The Menu System ................................................................................................................... 27
2.1 Navigating the Menus .......................................................................................................... 27
2.2 The Basic Setup Menus ......................................................................................................27
2.2.1 Accessing and Exiting the Basic Setup Menus .......................................................... 27
2.2.2 Video Setup Menu ...................................................................................................... 28
2.2.3 System Setup Menu ................................................................................................... 30
2.2.4 Language Setup Menu ............................................................................................... 30
2.3 The Advanced Setup Menus ............................................................................................... 31
2.3.1 Accessing and Exiting the Menus .............................................................................. 31
2.3.2 The Advanced Setup: Information Menu .................................................................... 32
2.3.3 The Advanced Setup: Network Menu ........................................................................ 32
2.3.4 The Advanced Setup: Firmware Upgrade Menu ........................................................ 35
Chapter 3
Demo Server Setup.................................................................................................................37
STB-1001S User’s Guide
11

Table of Contents
3.1 Media Server Overview Example ........................................................................................ 37
3.2 Server Setup Overview ........................................................................................................ 38
3.3 Third-Party Software and Compatibility ............................................................................... 38
3.4 Set up the Apache HTTP Server ......................................................................................... 39
3.4.1 Download Apache ...................................................................................................... 39
3.4.2 Install Apache ............................................................................................................. 40
3.4.3 Set Up the Demo Interface ......................................................................................... 41
3.5 Set up the LIVE555 Media Server and Demo Content ........................................................ 44
3.6 Set up the STB .................................................................................................................... 44
3.7 Play Live TV ........................................................................................................................ 45
3.8 Play VOD ............................................................................................................................. 46
Chapter 4
Troubleshooting......................................................................................................................47
4.1 Power, Hardware Connections, and LEDs .......................................................................... 47
4.2 STB Access and Login ........................................................................................................ 48
4.3 Internet Access .................................................................................................................... 49
Chapter 5
Product Specifications...........................................................................................................51
5.1 General STB Specifications .................................................................................................51
5.2 Power Adaptor Specifications .............................................................................................. 52
Part II: Using the STB (Russian)........................................................... 55
Chapter 6
Краткий обзор STB................................................................................................................57
6.1 Общие сведения ................................................................................................................ 57
6.2 Светодиодные индикаторы ............................................................................................... 58
6.3 Разъемы на задней панели ............................................................................................... 59
6.4 Сброс устройства STB ....................................................................................................... 60
Chapter 7
Система меню........................................................................................................................61
7.1 Перемещение по меню ...................................................................................................... 61
7.2 Меню базовой настройки .................................................................................................. 61
7.2.1 Вход в меню базовой настройки и выход из него .................................................. 62
7.2.2 Меню настройки видео ............................................................................................ 62
7.2.3 Меню настройки системы ........................................................................................ 64
7.2.4 Меню настройки языка ............................................................................................. 65
7.3 Меню расширенной настройки ......................................................................................... 65
12
STB-1001S User’s Guide

Table of Contents
7.3.1 Вход в меню настройки и выход из него ................................................................. 66
7.3.2 Меню "Advanced Setup: Information"
(Расширенная настройка: информация) ................................................................... 66
7.3.3 Меню "Advanced Setup: Network"
(Расширенная настройка: сеть) ................................................................................. 67
7.3.4 Меню "Advanced Setup: Firmware Upgrade"
(Расширенная настройка: обновление микропрограммы) ...................................... 70
Chapter 8
Настройка демонстрационного сервера...........................................................................73
8.1 Пример использования мультимедийного сервера ........................................................ 73
8.2 Обзор настройки сервера .................................................................................................. 74
8.3 Программное обеспечение сторонних производителей и проблемы совместимости .75
8.4 Настройка HTTP-сервера Apache .................................................................................... 76
8.4.1 Загрузка файлов Apache ......................................................................................... 76
8.4.2 Уста нов ка Apache ..................................................................................................... 77
8.4.3 Настройка демонстрационного интерфейса .......................................................... 78
8.5 Установ ка мультимедийного сервера LIVE555
и демонстрационного контента ........................................................................................ 80
8.6 Настройка устройства STB ............................................................................................... 80
8.7 Просмотр телевещания в реальном времени ................................................................. 82
8.8 Воспроизведение видео по запросу ................................................................................. 82
Chapter 9
Поиск и устранение неисправностей ................................................................................ 83
9.1 Электропитание, подключение оборудования и светодиодные индикаторы ................ 83
9.2 Доступ к устройству STB и вход в систему ...................................................................... 84
9.3 Доступ в Интернет ............................................................................................................. 85
Chapter 10
Технические характеристики изделия .............................................................................. 87
10.1 Общие технические характеристики устройства STB ................................................... 87
10.2 Характеристики блока питания ....................................................................................... 89
Part III: Appendices and Index.............................................................. 91
Appendix A Setting up Your Computer’s IP Address..............................................................93
Appendix B IP Addresses and Subnetting ........................................................................... 115
Appendix C Legal Information ..............................................................................................125
Appendix D Customer Support............................................................................................. 129
STB-1001S User’s Guide
13

Table of Contents
Index....................................................................................................................................... 135
14
STB-1001S User’s Guide

List of Figures
List of Figures
Figure 1 Overview .................................................................................................................................. 23
Figure 2 LEDs ......................................................................................................................................... 24
Figure 3 Rear Panel Connections .......................................................................................................... 25
Figure 4 The Home Menu ....................................................................................................................... 28
Figure 5 The Video Setup Menu ............................................................................................................. 29
Figure 6 The System Setup Menu .......................................................................................................... 30
Figure 7 The Language Setup Menu ...................................................................................................... 31
Figure 8 The Login Menu ....................................................................................................................... 31
Figure 9 The Information Menu .............................................................................................................. 32
Figure 10 The Network: DHCP Menu .................................................................................................... 33
Figure 11 The Network: Static IP Menu ................................................................................................. 34
Figure 12 The Network: PPPoE Menu ................................................................................................... 34
Figure 13 The Firmware Upgrade Menu ................................................................................................ 35
Figure 14 Firmware Upgrade Error ......................................................................................................... 35
Figure 15 Media Server Overview .......................................................................................................... 37
Figure 16 The Apache Wizard ................................................................................................................ 40
Figure 17 The Apache Wizard: Finished ................................................................................................ 41
Figure 18 Apache: Default Screen ......................................................................................................... 41
Figure 19 The Apache Folder ................................................................................................................. 42
Figure 20 Interface Installed ................................................................................................................... 44
Figure 21 Enter Password ...................................................................................................................... 45
Figure 22 Left-hand Menu: Network ....................................................................................................... 45
Figure 23 Enter IP Address .................................................................................................................... 45
Figure 24 Wall-mounting Example .......................................................................................................... 54
Figure 25 Masonry Plug and M4 Tap Screw ........................................................................................... 54
Figure 26 Обзор ..................................................................................................................................... 58
Figure 27 Светодиодные индикаторы .................................................................................................. 59
Figure 28 Разъемы на задней панели .................................................................................................. 60
Figure 29 Главное меню ....................................................................................................................... 62
Figure 30 Меню настройки видео ......................................................................................................... 63
Figure 31 Меню настройки системы .................................................................................................... 64
Figure 32 Меню настройки языка ......................................................................................................... 65
Figure 33 Меню входа ........................................................................................................................... 66
Figure 34 Меню "Information" (Информация) ....................................................................................... 67
Figure 35 Меню "Network: DHCP" (Сеть: DHCP) ................................................................................. 68
Figure 36 Меню "Network: Static IP" (Сеть: статический IP-адрес) ................................................... 69
Figure 37 Меню "Network: PPPoE" (Сеть: PPPoE) .............................................................................. 70
Figure 38 Меню "Firmware Upgrade" (Обновление микропрограммы) .............................................. 71
STB-1001S User’s Guide
15

List of Figures
Figure 39 Ошибка при обновлении микропрограммы ........................................................................ 71
Figure 40 Краткое описание мультимедийного сервера .................................................................... 74
Figure 41 Мастер Apache ...................................................................................................................... 77
Figure 42 Мастер Apache: завершение работы .................................................................................. 77
Figure 43 Apache: экран по умолчанию ............................................................................................... 78
Figure 44 Папка Apache ........................................................................................................................79
Figure 45 Интерфейс установлен ........................................................................................................ 80
Figure 46 Ввод пароля .......................................................................................................................... 81
Figure 47 Меню в левой части экрана: Network (Сеть) ...................................................................... 81
Figure 48 Ввод IP-адреса ...................................................................................................................... 81
Figure 49 WIndows 95/98/Me: Network: Configuration .......................................................................... 94
Figure 50 Windows 95/98/Me: TCP/IP Properties: IP Address .............................................................. 95
Figure 51 Windows 95/98/Me: TCP/IP Properties: DNS Configuration .................................................. 96
Figure 52 Windows XP: Start Menu ........................................................................................................ 97
Figure 53 Windows XP: Control Panel ................................................................................................... 97
Figure 54 Windows XP: Control Panel: Network Connections: Properties ............................................. 98
Figure 55 Windows XP: Local Area Connection Properties ................................................................... 98
Figure 56 Windows XP: Internet Protocol (TCP/IP) Properties .............................................................. 99
Figure 57 Windows XP: Advanced TCP/IP Properties ......................................................................... 100
Figure 58 Windows XP: Internet Protocol (TCP/IP) Properties ............................................................ 101
Figure 59 Windows Vista: Start Menu ................................................................................................... 102
Figure 60 Windows Vista: Control Panel .............................................................................................. 102
Figure 61 Windows Vista: Network And Internet ..................................................................................102
Figure 62 Windows Vista: Network and Sharing Center ....................................................................... 102
Figure 63 Windows Vista: Network and Sharing Center ....................................................................... 103
Figure 64 Windows Vista: Local Area Connection Properties .............................................................. 103
Figure 65 Windows Vista: Internet Protocol Version 4 (TCP/IPv4) Properties ..................................... 104
Figure 66 Windows Vista: Advanced TCP/IP Properties ...................................................................... 105
Figure 67 Windows Vista: Internet Protocol Version 4 (TCP/IPv4) Properties ..................................... 106
Figure 68 Macintosh OS 8/9: Apple Menu ............................................................................................ 107
Figure 69 Macintosh OS 8/9: TCP/IP ................................................................................................... 107
Figure 70 Macintosh OS X: Apple Menu .............................................................................................. 108
Figure 71 Macintosh OS X: Network .................................................................................................... 109
Figure 72 Red Hat 9.0: KDE: Network Configuration: Devices ............................................................110
Figure 73 Red Hat 9.0: KDE: Ethernet Device: General .....................................................................110
Figure 74 Red Hat 9.0: KDE: Network Configuration: DNS ..................................................................111
Figure 75 Red Hat 9.0: KDE: Network Configuration: Activate ........................................................... 111
Figure 76 Red Hat 9.0: Dynamic IP Address Setting in ifconfig-eth0 ..................................................112
Figure 77 Red Hat 9.0: Static IP Address Setting in ifconfig-eth0 ......................................................112
Figure 78 Red Hat 9.0: DNS Settings in resolv.conf ...........................................................................112
Figure 79 Red Hat 9.0: Restart Ethernet Card ....................................................................................112
Figure 80 Red Hat 9.0: Checking TCP/IP Properties ..........................................................................113
Figure 81 Network Number and Host ID ...............................................................................................116
16
STB-1001S User’s Guide

List of Figures
Figure 82 Subnetting Example: Before Subnetting ...............................................................................118
Figure 83 Subnetting Example: After Subnetting ..................................................................................119
Figure 84 Conflicting Computer IP Addresses Example ...................................................................... 123
Figure 85 Conflicting Computer IP Addresses Example ...................................................................... 123
Figure 86 Conflicting Computer and Router IP Addresses Example .................................................... 124
STB-1001S User’s Guide
17

List of Figures
18
STB-1001S User’s Guide

List of Tables
List of Tables
Table 1 LEDs ......................................................................................................................................... 24
Table 2 Rear Panel Connections ........................................................................................................... 25
Table 3 The Video Setup Menu ............................................................................................................. 29
Table 4 The System Setup Menu .......................................................................................................... 30
Table 5 The Information Menu ............................................................................................................... 32
Table 6 The Network: DHCP Menu ....................................................................................................... 33
Table 7 The Network: Static IP Menu .................................................................................................... 34
Table 8 The Network: PPPoE Menu ...................................................................................................... 35
Table 9 Hardware Specifications ........................................................................................................... 51
Table 10 Firmware Specifications .......................................................................................................... 52
Table 11 Standards Supported .............................................................................................................. 52
Table 12 Power Adaptor Specifications ................................................................................................. 52
Table 13 Светодиодные индикаторы ................................................................................................... 59
Table 14 Разъемы на задней панели .................................................................................................. 60
Table 15 Меню настройки видео ......................................................................................................... 63
Table 16 Меню настройки системы ..................................................................................................... 64
Table 17 Меню "Information" (Информация) ....................................................................................... 67
Table 18 Меню "Network: DHCP" (Сеть: DHCP) .................................................................................. 68
Table 19 Меню "Network: Static IP" (Сеть: статический IP-адрес) ..................................................... 69
Table 20 Меню "Network: PPPoE" (Сеть: PPPoE) ............................................................................... 70
Table 21 Технические характеристики аппаратного обеспечения .................................................... 87
Table 22 Характеристики микропрограммы ....................................................................................... 88
Table 23 Поддерживаемые стандарты ............................................................................................... 88
Table 24 Характеристики блока питания ............................................................................................ 89
Table 25 IP Address Network Number and Host ID Example ..............................................................116
Table 26 Subnet Masks ........................................................................................................................117
Table 27 Maximum Host Numbers .......................................................................................................117
Table 28 Alternative Subnet Mask Notation ..........................................................................................117
Table 29 Subnet 1 .................................................................................................................................119
Table 30 Subnet 2 ................................................................................................................................ 120
Table 31 Subnet 3 ................................................................................................................................ 120
Table 32 Subnet 4 ................................................................................................................................ 120
Table 33 Eight Subnets ........................................................................................................................ 120
Table 34 24-bit Network Number Subnet Planning .............................................................................. 121
Table 35 16-bit Network Number Subnet Planning .............................................................................. 121
STB-1001S User’s Guide
19

List of Tables
20
STB-1001S User’s Guide

PART I
Using the STB
(English)
Introducing the STB (23)
The Menu System (27)
Demo Server Setup (37)
Troubleshooting (47)
Product Specifications (51)
21

22
CHAPTER 1
Introducing the STB
This chapter introduces the main applications and features of the STB. It also introduces the
ways you can manage the STB.
1.1 Overview
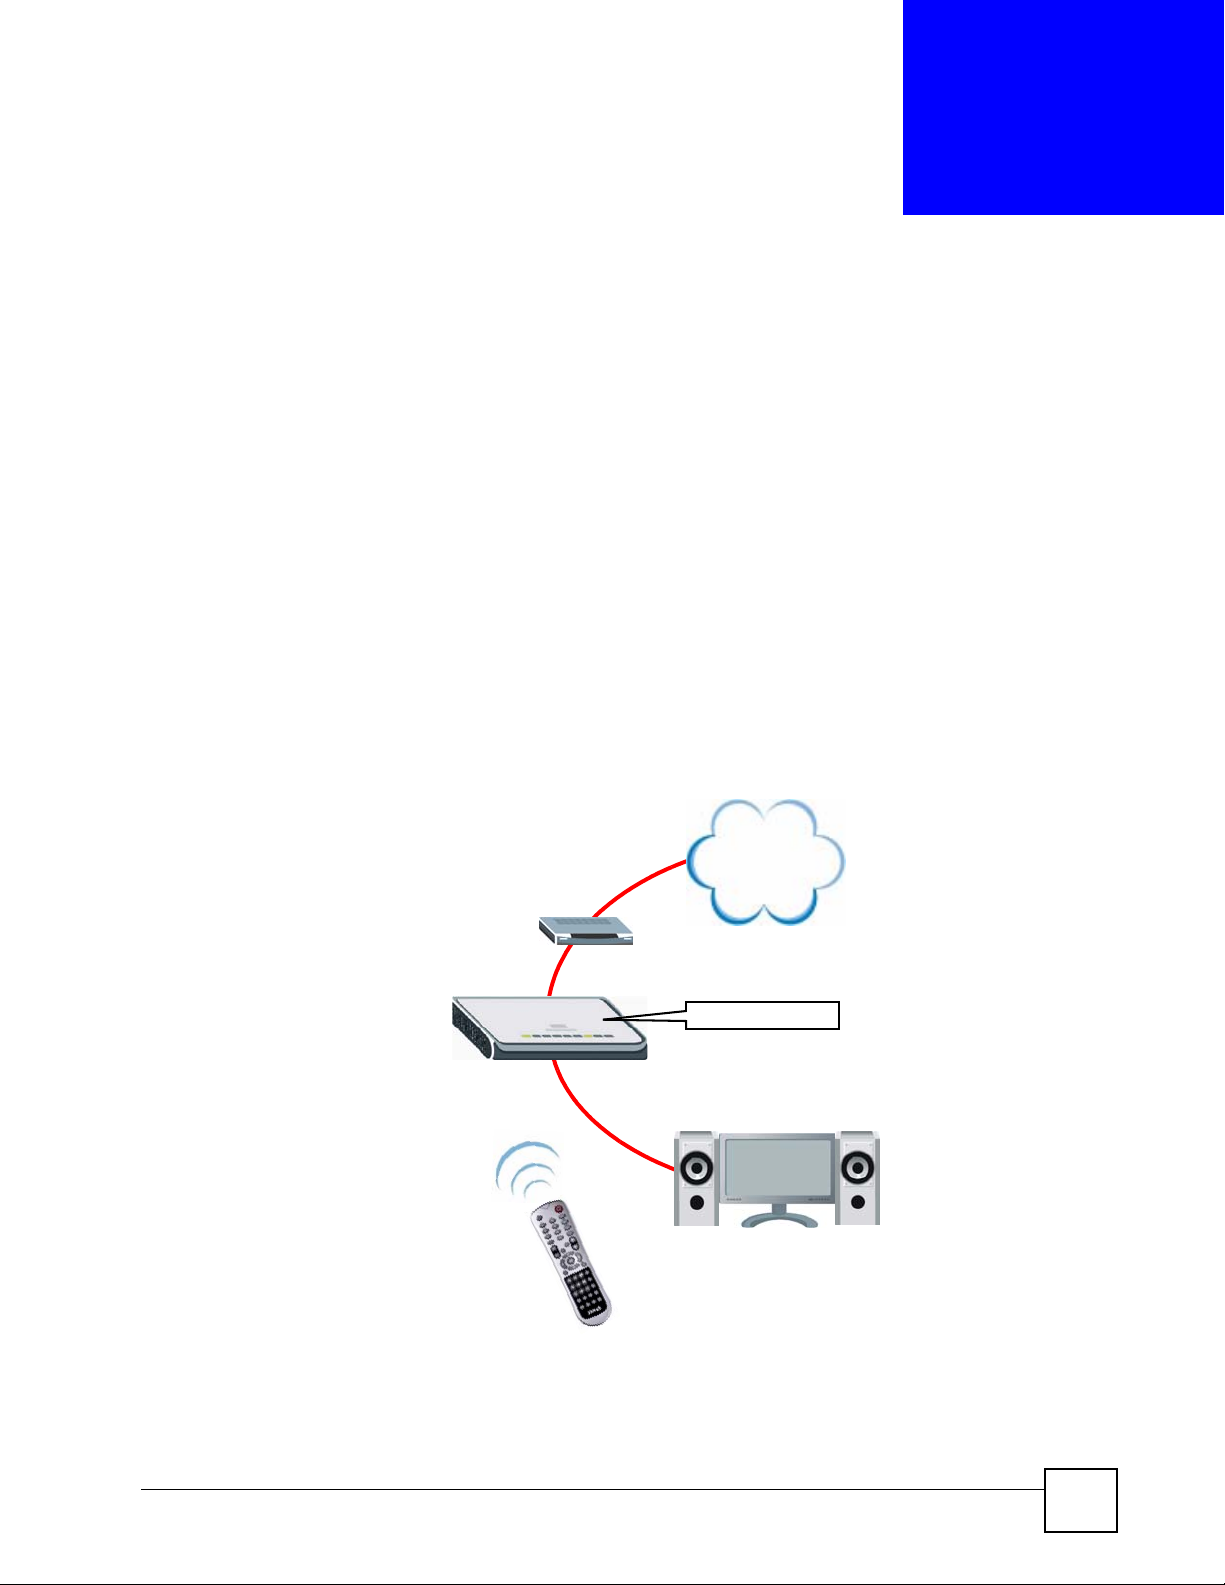
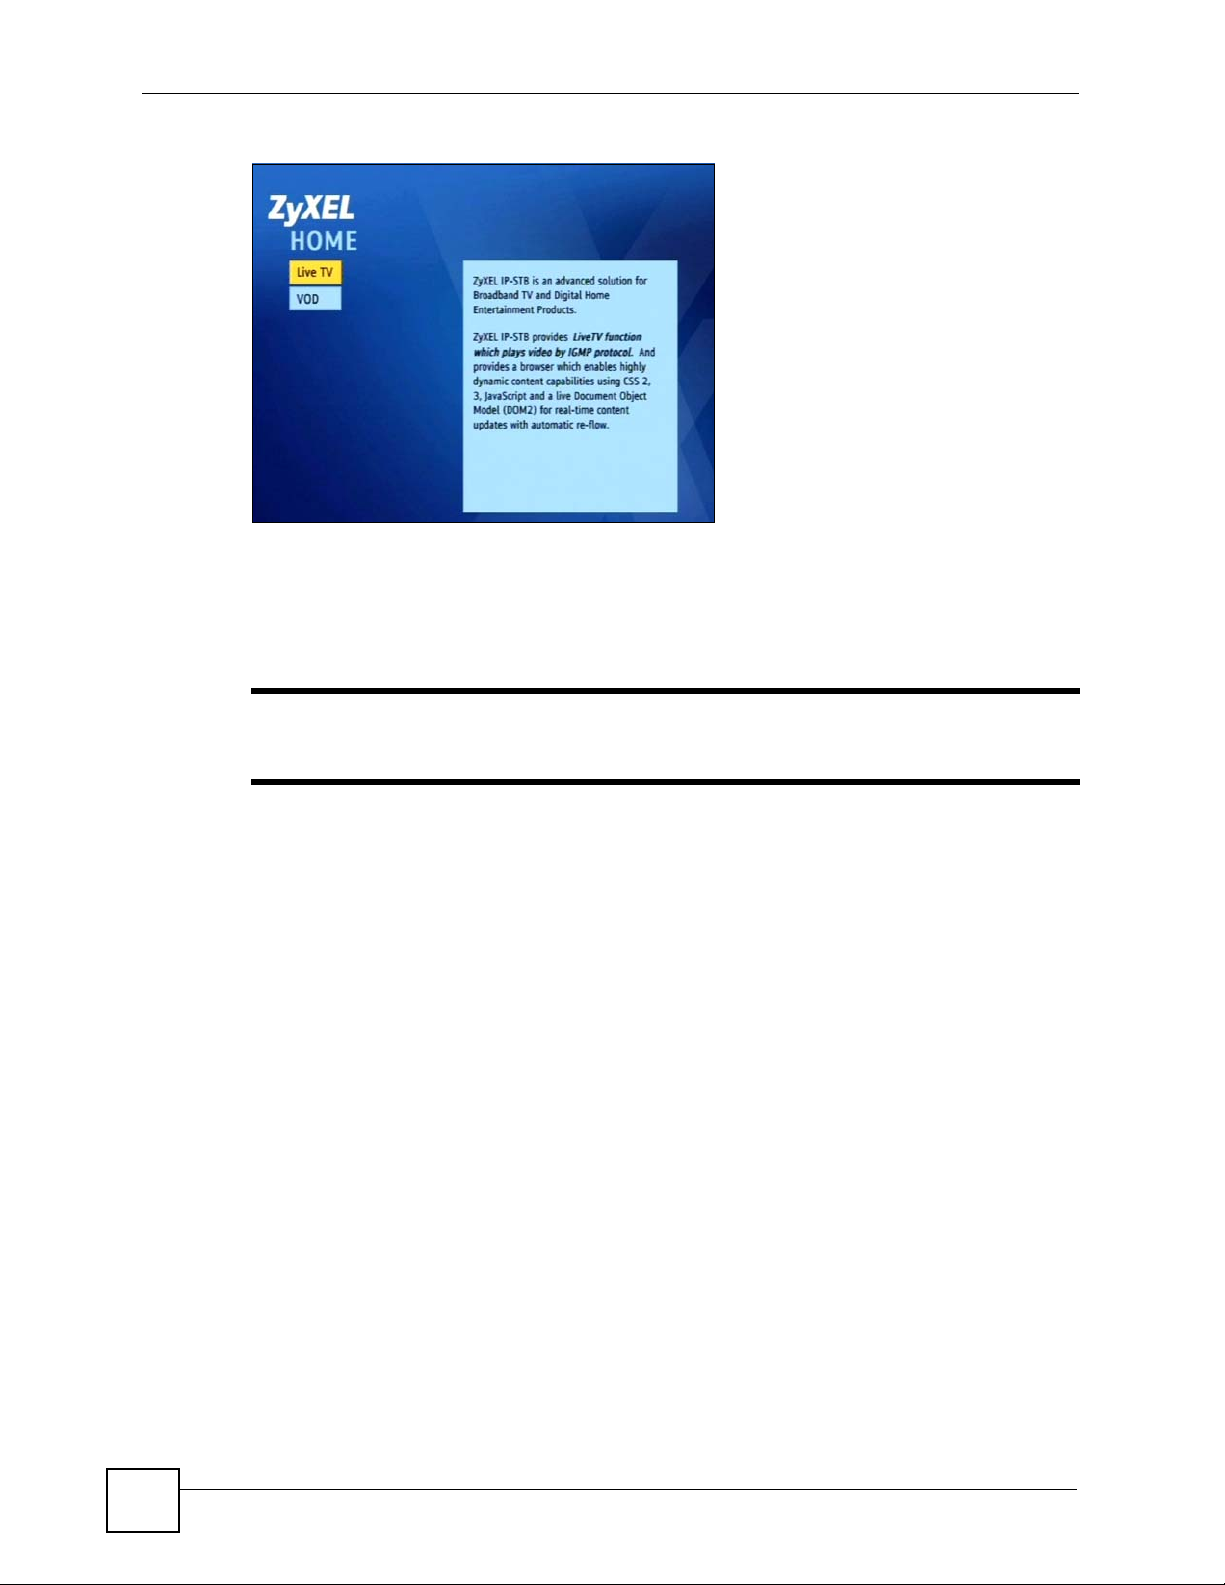
Your STB is an IP Set-Top Box. Use it to watch Internet Television (IPTV) and Video on
Demand (VOD) on your television. Connect the STB to your regular Internet access device (a
broadband modem or router, for example). Operate the STB using the supplied remote control.
The following figure shows your STB (A) connected to your Internet access device (B)
supplying content from the service provider on the Internet to your TV (C), operated by the
remote control (D).
Figure 1 Overview
INTERNET
B
A
STB-1001S
C
D
STB-1001S User’s Guide
23

Chapter 1 Introducing the STB
1.2 LEDs
This section describes the LEDs (lights) on the front of the STB.
Figure 2 LEDs
Table 1 LEDs
LED STATUS DESCRIPTION
POWER On Red The STB is starting up, or is in standby mode.
Green The STB is on and ready to use.
Off The STB is not receiving power, or has malfunctioned.
LAN On Green The STB has an Ethernet connection to the network on
Blinking Green The STB has an Ethernet connection to the network on
Off The STB has no network connection on the LAN port.
REMOTE Blinking Green The Infra-red receiver on the front of the STB is
Off The Infra-red receiver on the front of the STB is not
1.3 Rear Panel Connections
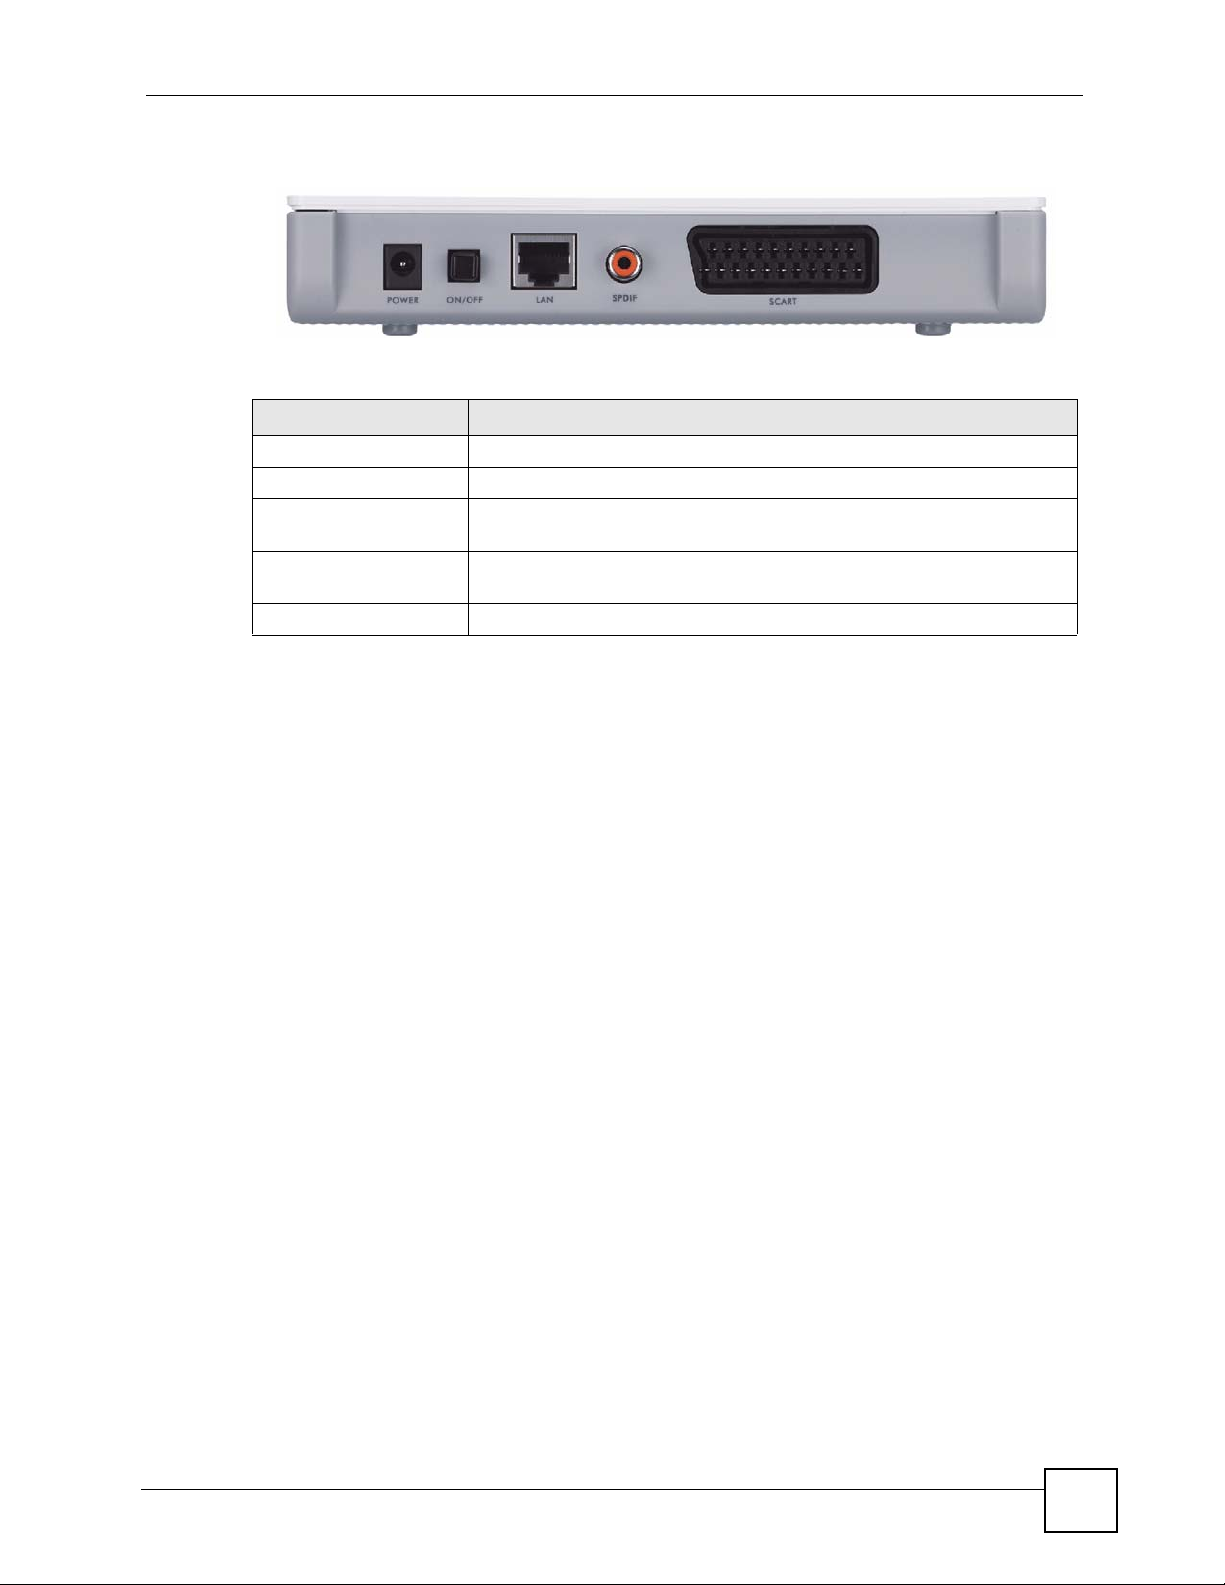
This section describes the rear of the STB.
the LAN port.
the LAN port, and is transmitting or receiving data.
receiving signals from the remote control.
receiving signals from the remote control.
24
STB-1001S User’s Guide
Chapter 1 Introducing the STB
Figure 3 Rear Panel Connections
Table 2 Rear Panel Connections
LABEL DESCRIPTION
POWER Connect this port to a suitable power supply using the provided adaptor.
ON/OFF Use this switch to turn the STB on or off.
LAN Use this Ethernet port to connect the STB to your Internet access device or
network.
SPDIF Use this port to connect the STB to a S/PDIF (Sony / Philips Digital
Interface Format) audio device.
SCART Use this port to connect the STB to your TV.
1.4 Resetting the STB
To reset the STB to its factory defaults, use the System Setup menu (see Section 2.2.3 on page
30).
STB-1001S User’s Guide
25

Chapter 1 Introducing the STB
26
STB-1001S User’s Guide

CHAPTER 2
The Menu System
This chapter discusses the STB’s menus. These menus are displayed on the screen of the
television connected to the STB, and operated using the STB’s remote control.
• Use the Basic Setup menus to make basic changes to the STB’s configuration (such as
activating Daylight Saving Time or selecting the video mode).
• Use the Advanced Setup menus to make advanced changes to the STB’s configuration
(such as setting the STB’s homepage or changing its IP address).
2.1 Navigating the Menus
• Each menu has two columns. On the left, you can select the setup menu you want to see,
and on the right you can change the menu’s settings.
• Use the and navigator keys on the remote control to move between the two columns.
• Use the and navigator keys on the remote control to highlight the menu or setting you
want.
• The currently highlighted item is colored orange.
• Use the OK key on the remote control to select the highlighted object.
• When you go to a new menu, the top item in the right-hand column is automatically
highlighted. To move to the left-hand column, press the key.
• Highlight and select the Save button in each menu to store the changes you configure.
2.2 The Basic Setup Menus
Use the Basic Setup menus to configure how the STB shows media, to turn Daylight Saving
Time on or off, or to reset the STB. Use the remote control to navigate the menu system.
2.2.1 Accessing and Exiting the Basic Setup Menus
Take the following steps to access the Basic Setup menus.
1 Make sure the network is connected.
If you are not sure whether the network is connected or not, press the HOME key on the
remote control. If the Home menu displays normally, the STB is properly connected.
STB-1001S User’s Guide
27
Chapter 2 The Menu System
Figure 4 The Home Menu
2 Press the MENU key on the remote control. The Video Setup menu displays (see
Section 2.2.2 on page 28).
To leave the basic setup menus, press the HOME key on the remote control at any time. The
Home menu displays.
" Changes do not take effect until you save them. Each menu has a Save
button.
2.2.2 Video Setup Menu
Use the Video Setup menu to change the STB’s display type.
28
STB-1001S User’s Guide
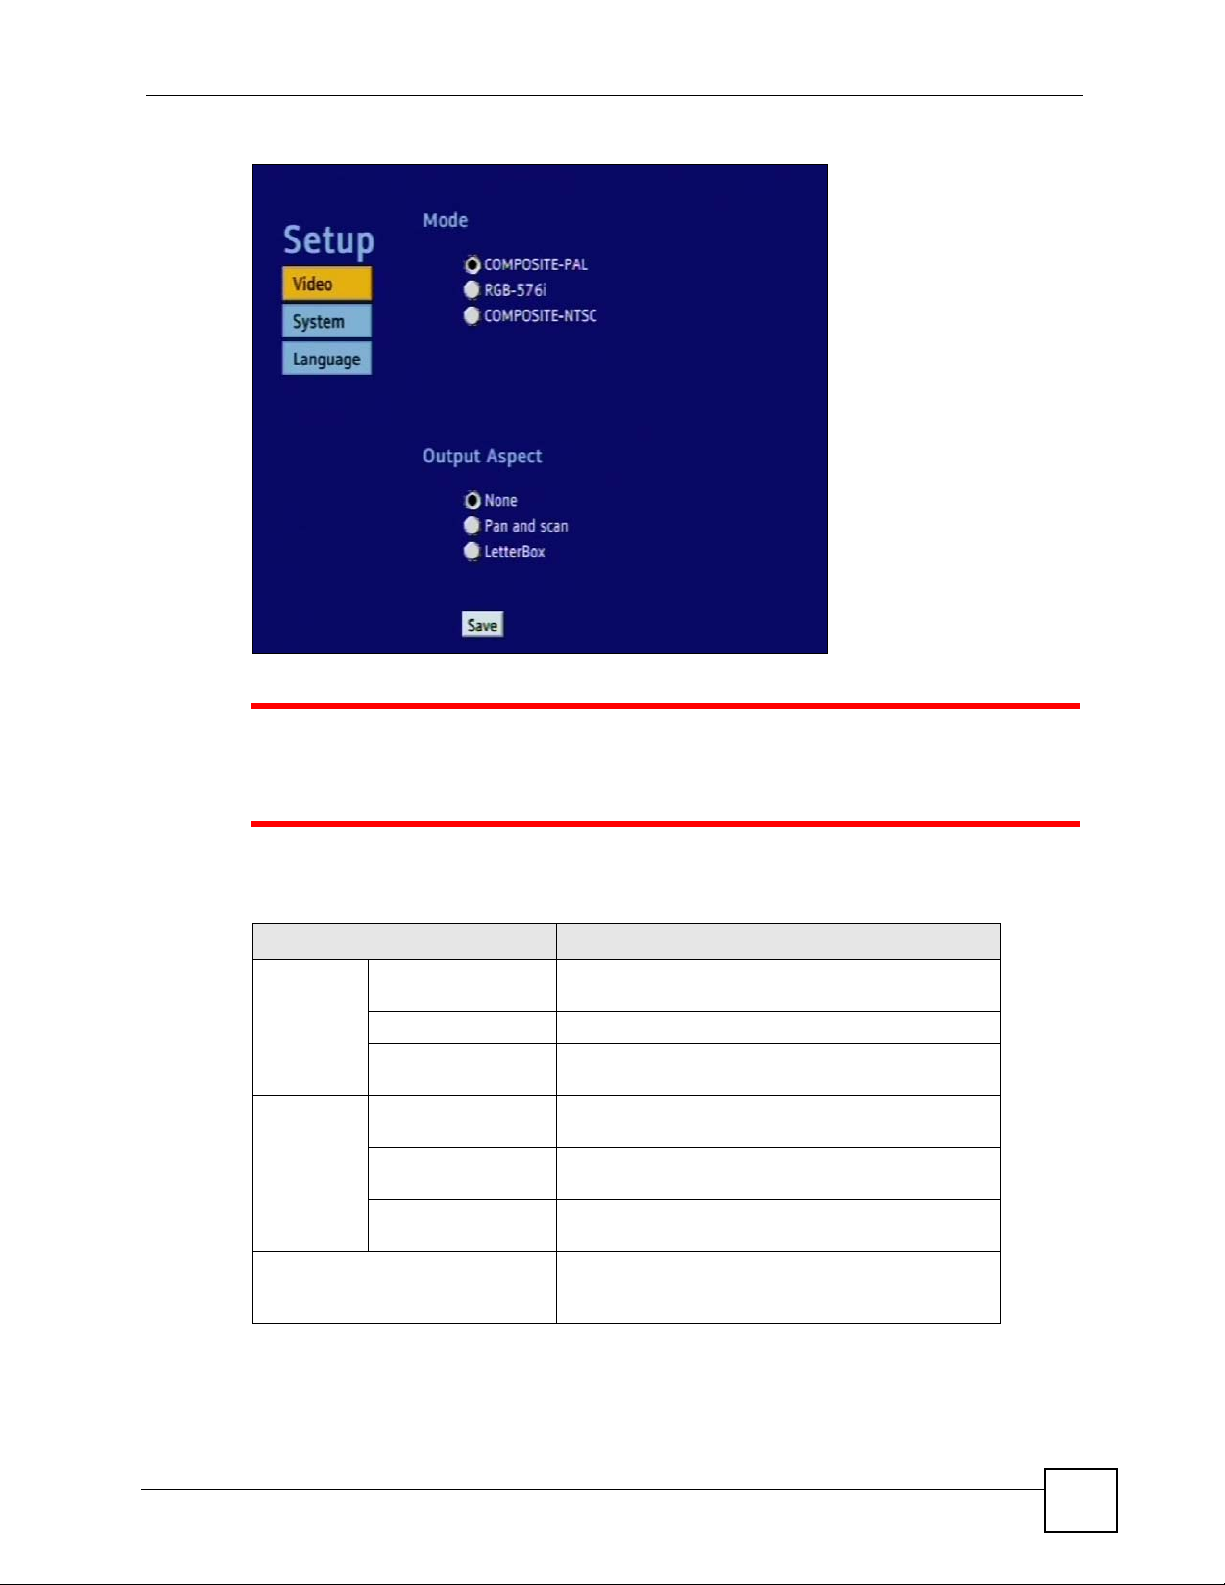
Figure 5 The Video Setup Menu
Chapter 2 The Menu System
1 Do not change the Mode in this menu! If you do so, the picture on your TV
may not display correctly. NTSC is supported in North American televisions,
and PAL is supported in European televisions.
The following table describes the labels in this menu.
Table 3 The Video Setup Menu
LABEL DESCRIPTION
Mode COMPOSITE-PAL Select this if your TV supports PAL (common in
Europe and most of the world).
RGB-576i Select this if your TV supports RGB PAL (interlaced).
COMPOSITE-NTSC Select this if your TV supports NTSC (Common in
North and Central America and Japan).
Output
Aspect
Save Select this to store your changes. You may need to
None Select this to display images without changing their
shape.
Pan and scan Select this to watch TV or video with a 4:3 aspect ratio
(traditional television).
LetterBox Select this to watch TV or video with a 16:9 aspect
ratio (widescreen).
reboot your STB (use the ON/OFF hardware switch)
before the new settings are used.
STB-1001S User’s Guide
29
Chapter 2 The Menu System
2.2.3 System Setup Menu
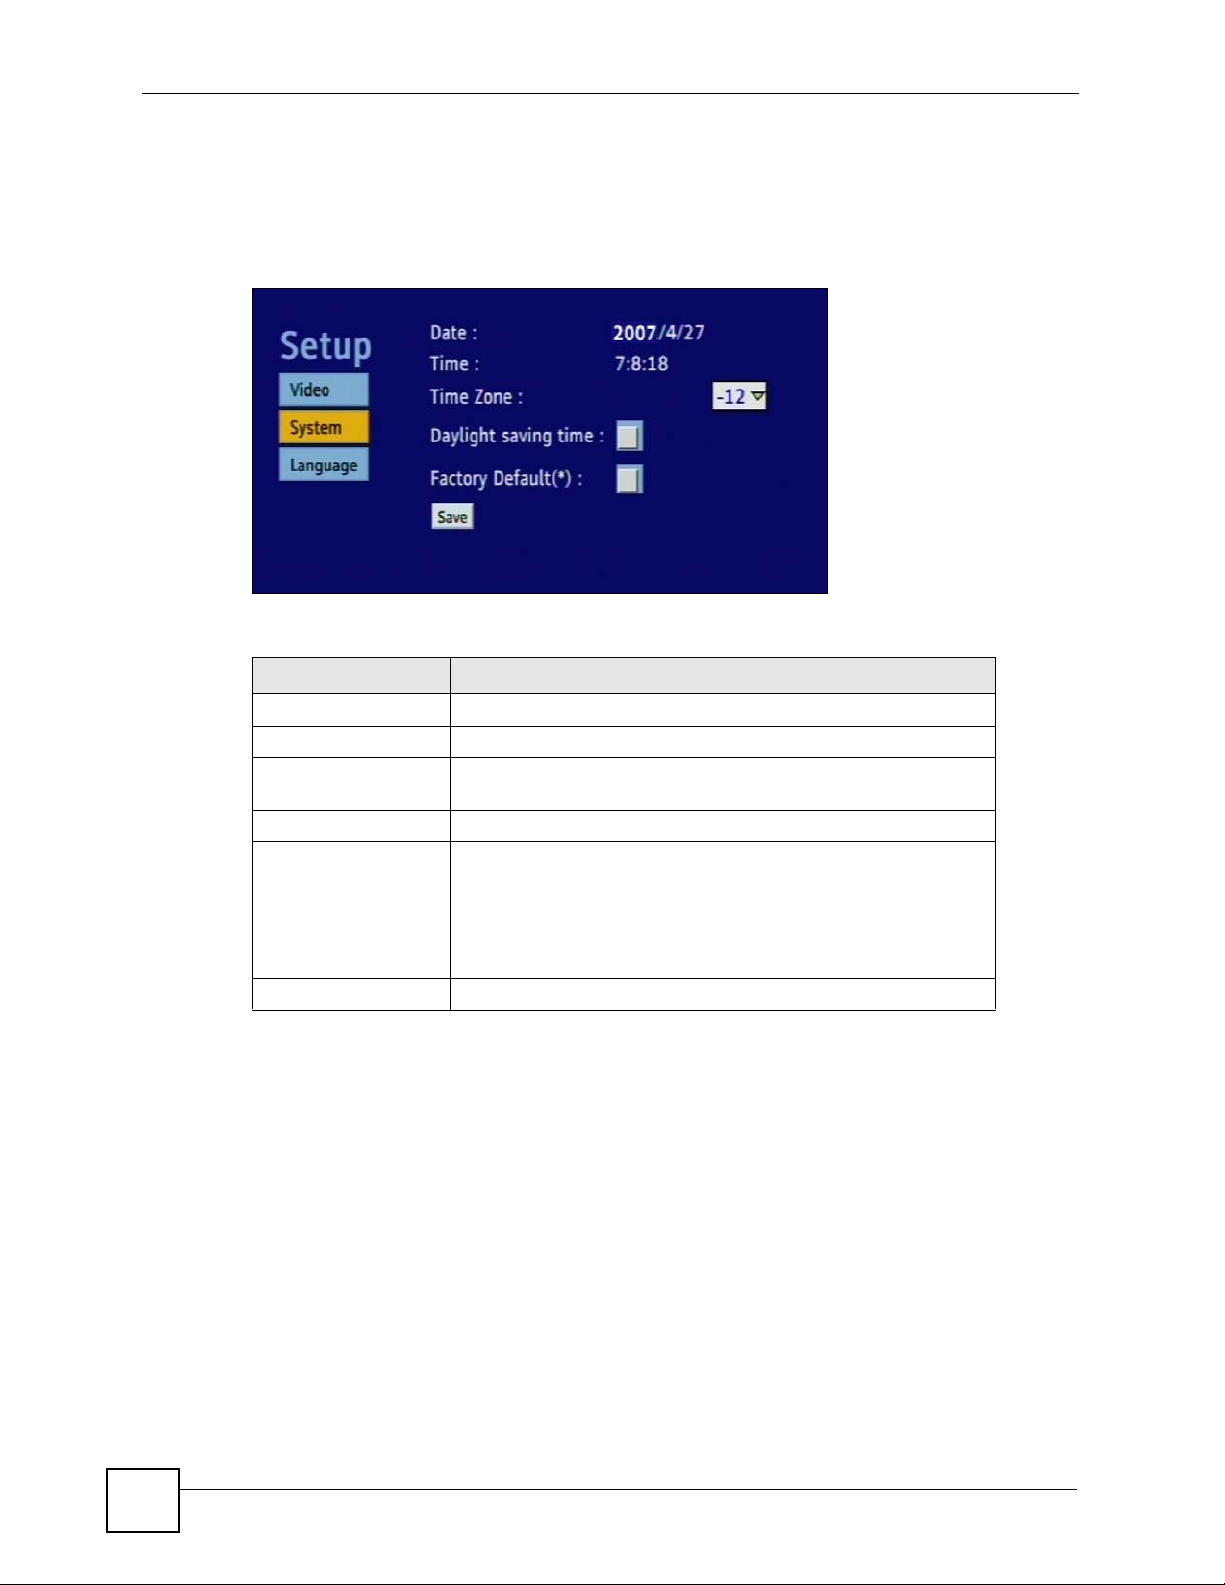
Use the System Setup menu to check the STB’s date and time settings, change the time zone,
and activate or deactivate Daylight Saving Time.
Figure 6 The System Setup Menu
The following table describes the labels in this menu.
Table 4 The System Setup Menu
LABEL DESCRIPTION
Date This is the current date. This comes from an external time server.
Time This is the current time. This comes from an external time server.
Time Zone Select your time zone from the list. In the list, 0 is GMT (Greenwich
Mean Time) so, for example, 8 is GMT plus eight hours.
Daylight Saving Time Select this when Daylight Saving Time is in effect.
Factory Default Select this to return the following settings to their factory defaults
(when you click Save).
• Video mode (composite PAL, RGB-756i or composite NTSC).
• Aspect ratio (none, pan and scan or letterbox).
• Time zone.
• Daylight Saving Time.
Save Select this to store your configuration changes.
2.2.4 Language Setup Menu
Use this menu to select the STB’s operating language. At the time of writing, only English is
supported.
30
STB-1001S User’s Guide
 Loading...