

Page 1

VPN Administration Guide
Revision A
SafeNet/Soft-PK Version 5.1.3 Build 4
Sidewinder Version 5.1.0.02
Page 2

Page 3

Copyright No tice
This document and the software d escri bed in i t are co pyrighte d. Un der the copyri ght laws, neit her th is doc ument nor this
software may be copied, reproduced, translated, or reduced to any electronic medium or machine-readable form without
prior written authorization of Secure Computing Corporation. Copyright © 2001, Secure Computing Corporation. All
rights reserved. Made in the U.S.A.
Trademarks
Secure Computing, Sidewinder, Type Enforcement, and Strikeback are either registered trademarks or trademarks of
Secure Computing Corporation. All other trademarks, tradenames, service marks, service names, product names, and
images mentioned and/or used herein belong to their respective owners.
Secure Computing Corporation Software License Agree ment
CAREFULLY READ THE FOLLOWING TERMS AND CONDITIONS BEFORE LOADING THE SOFTWARE. BY LOADING
THE SOFTWARE, YOU ACKNOWLEDGE THAT YOU HAVE READ THIS AGREEMENT, UNDERSTAND IT, AND AGREE
TO BE BOUND BY ITS TERMS AND CONDITIONS.
Secure Computing Corporation ("Secure Computing") provides its software and licenses its use either directly or through
authorized dealers. You assume responsibility for the selection of the programs to achieve your intended results, and for
the installation (unless installation is purchased from Secure Computing or an authorized dealer), use, and results
obtained from the programs.
1. Grant of License
Secure Computing grants to you, and you accept, a non-exclusive, and non-transferable license (without right to sublicense) to use the Software Products as defined herein on a single machine.
2. Software Products
"Software Products" mean (i) the machine-readable object-code versions of the Software of Secure Computing
contained in the media (the "Software"), (ii) the published user manuals and documentation that are made available for
the Software (the "Documentation"), and (iii) any updates or revisions of the Software or Documentation that you may
receive (the "Update"). Under no circumstances will you receive any source code of the Software. Software Products
provided for use as "backup" in the event of failure of a primary unit may be used only to replace the primary unit after
a failure in fact occurs. They may not be used to provide any capability in addition to the functioning primary system
that they ba c k u p .
3. Use
You may not transfer any Software Products to any third party. You may not copy, translate, modify, sub-license, adapt,
decompile, disassemble, or reverse engineer any Software Product in whole or in part except to make one copy of the
Software solely for back-up or archival purposes.
4. Limited Warranty an d Remedies
Secure Computing warrants that the disk(s) or tape(s) on which its Software is recorded is/are free from defects in
material and workmanship under normal use and service for a period of ninety (90) days from the date of shipment to
you.
Secure Computing does not warrant that the functions contained in the Software will meet your requirements or that
operation of the program will be uninterrupted or error-free. The Software is furnished "AS IS" and without warranty as
to the performance or resu lt s Licensee may obtain by using the Software. The entire risk as to the result s and
performance of the Software is assumed by Licensee. If Licensee does not receive media which is free from defects in
materials and workmanship during the 90-day warranty period, Licensee will receive a refund for the amount Licensee
paid for the Software Product returned.
5. Limitation of Warranty and Remedies
THE W ARRANTIES STATED HEREIN ARE IN LIEU OF ALL OTHER WARRANTIES, EXPRESS OR IMPLIED, INCLUDING
ANY WARRANTIES OF MERCHANTABILITY OR FITNESS FOR A PARTICULAR PURPOSE. SOME STATES AND
COUNTRIES DO NOT ALLOW THE EXCLUSION OF IMPLIED WARRANTIES, S O THE ABOVE EXCLUSION MAY NOT
APPLY TO YOU. THIS WARRANTY GIVES YOU SPECIFIC LEGAL RIGHTS. YOU MAY HAVE OTHER RIGHTS WHICH
VARY B Y STATE OR COUNTRY.
i
Page 4

SECURE COMPUTING’S AND ITS LICENSORS ENTIRE LIABILITY UNDER, FOR BREACH OF, OR ARISING OUT OF
THIS AGREEMENT, IS LIMITED TO A REFUND OF THE PURCHASE PRICE OF THE PRODUCT OR SERVICE THAT
GAVE RISE TO THE CLAIM. IN NO EVENT SHALL SECURE COMPUTING OR ITS LICENSORS BE LIABLE FOR YOUR
COST OF PROCURING SUBSTITUTE GOODS. IN NO EVENT WILL SECURE COMPUTING OR ITS LICENSORS BE
LIABLE FOR ANY INDIRECT, SPECIAL, CONSEQUENTIAL, INCIDENTAL, EXEMPLARY, OR OTHER DAMAGES
WHETHER OR NOT SECURE COMPUTING HAS BEEN ADVISED OF THE POSSIBILITY OF SUCH LOSS OR DAMAGE.
6. Term and Termination
This license is effective until terminated. If you are using this license with a limited term, it shall expire at the end of
the license term. You may terminate it at any time by destroying the Software Product, including all computer programs
and documentation, and erasing any copies residing on computer equipment. This Agreement also will automatically
terminate if you do not comply with any terms or conditions of this Agreement. Upon such termination, you agree to
destroy the Software Product and erase all copies residing on computer equipment.
7. Ownership
All intellectual property rights including trademarks, service marks, patents, copyrights, trade secrets, and other
proprietary rights in or related to the Software Products are, and will remain the property of Secure Computing or its
licensors, whether or not specifically recognized or protected under local law.
8. Export Restrictions
You agree to comply with all applicable United States export control laws and regulations, including without limitation,
the laws and regulations administered by the United States Department of Commerce and the United States Department
of State.
9. U.S. Government Rights
Software Products furnished to the U.S. Government are provided on these commercial terms and conditions as set
forth in DFARS 227.7202-1(a).
10. General
Any waiver of or modification to the terms of this Agreement will not be effective unless executed in writing and
signed by Secure Computing. If any provision of this Agreement is held to be unenforceable, in whole or in part, such
holding shall not affect the validity of the other provisions of this Agreement. In the event of any inconsistency
between this Agreement and any other related agreements between you and Secure Computing, the terms of this
Agreement shall prevail.
Technical Support Information
Secure Computing works closely with our Channel Partners to offer worldwide Technical Support services. If you
purchased this product through a Secure Computing Channel Partner, please contact your reseller directly for support
needs.
To contact Secure Computing directly or inquire about obtaining a support contract, refer to our “Contact Secure" Web
page for the latest contact information at www.securecomputing.com. Or if you prefer, send us an email at
support@securecomputing.com.
Comments?
If you have comments or suggestions you would like to make regarding this document, please send an email to
techpubs@securecomputing.com.
Printing History
Date Part number Software Release
March 2001 86-0935037-A Soft-PK 5.1.3 Build 4 and Sidewi nder 5.1.0.02
ii
Page 5

T ABLE OF CONTENTS
Preface: About this Guide. . . . . . . . . . . . . . . . . . . . . . . . . . . .v
Who should read this guide? . . . . . . . . . . . . . . . . . . . . . . . . . . . . . .v
How this guide is organized . . . . . . . . . . . . . . . . . . . . . . . . . . . . . vi
Where to find additional information . . . . . . . . . . . . . . . . . . . . . . .vii
Chapter 1: Getting Started . . . . . . . . . . . . . . . . . . . . . . . . . 1-1
About Soft-PK & Sidewinder VPNs . . . . . . . . . . . . . . . . . . . . . . . 1-2
Requirements . . . . . . . . . . . . . . . . . . . . . . . . . . . . . . . . . . . . . . .1-3
Sidewinder and other network requirements . . . . . . . . . . . . . . 1-3
Soft-PK requirements . . . . . . . . . . . . . . . . . . . . . . . . . . . . . . . 1-4
Roadmap to deploying your VPNs . . . . . . . . . . . . . . . . . . . . . . . 1-5
Chapter 2: Planning Your VPN Configuration. . . . . . . . . . 2-1
Identifying basic VPN connection needs . . . . . . . . . . . . . . . . . . . 2-2
Identifying authentication requirements . . . . . . . . . . . . . . . . . . . 2-3
Using digital certificate authentication . . . . . . . . . . . . . . . . . . . 2-3
Understanding pre-shared key authentication . . . . . . . . . . . . 2-5
Extended authentication . . . . . . . . . . . . . . . . . . . . . . . . . . . . . 2-6
Determining where you will terminate your VPNs . . . . . . . . . . . .2-7
More about virtual burbs and VPNs . . . . . . . . . . . . . . . . . . . . 2-8
Defining a virtual burb . . . . . . . . . . . . . . . . . . . . . . . . . . . . . . .2-8
Understanding Sidewinder client address pools . . . . . . . . . . . . .2-9
Chapter 3: Configuring Sidewinder for Soft-PK Clients . 3-1
Enabling the VPN servers . . . . . . . . . . . . . . . . . . . . . . . . . . . . . . 3-2
Configuring ACL & proxies entries for VPN connections . . . . . .3-3
Managing Sidewinder self-signed certs . . . . . . . . . . . . . . . . . . .3-4
Creating & exporting a firewall certificate . . . . . . . . . . . . . . . . 3-4
Creating & exporting remote certificate(s) . . . . . . . . . . . . . . . .3-6
Managing CA-based certificates . . . . . . . . . . . . . . . . . . . . . . . . . 3-9
Defining a CA to use and obtaining the CA root cert . . . . . . . 3-9
Requesting a certificate for the firewall . . . . . . . . . . . . . . . . . 3-10
Determining identifying information for client certificates . . . 3-12
Table of Contents iii
Page 6

Defining remote client identities in Sidewinder . . . . . . . . . . . 3-13
Managing pre-shared keys (passwords) . . . . . . . . . . . . . . . . . .3-14
Configuring the VPN on the Sidewinder . . . . . . . . . . . . . . . . . . 3-15
Chapter 4: Inst a lling and Working w ith S o ft -P K . . . . . . . . 4-1
Soft-PK installation notes . . . . . . . . . . . . . . . . . . . . . . . . . . . . . .4-2
Starting Soft-PK . . . . . . . . . . . . . . . . . . . . . . . . . . . . . . . . . . . . . 4-3
Determining Soft-PK status from icon variations . . . . . . . . . . .4-3
Activating/Deactivating Soft-PK . . . . . . . . . . . . . . . . . . . . . . .4-4
About the Soft-PK program options . . . . . . . . . . . . . . . . . . . .4-5
Managing certificates on Soft-PK . . . . . . . . . . . . . . . . . . . . . . . . 4-6
Setting up Sidewinder self-signed certificates . . . . . . . . . . . . . 4-6
Setting up CA-based certificates . . . . . . . . . . . . . . . . . . . . . . . 4-7
Requesting a personal certificate from a CA on user’s behalf 4-8
Importing certificate in Soft-PK . . . . . . . . . . . . . . . . . . . . . . . .4-9
Configuring a security policy on the Soft-PK . . . . . . . . . . . . . . .4-13
Chapter 5: Deploying Soft-PK to Your End Users . . . . . . 5-1
Overview . . . . . . . . . . . . . . . . . . . . . . . . . . . . . . . . . . . . . . . . . . . 5-2
Customizing the user worksheet . . . . . . . . . . . . . . . . . . . . . . . . . 5-4
Specifying dial-up network instructions . . . . . . . . . . . . . . . . . . 5-4
Specifying installation instructions . . . . . . . . . . . . . . . . . . . . .5-4
Specifying certificate import/request instructions . . . . . . . . . . 5-5
Specifying security policy instructions . . . . . . . . . . . . . . . . . . . 5-6
Specifying basic connection information . . . . . . . . . . . . . . . . . 5-6
iv Table of Contents
Appendix A: Troubleshooting . . . . . . . . . . . . . . . . . . . . . .A-1
Soft-PK Log Viewer . . . . . . . . . . . . . . . . . . . . . . . . . . . . . . . . . . .A-1
Soft-PK Connection Monitor . . . . . . . . . . . . . . . . . . . . . . . . . . . .A-2
More about the Connection Monitor . . . . . . . . . . . . . . . . . . . .A-3
To view the details . . . . . . . . . . . . . . . . . . . . . . . . . . . . . . . . .A-3
Sidewinder troubleshooting commands . . . . . . . . . . . . . . . . . . .A-4
Page 7

P REFACE
Who should read
this guide?
About this Guide
This guide provides the information needed to set up connections
between remote systems running SafeNet/Soft-PK™ VPN client
software and systems on a network protected by Secure Computing’s
Sidewinder firewall. SafeNet/Soft-PK is a Windows-compatible
program that secu res data communications sent from a desktop o r
laptop computer across either a public network or an existing
corporate dial-up line.
Note: The SafeNet/Soft-PK product is referred to as simply "Soft-PK" throughout the
remainder of this document.
IMPORTANT: This guide describes administration of VPNs between Soft-PK Version 5.1.3
Build 4 and Sidewinder Version 5.1.0.02. If you are working with a later version of either
product, check our Web page at www.securecomputing.com for the latest
documentation (select Downloads & Activations -> Product Documentation).
This guide is written for the person as signed to administer
Sidewinder-bas ed VPN connections involving a Soft-PK VP N client.
Setting up VPN con nect ions i nvo lves p roce dures done on Si dewi nder
and procedure s done using Soft-PK to pre-configure the VPN client
security policy for eac h remote user (road warrior, telecommuter,
etc.).
P
As a network administrator, you should read and understand all the
procedures in this document. You will then be able to provide all
remote users with the information, files, and software they need to set
up Soft-PK software to communicate with your trusted network(s).
This guide assumes you are familiar with networks and network
terminology. Because Soft-PK will use a security association with a
Sidewinder firewall, you sh ould be familiar with Sidewinder
administration. Know led ge of the Int ernet and of Windows operating
systems are also key requirements.
Preface: Abou t th i s Gui de v
Page 8

How this guide is organized
P
How this guide is
organized
This guide contains the f ollowing chapters.
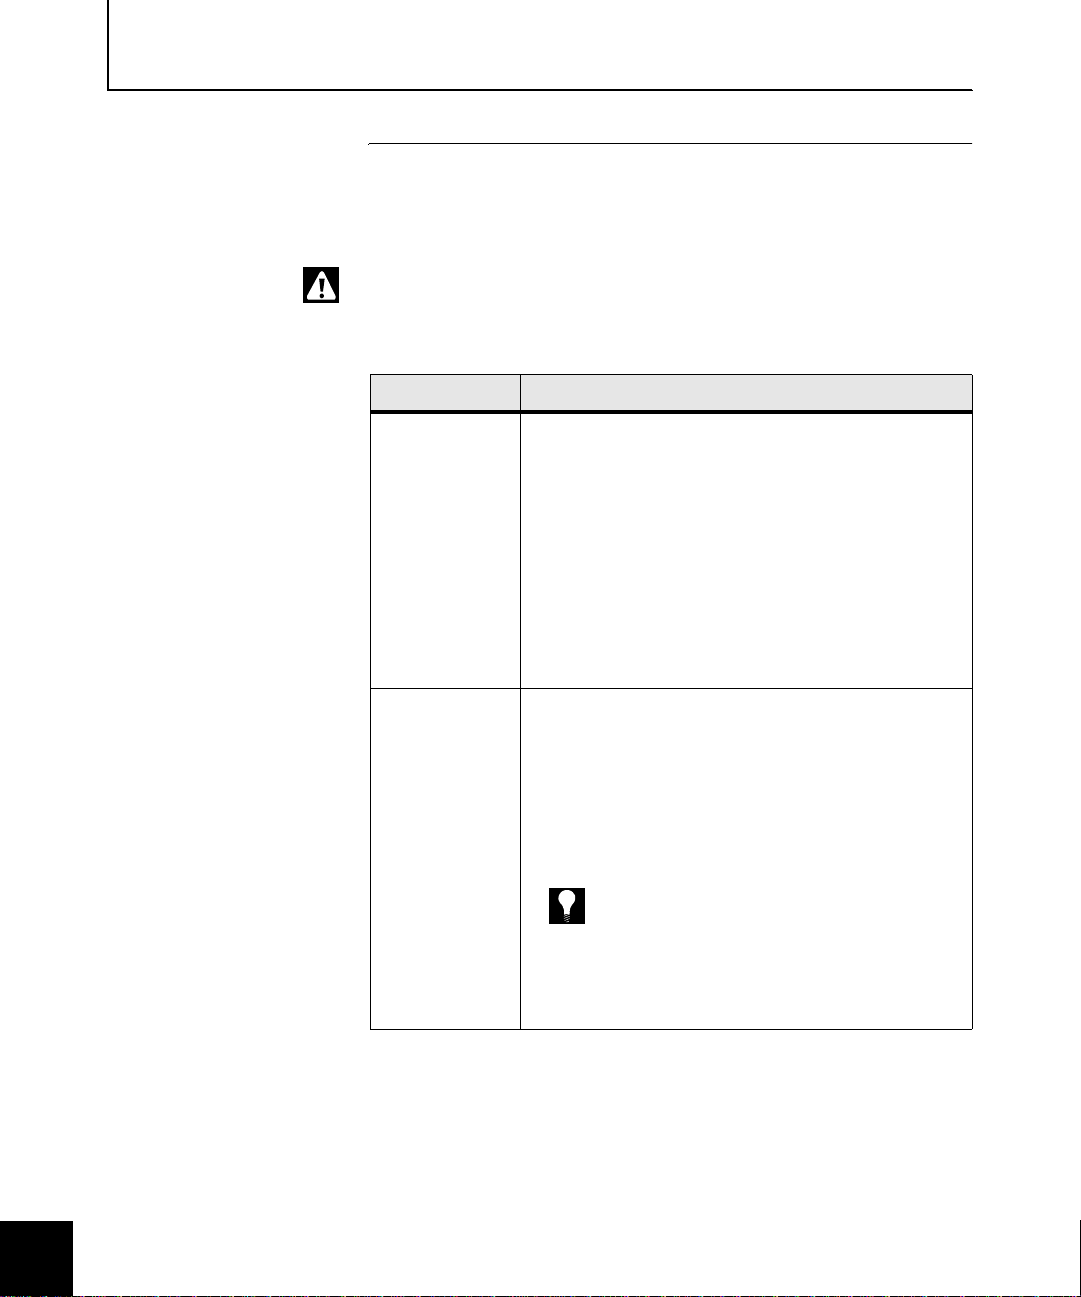
Chapter Title Description
Chapter 1:
Getting Started
Chapter 2:
Planning your VPN
Configuration
Chapter 3:
Configuring Sidewinder
for Soft-PK Clients
Chapter 4:
Installing and Working
with Soft-PK
Chapter 5:
Deploying Soft-PK to Your
End Users
Presents an overview of the Soft-PK and the
Sidewinder Virtual Private Network (VPN)
environment and describes the requirements. It
includes a checklist to guide you through the
basic steps to setup and deploy a VPN.
Provides information to help you understand key
concepts and options that are involved in a VPN
connection.
Provides a summary of Sidewinder procedures
associated with setting up and configuring SoftPK connections in your network.
Note: Perform these procedures before you
configure your Soft-PK clients.
Includes Soft-PK installation notes and describes
the basic Soft-PK procedures for managing
certificates and creating a customized Soft-PK
security policy for your remote clients.
Summarizes the steps for preparing and
deploying the Soft-PK software, digital certi ficat e
files, and security policy to your end users. It is
based on a worksheet (in MS Word format) that
you edit and send to each remote end user.
Finding information This guide is in Acrobat (softcopy) format only and does not contain
vi Preface: About this Gui d e
Appendix A:
Troubleshooting
an index. However, you can use Acrobat’s
Provides a summary of troubleshooting
techniques available for reso lvin g Soft-PK and
Sidewinder VPN connection problems.
Find feature to search for
every instance of any word or phrase that you want.
Page 9

Where to find additional information
Viewing and printing this document online
Where to find
additional
information
When you view this document online in PDF format, you may find
that the screen images are blurry. If you nee d to see the image more
clearly, you can either enlarge it (which may not eliminate the
blurriness) or you can print it. (The images are very clear when
printed out.)
For the best results, print this PDF document using a PostScript printer
driver.
If your printer understands PostScript but does not have a
PostScript driver inst alled, you need to install a PostScript driver.
You can download one for your printer from
www.adobe.com.
If your printer is no t a Po s tScript printer and this do c ument does
not print as expected, try one of the follow ing:
— If your pri nter h as t he op tion,
and then try printing .
— Print specific pag e(s) at a ti me ra ther than sending the entire
document to the printer.
Refer to the following for related information.
Print as Image, enable this option
About Soft- PK
For additional information about configuring and troubleshooting
Soft-PK software, refer to the online help that is integrated into the
program’s user interface. Soft-PK online help provides detailed
step-by-step procedures for individual VPN client tasks.
About Sidewi nder
For more information about setting up VPN connections on
Sidewinder, refer to Chapter 11 in the Sidewinder Administration
Guide. In addition, be s ure to review docume ntation associated
with patch releases.
About digital certificates
For information on digital c ertificates and Pu blic Key Infras tructure
(PKI) technology, see:
— Understanding Public-Key Infrastructure, by Carlisle Adams
and Steve Lloyd (1999)
— Internet X.509 Public Key Infrastructure, Certificate and CRL
Profile, RFC 2459, R. Housley, W. Ford, W. Polk, D. Solo
(January 1999)
Preface: Abou t th i s Gui de vii
Page 10

Where to find additional information
To contact Secure Computing directly or inquire about obtaining a
support contra ct, refer to our Web site at
and select “Contact Us." Or if you prefer, send us email at
support@securecomputing.com (be sure to include your customer ID in
the email).
www.securecomputing.com,
viii Preface: About this Guide
Page 11

1
C HAPTER 1
Getting St arted
About this chapter This chapter provides an overview of the Soft-PK™ and Sidewinder
Virtual Private Network (VPN) environment and describes the
requirements. It includes a checklist to guide you through the basic
steps to setup and deploy a VP N.
This chapter addresses the following topics:
"About Soft-PK & Sidewinder VPNs" on page 1-2
"Requirements" on pag e 1-3
"Roadmap to depl oy ing your VPNs" on page 1-5
1
Getting Started 1-1
Page 12
About Soft-PK & Sidewinder VPNs
1
About Soft-PK &
Sidewinder VPNs
Figure 1-1.
Sidewinder VPN
connection providing
secure data transmission
between a remote
system running Soft-PK
and your internal
network(s)
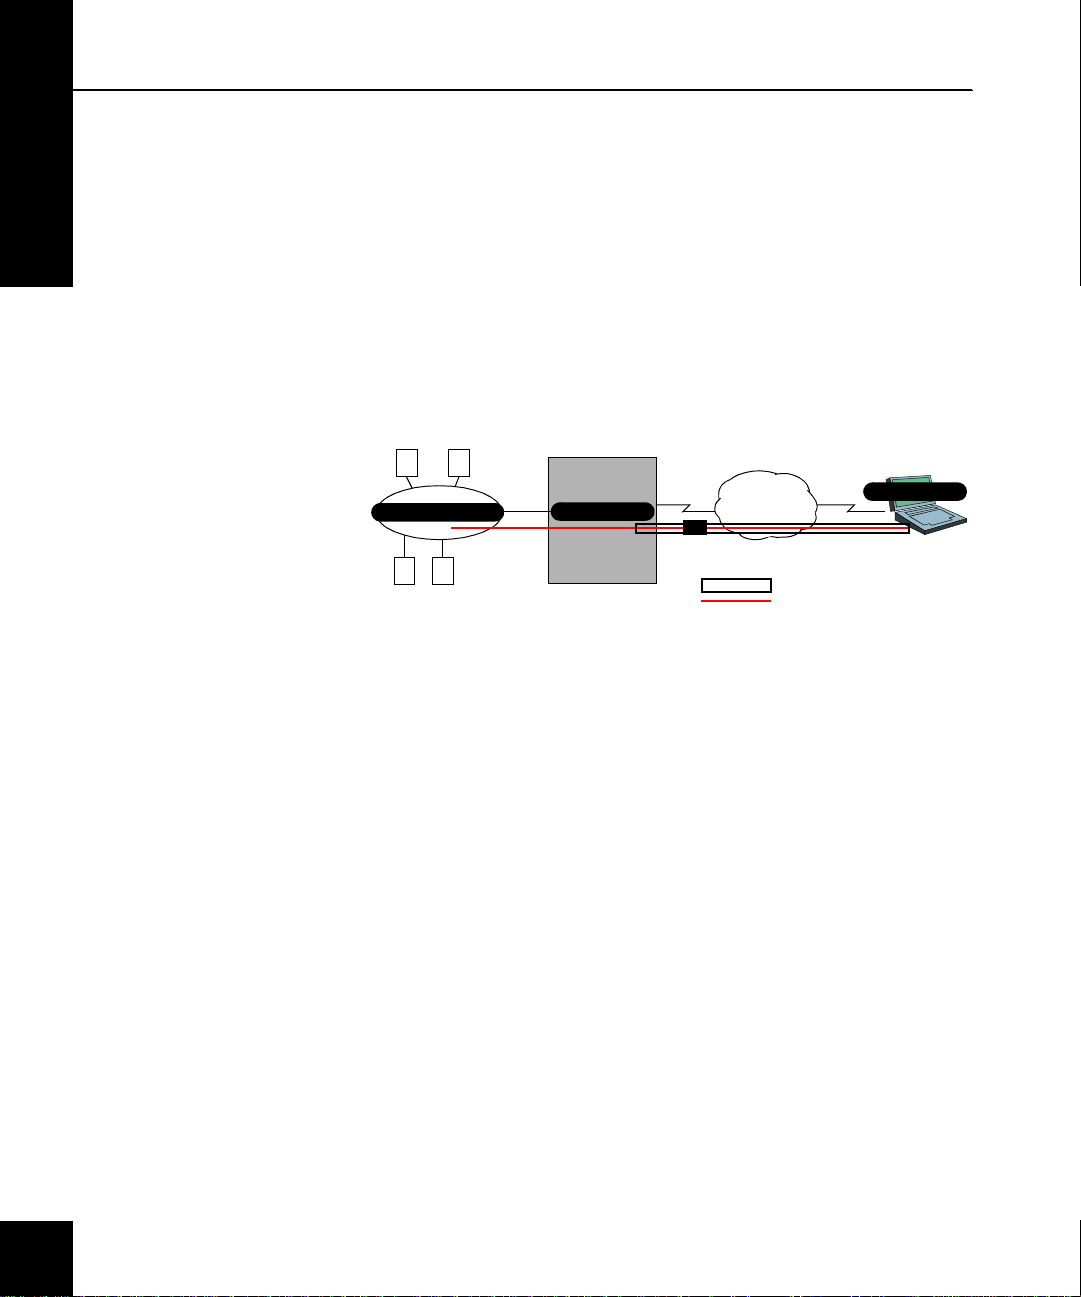
Soft-PK is security software for remote PC users. It is designed to
provide data privac y between remote users and a corporate network.
Industry-sta ndard encryp tion and us er verif ication rou tines prot ect the
data sent over the connection. Soft-PK conforms to Internet
Engineering Task Force (IETF) standards for TCP/IP and IP Security
(IPSec) protocols.
Soft-PK works with the Secure Computing Sidewinder firewall to
establish secure VPNs over public and private networks. Information
passed across a VPN is encrypted, ensuring privacy and
confidentiality.
Protected Network
Note: In a VPN connection, keep in mind that the definition of "remote" depends on
perspective. From the Sidewinder’s point of view, the remote end is a system connecting
from the Internet. From the Soft-PK system’s point of view, the remote end is the Sidewinder
(VPN gateway) and the protected network.
Sidewinder
Internet
VPN
= VPN tunnel
= Data
Soft-PK
Internet
1-2 Getting Started
Using Soft-PK, a mobile employee or telecommuter can establish
authenticated and encrypted access with networks protected by
Secure Computing’s fully IKE (Internet Key Exchange) compliant
Sidewinder firewall. Remote users can access secure corporate
resources using either public networks or corporate dial-up lines.
Page 13

Requirements
Requirements To configure VPN commun ic at ion between Sidewinder and Soft-PK
clients, your Sidewinder must be configured with the proper VPN
parameter settings and access rules. In addition, depending on your
VPN connection set up, you may also need to define the proper
digital certificates.
To run the Soft-PK VPN client, each remote system must meet
minimum hardware and software requirements. In addition, the
system must be able to make a connection with the Internet through
any of a number of means (for example, a di al-up net working fac ility,
an Ethernet LAN interface, DSL, cable modem, etc.).
Before starting your VPN setup, ensure that your environment meets
the requirement s lis t ed in this section.
Sidewinder and other network requirements
The network over which Soft-PK and Sidewinder will be used must
meet the basic requirements listed in Table 1-1.
Table 1-1. Network requirements for using Soft-PK with Sidewinder
Category Requirement
Network
Sidewinder
A network infrastructure with at least one installed and
operational Sidewinder.
Note: You can protect more than one LAN with a single
Sidewinder.
Sidewinder Version 5.1 or later
a
VPN feat u re license
Remote client
Internet
connection
If using digital
certificate
authentication
Connection to the Internet (via a dial-up line, DSL, cable
modem, etc.)
Digital certificates based on Sidew in de r self -signed
certificates,
or
Digital certificates from a public CA or y our ow n CA
server. (Registration over the network using SCEP is
recommended.)
a. This document is based on Sidewinder running Version 5.1.0.02.
Getting Started 1-3
Page 14
Requirements
Soft-PK requirements
Each system on which Soft-PK will be installed must meet the
requirements listed in Table 1-2
IMPORTANT: A remote system must only run one VPN client. If a VPN client program
such as SecureClient was previously installed on the remote system, ensure it is properly
uninstalled. See Chapter 4, "Installing and Working with Soft-PK" fo r deta ils.
Table 1-2. System requiremen ts f o r running Soft- P K
Category Requirement
.
Hardware
Software
An IBM PC or compatible computer (portable or desktop)
with at least a 75 Mhz Pentium microprocessor (or
equivalent).
A non-encrypting modem (for use with dial-up
networking) or an Ethernet interface.
At least 10 MB of free hard disk space.
The reco mmended system RA M size:
—Windows 95: 16 MB
— Windows 98, NT: 32 MB
— Windows 2000, Me: 64 MB
Microsoft Windows 95, 98, Me, NT 4.0, or 2000
Professional.
Dial-up Networking component of Microsoft Windows
and/or Ethernet LAN interface.
If the remo te system uses a mod em, the end user mus t
have dial-up account with an Internet Service provider
(ISP) or a private corporate dial-up account.
TIP: Instruct Soft-PK users to follow the instructions
provided by Microsoft to install Dial-Up Networking
on their Windows machine. Also, create a dial-up
networking profile for the ISP used to gain access to the
Internet.
Microsoft Internet Explorer 4.0 or later (for using help)
1-4 Getting Started
Page 15

Roadmap to deploying your VPNs
Roadmap to
deploying your
VPNs
Because Secure Co mputing products provide network securi ty, we
recommend that, as the network administrator, you carefully oversee
the installation and configuration of the Soft-PK client(s). Setting up
VPN connections u sing Soft-PK and Sidewinder involves performing
procedures on ea ch remote system runn i ng Soft-PK AND on your
Sidewinder.
If done properly, ad ministr ators ca n do most of the VPN confi guration
for both Soft-PK and Sidewinder, with little required of the end user s.
For example, you can set up the digital certificates and create a
security profile tha t yo u inc lude with Soft-PK’s installation files. Use rs
then simply need to install Soft-PK and import a few files.
TIP: A separate Soft-PK User’s Guide is NOT provided for end users of Soft-PK. As an
administrator, you should use the worksheet provided on the SafeNet/Soft-PK CD -R OM (in
MS Word format) as the basis for providing the remote Soft-PK users with the appropriate
installation and setup instructions. This way, Soft-PK users are required to follow o n ly the
instructions that have been customized for your firewall configuration. (Refer to Chapter 5,
"Deploying Soft-PK to Your End Users" for details about the worksheet.)
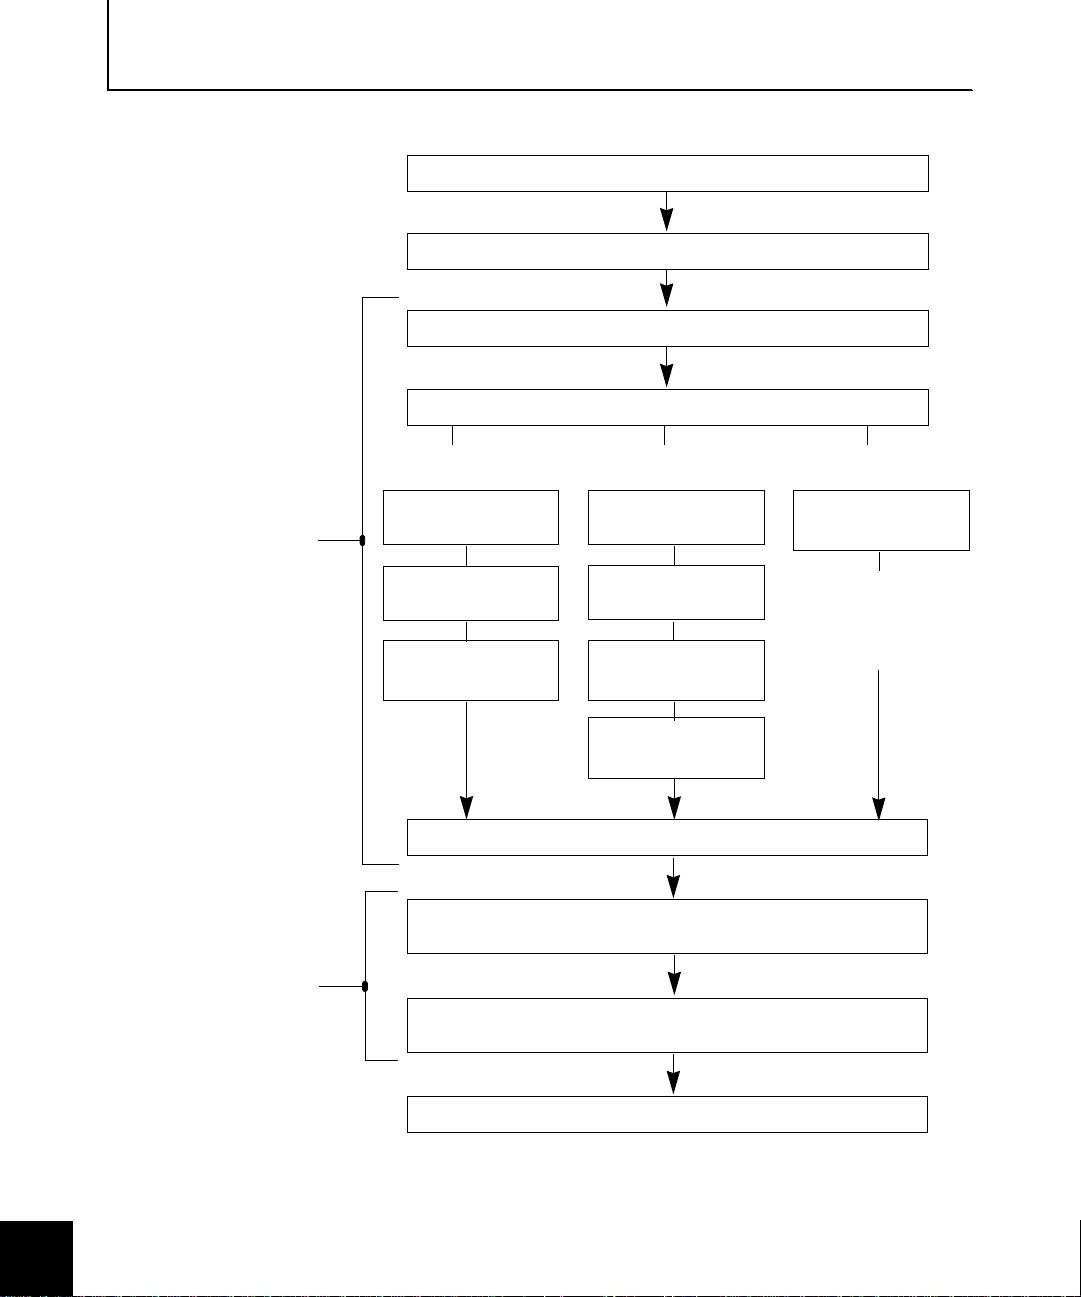
Figure 1-2 provi des a graphical over view of the Soft-PK a nd
Sidewinder VPN deployment process. Each of the tasks depicted in
Figure 1-2 are also reflected in the checklist starti ng on page 1-7.
Getting Started 1-5
Page 16
Roadmap to deploying your VPNs
Admin tasks
performed on
Sidewinder system
Admin tasks
performed using
Soft-PK prior to
deploying to end
users
Figure 1-2. VPN
deployment
overview
1 — Satisfy Sidewinder, network, & system requirements
2 — Plan your VPN configuration
3 — Enable appropriate Sidewinder servers, ACL entries, & proxies
4 — Set up VPN authentication on Sidewinder
If using Sidewinder
self-signed certificates:
4a1 — Create & e xpo rt a
firewall certificate
4a2 — Create & export
remote certificates
4a3 — Convert key file/
certificate pair to pkcs12
format
If using CA-assigned
certificates:
4b1 — Request/export
the CA root certificate
4b2 — Request a firewall
certificate
4b3 — Determine the
identifying information
(DN) your clients use
4b4 — Define remote
certificate identities
within Sidewinder
5 — Configure the VPN connections on the Sidewinder
6 — Configure the certificates and security policy(ies) for your
remote users
7 — Prepare and deploy your Soft-PK installation package to
remote users
If using pre-shared
keys (passwords):
4c1 — Define remote
identities within
Sidewinder
Important: Be sure
specify Extended
Authentication when
configuring your VPN
connection in Step 5
8 — Troubleshoot any connection problems
1-6 Getting Started
Page 17
Roadmap to deploying your VPNs
Soft-PK deployment checklist
The following checklist identi f i es each major step inv ol ved in the
setup and deployment of your Soft-PK software (as shown in Figure
1-2). You can use the checklist as a reference point and mark off each
item as you complete it to ensure a successful VPN rollout.
TIP: Each step provides an overview of the task and points you to specific documentation
for more detailed information.
1 — Satisfy Sidewinder, network, & system requirements
Sidewinder/network: Verify that your Sidewinder is at Version 5.1.0.02 or later,
❒
licensed for VPN, and that your network is fully operational.
End-user systems: Verify that each system on which Soft-PK will be installed meets
❒
the requirements as described on page 1-4.
2 — Plan your VPN configuration
Review Chapter 2 to become familiar with key concepts and options that are
❒
available when setting up VPNs.
Review Chapter 11 in the Sidewinder Administration Guide for additional background
❒
on VPN configuration.
Review the readme.txt file located on the So ft-PK CD for additi onal informatio n fr o m
❒
Secure Computing.
3 — Enable appropriate Sidewinder servers, ACL entries, & proxies
Note: For details, see"Enabling the VPN servers" on page 3-2 and "Configuring ACL & proxies
entries for VPN connections" on page 3-3.
CMD server: The Certificate Management Daemon (CMD) server must be enabled
❒
before you can configure the certificate ser ver.
EGD server: The Entropy Generating Daemon (EGD) server is used by ISAKMP. This
❒
server must be enabled before you can create VPN associations.
ISAKMP server: The ISAKMP server must be enabled and set to listen on the
❒
appropriate burb (typically, this w ill be the Internet burb).
Getting Started 1-7
More...
Page 18

Roadmap to deploying your VPNs
❒
❒
❒
4 — Create/Request the digital certificates
If using Sidewinder self-signed certificates:
❒
❒
❒
ISAKMP ACL entry: At a minimum, you must define and enable an ACL entry that
allows ISAKMP traffic from the Internet to the Internet burb on Sidewinder (external
IP address of Sidewinde r).
Other ACL entries: Depending on where you terminate your VPN connections on
Sidewinder (e.g., in a vir t ual burb), you may need to create ACL entries to allow traffic
between burbs.
Proxies: Depending on where you terminate your VPN connections on Sidewinder
(e.g., in a virtual burb), you may need to enable proxies to allow traffic between burbs.
Use Cobra to create and export a firewall certificate. See "Creating & exporting a
firewall certificate" on page 3-4 for details.
Use Cobra to create and export remote certificates for each end user. See "Creating &
exporting remote certi ficate(s)" on page 3-6 for details.
Use a command-line utility on Sidewinder to convert the key/file certificate pair to
pkcs12 format. See "Conve r t in g t h e certificate file/private key file pair to pkc s 12
format" on page 3-8 for details.
If using a CA -assigned certificates:
Use Cobra to define a CA and obtain the CA root certificate and export it for sending
❒
to client(s). See "Defining a CA to use and obtaining the CA root cert" on page 3-9 for
details.
Use Cobra to request a certificate for the firewall from the CA. See "Requesting a
❒
certificate for the firewall" on page 3-10 for details.
Determine the identifying info r mation (e.g., Dist i n g u is h ed Name settings) you r
❒
clients will use in the ir p ersonal cer tifi cates. Se e " Det ermini ng ide nt ifyin g inf ormatio n
for client certificates" on page 3-12.
Use Cobra to specify the client certificat e identity information to within Sidew in d e r .
❒
See "Defining re mote client identities in Sidewi n der" on page 3-13 for details.
If using pre-shared keys (passwords):
Use Cobra to specify the client identity information to within Sidewinder. See
❒
"Managing pre-shared keys (passwords)" on page 3-14 for details.
1-8 Getting Started
More...
Page 19

Roadmap to deploying your VPNs
TIP: Use the
UserWorksheet.doc
file on the Soft-PK CD
as a starting point to define
the information each end
user will need to install and
quickly set up Soft-PK for
your network .
5 —Configure the VPN connections on the Sidewinder
Use Cobra to define the VPN security association configuration. See "Configuring the
❒
VPN on the Sidewinder" on page 3-15 for details.
Enable Extended Authentication.
❒
6 — Configure the certificates and security policy(ies) for your remote
users
Install your copy of Soft-PK. See "Soft-PK installation notes" on page 4-2 for details.
❒
Use Soft-PK to set up the certificates needed by each end users. See
❒
Use Soft-PK to create and save security policies that are customized for your end
❒
users. See "Configuring a security policy on the Soft-PK" on page 4-13 for details.
7 — Prepare and deploy your Soft-PK installa tion pac kage to remot e users
Prepare the files you will distribute to your end users. For details, see "Overview" on
❒
page 5-2.
Create Soft-PK installation and configuration instructions for your end users. For
❒
details, see "Customizing the user worksheet" on page 5-4.
— If necessary, define configuration steps for the Windows Dial-Up Networking
feature on each machine on which y ou ar e installing and using Soft-PK. For
details, see "Spe cifying dial-u p n etwork instructions" on page 5-4.
— Specify the Soft-PK installatio n instructions. F or details , see "Spe cifying install ation
instructions" on page 5- 4.
— Specify the instructions for importing/requesting/setting up client certificates.
For details , s ee "Specifying certificate import/request instruct ion s" on page 5-5.
— Specify the instructions for establishing a security association. For details, see
"Specifying security policy instructions" on page 5-6.
Send the Soft-PK deployment software and files to your end users.
❒
More...
Getting Started 1-9
Page 20

Roadmap to deploying your VPNs
8 —Troubleshoot any connection problems
❒
❒
❒
Use the Soft-PK Log Viewer. See "Soft-PK Log Viewer" on page A-1.
Use the Soft-PK Connection Monitor. See "Soft-PK Connection Monitor" on page A-2.
Use Sidewinder commands. See "Sidewinder troubleshoot ing com mands" on p age
A-4 and the Sidewinder Administration Guide for details.
1-10 Getting Started
Page 21

2
C HAPTER 2
Planning Your VPN
Configuration
About this chapter This chapter provides information to help you understand key
concepts and options that are involved in a VPN connection. It
addresses the foll ow i ng topics:
"Identifying basic VPN connection needs" on page 2-2
"Identifying authentication requirements" on page 2-3
"Determining where you will terminate your VPNs" on page 2-7
"Understanding Si dewinder client address pools" on page 2-9
2
Planning Your VPN Configuration 2-1
Page 22

Identifying basic VPN connection needs
2
Identifying basic
VPN connection
needs
Figure 2-1.
Identify remote users
and the target internal
systems in a sample
diagram
Before you actually begin configuring your Sidewinder or work with
Soft-PK, ensure you have an understanding of the basic profile for
your VPN connecti on s.
Begin by doing the following:
List the remote users that need a VPN connecti on
List the internal/ tr usted systems to which users need a cc ess
Identify the importan t I P ad dresses
It may help to start a sketch that defines your basic requirements.
Depending on your organization and network, this could be
somewhat more complex than the diagram shown in Figure 2-1.
Mike
(1)
abc server
172.16.17.2
Protected Network
xyz server
- How many remote clients?
- Which internal networks?
- Sidewinder addresses?
Sidewinder
192.168.10.7
(1)
Internet
Bryan
(4) road warriors
Support group
(4) road warriors
Gary
Laz
Todd
Chuck
Sales
Larry
Moe
Curly
Shemp
2-2 Planning Your VPN Configuration
Page 23

Identifying authentication requirements
Identifying
authentication
requirements
Determine how you will id entify and auth enticate t he partner s in your
VPN. Sidewinder and Soft-PK both support using digital certificates
and pre-shared key VPN configurations. In addition, when you use
Sidewinder version 5.1.0.02 or later, you can set up Extended
Authentication to provide increased security to your VPN network.
The following sum marizes VPN authentic a tion methods.
Using digital cert ifi c at e au th e ntication
When using digital certificates (or "public key authentication"), each
system in the VPN requires a unique
corresponding public key
certificate file.
The private key file
A private key file is unique t o each system in the net work and kept
secret by the holder (VPN client, firewall, etc.). It is used to create
digital signatures and, depending upon the algorithm, to decrypt
data encrypted with the corresponding public key.
The certificate file (with public key)
Certificates contain informational values such as the identity of the
public key’s owner, a copy of the public key itself (so others can
encrypt messages or verify digital signatures), an expiration date,
and the digital signature of creating entity (CA or firewall).
private key file and a
When using Sid ewinder, the trusted source for a uthorizing key/
certificate pairs can be Sidewinder itself through "self-signed"
certificates, or a public or p rivate Cert ificate Autho rity (CA) serve r (for
example; Netscape, Baltimor e, Entrust, etc.). Digital certificate
implementations using Sidewinder/Soft-PK follow the X.509 standard.
IMPORTANT: You must configure the necessary certificates before you configure the VPN
connection parameters on Sidewinder or Soft-PK.
In addition, digital certificates have an "effective" date and an
"expiration date." Before certificates expire, they must be retrieved
and updated in the VPN gateway (i.e. , S idewinder firewa ll) to
continue using them in a VPN.
Planning Your VPN Configuration 2-3
Page 24

Identifying authentication requirements
If not already done, decide if you will use self-signed certificates
generated by Sidewinder or a public/private CA server.
Table 2-1. Sidewinder self-signed cert ific ates versus CA-based certificates
Scenario Profile
A closer look at self-signed certificates
Figure 2-2. Sidewinder
self-signed certificate
summary
Using self-signed cer t ificates
(for a small number of VPN
No CA needed
Requires one VPN association for each client
clients)
Using CA-based certificates
(for a medium to large
number of VPN clients)
Uses a private or public CA
Single VPN association for all clie n t s
Can make VPN deployment and management
more efficient
A VPN implemented using Sidewi nder self- signed ce rtificates d oes not
require an external certificate authority and is relatively easy to
configure fo r a small number of (le ss than 10) clients. However, one
VPN association m ust be config ured on Sid ewinde r for e ach cl ient. As
the number of configured clients grows, so does the administrative
time. Figure 2-2 shows the certificates involved in a VPN using
Sidewinder self-signed certificates.
4
Soft-PK
5
Firewall
Cert.
Client
Cert.
Protected Network
Admin creates f irewall private key and
1
certificate
Admin creates client private key/
2
certificate pair(s)
Admin converts client private key &
3
exports certificate f iles to PK12 object
Firewall certific ate imported to Soft-PK,
4
(private key remains on Sidewinder)
Client private key and certificate file
5
(PKCS12) imported into Soft-PK
1
Sidewinder
Firewall
Cert.
Client
Cert.
2
*.pk1
*.pem
Internet
*.pem
3
PK12 object for
importing to
Soft-PK
Note: A self-si g n ed ce rtificate cre ate d
on Sidewinder remains valid for one
year beginnin g f rom the date it is
created.
2-4 Planning Your VPN Configuration
Page 25

Identifying authentication requirements
A closer look at CA-based certificates
Figure 2-3. C A-based
digital certificate
summary
A VPN implemented using CA-based certificates requires access to a
private or public CA. Each end-p oint (clie nt, fire wall, etc.) in the VPN
retains a private key file that is associated with a public certificate. In
addition, each end-poin t in th e VPN nee ds the CA root cert if icate on
their system. Figu re 2-3 shows the certificates involved in a VPN usin g
CA-based certificates.
Client
4
3
Cert.
Soft-PK
CA
Cert.
Protected Network
CA
Admin requests CA root certificate
1
2
Admin requests firewall certificate
Admin provides CA root certificate to
3
client (or instructions to obtain it)
Admin provides cl ient key/certificate
4
to client (or instructions to obtain it)
Firewall
2
*.pk
Cert.
Sidewinder
CA
Cert.
1
Private CA server (could be a public CA
server not in the network)
*.pem
Internet
*.pem
Understanding pre-shared key authentication
A pre-shared key (referred to as shared password by Sidewinder) is
an alphanumeric string—from eight to 54 characters—that can replace
a digital certificate as the means of identifying a communicati ng party
during a Phase 1 IKE negotiation. This key/ password is called "preshared" because you have to share it with another party before you
can communicate wi th them over a secur e connection . Once you both
have this key/password, you would both have to enter it into your
respective IPSec-compliant devices (e.g., firewall and software client).
Using a pre-shared key/password for authentication is the easiest type
of VPN associat ion to configure.
IMPORTANT: You should only use this method along with Extended Authentication.
Planning Your VPN Configuration 2-5
Page 26

Identifying authentication requirements
Extended authentication
In addition to the normal authentication checks inherent during the
negotiation pr ocess at the start of ever y V PN association, Extended
Authentication goes one step further by requiring the person
requesting the VPN co nnection to validate their identity.
Depending on the auth entic at ion me thod yo u s elect , the p ers on must
provide a unique user name and password, a special passcode, or
one-time password before the VPN association is established. For
example, assume you configure a VPN association to use Extended
Authentication and that you select the standard password process as
the form of authentication. When a person attempts to establish a VPN
connection, Sidewinder will perform the standard VPN negotiations
but in addition will issue a request for the proper password. The
person initiating the VPN connection request must then enter the
proper password at their workstation before the connection will be
made.
The Extended Authentication option is most useful if you have
travelling employe e s that connect remotely to your network using
laptop computers. If a laptop computer is stolen, without Extended
Authentication it might be possible for an outsider to illegally access
your network. This is beca use t he informati on nee ded to establi sh th e
VPN connection (the self-signed certificate, etc.) is saved within the
VPN client software. When Extended Authentication is used, however,
the user is required to enter an additional pi ece of authentication
information that is not sav ed on the computer—either a password,
passcode, or PIN. This additional level of authentication renders the
VPN capabilities of the laptop useless when in the hands of a thief.
2-6 Planning Your VPN Configuration
Page 27

Determining where you will terminate your VPNs
Determining
where you will
terminate your
VPNs
Figure 2-4. VPN tunnel
terminating on trusted
Figure 2-5. VPN tunnel
terminating on a
virtual burb
burb
You can configure a VPN s ecurity associat ion on Sidewinder to
terminate in any burb. For examp le, Figure 2-4 shows a VPN security
association terminating i n the trus ted burb. It allows all n etwork traffic
to flow between th e ho sts on the t rus ted net wo rk and th e VP N cli ent.
Other than an external-to-ext ernal ISA KMP ACL entry, you need no
special ACL entries or proxy control.
Internet
Protected Network
Trusted
burb
Sidewinder
burb
Internet
Soft-PK
VPN
= VPN tunnel
= Data
Figure 2-5 shows another opt io n that allows you to terminate VPN
traffic in a "virtual" burb. A virtua l burb is a burb that does not contain
a network interface card. Th e sole purpose of a virt ual burb is to serve
as a logical endpoi nt for a VPN association.
Internet
burb
Proxies
Proxies
Virtual
burb
Sidewinder
Internet
Soft-PK
VPN
= VPN tunnel
= Data
Protected Network
Trusted
burb
Terminating a VPN association in a virtual burb accomplishes two
important goals:
Separation of VPN traffic fro m no n-V PN tr affic
Enforce a security policy that applies strictly to your VPN users
By terminating the VPN in a virtual burb you effectively isolate the
VPN traffic from non-VPN traffic. Plus, you are able to configure a
unique set of rules (via proxies and ACLs) for the virtual burb that
allow you to control pr ec isely what your VPN users can or canno t do.
Note: The VPN implementation depicted in Figure 2-5 represents a "proxied" VPN because
proxies must be used to move VPN data between burbs. The use of proxies enables you to
control the resources that a VPN client has access to on your internal network.
Planning Your VPN Configuration 2-7
Page 28

Determining where you will terminate your VPNs
More about virtual burbs and VPNs
Consider a VPN association that is implemented without the use of a
virtual burb. Not only will VPN traffic mix with non-VPN traffic, but
there is no way to enforce a different set of rules for the VPN traffic.
This is because pr oxies and AC Ls, the agent s used to en force the r ules
on a Sidewinder, are appli ed on burb basis, not to specific traffi c
within a burb.
Note: Do not terminate VPN connections in the Internet burb.
You can de f ine up to nine physi cal and virtual burbs. For example, if
you have two distinct types of VPN associations and you want to
apply a different set of rules to each type, simply create two virtual
burbs, then configure the required proxies and ACLs for each virtual
burb.
One question that might come to mind when using a virtual burb is:
"How does VPN traffic get to the virtual burb if it do esn’t have a
network card?" The answer is found in the way that a VPN security
association is de f ined on the Sidewinder. All VPN traffic originating
from the Internet initially arrives in the Internet burb. A VPN security
association, however, can terminate VPN traffic in any burb on the
Sidewinder. By terminating the VPN in a virtual burb, the VPN traffic
is automatically routed to that virtual burb within Sidewinder.
Defining a virtual burb
To create a virtual burb on the Sidewinder for terminating a VPN, do
the following.
1. Select Firewall Administration -> Burb Configuration.
2. Click New and create the new virtual burb.
3. Click Apply.
4. Assign DNS to listen for the virtual burb. Enter the following command:
cf dns add listen burb=burbname
where: burbname = the name you have assigned your virtual burb
5. Verify that DNS is listening on the virtual burb by typing the following
command:
cf dns query
2-8 Planning Your VPN Configuration
Page 29

Understanding Sidewinder client address pools
Understanding
Sidewinder client
address pools
Figure 2-6. VPN
association
implemented using
client address pool
You may choose to implement your VPN using Sidewinder client
address pools. Client address pools are reserved virtual IP addresses,
recognized as internal addresses of the trusted network. Addresses in
this pool are configured on Side winder and assi gned (or "pus hed" ) to
a VPN client (per VPN configuration) when the VPN connection is
started. Client traffic w ithin the protected netwo rk appears to come
from the virtual IP address pool. Only Sidewinder knows the client’s
real IP address.
Client address pool
10.1.1.1
10.1.1.2 (reserved for Client Y)
10.1.1.3
10.1.1.254
Internal
network
Sidewinder
Proxies
Virtual
burb
Internet
burb
Trusted
burb
N
P
V
Internet
VPN
V
P
N
VPN
Client A
VPN
Client Y
VPN
Client Z
Virtual IP address
mappings using this
client address pool.
VPN Client Virtual IP Address
A Next available within the pool
Y
10.1.1.2
Next available within the pool Z
One of the reasons fo r using client address pools i s that they simplify
the management of VPN clients. They allow the firewall to manage
certain configuration details on behalf of the client. This enables a
remote client to initiate a VPN connection even if the client has not
preconfigured itself for the connection.
When using client address pool, all the Soft-PK client needs to initiate
a VPN connection is :
Authentication inf ormation (e.g . a password or certificate)
Planning Your VPN Configuration 2-9
Page 30

Understanding Sidewinder client address pools
Address of the firewall
Protected networks
The client does not need to define a virtual IP for use in the VPN
connection, nor do th ey need to co ncern the mse lves wit h DNS issu es
on the trusted n etw ork.
In addition to simplifying the configuration process for your clients,
client address pools give you the ability to place additional controls
on VPN clients.
You can all ow or restrict acces s on a client address pool basis.
For example, assume you create two client address pools. Client
associations initi a t ed f ro m pool A might be granted access to certain networks that are off limits to clients from pool B.
You can allow or restrict access on a client basis.
This is done by assigning a specific IP address within a client
address pool to a specific user. By creating a network object for
that IP address, you can then use the network object in an ACL
entry to allow or restrict the client’s access to ad di tional services.
IMPORTANT: Client address pools are most useful when implemented in a VPN
association between Sidewinder and clients or gateways whose IP addresses are assigned
dynamically. Client address pools are not typically used in VPN associations between two
peers that contain static IP addresses.
For more detailed information on client address pools, see the
Sidewinder Administration Guide.
2-10 Planning Your VPN Configuration
Page 31

3
C HAPTER 3
Configuring Sidewinder for
Soft-PK Clients
About this chapter This chapter provides a summary of Sidewinder procedures associated
with setting up and configuring Soft-PK connections in your network.
IMPORTANT: Perform these procedures before you configure your Soft-PK clients.
This chapter addresses the following topics:
"Enabling the VPN ser v er s " on pag e 3-2
"Configurin g A CL & p rox ies entries for VPN connec tions" on page
3-3
"Managing Sidewinder self-signed certs" on page 3-4
"Managing CA-based certificates" on page 3-9
"Managing pre-shared keys (pas swords)" on page 3-14
"Configuring th e VP N on the Sidewinder" on page 3-15
3
Configuring Sidewinder for Soft-PK Clients 3-1
Page 32

Enabling the VPN servers
3
Enabling the VPN
servers
Figure 3-1. Servic es
Configuration -> Servers
-> Control
Before you confi gure a VPN ass ociation on y our Sidewinder, you must
first enable the Sidewinder’s EGD and CMD servers. In addition, you
must enable the ISAKMP server and set it to listen on the Internet
burb.
Do the follow ing from the Sidewinder Cobra inte rface:
1. Enable the cmd, egd, and isakmp servers. a. Select Services Configuration -> Servers -> Control.
Enable these servers (cmd server is
enable by default)
To enable a server , select it from the Server Name list and click
b.
Enable.
c. Click Apply.
2. Configure the ISAKMP server. a. Select VPN Configuration -> ISAKMP Server.
Figure 3-2. VPN
Configuration -> ISAKMP
Server
b.
c. In the Available Authentication Method fields, specify the method(s)
d. Click Apply.
3-2 Configuring Sidewinder for Soft-PK Clients
In the Burbs to Listen on list column, click the burb name associated
with the Internet burb.
to use for Extended Authentication.
Page 33

Configuring ACL & proxies entries for VPN connections
Configuring ACL &
proxies entries for
VPN connections
Depending on where you decide to terminate your VPN tunnel, you
must ensure that you have the appropriate ACL entries set up to allow
ISAKMP traffic and allow/deny the appropriate proxy traffic. At a
minimum, you must define and ena ble an ACL entry that allows
ISAKMP traffic from th e I nternet to the extern al IP address of
Sidewinder.
1. Define (or ensure you have) an ACL entry that allows external-to-
external ISAKMP traffic. Select
Check for these attributes:
Policy Configuration -> Access Control List.
Agent = Server
Service = ISAKMP
Action = Allow
Enabled = Enable
Source burb = Internet (all source addresses, *)
D e s tin at ion burb = Internet b urb (external IP of Side wi nder)
Note 1: Ensure you have defined appropriate network objects/groups. To view the
current network object configuration, select Shortcut to Network Objects from the
Source/Destination tab.
Note 2: For details about configuring and managi ng network objects, see Chapter 4
in the Sidewinder Administration Guide.
2. [Configuration dependent] Define (or ensure you have) ACL entries that
allow access to and from any virtual burbs you may have. The virtual
burb should be specified as either the source or destination burb,
depending on the type of ACL entry bein g defi ne d.
Note: For details about configuring and managing ACL entries, see Chapter 4 in the
Sidewinder Administration Guide.
3. [Configuration dependent] Enable the desired proxies in the
appropriate virtual burb(s). Select
Services Configuration -> Proxies.
Configuring Sidewinder for Soft-PK Clients 3-3
Page 34

Managing Sidewinder self-signed certs
Managing
Sidewinder selfsigned certs
Figure 3-3.
Sidewinder Certificate
Management: Create
New Firewall Certificate
window
If you are using Sidewinder to generate certificates, use the following
procedure to create and expor t self-signed certificates that ide ntify the
firewall and each remote client.
TIP: Typically, a VPN configuration using Sidewinder self-signed certificates is suitable if
the number of clients is small.
Note: A self-signed certificate created on Sidewinder remains valid for one year
beginning from the date it is created.
Creating & exporting a firewall certificate
Use the following procedu re on Sid ewin der to create and export a
firewall self-signed certificate that identifies the firewall. The firewall
certificate file (with its embed ded public key) will reside on the
Sidewinder and must eventually be imported by each Soft-PK client
system.)
From the Sidewinder Cobra interface:
1. Select Services Configuration -> Certificate Management.
2. Select the Firewall Cer tificates ta b. Click New.
3-4 Configuring Sidewinder for Soft-PK Clients
Page 35

Managing Sidewinder self-signed certs
Specify the following Firewall Certificate settings.
3.
Field Setting
Certificate Name Specify a name for the firewall certificate.
Distinguished
Name
Specify a set of data that identifies the firewall. Use the
following format:
cn=,ou=,o=,l=,st=,c=
where:
cn = common name
ou = organizational unit
o = organization
l = locality
st = state
c = country
IMPORTANT: The syntax for this field is very
important. The above entries must be separated
by commas, and contain no spaces. In addition,
the order of the specified distinguished name fields
must match the desired order to be listed in the
certificate.
E-Mail Address,
Domain Name,
IP Address
Submit to CA Select Self Signed.
Signature Type Select RSA.
Optional fields to identify information (in addition to
DN).
Export the firewall certificate (for later transfer to each client system)
4. Click Add to add the certificate to the Certificates list.
5. Click Close to return to the F irewall Certificate window.
Click Export and save the firewall certificate (containing the public key)
6.
to a file. Add a
7. Click OK when done.
.pem extension (for example, "firewallcert.pem").
Once you have fi nished creating the fi rewall certificate, you will
typically copy it to an MS-fo rmatted diskette for dist ribution to each
remote Soft-PK clien t. You can do th is usi ng the
mcopy command. For
example:
% mcopy -t filename a:filename
Configuring Sidewinder for Soft-PK Clients 3-5
Page 36

Managing Sidewinder self-signed certs
Creating & exporting remote certificate(s)
Use the follow ing procedure on Sidewinder to crea te a self-signed
certificate file (with its embedded public key) and a private key file
for each of your Soft-PK client s. Once a pair of certificate/private key
files are created for a unique client, you must use Sidewinder’s
pkcs12_util command to combine each file pair i nto a PKCS12-
formatted object. Each PKCS12-formatted object must be distributed to
the respective Soft-PK client.
From the Sidewinder Cobra interface:
Note: Do this from the local Sidewinder console (not a remote Cobra interface).
1. Select Services Configuration -> Certificate Management.
2. Select the Remo te Certificates tab. Click New.
Sidewinder Certificate
Management: Create
New Remote ( Client)
certificate window
Figure 3-4.
3-6 Configuring Sidewinder for Soft-PK Clients
Page 37

Managing Sidewinder self-signed certs
Specify the following Remote Certificate settings.
3.
Field Setting
Certificate Name Specify a name for the remote certificate.
Distinguished
Name
Specify a set of data that identifies the client. Use the
following format:
cn=,ou=,o=,l=,st=,c=
where:
cn = common name
ou = organizational unit
o = organization
l = locality
st = state
c = country
IMPORTANT: The syntax for this field is very
important. The above entries must be separated
by commas, and contain no spaces. In addition,
the order of the specified distinguished name fields
must match the desired order to be listed in the
certificate.
E-Mail Address,
Domain Name,
IP Address
Submit to CA Select Self Signed.
Signature Type Select RSA.
Optional fields to identify information (in addition to
DN).
Generated Private
Key File
Generated
Certificate File
4. Click Add to add the certificate to the Certificates list.
Click Browse and specify where you want to save the
private key associated with this certificate. You must use
a .pk1 extension (for example, "clientprivate.pk1").
IMPORTANT: The private key files must be
created as
used starting in Step 6 will not work with
objects.
Click Browse and specify where you want to save this
certificate. Use a .pem extension (for example,
"clientcert.pem").
.pk1 objects. The conversion utility
Configuring Sidewinder for Soft-PK Clients 3-7
.pk8
Page 38

Managing Sidewinder self-signed certs
5.
Click Close to return to the previous window.
Converting the certifi cate file/private key file pair to pkcs12 format
To start the PKCS12 utility on the Sidewinder, from the command line,
6.
enter the following command:
pkcs12_util
The utility will prompt you for the name and location of the private key
file, for the name and location of the associated certificate file, and for
the name and location in which to store the resulting PKCS12-formatted object.
The following message appears:
Please put file extensions on all file names.
Enter the name of the PKCS1 object (private key) file:
7. Type the full path name of the private key file.
The following message appears:
Enter the name of the PEM signed public key (certificate)
file:
8. Type the full path name of the associated certificate file.
The following message appears:
Enter the name of the output PKCS12 object (*.p12):
9. Type the full path name of the object file that will be created by the
utility. Be sure to use a
.p12 extension on the file name.
The following message appears:
pkcs12 encryption password for public key (it WILL be clear
screen text):
10. Type a password for this PKCS12 object.
You apply a password to the object because the object contains both
the public and private keys. The password will be needed when importing this object into a Soft-PK client. The password can consist of any
alpha-numeric characters.
Note: After typing the password, the utility creates the PKCS12 file in the directory
you specified in Step 9.
11. Return to Step 1 for each remote cli ent.
Copy the client key/ certificate object to a diskette
3-8 Configuring Sidewinder for Soft-PK Clients
Once you have fini shed creating the PKCS12 object(s), copy ea ch
object to its own di sk ette for distributi on to the appropriate S oft-PK
client. You can do this using the
% mcopy -t filename a:filename
mcopy command. For example:
Page 39

Managing CA-based certificates
Managing CAbased certificates
Figure 3-5.
Create New Certificate
Authority window
If you are using a CA to authorize certificates, use the following
procedures to de fine the CA, request the fir ewa ll and CA certificates,
and define the remote identit ie s of each client within Sidewinder
(needed later when setting up your VPN connections).
Defining a CA to use and obtaining the CA root cert
To request a CA certificate for Sidewinder, do the following from
Cobra.
1. Select Services Configuration -> Certificate Management and click the
Certificates Authorities tab. Click New.
2. In the New Certificate Authority window, specify the name, type, and
location of the CA.
3. Click Add, then click Close.
4. Click Get CA Cert to request the CA certificate and import it to the
firewall
5. Click Get CRL to manually re trieve a new C ertificate Revo cation List (CRL)
from the CA.
Configuring Sidewinder for Soft-PK Clients 3-9
Page 40

Managing CA-based certificates
Click Export to save the CA certificate to a file for later importation into
6.
client system(s). Each user must then use Soft-PK to import the CA
certificate you obt ain ed for them.
Note: You can have the user request the CA certificate from the CA using Soft-PK.
You must provide the necessary CA information/instructions to do so.
Requesting a certificate for the firewall
To request a firewal l certificate fro m a CA, do the follow ing.
1. Select Services Configuration -> Certificate Management and click the
Firewall Certificates tab. Click New.
Create New Firewall
Certificates window
Figure 3-6.
3-10 Configuring Sidewinder for Soft-PK Clients
Page 41

Managing CA-based certificates
Specify the firewall certificate information.
2.
Field Setting
Certificate Name Specify a name for the firewall certificate.
Distinguished
Name
Specify a set of data that identifies the firewall. Use the
following format:
cn=,ou=,o=,l=,st=,c=
where:
cn = common name
ou = organizational unit
o = organization
l = locality
st = state
c = country
IMPORTANT: The syntax for this field is very
important. The above entries must be separated
by commas, and contain no spaces. In addition,
the order of the specified distinguished name fields
must match the desired order to be listed in the
certificate.
E-Mail Address,
Domain Name,
IP Address
Submit to CA Select the CA appropriate for your configuration.
Signature Type Select RSA.
Optional fields to identify information (in addition to
DN).
SCEP Password Specify a password for managing the certificate (e.g., to
3. Click Add to send the enrollment request.
IMPORTANT: After you send the enrollment request, the CA administrator must
issue the certificate before you can continue.
4. On the Firewall Certifica tes tab, click Query to request the CA for a
retrieve the key, revoke, etc.)
signed copy of the certificate. (Certificates are automatically submitted
to its CA approximately every 15 minutes.)
5. Record all firewall ce rtificate inform at ion spe cif ie d in Ste p 2. This
information must be entered into each Soft-PK client.
Configuring Sidewinder for Soft-PK Clients 3-11
Page 42

Managing CA-based certificates
Determining identifying inform ation for client certificates
Define the identifying information that will be used for each remote
client certificate. Typically, these are the values entered in the
Distinguished Name (DN) fields when defining a certificate. This
information will be needed in either of the following scenarios:
If you plan to direct re mote users to request a remote certificate
from the CA.
or
If you plan to request remote c ertif icat es from t he CA on behalf of
the end-user.
Use Table 3-1 as a template for defining this information.
Table 3-1. Client Distinguished Name (DN) information
Distinguished Name fields Setting
cn (common name)
ou (organizational unit)
Note: Soft-PK lists this field as
"Department."
o (organization)
Note: Soft-PK lists this field as
"Company."
l (locality)
Note: Soft-PK lists this field as
"City."
st (state)
c (country)
3-12 Configuring Sidewinder for Soft-PK Clients
Page 43

Managing CA-based certificates
Defining remote client identities in Sidewinder
When using CA-based certificates, you must define an identity
"template" in Sidewi nder that matches all possible client identities
used by the remo te entities in your V PN.
To define remote certificate identities on Sidewinder, do the
following.
1. Select Services Configuration -> Certificate Management and click the
Certificate Identities tab. Click New.
Certificate Identities
Figure 3-7.
defined on the firewall
Specify an identify name and the Distinguished Name fields.
2.
Note: An asterisk can be used as a wildcard when defining the fields on this window.
(Other special characters are not allowed.) F or example; *, O=acme , C=us represents
all users at ACME.
3. Click Add.
Configuring Sidewinder for Soft-PK Clients 3-13
Page 44

Managing pre-shared keys (passwords)
Managing preshared keys
(passwords)
When using pre-shared keys (pass words), you must define an identit y
"template" in Sidewi nder that matches all possible client identities
used by the remo te entities in your V PN.
To define remote certificate identities on Sidewinder, use the same
procedure as defined in "Defining remote clie nt identities in
Sidewinder" on page 3-13.
IMPORTANT: Be sure to specify Extended Authentication, as described in the next
section, when configuring the VPN on the Sidewinder.
3-14 Configuring Sidewinder for Soft-PK Clients
Page 45

Configur in g th e VP N on the Sidewinder
Configuring the
VPN on the
Sidewinder
Figure 3-8.
Sidewinder Security
Associations window
(defined VPNs)
Create a VPN security association for a Tunnel VPN using the newly
created certificates. Do the following from the Sidewinder Cobra
interface:
1. Select VPN Configura t ion -> Security Associat io ns . Click New.
Select the General tab and specify the following primary VPN settings.
2.
Field Setting
Name Enter the name of this VPN association.
Encapsulation Select Tunnel. This is the more popular form of VPN
encapsulation. Both the data and the source and
destination IP addresses are encrypted within the
encapsulated payload.
Mode Select either Dynamic IP Client or Dynamic IP
Restricted Client (the remote end is a device whose IP
address is not fixed). Example: A salesperson that gains
Internet access from a laptop.
Note: For Dynamic IP Restricted Client, the remote
end is assigned a virtual internal IP address using one of
two methods. You specify the range of IP addresses
available to the remote end by using either the Client
Address Pool field or the Dynamic Virtual Address Range
field.
More...
Configuring Sidewinder for Soft-PK Clients 3-15
Page 46

Configuring the VPN on the Sidewinder
Field Setting
Local Network/IP Specify the network names or IP addresses to use as
the destination for the client(s) in the VPN. Click the
New button to specify the IP Address / Hostname
and Number of bits in Netmask. The value specified
identifies the network portion of the IP address. For
example, if you specify 24 with an IP address of
10.10.10.0, all IP addresses that begin with 10.10.10 are
accepted.
Note: If you are using Client Address Pools, the local
(destination for clients) is configured using different
windows.
Enabled Select Yes.
Burb Click the dropdown list to assign this VPN to a burb.
Sidewinder terminates each VPN in a burb so that
access rules may or may not be applied to the VPN.
If you selected Dynamic I P Restricted Client in the Mode field, you will
need to define one of the following mutually exclusive options.
Client Address
Pool
Determine if you want remote clients to be assigned
only the IP addresses contained within one of the
available client address pools. If so, use the dropdown
list to select the client address pool you want to use.
With this option, Sidewinder selects an IP address from
the available pool and assigns it to the client for use
during the VPN connection.
Note: For information on creating Client Address Pools,
see Chapter 11 in the Sidewinder Administration Guide.
Dyna mic Virt ual
Address Range
Define the range of addresses a client can use when
initiating a VPN connection. The addr e sses specified
here do not represent a real network but are virtual
addresses. With this option the client assigns their own
IP address, although the address must be within the
approved address range.
3-16 Configuring Sidewinder for Soft-PK Clients
Page 47

Configur in g th e VP N on the Sidewinder
Select the Authentication tab. Choose the authentication method
3.
appropriate for y our configuration.
Sidewinder Security
Figure 3-9.
Associations Properties,
Authentication tab
Figure 3-10.
"Single Certificate"
options
The "view" changes
depending upon the
Authentication Method
you select from the
dropdown list.
If you selected Single Certificate (Figure 3-10), specify the following
self-signed certificate options.
Table 3-2. Single Certificate (self-signed) options
Field Setting
Firewall
Certificate
Select the certificate used to authenticate the key
exchange.
Remote
Certificate
Firewall Identity
Type
Select the certificate used on the remote end of the
VPN from the list provided.
Select the type of identity to use when identifying the
firewall to the remot e c lient.
Value Contains the actual value used as the firewall identity.
This field cannot be edited.
Require Extended
Enable this checkbox.
Authentication
Configuring Sidewinder for Soft-PK Clients 3-17
Page 48

Configuring the VPN on the Sidewinder
Figure 3-11. "Certificate
& Certificate Authority"
options
If you selected Certificate & Certificate A uthority (Figure 3-11),
specify the following CA certificate options.
Table 3-3. Certific ate + Certific ate Authority options
Field Setting
Firewall
Credentials
tab
Remote
Credentials
tab
Firewall
Certificate
Firewall Identity
Type
Value Contains the actual value used as the
Require Extended
Authentication
Certificate
Authorities
Certificate
Identities
Select the certif icate used to
authenticate the key exchange.
Select the type of identity to use when
identifying the firewall to the remote
client.
firewall identity. This field cannot be
edited.
Enable this checkbox.
Select the certificate authority used to
sign the digital certificates.
Select the certificate identity(ies) to
recognize in VPN connections.
3-18 Configuring Sidewinder for Soft-PK Clients
Page 49

Figure 3-12. "Password"
options
Configur in g th e VP N on the Sidewinder
If you selected Password (Figure 3-12), specify the following
password options.
Table 3-4. Password options
Field Setting
Save your settings! 4.
General Enter Passwo rd/
Renter password
Require Extended
Authentication
Identities Firewall Identity Specify the identity to use when
Remote Identity Specify the Certificate Identities and
Select the certif icate used to
authenticate the key exchange.
Enable this checkbox.
identifying the firewall to the remote
client.
select the certificate identity(ies) to
recognize in VPN connections.
Click Add to save the settings.
5. Click Close.
TIP: For typical Soft-PK configurations, you do not need to configure sett in gs in the
Crypto tab or Advanced tab windows. For details about those settings, refer to Chapter 11
in the Sidewinder Administration Guide.
Configuring Sidewinder for Soft-PK Clients 3-19
Page 50

Configuring the VPN on the Sidewinder
3-20 Configuring Sidewinder for Soft-PK Clients
Page 51

4
C HAPTER 4
Installing and Working with
Soft-PK
About this chapter This chapter includes Soft-PK installation notes. It also describes the
basic Soft-PK procedures for managing certificates and creating a
customized Soft-PK security policy for your remote clients.
IMPORTANT: As network administrator, you need to install your own copy of Soft-PK
and become familiar with the software before you deploy setup instructions and the SoftPK software to each end user.
This chapter addres ses the following topics:
"Soft-PK installation notes" on page 4-2
"Starting Soft-P K" on page 4-3
"Managing certificates on Soft-PK" on page 4-6
"Configuring a security policy on the Soft-PK" on page 4-13
TIP: Chapter 5, "Deployi ng Soft-PK to Your End Users" describes how you should
customize the UserWorksheet.doc file contained on the Soft-PK CD to specify the correct
information your end users sho u ld follow.
4
Installing and Working with Soft-PK 4-1
Page 52

Soft-PK installation notes
4
Soft-PK
installation notes
Note the following about inst alli ng, removing, or upgrading Soft-PK
software. You can customize the UserWorksheet.doc file located on the
product CD to specify detailed in stallation instru ctions to your end
users. (See Chapter 5 for details.)
Table 4-1. Soft-PK install/uninstall task summary
Task Notes
Uninstall any
existing VPN
client programs
Installing
Soft-PK
Prior to installing Soft-PK on any system, uninstall/remove
any other VPN client programs that reside on the system.
Uninstall using the Control Panel’s Add/Remove program
and reboot your computer before beginning the Soft-PK
installation or upgrade.
IMPORTANT: This applies to any previous copies of
SecureClient software.
To install Soft-PK, run the Autorun program from the Soft-PK
CD. (If Autorun is disabled, you can also run the
program in the SoftPK directory.)
For Windows NT or 2000, be sure to log in as Administrator
or equivalent.
TIP: When setting up remote installations, you may
elect to provide the installation Autorun/setup.exe
program to your end users via other means (for
example, provide a zip distribution or network-based
installation).
Note: Soft-PK may warn of an error on install when PPTP is
already installed on the clien t system. This is not a concern
when establishing Soft-PK to Sidewinder VPNs. Bypass the
warning (press OK) and continue the ins ta lla tion normally
(press next).
setup.exe
4-2 Installing and Working with Soft-PK
Uninstalling
Soft-PK
Upgrading
Soft-PK
To remove Soft-PK, follow the standard Windows Uninstall
program.
IMPORTANT: When you remove this software and
its components, you have the option to keep your
security policy, digital certificates, and private keys.
This is recommended if you are uninstalling before an
upgrade.
Before upgrading or reinstalling Soft-PK, uninstall any
previous versions as noted above.
Page 53

Starting Soft-PK
Starting Soft-PK Soft-PK starts automa ti cal ly each time the computer on which it
resides is started. It runs transparently at all times behind all other
software applications including the Windows login. The Soft-PK icon
in the taskbar changes color and image to indicate the status of system
communications.
Figure 4-1. Soft-PK icon in the Windows taskbar
Soft-PK icon in taskbar
Determinin g Soft-PK status from icon variations
The following table summarizes all icon variations and their meaning.
Table 4-2. Soft-PK taskbar icons
Icon Description
Grey — Indicates Windows did not start the Soft-PK service
properly.
Red — Indicates Soft-PK is installed correctly; no connection is
established.
Red box — Indicates a non-s ecure connecti o n established;
transmitting non-secure communications.
Yellow ke y — Indicates at least one secure connection
established; no transmission.
Yellow ke y/green box — Indicates at least one secure
connection established; transmitting secure communications
only.
Yellow ke y/red box — Indicates at least on e s ecure connection
established; transmitting non-secure communications only.
Yellow key/red and green box — Indicates at least one secure
connection established; transmitting secure and non-secure
communications.
In summary, green means the computer is transmitting securely; red
means it is transmitting unsecure communications. Both
red and green
means that the computer i s transmitting both secure and unsecure
data simultaneously, on different channels.
Installing and Working with Soft-PK 4-3
Page 54

Starting Soft-PK
Activating/Deactivating Soft-PK
The Soft-PK user interface defines the security mode and the action
Soft-PK takes when it det ects packet s of various protocol s and various
destinations. Onc e confi gured , user s nee d to acc ess the us er int erface
only to view or modify these settings.
As shown in Figure 4-2, you can right-click on the Soft-PK icon in the
taskbar to see all progr a m options.
Figure 4-2. Soft-PK
taskbar icon options
Figure 4-3. Soft - PK Start
menu options
Right-click the Soft-PK tray icon to
access menu
Means Soft-PK security policy is
currently active!
IMPORTANT: To deactivate the Soft-PK security policy, right-click on the Soft-PK ic o n in
the taskbar and toggle the Activate/Deactivate Security Policy menu option. (When
deactivated, the option shows Activate Security Policy.) If you deactivate the security
policy, you must toggle this setting to reactivate.
Figure 4-3 shows the program options that are avail a ble when you
launch the Soft-PK user interface from the Start menu.
Soft-PK options after selecting Start ->
Programs -> SafeNet Soft-PK
TIP: Browse the Soft-PK online help system to become familiar with client procedures.
4-4 Installing and Working with Soft-PK
Page 55

Starting Soft-PK
About the Soft-PK progr a m options
This section provides a brief description of the Soft-PK main program
options. Use Soft-PK’s comprehensive online help for detailed
information.
Certificate Manager
The Certificat e Manager allows you to request, import, and store
the digital certificates received from certificate authorities (CAs). To
communicate secu rely using digital certificates, us er s mus t have
two digital cer tific ates: a CA (or se lf-sig ned fi re wall) ce rtifi cate and
a personal certificate.
Security Policy Editor
The Security Policy Edi tor allows you to create connecti on policies
and their associated pr oposals and li st them in a hierarchic al order
that defines an IP data communications security policy.
Log Viewer
The Log Viewer displays the communicat ions log , a diagn ostic tool
that lists the IKE nego tiations that occur during th e authentication
phase.
Conne ction Monitor
The Connection Monit or display s statist ical and di agnosti c information for each active connection in the security policy. This utility is
designed to display the actual security policy settings configured in
the Security Policy Editor and the security association (SA) information established during Phase 1 IKE negotiations and Phase 2
IPSec negotiati ons.
Installing and Working with Soft-PK 4-5
Page 56

Managing certificates on Soft-PK
Managing
certificates on
Soft-PK
If you are using digital certificate authentication in your VPN, you
should provide your end users with the informa tion and files nee ded
to set up the nece ssary c ertific ates on t heir Soft- PK client . This se ction
provides a basic overview of what you need to do and includes (or
provides cross-re ference to) the appropriate pr ocedures.
IMPORTANT: The firewall self-signed or CA root certificate should always be present on
the Soft-PK client before configuring the client certificate.
Setting up Sidewinder self-signed certificates
If you are using Sidewinder self-signed digital certificates, as
administrator, do the following.
1. If not already done, cre ate and export a firewall certificat e. Se e "Creatin g
& exporting a firewall certif icate" on page 3-4 for details.
Note: You must have the firewall certificate configured in the Soft-PK system before you
import the personal cer tificate.
2. If not already done for each end user, create and export a remote
certificate and convert to PKCS12. See "Creating & exporting remote
certificate(s)" on page 3-6 for details.
3. Provide instructions for importing the self-signed firewall certificate. A
copy of this procedure is provided in this chapter, see "Importing a CA
root or self-signed firewall certificate into Soft-PK" on page 4-9 and
included in the UserWorksheet.doc file.
4. Provid e instructions for importing the self-signed personal certificate. A
copy of this procedure is provided in this chapter, see "Importing a
personal certificate into Soft-PK" on page 4-11 and included in the
UserWorksheet.doc file.
4-6 Installing and Working with Soft-PK
Page 57

Managing certificates on Soft-PK
Setting up CA-based certificates
If you are usin g CA-based digita l certificates, a s administrator, do the
following.
1. If not already done, re quest and export the CA root certificate. See
"Defining a CA to use and obtaining the CA root cert" on page 3-9 for
details.
Note: You must have a CA certificate configured in the Soft-PK system before you can
request a personal certificate online.
2. If not already done for each end user, create and export a remote
certificate. See "Requesting a personal certificate from a CA on user’s
behalf" on page 4-8 for details.
3. Provide instructions for importing th e CA root certificate. A copy of this
procedure is provided in this chapter, see "Importing a CA root or selfsigned firewall certificate into Soft-PK" on page 4-9 and included in the
UserWorksheet.doc file.
4. Provid e instructi ons for importing the p ersonal c ertificate . A copy of this
procedure is provided in this chapter, see "Importing a personal
certificate into Soft-PK" on page 4-11 and included in the
UserWorksheet.doc file.
Installing and Working with Soft-PK 4-7
Page 58

Managing certificates on Soft-PK
Requesting a personal certificate from a CA on user’s behalf
1. Select Start -> Programs -> SafeNet/Soft-PK -> Certificate Manager (or
right click the SafeNet icon and select Certificate Manager).
2. Click the My Certificates tab.
3. Click Request Certificate.... The Online Certificate Request dialog box
appears.
4. Select the Gene rate Exportable Key check box.
Note: You will only be able to export the private key associated with the personal
certificate you are now requesting if you check this option now. For security reasons,
no one can change it later. This is the only time the certificate can be exported.
5. Click Advanced to select a certificate service provider.
6. Under Enrollment method, click Online.
7. Under Subject Information, enter all re levant personal information,
pressing the Tab key to move through the dialog box.
Note: If you press Enter, the request will generate before you are finished.
8. Under Online Request Information, enter or select these options: a. In the Challenge Phrase box, enter any combination of numbers or
letters you choose. For security reasons, only asterisks appear here.
b. In the Confirm Challenge box, enter the s ame phrase from the last
step.
c. From the Issuing CA list, select a CA certificate.
9. Click OK. Certificate Manager now generates a public/private key pair,
and then di splays the
Online Certificate Request dialog box to indicate
that it is waiting for a response from the CA. When the CA accepts your
request, the
10. Optional: To view your request, click the Certificate Requests tab. Select
the request and click
11. Get your CA administrator to approve your request.
12. Once your request is approved, select it under the Certificate Requests
tab and click
13. Click Yes when the Certificate Manager dialog box asks if you want to
Certificate Manager dialog box appears. Click OK again.
View. Click inside the certificate window to close it.
Retrieve.
add this personal certificate. The request disappears, but the personal
certificate now appears under the My Certificates tab .
4-8 Installing and Working with Soft-PK
Page 59

Managing certificates on Soft-PK
TIP: You should select the new certificate and click Verify to validate it.
Exporting a personal certificate
Importing a CA root or selfsigned firewall certificate
into Soft-PK
14. In the My Certificates tab, select a personal certificate.
15. Click Export. The Export Certificate and Private Key dialog box appears.
16. In the Filename box, enter the drive, directory, and filename for the
personal certificate file. The default setting is C:\Temp\Cert.p12.
17. In the Password box, type any password you choose.
18. In the Confirm Password box, retype the password.
Note: The end user will need to know this password when import this file into their copy
of Soft-PK.
Importing certificate in Soft-PK
Use the following procedures to import certificates into the Soft-PK
system.
Note: These procedures are summarized on the UserWorksheet.doc file, customize as
needed for your end users.
Use the follo wing procedure to import a self-si g ned firewall or CA
root certificate into the Soft-PK system. This procedure is done at the
client system and assumes Soft-PK is already installed and you already
have a diskette containing an exported self-signed firewall or CA root
certificate.
1. Select Start -> Programs -> SafeNet/Soft-PK -> Certificate Manager (or
right click the SafeNet icon and select Certificate Manager).
2. Click the CA Certificates tab.
3. Click Import Certific ate.... The Import CA Certificate window appears.
Installing and Working with Soft-PK 4-9
Page 60

Managing certificates on Soft-PK
Soft-PK Certificate
Figure 4-4.
Manager: CA Certificates
tab, Import CA
Certificate
Figure 4-5.
Verificati on window
Insert the diskette containing the self-signed firewall or certificate file.
4.
5. From the Files of type: field, select All Files (*.*) and then navigate to
display the files located on the diskette.
6. Select the appropriate certname.pem file and click Open. The following
window appears prompting you to confirm you want to import the
selected certificate.
7.
Click Yes.
8. [Optional] From the CA Certificates tab, click View to see the information
in the certificate.
Viewing the certificate
4-10 Installing and Working with Soft-PK
Figure 4-6.
Page 61

Managing certificates on Soft-PK
Importing a personal certificate into Soft-PK
Figure 4-7.
My Certificates tab:
Import Certificate (and
private Key) window
Use the following procedure t o i m p ort a personal certificate into the
Soft-PK system. This procedure is done at the client system and
assumes Soft-PK is already installed.
Note: This procedure is summarized on the UserWorksheet.doc file, customize that
procedure as needed for your end users.
1. Select Start -> Programs -> SafeNet/Soft-PK -> Certificate Manager (or
right click the SafeNet icon and select Certificate Manager).
2. Click the My Certificates tab.
3. Click Import Certific ate....
Figure 4-8. Import
Certificate Password
window
Insert the diskette containing the remote key/certificate object file.
4.
5. From the Files of type: field, select All Files (*.*) and then navigate to
display the files located on the diskette.
6. Select the appropriate filename.p12 file and click Open. The following
window appears.
Note: The file type must be a PKCS12 object. PKCS8 and PKCS1 objects cannot be
used.
Specify the password used when creating the p12 object (step 10 on
7.
page 3-8). You will not be allowed to import the certifica te if the
password is incorrect.
Installing and Working with Soft-PK 4-11
Page 62

Managing certificates on Soft-PK
Note: You must provide this password to the end user so they can later import this
certificate file.
8. Click Import. A prompt appears to confirm you want to import the
selected Personal Certificate.
Verificati on window
Figure 4-9.
Figure 4-10.
Viewing the certificate
Click Yes.
9.
10. [Optional] From the My Certificates tab, click View t o see the in formation
in the certificate.
4-12 Installing and Working with Soft-PK
Page 63

Configuring a security policy on the Soft-PK
Configuring a
security policy on
the Soft-PK
Basic connection options When you configure a us er policy on Soft -PK, you can sp ecify to se nd
As an administrator, you can configure end user security policies on
your Soft-PK system, save them to a diskette, and distribute them to
your users. Your end users then simply import the security policy
you’ve set up.
all traffic ove r one VPN connection , o r specify to send traff i c over
separate connections (some or all of which can be secured) for
different traffic destinations. This choice is made by select ing
> Secure
from the main menu.
Options -
All Connections — This allows you to configure one, and only one
connection that secures all IP communications with the option to
direct all conn ections to a specific ga teway.
Specified Connections — This option allows you to configure
multiple simultaneous connections. This option includes a default
connection confi gurat ion c all ed "Ot her C onnec ti ons," t hat c ontr ols
traffic not covered by prior connection rules.
Setting up an Other Connections policy
The remainder of this section describes the setup of a single
connection policy under the
Specified Connections scenario. The
connection settings you configure must coincide with configured
settings/capabilities on the Sidewinder VPN Gateway.
Note: This procedure assumes your client system will not use this policy for every
connection. That is, the system may sometimes be used in a local network where a VPN
connection is not needed.
1. Select Start -> Programs -> SafeNet/Soft-PK -> Security Policy Editor (or
right click the SafeNet icon and select Security Policy Editor).
2. Select Options -> Secure Specified Connections.
3. Click on Other Connections. This is the catchall rule for all IP
communications that do not conform to the proposals you will defined
for individual connections. This policy will handle all traffic not defined
in another policy.
Note: Configure this according to your site/user requirements. You can allow all
traffic to pass through (Non-secure mode), configure a VPN policy (Secure mode), or
stop all other traffic (Block mode).
Installing and Working with Soft-PK 4-13
Page 64

Configuring a security policy on the Soft-PK
Start defi ning a new policy. Select Edit -> Add -> Connection to create a
4.
new policy.
Soft-PK: Security Policy
Figure 4-11.
Editor
New connection
named SecureVPN
Note: By default, the
"Other Connections"
policy handles all
traffic not defi ned i n
other policies
Specify a descriptive name for the connection. (The name "SecureVPN"
5.
is used in this example.)
6. Specify the connection type. In the Conn ect ion Security field, specify
Secure.
7. Specify the trusted network to which the client will be communicating.
Remote Party Identity and Addressing fields:
In the
Change the ID Type to IP Subnet.
Specify the Subnet and Mask of the trusted network.
8. Specify the Sidewinder connection information. a. Enable the Connect using Secure Gateway Tunnel box. b. Specify the interface information:
If using shared password: Specify set the ID Type to IP Address
and enter the IP Address of the Sidewinder’s internet interface.
If using digital certificates:
— Set the
— Enter the
the IP Address field.
4-14 Installing and Working with Soft-PK
ID Type to Distinguished Name.
IP Address of the Sidewinder’s internet interface in
Page 65

Figure 4-12. Soft-PK: Edit
Distinguished Name
window to specify
Firewall public certificate
Figure 4-13.
Soft-PK: Security Policy
fields
Configuring a security policy on the Soft-PK
— Click on the Edit Name button, in the window that appears
(Figure 4-12, enter the
Distinguished Name information. Input
all fields from the Firewall Certificate and click
This is case sensitive,
make sure it matches
the certificate exactly.
Select Security Policy and select the Phase 1 Negotiation Mode.
9.
Use Main Mode for
certificate-based VPNs
Use Aggressive Mode
for pre-shared keys
OK.
Soft-PK: My Identity
Figure 4-14.
fields
Specify how the user will be identified to the Sidewinder. Select My
10.
Identify
.
Installing and Working with Soft-PK 4-15
Page 66

Configuring a security policy on the Soft-PK
a.
b. In the Internet Interface selection drop-down box, specify which
11. Specify the Authentication settings. Select Authentication (Phase 1) ->
Proposal 1
Select the authentication method for thi s connection.
If using shared password: Click Pre-Shared Key and enter the
shared password.
If using digital certificates: Select the personal certificate
previously imported from the drop-down list. Notice the ID Type
automatically changes to Distinguished Name.
interface to use when creating the VPN. For our example, the default
“Any” is adequate.
.
Soft-PK: Authentication
Figure 4-15.
(Phase 1) -> Proposal 1
fields
In Authentication Method field, specify the method appropriate for
a.
your configuration. (For example, use RSA Signatures if using only
digital certificate authentication, use RSA Signatures: Extended
Authentication if using digital certificate authentication and
extended authentication.)
b. In Encryp tion and Data Integrity/Algorithms fields:
Encrypt Alg: Select DES or Triple-DES (highest).
Hash Alg: Select MD5 or SHA-1 (highest).
SA Life: Set this to 3500 seconds.The Phase 1 Lifetime on the Soft-
PK should NOT be left as Unspecified. It should be set to some
period of time slightly shorter than is configured on the
Sidewinder SA definition (Advanced tab on the Sidewinder COBRA
GUI).
c. In Key Group field, select at least Group 2. Group 5 (highest).
4-16 Installing and Working with Soft-PK
Page 67

Configuring a security policy on the Soft-PK
Specify the Key Exchange settings. Select Key Exchange (Ph a se 2 ) ->
12.
Proposal 1
.
Soft-PK: Key Exchange
Figure 4-16.
(Phase 2) -> Proposal 1
fields
SA Life: Select Unspecified to default to Sidewinder settings.
Compression should not be used.
E ncap su lation Protocol: Select the same settings in the Encryption
and Hash Algorithms fields as Phase I. Do
Encapsulation
.
not change Tunnel
Do not use the Authentication Protocol (AH). (This does not encrypt
traffic.)
13. [Optional] Click Save to save the policy on this system.
IMPORTANT: You can export a policy without saving it, but the policy will then not
be saved on the system on which it was configured
14. Select File -> Export. a. You will be prompted to protect your security policy. Your end users
will then not be able to change the settings or create new policies.
However, your end users will be able to change the
My Ident ity
fields.
b. Specify the location of the exported file.
15. Provide a copy of this file to the appropriate end users (see Chapter 5 for
details).
Installing and Working with Soft-PK 4-17
Page 68

Configuring a security policy on the Soft-PK
4-18 Installing and Working with Soft-PK
Page 69

5 7
C HAPTER 5
Deploying Soft-PK to Your
End Users
About this chapter This chapter summarizes the final prepar ation step s for deploy in g the
Soft-PK software, digital certificate files, and security policy to your
end users. It is based on a worksheet that you edit and send to each
remote end user.
IMPORTANT: This chapter assumes you have obtained the required certificates and
have configured and saved a security policy.
This chapter addres ses the following topics:
"Overview" on page 5-2
"Customizi ng the user worksheet" on page 5-4
5
Deploying Soft-PK to Yo ur En d Us e r s 5-1
Page 70

Overview
Overview Y ou should depl oy the Soft-PK installat ion program with a custom ized
security policy and the necessary digital certificates. Custom
installations are designed to make it easy to manage corporate
security policies for tens, hundreds, or thousands of end users.
5
Along with the necessary software and files, yo u should provide
specific Soft-PK installation and setup instructions for each end user.
This facilit ates managemen t of corporat e security p olicies for your end
users and simplifies what the end user must do.
The Soft-PK product CD provided by Secure Computing includes a
file (userworksheet.doc) in MS Word format that you can customize
and send to users.
Figure 5-1. Sample
userworksheet.doc file
contained on Soft-PK
product CD
Word
format
This worksheet contains five main sections that you should edit and
save before dis trib uti ng t o end us ers . The se sect io ns are b ase d on th e
information pre sented in earlier chapters in th i s manual.
Dial-up network instructions
Soft-PK installation instructions
Certificate instructions
Security policy instructions
Basic connection instructions
5-2 Deploying Soft-PK to Your End Users
Page 71

Overview
Prior to customizing the worksheet, take a few minutes to organize
the files and information you need to deploy to your end users.
Table 5-1. Organize the files/software for each client (end user)
Deployment
item
Soft-PK software
program
Digital certificate
files
Notes
Soft-PK setup.exe file and supporting fil es.
If deploying Sidewinder self-signed certi fic at es:
firewall certificate (*.pem)
personal certificate, with private key (*.p12)
If deploying CA-based certificates:
CA root certificate (*.pem)
personal certificate, with private key (*.pk)
IMPORTANT: Person al certificates must be
unique to each individual ; you cannot distribute
one personal certificate to all of your end users.
Security policy Include a locked security policy file (*.spd) that end users
Copy the Soft-PK software, certi ficate file , person al certific ate file, and
security policy file to an unzip pe d im age of SafeNet /Soft-PK software.
cannot modify.
Deploying Soft-PK to Yo ur En d Us e r s 5-3
Page 72

Customizing the user worksheet
Customizing the
user worksheet
Figure 5-2. Sample text
for specifying dial-up
networking setup
Figure 5-3. Sample text
for specifying Soft-PK
installation instructions
This section provides summary information about each section in the
default UserWorksheet.doc file.
Specifying dial-up network instructions
Figure 5-2 shows the text in the initial UserWorksheet.doc file that
pertains to setting up dial-up netw orking. Delete or change this tex t as
needed for your end user’s particular environment.
Specifying installation instructions
Figure 5-3 shows the text in the initial UserWorksheet.doc file that
pertains to Soft-PK installation instructions. The default text covers
basic installation, one that installs only th e Soft-PK. Change this text
according to how you want users to install Soft.PK
5-4 Deploying Soft-PK to Your End Users
Page 73

Figure 5-4. Sample text
for specifying certificate
instructions (if
applicable)
Customizing the user worksheet
Specifying certificate import/request instructions
Figure 5-4 shows the text in the initial UserWorksheet.doc file that
pertains to digital certificates. The default text covers a basic
instructions for importing cer t ific at e files from a disk you provide.
Change this text according to how you want users to set up
digital certificates (or delete if not using certificates).
Deploying Soft-PK to Yo ur En d Us e r s 5-5
Page 74

Customizing the user worksheet
Figure 5-5. Sample text
for importing the
security policy
Specifying security policy instructions
Figure 5-5 shows the text in the initial UserWorksheet.doc file that
pertains to the Soft-PK security policy. The default text covers a basic
instructions for importing a security policy from a disk you provide.
Change this text according to how you want users to set up the
security policy.
Specifying ba sic connection information
Figure 5-6 shows the text in the initial UserWorksheet.doc file that
pertains to starti ng the VPN . The defaul t text cov ers basic ac tivation of
a security policy.
Figure 5-6. Sample text
for starting the VPN
5-6 Deploying Soft-PK to Your End Users
Page 75

A
A PPENDIX A
Troubleshooting
About this appendix This appendix provides a summary of troubleshooting techniques
available for resolving Soft-PK and Sidewinder VPN connection
problems. This appendi x addresses the following topics:
"Soft-PK Log Viewer" on page A-1
"Soft-PK Connection Monitor" on page A-2
"Sidewinder troubleshooting commands" on page A-4
Soft-PK Log Viewer
The Log Viewer displays the communi c a tions log, a diagno stic tool
that lists the IKE nego tiations that occur during th e authentication
phase. This is a very u seful tool w hen you cannot correct ly est ablish a
VPN connection. (However, a good log viewer does not replace a
carefully set up VPN security association.)
Note: The Log Viewer shows only ISAKMP and IKE messages, it does not show audit
messages for all traffic flow through the VPN.
To start the Log Viewer, right-click the Soft-PK icon or select it from
the Start menu.
A
Figure A-1. Log Viewer
window on Soft-PK
IMPORTANT: This in fo rmation is not saved. Unless you freeze and save o r pr in t this
information, it will be cleared by ongo in g negotiations.
Troubleshooting A-1
Page 76

A
Soft-PK Connection Monitor
The following summarizes the tasks you can perform.
Button Summary
Clear Clears the communications log.
IMPORTANT: You cannot retrieve this information once you
clear it.
Soft-PK
Connection
Monitor
Freeze Freezes/Unfreezes the communications log. Because the
communications log scrolls throug h IKE n ego ti at ion s as
they occur, you may need to freeze the log in order to save
or print specific mes s ages.
Since this button acts as a toggle, it will now read UnFreeze
until you click it again to restart the log.
Print Print the current conte n t in the communications log.
TIP: You may want to freeze the log before you attempt to
print it.
Save Print the current content in the communications log.
TIP: You may want to freeze the log before you attempt to
save it.
Close Closes the log viewer.
The Connection Monit or displays statist ical and diagnosti c information
for each active connection in the security policy. This utility is
designed to display the actual security policy se ttings configured in
Security Policy Editor and the security association (SA) information
established during Phase 1 IKE negotiations and Phase 2 IPSec
negotiations.
Figure A-2. Connection
Monitor window
A-2 Troubleshooting
To start th e Connection Monitor, right-click the Soft-PK icon or select
it from the Star t menu.
Page 77

Soft-PK Connection Monitor
You will see an icon to the left of the connection name:
A key indicates that the connection has a Phase 2 IPSec SA, or both
a Phase 1 and Phase 2 SA. When there is a single Phase 1 SA to a
gateway that is protecting multiple Phase 2 SAs, there will be a
single Phase 1 connecti on with the SA icon and indiv idual Pha se 2
connections with the key icon listed above that entry.
An SA indicates that the connection has only a Phase 1 IKE SA.
This occurs when connec ting to a secure gateway tunnel or when
a Phase 2 IPSec SA fails to establish or has not been established
yet.
A black mark moving beneath the key icon indicates that the client
is processing secur e IP tr affic for that connection.
More about the Connection Monitor
Global Statistics are not real-time operations; they are updated every
five seconds.
Dropped Packe ts includes packets from connections that a re
configured as blocked.
Figure A-3. Connection
Monitor window
Remote Modifier is either the remote party subnet mask or the end of
the address range whe n IP Ad dress Range is selected for th e Remote
Party Identity and Addressing ID Type.
To view the details
To see the details about a connection, click Details. The Security
Association Details window appears as shown below.
You will see a Phase 1 tab and/or a Phase 2 tab; these tabs indicate
Troubleshooting A-3
Page 78

Sidewinder troubleshooting commands
that the selected conn ection has established SAs.
To view Authentication (Phase 1) security asso ciations negotiated
To view Key Exchange (Pha se 2) security associations negotiated
by IKE, click the Phase 1 tab.
by IPSec, click the Phase 2 tab.
Sidewinder
troubleshooting
commands
In addition to standard logg ing, the Sidewinder also performs auditing
of certain system event s whi ch al lows y ou to gene rate info rmation on
VPN connections. Table A -1 shows some useful commands you can
use to track VPN connections in real-time mode and check VPN
settings/configuration.
Table A-1. Basic Sidewinder VPN troubleshooting commands
Commands
tcpdump -n pi ext_interface port 500 proto 50
To show IPSEC and ESP traffic arriving at the firewall
cf ipsec q
To review VPN policies on Side w in der console
cf ipsec policydump
To determine if VPN is active
showaudit -v
To show detailed audit trace information for VPN.
A-4 Troubleshooting
Page 79

Page 80

Part Number: 86-0935037-A
Software Version : Soft-PK 5.1.3 Build 4 and Sideiwnder 5.1.0.02
Product names used within are trademarks of their respective owners.
Copyright © 2001 Secure Computing Corporation. All rights reserved.
 Loading...