

Page 1

Prestige 2002 Series
VoIP Analog Telephone Adaptor
Quick Start Guide
Version 3.60
July 2004
Page 2

Prestige 2002 Series
1 Introducing the Prestige
The Prestige 2002 is a VoIP (Voice over IP) analog telephone adaptor. It lets you use a traditional
analog telephone to send voice over the Internet. You can call landline or mobile telephones as well
as IP telephones (depending on your VoIP service provider). Calls received from IP telephones
work exactly as you would expect from the traditional telephone service. The Prestige uses SIP
(Session Initiated Protocol), an internationally recognized standard for implementing VoIP.
The Prestige’s two Ethernet ports allow you to connect the Prestige to your LAN and connect your
computer to the Prestige. This way your computer can still access the LAN without adding an extra
Ethernet switch.
The Prestige’s two Ethernet ports allow you to connect your LAN and your computer to the
Prestige, so your computer can still access the LAN without adding an Ethernet switch.
The Prestige's web configurator allows easy management and configuration. See your User’s Guide
for more details on all Prestige features.
Procedure to View Your Product’s Certifications
1. Go to www.zyxel.com.
2. Select your product from the drop-down list box on the ZyXEL home page to go to that
product's page.
3. Select the certification you wish to view from this page.
1.1 Required Information
You need the following information from your ISP or network administrator.
Ethernet Interface Information
Your device’s IP Address (if given): __________________
Your device’s IP Address Subnet Mask (if given): __________________
Your default gateway’s IP Address (if given): __________________
DNS Server IP Addresses (if given): Primary __________________, Secondary _________________
If using a PPPoE client: User Name: ____________ Password: ____________
You should have a voice account already set up. Your VoIP service provider should have given you
most of the following information.
2
Page 3

Prestige 2002 Series
Some VoIP service providers automatically configure VoIP settings when
the Prestige connects to the Internet. If your VoIP service provider does
this, you only need the authentication user ID and password.
Voice Account Information
SIP Number : __________________ SIP Local Port (if given): __________________
SIP Server Address (if given): __________________
SIP Server Port (if given): __________________
REGISTER Server Address (if given): __________________
REGISTER Server Port (if given): __________________
SIP Service Domain: __________________
Authentication User ID: __________________ Authentication Password: __________________
2 Hardware
2.1 Safety Warnings
For your safety, be sure to read and follow all warning notices and instructions.
To reduce the risk of fire, use only No. 26 AWG or larger telecommunication line cord.
Do NOT open the device or unit. Opening or removing covers can expose you to dangerous
high voltage points or other risks. ONLY qualified service personnel can service the
device. Please contact your vendor for further information.
Use ONLY the dedicated power supply for your device. Connect the power cord or power
adaptor to the right supply voltage, that is, 110V AC for North America or 230V AC for
Europe.
Do NOT use the device if the power supply is damaged as it might cause electrocution.
If the power supply is damaged, remove it from the power outlet.
Do NOT attempt to repair the power supply. Contact your local vendor to order a new
power supply.
Place connecting cables carefully so that that no one will step on them or stumble over
them. Do NOT allow anything to rest on the power cord and do NOT locate the product
where anyone can walk on the power cord.
If you wall mount your device, make sure that no electrical, gas or water pipes will be
damaged.
3
Page 4
Prestige 2002 Series
Do NOT install nor use your device during a thunderstorm. There may be a remote risk of
electric shock from lightning.
Do NOT expose your device to dampness, dust or corrosive liquids.
Do NOT use this product near water, for example, in a wet basement or near a swimming
pool.
Make sure to connect the cables to the correct ports.
Do NOT obstruct the device ventilation slots, as insufficient airflow may harm your device.
Do NOT store things on the device.
Connect ONLY suitable accessories to the device.
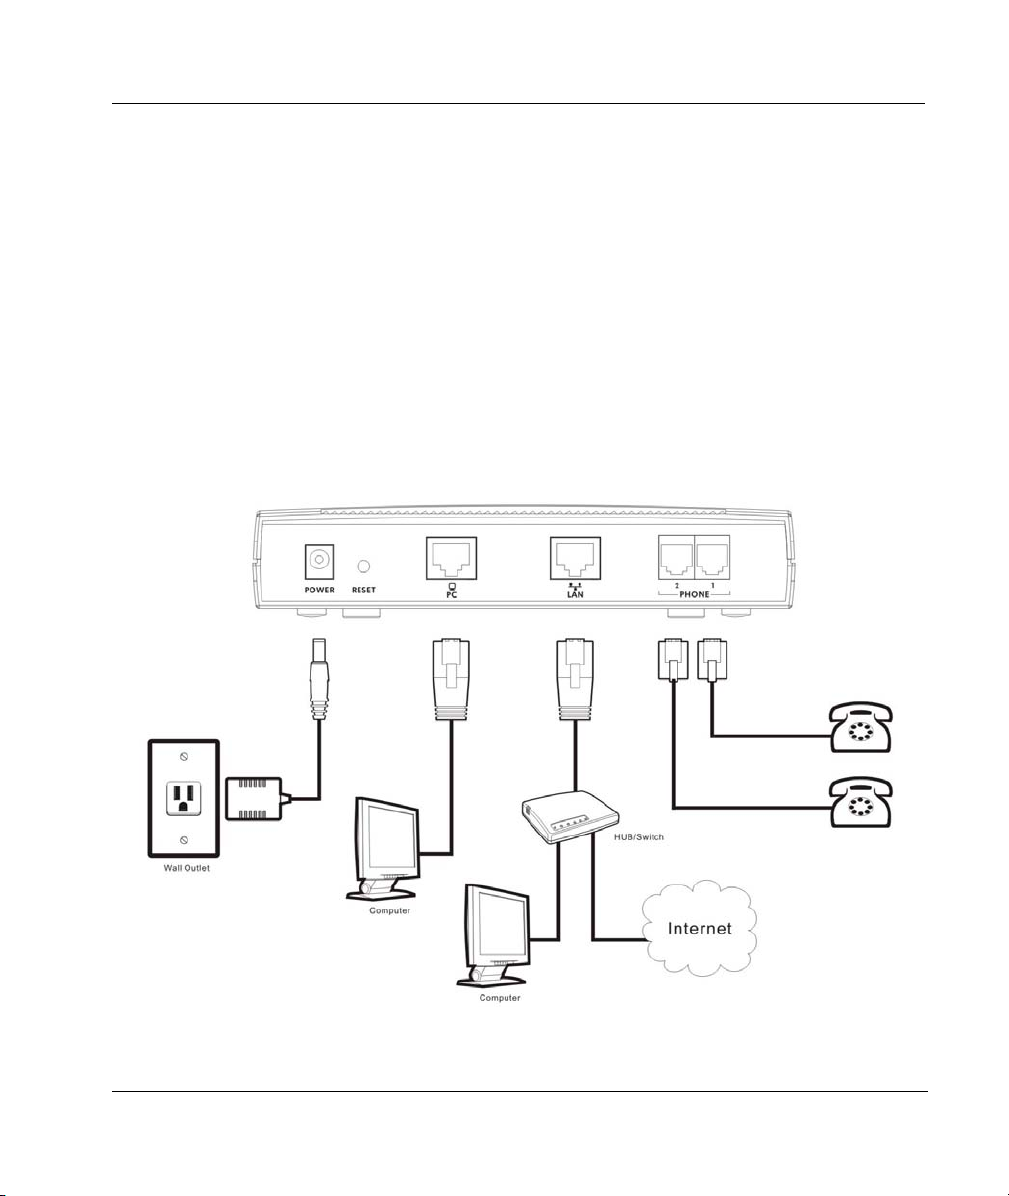
2.2 Rear Panel Connections
Prestige 2002 Rear Panel Connections
4
Page 5

Prestige 2002 Series
LABEL DESCRIPTION
1. PC Connect a computer to this port with an Ethernet cable. This port is auto-negotiating (can
2. LAN Connect a cable/DSL modem or router or an Ethernet LAN switch to this port with the
3. PHONE 1-2 Connect analog telephones to these ports using telephone wire. These are FXS (Foreign
4. POWER Use the included power adaptor to connect the POWER socket to an appropriate power
The PWR/VoIP LED turns on. The LAN, PC and Phone 1 and 2 LEDs turn on if the LAN, PC and PHONE
RESET You only need to use this button if you’ve forgotten the Prestige’s password. It returns the
connect at 10 or 100Mbps) and auto-sensing (automatically adjusts to straight-through or
crossover Ethernet cable).
Ethernet cable that came with your modem.
Exchange Station) ports.
source (see the User’s Guide for power adaptors by region).
ports are properly connected.
Prestige to the factory defaults (password is 1234, management IP address 192.168.5.1
etc.; see your User’s Guide for details).
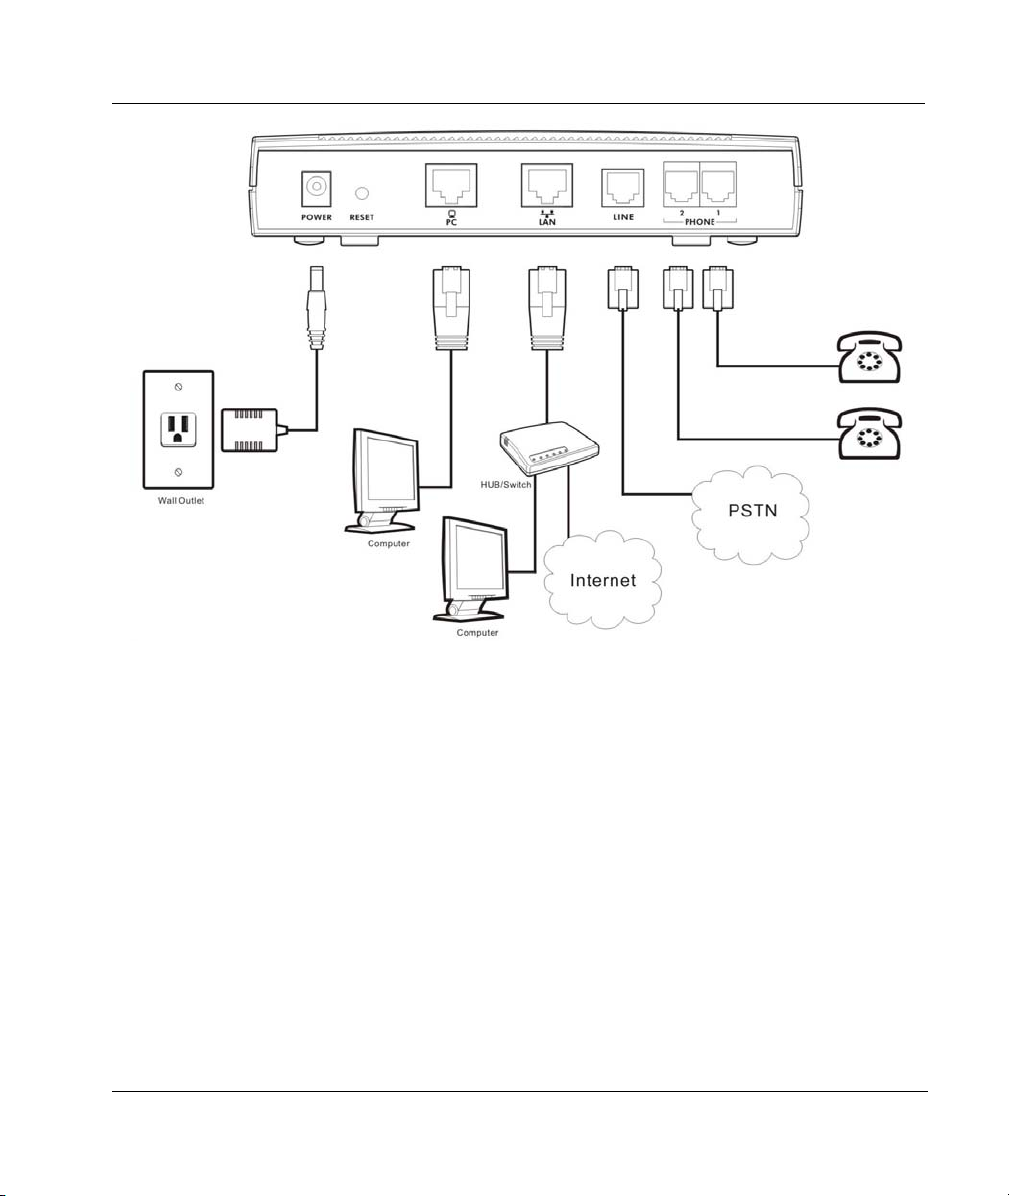
2.3 Prestige 2002L
The Prestige 2002L’s lifeline feature adds regular phone services. Make and receive regular phone
calls while someone else connected to the Prestige is making VoIP calls.
Use the Prestige 2002L’s included gray telephone wire to connect the LINE port to the telephone
jack. The LINE port is a FXO (Foreign Exchange Office) port.
5
Page 6
Prestige 2002 Series
Prestige 2002L Rear Panel Connections
6
Page 7

Prestige 2002 Series
2.4 LEDs
LED COLOR STATUS DESCRIPTION
PWR/VoIP
Orange On The VoIP SIP registration was successful.
Off The Prestige is not receiving power.
LAN
PC Green
Green
On The Prestige is receiving power. Green
Blinking The Prestige is self-testing.
On The Prestige has an Ethernet connection with the cable/DSL modem.
Blinking The Prestige is sending/receiving data to /from the cable/DSL modem.
Off The Prestige doesn’t have an Ethernet connection with the cable/DSL
modem.
On The Prestige has an Ethernet connection with a computer.
Blinking The Prestige is sending/receiving data to /from the computer.
Off The Prestige does not have an Ethernet connection with a computer.
7
Page 8

Prestige 2002 Series
LED COLOR STATUS DESCRIPTION
Phone 1-2 Green
On The telephone(s) connected to this port is (are) in use.
Blinking The telephone(s) connected to this port is (are) ringing.
Off The telephone(s) connected to this port is (are) not in use.
3 Setting Up Your Computer’s IP Address
For initial configuration, your computer must have an IP address in the
same subnet as 192.168.5.1.
Use this section to assign your computer a static IP address in the 192.168.5.2 to 192.168.5.254
range with a subnet mask of 255.255.255.0. This is necessary to ensure that your computer can
communicate with your Prestige. Record your original IP address settings so you can set your
computer back to them after you finish configuring the Prestige.
Your computer must have an Ethernet card and TCP/IP installed. TCP/IP should already be installed
on computers using Windows NT/2000/XP, Macintosh OS 7 and later operating systems.
3.1 Windows 2000/NT/XP
1. In Windows XP, click start, Control Panel. In Windows 2000/NT, click Start, Settings, Control Panel.
2. In Windows XP, click Network Connections.
In Windows 2000/NT, click Network and Dial-up Connections.
3. Right-click Local Area Connection and then click Properties.
4. Select Internet Protocol (TCP/IP) (under the General tab in Win XP) and click Properties.
8
Page 9

Prestige 2002 Series
5. The Internet Protocol TCP/IP Properties screen
opens (the General tab in Windows XP).
-To configure a static IP address, click Use the
following IP Address and fill in the IP address
(choose one from192.168.5.2 to 192.168.5.254),
Subnet mask (255.255.255.0), and Default gateway
(192.168.5.1) fields.
6. Click Advanced. Remove any previously installed
gateways in the IP Settings tab and click OK to go back
to the Internet Protocol TCP/IP Properties screen.
7. Click OK to close the Internet Protocol (TCP/IP)
Properties window.
8. Click OK to close the Local Area Connection
Properties window.
3.2 Checking Your Computer’s IP Address
1. In the computer, click Start, (All) Programs, Accessories and then Command Prompt.
2. In the Command Prompt window, type "ipconfig" and then press ENTER to verify that your computer’s IP
address is in the correct range (192.168.5.2 to 192.168.5.254) with subnet mask 255.255.255.0. This is
necessary in order to communicate with the Prestige.
Refer to your User’s Guide for detailed IP address configuration for other Windows and Macintosh
computer operating systems.
9
Page 10

Prestige 2002 Series
3.3 Testing the Connection to the Prestige
1. Click Start, (All) Programs, Accessories and then Command Prompt.
2. In the Command Prompt window, type "ping” followed by a space and the management IP address of the
Prestige (192.168.5.1 is the default).
3. Press ENTER and the following screen displays.
C:\>ping 192.168.5.1
Pinging 192.168.5.1 with 32 bytes of data:
Reply from 192.168.5.1: bytes=32 time=10ms TTL=254
Reply from 192.168.5.1: bytes=32 time<10ms TTL=254
Reply from 192.168.5.1: bytes=32 time<10ms TTL=254
Reply from 192.168.5.1: bytes=32 time<10ms TTL=254
Ping statistics for 192.168.5.1:
Packets: Sent = 4, Received = 4, Lost = 0 (0% loss),
Approximate round trip times in milli-seconds:
Minimum = 0ms, Maximum = 10ms, Average = 2ms
Your computer can now communicate with the Prestige.
4 Configuring Your Prestige
The web configurator is an HTML-based management interface that allows easy Prestige setup and
management via Internet browser. Use Internet Explorer 6.0 and later or Netscape Navigator 7.0 and
later versions with JavaScript enabled. Recommended screen resolution is 1024 by 768 pixels.
This Guide shows you how to perform initial configuration only. See your
User’s Guide for background information on all Prestige features.
4.1 Accessing Your Prestige Via Web Configurator
1. Launch your web browser. The Prestige 2002 has a management IP address (default
192.168.5.1). This is because by default, the Prestige is set to receive a dynamically assigned IP
address and thus has no IP address. For initial configuration, use the Prestige’s management IP
address. Whether you use the Prestige’s management IP address or its actual IP address (after it
receives one), make sure that your computer’s IP address is in the same subnet.
10
Page 11

Prestige 2002 Series
If your LAN has multiple Prestige 2002s, you can disconnect your Prestige
2002’s LAN port to avoid accessing the wrong Prestige 2002 via the
management IP address. Reconnect your Prestige 2002’s LAN port after the
Login screen displays.
Management IP Address
2. Type "1234" (default) as the password and click Login. In some versions, the default password
appears automatically - if this is the case, click Login.
3. You should see a screen asking you to change your password (highly recommended) as shown
next. Type a new password (and retype it to confirm) and click Apply or click Ignore.
4. You should now see the web configurator MAIN MENU screen.
Click the HELP icon (located in the top right corner of most screens) to view online help.
Click a link under CONFIGURATION to configure Prestige features.
11
Page 12

Prestige 2002 Series
Click a link under MAINTENANCE to see Prestige performance statistics, upload
firmware and back up, restore or upload a configuration file, or restart the Prestige.
Click LOGOUT in the navigation panel when you have finished a Prestige management
session.
Navigation panel
LOGOUT
The Prestige automatically logs you out if the management session is idle
for five minutes. Simply log back in if this happens to you.
4.2 Common Screen Command Buttons
The following table shows common command buttons found on many web configurator screens.
Apply Click Apply to save your changes back to the Prestige.
Reset/Cancel Click Reset or Cancel to begin configuring this screen afresh.
5 Initial Configuration
This section describes how to configure your device’s Ethernet interface and Voice over IP settings.
12
Page 13

Prestige 2002 Series
5.1 ETHERNET Configuration
Click ETHERNET in the navigation panel to display the following screen. Use this screen to
configure the Prestige’s Ethernet interface with the information in the Ethernet Interface
Information table. Your ISP may have already configured some of the fields for you.
You can manage the Prestige through the Ethernet IP address, but you may not always know the
Prestige’s IP address (especially if the IP address is dynamic). Use the Mgnt Port screen (see the
User’s Guide) to configure a static IP address that you use to access the Prestige for management.
Select Get IP Address Automatically if
you have a dynamic IP address.
Select Use Fixed IP Address and fill in
the fields below if the ISP assigned you a
static IP address.
Type the (static) IP address assigned to
you by your ISP.
Type the subnet mask assigned to you by
your ISP (if given).
Enter the gateway IP address assigned to
you by your ISP (if given).
DNS (Domain Name System) is for
mapping a domain name to its
corresponding IP address and vice versa.
The DNS servers are extremely important
because without them, you must know
the IP address of a computer before you
can access it. Specify the DNS servers.
Select PPPoE Client if your ISP provides a PPPoE user name and password.
Enter the user name and password exactly as your ISP assigned them.
Click Apply to save your changes back to the Prestige.
5.2 VoIP Configuration
Click VoIP in the navigation panel to display the following screen. Use this screen to configure the
Prestige’s voice settings with the information in the Voice Account Information table.
Your VoIP service provider may automatically configure VoIP settings when
the Prestige connects to the Internet. If so, you only need to configure the
authentication user ID and password in this screen.
13
Page 14

Prestige 2002 Series
A SIP account's Uniform Resource Identifier (URI) identifies the SIP account in a way similar to the
way an e-mail address identifies an e-mail account. It is also known as a SIP identity or address. The
format of a SIP identity is SIP-Number@SIP-Srevice-Domain.
A SIP number is the part of the SIP URI that comes before the "@" symbol. For example, if
1122334455@VoIP-provider.com
was your SIP URI, “1122334455” would be your SIP number.
A SIP service domain is the domain name that comes after the @ symbol in a SIP URI. For
example, if 1122334455@VoIP-provider.com
was your SIP URI, “VoIP-provider.com” is the SIP
service domain.
You can configure the Prestige
to use multiple SIP accounts.
Select one to configure its
settings on the Prestige.
Enter your SIP number in the
SIP Number field.
If you were given a SIP Local
Port number, enter it;
otherwise leave it set to the
default.
Type the IP address of the
VoIP service provider’s SIP
server in the SIP Server
Address field. If you were
given a SIP Server Port
number, enter it; otherwise
leave it set to the default.
If your VoIP service provider
gave you a registrar server
address and port, enter them in
the REGISTER Server
Address and REGISTER
Server Port fields. If you were
not given a registrar server
address and port, enter the
address and port from the SIP
Server Address and SIP
Server Port fields again here.
Enter the SIP service domain name.
In the Authentication User ID field, type the username exactly as it was given to you.
In the Authentication Password field, type the password associated with the username above.
1
1
Up to two.
14
Page 15

Prestige 2002 Series
Select Send Caller ID if you want to show identification information when you make VoIP calls.
Phone 1 and Phone 2 correspond to the Prestige’s physical PHONE 1 and 2 ports, respectively. Select whether
you want to receive calls for this SIP account on Phone 1, Phone 2 or both. If you select both, you will not know
which SIP account a call is coming in on.
Click Apply to save your changes back to the Prestige.
5.3 Phone Configuration
Click PHONE in the navigation panel to display the following screen. Use this screen to configure
which SIP account to use with each phone port for making outgoing calls.
Use Phone Port Settings to
select the phone port that you
want to configure.
Use the Outgoing Call use
field to select whether you want
the phone(s) attached to this
phone port to use SIP account
1, 2 or either when you make a
call. If you select both SIP
accounts, the Prestige will first
try to use SIP account 2 and
then SIP account 1 when you
make a call.
For your initial configuration,
you can use the default
settings for the rest of the
fields.
Click Apply to save your
changes back to the Prestige.
6 Phone Book
Use the phone book feature to configure speed dial entries and the lifeline settings2.
6.1 Speed Dial Configuration
Click PHONE BOOK in the navigation panel and then Speed Dial to display the following screen.
Speed dial provides (up to 10) shortcuts for dialing frequently used (VoIP) phone numbers.
2
Lifeline applies to the Prestige 2002L.
15
Page 16

Prestige 2002 Series
Use the Add New Entry
section of the screen to edit
and save new or existing
speed dial phonebook
entries.
Select a speed dial key
combination from the dropdown list box.
Enter the SIP number of the
party that you will call (use
the number or text that
comes before the @ symbol
in a full SIP URI).
Enter a descriptive name to
identify the party that you will
use this entry to call.
Select Use Proxy if calls to
this party use your SIP
account configured in the
VoIP screen.
Select Non-Proxy (Use IP
or URL) if calls to this party
use a different SIP server or
go directly to the callee’s
VoIP phone (peer-to-peer).
Enter the SIP server’s or the
party’s IP address or domain
name (up to 127 ASCII
Extended set characters).
Click Add to save the entry in the speed dial phonebook. The speed dial entry displays in the Speed Dial Phone
Book section of the screen.
The Speed Dial Phone Book section of the screen displays the currently saved speed dial entries. You can use
these entries to make calls.
Click Delete to remove an entry from the speed dial phonebook.
Click Edit to change the speed dial entry. The speed dial entry displays in the Add New Entry section of the
screen where you can edit it.
Click Clear to remove all of the entries from the speed dial phonebook.
6.2 Lifeline Configuration (Prestige 2002L)
Click PHONE BOOK in the navigation panel and then Lifeline to display the following screen.
With lifeline you can make and receive regular phone calls. Use a prefix number to make a regular
call whenever the VoIP service is available.
16
Page 17

Prestige 2002 Series
Specify phone numbers that should always use the regular phone service (without having to dial a
prefix number). Do this for emergency numbers (like those for contacting police, fire or emergency
medical services).
Specify the prefix number for dialing regular calls when the
VoIP service is available.
Use the Relay to PSTN fields to specify phone numbers to
which the Prestige always sends calls through the regular
phone service (without the need of dialing a prefix number).
These numbers must be for phones on the PSTN (not VoIP
phones).
Click Apply to save your changes back to the Prestige.
7 Dealing with NAT and Firewalls
A SIP Application Layer Gateway (ALG) is a NAT router that allows VoIP calls to pass through.
With a SIP ALG, you do not need to use STUN or do any extra configuration for the Prestige 2002.
STUN allows you to use a NAT (Network Address Translation) router between the Prestige 2002
and the Internet. STUN does not work with symmetric NAT routers or firewalls. If your ISP
provides the IP address of a STUN server, click VoIP and then Advanced to open this screen.
17
Page 18

Prestige 2002 Series
Remember that you
can configure the
Prestige to use multiple
SIP accounts. This
screen configures
settings for one SIP
account at a time.
In the STUN section:
Select the Active
checkbox.
Type the IP address of
the VoIP service
provider’s STUN server
in the Server Address
field. If you were given
a STUN port number,
enter it in the Server
Port field; otherwise
leave it set to the
default.
Click Apply to save
your changes back to
the Prestige.
See the User’s Guide
for more about STUN
and NAT.
7.1 Test Your Configuration
If you have configured the Prestige correctly, the PWR/VoIP LED should be on with an orange
color. Use the Maintenance Status screen to check on the Prestige’s IP addresses and VoIP status.
Check your configuration in the web configurator if the PWR/VoIP LED does not turn on orange or
the Maintenance Status screen shows a problem with the Prestige’s IP addresses or VoIP status.
Restore your computer’s normal IP address settings when you are done
configuring the Prestige.
8 Making VoIP Calls
When the PWR/VoIP LED is orange, use a telephone connected to one of the ports to make VoIP
calls. Dial a numerical SIP number (like a regular phone number) on your telephone’s keypad. For
18
Page 19

Prestige 2002 Series
an alphabetical SIP number (like an e-mail address), configure a speed dial entry in the phone book
(see section 6.1). Dial the speed dial entry on your telephone’s keypad.
Remember that you may have set the PHONE port to use a particular SIP account for making calls
(see section 5.3)
9 Making Regular Calls (Prestige 2002L)
When the PWR/VoIP LED is orange, dial a prefix number and the phone number. You can find the
prefix number in PHONE BOOK Lifeline screen (see section 6.2).
When the PWR/VoIP LED is green or off, make regular calls without dialing a prefix number.
10 Troubleshooting
PROBLEM CORRECTIVE ACTION
None of the LEDs turn
on when you connect
the Prestige’s power.
Cannot access the
Prestige from the LAN.
Cannot access the
web configurator.
Accessing the wrong
Prestige 2002 via the
management IP
address.
Cannot ping any
computer on the LAN.
Make sure that you have the correct power adaptor connected to the Prestige and
plugged in to an appropriate power source. Check all cable connections.
If the LEDs still do not turn on, you may have a hardware problem. In this case, you
should contact your local vendor.
Check the cable connection between the Prestige and your computer or hub. Refer to
section 2.2 for details.
Ping the Prestige from a LAN computer. Make sure your computer Ethernet adapter is
installed and functioning properly.
Your computer’s IP address must be on the same subnet as the Prestige’s Ethernet IP
address or management IP address (whichever you want to use to access the
Prestige). If the Prestige’s Ethernet IP address or management IP address has
changed, then enter the new one as the URL.
If you have switched from managing one Prestige 2002 to another, your computer’s
ARP (Address Resolution Protocol) table may contain an entry that maps the
management IP address to a different Prestige 2002’s MAC address).
In Windows, use arp -d at the command prompt to delete all entries in your computer’s
ARP table.
This problem may occur if you have more than one Prestige 2002 on the same LAN.
Disconnect your Prestige 2002’s LAN port from the network and connect directly
through the Prestige 2002’s PC port. You may also need to delete your computer’s
ARP table entry for the Prestige 2002’s IP address (see above).
If the LAN LED is off, check the cable connections between the Prestige and your LAN
computers.
Verify that the IP address, subnet mask of the Prestige and the LAN computers are in
the same IP address range.
19
Page 20

Prestige 2002 Series
PROBLEM CORRECTIVE ACTION
Cannot get a LAN IP
address from the ISP.
Cannot access the
Internet.
The telephone port
doesn’t work or there
is no dial tone.
If the ISP checks the user ID, check your service type, user name, and password in the
ETHERNET screen.
Verify the Internet connection settings in the ETHERNET screen.
Make sure you entered the correct user name and password if you are using PPPoE.
Check the telephone connections.
Make sure you have the VoIP screen properly configured.
20
 Loading...