

Page 1

External ADSL modem for LAN
Внешний ADSL-модем для локальной сети
Зовнішній ADSL-модем для локальної мережі
Installation guide • 3
Руководство по установке • 11
Інструкція з установлення • 19
Page 2

2
Page 3

3
Installation guide
© 2004, ZyXEL Communications Corporation. All rights reserved.
No part of this publication may be reproduced in any form or by any means without written permission from
the publisher. This publication is subject to change without notice. ZyXEL Communications Corporation does
not assume any liability arising out of errors that can be found in this guide. Trademarks mentioned in this
manual are used for informational purposes only and are properties of their respective owners. Information on
certificates numbers and terms could be obtained on corporate Internet server at http://www.zyxel–europe.com
Unpacking your modem
Before you install your modem, check the package and compare its contents to the list below to make sure that
no part is lost. The complete package should include:
• ZyXEL OMNI ADSL LAN modem
• Installation Guide
• 220V AC power adapter
• Ethernet cable
• Splitter
• Two phone cables
• CD with support documents
If one or more items from this list are missing, please contact your dealer immediately.
Registrering owner's rights
You can register your modem on the Internet at http://www.zyxel–europe.com
By registering on the Internet, you will get an additional year of warranty as well as other benefits.
ENGLISH
Page 4
4
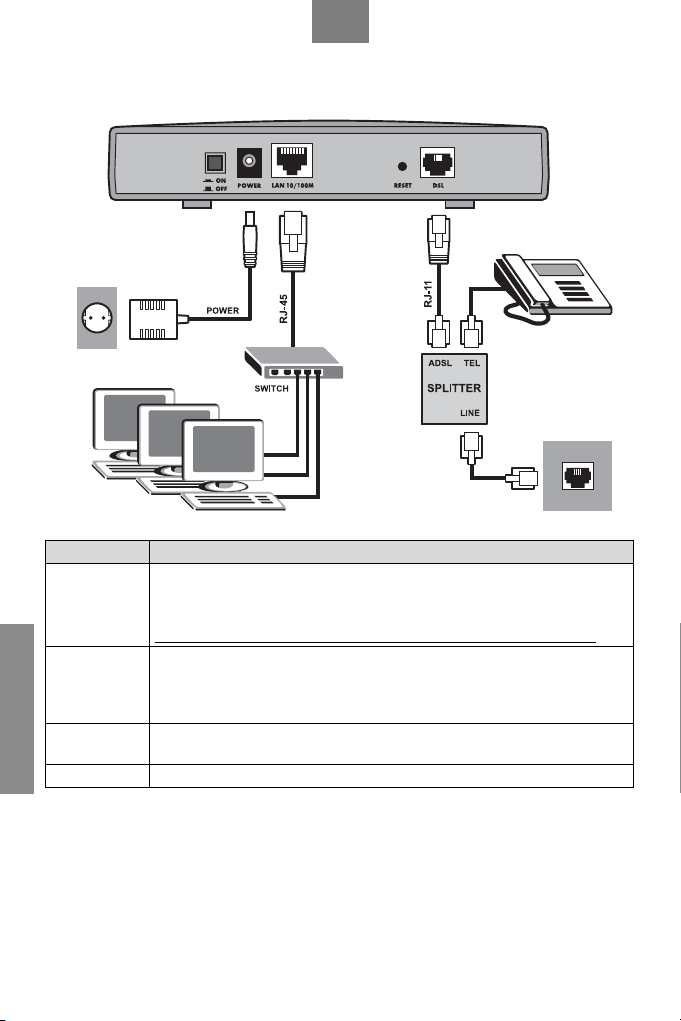
OMNI ADSL LAN Rear Panel Connections
PORT CONNECTION
Connect the DSL jack on the OMNI ADSL LAN to the ADSL jack on the splitter using
DSL
LAN 10/100M
ENGLISH
RESET
POWER
included telephone wire. Connect telephone to the TEL jack on the splitter. Connect wall
jack to the LINE jack on the splitter.
Be careful not to insert an RJ-11 connector into the RJ-45 port.
Use an Ethernet cable to connect this port to a computer (with an Ethernet card)
or a Switch (if your network has more than one computer). The port is auto-negotiating
(can connect at 10 or 100Mbps) and auto-crossover (automatically adjusts to the type
of Ethernet cable you use (straight-through or crossover)).
You only need to use this button if you have forgotten the OMNI ADSL LAN’s password
or IP address. It returns the OMNI ADSL LAN to the factory defaults.
Connect the end of the included power adapter for your region to this power socket.
Page 5
5
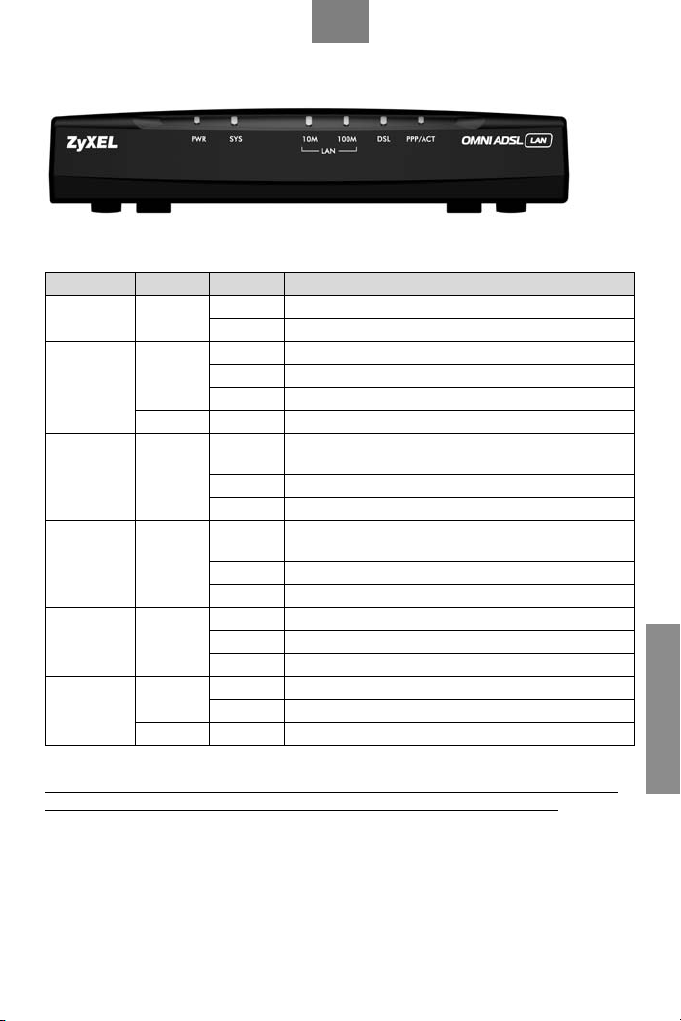
OMNI ADSL LAN Front Panel LED Description
LED COLOR STATUS DESCRIPTION
PWR
SYS
LAN 10M
LAN 100M
DSL
PPP/ACT
Green
Green
Red On The power to the OMNI ADSL LAN is too low
Green
Orange
Green
Green
Orange On The OMNI ADSL LAN is initiating a PPPoE connection
On The OMNI ADSL LAN is receiving power
Off The OMNI ADSL LAN is not receiving power
On The OMNI ADSL LAN is functioning properly
Blinking The OMNI ADSL LAN is restarting
Off The OMNI ADSL LAN is not ready or has malfunctioned
On
Blinking The OMNI ADSL LAN is receiving or sending data
Off No device is connected at 10Mbps
On
Blinking The OMNI ADSL LAN is receiving or sending data
Off No device is connected at 100Mbps
On The OMNI ADSL LAN is linked successfully to a DSLAM
Blinking The OMNI ADSL LAN is initializing the DSL line
Off The DSL link is down
Blinking The OMNI ADSL LAN is receiving or sending data
Off The OMNI ADSL LAN is ready but not sending or receiving data
The OMNI ADSL LAN has a successful 10Mbps Ethernet
connection
The OMNI ADSL LAN has a successful 100Mbps Ethernet
connection
ENGLISH
Press the power switch in. The Power LED turns on. The SYS LED blinks and turns
steady on. The LAN and DSL LEDs turn on, if they are properly connected.
Page 6

6
OMNI ADSL LAN Factory Defaults
LAN IP Address 192.168.1.1 Default Password 1234
Subnet Mask 255.255.255.0 DHCP IP Pool 192.168.1.33 – 192.168.1.64
Internet Account Information
Your ISP (Internet Service Provider) or telephone company should give you most of the following information or
pre-configured the OMNI ADSL LAN with it when you signed up for your Internet access account. You do not
need to know every field.
REQUIRED INFORMATION
Virtual Path Identifier (VPI):
Virtual Channel Identifier (VCI):
Multiplexing (VC-based or LLC-based):
Your device’s WAN IP Address (if given):
Encapsulation:
❑ VC ❑ LLC
❑ RFC 1483
❑ ENET ENCAP Ethernet Encapsulation Gateway IP Address:
❑ PPPoA User Name: Password:
❑ PPPoE (PPPoE) Service Name:
User Name: Password:
Preparing Your Network
All computers must have a 10M or 100M network card and TCP/IP installed. TCP/IP should already be installed
on computers using Windows NT/2000/XP, Macintosh OS 7 and later operating systems. See your User’s Guide
for information on configuring static IP address for your computer.
These procedures are for dynamic IP address assignment.
Setting up Your Windows 95/98/Me Computer
Installing TCP/IP Components
1. Click Start, Settings, Control Panel and double-click the Network icon.
2. The Network window Configuration tab displays a list of installed components.
ENGLISH
To install TCP/IP:
a. In the Network window, click Add.
b. Select Protocol and then click Add.
c. Select Microsoft from the list of manufacturers.
d. Select TCP/IP from the list of network protocols and then click OK.
Page 7
7
Configuring TCP/IP
1. In the Network window Configuration tab, select your network adapter’s TCP/IP entry and click Properties.
2. Click the IP Address tab. Click Obtain an IP address automatically.
3. Click the DNS Configuration tab. Select Disable DNS.
4. Click the Gateway tab. Highlight any installed gateways and click Remove until there is none listed.
5. Click OK to save and close the TCP/IP Properties window.
6. Click OK to close the Network window.
7. Turn on your OMNI ADSL LAN and restart your computer when prompted.
Insert the Windows CD if prompted.
Verifying TCP/IP Properties
1. Click Start and then Run. In the Run window, type “winipcfg” and then click OK to open the IP Configuration
window.
2. Select your network adapter. You should see your computer’s IP address, subnet mask and default gateway.
Setting up Your Windows NT/2000/XP Computer
Configuring TCP/IP
1. Click Start, Settings, Network and Dial-up Connections and right-click Local Area Connection or the
connection you want to configure and click Properties. For Windows XP, click start, Control Panel, Network
and Internet Connections and then Network Connections. Right-click the network connection you want to
configure and then click Properties.
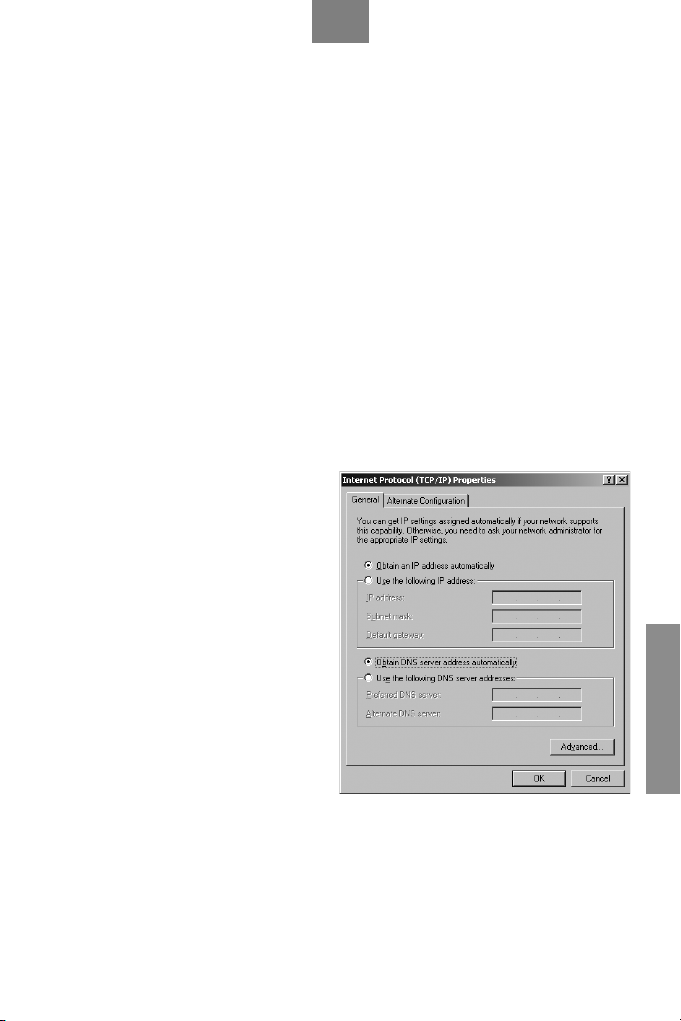
2. Select Internet Protocol (TCP/IP) (under the General tab in Win XP) and click Properties.
3. The Internet Protocol TCP/IP Properties window
opens. Click Obtain an IP address automatically.
4. Click Obtain DNS server automatically.
5. Click Advanced, IP Settings tab and remove any
installed gateways, then click OK.
6. Click OK to save and close the Internet Protocol
(TCP/IP) Properties window.
7. Click OK to close the Local Area Connection
Properties window.
8. Turn on your OMNI ADSL LAN and restart your
computer (if prompted).
Verifying TCP/IP Properties
1. Click Start, Programs, Accessories and then
Command Prompt.
2. In the Command Prompt window, type “ipconfig”
and then press ENTER. The window displays
information about your IP address, subnet mask
and default gateway.
ENGLISH
Page 8
8
Setting up Your Macintosh Computer
Configuring TCP/IP Properties
1. Click the Apple menu, Control Panel and double-click TCP/IP to open the TCP/IP Control Panel.
2. Select Ethernet from the Connect via list.
3. Select Using DHCP Server from the Configure list.
4. Close the TCP/IP Control Panel.
5. Click Save if prompted, to save changes to your configuration.
6. Turn on your OMNI ADSL LAN and restart your computer (if prompted).
Verifying TCP/IP Properties
Check your TCP/IP properties in the TCP/IP Control Panel.
Accessing the OMNI ADSL LAN
Access the OMNI ADSL LAN using the web configurator or the SMT via a telnet session.
Procedure For Web Configurator Configuration
1. Launch your web browser and enter “192.168.1.1” as the URL.
2. Type “admin” as the user name, “1234” (default) as the password and press ENTER.
3. You should now see the SITE MAP screen. Click the help icon (located in the upper right portion all screens)
for online HTML help.
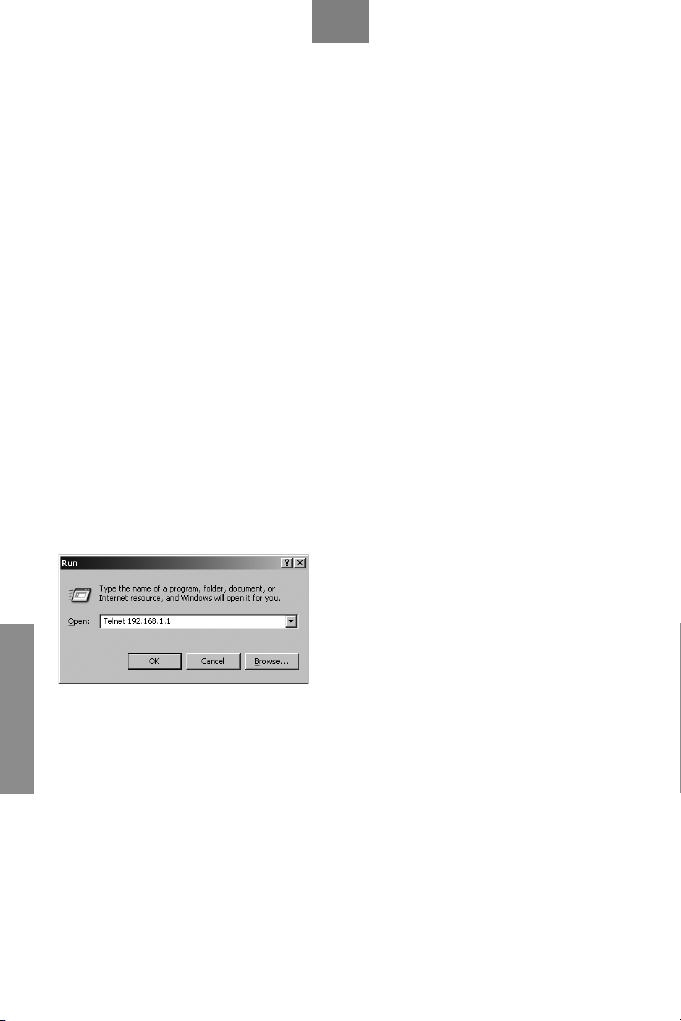
Procedure For SMT Configuration via Telnet
1. Launch a Telnet program. In Windows, click Start and then Run.
2. Type “Telnet” followed by a space and the IP address of the OMNI ADSL LAN, (192.168.1.1 is the default)
and click OK to display the password screen.
3. Enter “1234”, the default password, to access the SMT main menu. As you type a password, the screen
displays an asterisk “ * ” for each character you type.
ENGLISH
Page 9

9
Troubleshooting
PROBLEM CORRECTIVE ACTION
Make sure the OMNI ADSL LAN’s power adapter is connected to the
The PWR and/or SYS LEDs
are off.
The LAN LED won’t turn on.
The DSL LED is off.
I cannot access the SMT menu.
I cannot access the web
configurator.
I cannot ping any computer on
the LAN.
I cannot access the Internet.
OMNI ADSL LAN and plugged into an appropriate power source. Check
that the OMNI ADSL LAN and the power source are both turned on.
Turn the OMNI ADSL LAN off and on. If the error persists, you may have a
hardware problem. In this case, you should contact your vendor.
Check the cable connection to the OMNI ADSL LAN port.
Make sure your computer network card is working properly.
Check the connection between the OMNI ADSL LAN DSL port and the
wall jack.
The default SMT password is “1234”. If you have changed the password
and have now forgotten it, you will need to reset the OMNI ADSL LAN or
upload the default configuration file (see User’s Guide).
Check that your computer IP address and the OMNI ADSL LAN IP address
are on the same subnet.
If you changed the OMNI ADSL LAN default LAN IP address then enter the
new one as the URL.
Make sure you enter the correct user name and password. The default
user name is “admin” and the default password is “1234”. If you forgot
your password, you have to reset the OMNI ADSL LAN. See the User’s
Guide.
If the 10/100M LAN LED is off, check the cables between the OMNI ADSL
LAN and your computer or switch.
Check the TCP/IP configuration on your computer. Make sure that the IP
address and the subnet mask of the OMNI ADSL LAN and the computers
are on the same subnet.
Make sure the OMNI ADSL LAN is turned on and connected to the
network.
If the OMNI ADSL LAN’s DSL LED is off, check the cable between the
OMNI ADSL LAN and the telephone wall jack.
Make sure you entered your user name correctly. Your user name may
be case-sensitive.
ENGLISH
Page 10

10
Page 11

11
Руководство по установке
© 2004, ZyXEL Communications Corporation. Все права защищены.
Ни одна часть этой публикации не может быть воспроизведена или передана в любом виде или любым
способом без письменного разрешения издателя. Информация в этом руководстве может быть изменена
без специального уведомления. ZyXEL Communications Corporation не несет ответственности за любые
ошибки, которые могут иметь место в настоящем руководстве. Торговые марки, упоминаемые в данном
руководстве, используются исключительно с информационной целью и являются собственностью их
владельцев. Сведения о номерах сертификатов и сроках их действия можно получить в сети Интернет на
официальном сервере компании по адресу http://www.zyxel–europe.com.
Распаковка модема
Прежде чем начать установку модема, проверьте его комплектацию по данному списку, чтобы убедиться,
что ничего не пропало. Коробка должна содержать:
• Модем ZyXEL OMNI ADSL LAN
• Руководство по установке
• Блок питания 220 Вольт
• Кабель Ethernet
• Сплиттер
• Два телефонных кабеля
• Компакт-диск с документацией
Обращайтесь в фирму, где вы приобрели модем, если что-либо из приведенного списка отсутствует в
комплекте поставки.
Регистрация прав собственника
Вы можете зарегистрировать ваш модем через Интернет по адресу http://www.zyxel–europe.com
Регистрация через Интернет дает дополнительный год бесплатной гарантии и ряд других преимуществ.
РУССКИЙ
Page 12

12
Разъемы задней панели OMNI ADSL LAN
ПОРТ ПОДКЛЮЧЕНИЕ
Подключите порт DSL модема к гнезду ADSL сплиттера, а телефон к гнезду TEL
сплиттера. Гнездо LINE сплиттера, в свою очередь, подключите к телефонной
DSL
РУССКИЙ
LAN 10/100M
Reset
POWER
розетке. Используйте для этого входящие в комплект поставки телефонные кабели.
Соблюдайте осторожность и не подключайте разъем RJ-11 к
порту RJ-45.
Используйте кабель Ethernet для подключения данного порта к компьютеру (с картой
Ethernet) или коммутатору (если в Вашей сети более одного компьютера). Порт
обладает возможностью автоматического выбора скорости (может подключаться
к 10 или 100 Мбит/с) и автоматического распознавания перекрестного кабеля
(автоматически выбирает используемый тип кабеля Ethernet (прямой или
перекрестный)).
Эту кнопку необходимо использовать, только если Вы забыли пароль или IP-адрес
OMNI ADSL LAN. Она восстанавливает заводские настройки OMNI ADSL LAN по
умолчанию.
Подключите входящий в комплект адаптер питания для Вашего региона к данной
розетке питания.
Page 13

13
Описание светодиодов
на передней панели OMNI ADSL LAN
СВЕТОДИОД ЦВЕТ СОСТОЯНИЕ ОПИСАНИЕ
PWR
SYS
LAN 10M
LAN 100M
DSL
PPP/ACT
Зеленый
Зеленый
Красный Горит
Зеленый
Оранжевый
Зеленый
Зеленый
Оранжевый Горит OMNI ADSL LAN инициирует соединение PPPoE
Горит Питание подается на OMNI ADSL LAN
Не горит Питание не подается на OMNI ADSL LAN
Горит
Мигает OMNI ADSL LAN перезагружается
Не горит OMNI ADSL LAN не готов или неисправен
Горит
Мигает OMNI ADSL LAN принимает или передает данные
Не горит
Горит
Мигает OMNI ADSL LAN принимает или передает данные
Не горит
Горит
Мигает OMNI ADSL LAN инициализирует линию DSL
Не горит Канал DSL не работает
Мигает OMNI ADSL LAN принимает или передает данные
Не горит
OMNI ADSL LAN функционирует надлежащим
образом
На OMNI ADSL LAN подается недостаточное
питание
OMNI ADSL LAN успешно установил соединение
Ethernet 10 Мбит/с
Ни одно устройство не подключено на скорости
10 Мбит/с
OMNI ADSL LAN успешно установил соединение
Ethernet 100 Мбит/с
Ни одно устройство не подключено на скорости
100 Мбит/с
OMNI ADSL LAN успешно установил связь с
концентратором DSLAM
OMNI ADSL LAN готов, но не передает и не
принимает данные
РУССКИЙ
Нажмите кнопку питания. Загорится светодиод PWR. Светодиод SYS сначала
мигает, а потом горит постоянно. Светодиоды LAN и DSL загораются, если
подключения были выполнены правильно.
Page 14

14
Заводские настройки OMNI ADSL LAN по
умолчанию
IP-адрес ЛВС 192.168.1.1 Пароль по умолчанию 1234
Маска подсети 255.255.255.0 IP-пул DHCP 192.168.1.33 – 192.168.1.64
Информация для доступа в Интернет
Ваш Интернет-провайдер (ISP - Internet Service Provider) или телефонная компания должны предоставить
большую часть следующей информации или предварительно настроить OMNI ADSL LAN при заключении
договора о предоставлении доступа в Интернет. Вам не обязательно знать значения всех полей.
ОБЯЗАТЕЛЬНЫЕ СВЕДЕНИЯ
Идентификатор виртуального пути (VPI):
Идентификатор виртуального канала (VCI):
Мультиплексирование (на базе VC или на базе LLC):
IP-адрес Вашего устройства в глобальной сети (если назначен):
Инкапсуляция:
❑ VC ❑ LLC
❑ RFC 1483
❑ ENET ENCAP IP-адрес шлюза инкапсуляции Ethernet:
❑ PPPoA Имя пользователя: Пароль:
❑ PPPoE Название услуги (PPPoE):
Имя пользователя: Пароль:
Подготовка Вашей сети
На всех компьютерах должна быть установлена сетевая карта 10M или 100M и протокол TCP/IP. TCP/IP
уже должен быть инсталлирован на компьютерах с системами Windows NT/2000/XP, Macintosh OS 7 или
РУССКИЙ
более поздними операционными системами. Информацию по настройке статического IP-адреса на
компьютере смотрите в Руководстве пользователя.
Приведенные здесь процедуры применимы в случае динамического
назначения IP-адреса.
Настройка компьютера с Windows 95/98/Me
Инсталляция компонентов TCP/IP
1. Щелкните на Start (Пуск), Settings (Настройка), Control Panel (Панель управления), а затем дважды
щелкните на иконке Network (Сеть).
2. На закладке Configuration (Настройки) в окне Network (Сеть) показан список установленных
компонентов.
Для установки TCP/IP:
a. Щелкните Add (Добавить) в окне Network (Сеть).
b. Выберите Protocol (Протокол) и щелкните Add (Добавить).
c. Выберите Microsoft из списка производителей.
d. Выберите TCP/IP из списка сетевых протоколов и щелкните на OK.
Page 15

15
Конфигурирование TCP/IP
1. В окне Network (Сеть) на закладке Configuration (Настройки), выберите позицию TCP/IP для своего
сетевого адаптера и щелкните Properties (Свойства).
2. Щелкните на закладке IP Address (IP-адрес). Щелкните Obtain an IP address automatically (Получить IPадрес автоматически).
3. Щелкните на закладке DNS Configuration (Конфигурация DNS). Выберите Disable DNS (Отключить
DNS).
4. Щелкните на закладке Gateway (Шлюз). Выделите любой установленный шлюз и щелкните на кнопке
Remove (Удалить) для его удаления, пока в списке не останется ни одного шлюза.
5. Щелкните на кнопке OK для сохранения, а затем закройте окно TCP/IP Properties (Свойства TCP/IP).
6. Щелкните на кнопке OK, чтобы закрыть окно Network (Сеть).
7. Включите OMNI ADSL LAN и перезапустите компьютер (при наличии соответствующей подсказки) При
появлении соответствующей подсказки вставьте компакт-диск с Windows.
Проверка свойств TCP/IP
1. Щелкните Start (Пуск), а затем на Run (Выполнить). В окне Run (Выполнить) введите “winipcfg”, а
затем щелкните на OK для перехода к окну IP Configuration (Настройки IP).
2. Выберите сетевой адаптер. При этом должен быть выведен IP-адрес и маска подсети Вашего
компьютера, а также шлюз по умолчанию.
Настройка компьютера под управлением Windows NT/2000/XP
Конфигурирование TCP/IP
1. Щелкните на Start (Пуск), Settings (Настройка), Network and Dial-up Connections (Сеть и удаленный
доступ к сети), затем правой кнопкой мыши щелкните на Local Area Connection (Подключение
к локальной сети) или соединении, которое нужно сконфигурировать, и щелкните Properties
(Свойства). В Windows XP щелкните Start (Пуск), Settings (Настройка), Network and Internet Connections
(Подключения к локальной сети и Интернет) и затем Network Connections (Сетевые подключения).
Правой кнопкой мыши щелкните на сетевом соединении, которое нужно сконфигурировать, а затем
щелкните Properties (Свойства).
2. Выберите Internet Protocol (TCP/IP) (Протокол
Интернета (TCP/IP)) (на закладке General
(Общие) в WinXP) и щелкните Properties
(Свойства).
3. Откроется окно Internet Protocol (TCP/IP)
Properties (Свойства протокола Интернета (TCP/
IP)). Щелкните Obtain an IP address automatically
(Получить IP-адрес автоматически).
4. Щелкните Obtain DNS server automatically
(Получить IP-адрес сервера DNS
автоматически).
5. Щелкните Advanced (Дополнительно), выберите
закладку IP Settings (Настройки IP) и удалите
все установленные шлюзы, затем щелкните OK.
6. Щелкните OK для сохранения и закройте окно
Internet Protocol (TCP/IP) Properties (Свойства
протокола Интернета (TCP/IP)).
7. Щелкните на OK, чтобы закрыть окно Local Area
Connection Properties (Свойства подключения к
локальной сети).
8. Включите OMNI ADSL LAN и перезапустите компьютер (при появлении соответствующей подсказки).
РУССКИЙ
Page 16

16
Проверка свойств TCP/IP
1. Щелкните Start (Пуск), Programs (Программы), Accessories (Стандартные) и Command Prompt
(Командная строка).
2. В окне Command Prompt (Командная строка) введите “ipconfig” и нажмите на клавишу ENTER. В окне
будет показана информация об IP-адресе, маске подсети и шлюзе по умолчанию Вашего компьютера.
Настройка компьютера Macintosh
Конфигурирование TCP/IP
1. Щелкните на меню Apple, Control Panel (Панель управления), а затем дважды щелкните на TCP/IP,
чтобы открыть TCP/IP Control Panel (Панель управления TCP/IP).
2. Выберите Ethernet из списка Connect via (Подключиться через).
3. Выберите Using DHCP Server (При помощи сервера DHCP) из списка Configure (Настройка).
4. Закройте окно TCP/IP Control Panel (Панель управления TCP/IP).
5. При появлении соответствующей подсказки щелкните Save (Сохранить) для сохранения изменений в
конфигурации.
6. Включите OMNI ADSL LAN и перезапустите компьютер (при появлении соответствующей подсказки).
Проверка свойств TCP/IP
Проверьте свойства TCP/IP в окне TCP/IP Control Panel (Панель управления TCP/IP).
Доступ к OMNI ADSL LAN
Доступ к OMNI ADSL LAN при помощи Web-конфигуратора или SMT через сеанс связи Telnet.
Процедура настройки через Web-конфигуратор
1. Запустите Web-браузер и введите адрес “192.168.1.1”.
2. Введите “admin” в качестве имени пользователя, “1234” (по умолчанию) в качестве пароля и нажмите
клавишу ENTER.
3. Должен появиться экран SITE MAP (КАРТА САЙТА). Щелкните иконку справки (расположена в правой
верхней части всех экранов) для получения оперативной справки на основе HTML.
Процедура настройки SMT через Telnet
1. Запустите программу Telnet. В Windows щелкните Start (Пуск), а затем Run (Выполнить).
2. Введите “Telnet” и через пробел IP-адрес OMNI ADSL LAN, (по умолчанию 192.168.1.1), и щелкните OK
РУССКИЙ
для отображения экрана ввода пароля.
3. Введите “1234”, пароль по умолчанию, для доступа к главному меню системной консоли. При вводе
пароля набираемые символы на экране заменяются на символ звездочки “ * ”.
Page 17

17
Устранение неисправностей
ПРОБЛЕМА СПОСОБ УСТРАНЕНИЯ
Не горят светодиоды
PWR и/или SYS.
Не загорается
светодиод LAN.
Светодиод DSL не
горит.
Нет доступа к меню
SMT.
Нет доступа к Webконфигуратору.
Невозможно
связаться ни с
одним компьютером
локальной сети.
Невозможно получить
доступ в Интернет.
Убедиться, что адаптер питания подсоединен к OMNI ADSL LAN
и к соответствующему источнику питания. Проверьте, включен ли OMNI ADSL
LAN и источник питания.
Выключить и снова включить OMNI ADSL LAN. Если проблема не исчезла,
возможно, имеет место аппаратная неисправность. В этом случае следует
связаться с продавцом или сервисными центрами.
Проверьте кабельное подключение к порту локальной сети OMNI ADSL LAN.
Убедитесь, что сетевая карта компьютера функционирует надлежащим
образом.
Проверьте соединение между портом DSL модема OMNI ADSL LAN и стенной
розеткой.
По умолчанию установлен пароль SMT “1234”. Если Вы сменили пароль и
забыли его, необходимо сбросить настройки OMNI ADSL LAN или загрузить
файл конфигурации по умолчанию (смотрите Руководство пользователя).
Проверьте, что IP-адрес компьютера и IP-адрес OMNI ADSL LAN принадлежат
одной подсети.
Если Вы изменили IP-адрес OMNI ADSL LAN в локальной сети по умолчанию,
введите новый в поле адреса.
Убедитесь в правильности введенного имени пользователя и пароля.
По умолчанию имя пользователя - “admin”, а пароль - “1234”. Если Вы забыли
пароль, необходимо сбросить настройки OMNI ADSL LAN. См. Руководство
пользователя.
Если светодиод 10/100M LAN не горит, проверьте кабельные подключения
между OMNI ADSL LAN и компьютером или концентратором.
Проверьте конфигурацию TCP/IP на компьютере. Убедитесь, что IP-адрес
и маска подсети OMNI ADSL LAN находятся в одной подсети с компьютерами
локальной сети.
Убедитесь, что OMNI ADSL LAN включен и подсоединен к сети.
Если светодиод DSL не горит, проверьте кабель между OMNI ADSL LAN
и телефонной розеткой.
Убедитесь в правильности введенного имени пользователя. При вводе имени
пользователя может учитываться регистр.
РУССКИЙ
Page 18

18
Page 19

19
Інструкція з установлення
© 2004, ZyXEL Communications Corp. Усі права захищені.
Забороняється відтворювати чи передавати в будь-якому вигляді та в будь-який спосіб будь-яку частину
цієї публікації без письмового дозволу видавця. Інформація в цьому посібнику може бути змінена без
особливого повідомлення. Фірма ZyXEL Communications Corporation не несе відповідальності за жодні
помилки, які можуть мати місце в цьому посібнику. Знаки товарів та послуг, згадані в цьому посібнику,
використані виключно з інформаційною метою й є власністю їхніх власників. Відомості про номери
сертифікатів та термін їх чинності можна отримати в мережі Інтернет на офіційному сервері фірми за
адресою http://www.zyxel–europe.com.
Розпакування модема
Перед встановленням модема перевірте його комплектацію за наведеним далі переліком, щоб
пересвідчитися в наявності всіх комплектуючих. У коробці повинні знаходитися:
• Модем ZyXEL OMNI ADSL LAN
• Інструкція з установлення
• Блок живлення 220 В
• Кабель Ethernet
• Розгалужувач
• Два телефонних кабелі
• Компакт-диск із документацією
Зверніться до фірми, на якій був придбаний модем, якщо якісь комплектуючі з наведеного переліку
відсутні.
УКРАЇНСЬКА
Реєстрація прав користувача
Зареєструвати модем можна через Інтернет за адресою http://www.zyxel–europe.com
Реєстрація через Інтернет надасть додатковий рік безкоштовного гарантійного обслуговування, а також
певні інші вигоди.
Page 20

20
Пристрій OMNI ADSL LAN: тильна панель
із гніздами
УКРАЇНСЬКА
ПОРТ З’ЄДНАННЯ
Приєднайте порт DSL модему до гнізда ADSL розгалужувача, а телефон – до
гнізда TEL розгалужувача. Гніздо LINE розгалужувала, в свою чергу, приєднайте
DSL
LAN 10/100M
(Порт ЛОМ)
RESET
(Відновлення
заводських уставок)
ЖИВЛЕННЯ
до телефонної розетки. Для цього використовуйте телефонні кабелі, наявні в
комплекті поставки.
Увага! Вставляти з’єднувач RJ-11 у порт RJ-45
забороняється.
За допомогою кабелю для мережі Ethernet приєднайте цей порт до комп’ютера
(з платою Ethernet) або концентратора (якщо в мережі декілька комп’ютерів).
Цей порт автоматично визначає швидкість з’єднання (може з’єднувати як на
10, так і на 100 Мбіт/с) і має автоматичне розпізнавання перехрещення ліній
(автоматично пристосовується до кабелю Ethernet як без перехрещення, так і з
перехрещенням ліній).
Натискайте цю кнопку, лише якщо забули пароль або ІР-адресу пристрою OMNI
ADSL LAN. Параметри пристрою OMNI ADSL LAN автоматично повертаються до
заводських.
У це гніздо вставте шнур комплектного блоку живлення від електромережі, який
відповідає вашому регіону.
Page 21

21
Світлодіоди на передній панелі
пристрою OMNI ADSL LAN
СВІТЛОДІОД КОЛІР СТАН ОПИСАННЯ
PWR
SYS
LAN 10M
LAN 100M
DSL
PPP/ACT
Натисніть вимикач живлення. Світлодіод PWR (Живлення) світиться
постійно. Світлодіод SYS (Система) миготить, а потім світиться постійно.
Світлодіоди LAN (ЛОМ) і DSL світяться, якщо відповідні з’єднання правильні.
Зелений
Зелений
Червоний Світиться Живлення пристрою OMNI ADSL LAN недостатнє
Зелений
Жовтогарячий
Зелений
Зелений
Жовтогарячий Світиться
Світиться Пристрій OMNI ADSL LAN має живлення
Вимкнений Пристрій OMNI ADSL LAN не має живлення
Світиться Пристрій OMNI ADSL LAN працює нормально
Миготить Пристрій OMNI ADSL LAN перезапускається
Вимкнений
Світиться
Миготить Пристрій OMNI ADSL LAN приймає або передає дані
Вимкнений
Світиться
Миготить Пристрій OMNI ADSL LAN приймає або передає дані
Вимкнений
Світиться
Миготить Пристрій OMNI ADSL LAN ініціалізує канал DSL.
Вимкнений Канал DSL не працює
Миготить Пристрій OMNI ADSL LAN приймає або передає дані
Вимкнений
Пристрій OMNI ADSL LAN не готовий або зазнав
порушення нормальної роботи
Пристрій OMNI ADSL LAN успішно встановив
з’єднання в мережі Ethernet на 10 Мбіт/с
На швидкості 10 Мбіт/с не приєднаний жоден
пристрій
Пристрій OMNI ADSL LAN успішно встановив
з’єднання в мережі Ethernet на 100 Мбіт/с
На швидкості 100 Мбіт/с не приєднаний жоден
пристрій
Пристрій OMNI ADSL LAN успішно встановив зв’язок
через DSLAM
Пристрій OMNI ADSL LAN готовий, але не передає й
не приймає даних
Пристрій OMNI ADSL LAN намагається встановити
з’єднання PPPoE
УКРАЇНСЬКА
Page 22

22
Заводські параметри пристрою OMNI ADSL LAN
ІР-адреса в ЛОМ 192.168.1.1 Пароль за умовчанням 1234
Маска підмережі 255.255.255.0 Сукупність ІР-адрес DHCP
(динамічного протоколу
конфігурації локальної станції)
192.168.1.33 – 192.168.1.64
Інформація про абонемент Інтернет
Провайдер (надавач послуг Інтернет) або телефонна компанія мають надати більшість поданої далі
інформації або виконати настроювання пристрою OMNI ADSL LAN, коли ви купуєте абоненемент на доступ
до Інтернет. Знання всіх полів не потрібне.
ОБОВ’ЯЗКОВА ІНФОРМАЦІЯ
Ідентифікатор віртуального шляху (VPI):
Ідентифікатор віртуального каналу (VCI):
Мультиплексування (на основі VC [віртуальних каналів]
або LLC [керування логічним каналом]):
IP-адреса вашого пристрою в регіональній обчислювальній мережі (РОМ) (якщо надається):
Інкапсуляція:
❑ VC ❑ LLC
❑ RFC 1483
❑ ENET ENCAP IP-адреса шлюзу інкапсуляції мережі Ethernet:
❑ PPPoA Ім’я користувача: Пароль:
❑ PPPoE Ім’я системної служби (PPPoE):
УКРАЇНСЬКА
Ім’я користувача: Пароль:
Підготовка мережі
В усіх комп’ютерах мають бути встановлені мережні плати на 10 або 100 Мбіт/с і протокол TCP/IP.
Зазвичай протокол TCP/IP встановлюється виробником на комп’ютерах з операційними системами
Windows NT/2000/XP, Macintosh OS 7 та новішими. Докладніше про настроювання статичної ІР-адреси
комп’ютера див. Інструкцію з експлуатації.
Далі описано порядок присвоєння динамічної ІР-адреси.
Настроювання комп’ютерів із Windows 95/98/Me
Установлення компонентів TCP/IP
1. Натисніть Start (Пуск), Settings (Параметри), Control Panel (Панель керування) й двічі клацніть на
піктограмі Network (Мережа).
2. У вікні Network (Мережа) під вкладкою Configuration (Конфігурація) знаходиться перелік установлених
компонентів.
Для встановлення TCP/IP:
a. У вікні Network (Мережа) натисніть Add (Додати).
b. Виберіть Protocol (Протокол), натисніть Add (Додати).
c. З переліку виробників виберіть Microsoft (фірма Майкрософт).
d. Виберіть TCP/IP з переліку мережних протоколів і натисніть OK.
Page 23

23
Настроювання TCP/IP
1. У вікні Network (Мережа) перейдіть на вкладку Configuration (Конфігурація), виберіть TCP/IP для
встановленого мережного адаптера й натисніть Properties (Властивості).
2. Перейдіть на вкладку IP Address (ІР-адреса). Натисніть Obtain an IP address automatically (Отримувати
ІР-адресу автоматично).
3. Перейдіть на вкладку DNS Configuration (Настроювання серверу доменних імен). Виберіть Disable DNS
(Вимкнути сервер доменних імен).
4. Перейдіть на вкладку Gateway (Шлюз). Вибирайте по черзі встановлені шлюзи й натискайте щоразу
Remove (Видалити), поки в переліку не залишиться жодного.
5. Натсиніть OK, аби закрити вікно TCP/IPProperties (Властивості протоколу Інтернет ТСР/ІР).
6. Натисніть OK, аби закрити вікно Network (Мережа).
7. Ввімкніть пристрій OMNI ADSL LAN і перезавантажте комп’ютер на вимогу програми. На вимогу вставте
компакт-диск Windows.
Перевірка властивостей TCP/IP
1. Натисніть Start (Пуск), потім Run (Виконати). У вікні Run (Виконати) уведіть “winipcfg” і натисніть OK,
аби відкрити вікно IP Configuration (Настроювання ІР).
2. Виберіть наявний мережний адаптер. На екрані з’являються IP-адреса, маска підмережі та шлюз за
умовчанням комп’ютера.
Настроювання комп’ютерів із Windows NT/2000/XP
Настроювання TCP/IP
1. Натисніть Start (Пуск), Settings (Параметри), Network and Dial-up Connections (З’єднання з мережею
та комутовані). Виберіть правою кнопкою мишки Local Area Connection (З’єднання через локальну
мережу) або інше з’єднання, яке бажано настроїти, й виберіть Properties (Властивості). У Windows XP
натисніть start (Пуск), Control Panel (Панель керування), Network (Мережа), далі Internet Connections
(З’єднання з Інтернет), нарешті, Network Connections (З’єднання з мережею). Виберіть правою
кнопкою мишки мережне з’єднання, яке потрібно настроїти, й натисніть Properties (Властивості).
2. Виберіть Internet Protocol (TCP/IP) (Протокол Інтернет) (на вкладці General (Загальні) у Win XP) та
виберіть Properties (Властивості).
3. Відкривається вікно Internet Protocol TCP/IP
Properties (Властивості протоколу Інтернет ТСР/
ІР). Натисніть Obtain an IP address automatically
(Отримувати ІР-адресу автоматично).
4. Натисніть Obtain DNS server automatically
(Отримувати сервер доменних імен
автоматично).
5. Натисніть Advanced (Докладно), перейдіть на
вкладку IP Settings (Параметри ІР), видаліть усі
встановлені шлюзи й натисніть OK.
6. Виберіть OK, аби зберегти параметри й закрити
вікно Internet Protocol (TCP/IP) Properties
(Властивості протоколу Інтернет ТСР/ІР).
7. Виберіть OK аби закрити вікно Local Area
Connection Properties (Властивості з’єднання в
локальній мережі).
8. Увімкніть пристрій OMNI ADSL LAN і
перезавантажте комп’ютер на вимогу програми.
УКРАЇНСЬКА
Page 24

24
Перевірка властивостей TCP/IP
1. Натисніть Start (Пуск), Programs (Програми), Accessories (Приладдя) і Command Prompt (Запрошення
до команди).
2. У вікні Command Prompt (Запрошення до команди) введіть “ipconfig” і натисніть ENTER (Виконати). На
екрані з’являється вікно з такою інформацією: IP-адреса, маска підмережі, шлюз за умовчанням.
Настроювання комп’ютера Macintosh
Настроювання властивостей TCP/IP
1. Перейдіть у меню Apple, натисніть Control Panel (Панель керування), двічі клацніть на TCP/IP.
Відкривається панель керування TCP/IP Control Panel.
2. Виберіть Ethernet з переліку Connect via (З’єднання через).
3. Виберіть Using DHCP Server (Використовувати сервер DHCP) з переліку Configure (Настроювання).
4. Закрийте панель керування TCP/IP Control Panel.
5. На вимогу програми натисніть Save (Записати), аби записати зміни конфігурації.
6. Увімкніть пристрій OMNI ADSL LAN і перезавантажте комп’ютер на вимогу програми.
Перевірка властивостей TCP/IP
Перевірка властивостей TCP/IP виконується на панелі керування TCP/IP Control Panel.
Доступ до пристрою OMNI ADSL LAN
Доступ до пристрою OMNI ADSL LAN здійснюється через Майстер “web configurator” або термінал
адміністрування системи (SMT) у сеансі telnet.
Настроювання за допомогою Майстра “Web Configurator”
1. Запустіть програму-оглядач і введіть в рядку URL значення “192.168.1.1”.
2. У полі імені користувача введіть “admin”, у полі паролю “1234” (пароль за умовчанням) і натисніть
ENTER (Виконати).
УКРАЇНСЬКА
3. На екрані з’являється мапа вузла (SITE MAP). Виберіть піктограму довідки (help) (у правій верхній
частині кожного екрану), аби отримати довідку в форматі HTML.
Настроювання за допомогою SMT через мережу Telnet
1. Запустіть програму Telnet. У Windows натисніть Start (Пуск), потім Run (Виконати).
2. Уведіть “Telnet”, пробіл та IP-адресу пристрою OMNI ADSL LAN, (за умовчанням 192.168.1.1) та
натисніть OK, аби вивести екран введення паролю.
3. Уведіть пароль за умовчанням “1234”, аби ввійти в головне меню SMT. Під час уведення паролю
замість символів, що вводяться, на екрані з’являються зірочки “ * ” .
Page 25

25
Несправності та їх усунення
НЕСПРАВНІСТЬ УСУНЕННЯ
Світлодіоди PWR (Живлення)
або SYS (Система) не
світяться.
Сітлодіод LAN (ЛОМ) не
світиться.
Світлодіод DSL не світиться. Перевірте з’єднання між портом DSL пристрою OMNI ADSL LAN і
Немає доступу до меню SMT. Пароль SMT за умовчанням “1234”. Якщо ви змінили пароль і забули
Немає доступу до Майстра
“web configurator”.
Команда “ping” не виявляє
жодного комп’ютера ЛОМ.
Немає доступу до Інтернет. Переконайтеся, що пристрій OMNI ADSL LAN увімкнений і приєднаний
Переконайтеся, що блок живлення приєднаний до пристрою OMNI
ADSL LAN і до відповідної електромережі. Переконайтеся, що пристрій
OMNI ADSL LAN ввімкнений, а в мережі є напруга.
Вимкніть і знов увімкніть пристрій OMNI ADSL LAN. Якщо він однаково
не працює як слід, можливо, він несправний. У цьому разі зверніться до
фірми, де було придбано пристрій.
Перевірте кабельне з’єднання порту LAN (ЛОМ) пристрою OMNI ADSL
LAN.
Переконайтеся, що мережна плата комп’ютера працює належним
чином.
розеткою.
його, натисніть кнопку Reset пристрою OMNI ADSL LAN, аби відновити
заводські параметри, або завантажте файл із конфігурацією за
умовчанням (див. Інструкцію з експлуатації).
Переконайтеся, що ІР-адреси комп’ютера й пристрою OMNI ADSL LAN
належать до однієї підмережі.
Якщо ІР-адресу пристрою OMNI ADSL LAN у ЛОМ було змінено, введіть
нову як URL.
Переконайтеся, що ім’я користувача й пароль уведено правильно.
За умовчанням ім’я користувача “admin”, а пароль “1234”. Якщо ви
забули пароль, натисніть кнопку Reset пристрою OMNI ADSL LAN. Див.
Інструкцію з експлуатації.
Якщо світлодіод 10/100M LAN не світиться, перевірте кабель між
пристроєм OMNI ADSL LAN і комп’ютером чи концентратором.
Перевірте конфігурацію TCP/IP комп’ютера. Перевірте, чи ІР-адреси та
маски підмережі пристрою OMNI ADSL LAN та комп’ютерів знаходяться
в одній підмережі.
до мережі.
Якщо на пристрої OMNI ADSL LAN не світиться світлодіод DSL,
перевірте кабель між пристроєм OMNI ADSL LAN та телефонною
розеткою.
Перевірте, чи правильно введено ім’я користувача. Можливо, в імені
користувача розрізняються верхній і нижній регістри.
УКРАЇНСЬКА
Page 26

26
Page 27

27
Page 28

6 Innovation Road II
Science Based Industrial Park
Hsinchu, 300 Taiwan R.O.C.
www.zyxel-europe.com
 Loading...