

ZyXEL G570S Users Manual

6.13 Security Parameters Summary
Refer to this table to see what other security parameters you should configure for each
authentication method/ key management protocol type. You enter manual keys by first
selecting 64-bit WEP, 128-bit WEP or 152-bit WEP from the WEP Encryption field and
then typing the keys (in ASCII or hexadecimal format) in the key text boxes. MAC address
filters are not dependent on how you configure these security features.
Table 16 Wireless Security Relational Matrix
AUTHENTICATION
METHOD/ KEY
MANAGEMENT
PROTOCOL
Open None No Disable
Open WEP No Enable with Dynamic WEP Key
Shared WEP No Enable with Dynamic WEP Key
WPA TKIP No Enable
WPA-PSK TKIP Yes Enable
WPA2 AES No Enable
WPA2-PSK AES Yes Enable
ENCRYPTION
METHOD
ENTER MANUAL
KEY
Yes Enable without Dynamic WEP Key
Yes Disable
Yes Enable without Dynamic WEP Key
Yes Disable
ZyXEL G-570S User’s Guide
IEEE 802.1X
6.14 Wireless Client WPA Supplicants
A wireless client supplicant is the software that runs on an operating system instructing the
wireless client how to use WPA. At the time of writing, the most widely available supplicants
are the WPA patch for Windows XP, Funk Software's Odyssey client, and Meetinghouse Data
Communications' AEGIS client.
The Windows XP patch is a free download that adds WPA capability to Windows XP's builtin "Zero Configuration" wireless client. However, you must run Windows XP to use it.
6.15 Configuring Wireless Security
In order to configure and enable wireless security; click SETTINGS > WIRELESS >
Security to display the Security screen. This screen varies according to the encryption method
you select.
Chapter 6 Wireless Screens 81

ZyXEL G-570S User’s Guide
6.15.1 Wireless Security: Disable
If you do not enable any wireless security on your device, your network is accessible to any
wireless networking device that is within range.
Figure 47 Wireless Security: Disable
The following table describes the labels in this screen.
Table 17 Wireless Security: Disable
LABEL DESCRIPTION
Encryption Method Select Disable to have no wireless LAN security configured.
Apply Click Apply to save your changes back to the device.
Reset Click Reset to begin configuring this screen afresh.
6.15.2 Wireless Security: WEP
WEP provides a mechanism for encrypting data using encryption keys. Both the AP and the
wireless stations must use the same WEP key to encrypt and decrypt data. You can configure
up to four 64-bit, 128-bit or 152-bit WEP keys, but only one key can be used at any one time.
82 Chapter 6 Wireless Screens
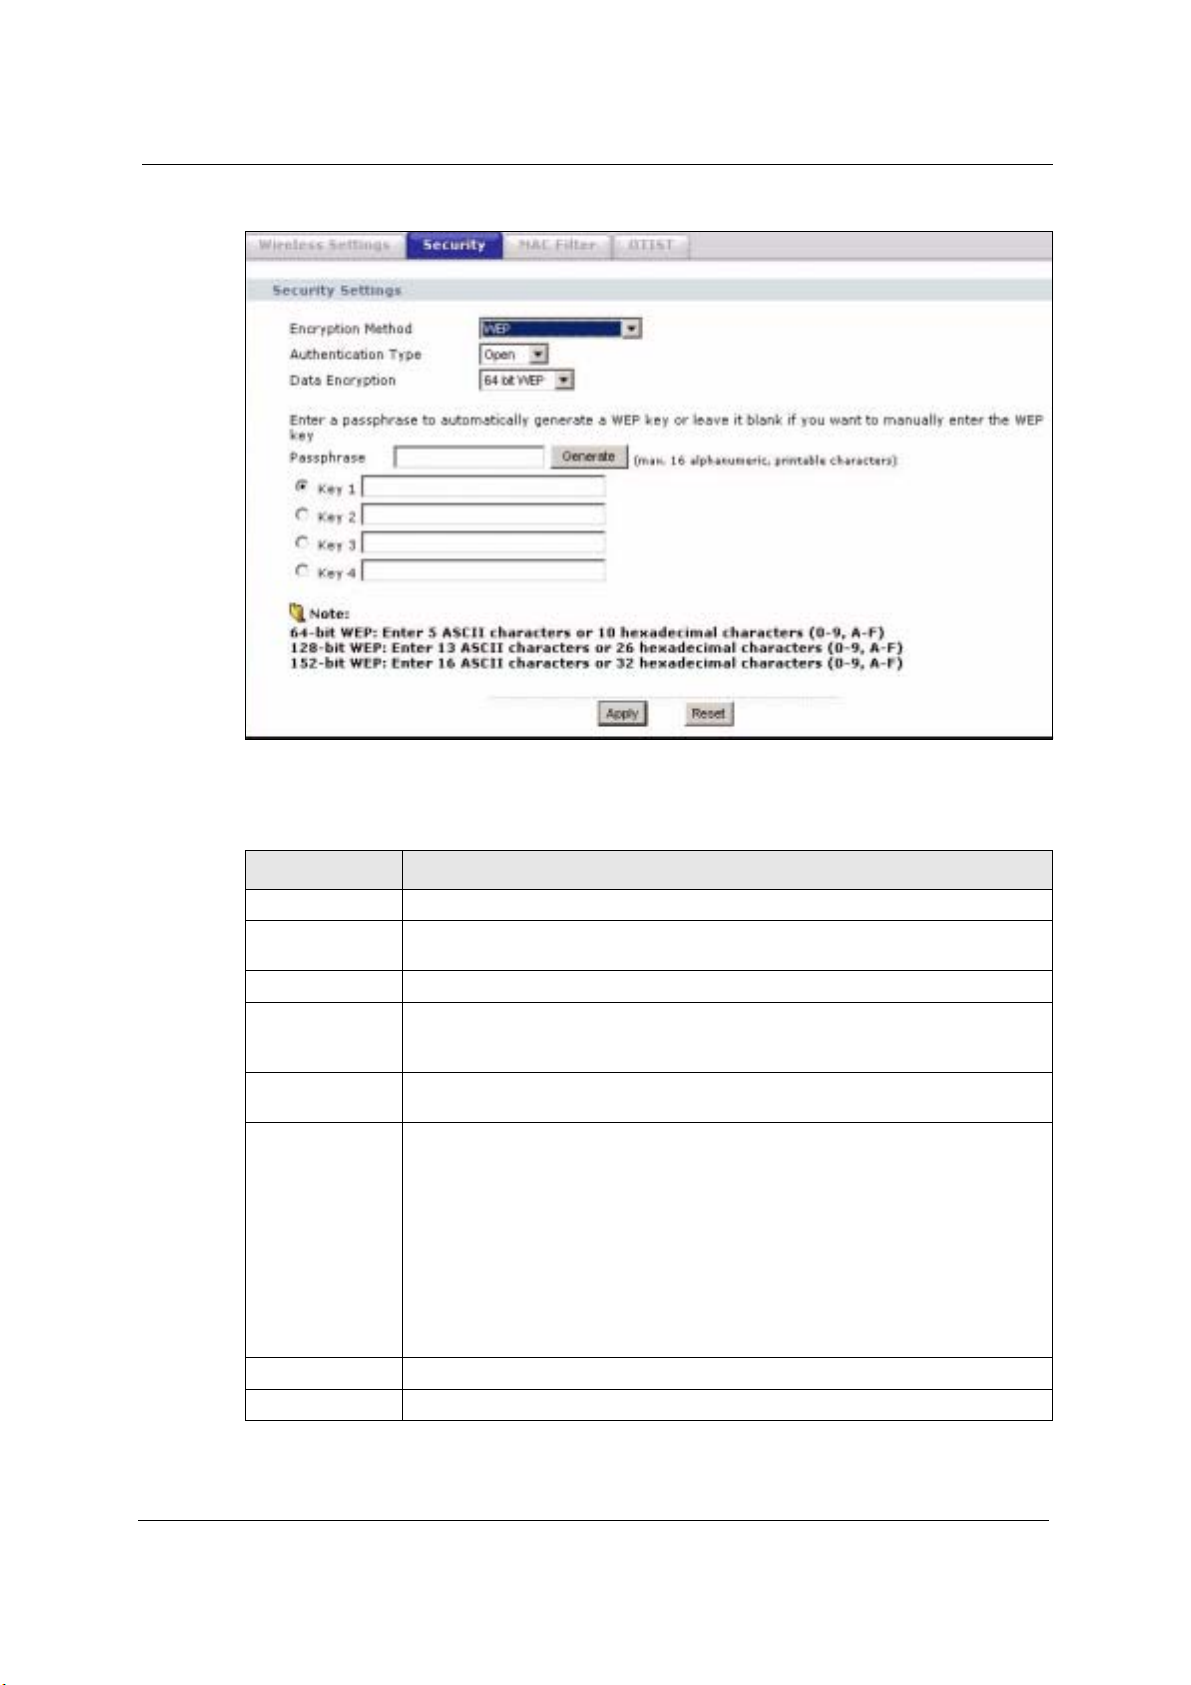
Figure 48 Wireless Security: WEP
ZyXEL G-570S User’s Guide
The following table describes the labels in this screen.
Table 18 Wireless Security: WEP
LABEL DESCRIPTION
Encryption Method Select WEP if you want to configure WEP encryption parameters.
Authentication
Type
WEP Encryption Select 64 bit WEP, 128 bit WEP or 152 bit WEP to enable data encryption.
Passphrase If you selected 64-bit or 128-bit WEP, you can enter a “passphrase” (password
Generate After you enter the passphrase, click Generate to have the device generates four
Key 1 to
Key 4
Apply Click Apply to save your changes back to the device.
Reset Click Reset to begin configuring this screen afresh.
Select Auto, Open or Shared from the drop-down list box.
phrase) of up to 32 case-sensitive printable characters and click Generate to have
the device create four different WEP keys.
different WEP keys automatically.
If you want to manually set the WEP keys, enter the WEP key in the field provided.
Select a WEP key to use for data encryption.
The WEP keys are used to encrypt data. Both the device and the wireless stations
must use the same WEP key for data transmission.
If you chose 64 bit WEP, then enter any 5 ASCII characters or 10 hexadecimal
characters ("0-9", "A-F").
If you chose 128 bit WEP, then enter 13 ASCII characters or 26 hexadecimal
characters ("0-9", "A-F").
If you chose 152 bit WEP, then enter 16 ASCII characters or 32 hexadecimal
characters ("0-9", "A-F").
Chapter 6 Wireless Screens 83
ZyXEL G-570S User’s Guide
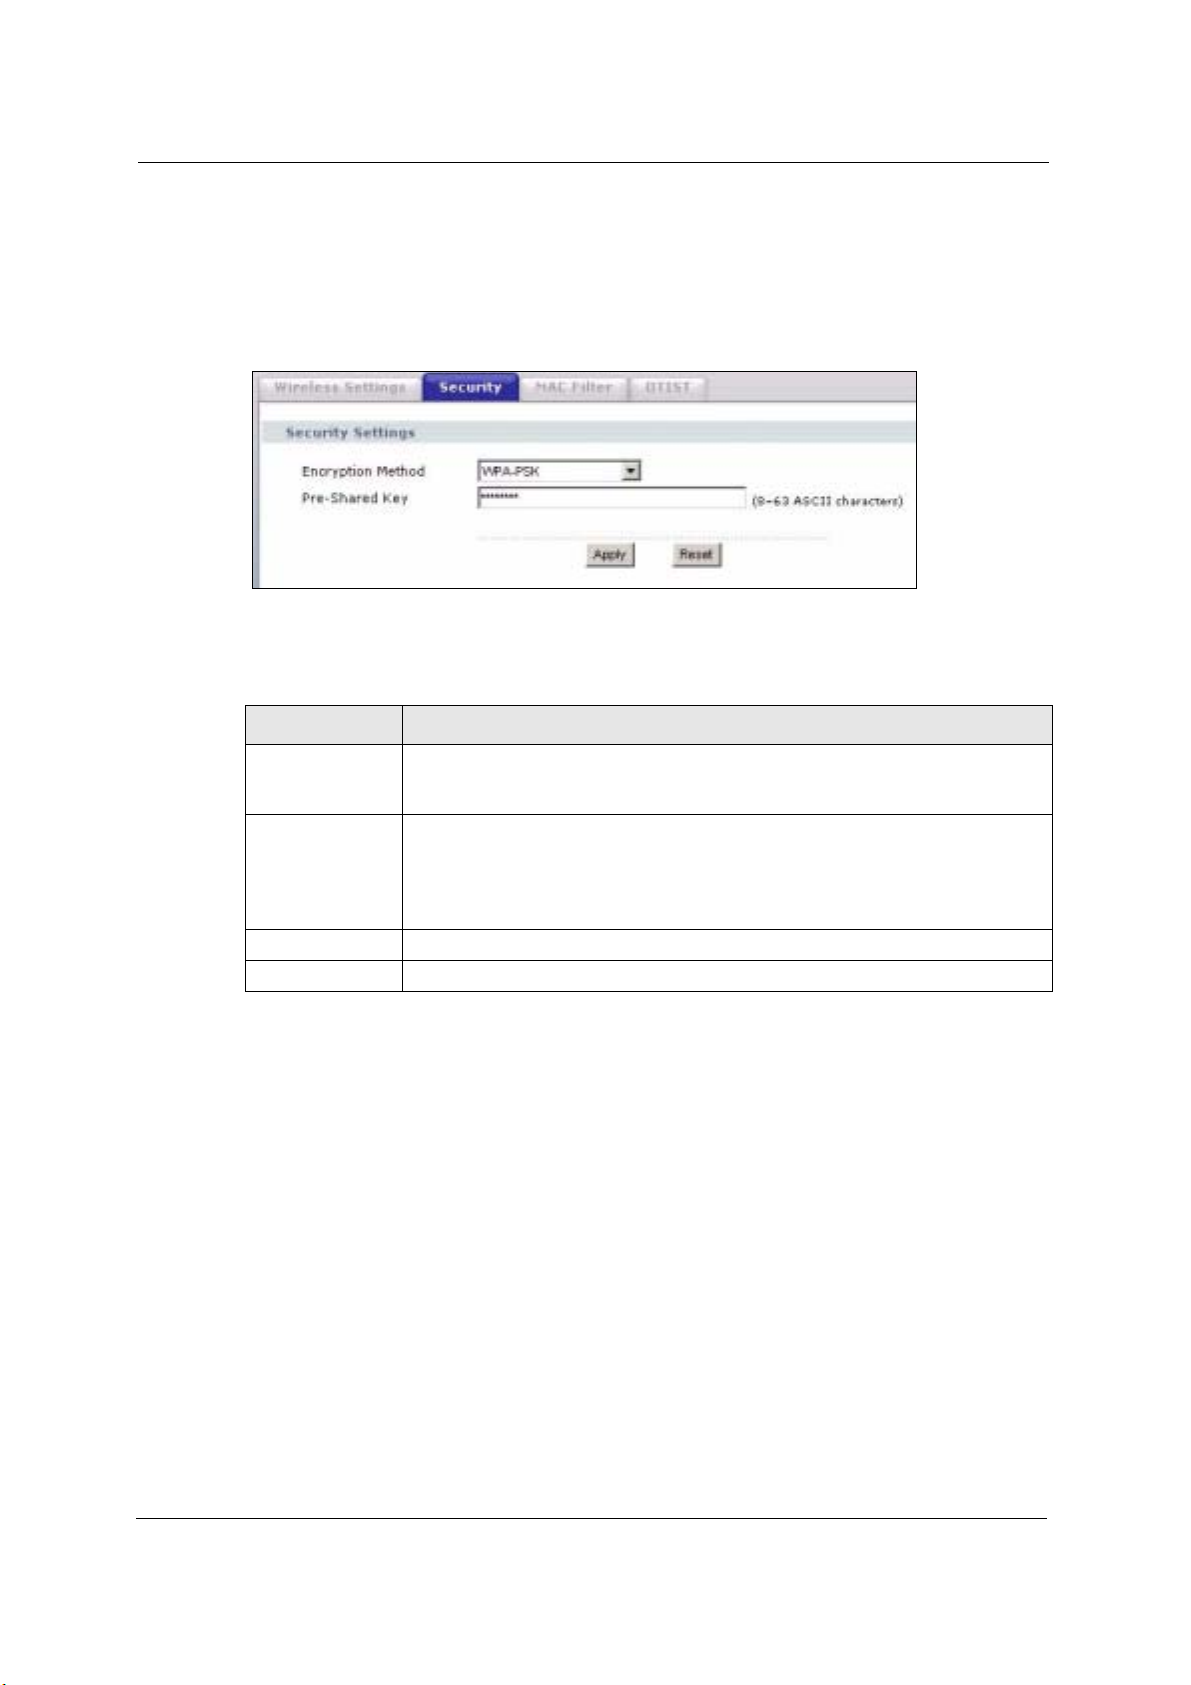
6.15.3 Wireless Security: WPA(2)-PSK
Select WPA-PSK, WPA2-PSK or WPA-PSK & WPA2-PSK in the Encryption Method
drop down list-box to display the screen displays as next.
Figure 49 Wireless Security: WPA(2)-PSK
The following table describes the labels in this screen.
Table 19 Wireless Security: WPA-PSK
LABEL DESCRIPTION
Encryption Method Select WPA-PSK, WPA2-PSK or WPA-PSK & WPA2-PSK if you want to
Pre-Shared Key The encryption mechanisms used for WPA and WPA-PSK are the same. The only
Apply Click Apply to save your changes back to the device.
Reset Click Reset to begin configuring this screen afresh.
configure a pre-shared key. Choose this option only if your wireless clients support
it.
difference between the two is that WPA-PSK uses a simple common password,
instead of user-specific credentials.
Type a pre-shared key from 8 to 63 ASCII characters (including spaces and
symbols). This field is case-sensitive.
6.15.4 Wireless Security: WPA(2)
WPA (Wi-Fi Protected Access) is a subset of the IEEE 802.11i standard. WPA2 (IEEE
802.11i) is a wireless security standard that defines stronger encryption, authentication and
key management than WPA. Key differences between WPA(2) and WEP are user
authentication and improved data encryption.
84 Chapter 6 Wireless Screens
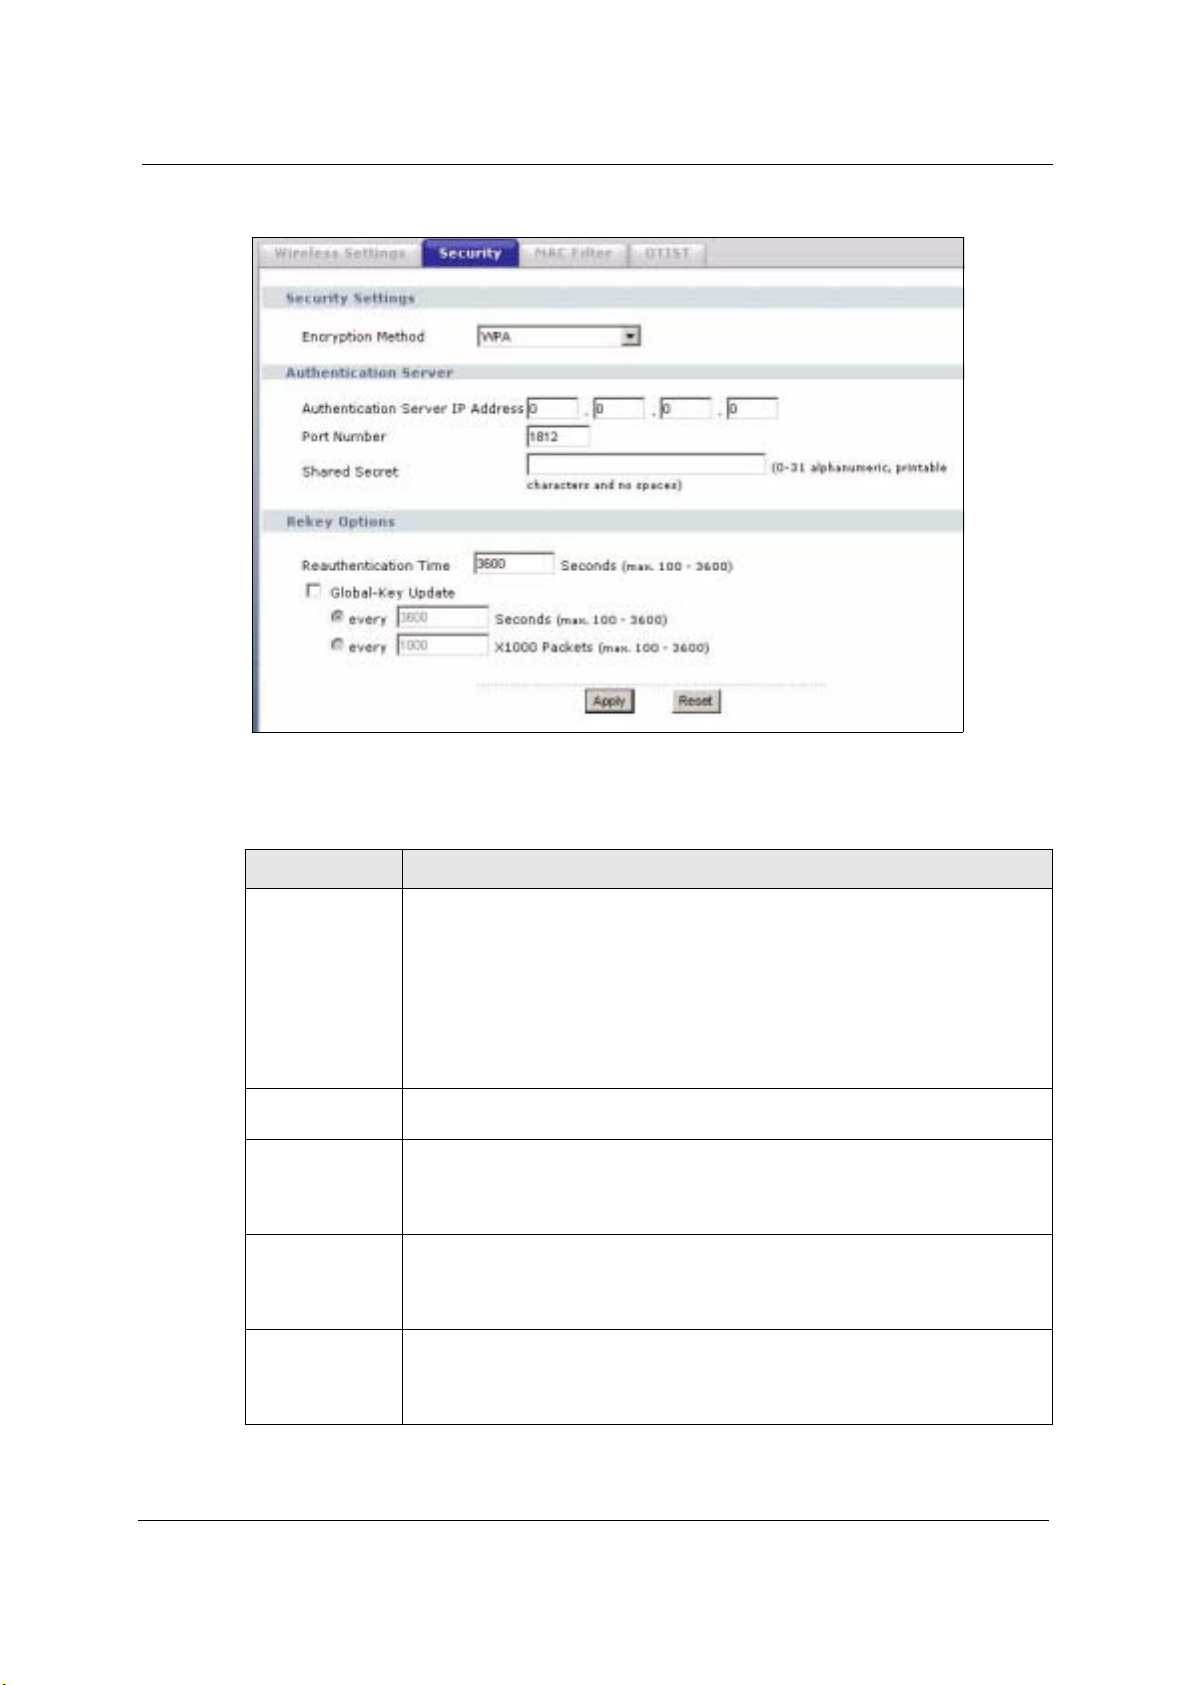
Figure 50 Wireless Security: WPA(2)
ZyXEL G-570S User’s Guide
The following table describes the labels in this screen.
Table 20 Wireless Security: WPA(2)
LABEL DESCRIPTION
Encryption Method Select WPA, WPA2 or WPA & WPA2 to configure user authentication and
improved data encryption.
Note: WPA, WPA2 and IEEE 802.1x wireless security are not
available when you use Wireless Client, Bridge or
AP+Repeater mode.
You can only use WEP keys to encrypt traffic between APs.
Authentication
Server IP Address
Port Number Enter the port number of the external authentication server. The default port
Shared Secret Enter a password (up to 63 printable characters) as the key to be shared between
Reauthentication
Time
Enter the IP address of the external authentication server in dotted decimal
notation.
number is 1812.
You need not change this value unless your network administrator instructs you to
do so with additional information.
the external authentication server and the device.
The key must be the same on the external authentication server and your device.
The key is not sent over the network.
Specify how often wireless stations have to resend user names and passwords in
order to stay connected. Enter a time interval between 100 and 3600 seconds.
If wireless station authentication is done using a RADIUS server, the
reauthentication timer on the RADIUS server has priority.
Chapter 6 Wireless Screens 85

ZyXEL G-570S User’s Guide
Table 20 Wireless Security: WPA(2) (continued)
LABEL DESCRIPTION
Global-Key
Update
Apply Click Apply to save your changes back to the device.
Reset Click Reset to begin configuring this screen afresh.
This is how often the AP sends a new group key out to all clients. The re-keying
process is the WPA equivalent of automatically changing the WEP key for an AP
and all stations in a WLAN on a periodic basis.
Specify an interval either in seconds or thousands of packets that the device
sends.
6.15.5 Wireless Security: IEEE 802.1x
The IEEE 802.1x standard outlines enhanced security methods for both the authentication of
wireless stations and encryption key management.
Note: Once you enable user authentication, you need to specify an external RADIUS
server on the device for authentication.
Figure 51 Wireless Security: 802.1x
86 Chapter 6 Wireless Screens

The following table describes the labels in this screen.
Table 21 Wireless Security: 802.1x
LABEL DESCRIPTION
ZyXEL G-570S User’s Guide
Encryption Method Select 802.1X to configure authentication of wireless stations and encryption key
management.
Note: WPA, WPA2 and IEEE 802.1x wireless security are not
available when you use Bridge or AP+Repeater mode. You
can only use WEP keys to encrypt traffic between APs.
Data Encryption Select None to allow wireless stations to communicate with the access points
Authentication
Server IP Address
Port Number Enter the port number of the external authentication server. The default port
Shared Secret Enter a password (up to 63 printable characters) as the key to be shared between
Reauthentication
Time
Global-Key
Update
Apply Click Apply to save your changes back to the device.
Reset Click Reset to begin configuring this screen afresh.
without using dynamic WEP key exchange.
Select 64 bits WEP, 128 bits WEP or 152 bits WEP to enable data encryption.
Up to 32 stations can access the device when you configure dynamic WEP key
exchange.
Enter the IP address of the external authentication server in dotted decimal
notation.
number is 1812.
You need not change this value unless your network administrator instructs you to
do so with additional information.
the external authentication server and the device.
The key must be the same on the external authentication server and your device.
The key is not sent over the network.
Specify how often wireless stations have to resend user names and passwords in
order to stay connected. Enter a time interval between 100 and 3600 seconds.
If wireless station authentication is done using a RADIUS server, the
reauthentication timer on the RADIUS server has priority.
This is how often the AP sends a new group key out to all clients. The re-keying
process is the WPA equivalent of automatically changing the WEP key for an AP
and all stations in a WLAN on a periodic basis.
Specify an interval either in seconds or thousands of packets that the device
sends.
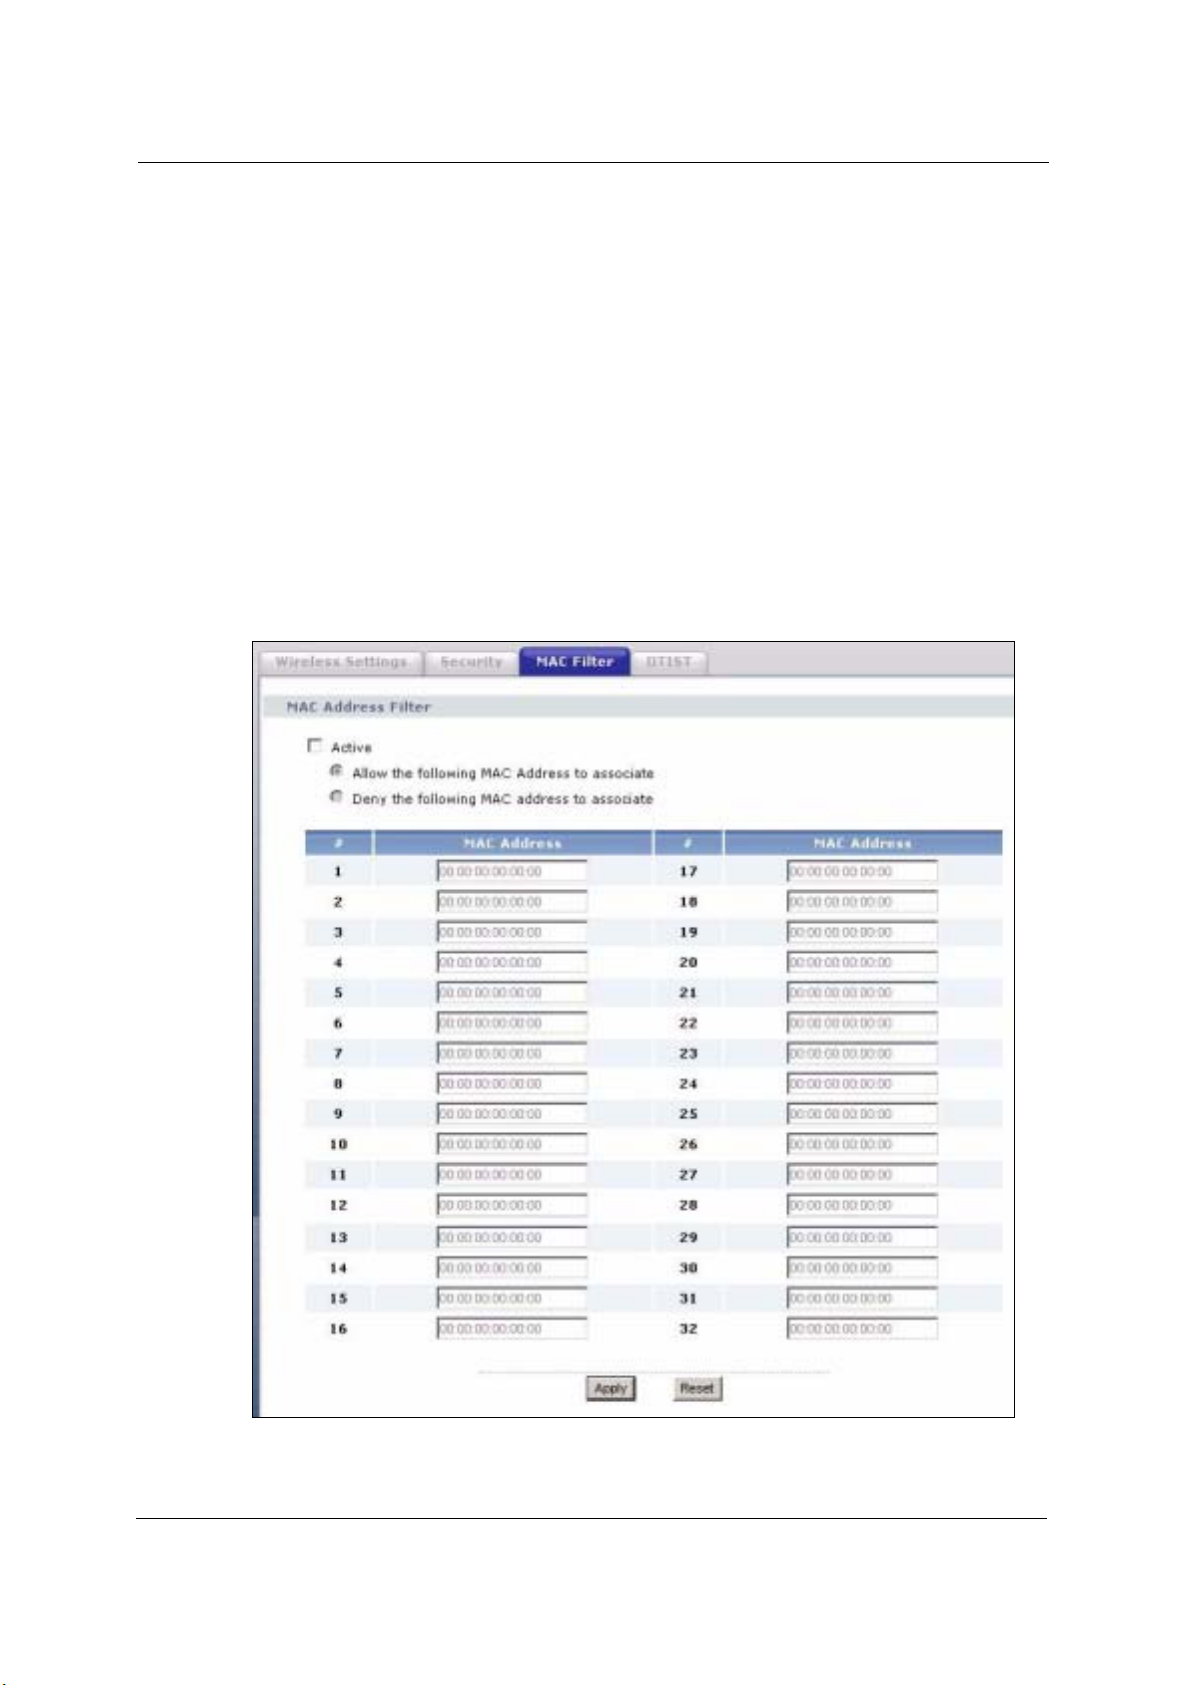
6.16 MAC Filter
The MAC filter screen allows you to give exclusive access to up to 32 devices (Allow
Association) or exclude up to 32 devices from accessing the device (Deny Association). Every
Ethernet device has a unique MAC (Media Access Control) address. The MAC address is
assigned at the factory and consists of six pairs of hexadecimal characters, for example,
00:A0:C5:00:00:02. You need to know the MAC addresses of the devices to configure this
screen.
The MAC filter works when the device functions as an AP. It allows or denies wireless client
access. The MAC filter does not apply to bridge or repeater functions.
Chapter 6 Wireless Screens 87
ZyXEL G-570S User’s Guide
The following applies if you set the device to client mode and want to connect to an AP that
uses a MAC filter. After the device turns on in client mode, it clones the MAC address of the
first packets that it receives from devices connected to the Ethernet port. It uses this MAC
address on the packets that it sends to an AP. All of the packets that the device sends to an AP
will appear to be from the first device that connected to the Ethernet port. If you turn the
device off and back on, it again clones the MAC address of the first packets that it receives
from devices connected to the Ethernet port. You may be able to check the association list on
the AP to determine which MAC address the device is currently using.
To change your device's MAC filter settings, click WIRELESS > SETTINGS > MAC
Filter. The screen appears as shown.
Note: Be careful not to list your computer's MAC address and select Deny the
following MAC address to associate when managing the device via a
wireless connection. This would lock you out.
Figure 52 MAC Filter
88 Chapter 6 Wireless Screens

The following table describes the labels in this screen.
Table 22 MAC Filter
LABEL DESCRIPTION
ZyXEL G-570S User’s Guide
Active Select the check box to enable MAC address filtering and define the filter action for
# This is the index number of the MAC address.
MAC Address Enter the MAC addresses (in XX:XX:XX:XX:XX:XX format) of the wireless station
Apply Click Apply to save your changes back to the device.
Reset Click Reset to begin configuring this screen afresh.
6.17 OTIST
In a wireless network, the wireless clients must have the same SSID and security settings as
the access point (AP) or wireless router (we will refer to both as “AP” here) in order to
associate with it. Traditionally this meant that you had to configure the settings on the AP and
then manually configure the exact same settings on each wireless client.
OTIST (One-Touch Intelligent Security Technology) allows you to transfer your AP’s SSID
and WEP or WPA-PSK security settings to wireless clients that support OTIST and are within
transmission range. You can also choose to have OTIST generate a WPA-PSK key for you if
you didn’t configure one manually.
the list of MAC addresses in the MAC address filter table.
Select Allow the following MAC address to associate to permit access to the
device, MAC addresses not listed will be denied access to the device.
Select Deny the following MAC address to associate to block access to the
device, MAC addresses not listed will be allowed to access the device.
that are allowed or denied access to the device in these address fields.
Note: OTIST replaces the pre-configured wireless settings on the wireless clients.
6.17.1 Enabling OTIST
You must enable OTIST on both the AP and wireless client before you start transferring
settings.
Note: The AP and wireless client(s) MUST use the same Setup key.
6.17.1.1 AP
You can enable OTIST using the OTIST button or the web configurator.
6.17.1.1.1 OTIST Button
If you use the OTIST button, the default (01234567) or previous saved (through the web
configurator) Setup key is used to encrypt the settings that you want to transfer.
Chapter 6 Wireless Screens 89
ZyXEL G-570S User’s Guide
Hold in the OTIST button for one or two seconds.
6.17.1.1.2 Web Configurator
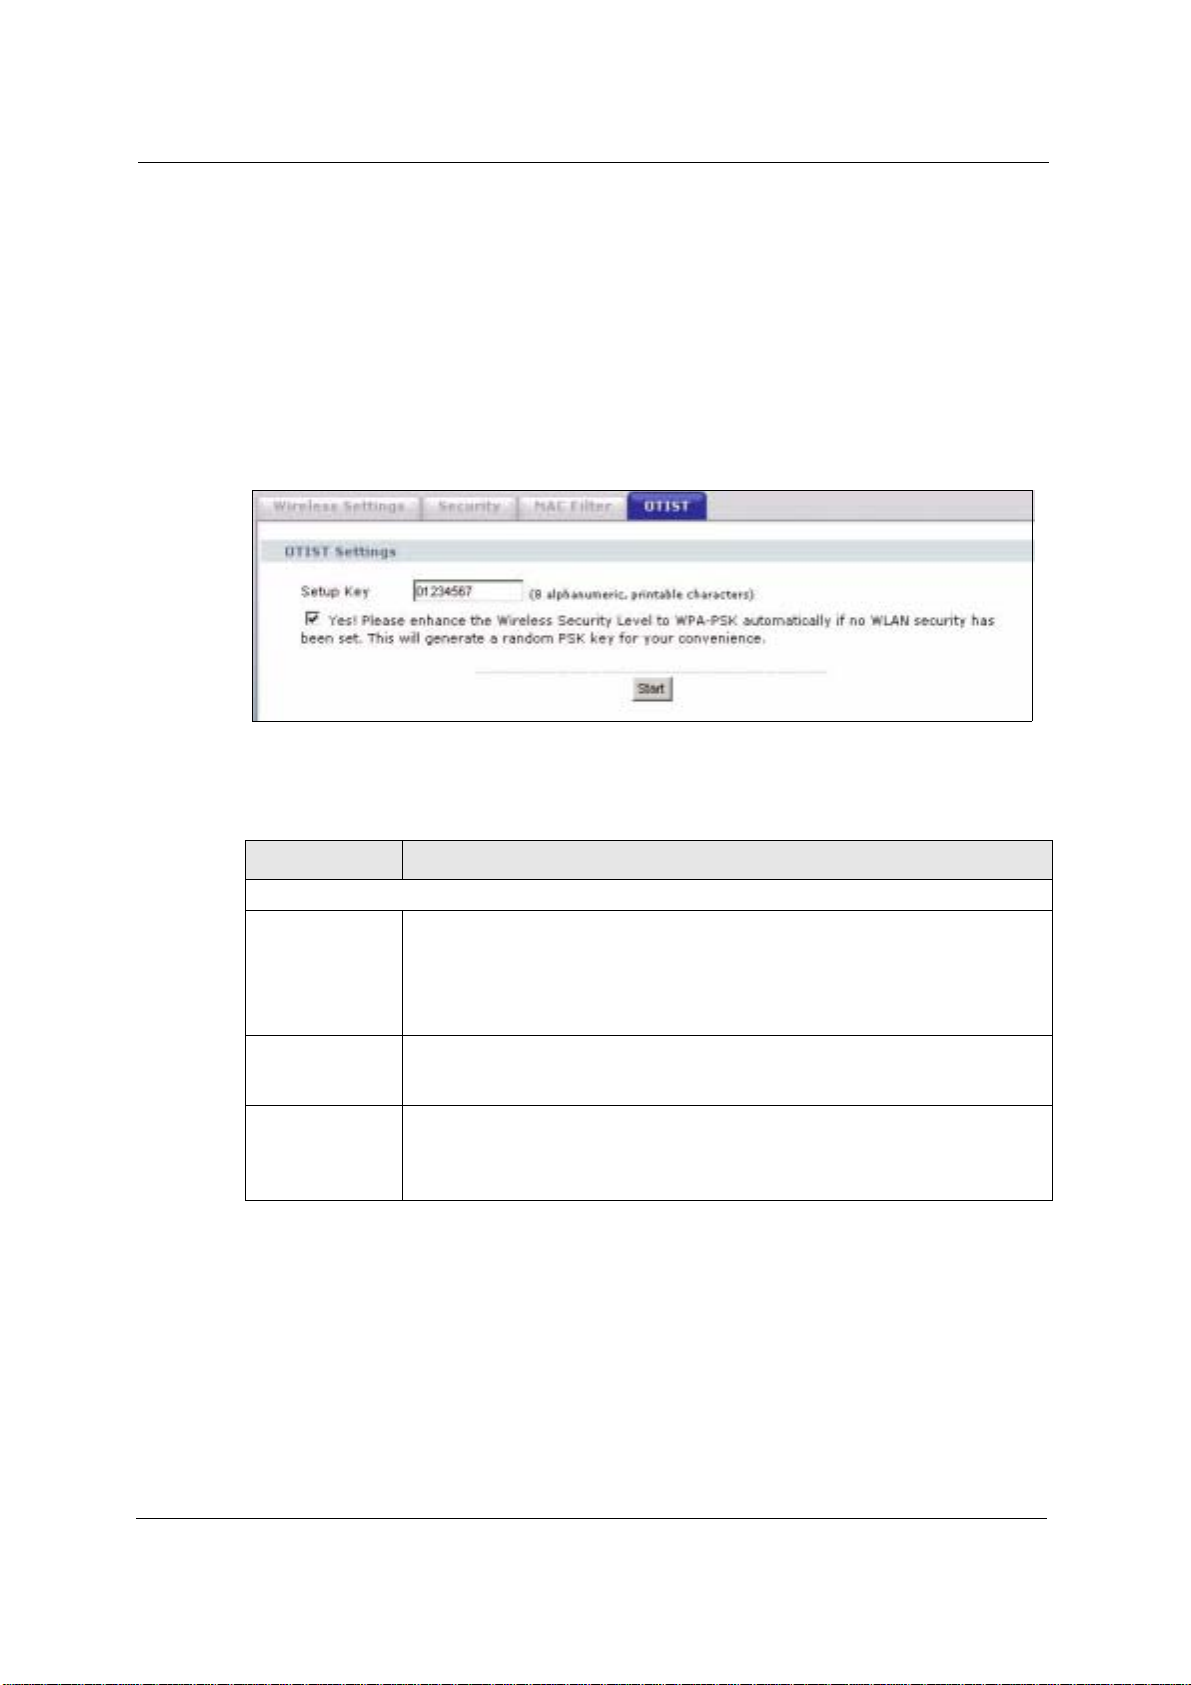
Click WIRELESS > SETTINGS > OTIST to configure and enable OTIST. The screen
appears as shown.
Note: At the time of writing the device does not support OTIST in the wireless client
mode.
Figure 53 OTIST
The following table describes the labels in this screen.
Table 23 OTIST
LABEL DESCRIPTION
One-Touch Intelligent Security Technology
Setup Key Enter the setup key of up to eight printable characters. The default OTIST setup
Yes! To have OTIST automatically generate a WPA-PSK key, select this check box. If
Start Click Start to encrypt the wireless security data using the setup key and have the
6.17.1.2 Wireless Client
Start the ZyXEL utility and click the Adapter tab. Select the OTIST check box, enter the
same Setup Key as your AP’s and click Save.
key is "01234567".
Note: If you change the OTIST setup key here, you must also make
the same change on the wireless client(s).
you manually configured a WEP key or a WPA-PSK key and you also select this
check box, then the key you manually configured is used.
device set the wireless client to use the same wireless settings as the device. You
must also activate and start OTIST on the wireless client at the same time.
The process takes three minutes to complete.
90 Chapter 6 Wireless Screens

Figure 54 Example Wireless Client OTIST Screen
6.17.2 Starting OTIST
ZyXEL G-570S User’s Guide
Note: You must click Start in the AP OTIST web configurator screen and in the
wireless client(s) Adapter screen all within three minutes (at the time of
writing). You can start OTIST in the wireless clients and AP in any order but
they must all be within range and have OTIST enabled.
1 In the AP, a web configurator screen pops up showing you the security settings to
transfer. After reviewing the settings, click OK.
Figure 55 Security Key
Chapter 6 Wireless Screens 91

ZyXEL G-570S User’s Guide
2 This screen appears while OTIST settings are being transferred. It closes when the
transfer is complete.
Figure 56 OTIST in Progress (AP)
Figure 57 OTIST in Progress (Client)
• In the wireless client, you see this screen if it can't find an OTIST-enabled AP (with the
sameSetup key). Click OK to go back to the ZyXEL utility main screen.
Figure 58 No AP with OTIST Found
• If there is more than one OTIST-enabled AP within range, you see a screen asking you to
select one AP to get settings from.
6.17.3 Notes on OTIST
1 If you enabled OTIST in the wireless client, you see this screen each time you start the
utility. Click Yes for it to search for an OTIST-enabled AP.
92 Chapter 6 Wireless Screens

ZyXEL G-570S User’s Guide
Figure 59 Start OTIST?
2 If an OTIST-enabled wireless client loses its wireless connection for more than ten
seconds, it will search for an OTIST-enabled AP for up to one minute. (If you manually
have the wireless client search for an OTIST-enabled AP, there is no timeout; click
Cancel in the OTIST progress screen to stop the search.)
3 When the wireless client finds an OTIST-enabled AP, you must still click Start in the AP
OTIST web configurator screen or hold in the OTIST button (for one or two seconds)
for the AP to transfer settings.
4 If you change the SSID or the keys on the AP after using OTIST, you need to run OTIST
again or enter them manually in the wireless client(s).
5 If you configure OTIST to generate a WPA-PSK key, this key changes each time you run
OTIST. Therefore, if a new wireless client joins your wireless network, you need to run
OTIST on the AP and ALL wireless clients again.
Chapter 6 Wireless Screens 93

ZyXEL G-570S User’s Guide
94 Chapter 6 Wireless Screens

Management Screens
This chapter describes the Maintenance screens.
7.1 Maintenance Overview
Use these maintenance screens to change the password, view logs, back up or restore the G570S configuration and change the web configurator language.
7.2 Password
To change your device's password (recommended), click SETTINGS > MANAGEMENT.
The screen appears as shown. This screen allows you to change the device's password.
ZyXEL G-570S User’s Guide
CHAPTER 7
If you forget your password (or the device IP address), you will need to reset the device. See
the section on resetting the device for details.
Figure 60 Management: Password
The following table describes the labels in this screen.
Table 24 Management: Password
LABEL DESCRIPTION
Current Password Type in your existing system password (1234 is the default password).
New Password Type your new system password (up to 30 printable characters). Spaces are not
Retype to Confirm Retype your new system password for confirmation.
allowed.
Note that as you type a password, the screen displays an asterisk (*) for each
character you type.
Chapter 7 Management Screens 95

ZyXEL G-570S User’s Guide
Table 24 Management: Password (continued)
LABEL DESCRIPTION
Apply Click Apply to save your changes back to the device.
Cancel Click Cancel to reload the previous configuration for this screen.
7.3 Logs
Click SETTINGS > MANAGEMENT > Logs to open the Logs screen.
You can view logs and alert messages in this screen. Once the log table is full, old logs are
deleted as new logs are created.
Click a column heading to sort the entries. A triangle indicates the direction of the sort order.
Figure 61 Management: Logs
The following table describes the labels in this screen.
Table 25 Management: Logs
LABEL DESCRIPTION
Display Select a category of logs to view.
Refresh Click Refresh to renew the log screen.
Clear Log Click Clear Log to clear all the logs.
# This is the log’s index number.
Time This field displays the time the log was recorded. It is the number of seconds since
Message This field states the reason for the log.
96 Chapter 7 Management Screens
the last time the system turned on.

Table 25 Management: Logs (continued)
LABEL DESCRIPTION
ZyXEL G-570S User’s Guide
Source This field lists the source IP address and the port number of the incoming packet
Destination This field lists the destination IP address and the port number of the outgoing
Note This field displays additional information about the log entry.
that caused the log.
packet that caused the log.
7.4 Configuration File
The configuration file (often called the romfile or rom-0) contains the factory default settings
such as password and TCP/IP Setup, etc. It arrives from ZyXEL with a .rom filename
extension. Once you have customized the device's settings, they can be saved back to your
computer under a filename of your choosing.
Click SETTINGS > MANAGEMENT > Configuration File. Information related to factory
defaults, backup configuration, and restoring configuration appears as shown next.
Figure 62 Management: Configuration File
Chapter 7 Management Screens 97
ZyXEL G-570S User’s Guide
7.4.1 Backup Configuration
Backup configuration allows you to back up (save) the device's current configuration to a file
on your computer. Once your device is configured and functioning properly, it is highly
recommended that you back up your configuration file before making configuration changes.
The backup configuration file will be useful in case you need to return to your previous
settings.
Click Backup to save the device's current configuration to your computer.
7.4.2 Restore Configuration
Restore configuration allows you to upload a new or previously saved configuration file from
your computer to your device.
Table 26 Management: Configuration File: Restore Configuration
LABEL DESCRIPTION
File Path Type in the location of the file you want to upload in this field or click Browse ... to
Browse... Click Browse... to find the file you want to upload. Remember that you must
Upload Click Upload to begin the upload process.
find it.
decompress compressed (.zip) files before you can upload them.
Note: Do not turn off the device while configuration file upload is in progress.
The following screen displays. You must wait one minute before logging into the device
again.
Figure 63 Configuration Upload Successful
The device automatically restarts in this time causing a temporary network disconnect. In
some operating systems, you may see the following icon on your desktop.
98 Chapter 7 Management Screens

ZyXEL G-570S User’s Guide
Figure 64 Network Temporarily Disconnected
If you uploaded the default configuration file you may need to change the IP address of your
computer to be in the same subnet as that of the default device IP address (192.168.1.2).
If the upload was not successful, the following screen will appear. Click Return to go back to
the Configuration File screen.
Figure 65 Configuration Upload Error
7.4.3 Back to Factory Defaults
Clicking the RESET button in this section clears all user-entered configuration information
and returns the device to its factory defaults. The following warning screen will appear.
Figure 66 Reset Warning Message
You can also press the RESET button on the rear panel to reset the factory defaults of your
device. Refer to the section on resetting the device for more information on the RESET
button.
7.5 F/W Upload Screen
Find firmware at www.zyxel.com in a file that (usually) uses the system model name with a
.rmt extension, for example, "zyxel.rmt". The upload process uses HTTP (Hypertext Transfer
Protocol) and may take up to two minutes. After a successful upload, the system will reboot.
Chapter 7 Management Screens 99
ZyXEL G-570S User’s Guide
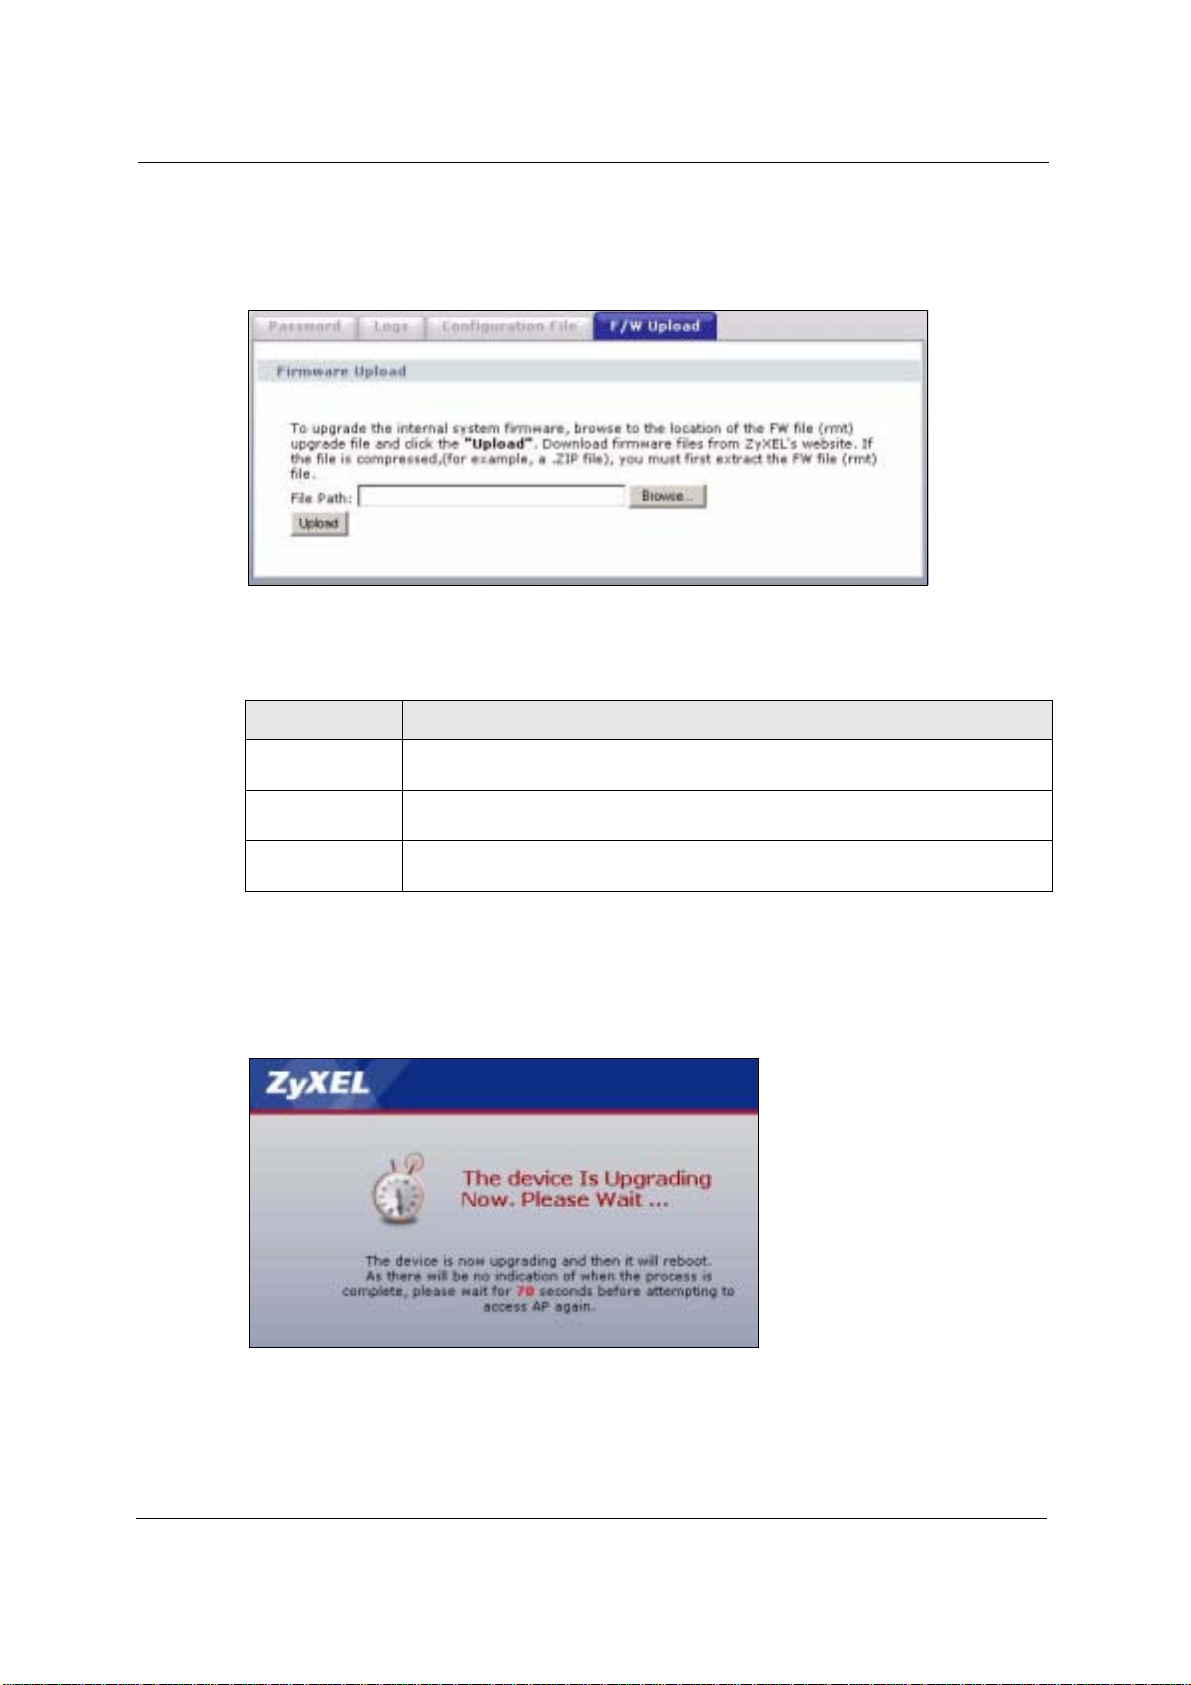
Click SETTINGS > MANAGEMENT > F/W Upload to display the screen as shown.
Follow the instructions in this screen to upload firmware to your device.
Figure 67 Management: F/W Upload
The following table describes the labels in this screen.
Table 27 Management: F/W Upload
LABEL DESCRIPTION
File Path Type in the location of the file you want to upload in this field or click Browse ... to
Browse... Click Browse... to find the .rmt file you want to upload. Remember that you must
Upload Click Upload to begin the upload process. This process may take up to two
find it.
decompress compressed (.zip) files before you can upload them.
minutes.
Note: Do not turn off the device while firmware upload is in progress!
The following screen appears. Wait two minutes before logging into the device again.
Figure 68 Firmware Upgrading Screen
The device automatically restarts in this time causing a temporary network disconnect. In
some operating systems, you may see the following icon on your desktop.
100 Chapter 7 Management Screens

ZyXEL G-570S User’s Guide
Figure 69 Network Temporarily Disconnected
After two minutes, log in again and check your new firmware version in the System Status
screen.
If the upload was not successful, the following status message displays at the bottom of the
screen.
Figure 70 Firmware Upload Error
Chapter 7 Management Screens 101

ZyXEL G-570S User’s Guide
102 Chapter 7 Management Screens

CHAPTER 8
Troubleshooting
This chapter covers potential problems and possible remedies. After each problem description,
some instructions are provided to help you to diagnose and to solve the problem.
8.1 Problems Starting Up the G-570S
Table 28 Troubleshooting the Start-Up of Your G-570S
PROBLEM CORRECTIVE ACTION
ZyXEL G-570S User’s Guide
None of the LEDs
turn on when I
plug in the power
adaptor.
The G-570S
reboots
automatically
sometimes.
Make sure you are using the supplied power adaptor and that it is plugged in to an
appropriate power source. Check that the power source is turned on.
If the problem persists, you may have a hardware problem. In this case, you should
contact your local vendor.
The supplied power to the G-570S is too low. Check that the G-570S is receiving
enough power.
Make sure the power source is working properly.
8.2 Problems with the Password
Table 29 Troubleshooting the Password
PROBLEM CORRECTIVE ACTION
I cannot access the
G-570S.
The Password field is case-sensitive. Make sure that you enter the correct
password using the proper casing.
Use the RESET button on the rear panel of the G-570S to restore the factory
default configuration file (hold this button in for about 10 seconds or release the
button when the PWR LED starts blinking). This will restore all of the factory
defaults including the password.
Chapter 8 Troubleshooting 103

ZyXEL G-570S User’s Guide
8.3 Problems with the WLAN Interface
Table 30 Troubleshooting the WLAN Interface
PROBLEM CORRECTIVE ACTION
Cannot access the
G-570S from the
WLAN.
I cannot ping any
computer on the
WLAN.
Make sure the wireless adapter on the wireless station is working properly.
Check that both the G-570S and your wireless station are using the same
ESSID, channel and security settings.
Make sure the wireless adapter on the wireless station(s) is working properly.
Check that both the G-570S and wireless station(s) are using the same ESSID,
channel and security settings.
8.4 Problems with the Ethernet Interface
Table 31 Troubleshooting the Ethernet Interface
PROBLEM CORRECTIVE ACTION
I cannot access the
G-570S from the
LAN.
I cannot ping any
computer on the
LAN.
If the ETHN LED on the front panel is off, check the Ethernet cable connection
between your G-570S and the Ethernet device connected to the ETHERNET
port.
Check for faulty Ethernet cables.
Make sure your computer’s Ethernet adapter is installed and working properly.
Check the IP address of the Ethernet device. Verify that the IP address and the
subnet mask of the G-570S, the Ethernet device and your computer are on the
same subnet.
If the ETHN LED on the front panel is off, check the Ethernet cable connections
between your G-570S and the Ethernet device.
Check the Ethernet cable connections between the Ethernet device and the
LAN computers.
Check for faulty Ethernet cables.
Make sure the LAN computer’s Ethernet adapter is installed and working
properly.
Verify that the IP address and the subnet mask of the G-570S, the Ethernet
device and the LAN computers are on the same subnet.
104 Chapter 8 Troubleshooting

Table 31 Troubleshooting the Ethernet Interface (continued)
PROBLEM CORRECTIVE ACTION
ZyXEL G-570S User’s Guide
Cannot access the
web configurator.
Your computer’s and the G-570S’s IP addresses must be on the same subnet
for LAN access.
If you changed the G-570S’s IP address, then enter the new one as the URL.
If you don’t know the G-570S’s IP address, type the device name of your G-
570S as the URL. ZyXELXXXX is the default where “XXXX” is the last four digits
of the MAC address. The MAC address is on the bottom of the device).
If you just changed the G-570S’s IP address, your computer’s cache of machine
names may contain an entry that maps the name of the G-570S to its previous
IP address.
In Windows, use nbtstat -R at the command prompt to delete all entries in your
computer’s cache of machine names.
Open a new browser window.
See the following section to check that pop-up windows, JavaScripts and Java
permissions are allowed.
You may also need to clear your Internet browser’s cache.
In Internet Explorer, click Tools and then Internet Options to open the Internet
Options screen.
In the General tab, click Delete Files. In the pop-up window, select the Delete
all offline content check box and click OK. Click OK in the Internet Options
screen to close it.
If you disconnect your computer from one device and connect it to another
device that has the same IP address, your computer’s ARP (Address Resolution
Protocol) table may contain an entry that maps the management IP address to
the previous device’s MAC address).
In Windows, use arp -d at the command prompt to delete all entries in your
computer’s ARP table.
Open a new browser window.
8.4.1 Pop-up Windows, JavaScripts and Java Permissions
In order to use the web configurator you need to allow:
• Web browser pop-up windows from your device.
• JavaScripts (enabled by default).
• Java permissions (enabled by default).
Note: Internet Explorer 6 screens are used here. Screens for other Internet Explorer
versions may vary.
8.4.1.1 Internet Explorer Pop-up Blockers
You may have to disable pop-up blocking to log into your device.
Either disable pop-up blocking (enabled by default in Windows XP SP (Service Pack) 2) or
allow pop-up blocking and create an exception for your device’s IP address.
Chapter 8 Troubleshooting 105
 Loading...