

Page 1

ZyAIR G-5100
Outdoor Dual-802.11g Wireless LAN Access Point & Bridge
Quick Start Guide
Version 3.50
5/2005
Page 2
ZyAIR G-5100
Overview
This Quick Start Guide covers how to set up and configure the ZyAIR as an Access Point (AP) to allow
wireless clients to access your wired network. See your User’s Guide for how to configure bridge/repeater
functions and for background information on all features. This Quick Start Guide is divided into the following
sections.
1 Requirements
2 Hardware Connections
3 Set Your Computer’s IP Address
4 Initial Configuration
5 Hardware Installation
6 Troubleshooting
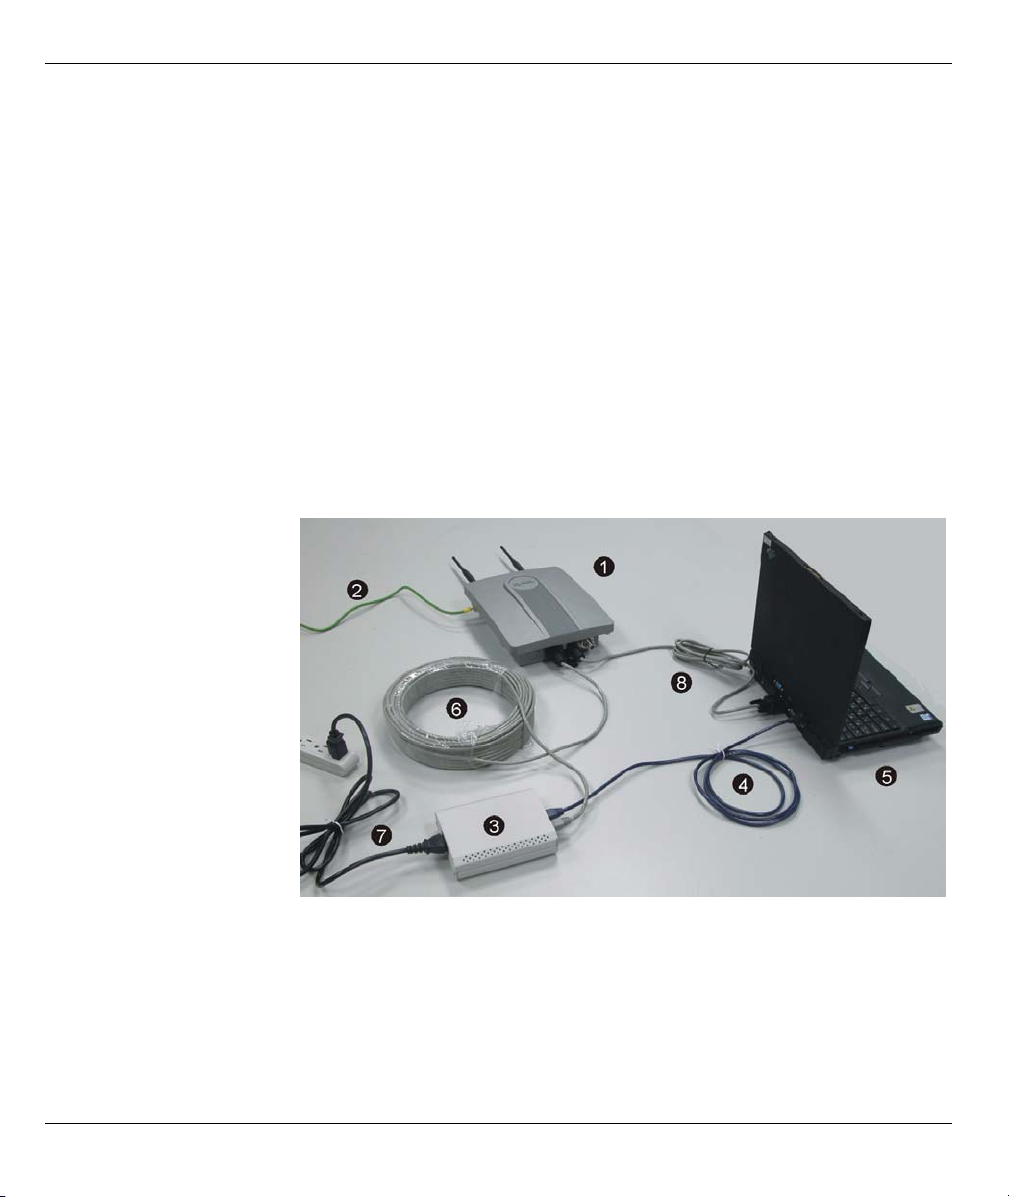
1 Requirements
You need the following.
1 ZyAIR
2 Ground Cable
3 Power Injector (PoE
(Power over Ethernet))
4 Cross-over RJ-45
Ethernet Cable
5 Computer
6 Outdoor Ethernet Cable
(straight through)
7 Power Cord
8 Console Cable (optional)
2 Hardware Connections
Configure the ZyAIR before mounting it. Use the following steps to connect the ZyAIR.
Note: Keep the ZyAIR’s box and packing materials.
2
Page 3

1 Use the installation tool to
connect the ground cable
to the ZyAIR’s frame
ground. Connect the other
end of the ground cable to
an appropriate grounding
system.
2 For initial configuration,
use a cross-over Ethernet
cable to connect the
power injector’s DATA IN
port to a computer.
3 Connect the RJ-45
Ethernet connector end of
the outdoor Ethernet cable
to the power injector’s
POWER & DATA OUT
port.
Connect the other end to
the outdoor Ethernet port
on the bottom of the ZyAIR
(align the connector’s
notch with the port’s inside
bump).
4 Use a power cord to
connect the power
injector’s power socket to
an AC power source.
ZyAIR G-5100
5 Look at the front of the
power injector. The
POWER LED turns on
first. Then the ACTIVE
LED turns on and the
ZyAIR starts.
3
Page 4

ZyAIR G-5100
3 Set Your Computer’s IP Address
This section shows you how to assign your computer a static IP address in the 192.168.1.3 to 192.168.1.254
range with a subnet mask of 255.255.255.0. This ensures that your computer can communicate with your
ZyAIR. The following instructions are for the Windows 2000, Windows NT and Windows XP operating
systems.
1 In Windows XP, click Start, Control Panel.
In Windows 2000/NT, click Start, Settings, Control
Panel.
2 In Windows XP, click Network Connections.
In Windows 2000/NT, click Network and Dial-up
Connections.
3 Right-click Local Area Connection and then click
Properties.
4 Select Internet Protocol (TCP/IP) (under the
General tab in Windows XP) and click Properties.
5 The Internet Protocol TCP/IP Properties screen
opens (the General tab in Windows XP).
6 Select Use the following IP address and fill in the IP
address (choose one from192.168.1.3 to
192.168.1.254) and Subnet mask (255.255.255.0)
fields.
7 Click OK to close the Internet Protocol (TCP/IP)
Properties window.
8 Click Close (OK in Windows 2000/NT) to close the
Local Area Connection Properties window.
9 Close the Network Connections screen.
4 Initial Configuration
Use Internet Explorer 6.0 and later versions with JavaScript enabled.
Note: Even though you can connect to the ZyAIR wirelessly, it is recommended that you connect your
computer to the DATA IN port for initial configuration.
4
Page 5

ZyAIR G-5100
1 Launch your web browser. Enter 192.168.1.2 (the
ZyAIR’s default IP address) as the address.
If the login screen does not display, see Section 3
to set your computer’s IP address.
3 Change the login password by entering a new
password and clicking Apply.
2 Click Login (the default password 1234 is already
entered).
4 Click Apply to replace the ZyAIR’s default digital
certificate.
5
Page 6

ZyAIR G-5100
5 Click WIZARD SETUP.
4.1 Wizard Setup
Use the setup wizard to configure your ZyAIR for wireless clients to access your wired LAN.
Note: Click Next in each screen to continue or click Back to return to the previous screen.
Your settings are not saved when you click Back.
1 This screen is optional. You can just click Next.
System Name is for identifying the ZyAIR.
You can enter your computer's "Computer
Name".
Enter a Domain Name if your ISP requires
one for authentication; otherwise you can
leave it blank or set to whatever may have
displayed automatically.
6
 Loading...