

Page 1

AES-100
ADSL-Ethernet Switch
May 2002
User’s Guide
Page 2

AES-100 User’s Guide
Copyright
Copyright © 2002 by ZyXEL Communications Corporation.
The contents of this publication may not be reproduced in any part or as a whole, transcribed, stored in a retrieval
system, translated into any language, or transmitted in any form or by any means, electronic, mechanical,
magnetic, optical, chemical, photocopying, manual, or otherwise, without the prior written permission of ZyXEL
Communications Corporation.
Published by ZyXEL Communications Corporation. All rights reserved.
Disclaimer
ZyXEL does not assume any liability arising out of the application or use of any products, or software described
herein. Neither does it convey any license under its patent rights nor the patents rights of others. ZyXEL further
reserves the right to make changes in any products described herein without notice. This publication is subject to
change without notice.
Trademarks
Trademarks mentioned in this publication are used for identification purposes only and may be properties of their
respective owners.
ii Copyright
Page 3

AES-100 User’s Guide
ZyXEL Limited Warranty
ZyXEL warrants to the original end user (purchaser) that this product is free from any defects in materials or
workmanship for a period of up to two (2) years from the date of purchase. During the warranty period, and upon
proof of purchase, should the product have indications of failure due to faulty workmanship and/or materials, ZyXEL
will, at its discretion, repair or replace the defective products or components without charge for either parts or labor,
and to whatever extent it shall deem necessary to restore the product or components to proper operating condition.
Any replacement will consist of a new or re-manufactured functionally equivalent product of equal value, and will be
solely at the discretion of ZyXEL. This warranty shall not apply if the product is modified, misused, tampered with,
damaged by an act of God, or subjected to abnormal working conditions.
Note
Repair or replacement, as provided under this warranty, is the exclusive remedy of the purchaser. This warranty is
in lieu of all other warranties, express or implied, including any implied warranty of merchantability or fitness for a
particular use or purpose. ZyXEL shall in no event be held liable for indirect or consequential damages of any kind
of character to the purchaser.
To obtain the services of this warranty, contact ZyXEL's Service Center; refer to the separate Warranty Card for
your Return Material Authorization number (RMA). Products must be returned Postage Prepaid. It is recommended
that the unit be insured when shipped. Any returned products without proof of purchase or those with an out-dated
warranty will be repaired or replaced (at the discretion of ZyXEL) and the customer will be billed for parts and labor.
All repaired or replaced products will be shipped by ZyXEL to the corresponding return address, Postage Paid
(USA and territories only). If the customer desires some other return destination beyond the U.S. borders, the
customer shall bear the cost of the return shipment. This warranty gives you specific legal rights, and you may also
have other rights which vary from state to state.
ZyXEL Limited Warranty iii
Page 4

AES-100 User’s Guide
Interference Statements and Warnings
FCC
Interference Statement:
This device complies with Part 15 of the FCC rules. Operation is subject to the following two conditions:
(1) This device may not cause harmful interference.
(2) This device must accept any interference received, including interference that may cause undesired operations.
FCC Warning!
This equipment has been tested and found to comply with the limits for a Class A digital device, pursuant to Part 15
of the FCC Rules. These limits are designed to provide reasonable protection against harmful interference in a
commercial environment. This equipment generates, uses, and can radiate radio frequency energy and, if not
installed and used in accordance with the instruction manual, may cause harmful interference to radio
communications. Operation of this equipment in a residential area is likely to cause harmful interference in which
case the user will be required to correct the interference at his own expense.
CE Mark Warning:
This is a class A product. In a domestic environment this product may cause radio interference in which case the
user may be required to take adequate measures.
Taiwanese BCIQ A Warning:
Certifications
Refer to the product page at www.zyxel.com.
iv Interference Statements and Warnings
Page 5

AES-100 User’s Guide
Customer Support
If you have questions about your ZyXEL product or desire assistance, contact ZyXEL Communications
Corporation offices worldwide, in one of the following ways:
Contacting Customer Support
When you contact your customer support representative, have the following information ready:
♦ Product model and serial number.
♦ Firmware version information.
♦ Warranty information.
♦ Date you received your product.
♦ Brief description of the problem and the steps you took to solve it.
METHOD
LOCATION
Worldwide
America
Malaysia
E-MAIL - SUPPORT/
SALES
support@zyxel.com.tw +886-3-578-3942 www.zyxel.com
sales@zyxel.com.tw +886-3-578-2439 ftp.europe.zyxel.co
support@zyxel.com +1-714-632-0882
sales@zyxel.com +1-714-632-0858 ftp.zyxel.com
support@zyxel.dk +45-3955-0700 www.zyxel.dkScandinavia
sales@zyxel.dk +45-3955-0707 ftp.zyxel.dk
support@zyxel.at +43-1-4948677-0 www.zyxel.atAustria
sales@zyxel.at +43-1-4948678 ftp.zyxel.at
support@zyxel.de +49-2405-6909-0 www.zyxel.deGermany
sales@zyxel.de +49-2405-6909-99
support@zyxel.com.my
sales@zyxel.com.my +603-795-34-407
TELEPHONE/FAX WEB SITE/ FTP
SITE
www.europe.zyxel.
com
m
www.zyxel.comNorth
800-255-4101
+603-795-44-688
www.zyxel.com.my
REGULAR MAIL
ZyXEL Communications
Corp., 6 Innovation Road II,
Science-Based Industrial
Park, HsinChu, Taiwan 300,
R.O.C.
ZyXEL Communications Inc.,
1650 Miraloma Avenue,
Placentia, CA 92870, U.S.A.
ZyXEL Communications A/S,
Columbusvej 5, 2860
Soeborg, Denmark.
ZyXEL Communications
Services GmbH.
Thaliastrasse 125a/2/2/4 A1160 Vienna, Austria
ZyXEL Deutschland GmbH.
Adenauerstr. 20/A4 D-52146
Wuerselen, Germany
Lot B2-06, PJ Industrial Park,
Section 13, Jalan Kemajuan,
46200 Petaling Jaya Selangor
Darul Ehasn, Malaysia
Customer Support v
Page 6

AES-100 User’s Guide
Table of Contents
Copyright....................................................................................................................................................................................... ii
ZyXEL Limited Warranty ............................................................................................................................................................. iii
Interference Statements and Warnings ..................................................................................................................................... iv
Customer Support ........................................................................................................................................................................ v
Table of Contents ........................................................................................................................................................................ vi
List of Figures.............................................................................................................................................................................. ix
List of Tables ................................................................................................................................................................................ x
Preface ......................................................................................................................................................................................... xi
Chapter 1 Getting to Know the AES-100 ............................................................................................................................. 1-1
1.1 Features......................................................................................................................................................... 1-1
1.2 Benefits.......................................................................................................................................................... 1-3
1.3 Physical Specifications ..................................................................................................................................1-4
Chapter 2 Hardware Overview ............................................................................................................................................. 2-1
2.1 Unpacking the AES-100 ................................................................................................................................2-1
2.2 Additional Installation Requirements .............................................................................................................2-1
2.3 Front Panel ....................................................................................................................................................2-1
2.4 Console Port .................................................................................................................................................. 2-2
2.5 ADSL Port Connections................................................................................................................................. 2-3
2.6 Rear Panel..................................................................................................................................................... 2-3
Chapter 3 Factory Default Settings ..................................................................................................................................... 3-1
3.1 IP Parameters................................................................................................................................................ 3-1
3.2 Console Port .................................................................................................................................................. 3-1
3.3 SNMP Community Strings.............................................................................................................................3-1
3.4 Console, Telnet and FTP Password ..............................................................................................................3-1
3.5 ADSL Ports .................................................................................................................................................... 3-1
3.6 Ethernet Port..................................................................................................................................................3-2
3.7 Other Factory Defaults ..................................................................................................................................3-2
Chapter 4 System Commands ............................................................................................................................................. 4-1
4.1 Command Line Interface (CI) ........................................................................................................................4-1
4.2 Console Connection ......................................................................................................................................4-1
4.3 Command Structure ......................................................................................................................................4-1
4.4 Commonly Used Commands.........................................................................................................................4-2
4.5 Sys Commands .............................................................................................................................................4-3
4.6 Secured Host Commands .............................................................................................................................4-4
4.7 UNIX Syslog Commands............................................................................................................................... 4-5
4.8 System Error Log Commands .......................................................................................................................4-6
Chapter 5 ADSL Configuration ............................................................................................................................................5-1
vi Table of Contents
Page 7

AES-100 User’s Guide
5.1 ADSL Standards............................................................................................................................................ 5-1
5.2 Profiles........................................................................................................................................................... 5-1
5.3 Configured Vs. Actual Rate ........................................................................................................................... 5-1
5.4 Default Settings ............................................................................................................................................. 5-2
5.5 ADSL Commands.......................................................................................................................................... 5-3
Chapter 6 10/100M Fast Ethernet Port Commands.............................................................................................................6-1
6.1 10/100M Auto-Sensing Ethernet ................................................................................................................... 6-1
6.2 Ethernet Commands ..................................................................................................................................... 6-1
Chapter 7 Bridge Commands ...............................................................................................................................................7-1
7.1 Bridge Port Numbers..................................................................................................................................... 7-1
7.2 Basic Commands .......................................................................................................................................... 7-1
7.3 MACfilter Commands .................................................................................................................................... 7-2
7.4 Filter Commands ........................................................................................................................................... 7-3
7.5 Port-Based VLAN Commands....................................................................................................................... 7-5
7.6 Tagged Ethernet Frames Commands (Fast Mode)....................................................................................... 7-8
Chapter 8 IEEE 802.1Q Tagged VLAN Commands .............................................................................................................8-1
8.1 Introduction.................................................................................................................................................... 8-1
8.2 IEEE 802.1Q Tagged VLAN -Tags ................................................................................................................ 8-1
8.3 VLAN-Aware/VLAN-Unaware Devices.......................................................................................................... 8-1
8.4 Filtering Databases ....................................................................................................................................... 8-1
8.5 IEEE 802.1Q Tagged VLAN Commands....................................................................................................... 8-2
Chapter 9 IEEE 802.1p Priority Commands.........................................................................................................................9-1
9.1 Introduction.................................................................................................................................................... 9-1
9.2 IEEE 802.1p Priority Commands................................................................................................................... 9-1
Chapter 10 IP Commands .....................................................................................................................................................10-1
10.1 Setting the IP Address............................................................................................................................. 10-1
10.2 General IP Commands............................................................................................................................ 10-2
Chapter 11 Remote Management .........................................................................................................................................11-1
11.1 Management by Telnet ............................................................................................................................ 11-1
11.2 SNMP Management ................................................................................................................................ 11-1
11.3 SNMP Access Configuration ................................................................................................................... 11-2
11.4 SNMP Trap Configuration ....................................................................................................................... 11-3
Chapter 12 Configuration Backup/Restore .........................................................................................................................12-1
12.1 Configuration Files of the ADSL Networking Module.............................................................................. 12-1
12.2 Configuration Backup .............................................................................................................................. 12-1
12.3 Configuration Restore ............................................................................................................................. 12-1
Chapter 13 Firmware Upload and Recovery ....................................................................................................................... 13-1
13.1 FTP Firmware Upload on the ADSL Networking Module........................................................................ 13-1
13.2 BOOTP/TFTP Firmware Recovery of the ADSL Networking Module ..................................................... 13-2
Table of Contents vii
Page 8

AES-100 User’s Guide
Chapter 14 Troubleshooting ................................................................................................................................................ 14-1
14.1 ADSL LED(s) ...........................................................................................................................................14-1
14.2 Data Transmission................................................................................................................................... 14-1
14.3 ADSL LED(s) turn On and Off .................................................................................................................14-2
14.4 Data Rate................................................................................................................................................. 14-2
14.5 Configured Settings .................................................................................................................................14-2
14.6 Password .................................................................................................................................................14-3
14.7 Remote Server.........................................................................................................................................14-3
14.8 SNMP ......................................................................................................................................................14-3
14.9 Telnet .......................................................................................................................................................14-4
Index .............................................................................................................................................................................................. A
viii Table of Contents
Page 9

AES-100 User’s Guide
List of Figures
Figure 1-1 MTU Application ......................................................................................................................................................1-3
Figure 1-2 ISP Application..........................................................................................................................................................1-4
Figure 2-1 AES-100 Front Panel.................................................................................................................................................2-2
Figure 2-2 AES-100 Rear Panel AC Power Version ...................................................................................................................2-3
Figure 2-3 AES-100 Rear Panel DC Power Version ...................................................................................................................2-3
Figure 2-4 Connecting the Power Cord to the AES-100 and a Power Source ............................................................................2-4
Figure 4-1 Example: Procedure to Save and View a Previous Error Log ...................................................................................4-7
Figure 7-1 Default VLAN Settings .............................................................................................................................................7-6
Figure 7-2 Example of Modified VLAN Port 2 ..........................................................................................................................7-7
Figure 7-3 Example of Modified VLAN Port 3 ..........................................................................................................................7-8
Figure 7-4 Example of Modified VLAN Settings.......................................................................................................................7-8
Figure 8-1 Example: PVID Command Display...........................................................................................................................8-3
Figure 8-2 Example: SVLAN List Command Display................................................................................................................8-3
Figure 8-3 Example: SVLAN List Command Display................................................................................................................8-4
Figure 8-4 SVLAN Example.......................................................................................................................................................8-5
Figure 8-5 Example: Svlan Getentry 2 Command Display.........................................................................................................8-6
Figure 8-6 Example: DVLAN List Command Display...............................................................................................................8-7
Figure 8-7 Example: DVLAN Getentry 2 Command Display....................................................................................................8-7
Figure 8-8 Example: VLAN List Command Display..................................................................................................................8-8
Figure 10-1 Setting IP Address and Default Gateway...............................................................................................................10-2
Figure 11-1 SNMP Management Model ...................................................................................................................................11-1
Figure 13-1 BOOTP/TFTP Server ............................................................................................................................................13-3
Figure 13-2 Input MAC.............................................................................................................................................................13-3
Figure 13-3 Database Edit Dialog .............................................................................................................................................13-4
Figure 13-4 Enable BOOTP/TFTP............................................................................................................................................13-4
Figure 13-5 Enter Debug Mode.................................................................................................................................................13-4
List of Figures ix
Page 10

AES-100 User’s Guide
List of Tables
Table 2-1 Front Panel Ports of an ADSL Network Module ........................................................................................................ 2-2
Table 2-2 AES-100 Network Module LED Descriptions............................................................................................................2-2
Table 4-1 Logs Sent to Your UNIX Server ................................................................................................................................. 4-5
Table 5-1 Maximum Transfer Rates of the AES-100’s ADSL Ports........................................................................................... 5-1
Table 7-1 Physical Ports, Port Numbers and AES-100 Default PVID Tags in Fast Mode..........................................................7-9
Table 14-1 Troubleshooting the ADSL LED(s)........................................................................................................................ 14-1
Table 14-2 Troubleshooting Data Transmission........................................................................................................................14-1
Table 14-3 Troubleshooting a Non-Constant ADSL LED ........................................................................................................14-2
Table 14-4 Troubleshooting the SYNC-rate.............................................................................................................................. 14-2
Table 14-5 Troubleshooting the AES-100’s Configured Settings............................................................................................. 14-2
Table 14-6 Troubleshooting the Password ................................................................................................................................ 14-3
Table 14-7 Troubleshooting a Remote Server........................................................................................................................... 14-3
Table 14-8 Troubleshooting the SNMP Server ......................................................................................................................... 14-3
Table 14-9 Troubleshooting Telnet ........................................................................................................................................... 14-4
x List of Tables
Page 11

AES-100 User’s Guide
Preface
Congratulations on your purchase of the AES-100 ADSL-Ethernet Switch.
This preface introduces you to the AES-100 and discusses the organization and conventions of this user’s guide. It
also provides information on other related documentation.
About the AES-100
The AES-100 is an ADSL (Asymmetrical Digital Subscriber Line) to Ethernet switch. It allows you to multiplex
traffic from up to 16 ADSL lines to an Ethernet network before it is forwarded to the Internet.
General Syntax Conventions
“Enter” means for you to type one or more characters and press the carriage return. “Select” or “Choose” means
for you to select one from the predefined choices.
Related Documentation
AES-100 Quick Start Guide
Our Quick Start Guide is designed to help you get up and running right away. It contains detailed easy-to-follow
directions for initial configuration, setting up IP parameters and setting up and enabling ADSL ports.
AES-100 Hardware Installation Guide
This guide provides detailed information about the physical specifications and procedures for installing the AES100 hardware.
Support Notes
More detailed information about the AES-100 and examples of its use can be found in the Support Notes accessible
through the ZyXEL web pages at www.zyxel.com.
ZyXEL Web Page and FTP Server Site
You can access release notes as well as firmware upgrades at ZyXEL web and FTP sites. Refer to the Customer
Support page for more information.
Glossary
Please refer to www.zyxel.com for an online glossary of networking terms.
Preface xi
Page 12

Page 13

AES-100 User’s Guide
Chapter 1
Getting to Know the AES-100
This chapter describes the key features, benefits and applications of your AES-100.
The AES-100 is an ADSL (Asymmetrical Digital Subscriber Line) to Ethernet switch. It aggregates traffic from up
to 16 ADSL lines to Ethernet.
ADSL allows the coexistence of broadband data service and conventional voice service over the same telephone
wire. When deployed together with ZyXEL’s ADSL modems, for instance the P642M, and WAN routers, like the
P1400, the combination forms an integrated solution for providing broadband services to multiple tenant units such
as apartments, hotels, offices and campus buildings.
1.1 Features
Two-Slot Chassis
The AES-100 has two slots for the ADSL to Ethernet multiplexer modules. This design provides the flexibility for
you to install as few as a single module for the initial deployment and yet still has room to grow as demand
increases.
8-Port ADSL to Ethernet Multiplexer Modules
Each ADSL to Ethernet multiplexer module aggregates traffic from 8 lines to an Ethernet port.
Integrated Splitters
The integrated splitters eliminate the need to use external splitters to separate voice-band and ADSL signals.
10/100 Mbps Auto-sensing Ethernet Port
This 10/100 Mbps auto-sensing Ethernet port connects the AES-100 to an Ethernet network. With Ethernet as the
backbone, you can create a network that provides ADSL service to hundreds of subscribers.
ADSL Compliance
• Multi-Mode ADSL standard
G.DMT (ITU-T G.992.1)
G.Lite (ITU-T G.992.2)
G.hs (ITU-T G.994.1)
ANSI T1.413 issue 2
Rate adaptation support
•
Bridging
IEEE 802.1D transparent bridging
•
Up to 4096 MAC entries address table
•
IGMP snooping for appropriate multicast forwarding.
•
Getting to Know the AES-100 1-1
Page 14

AES-100 User’s Guide
IEEE 802.1Q Tagged VLAN
Your AES-100 uses the IEEE 802.1Q Tagged VLAN (Virtual Local Area Network) which allows your device to
deliver tagged/untagged packets to and from its ports. The AES-100 supports up to 255 VLANs and the maximum
VLAN ID 4094.
IEEE 802.1p Priority
IEEE 802.1p Priority gives your AES-100 the ability to regenerate priority changes for ports.
Fast Mode
The AES-100’s fast mode makes use of the “tag” subset of the IEEE 802.1Q standard to identify the source port of
a frame and speed traffic through a service gateway.
MAC (Media Access Control) Filtering
Use MACfilter commands to filter incoming packets based on MAC (Media Access Control) address(es) that you
specify. You may enable/disable specific ports. You may specify up to five MAC addresses per port.
Secured Host
Allow up to ten remote hosts to access your AES-100 via IP addresses you specify.
System Error Logging
The system error log will record error logs locally to the AES-100 memory. These logs may be viewed again after a
warm restart.
UNIX Syslog Logging
Use UNIX syslog commands to send logs to your UNIX server.
Protocol
Multiple Protocols over AAL5 (RFC 1483)
•
Management
Remote configuration backup/restore and firmware upgrade
•
SNMP manageable
•
Text-based management locally via console port and remotely via telnet
•
Security
Password protection for system management
•
Port-based VLAN
•
IGMP Snooping
IGMP (Internet Group Management Protocol) snooping reduces multicast traffic for maximum performance.
Overheating Detection and Warning
An ALM LED turns on when the AES-100’s internal temperature is too high and turns off when the
•
temperature has returned to a normal level.
1-2 Getting to Know the AES-100
Page 15
AES-100 User’s Guide
1.2 Benefits
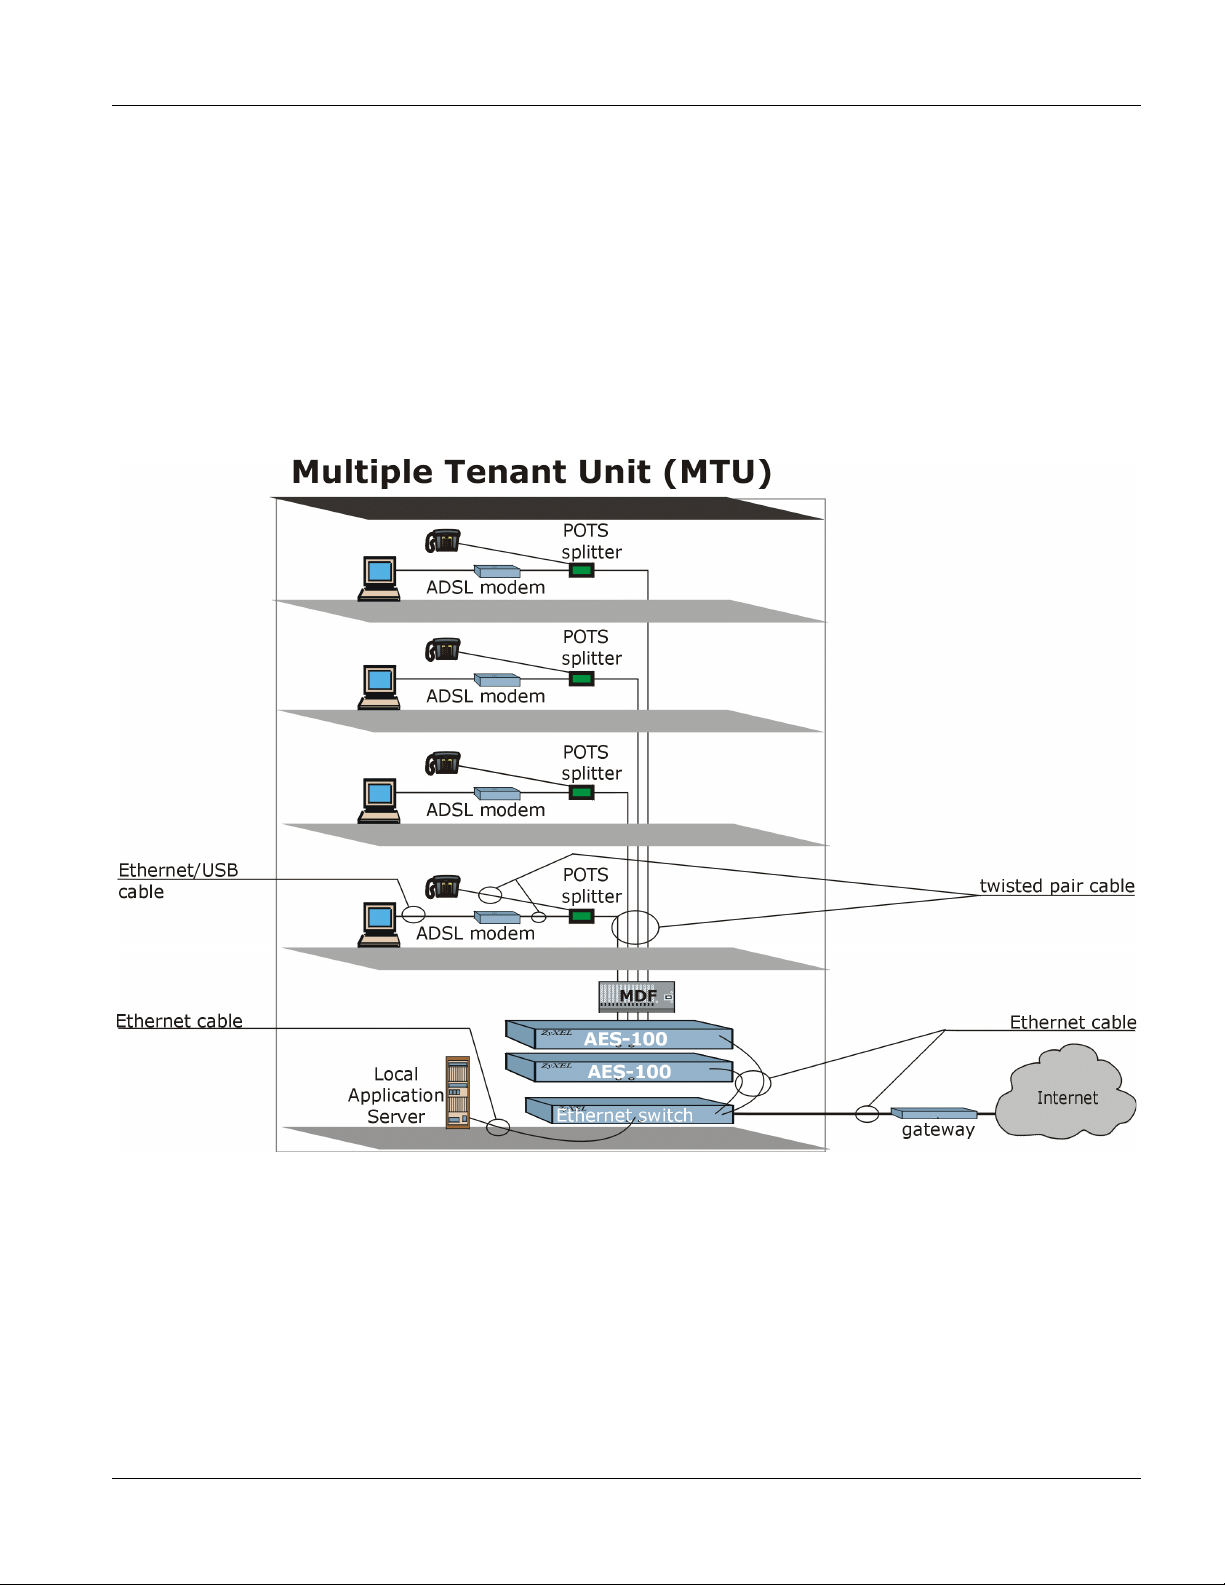
1.2.1 MTU Application
The following diagram depicts a typical application of the AES-100 is in a large residential building, or multiple
tenant unit (MTU), that leverages the existing phone line wiring to provide Internet access to all tenants.
A tenant connects a computer to the phone line in a unit using an ADSL modem. The other end of the phone line is
connected to a port on the AES-100. The AES-100 aggregates the traffic from the tenants to the Ethernet port and
forwards it to a router. The router then routes the traffic further to the Internet. The following diagram shows the
installation environment for an MTU Application.
Figure 1-1 MTU Application
Getting to Know the AES-100 1-3
Page 16
AES-100 User’s Guide
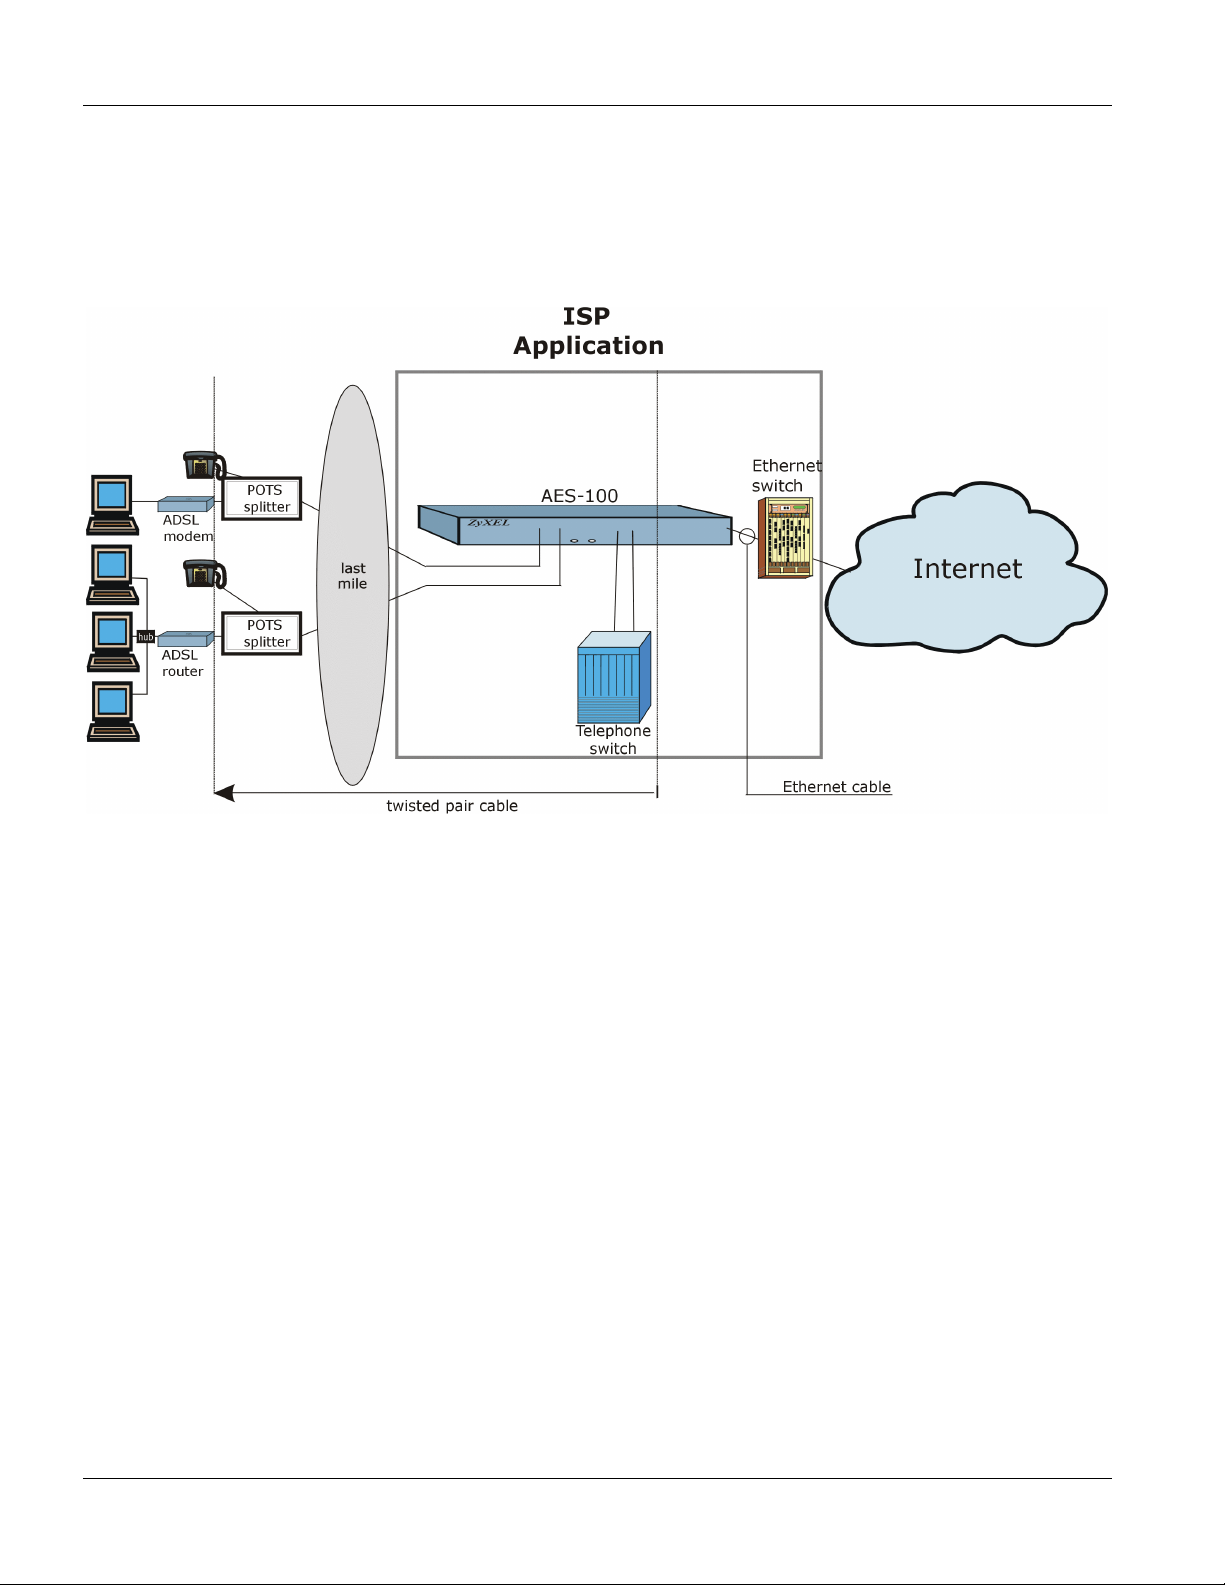
1.2.2 ISP Application
The AES-100 can also be used by an Internet Service Provider (ISP) as an IP DSLAM. The AES-100 terminates all
of the ADSL ATM circuits and converts the traffic to IP packets. All IP traffic goes directly to the ISP’s internal
Ethernet network, before being routed to the Internet. The following diagram is an example of the AES-100 in an
ISP Application.
Figure 1-2 ISP Application
1.2.3 Compact Design for Limited Space
The AES-100 occupies only 1.5 U of standard Telco rack space. Its compactness is perfect for collocation
(installation in a central office) and basement installation. Because the AES-100 has built-in POTS splitters, service
providers do not have to allocate extra space for POTS splitter shelves.
1.2.4 Scalable Platform for Future Expansion
The flexible design of the AES-100 series allows service providers to start with minimum cost. As the number of
users and applications increases additional AES-100s can be added to provide greater bandwidth.
1.3 Physical Specifications
Physical Interfaces
Two network module slots
•
Each network module has eight RJ-11 ports to the CO side and eight RJ-11 ports to the USER side
•
Each network module has one auto-sensing 10/100M Ethernet port
•
Each network module has one RS-232 console port for local configuration and management
•
1-4 Getting to Know the AES-100
Page 17

Dimensions
In mm: 440 (W) x 320 (L) x 66 (H)
•
Weight
6.84 kg (two network modules loaded)
•
Power Consumption
80 watts maximum
•
100 - 240 VAC, 50/60 Hz
•
Operating Environment
Temperature: 0 - 50°C; Humidity: 5% - 95%
•
Storage Environment
Temperature: -30 - 60°C; Humidity: 2% - 95%
•
AES-100 User’s Guide
Getting to Know the AES-100 1-5
Page 18

Page 19

AES-100 User’s Guide
Chapter 2
Hardware Overview
This chapter gives a brief introduction to the AES-100 hardware.
2.1 Unpacking the AES-100
Before installing, check to see that all the components of the AES-100 are included in the package.
2.2 Additional Installation Requirements
In addition to the contents of the package, you need the following hardware and software components before you
install and use your product:
• A computer with Ethernet 10Base-T or 100Base-TX NIC (Network Interface Card)
• WAN service provided by a local phone company
• A computer with terminal emulation software configured to the following parameters:
VT100 terminal emulation
9600 bps
No parity, 8 data bits, 1 stop bit
No flow control
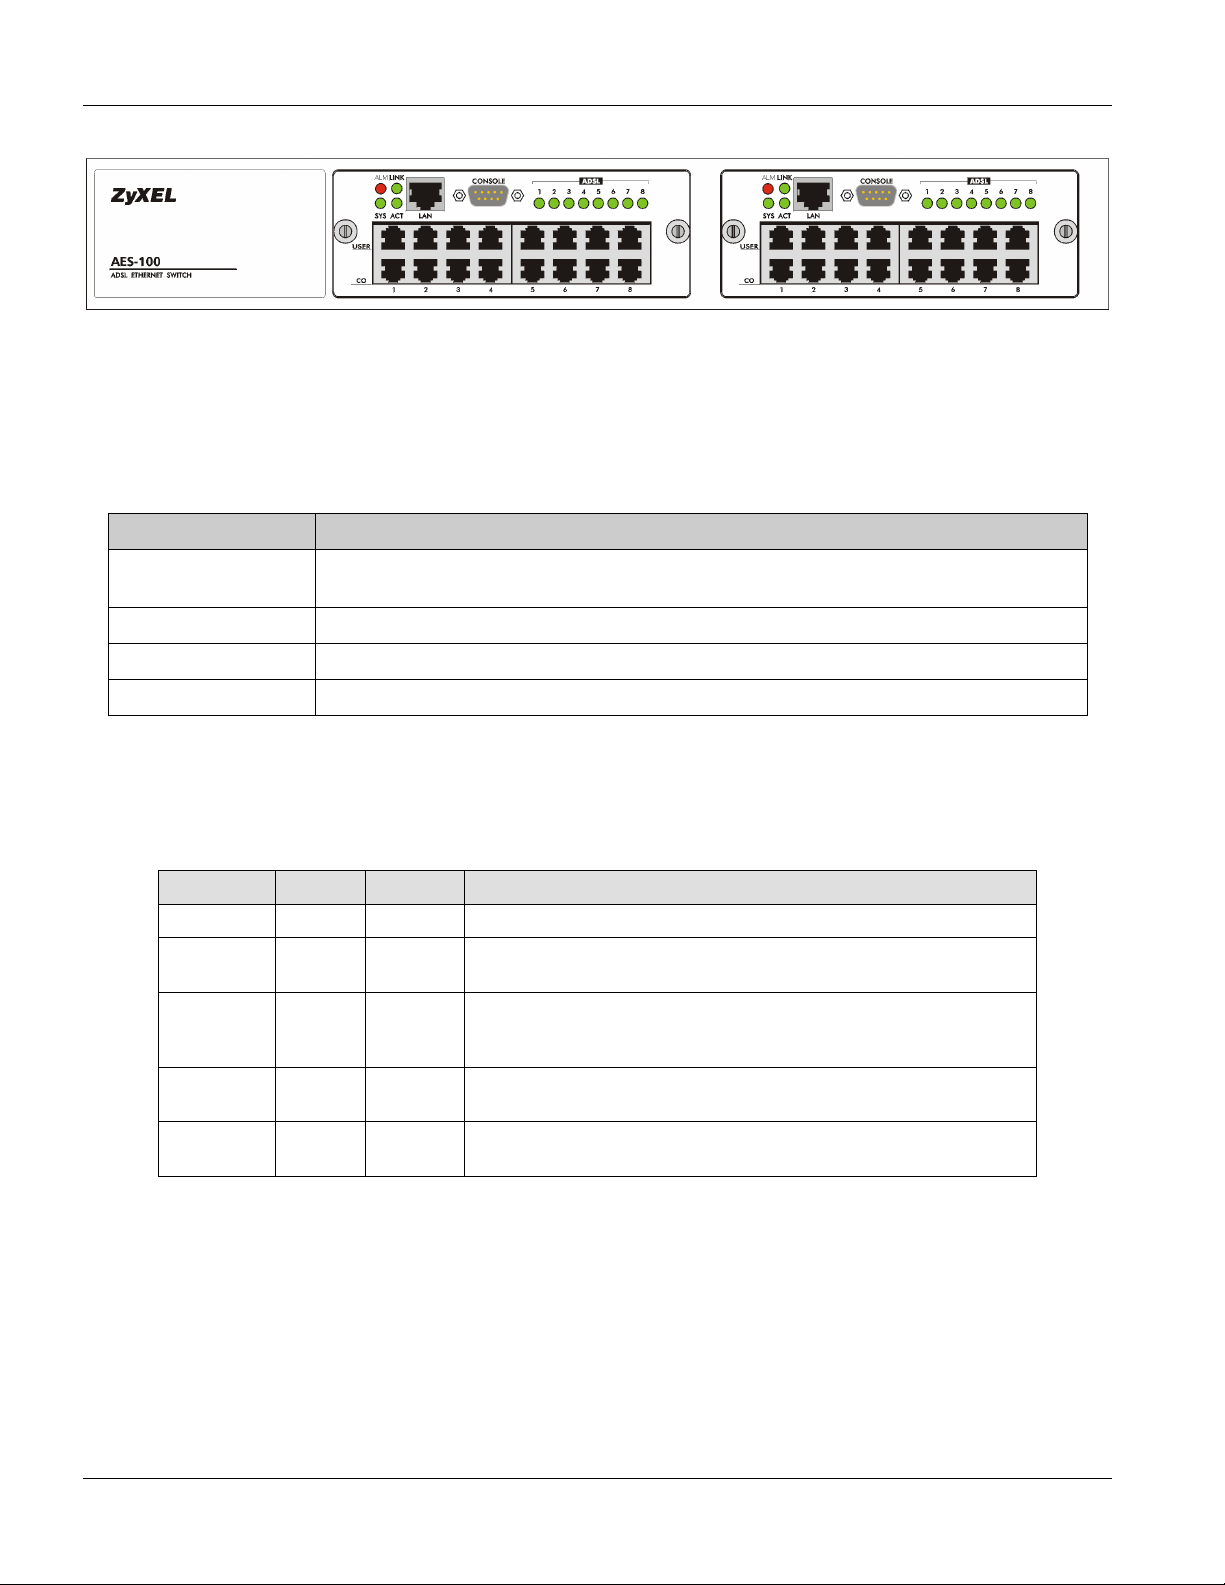
2.3 Front Panel
The following figure shows the front panel of the AES-100.
Hardware Overview 2-1
Page 20
AES-100 User’s Guide
Figure 2-1 AES-100 Front Panel
2.3.1 Front Panel Ports
The following table describes the ports on the front panel of an AES-100 network module.
Table 2-1 Front Panel Ports of an ADSL Network Module
PORTS DESCRIPTION
LAN The LAN port is a 10/100 Mbps auto-sensing Ethernet port for connection to a
router.
CONSOLE The CONSOLE port is an RS-232 port for configuring the AES-100.
USER 1-8 The USER port connects to the user (subscriber) ADSL equipment.
CO 1-8 The CO port connects to the central office or a PBX.
2.3.2 Front Panel LEDs
The following table describes the LED indicators on the front panel of an AES-100 network module.
Table 2-2 AES-100 Network Module LED Descriptions
LED COLOR STATUS MEANING
ALM Red On The AES-100 network module has overheated.
LINK Green On
Off
SYS Green On
Off
Blinking
ACT Green Off
Blinking
ADSL 1-8 Green On
Off
The LAN port link is up.
The LAN port link is down.
Your AES-100 Network Module is on and functioning properly.
The system is not ready or has a malfunction.
The system is initializing.
The LAN port is not active.
Data is being sent.
The ADSL link is up.
The ADSL link is down.
2.4 Console Port
For the initial configuration, you need to use terminal emulator software on a computer and connect it to the AES100 through the console port. Connect the male 9-pin end of the console cable to the console port of the AES-100.
Connect the other end (either a female 25-pin or female 9-pin) to a serial port (COM1, COM2 or other COM port)
of your computer. You can use an extension RS-232 cable if the enclosed one is too short. After the initial setup,
you can modify the configuration remotely through telnet connections.
2-2 Hardware Overview
Page 21
AES-100 User’s Guide
2.5 ADSL Port Connections
The line from the user carries both the ADSL and the voice signals. For each line, the AES-100 has a built-in
splitter that separates the high frequency ADSL signal from the voice band signal and feeds the ADSL signal to the
AES-100, while the voice band signal is diverted to the CO port.
To complete an ADSL connection, connect the line from the user equipment to the
the central office switch or PBX (Private Branch Exchange) to the
the
line are not shorted on the MDF (Main Distribution Frame).
CO
port. Make sure that the
CO
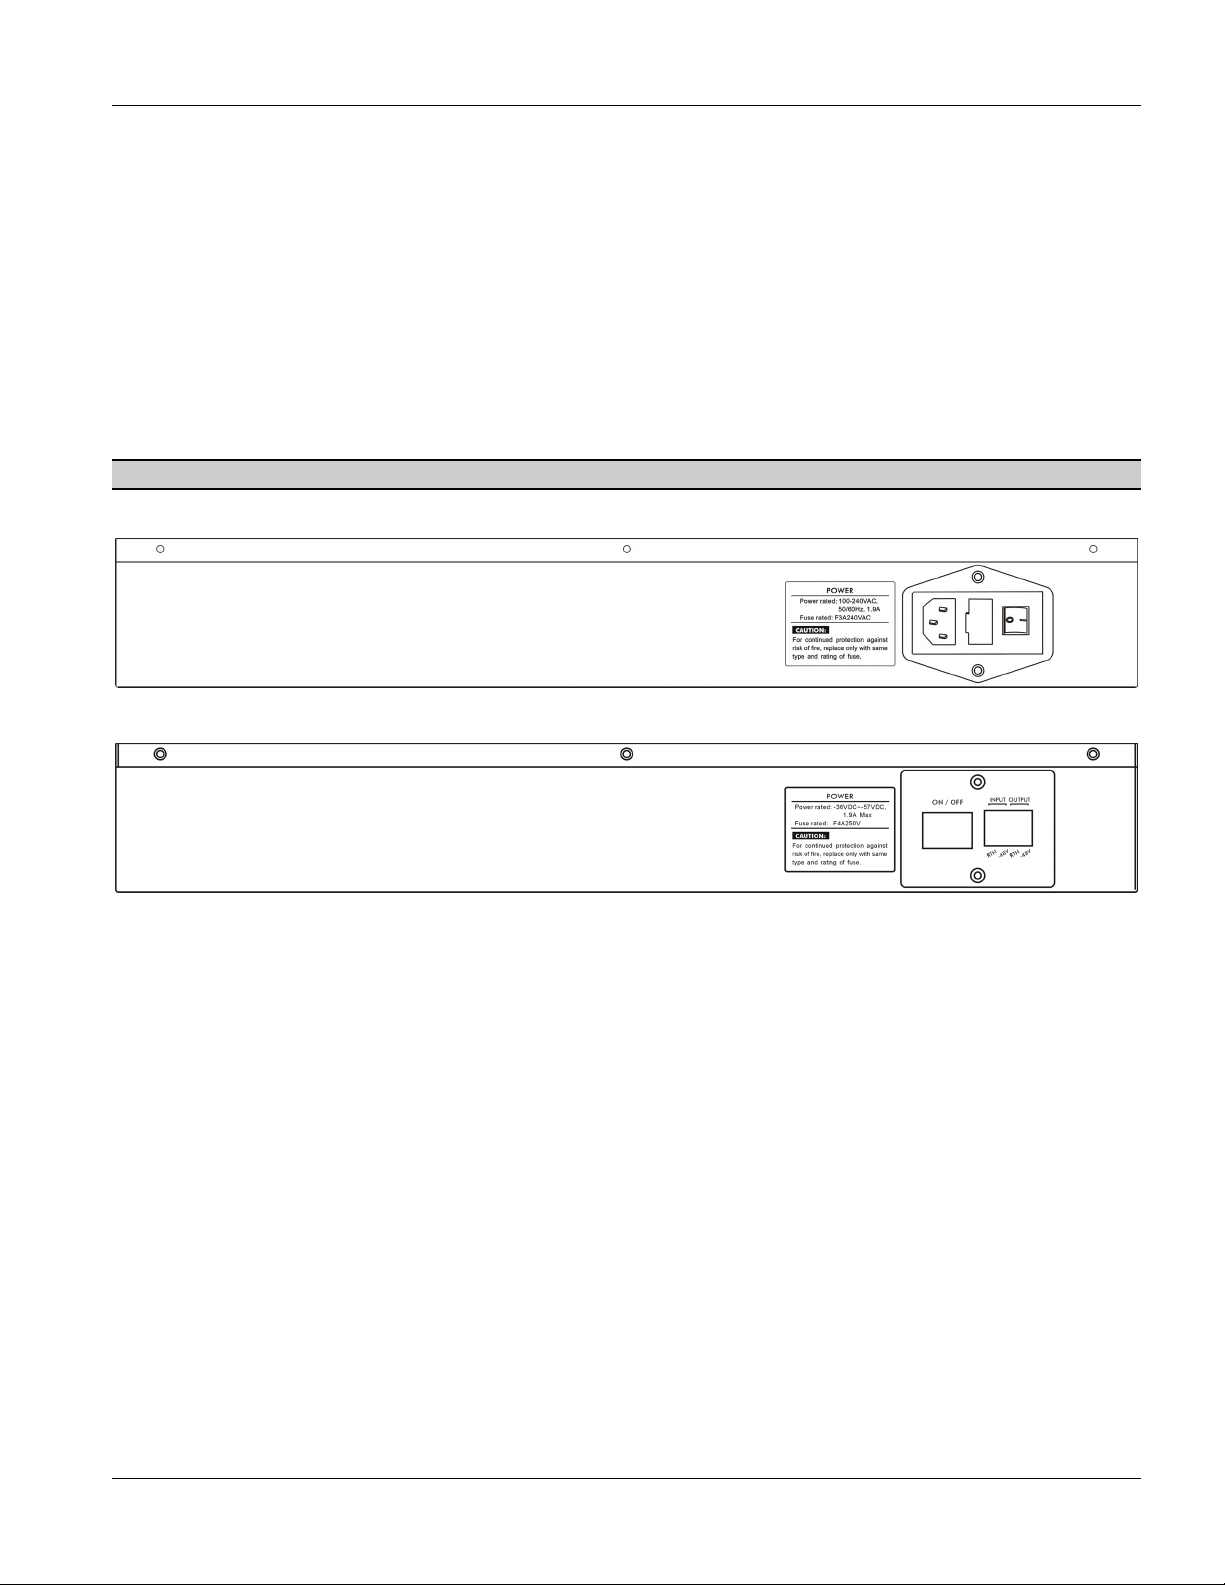
2.6 Rear Panel
Make sure you are using the correct power source.
The following figure shows the rear panel of the AES-100.
Figure 2-2 AES-100 Rear Panel AC Power Version
USER
port and the line from
USER
line and
Figure 2-3 AES-100 Rear Panel DC Power Version
Hardware Overview 2-3
Page 22
AES-100 User’s Guide
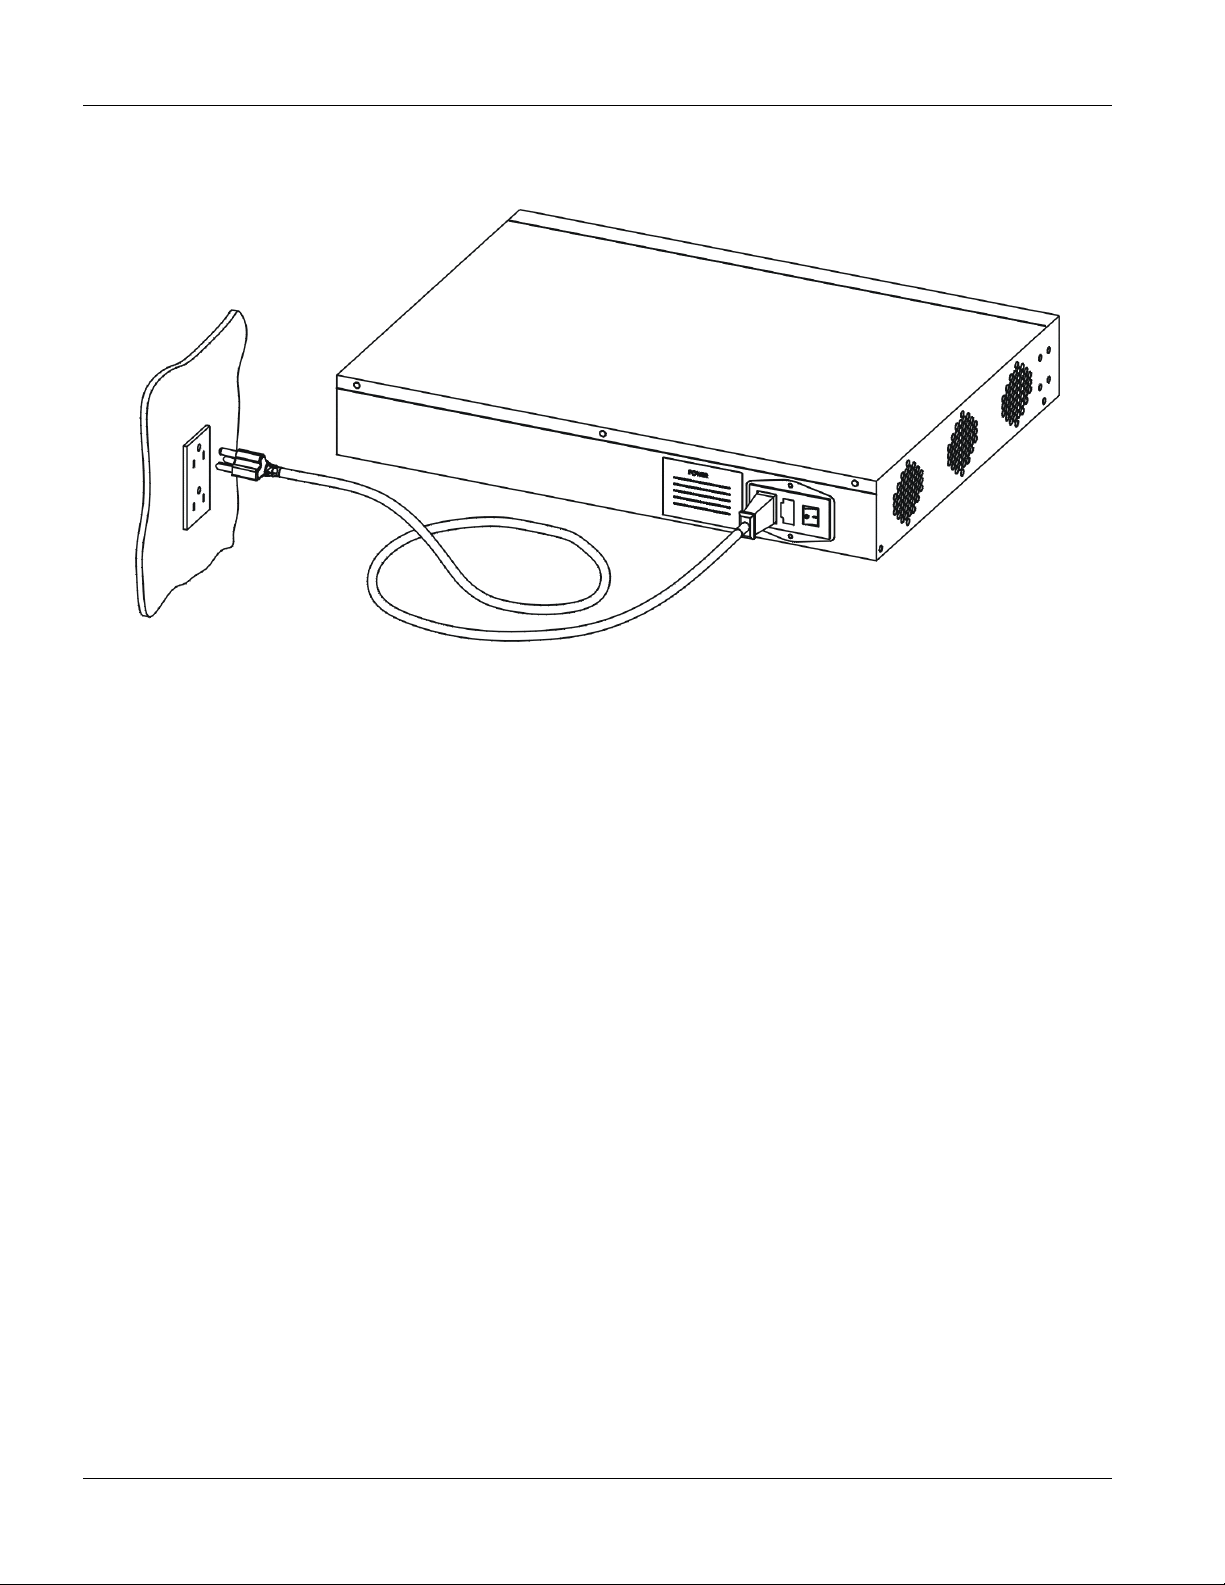
Connect the female end of the power cord to the power receptacle on the rear panel of your AES-100 (just to the
right of the warning sticker) as seen next. Connect the other end of the cord to a power outlet. Make sure that no
objects obstruct the airflow of the fans (located on the side of the unit).
Figure 2-4 Connecting the Power Cord to the AES-100 and a Power Source
2-4 Hardware Overview
Page 23

AES-100 User’s Guide
Chapter 3
Factory Default Settings
This section describes the factory default settings of the AES-100.
3.1
• IP address = 192.168.1.1
• Subnet mask = 255.255.255.0
• Default gateway = 192.168.1.254
IP Parameters
3.2 Console Port
• Baud rate = 9600 bps
• Data bits = 8
• Parity = none
• Stop bit = 1
• Flow control = none
3.3 SNMP Community Strings
• Read = public
• Write = 1234
3.4 Console, Telnet and FTP Password
• 1234 (default)
3.5 ADSL Ports
• Encapsulation: RFC 1483
• Multiplexing: LLC-based
• VPI: 0
• VCI: 33
• Enable/Disable State: Disabled
• Maximum Upstream Rate: 1024 Kbps for G.dmt, 512 Kbps for G.Lite
Factory Default Settings 3-1
Page 24

AES-100 User’s Guide
• Maximum Downstream Rate: 8160 Kbps for G.dmt, 1536 Kbps for G.Lite
• Operational Mode: auto
3.6 Ethernet Port
The factory default settings for the Ethernet port of the AES-100 are:
- Auto-negotiation: ON
- Speed used with auto-negotiation OFF: 100Mbps
- Duplex mode used with auto-negotiation OFF: half duplex
3.7 Other Factory Defaults
• MACfilter: Disabled
• Secured Host: Disabled
• Sys Error Log: Always Enabled
• UNIX Syslog: Disabled
• IEEE 802.1Q Tagged VLAN: Disabled
3-2 Factory Default Settings
Page 25

AES-100 User’s Guide
Chapter 4
System Commands
This section describes basic configuration and system-related commands.
4.1 Command Line Interface (CI)
The AES-100 uses text command lines as the user interface for software configuration. Before discussing the
details of configuration, the rules of the commands are listed next.
The command keywords are in regular courier font.
1. The command keywords must be entered exactly as shown, that is, no abbreviations are allowed.
2. The required fields in a command are enclosed in angle brackets (<>), for instance,
list port <port #>
means that you must specify the port number for this command.
3. The optional fields in a command are enclosed in square brackets ([]), for instance,
config [save]
means that the field save is optional.
4. “Command” refers to a command used in the command line interface (CI command).
Using commands not documented in the user’s guide can damage the unit and possibly render it unusable.
4.2 Console Connection
For the initial configuration, you must use the console port. After the initial setup, you can telnet to the system and
perform additional management tasks. Connect the RS-232 cable to the console port of the ADSL Networking
Module. Connect the other end to a serial port (COM1, COM2 or other COM port) of your computer.
You can use any terminal emulation program (Windows’ built-in HyperTerminal for example) with the following
parameters:
• VT100 terminal emulation
• 9600 bps
• No parity, 8 data bits, 1 stop bit
• No flow control
4.3 Command Structure
The system uses a two-level command structure. The commands related to one subsystem are grouped under a
primary command of that subsystem, for instance, to configure the ADSL parameters, you must first enter the
ADSL subsystem by entering the adsl command. When you are in a subsystem, the system reminds you by
including the subsystem name in the command prompt, for example,
System Commands 4-1
Page 26

AES-100 User’s Guide
192.168.1.1 adsl>
To get back to the top level prompt from a subsystem, use the home command.
The remainder of this user’s guide describes CI Commands that are helpful for configuring network
modules.
4.3.1 Help Facility
The system includes a help facility to provide you with online assistance.
• You can issue the help or ? command at any time. The system will display a list of available commands in
response.
• You can issue
192.168.1.1> help version
yields
version - show system software version
The system responds with a description of the version command.
help with a command name to get more details about it, for instance, the command
4.3.2 Saving Your Configuration
Always remember to save your configuration using the following syntax:
192.168.1.1> config save
This command saves all system configurations into nonvolatile memory. You must use this command to save any
configurations that you make, otherwise the AES-100 will return to its default settings when it is restarted.
Do not turn off your AES-100 while saving your configuration.
4.4 Commonly Used Commands
This section shows you commonly used commands.
4.4.1 Uptime Command
Syntax:
192.168.1.1> uptime
This command shows the elapsed time the system has been running since the last reboot.
4.4.2 Version Command
Syntax:
192.168.1.1> version
This command shows the system firmware version and date
4.4.3 Restart Command
Syntax:
4-2 System Commands
Page 27

AES-100 User’s Guide
192.168.1.1> restart
This command instructs the system to perform a warm start, that is, restarting the system without turning the power
off and on.
4.4.4 Passwd Command
Syntax:
192.168.1.1> passwd
This command changes the management password. The management password is used for authentication at console
or Telnet login. This command is only allowed for local console management sessions. The management password
must be from 1 to 8 characters long and any character is accepted. The factory default password is “1234”.
It is very important that you remember your password. If you forget it, refer to the Troubleshooting section
for help.
4.4.5 Config Print Command
Syntax:
192.168.1.1> config print
This command lists all current system configuration settings.
4.4.6 Exit Command
Syntax:
192.168.1.1> exit
This command terminates the console or telnet management session.
4.5 Sys Commands
4.5.1 Info Command
Syntax:
192.168.1.1 sys> info
This command displays system related information.
4.5.2 Set Name Command
Syntax:
192.168.1.1 sys> set name <name>
This command allows you to set the name of your AES-100. The previous setting will be cleared if the command is
entered with the <name> parameter omitted.
4.5.3 Set Contact Command
Syntax:
System Commands 4-3
Page 28

AES-100 User’s Guide
192.168.1.1 sys> set contact [<name>]
This command allows you to set the name of the contact person for your AES-100. The previous setting will be
cleared if the command is entered with the name omitted.
4.5.4 Set Location Command
Syntax:
192.168.1.1 sys> set location [<name>]
This command allows you to set the location of your AES-100. The previous setting will be cleared if the command
is entered with the location omitted.
4.5.5 Set Mode
Syntax:
192.168.1.1 sys> set mode [fast/normal]
where
fast =
Normal =
This command lets you set the ADSL Networking Module into fast or normal mode. Determine which mode you
are using by entering the info command.
makes use of the “tag” subset of the IEEE 802.1Q standard to identify the source port of
a frame and speed traffic through a service gateway.
switches packets using a layer two switch (IEEE 801.1D) transparent bridge standard.
Use normal mode when you are using a regular gateway.
Enable fast mode only when you are using a service gateway.
4.6 Secured Host Commands
Allow up to ten remote users to access your AES-100 via IP addresses you specify.
4.6.1 Secured Host Command
Syntax:
192.168.1.1 sys> secured host [<mode>]
where
<mode> =
"enable" or "disable".
If <mode>= disable (default), then anyone may access your AES-100.
If <mode>= enable, then only those users with IP addresses specified by you
may access your AES-100 (refer to the Secured Host Add command).
This command enables/disables the secured host function. To display current secured host settings, simply enter the
command secured host.
4.6.2 Secured Host Add Command
Syntax:
4-4 System Commands
Page 29

192.168.1.1 sys> secured host add <host IP>
where
<host IP> =
This command adds the IP address of a secured host. You may add up to ten IP addresses.
IP address of a secured host.
4.6.3 Secured Host Delete Command
Syntax:
192.168.1.1 sys> secured host delete <host IP>
where
AES-100 User’s Guide
<host IP> =
This command deletes the IP address of a previously added secured host.
IP address of a secured host.
4.7 UNIX Syslog Commands
Use UNIX syslog commands to send logs to your UNIX syslog server. If the ADSL link is on or goes down, the
AES-100 will send a log to your UNIX syslog server. The table, shown next, indicates what is logged in each case.
Table 4-1 Logs Sent to Your UNIX Server
ADSL LINK ON ADSL LINK DOWN
port number port number
sequence number sequence number
rate -
If your Unix syslog server is down these logs will be lost.
4.7.1 Syslog Command
Syntax:
192.168.1.1 sys> syslog [<mode>]
where
<mode> =
This command enables or disables the sending of logs to your Unix syslog server. The default is disable (<mode>=
disable). A log is sent if <mode>= enable. To display current settings, do not specify a <mode>.
enable or disable.
4.7.2 Syslog Facility Command
Syntax:
192.168.1.1 sys> syslog facility <facility>
where
<facility> =
System Commands 4-5
local1 to local7.
Page 30

AES-100 User’s Guide
This command sets the syslog facility for the UNIX system.
4.7.3 Syslog Server Command
Syntax:
192.168.1.1 sys> syslog server <server IP>
where
<server IP> =
This command sets the UNIX syslog server IP address. If <server IP>=0.0.0.0 (default), then logs will be
dropped (not be sent).
IP address of syslog server.
4.8 System Error Log Commands
The system error log will record error events locally to the AES-100 memory. You may clear or display these logs
using the commands listed in this section.
The following lists what logs the system error log can record.
• ADSL link on (port number, sequence number,
rate, noise margin, attenuation)
• ADSL OVER_HEAT_ACTIVE (temperature) • ADSL OVER_HEAT_RELEASE (temperature)
• Console session begin • Console session end
• Telnet session begin • Telnet session end
• Incorrect telnet password • Insecure telnet access (IP address)
• FTP session begin • FTP session end
• Incorrect FTP password • Insecure FTP access (IP address)
• FTP image error (reason) • FTP receive file OK (file name)
• ADSL link down (port number, sequence
number, noise margin, attenuation)
• System reboot
4.8.1 Errlog Display Command
Syntax:
192.168.1.1 sys> errlog display
This command displays the system error log.
4.8.2 Errlog Clear Command
Syntax:
192.168.1.1 sys> errlog clear
This command clears the system error log.
If you clear a log (using the errlog clear command), you may not view it again.
4-6 System Commands
Page 31

AES-100 User’s Guide
4.8.3 Saving and Viewing a Previous Error Log
You may save and view a previous error log after warm restarting the AES-100 (refer to Figure 4-1).
192.168.1.1> sys
192.168.1.1 sys> errlog display
0 Thu Jan 01 00:00:12 SNMPR WARN Cold Start Trap
1 Thu Jan 01 00:00:14 CONSOL INFO CONSOLE Session Begin
192.168.1.1 sys> home
192.168.1.1> restart
192.168.1.1> fm
192.168.1.1 fm> cat errorlog
0 Thu Jan 01 00:00:12 SNMPR WARN Cold Start Trap
1 Thu Jan 01 00:00:14 CONSOL INFO CONSOLE Session Begin
Log in memory before you restart
your AES-100.
Make sure you restart using these CI
commands. This procedure will not
work if you cold restart the AES-100.
DO NOT turn the AES-100 power
switch off and on during this
procedure.
Log in file after you restart your AES-
100.
Figure 4-1 Example: Procedure to Save and View a Previous Error Log
System Commands 4-7
Page 32

Page 33

AES-100 User’s Guide
Chapter 5
ADSL Configuration
The ADSL (Asymmetrical Digital Subscriber Line) subsystem allows you to configure and monitor the
ADSL ports.
5.1 ADSL Standards
The AES-100 supports both the G.lite and the G.dmt standards. G.lite is intended to minimize the cost for the
consumer market.
Table 5-1 Maximum Transfer Rates of the AES-100’s ADSL Ports
STANDARD MAXIMUM DOWNSTREAM MAXIMUM UPSTREAM
G.dmt 8160 Kbps 1024 Kbps
G.lite 1536 Kbps 512 Kbps
T1.413 8160 Kbps 1024 Kbps
5.2 Profiles
A profile is a table that contains a list of pre-configured ADSL settings. Each ADSL port has one (and only one)
profile assigned to it at any given time. The profile defines the maximum and minimum upstream/downstream
rates, the target upstream/downstream signal noise margins, and the maximum and minimum upstream/downstream
acceptable noise margins of all the ADSL ports that have this profile. You can configure multiple profiles,
including profiles for troubleshooting.
Profiles allow you to configure ADSL ports efficiently. You can configure all of the ADSL ports with the same
profile by modifying the profile, thus removing the need to configure the ADSL ports one-by-one. You can also
change an individual ADSL port by assigning it a different profile.
For example, you could set up different profiles for different kinds of accounts (say economy, standard and
premium). Assign the appropriate profile an ADSL port to and it takes care of a large part of the port’s
configuration. You still get to individually enable or disable each port, as well as configure its encapsulation type,
multiplexing mode, VPI, VCI and operational mode. See later in this chapter for how to configure profiles.
5.3 Configured Vs. Actual Rate
You configure the maximum rate of an individual ADSL port by modifying its profile (see the set profile
command) or assigning the port to a different profile (see the set port command). However, due to noise and
other factors on the line, the actual rate may not reach the maximum that you specify.
Even though you can specify arbitrary numbers in the
of 32 Kbps. If you enter a rate that is not a multiple of 32 Kbps, the actual rate will be the next lower multiple of
32Kbps. For instance, if you specify 60 Kbps for a port, the actual rate for that port will not exceed 32 Kbps, and if
you specify 66 Kbps, the actual rate will not be over 64Kbps.
ADSL Configuration 5-1
set profile command, the actual rate is always a multiple
Page 34

AES-100 User’s Guide
Note that when you configure an ADSL port, the upstream rate must be less than or equal to the downstream rate.
Note also that the
port
command displays the actual rates.
list port command displays the configured parameters of the ADSL port, while the show
5.4 Default Settings
The default profile always exists and all of the ADSL ports belong to it when the AES-100 is shipped. The default
profile's name is set to
5.4.1 Default Profile Settings
The following are the settings of the default profile.
- Name: DEFVAL
- Profile Status: Active
Downstream ADSL settings:
- Target Signal/Noise Ratio: 6 db
- Maximum Signal/Noise Ratio: 31 db
DEFVAL.
- Minimum Signal/Noise Ratio: 0 db
- Minimum Transmission Rate: 32 Kbps
- Maximum Transmission Rate: 2048 Kbps
Upstream ADSL settings:
- Target Signal/Noise Ratio: 6 db
- Maximum Signal/Noise Ratio: 31 db
- Minimum Signal/Noise Ratio: 0 db
- Minimum Transmission Rate: 32 Kbps
- Maximum Transmission Rate: 512 Kbps
5.4.2 Other Default Settings
The factory default settings for all ADSL ports of the AES-100 are
- Encapsulation: RFC 1483
- Multiplexing: LLC-based
- VPI : 0
- VCI : 33
- Enable/Disable State: disabled
- Operational mode: auto
5-2 ADSL Configuration
Page 35

AES-100 User’s Guide
5.5 ADSL Commands
5.5.1 Config Save Command
Syntax:
192.168.1.1 adsl> config save
The config save command saves the ADSL configuration into nonvolatile memory.
5.5.2 Disable Port Command
Syntax:
192.168.1.1 adsl> disable port <port number>
where
<port number> = port number, from 1 to 8
disable port command forcibly disables the specified ADSL port.
The
The factory default of all ports is disabled. A port must be enabled before data transmission can occur. An
enabled but disconnected ADSL port generates more heat than an operating port. To minimize heat
generation and to enhance reliability, remember to disable a port when it is not in use.
5.5.3 Disable Ports Command
Syntax:
192.168.1.1 adsl> disable ports
The disable ports command forcibly disables all ADSL ports.
The factory default of all ports is disabled. A port must be enabled before data transmission can occur. An
enabled but disconnected ADSL port generates more heat than an operating port. To minimize heat
generation and to enhance reliability, remember to disable a port when it is not in use.
5.5.4 Enable Port Command
Syntax:
192.168.1.1 adsl> enable port <port number>
where
<port number> = port number, from 1 to 8
enable port command forcibly enables the specified ADSL port.
The
The factory default of all ports is disabled. A port must be enabled before data transmission can occur. An
enabled but disconnected ADSL port generates more heat than an operating port. To minimize heat
generation and to enhance reliability, remember to disable a port when it is not in use.
5.5.5 Enable Ports Command
Syntax:
ADSL Configuration 5-3
Page 36

AES-100 User’s Guide
192.168.1.1 adsl> enable ports
The enable ports command forcibly enables all ADSL ports.
The factory default of all ports is disabled. A port must be enabled before data transmission can occur. An
enabled but disconnected ADSL port generates more heat than an operating port. To minimize heat
generation and to enhance reliability, remember to disable a port when it is not in use.
5.5.6 Linedata Command
Syntax:
192.168.1.1 adsl> linedata <port number>
where
<port number> = port number, from 1 to 8
linedata command shows the line bit allocation of an ADSL port.
The
An example is shown next.
192.168.1.1 adsl> linedata 7
DS carrier load: number of bits per symbol(tone):
tone 0- 31: 0 0 0 0 0 0 0 0 0 0 0 0 0 0 0 0
tone 32- 63: 0 0 0 22 22 33 33 33 33 33 33 44 33 44 44 44
tone 64- 95: 4 44 44 43 43 33 34 44 33 44 44 34 44 43 33 44
tone 96-127: 44 43 34 44 44 33 43 44 44 34 44 44 33 44 44 44
tone 128-159: 44 44 44 34 44 34 43 44 33 43 34 33 33 33 33 34
tone 160-191: 43 33 33 34 34 33 23 33 33 33 22 33 33 33 33 33
tone 192-223: 33 33 33 23 22 33 33 33 23 33 33 33 22 23 22 32
tone 224-255: 22 22 22 22 20 22 22 22 20 0 0 0 0 0 0 0
US carrier load: number of bits per symbol(tone)
tone 0- 31: 0 0 0 0 2 34 55 77 88 89 99 99 99 98 88 87
tone 32- 63: 0 0 0 0 0 0 0 0 0 0 0 0 0 0 0 0
The results can determine whether a given sub-carrier loop has sufficient margins to support ADSL transmission
rates, and possibly to determine whether certain specific types of interference or line attenuation exist.
The bit allocation contents are only valid when the link is up.
5.5.7 Lineinfo Command
Syntax:
192.168.1.1 adsl> lineinfo <port number>
where
<port number> = port number, from 1 to 8
The
lineinfo
command shows the line operating values of an ADSL port.
An example is shown next.
192.168.1.1 adsl> lineinfo 7
5-4 ADSL Configuration
Page 37

Current Operating Modes:
Data Mode: ATM Service Type in operation: G.DMT
Number of Channels (Down/up stream): 1/1
Downstream Framing Structure : 3
Active down/up stream rate option : 1/1
TRELLIS operation mode is : ON
Current Connection detail:
Down/up stream interleaved Delay : 4/ 4 ms
Downstream Parity byte assigned to fast/interleaved : 0/ 2
Upstream Parity byte assigned to fast/interleaved : 0/ 2
Downstream Symbols assigned to fast/interleaved : 0/ 1
Upstream Symbols assigned to fast/interleaved : 0/ 1
Down/up stream Depth value : 2/ 2
Total Transceiver Output Power : 8dB
Current ATUR Information:
Country code 0
AES-100 User’s Guide
Provider Code 01020304
Capabilities:
g.dmt POTS overlap (Annex A)
The results contain the operating modes, interleave delay, parity byte assignment, parity bytes per codeword,
symbols per codeword and interleave depth. Current ATUR Information contains data acquired from the
ATUR (stands for ADSL Termination Unit – Remote, in this case the user’s ADSL modem or router) during
negotiation/provisioning message interchanges. It includes the Vendor ID and Version Number obtained from
Vendor ID fields (g.994.1) or R-MSGS1(T1.413) and country code from Vendor ID (g.994.1).
Information obtained prior to training to steady state transition will not be valid or will be old information.
5.5.8 Lineperf Command
Syntax:
192.168.1.1 adsl> lineperf <port number>
where
<port number> = port number, from 1 to 8
lineperf command shows the line performance counters of an ADSL port.
The
An example is shown next.
192.168.1.1 adsl> lineperf 7
nfebe-I/nfebe-ni : 0/0
ncrc-I/ncrc-ni : 0/0
nfecc-I/nfecc-ni : 0/0
nfec-I/nfec-ni : 0/0
nblks-ds/nblks-us : 120878/120878
ADSL Configuration 5-5
Page 38

AES-100 User’s Guide
nsec-ds/nsec-us : 2060/2060
n-eb-ds/n-eb-us : 0/0
n-bbe-ds/n-bbe-us : 0/0
n-es-ds/n-es-us : 0/0
n-ses-ds/n-ses-us : 0/0
non-ses-blks-ds/non-ses-blks-us : 120878/120878
n-uas-ds/n-uas-us : 0/0
fe_loss_seconds/ne_loss_seconds : 0/0
fe_fec_seconds/ne_fec_seconds : 0/0
fast_trains : 0
fast_trains_fail : 0
These counts contain line performance data that has been accumulated since the system started. In the list above the
definitions of near end/far end will always be relative to the ATU-C (ADSL Termination Unit-Central Office).
Downstream (ds) refers to data from the ATU-C and upstream (us) refers to data from the ATU-R.
5.5.9 Linerate Command
Syntax:
192.168.1.1 adsl> linerate <port number>
where
<port number> = port number, from 1 to 8
linerate command shows the line rate parameters of an ADSL port.
The
An example is shown next.
192.168.1.1 adsl> linerate 7
Current Active Rates:
AS0 downstream rate : 2048 Kbps
AS1 downstream rate : 0 Kbps
LS0 upstream rate : 512 Kbps
LS1 upstream rate : 0 Kbps
Down/up stream noise Margin : 31/22 dB
Down/up stream Attenuation : 0/ 0 dB
Attainable Down/up stream Rate : 11456/ 1344 Kbps
These results contain the current downstream and upstream operating values (SHOWTIME) for the requested line,
the latest available downstream and upstream noise margins, channel attenuation and the maximum attainable rate.
Downstream and upstream noise margins must both be at least 6 dB. The initial downstream and upstream noise
margins are first set during training. The upstream margin is recalculated every 15 seconds during “showtime” at
the ATU-C and the downstream margin updates every 15 seconds during “showtime” by using EOC messaging.
Information obtained prior to training to steady state transition will not be valid or will be old information.
5-6 ADSL Configuration
Page 39

AES-100 User’s Guide
5.5.10 List Port Command
Syntax:
192.168.1.1 adsl> list port <port number>
where
<port number> = port number, from 1 to 8
list port command shows the configured maximum upstream/downstream rates, the mode (or standard),
The
and enable/disable state of an individual ADSL port.
5.5.11 List Ports Command
Syntax:
192.168.1.1 adsl> list ports
The
list ports
command shows the configured maximum rates, modes and states of all ADSL ports.
5.5.12 Set Profile Command
Syntax:
192.168.1.1 adsl> set profile <name> <atur max rate > <atuc max rate> [<atur ...>
<atuc ...>]
<atux ...> = <target margin> <min margin> <max margin> <min rate>
where
<name> =
<atur max rate> =
<atuc max rate> =
<atur target margin> =
<atuc target margin> =
<atur min margin> =
<atuc min margin> =
<atur max margin> =
<atuc max margin> =
The name of the profile (up to 32 characters).
The maximum ADSL upstream transmission rate.
The maximum ADSL downstream transmission rate.
The target ADSL upstream signal/noise margin (0..31db).
The target ADSL downstream signal/noise margin (0..31db).
The minimum acceptable ADSL upstream signal/noise margin (0..31db).
The minimum acceptable ADSL downstream signal/noise margin (0..31db).
The maximum acceptable ADSL upstream signal/noise margin (0..31db).
The maximum acceptable ADSL downstream signal/noise margin (0..31db).
<atur min rate> =
<atuc min rate> =
ATU-C (
atur) stands for ADSL Termination Unit-Remote and refers to upstream transmission.
(
atuc) stands for ADSL Termination Unit-Central and refers to downstream transmission and ATU-R
The minimum ADSL upstream transmission rate in Kbps.
The minimum ADSL downstream transmission rate in Kbps.
The profile is a table that contains information on ADSL line configuration. Each entry in this table reflects a
parameter defined by a manager, which can be used to configure the ADSL line.
Note that the default value will be used for any of the above fields that are omitted.
The upstream rate must be less than or equal to the downstream rate.
ADSL Configuration 5-7
Page 40

AES-100 User’s Guide
Even though you can specify arbitrary numbers in the set profile command, the actual rate is always a multiple
of 32 Kbps. If you enter a rate that is not a multiple of 32 Kbps, the actual rate will be the next lower multiple of
32Kbps. For instance, if you specify 60 Kbps for a port, the actual rate for that port will not exceed 32 Kbps, and if
you specify 66 Kbps, the actual rate will not be over 64Kbps.
An example is shown next.
192.168.1.1 adsl> set profile debug 800 8000
This command sets the maximum upstream transmission rate to 800 kbps and the maximum downstream
transmission rate to 8000 kbps. None of the other settings are changed
5.5.13 Delete Profile Command
Syntax:
192.168.1.1 adsl> delete profile <name>
where
<name> = profile name
delete profile command allows you to delete an individual profile index by its name.
The
5.5.14 List Profiles Command
Syntax:
192.168.1.1 adsl> list profiles
The list profiles command displays all of the configured ADSL profiles and which ADSL ports are assigned
to each.
An example is shown next.
192.168.1.1 adsl> list profiles
Profile 1 : DEFVAL
Profile 2 : debug
Port 1, Profile : DEFVAL
Port 2, Profile : DEFVAL
Port 3, Profile : DEFVAL
Port 4, Profile : debug
Port 5, Profile : DEFVAL
Port 6, Profile : DEFVAL
Port 7, Profile : DEFVAL
Port 8, Profile : DEFVAL
This display shows that there are two profiles (DEFVAL and debug) and that port 4 belongs to the debug profile
while ports 1, 2, 3, 5, 6, 7 and 8 belong to the DEFVAL profile.
5.5.15 Show Profile Command
Syntax:
5-8 ADSL Configuration
Page 41

192.168.1.1 adsl> show profile <name>
where
<name> = a profile name
show profile command displays the settings of an ADSL profile.
The
An example is shown next.
192.168.1.1 adsl> show profile debug
#Entry type : adslLineConfProfileEntry
ConfProfileName : debug
AtucConfTargetSnrMgn : 6 db
AtucConfMaxSnrMgn : 31 db
AtucConfMinSnrMgn : 0 db
AtucChanConfInterleaveMinTxRate : 32 Kbps
AtucChanConfInterleaveMaxTxRate : 8000 Kbps
AturConfTargetSnrMgn : 6 db
AturConfMaxSnrMgn : 31 db
AturConfMinSnrMgn : 0 db
AES-100 User’s Guide
AturChanConfInterleaveMinTxRate : 32 Kbps
AturChanConfInterleaveMaxTxRate : 800 Kbps
ConfProfileRowStatus : active(1)
This display shows that the maximum upstream ransmission rate is set to 800 kbps and the maximum downstream
transmission rate is set to 8000 kbps. All of the other settings are still at the default values.
5.5.16 Show Profiles Command
Syntax:
192.168.1.1 adsl> show profiles
The show profiles command displays the settings of all the ADSL profiles.
5.5.17 Set Port Command
Syntax:
192.168.1.1 adsl> set port <port number> <profile name> <oper mode>
where
<port number> =
<profile name> =
Port number ranging from 1 to 8.
The profile that will define the settings of this port.
<oper mode> =
set port
The
command assigns an individual port to a specific profile and sets the port’s mode, or standard. The
Operational mode; the available choices are glite, gdmt, t.413 or auto.
profile defines the maximum and minimum upstream/downstream rates, the target upstream/downstream signal
noise margins, and the maximum and minimum upstream/downstream acceptable noise margins of all the ADSL
ports that are assigned to it.
ADSL Configuration 5-9
Page 42

AES-100 User’s Guide
The mode parameter specifies the standard that this port is allowed. When set to auto, the AES-100 follows
whatever mode is set on the other end of the line.
When the mode is set to auto and the negotiated mode is G.lite, if the configured rates exceed those
allowed by G.lite, the actual rates are governed by G.lite, regardless of the configured numbers.
An example is shown next.
192.168.1.1 adsl> set port 4 debug auto
This command sets ADSL port 4 to have the debug profile. The results of this command are reflected when you use
the list profiles command.
5.5.18 Set Ports Command
Syntax:
192.168.1.1 adsl> set ports <profile name> <oper mode>
where
<profile name> =
<oper mode> =
The
set ports command assigns a specific profile to all of the ADSL ports and sets all of the ports to one mode,
or standard. The profile defines the maximum and minimum upstream/downstream rates, the target
upstream/downstream signal noise margins, and the maximum and minimum upstream/downstream acceptable
noise margins of all the ADSL ports.
The mode parameter specifies the standard that this port is allowed. When set to auto, the AES-100 follows
whatever mode is set on the other end of the line.
When the mode is set to auto and the negotiated mode is G.lite, if the configured rates exceed those
allowed by G.lite, the actual rates are governed by G.lite, regardless of the configured numbers.
The profile that will define the settings of this port.
Operational mode; the available choices are glite, gdmt, t1.413, or
auto.
5.5.19 Show Port Command
Syntax:
show port <port number>
where
<port number> = port number, from 1 to 8
The show port command shows the line status (up or down), the actual upstream/downstream rates and mode of an
individual ADSL port.
5.5.20 Show Ports Command
Syntax:
192.168.1.1 adsl> show ports
The show ports command shows the line status (up or down), the actual upstream/downstream rates and the
mode of all ADSL ports.
5-10 ADSL Configuration
Page 43

AES-100 User’s Guide
5.5.21 Set PVC Command
Syntax:
192.168.1.1 adsl> set pvc <port number> <multiplexing mode> <tx vpi> <tx vci> [<rx
vpi> <rx vci>]
where
<port number> =
<multiplexing mode> =
<tx vpi> = the VPI setting of the ADSL port for use with a TX based network
<tx vci> = the VCI setting for the ADSL port for use with a TX based network
<rx vpi> = the VPI setting for the ADSL port for use with Rx based networks
<rx vci> = the VCI setting for the ADSL port for use with Rx based networks
<rx vpi> and <rx vci> settings will be equal to those of
The
port number, from 1 to 8.
either “llc” or “vc"
<tx vpi>
and <tx vci> if the rx settings
are not configured.
The
set pvc command allows the configuration of a PVC (permanent virtual circuit) for an individual ADSL
port.
5.5.22 Set PVCs Command
Syntax:
192.168.1.1 adsl> set pvcs <multiplexing mode> <tx vpi> <tx vci> [<rx vpi> <rx
vci>]
where
<multiplexing mode> = either “llc” or “vc”
<tx vpi> = the VPI setting of the ADSL ports for use with a TX based network
<tx vci> = the VCI setting for the ADSL ports for use with a TX based network
<rx vpi> = the VPI setting for the ADSL ports for use with Rx based networks
<rx vpi> = the VCI setting for the ADSL ports for use with Rx based networks
<rx vpi> and <rx vci> settings will be equal to those of
The
<tx vpi>
and <tx vci> if the rx settings
are not configured.
The
set pvcs
command allows you to configure a single PVC for all of the ADSL ports at once.
5.5.23 Show PVC Command
Syntax:
192.168.1.1 adsl> show pvc <port number>
where
<port number> =
The show pvc command allows you to display the PVC parameters of an individual ADSL port.
ADSL Configuration 5-11
port number, from 1 to 8.
Page 44

AES-100 User’s Guide
5.5.24 Show PVCs command
Syntax:
192.168.1.1 adsl> show pvcs
The
show pvcs
command allows you to display the PVC parameters of all ADSL ports.
5-12 ADSL Configuration
Page 45

AES-100 User’s Guide
Chapter 6
10/100M Fast Ethernet Port Commands
The Ethernet subsystem allows you to configure and monitor the 10/100M fast Ethernet port.
6.1 10/100M Auto-Sensing Ethernet
The AES-100 supports 10/100Mbps auto-sensing Ethernet. There are two factors related to the connection of two
Ethernet ports: rate and duplex mode. In a 10/100Mbps fast Ethernet, the rate can be 10Mbps or 100Mbps and the
duplex mode can be half duplex or full duplex. The auto-negotiation capability makes one Ethernet port able to
negotiate with a peer automatically to obtain the optimal connection rate and duplex mode.
When auto-negotiation is turned on, the Ethernet port of the AES-100 negotiates with the peer Ethernet port on the
Ethernet cable automatically to determine the optimal connection rate and duplex mode. If the peer Ethernet port
does not support auto-negotiation or turns off this feature, the AES-100 determines the connection rate by detecting
the signal on the cable and using half duplex mode. When the AES-100’s auto-negotiation is turned off, the
Ethernet port uses the pre-configured rate and duplex mode settings when making a connection, thus requiring you
to check the settings of the peer Ethernet port in order to connect.
6.2 Ethernet Commands
6.2.1 Set Auto Command
Syntax:
192.168.1.1 ethernet> set auto <ON/OFF>
where
<ON/OFF> = on or off
This command sets the auto-negotiation of the Ethernet port either on or off.
6.2.2 Set Duplex Command
Syntax:
192.168.1.1 ethernet> set duplex <mode>
where
<mode> = full or half
This command sets the duplex mode used when auto-negotiation is turned off.
6.2.3 Set Speed Command
Syntax:
192.168.1.1 ethernet> set speed <speed>
where
10/100M Fast Ethernet Port Commands 6-1
Page 46

AES-100 User’s Guide
<speed> = 10 or 100
This command sets the connection speed used when auto-negotiation is turned off. 10 stands for 10Mbps and 100
stands for 100Mbps.
6.2.4 Status Command
Syntax:
192.168.1.1 ethernet> status
This command shows the current status of the Ethernet port.
6-2 10/100M Fast Ethernet Port Commands
Page 47

AES-100 User’s Guide
Chapter 7
Bridge Commands
This chapter discusses the bridge subsystem. It allows you to configure and monitor the bridging,
configure MAC filters, port-based VLANs and tagged frame functions of the AES-100.
The AES-100 supports IEEE 802.1D transparent bridging; but not the static filtering feature or spanning tree
protocol. The bridge learns the source MAC addresses of sender hosts by inspecting incoming Ethernet frames and
recording the learned MAC addresses with their incoming port numbers into its filtering database. Based on the
database, the bridge forwards each incoming frame to its destination port.
7.1 Bridge Port Numbers
The bridge subsystem of the AES-100 defines its own numbering convention for ports.
The bridge has a total of nine ports: bridge port 1 stands for the Ethernet port, bridge port 2 stands for
ADSL port 1, bridge port 3 stands for ADSL port 2, and so on.
Be sure you have clarified the relation between bridge ports and ADSL ports.
7.2 Basic Commands
7.2.1 Config Save Command
Syntax:
192.168.1.1 bridge> config save
This command saves the bridge configuration into nonvolatile memory. You must use this command to save any
configurations that you make, otherwise the AES-100 will return to its default settings when it is restarted.
Do not turn off your AES-100 while saving your configuration.
7.2.2 Device Command
Syntax:
192.168.1.1 bridge> device
This command shows information on all bridge ports.
7.2.3 Status Command
Syntax:
192.168.1.1 bridge> status
This command displays the bridge status.
Bridge Commands 7-1
Page 48

AES-100 User’s Guide
7.3 MACfilter Commands
Use MACfilter commands to filter incoming packets based on MAC (Media Access Control) address(es) that you
specify. If you do not use this command, your AES-100 will not filter packets. MACfilter commands are listed
next. You may specify up to five MAC addresses per port.
7.3.1 MACfilter Command
Syntax:
192.168.1.1 bridge> macfilter [<port>]
where
<port> =
This command displays the MAC filtering status and the fixed source MAC addresses on a port or on all ports if no
port is specified.
7.3.2 Macfilter Enable Command
Syntax:
a bridge port number.
192.168.1.1 bridge> macfilter enable [<port>]
where
<port> =
This command enables the MAC filtering feature on a specific port or on all ports if no port is specified.
a bridge port number.
7.3.3 Macfilter Disable Command
Syntax:
192.168.1.1 bridge> macfilter disable [<port>]
where
<port> =
This command disables the MAC filtering feature on a specific port or on all ports if no port is specified.
a bridge port number.
7.3.4 Macfilter Add Command
Syntax:
192.168.1.1 bridge> macfilter add <port> <mac>
where
<port> =
<mac> =
This command adds a source MAC address fixed on a specified port. You may add up to five MAC addresses.
7-2 Bridge Commands
a bridge port number.
the source MAC address in "00:a0:c5:12:34:56" format.
Page 49

7.3.5 Macfilter Delete Command
Syntax:
192.168.1.1 bridge> macfilter delete <port> <mac>
where
AES-100 User’s Guide
<port> =
<mac> =
This command removes a configured source MAC address from a port specified by you.
a bridge port number.
the source MAC address in "00:a0:c5:12:34:56" format.
7.4 Filter Commands
7.4.1 Filter Command
Syntax:
192.168.1.1 bridge> filter
This command displays the filtering database.
7.4.2 A Note about IGMP Snooping
Traditionally, IP packets are transmitted in one of either two ways - Unicast (1sender to 1 recipient) or Broadcast (1
sender to everybody on the network). Multicast delivers IP packets to just a group of hosts on the network. IGMP
(Internet Group Multicast Protocol) is a session-layer protocol used to establish membership in a Multicast group it is not used to carry user data. Refer to RFC 2236 for information IGMP version 2 and RFC 1112 for IGMP
version 1. A Layer 2 switch can passively snoop on IGMP Query and Report packets transferred between IP
Multicast Routers/Switches and IP Multicast host groups to learn the IP Multicast group members. It checks IGMP
packets passing through it, picks out the group registration information, and configures multicasting accordingly.
IGMP Snooping generates no additional network traffic, allowing you to significantly reduce the multicast traffic
passing through your switch.
7.4.3 Mfilter Command
Syntax:
192.168.1.1 bridge> mfilter
This command displays the multicast filtering database. The mfilter command is what allows you to monitor the
AES-100’s IGMP snooping activities.
The following is an example of a multicast filtering database.
192.168.1.1 bridge> mfilter
ID GDA MAC Member Ports
Bridge Commands 7-3
Page 50

AES-100 User’s Guide
239.255.255.250
0
224.000.001.022
1
235.001.001.006
2
229.055.150.208
3
224.000.001.060
4
235.209.237.084
5
Total 6 entries.
IGMP version 2
Query Received 343
Max Response Time 100 * 1/10 seconds
Query Interval 125 seconds
7f-ff-fa
00-01-16
01-01-06
37-96-d0
00-01-3c
51-ed-54
where
ID
GDA
MAC
Member Ports
The location of the entry in the multicast filtering database.
Group Destination Address. The IP address of a multicast group destination.
The last 3 bytes of the multicast MAC that the GDA is mapped to.
The ports that belong to this multicast group. 1= Ethernet, 2= ADSL port 1, 3=ADSL
port 2 and so on.
1, 2
1, 3, 4
1, 2, 5, 7,8
1, 9
1, 3, 5, 6
1, 4, 6, 9
IGMP version
Query Received
Max Response Time
The version of IGMP being used in the network.
The number of query packets received by the AES-100.
The longest period of time used to respond to a query packet, measured in tenths of a
second.
Query Interval
The time period between query packets.
7.4.4 Filterage Command
Syntax:
192.168.1.1 bridge> filterage [age]
where
age =
aging out timer period in seconds.
This command sets or shows the aging out timer period of the filtering database. It is recommended that you use the
default setting. If the time interval is set too short, it could increase broadcast traffic and reduce the available
bandwidth.
7.4.5 Flush Command
Syntax:
192.168.1.1 bridge> flush [port]
where
port =
A bridge port number
7-4 Bridge Commands
Page 51

AES-100 User’s Guide
This command flushes out the filtering database of the specified bridge port. If the <port> field is omitted, this
command will flush out the filtering databases of all ports.
7.4.6 Info Command
Syntax:
192.168.1.1 bridge> info
This command shows the software number of the bridge implementation and the maximum size of the filtering
database.
7.5 Port-Based VLAN Commands
The AES-100 VLAN (Virtual Local Area Network) mechanism can be used to limit the broadcast domain to the
members of a VLAN group only. In this way, VLAN increases network performance by limiting broadcasts to a
smaller and more manageable logical broadcast domain. In traditional switched environments, all broadcast packets
go to each and every individual port.
The stations on a logical network belong to one group; however, a station can belong to more than one group. Users
of one group are not allowed to access the resources of other groups and a higher level of security is achieved. This
isolates the subscribers from one another and prevents a subscriber from discovering the resources, for example,
shared drives or printers, of another subscriber.
In the AES-100 port-based VLAN, the allowable outgoing port(s) of each incoming port must be defined. Ethernet
frames are forwarded according to these rules. Therefore, if you wish to allow two subscriber ports to talk to each
other, for example, between conference rooms in a hotel, you must define the egress port (outgoing port) for both
ports. An egress port is an outgoing port, that is, a port through which a data packet leaves. Port-based VLANs are
specific only to the switch on which they were created.
The factory default settings for the port-based VLAN of the AES-100 are:
- Bridge port 1 (Ethernet port) allowed to all bridge ports
- Bridge port 2 (ADSL port 1) allowed to bridge port 1 (Ethernet port) only
- Bridge port 3 (ADSL port 2) allowed to bridge port 1 (Ethernet port) only
- Bridge port 4 (ADSL port 3) allowed to bridge port 1 (Ethernet port) only
- Bridge port 5 (ADSL port 4) allowed to bridge port 1 (Ethernet port) only
- Bridge port 6 (ADSL port 5) allowed to bridge port 1 (Ethernet port) only
- Bridge port 7 (ADSL port 6) allowed to bridge port 1 (Ethernet port) only
- Bridge port 8 (ADSL port 7) allowed to bridge port 1 (Ethernet port) only
- Bridge port 9 (ADSL port 8) allowed to bridge port 1 (Ethernet port) only
The default VLAN settings allow each ADSL port to communicate back and forth with only the Ethernet port,
and not with other ADSL ports. The following figure illustrates this.
Bridge Commands 7-5
Page 52

AES-100 User’s Guide
Figure 7-1 Default VLAN Settings
7.5.1 Portfilter Command
Syntax:
192.168.1.1 bridge> portfilter <source port> [all|<dest ports>]
where
<source port> =
all =
<dest ports> =
an incoming bridge port number.
all bridge ports are allowed outgoing ports.
the outgoing bridge ports. Separate by a space if there is more than one port.
This command sets or displays the port-based VLAN configuration.
An example is shown next.
192.168.1.1 > bridge
192.168.1.1 bridge> portfilter
Port 1 (ethernet): all
Port 2 (adsl1): 1
Port 3 (adsl2): 1
Port 4 (adsl3): 1
Port 5 (adsl4): 1
Port 6 (adsl5): 1
Port 7 (adsl6): 1
Port 8 (adsl7): 1
Port 9 (adsl8): 1
The above shows the current configuration of the port-based VLAN. It is the same as the default settings.
An example with an altered configuration is shown next.
192.168.1.1 > bridge
192.168.1.1 bridge> portfilter 2 1 3
192.168.1.1 bridge> portfilter 3 1 2
7-6 Bridge Commands
Page 53

AES-100 User’s Guide
This example sets the allowed outgoing bridge ports of port 2 (ADSL port 1) to port 1 (Ethernet port) and port 3
(ADSL port 2). The allowed outgoing bridge ports of port 3 (ADSL port 2) are set to port 1 (Ethernet port) and
port 2 (ADSL port1). This way ADSL ports 2 and 3 can communicate with each other and the Ethernet port. You
can see the effects of this example by using the following command:
192.168.1.1 bridge> portfilter
Port 1 (ethernet): all
Port 2 (adsl1): 1 3
Port 3 (adsl2): 1 2
Port 4 (adsl3): 1
Port 5 (adsl4): 1
Port 6 (adsl5): 1
Port 7 (adsl6): 1
Port 8 (adsl7): 1
Port 9 (adsl8): 1
The following figures illustrate the above example. Notice that ports 2 (ADSL port 1) and 3 (ADSL port 2) are
able to communicate with each other, as well as with the Ethernet. All of the other ports will only be able to
communicate with the Ethernet port.
The following figure illustrates the
192.168.1.1 bridge> portfilter 2 1 3
command line. Port 2 (ADSL port 1) is able to send to both the Ethernet port and port 3 (ADSL port 2).
Figure 7-2 Example of Modified VLAN Port 2
The following figure illustrates the
192.168.1.1 bridge> portfilter 3 1 2
command line.
Port 3 (ADSL port 2) is able to send to both the Ethernet port and port 2 (ADSL port 1).
Bridge Commands 7-7
Page 54

AES-100 User’s Guide
Figure 7-3 Example of Modified VLAN Port 3
The following figure illustrates that port 1 (the Ethernet port) is linked to ports 2 (ADSL port 1) and 3 (ADSL port
2). Ports 2 (ADSL port1) and 3 (ADSL port 2) are also linked to each other. Or, in other words, the following figure
is a result of the following commands:
192.168.1.1 bridge> portfilter 2 1 3
192.168.1.1 bridge> portfilter 3 1 2
Figure 7-4 Example of Modified VLAN Settings
7.6 Tagged Ethernet Frames Commands (Fast Mode)
The ADSL Networking Module’s fast mode makes use of the “tag” subset of the IEEE 802.1Q standard to identify
the source port of an Ethernet frame and speed traffic through a service gateway. In this way, the source port of a
frame can be recognized across switches.
7.6.1 PVID Command
Syntax:
192.168.1.1 bridge> pvid [<port> <vid>]
where
<port> =
<vid> =
port number of the ADSL Networking Module. Port 0 is the CPU’s port, port 1 is the
Ethernet port and ports 2-9 are the bridge ports on ADSL Networking Module
modules. These are logical ports.
The tag number (or IEEE 802.1Q identification) that identifies the source port of an
Ethernet frame. Allocate tag numbers for all logical ports on your ADSL Networking
Module.
7-8 Bridge Commands
Page 55

AES-100 User’s Guide
This command lets you allocate IEEE 802.1Q identification numbers (tags) on a port-by-port basis.
The command 192.168.1.1 bridge> pvid displays the default port identification of all ADSL Networking
Module ports.
The IEEE 802.1Q standard uses an explicit tag in the header to specify the VLAN ID (VID) of an Ethernet frame.
In this way, the VLAN membership of a frame can be carried across switches. The following table displays the
physical port and corresponding default PVID tag on the AES-100.
Table 7-1 Physical Ports, Port Numbers and AES-100 Default PVID Tags in Fast Mode
PHYSICAL
PORT
PORT
NUMBER
CPU (Central Processing Unit) 0 1
ADSL Networking Module LAN
1N/A
Port (Ethernet)
ADSL Port 1 2 2
ADSL Port 2 3 3
ADSL Port 3 4 4
ADSL Port 4 5 5
ADSL Port 5 6 6
ADSL Port 6 7 7
ADSL Port 7 8 8
ADSL Port 8 9 9
DEFAULT PVID TAG
Bridge Commands 7-9
Page 56

Page 57

AES-100 User’s Guide
Chapter 8
IEEE 802.1Q Tagged VLAN Commands
This chapter generally describes the IEEE 802.1Q Tagged VLAN and associated CI Commands.
8.1 Introduction
The IEEE 802.1Q Tagged VLAN allows your ADSL Networking Module to deliver tagged/untagged frames to and
from its ports. The standard gives the ADSL Networking Module the ability to recognize VLAN-aware and VLANunaware devices and automatically strips tags off of frames destined for ports that would normally drop tagged
frames.
The system mode of the ADSL Networking Module must be set to “Normal” (see
802.1Q Tagged VLAN.
) in order to use the
4.5.5
8.2 IEEE 802.1Q Tagged VLAN -Tags
When a LAN bridge receives a frame from a workstation, the VLAN from whence it came must be known so the
bridge may respond, if necessary, to the source of the frame. This is accomplished by tagging. There are two kinds
of tagging:
1. Explicit Tagging
• A VLAN identifier is added to the frame header that identifies the source VLAN.
2. Implicit Tagging
• The MAC (Media Access Control) number, the port or other information is used to identify the source of a
VLAN frame.
The IEEE 802.1Q Tagged VLAN uses both explicit and implicit tagging.
8.3 VLAN-Aware/VLAN-Unaware Devices
It is important for the LAN bridge to determine what devices are VLAN-aware and VLAN-unaware so that it can
decide whether to forward a tagged frame (to a VLAN-aware device) or first strip the tag from a frame and then
forward it (to a VLAN-unaware device).
8.4 Filtering Databases
A filtering database stores and organizes VLAN registration information useful for routing frames to and from a
LAN bridge. A filtering database consists of a static entries (Static VLAN or SVLAN table) and dynamic entries
(Dynamic VLAN or DVLAN table).
8.4.1 Static Entries (SVLAN Table)
Static entry registration information is added, modified and removed by management only.
IEEE 802.1Q Tagged VLAN Commands 8-1
Page 58

AES-100 User’s Guide
8.4.2 Dynamic Entries (DVLAN Table)
Dynamic entries are learned by the bridge and cannot be created or updated by management. The bridge learns this
information by observing what port, source address and VLAN ID (or VID) is associated with a frame. Entries are
added and deleted using GARP VLAN Registration Protocol (GVRP), where GARP is the Generic Attribute
Registration Protocol.
8.5 IEEE 802.1Q Tagged VLAN Commands
Bridge port 1 stands for the Ethernet port, bridge port 2 stands for ADSL port 1, bridge port 3 stands for
ADSL port 2, and so on.
8.5.1 Enabling the IEEE 802.1Q Tagged VLAN
The default for the IEEE 802.1Q Tagged VLAN is disable. Enable the IEEE 802.1Q Tagged VLAN by following
the example shown next.
Syntax:
192.168.1.1 vlan1q> vlan enable
8.5.2 Disabling the IEEE 802.1Q Tagged VLAN
You can disable the IEEE 802.1Q Tagged VLAN by using the VLAN Disable command.
Syntax:
192.168.1.1 vlan1q> vlan disable
This command disables the IEEE 802.1Q Tagged VLAN.
8.5.3 PVID Command
Syntax:
192.168.1.1 vlan1q> pvid [<port #> <vlan id>]
where
<port #> =
<vlan id> =
This command sets the VLAN ID to a specific port in the PVID table. To display the PVID table simply enter this
command without parameters, as shown next.
192.168.1.1 vlan1q> pvid
bridge port number. Valid parameter range = [1 - 9].
VLAN ID. Valid parameter range = [1 - 4094].
8-2 IEEE 802.1QTagged VLAN Commands
Page 59

pvid port#
----- ----11
12
13
14
15
16
17
18
19
192.168.1.1 vlan1q>
Figure 8-1 Example: PVID Command Display
8.5.4 SVLAN CPU Command
Syntax:
192.168.1.1 vlan1q> svlan cpu [<vid>]
where
AES-100 User’s Guide
<vid> =
VLAN ID. Valid parameter range = [1 – 4094].
This command registers your CPU as a port member of the static VLAN with <vid>. To display the CPU static
VLAN identification, simply enter this command without parameters, as shown next.
192.168.1.1 vlan1q> svlan cpu
8.5.5 SVLAN List Command
Syntax:
192.168.1.1 vlan1q> svlan list
This command displays the static VLAN registration table. The following figure is an example of what is displayed
when you use this command.
vid port# ad_control tag_control
-------- ------- ------------ ------------
1 1 fixed Tag
2 1 normal UnTag
3 1 normal UnTag
2 normal UnTag
3 normal UnTag
2 fixed UnTag
3 normal UnTag
2 normal UnTag
3 fixed UnTag
Figure 8-2 Example: SVLAN List Command Display
For more information about the Svlan List command display, refer to the Svlan Setentry command (shown next).
IEEE 802.1Q Tagged VLAN Commands 8-3
Page 60
AES-100 User’s Guide
8.5.6 SVLAN Setentry Command
Syntax:
192.168.1.1 vlan1q> svlan setentry <vid> <port#> <ad_control> <tag_control>
where
<vid> =
<port#> =
VLAN ID. Valid parameter range = [1 – 4094].
bridge port number.
Valid parameter range = [1 – 9].
<ad_control> =
Registrar administration control flag.
Valid parameters = [fixed, forbidden, normal].
Select fixed to register a <port #> to the static VLAN table with <vid>.
Select normal to confirm registration of the <port #> to the static VLAN table
with <vid>.
Select forbidden to unregister a <port #> from the static VLAN table with
<vid>.
<tag_control> =
Tag control flag. Valid parameters = [tag, untag].
Select tag to tag outgoing frames.
Select untag if you do not want to tag outgoing frames.
This command adds or modifies an entry into the static VLAN table. Display your configuration by using the
Svlan List command. An example of a configuration is shown next.
Modify a Static VLAN Table Example
The following is an example of how to modify a static VLAN table.
1.
2.
3.
4.
192.168.1.1 vlan1q> svlan setentry 3 3 fixed untag
192.168.1.1 vlan1q> svlan setentry 2 2 fixed untag
192.168.1.1 vlan1q> svlan setentry 1 1 fixed tag
192.168.1.1 vlan1q> svlan list
The arrows, in the figure shown next, point to the lines that have been modified in this table as a result of the
previous commands.
vid port# ad_control tag_control
-------- ------- ------------ ------------
3.
2.
1.
1 1 fixed tag
2 normal untag
3 normal untag
2 1 normal untag
2 fixed untag
3 normal untag
3 1 normal untag
2 normal untag
3 fixed untag
Figure 8-3 Example: SVLAN List Command Display
8-4 IEEE 802.1QTagged VLAN Commands
Page 61

AES-100 User’s Guide
Forwarding Process Example
The switch uses the SVLAN in making frame-forwarding decisions.
First the switch checks the MAC address in a frames header against the MAC filtering database.
Next the switch checks the VLAN ID (VID) of tagged frames or assigns temporary VIDs to untagged frames (see
the PVID Command).
The switch then checks the VID in a frame’s tag against the SVLAN table.
The switch notes what the SVLAN table says (that is, the SVLAN tells the switch whether or not to forward a
frame and if the forwarded frames should have tags).
Then the switch applies the port filter to finish the forwarding decision. This means that frames may be dropped
even if the SVLAN says to forward them. Frames might also be dropped if they are sent to an ADSL CPE device
that does not accept tagged frames.
The following figure shows the flow of the decision process used with a broadcast frame (one that is meant to go to
all of the ports).
Figure 8-4 SVLAN Example
An untagged frame comes in from the LAN.
The switch checks the PVID table and assigns a temporary VID of 1.
The switch ignores port# 1 (the LAN port where the frame came in), because the switch does not send a frame to
the port that it came in through.
IEEE 802.1Q Tagged VLAN Commands 8-5
Page 62

AES-100 User’s Guide
The switch sees that port #s 2, 3, 4, 6, 8 and 9 (ADSL ports 1, 2, 3, 5, 7 and 9) are all set to “fixed” and “untag”
which means the SVLAN allows the frame to be sent to those ports without a tag.
Port # 5 is “forbidden” so the frame is not forwarded to adsl port # 4.
Port # 7 (ADSL port 6) is “normal” which means that it was entered dynamically, so the frame is permitted to be
forwarded to port # 7 if port # 7 is registered in the DVLAN table.
After looking at the SVLAN, the switch sees that the port filter is set for port 1 (the LAN port) to forward frames to
all of the ADSL ports, so the switch forwards everything that the SVLAN permits.
Please note that the switch also sends the frame to “CPU” (the switch itself), because the switch is a member of this
VLAN. The switch can be a member of only one VLAN at a time.
8.5.7 SVLAN Getentry Command
Syntax:
192.168.1.1 vlan1q> svlan getentry <vid>
where
<vid> =
VLAN ID. Valid parameter range = [1 – 4094].
This command displays an entry with a specified VLAN ID in the static VLAN table.
Display a Static VLAN Table Entry Example
The following figure is an example display of the following command.
192.168.1.1 vlan1q> svlan getentry 2
vid port# ad_control tag_control
-------- ------- ------------ ------------
2 1 normal UnTag
2 fixed UnTag
3 normal UnTag
Figure 8-5 Example: Svlan Getentry 2 Command Display
8.5.8 SVLAN Delentry Command
Syntax:
192.168.1.1 vlan mgr> svlan delentry <vid>
where
<vid> =
VLAN ID. Valid parameter range = [1 – 4094].
This command deletes an entry with a specified VLAN ID in the static VLAN table
Delete a Static VLAN Entry Example
The following example will delete entry 2 in the static VLAN table.
192.168.1.1 vlan mgr> svlan delentry 2
8-6 IEEE 802.1QTagged VLAN Commands
Page 63

AES-100 User’s Guide
||
|| ||
|| ||
8.5.9 DVLAN List Command
Syntax:
192.168.1.1 vlan1q> dvlan list
This command displays the dynamic VLAN registration table. The following figure is an example of what is
displayed when you use this command.
vid 01 02 03 04 05 06 07 08 09
---- ---- ---- ---- ---- ---- ---- ---- ---- ----
2||>>||||>>>>||||>>
3>>>>||||||>>>>>>||
4>>||||>>>>||||>>>>
5||>>||||>>>>||||>>
6>>>>||||||>>>>>>||
7||>>||>>>>||||>>>>
8>>||||>>||>>>>>>>>
>>
>>
>> >>
Figure 8-6 Example: DVLAN List Command Display
In the figure above, “||” denotes “filter” and “>>” denotes “forward”.
8.5.10 DVLAN Getentry Command
Syntax:
192.168.1.1 vlan1q> dvlan getentry <vid>
where
<vid> =
VLAN ID. Valid parameter range = [1 – 4094].
This command displays an entry with a specified VLAN ID in dynamic GVRP table.
Display a Dynamic VLAN Table Entry Example
The following figure is an example display of the following command.
192.168.1.1 vlan1q> dvlan getentry 2
vid 01 02 03 04 05 06 07 08 09
---- ---- ---- ---- ---- ---- ---- ---- ---- ----
2
>>
>> >>
Figure 8-7 Example: DVLAN Getentry 2 Command Display
In the figure above, “||” denotes “filter” and “>>” denotes “forward”.
8.5.11 VLAN List Command
Syntax:
>>
192.168.1.1 vlan1q> vlan list
This command displays the entire VLAN table. The display refreshes periodically. Press [ENTER] and then enter
the stop command to stop the display from refreshing. The following figure is an example what is displayed when
you use this command.
IEEE 802.1Q Tagged VLAN Commands 8-7
Page 64

AES-100 User’s Guide
vid 01 02 03 04 05 06 07 08 09
---- ---- ---- ---- ---- ---- ---- ---- ---- ----
1O O O O
2OO
3OOO
VXXXXXXXX
XXXXXXXXX
XXVXXXXXV
Figure 8-8 Example: VLAN List Command Display
In the figure above “O" denotes “egress port”, “V” denotes “tagged” and “X” denotes “ untagged”.
8-8 IEEE 802.1QTagged VLAN Commands
Page 65

AES-100 User’s Guide
Chapter 9
IEEE 802.1p Priority Commands
This chapter explains IEEE 802.1p Priority CI Commands.
9.1 Introduction
IEEE 802.1p Priority CI Commands provide priority regeneration for ports. IEEE 802.1p defines up to eight
priorities (0-7) by inserting a tag into a MAC-layer frame that contains bits to define priority of service.
9.2 IEEE 802.1p Priority Commands
Bridge port 1 stands for the Ethernet port, bridge port 2 stands for ADSL port 1, bridge port 3 stands for
ADSL port 2, and so on.
9.2.1 Priority Port Command
Syntax:
192.168.1.1 vlan1q> priority port <port #> <priority>
where
<port #> =
<priority> =
This command sets the default priority for an ingress port.
To display the default port priority table, simply use the Priority Port command without parameters, as shown
next.
192.168.1.1 vlan1q> priority port
bridge port number. Valid parameter range = [1 - 9].
default priority for the specified port. Valid parameter range = [0 - 7], where 0 is
the lowest priority and 7 is the highest priority.
9.2.2 Regen Port Command
Syntax:
192.168.1.1 vlan1q> regen port [<port #> <user priority> <regened priority>]
where
<port #> =
<user priority> =
bridge port number. Valid parameter range = [1 – 9].
the user priority for a frame received on this port. Valid parameter
range = [0 - 7], where 0 is the lowest priority and 7 is the highest
priority.
<regened priority> =
IEEE 802.1p Priority Commands 9-1
the regenerated user priority the incoming user priority is mapped to for
<port #>. Valid parameter range = [0 - 7], where 0 is the lowest
priority and 7 is the highest priority.
Page 66

AES-100 User’s Guide
This command sets the mapping of incoming user priority to a regenerated user priority for an ingress port.
To display the regeneration table, simply use the Regen Port command without parameters, as shown next.
192.168.1.1 vlan1q> regen port
9-2 IEEE 802.1p Priority Commands
Page 67

AES-100 User’s Guide
Chapter 10
IP Commands
This chapter shows you how to configure the IP (Internet Protocol) parameters. The IP host
implementation in the AES-100 allows you to manage it over the network.
More often than not, you have more than one AES-100 for a particular installation. Before you start configuring
the AES-100s, make sure that you
1. Plan ahead.
2. Have a complete diagram showing the whole network.
3. Record the IP parameters assigned to the equipment in your network.
10.1 Setting the IP Address
To set the IP address, default gateway and the subnet mask of the Ethernet port of a ADSL Networking Module, use
the following command sequence.
1.
2.
3.
4.
5.
6.
192.168.1.1> ip
192.168.1.1 ip> device delete ether
<mac address> ip> device add ether ether //bridge <new ip address>
<new ip address> ip> route delete default
<new ip address> ip> route add default 0.0.0.0 <default gateway> 00:00:00:00
<new ip address> ip> config save
where
<mac address> =
<new ip address> =
<default gateway> =
Line 1 brings you to the IP subsystem.
Line 2 clears the old parameters of the AES-100.
Line 3 allows you to add a new IP address for the AES-100. The MAC address of the AES-100 is displayed in the
command prompt. The system will automatically compute the subnet mask when the system is restarted. If you
want to specify a subnet manually, add the following two commands before line 4:
192.168.1.1 ip> subnet delete ether.home
192.168.1.1 ip> subnet add ether.home ether <subnet address> <subnet mask>
where <subnet mask> is the subnet mask in hexadecimal, for example “
Line 4 deletes the existing default route.
Line 5 adds the new default route. The default route tells the system where the gateway (next hop) is when the
AES-100 sends frames to a destination that is not on the same subnet as the AES-100.
Line 6 saves the new configuration to the nonvolatile memory.
The MAC address of the ADSL Networking Module.
The IP address you want to configure into the ADSL Networking
Module.
The default gateway IP address of the ADSL Networking Module.
ff:ff:ff:00
”.
IP Commands 10-1
Page 68

AES-100 User’s Guide
For example, if you want the AES-100 to have 172.21.100.1 as the IP address, 255.255.255.0 for the subnet mask
and 172.21.100.254 for the default gateway, you may use the following command sequence:
192.168.1.1> ip
192.168.1.1 ip> device delete ether
192.168.1.1 ip> device add ether ether //bridge 172.21.100.1
192.168.1.1 ip> subnet delete ether.home
192.168.1.1 ip> subnet add ether.home ether 172.21.100.0 ff:ff:ff:00
192.168.1.1 ip> route delete default
192.168.1.1 ip> route add default 0.0.0.0 172.21.100.254 00:00:00:00
192.168.1.1 ip> config save
Figure 10-1 Setting IP Address and Default Gateway
The AES-100 leaves the factory with a default IP address of 192.168.1.1 and a subnet mask of 255.255.255.0, or
FF.FF.FF.0 in hexadecimal notation, and the default gateway set at 192.168.1.254. Make sure that you configure
the IP parameters correctly before you connect an AES-100 to the network, otherwise, you may interrupt services
already running.
10.2 General IP Commands
The following is a list of general IP commands that help with the management of the IP parameters.
10.2.1 Config Command
Syntax:
192.168.1.1> config [save]
This command shows the IP configuration. The save option saves the configuration to the nonvolatile memory.
10.2.2 Version Command
192.168.1.1> version
This command shows the firmware version and date on the ADSL Networking Module.
10.2.3 Ping Command
Syntax:
10-2 IP Commands
Page 69

where
192.168.1.1> ping <host> [<ttl> [<size>]]
host =
the IP address of the target.
AES-100 User’s Guide
ttl =
size =
This is an IP facility to check for network functionality by sending an echo request to another IP host and waiting for
the reply.
Time to Live (optional). This parameter limits the number of hops (routers) that the
echo request can travel before it reaches the target.
The parameter specifies the size of the payload, that is, not counting the headers, of
the echo request. The default size is 32 octets.
10.2.4 Statistics Command
Syntax:
192.168.1.1> stats <sub cmd>
This command shows the statistics for the traffic of the type specified by the sub-command. Statistics are available
for the following traffic types: ARP, ICMP, IP, raw, TCP and UDP.
IP Commands 10-3
Page 70

Page 71

AES-100 User’s Guide
Chapter 11
Remote Management
This chapter shows you how to manage the AES-100 remotely.
More often than not, you will have the AES-100 located remotely making its remote management features very
useful.
11.1 Management by Telnet
After you have set up the IP parameters and connected the AES-100 to the network, you can manage it remotely
with telnet. You can use any telnet client that you find convenient. The configuration procedures with telnet are
exactly the same as those using the direct connection via the console port. The default password for a telnet session
is “1234”. Although telnet will work while the console port is being used, only one telnet session is allowed at a
time.
11.2 SNMP Management
SNMP (Simple Network Management Protocol) is a protocol used for exchanging management information
between network devices. The AES-100 supports SNMP version 2 agent functionality, which allows a manager
station to manage and monitor it through the network.
The next figure illustrates an SNMP management operation.
Figure 11-1 SNMP Management Model
An SNMP managed network consists of two main component types: agents and a manager.
Remote Management 11-1
Page 72

AES-100 User’s Guide
An agent is a management software module that resides in a managed device (the AES-100). An agent translates
the local management information from the managed device into a form compatible with SNMP. The manager is
the station through which network administrators perform network management functions. It executes operations
that control and monitor the managed devices.
The managed devices contain objects that define each piece of information to be collected about a device.
Examples of variables include the number of frames received, node port status, etc. A Management Information
Base (MIB) is a collection of managed objects. SNMP allows manager and agents to communicate for the purpose
of accessing these objects.
SNMP itself is a simple request/response protocol based on the manager/agent model. The manager issues a request
and the agent returns responses using the following protocol operations:
♦ Get
Allows the manager to retrieve an object variable from the agent.
♦ GetNext
Allows the manager to retrieve the next object variable from a table or list within an agent. In SNMPv1, when a
manager wants to retrieve all elements of a table from an agent, it initiates a Get operation, followed by a series
of GetNext operations.
♦ Set
Allows the manager to set values for object variables within an agent.
♦ Trap
Used by the agent to inform the manager of some events.
11.2.1 Supported MIBs
The ADSL Networking Module supports MIB II that is defined in RFC 1213 and RFC 1215 as well as transparent
bridge MIBs defined in RFC 1493. The ADSL Networking Module can also respond with specific data from the
ZyXEL private MIB (ZYXEL-MIB).
11.3 SNMP Access Configuration
To control access to the agent in the ADSL Networking Module, use the access commands in the SNMP
subsystem. Note that “community” is SNMP’s terminology for password. After configuring the SNMP access
parameters, save the configuration to the nonvolatile memory with the
community string is “1234”, and the default read community string is “public”.
config save
11.3.1 SNMP Access Read/Write Command
Syntax:
192.168.1.1 snmp> access <read | write> <community> [<IP addr>]
where
command. The default write
<read | write> = Specifies read-only/read-write permission.
<community> = Password needed to access the SNMP agent on
the ADSL Networking Module.
[<IP addr>] = Optional IP address of the allowed SNMP
manager.
11-2 Remote Management
Page 73

AES-100 User’s Guide
This command allows read-only or read-write access. If the IP address is specified, access is allowed for the
manager station with that address only.
11.3.2 SNMP Access Delete Command
Syntax:
192.168.1.1 snmp> access delete <community> [<IP addr>]
This command revokes SNMP access by the specified community (password). If the IP address is specified, access
is denied for that manager station only.
11.3.3 SNMP Access Flush Command
Syntax:
192.168.1.1 snmp> access flush
This command revokes access by any and all manager stations.
11.3.4 SNMP Access List Command
Syntax:
192.168.1.1 snmp> access list
This command shows the allowed access.
11.4 SNMP Trap Configuration
The ADSL Networking Module uses the SNMP trapping facility to proactively report unusual events to one or
more trap servers. To configure the trap parameters, use the
configuring the SNMP trap parameters, save the configuration to the nonvolatile memory with the
command.
11.4.1 Supported Traps
ADSL Networking Module supports the following traps
♦ coldStart Trap (defined in RFC 1215) :
This trap is sent at system start-up.
♦ authenticationFailure Trap (defined in RFC 1215) :
This trap is sent if a request arrives with an invalid community string.
♦ linkUp Trap (defined in RFC 1215) :
trap commands in the SNMP subsystem. After
config save
This trap is sent when an ADSL port is up.
♦ linkDown Trap (defined in RFC 1215) :
This trap is sent when an ADSL port is down.
♦ overheat Trap (defined in ZYXEL-MIB) :
This trap is sent when the ADSL Networking Module is overheated.
Remote Management 11-3
Page 74

AES-100 User’s Guide
♦ overheatOver Trap (defined in ZYXEL-MIB) :
This trap is sent periodically when the ADSL Networking Module is no longer overheated.
11.4.2 Trap Add Command
Syntax:
192.168.1.1 snmp> trap add <community> <IP addr> [<port>]
where
<community> =
<IP addr> =
[<Port>] =
This command adds a trap server.
The password used by the ADSL Networking Module to authenticate itself
to the trap server.
The IP address of the trap server.
The optional port parameter is for specifying the UDP port number on the
server in case it is different from the default of port 162.
11.4.3 Trap Delete Command
Syntax:
192.168.1.1 snmp> trap delete <community> <IP addr> [<port>]
This command deletes a trap destination. The parameters are the same as the trap add command.
11.4.4 Trap Flush Command
Syntax:
192.168.1.1 snmp> trap flush
This command deletes all trap destinations.
11.4.5 Trap List Command
Syntax:
192.168.1.1 snmp> trap list
This command lists all the trap destinations.
11-4 Remote Management
Page 75

AES-100 User’s Guide
Chapter 12
Configuration Backup/Restore
This chapter describes the process for backing up your user settings (configuration) from the ADSL
Networking Module onto your computer and how to restore them to the ADSL Networking Module.
The ADSL Networking Module uses FTP for configuration backup/restore through its built-in FTP server. You can
use any FTP client (for example, ftp.exe in Windows) to backup/restore the ADSL Networking Module’s
configuration.
12.1 Configuration Files of the ADSL Networking Module
The ADSL Networking Module uses configuration files to store the user’s settings, so they can be applied the next
time the ADSL Networking Module is booted. The ADSL Networking Module has the following two configuration
files:
init = The system configuration file for the ADSL Networking Module.
password = The configuration file for the console, Telnet and FTP password.
12.2 Configuration Backup
You can backup all or some configuration files from the ADSL Networking Module to your computer. Backup the
system configuration by following the example shown next.
Step 1.
C:\> ftp <ADSL Networking Module IP address>
Step 2.
User: <ENTER>
Step 3.
Password: 1234
230 Logged in
Step 4.
ftp> get init
Step 5.
ftp> quit
Connect to the ADSL Networking Module with your favorite FTP client. The command is generally
at the computer command prompt.
Enter the User name (just press [ENTER]).
Enter the management password (1234 by default).
Get the configuration files from the ADSL Networking Module
Quit FTP.
12.3 Configuration Restore
You can restore configuration files from your computer to the ADSL Networking Module. Restore the system
configuration by following the example shown next.
Configuration Backup/Restore 12-1
Page 76

AES-100 User’s Guide
Do not turn off the ADSL Networking Module during the restore process, as it may corrupt the firmware and
make your ADSL Networking Module unusable.
Step 1.
C:\> ftp <ADSL Networking Module IP address>
Connect to the ADSL Networking Module with your favorite FTP client. The command is generally
at the computer command prompt.
Step 2.
User: <ENTER>
Step 3.
Password: 1234
230 Logged in
Step 4.
ftp> put init
Step 5.
ftp> quit
Enter the User name (just press [ENTER]).
Enter the management password (1234 by default).
Transfer the configuration files to the ADSL Networking Module
Quit FTP.
Wait for the update to finish. The ADSL Networking Module restarts automatically.
12-2 Configuration Backup/Restore
Page 77

AES-100 User’s Guide
Chapter 13
Firmware Upload and Recovery
ZyXEL periodically releases new firmware for the ADSL Networking Module for bug fixes and
enhancements. Please check the web site at www.zyxel.com every now and then for the latest firmware
release.
The ADSL Networking Module uses FTP to upload firmware and no longer supports TFTP uploads. If the
firmware in non-volatile memory is damaged, the ADSL Networking Module uses BOOTP/TFTP to recover the
firmware. The differences between these two methods are as follows:
♦ Upload timing:
An FTP upload is done during operation (run-time), while a BOOTP/TFTP recovery is done when the ADSL
Networking Module is restarted.
♦ Protocols used:
An FTP upload uses FTP protocol, while a BOOTP/TFTP recovery uses BOOTP and TFTP protocols.
♦ Remote upload:
An FTP upload does not require the ADSL Networking Module and your computer to be on the same LAN,
while a BOOTP/TFTP recovery does.
♦ Firmware files used:
An FTP upload uses a file with an “.img” extension name, while a BOOTP/TFTP recovery uses a file with a
“.bin” extension name.
♦ The role of the ADSL Networking Module:
An FTP upload uses the ADSL Networking Module’s built-in FTP server and a BOOTP/TFTP recovery uses
the ADSL Networking Module’s built-in BOOTP/TFTP client.
♦ The impact to the ADSL Networking Module:
An FTP upload overwrites the ADSL Networking Module’s firmware only while a BOOTP/TFTP recovery
overwrites the ADSL Networking Module’s firmware and all configuration files.
13.1 FTP Firmware Upload on the ADSL Networking Module
The ADSL Networking Module uses FTP for firmware uploads through its built-in FTP server when the ADSL
Networking Module is operational. To update the firmware, first download it (the file will have an “img” extension
name) from the ZyXEL web site and store it on your computer. You can use any FTP client (for example, ftp.exe
in Windows) to upgrade the ADSL Networking Module’s firmware. The procedure for FTP upgrade is as follows.
Do not turn off the ADSL Networking Module during the updating process, as it may corrupt the firmware
and make your ADSL Networking Module unusable.
1.
2.
Firmware Upload and Recovery 13-1
Connect to the ADSL Networking Module with your favorite FTP client.
The command is generally: ftp <ADSL Networking Module IP address> at the computer command
prompt.
Enter the user name (just press [ENTER]). For example,
User: <ENTER>
Page 78

AES-100 User’s Guide
3. Enter the management password (1234 by default). For example,
Password: 1234
230 Logged in
4. Transfer the firmware file to the ADSL Networking Module. For example,
ftp> put 201AS0b1.img image
where
201AS0b1.img = The firmware file that you want to upload.
image = The internal firmware name in the ADSL Networking Module.
5. Quit FTP. For example,
ftp> quit
Wait for the update to finish. The ADSL Networking Module restarts automatically.
Do not turn off the AES-100 during the updating process, as it may corrupt the firmware and make your unit
unusable.
13.2 BOOTP/TFTP Firmware Recovery of the ADSL Networking Module
The ADSL Networking Module uses BOOTP/TFTP for firmware recovery through its built-in BOOTP/TFTP client
when the ADSL Networking Module is restarted. To recover the firmware, first download it from the ZyXEL web
site and store it on your computer. You can use any BOOTP/TFTP server (for example, BootpTftp.exe) to update
the ADSL Networking Module’s firmware. The update procedure for BootpTftp.exe is as follows:
Do not turn off the AES-100 during the updating process, as it may corrupt the firmware and make your unit
unusable.
1. Connect your ADSL Networking Module’s LAN port to a computer’s LAN port directly using a
crossover Ethernet cable, or connect both to an Ethernet hub/switch using straight-through cables.
2. Connect your ADSL Networking Module’s console port to a computer’s serial port with a console
cable.
3. Run any terminal emulation program, for example, Windows’ built-in HyperTerminal, with the
following parameters:
VT100 terminal emulation
9600 bps
No parity, 8 data bits, 1 stop bit
No flow control
4.
Run BootpTftp.exe, to bring up the following window. Click New to create a MAC address entry.
13-2 Firmware Upload and Recovery
Page 79

AES-100 User’s Guide
Figure 13-1 BOOTP/TFTP Server
5. The Input Box window will pop up as shown next. Type the MAC address of the ADSL Networking
Module and then click OK. You can find the MAC address of the ADSL Networking Module on its
boot console.
Figure 13-2 Input MAC
6. Type the host IP address (the IP address you want to assign to the ADSL Networking Module), server
IP address (the IP address of this computer), net mask, gateway and filename (the new firmware name)
into the appropriate fields in the screen shown next. Click Update Database.
Firmware Upload and Recovery 13-3
Page 80

AES-100 User’s Guide
Figure 13-3 Database Edit Dialog
7. Select Normal Bootp to enable normal BOOTP/TFTP functions.
Figure 13-4 Enable BOOTP/TFTP
8. Restart the ADSL Networking Module and press any key within three seconds to get the following
screen.
SDRAM Testing ...
Mac address 00:A0:C5:12:34:56
Press any key within 3 seconds to enter debug mode
.............................
Figure 13-5 Enter Debug Mode
9.
Press any key at the “Press any key within 3 seconds to enter debug mode
………………” message, to enter the debug mode.
10.
Enter atnb at the ADSL Networking Module boot console.
13-4 Firmware Upload and Recovery
Page 81

AES-100 User’s Guide
11. Wait for the firmware upload to finish.
12. Use the following command sequence on the ADSL Networking Module to write new firmware to
flash memory.
192.168.1.1> flashfs
192.168.1.1 flashfs> wipe
192.168.1.1 flashfs> update
13. Wait for the update to complete and then restart the ADSL Networking Module.
Firmware Upload and Recovery 13-5
Page 82

Page 83

AES-100 User’s Guide
Chapter 14
Troubleshooting
This chapter covers potential problems and possible remedies. After each problem description, some steps are
provided to help you to diagnose and to solve the problem.
14.1 ADSL LED(s)
An ADSL LED is not on.
Table 14-1 Troubleshooting the ADSL LED(s)
STEPS CORRECTIVE ACTION
1 Unplug the phone wire coming from the USER port of the AES-100 and connect the user’s ADSL modem
or router directly to the USER port of the AES-100 using a different telephone wire.
If the LED turns on, check for a problem with the building’s phone wire.
2 Make sure the ADSL port is enabled (refer to the section on enabling ADSL ports).
3 If the LED remains off, contact the distributor.
14.2 Data Transmission
The ADSL LED is on, but data can not be transmitted.
Table 14-2 Troubleshooting Data Transmission
STEPS CORRECTIVE ACTION
1 Unplug the phone wire coming from the USER port of the AES-100 and connect the user’s ADSL modem
or router directly to the USER port of the AES-100 using a different telephone wire.
If data can be transmitted, check for a problem with the building’s phone wire.
2 Check to see that the VPI/VCI settings in the user’s ADSL modem or router match those in the AES-100
(refer to the Default Settings in the ADSL Configuration chapter of this User’s Guide). Also make sure
that it is using RFC-1483 encapsulation, bridge mode and LLC- based multiplexing.
3 Make sure that the device type of the AES-100’s IP address is set to bridge (refer to the Setting IP
Address section).
4 Check the VLAN configuration of the AES-100 (refer to the Bridge Configuration chapter).
5 Ping the AES-100 from the user’s computer.
6 If you cannot ping, connect the ADSL modem or router to another AES-100 ADSL port.
If the ADSL modem or router works with a different port, then there may be a problem with the port user’s
original port. Contact the distributor.
7 If using a different port does not work, try a different ADSL modem or router with the original port.
Troubleshooting 14-1
Page 84

AES-100 User’s Guide
14.3 ADSL LED(s) turn On and Off
An ADSL LED turns on and off intermittently.
Table 14-3 Troubleshooting a Non-Constant ADSL LED
STEPS CORRECTIVE ACTION
1 Unplug the phone wire coming from the USER port of the AES-100 and connect the user’s ADSL modem or
router directly to the USER port of the AES-100 using a different telephone wire.
If the ADSL LED stays on, check for a problem with the building’s phone wire.
2
Use the linerate command to check the user’s regular telephone wire (refer to the ADSL Configuration
chapter).
If the ADSL LED still turns on and off repeatedly, contact the distributor.
14.4 Data Rate
The SYNC-rate is not the same as the configured rate.
Table 14-4 Troubleshooting the SYNC-rate
STEPS CORRECTIVE ACTION
1 Unplug the phone wire coming from the USER port of the AES-100 and connect the user’s ADSL modem or
router directly to the USER port of the AES-100 using a different telephone wire.
If the rates match, the regular phone wire quality may be limiting the speed to a certain rate (see the
Configured Vs. Actual Speed section).
2
Use the linerate command to check the user’s regular telephone wire (refer to the ADSL Configuration
chapter).
If they do not match when a good wire is used, contact the distributor.
14.5 Configured Settings
The AES-100’s configured settings do not take effect at restart.
Table 14-5 Troubleshooting the AES-100’s Configured Settings
CORRECTIVE ACTION
After you finish configuring the settings, remember to use the config save command to save your
settings to the AES-100.
If this does not work, contact the distributor.
14-2 Troubleshooting
Page 85

AES-100 User’s Guide
14.6 Password
I forgot the password to my AES-100.
Table 14-6 Troubleshooting the Password
OPTIONS CORRECTIVE ACTION
1 Send a screen shot of your AES-100’s MAC address to your local distributor.
2 Refer to the BOOTP/TFTP Firmware Update section to update your firmware. All settings will return to
default value, so any configurations you have made will be lost.
14.7 Remote Server
The user’s computer behind the ADSL modem or router can not access a remote server.
Table 14-7 Troubleshooting a Remote Server
STEPS CORRECTIVE ACTION
1 Refer to Data Transmission in this chapter to make sure that the user is able to transmit to the AES-100.
2 Make sure the gateway’s IP address is the same as the one configured in the user’s computer.
3 Check the VLAN configuration of the Ethernet port on the AES-100 (refer to the Bridge Configuration
chapter).
4 Check the Ethernet cable and connections between the AES-100 and the gateway.
5 Try to access another remote server.
If data can be transmitted to a different remote server, the remote server that could not be accessed may
have a problem.
14.8 SNMP
The SNMP manager server can not get information from the AES-100.
Table 14-8 Troubleshooting the SNMP Server
STEPS CORRECTIVE ACTION
1 Ping the SNMP server from the AES-100.
If you cannot, change the cable or IP configuration (see the IP Configuration chapter).
2 Check to see that the community (or trusted host) in the AES-100 matches the SNMP server’s
community.
If these steps fail to correct the problem, contact the distributor.
Troubleshooting 14-3
Page 86

AES-100 User’s Guide
14.9 Telnet
I can not telnet into the AES-100.
Table 14-9 Troubleshooting Telnet
STEPS CORRECTIVE ACTION
1 Make sure that a telnet session is not already operating. The AES-100 will only accept one telnet session at
a time.
2 Ping the AES-100 from your computer.
If you are able to ping the AES-100 but are still unable to telnet, contact the distributor.
If you cannot ping the AES-100, check the IP addresses in the AES-100 and your computer. Make sure that
both IP addresses are located in the same subnet (refer to the Setting IP Address section of this User’s
Guide).
3 If you are attempting to telnet from the ADSL side of the AES-100, refer to Data Transmission in this chapter
to make sure that you can transmit data to the AES-100.
4 If you are attempting to telnet from the Ethernet side of the AES-100, check the Ethernet cable.
5 Make sure that the device type of the AES-100’s IP address is set to bridge (refer to the Setting IP Address
section).
If these steps fail to correct the problem, contact the distributor.
14-4 Troubleshooting
Page 87

AES-100 User’s Guide
Index
1
10/100M Auto-Sensing Ethernet............................ 6-1
A
AC INPUT .............................................................2-4
Access Delete Command .....................................11-3
Access Flush Command....................................... 11-3
Access List Command.......................................... 11-3
Actual Rate............................................................. 5-1
ADSL Compliance ................................................. 1-1
ADSL Configuration.............................................. 5-1
ADSL standards ..................................................... 5-2
ADSL Standards..................................................... 6-2
AES-100................................................................... xi
Aggregates traffic................................................... 1-3
airflow ....................................................................2-4
auto................................................................5-9, 5-10
Configuration
Backing up........................................................ 12-1
Restoring .......................................................... 12-1
Configuration Backup/Restore............................. 12-1
Connections
ADSL Port.......................................................... 2-3
Console Port........................................................... 2-2
Contacting Customer Support................................... v
Copyright .................................................................. ii
Customer Support ..................................................... v
D
Default IP Address ............................................... 10-2
Default Profile Settings.......................................... 5-2
Default Route ....................................................... 10-1
Default Settings...................................................... 5-2
Defaults .................................................................. 3-2
B
BOOTP/TFTP ...................................................... 13-2
Bridge Commands.................................................. 7-1
Bridge Port Numbers.............................................. 7-1
C
CE Mark Warning .................................................... iv
certification .............................................................. iv
channel attenuation................................................. 5-6
Chassis ...................................................................1-1
CI Commands......................................................... 4-1
CO port................................................................... 2-3
Command Line Interface........................................ 4-1
Command Structure ...............................................4-1
Community........................................................... 11-2
Config Command................................................. 10-2
Config Print Command .......................................... 4-3
Delete Profile Command........................................ 5-8
Device Command................................................... 7-1
Dimensions ............................................................ 1-5
Disable Port Command .......................................... 5-3
Disable Ports Command......................................... 5-3
Disclaimer ................................................................. ii
Downstream (ds) .................................................... 5-6
DVLAN Table.................................................8-1, 8-2
E
Enable Port Command ........................................... 5-3
Enable Ports Command.......................................... 5-3
Ethernet Port Commands ....................................... 6-1
Ethernet Port Default Settings................................ 3-2
Exit Command .......................................................4-3
F
Factory Default Settings......................................... 3-1
Config Save Command ........................... 4-2, 5-3, 7-1
Index A
Fast Mode............................................................... 1-2
Page 88

AES-100 User’s Guide
FCC ..........................................................................iv
FCC Rules ................................................................ iv
Federal Communications Commission (FCC)
Interference Statement ..........................................iv
Filter Command......................................................7-3
Filterage Command ................................................7-4
Filtering Databases ................................................. 8-1
Firmware
Recovery ................................................. 13-1, 13-2
Remote Upload .................................................13-1
Firmware Upload
File Types .........................................................13-1
FTP ...................................................................13-1
Impact to the AES-100 .....................................13-1
Protocols ...........................................................13-1
Timing ..............................................................13-1
Flush Command .....................................................7-4
Front Panel .............................................................2-1
Front Panel Indicators ............................................2-2
Front Panel Ports ....................................................2-2
FTP ....................................................................... 13-1
FTP Firmware Upload..........................................13-1
G
G.dmt....................................................... 5-1, 6-1, 7-1
G.lite............................................... 5-1, 5-10, 6-1, 7-1
GARP .....................................................................8-2
gdmt.............................................................. 5-9, 5-10
General IP Commands................................ 10-2, 12-1
GetNext ...................................................... 11-2, 11-3
glite............................................................... 5-9, 5-10
GVRP .....................................................................8-2
H
Help Facility...........................................................4-2
I
IEEE 802.1p Priority ..............................................9-1
Commands ..........................................................9-1
IEEE 802.1Q Tagged VLAN ....1-2, 4-4, 7-8, 7-9, 8-1
Commands.......................................................... 8-1
Default ................................................................3-2
Introduction ........................................................8-1
Register Your CPU............................................. 8-3
Tags ....................................................................8-1
IEEE 802.1Q VLAN
Standard.............................................................. 1-2
IGMP Packets......................................................... 7-3
IGMP Snooping .....................................................1-2
Monitoring.......................................................... 7-3
Notes About........................................................7-3
Info Command ................................................4-3, 7-5
Ingress .............................................................9-1, 9-2
Installation Requirements....................................... 2-1
interleave delay ......................................................5-5
IP Commands .......................................................10-1
IP Parameters..........................................................3-1
ISP Application ......................................................1-4
L
line bit allocation....................................................5-4
line operating values...............................................5-4
line performance counters ......................................5-5
line rate parameters ................................................5-6
Linedata Command ................................................5-4
Lineinfo Command ................................................5-4
Lineperf Command ................................................5-5
Linerate Command................................................. 5-6
List Port Command ................................................5-7
List Ports Command...............................................5-7
List Profiles Command...........................................5-8
Location Name Command .....................................4-4
M
MACfilter............................................................... 7-2
Default ................................................................3-2
Disable................................................................ 7-2
B Index
Page 89

AES-100 User’s Guide
Enable................................................................. 7-2
Filter ...................................................................7-2
Status .................................................................. 7-2
Management........................................................... 1-2
Management Information Base (MIB)................. 11-2
margins................................................................... 5-6
maximum attainable rate ........................................ 5-6
MDF (Main Distribution Frame)............................2-4
Mfilter Command................................................... 7-3
MTU....................................................................... 1-3
Multiplexer............................................................. 1-1
N
Network Interface Card.......................................... 2-1
NIC..................................See Network Interface Card
O
Operating Environment.......................................... 1-5
Related Documentation............................................ xi
Remote Firmware Upload.................................... 13-1
Remote Management ...........................................11-1
Restart Command................................................... 4-2
RFC 1213 ............................................................. 11-2
RFC 1215 .................................................... 11-2, 11-3
RFC 1483 ............................................................... 3-1
RFC 1493 ............................................................. 11-2
S
Scalable .................................................................. 1-4
Secured Host .......................................................... 4-4
Default................................................................ 3-2
Enable/Disable.................................................... 4-4
Set ..................................................... 11-2, 11-3, 11-4
Set Auto Command................................................ 6-1
Set Contact Command ........................................... 4-3
Operational mode ..........................................5-9, 5-10
P
parity byte assignment............................................ 5-5
parity bytes per codeword ...................................... 5-5
Passwd Command ..................................................4-3
Password ..............................................................11-2
Physical Interfaces .................................................1-4
Physical Specifications........................................... 1-4
Ping Command..................................................... 10-2
Port-Based VLAN.................................................. 7-5
Portfilter Command................................................ 7-6
Power Consumption............................................... 1-5
Profile..................................................................... 5-1
PVID ......................................................................8-2
PVID Command..................................................... 7-8
R
Set Duplex Command ............................................ 6-1
Set Name Command ..............................................4-3
Set Port Command ................................................. 5-9
Set Ports Command.............................................. 5-10
Set Profile Command ............................................. 5-7
Set PVC Command .............................................. 5-11
Set PVCs Command............................................. 5-11
Set Speed Command .............................................. 6-1
Setting IP Address................................................ 10-1
Show Port Command ........................................... 5-10
Show Ports Command.......................................... 5-10
Show Profile Command ......................................... 5-8
Show Profiles Command ....................................... 5-9
Show PVC Command ...................................5-11, 7-2
Show PVCs command ......................................... 5-12
SHOWTIME .......................................................... 5-6
Rear Panel ..............................................................2-3
Rear Panel Connections
Connections ........................................................2-4
Rear Panel........................................................... 2-3
Index C
SNMP................................................ 11-1, 11-2, 11-3
Get ...........................................................11-2, 11-3
Manager............................................................ 11-2
Trap ..................................................................11-2
Page 90

AES-100 User’s Guide
Splitters
Integrated Splitters..............................................1-1
Statistics Command..............................................10-3
Status Command............................................. 6-2, 7-1
Storage Environment..............................................1-5
Supported Traps ...................................................11-3
SVLAN Table.........................................................8-1
Syntax Conventions.................................................. xi
Sys Errlog...............................................................4-6
Clear Log ............................................................4-6
Logs ....................................................................4-6
Saving and Viewing a Previous Error Log .........4-7
Sys Error Log
Default ................................................................3-2
System Commands.................................................4-1
T
Enable/Disable Logs...........................................4-5
Logs Lost ............................................................4-5
Logs Sent ............................................................4-5
Unpacking .............................................................. 2-1
Upload Firmware
File Types .........................................................13-1
Protocols ...........................................................13-1
Timing ..............................................................13-1
upstream (us).......................................................... 5-6
Uptime Command ..................................................4-2
USER port ..............................................................2-3
V
Vendor ID...............................................................5-5
Version Command..................................................4-2
Version Number .....................................................5-5
VLAN..............................................................7-5, 8-1
Tagged Ethernet Frames.........................................7-8
Taiwanese BCIQ A Warning ...................................iv
Telco Rack Space ...................................................1-4
Telnet....................................................................11-1
Terminal Emulation........................................ 2-1, 4-1
TFTP........................................................... 12-1, 13-2
Trademarks................................................................ii
Trap Add Command.............................................11-4
Trap Configuration ...............................................11-3
Trap Delete Command .........................................11-4
Trap Flush Command...........................................11-4
Trap List Command..............................................11-4
Troubleshooting ...................................................14-1
U
UNIX Syslog ..........................................................4-5
Default ................................................................3-2
Aware Devices.................................................... 8-1
Explicit Tagging .................................................8-1
ID (VID) ......................................................7-9, 8-2
Implicit Tagging .................................................8-1
Port-Based ..........................................................7-5
Registration Information.....................................8-1
Tags ....................................................................8-1
Unware Devices.................................................. 8-1
VT100 .............................................................2-1, 4-1
W
Warm Restarting ....................................................4-7
Warning Sticker .....................................................2-4
Weight .................................................................... 1-5
Z
ZyXEL Limited Warranty........................................ iii
D Index
 Loading...