

Page 1

GSM Wireless Phone
User Guide
ZTE CORPORATION
NO. 55, Hi-tech Road South, ShenZhen, P.R.China
Postcode: 518057
Tel: (86) 755 26779999
URL: http://www.zte.com.cn
E-mail: mobile@zte.com.cn
Manual No. : 079584500000
1
Page 2

LEGAL INFORMATION
Copyright © 2011 ZTE CORPORATION.
All rights reserved.
No part of this publication may be excerpted, reproduced, translated
or utilized in any form or by any means, electronic or mechanical,
including photocopying and microfilm, without the prior written
permission of ZTE Corporation.
The manual is published by ZTE Corporation. We reserve the right to
make modifications on print errors or update specifications without
prior notice.
2
Page 3

C h a p t e r 1
Know Your Phone
LCD Screen
1
4
5
6
2
3
C h a p t e r 2
Key Instruction
Key Description
1. MENU/SELECT
2. Number
3. # , *
3
• Enter main menu.
• Select or confirm options in menus.
• Use these keys to enter numbers and
characters.
• Perform different functions under different
conditions.
7
8
9
10
Page 4
Key Description
4.Scrolling
• Press these keys to scroll cursor to the
left, right, up or down when inputting
characters or selecting items.
• Default functions in standby mode are set
in Settings menu.
5. EXT PWR
• Lights up when the phone is connected to
external power outlet.
6.
NAMES/CLR/BACK
• In standby mode, press this key to enter
right-bottom submenu on the screen.
• Press this key to erase character(s) while
editing text.
• Press this key to return to the previous
page during menu navigation.
7.MESSAGE
• This is the shortcut key to enter message
menu in standby mode.
8. EXIT
• End an active call or reject calls.
• Power on/power off the phone.
9. CALL/REDIAL
• Make a call or answer an incoming call.
• In standby mode, press this key to enter
recent Outgoing calls list.
10.HANDS-FREE
• If you are using the handset to call and
want to transfer the call to the
speakerphone, press this key and hang up
the handset to put conversation on the
speakerphone.
• Press this key to end a hands-free call.
Notes:
In this manual, “press” a key means to press the key once, “h
4
Page 5
old” a key means to press the key for 2 or 3 seconds.
C h a p t e r 3
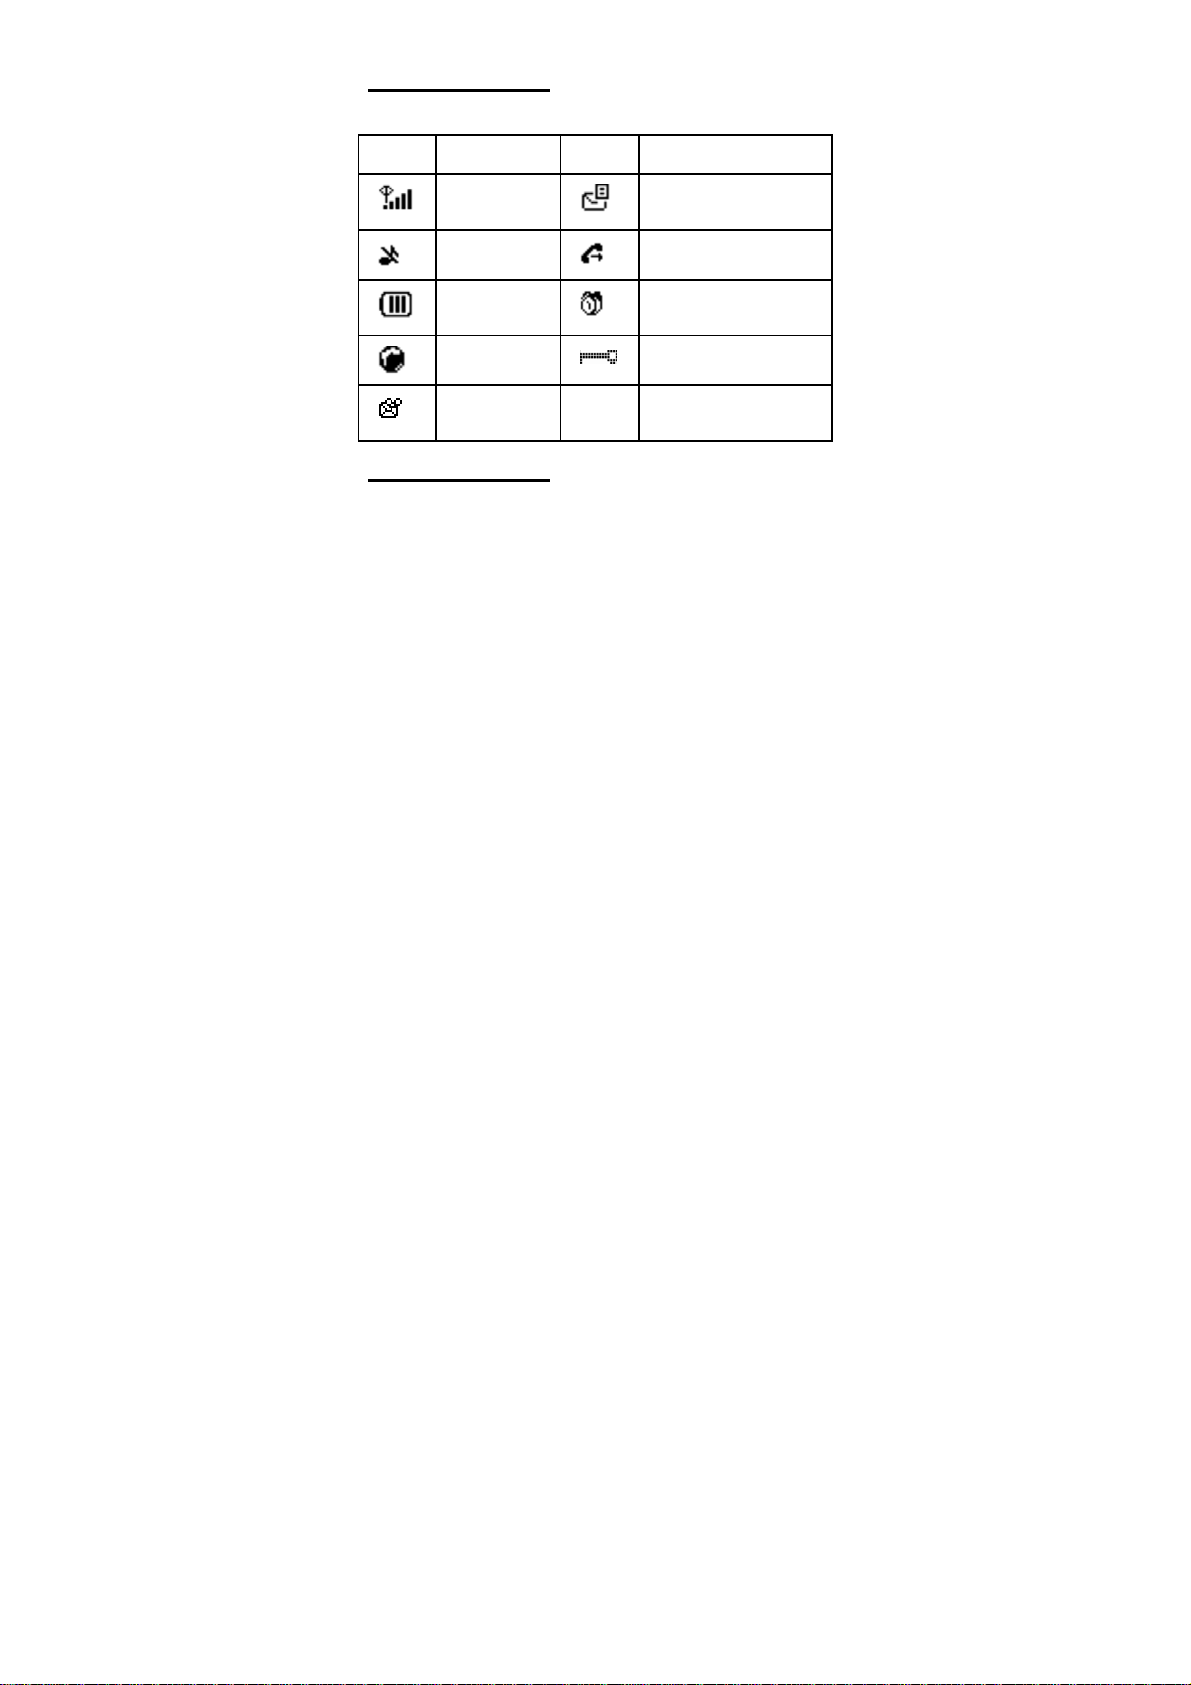
Interface Icons
Icon Description Icon Description
Signal
strength
Silent Divert always
Power
indicator
Roaming
New voice
mail
New message (blinks
when memory is full)
Alarm clock
Keypad lock
C h a p t e r 4
Installation
1. Handset
Connect phone and handset via the phone cord.
2. External power adapter
Plug the external power adapter to the external AC socket.
3. SIM card
Always switch the phone off before removing or inserting SIM card.
Open the bottom cover of the battery. Remove the battery, slide the
SIM card into the SIM card slot. Make sure that the contact area of
5
Page 6

the card is facing down, and the beveled corner matches with the
SIM card slot. Put in the battery and install the bottom cover.
C h a p t e r 5
How to Power on/off
To power on the phone, connect phone and external power
outlet with the power adapter and then hold Exit key for about
three seconds.
To power off the phone, hold the Exit key till the phone is
powered off.
Notes:
It is strongly recommended to connect the phone to external power
outlet, and use internal battery to power your phone only when
external power fails or is not available. The phone will charge the
internal battery automatically when it is connected to external power
outlet.
C h a p t e r 6
How to Make a Call
There are two methods for making a call.
The first method:
1. Pick up the handset or press the HANDS-FREE key.
2. Enter the phone number, press CALL/REDIAL key to make the
call.
The second method:
Enter the number or select recipient’s number from Phonebook,
or press CALL/REDIAL key to select a number from the recent
calls list, then press CALL/REDIAL key to make the call.
Notes:
Add the international prefix, country code and area code (without the
leading 0) before the number when making an international call.
6
Page 7

C h a p t e r 7
Voice Mail
Before using voice mail, please contact service provider to confirm
that the voicemail has been activated.
The system automatically sends a message to your phone to inform
you that there is a new voice mail. Read the message and then dial
voice mailbox number to listen to your voice mail.
To read or send your voice mail quickly, you set the voice mailbox
number first. Pick up the handset or press HANDS-FREE key, and
then hold “1” key to dial voice mailbox number. In standby mode,
you can also hold “1” key directly to dial voice mailbox number.
C h a p t e r 8
Message
Select Short Message in Menu, and press Select.
• Select New message to write message text, select Accept to send
or save the message.
• Select Inbox to view messages received.
• Select Outbox to view the sent messages.
• Select Draftbox to view draft messages.
• Select Voice mail to listen to your voice mail messages, or set the
voice mailbox number.
• Select Message settings to make some necessary short message
settings.
C h a p t e r 9
Phone Code
Phone code could prevent your phone from unauthorized use. The
default phone code is 1234. Change it to your own as soon as
possible.
7
Page 8

If you change the default phone code to a new one, remember it or
place it at secure place.
C h a p t e r 10
PIN1 Code and PUK Code
• PIN1 code (SIM password): PIN1 code could prevent your SIM
card from illegal use. When PIN1 code is enabled, you should
enter the PIN1 code when powering on the phone again. Change
the default PIN1 code to your own as soon as possible.
• PUK code: The SIM card will be locked if you enter a wrong PIN1
code consecutively for several times. To unlock, you need PUK
code.
Notes:
PIN1 code and PUK code may be offered together with the SIM card.
If not, contact your service provider.
C h a p t e r 11
Text Input
Operation Method
Input letters
Input digits
Input words “Eng”, press the Number keys
8
“ABC”, “Abc” or “abc”, press
corresponding letter key till the
letter appears.
“123”, press the Number keys
to input the digits you want
directly.
to input the characters of the
word. Press 0 key to confirm
Page 9

Operation Method
the word
Input symbol
Input space
Erase character
Erase all the characters
Move the cursor
Change input mode
Press * key, and then select
corresponding symbol by using
Scrolling keys.
Press “1” key till the symbol
(common symbols) appears
under Multitap input mode.
Apart from Numbers input
mode, press “0” key to add
space.
Press NAMES/CLR/BACK
key.
Hold NAMES/CLR/BACK key till
all the characters before the
cursor are erased.
Press Scrolling keys.
Press # key to change text
input mode.
C h a p t e r 12
Menu Function
Hereinafter are brief instructions for menu functions of the phone.
9
Page 10

Function Description Selection
Create
message
Create
message and
send to others.
Read
message
Read message
in Inbox,
Outbox,
Draftbox.
Voicemail Receive and
listen to voice
mail messages.
Set voice
mailbox
number.
Message
settings
Make some
necessary
short message
settings.
Browse
contact
View contacts
of the selected
group.
Add contact Save phone
number.
Search
contact
Speed dial
list
Search for a
contact entry.
View speed dial
list.
Menu→Short Message→New
message
Menu→Short
Message→Inbox/Outbox/Draftb
ox
Menu→Short Message→Voice
mail
Menu→Short
Message→Message settings
Menu→Contacts→Browse
Menu→Contacts→Create
Menu→Contacts→Browse→Op
tion→Scrolling→Search
Menu→Contacts→Settings→S
peed dial
10
Page 11

Function Description Selection
Storage
setting
Set the storage
location of
contact
Storage
status
View the
number of
saved entries
and maximum
number of
entries capacity
in phone and
SIM.
Ring tone Set ring tone
for the contact
groups.
Batch
operation
Copy/move all
the contact
information
between SIM
card and
phone. Delete
all contacts in
SIM card or
phone.
Call divert Specify the
conditions
under which
the call types
should be
diverted to your
voicemail box
or another
number.
Menu→Contacts→Settings→St
orage setting
Menu→Contacts→Settings→St
orage status
Menu→Contacts→Settings→S
et group ring tone
Menu→Contacts→Record
management→Copy SIM card
to phone/ Copy phone to SIM
card / Move to phone from
SIM card/ Move to SIM card
from phone/Delete all phone
entries/ Delete all SIM entries
Menu→Call Menu→Call divert
11
Page 12

Function Description Selection
Recent calls View or dial all
recent calls.
Menu→Call Menu
→Call→Missed call/Outgoing
call/Incoming call
Call duration Check the
outgoing or
Menu→Call Menu→Call→Call
duration
incoming
duration.
Browse all View the recent
calls list
Firewall Incoming call
Menu→Call Menu
→Call→Browse all
Menu→Call Menu→Firewall
firewall
Shortcut key Set the
scrolling key as
Menu→Settings→Phone
settings→ Shortcut settings
shortcut key of
some menu.
Keypad lock Lock the
keypad
Menu→Settings→Phone
settings→Auto lock keypad
automatically.
Press # key,
then * key to
unlock.
Backlight Set the
backlight on/off
Menu→Settings→Display
Settings→Back light
when using the
phone.
Language Set language
for the phone.
Menu→Settings→Display
Settings→Language
Profiles Set profiles of Menu→Settings→Profiles
12
Page 13

Function Description Selection
your phone.
Date and
Time
Date display
format
Time display
format
Set the date
and the time.
Set the date
format.
Set the time
format.
Call waiting Put the current
call on hold to
answer the
other incoming
call.
Auto redial Set auto redial
function.
Any key
answer
Minute
minder
Network
Settings
Set Any key
answer
Set minute
minder.
Set the way of
searching
network.
SIM
password
Set or change
the SIM
password.
Menu→Settings→Time
date→Date & Time settings
Menu→Settings→Time
date→Date display format
Menu→Settings→Time
date→Time display format
Menu→Settings→Call
settings→ Call waiting
Menu→Settings→Call
settings→Auto redial
Menu→Settings→Call
settings→Any key answer
Menu→Settings→Call
settings→Minute beep
Menu→Settings→Network
service→Network selection
Menu→Settings→Security
settings→ SIM password
Phone code Set or change Menu→Settings→Security
13
Page 14

Function Description Selection
the phone lock
code.
Call barring Restrict the
Factory
settings
SW Version View the
Alarm clock Set alarm clock
Calculator Execute basic
FM radio Listen Menu→Tools→FM radio
STK SIM Card Tool
dialing or
receiving of
certain calls.
Switch to the
factory default
settings.
software
version of the
phone.
time.
math
calculation.
Kit (various for
different SIM
card).
settings→ Phone code
Menu→Settings→Security
settings→ Call barring
Menu→Settings→Security
settings→ Factory settings
Menu→Settings→SW Version
Menu→Tools→Set New Alarm
Menu→Tools→Calculator
Menu→STK
C h a p t e r 13
Warning and Maintenance
• FWT must be far away at least 20cm when using.
14
Page 15

• Some electronic devices are susceptible to electromagnetic
interference sent by the phone if inadequately shielded. Keep using
the phone at least 20 cm or as far away as you can from TV sets,
radio and other automated office equipment so as to avoid
electromagnetic interference.
• Operating the phone may interfere with medical devices like
hearing aides and pacemakers, or other medical devices in hospital.
Consult a physician or the manufacturer of the medical device
before using the phone.
• Be aware of the usage limitation when using the phone at places
such as oil warehouses, or chemical factories, where there are
explosive gases or explosive products being processed, because
even if your phone is in idle state, it still transmits radio frequency
(RF) energy. Therefore, power off your phone if required.
• Do not touch the antenna while calling. Otherwise it will affect the
quality of calling and waste battery energy. The damaged antenna
will cause slight burn while touching your skin.
• Keep the antenna free from obstructions and position the antenna
straight up. This will ensure best call quality.
• Keep the phone out of the reach of small children. The phone may
cause injury if used as a toy.
• Do not put other things on the terminal to avoid overlaying radiator.
• Use original accessories or accessories that are authorized by the
manufacturer. Using any unauthorized accessories may affect your
phone’s performance, and violate related national regulations about
telecom terminals, or even endanger your body.
• As your phone can produce electromagnetic field, do not place it
near magnetic items such as computer disks.
• Do not expose your phone to direct sunlight or store it in hot areas.
High temperature can shorten the life of electronic devices.
• Prevent liquid from leaking into your phone.
• Disconnect external power supply and do not use your phone
during thunderstorm.
• Unplug the external power adapter or remove battery when your
15
Page 16

phone is not in use, esp. for a long period of time.
• It is highly recommended to charge the battery before initial use.
The battery might have been discharged during storage and
delivery.
• Do not unplug the connector of the data cable from the phone, and
not install or remove battery, when the power is on.
• Do not attempt to disassemble the phone by yourself. Non-expert
handling of the devices may damage them.
• The phone is non-waterproof, keep it dry and store in shady and
cool place.
• If you want to clean your phone, please use clean fabric that is a
bit wet or anti-static. Do not use harsh chemical cleaning solvents
or strong detergents to clean your phone, such as alcohol, dilution
agent and benzene. Power off your phone before you clean it.
C h a p t e r 14
Limited Warranty
• This warranty does not apply to defects or errors in the Product
caused by:
i. Reasonable Router Appearance Disfiguration.
ii. End User’s failure to follow ZTE’s installation, operation or
maintenance instructions or procedures.
iii. End User’s mishandling, misuse, negligence, or improper
installation, disassemble, storage, servicing or operation of the
Product.
iv. Modifications or repairs not made by ZTE or a ZTE-certified
individual.
v. Power failures, surges, fire, flood, accident, actions of third
parties or other events outside ZTE’s reasonable control.
vi. Usage of products of third Parties, or usage in conjunction with
third party products provided that such defects is due to the
combined usage.
16
Page 17

vii. Any other cause beyond the range of normal usage for
Products.
End User shall have no right to reject, return, or receive a refund
for any product from ZTE under the above-mentioned situations.
• This warranty is end user’s sole remedy and ZTE’s sole liability for
defective or nonconforming items, and is in lieu of all other
warranties, expressed, implied or statutory, including but not
limited to the implied warranties of merchantability and fitness for a
particular purpose, unless otherwise required under the mandatory
provisions of the law.
C h a p t e r 15
Limitation of Liability
ZTE shall not be liable for any loss of profits or indirect, special,
incidental or consequential damages resulting from or arising out of
or in connection with using of this product, whether or not ZTE had
been advised, knew or should have known of the possibility of such
damages, including, but not limited to lost profits, interruption of
business, cost of capital, cost of substitute facilities or product, or
any downtime cost.
C h a p t e r 16
Troubleshooting
If your phone appears following phenomenon in the process of
application, read following relative information at first. If the problems
still can not be solved, please contact with the distributor or service
provider.
Problem Check Point
When switching on
the phone, it
prompts “Enter
PIN 1”.
17
Input your PIN code which offered with
SIM card together. If you have changed
PIN code, input the new PIN code.
Page 18

Problem Check Point
When switching on
the phone, it
Check whether valid SIM card is
inserted or not.
prompts
“Emergency Only”.
When switching on
the phone, it
Enter lock code you set already to
unlock the phone.
prompts “Enter
phone code”.
No ring tone
prompt for a
Check volume setting of ring tone.
And check whether "mute" is set in Profiles
incoming call.
No display on
screen when
disconnect
Check whether the battery has
electricity, or it is damaged; or power on
the phone again.
external power
supply.
Press
CALL/REDIAL
Check whether you have set call
barring.
key, but no
number is sent.
Certain call cannot
Check whether the number is restricted.
be received.
Cannot send short
messages.
Other abnormal
phenomenon.
Check the network condition, or
message center setting.
First refer to the user manual, and then
check whether the power is connected
correctly or not. If there is no problem,
restart the phone.
18
 Loading...