

Page 1

Vodafone Smart X9
User Manual
1
Page 2

About this manual
Thank you for choosing this mobile phone. In order to keep your
phone in its best condition, please read this manual and keep it for
future reference.
Copyright
Copyright © 2018 Vodafone Group
All rights reserved.
No part of this pu blication may be quoted, reproduced, translated
or used in any form or by any means, electr onic or mechanical,
including photocopying and microf ilm, without the prior written
permission of Vodafone Group.
Notice
Vodafone Group reserves the right to make modifications on print
errors or update specifications in this guide without prior notice.
This manual has been designed with th e utmost care to ensure the
accuracy of its content. However, all statem ents, information and
recommendations contained therein do not constitute a warranty of
any kind, either expressed or implied. We offer self-service for our
smart terminal device users.
Disclaimer
Vodafone Group expressly disclaims a ny liability for faults and
damages caused by unauthorised mo difications of the software.
Images and screenshots used in this manual may differ from the
actual product. Content in this manua l may differ from the actual
product or software.
Trademarks
Android is a trademark of Google LLC ; Oreo is a trademark of
Mondelez International, Inc. group.
The Bluetooth® word mark and logos are registered tradema rks
owned by the Bluetooth SIG, Inc. and any use of such marks by
Vodafone Group is under license.
microS DXC Logo is a trademark of SD-3C, LLC.
2
Page 3

Qualcomm® Snapdragon™ processors are products of Q ualcomm
Technologies, Inc.
Qualcomm and Snapdragon are trade marks of Qualcomm
Incorporated, registered in the Unite d States and other countries.
Used with permission.
Other trademarks and trade names ar e those of their respective
owners.
Version No.: R1.0
Edition Time: March 13, 2018
3
Page 4

Contents
Getting started ................................................... 8
Getting to know your phone............................................8
Knowing the keys ...........................................................9
Installing the nano-SIM card and the microSD™ card .....9
Charging the battery ....................................................10
Extending the battery life ............................................. 11
Powering on/off ......................................................... 12
Setting up for the first time ......................................... 12
Locking/unlocking the screen and keys....................... 12
Using the touch screen ............................................... 13
Getting to know the home screen .................................15
Personalising ................................................... 17
Changing the system language .................................... 17
Setting the date and time ............................................ 17
Changing ringtone, notification and alarm sound ......... 17
Turning on/off other sounds and vibration ................... 18
Adjusting volume ........................................................ 18
Using do not disturb mode .......................................... 18
Adding a mute switch on the lock screen ..................... 20
Applying new wallpapers ............................................ 20
Changing screen brightness ......................................... 21
Using night light .......................................................... 21
Showing or hiding the navigation keys .......................... 21
Protecting your phone with screen locks ....................... 21
Using your fingerprint ................................................. 22
Protecting your phone with screen pinning .................. 23
Knowing the basics ........................................... 25
Monitoring the phone status ....................................... 25
Managing notifications ............................................... 25
Managing shortcuts and widgets .................................27
Organising with folders ............................................... 28
Rearranging the favourites tray ................................... 29
Using app shortcuts.................................................... 29
Notification dots......................................................... 29
Entering text ............................................................... 30
4
Page 5

Editing text ................................................................. 33
Opening and switching apps ....................................... 33
Use two apps in split-screen mode .............................. 34
Uninstalling an app ..................................................... 34
Connecting to networks and devices ................... 35
Connecting to mobile networks ................................... 35
Connecting to Wi-Fi (WLAN) ......................................... 36
Using Wi-Fi Direct® ..................................................... 38
Connecting to Bluetooth devices ................................. 38
Exchanging data via NFC ............................................. 40
Using tap & pay .......................................................... 40
Connecting to your computer via USB .......................... 41
Using USB On-The-Go (OTG) ........................................ 42
Removing or Erasing the microSD card ........................ 42
Sharing your mobile data connection........................... 42
Connecting to virtual private networks ......................... 44
Using emergency mode ............................................... 45
Phone calls .......................................................47
Placing and ending calls ............................................. 47
Answering or rejecting calls ......................................... 47
Working with the call history ........................................ 48
Calling your contacts................................................... 49
Checking voicemail ..................................................... 49
Using options during a call .......................................... 49
Managing multi-party calls.......................................... 50
Adjusting your call settings .......................................... 51
Contacts ......................................................... 55
Checking contact details ............................................. 55
Adding a new contact .................................................. 55
Setting up your own profile .......................................... 55
Importing, exporting, and sharing contacts .................. 55
Working with favourite contacts ................................... 56
Searching for a contact ............................................... 57
Editing contacts .......................................................... 57
Web accounts .................................................. 58
Adding or removing accounts ...................................... 58
5
Page 6

Configuring account sync ............................................ 58
Messages ........................................................ 60
Opening the Messages screen .................................... 60
Sending a message .................................................... 60
Adding an attachment ................................................ 60
Replying to a message .................................................61
Forwarding a message .................................................61
More message options ................................................61
Web browser .................................................... 63
Opening the browser................................................... 63
Using multiple browser tabs........................................ 63
Downloading files ....................................................... 63
Changing Chrome settings .......................................... 64
Camera ........................................................... 65
Capturing a photo....................................................... 65
Recording a video ....................................................... 66
Using manual camera mode ....................................... 67
Using other camera modes ......................................... 67
Customising camera/camcorder settings ................... 68
Gallery ............................................................ 71
Opening gallery ........................................................... 71
Working with albums ................................................... 71
Working with pictures .................................................. 71
Retouching your pictures ............................................ 72
Making a GIF picture or a collage ................................ 73
Playing videos ............................................................. 74
Music .............................................................. 75
Viewing your music library........................................... 75
Setting a song as the default ringtone or notification
sound ........................................................................ 75
Playing music ............................................................. 75
Managing playlists ...................................................... 76
Video .............................................................. 78
Opening the video library ............................................ 78
Playing and controlling videos..................................... 78
6
Page 7

Managing video files ................................................... 78
Voice recorder .................................................. 80
Recording a voice memo ............................................. 80
Playing a voice memo .................................................. 80
Editing a voice memo .................................................. 80
More apps ....................................................... 81
Calculator ................................................................... 81
Clock .......................................................................... 81
Downloads ................................................................. 82
File manager ............................................................... 82
Private Space ............................................................. 82
Google apps ............................................................... 84
Settings .......................................................... 86
Network & Internet ...................................................... 86
Connected devices ...................................................... 87
Apps & notifications ................................................... 88
Features ..................................................................... 90
Battery ....................................................................... 91
Display ....................................................................... 91
Sound ........................................................................ 92
Storage ...................................................................... 92
Security & location...................................................... 92
Accounts .................................................................... 95
Accessibility ............................................................... 95
Google........................................................................ 96
System ....................................................................... 96
Software updates ....................................................... 97
Troubleshooting ............................................... 98
7
Page 8
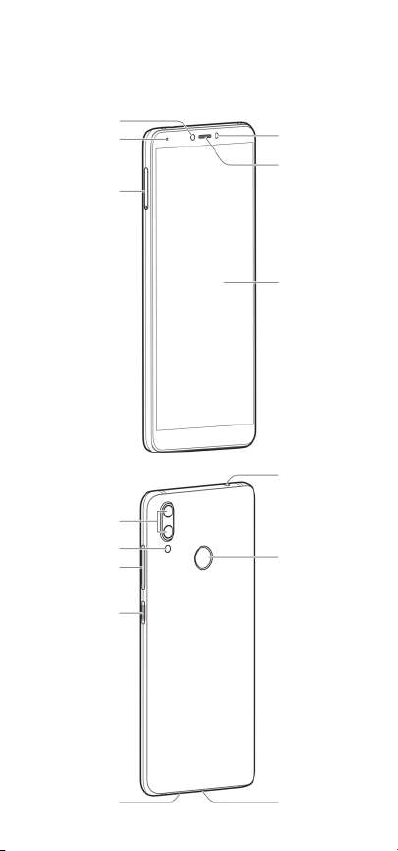
Power key
Headset jack*
Type-C jack
Speaker
Dual-flash
lens
camera
sensor
SIM/
microSD card
tray
e key
Touch screen
Getting started
Getting to know your phone
Front camera
Indicator light
nano-
Dual-
Volum
Proximity & light
sensor
Earpiece
Fingerprint
Charging/USB
8
Page 9
Press to turn off or on the screen dis play.
volume up or down.
Touch to go to the previous screen.
split-screen mode.
* Supports CTIA headsets only
Knowing the keys
Key Function
Power key Press and hold to power off, restart, turn on
Volume key Press or hold either end of the key to turn the
(Home)
(Back)
(Recent apps)
or off flight mode, or capture the scre en.
Touch to return to the home screen f rom any
application or screen.
Touch and hold to use Google Assista nt.
Touch to see recently used apps.
Double-tap to switch to the most rece nt
application.
Touch and hold while using an app to activate
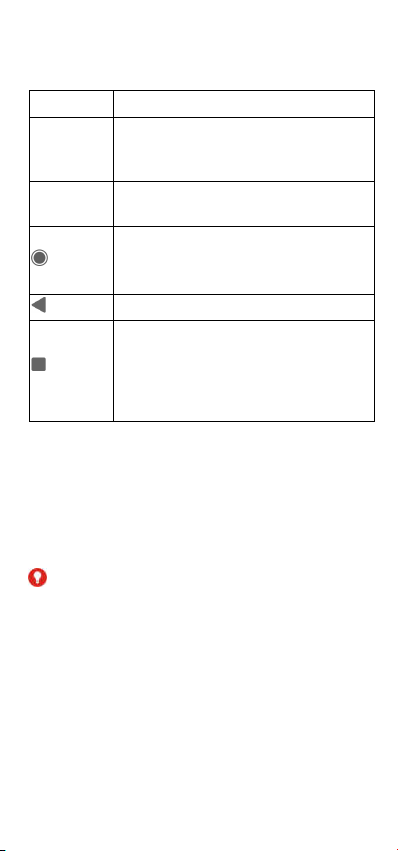
Installing the nano-SIM card and the microSD™
card
A microSD card (optional, not included ) can be installed or removed
while the phone is turned on. You nee d to unmount the microSD
card before removing it. See Removin g the microSD card from your
phone.
WARNING!
To avoid damage to the phone, do not use any other kind of SIM
cards, or any non-standard nano-SIM car d cut from a SIM card. You
can get a standard nano-SIM card from yo ur Vodafone service.
1. Insert the tip of the tray eject tool into the hole on the card tray .
9
Page 10
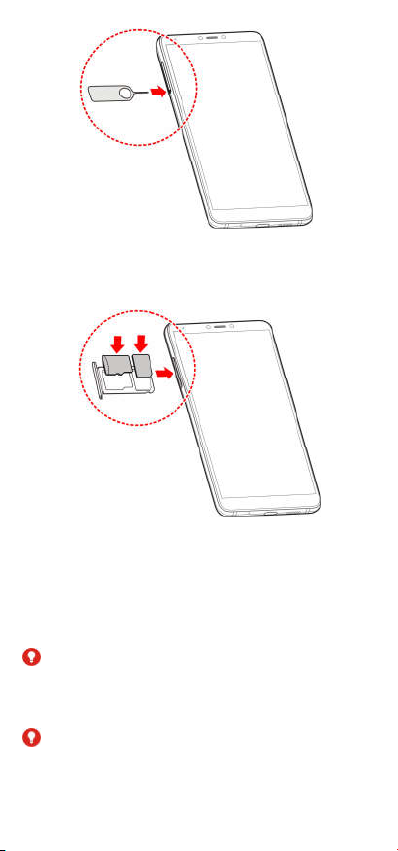
2. Pull out the card tray. You can place a nano-SIM card on the
right card slot, and place a microSD card on the left card slot,
as shown. Carefully slide the tray back into place.
Charging the battery
Your phone’s battery should have eno ugh power for the phone to
turn on, find a network signal, and m ake a few calls. You should fully
charge the battery as soon as possib le.
If the battery is low, there will be a po p-up message on the screen.
WARNING!
Use only approved chargers and USB Type-C cables. The use of
unapproved accessories could damage your phone or, in the worst
case, cause the battery to explode.
WARNING!
Do not remove the back cove r. The battery is not removable.
Removal may cause fire or exp losion.
1. Connect the charger adapter to the phone charging jack. Do
10
Page 11
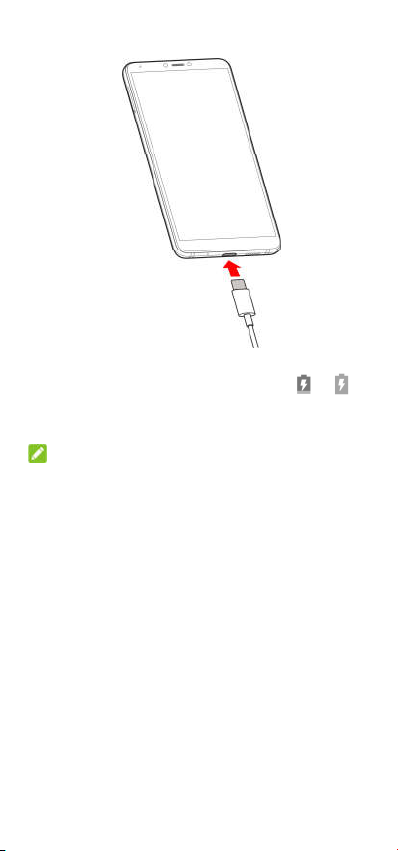
not force the charger connector into the phone charging jack.
2. Connect the charger to a standard AC power outlet. If the
phone is on, you’ll see a charging icon , such as or ,
appear on the status bar.
3. Disconnect the charger when the battery is fully charged.
NOTE:
If the battery is extremely low, you m ay be unable to power on the
phone even when it is being charged. In t his case, try again after
charging the phone for at least 20 m inutes. Contact the customer
service if you still cannot power on th e phone after prolonged
charging.
Extending the battery life
Active applications, screen brightness levels, Bluetooth and Wi-Fi
usage and GPS functionality can drain your battery. You can follow
the helpful tips below to help conserve your battery power:
Use the Power-saver feature in Settin gs. See Battery.
Reduce the screen backlight time.
Lower the screen brightness.
Turn Wi-Fi, Bluetooth and auto-sync of f when not in use.
Disable the GPS function when not in use. Most applications
using this function will periodically qu ery the GPS satellites for
11
Page 12

your current location, and each query d rains your battery.
Powering on/off
Press and hold the Power key to turn on your phone.
To power off, press and hold the Power k ey to open the options
menu and touch Shut down.
NOTE:
If the phone freezes or takes too long to re spond, you can press and
hold the Power key for about 16 seco nds to restart the phone.
Setting up for the first time
When you first power on your phone af ter you purchase it or reset it
to factory settings (see Reset options ), you will need to setup the
device before use.
Select the language field and follow th e on-screen prompts to setup
your phone.
Locking/unlocking the screen and keys
Your phone allows you to quickly lock the sc reen and keys (put the
phone to sleep mode) when not in us e and to turn the screen back
on and unlock it, as needed.
To lock the screen and keys:
To quickly turn the screen off and lock the keys, press the Power key.
NOTE:
To save battery power, the phone aut omatically turns off the screen
after some time of inactivity. You will still be able to receive
messages and calls while the phone sc reen is off.
To unlock the screen and keys :
1. Press the Power key to turn the screen on.
2. Swipe up on the screen.
- or -
Swipe from a shortcut icon at the bot tom to open the related
app or feature.
- or -
Touch a notification twice consecutive ly to open the related
app.
NOTE:
12
Page 13

If you have set a fingerprint, an unloc k pattern, a PIN or a password
for your phone (see Protecting your p hone with screen locks and
Using your fingerprint), you’ll need to press your finger against the
fingerprint sensor, draw the pattern o r enter the PIN/password to
unlock your screen.
NOTE:
You can edit the shortcut icons on th e lock screen. Swipe up on the
home screen and touch Settings > Dis play > Edit lock screen
shortcuts, and then touch Lock sc reen layout to set the number of
shortcuts, touch a shortcut to change it, or touch Add shortcut to
add one.
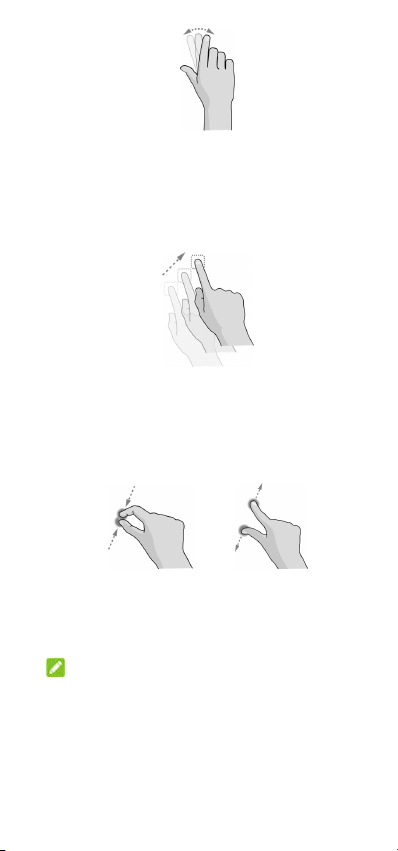
Using the touch screen
Your phone’s touch screen enables yo u to control actions through a
variety of touch gestures.
Touch
When you want to type using the ons creen keyboard, select
items on the screen such as the ap plication and settings icons,
or press the onscreen buttons, simply touch them with your
finger.
Touch and Hold
To open the available options for an item (for example , a
message or link in a web page), touc h and hold the item.
Swipe or Slide
To swipe or slide means to quickly drag yo ur finger verticall y or
horizontally across the s creen.
13
Page 14
Drag
To drag, press and hold your finger w ith some pressure before
you start t o move your finger. While dragging, do not release
your finger from the s creen until you have reached the target
position.
Pinch
In some apps (such as Maps, web br owser, and Gallery), you
can zoom in and out by placing two fing ers on the screen at
once and pinching them toge ther (to zoom out) or spreading
them apart (to zoom in).
Rotate the screen
For most screens, you can autom atically change the screen
orientation from por trait to landscape by turning the phone
sideways.
NOTE:
The auto-rotate fea ture needs to be enabled for the screen
orientation to automat ically change. Swipe up on the home
screen and touch Settings > D isplay, and then switch on
Auto-rotate scr een if it is turned off.
You can also access the screen rotation c ontrol by sliding down
the status bar twice, slide left and touch Auto-rotate/Por trait.
14
Page 15
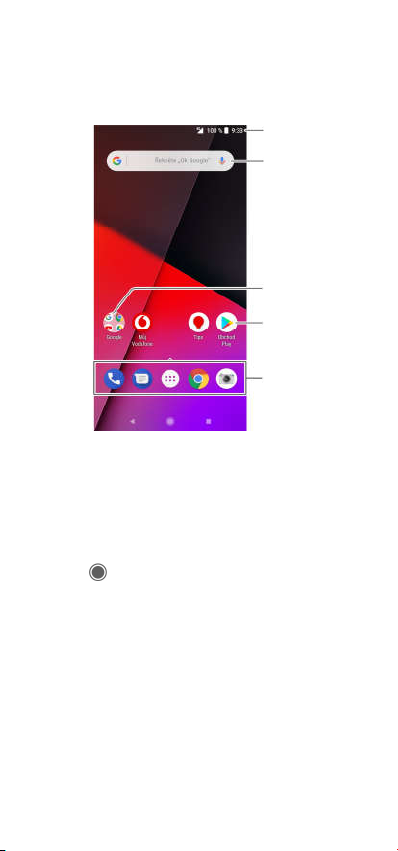
Shortcut
Folder
Getting to know the home screen
The home screen is the starting point for your phone’s applications,
functions, and menus. You can custom ise your home screen by
adding shortcuts, folders, widgets, an d more.
Status bar
Google search
Favourites tray
Extended home screen panels
Your home screen is extendable, providing more spac e for shortcuts,
widgets, or folders. Simply swipe righ t to left on the home screen to
see the extended panels, if already con figured. You can also add or
remove home screen panels, or adjus t their order.
To add a new home screen panel :
1. Touch to access the home screen.
2. Touch and hold an item such as a shortcut, a folder or a widget
on the screen and drag it to the right edge of the screen to
create a new home screen panel and put the item on it.
To move a home screen pane l:
1. Touch and hold an empty area of the home screen and slide left
or right to view the home screen thum bnails.
2. Touch and hold a thumbnail and drag it left or right to the place
you need.
To delete a home screen pane l:
15
Page 16

No empty home screen panel is allow ed to exist. If the shortcut,
widget or folder is the only item on th e current home screen panel,
the panel will be deleted as you remov e the item.
To open your favourite home s creen app:
You can slide left to right on the hom e screen to open your favourite
app quickly, which will require you to set i t up first time round.
Slide left to right on the home screen to access your favourite home
screen app.
NOTE:
Swipe up on the home screen and to uch Se ttings > Display, and
then touch Favourite app panel to turn on or off this feature, or
touch Favourite home screen app to select your favourite app.
To lock or unlock your home s creen layout:
After the home sc reen layout is locked, you cannot add/remove
/adjust the home screen panel, or add/remove/move items on the
home screen.
1. To do this simply, touch and hold an empty area of the home
screen to access the home screen th umbnails.
2. Touch the / symbol a t the top of the screen to
lock/unlock the home screen layout.
NOTE:
Swipe up on the home screen and to uch Se ttings > Display > Lock
home screen layout to lock or un lock the home screen layout.
16
Page 17

Personalising
Changing the system language
1. Swipe up on the home screen and touch Settings > Syste m >
Languages & input > Languages. The first language in the list is
the default system language.
2. Touch Add a language and then the language you need. Select
the regional variant of the language if prom pted.
3. Touch and hold a language and move it to the top to switch to
that language.
NOTE:
To remove languages from the list, to uch > Remove and select
the languages you want to delete.
Setting the date and time
1. Swipe up on the home screen and touch Settings > Syste m >
Date & time.
2. Set the date, time, time zone, and time format.
To adjust the date and time automatic ally, turn on
Automatic date & time.
To adjust the date and time manually, turn off Automatic
date & time and touch Set date / Set time to change the
date and time.
To adjust the time zone automatically, turn on Automatic
time zone.
To adjust the time zone manually, tur n off Automatic time
zone and touch Select time zone to set the correct time
zone.
To adjust the time format, touch Use 24- hour format.
Changing ringtone, notification and alarm sound
You can customise the default incoming call ringto ne, notification
sound, and alarm sound.
1. Swipe up on the home screen and touch Settings > Sou nd >
Ringtones.
2. Touch Phone ringtone, Default notification sound , or Default
alarm sound.
17
Page 18

3. Select the ringtone you want to use.
NOTE:
If you have additional audio files save d in the internal storage
or the microSD card, touch Add ringto ne at the bottom of the
ringtone list to choose one as the ring tone.
4. Touch OK.
NOTE:
See Set a ringtone for a cont act for how to assign a special ringtone
to an individual contact.
NOTE:
To make the phone ringtone fade in when a call comes, touch
Settings > Sound and switch o n Gradually increase ringtone.
Turning on/off other sounds and vibration
1. Swipe up on the home screen and touch Settings > Sound.
2. Touch Dial pad tones, Screen-locking sounds, Charging sounds,
Touch sounds, Vibrate on t ap, or Gradually increase ringto ne.
Adjusting volume
1. Swipe up on the home screen and touch Settings > Sou nd.
2. Drag the sliders below Ringtone volume, Notification vo lume,
Media volume, and Alarm volume to adjust the volume for each
type of audio.
NOTE:
You can adjust the media volume when a media app lication is in use
by pressing the Volume key. If no media application is active, pres s
the Volume key to adjust ringtone volume (or the earpiece volume
during a call).
Using do not disturb mode
You can limit interruptions with Do not disturb mode. This mode
silences your phone so that it doesn’ t make sounds or vibrate when
you don’t want it to.
To turn on Do not disturb mod e:
1. Swipe down from the top of the screen with two fingers to
access the Quick Settings.
2. Touch the word “Do not disturb” and turn on the switch at the
top right corner.
18
Page 19

3. Touch Total silence, Alarms only, or Priority only depe nding on
whether you want to allow exceptions . You can customise the
exceptions when Priority only is se lected.
4. Touch Until you turn off Do not disturb if you want to tur n off Do
not disturb mode manually; touch or to set the time
before Do not disturb mode turns of f automatically.
5. Touch DONE.
NOTES:
Press the Volume key when no media application is active to
show the volume bar. Drag the slider to the left or keep
pressing the Volume down key to turn on vibration. Press the
key again to turn on Alarms only.
To turn off Do not disturb mode quick ly, press either end of the
Volume key when the screen is on an d then touch TURN OFF
NOW.
To set exceptions for Do not d isturb mode (Priority only):
You can set reminders, events, and ca llers that you specify as
exceptions when Do not disturb mod e is set to Priority only.
1. Swipe up on the home screen and touch Settings > Sou nd > Do
not disturb preferences > Prior ity only allows.
2. Turn on the switch next to the items you want to allow. Touch
Messages or Calls and set who can ale rt you of their messages
or calls.
NOTE:
When Repeat callers is switched on, yo u’ll receive a notification if
someone calls you a second time with in a 15 minute period,
regardless of whether notifications fro m that person receive priority
status.
To set a Do not disturb rule:
If you want to allow all notification al erts through most of the time,
but want to limit alerts during certain times (like at night or on the
weekends), you can set a rule for Do not d isturb mode.
1. Swipe up on the home screen and touch Settings > Sou nd > Do
not disturb preferences > Ad d more.
2. Enter the rule name, select Time rule or Event rule.
3. Enter a name for the rule and touch OK.
4. For a time rule, set the days, the start and end times, and set
Do not disturb preferences. You can also choose whether to
19
Page 20

allow the rule to stop at either the rule end time or by the next
alarm you've set in the Clock app.
For an event rule, select a Calendar a ccount you want to make
the rule for, select the type of reply yo u want to use, and set Do
not disturb preferences.
NOTE:
To turn on or off a rule, touch it to op en its details screen and then
touch the on/off switch.
To block visual disturbances:
You can set Do not disturb mode to bl ock visual disturbances such
as notifications.
1. Swipe up on the home screen and touch Settings > Sou nd > Do
not disturb preferences > Bloc k visual disturbances.
2. Touch the on/off switches to choose whether to block visual
notifications when the screen is on an d off.
Adding a mute switch on the lock screen
This feature allows you to quickly enab le or disable silent mode on
your phone via a virtual mute switch on the lock screen.
To add the mute switch:
1. Swipe up on the home screen and touch Settings > Soun d.
2. Switch on Silent mode mute switch.
3. Touch Turn on mute switch to to select Allow alarms only or
Total silence for the mute switch.
To use the mute switch:
1. Slide left on the mute switch bar on the right side of the lock
screen.
2. Touch the switch to enable or disable silent mode.
Applying new wallpapers
You can set the wallpaper for the hom e screen and lock screen.
1. Touch and hold an empty place on the home screen and then
touch WALLPAPERS.
2. Pick an image from Gallery, Photos or Wallpapers, or an
animation from Live wallpapers. Pinch on the image from
Gallery and Photos to crop it if needed .
20
Page 21

3. If prompted, select to set the wallpaper for the home screen,
the lock screen or both.
NOTE:
In addition, you can swipe up on the h ome screen and touch
Settings > Display > Wallpape r to pick an image from Gallery,
Photos or Wallpapers, or an anim ation from Live wallpapers.
Changing screen brightness
1. Swipe up on the home screen and touch Settings > Disp lay >
Brightness level.
2. Drag the slider to manually adjust the screen brightness.
NOTE:
Your phone can automatically adjust th e screen brightness for
available light. Touch beside the slider to turn the feature on
or off.
Using night light
You can enable Night Light to tint the screen amber for eye care, or
set a schedule when Night Light wi ll be turned on.
1. Swipe up on the home screen and touch Settings > Disp lay >
Night Light.
2. Turn on the switch beside Status to enable Night Light.
- or If you want to set a schedule when N ight Light will be turned on
automatically, touch Schedule an d select an option.
3. Drag the slider below Intensity to adjust the eye care ef fect
when Night Light is on.
Showing or hiding the navigation keys
1. Swipe up on the home screen and touch Settings > Feat ures >
Navigation keys.
2. To hide the navigation keys, switch off Always show the
navigation keys and touch on the navigation bar. To
display the navigation keys again, swi pe up from the bottom of
the screen.
Protecting your phone with screen locks
You can protect your phone by creatin g a screen lock. When it is
enabled, you need to swipe up on the screen, draw a pattern or
21
Page 22

enter a numeric PIN or password to u nlock the phone’s screen and
keys.
1. Swipe up on the home screen and touch Settings > Sec urity &
location > Screen lock.
2. Touch None, Swipe, Pattern, PIN or Password.
Touch None to disable the screen loc k.
Touch Swipe to enable screen lock and allow unlocking
with a ‘swipe' gesture. You can unloc k the screen by
touching the display and sliding up.
Touch Pattern to draw and redra w a pattern that you must
draw to unlock the screen.
Touch PIN or Password to set a numer ic PIN or a password
that you must enter to unlock the scre en.
3. For Pattern, PIN, or Password lock, select whether to protect
your phone by requiring your pattern, PIN or password before it
starts up. Then follow the onscreen pr ompts to continue.
NOTE:
When this feature is enabled, your pho ne cannot receive calls,
messages, or notifications until it star ts up.
4. For Pattern, PIN, or Password lock, select how you want
notifications and their contents to sho w when the phone is
locked. Then touch DONE.
CAUTION:
Remember the pattern, PIN or passwo rd you set. Otherwise, you will
have to reflash the phone software to use the phone and all data in
your phone will be erased.
Using your fingerprint
With the fingerprint sensor on the bac k of your phone, you can
register up to 5 fingerprints and use th em to unlock the phone, or
access Private Space. You can also simply press the fingerprint
sensor to take photos or answer calls , or swipe down on the
fingerprint sensor to open the notific ation panel.
NOTE:
The fingerprint feature is only usable when the screen lock (Pattern,
PIN or Password) is enabled. When the screen lock is reset to None
or Swipe, all registered f ingerprints are erased.
To register a fingerprint:
1. Swipe up on the home screen and touch Settings > Sec urity &
22
Page 23

location > Fingerprint > Finge rprint management.
2. Enter the screen lock pattern, PIN or password you set. If you
haven’t set a screen lock, follow the p rompts to set it.
3. Touch REGISTER or Add fingerprint.
4. Follow the prompts to record a finger.
5. Touch OK.
NOTE:
Touch an existing fingerprint record t o change its name or delete it.
To set touch-control functions :
1. Swipe up on the home screen and touch Settings > Sec urity &
location > Fingerprint.
2. You can set the following options.
Take photo: Press the fingerprint sens or to take a photo
when the Camera app is opened. No fing erprint
verification is needed.
Answer call: Press the fingerprint sens or to answer
incoming calls. No fingerprint verifica tion is needed.
View notification panel: Swipe do wn on the fingerprint
sensor to open the notification panel.
To set fingerprint functions:
1. Swipe up on the home screen and touch Settings > Sec urity &
location > Fingerprint > Finge rprint management.
2. Enter the screen lock pattern, PIN or password you set.
3. Switch on or off Access Private Space. When this featu re is
enabled, you can press the fingerprin t sensor to access Private
Space with a registered fingerprint. Se e Private Space.
Protecting your phone with screen pinning
You can use the screen pinning feature to keep an app in view, so
others cannot switch t o other apps or access your personal
information.
Turn on screen pinning
1. Swipe up on the home screen and touch Settings > Sec urity &
location > Screen pinning.
2. Touch the switch to turn it on.
3. If you want to ask for the unlock pattern, PIN or password
before unpinning the screen, switch on Ask for unlock pattern /
PIN / password before unpinn ing when the screen lock has
been set.
23
Page 24

Pin a screen
1. Ensure that screen pinning is turned on.
2. Open the app you want to keep in view.
3. Touch .
4. If there are many app tabs, swipe up to find on the
front-most tab.
5. Touch .
Unpin the screen
To unpin the screen and return to normal use, touc h and hold
and at the same time.
If you have asked for the unlock patt ern, PIN or password before
unpinning the screen, swipe up on the lock screen and draw the
pattern or enter the PIN/passwor d. You can also unlock the screen
with your fingerprint i f you have registered one.
24
Page 25
Do not disturb mode
Do not disturb mode
Wi-Fi® network
Phone microphone
GPS on
Portable W i-Fi hotspot
detected
Knowing the basics
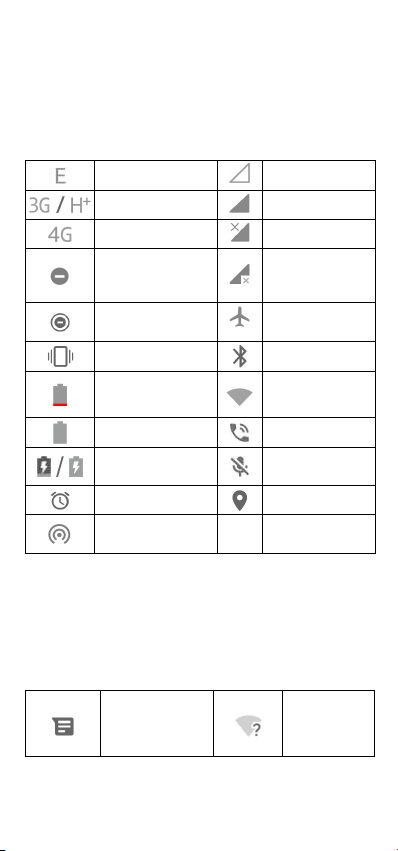
Monitoring the phone status
The status bar at the top of the hom e screen provides phone and
service status icons on the right side. Below are some of the icons
you may see.
EDGE connected
3G/HSPA+ connected
4G connected
on (Alarms only or
Priority only)
on (Total silence)
Vibration on
Battery low
Battery full
Battery char ging
Alarm set
on
Managing notifications
Notification icons
The status bar at the top of the hom e screen provides notification
icons on the left. Below are some of t he icons you may see.
Applications may present their own no tification icons.
New SMS/MMS
No signal
Signal strength
No data connection
Issues with data
connection
Flight mode
Bluetooth® on
Connected to a
Speaker on
off
New Wi-Fi
network
25
Page 26
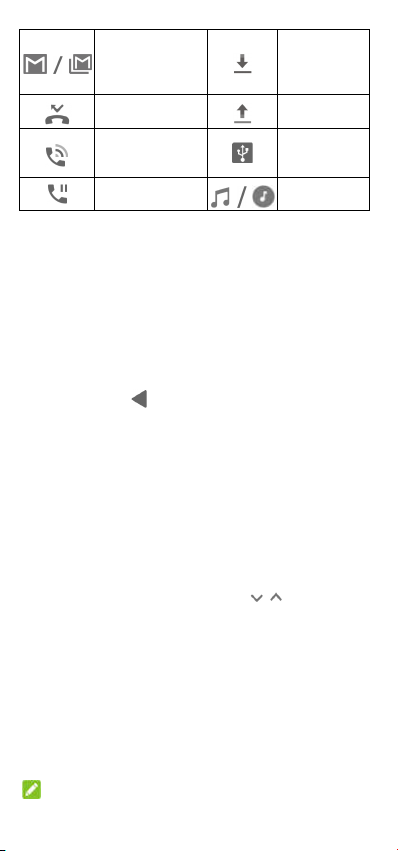
app
on
New message(s)
from the Gmail™
Downloading
data
Missed call
Call in progress
Call on hold
Sending data
USB tethering
Song playing
Open/close the notification panel
Notifications report the arrival of new messages, calendar events,
and alarms, as well as ongoing events, such as when you are playing
music. You can open the notification panel to view the details of
notifications.
To open the notification panel, swipe y our finger down from the
top of the screen.
To close the notification panel, swipe y our finger up on the
screen or touch .
Respond to or remove a notification
In the notification panel, you can respond t o a notification or
remove the notifications. The notifica tion panel also supports
expandable notifications that let you p erform additional actions
right from the notification itself.
To respond to a notification, just touc h it.
Slide down with one finger to expand cert ain notifications. You
can also swipe two fingers vertically o r pinch-zoom to expand or
collapse certain notifications, or touc h / to expand or
collapse certain notifications and bun dled notifications.
You can take quick actions on some n otifications. For example,
you can expand a new message notif ication and reply it.
To remove a notification, swipe it left o r right.
To remove all non-persistent notificat ions, touch CLEAR ALL
below all the notifications.
To manage notifications you have rece ived, touch and hold a
notification to see and customise the notification settings
available. See Notifications.
NOTE:
26
Page 27

If you block notifications f or an app, you may miss its important
alerts and update s.
Use Quick Settings
The Quick Settings make it convenient to view or change the most
common settings for your phone.
Open the notification panel and you c an find a few Quick Settings
on the top. To open the Quick Settings panel and find all setting
tiles, drag the notification panel down wards, or swipe down from
the top of the screen with two finger s.
NOTE:
You can swipe left or right on the Quic k Settings panel to find all
setting tiles.
To turn on or off settings quick ly:
1. Swipe down from the top of the screen with two fingers to ope n
the Quick Settings panel.
2. To turn on or off a setting, touch its tile. Touch and hold certain
tiles to access more setting options. For example, touch and
hold the Wi-Fi tile to open Wi-Fi settings.
To customise the Quick Settings p anel:
You can add, remove or rearrange the tiles on the Quic k Settings
panel.
1. Open the Quick Settings panel.
2. Touch at the bottom and do one of the following.
Touch and hold a tile and drag it to the pos ition you want.
Touch and hold a tile and drag it to the sec tion below to
hide it.
In the Drag to add tiles section, dr ag a tile up to show it in
the Quick Settings panel.
NOTE:
On the Quick Settings panel, touch at the bottom to ge t to the
Settings menu.
Managing shortcuts and widgets
Add shortcuts and widgets
1. Swipe up on the home screen to view apps.
- or To view widgets, touch and hold an empt y area of the home
27
Page 28

screen and select WIDGETS.
2. Slide up or down to browse the available apps or widgets.
3. Touch and hold a widget or an app icon and drag it to a home
screen panel.
NOTE:
While holding the item, you can drag it to the right edge of the
screen to create a new home screen pan el and put the item on it.
Move shortcuts or widgets
1. Touch and hold a shortcut or widget on the home screen.
2. Drag it to the place you need.
Remove shortcuts or widgets
1. Touch and hold a shortcut or widget on the home screen.
2. Drag it to (Remove) to remove it.
Adjust widget size
1. Touch and hold a widget on the home screen and then release
it.
2. An outline appears around the widget. Drag the outline to
resize the widget.
NOTE:
Not all widgets can be resized.
Organising with folders
You can create folders on the home s creen and add several
shortcuts to a folder.
You can move or remove folders the s ame way as moving or
removing shortcuts.
1. Touch and hold a shortcut on the home screen and drag it
quickly over another shortcut.
2. Release the shortcut. A new folder will be created and both
shortcuts are added into the folder.
3. To add more shortcuts into the folder, touch and hold each
shortcut and drag it over the folder b efore releasing it.
NOTE:
Touch the folder and then touch the nam e field to rename the
folder.
28
Page 29
Rearranging the favourites tray
The home screen includes a custo misable Favourites tray at the
bottom visible from all home screens. You can keep at most five
items in the Favourites tray. Drag shor tcuts or folders including the
icon in or out of the tray to rear range it.
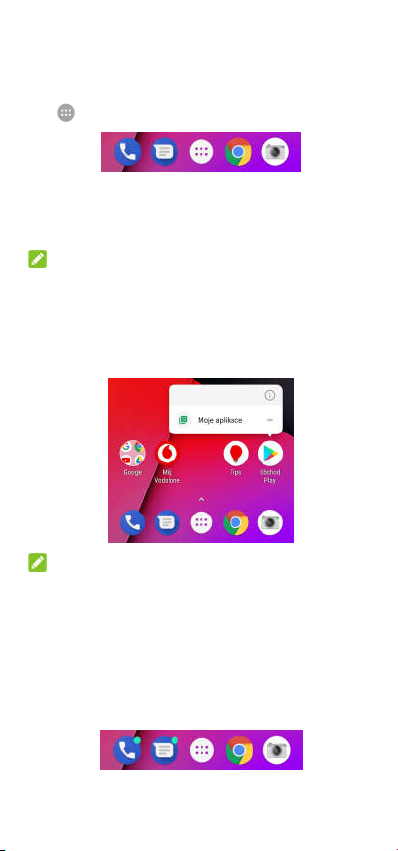
Using app shortcuts
The app shortcuts f eature allows you to quickly access common app
functions from the home screen an d the app list screen.
NOTE:
Not all apps suppor t the app shortcuts feature.
1. Touch and hold an app icon on the home screen or the app list
screen.
2. From the displayed menu, touch the function you want to use in
the app.
NOTE:
You can also touch and hold a function fr om the displayed menu,
and drag it to a home screen panel to create a shortcut of the
function.
Notification dots
Some apps will display a dot when they h ave notifications. The
notification dots appear on th e app icons on both the home screen
and the app list screen.
Touch and hold an app icon with a dot to preview its no tifications.
You can swipe a notification lef t or right to dismiss it.
29
Page 30

To turn on/off notification dots for all apps:
1. Swipe up on the home screen and touch Settings > Apps &
notifications > Notifications.
2. Touch the Allow notification dots switch to turn it on or off.
To turn on/off notification dots for specific apps:
1. Swipe up on the home screen and touch Settings > Apps &
notifications > Notifications.
2. Switch on Allow notification dots.
3. Touch App notifications.
4. Touch the app you want to customise and touch the Allow
notification dot switch.
Entering text
You can enter text using the onscreen keyb oard. Some apps open it
automatically. In others, you open it b y touching where you want to
type. Touch to hide the onscreen keyboard. You can also enter
text by speaking with the Google voice typing feature.
Enable or disable input methods
1. Swipe up on the home screen and touch Settings > Syste m >
Languages & input > Virtual ke yboard.
2. Touch Manage keyboards.
3. Slide the switches beside the input methods to enable or
disable them.
NOTE:
Some default input methods may not be disabled.
Change input methods
1. When you use the onscreen keyboard to enter text, touch the
icon at the bottom right corner of the s creen.
2. Select the input method you need.
NOTE:
The icon appears only when more than one input method is
installed and enabled.
Gboard
Gboard provides a layout similar to a desktop computer keyboard.
When screen auto-rotation is enabled , turn the phone sideways and
the keyboard will change from portra it to landscape. The landscape
30
Page 31

keyboard is not supported in all appli cations.
Touch the alphabetic keys to enter le tters. Touch and hold
some specific keys to enter associate d accented letters or
numbers. For example, to enter È, to uch and hold and the
available accented letters and numbe r 3 appear. Then slide to
choose È.
As you enter a word, candidates appe ar above the keyboard.
Touch to select the correct one. (You c an drag a word to
to remove it from the list of possible suggestions.)
Touch to use uppercase. Double-tap to lock
uppercase. This key also changes to in dicate the current case
you are using: for lowercase, for uppercase, and
when locked in uppercase.
Touch to delete the text before the cursor.
Touch to select numbers and symbols. You can then
touch to find more or touch to choose emoji and
emoticons.
Touch to use Google voice typing.
Touch and hold to change the input language or set up
Gboard.
Touch and hold and then slide to to change the
keyboard layout for one-handed typing .
Touch to access more options.
NOTE:
The keyboard layout may change in dif ferent apps.
Glide Typing
Gboard supports the glide typing featu re. You can use this feature to
input a word by sliding through the let ters.
To enable and use glide typing:
31
Page 32

1. Touch and hold on Gboard, and then touch Gboard
keyboard settings.
2. Touch Glide typing and then touch Enable glide typing if t his
feature is turned off.
3. Move your finger from letter to letter on the keyboard to trace a
word without lifting the finger until you reach the end of the
word.
End of the
Start of
the word
NOTES:
Touch when you want to. If you want t o enter a single letter, go
ahead and touch.
Lift your finger at the end of the word . A space is added
automatically when you begin to input the next word.
word
Google voice typing
Google voice typing uses the Google vo ice recognition service to
convert speech to text.
1. Touch to access the voice typing feature whe n you are
using Gboard.
Or touch at the bottom right and select Google vo ice
typing.
2. When you see the microphone image, speak what you want to
type.
3. You can continue entering text to keep it or to delete it.
NOTE:
Say "comma," "period," "question m ark," "exclamation mark,"
or "exclamation point" to enter p unctuation.
32
Page 33

Editing text
Move the insertion point: Touch w here you want to type. The
cursor blinks in the new position, and a ta b appears below it.
Drag the tab to move the cursor.
Select text: Touch and hold or do uble-tap within the text. The
nearest word highlights, with a tab at each end of the selection.
Drag the tabs to change the selection.
Cut or copy: Select the text you w ant to manipulate. Then touch
CUT or COPY to cut or copy the text t o the clipboard.
Replace text with the clipboard tex t: Select the text you want to
replace. Then touch PASTE.
Insert clipboard text to the tex t field: Touch the tab below the
cursor and then select PASTE.
Opening and switching apps
Open an app
1. Swipe up on the home screen or touch on the home
screen to view apps.
2. Slide up or down on the screen and touch an app to open it.
NOTE:
Drag the slider on the right side of th e screen to the initial letter of
the app you need, or touch the search box at the top to search for
apps.
Switch between recently opened apps
1. Touch . The apps y ou’ve used recently are displayed in a
series of tabs. Slide up and down to s ee all the tabs.
2. Touch a tab to open that app.
NOTE:
You can swipe a tab sideways or touch X on the tab to remove it from
the screen, (which will free up run ning memory on the device) ; touch
on the tab to lock it.
NOTE:
Double-tap to quickly switch between two most r ecently
opened apps.
33
Page 34

Use two apps in split-screen mode
You can work with two apps at the same time in split -screen mode.
NOTE:
Some apps may not suppor t split-screen mode.
Method one:
1. Touch to view your recently used apps.
2. Touch and hold the tab of the first app you want to use, and
then drag it to the Drag here to use sp lit screen area.
3. If the second app you want to use is in the recent apps list,
touch its tab. If not, from the home sc reen, touch to find
and open the app you need.
Method two:
1. Open the first app you want to use, and then touch and hold
. The screen is divided into two.
2. Find and open the second app you want to use, either by
touching and selecting a tab or by touching from the
home screen.
To turn off split-screen mode, touc h and hold , or dr ag to
the top or bottom of the screen.
Uninstalling an app
1. Swipe up on the home screen or touch on the home
screen to view apps.
2. Touch and hold an app icon and drag the icon to (Uninstall)
at the top of the screen.
3. Touch OK to uninstall the app.
NOTE:
The pre-installed apps may not be uninstalled.
34
Page 35

Connecting to networks and devices
Connecting to mobile networks
Control mobile data use
To enable or disable data access:
1. Swipe up on the home screen and touch Settings > Netw ork &
Internet > Data usage.
2. Touch the Mobile data switch to enable or disable mobile data
use.
To get data servic es when roaming:
1. Swipe up on the home screen and touch Settings > Netw ork &
Internet > Mobile network.
2. Touch the Roaming switch if it is turned off.
3. Touch the Data roaming reminder switch to turn on or of f the
reminder of data roaming.
NOTE:
Data roaming may incur significant roamin g charges.
Select preferred network type
1. Swipe up on the home screen and touch Settings > Netw ork &
Internet > Mobile network.
2. Touch Preferred network type and touch the type of ne twork you
prefer the phone to connect to.
Set access point names
To connect to the Internet you can us e the default Access Point
Names (APN). However if you wish to select, edit or add a new APN,
please contact the service provider to get the necessary
information.
1. Swipe up on the home screen and touch Settings > Netw ork &
Internet > Mobile network.
2. Touch Access point names and then touch .
3. Touch each item to enter the information you get from your
service provider.
4. Touch > Save to complete.
NOTE:
To set the APN to default settings, to uch > Reset to de fault.
35
Page 36

Select network operator
1. Swipe up on the home screen and touch Settings > Network &
Internet > Mobile network.
2. Switch o ff Automatically select network.
3. Touch Networ k to search for all available networks.
4. Touch a netwo rk in the network list to register manually.
You can also switch on Automatically s elect network to select
the preferred network automatically.
Connecting to Wi-Fi (WLAN)
Wi-Fi is a wireless networking technolo gy that can provide Internet
access at distances of up to 100 met ers, depending on the Wi-Fi
router and your surroundings.
Turn Wi-Fi on and connect to a Wi-Fi network
1. Swipe up on the home screen and touch Settings > Network &
Internet > Wi-Fi.
2. Slide the switch to the On position to turn on Wi-Fi.
3. Touch a Wi-Fi network name to connect to it.
4. If the networ k is secured, enter the password and touch
CONNECT.
NOTE:
Your phone automatically connects to prev iously used Wi-Fi
networks when they are in range.
Get notified of open networks
1. Swipe up on the home screen and touch Settings > Network &
Internet > Wi-Fi.
2. Touch Wi-Fi preferences.
3. Turn on the Op en network notification switch.
When Wi-Fi is on, you receive notif ications in the status bar when
your phone detects a high-quality open Wi-Fi network. Switc h off
this option to turn off n otifications.
Add a Wi-Fi network
You can add a Wi-Fi network if the ne twork does not broadcast its
name (SSID), or to add a Wi-Fi network wh en you are out of range.
To connect to a secured network, you f irst need to get the security
details from the network's administra tor.
36
Page 37

1. Swipe up on the home screen and touch Settings > Network &
Internet > Wi-Fi.
2. Slide the switch to the On position.
3. Touch Add ne twork at the bottom of the Wi-Fi networks list.
4. Enter the network SSID (name). If necessary, enter sec urity or
other network configuration details.
5. Touch SAVE .
Connect to a WPS network
Wi-Fi Protected Setup (WPS) is a feat ure that makes it easy to add
your phone to the access points which support WPS.
You can use one of the following meth ods to connect your phone to
a wireless network using WPS.
Method one: WPS button ( Recommended)
1. Swipe up on the home screen and touch Settings > Network &
Internet > Wi-Fi.
2. Slide the switch to the On position.
3. Touch Wi-Fi preferences > WPS Push Button.
4. Press the WPS button on the access point and the acce ss point
will recognise your phone and add it t o the network.
Method two: PIN number
1. Swipe up on the home screen and touch Settings > Network &
Internet > Wi-Fi.
2. Slide the switch to the On position.
3. Touch Wi-Fi preferences > WPS Pin Entry.
4. The WPS PIN number displays on the screen. Enter the PIN
number into the access point's setup page.
After entering the PIN number, your phone automatically finds the
access point and configures the conn ection.
NOTE:
For detailed information about the W PS feature of the access point,
please refer to its user documents.
Forget a Wi-Fi network
You can make your phone forget abou t the details of a Wi-Fi network
that you added – for example, if you don’t want the phone to
connect to it automatically or if it is a net work that you no longer
use.
1. Swipe up on the home screen and touch Settings > Network &
37
Page 38

Internet > Wi-Fi.
2. Touch Saved n etworks at the bottom.
3. Touch the Wi-Fi network name and then touch FORGET.
Using Wi-Fi Direct®
Wi-Fi Direct allows Wi-Fi devices to sh are files and data directly by
connecting to each other without the need for wireless access
points (hotspots).
To connect to another device via Wi-Fi Direct:
1. Swipe up on the home screen and touch Settings > Network &
Internet > Wi-Fi.
2. If Wi-Fi is off, slide the switch to the On position.
3. Touch Wi-Fi preferences > Wi-Fi Direct. Your phone will search
for other devices enabled with Wi-Fi D irect connections.
4. Touch a device name below Peer devices to connect with it.
The other device will receive a connect ion prompt and need to
accept the request for connection. Bo th devices may need to
enter a common PIN.
5. Once co nnected the device is displayed as “Connected” in the
Peer devices list.
Connecting to Bluetooth devices
Bluetooth is a short-range wireless co mmunication technology.
Phones or other devices with Bluetoo th capabilities can exchange
information wirelessly within a distanc e of about 10 metres. The
Bluetooth devices must be paired bef ore the communication is
performed.
Turn Bluetooth on/off
1. Swipe up on the home screen and touch Settings > Connected
devices > Bluetooth.
2. Slide the switch to the On or Off position.
When Bluetooth is on, the icon appears in the status bar.
Change the device name
1. Swipe up on the home screen and touch Settings > Connected
devices > Bluetooth.
2. Slide the switch to the On position if Bluetooth is off.
3. Touch Device n ame.
4. Edit the nam e and touch RENAME.
38
Page 39

Pair with another Bluetooth device
1. Swipe up on the home screen and touch Settings > Connected
devices > Bluetooth.
2. Slide the switch to the On position if Bluetooth is off.
3. Touch Pair ne w device. Your phone automatically scans for and
displays the IDs of all available Blueto oth devices in range.
4. Touch th e device you want to pair with.
5. If necess ary, confirm that the Bluetooth passkeys are the same
between the two devices and touch PAIR . Alternatively, enter a
Bluetooth passkey and touch PAIR.
Pairing is successfully completed whe n the other device
accepts the connection or the same p asskey is entered.
NOTE:
The Bluetooth passkey may be fixed f or certain devices, such as
headsets and hands-free car kits. You can try entering 0000 or
1234 (the most common passkeys), or refer to the documents for
that device.
Forget (unpair with) a Bluetooth device
You can make your phone forget its p airing connection with another
Bluetooth device. To connect to the d evice again, you must search
for it and may need to enter or confirm a passkey again.
1. Swipe up on the home screen and touch Settings > Connected
devices > Bluetooth and ensure t hat Bluetooth is turned on.
2. In the list of paired devices, touch the icon beside the
Bluetooth device you want to forget.
3. Touch FORG ET.
Send data via Bluetooth
1. Open the ap propriate application and select the file or item you
want to share.
2. Select the opt ion for sharing via Bluetooth. The method may
vary by application and data type.
3. Touch a B luetooth device the phone has paired with or w ait for
it to search for new devices and touch one of them.
Receive data via Bluetooth
1. Turn Blue tooth on before trying to receive data via Blue tooth.
2. Touch ACCE PT to start receiving the data. If necessary, flick
down the status bar, touch ACCEPT on the Bluetooth sharing
notification.
39
Page 40

Received files are stored automaticall y in a dedicated folder
(Bluetooth, for instance) in the p hone. You can access them with the
File Manager app.
Exchanging data via NFC
Near Field Communication (NFC) allow s your phone to exchange
data with another NFC-enable d device when they touch each other
or in close proximity.
Depending on the applications that you h ave installed on your
phone, you might be able to use your phone as a transit pass or as
an access pass. To use this feature, tap the bac k of your phone
against an NFC-enabled access p oint, subject to applicable terms
and conditions from the par ticular vendor.
To turn on and use NFC:
1. Swipe up on the home screen and touch Settings > Connected
devices.
2. Slide the NF C switch to the on position.
3. If you w ant to share web pages, contact information, YouTube
videos or other content on your phon e to another NFC-capable
device, touch Android Beam and s lide the switch to the On
position.
Using tap & pay
You can tap and pay with your phone at the mer chants that accept
contactless payments.
NOTE:
To use tap & pay, you need to install a nano-SIM card which
supports NFC in your phone. For deta iled information, please
contact your Vodafone service provid er.
Set up tap & pay
To tap and pay, you must turn on NFC on your phone.
1. Swipe up on the home screen and touch Settings > Connected
devices.
2. Slide the NF C switch to the on position.
Manage apps using tap & pay
If you have more than one app that le ts you tap and pay, you can
choose a default. Your default app is the one you’ll automatically
use when you tap and pay at a sto re. You can browse Google Play
Store for more payment apps. Your payment apps need t o support
40
Page 41

the tap and pay functionality in o rder to show up.
To set your default payment app:
1. Open the pa yment app and turn on tap and pay.
2. Swipe up on the home screen and touch Settings > Apps &
notifications > Default apps > Tap & pay.
3. Select you r default payment app.
Turn off tap & pay
You can turn off tap and pay in tw o ways:
Turn off NFC on your phone. Swipe up on the home screen and
touch Settings > Connected device s and then slide the NFC
switch to the off position. This also tu rns off Android Beam and
other NFC features.
Turn off the tap and pay functionality in your payment app. Not
all payment apps support this option .
Connecting to your computer via USB
You can connect your phone to a com puter with a USB cable and
transfer music, pictures, and other fi les in both directions. Your
phone stores these files in the phone storage or on a removable
microSD card (if available).
If you are using USB tethering, you m ust turn that off before you can
use USB to transfer files between yo ur phone and computer.
Connect your phone to a computer via USB
1. Connect your phone to the PC with a USB cable.
2. The Use USB to options menu will automatically open, or you
can open the Notification Panel and touch .
3. Choose one o f the following options:
Charge this device: Charge your ph one via USB.
Transfer files (MTP): Transfer files on Windows® or Mac®.
NOTE:
For Windows XP, please install Media Player 11 (or later
version) when you use MTP.
Transfer photos (PTP): Transfer ph otos or files if MTP is not
supported by your computer.
Disconnect your phone from the computer
To disconnect the phone from the co mputer, simply unplug the USB
cable when you’re finished.
41
Page 42

Using USB On-The-Go (OTG)
Your phone supports USB On-The-Go. You can connect th e phone
and a USB peripheral device (s uch as a USB flash drive, a USB
mouse, or a USB keyboard) with a n OTG adapter cable.
For example, when you connect the p hone with a USB flash drive,
you can browse the file s on the flash drive; connect the phone with a
USB mouse and you can navigate the phone with the mouse.
NOTE:
To safely remove a connected USB sto rage device (such as a USB
flash drive), swipe up on the home scr een and touch Settings >
Storage and find the name of the dev ice. Then touch next to it.
Removing or Erasing the microSD card
Removing the microSD card from your phone
If you need to remove the microSD ca rd while the phone is on, you
must unmount it first.
1. Swipe up on the home screen and touch Settings > Storage.
2. Touch next to the card name in th e Portable storage
section.
3. When the screen prompts the card is safely ejected, you can
now remove it from the phone.
Erasing and formatting the microSD card
1. Swipe up on the home screen and touch Settings > Storage.
2. Touch the card name in the Portable storage se ction.
3. Touch > Storage settings and then touch Format .
4. Touch ERAS E & FORMAT.
CAUTION:
The formatting procedure erases all t he data on the microSD card,
after which the files CANNOT be retri eved.
Sharing your mobile data connection
You can share your phone’s data cap abilities through tethering or by
activating the Wi-Fi hotspot feature to create a mobile hotspot.
Share your mobile data connection via USB
You can access the Internet on your comp uter via the USB tethering
feature of your phone. The feature nee ds a data connection on a
42
Page 43

mobile network and may result in dat a charges.
NOTE:
You cannot transfer files between your phone and your computer
when the phone is USB tethered.
1. Connect your phone to your computer with a USB cable.
2. Swipe up on the home screen and touch Settings > Network &
Internet > Hotspot & tethering .
3. Switch o n USB tethering. A new network connection will be
created on your computer.
NOTE:
To stop sharing your data connection , switch off USB tethering or
disconnect the USB cable.
Share your mobile data connection via Bluetooth
If your computer can obtain an Inter net connection via Bluetooth,
you can configure your phone to shar e its mobile data connection
with your computer.
1. Pair your phone with your computer via Bluetooth.
2. Configure your computer to obtain its network connect ion via
Bluetooth. For more information, plea se see your computer's
documentation.
3. Swipe up on the home screen and touch Settings > Network &
Internet > Hotspot & tethering .
4. Switch o n Bluetooth tethering. Your computer is now sharing
your phone's data connection.
NOTE:
To stop sharing your data connection, switch off Bluetooth
tethering.
Share your mobile data connection as a Wi-Fi hotspot
You can share your phone’s data con nection with other devices by
turning your phone into a portable W i-Fi hotspot. The feature needs
a data connection on a mobile networ k and may result in data
charges.
NOTE:
When the portable Wi-Fi hotspot featu re is enabled, you cannot use
your phone’s Wi-Fi capability to access the Internet. You still remain
connected to the Internet via your m obile data network.
1. Swipe up on the home screen and touch Settings > Network &
Internet > Hotspot & tetherin g.
43
Page 44

2. Switch o n Wi-Fi hotspot.
After a moment, the phone starts bro adcasting its Wi-Fi
network name (SSID).
3. On anot her device, locate your phone via Wi-Fi and connect
with it.
4. Enter the password on that device. The password can be found
in Settings > Network & Internet > Hotspot & tethering > Set up
Wi-Fi hotspot > Password.
NOTE:
To stop sharing your data connection, switch off Wi-Fi hotspot.
Set your Wi-Fi hotspot
You can change the name of your phone's Wi-Fi network (SSID),
secure your portable Wi-Fi hotspot, a nd set other options.
1. Swipe up on the home screen and touch Settings > Network &
Internet > Hotspot & tethering .
2. Touch th e following Wi-Fi hotspot options:
Set up Wi-Fi hotspot:
-
Network name: Enter or edit a ne twork name (SSID)
that other devices see when scanning for Wi-Fi
networks.
Security: Choose a security optio n: Op en (not
-
recommended) or WPA2 PSK (other u sers can access
your Wi-Fi hotspot only if they enter t he correct
password). When you select WPA2 PS K, touch the
Password field to edit the securit y password.
Show password: If you have chosen WPA2 PSK security,
-
check to show or uncheck to hide the password.
-
Hide my device: Check to hide or unc heck to broadcast
your network name (SSID). If you choo se to hide your
device, other users need to get your ne twork SSID to
find the Wi-Fi hotspot.
Manage users: View a list of conn ected users, block or
unblock users, or set the maximum nu mber of devices that
can connect to the hotspot simultane ously.
More Settings: Set hotspot sleep notification and policy.
Connecting to virtual private networks
Virtual private networks (VPNs) allow you to connect to the
resources inside a secured local netw ork. VPNs are commonly
deployed by corporations, schools, an d other institutions to let
people access local network resources when not on campus, or
44
Page 45

when connected to a wireless network .
Depending on the type of VPN you ar e using, you may be required to
enter your login credentials or install s ecurity certificates before you
can connect to your VPN. You can get this i nformation from your
network administrator.
Add a VPN
1. Swipe up on the home screen and touch Settings > Network &
Internet > VPN.
2. Touch at the top right corner and fill in the information
provided by your network administrato r.
3. Touch SAVE .
The VPN is added to the list on the VPN sc reen.
NOTE:
You must set a lock screen pattern, PI N or password before using
VPN.
Connect to a VPN
1. Swipe up on the home screen and touch Settings > Network &
Internet > VPN.
2. Touch the VPN that you want to connect to.
3. When prompt ed, enter any requested credentials, and then
touch CONNECT.
Modify a VPN
1. Swipe up on the home screen and touch Settings > Network &
Internet > VPN.
2. Touch beside the VPN that you want to modify.
3. Edit the VPN settings and then touch SAVE.
Using emergency mode
You can activate Emergency mode in an emergency. When it is
activated, your phone will call the em ergency services number, send
SOS messages, sound the alarm, or fla sh SOS signal according to
your settings.
To set up Emergency mode:
Before you use Emergency mode, you need to set it up.
1. Swipe up on the home screen and touch Settings > Accounts >
Emergency mode.
2. Touch SETUP and follow the onscreen prompts to edit the SOS
message, add your SOS contacts, edit your local emergency
45
Page 46

services number, and set the emerge ncy mode options.
3. Touch DONE .
To activate or deactivate Emer gency mode:
Press and hold the Power key, and to uch Emergency mode. When
the timer counts down to zero, Emer gency mode will be activated.
To deactivate Emergency mode, touc h END.
To set the Emergency mode option s:
1. Swipe up on the home screen and touch Settings > Accounts >
Emergency mode.
2. Slide the switch to the On position.
3. You can set the following options:
Quick access: Press the Power ke y quickly 7 times to
activate Emergency mode.
Auto call emergency services: Make your phone
automatically call the emergency servi ces number when
Emergency mode is activated.
Emergency services number: Edit the emergency services
number.
Send SOS messages: Make your p hone automatically
send SOS messages to selected cont acts when Emergency
mode is activated.
Edit SOS contacts: Add up to 5 emer gency SOS contacts.
Edit SOS messages: Edit the defa ult SOS messages that
will be sent to your selected contacts .
Alarm sound: Make your phone a utomatically sound the
alarm when Emergency mode is activ ated.
Flash Emergency light: Make your p hone flash SOS signal
using the flashlight when Emergency mode is activated.
46
Page 47

Phone calls
You can place calls from the Phone a pp, the Contacts app, or other
apps or widgets that display contact in formation. Wherever you see
a phone number, you can usually touc h it to dial.
Placing and ending calls
Place a call by dialling
1. From th e home screen, touch .
2. Touch and enter the phone number or the contact name
with the dialpad. Touch to delete incorrect digits.
NOTE:
As you enter the phone number or th e contact name, your
phone searches for matching informat ion in your contacts. If
you see the number and contact you w ant to call, touch it to
place the call immediately.
3. Touch below the keypad to dial.
You can also touch the search box at the top of the Phone app
screen and enter the phone number o r contact name you want to
call. Touch the matching contact or Call [n umber] to place the call.
NOTE:
To make an international call, touch a nd hold the 0 key to enter the
plus (+) symbol. Next, enter the coun try code, followed by the
city/area code and then the phone numb er.
NOTE:
To redial the last call you made, just to uch from the home
screen, touch > and touch again.
End a call
During a call, touch on th e screen.
Answering or rejecting calls
When you receive a phone call, the inc oming call screen opens,
displaying the caller ID or the informat ion about the caller that
you've entered in the Contacts app. Y ou can answer or reject the
call, or reject it with a text message.
Answer a call
When you receive a phone call, swipe up on the screen to answer
47
Page 48

the call.
- or If the screen is unlocked, touch ANSW ER to answer the call.
NOTE:
To silence the ringer before answerin g the call, press either end of
the Volume key or the Power key.
Reject a call
When you receive a phone call, swipe down on the screen to reject
the call.
You can also swipe from at the bottom left to reject the call
and select a pre-set text message or edit one to send to the caller.
- or If the screen is unlocked, touch DECL INE to reject the call.
NOTE:
To edit the preset text response from within the Phone app, touch
in the top search field and select Setting s > Quick responses.
Working with the call history
The call history is a list of all the calls you've placed, received, or
missed. It provides a convenient way t o redial a number, return a
call, or add a number to your contacts.
To open the call history, you can touch from the home screen
and touch (in the top search field) > Call hist ory.
Place a call from the call history
1. Open the call history.
2. Touch beside a listing to call back.
Add a number from call history as a contact
1. Open the call history.
2. Touch th e contact icon in front of a number.
3. Touch on the contact information screen.
4. To add t he number to an existing contact, touch a contact in
the list. To add a new contact, touch Crea te contact.
Take other actions on a call history entry
Open the call history, touch a listing and t hen touch Call details to
view more call information.
Touch to delete the entry.
48
Page 49

Touch Copy number to copy the numb er.
Touch Edit number before call to edit the number in the dialler
before calling it.
Touch the contact icon in front of the entr y to open the contact
information screen, where you can se nd a message or email,
call back or make a video call, edit th e contact, add the contact
to favourites, or add the number to co ntacts.
You can also block a number and repo rt it as spam. Just touch a
listing in the call history and touch Block/ report spam, check
Report call as spam as you need and t hen touch BLOCK.
NOTE:
Touch > Clear call histor y in the call history screen to delete all
history reco rds.
Calling your contacts
1. From th e home screen, touch .
2. Touch . Your favo urite and frequently called contacts are
displayed in the tab. Touch one to make a call.
or -
-
Touch . Your full contact list is displayed. Touch a
contact and then touch its number to make a call.
Checking voicemail
If you have set the phone to diver t calls to voicemail, callers can
leave voicemail messages when they canno t reach you. Here’s how
to check the messages the y left.
1. From th e home screen, touch > .
2. Touch and hold the 1 key in the dialler. If prompted, enter your
voicemail password.
3. Follow th e voice prompts to listen to and manage your
voicemail messages.
NOTE:
See Set voicemail for how to set your voice mail service. For detailed
information, please contact the servi ce provider.
Using options during a call
During a call, you will see a number o f onscreen options. Touch an
option to select it.
Touch to tu rn on or off the speaker.
49
Page 50

Touch to mute or unmute your micr ophone.
Touch to switch to the keypad whe n you need to enter a
code (for example, the PIN for your vo icemail or bank account)
during the call.
Touch to put the call on hold.
Touch to make another call separately fr om the first call,
which is put on hold.
Touch to put the caller you are speaking to on hold, and
switch to the other call that has been pu t on hold.
Touch to merge the separate calls into a single
conference call.
Touch to end the current call.
WARNING!
Because of higher volume levels, do no t place the phone near your
ear during speakerphone use.
Managing multi-party calls
When the call waiting and three-way c all features are available, you
can switch between two calls or set up a conference call.
NOTE:
The call waiting and three-way call fea tures need network support
and may result in additional charges. Please contact your Vodafone
service provider for more information.
Switch between current calls
When you’re on a call and another ca ll comes in, your phone screen
informs you and displays the caller ID .
To respond to an incoming call while you’re o n a call:
Swipe up on the screen to answer the ca ll. This puts the first
caller on hold and answers the second call.
Swipe from at the bottom right to answer the call. This
ends the first call and answers the sec ond call.
Swipe down on the screen to reject t he second call.
Swipe from at the bottom left to reject the second call and
select a preset text message or edit one to send to the caller.
To switch between two calls:
Touch to switch to the other call.
50
Page 51

Set up a conference call
With this feature, you can talk to two peop le at the same time.
1. Place th e first call.
2. Once you ha ve established the connection, touch and dial
the second number. This puts the first caller on hold.
3. When you ’re connected to the second party, touch .
4. To end t he conference call, touch .
NOTE:
If one of the people you called hangs up d uring your call, you and
the remaining caller stay connected. If you initiated the call and are
the first to hang up, all callers are disc onnected.
Adjusting your call settings
Set contact display options
You can set the order of the contacts displayed in the tab of
the Phone app.
1. From th e home screen, touch > (in the top search
field) > Settings > Display op tions.
2. Touch Sort by or Name format to set the order of the contacts
and the format of the contact names .
Set sound and vibration
Set the sound and vibration f or incoming calls as well as dialpad
sounds.
1. From th e home screen, touch > (in the top search
field) > Settings > Sounds and vibr ation.
2. Touch th e following options you want to configure.
Touch Phone ringtone to select the ring tone for incoming
call notification.
Switch on Also vibrate for calls to enable vibration for
incoming call notification.
Switch on Keypad tones to play s ounds when you touch
the dialpad keys.
Edit quick response to rejected callers
1. From th e home screen, touch > (in the top search
field) > Settings > Quick respons es.
2. Touch a text message to edit it.
51
Page 52

Use fixed dialling numbers
Fixed Dialling Numbers (FDN) allows y ou to restrict outgoing calls to
a limited set of phone numbers.
1. From th e home screen, touch > (in the top search
field) > Settings > Calls.
2. Touch Fixed dialling numbers and the following options are
available.
Enable FDN: Input the PIN2 code to enable the FDN
feature.
Change PIN2: Change the PIN2 code f or FDN access.
FDN list: Manage the FDN list.
NOTE:
The PIN2 code is provided by your ca rrier. Entering an incorrect PIN2
code more times than allowed can ge t your nano-SIM card locked.
Contact your Vodafone service provide r for assistance.
Bar certain calls
Call barring feature allows you to forb id certain types of calls from
your phone.
1. From th e home screen, touch > (in the top search
field) > Settings > Calls.
2. Touch Call b arring.
3. Set the restri ction of specific types of calls from your phone.
Forward incoming calls
Call forwarding feature allows you to f orward your incoming calls to
another phone number.
1. From th e home screen, touch > (in the top search
field) > Settings > Calls.
2. Touch Call for warding.
3. Touch an avai lable option to enable it.
Set call waiting and caller ID
1. From th e home screen, touch > (in the top search
field) > Settings > Calls.
2. Touch Call w aiting and turn on the switch to get notified of
incoming calls during a call. Or touch Addit ional settings >
Caller ID to choose whether your num ber is displayed when
someone receives your outgoing call.
NOTE:
52
Page 53

Please contact the service provider to chec k whether the caller ID
and call waiting features are available.
Set call blocking
Call blocking allows you to block calls and messages from certain
numbers.
1. From th e home screen, touch > (in the top search
field) > Settings > Call blocking.
2. Touch ADD A NUMBER.
3. Enter the phone number or touch > > Contacts and
select one from the contact list.
4. Touch BLOC K.
NOTE:
To unblock a number, touch next to the number and touch
UNBLOCK.
Set voicemail
1. From th e home screen, touch > (in the top search
field) > Settings.
2. Touch Voicem ail to configure voicemail settings.
Touch Notifications to configure th e notifications of
voicemail.
Touch Advanced Settings > Servic e to select the voicemail
service provider. Your carrier is the de fault.
Touch Advanced Settings > Setup > Voicemail number to
edit the voicemail number.
Use caller ID & spam protection
When you make or receive a call with calle r ID and spam protection
on, you can see information about ca llers or businesses not in your
contacts or warnings about potential spam callers. To use caller ID
and spam protection, your phone may need to send information
about your calls to Google.
1. From the home screen, touch > (in the top search
field) > Settings > Caller ID & spa m.
2. Switch Calle r ID & spam on or off to enable or disable this
feature.
Use Nearby places
When you search from the Phone app , this feature will use your
location to find nearby places that m atch your query.
53
Page 54

1. From th e home screen, touch > (in the top search
field) > Settings > Nearby places.
2. Switch Near by places on to enable it and set its options.
54
Page 55

Contacts
You can add contacts on your phone and s ynchronise them with the
contacts in your Google account or ot her accounts that support
contact syncing.
To see your contacts, swipe up on the home screen a nd touch
Contacts.
Checking contact details
1. Open Contac ts to access your contact list.
NOTE:
If more than one sync account has b een added, touch >
> the account name to switch to the account and view its
contacts.
2. Scroll thr ough the list to view all your contacts.
3. Touch a conta ct to view its details.
Adding a new contact
1. Open Contac ts.
2. Touch to add a new contact.
3. Enter th e contact name, phone numbers, email addresse s, and
other information. Touch More fields if necessary.
4. Touch SAVE to save the contact.
Setting up your own profile
You can create your own name card in your phone.
1. Open Contac ts.
2. Touch > Settings > Your info.
If a profile has already been set up, to uch .
3. Edit your profile information.
4. Touch SAVE .
Importing, exporting, and sharing contacts
You can import contacts from your n ano-SIM card, or import/export
contacts from/to the phone storage o r the microSD card. This is
especially useful when you need to tr ansfer contacts between
different devices. You can also quickly share contacts using Gmail,
Messages, Android Beam (NFC), Blue tooth, Google Drive, etc.
55
Page 56

Import contacts from the nano-SIM card
1. Open Contac ts.
2. Touch > Settings > Import > SIM card .
3. Check the con tacts you need and then touch IMPORT.
Import contacts from the phone storage or the microSD
card
1. Open Contac ts.
2. Touch > Settings > Import > .vcf f ile.
3. Touch and find the vCard file(s) on the phone stor age or
microSD card and touch one to impo rt contacts.
NOTE:
Touch > Show internal storage if need ed to find your vCard
file(s).
Export contacts to the phone storage or the microSD card
1. Open Contac ts.
2. Touch > Settings > Export.
3. Touch and select the directory in which th e vCard file will
be saved. Touch > Show interna l st orage if needed.
4. Edit the f ile name if needed and touch SAVE to create t he file.
Share contacts
1. Open Contac ts.
2. In the contact list, touch and hold the contact you want to
share.
3. Check m ore contacts if needed and then touch .
4. Choose how t o share the contacts. Options depend on the
applications and services installed.
Working with favourite contacts
At the top of the contact list, you can find your favourite contacts.
Add a contact to favourites
You can add the contacts you use freq uently to favourites so that
you can find them quickly.
1. Open Contac ts.
2. Touch a conta ct and then touch at the top.
56
Page 57

Remove a contact from favourites
1. Open Contac ts.
2. Touch a favou rite contact and then touch at the top.
Searching for a contact
1. Open Contac ts.
2. Touch at the top of the screen.
3. Enter the contact name or other information (such as p hone
number) you want to search for. The c ontacts matched will be
listed.
Editing contacts
Edit contact details
1. Open Contac ts.
2. Touch a conta ct you need to edit and then touch .
3. Edit the cont act and touch SAVE.
Set a ringtone for a contact
Assign a special ringtone to a con tact, so you know who is calling
when you hear the ringtone.
1. Open Contac ts.
2. Touch a conta ct you want to set a ringtone for and then touch
> Set ringtone.
3. Select a ringtone you like and touch OK.
Delete contacts
1. Open Contac ts.
2. Touch an d hold the contact you want to remove.
3. Check m ore contacts if needed and then touch > DELETE.
57
Page 58

Web accounts
Adding or removing accounts
You can add multiple Google accounts and Microsof t Exchange
ActiveSync® accounts. You may also add other kinds of accounts
depending on the apps inst alled on your phone.
Add an account
1. Swipe up on the home screen and touch Settings > Accounts >
Add account.
2. Touch the type of accou nt you want to add.
3. Follow th e onscreen steps to enter the i nformation about the
account. Most accounts require a username and password, but
the details may var y. You may also need to obtain some
information from IT suppo rt or your system administrator.
When the account is successfully adde d, it is displayed in the
Accounts menu.
Remove an account
Removing an account will delete it and all i nformation associated
with it from your phone, such a s emails and contacts.
1. Swipe up on the home screen and touch Settings > Accounts.
2. Touch the account you want to remove.
3. Touch REMOVE ACCOUNT > REMOVE ACCOUNT.
Configuring account sync
Configure auto sync setting
1. Swipe up on the home screen and touch Settings > Accounts.
2. Switc h Automatically sync data on or off.
When automatic sync is turned o n, changes you make to
information on your phone or on the w eb are automatically
synced with each other.
When automatic sync is turned o ff, you need to sync
manually to collect emails, updat es, or other recent
information.
Sync manually
1. Swipe up on the home screen and touch Settings > Accounts.
58
Page 59

2. Touch an account and to uch Account sync.
3. Touch > Sync now. Or touch t he types of information you
want to sync.
Change an account’s sync settings
1. Swipe up on the home screen and touch Settings > Accounts.
2. Touch an account and t ouch Account sync. The account sync
screen appears, showing a list of information the account can
sync.
3. When aut o-sync is enabled, switch on or off items as you need.
The types of information enabled on the phone and the web will
be kept in auto-sync. When auto- sync is disabled, touch a
listing to sync that type of info rmation between the phone and
the web.
59
Page 60

Messages
You can use Messages to exchange text mess ages (SMS),
multimedia messages (MMS), and cha t messages.
Opening the Messages screen
From the home screen, touch .
The Messages screen opens, whe re you can create a new message,
search for messages, or open an ongoing message thread.
Touch to write a new message or group chat.
Touch to search for conversations with a contact using
keywords of the contact na me or number, or search for
messages using keywords of the m essage content.
Touch an existing message thread to open th e conversation
you’ve had with a cert ain number.
Sending a message
1. On the Messa ges screen, touch .
2. Add recipients by one of the following ways.
Manually enter the recipient’s nu mber or contact name.
(You can touch to enter numbers with a dialpad.) If the
phone presents a few sugges tions, touch the one you want
to add.
Select a recipient from your cont act list.
To add more recipients for a group conver sation, touch
to add more recipients and then touch .
3. Touch the text box an d enter the message text.
If you want to send a multimedia mes sage, touch to add a
sticker, picture, video, audio, or location infor mation to the
message. See Adding an attac hment below.
4. Touch .
NOTES:
Do not add an attachmen t if you want to send a text message.
Otherwise you may be c harged for a multimedia message.
You can also include email addresses as recipients for
multimedia messages.
Adding an attachment
To add stickers, touch .
60
Page 61

To add a photo, touch . Touch to snap a photo.
Swipe up on the mini viewscreen t o enlarge it to full size; swipe
down to return to the mini vie wscreen.
To add a video, touch . Touch to star t recording a
video and touch to stop recording.
To add images or videos, touch . Touch a photo or video
thumbnail or swipe up to select m ore images or videos. You can
also touch > to add audio files, images or videos.
To add a voice recording, touch . Touch and hold to
record a voice message.
To add your location information, touch .
NOTE:
You can touch at the corner of an attachment to remove it fr om
the message.
Replying to a message
Messages you receive are appended to existing threads of the same
number. If the new message comes from a new number, a new
thread is created.
1. On the Messa ges screen, touch the thread that has the
message you want to reply to.
2. Type your reply in the te xt box at the bottom. You can touch
if you want to reply with an MMS
3. Touch .
Forwarding a message
1. On the Messa ges screen, touch the thread that has the
message you want to for ward.
2. Touch and hold the mes sage and then touch in the menu
that opens.
3. Touch an existin g thread, or touch NEW MESSAGE to enter a
recipient for the message.
4. Edit the cont ent, if needed.
5. Touch .
More message options
On the Messages screen, touc h and hold a thread and the following
options are available.
61
Page 62

Touch to arc hive the thread. You can touch > Archived
from the Messages screen to find all archived messages.
Touch > DELETE to delete the t hread.
Touch or to turn on or off the notifications of the
thread.
Touch to add the new nu mber in the thread to your
contacts.
Touch > BLOCK to block the contact or nu mber in the
thread, and the thread will be arc hived. You can touch >
Blocked contacts fr om the Messages screen to find all blocked
numbers.
NOTE:
You can touch and hold a thread and touc h more to select them,
and then choose to arc hive or delete them, or turn off their
notifications.
62
Page 63

Web browser
Use Chrome to view web p ages and search for information .
Opening the browser
Swipe up on the home screen and to uch Chrome to launch the web
browser.
Chrome also opens when you t ouch a web link - for example, in an
email or a text message.
To open a web page or search the web:
1. Open the Ch rome app.
2. Touch the address box at the top of the web page.
3. Enter the address (URL) of a web page or enter terms you want
to search for. You can also touch to searc h by voice.
4. Touch a URL or sear ch suggestion or touch enter key on the
keyboard to open the web pag e or search results.
NOTE:
Touch > if you want to stop opening the page.
Using multiple browser tabs
You can open several web pages at the same time (on e page in each
tab) and switch betwe en them freely.
To open a new browser tab:
Touch > New tab. A new browse r tab opens.
To switch between tabs:
1. Touch (the number shows how many tabs you have
opened).
2. Swipe ve rtically to scroll through the list of opened tab s.
3. Touch the thumbna il of the tab you want to open.
NOTE:
Swipe a thumbnail horizontall y or touch its X to close the tab.
Downloading files
1. Touch and hold an image or a link to a file or to another web
page.
2. In the m enu that opens, touch Download image or Download
link.
63
Page 64

The downloaded files are save d to your phone. You can view or open
them in the Downloads app.
Changing Chrome settings
You can configure a number of settings t o customise the way you
browse the web, including seve ral that you can use to control your
privacy.
To open the Chrome settings screen, touc h > Settings.
64
Page 65

Number
Function
special effects.
automatically afte r you touch the shutter icon.
3
Change the flash setting.
4
Turn on or off the HDR feature.
5
Change the camera settings.
and blur backgrou nds.
7
View pictures and videos you have t aken.
Camera
You can use your phone to take photos and re cord videos. Photos
and videos are stored in the p hone storage. You can copy them to
your computer or access them in the Gallery app.
Capturing a photo
1. From th e home screen, touch .
NOTE:
You can quickly open the camera when the p hone is in sleep
mode or in the lock screen by double -pressing either end of the
Volume key. To use this feature, touch on the camera
screen and switch on Camera q uick launch.
2. Aim the cam era at the subject and make any necessary
adjustment. PHOTO (auto cam era) mode is used by default.
Use the filter to select a co lour effect or other
1
Set a time delay before the camer a takes a picture
2
Switch among the default PHO TO mode, VIDEO
mode, and PORTRAIT mode. You can use POR TRAIT
6
mode to focus on your subject wi th a depth effect
65
Page 66

Number
Function
8
Capture a picture.
9
Switch between the fr ont and back cameras.
SELFIE.
Use special photo or video camer a modes:
MANUAL, PANORAMA, SUPER NIGHT, MULTI
10
EXPOSURE, SLOW EXPOSURE, TIME LAPS E, SLOW
MOTION, MONO, BEAUT Y, C OLLAGE, and WIDE
WARNING!
Keep a safe distance whe n using the flash. Do not point the
flash towards the eyes of people or animals.
NOTE:
You can spread or pinch on the screen to zoom in or o ut before
taking pictures.
3. Touch the area where yo u want the camera to focus, or leave
the camera to autofoc us on the centre of the image.
NOTE:
In PHOTO mode, when you touc h the screen to focus, the
exposure bar appears bes ide the focus point. You can drag
up or down to adjust the exposure.
4. Lightly to uch . You can also press either end of the Volume
key or touch the finger print sensor to take a photo. See Using
your fingerprint.
NOTE:
When you use the front camer a, you can also touch BEAUTY to use
BEAUTY m ode.
Recording a video
You can record normal-speed video clips. The back camera also
allows you to record slow motion or time lapse video.
1. From th e home screen, touch .
2. Touch VIDEO.
3. Aim the cam era at the subject and make any necessary
adjustments. You can touch any area on the screen th at you
want the camcorder to focus o n before and during recording.
4. Touch to star t recording. You can touch /
pause or resume recording, o r touch to save the frame as
a photo.
to
66
Page 67

5. Touch to stop recording.
NOTES:
You can pinch or spread your finger s on the screen to zoom in
or out before and during recor ding.
When you touch the screen to focus, the exposure bar appears
beside the focus point. You can drag up or down to ad just
the exposure. Touch and hold the focus point or touc h at
the top to lock the focus.
To capture slow motion or time lapse video, touch >
SLOW MOTION or TIME LAPSE. Touch to star t recording
and / to stop. In SLOW MOTION mode, you can
touch / to pause or resume recording. In
TIMELAPSE mode, you can touch to save the frame as a
photo.
Using manual camera mode
You can use MANUAL mode to adjust more camer a options for your
photo such as ISO, white balan ce, exposure, etc.
1. From th e home screen, touch .
2. Touch > MANUAL.
3. Aim the cam era at the subject and you can make the following
adjustments.
Drag the green square to any area on the screen that you
want to focus on. Touch and hold it to lock the focus.
Drag the yellow circle to any area on the sc reen where you
want the camera to meter exposure so as to adjust the
photo brightness. Touch and hold the circle to lock
exposure.
Touch the camera option icons and u se the slider to adjust
them, including shutter speed, ISO, o verall exposure, white
balance, interval for time lapse picture s, and focus.
4. Touch to take the photo.
Using other camera modes
Besides capturing photos and vide os in the traditional way, your
camera app of fers other powerful and interesting camer a modes.
Touch in the viewfinder screen to f ind them all.
MANUAL: Adjust more camer a options for your photo such as
67
Page 68

ISO, white balance, exposure, etc.
PANORAMA: Capture panorama pho tos both horizontally and
vertically.
SUPER NIGHT: Capture pictures in low-light envir onment.
MULTI EXPOSURE: Capture multiple phot os to create collages
and special effect s.
SLOW EXPOSURE: Capture water f low, star trail, or car tr ail.
TIME LAPSE: Set the time int erval between eac h frame when
you shot time lapse videos with the bac k camera.
SLOW MOTION: Capture slow motion v ideo clips.
MONO: Take a photo with only one colour visible. Touch a
colour option, and then use the ran ge slider to adjust the
colour selection to achieve the desired effect.
BEAUTY: Use auto -beauty mode or customise the personal
options to beautify faces in the p icture.
COLLAGE: Capture two photos to cr eate a collage.
WIDE SELFIE: Take a wide-angle selfie with the fr ont camera.
NOTE:
Some camera modes are only available for the back camera.
Customising camera/camcorder settings
Before capturing a photo or a vide o, you can touch to open
the following camera and camcorder setting options.
NOTE:
Some camera and video optio ns will change according to d ifferent
camera modes.
Options in photo mode
Resolution: Set the image size fo r your photo.
Active photo: Enable active photo mod e to shoot active
photos, which include a still image an d a short video clip.
Smile capture: Available for the f ront camera. When this
feature is enabled, the phone will tak e a photo
automatically when a smile face is det ected.
Point-and-shoot: Available for the f ront camera. When this
feature is enabled, you can touch the v iewfinder screen to
take a photo.
Mirror image: Available for the fro nt camera. When this
feature is enabled, the captured phot o will be saved as it
is shown in the preview.
V gesture: Available for the front cam era. When this
68
Page 69

feature is enabled, the phone will tak e a photo
automatically when you show the V ge sture.
Watermark: Apply a watermark t o your photos. You can
customise the watermark.
Metering: Adjust the metering se tting.
Histogram: Turn on or off histogr am, which can show the
brightness and darkness of the curre nt view.
Composition: Show or hide grid or golden spiral for
balanced photo composition.
Level guide: Enable or disable the level guide.
Shutter sound: Turn on or off the s hutter tone.
Location tag: Select whether to s tore the location
information in your captured photos an d videos.
Volume key control: Use the Volum e key as the shutter
button or to zoom in and out.
Fingerprint: Allow you to touch th e fingerprint sensor to
take a photo or record a video.
Camera quick launch: If this featu re is enabled, you can
quickly open the camera and take a photo when the
screen is off and locked by double-pr essing either end of
the Volume key.
Anti-banding: Set the anti-bandin g value when you take
pictures of TV or computer screens to avoid stripes on the
screen.
Save original image: Choose whet her to keep both the
original and HDR/filter versions of th e photo.
Save location: Change the storage location for captured
photos and videos when a microSD ca rd is installed.
Help: Enable the Help icon on the view finder screen and
touch the icon to view help details.
Reset settings: Restore default c amera and video settings.
Options in video mode
Video quality: Set the quality for yo ur video.
Shutter sound: Turn on or off the s hutter tone.
Location tag: Select whether to st ore the location
information in your captured photos and videos.
Fingerprint: Allow you to touch th e fingerprint sensor to
take a photo or record a video.
Anti-banding: Set the anti-bandin g value when you record
videos of TV or computer screens to av oid stripes on the
screen.
Save location: Change the storage location for captured
69
Page 70

photos and videos when a microSD ca rd is installed.
Help: Enable the Help icon on the view finder screen and
touch the icon to view help details.
Reset settings: Restore default c amera and video settings.
70
Page 71

Gallery
Opening gallery
Swipe up on the home screen and to uch Gallery to view albums of
your pictures and videos.
Working with albums
When you open Galler y, all p ictures and videos on your phone are
displayed in a number of albums. Touch PHOTOS/AL BUMS or slide
left or right to switc h between the Camera album and other albums.
To view album contents:
Touch an album to view the pictures and videos it co ntains.
To share albums, pictures, or videos:
1. Touch and hold an a lbum to select it or touch and hold a n item
after you open an album to select a picture or a video.
2. Touch more items tha t you want to share.
3. Touch and select how you want to share the items.
To delete albums, pictures, or videos:
1. Touch and hold an a lbum to select it or touch and hold an item
after you open an album to select a picture or a video.
2. Touch more items tha t you want to delete.
3. Touch > OK.
Working with pictures
Touch a picture in an album to view the picture in full screen.
71
Page 72

When viewing a picture in full screen, t he following features are
available.
Swipe horizontally to see more picture s or videos.
Pinch a picture or video to make it sm aller. You'll then see a
filmstrip-style view of all your pictures and videos in a row.
Swipe left or right to scan through them a ll.
In the filmstrip-style view, you can dele te a picture or video by
swiping it up. If you accidentally delete one, touch UNDO to
retrieve it.
In the filmstrip-style view, you can enc rypt a picture or video by
swiping it down when Privacy Space is en abled. See Privacy
Space.
Double-tap the picture, or pinch two f ingers together or spread
them apart to zoom out or in.
Touch , or to edit, share or delete the picture.
Touch to rotate, edit or print the picture, set it as wallpaper
or contact photo, check f ile details, rename the picture or video,
encrypt the picture or video when Privacy S pace is enabled, or
browse the album contents in a slide show.
If the picture is an active photo you h ave captured, touch
to play it.
NOTE:
Some options may not be available for cer tain albums or pictures.
Retouching your pictures
You can edit any phot os you took and some other picture s in Gallery.
72
Page 73

The changed picture is saved in th e same album as the original
Apply blur effects, filters, or old photo effects.
Crop, rotate, or flip (mirror) the picture.
options.
other colour effects.
mosaic effect on the picture.
image, which is not af fected.
1. Touch while viewing a picture in full screen to open th e
Photo Editor inter face.
NOTE:
You can also touch > Other edit > Photos to edit the picture
with Photos.
2. Touch an edit option alon g the bottom of the screen and edit
the picture.
Adjust exposure, contrast, sharpness, and other light
Adjust the colour of the picture with saturation, hue, and
Select a colour and draw anything, add text, or apply a
3. Touch to keep the change or touch to cancel it.
4. Touch to save the new picture.
NOTE:
Touch in the Photo Editor screen to see the edits you have
made and undo or redo them.
Making a GIF picture or a collage
You can put together a few pictures in the albums to make an
animated GIF picture or a collage of pi ctures.
1. Open the Ga llery app and touch > GIF maker or Collage
maker.
2. Touch an album.
3. Touch the pictures you n eed. You can exit the album and open
other albums to add more picture s.
To make a GIF, touch 2 to 50 pictures in the order or
reverse to the ord er that you want them to appear in the
GIF.
To make a collage, touch 2 to 9 pictures.
The pictures you touched are disp layed along the bottom.
Touch to remove the pictures you d o not need.
73
Page 74

4. Touch NEXT. The GIF or c ollage is displayed.
5. Touch the options along the bottom to adjust the final picture.
For GIF, you can adjust the speed, play order, image size,
or touch MORE to adjust each picture or rearrange the
pictures.
For collage, touch TEMPLATE, FREE, or COLLAGE and then
select a border, shading, or style.
6. When you are satisfied with the final picture, touch to
save the GIF or touch to save the collage.
The picture is saved to the picture _editor/GIF or
picture_editor/Collage folde r in your phone.
Playing videos
1. Touch an album in the ga llery and then touch the thumbnail of
a video.
2. Touch at the centre and select a player to star t playing.
Touch the video to view the playback contr ols.
74
Page 75

Music
Swipe up on the home screen and to uch Music to play audio f iles
stored on your phone. Music supp orts a wide variety of audio
formats, so it can play music you purc hase from online stores,
music you copy from your CD collectio n, and so on.
Viewing your music library
Open Music and touch All song s to view all your audio files or by
categorised lists of ar tists, albums, and genres. You can also touch
Favourites, Recently played or Folders to find songs, or view all your
playlists in the My playlists section.
NOTE:
If an audio file is being played, its nam e and player controls are
displayed at the bottom of the screen. Touch the area to open the
playback screen.
Setting a song as the default ringtone or notification
sound
The song will be used as the ringtone f or all incoming calls, except
those from contacts t o whom you have assigned special ringtones
(see Set a Ringtone for a Con tact). You can also set a song as the
notification sound.
1. Open Music and touch All songs to see your music librar y.
NOTE:
If you are in the playback screen, touc h at the top lef t of
the screen to return to the m usic library.
2. Touch next to a song in any list.
3. In the m enu that opens, touch Set as rin gtone.
4. Touch Set as rin gtone or Notification sound.
5. If pr ompted, select part of the song or full song and touch SET
AS RINGTONE or SET AS NO TIFICATION TONE.
NOTE:
If the song is being played and you’re in the playbac k screen, you
can touch > Set as ringtone.
Playing music
Touch a song in the music librar y to listen to it. Touch the bottom of
75
Page 76

Number
Function
1
Return to the music librar y.
2
Song, album, and artis t information.
3
Album artwor k.
4
Add the song to the Favourites playlis t.
5
Turn on or off shuff le.
the track.
repeat the current playlist, or turn of f repeat.
8
View the current playlist.
9
Get more options.
the screen to open the following playb ack screen.
Playback control: Skip songs o r pause and resume
6
playback. Drag the pr ogress bar to jump to any part of
Toggle repeat mode. You can repeat the current song,
7
Managing playlists
Create playlists to organis e your music files into sets of so ngs, so
that you can play the songs you like in the or der you prefer.
From any music library category, touc h > Add to next to a
song to add it to a playlist or create a new playlist.
76
Page 77

In the My playlists section, touch a playlist to view its content.
You can then touch at the top right and select to add more
songs to the playlist, rename or delet e the playlist; touch >
Remove next to the song to remove it from the playlist.
77
Page 78

Video
Use the Video app to manage your vide o library and watch videos.
Opening the video library
Swipe up on the home screen and to uch Video to view your video
library, where your video f iles are displayed in a list.
Swipe up or down to find the vi deo you want. You can also touch
> Search to search for video f iles, or touch > View or Sort to
change the display mode or sor t the list.
Playing and controlling videos
Touch a video in the video librar y to play it. Touch the screen to show
the playback controls. You can control th e video and audio or carry
out other operations.
Touch the play/pause button at the bottom to pau se or resume
the playback.
Slide horizontally on the scree n to rewind or fast forward.
Slide vertically on the ri ght or left part of the screen to adjust
volume or brightness.
Spread or pinch two finger s on the screen to zoom the video in
or out.
Touch or to skip to the previous or the next video.
Touch to change the video ratio.
Touch or to hide or show the contr ol panel.
Touch to play the video in a small floating w indow.
Touch to share, delete, rename, encrypt, or trim th e video,
check file detail s, or configure player settings.
Managing video files
Delete video clips
1. Touch and hold the video you want to delete in the video library.
2. Touch more videos that y ou want to delete.
3. Touch > OK.
Share video clips
1. Touch and hold the vide o you want to share in the video library.
2. Touch more videos that y ou want to share.
78
Page 79

3. Touch and select how you want to share th em.
79
Page 80

Voice recorder
Voice Recorder enables you to record a nd listen to voice memos.
Recording a voice memo
1. Swipe up on the home screen and touch Voice Recorde r.
2. Touch to select the audio format of the recording.
3. Touch to start recordin g. During recording, you can do the
following:
Touch / to pause or continue the recording.
Touch to add time tags to the recording.
4. Touch Done to s top recording.
5. Edit the f ile name and touch SAVE to save the recording.
If you don’t want to save the memo a fter recording it, touch
DELETE > DELETE to delete it .
Playing a voice memo
1. Touch at the top right of the screen to see all recordings.
2. Touch the title of a mem o to play it.
Editing a voice memo
You can trim a voice recording and add or remove tim e tags.
1. While playing a recording, touch to open the editing
screen.
2. Drag to trim the recording. You can touch to
preview the trimmed recordin g.
NOTE:
Touch a tag to delete it, or touc h to add a tag.
3. Touch and touch SAVE to save your chan ges and a new
file will be created.
NOTE:
Touch next to a recordin g in the list to share, delete, rename,
edit, encrypt, v iew details, or set as the default ph one ringtone or
notification ringtone.
80
Page 81

More apps
Calculator
Swipe up on the home screen and to uch Ca lculator to use the
phone’s convenient built-in calculator for some basic as well as
advanced mathematical equations.
NOTE:
Slide left while holding the phone upr ight, or hold the phone on its
side, to access advanced buttons.
Clock
Swipe up on the home screen and to uch Clock. The Clock app
allows you to check local t ime in places around the world, set
alarms, and use timers.
Set a new alarm
1. Touch the tab in the Clock app.
2. Touch an existin g alarm to configure it, or touc h at the
bottom of the screen to creat e a new alarm.
3. Set the ti me and touch OK. Then edit repeat, alarm sound,
vibration, and label.
NOTES:
To enable or disable existing alarms directly, just touc h the
switches on the right side.
Touch to set more alarm options in the Alarms section.
Check world time
Touch the tab in the Cloc k app to check local time around the
world as well as the next alarm.
Touch at the bottom to add other cities.
Use the stopwatch and timer
Touch the or tab in the Clock app to use the stopw atch or
the countdown timer.
Stopwatch allows you to reco rd lap times, while countdown allows
you to set a time and count down to zero.
81
Page 82

Downloads
The Downloads app keeps a recor d of the files you have
downloaded using apps such as Chr ome or Gmail.
Swipe up on the home screen and to uch Downloads to check the
record.
Touch a file to open it with the appr opriate applications.
Touch and hold a file to delete or share it, or get more options.
File manager
Quickly access all of your images, video s, audio clips, and other
types of files on your phone s torage, the microSD card and the
connected USB device.
Swipe up on the home screen and to uch File Manager. Touch
Category to find the file you need by category, or touch Local
storage > Phone, SD card, or General USB drive to browse folder s
and files on the phone sto rage, the microSD card, or the connected
USB device.
Touch folders and files to access stored items.
Touch and hold an item and touch to access option icon s
such as Copy, Move, Rename, or Compress.
To copy or move an item, navigate to a new location and touch
PASTE.
Touch to create a new folder in the current directory.
Touch to search for a f ile or folder by name.
Touch > Sort by to change the orde r of the items in the list.
Touch > Multi-Select to select multiple items for sharing ,
deletion, copying, moving, or compression .
Private Space
Private Space allows you to encr ypt your files, lock your apps and
manage your account passwords . To acce ss Private Space, you
need to draw a pattern, e nter a PIN, or use your registered
fingerprint.
Open Private Space for the first time
When you use Private Space for the f irst time, you need to set a new
lock pattern or PIN for Private Space.
1. Swipe up on the home screen and touch Private Space.
2. Touch SETUP PASSWORD.
3. Draw and redraw a pattern that you must draw to access
82
Page 83

Private Space, or touch Or se t PIN to set a PIN that you must
enter to access Private Space .
NOTE:
The pattern and PIN are dif ferent from the screen lock pattern
and PIN.
4. Select the sec urity question and enter your answer, and then
touch DONE.
NOTE:
If you forget the pattern or PIN you set, you can reset it by
entering the answer of the securit y question.
5. If you have re gistered a fingerprint in your phone, the phone will
prompt you to use your f ingerprint to access Private Space.
Touch OK to confirm.
Encrypt pictures/videos/files
After the pictures , videos, and files are encrypted, they can be
accessed only in Private Space.
1. Swipe up on the home screen and touch Private Space.
2. Enter the lock pattern, PIN or fingerprint you set.
3. Touch Pictures, Vide os or Files.
4. Touch to add pictures, videos, or files from your p hone
storage or the micr oSD card. You can also take pictures or
videos and encryp t them directly.
The added items will be moved in to Private Space.
NOTE:
To decrypt pictures, videos, or f iles, touch and hold an item and
touch more to select them, an d then touch > OK.
Lock apps
After an app is loc ked, you need to enter the lock pattern, PIN or
fingerprint you set before using that app.
1. Swipe up on the home screen and touch Private Space.
2. Enter the lock pattern, PIN or fingerprint you set.
3. Touch App lock.
4. Turn on the switche s beside the apps you want to lock .
NOTE:
Touch on the App lock screen and touch App loc k to turn on or
off this feature, or touch Lock mode to set when the locked apps will
be locked again af ter you finish using them.
83
Page 84

Use password book
1. Swipe up on the home screen and touch Private Space.
2. Enter the lock pattern, PIN or fingerprint you set.
3. Touch Password b ook. You can add and manage your account
description, user name and passwor d in the password book.
Set Private Space
1. Swipe up on the home screen and touch Private Space.
2. Enter the lock pattern, PIN or fingerprint you set.
3. Touch and set the following options.
Security settings:
Login type: Select pattern or PIN as the login type to
-
access Private Space and the locked app s.
Security question: Edit your secur ity question and
-
answer.
NOTE:
If you forget the lock patt ern or PIN, you can touch
Forgot password on th e screen and enter your answer
to reset the pattern or PIN.
-
Pattern settings: Set whethe r the phone vibrates or
whether the pattern is visible when yo u draw the lock
pattern.
-
Fingerprint access Private Spa ce: Set whether to use
the fingerprint you set to access Priva te Space and the
locked apps.
Private Space backup: Bac k up Private Space data. If you
forget the pattern or PIN of Private Space, you cannot
restore the data.
Private Space restore : Restore Private Space data.
Backup reminder notif ication: Set whether to be notified to
back up regularly when Private Sp ace has new data.
Google apps
Open the Google apps to use Goo gle services.
NOTE:
Some contents or Google ser vices may not be available in your
region.
Calendar: Organise yo ur time and reminds you of important
events.
Chrome: Use the Chrome a pp to browse the Internet and get
your bookmarks, brow sing history, and more synced w ith your
Google account.
84
Page 85

Docs/Sheets/Slides: Use words documents, excel sheet s, and
slideshows offered by Google for your work and projects.
Drive: Store files on Goog le servers f or free after you sign in to
your Google account. You can access them on your compu ters,
your phones and other devices, share them, or collaborate with
others.
Duo: Video chat one-on-one using W i-Fi or mobile data.
Find Device: Locate, lock , or wipe your lost device remotely.
Fit: Make it easy to store, a ccess, and manage your fitness
data and help you measure a nd achieve fitness goals.
Gmail: Send and receive emails via yo ur Gmail account or other
personal email accounts.
Google: Use Google searc h or get information when you need it
with the Google feed.
Keep: Create, share, and collabor ate notes quickly and easily.
Maps: Find your place and find your way in the world.
News & Weather: View weath er forecasts and news stories
about common topics. You can also customise the news topics
that are displayed.
Newsstand: Purc hase and read newspapers and magazines.
Photos: Manage photos on th e phone and your Google
account.
Play Books: Read eBooks downloaded from the Google Play
Store. You can read books online or mark them for a vailability
offline, so you can read them when you don't have an Int ernet
connection.
Play Games: Buy and play games from the Google Play Store.
Share your gaming experience and pro gress with your friends.
Play Movies & T V: Pu rchase, download and watch the latest
and your favourite movies and T V shows.
Play Music: Play music on the phone and on your Google
account.
Play Store: Buy and download apps, games , and other content
from the Google Play Store.
Translate: Type, speak or point the camera a t text to translate
with Google Translate.
YouTube: Watch video clips from YouTube.com, or upload your
own and share with the world.
85
Page 86

Settings
Swipe up on the home screen and to uch Settings. The Settings app
contains most of the t ools for customising and configuring your
phone.
At the top of the Settings screen , you can see setting suggestions.
Touch to check the recommended se ttings.
Network & Internet
Wi-Fi
Open Settings and touch Netw ork & Internet > Wi-Fi. You can turn
Wi-Fi on or off and con figure your Wi-Fi connections. See
Connecting to Wi-Fi (WLAN).
When Wi-Fi is on, touch Wi-Fi pref erences > Wi-Fi Direct in the Wi-Fi
menu to share data betw een two devices via Wi-Fi directly. See
Using Wi-Fi Direct®.
Mobile network
Open Settings and touch Netw ork & Internet > Mobile network to
control mobile data r oaming, set network type, set access point
names and select mobile networ k. See Connecting to mobile
networks.
Data usage
Open Settings and touch Netw ork & Internet > Data usage to check
and manage mobile data use. You can vie w and restrict Wi-Fi data
usage as well.
Touch Data Saver to enable Dat a Saver which prevents apps
from using data conn ection in the background. For an app
you’re currently using, it can access da ta, but may do so less
frequently when Data Saver is enabled. You can also touch
Unrestricted data and allow some apps to always have access
to data connection even w hen Data Saver is turned on.
Touch the Mobile data switch to tu rn on or off mobile data.
Touch Mobile data usage to c heck how much data has be en
used during the time cycle you set, se e what apps have been
using mobile data, restrict background data for individua l apps,
or allow unrestricted data u sage when Data Saver is on for
individual apps.
Touch Billing cycle to set the reset date o f the data usage cycle,
and set mobile data warn ing and limit.
Touch Wi-Fi data usage to view th e Wi-Fi usage of apps.
86
Page 87

Touch Network restrictions to select Wi-Fi networks that are
metered. Apps may warn before usin g these networks for large
downloads to avoid high mobile d ata bills.
NOTE:
The data usage is measured by you r phone, and your carrier’s data
usage accounting may dif fer.
Hotspot & tethering
Open Settings and touch Netw ork & Internet > Hotspot & tethering
to share your phone’s mobile dat a connection with PCs or other
devices via USB, Bluetooth or Wi- Fi. See Sharing your mobile data
connection.
VPN
Open Settings and touch Netw ork & Internet > VPN to set up and
connect to virtual p rivate networks. See Connecting to virtual
private networks.
Flight mode
Open Settings and touch Netw ork & Internet > Flight mode to turn
flight mode on or of f. All the phone’s radios that transmit voice or
data are turned of f when flight mode is on.
Call settings
Open Settings and touch Netw ork & Internet > Call settings to
configure calling options. See Adjusting your call settings.
Connected devices
Bluetooth
Open Settings and touch Conn ected devices > Bluetooth. You can
turn Bluetooth on or of f and configure your Bluetooth connections.
See Connecting to Bluetooth d evices.
Cast
Open Settings and touch Conn ected devices > Cast. Touch and
check Enable wireless disp lay. Connect with TVs, pr ojectors or other
devices that suppor t wireless display and project your phone’s
content wirelessly to that dev ice. You need to turn on Wi-Fi first. For
detailed introduct ion, please refer to the device manual.
NFC and Android beam
Open Settings and touch Conn ected devices. You can switch on NFC
to exchange data with another NFC-enabled device when they touc h
each other or in close prox imity. Touch Android Beam and turn it on
87
Page 88

if you want to share web pages, cont act information, YouTube videos
or other content on your phone t o another NFC-capable device. See
Exchanging data via NFC.
Printing
Open Settings and touch Conn ected devices > Printing to use the
default printing ser vice or other printer plug-ins installed from the
Google Play Store or your printer manufa cturer.
USB
Open Settings and touch Conn ected devices > USB. You can select
the USB connection mode between yo ur phone and PC after you
connect your phone to a compute r with a USB cable. See
Connecting to your computer via U SB.
Apps & notifications
App info
Open Settings and touch Apps & notifications to see recently
opened apps or all apps insta lled on your phone and manage them.
Touch an app to see its information. The follo wing options may be
available:
FORCE STOP: Stop the app.
UNINSTALL: Uninstall the app.
DISABLE/ENABLE: Disable or enable the app.
App notifications: Cus tomise the notification options for the
app.
Permissions: Check or change the app permissions.
Storage: Check its sto rage information, clear its data or cache.
Data usage: Check how muc h data has been used by the app
during the time cycle you set and res trict background data for
the app.
Battery : Check the battery u se details of the app since last full
charge and optimise batter y use.
Open by default: Check the app’s supported l inks and set
whether to open the links in the ap p, and clear the app’s
defaults.
Display over other apps: Allow the ap p to display on top of
other apps that you’re using.
Modify system setting s: Allow the app to modify system
settings.
Picture-in-picture: Allow the app to create a picture-in-picture
88
Page 89

window while the app is open or af ter you leave it (for example,
to continue watching a video) .
NOTE:
Not all options are available for the a pps. Some apps may have
more options.
Notifications
Open Settings and touch Apps & notifications > Notifications to
manage app notifications .
App notifications: Touch an app and cus tomise its notifications.
You can block or mute app notifications, select its notification
content to be displayed on the loc k screen, let its notifications
override your Do No Disturb settin gs, etc. The notification
options vary accor ding to the apps.
On the lock screen: Select the notification content to be
displayed on the lock screen.
Allow notification dots: Choose to show or hide the dot on the
app icons. Some apps may show a dot w hen they receive
notifications.
Default notification so und: Set the default notification sound.
Simple notifications
This feature allows you to gr oup similar notifications from different
apps together, so you can quickly and ea sily see them at a glance.
Open Settings and touch Apps & notifications > Simple
notifications to set the following options.
Simple notifications: Turn on or of f simple notifications.
Reminder: Afte r the simple notifications feature is enabled, you
can set whether to show a re minder for missed calls or
messages when you unlock the phone.
Notification group s: Check or uncheck the notification groups
as you need. The notification gr oups not selected will appear in
the “Other notifications” gr oup on the notification panel when
the simple notifications feature is enabled.
App permissions
Open Settings and touch Apps & notifications > App permissions to
check what apps have been all owed to access cert ain permissions.
You can also change the app permissions.
WARNING!
Changing the app permissions may result in the app not working
89
Page 90

correctly or as originally intended.
Default apps
Open Settings and touch Apps & notifications > Default apps to set
the following options.
Assist & voice input: Sele ct the default app for voice assistant
and input, and set the app’s relate d options.
Browser app/Home a pp/Phone app/SMS app/Tap & pay:
Select the default app for web br owsing, the launcher, phone
calling, messaging and tap & pay.
Opening links: Set Inst ant apps options, or touch an installed
app to check its suppor ted links and set whether to open the
links in the app, and clear the app’s d efaults.
Emergency alerts
Open Settings and touch Apps & notifications > Emergency alerts
to configure the emer gency broadcast notifications.
Special app access
Open Settings and touch Apps & notifications > Special app access
to set special access options of ap ps.
Features
Open Settings and touch Feat ures. The following features are
available.
Navigation keys: Swap the positions o f and . You can
also hide the navigation keys. Just switch off Always show the
navigation keys and touch on the navigation bar. To
display the navigation keys again, swipe u p from the bottom of
the screen.
Scheduled power On/Of f: Set the day and time when the phone
automatically powers o n or off. You can also touch the switches
on the right to turn the features on or off.
Gesture & motion: You can control th e phone with special
finger gestures or moving t he phone in different ways. Touch
the switches to enable eac h function; touch each function t o
view how to use it or tr y it out.
NOTE:
The use of phone cover/case may sto p certain functions from
working.
Smart cover. Turn on the switc h to enable the Smart cover
feature. When you put the phone in a n optional case, you can
open or close the case cover to turn o n or off the screen
display.
90
Page 91

NOTE:
The case is sold separately.
Battery
Open Settings and touch Batte ry to view the battery lev el, check
what has been using the batter y, enable different battery saving
modes, reduce screen resolution or m anually optimise apps to
improve batter y life, or show or hide battery percentage i n the
status bar.
Display
Open Settings and touch Disp lay to configure the following options.
Favourite app panel: When this fe ature is enabled, you can
swipe right on the leftm ost home screen to open the favourite
app you set.
Favourite home screen app: Sele ct the app opened when
swiping right on the lef tmost home screen.
Lock home screen layout: When the home screen layout is
locked, you cannot make any change s to your home screen.
Lock screen shor tcuts: Show shortcut icons on the lock screen.
You can swipe from a shortcut icon at the bottom of the lock
screen to open the related app or feature.
Edit lock screen shor tcuts: Set the lock screen layout, touch a
lock screen shortc ut to change or remove it, or touch Add
shortcut to add one.
Brightness level: Set the brigh tness of the display.
Night Light: Enable Night Light to tint the screen amber for eye
care, or set a schedule when Nigh t Light will be turned on. See
Using night light.
Dark mode: Enable or disable the dark theme for the phone
system.
Network operat or name: Touch the switch to hide or disp lay the
network operator name on the status bar.
Adaptive brightness: Automat ically adjust screen brightness.
Full screen apps: Switch on the apps y ou want to use in full
screen. When you launch the app s, they will automatically fit to
full screen.
Wallpaper: Select a backgr ound image or animation for the
home screen and the lock screen .
Sleep: Set the length of time of in activity before the screen
turns off automat ically.
91
Page 92

Double tap to wake: Double -tap on the screen to turn it on
when the phone is in sleep mode.
Auto-rotate scr een: Select whether the screen contents should
rotate when the p hone is rotated.
Font size: Set the font size of the text on the screen.
Display size: Adjust the display size of it ems including fonts,
icons and images on the screen.
Screen saver: Manage the screen saver function. When it is
enabled, clock, photos or an imations will be displayed as a
screensaver.
Ambient display: Set whe ther the screen will be woken up when
you receive notifications.
Pulse notification light : Flash the indicator light to notify you of
charging, low batter y, or new notification.
Sound
Open Settings and touch Soun d. You can adjust different types of
volume (see Adjusting volume), se t Do not disturb options (see
Using do not disturb mode), show or hide silent mode mute switch
on the lock screen (see Adding a mute switch on the lock screen),
set up ringtone, notification and alarm sound (see Changing
ringtone, notification and a larm sound), set other sounds and
vibration (see Turning on/off o ther sounds and vibration) , and se t
emergency aler ts.
Storage
Open Settings and touch Stor age to view the memory information of
the internal phone stor age and the microSD card.
Touch Internal shared storag e to get a detailed breakdown of space
usage by type. Touch a data type to see more i nformation or delete
the files you do not need, or to uch Files to view and manage all files
in the storage.
For information about removing or fo rmatting the microSD card, see
Removing or Erasing the micr oSD card.
When you connect a USB stor age device (such as a USB flash) to
your phone with an OTG adapter cable , you can view its storage
status, unmount it, or erase all data on it. See Using U SB
On-The-Go (OTG).
Security & location
Open Settings and touch Secu rity & location to configure options
that help keep your phone and dat a safe, and manage location
92
Page 93

services, which h elp your phone and apps determine your location.
Google Play Protect: Google Play Protect regularly checks your
apps and phone for harmful behaviour and warns you about
any detected potential harm. Switch on Scan device for
security threats to enable this feature. To s end unknown apps
to Google for better detect ion, switch on Improve harmful app
detection.
Find My Device: Use Find My Device to locate, lock, or wipe
your lost device remotely. The lost dev ice must be signed in to a
Google account.
Security update: Check for security update of your system.
Screen lock: Disable the screen loc k or enable it with swipe,
pattern, PIN, or password. See Protecting your phone with
screen locks.
Touch beside Screen lock to set the foll owing options.
Make pattern visible: Show the p attern as you draw it. This
option is available when unlock patte rn is set.
Automatically lock: Set the time ne eded for the lock
protection to be activated after the s creen turns off. This
option is available when unlock patte rn, PIN or password is
set.
Power button instantly locks: Lock protection is activated
immediately when you press the Powe r key. This option is
available when unlock pattern, PIN or pass word is set.
Lock screen message: Set the tex t to be displayed on the
lock screen.
Lock screen preferences: Set the lock screen preferences.
Fingerprint: Set u p to 5 fingerprints and enable them to unlock
the phone or access Private Space. En able the touch-control
functions of the finger print sensor. See Using your fingerprint .
Smart Loc k: Keep the phone unlocked when connected to
trusted devices, in trusted places, or unlocked by trusted faces
or voice, or unlocked when your phon e is being carried on the
body.
NOTE:
You need to sign in to your Google account on the pho ne to use
all the Smart Loc k features.
Location: Manage location ser vices, which help your phone
and apps determine your location . To use location-related
applications, such as find ing your location on Google Maps,
you must have location ser vices enabled on your phone.
Mode: Select location sources you wan t to use. To get your
93
Page 94

accurate location, choose High accura cy. To save battery
power and get approximate location, choose Battery saving.
To use only GPS to pinpoint your locat ion, choose Device
only.
App-level permissions: Set wh ich apps can access the
location permission.
Scanning: Set whether to improv e location by allowing
system apps and services to detect W i-Fi networks or
Bluetooth devices at any time.
Google Location History/Google Lo cation Sharing:
Configure Google Location options (Go ogle account
required).
Show passwords: Display pas swords as you enter them.
Device admin apps: View or deactivate apps you have
authorised to be device adminis trators.
SIM card lock:
Lock SIM card: Activat e or deactivate the PIN lock to
require PIN before accessing the nano-SIM card.
Change SIM PIN: Change the PIN used to access the
nano-SIM card.
NOTE:
Put all your confidential passwor ds in a safe place for future
use. If you enter the wrong SIM PIN more times than allowed,
your nano-SIM card will be loc ked and you cannot access the
mobile phone network . Contact your operator for a PIN Unlock
Key (PUK) to restore the nano -SIM card.
Encryption & cr edentials:
Encrypt phone : Your phone i s already encrypted.
Storage type: Check t he credential storage type.
Trusted credentials: Display trusted C A certificates.
User credentials: View and modify stored credentials.
Install from s torage: Install certificates fr om the internal
storage or the micr oSD card.
Clear credentials: Delete all ce rtificates.
Trust agents: View or deactivate trust ag ents.
Screen pinning: Keep a screen of your choice in view, so that
others cannot switch t o other apps and access your personal
information. Touch this option to see how it wor ks. See
Protecting your phone with scr een pinning.
Apps with usage access: Turn on or of f some apps’ access to
your phone usage information.
94
Page 95

Accounts
Users
Open Settings and touch Acco unts > Users to manage the user
accounts of your phone.
You can share your phone with other people by creating addit ional
user accounts. Each user with a s eparate account has his/her own
storage space, wallpaper, screen lock a nd so on. Users can also
adjust phone settings like Wi-Fi th at affect everyone and update
apps for all other users.
By default, a Guest account is avail able for anyone who needs to
use your phone temporar ily. You can touch Add user to create more
user accounts.
If you want to add users w hen the phone is locked, switch on Add
users from loc k screen in the Accounts screen. You can then open
the Quick Settings panel fr om the lock screen and touch > Add
user to create new user accounts.
NOTES:
Touch next to an account to configu re its options.
When a guest user has fini shed using your phone, he/she can
touch Remove guest in the User s menu to delete all his/her
data from your phone.
Accounts for owner
Open Settings and touch Acco unts. In the Accounts for Owner
section, you can manage your web accou nts and synchronisation.
Touch Add account to sign in to or create accounts on your phone.
Touch an account to configure account sy nc and adjust the account
settings. See Web accounts.
You can touch Emergency inform ation in the Accounts screen to
enter your emergency info rmation and contacts. The info rmation
you enter can help the fir st-response team in an emergency. Anyone
can read it from the emer gency dialler without unlocking your
phone.
You can also activate Emergency mode in an emer gency. See Using
emergency mode.
Accessibility
Open Settings and touch Acce ssibility to configure accessibility
plug-ins and servic es on your phone, such as using Colour inversion
or Display size for users w ith sight problems.
You can also switch on Glove mode to get bet ter screen responses
even when you’re wearing gloves.
95
Page 96

Google
Open Settings and touch Goog le to easily manage settings for
Google apps and features. You can set the options for Google
account and servic es.
System
Languages & input
Open Settings and touch Sys tem > Languages & input to configure
options related to sys tem language, input methods, speech input
and output as well as mouse/tra ckpad input.
Languages: Select a language for your system.
Virtual keyboar d: Configure text input settings. See Entering
text.
Physical keyboard: Set rela ted options when a physical
keyboard is connected to yo ur phone.
Spell checker: Use Go ogle Spell Checker to check for spelling
errors when enterin g text.
Auto-fill ser vice: Enable or disable Auto-fill with Google. To use
the Auto-fill ser vice, you need to sign in to your Google
account.
Personal dictionar y: Add new words to the phone’s dictionar y
or remove words from the d ictionary. The words you add are
used for spelling check and wo rd suggestion.
Pointer speed: Select how fas t the pointer/mouse should scroll
when you connect the phone to a tr ackpad or mouse accessory.
Text-to-speech output: Select the speec h synthesis engine or
change its settings, select the lang uage for text-to-speech
output, set speech rat e and pitch, and play a brief sample of
the speech synthesizer.
Date & time
Open Settings and touch Sys tem > Date & time to set date, time,
time zone, and the time format. You can also use net work-provided
data.
Backup
Open Settings and touch Sys tem > Backup to manage data backup
options. You can back up app data, call his tory, device settings
including Wi-Fi passwords, an d other data to Google servers af ter
you sign in to your Google account.
96
Page 97

Reset options
Open Settings and touch Sys tem > Reset options to reset the
network setting, app pref erences or the phone to factory status.
Reset Wi-Fi, mobile & Bluetoot h: Reset all network settings
including Wi-Fi, mobile data a nd Bluetooth.
Reset app preferences: Reset app pre ferences. No app data
will be deleted.
Erase all data (fact ory reset): Reset your phone to factor y
default settings. You can also choose to er ase all your data in
the internal storage or the microSD card.
Device rating & feedback
Open Settings and touch Sys tem > Device rating & feedback to rat e
your device and send the feedbac k.
About phone
Open Settings and touch Sys tem > About phone to view import ant
phone information and legal inform ation.
Software updates
Open Settings and touch Sof tware updates to check for system
updates and install them w hen they become available.
97
Page 98

Problem
Possible causes
Possible solution
effectively reach it .
to handle additional calls).
time.
provider.
phone line.
phone line.
Troubleshooting
If you encounter problems whil e using the phone, or if it performs
abnormally, you can refer to the char t below. If your particular
problem cannot be resolved u sing the information in the char t,
contact the dealer where you pur chased the phone.
The network signal is too
weak at your current
location, for example, in a
basement or near a tall
building, because wireless
transmissions cannot
Move to a location
where the network
signal can be
properly received.
Poor reception
Echo or noise
The network is busy at the
current time (for example,
during peak times, there may
be too much network t raffic
You are too far away from a
base station for your ser vice
provider.
The network link quality is
poor on the part o f your
service prov ider.
The quality of the phone line
that you are calling is poor.
Avoid using the
phone at such
times, or try again
after waiting a sh ort
You can request a
service area m ap
from your ser vice
End the call and
dial again. You may
be switched to a
better-quality
network link or
End the call and
dial again. You may
be switched to a
better-quality
network link or
98
Page 99

Problem
Possible causes
Possible solution
features.
charger is damaged.
temperature.
made.
standby time.
will be shortened.
Unable to
select cert ain
features
Cannot charge
the battery
Shortened
standby time
Your service provider does
not support these f eatures,
or you have not applied for
services that pr ovide these
The battery or batt ery
The phone’s temperature is
below 0 °C or higher than
45 °C.
The contact between the
charging jack and char ger is
poor.
The standby time is related
to your service pr ovider
system configur ation. The
same phone used with
different ser vice providers’
systems will not provid e
exactly the same length of
The battery is d epleted. In
high temperature
environments, batter y life
Contact your ser vice
provider.
Contact the dealer.
Adjust the batter y
charging
environment to
avoid extremes of
Check all
connectors to
ensure that all
connections have
been properly
If you are located in
an area where
signalling is weak,
temporarily power
off the phone.
Contact the dealer
to change a new
battery.
99
Page 100

Problem
Possible causes
Possible solution
shorten st andby time.
your phone on
depleted.
phone’s batter y.
inserted impr operly.
card properly.
contacts.
provider for testing.
provider.
service prov ider.
window.
incoming calls
calls.
calls.
If you are not able to connect
to the network, the phone
will continue to send out
signals as it attempts to
locate a base station. Doing
so consumes batter y power
and will consequently
Change your
location to one
where the network
is accessible, or
temporarily turn of f
your phone.
Cannot turn
nano-SIM
card error
Unable to
connect to the
network
Cannot
answer
Cannot make
outgoing calls
Battery power has b een
The nano-SIM card is
There is debris on the
nano-SIM card contac ts.
The nano-SIM card is
malfunctioning or damaged.
The nano-SIM card is invalid.
You are not within the
network’s ser vice area.
The signal is poor.
You have activated the Call
barring feature.
You have activated the Call
barring feature.
Recharge the
Insert the nano-SI M
Use a soft, dr y cloth
to clean the
nano-SIM card
Take the nano-SIM
card to your ser vice
Contact your ser vice
Check the ser vice
area with your
Move to an open
space, or if you are
inside a building,
move closer to a
Disable this feature.
See Bar certain
Disable this feature.
See Bar certain
100
 Loading...