


Vodafone 1231+
User Guide

2
Product Safety Information
Read the Safety Information section of
this user guide on page 2
Do not use hand-held while driving
For body-worn operation maintain a
separation of 15 mm
Small parts may cause a choking
hazard
This device may produce a loud
sound
Keep away from pacemakers and
other personal medical devices
Switch off when instructed in hospital
and medical facilities
Switch off when instructed in aircrafts
and airports
Switch off in explosive environments
Do not use while re-fuelling
This device may produce a bright or
flashing light
Do not dispose of it in a fire
Avoid any contact with magnetic media
Avoid Extreme Temperatures
Avoid any contact with liquid, keep it dry
Do not attempt to disassemble
Do not rely on this device for
emergency communications
Only use approved accessories

3
FCC COMPLIANCE STATEMENT
This device complies with part 15, part 22 and part 24 of the FCC rules. Operation is subject to the
following two conditions:
(1) this device may not cause harmful interference
(2) this device must accept any interference, including interference that may cause undesired
operation.
This equipment has been tested and found to comply with the limits for a Class B digital device,
pursuant to Part 15 of the FCC Rules. These limits are designed to provide reasonable protection
against harmful interference in a residential installation. This equipment generates uses and can
radiate radio frequency energy and, if not installed and used in accordance with the instructions,
may cause harmful interference to radio communications. However, there is no guarantee that
interference will not occur in a particular installation. If this equipment does cause harmful
interference to radio or television reception, which can be determined by turning the equipment off
and on, the user is encouraged to try to correct the interference by one or more of the following
measures:
- Reorient or relocate the receiving antenna.
- Increase the separation between the equipment and receiver.
- Connect the equipment into an outlet on a circuit different from that to which the receiver is
connected.
Consult the dealer or an experienced radio/TV technician for help.
Warning

4
Changes or modifications made to this equipment not expressly approved by ZTE for compliance
could void the user's authority to operate the equipment.
Health and safety information
The phone with internal antenna has been tested for compliance with FCC RF Exposure (SAR)
limits and is complied with FCC RF exposure compliance
requirements.
Exposure to radio frequency energy
Radio wave exposure and Specific Absorption Rate (SAR) information The handset is designed to
comply with safely, requirements for exposure to radio waves. This requirement is based on
scientific guidelines that include safety margins designed to assure the safety of all persons,
regardless of age and health.
The radio wave exposure guidelines employ a unit of measurement known as the Specific
Absorption Rate, or SAR. Tests for SAR are conducted using a standardized method with the
phone transmitting at its highest certified power level in all used frequency bands. While there may
be differences between the SAR levels of various ZTE phone models, they are all designed to
meet the relevant guidelines for exposure to radio waves.
The SAR limit recommended is 1.6W/kg averaged over one(1) gram of tissue. The highest SAR
value for this device when tested at the ear was 0.9 W/kg*, and when tested at the body it was
1.38 W/kg SAR compliance for body worn operations is restricted to belt-clips, holsters, or similar
accessories that have no metallic component in the assembly and which provide at least 1.5 cm
separation between the device, including its antenna, and the users body.

5
Distraction
Driving
Full attention should be given to driving at all times in order to reduce the risk of an accident. Using
a phone while driving (even with a hand free kit) causes distraction and can lead to an accident.
You must comply with local laws and regulations restricting the use of wireless devices while
driving.
Operating Machinery
Full attention must be given to operating the machinery in order to reduce the risk of an
accident.
Product Handling
General Statement on Handling and Use
You alone are responsible for how you use your phone and any consequences of its use.
You must always switch off your phone wherever the use of a phone is prohibited. Use of your
phone is subject to safety measures designed to protect users and their environment.
• Always treat your phone and its accessories with care and keep it in a clean and dust-free
place.
• Do not expose your phone or its accessories to open flames or lit tobacco products.
• Do not expose your phone or its accessories to liquid, moisture or high humidity.

6
• Do not drop, throw or try to bend your phone or its accessories.
• Do not use harsh chemicals, cleaning solvents, or aerosols to clean the device or its
accessories.
• Do not paint your phone or its accessories.
• Do not attempt to disassemble your phone or its accessories, only authorized personnel must
do so.
• Do not expose your phone or its accessories to extreme temperatures, minimum - [5] and
maximum + [50] degree Celsius.
• Please check local regulations for disposal of electronic products.
• Do not carry your phone in your back pocket as it could break when you sit down.
Small Children
Do not leave your phone and its accessories within the reach of small children or allow them to play
with it.
They could hurt themselves or others, or could accidentally damage the phone.
Your phone contains small parts with sharp edges that may cause an injury or which could
become detached and create a choking hazard.
Demagnetization
To avoid the risk of demagnetization, do not allow electronic devices or magnetic close to your
phone for a long time.
Electrostatic discharge (ESD)
Do not touch the SIM card’s metal connectors.

7
Antenna
Do not touch the antenna unnecessarily.
Normal Use Position
When placing or receiving a phone call, hold your phone to your ear, with the bottom towards you
mouth or as you would a fixed line phone

8
Air Bags
Do not place a phone in the area over an air bag or in the air bag deployment area.
Store the phone safely before driving your vehicle.
Seizures/ Blackouts
This phone is capable of producing bright flashing lights.
Repetitive Motion Injuries
• To minimize the risk of RSI, when texting or playing games with your phone:
• Do not grip the phone too tightly.
• Press the buttons lightly.
• Make use of the special features in the handset which minimize the number of the buttons which
have to be pressed, such as message templates and predictive text.
• Take lots of breaks to stretch and relax.
Emergency Calls
This phone, like any wireless phone, operates using radio signals, which cannot guarantee
connection in all conditions. Therefore, you must never rely solely on any wireless phone for
emergency communications.
Loud Noise
This phone is capable of producing loud noise which may damage your hearing.

9
Bright Light
The phone is capable of producing flash of light or use as a torch, do not use it too close to the
eyes.
Phone Heating
Your phone may become warm during charging and during normal use.
Electrical Safety
Accessories
Use only approved accessories.
Do not connect with incompatible products or accessories.
Take care not to touch or allow metal objects, such as coins o r key rings , to contact or
short-circuit in the battery terminals.
Connection to a Car
Seek professional advice when connecting a phone interface to the vehicle electrical system.
Faulty and Damaged Products
Do not attempt to disassemble the phone or its accessory.
Only qualified personnel must service or repair the phone or its accessory.
If your phone or its accessory has been submerged in water, punctured, or subjected to a
severe fall, do not use it until you have taken it to be checked at an authorized service centre.

10
Interface
General Statement on Interface
Care must be taken when using the phone in close proximity to personal medical devices, such as
pacemakers and hearing aids.
I
Pacemakers
Pacemaker manufacturers recommend that a minimum distance of 15 cm be maintained
between a mobile phone and a pacemaker to avoid potential phone interference with the
pacemaker. To achieve this use the phone on the opposite ear to your pacemaker and do not
carry it in a breast pocket.
Hearing Aids
People with hearing aids or other cochlear implants may experience interfering noises when using
wireless devices or when one is nearby.
The level of the interference will depend on the type of hearing device and the distance from
the interference source, increasing the sepa ratio n between the m may reduce th e interference.
You may also consult your hearing aid manufacturer to discuss alternatives.
Medical Devices
Please consult your doctor and the device manufacturer to determine if operation of your phone
may interfere with the operation pf your media device.

11
Hospitals
Switch off your wireless device when requested to do so in hospital, clinics or health care
facilities. These requests are designed to prevent possible interference with sensitive medical
equipment.
Aircraft
Switch off your wireless device whenever you are instructed to do so by airport or airline staff.
Consult the airline staff about the use of wireless devices on board the aircraft, if your device
offers a ‘flight mode’ this must be enabled prior to boarding an aircraft.
Interference in Cars
Please note that because of possible interference to electronic equipment, some vehicle
manufacturers forbid the use of mobile phones in their vehicles unless a hands free kit with an
external antenna is included in the installation.
Explosive Environments
Petrol Stations and Explosive Atmospheres
In locations with potentially explosive atmospheres, obey all posted signs to turn off wireless device
such as your phone or other radio equipment.
Areas with potentially explosive atmospheres include fuelling areas, below decks on boats, fuel or
chemical transfer or storage facilities, areas where the air contains chemicals or particles,
such as grain, dust, or metal powders.

12
Blasting Caps and Areas
Turn off your mobile phone or wireless device when in a blasting area or in areas posted turn off
“two-way radios” or “electronic devices” to avoid interfering with blasting operations.

13
About Your Vodafone 1231+
The mobile device Vodafone 1231+ described in this guide is approved for use on the GSM
900/1800/1900 network. If you need more information about GSM networks get in touch with
Vodafone customer care or visit www.vodafone.com
Your Vodafone service number is +xx xxx xxxx.
When using the features in this device, obey all laws, respect the privacy and legitimate rights of
others, including copyrights.
Copyright protections may prevent some images, music (including ringing tones), and other content
from being copied, modified, transferred, or forwarded.
Your Vodafone 1231+ supports internet connections and Bluetooth™. Like computers, your device
may be exposed to viruses, malicious me ssages and applications, and other harmful content.
Exercise caution and open messages, accept conne ctivity reques ts, down load content and
accept installations only from trustworthy sources. To increase the security of your device, you can
consider installing appropriate antivirus software with a regular update service and usi ng a firewall
application.
Warning: To use any features including alarm clock in this device, the Vodafone 1231+ must be
switched on. Do not switch the device on when your mobile device use may cause
interference or danger.

14
Network Services
To use the phone you must have a service agreement with Vodafone. Some of the features may
require special networksupport and service provisioning. Contact Vodafone customer care for any
guidance.
This device supports WAP 2.0 protocols (HTTP and SSL) that run on TCP/IP protocols. Some
features of this device, such as e-mail, browsing, multimedia messages and content downloading,
require network support and service provisioning for these technologies.

15
Contents
1 Getting Started................................................................................................................18
1.1 Starting Up........................................................................................................................18
1.2 Your Phone.......................................................................................................................23
1.3 Home Screen....................................................................................................................27
1.4 Input Methods...................................................................................................................31
1.5 Basic Operations..............................................................................................................33
1.6 Function and Feature Preview.........................................................................................35
2 Using the Phone..............................................................................................................39
2.1 Starting the Phone Function.............................................................................................39
2.2 Making a Call....................................................................................................................40
2.3 Answering Incoming Calls................................................................................................42
2.4 In-Call Options..................................................................................................................43
2.5 Dialing up Voicemail.........................................................................................................45
2.6 Using Speed Dial..............................................................................................................45
2.7 Using SIM Card Services (STK).......................................................................................46
3 Messaging........................................................................................................................47
3.1 Messages .........................................................................................................................47
3.2 Outlook E-mail..................................................................................................................53
3.3 Vodafone E-mail...............................................................................................................56

16
4 Personal Information......................................................................................................58
4.1 Contacts............................................................................................................................58
4.2 Calendar...........................................................................................................................62
4.3 Tasks.................................................................................................................................65
4.4 Voice Notes ......................................................................................................................66
4.5 SIM Manager....................................................................................................................68
5 Settings............................................................................................................................69
5.1 General Settings...............................................................................................................69
5.2 Function Settings..............................................................................................................73
5.3 Management.....................................................................................................................75
6 Experiencing Multimedia................................................................................................79
6.1 Camera.............................................................................................................................79
6.2 Managing Pictures and Video Files..................................................................................82
6.3 Windows Media Player Mobile.........................................................................................84
6.4 Java Applications..............................................................................................................88
7 Getting Connected..........................................................................................................91
7.1 Connecting to the Internet................................................................................................91
7.2 Internet Explorer Mobile...................................................................................................93
7.3 Internet Sharing................................................................................................................96
7.4 Bluetooth ..........................................................................................................................97
7.5 Windows Live ™.............................................................................................................100
7.6 Windows Live Messenger ..............................................................................................101

17
7.7 GPS................................................................................................................................106
8 More Applications.........................................................................................................108
8.1 File Explorer ...................................................................................................................108
8.2 Microsoft® Office Mobile..................................................................................................109
8.3 Microsoft® Office Word® Mobile......................................................................................110
8.4 Microsoft® Office Excel® Mobile......................................................................................113
8.5 Microsoft® Office PowerPoint® Mobile............................................................................117
9 Synchronization............................................................................................................120
9.1 Installing ActiveSync.......................................................................................................120
9.2 Choosing Your Synchronization Type............................................................................121
9.3 Using ActiveSync tools...................................................................................................122
9.4 Using SyncML ................................................................................................................124
10 Specifications................................................................................................................125
11 Troubleshooting............................................................................................................126
12 Attachments ..................................................................................................................127
18
1 Getting Started
1.1 Starting Up
Install the SIM Card and Battery
1. Hold your SIM card with the cut corner oriented as shown below and then insert it into the
card holder properly. See Figure 1.
2. Insert the battery by aligning the gold contacts on the battery with the gold contacts in the
battery compartment on the phone. Push down the battery until it clicks into place. See Figure
2.
3. Replace the battery cover and press it gently until you hear a click. See Figure 3.
Figure 1 Figure 2 Figure 3

19
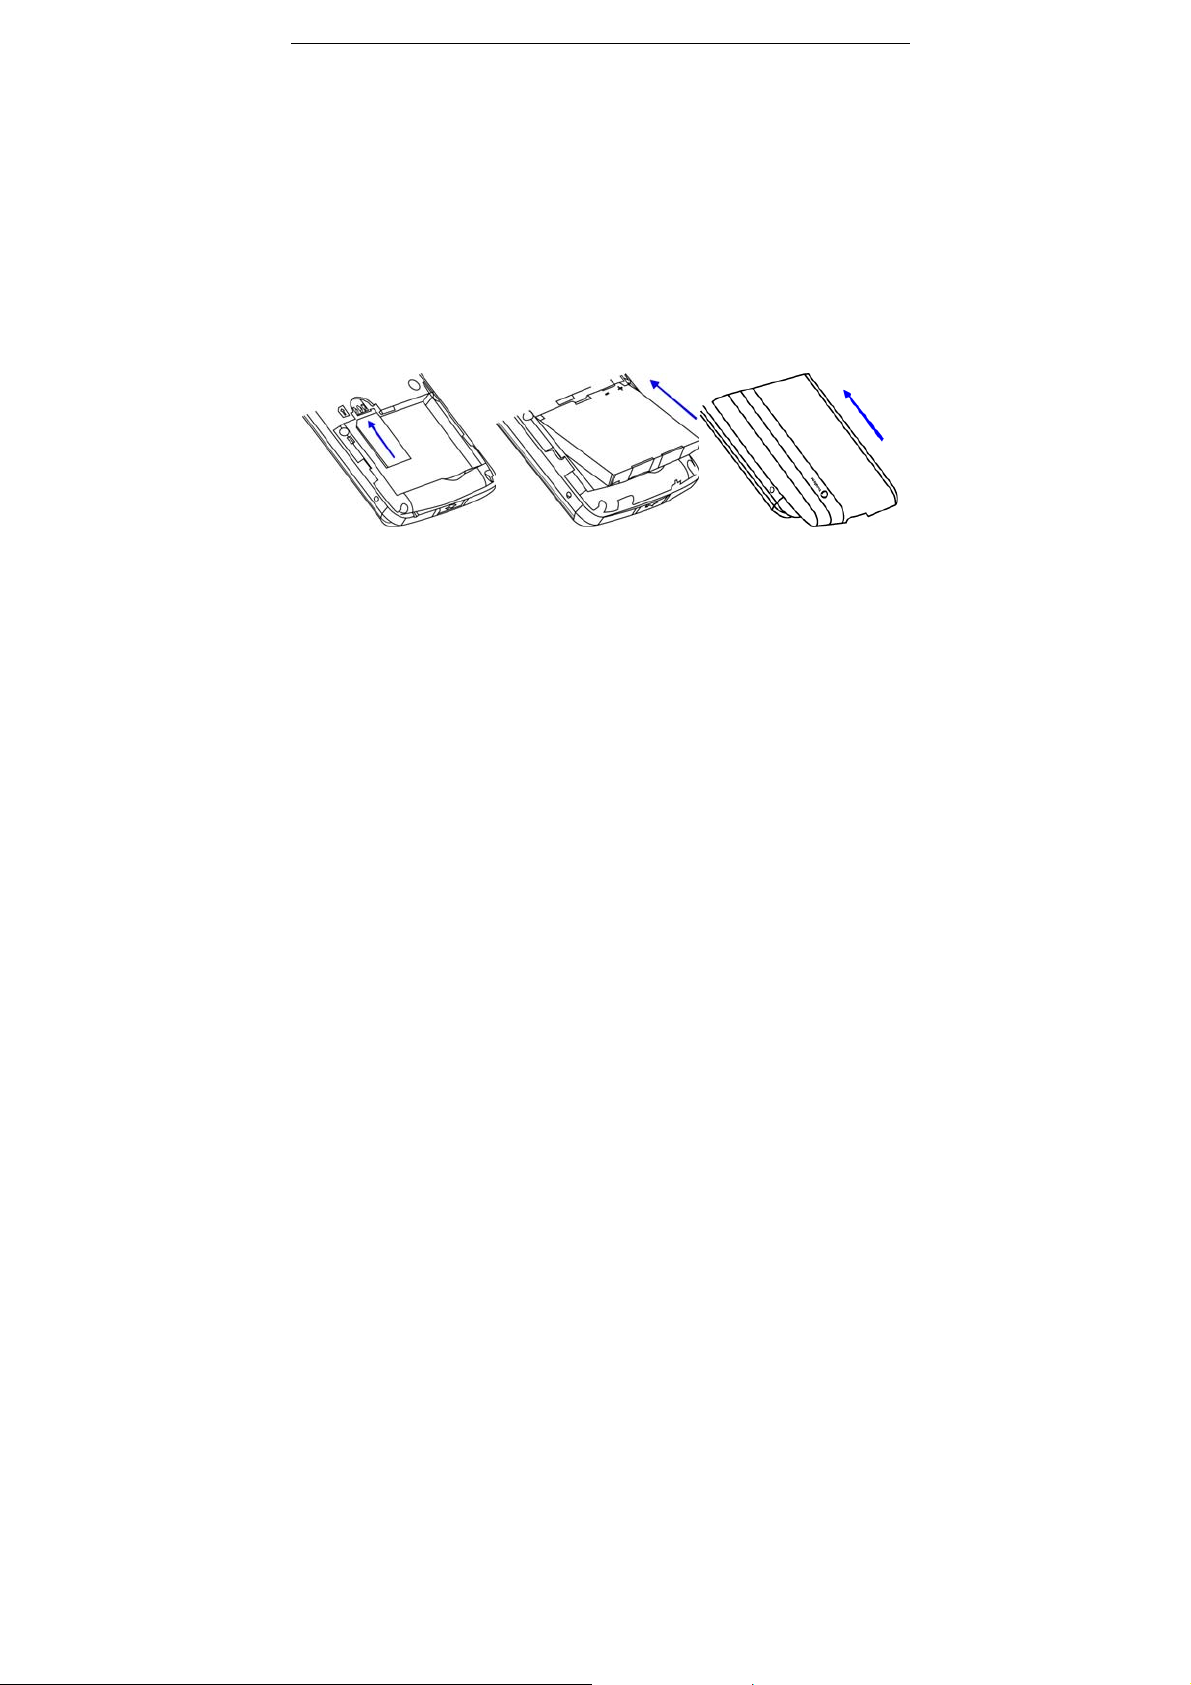
Remove the Battery and SIM Card
1. Ensure that your mobile phone is switched off.
2. Remove the battery cover. See Figure 4.
3. Pull the battery up and remove it from the mobile phone. See Figure 5.
4. Pull the SIM card out and remove it from the mobile phone. See Figure 6.
Figure 4 Figure 5 Figure 6
Charge the Battery
The new battery is not fully charged. To charge the battery, you need to:
1. Open the cover of the adapter slot on the bottom of the phone. See Figure 7.
2. Connect the adapter to the adapter slot. See Figure 8.
3. Connect the charger to a standard AC wall outlet.

20
4. When charging in the power-off mode, the battery icon is flashing. When charging is
completed, the battery icon stops flashing. When charging in the power-on mode, the icon
appears on the title bar of the Home screen. When charging is completed, the battery
indicator
5. Disconnect the charger when the battery is fully charged.
appears on the title bar.
Figure 7 Figure 8
MicroSD Card
Your phone supports MicroSD cards. It expands the storage capacity of the phone. You can store
or copy files such as videos, photos, music, etc.

21
To insert & remove MicroSD card
1. Insert: Open the cover of MicroSD card s lot on the left side of the phone. See Figure
9. Insert the card with the metal contacts facing upwards until it cl icks to the right position.
See Figure 10.
2. Remove: Press and release the card to pop it out, and then remove it.
Figure 9 Figure 10
Cautions for using MicroSD card
• Do not take out the card or switch off the phone while transmitting or storing data, which
may cause data loss or damage to the phone or the card.
• Do not touch the metal contacts on the card with hands or metal objects. Use a soft cloth
to clean the card.
• Keep the card out of the reach of the children.

22
Power On/Off Your Phone
Make sure that your SIM card is in your mobile phone and the battery is charged. Hold the
Power key to power on/off the phone. The phone will automatically search for the network.
Note: You may need to enter the PIN (Personal Identification Number) code if you have enabled th e SIM
PIN. (See "To use the SIM PIN" in Section 5.3 Management.)

1.2 Your Phone
Key Definition
Front components
23
Figure 11

24
Item Name Function
1 Earpiece Listen to a phone call.
2 Display Screen View information on the display screen.
3 Home Key Press to go to the Home screen.
4 Left Soft Key
5 Dial Key
Navigation (Up/
Down/Left/Right)
6
Keys /Center OK
Key
7 Right Soft Key
8 Back Key
9 End Key Press to end a call.
10 Qwerty Keyboard
11 Shift Key Press to switch between uppercase and lowercase.
Press to perform the command shown in the label above the
key.
Press to dial a phone number, answer a call, switch to
another call, or put a call on hold.
Use to scroll up, down, left, or right. Press the center key to
use as the OK key.
Press to perform the command shown in the label above the
key.
Press to go to the previous screen, or backspace over
characters.
Use Qwerty keyboard, which is similar to a standard keyboard
on a PC, to enter alphanumerical characters and symbols.

25
Item Name Function
12 Fn Key Press to change input mode.
13 Tab Key Press to enter a tab symbol.
14 Sym Key Press to enter more symbols. Hold to lock keyboard.
15 Camera Key Press to open the Camera program.
16 Volume Keys Press the two keys to adjust the volume.
17 MicroSD Slot Open the cover to install MicroSD card.
18 USB Interface Open the cover to connect the USB cable or charger.
19 Microphone
20 Power Key
21 Earphone Jack Connect the earphone to listen to audio.
22 Reset Hole
Speak into the microphone when making a phone call or
recording voice.
Hold to turn the phone on/off. Short press to open the Quick
List.
Use a needle-like object to insert and press to restart the
phone.

Back components
26
Figure 12
Item Name Function
23 Speaker Listen to system sound, conversation, and music.
24 Camera Lens Built-in CMOS lens with 1.3-megapixel camera.
27
Item Name Function
25 Camera Flash Provide flashlight when taking picture.
26 Self-photo Mirror
27 Battery Cover
Note: In this manual "press a key" means you press a key and then release it; and "hold a key" means
you press a key and hold on for two seconds or more.
Take a photo of yourself by aligning your reflection in this
mirror.
Open the battery cover to install or remove the battery and
SIM card.
1.3 Home Screen
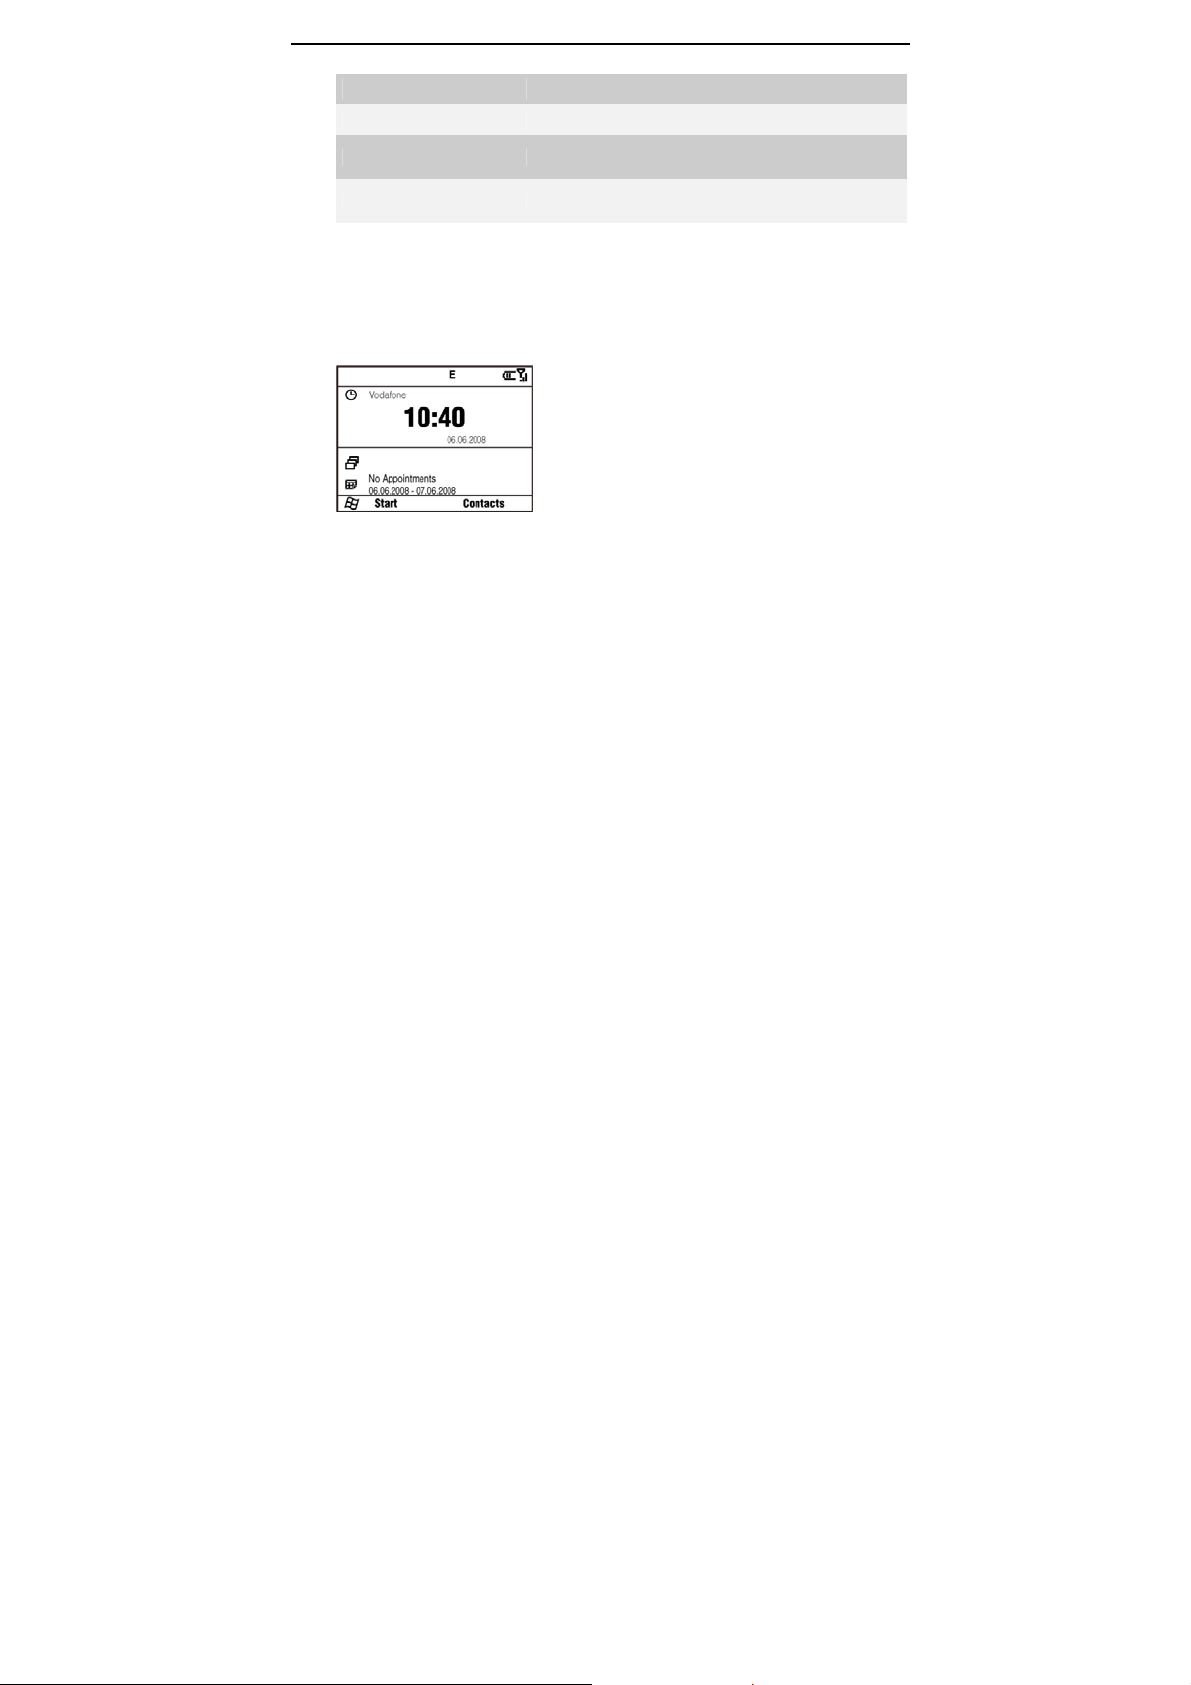
Home Screen Displays
Figure 13

28
The Home screen appears when you turn on the phone.
Use the Navigation keys to scroll down the Home screen to see more information.
The default Home screen displays important information, such as:
• Current date and local time,
• Number of SMS/MMS messages/Voicemails, missed calls, number of new Outlook e-mails,
Vodafone business e-mails, (For Outlook e-mails, see Section 3.2. For Vodafone e-mail, see
Section 3.3),
• Saved appointments,
• Alarm icon if you have set up the alarm,
• Current profile.
Tip: To access the Home screen from anywhere, press the Home key.
You can customize the view of the Home screen. For more information, see "To custo miz e the
Home screen" in Section 5.1 General Settings.
If you enable the Show recent programs function in the Home screen settings, press Start on
the Home screen to view the recent programs. Press All Programs to view all of th e programs.
29
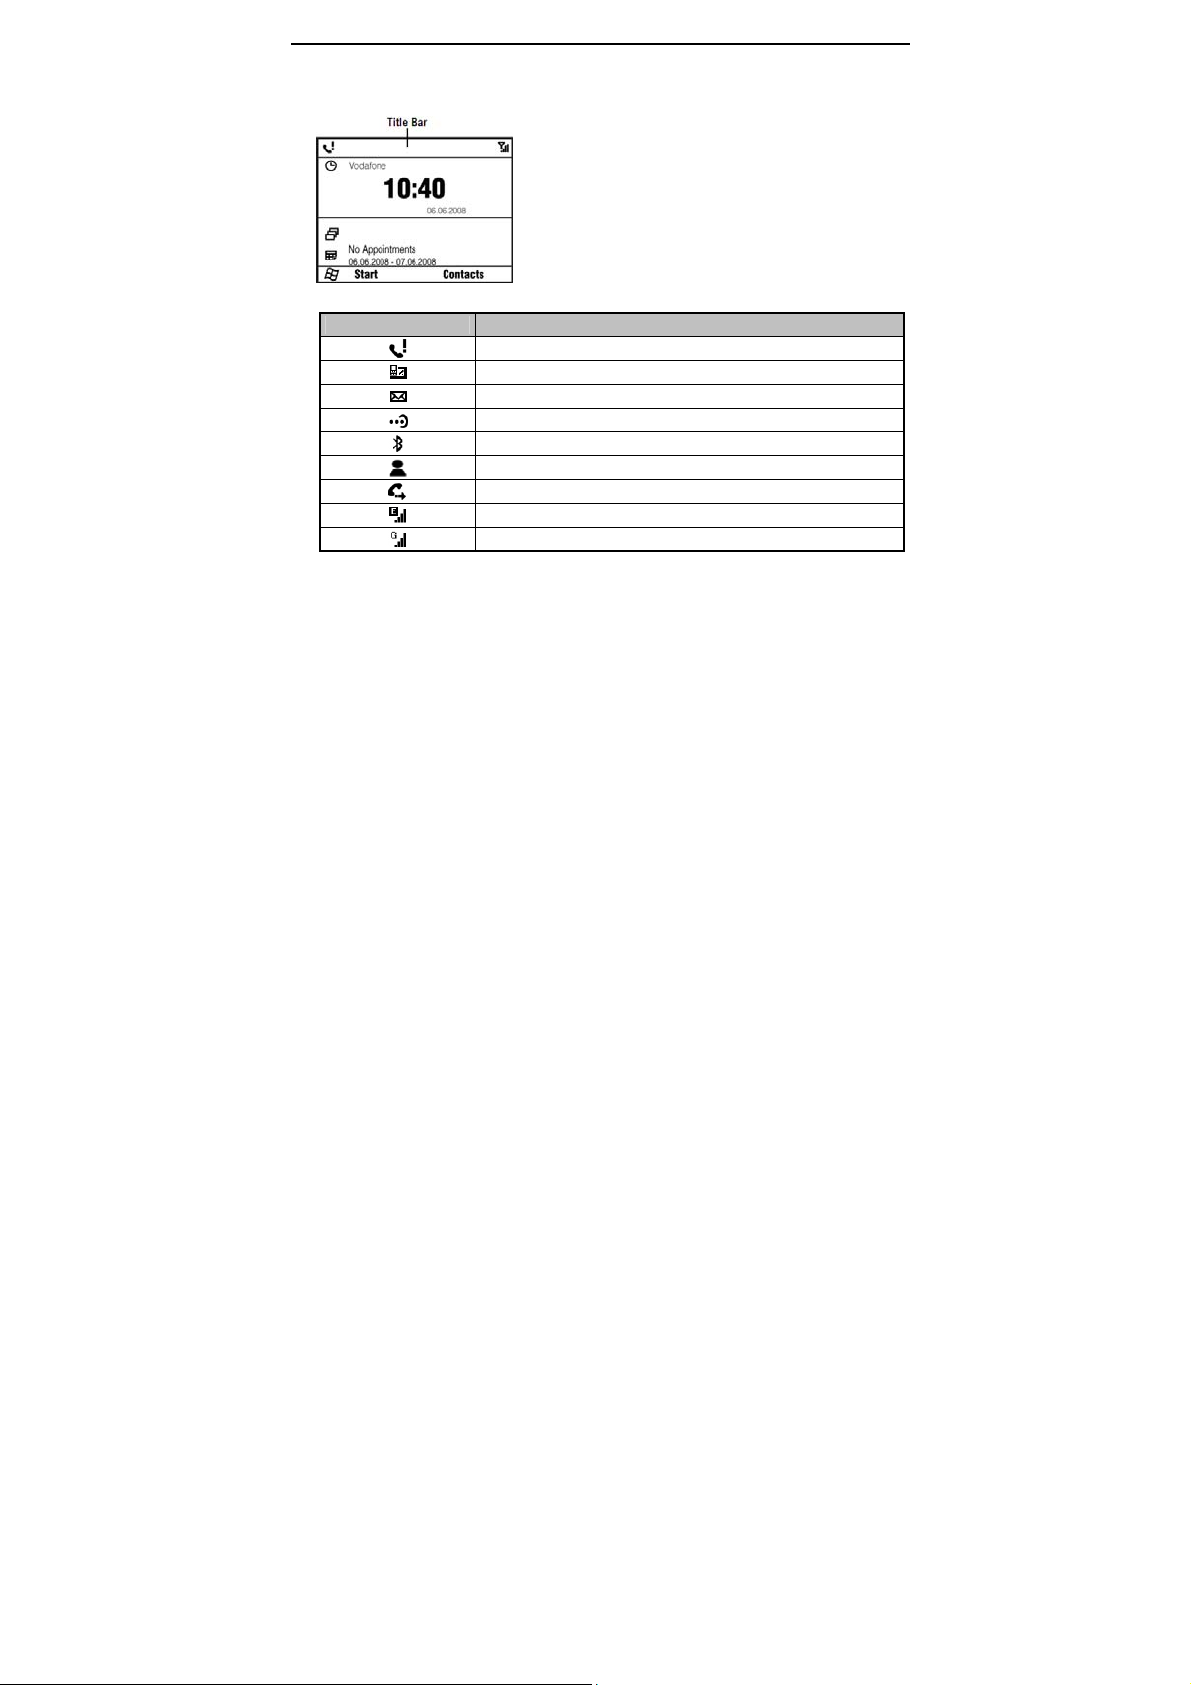
Common Status Indicators on the Title Bar of the Home Screen
Figure 14
Indicator What it means
Missed call
New message
New mail
Bluetooth connection is active
Bluetooth on
New Windows Live
TM
message
Calls are forwarded
EDGE in use
GPRS in use

30
Indicator What it means
GPRS roaming
Vibrate mode
Sound off
Speakerphone on
Bluetooth headset detected
Bluetooth headset playing music
Battery charging
Battery full
Battery low
Maximum signal strength
Searching for phone service
Phone is turned off
No phone service
EDGE available
GPRS available
Call on hold
Voice call in progress
Connection is active
No SIM card inserted

31
1.4 Input Methods
Switch Between Different Input Modes
Press the Fn key to switch between input modes when you need to enter characters, numbers, or
symbols. The input mode indicator is displayed on the title bar.
Enter Numbers and Symbols
Use the Fn key to switch between the following modes:
for numeric or symbol input. You can enter various punctuation symbols and numbers. For
example, press the “P” key to get “@”, press the “P” key again, you will get the “p”.
for locked numeric or symbol input, You can enter numbers and symbols continuously. For
example, press the “P” key to get “@”, press the “P” key again, you will get the “@” again.
In these modes, you can:
• Use the Sym key to enter more symbols.
• Use the Back key to delete a single character, and hold this key to clear all inputs.
• Use the Space key to input a space.

32
Figure 15
Enter English
Use the Shift key to switch between the following modes:
for lowercase text input. All lowercase.
for uppercase text input. First letter in uppercase, followed by lowercase letters.
for continuous uppercase text input. All uppercase.
In these modes, you can:
• Use the Back key to delete a single character, and hold this key to clear all inputs.
• Use the Enter key to turn to the next line.
• Use the Tab key to jump to the next input text field.
• Use the Space key to input a space.

33
1.5 Basic Operations
Screen Navigation
Start menu
In the Home screen, press Start to get the Start menu. It shows the shortcuts for the software
bundled with the phone and the application programs installed by the user. You can use the
Navigation keys to move through these application programs (see Figure16), and press the
OK key to run them. To show more programs, press More.
Figure 16
To return to the Home screen
At any screen, press the Home key to go back to the Home screen so that you can run other
tasks.
Note: You can also press the End key to return to the Home screen. If you press the End key during
a call, however, the call will be ended.

34
To go back to the previous page
Press the Back key to go back to the previous screen.
Note: In editing mode, you can press the Back key to delete text. In the File Explorer, press the
Back key to go back to the previous folder.
Quick List
Short press the Power key to access the Quick List. The Quick List includes powering off the
phone, locking your phone and keypad, opening Task Manager & Wireless Manager, and
choosing a different profile.
The Quick List provides a quick access to the profile. In different situations, you can choose
different profiles, such as Normal, Silent, Vibrate, Outdoor, and Automatic. For more
information, see "Set Events or Actions Notifications” in Section 5.1 General Settings.
To use Task Manager
Task Manager allows you to view all the programs currently running on your phone.
1. In the Quick List, select Task Manager.
2. To stop a running program, select the program on the list and press End Task. To stop all
running programs, select Menu > End All Tasks.
Find the Menu Key
Each application has its own Menu that allows you to perform additional functions, such as editing,
saving a file, etc.
Press the Right Soft Key to activate the Menu, and then select an item you desire.

35
Lock/Unlock the Keypad
You can use the keypad lock to avoid unintentional operations. You can answer an incoming call with
the regular operation when the keypad is locked.
To lock the keypad
Hold the Sym key at any screen until a locked screen appears.
To unlock the keypad
Press the Left Soft key, and then press the Sym key as indicated on the screen.
Adjust Earpiece Volume
Press the Volume keys to adjust the volume for headset, music, games, and ringtone tests.
Note: This operation does not adjust the volume for incoming call ringtones and reminders.
1.6 Function and Feature Preview
Vodafone E-mail
The Vodafone E-mail service allows you to set up Vodafone business e-mail accounts and other
personal e-mail accounts as well. See Section 3.3.

36
Vodafone Live!
Vodafone live! brings you new and exciting ways to communicate, to access information, music
and games. You can find more details on the Vodafone Website (www.vodafone.com).
Note: This feature might not be supported by all operators.
Outlook E-mail
The Outlook E-mail service allows you to set up multiple e-mail accounts including business and
personal e-mail accounts. You must set up a POP3/IMAP4 e-mail account in order to send/receive
e-mails through remote servers. See Section 3.2.
Calculator
Select Start > Organiser & Tools > Calculator.
It supports basic arithmetic and calculations.
Note: This calculator has limited accuracy. Rounding errors may occur esp ecially in long division.
Calendar
Select Start > Organiser & Tools > Calendar.
You can use the calendar to schedule appointments, including meetings, and other events. Your
appointments will be displayed on the screen as is scheduled. See Section 4.2.
Clock & Alarm
Select Start > Organiser & Tools > Clock & Alarm.

37
Set the time zone along with the current time and date. The time and date information will affect
the calendar reminders and the alarm ring time.
To set the date and time, select Date and Time. Select the time zone and then use the
numeric keys to enter the current date and time.
To set the alarm, select Alarm 1 or Alarm 2. Enter the alarm ring time, and set the alarm as on/off.
Then set the sound, type and volume.
PDF Reader
Select Start > Organiser & Tools > PDF Reader.
To view documents in portable document format (PDF).
Tasks
Select Start > Organiser & Tools > Tasks.
The Tasks function can assist you in tracking the status of various tasks. Tasks can be a single task
or re-occurring tasks. You can set up reminders for tasks, or manage them by setting up dif ferent
categories. See Section 4.3.
Voice Notes
Select Start > Organiser & Tools > Voice Notes.
Voice Notes can help you to quickly note your thoughts and create short recording contents. See
Section 4.4.
Tip: If the storage of your phone is running out, remove some voice n otes.

38
Camera
Select Start > Entertainment > Camera.
You can capture still/video images with the 1.3 megapixel handset camera and send images via
MMS. See Section 6.1.
Games
Select Start > Entertainment > Games.
There are two built-in games: Bubble Breaker and Solitaire.
Windows Media
Select Start > Entertainment > Windows Media.
Play downloaded music and video images as well as those recorded/captured on handset. See
Section 6.3.
GPS
Your phone has a built-in GPS module to support basic GPS operation and 3rd party navigation
softwa re. See Section 7.7.

39
2 Using the Phone
2.1 Starting the Phone Function
Disable & Enable Phone Function
When using this phone, you can control wireless functions. When the phone function is off, you
will not be able to receive calls, send/receive messages, or use GPRS to connect to wireless
mobile network. But other handset functio ns such as brow sing the calen dar, listening to
music, or playing games, can still be used.
1. Press the Power key to activate the Quick List, and then select Wireless Manager. Or select
Start > Settings > Connections > Wireless Manager.
2. Select On to enable the phone function, or select Off to disable the phone function. The
title bar will display
Note: Under certain circumstances (such as on a plane), you may need to turn off the phone function.
Open Phone Screen
From the Phone screen, you can open, call, or find a contact, and even save a new number into
Contacts. To access, press the Dial key or enter the phone number.
for On or for Off.

40
Enter SIM PIN
Each time you turn on the phone or activate the phone function, you will need to enter the SIM
card PIN provided by Vodafone if you have enabled the PIN code.
Enter the phone’s SIM PIN code and press Done. Wait for the phone to verify the PIN code.
Warning! If you enter your PIN incorrectly for three times, the SIM card will be locked automatically. Contact
Vodafone to obtain the PIN Unblocking Key (PUK) code to unlock the SIM card.
2.2 Making a Call
Make a Call from the Phone Screen
1. Enter phone numbers you want to call in the Home screen or the Phone screen.
2. If you make a mistake, press the Back key or Backspace key to erase the last digit, hold this
key to clear all digits.
3. Press the Dial key to call. Your phone automatically lists the matched contacts.
4. Press the End key to end the call.
Make a Call from Contacts
To dial from contacts list
1. On the Home screen, press Contacts (if displayed) or select Start > Contacts.

41
2. Select the contact you wish to call. Press the Dial key to dial the default number of the
contact.
To learn more about Contacts, see Section 4.1.
To dial from contacts’ details
Select a contact; then press the OK key to open its Contact details. Select the contact’s
number you wish to call, and then press the Dial key.
Make a Call from Call History
On the Home screen, select Call History (if displayed) or select Start > Call History. Select a
name or number, and press the Dial key to dial.
The Call History includes missed calls, incoming calls, and outgoing calls.
Call History icons:
Missed calls, Incoming calls, Outgoing calls.
Make a Call from Messages
In the Inbox list or when viewing a message, press the Dial key to check the number, and then
press Call or press the Dial key to dial the number.
Make Emergency Calls
Enter the emergency number, then press the Dial key. It is possible to dial emergency numbers when
the keypad is locked.
SIM card may store other emergency numbers. Contact Vodafone if you need more
information.

42
Make International Calls
Hold the “0” key until “+” appears.
Enter the full phone number, and press the Dial key, for example: +49-123-12345678 in the
following format: +country code-area code-phone number.
Make Speed Dial
Press and hold the speed key to call in the Home screen. You can set speed dial entries/
shortcuts for the frequently dialed contact numbers.
To learn how to use Speed Dial, see Section 2.6.
2.3 Answering Incoming Calls
When there is an incoming call, the phone will display the information on the screen.
To answer, press the Dial key or press Answer. To ignore, press the End key or the Right Soft
key.
Tip: When you are taking a call, you can still return to the Home screen at any time by pressing the
Home key, or operate other applications.

43
2.4 In-Call Options
During a call, press Menu to access in-call options.
Hold the Call
During a call, to hold it, select Menu > Hold, or press the Dial key. To cancel, press Unhold, or
press the Dial key again.
Note: It needs network support. Contact Vodafone for more information.
Enable Call Waiting
You can enable Call Waiting so that the phone will notify you of a new incoming call while you
have a call in progress.
1. On the Home screen, select Start > Settings > Phone > Call Waiting.
2. After you have downloaded these settings from Vodafone, check Provide call waiting
notifications box and press Done.
Note: It needs network support. Contact Vodafone for more information.
Answer Another Call
You can swap between two calls while you are taking a call, and the second call is coming.
1. Press Answer to take the second call and put the first call on hold.
2. To end the second call and return to the first call, press the End key. To switch between the
two calls, press Swap.

44
Set up a Conference Call
1. Either put a call on hold (select Menu > Hold) and dial a second numbe r, or answer
another incoming call.
2. Select Menu > Conference, then the Conference is created.
Note: It needs network support. Contact Vodafone for more information.
Turn On/Off Speakerphone
Select Menu > Speakerphone On. After speakerphone is activated, the icon
title bar.
To disable the speakerphone, select Menu > Speakerphone Off.
Note: To avoid any damage to your hearing, do not place the handset close to your ears whi le using the
speakerphone.
appears on the
Mute a Call
During a call, you can temporarily turn off the microphone to prevent the opposite party from
hearing your voice.
Select Menu > Mute. You can also press the Mute key directly on the screen. After Mute is
activated, the icon
appears on the top right corner of the screen.
Adjust Earpiece Volume
Press the Volume keys to adjust earpiece volume during a call.

45
Search for a Number
During a call, press Menu first, and then select Contacts or Call History.
View Calendar
During a call, press Menu first, then select View Calendar.
2.5 Dialing up Voicemail
To listen to voicemail messages, you can dial the voicemail number (provided by Vodafone) from
the phone screen.
You can also hold the speed dial key 1 directly on the Home screen. The numeric key 1 is set
up as the voicemail number by default.
Note: Voicemail needs network support. Contact Vodafone for more information .
2.6 Using Speed Dial
Create a Speed Dial
You can create speed dial entries (or shortcuts) for frequently dialed numbers or accessed
programs.
1. To add a frequently dialed number: Activate the Contacts list. Choose one contact, then
choose an item to set up, for example, mobile phone number.
To add a frequently accessed program: Highlight a program.

46
2. Select Menu > Add to Speed Dial. Select keyboard assignment, then press Done. You can
set 0-99 as Speed Dials.
Edit a Speed Dial
Select Start > Organiser & Tools > Speed Dial, and then select the speed dial entry you wish
to edit, then press Done.
Use Speed Dial
You will only need to hold the corresponding speed dial entry/shortcut key to dial up the contact or
access the application program.
For example, if 15 is set for Calendar, you have to press 1 and then hold 5 to quickly launch
Calendar.
2.7 Using SIM Card Services (STK)
To use the SIM card services, insert your SIM card into the phone at first. SIM card information
services rely on Vodafone networks.
Select Start > Organiser & Tools > STK. The displayed name on the STK Service is provided by
Vodafone.

47
3 Messaging
Messaging is where all of your e-mail, SMS, and MMS accounts are located.
When you receive a new message, you can open it from the Home screen. Simply scroll to the
row where t h e ne w message is lo c a te d a nd s e l ec t i t to read. To ac c e s s y ou r m e s sage accounts,
select Start > Messaging and then select the account you want to read.
3.1 Messages
The handset will alert you for the unread message(s) with the icon on the title bar. Your
received messages are categorized as read
Compose and Send a Message
To add new SMS
On the Home screen, select Start > Messaging > Messages to access the messages list
screen, and then select Menu > New > SMS.
1. Enter the mobile phone number of one or more recipients, separating them with a
semicolon (;).
To access phone numbers from Contacts, select Menu > Add Recipient in To. Select a
contact from the list and press the OK key.
2. Enter the text message contents.
or unread .

48
3. Press Send to send the message.
To add new MMS
On the Home screen, select Start > Messaging > Messages to access the messages list
screen, select Menu > New > MMS.
1. Enter the mobile phone number of one or more recipients, separating them with a
semicolon (;).
To access phone numbers from Contacts, select Menu > Recipients in To, then
select From Contacts or From Call History. Select a contact from the list and press the
OK key.
To send a copy of this message to others, move up to the Cc and Bcc fields above the
To field.
2. Enter the MMS subject.
3. Select Insert Picture/Video to select a photo or video clip from the Select Media
screen and insert it.
To capture a new photo, press the camera key or select Menu > Capture > Image.
To record a new video, press the camera key or select Menu > Capture > Video.
See Section 6.1 for the use of camera.
4. Select Insert Text to enter text for your MMS message.
To insert predefined text or emoticons, select Menu > Insert My Text or Insert
Emoticon.

49
5. Select Insert Audio to insert an audio clip. Select an audio clip on the Select Audio
screen.
To record a new audio clip, select Menu > Capture > Audio.
6. Select Menu > Attachments to add vCard, vCalendar and File.
7. Select Menu >Template to use a template or save the current message as a template.
8. Select Menu >Preview Message to preview the current message.
9. Press Send to send the message.
Note: To remove the picture, video, text, or audio, select the item and press the Back key.
To cancel message editing
Select Menu > Cancel Message. Choose "Yes" to save the message as a draft. Choose
"No" to discard the message.
To know whether your message has been received
In SMS, before sending the message, select Menu > Message Options and select Request
message delivery notification.
In MMS, before sending the message, select Menu > Options > Send Options and select
Delivery report.

50
Other Actions
To reply messages
Select Menu > Reply > Reply / Reply All / Forward to reply to the sender/all persons listed in
To and CC boxes/forward the message to someone else.
To switch messages folders
Select Menu > Folders. Open the messages folder list. Switch to a different messages
folder.
There are five folders in Messages:
• Deleted Items: Store deleted messages.
• Draft: Store message drafts.
• Inbox: Store all received and sent messages.
• Outbox: Store messages that are being sent and ready to be sent.
• Sent Items: Store sent messages.
To move message
On Draft, Deleted Items, Outbox or Sent Items screen, select the message you wish to
move. Then select Menu > Move. Select the folder to keep the message.
To select messages
Select Menu > Select Messages. Select All, All Below or Several as you wish.

51
To delete message
Select the message, and then select Menu > Delete. Then confirm. Deleted messages will be
moved to the Deleted Items folder.
To configure message settings
On the Messages list screen, select Menu > Tools > Options to configure various settings in
Message.
Display options:
1. Show date and time in the message list: Choose whether to display date and time in
the message list.
2. Sort messages by: Choose the sorting column or the sorting order.
Sorting column includes: Date received / Subject / Sender / Message type.
Sorting order includes: Descending / Ascending.
3. After deleting or moving a message: Choose an action to perform after deleting or
moving a message.
Action includes: Return to message list / Show next message / Show previous
message.
Sending options:
1. Include copy of original message when replying to e-mail: Choose whether to
include the original message when replying to e-mail.
2. Save copies of sent items: Choose whether to make backup copies of sent items.

52
Signatures options:
1. Select an account: Select an account you wish to set.
2. Use signature with this account: Choose whether to use the signature with your
selected account.
3. Include when replying and forwarding: Choose whether to include the signature when
replying or forwarding e-mail.
4. Signature: Enter or edit your signature here.
Account Settings options:
1. Request delivery notifications: Choose whether to receive a notification when the
message reaches the recipient.
2. Use Unicode when necessary: Choose whether to enable this function.
Setup E-mail options:
Set up a POP3/IMAP4 e-mail account when you need to send/receive e-mails through a
remote server. See Section 3.2 for details.
Security options:
Warn before navigating to a URL or file link that is not on my device: Choose
whether to displa y a war nin g mes sage b efor e op eni ng a U RL or a fi le link i n a me ssage that
is not located in the phone.

53
Other options:
1. Display account picker when opening Messaging: Choose whether to enable this
function.
2. Warn when deleting messages in the message list: Choose whether to enable this
function.
3.2 Outlook E-mail
Configure POP3/IMAP4 E-mail Account
If you want to send/receive e-mails through remote servers, you have to set up a POP3/IMAP4 e-mail
account. On the Home screen, select Start > Messaging > Setup E-mail to set your account.
1. Enter your e-mail address and password, and then press Next.
2. Follow the guide to comple te the server set tings. Dif ferent e -mails may require
different steps. Then press Next.
3. Enter the user information, such as user name, password, and domain.
4. Set the synchronizing options.
After setting up e-mail accounts on your phone, you can start sending and receiving e-mail
messages.

54
Create and Reply to E-mails
To compose and send an e-mail
1. Select Start > Messaging, and then select an e-mail account.
2. Select Menu > New.
3. Enter the e-mail address of one or more recipients, separati ng them wit h a semico lon (;).
To access e-mail addresses stored in Contacts, select Menu > Add Recipient in To.
Select a contact from the list and press OK. You can press the Up key to find the field for
"Bcc" and "Cc".
4. Enter a subject and compose your message. To quickly add common messages, select
Menu > My Text and select a desired message.
5. Press Send.
Tip: You can find the priority option in Menu > Message Options.
If you are working offline, e-mail messages are moved to the Outb ox folder and will be sent out the
next time you connect.
To add an attachment to an e-mail
1. In the message that you are composing, select Menu > Insert and select the item you
want to attach: Picture, Voice Note, or File.
2. Select the file you want to attach, or record a voice note.

55
View and Reply to E-mails
The Home screen will display the e-mail item when a new e-mail message arrives. Select E-mail
then press the OK key. You will also be able to browse the e-mail from the Messaging. Select the
e-mail to be browsed, and then press OK.
To read incoming messages
By default, only the first few kilobytes of a message are shown when you open and read an
inc oming me ssage. T o read the whol e mes sage, sc roll dow n to th e end of t he me ssage and
select Get entire message and any attachment s; or select Menu > Download Message.
To download an attachment
In an open message with an attachment to download, select the attachment. You can
directly open the file in the associated program after you download them by selecting the
attachment again.
To reply to or forward an e-mail
1. Open the message and select Menu > Reply > Reply, Reply All, or Forward.
2. Enter your response. To quickly add common messages, select Menu > My Text and
choose a desired message.
3. Press Send.
Tip: To see more header information, scroll up.
To always include the original message, from the list view, select Menu > Tools > Options >
Sending, and select Include copy of original message when rep lying to e-mail check box.

56
3.3 Vodafone E-mail
With VF E-mail you can access up to five separate Internet based e-mail accounts and gain
anywhere real-time access to your e-mail and attachments on your mobile phone. After setting up
the VF E-mail software on your phone and connecting to your Internet based e-mail account,
your e-mails will automatically be sent to your phone as soon as they arrive in your Internet
mailbox. You will be able to manage your e-mail and send and receive attachments from wherever
you are.
Install VF E-mailConnect
Select Start > VF E-mailConnect > Install. You will start the setup procedure which will guide
you through a small number of required steps to access your e-mail. You will soon be receiving
your me s sa g es w it h i n m i n ut e s . If it f a il s , en s ure that y ou r p ho n e i s ab l e t o e st a bl i s h data connectivity.
Note: VF E-mail will automatically input your Email Service Provider settings. If it cannot, it may prompt
you to enter the settings. You can get information about your e-mail account from your e-mail provider.

57
Send and receive e-mails
You interact with the VF E-mail application. VF E-mail works in the background to synchronize the
Inbox on your phone with your e-mail service provider. To send an e-mail you go in to the e-mail
Inbox and select Menu > New. You can also repl y or forw a rd an y e-mail from your Inbox. Make
sure that you always select VF E-mail when you send an e-mail message.
Read and add attachments
The attachment is indicated by a paperclip symb ol next to the heade r in the Inbox.
Attachments are not pushed to the phone automatically to preserve the phone memory and limit data
usage. You can download the attachment to the phone by opening the e-mail, then selecting the file
name. Once the download is completed (indicated by the icon appearing), open it. You can only
open the file if it is recognized by the phone and supported by one of its viewer applications.

58
4 Personal Information
4.1 Contacts
Select Start > Contacts. Open Contacts application program.
Open Contacts from Home Screen
You can add new contacts along with their information. Setting up communication information for the
contact will allow you to connect with the person quickly or browse the contact's information.
Contacts will be saved in the phone memory or in the SIM card. If you store the information in the
SIM card, you can fill the name and a number. If you store the information in the phone memory,
you can also fill out each information field including category, e-mail, address, pictures, ringtones,
etc.
You can add new contacts to Outlook and their information to the phone. Besides, you can
synchronize contacts between your device and specified remote server. For more details, see
Section 9.4.
Create a Contact on Your Phone
1. On the Home screen, select Start > Contacts > New > Outlook Contact.
2. Enter information for the new contact.

59
To easily identify the caller, you can assign a custom ringtone and a picture to each
Outlook contact.
To assign a custom ringtone, scroll down to Custom ring tone, and select the desired
ringtone.
To assign a picture to a contact, scroll down to Picture and Select a picture to select the
picture you want. To remove the picture, select Menu > Remove Picture.
3. Press Done.
If someone who is not in your list of contacts calls you, you can quickly save the number to
contacts by pressing Save.
Note: In contact’s detailed information, “m” stands for mobile number, “h” stands for home numbe r and
“w” stands for work number.
Create a Contact on SIM Card
1. On the Home screen, select Start > Contacts > New > SIM Contact.
2. Enter the Name and Number for the new contact.
3. Press Done.
View and Edit Contact Information
1. On the Home screen, select Start > Contacts.
2. Select the contact whose information you want to view or edit, and select Menu > Edit.
3. When you finish, press Done.

60
View the Contact List with Different Sort Column
If you have entered information under Company for your Outlook contacts on your phone, you
can switch between Company mode and Name mode by selecting Menu > View By >
Company/Name. In Company view mode, you can quickly locate the contacts who work for a
specific company.
You can filter the contact list by categories. In the contact list, select Menu > Filter and then
select a category. And then select the category if you have set the contacts’ categories. You can
set at the Categories field on the contact’s editing screen. The corresponding list will be shown.
To show all contacts again, select All Contacts.
Call a Contact from the Contact List
1. On the Home screen, select Start > Contacts.
2. Move to the contact to call and press the Dial key. The contact’s default phone number is
dialed.
To call a phone number other than the default, select the contact, scroll to the number you want to
dial, and press the Dial key.
Find a Contact
Search Contact by Name: On the Contacts’ list screen input the word to search for a contact.
Search Contact by Phone Number: On the Home screen input the contact’s phone number.
Contacts that have phone numbers starting with the numbers you input will be highlighted.

61
Send Contact Information
• Select Menu > Send Contact > Beam. Select contact information to send. Select the
device. Then press Beam.
Note: Make sure that both transmitter and receiver have activated the Bluetooth
function.
• Select Menu > Send Contact > Messages. Select the contact information tha t you want to send.
Then press Done.
The contact information you have selected will be sent to the recipient of the message.
• Select Menu > Send as vCard. Enter the recipient in To of the MMS message, and then
press Send.
If the recipient accepts the MMS message, the contact information you sent are
automatically saved in that person’s Contacts.
Send MMS to Contacts
Select Menu > Send MMS (Mobile) to send an MMS to the selected contact.
If the contact information contains the e-mail address, you can send an MMS to the e-mail
address by selecting Send MMS (E-mail).

62
4.2 Calendar
Select Start > Organiser & Tools > Calendar.
You can use the calendar to schedule appointments, including meetings and other events. Your
appointments will be displayed on the screen as is sched uled. You can choo se to Dismiss
the reminder or use the Menu set the snooze time. On the Reminder screen, select Menu > View
Item to view the details.
Add New Appointments
1. Select Menu > New Appointment.
2. Enter information about the appointment.
3. Press Done.
The detailed appointment information includes:
• Subject: Enter the subject.
• Start/End date: Set the start/end date.
• Start/End time: Set the start/end time.
• All day event: Set the appointment as all day events.
All-day event does not occupy blocks of time in Calendar; instead, they appear in banners at the top
of the calendar.
• Location: Enter the location information.

63
• Attendees: If you select Add Required Attendee… or Add Optional Attendee…, and
choose the contact as the attendee, it will send invitation to them.
• Reminder: Set a notification time to let the phone alert you a certain period of time before an
appointment.
• Occurs: Set the re-occurring times or frequency.
• Status: Choose the appointment status.
Each appointment status is represented by a color block in the view screen. Busy as blue, Out of
Office as magenta, Tentative as light blue, Free as white.
• Sensitivity: Choose the degree of the privacy of the appointment.
• Notes: Enter the note information.
View and Edit Appointments
You can view your schedule in three different views: Month, Week, and Agenda. To switch the
Calendar View, press the Left Soft key or press Menu and choose the view you want.
1. Select the appointment to view, and press the OK key.
2. Select Menu > Edit, and edit the field.
3. Press Done.
Send Appointments
Select appointment and press the OK key. Select Menu > Beam Appointment, and then select
device to exchange, and press Beam.
You can send a calendar appointment to another phone over MMS.

64
1. Select an appointment, then select Menu > Send as vCalendar.
2. Enter the recipient in To.
3. Press Send.
Configure Calendar Options
Select Menu > Tools > Options to open the Calendar options settings screen. Select the item
to set up. Options include:
1. Start in: Set the default view option for Calendar.
2. First day of week: Choose a day as the first day of the week.
3. Week view: Choose how many days to display for the weekly view.
4. Month view: Choose whether you wish to have the week numbers displayed in the
monthly view.
5. Set reminders: Set a notification time to let the phone alert you a certain period of time before
an appointment.
6. Respond to meetings via: Set the default e-mail account of sending the invitations of
meetings.

65
4.3 Tasks
Select Start > Organiser & Tools > Tasks.
Add New Tasks
1. Select Menu > New Task.
2. Enter the task information.
3. Press Done.
The detailed task information includes:
• Subject: Enter the subject.
• Priority: Choose the priority level of the task.
• Status: Confirm whether the task is completed or not.
• Start/Due date: Set the start/end date of the task.
• Occurs: Set the re-occurring times or frequency.
• Reminder: Set a notification time to let the phone alert you a certain period of time before
a task.
• Categories: Choose category of the task.
• Sensitivity: Choose the privacy level of the task.
• Notes: Enter the note information.

66
View the Task List with Different Sort Column
To sort the list, select Menu > Sort by, and select a sort option.
To filter the list by category, select Menu > Filter, and select the category to be displayed.
Mark a Task as Completed
Move to the completed task. Press Complete. If you want to activate this task again, you can move
to it and press Activate.
To Send a Task
In the Tasks list, select the task you want to send and select Menu > Beam Task, then select device
to exchange, and press Beam.
If the receiver supports the task format, he/she will see the task in his/her task list.
4.4 Voice Notes
Select Start > Organiser & Tools > Voice Notes.
Add a New Voice Note
1. Press Record to start recording a voice note. Keep the microphone close to your mouth
during the recording.
2. The phone starts recording.
3. To finish recording, press Stop.
4. Voice notes are listed in the All Notes list.

67
Play a Voice Note
Select a voice note to playback, and press the OK key. Or select Menu > Play. To stop, press
Stop.
Rename a Voice Note
1. Select Menu > Rename.
2. Enter the new name.
3. Press Done.
Delete a Voice Note
1. Select the voice note to delete.
2. Select Menu > Delete.
3. Press Yes.
Note: If you delete a voice note that has a default name, such as Recording1, this name becomes
available for a new voice note.
Set as Ringtone
To set a selected voice note as the current ringtone, select Menu > Set As Ringtone.

68
4.5 SIM Manager
Select Start > Organiser & Tools > SIM Manager to open the SIM manage tool. With SIM
Manager, you can manage the contacts information in your SIM card and perform actions such
as select, delete, copy to Outlook, etc.
You can select Options > Select All to select all SIM card contacts to perform the action.
If you want to manage the contacts information in the phone memory, you can select Options
> Outlook Contacts.

69
5 Settings
5.1 General Settings
Select Start > Settings to open the homepage of Settings. Select More to see more settings.
Set up the Home Screen
The Home screen is the starting place for most tasks you perform on your phone. You can get
access to all features and programs from the Home screen.
To customize the Home screen:
Select Home Screen. You can set the Home screen layout, Show recent programs, Color
scheme, Background image, and Time out for the Home screen, see Figure 17.
Figure 17

70
Set the Regional Information
Your phone should already be set up with the regional settings that are appropriate for your
locale.
Select Regional Settings to set the Language, Locale, Short / Long date style, Time format,
Positive / Negative number and Positive / Negative currency.
Note: If you change the locale option, the format of the remaining options (such as date, time, and
currency) will be changed automatically according to the lo cale you specify.
Set Events or Actions Notifications
To specify the sound for an event
Select Sounds. For an event, select a desired sound. Select None if you do not want to hear a
sound.
When you select a sound, the sound plays. To listen to it again, select Menu > Play.
Note: Store the custom ring ton es in \My Do cum ents\ M y Ring ton es fol de r. Fo r ring ton es, you can us e
sound files in *.wav, *.mid, *.wma, or *.mp3 format. For notifications or reminders, you can use *.wav
or *.mid files.
To change the current profile
Select Profiles or short press the Power key to display the Quick List, and choose a profile (see
Section 1.5). Choose a new profile you want to use.
Tip: You can choose the automatic profile so that your phone will auto matically switch between Normal
and Vibrate according to busy/free status in your calendar.

71
To edit a profile
In the Profiles choose the one you want to edit, then select Menu > Edit to modify the
settings.
The profile settings include: name of the profile, ring type and volume, reminder type and volume,
notification type and volume, and system sound volume.
To cancel without saving changes, press Cancel.
To revert to the default profile settings, select Menu > Reset to default.
Set the Owner Information
Select Owner Information to enter the owner name, telephone nu mbe r, E- mail add ress and
notes.
Set the Device Name
Select Device Name to enter the device name and description. This name will show in the
Bluetooth pairing.
Power Management
Select Power Management to check the main battery power level and set the options
including:
• Backlight time out on battery: Set backlight timeout while your phone is powered by the
battery.
• Backlight time out on AC: Set backlight timeout while your phone is charged by AC.

72
• Backlight brightness: Set backlight brightness of the screen.
• Display time out: Set display timeout to automatically shut off the screen.
Reset to Factory Default Settings
Select Reset To Factory Settings. Follow the instructions displayed on the screen to reset the
phone. The phone will restart after reset.
Warning! After you reset your phone to factory setting, all the informa tion and s ettings y ou have saved on
your phone will be lost.
Device Information
Select Device Information to check the hardware & software version information.
About
Select About to check the information as below:
• System version number.
• Technical details of your device such as the type or speed of the processor, memory size, etc.
• License and copyright information.
• More relevant hardware information about the machine.

73
5.2 Function Settings
Select Start > Settings to open the homepage of Settings. Select More to see more settings.
Set the Phone Function
Select Phone, the phone function settings include:
• Auto Answer: Set the auto answer time.
• Call Barring: Restrict incoming and outgoing calls.
• Call Forwarding: Choose to use call forwarding.
• Call Options: Set Any key answer, Show SIM contacts, Voice mail number, Text messages
service center number, Country code, and Area code.
• Call Waiting: Choose if you wish to use call waiting. You can choose to p rovide call
waiting notifications.
• Caller ID: Choose to display your caller ID to the party you call.
• Channels: Choose whether to enable channels and receive channel list. And choose the
channel language.
• Fixed Dialing: Edit fixed dialing number and enable the fixed dialing. Using fixed dialing can
limit your dialing recipients.
• Networks: Choose whether to manually connect to Vodafone network.
Note: Some of the services may require network support. Consult Vodafone for more information.

74
Set up Connections
See Section 2.1 for Wireless Manager in Disable & Enable Phone Function.
See Section 7.4 for Bluetooth.
See Section 7.1 for Dial-up.
See Section 7.1 for GPRS.
For other connections, consult Vodafone or the network administrator.
Set up Accessibility
Select Accessibility to set options as follows:
• System font size
• Multipress time out
• Confirmation time out
• In-call alert volume
Set the Text Input
Select Text Input Settings to set the input method.
You can decide:
• To display the suggested words while typing;
• When and how many suggested words to show;
• To add a space automatically after each word;
• To enable the auto-correct function.

75
5.3 Management
Select Start > Settings to open the homepage of Settings. Select More to see more settings.
Add and Remove Programs
Before you purchase additional programs for your phone, make sure that they are compatible with
the Windows Mobile
To add a program
1. Download a program to your PC (or insert the disc that contains the program into your
PC). Make sure that you select a program developed for your phone and processor
type.
2. Read the installation instructions that come with the program and follow it to
complete the setup.
To remove a program
Select Remove Programs, choose the one you want to remove then select Menu > Remove
to remove the programs, or select Menu > Cancel to give up.
Note: Program that are preinstalled on the phone cannot be removed.
Set the Security
Select Security to open the security settings screen.
®
6.1 Standard operating system.

76
To use the device lock
To enable the phone lock:
Select Security > Device lock, and check the Prompt if device unused for box, and set the
timeout. Choose the Password type, then enter and confirm your password.
Note: Once you configure the phone lock settings, you can enable the phon e lock from the Quick
List directly without configuring the settings again.
After the phone lock is activated, you have to enter the password to unlock it after timeout.
To disable the phone lock:
Select Security > Device lock, and uncheck the Prompt if device unused for box.
To use the SIM PIN
You can set the PIN password to prevent others from using the SIM function. The initial PIN
code is provided by Vodafone.
To enable the SIM PIN:
After the PIN code is activated, each time you turn on the phone, you have to enter the PIN
code. Otherwise you can not use the functions of the phone. The P IN code is required
before it is modified or cancelled. If you forget the PIN code, contact Vodafone.
Select Security > Enable SIM PIN, then enter your PIN.
Note: To cancel without enabling the SIM PIN, press Cancel.
Warning! If you enter your PIN incorrectly for three times, the SIM card will be locked automatically. Contact

77
Vodafone to obtain the PUK code to unlock the SIM card.
To disable the SIM PIN:
You have to enter the correct PIN code to disable the use of the PIN code. After it is disabled,
each time you turn on the phone, you will not be asked to enter the PIN code.
Select Security > Disable SIM PIN, then enter your PIN.
To change the SIM PIN:
When the new SIM PIN is enabled, you must enter this PIN to unlock the phone.
Select Security > Change SIM PIN. In Old PIN, enter the current PIN. Then enter and confirm
the new PIN.
To change PIN2
Select Security > Change PIN2, enter the current PIN2. Then enter and confirm the new
PIN2.
To check the certificates
Select Security > certificates. You can check the personal /int erme di ate/ ro ot ce rtif ic ates on your
phone.
To encrypt files on the MicroSD Card
Select Encryption > Encrypt files when placed on storage cards to encrypt the files on the
MicroSD card.

78
Set up Windows Update
Select Windows Update. Press Next to choose to manually or automatically check for and
download important updates on the Microsoft Web site. It will connect to the Internet to
download updates on your device with the latest security patches or fixes.
For more information, read the description on the Windows Update screen.
Managed Programs
Select Managed Programs to view a list of programs that are currently loaded on you phone.
Set the Error Reporting
Select to enable/disable Error Reporting. If enabled, the phone will remind you to send the error
report to Microsoft Corporation.
For more information, read the description on the Error Reporting screen.
Set the Customer Feedback
Select Customer Feedback, and then press the Left/Right key to enable/disable this function. If
enabled, the phone will remind you to send a feedback to Microsoft Corporation.
For more information, read the description on the Customer Feedback screen.

79
6 Experiencing Multimedia
6.1 Camera
Use Camera
To open camera
On the Home screen, select Start > Entertainment > Camera to launch the camera program.
Tip: You can also launch your camera program from anywhere by pressing the Camera key.
Camera standby screen
It displays Standby on the camera screen after 30-second idle as shown in Figure18. Press
any key in the Qwerty Keyboard to activate it. Press Thumbnails to open the Pictures &
Videos program.

80
Figure 18
To exit camera
Press the End key.
Take a Photo or Capture a Video Clip
To switch between taking a photo and recording video clip, press Menu in camera screen,
select Still or Video. Aim the camera at the subject and then press the OK key o r the
Camera key to take the shot. To capture a video, press the OK key or the Camera key to start
recording; press again to stop. During video recording process, you can pause/resume by
pressing the Right Soft key.
Note: The paused record will be ended and saved automatically after standby . The video re cording will be
stopped and saved when reaching the preset maximum time. By defaul t, the maximum time is 30
seconds. You can change it in Menu > Options… > Video > Time limit for videos.

81
To use zooming
Before capturing a photo, press the Up key on your phone to zoom in, press the Down key to
zoom out. Or press Menu, and then select Zoom.
To adjust brightness
To adjust the brightness, press Menu, and then select Brightness.
Tip: In all capture modes, press the Left/Right key to change the brightness value.
Configure Your Camera
Press Menu to configure your camera, including:
• Mode: There are three modes to capture picture.
Normal: You can capture a still image by pressing the Camera key or the OK key.
Burst: You can capture 5 consecutive images by pressing the Camera key or the OK
key.
Timer: When you press the OK key or the Camera key, it starts to count down, and
then captures a picture in 5 seconds.
• Resolution: Choose an appropriate resolution mode.
• White Balance: Choose an appropriate white balance mode.
• Flash: Choose to turn on/off the flashlight.
• Full Screen: Choose to enable the Full Screen mode. To exit t he Full Screen mode, press
the Right Soft key and cancel Full Screen from the Menu.

82
• Options…: To customize the settings for the pictures and videos.
General: You can resize a picture to match your requirement before sending it by
e-mail. You can also change the rotating orientation in this setting screen.
Slide Show: Your phone has two orientation modes: Portrait and Landscape. You can
decide whether to play screensaver when your phone is connected to PC and idle for 2
minutes.
Camera: Pictures are saved into your phone by default. You can choose to save
them in the storage card if it is available. Pictures captured by camera are saved
with a default prefix “img”. You can change the prefix and compress pictures to
different levels.
Tip: The file names are numbered in an increasing order. For example, the files are saved as
“img001” and “img002”.
Note: The Type filename prefix field cannot be blank; otherwise, the files will be saved with
default prefix automatically.
Video: You can decide whether to include audio when recording video files. You can
also set the maximum time for video recording.
6.2 Managing Pictures and Video Files
The Pictures & Videos program allows you to view and manage media files on your phone.
View Files after Capture
Select Start > Entertainment > Pictures & Videos, then move to the picture or video file and

83
press View/Play or the OK key to open it.
Copy a Picture or Video Clip to Your Phone
You can copy pictures and video files from your PC to the My Pictures folder on your phone, and
then view them on your phone.
For more information about copying files from your PC to your phone, see Windows Mobile Device
Center or ActiveSync Help on your PC.
Note: You can also copy pictures and video files from your PC to your phone using a memory card.
Pictures & Videos Menu
Move to a media file and press Menu to open a list of options.
You can choose to send the selected media file to another device via MMS, e-mail, or
Bluetooth, play the pictures as a slide show, send the picture to your Windows Live Space
account, etc.
• Open a file, and select Menu > Use as Home Screen to set th e p ic t u r e a s y o ur H o me screen
background.
• Select Menu > Options to customize picture settings and s lide show playback
preferences.
• Select Menu > Edit to d o m i n or to u c h up s t o the pict u r e such as r o t a t i ng an d cropping.
Note: The available menu options depend on the selected media file.

84
6.3 Windows Media Player Mobile
You can use Microsoft Windows Media Player Mobile to play digital audio and video files.
To open Windows Media Player Mobile, select Start > Entertainment > Windows Media.
Formats Supported
The following file formats are well supported by this phone.
Video: .wmv/.asf/.mp4/.3gp/.avi
Audio: .wma/.mp3/.mid/.midi/.rmi
About the Controls
By default, these controls are assigned to Windows Media Player Mobile functions.
To Select Menu Press/Hold Key
Play or pause Play/Pause Press the OK key or Enter key
Stop Stop
Skip to a previous file Press the Left key
Skip to the next file Press the Right key
Fast-forward a file Hold the Right key
Rewind a file Hold the Left key
Increase the volume Press the Up key

85
Decrease the volume Press the Down key
Turn the sound on or off quickly (mute) Press #
Switch to full screen during video
playback
Change rating Press *
Play the items in the Now Playing play list
in random order/repeatedly.
Tip: To change the assigned hardware keys, on the Playback sc ree n, select Menu > Options > Buttons.
Press 0
Shuffle/Repeat
About Licenses and Protected Files
Some media files have associated licenses that protect them from being unlawfully distributed or
shared.
If you want to copy a protected file from your PC to your phone, use the Windows Media Player on
your PC to synchronize the file to your phone. This will ensure that the license is copied along with
the protected file. For more information about synchronizing files to your phone and other mobile
devices, see Windows Media Player Help.
Note: You can view the protection status for a file by checking its file properties (Menu > Properties).

86
Play Media
To play a media file
To play media files from the library, select Menu > Library to open the Library screen. If
necessary, select a library. Then select the file from the catalogues (for example, My Music or
My Playlists), move to an item (such as a song, album, or artist name), press Play to play the
media file on the player screen.
To play media files from the phone or the storage card, on the Library screen, press Menu, and
then select Library > My device/Storage Card. Press the OK key to browse the file list and
play file(s).
Note: On the Library screen, to play a file that is stored on your phone but is not in a libr ary, se lect Menu
> Open File. Select the item (such as a file or a folder), and press Play.
To play media files from the Internet, on the Library screen, press Menu > Open URL to
prompt an input screen. Enter the desired URL and press OK to open the file from the
Internet. Press Menu to clear history logs or go back to the previous screen.
About the screens and menus
Press Menu. The available menu options depend on the screen you are viewing.
• Library: Display the Library screen so that you can choose a file to play.
• Play/Pause: Start or pause playback.
• Stop: Stop playback.
• Shuffle/Repeat > Shuffle: Play the items in the Now Playing playlist in random order.

87
• Shuffle/Repeat >Repeat: Play the items in the Now Playing playlist repeatedly.
• Full Screen: Display the current playing video in full screen mode.
• Options: Adjust v a ri o u s W i n d ow s Me d i a P l a ye r M o bi l e o p t i o n s, in c l u di n g ne t w or k , s ki n , and
hardware key options, etc.
• Properties: Display information about the currently playing file.
• About: Display information about Windows Media Player Mobile, such as the version
number.
Manage Your Media Library
To open media library
On the Windows Media screen, select Menu > Library. The screen lets you quickly find your
audio files, video files, and playlists. It contains the following items:
• My Music: You can view or play the music files.
• My Videos: You can view or play the video files.
• My TV: You can view or play the TV files.
• My Playlists: You can add the media files into your playlist.
• Now Playing: You can see the current file being played and files that are queued up to
play next.

88
To update media library
You can manually update the library to ensure that it contains new files that you recently copied
to your phone or storage card. Select Menu > Update Library to manu a l ly update the
library list. On the Library screen, select Menu > Update Library to update the media library.
The new media files, such as the video clip shot by the camera, will be added into the library.
To delete file from media library
In the media files list, select the file and then select Menu > Delete from Library to delete it.
Troubleshooting
For more information, see the Use Windows Media Player Mobile page at the Microsoft Web site
(www.microsoft.com/windowsmobile/en-us/help/more/windows-media-player. mspx).
6.4 Java Applications
Your phone supports Java 2 Micro Edition, J2ME. MIDlets are Java-based applications that can
run on mobile phones.

89
Install and Run MIDlets/MIDlet Suite
To install MIDlets from the Internet
1. On the Home screen, select Start > Programs > Applications.
2. Select Download Application to open the Internet Explorer.
3. Locate the MIDlet/MIDlet suite while connected to the Internet.
4. Select the MIDlet/MIDlet suite to download.
5. To start installing the MIDlet/MIDlet suite, press Yes.
6. Press Install to confirm the installation.
Note: You can cancel the installation at any time.
Downloaded MIDlets will be automatically saved in My Documents folder.
To install MIDlets from a PC
You can use the USB cable, or Bluetooth to install the MIDlets/MIDlet suites from a PC into
your phone.
Tip: MIDlets copied to your phone using Bluetooth or e-mail attachments are auto matically saved in
My Documents folder.
To install MIDlets from a local folder
1. On the Home screen, select Start > File Explorer.
2. Select the MIDlet/MIDlet suites currently saved in My Documents folder to install.
3. Press OK to install.

90
To run MIDlets/MIDlet suites on your phone
1. On the Home screen, select Start > Programs > Applications.
2. Select a MIDlet from the list.
3. Press OK key or press Launch to run the MIDlet.
Manage MIDlets/MIDlet Suite
You can organize the MIDlets/MIDlet suites into folders. You can also uninstall the MIDlets/MIDlet
suites.
To uninstall a MIDlet/MIDlet suite
Before you uninstall a MIDlet/MIDlet suite, make sure that it is not running.
1. On the Java Apps screen, move to the MIDlet/MIDlet suite.
2. Select Menu > Delete.
3. Press Yes to confirm.
To update a MIDlet/MIDlet suite
Java will search for updates for the selected MIDlet/MIDlet suite.
1. On the Java Apps screen, move to the MIDlet/MIDlet suite.
2. Select Menu > Update, the application then searches for updates.

7 Getting Connected
7.1 Connecting to the Internet
Ways of Connecting to the Internet
Your phone’s networking capabilities allow you to access the Internet or your corporate network at
work through wireline and wireless connections.
You can connect to the Internet by: GPRS or Dial-up.
Note: You can also add and set up the following connections:
• VPN: A VPN connection is used to access your corporate network by using an ex isting Inter net
connection.
• Proxy: A Proxy connection is used to access the Internet by using an existing conn ection to your
corporate or WAP network.
GPRS
You can use GPRS to connect to the Internet or to send and receive MMS.
If GPRS settings are not preset on your phone, obtain the Access point name from Vodafone. Also,
check with Vodafone if a user name and password are required.
To set up a new GPRS connection
1. On the Home screen, select Start > Settings > Connections > GPRS > New.

2. In Description, enter a name for the connection.
3. In Connects to, select the type of network to which you will connect.
4. Enter the Vodafone GPRS Access point information.
5. Enter the appropriate information in the remaining fields, if required by Vodafone.
6. Press Done.
Dial-up
You can use your phone to dial up to connect to the Internet or to your corporate network.
To set up a new dial-up connection
1. On the Home screen, select Start > Settings > Connections > Dial-up > New.
2. In Description, enter a name for the connection.
3. In Connects to, select the type of network to which you will connect.
4. Enter the appropriate information in the remaining fields.
5. Press Done.
Advanced Options
From the Connections screen, you can access advanced options to configure the connection type,
the number of redial attempts, the amount of idle time to wait before disconnecting, etc.
1. On the Home screen, select Start > Settings > Connections > Menu > Advanced.

2. Configure each connection type. You can choose Automatic to allow the phone to set a
service provider for each connection by default.
3. Select Menu > Options.
4. Choose the appropriate information in the remaining fields.
5. Press Done.
Tip: You may need to set URL exception in order to view some pages on your company Intranet. On
the Home screen, select Start > Settings > Connections > Menu > Advanced. Select Menu > Work
URL Exceptions > Menu > Add. In URL Pattern, enter the URL name. To add multiple URLs, use a
semicolon (;). Press Done.
7.2 Internet Explorer Mobile
Internet Explorer Mobile is a full-featured Internet browser, optimized for use on your phone. You
can use Internet Explorer to browse most of the Websites. Some web pages may not be displayed
properly as some specific web page technologies, such as Flash, are not supported by the phone.
Your phone will automatically create an EDGE or GPRS connection for you while browsing web
pages.
On the Home screen, select Start > Internet Explorer to open Internet Explorer.
Browse the Web
When you use EDGE or GPRS mobile network to browse web pages, the phone will
automatically make data connections. If you want to interrupt the data connection, select Menu
> Disconnect Cellular Data in the Wireless Manager. For more information about the Wireless
Manager, see Section 2.1.

Enter the text when the cursor is in the text field. Press the OK key to send the entered text. Use
the Navigation keys to move around the screen. Use the Navigation keys to move to the hyperlink;
press the OK key to link to the web page . Press the Back key to go back to the previous page.
Open Web Pages
In Internet Explorer, you can open web pages in the following ways:
• Select Menu > Favorites to expand Favorites list, then open a web site.
• Select Menu > Address Bar. Enter the web address directly, and press Go to open the web
page.
• Select Menu > History to expand the History list. Then select a web site.
Browsing Options
While browsing the Web, press Menu.
• Add to Favorites: Enter name, web address, and folder. Then press Add to add the current
web page to Favorites.
• Refresh: Reload the Web Page Contents.
• View:
Zoom Level : Adjust the zoom level.
One Column: Switch to single column view. The contents are sorted in a single column. The
column width is the same as screen width. You will rarely need to do a horizontal scroll.
Fit to Screen: Switch to Fit to Screen view. It retains the same layout as the Desktop, but
the items and edited contents may shrink. However, you can still view the majority of the

page without doing a horizontal scroll.
Desktop: Switch to Desktop view. It retains the same layout and size as the Desktop.
When browsing web pages, you need to do both horizontal and vertical scrolling of the
page.
Full Screen: Switch to Full Screen view. To exit the Full Screen mode, press the Left/
Right Soft key and cancel Full Screen from the Menu.
Show Pi ctures: Turn off Show Pictures. To open Show Pictures, re-select it.
• Tools:
Send Li nk…: Send the current link by SMS/MMS/E-mail.
Properties: Show the properties information.
Options
General: Select an option to configure, such as Play sounds, Warn when changing to an
insecure page, Allow Cookies, Encoding, and Wa rn when page content is blocked
by security settings, etc.
Home Page: Choose to use which web page as your home page. If you choose Use
Custom, you have to enter the address in the field below.
Connections: Select a checkbox to configure, such as Automatic detection settings,
Select Network, etc.
Note: When using the automatic detection, it will decide the connection method
according to the web page that you want to browse.
Memory: You can view the memory usage status. Move to Temporary Files, Cookies

or History, then press Clear to clear corresponding memory.
Note: When you browse the Internet, web pages and pictures will be cached in your
phone’s memory. This will allow quick access in the future. These are temporary files.
Deleting these files can effectively increase the memory on the phone. Cookies are files of
personal inform ati on an d ac tio ns r eco rd ed by the web si te. Del ete d coo ki es cannot be
restored.
7.3 Internet Sharing
With Internet Sharing, you can use your phone as an external modem for another device such as a
PDA or laptop.
Note: Make sure that you have installed SIM/USIM card, and set up a GPRS or Dial-up connection. If your
phone has not been set up with a data connection yet, select Menu > Connection Settings on the
Internet Sharing screen to configure first. See "GPRS" in Section 7.1 for setting up a GPRS connection.
See "Dial-up" in Section 7.1 for setting up a phone dial-up connecti on.
Set up the Phone as a USB Modem
1. On your phone, select Start > Organiser & Tools > Internet Sharing.
2. In the PC Connection list, choose USB.
3. In the Network Connection list, choose the connection that your phone uses to connect to the
Internet.
4. Use the USB cable to connect your phone with PC.
5. Press Connect.

End the Internet Connection
On the Internet Sharing screen, press Disconnect.
Set up the Phone as a Bluetooth Modem
1. On your phone, turn on Bluetooth and set it to visible mode.
2. Initiate a Bluetooth partnership from your phone, see “Pair a Bluetooth Device” in Section 7.4.
3. Select Start > Organiser & Tools > Internet Sharing.
4. In the PC Connection list, choose Bluetooth PAN.
5. In the Network Connection list, choose the connection that your phone uses to connect to the
Internet.
6. Press Connect to connect your phone to the PC through Bluetooth.
7.4 Bluetooth
Bluetooth is a short-range wireless communications technology. Phones with Bluetooth
capabilities can exchange information within a distance of about 10 meters without any
physical connection. The Bluetooth devices must be paired befo re the commu nicatio n is
performed.
Bluetooth Modes
Bluetooth on your phone operates in three different modes:
On: Bluetooth is turned on. Your phone can detect other Bluetooth-enabled devices, but not

vice versa.

Off: Bluetooth is turned off. In this mode, you can neither send nor receive information using
Bluetooth.
Visible: Bluetooth is turned on, and all other Bluetooth-enabled devices within range can detect
your phone.
Turn On or Off Bluetooth on Your Phone
1. On the Home screen, select Start > Settings > Connections > Bluetooth.
2. On Bluetooth Devices screen select Menu > Turn On Bluetooth.
3. To turn off Bluetooth on your phone, select Menu > Turn Off Bluetooth.
Make Your Phone Visible
1. On the Home screen, select Start > Settings > Connections > Bluetooth.
2. Select Menu > Turn On Visibility.
make your phone invisible, select Menu > Turn Off Visibility.
3. To
Tip: Select Start > Settings > Device Name to enter a name for your phone. This device name will be
shown on another Bluetooth-enabled device when it detects your phone.
Pair a Bluetooth Device
1. On the Home screen, select Start > Settings > Connections > Bluetooth. Select Add new
device… Wait for the phone to search for new other Bluetooth-enabled devices and list them.
2. Select the new device to be added and press Next.
3. Enter the Passcode to establish a secure connection, then press Next. Wait for the paired

device to accept the partnership.
Tip: You must enter the same Passcode on the pairing devices to complete the matching
procedure.
4. When the devices are paired, a message will appear on you phone. Press Done to confirm.
5.
Select the new device. You could edit and enter a display name for that device, then press
6. Select the checkboxes of services that you want to use from the paired device and press
Done.
7.5 Windows Live ™
Windows Live™ gives you full Internet experience on your phone. It helps you to find
information, pursue your interests, and get in touch with friends and family on the Internet more
easily. Windows Live offers the following key features:
• Live Search Bar, which lets you search for information on the Web.
• Live Messenger, the next generation of MSN Messenger Mobile.
• Live Mail, the next generation of Hotmail.
• Live Search, which lets you find locations, browse maps, and check for directions.
• Live Contacts, address book for storing Live Mail, Live Messaging, and Hotmail contacts.
Set up Windows Live
To set up Windows Live for the first time
Next.
 Loading...