

Page 1

Page 2

Verizon Wireless Salute
CDMA 1X Digital Mobile Phone
User Manual
TM
Page 3

Copyright © 2010 ZTE Corporation
All rights reserved
No part of this publication may be excerpted,
reproduced, translated or utilized in any form or by any
means, electronic or mechanical, including photocopying
and microfilm, without the prior written permission of
ZTE Corporation.
The manual is published by ZTE Corporation. We
reserve the right to make modifications on print errors or
update specifications without prior notice.
Version: V1.0
Manual Number: 079584501389
2010.4.20
Page 4

Contents
1. Introduction ......................................... 10
Overview .......................................................10
What’s Included............................................. 10
Technical Specifications................................ 11
Phone Overview ............................................12
Key Definitions...............................................13
Idle Mode.......................................................15
Main Display Icons ........................................16
2. Get Started With Your Phone............. 21
Battery ...........................................................21
Install the Battery ....................................21
Charge the Battery..................................22
Remove the Battery ................................23
Power On/Off Your Phone............................. 23
Lock/Unlock the Keypad................................24
Connect to the Network.................................25
Activate Your Phone......................................25
Menu Outline .................................................25
3. Basic Operations................................. 34
Make Voice Calls...........................................34
Use the Keypad ......................................34
Use the Contact List................................34
3
Page 5

Use the Last Number Dialed .................. 35
Use the Number from the Call History.... 35
Make an International Call...................... 36
Caller ID Function................................... 36
Wait/Pause Feature................................ 36
Use Speed Dials..................................... 37
Answer Voice Calls....................................... 38
In-Call Features ............................................ 38
Three-Way Call............................................. 40
Call Waiting................................................... 40
4. Enter Text............................................. 42
Text Input Key Functions .............................. 42
Text Input Modes .......................................... 43
5. Contacts ............................................... 47
New Contact ................................................. 47
Contact List................................................... 50
Backup Assistant .......................................... 51
Groups .......................................................... 52
Speed Dials .................................................. 52
In Case of Emergency .................................. 53
My Name Card.............................................. 56
6. Messaging............................................ 58
New Message ............................................... 58
How to Send a Text Message ................ 58
4
Page 6

How to Send a Picture Message.............59
How to Send a Voice Message...............61
Inbox..............................................................63
Sent ...............................................................66
Drafts............................................................. 68
Voicemail....................................................... 68
Email .............................................................69
Chat............................................................... 70
Change Message Settings ............................70
Erase Messages............................................74
7. Recent Calls......................................... 75
Missed ...........................................................75
Received .......................................................75
Dialed ............................................................75
All ..................................................................75
View Timers...................................................76
8. Media Center........................................77
Search ...........................................................77
Tunes & Tones ..............................................78
Get New Ringtones.................................78
My Ringtones.......................................... 78
My Sounds.............................................. 79
Pictures .........................................................80
Get New Pictures....................................80
My Pictures .............................................80
5
Page 7

Take Picture ........................................... 81
Online Album.......................................... 83
Games .......................................................... 83
Mobile Web................................................... 84
Browse & Download...................................... 85
Extras............................................................ 86
9. My Pictures .......................................... 87
10. VZ Navigator®...................................... 88
11. Bluetooth.............................................. 89
Turn Bluetooth On/Off................................... 89
Add New Device ........................................... 90
Bluetooth Settings......................................... 93
12. Settings & Tools.................................. 94
My Verizon.................................................... 94
Master Volume.............................................. 95
Tools ............................................................. 95
Voice Commands................................... 95
Calculator ............................................. 101
Ez Tip Calculator.................................. 102
Calendar............................................... 102
Alarm Clock.......................................... 104
Stop Watch........................................... 105
World Clock.......................................... 106
Notepad................................................ 106
6
Page 8

Bluetooth Menu ...........................................107
Sounds Settings ..........................................107
Easy Set-up ..........................................107
Call Sounds ..........................................107
Alert Sounds .........................................108
Keypad Volume.....................................109
Digital Dial Readout ..............................109
Service Alerts........................................110
Power On/Off ........................................110
Display Settings...........................................111
Easy Set-up ..........................................111
Banner ..................................................112
Backlight ...............................................112
Wallpaper..............................................113
Display Themes ....................................113
Main Menu Settings ..............................114
Dial Fonts..............................................115
Menu Font Type....................................115
Menu Font Size.....................................116
Clock Format.........................................116
Phone Settings ............................................117
Airplane Mode.......................................117
Set Shortcuts ........................................117
Voice Commands Settings....................119
Language.............................................. 119
7
Page 9

Location................................................ 120
Current Country.................................... 120
Security ................................................ 121
System Select ...................................... 123
NAM Select .......................................... 124
Auto Key Lock ...................................... 124
Call Settings................................................ 125
Answer Options.................................... 125
Auto Retry ............................................ 126
TTY Mode ............................................ 126
One Touch Dial .................................... 127
Voice Privacy........................................ 127
DTMF Tones ........................................ 127
Assisted Dialing.................................... 127
Hearing Aid Mode................................. 128
Phone Memory............................................ 129
Phone Info .................................................. 129
Set-up Wizard ............................................. 130
13. For Your Safety ................................. 131
General Care .............................................. 131
Aircraft Safety ............................................. 134
Hospital Safety............................................ 135
General Guidelines ..................................... 135
Road Safety ................................................ 136
Vehicles Equipped with an Airbag............... 137
8
Page 10

Third Party Equipment.................................138
Efficient Use ................................................138
Radio Frequency (RF) Energy.....................138
Emergency Services....................................140
FCC Compliance .........................................140
Use Your Phone with a Hearing Aid Device 142
Turn on the HAC Setting .............................143
Copyright Notice.......................................... 144
14. Glossary ............................................. 145
15. Troubleshooting................................146
16. Index ................................................... 148
9
Page 11

1. Introduction
Overview
To guarantee this mobile phone is always in its best
condition, read this manual carefully and keep it for future
reference. To ensure your safety, read Section 13: For
Your Safety thoroughly before using this handset for the
first time.
Note: The pictures and icons presented in this manual
are meant for illustrative purposes only and may not
accurately represent the actual pictures and icons found
on the phone. Your phone contains the most up to date
information.
What’s Included
Your Verizon Wireless SaluteTM Mobile Phone package
contains the following components. Check the box carefully
to ensure all items are present.
TM
Salute
Standard Lithium Ion Battery
Wall Charger
Product Safety and Warranty Guide
Quick Reference Guide
We, ZTE Corporation, declare that the product is packaged
with the battery separate in the box. The FCC ID label is
placed on the mobile phone clearly visible to all persons
at the time of purchase.
10
Phone
Page 12
Technical Specifications
Handset Type SaluteTM
Dimensions (L x W x H)
Weight
Continuous Standby
Time
Continuous Talk Time
102 × 51 × 14 mm
(4.0 × 2.0 × 0.55 in.)
approximately 100 g (3.53 oz)
including battery
220 hours (subject to the
network)
240 minutes (subject to the
network)
11
Page 13
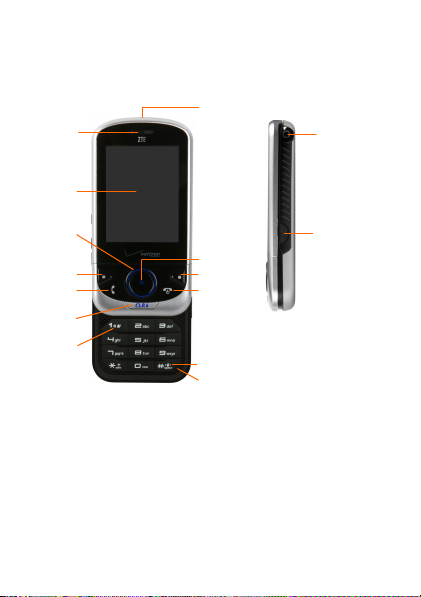
Phone Overview
Earpiece
LCD Screen
Directional Key
Left Soft Key
Send Key
CLR/Voice
Commands Key
Voicemail Key
12
Wrist Strap
Eyelet
OK Key
Right Soft Key
End Key
Vibration Mode Key
Microphone
2.5mm
Headset Jack
Camera Key
Page 14
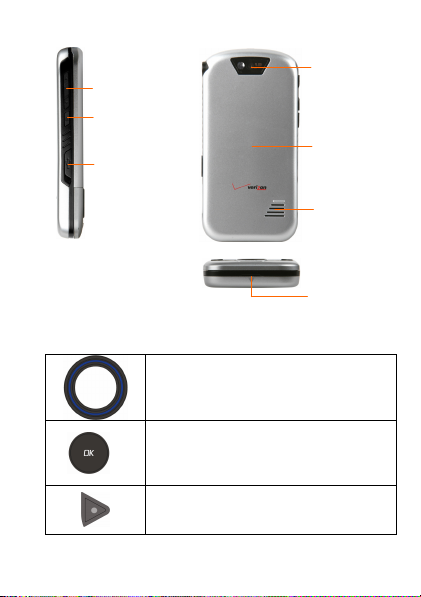
r
Volume Keys
Speakerphone Key
Accessory/
USB Charger Port
Key Definitions
Directional Key – The Directional Key
allows you to scroll through phone menu
options and provides a shortcut to phone
functions from idle mode.
OK Key – Allows you to access the
menu screen. It also allows you to accept
choices when navigating through a
menu.
Left Soft Key – Press to display the
Message menu or access the function
listed above the key.
Camera Lens
Back Cove
External Speaker
Back Cover Slot
13
Page 15
14
~
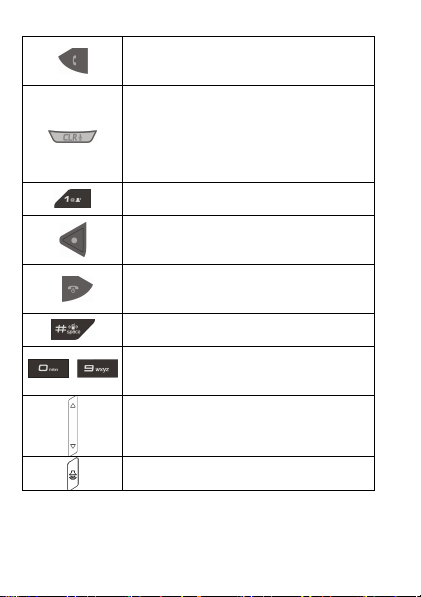
Send Key – Press to make or receive
a call. From idle mode, press to access
the All Calls list.
CLR/Voice Commands Key – Delete
characters or entire words during text
entry mode. Press to return to the
previous menu or screen. Press and hold
to launch Voice Commands from idle
mode.
Voicemail Key – Press and hold to dial
your voicemail from idle mode.
Right Soft Key – Press to display the
Contacts menu or access the function
listed above the key.
End Key – Press to end calls or close
applications. Press and hold to power
your phone on or off.
Vibration Mode Key – Press and hold
to turn Vibrate Mode on or off.
Alphanumeric Keys – Use to enter
numbers and characters or to select
menu items.
Volume Keys – Allows you to adjust the
master volume or the earpiece volume
during a call.
Speakerphone Key – Press to activate
or deactivate the speakerphone.
Page 16
Camera Key – Press to access camera
viewfinder mode or to take a picture.
Note: Please hold the phone sideways
when you take pictures, so that the taken
pictures saved in your phone are shown
in the vertical orientation.
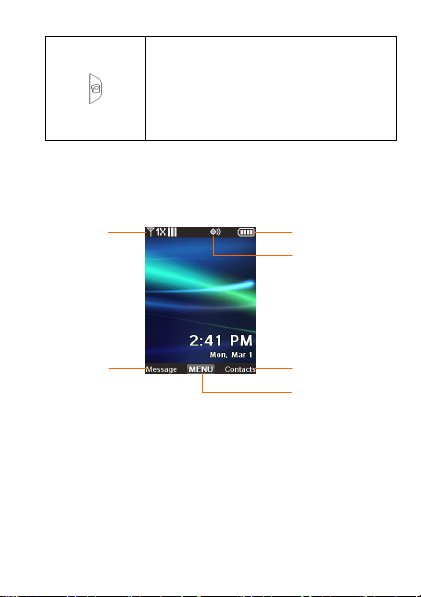
Idle Mode
The start screen indicates that your device is in Idle
Mode.
1
2
1. Signal strength — The strength of the signal received
by the device is indicated by the number of bars
displayed.
2. Message — Press the Left Soft Key to select this option.
3. MENU — Press the OK Key to select this option.
4. Contacts — Press the Right Soft Key to select this
option.
5
6
4
3
15
Page 17

5. Battery strength — Four bars indicate a fully charged
battery.
6. Location — Location information sharing mode.
Your phone can be customized via the menu. Each function
can be accessed by scrolling with the Directional Key or
by pressing the number that corresponds with the menu
item.
1. Slide the phone up, then press the OK Key [MENU].
2. To scroll through the menu, press the Directional
Key up, down, left or right, or press the number that
corresponds to the desired menu item.
3. To return to the previous page, press the CLR Key.
To exit the current menu and return to idle mode,
press the End Key.
4. Slide the phone up, then press the Left Soft Key
[Message] to open the Messaging menu. Or, press the
Right Soft Key [Contacts] to open your Contact List.
Note: This manual assumes that Main Menu Settings is
set to Grid and Display Themes is set to ZTE Flourescent,
which are the default settings.
Main Display Icons
Top Display Icons
Digital: Indicates your phone is receiving digital
data. More bars indicate a stronger signal.
1X: Indicates your phone is in the CDMA 1X
network. More bars indicate a stronger signal.
16
Page 18

Airplane Mode: Indicates Airplane Mode is on.
Roaming: Indicates the phone is outside your
home network and roaming.
SSL: Indicates the secure socket layer (SSL)
is transmitting encrypted data over the internet.
Voice Privacy: Indicates voice privacy feature
is on.
Data Call: Indicates a data call is in progress.
Dormant: Indicates no data is transmitting.
No Service: Indicates your phone is outside the
service area. Please wait for the signal or move
to other places to get a signal.
TTY: Indicates TTY feature is enabled.
Voice Call: Indicates a voice call is in progress.
E911: Indicates Global Positioning Service
(GPS) location feature for 911 is enabled (for
emergency calls only).
Location On: Indicates Global Positioning
Service (GPS) location feature is enabled (for
location and emergency calls).
Keypad Lock: Indicates the keypad is locked.
Bluetooth On: Indicates Bluetooth is turned on.
Bluetooth Connected: Indicates Bluetooth is
turned on and your phone is paired with another
Bluetooth device.
17
Page 19
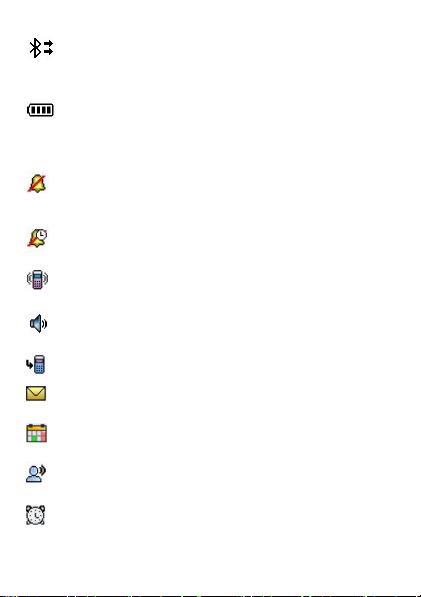
Bluetooth Active: Indicates your phone is
connected to another Bluetooth device and sending
or receiving data.
Battery Level: Indicates the battery level. More
bars indicate stronger battery power.
Bottom Display Icons
All Sounds Off: Indicates all sounds are silenced
including incoming call ringtone, message alert,
alarm sound and other alert sounds.
Alarm Only: Indicates your phone only rings for
the alarm sounds.
Vibrate On: Indicates your phone vibrates when
receiving a call, a message or other prompts.
Speakerphone: Indicates the speakerphone of
your phone is activated instead of earpiece.
Missed Calls: Indicates you have missed calls.
Message: Indicates you have received a new
message.
Calendar Appointment: Indicates you have
scheduled a calendar event.
Voicemail: Indicates you have received a new
voicemail message.
Alarm On: Indicates your phone has a set alarm.
18
Page 20
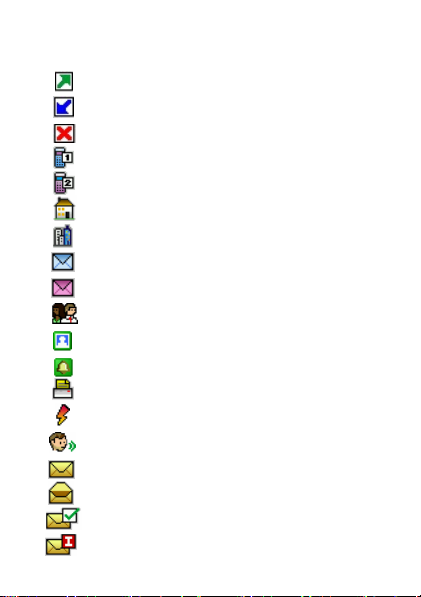
Other Display Icons
Dialed Call
Received Call
Missed Call
Mobile 1
Mobile 2
Home
Work
Email 1
Email 2
Group
Picture
Ringtone
Fax
Speed Dial
Voice Dial
New/Unread Message
Opened/Read Message
Message Delivered
Incomplete Delivery
19
Page 21
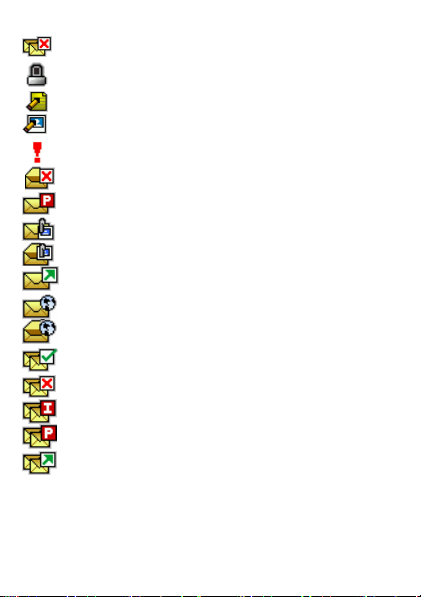
Sent Message, Delivery Failed
Message Locked
Text Message Draft
Multimedia Message Draft
Priority
Corrupt Message
Pending Message Send
Unread MMS
Read MMS
Sent Message
Unread WAP PUSH
Read WAP PUSH
Multiple Message Delivered
Multiple Message Failed
Multiple Message Incomplete
Multiple Message Pending
Multiple SMS/MMS Ack
Note: To view the icon glossary, please slide the phone
up and press the OK Key [MENU]→Settings & Tools→
Phone Info→Icon Glossary.
20
Page 22
2. Get Started With Your
Phone
This chapter outlines the steps required to set up your
phone, power on and activate on your service provider’s
network. Follow the procedure below step-by-step to get
started.
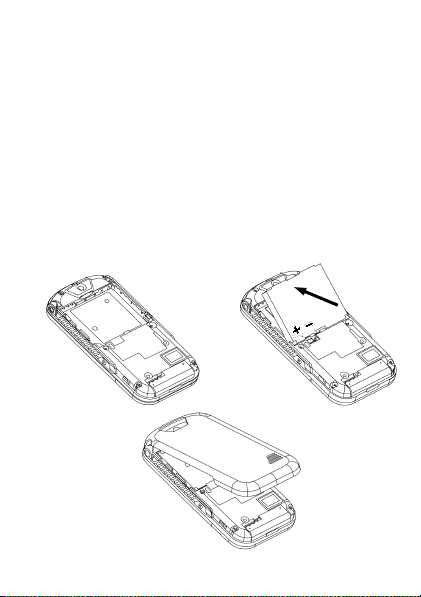
Battery
Install the Battery
1
2
3
21
Page 23

1. Insert the battery by aligning the contacts (1) and then
gently press it down until it clicks into place (2).
2. Replace the battery cover and snap it into place (3).
Charge the Battery
Your phone is powered by a rechargeable battery. The
battery is not fully charged when you purchase your
phone, but there may be enough power in the battery to
turn the phone on. Charge the battery with the
procedure indicated below.
Note: For maximum battery performance, it is
recommended that you completely charge the battery
before using the phone for the first time. A new battery’s
full performance is achieved only after three complete
charge and discharge cycles.
1. Connect the USB data cable into the cableless wall
adapter.
22
Page 24
2. Plug the USB data cable into the phone's USB Charger
Port (as shown in the above illustration) and the wall
adapter end into an electrical outlet.
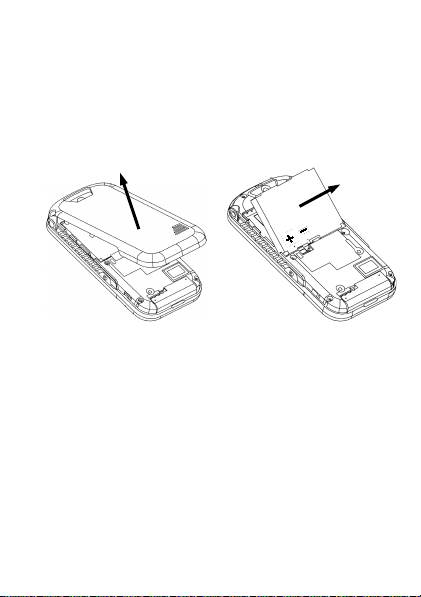
Remove the Battery
If you need to remove your phone’s battery, please
follow the procedure indicated below:
1
2
1. Insert your fingernail into the back cover slot on the
bottom of the phone and lift off the back cover (1).
2. Insert your fingernail into the slot and lift the battery
from the compartment (2).
Power On/Off Your Phone
To power on the phone, slide the phone up and
press and hold the End Key until the LCD screen
lights up.
If the handset lock code has been activated, the
phone will prompt you to enter the code. The
default lock code for an inactivated phone is 0000.
23
Page 25

Once you have activated your handset, the default
lock code will be the last 4 digits of your phone
number.
It is also possible that the lock code has been
updated by the user. If the updated lock code is lost
or forgotten, please contact your service provider.
To power off the phone, press and hold the End
Key until the display turns off.
Warning: Do not power the phone on when wireless phone
use is prohibited, or when it may cause interference or
danger.
Lock/Unlock the Keypad
To prevent accidental pressing of keys, your phone is
equipped with the keyguard feature.
To lock the keypad, slide the phone closed.
To unlock the keypad, press the Right Soft Key
[Unlock] and then press the OK Key; or slide the
phone up.
When the phone is closed, the Auto Key Lock feature
can lock the keypad automatically when the backlight
goes off.
To access the Auto Key Lock feature, slide the phone up
and press the OK Key [MENU]→Settings & Tools
→Phone Settings→Auto Key Lock. Select either On
or Off and press the OK Key [SET].
24
Page 26
Connect to the Network
After your phone is powered on, it will automatically search
for the network.
Activate Your Phone
Please contact your service provider for more
information.
Menu Outline
Contacts
1. New Contact
2. Contact List
3. Backup Assistant
4. Groups
5. Speed Dials
6. In Case of Emergency
7. My Name Card
Messaging
1. New Message
1. TXT Message
2. Picture Message
3. Voice Message
2. Inbox
25
Page 27

3. Sent
4. Drafts
5. Voicemail
6. Email
1. Mobile Email
2. Mobile Web Email
7. Chat
Recent Calls
1. Missed
2. Received
3. Dialed
4. All
5. View Timers
Search
Media Center
1. Search
2. Tunes & Tones
1. Get New Ringtones
1. Get New Applications
2. My Ringtones
1. Get New Applications
26
Page 28

3. My Sounds
1. Record New
3. Pictures
1. Get New Pictures
1. Get New Applications
2. My Pictures
3. Take Picture
4. Online Album
4. Games
1. Get New Applications
5. Mobile Web
6. Browse & Download
1. Get New Applications
7. Extras
1. Get New Applications
My Pictures
VZ Navigator
Bluetooth
1. Add New Device
27
Page 29

Settings & Tools
1. My Verizon
2. Master Volume
3. Tools
1. Voice Commands
2. Calculator
3. Ez Tip Calculator
4. Calendar
5. Alarm Clock
6. Stop Watch
7. World Clock
8. Notepad
4. Bluetooth Menu
1. Add New Device
5. Sounds Settings
1. Easy Set-up
2. Call Sounds
1. Call Ringtone
1. Get New Ringtones
1. Get New Applications
2. Call Vibrate
3. Caller ID Readout
3. Alert Sounds
1. TXT Message
28
Page 30

1. Tone
1. Get New Ringtones
1. Get New Applications
2. Vibrate
3. Reminder
2. Multimedia Message
1. Tone
1. Get New Ringtones
1. Get New Applications
2. Vibrate
3. Reminder
3. Voicemail
1. Tone
1. Get New Ringtones
1. Get New Applications
2. Vibrate
3. Reminder
4. Emergency Tone
5. Missed Call
1. Tone
1. Get New Ringtones
1. Get New Applications
2. Vibrate
3. Reminder
4. Keypad Volume
29
Page 31

5. Digit Dial Readout
6. Service Alerts
1. ERI
2. Minute Beep
3. Call Connect
4. Software Update
7. Power On/Off
1. Power On
2. Power Off
6. Display Settings
1. Easy Set-up
2. Banner
1. Personal Banner
2. ERI Banner
3. Backlight
1. Display
2. Keypad
4. Wallpaper
1. My Pictures
2. Fun Animations
5. Display Themes
6. Main Menu Settings
1. Menu Layout
2. Replace Menu Items
3. Position Menu Items
30
Page 32

4. Reset Menu Settings
1. Menu Layout
2. Menu Items
3. Item Positions
4. All
7. Dial Fonts
8. Menu Font Type
9. Menu Font Size
0. Clock Format
7. Phone Settings
1. Airplane Mode
2. Set Shortcuts
1. Set My Shortcuts
1. Shortcut 1
2. Shortcut 2
3. Shortcut 3
4. Shortcut 4
2. Set Directional Keys
1. UP Directional Key
2. LEFT Directional Key
3. DOWN Directional Key
3. Voice Commands Settings
1. Confirm Choices
2. Sensitivity
3. Adaptation
31
Page 33

1. Adapt Voice
4. Prompts
1. Mode
2. Audio playback
5. About
4. Language
5. Location
6. Current Country
7. Security
1. Edit Codes
1. Phone Only
2. Calls & Services
2. Restrictions
1. Location Setting
3. Phone Lock Setting
4. Lock Phone Now
5. Restore Phone
8. System Select
9. NAM Select
0. Auto Key Lock
8. Call Settings
1. Answer Options
2. Auto Retry
3. TTY Mode
4. One Touch Dial
32
Page 34

5. Voice Privacy
6. DTMF Tones
7. Assisted Dialing
8. Hearing Aid Mode
9. Phone Memory
1. Memory Usage
2. My Pictures
3. My Ringtones
4. My Sounds
5. My Contacts
0. Phone Info
1. My Number
2. SW/HW Version
3. Icon Glossary
4. Software Update
1. Status
2. Check New
*. Set-up Wizard
Note: Some contents in the user manual may differ from
your phone depending on the phone software. Please
refer to your phone for the most up to date information.
33
Page 35

3. Basic Operations
Make Voice Calls
Use the Keypad
1. Slide the phone up and enter a phone number including
full area code by using the alphanumeric keypad. If
an incorrect character is entered, use the CLR Key
to delete the digit. Press and hold the CLR Key to
erase all digits.
2. Press the Send Key to make the voice call.
3. Press the End Key to end the call, or to cancel the
call attempt.
Note: To make an emergency call, slide the phone up and
enter the emergency number and press the Send Key. If
possible, remain stationary and keep the line connected.
Use the Contact List
You can also make a call by choosing a record from your
Contacts. To place a call from the contact list:
1. Slide the phone up and press the OK Key [MENU]
→Contacts→Contact List to view your contact list.
Shortcut: Press the Right Soft Key [Contacts]. The
list of names in your contacts is displayed
alphabetically.
2. Scroll to the desired entry and press the Send Key to
34
Page 36

make a call.
Note: Selecting the Contact entry and then pressing the
Send Key will dial the Default Number of the Contact
entry automatically. If multiple numbers are saved in the
Contact List, select the Contact entry, then select the
phone number you want to dial. Then press the Send
Key.
Use the Last Number Dialed
Your phone can redial the last number dialed. To dial the
last number:
1. Slide the phone up and press the Send Key.
2. Press the Send Key again to dial the first entry.
Use the Number from the Call History
Generally, all calls you have made or received are
saved in a list on the phone.
You may use the Send Key as a shortcut key to the All
Calls list from the idle screen.
All numbers are grouped into Missed Calls, Received
Calls, and Dialed Calls. To dial a number from your call
history:
1. Slide the phone up and press the OK Key [MENU]→
Recent Calls.
2. Navigate through the menu and press the OK Key to
select Missed, Received or Dialed calls.
3. Select the phone number you want to dial from the
list and press the Send Key to place the call.
35
Page 37

Make an International Call
1. Slide the phone up, then press and hold the * Key.
The + required for international calls will be displayed.
2. Enter the country code, area code, and phone number
then press the Send Key.
3. To end the call, press the End Key.
Caller ID Function
Caller ID displays the number of the person calling when
your phone rings. If the caller ’s identity is stored in Contacts,
the name appears on the screen. The caller ID is stored
in the Recent Calls Menu.
Wait/Pause Feature
Pauses are used for automated systems (i.e., voicemail
or calling cards). Insert a pause after a phone number
and then enter another group of numbers. The second
set of numbers is dialed automatically after the pause.
This feature is useful for dialing into systems that require
a code.
Wait (W)
The phone stops dialing until you press the Send Key to
advance to the next number.
2-Sec Pause
The phone waits 2 seconds before sending the next string
of digits automatically.
1. Slide the phone up and enter the phone number.
36
Page 38

2. Press the Right Soft Key [Options].
3. Select Add 2-Sec Pause, and then press the OK Key.
4. Enter additional number(s) (pin number or credit card
number).
5. Press the Send Key to dial or the Left Soft Key[Save].
Use Speed Dials
Your phone is capable of storing Speed Dial numbers
that can be quickly dialed from idle mode.
One, Two, Three-Touch Dialing
Ideal for frequently dialed numbers, this feature allows
contact entries to be dialed via the keypad with only one,
two, or three key presses.
One-Touch Dialing:
1-9: Slide the phone up, then press and hold the number
you wish to connect to for more than 1 second.
1: Speed Dial entry 1 (Voicemail) is already assigned.
Two-Touch Dialing:
10-94: Slide the phone up, then press the first digit and
press and hold the second digit of the number to dial.
95, 96, 97, 98 and 99: Speed Dial entries 95(#Warranty
Center), 96(#DATA), 97(#BAL), 98(#MIN) and 99(#PMT)
are already assigned to Verizon Wireless Account Information.
Three-Touch Dialing:
100-999: Slide the phone up and press the first and second
digits, then press and hold the third digit of the number to dial.
37
Page 39

411: Speed Dial entry 411 (Directory Assistance) is already
assigned.
Note: If you have not already assigned a Speed Dial to
the selected key, the phone will prompt that no Speed
Dial has been assigned. For more information on using
Speed Dials, please refer to Section 5: Contacts-Speed
Dials in this manual.
Answer Voice Calls
1. When the phone rings or vibrates, you can answer the
call by simply sliding open the phone (Depending on
your phone’s settings, you may also answer incoming
calls by pressing Any Key or Auto with Handsfree)
2. Press the End Key to end the call.
Note: The default setting can be changed by pressing
the OK Key [MENU]→Settings & Tools→Call Settings
→Answer Options.
In-Call Features
Volume
1. Slide the phone up and press the Volume Keys on the
side of your phone up or down to adjust the volume.
2. Press the OK Key [SET] to confirm the setting.
Mute
You can mute your voice during a call by pressing the Left
Soft Key [Mute]. Press the Left Soft Key [Unmute] to
allow the caller to hear your voice again.
38
Page 40

Speakerphone
Your phone has a speakerphone function that allows you
to talk hands-free with the phone’s speaker.
1. During a call, press the Speakerphone Key on the
left side of your phone to activate or deactivate
speakerphone.
Advanced Features
Press the Right Soft Key [Options] during a call to enter
the advanced in-call features. Select one of the following
options and press the OK Key.
New TXT Message: Allows you to create a new text
message.
Contact List: Allows you to view the contact list.
Recent Calls: Allows you to view call history.
Bluetooth Menu: Opens the Bluetooth menu.
Main Menu: Opens the main menu.
Notepad: Opens the notepad.
Voice Privacy: Allows you to turn the voice privacy
feature On or Off.
Setting Ringtone to Vibrate
Vibration Mode mutes key tones and alerts for an incoming
call or message. To activate Vibration Mode:
1. Slide the phone up, then press and hold the # Key.
"PHONE SET TO VIBRATE ONLY" appears on the
display.
39
Page 41

2. To disable Vibration Mode, press and hold the # Key
again. "PHONE SET TO NORMAL" appears on the
display.
Three-Way Call
Your phone has a three-way calling feature, which enables
you to have conference calls with two parties. You can
activate this function by following the procedure below:
1. Slide the phone up and enter the phone number you
wish to call and then press the Send Key.
2. Once you have established the connection, enter the
second phone number you wish to call and then press
the Send Key again.
3. When you’re connected to the second party, press
the Send Key again to begin your 3-Way call.
Note: If one of the people you called hangs up during
your call, you and the remaining caller stay connected. If
you initiated the call and are the first to hang up, all three
calls are disconnected.
Call Waiting
Your phone can accept phone calls while another call is
active. You can manage the phone’s call waiting feature
as follows:
1. To answer another call while on the phone, press the
Send Key. This places the first call on hold. To switch
back to the first caller, press the Send Key again.
40
Page 42

Note: When the End Key is pressed, both the active
and holding user will be disconnected. If the holding
user remains on the call, your phone will ring again. You
may accept or reject the call.
Note: The three-way call and call waiting features require
network support and may result in additional charges.
Please contact your service provider for more information.
41
Page 43

4. Enter Text
Text Input Key Functions
Key
42
Function Description
Left Soft Key
Directional
Key
* Key
# Key
Press to select text
entry mode.
Move the cursor up
and down, left and
right during text
editing.
Press to switch among
lowercase, standard
and uppercase entry
mode.
Press and hold to
switch among Zi
Word, alphabetic and
numeric entry mode.
Press once to insert
a space.
Page 44

Key
~
Function Description
Enter characters 0 - 9
and letters from a - z.
In word and alphabetic
Alphanumeric
Keys
CLR Key
mode, press the ‘1’
Key to enter usual
punctuation marks
and symbols; In word
mode, press the ‘0’
Key to change to other
matching words.
Press to delete the
previous character
during text entry.
Press and hold the
CLR Key to erase an
entire word or
character string.
Text Input Modes
During text entry, the current input mode is indicated
above the Left Soft Key (Abc is the default).
Press the Left Soft Key to select the input mode.
Press the Left Soft Key and select Symbols or
Quick Text to enter the symbols or add pre-stored
quick texts.
43
Page 45

Display
Symbol
English Standard Word predictive mode
English Uppercase Word predictive mode
English Lowercase Word predictive mode
Standard Alphabetic mode
Uppercase Alphabetic mode
Lowercase Alphabetic mode
Numeric mode
Text Entry Mode
Enter Text Using Word Mode
Word mode allows you to input messages or text quickly
with the built-in predictive dictionary.
1. To activate Word Mode from the text entry field, press
the Left Soft Key, scroll to Zi Word, and press the
OK Key.
2. Enter the first few letters of your word with the keypad.
3. To display proposed matches, press the '0' Key until
the appropriate word is displayed.
4. When the desired word is displayed, press the # Key
to confirm and insert a space.
Note: In Zi Word mode, press the * Key to switch among
uppercase, lowercase and standard word modes.
In standard word mode, the first letter of a new sentence
will be capitalized automatically.
44
Page 46

In Spanish word mode, the text entering is the same as
in English word mode.
Enter Text Using Alphabetic Mode
In Alphabetic mode, the alphanumeric keys are used to
enter letters and numbers.
1. In the text input field, press the Left Soft Key and
select Abc or ABC, then press the OK Key.
2. Press the key labeled with the target letter once for
the first letter, press twice for the second letter, and
so on. Press and hold the key labeled with the target
number for that number.
Note: In Alphabetic mode, press the * key to switch
among uppercase, lowercase and standard alphabetic
modes.
In standard alphabetic mode, the first letter of a new
sentence will be capitalized automatically.
Enter Numbers Using Numeric Mode
In Numeric mode, use the alphanumeric keys to enter
the number.
1. In the text input field, press the Left Soft Key and
select 123, then press the OK Key.
2. Press the alphanumeric keys to enter the number
directly shown on the keypad.
Note: Letters can’t be entered in this mode.
45
Page 47

Symbol Mode
Allows you to enter symbols.
1. From the text entry screen, press the Left Soft Key
and select Symbols, then press the OK Key.
2. Select the symbol you wish to enter by highlighting it
using the Directional Key and pressing the OK Key
to select. For additional options, press the Right Soft
Key [Next], to return to the previous menu, press the
Left Soft Key [Prev].
46
Page 48

5. Contacts
This menu allows you to save and manage contact
information. To access Contacts from idle mode, slide the
phone up and press the OK Key [MENU]→Contacts.
Shortcut: To quickly access the contact list, slide the
phone up and press the Right Soft Key [Contacts].
New Contact
1. Slide the phone up and enter the phone number you
want to save.
2. Press the Left Soft Key [Save].
3. Select Add New Contact and press the OK Key.
4. Select Mobile 1, Mobile 2, Home, Work or Fax
and press the OK Key.
5. Enter the remaining contact information (Name,
Mobile 1, Home, Work, Email 1, Group, Picture,
Ringtone, Mobile 2, IM Screen Name, Fax, Email 2,
Street, City, State, Zip Code, Country, Notes) and
press the OK Key [SAVE].
Note: You can also create a contact by sliding the phone
up and pressing the OK Key [MENU]→Contacts→New
Contact.
Options to customize your contacts
Once the basic phone number and name information is
stored in your Contacts, you can edit and/or customize
the entries.
47
Page 49

1. Slide the phone up and press the Right Soft Key
[Contacts] and select the contact you would like to
edit.
2. Press the Left Soft Key [Edit].
3. Edit the information and press the OK Key [SAVE] to
save.
Edit contact entries
Add a phone number from idle mode
1. Slide the phone up and enter the phone number you
want to save.
2. Press the Left Soft Key [Save].
3. Select Update Existing and press the OK Key.
4. Select the contact you would like to update and press
the OK Key.
5. Select the desired number type and press the OK
Key. The phone number is updated to the contact.
Add a phone number from the Contact List screen
1. Slide the phone up and press the Right Soft Key
[Contacts] and select the contact you would like to
edit.
2. Press the Left Soft Key [Edit].
3. Select the desired number type, enter the new phone
number and press the OK Key [SAVE] to save.
48
Page 50

Default numbers
Change the default number
1. Slide the phone up and press the Right Soft Key
[Contacts] and select the contact you would like to
edit.
2. Press the Left Soft Key [Edit].
3. Highlight the number you would like to set as the
default and press the Right Soft Key [Options].
4. Select Set As Default and press the OK Key.
5. Select Yes and press the OK Key.
6. Press the OK Key [SAVE] to update the contact's
information.
Edit stored phone numbers
1. Slide the phone up and press the Right Soft Key
[Contacts] and select the contact you would like to
edit.
2. Press the Left Soft Key [Edit].
3. Select the desired number type and edit the stored
phone numbers. Press the OK Key [SAVE] to save.
Deleting
Delete a phone number from a contact
1. Slide the phone up and press the Right Soft Key
[Contacts] and select the contact you would like to
edit.
2. Press the Left Soft Key [Edit].
49
Page 51

3. Select the desired number type and press the CLR
Key to delete the stored phone number. Press the
OK Key [SAVE] to save.
Delete a contact entry
1. Slide the phone up and press the Right Soft Key
[Contacts] and select the contact you would like to
delete.
2. Press the Right Soft Key [Options], select Erase
and press the OK Key.
3. Select Yes and press the OK Key to confirm.
Contact List
Contact List allows you to view the list of all contacts
stored on your phone.
1. Slide the phone up and press the OK Key [MENU]→
Contacts→Contact List.
2. Press the Directional Key to scroll up or down the list,
and press the OK Key [VIEW] to view the desired
contact information.
3. Press the Left Soft Key [Edit] to edit the highlighted
contact.
4. Press the Right Soft Key [Options] to display the
following pop-up menu:
y New Contact: Add a new contact.
y Erase: Erase the contact.
y New TXT Message: Send a text message to the
contact.
50
Page 52

y New Picture Message: Send a picture message
to the contact.
y New Voice Message: Send a voice message to
the contact.
y Set As ICE Contact: Set the contact as an ICE
(In Case of Emergency) contact.
y Call: Make a call to the contact (Default number).
y Manage Contacts: You can mark the desired
contacts in the list to erase, lock or unlock. The
locked contacts cannot be erased.
y Send via Bluetooth: Send your name card via
Bluetooth to another Bluetooth compatible device.
Tip: You may also use the Go To field to search for a
contact. Type the name of the desired contact in the Go
To field. The phone will automatically scroll to the name
that most closely matches your input in the contact list.
Backup Assistant
Backup Assistant safeguards your mobile phone's address
book and automatically saves a copy of the names,
phone numbers, and email addresses stored in your
phone. You can also view, print, add, delete, and edit
your contacts online.
If you lose, damage, or upgrade your phone, Backup
Assistant will restore your contact list to a new or
replacement phone.
1. Slide the phone up and press the OK Key [MENU]→
Contacts→Backup Assistant.
51
Page 53

2. Follow the on-screen directions to continue.
Groups
This menu allows you to add contacts to the groups. You
can add, rename, delete the groups or send a message
to each contact in the selected group.
1. Slide the phone up and press the Right Soft Key
[Contacts], then select the Contact you want to add
to a group.
2. Press the Left Soft Key [Edit].
3. Scroll to the Group field and press the Left Soft Key
[Set].
4. Select either Business, Colleagues, Family,
Friends or School, press the OK Key [MARK], then
press the Left Soft Key [Done].
5. To create a new group, press the Right Soft Key
[New]. Enter the group name and press the OK Key
[SAVE].
6. Enter the remaining contact information then press
the OK Key [SAVE].
Speed Dials
Speed Dials allows you to view the current list of speed
dials and add new entries.
Add a new speed dial
1. Slide the phone up and press the Right Soft Key
[Contacts], then select the contact you want to set
speed dial to.
52
Page 54

2. Press the Left Soft Key [Edit].
3. Select the phone number you want to add to Speed
Dial and press the Right Soft Key [Options].
4. Select Set Speed Dial and press the OK Key, choose
a Speed Dial location then press the OK Key [SET].
5. To assign the entry select Yes then press the OK Key.
6. Press the OK Key [SAVE] to save.
Tip: Enter the speed dial number in the Go To field to
navigate to a speed dial number quickly.
Delete a speed dial
1. Slide the phone up and press the Right Soft Key
[Contacts], then select the desired contact.
2. Press the Left Soft Key [Edit].
3. Select the phone number you want to delete speed
dial for and press the Right Soft Key [Options].
4. Select Remove Speed Dial and press the OK Key.
5. To remove the speed dial select Yes then press the
OK Key.
6. Press the OK Key [SAVE] to save the updated contact
information.
In Case of Emergency
This feature allows you to store names, phone numbers
and other information, which may be very helpful in case
of emergency. It also allows you to add, read, edit, or
erase Personal Info (in the form of Notes) which may
also be useful in cases of emergencies.
53
Page 55

Add an ICE Contact
1. Slide the phone up and press the OK Key [MENU],
select Contacts and press the OK Key. Select In
Case of Emergency and press the OK Key.
2. Select Contact 1, Contact 2 or Contact 3 and press
the OK Key [ADD].
3. When selecting from ADD CONTACT, select From
Contacts and press the OK Key.
4. Select the desired contact entry and press the OK Key.
5. When adding a new contact, select New Contact and
press the OK Key.
6. Enter the contact information and press the OK Key
[SAVE].
7. The contact name will be displayed in place of
Contact 1, Contact 2 or Contact 3.
Add ICE Personal Info
1. Slide the phone up and press the OK Key [MENU],
select Contacts and press the OK Key. Select In
Case of Emergency then press the OK Key.
2. Select Personal Info and press the OK Key [VIEW].
3. Select Note 1, Note 2 or Note 3 and press the OK
Key [ADD].
4. Enter the information and press the OK Key [SAVE].
5. The information you entered now appears in place of
Note 1, Note 2 or Note 3.
54
Page 56

Re-assign emergency contacts
1. Slide the phone up and press the OK Key [MENU],
select Contacts and press the OK Key. Select In
Case of Emergency then press the OK Key.
2. Select the contact you want to re-assign and press
the Right Soft Key [Options]. Select Re-assign and
press the OK Key.
3. Select From Contact or New Contact to assign another
contact or add a new contact as the emergency contact.
Erase assigned emergency contacts
1. Slide the phone up and press the OK Key [MENU],
select Contacts and press the OK Key. Select In
Case of Emergency then press the OK Key.
2. Select an assigned contact that you would like to erase
and press the Right Soft Key [Options]. Select
Unassign and press the OK Key.
Call an assigned emergency contact
1. Slide the phone up and press the OK Key [MENU],
select Contacts and press the OK Key. Select In
Case of Emergency then press the OK Key.
2. Select an assigned contact and press the Left Soft
Key [Call] or press the Send Key to call the contact.
Edit or Erase saved personal info
1. Slide the phone up and press the OK Key [MENU],
select Contacts and press the OK Key. Select In
Case of Emergency then press the OK Key.
2. Select Personal Info and press the OK Key [VIEW].
55
Page 57

3. Select a desired note and press the Right Soft Key
[Erase]. Select Yes and press the OK Key to delete
the note.
4. Select a desired note and press the OK Key [VIEW]
to view the entry details.
5. Press the OK Key [EDIT] to make adjustments and
press the OK Key [SAVE] to save after editing.
My Name Card
This feature allows you to add your personal contact
information including name, phone number, Email, etc.
as a name card.
Edit My Name Card
1. Slide the phone up and press the OK Key [MENU],
select Contacts and press the OK Key. Select My
Name Card then press the OK Key.
2. Press the OK Key [EDIT].
3. Under EDIT CONTACT, adjust the fields as desired
and press the OK Key [SAVE] to save your changes.
Send My Name Card via Text or Picture Message
1. Slide the phone up and press the OK Key [MENU],
select Contacts and press the OK Key. Select My
Name Card then press the OK Key.
2. Press the Right Soft Key [Options] and select Send
via TXT Message/Picture Message, then press the
OK Key.
56
Page 58

3. Complete the remaining message fields as desired
and press the OK Key [SEND] to send the message.
Send My Name Card with Voice Message
1. Slide the phone up and press the OK Key [MENU],
select Contacts and press the OK Key. Select My
Name Card then press the OK Key.
2. Press the Right Soft Key [Options] and select Send
via Voice Message, then press the OK Key.
3. Press the OK Key to start recording and press the
OK Key [STOP] to finish recording and add the voice
record into the message.
4. Complete the remaining message fields as desired
and press the OK Key [SEND] to send the message.
Send My Name Card to another Bluetooth
device
1. Slide the phone up and press the OK Key [MENU],
select Contacts and press the OK Key. Select My
Name Card then press the OK Key.
2. Press the Right Soft Key [Options] and select Send
via Bluetooth, then press the OK Key.
3. Follow the on-screen prompts and select a paired
Bluetooth device.
4. Press the OK Key to send My Name Card. If Bluetooth
is turned off, the phone will prompt you to turn it on.
57
Page 59

6. Messaging
Your phone is able to send text, picture and voice
messages. To access Messaging, slide the phone up and
press the OK Key [MENU]→Messaging.
Shortcut: To quickly access Messaging, slide the phone
up and press the Left Soft Key [Message] in idle mode.
New Message
How to Send a Text Message
1. Slide the phone up and press the Left Soft Key
[Message], select New Message and press the OK
Key. Select TXT Message and press the OK Key.
Note: You can also press the OK Key [MENU]
→Messaging→New Message→TXT Message and
press the OK Key.
2. In the To field, enter the phone number or email
address of the recipient and press the OK Key.
3. Enter the message and press the OK Key [SEND].
Note: Up to 10 recipient addresses can be entered for
one message.
Edit the To field
In the To field, press the Right Soft Key [Add] to display
the pop-up menu:
From Contacts: Add the recipient from the contact list.
58
Page 60

Recent Calls: Add the recipient from the recent calls list.
Groups: Add the recipient from the group list.
To Contacts: If a phone number or email address is
entered in the field, add it to a new contact, or update
an existing contact with it.
Edit the Text field
In the Text field, press the Right Soft Key [Options] to
display the pop-up menu:
Insert Quick Text: Insert already written sentences
into the message.
Save as Draft: Save the current message into the
Drafts folder.
Add: Add Graphic, Animation, Sound, Signature or
Name Card into the message.
Format Text: Change the Alignment, Font Size, Font
Style, Text Color or Background Color of the text.
Priority Level: Set the priority level of the message
to High or Normal.
Cancel Message: Cancel the message editing and
go back to the previous menu.
How to Send a Picture Message
1. Slide the phone up and press the Left Soft Key
[Message], select New Message and press the OK
Key. Select Picture Message and press the OK Key.
Note: You can also press the OK Key [MENU]
→Messaging→New Message→Picture Message.
59
Page 61

2. In the To field, enter the phone number or email
address of the recipient and press the OK Key.
3. Press the Directional Key down and enter the message
in the Text field.
4. Press the Directional Key down to highlight the
Picture field, press the Left Soft Key [My Pics] to
select a picture from the MY PICTURES folder, and
then press the OK Key to add a picture.
5. Press the Directional Key down to highlight the Sound
field, press the Left Soft Key [Sounds] and select a
sound from the MY SOUNDS folder or record a new
sound, and then press the OK Key to add a sound record.
6. Press the Directional Key down to highlight the Name
Card field. Press the Left Soft Key [Add] to select a
name card From Contacts or select My Name Card,
and then press the OK Key to add a name card.
7. Press the Directional Key down to highlight the
Subject field and enter the subject.
8. Press the OK Key [SEND] to send the message.
Note: Up to 10 recipient addresses can be entered for
one message.
Edit the additional fields
In the Text, Picture, Sound, Name Card and Subject
field, press the Right Soft Key [Options] to display the
pop-up menu:
Preview: Display the message before it is sent.
Save As Draft: Save the current message into the
Drafts folder.
60
Page 62

Insert Quick Text: Insert already written sentences
into the message (available for the Text and Subject
fields).
Add Slide: Add a slide to the message.
Add Signature: Add the signature to the message
(available for the Text and Subject fields).
Priority Level: Set the priority level of the message
to High or Normal.
Remove Picture: Remove the added picture (available
for the Picture field).
Remove Sound: Remove the added sound (available
for the Sound field).
Remove Name Card: Remove the added name card
(available for the Name Card field).
Cancel Message: Cancel the message editing and
go back to the previous menu.
How to Send a Voice Message
1. Slide the phone up and press the Left Soft Key
[Message], select New Message and press the OK
Key. Select Voice Message and press the OK Key.
Note: You can also press the OK Key [MENU]
→Messaging→New Message→Voice Message.
2. To record a new Voice Message, press the OK Key
to start recording. Press the OK Key [STOP] to stop
recording and insert the recorded voice memo into
the message.
61
Page 63

3. Enter the phone number or email address of the
recipient and press the OK Key. Or press the Right
Soft Key [Add] to access the following options.
y From Contacts: Search for a phone number which
is stored in the contacts list.
y Recent Calls: Search for a phone number which
is stored in the recent calls list.
y Groups: Search the groups stored in the contacts
list.
y To Contacts: If a phone number or email address
is entered in the field, add it to a new contact, or
update an existing contact with it.
4. From the Voice field, you can re-record the message
by pressing the Left Soft Key [Record].
5. Press the Directional Key down to access the Text
field and enter the message.
6. Press the Directional Key down to access the Name
Card field. Press the Left Soft Key [Add] and select
My Name Card or From Contacts and press the OK
Key. Select the card or the contact and press the OK
Key.
7. Press the Directional Key down to access the
Subject field and enter the subject.
8. Press the Right Soft Key [Options] to access the
following options.
y Review: Review a written Voice Message.
y Save As Draft: Save the Voice Message.
y Insert Quick Text: Insert already written
sentences into the message.
62
Page 64

y Priority Level: Set the level of the priority to
High or Normal.
y Remove Recording: Remove inserted recorded
voice memo in the Voice field.
y Remove Name Card: Remove inserted name
card in the Name Card field.
y Cancel Message: Cancel the message editing
and go back to the previous menu.
9. Press the OK Key [SEND].
Inbox
The Inbox folder contains your received messages. From
this folder you can review your received messages, reply
to messages or forward messages to another recipient,
etc.
Note: You can set the Inbox view By Time or By Contact.
Please refer to Section 6: Messaging – Change
Message Settings for detailed information.
Inbox view By Time
When Inbox view is By Time, the received messages
are saved in the Inbox and you can view the messages
by receipt time.
1. Slide the phone up and press the Left Soft Key
[Message], select Inbox and press the OK Key.
Note: You can also press the OK Key [MENU]→
Messaging→Inbox.
2. Press the OK Key [OPEN] and view the message.
63
Page 65

3. When viewing the message, press the Right Soft
Key [Options] to display the pop-up menu. This menu
may differ according to TXT message, Picture message
and Voice message. Please refer to the actual menu
on the phone.
y Play Again: Play a received Voice message or
Picture message with audio attachment(s).
y Forward: Forward the TXT, Picture or Voice
message.
y Erase: Erase an inbox message.
y Reply w. Copy: Reply to the message with the
copy of the first 100 characters in the received
message.
y Save Graphic: Save a graphic (animation) from
the message to the My Pictures folder.
y Save Picture: Save a picture from the message
to the My Pictures folder.
y Save Sound: Save a sound from the message to
the My Sounds folder.
y Save As Ringtone: Save a sound from the
message to the My Ringtones folder and set it as
ringtone.
y View Name Card: View a name card in the
message.
y Save Name Card: Save a name card to Contacts.
y View Calendar Invite: View the Calendar Event
in the message.
y Picture Set As: Set the picture as Wallpaper or a
Picture ID.
64
Page 66

y Save Quick Text: Save the first 100 characters
in the message to Quick Text.
y Lock/Unlock: Lock or unlock the message to
prevent accidental deletion.
y Add to Contacts: Save the contact number or
email address of the received message to the
contact list or add to an existing contact.
y Extract Addresses: Extract all contact numbers,
callback number, email addresses or URLs in the
message.
y Message Info: Show received TXT, Picture or
Voice message information.
4. Press the OK Key [REPLY] to reply to the message.
5. To delete a TXT message, press the Left Soft Key
[Erase], select Yes and press the OK Key.
Inbox view By Contact
When Inbox view is By Contact, all messages sent to or
received from a contact are grouped in the combined
Messages folder. You can view the messages by
recipients.
1. Slide the phone up and press the Left Soft Key
[Message], select Messages and press the OK Key.
Note: You can also press the OK Key [MENU]→
Messaging→Messages.
2. Press the Directional Key up or down to highlight the
desired contact.
3. Press the Left Soft Key [Reply] to send a TXT, Picture
or Voice Message to the contact.
65
Page 67

4. Press the Right Soft Key [Options] to display the
pop-up menu.
y Erase: Erase the messages grouped by the
highlighted contact.
y Add To Contacts: Save the contact number or
email address of the received message to the
Contact List or add to an existing contact.
y Manage Messages: Mark the desired message(s)
or all messages in the Messages folder to erase
them, lock/unlock them or mark them as
read/unread.
y Sort Alphabetically/Sort By Time: Sort the
contacts in alphabetical order or by receipt time.
y Messaging Menu: Go back to the Messaging
menu.
5. Press the OK Key [OPEN] to view a list of messages
received from or sent to the highlighted contact. You
can select to view the sent or received messages.
6. To respond to an open message, enter your message
in the text box at the bottom of your screen and press
the OK Key [SEND].
Sent
The Sent folder contains your sent messages, regardless
of whether the messages are successfully transmitted.
1. Slide the phone up and press the Left Soft Key
[Message], select Sent and press the OK Key.
Note: You can also press the OK Key [MENU]→
Messaging→Sent.
66
Page 68

2. Press the Directional Key up or down to highlight
the desired message.
3. Press the OK Key [OPEN] and view the message.
4. When viewing the message, press the Right Soft
Key [Options] to display the pop-up menu.
y Play Again: Play a sent Voice message or Picture
message with audio attachment(s).
y Forward: Forward the TXT, Picture or Voice
message.
y Erase: Erase a sent message.
y Lock/Unlock: Lock or unlock the message to
prevent accidental deletion.
y Save Quick Text: Save the first 100 characters
in the message to Quick Text.
y Add to Contacts: Save the contact number or
email address of the received message to the
Contact List or add to an existing contact.
y Message Info: Show sent TXT, Picture or Voice
message information. If the message is sent to
multiple recipients, you can select one recipient
and press the OK Key [VIEW] to view each
message information.
5. Press the Left Soft Key [Erase] to delete the sent
message. Press the OK Key [SEND] to edit the
message and resend it.
67
Page 69

Drafts
The Drafts folder contains unfinished text messages,
picture messages and voice messages. In this folder
you can complete and send your messages.
1. Slide the phone up and press the Left Soft Key
[Message], select Drafts and press the OK Key.
Note: You can also press the OK Key [MENU]→
Messaging→Drafts.
2. Press the Directional Key up or down to highlight a
desired message.
3. Press the Right Soft Key [Options] to display the
pop-up menu.
y Send: Send the draft message.
y Add to Contacts: Save the contact number or
email address of the message recipient to the
Contact List or add to an existing contact.
y Manage Drafts: Mark the desired message(s) or
all messages in the Drafts folder to erase or
lock/unlock them.
4. Press the Left Soft Key [Erase] to erase a draft message.
5. Press the OK Key [EDIT] to edit a message and press
the OK Key [SEND] to send it after editing.
Voicemail
When the Voicemail function is available, all unanswered
calls to your phone can be transferred to your voice mailbox,
even if your phone is not being used or is powered off.
68
Page 70

You should set up your voice mailbox and personal
greeting as soon as your phone is activated. For more
information, contact your service provider.
Check your voicemail box
1. To dial your voicemail box directly, slide the phone
up and enter *86 and then press the Send Key.
Shortcut: In idle mode, press and hold 1 to access
Voicemail. One Touch Dial must be enabled, please see
Section 12: Settings & Tools – Call Settings – One
Touch Dial for details.
Note: Press the Left Soft Key [Message], select
Voicemail and press the OK Key then press the OK
Key [CALL] to dial.
2. Follow the prompts to enter your password and listen
to your messages.
When a new Voicemail arrives
When you receive a new voicemail message you’ll hear
a sound and a Voicemail icon appears in the display.
1. Select Listen Now and press the OK Key to access
your voicemail box.
2. Select Listen Later and press the OK Key to ignore
the voicemail message and return to idle mode.
Email
The Email menu allows you to send and receive emails
using Mobile Email or Mobile Web Email. Before using
the function, you should create the email account first.
69
Page 71

1. Slide the phone up and press the Left Soft Key
[Message], select Email and press the OK Key.
2. Select one of the following options and press the OK
Key.
y Mobile Email: To connect Brew Smartlink.
y Mobile Web Mail: To connect WAP Browser.
3. The Browser launches.
4. Select the desired Email provider and press the OK
Key.
5. Follow the on-screen prompts and functions.
Chat
The Chat menu allows you to chat with Internet messenger
users. Before using the function, you should acquire a
subscription to a Chat service provider first.
1. Slide the phone up and press the Left Soft Key
[Message], select Chat and press the OK Key.
2. The Browser launches.
3. Select one of the displayed chat rooms.
4. Follow the on-screen prompts and functions.
Change Message Settings
This menu allows you to configure the settings of the
Messaging menu.
1. Slide the phone up and press the Left Soft Key
[Message] and then press the Left Soft Key
[Settings].
70
Page 72

2. Select one of the settings below and press the OK
Key to select it.
y Inbox View
Set to sort the messages in your inbox by Time
or Contact. Choose the desired setting and
press the OK Key.
¾ Inbox view by Time: The received and sent
messages are separated into Inbox and Sent
folders. You can view the message by receipt
time.
¾ Inbox view by Contact: All messages sent to
or received from a contact are grouped in the
Messages folder. You can view your
messages by recipient.
y Entry Mode
Set the default input mode, choose either Zi Word,
Abc, ABC, or 123 and press the OK Key.
y Auto Save Sent
Select On, Off or Prompt and press the OK Key.
¾ On: All sent messages are saved in the Sent box.
¾ Off: Messages will not be saved in the Sent box.
¾ Prompt: Dialogue box will display after a
message is sent.
y Auto Erase Inbox
Select On or Off and press the OK Key.
¾ On: The oldest read unlocked message is
erased from the Inbox automatically when the
Inbox is full and a new message arrives.
71
Page 73

¾ Off: The phone will prompt that the memory is
full and you need to delete unwanted messages
when the Inbox is full and a new message
arrives.
y Messaging Font Size
Select Normal or Large and press the OK Key.
y TXT Auto View
Select On or Off and press the OK Key.
¾ On: When a new TXT message arrives, it is
displayed automatically.
¾ Off: When a new TXT message arrives, you
should enter the Inbox or respond to the new
message notification to view it.
y Multimedia Auto Receive
Select On or Off and press the OK Key.
¾ On: Picture/Voice messages download
automatically.
¾ Off: Picture/Voice messages must be retrieved
from the Inbox or at the new Picture/Voice
message prompt.
y Quick Text
To create a new quick text or edit the quick text
you have saved:
1. Select a quick text from the list and press the
OK Key [EDIT].
2. To add a new quick text, press the Right
Soft Key [Options], select New and press
the OK Key. Enter the new text and press
72
Page 74

the OK Key [SAVE].
3. To move the saved quick text, press the
Right Soft Key [Options], select Move and
press the OK Key. Select the desired
location and press the OK Key [SAVE].
4. To erase a saved quick text, press the Left
Soft Key [Erase]. Select Yes and press the
OK Key.
y Voicemail #
Enter a new voicemail number or edit the
voicemail number and press the OK Key (the
default number is *86).
y Callback #
Edit the default callback number so that the
recipient can call back or reply.
1. Select On or Off and press the OK Key.
2. If On is selected, input a new callback
number and press the OK Key.
y Signature
Create a signature that can be inserted at the
end of a TXT, Picture or Voice Message.
1. To deactivate, select None and press the OK
Key.
2. To input a Signature, select Custom. Enter
your signature in the text box and press the
OK Key.
y Delivery Receipt
1. Select On or Off and press the OK Key.
73
Page 75

2. If On is selected and the sent message is
received by the recipient successfully, the icon
for the sent message in the Sent box changes
and the delivery time is added into the sent
message information.
Erase Messages
You can delete the messages in Inbox, Sent or Drafts
folders.
1. Slide the phone up and press the Left Soft Key
[Message] and press the Right Soft Key [Options].
The following options are available:
y Erase Inbox: Erases all messages or only read
messages in Inbox folder.
y Erase Sent: Erases all messages in Sent folder.
y Erase Drafts: Erases all messages in Drafts
folder.
y Erase All: Erases all messages or all except
unread messages in all message folders.
2. Press the OK Key and select Yes or No (for Erase
Sent or Erase Drafts) to delete the selected messages
and press the OK Key. Press the OK Key and select
All Messages or Only Read Messages/All except
Unread (for Erase Inbox or Erase All) to delete the
selected messages and press the OK Key.
Note: Locked messages cannot be erased.
74
Page 76

7. Recent Calls
Your phone has a call history feature that automatically
stores information about missed, received and dialed calls.
You may press the Send Key as a shortcut to access
the ALL CALLS list from idle mode.
Slide the phone up and press the OK Key [MENU], select
Recent Calls and press the OK Key. The following
menus are displayed:
Missed
Displays recent calls received but not answered.
Received
Displays recent calls received by the phone.
Dialed
Displays recent calls made from the phone.
All
Displays all missed, received and dialed calls made from
the phone.
In the Missed, Received, Dialed and All calls lists,
Press the OK Key [OPEN] to open the entry in the
list.
Press the Send Key to dial the highlighted number.
75
Page 77

Press the Left Soft Key [Message] and select New
TXT Message/New Picture Message/New Voice
Message, then press the OK Key. Messages will
be sent to the highlighted number.
Press the Right Soft Key [Options] and select:
Save To Contacts: Add the highlighted entry to the
contact list.
Details: View the detailed information of the existing contact.
Erase: Delete the highlighted entry.
Lock/Unlock: Lock or unlock the highlighted entry.
Erase All: Delete all unlocked entries in the list.
View Timers: Enter the View Timers menu.
View Timers
Timers allow you to check usage time and manage your calls.
1. Slide the phone up and press the OK Key [MENU],
select Recent Calls and press the OK Key. Select
View Timers and press the OK Key.
2. Select Last Call, All Calls, Received Calls, Dialed
Calls, Roaming Calls, Transmit Data, Received
Data, Total Data, Last Reset, Lifetime Calls and
Lifetime Data Counter to view the information.
3. Press the Left Soft Key [Reset] to reset the
highlighted timer.
4. Press the Right Soft Key [Reset All] to reset all timers.
Note: View Timers is not intended for billing purposes.
The actual invoice for calls and service provider may
vary depending on network features, rounding off for
billing, rates and similar factors.
76
Page 78

8. Media Center
Media Center function allows you to record and play
sounds, take and view pictures and use Mobile Web to
access news, sports, weather, etc. It also allows you to
download ringtones, pictures, games and other various
applications on your phone.
Slide the phone up and press the OK Key [MENU]
→Media Center to access the Media Center menu.
In Media Center menu, press the Right Soft Key [Info]
to display the MEDIA CENTER INFO menu. You can
App. Memory, Phone Memory, View Log, or
check the
Help information about how to use Media Center.
Search
The Search function allows you to get free maps and local
business listings right on your phone when you need them.
Quickly find nearby services. Local restaurants, movie
theaters, businesses and directions to get there are at your
fingertips with Bing
1. Slide the phone up and press the OK Key [MENU],
select Media Center and press the OK Key. Select
Search and press the OK Key to access the Search
function.
2. Enter your search information in the Enter Keywords
text box and press the OK Key.
TM
for mobile.
77
Page 79

Tunes & Tones
Get New Ringtones
1. Slide the phone up and press the OK Key [MENU]→
Media Center→Tunes & Tones.
2. Press the OK Key [Get New Ringtones].
3. Press the OK Key [Get New Applications] to
download various ringtones.
My Ringtones
To play and use the ringtones
1. Slide the phone up and press the OK Key [MENU]→
Media Center→Tunes & Tones→My Ringtones.
2. Highlight a ringtone and press the OK Key [PLAY] to
listen.
3. For preloaded ringtones, press the Right Soft Key
[Info] to view the detailed information of ringtone.
For downloaded ringtones, press the Right Soft Key
[Options] to display the following menu:
y Erase: Delete the highlighted ringtone.
y Rename: Rename the highlighted ringtone.
y Lock/Unlock: Lock or unlock the highlighted
ringtone.
y Erase All: Delete all unlocked ringtones.
y File Info: View the detailed information of
ringtone.
78
Page 80

4. Press the Left Soft Key [Set As] and you can set the
sound as a Ringtone, Contact ID or Alert Sounds
(for All Messages, TXT Message, Multimedia
Message or Voicemail) by pressing the OK Key.
My Sounds
To record a new sound
1. Slide the phone up and press the OK Key [MENU]→
Media Center→Tunes & Tones→My Sounds.
2. Press the OK Key [Record New].
3. Press the OK Key to start recording and press the
OK Key [STOP] to stop recording.
To play and use the sound files
1. Slide the phone up and press the OK Key [MENU]→
Media Center→Tunes & Tones→My Sounds.
2. Highlight a sound file and press the OK Key [PLAY]
to play it.
3. For preloaded sounds, press the Right Soft Key
[Options] to display the following menu:
y Send: Send a sound.
y To Online Album: Upload the selected sound to
Online Album.
y File Info: Displays information for the selected
sound.
For recorded or received sounds, press the Right
Soft Key [Options] to display the following menu:
y Send: Send a sound.
79
Page 81

y To Online Album: Upload the selected sound to
Online Album.
y Rename: Rename the sound file.
y Lock/Unlock: Lock or unlock the sound file.
y Erase: Delete the highlighted sound file.
y Erase All: Delete all unlocked sound files.
y File Info: Displays information for the selected
sound.
4. Press the Left Soft Key [Set As] to set the sound as
a Ringtone, Contact ID or Alert Sounds (for All
Messages, TXT Message, Multimedia Message or
Voicemail) by pressing the OK Key.
Pictures
Get New Pictures
1. Slide the phone up and press the OK Key [MENU]→
Media Center→Pictures.
2. Press the OK Key [Get New Pictures].
3. Press the OK Key [Get New Applications] to download
various images. The downloaded contents are saved
in My Pictures.
My Pictures
To view and manage the pictures
1. Slide the phone up and press the OK Key [MENU]→
Media Center→Pictures→My Pictures.
80
Page 82

2. Highlight a picture, press the OK Key [VIEW] to view
it.
3. Highlight a picture, press the Left Soft Key [Erase],
select Yes and press the OK Key to delete the
picture.
4. Press the Right Soft Key [Options] to display the
pop-up menu:
y Send: Send the picture via Picture Message, To
Online Album, or Via Bluetooth.
y Set As: Set the picture as Wallpaper or a Picture
ID.
y Take picture: Turns on the camera function
allowing the user to take a new picture.
y Get New Pictures: Download various images.
y Manage Pictures: Erase, lock or unlock the
pictures
y Rename: Rename the picture.
y File Info: View detailed information about the
picture.
Note: You cannot erase or rename the preloaded pictures
stored in My Pictures.
Take Picture
To take and save a picture
1. Slide the phone up and press the OK Key [MENU]→
Media Center→Pictures→Take Picture.
81
Page 83

Shortcut: Slide the phone up and press the Camera
Key to turn on the camera.
2. Press the Directional Key up or down to adjust the
brightness. Press the Directional Key left or right to
zoom in and out (except for the 1280X960 resolution
mode).
3. Press the Right Soft Key [Options] to display the
pop-up menu:
y White Balance: press the Directional Key up or
down to choose from Auto, Darkness, Fluorescent,
Tungsten, Cloudy and Sunny.
y Color Effects: press the Directional Key up or
down to choose from Normal, Negative, Black &
White and Antique.
y Self Timer: press the Directional Key up or down
to choose from Off, 10 Seconds, 5 Seconds and
3 Seconds.
y Shutter Sound: press the Directional Key up or
down to choose from Shutter, Ready! 1 2 3, Say
“Cheez” and Silent.
y Resolution: press the Directional Key up or down
to choose from 1280x960, 640x480, 320x240 and
160x120.
4. Press the OK Key [TAKE] or the Camera Key to take
a picture.
5. Press the Left Soft Key [Save] to save the picture in
the My Pictures folder.
6. Press the Right Soft Key [Erase] to delete it.
82
Page 84

7. Press the OK Key [SEND] to send it via picture
message.
Note: Please hold the phone sideways when you take
pictures, so that the taken pictures saved in your phone
are shown in the vertical orientation.
Online Album
1. Slide the phone up and press the OK Key [MENU]→
Media Center→Pictures.
2. Highlight Online Album, and press the OK Key.
3. The browser launches and the Online Album signon screen appears. Follow the on-screen prompts.
Games
1. Slide the phone up and press the OK Key [MENU]→
Media Center.
2. Highlight Games, and press the OK Key.
3. Press the OK Key [Get New Applications].
4. Choose the game you want to download from the list
displayed on the screen. Once the application has
been downloaded, select Yes to run or No to return
to the Games menu.
Play downloaded games
1. While in the Games menu, highlight the game you
want to play.
2. Press the OK Key and follow the prompts to continue.
83
Page 85

Remove downloaded games
1. While in the Games menu, highlight the game you
want to remove.
2. Press the Right Soft Key [Options], select Erase and
press the OK Key. Select Yes and press the OK Key
to delete the game.
Mobile Web
Mobile Web feature allows you to access weather, sports
updates, breaking news, and other information on your
phone. For specific information on Mobile Web through
your phone, please contact your service provider.
1. Slide the phone up and press the OK Key [MENU]→
Media Center→Mobile Web to access the web
browser.
Shortcut: You can press the Directional Key up in idle
mode to quickly access Mobile Web.
Navigate through the web browser
y Use the Directional Key to browse the contents
on the screen and highlight options. Press and
hold the Directional Key to browse quickly.
y Press the Right Soft Key [MENU] and select from
VZW Home, Add Favorite, Search, Go To URL,
Show URL, Back, Manage Memory, Settings or
Advanced. You can press and hold the CLR Key
to return to the home page.
y Press the Left and Right Soft Keys to perform
the commands listed above them on the display.
84
Page 86

y Press the CLR Key to clear the last number, letter,
or symbol you entered or return to the previous
screen. Press and hold it to completely clear the
input field.
y Press the number keys to select the items in a
menu if they are numbered.
y To exit the Mobile Web, press the End Key.
Place a call when using the web browser
You can make a call while using the web browser if
the web site supports the feature. The number may
be highlighted, and you may press the appropriate soft
key to call the number. The internet connection is
terminated when you make the call. After you end the
call, the phone returns to the browser screen from
where you placed the call.
Browse & Download
You can download applications that keep you in touch
with the world, and help you find the places you need
while you’re on the go.
1. Slide the phone up and press the OK Key [MENU]→
Media Center.
2. Highlight Browse & Download, and press the OK
Key.
3. Press the OK Key [Get New Applications] and follow
the on-screen prompts to continue.
4. If there are preloaded applications, highlight the desired
application and press the OK Key to run it.
85
Page 87

Extras
1. Slide the phone up and press the OK Key [MENU]→
Media Center.
2. Highlight Extras, and press the OK Key.
3. Press the OK Key [Get New Applications].
4. Choose the application which you want to download
from the list displayed on the screen and follow the
prompts.
86
Page 88

9. My Pictures
The My Pictures feature allows you to view, manage
pictures on your phone, and use them as Wallpaper or
Picture ID. You can also take pictures and send them via
Picture Message or Via Bluetooth.
Slide the phone up and press the OK Key [MENU]→My
Pictures to access My Pictures.
For detailed information, please refer to Section 8: Media
Center - Pictures.
87
Page 89

10. VZ Navigator®
The VZ Navigator allows you to get directions to locations
when you're out and about. Using audible turn-by-turn
directions, you can locate nearly fourteen million points
of interest in the U.S.A. such as landmarks, restaurants
and ATMs. VZ Navigator uses GPS positioning to tell you
where you are, what's near you and to give you directions
to places, quickly and easily.
1. Slide the phone up and press the OK Key [MENU]→
VZ Navigator.
2. Follow the on-screen prompts to continue.
Note: To use VZ Navigator, you should turn location on
by pressing the OK Key [MENU]→Settings & Tools
→Phone Settings→Location→Location On and press
the OK Key [SET].
88
Page 90

11. Bluetooth
Your phone is capable of connecting to a variety of
Bluetooth wireless accessories. It allows you to transfer
data between Bluetooth devices, talk with a Bluetooth
wireless earphone, etc. You may create and store 25
pairings within the phone and connect to one device at a
time. The approximate range for Bluetooth wireless
technology is up to 30 feet (10 meters).
The Bluetooth menu allows you to search for Bluetooth
wireless devices, and manage devices that have already
been paired with your phone. This device is compliant
with Bluetooth specifications, supporting the following
profiles: Headset, Handsfree, Phonebook Access and
Object Push for vCard and vCalendar.
To access the Bluetooth menu from idle mode, slide the
phone up and press the OK Key [MENU]→Bluetooth.
Turn Bluetooth On/Off
1. Slide the phone up and press the OK Key [MENU]→
Bluetooth.
2. Press the Left Soft Key [Turn On] to turn Bluetooth
on. Press the Left Soft Key [Turn Off] to turn it off.
89
Page 91

Add New Device
To add and pair with a new device
1. Slide the phone up and press the OK Key [MENU]→
Bluetooth→Add New Device to find a new compatible
device.
2. If Bluetooth is off, you will be prompted to enable
Bluetooth. Select Yes and press the OK Key to enable
Bluetooth.
3. The phone will prompt you to place the device you
are connecting to in discoverable mode. Press the
OK Key to continue.
4. The phone will start to search for the device and the
found Bluetooth devices will be displayed in a list.
Highlight the Bluetooth device to be paired to and
press the OK Key [PAIR].
5. The phone will prompt you for the passkey (if matching
codes are not found). Consult the Bluetooth
instructions for the appropriate passkey (typically
"0000" - 4 zeroes). Enter the passkey and press the
OK Key.
6. Highlight Always Ask or Always Connect and press
the OK Key to connect to the device.
7. Once paired, you will see the device in the Bluetooth
menu.
Note: It is recommended that the pairing process be
performed at a secure location.
90
®
accessory
Page 92

When pairing with devices that do not have a predefined
passkey, it is recommended that at least 8 characters be
used for the passkey.
To transfer Name Card to a paired Bluetooth
device
1. When a Bluetooth device is paired with your phone,
highlight it in the Bluetooth menu and press the Right
Soft Key [Options] to display the pop-up menu.
2. Select Send Name Card Via Bluetooth and press
the OK Key.
3. You can mark the desired contact(s) by pressing the
OK Key [MARK] and when finished, press the Left
Soft Key [Done] and then send the contact information
to the paired device.
To transfer V-calendar to a paired Bluetooth
device
1. When a Bluetooth device is paired with your phone,
highlight it in the Bluetooth menu and press the Right
Soft Key [Options] to display the pop-up menu.
2. Select Send V-calendar Via Bluetooth and press
the OK Key.
3. You can mark the desired calendar event(s) by
pressing the OK Key [MARK] and when finished,
press the Left Soft Key [Done] and then send them
to the paired device.
91
Page 93

To transfer Pictures/Sounds to a paired Bluetooth
device
1. When a Bluetooth device is paired with your phone,
highlight it in the Bluetooth menu and press the Right
Soft Key [Options] to display the pop-up menu.
2. Select Send Pictures/Sounds Via Bluetooth and
press the OK Key.
3. You can mark the desired picture(s) in My Pictures or
sound file(s) in My Sounds by pressing the OK Key
[MARK] and when finished, press the Left Soft Key
[Done] and then send them to the paired device.
In the pop-up menu, you can also select the following
options:
Select Remove Device and press the OK Key, then
select Yes and press the OK Key to remove the paired
device from the list.
Select Remove All Devices and press the OK Key,
then select Yes and press the OK Key to remove all
paired devices.
Select Rename Device and press the OK Key to
rename the paired device name. Modify the name in
the Enter New Name field and press the OK Key [SET]
to confirm.
Select Incoming Security and press the OK Key.
Select Alw ays Ask or Always Connect and press
the OK Key [SET].
Select Service Discovery and press the OK Key to
view the supported Bluetooth services of the paired
device.
92
Page 94

Select Device Info and press the OK Key to view the
detailed information of the paired device.
Note: Send Name Card Via Bluetooth, Send V-calendar
Via Bluetooth, Send Pictures Via Bluetooth and Send
Sounds Via Bluetooth are only available for Bluetooth
enabled car kit, phone, computers and PDA devices.
Bluetooth Settings
In the Bluetooth menu, highlight Add New Device and
press the Right Soft Key [Options] to display the popup menu:
My Phone Name: Edit your phone name. This name
will appear on other Bluetooth devices when your
phone is located.
Discovery Mode: Allow other users to see your
accessibility. You can disable or enable discovery mode
by selecting On or Off and pressing the OK Key.
Note: After selecting On, other users have three minute
to see your accessibility, after which Discovery Mode
will automatically turn off.
Supported Profiles: View profiles that your phone
can support. Highlight a profile and press the OK Key
to view the description.
93
Page 95

12. Settings & Tools
The Settings & Tools menu allows you to customize your
phone’s display, sound, and various other settings based
on your preferences, and also provides helpful software
applications to assist with daily tasks. Slide the phone
up and press the OK Key [MENU]→Settings & Tools
to access the menu.
My Verizon
The My Verizon menu allows you to connect to the Verizon
Wireless Mobile Web. You can check your subscription
information ranging from your payment plan to your
software upgrade or other available services.
1. Slide the phone up and press the OK Key [MENU],
select Settings & Tools and press the OK Key.
Select My Verizon and press the OK Key.
Shortcut: In idle mode, press the Directional Key left
to access My Verizon.
2. Select from the following options:
y Balance: Information about your balance.
y Usage: Information about your usage.
y Payments: Information about your payments.
y My Plan: Information about your plan.
y My Features: Information about your service
features.
94
Page 96

y Chg Vmail Pswd: Resetting your voicemail
password.
y Find Store: Information about stores near you.
y Mobile2Mobile: Information about gift card options.
y FAQs: Frequently asked questions.
Master Volume
This feature allows you to set master volume of the phone.
1. Slide the phone up and press the OK Key [MENU]→
Settings & Tools→Master Volume.
2. Adjust the volume by pressing the Directional Key
either up or down.
3. Press the OK Key [SET] to save the setting. To check
the ringtone’s volume, press the Left Soft Key [Play].
Note: You can also press the Volume Keys to adjust
master volume.
Tools
Your phone tools include Voice Commands, Calculator,
Ez Tip Calculator, Calendar, Alarm Clock, Stop Watch,
World Clock, and Notepad.
Voice Commands
Voice Commands is advanced voice recognition software
that can be used to activate a wide variety of functions
on your phone.
95
Page 97

1. Slide the phone up and press the OK Key [MENU]→
Settings & Tools→Tools→Voice Commands to
access the function.
Shortcut: Press and hold the CLR/Voice Commands
Key to access the function.
2. The phone displays the Voice Commands menu and
prompts you to say the following name of the command
you want to use. To complete your task, simply follow
the voice prompts.
y Call <Name or #>
To make a call, say “Call” and the command system
will prompt you for the name or phone number. You
can state the name and number type of the contact
(for example, “Call John Work”) to access the
contact’s phone number directly.
When using the Call command, speak clearly and
say the name exactly as it is entered in our contact
list.
y Send <MSG Type >
To create a message, say “Send” and the command
system will prompt you for the type of message.
After choosing the message type, you will be
prompted for the contact name, number or group.
You can say a full-sentence command, which
states the message type and the name or number
of the contact (for example, “Send Text Message
to Bob Smith”), and the voice command system
will automatically start a text message. If the name
has more than one number, the system will prompt
you for the number type.
96
Page 98

When using the Send command, speak clearly
and say the name, number, or group exactly as it
is entered in your contact list.
y Go To <Shortcut >
To access a menu within the phone, say “Go to”
command. For example, “Go to Calendar”. If no
menu option is stated, a list of options will be
provided.
y Check <Item>
Say “Check” and the command system allows you
to check out device information including Status,
Voicemail, Messages, Missed Calls, Time, Signal
Strength, Battery, Volume, Balance, Minutes,
Payment and My Number.
y Contact <Name>
Say “Contact” and the command system will allow
you to look up a contact. For example, stating
“Contact Bob Smith” will display all the detailed
information of that contact. You will also be prompted
to call, modify or erase the contact.
When using the Contact command, speak clearly
and say the name exactly as it is entered in your
contact list.
y Search
The “Search” command starts an application that
allows you to search for information over the internet.
Enter your search text and press the OK Key.
97
Page 99

y Redial
To make a call to the last number that you called,
say “Redial”.
y My Verizon
The “My Verizon” command allows you to check
out the detailed information about your Verizon
Wireless account.
y Help
The “Help” command allows you to view a general
guideline about using Voice Commands.
Note: Each function has its detailed information on the
phone and you can press the Left Soft key [Info] to
view it.
If you are frequently prompted to repeat a command,
press the Right Soft Key [Settings]→Adaptation, and
adapt the system to your voice.
Set the Voice Commands
1. Slide the phone up and press and hold the CLR Key
to access Voice Commands.
2. Press the Right Soft Key [Settings] to display the
following options.
y Confirm Choices
This option allows you to choose if the Command
System prompts you with a list of potential matches.
Select one of the following options and press the
OK Key:
98
Page 100

¾ Automatic: The voice commands system will
display a list only when there are alternative
matches.
¾ Always Confirm: The voice commands system
will always present you with a best match list
of names or numbers. When multiple matches
are found, the system will prompt you to choose
from a list of matches.
¾ Never Confirm: The voice commands system
will select the best match.
y Sensitivity
This option controls how the system filters for
matches. Select one of the following options and
press the OK Key:
¾ More Sensitive: The voice commands system
will increase the sensitivity and displays more
potential matches.
¾ Automatic: The voice commands system will
control the sensitivity automatically.
¾ Less Sensitive: The voice commands system
will decrease the sensitivity to filter out more
potential matches. If you are frequently asked
to try again, select More Sensitive.
y Adaptation
Adaptation is the process of optimizing the voice
recognition software to your voice. Adaptation
requires recording your voice, which is then used
to customize the voice recognition system.
99
 Loading...