

Page 1

NX406E
WCDMA Digital Mobile
Phone Handset
User Manual
Page 2

Copyright Statement
Copyright © 2014 ZTE CORPORATION.
All rights reserved.
No part of this publication may be quoted,
reproduced, translated or used in any form or
by any means, electronic or mechanical,
including photocopying and microfilm,
without the prior written pe rm i ssion of ZTE
Corporation.
ZTE Corporation reserv es the right to make
modifications on print errors or update
specifications in this manual without prior
notice.
Trademarks
Android is a trademark of Google, Inc.
The Bluetooth
registered trademarks of Bluetooth SIG, Inc.,
and any use of such marks by ZTE
Corporation is under license.
The Micro-SIM card is a tiny SIM card with
the size of 12mm x 15mm, which functions
the same as the larger SIM cards.
All other trademarks remain the property of
their respective owners.
Third Party Applications
During the installation process of some third
party applications, issues of repeated restart
or abnormal use of software might be caused
by incompatibility of the third party
applications rather than the phone itself.
®
word and logos are
Version 1.0, Oct. 2014
Page 3

Before you get started
Thank you for choosing the NX406E. We’ll
simply refer to it as the ‘phone’ going forward.
Based on the Android
supports a quad-core processor with a novel
appearance and a unique user interface,
together bringing you a bra nd ne w experience.
If you’d like y ou r ph one t o l iv e a l on g and fr u i t ful
life, please read this guide carefully and keep it
for future reference. You never know when you
might need it.
Do Not worry if the pictures we use to
demonstrate the functions of your phone look a
little different from what you see on the scre en.
It’s the functions that matter.
If there are any inconsistencies between the
printed guide and the guide found on your
phone as a result of using the “update” function,
please refer to the updated guide found on your
phone.
TM
platform, the phone
- 1 -
Page 4
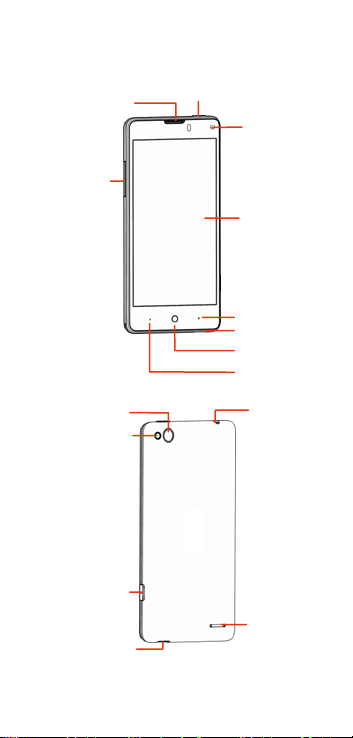
Volume keys
Microphone
Back camera
Camera key
Getting to know your phone
Earpiece
Flashlight
USB port
Power/Lock key
Front camera
Touch screen
Back key
Home key
Menu key
Headset jack
Speaker
- 2 -
Page 5

Descriptions of Keys
Keys
Power/Lock
key
Home key
Menu key
Back key T ap to g o to t he pr evious screen.
Volume
keys
Functions
Press and hold to turn phone
on/off, change the sound setting
to silent or sound, or to set to
Airplane mode.
Press to switch your phone to
Sleep Mode.
Press to wake up your phone.
Tap to return to the main home
screen from any application or
screen .
Tap and hold to see recently used
applications.
Tap to see the options for the
current screen.
Adjust the volume. Press & hold
the UP key to adjust to the
maximum volume, and press &
hold the DOWN key to adjust to
silent mode.
- 3 -
Page 6

Getting started
Inserting and removing the SIM card
You must insert a valid SIM card into your
phone before use. All information about
establishing a network connection, together
with other important information (ex. Contacts),
is stored on the SIM card.
1. Turn off your phone.
2. Remove the back
cover.
3. Slide the SIM card
into the SIM/UIM card slot and replace the
back cover.
Turn off your phone before taking out the SIM
card.
Note: Only micro-SIM cards may be used.
Inserting a memory card
1. Remove the back cover.
2. Push tightly until the card is installed in the
correct position and replace the back cover.
- 4 -
Page 7

Charging the battery
When you first unpack the phone, the battery
will only be partially charged. Please use the
remaining capacity of th e batt er y bef or e you
recharge it for the first time. To ensure the
battery is always in its best condition, please
charge the battery for 8 hours the first time and
recharge it for at least 2 hours each time
afterwards.
1. Connect the charger
with the phone
through the USB port,
and plug the charger
into a standard power
socket.
2. Please unplug the charger from the power
socket and from your phone aft er the
charging is completed.
Tips:
To charge the battery, you can also
connect your phone to the PC through the
USB cable.
During the process of charging, your
phone and charger may gene ral l y bec o m e
hot.
Power on/off
Powering on
Press & hold the Power key to turn on your
phone.
- 5 -
Page 8

Powering off
To turn it off, press and hold the Power key to
open the options menu, and then select Power
off.
Tips:
If your SIM card has enabled PIN verification,
you will need to enter the correct PIN when you
turn on your phone.
The PUK code is required to unlock the phone if
you have incorrectly entered the PIN three
consecutive times. Please contact your network
operator to get your PUK code.
If your phone cannot be turned off normally,
please press & hold the Power key for more
than 10 seconds to forcefully turn off your phone,
and then restart it.
- 6 -
Page 9

Basic Operation
Screen control
You can control your phone through a series of
operations on the screen.
Tap: Tap once on an item on the screen to
select/open it.
Slide to scroll: Slide your fingers on the
screen to move through the screen.
Press & hold: Press your finger down and
leave it there for a few seconds to open a
menu specific to what you're doing.
Drag: Drag an item on the screen to
perform certain operations.
Pinch or stretch: In some applications
(e.g., Gallery, Browser), touch the screen
with two or more fingers, and then pinch
your fingers together on the screen or
stretch them apart to zoom in or out.
Rotate: In most screens, rotate your
phone sideways to switch the screen from
portrait mode to landscape mode.
Home screen
The home screen appears when the phone is in
idle mode. On the ho me s cre en , you can c he ck
the status of the phone and access applications.
Extend home screen
The home screen can be extended to exceed
the width of the screen to provide more space
for newly added applicati ons, shortcuts,
widgets, etc.
- 7 -
Page 10

Slide to scroll through the home screen by
swiping to the left or right side of the home
screen.
Tap a small dot at the lower part of the screen
to directly move to the corresponding screen.
Press & hold the small dot area and drag it to
navigate quickly.
Add or move screen on home screen
Pinch your fingers together on the home screen
to display as thumbnails, and tap a thumbnail to
enter the correspondi ng scr een.
Tap to add a new screen and tap to
set the current screen as main home screen.
Self-defined function bar
There are four icons at the bottom of the screen.
You can replace these icons with applications
or shortcuts that you access most frequently.
1. Press & hold an icon at the function bar and
drag it to the area outside the function bar.
2. Press & hold the icon you want to replace it
with, and then drag it to the empty area in the
function bar.
Move icons on home screen
Press & hold the icon you want to move then
drag it to your desired position on the screen
and release it.
Press & hold an ico n wit h on e f inger and s cr o ll
the screen with another finger to put it on a
differen t scr een .
- 8 -
Page 11

Delete icons on home screen
Press & hold the app or widget icon to display
at the top of the screen, then drag and drop
it there to delete it.
Change wallpaper
Press & hold an empt y are a on the ho m e
screen to open the menu “Desktop Edit”, tap
“Wallpapers” and choose a wallpaper.
Lock and unlock the screen
Lock the screen
Press the Power key to lock the screen. The
phone will automatically lock after inactivity for
a short period of time.
Unlock the screen
1. Press the Power key to turn on the LCD
screen.
2. Press & hold the icon at the lower part of
the screen, then drag it to “UnLock” to unlock
the screen. Drag up to “UnLock to Camera”
to directly open the Camera application.
Change screen lock method
1. At the home screen, pres s the Me nu k ey >
“System settings” > “Security & location” >
“Screen lock”.
2. Choose the screen lock method.
- 9 -
Page 12

Access recently used
applications
Press & hold the Home key to display the list of
applications you’ve recently accessed. Tap the
application you want to open. Slide your fingers
up on an application thumbnai l to del et e it from
the list.
Tap the round icon at the lower part of the
screen to clear the list of applications you’ve
recently accessed.
USB mass storage
1. Connect your phone to the PC with a USB
cable.
2. Bring down the Notification menu on the
phone and tap “USB connected”.
3. Tap “USB mass storage” on the phone.
- 10 -
Page 13

Certification information (SAR)
This mobile device meets guidelines for
exposure to radio waves.
This device does not support V.O.I.P. function.
It means that the functions of WLAN and
Bluetooth do not have voice capability in the
held to ear mode for phone service.
Your mobile device is a radio transmitter and
receiver. It is designed not to exceed the limits
for exposure to radio waves recom m en ded by
international guidelines. These guidelines were
developed by the independent scientific
organization ICNIRP and include safety
margins designed to assure the protection of all
persons, regardless of age and health.
The exposure guidelines for mobile devices
employ a unit of measurement known as the
Specific Absorption Rate or SAR. The SAR limit
stated in the ICNIRP guidelines is 1.6
watts/kilogram (W/kg) averaged over 1 gram of
tissue. Tests for SAR are conducted using
standard operatin g positi o ns wit h the d ev ice
transmitting at its highest certified power level
in all tested frequency bands. The actual SAR
level of an operating device can be below the
maximum value because the device is
designed to use only the power required to
reach the network. That amount changes
depending on a number of factors such as how
close you are to a network base station.
Use of device accessories and enhancements
may result in different SAR values. SAR values
- 11 -
Page 14

may vary depending on national reporting and
testing requirement s and the network band.
Your mobile device is also designed to meet the
requirements for
established by the Federal Communications
Commission (USA) and Industry Canada. These
requirements set a SAR limit of 1.6 W/kg
averaged over one gram of tissue. The highest
SAR value reported under this standard during
product certification for use at the head is 0.592
W/Kg and when prop er ly worn on the body is
1.387 W/Kg.
While there may be differences between the
SAR levels of individual NX406E p hon es and
at various positions, they all m eet t he
government requirement.
The FCC has granted an Equipment
Authorization for this model phone with all
reported SAR levels evaluated as in
compliance with the FCC RF exposure
guidelines. SAR information on this model
phone is on file with the FCC and can be found
under the Display Grant section of
www.fcc.gov/oet/ea/fccid after searching on
FCC ID: SRQ-NX406E.
For body worn operation, this phone has been
tested and meets the FCC RF exposure
guidelines for use with an acc ess ory that
contains no metal and that positions the
handset a minimum of 1.0 cm from the body.
Use of other accessories may not ensure
compliance with FCC RF exposure guidelines. If
exposure to radio waves
- 12 -
 Loading...