

Page 1

Wireless Data Terminal User Guide
CDMA2000 1X
Wireless Data Terminal
User Guide
This User Guide is used for W ireless Data Terminal of MG880.
ZTE Corporation http://www.zte.com.cn
Page 2

Wireless Data Terminal User Guide
Copyright Statement
Copyright © 2007 by ZTE Corporation
All rights reserved.
No part of this publication may be excerp ted, reproduced, translated or utiliz ed in any form or by
any means, electronic or mechanical, including photocopying and microfilm, without the prior
written permission of ZTE Corporation.
ZTE Corporation reserves the right to make modifications on print errors or update specifications
in this manual without prior notice.
V1.0, Apr, 2007
ZTE Corporation http://www.zte.com.cn
Page 3

Wireless Data Terminal User Guide
Table of Contents
1. Introduction.............................................................................................................................1
2. Precautions..............................................................................................................................1
3. Appearance .............................................................................................................................2
3.1 Introduction.........................................................................................................................2
3.2 Insert R-UIM Card..............................................................................................................3
3.3 Operation Guide of Data Cable...........................................................................................3
4. Install and Uninstall................................................................................................................4
4.1 Windows 2000 ...................................................................................................................5
4.1.1 Install........................................................................................................................5
4.1.2 Uninstall...................................................................................................................9
4.2 Windows XP ....................................................................................................................10
4.2.1 Install......................................................................................................................10
4.2.2 Uninstall.................................................................................................................14
4.3 Windows Vista .................................................................................................................15
4.3.1 Install......................................................................................................................15
4.3.2 Uninstall.................................................................................................................19
5. Run the Application.................. .. ............................... .. ... .. ... .. ............................... .. ... .. ... .. ....20
6. Connect/Disconnect..............................................................................................................22
7. Connection Records..............................................................................................................23
8. Voice Call........................ .. ... .. ... .............................. ... .. ... .. ... .............................. ... .. ... ...........24
9. Call History............................................ .. ... .. .............................. ... .. ... ..................................28
10. Short Message .. .. ... .. ............................... .. ... .. ... .. .............................. ... .. ... .. ... ........................29
11. Phone Book...........................................................................................................................32
12. Setting...................................................................................................................................34
13. Help ......................................................................................................................................37
14. Connect to the Website.........................................................................................................37
15. Trouble-shooting...................................................................................................................38
16. Health and Safety Information – RF Exposure Information.................................................40
ZTE Corporation http://www.zte.com.cn
Page 4

Wi reless Data Terminal User Guide
1. Introduction
Thank you for choosing MG880 CDMA2000 1X Wireless Data Termin al (hereinafter referred to
as Data Terminal) of ZTE Corporation.
Through a standard USB interface, Data Terminal supports CDMA2000 1X network. In the area
where there is signal, it allows you to go surfing on the Internet, send & receive short messages,
and make & receive phone calls.
2. Precautions
¾ Please don’t use the product near flammable or explosive materials because it might cause
failure or fire.
¾ Keep the product away from high temperature, humidity, or dust because it might cause
failure.
¾ Avoid shock, cast or impact. Please keep the product well when you don’t use it.
¾ Do not unplug the antenna. Damage cause by misuse is not covered by this warranty.
¾ Don’t use the product near the place where is weak signal or high-precisi on electronic device
because the magnetic interference might cause the misoperation of electronic device or other
problems.
¾ Please make sure to quit the application before unplugging the terminal, othe rwise it would
damage the terminal or affect the normal operation of the system.
¾ Please don’t insert or pull out the card with great force to avoid damaging the interface.
ZTE Corporation http://www.zte.com.cn
Page 5

Wi reless Data Terminal User Guide
3. Appearance
3.1 Introduction
Tap
Top View Rear View
USB Interface
R-UIM Card Cover
Antenna
LED status descriptions:
LED
Inserting the
data terminal
Yellow OFF OFF Flash
Green OFF
BottomView
Host
LED
Earphone Jack
The data terminal is
working
Always ON
Upon an incoming
call
Always ON
ZTE Corporation http://www.zte.com.cn
Page 6

Wi reless Data Terminal User Guide
3.2 Insert R-UIM Card
Note: If your data terminal does n’t need R-UIM card, please skip this section.
1. Pull out the tap
2. Take out the R-UIM card cover in the
direction indicated by the arrow 3. Insert R-UIM card as below figure
4. Push back R-UIM card cover in the direction indicated by the arrow
3.3 Operation Guide of Data Cable
Generally, the Data Terminal could be directly connected with USB port. You could also connect
the Data Terminal with PC by using the accompanying data cable, as shown in the following
figure. Connect Interface ① with Data Terminal, and interface ② with PC's USB port. If the
power supply from USB port is insufficient, connect both interface ② and ③ with USB port
together.
ZTE Corporation http://www.zte.com.cn
Page 7

Wi reless Data Terminal User Guide
4. Install and Uninstall
System Requirements:
The Data Terminal supports the following operating system:
¾ Windows 2000
¾ Windows XP
¾ Windows Vista
PC minimum configurations:
CPU Pentium-II/233MHz
USB interface
2.0 (USB1.0 and 1.1 compatible)
Optical Drive CD-ROM (for installation only)
Memory 64 MB
Disk Space 50 MB (used for installation of application)
ZTE Corporation http://www.zte.com.cn
Page 8

Wi reless Data Terminal User Guide
4.1 Windows 2000
4.1.1 Install
Note: Do not insert the Data Terminal before installation.
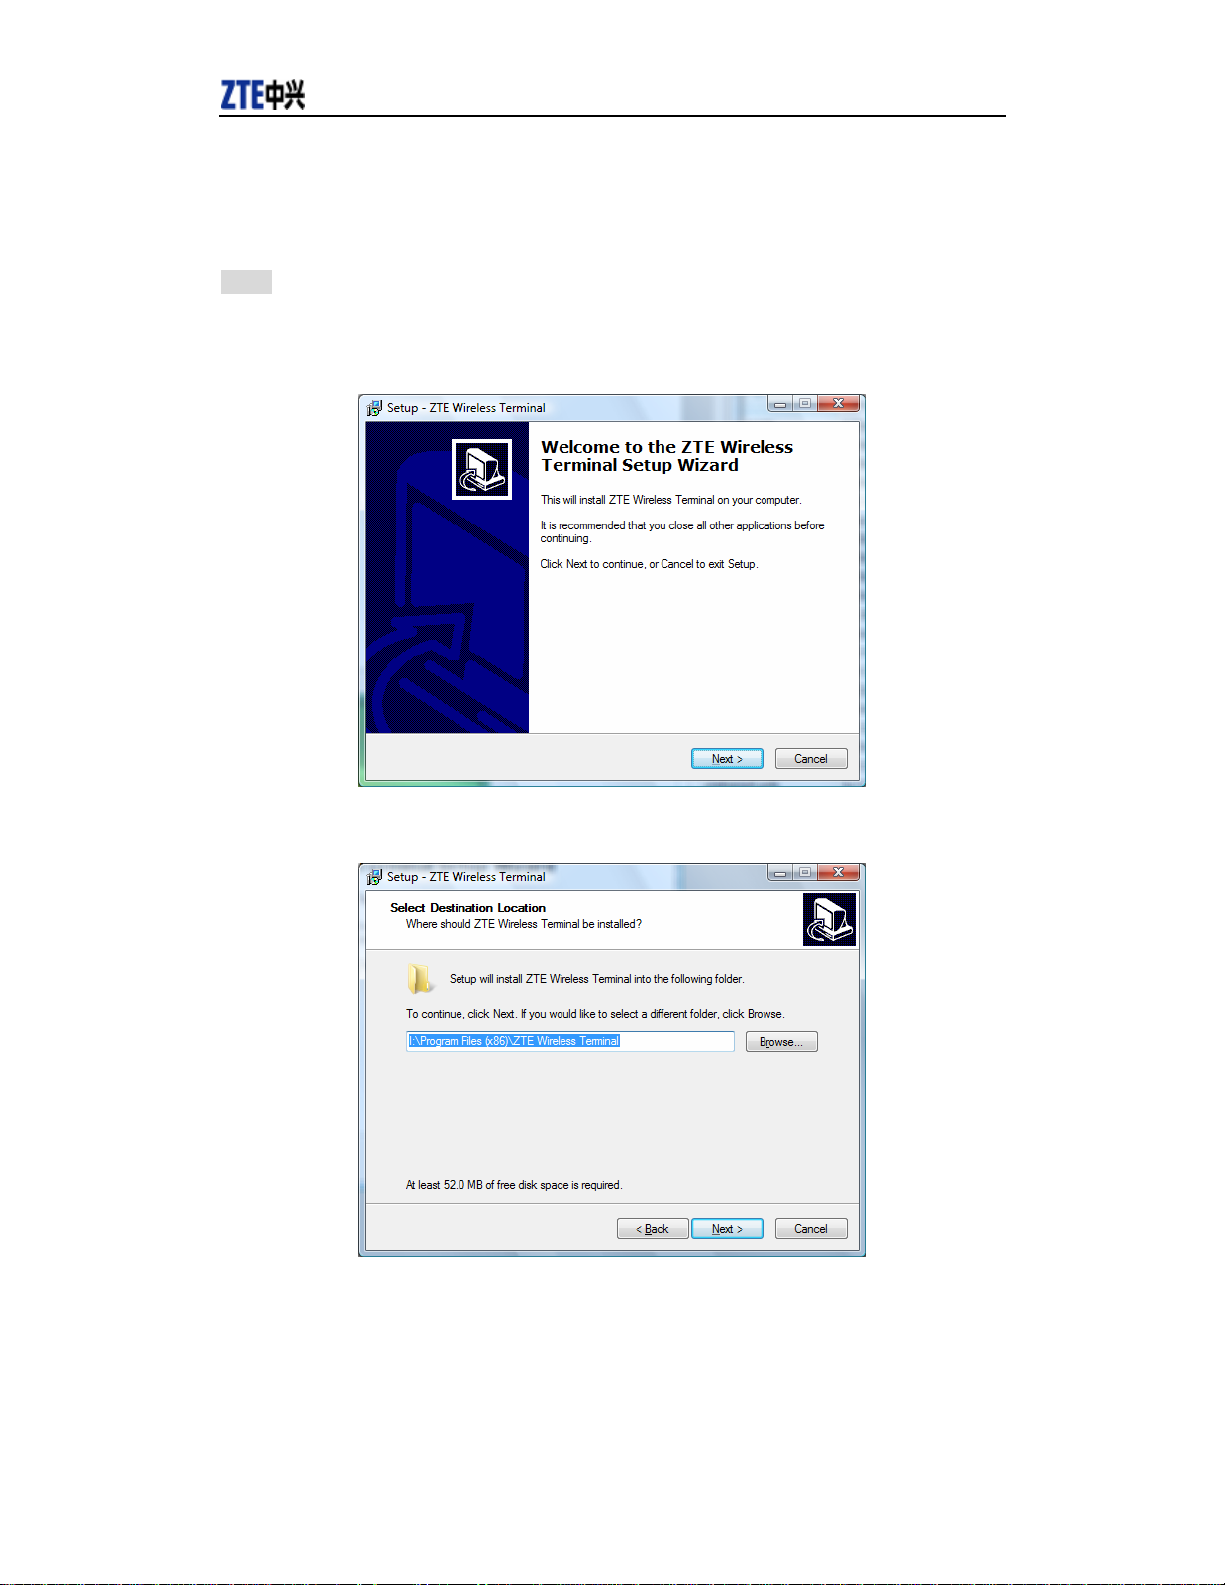
1、Find “Setup.exe” firstly in Data Terminal CD-ROM, double-click it to display the Welcome
picture, and then click “Next”;
2、Select the location where you want the program to be installed, and then click “Next”;
ZTE Corporation http://www.zte.com.cn
Page 9

Wi reless Data Terminal User Guide
3、Select Start Menu folder, and then click “Next”;
4、When you see the window below, please click “Install”;
5、Please wait for installation.
ZTE Corporation http://www.zte.com.cn
Page 10

Wi reless Data Terminal User Guide
6、Please insert the Data Terminal into USB interface if the system prompts you to insert the
hardware (If it has been inserted, please unplug it and insert again.)
7、The system shall find the new hardware and install the driver automatically. Just wait a minute;
ZTE Corporation http://www.zte.com.cn
Page 11

Wi reless Data Terminal User Guide
8、The driver is installed successfully. Pleas click “OK”;
9、Click “Finish” to close the last screen of the wizard. Now you can start the application for Data
Terminal.
ZTE Corporation http://www.zte.com.cn
Page 12

Wi reless Data Terminal User Guide
4.1.2 Uninstall
1、Select Start -> Programs -> ZTE Wireless Terminal -> Uninstall ZTE Wireless Terminal. Click
“Uninstall ZTE Wireless Terminal”, and you will be asked if you want to remove the program.
Click “Yes”;
2、Please wait;
3、Click “OK” when un-installation is completed;
ZTE Corporation http://www.zte.com.cn
Page 13

Wi reless Data Terminal User Guide
4.2 Windows XP
4.2.1 Install
Note: Do not insert the Data Terminal before installation.
1、Find “Setup.exe” firstly in the Data Terminal CD-ROM, double-click it to display the Welcome
picture, and then click “Next”;
2、Select the location where you want the program to be installed, and then click “Next”;
ZTE Corporation http://www.zte.com.cn
Page 14

Wi reless Data Terminal User Guide
3、Select Start Menu folder, and then click “Next”;
4、When you see the window below, please click “Install”;
5、Please wait for installation;
ZTE Corporation http://www.zte.com.cn
Page 15

Wi reless Data Terminal User Guide
6、Please insert the Data Terminal into USB interface if the system prompts you to insert the
hardware (If it has been inserted, please unplug it and insert again.)
7、The system shall find the new hardware and install the driver automatically. Just wait a
minute.(Please ignore the prompt during the installation, such as “USB device not recognized” or
“Your hardware might not be able to work normally because there is an error during the hardware
installation.”)
ZTE Corporation http://www.zte.com.cn
Page 16

Wi reless Data Terminal User Guide
8、The driver is installed successfully. Pleas click “OK”;
9、Click “Finish” to close the last screen of the wizard. Now you can start the application fo r d ata
terminal.
ZTE Corporation http://www.zte.com.cn
Page 17

Wi reless Data Terminal User Guide
4.2.2 Uninstall
1、Select Start -> Programs -> ZTE Wireless Terminal -> Uninstall ZTE Wireless Terminal. Click
“Uninstall ZTE Wireless Terminal”, and you will be asked if you want to remove the program.
Click “Yes”;
2、Please wait;
3、Click “OK” when un-installation is completed.
ZTE Corporation http://www.zte.com.cn
Page 18
Wi reless Data Terminal User Guide
4.3 Windows Vi sta
4.3.1 Install
Note: Do not insert the Data Terminal before installation.
1、Find “Setup.exe” firstly in the Data Terminal CD-ROM, double-click it to display the Welcome
picture, and then click “Next”;
2、Select the location where you want the program to be installed, and then click “Next”;
ZTE Corporation http://www.zte.com.cn
Page 19

Wi reless Data Terminal User Guide
3、Select Start Menu folder, and then click “Next”;
4、When you see the window below, please click “Install”;
5、Please wait for installation;
ZTE Corporation http://www.zte.com.cn
Page 20

Wi reless Data Terminal User Guide
6、Please insert the Data Terminal into USB interface if the system prompts you to insert the
hardware (If it has been inserted, pl ease unplug it and insert again.)
7、The system shall find the new hardware and install the driver automatically. Just wait a
minute.(Please ignore the prompt during the installation, such as “Device driver was not
successfully installed” )
ZTE Corporation http://www.zte.com.cn
Page 21

Wi reless Data Terminal User Guide
8、The driver is installed successfully. Pleas click “OK”;
9、Click “Finish” to close the last screen of the wizard. Now you can start the application fo r d ata
terminal.
ZTE Corporation http://www.zte.com.cn
Page 22

Wi reless Data Terminal User Guide
4.3.2 Uninstall
1、Select Start -> All Programs -> ZTE Wireless Terminal -> Uninstall ZTE Wireless Terminal.
Click “Uninstall ZTE Wireless Terminal”, and you will be asked if you want to remove the
program. Click “Yes”;
2、Please wait;
3、Click “OK” when un-installation is completed.
ZTE Corporation http://www.zte.com.cn
Page 23

Wi reless Data Terminal User Guide
5. Run the Application
After the application is installed successfully, the application icon will appear on your
desktop. Double-click this icon or select from Start -> Programs ->ZTE Wireless Terminal -> ZTE
Wireless Terminal. Run the application to display the following user interface.
Press
to display other icons. The icons on the interface are used to access the function,
which indicate as below:
Connect/Disconnect
Short message
Connection
Voice Call
Records
Help
URL
Call History
Phone book
Setting
ZTE Corporation http://www.zte.com.cn
Page 24

Status Bar:
Wi reless Data Terminal User Guide
1X indication
Signal strength indication. The more
Call indication
Missed call indication
bars there are, the stronger signals are.
CDMA network unavailable
Unread message
indication
Connection indication
Sleep indication
Inbox full indication
No R-UIM card
inserted indication
Roaming indication
R-UIM card inserted
indication
ZTE Corporation http://www.zte.com.cn
Page 25

Wi reless Data Terminal User Guide
6. Connect/Disconnect
Connect
Click
icon to set the relevant parameters. For details, please refer to Chapter 12
“Setting” for details.
Click
icon at the left-up corner of the interface.
After connecting to Internet, the current network information will appear on the
interface. Double-click any place in the display area to view the connection drawing.
Disconnect
After connecting to Internet, click the rotating icon
at the left-up corner of the interface.
ZTE Corporation http://www.zte.com.cn
Page 26

Wi reless Data Terminal User Guide
7. Connection Records
Click
icon to view connection records. Connection records save the previous relevant
information including Start at, Duration and Transmit bytes, which will help you know the status
easily.
By switching among “List”, “Monthly” and “Statistic”, you could inquire the records every time,
by month or by time.
Note:
The relevant information con tained in connection re cords are just for user ’s reference rather than
the charging basis.
Delete Connection Records
Click
button to delete the records you have selected on the interface.
Clear Connection Records
Click
button to delete all the records.
ZTE Corporation http://www.zte.com.cn
Page 27

Wi reless Data Terminal User Guide
8. Voice Call
Click
to enter voice call interface.
Make a call
Click the digits in the right side of the interface, or input the digits directly from
keyboard. Press
press
Click
button or press “Esc” to clear all the inputs.
button in the right side of the interface or press “Enter” to make a call.
button or press “Backspace” to delete the previous input digit;
Receive a call
When there is an incoming call, your comp uter will alert and the i ncoming caller ID will
appear on the interface.
Click
button in the right side of the interface or press “Enter” to receive the call.
Press button or press “Esc” to reject the call.
Redial the latest outgoing call
Click
button in the right side of the interface.
ZTE Corporation http://www.zte.com.cn
Page 28

Wi reless Data Terminal User Guide
Call Waiti ng
During a call, you could select to answer the second incoming call, and then you could switch
between the two incoming calls.
Please firstly apply for this service from your local telecom operator.
During a call, if there is a new incoming call, a pop-up window will prompt you that you
have the second incoming call.
If you select to answer, please click “Accept waiting call” button. The previous call
won’t be ended, but temporarily paused.
You could switch between two incoming calls by clicking “Switch call”.
ZTE Corporation http://www.zte.com.cn
Page 29

Wi reless Data Terminal User Guide
Three-way Call
This function allows for the call among three parties. Please firstly apply for this service from
your local telecom operator.
Note:
You need set “Show 3 way call button during calling”. Please perform the setting according to
chapter 12.
You could click “Dial second call” button during a call, input the third-party number in
the pop-up window, and then press “OK” button to call the third party. In this case, the
original call won’t be ended, but temporarily paused.
If the third party answers the call, click “Start conference” to enter the conference call.
During three-way conference call, click “Hangup second call” button to end the
conference call, and return to the original call.
ZTE Corporation http://www.zte.com.cn
Page 30

Wi reless Data Terminal User Guide
ZTE Corporation http://www.zte.com.cn
Page 31

Wi reless Data Terminal User Guide
9. Call History
Click
icon to view the call history. The outgoing/incoming calls are saved in call history,
including missed calls, incoming calls, outgoing calls, and talk duration. You could select the type
you want to view.
Missed/Accepted/Called Calls
Click
Click
Click
Click
Click
button to delete your selected record.
button to delete all records in Missed/Incoming/Outgoing catalog.
button to dial the number.
button to send a short message to this number.
button to save this number to the phone book.
Statistic
Click
button to clear the talk duration.
ZTE Corporation http://www.zte.com.cn
Page 32

Wi reless Data Terminal User Guide
10. Short Message
Click
icon to enter Short message interface.
Send a Message
Input the text.
Input the recipient’s number or click
book.
Add more recipients if you like.
Select priority.
Click
Click
button to send a message.
button to save the text into outbox.
button to select the recipient from phone
ZTE Corporation http://www.zte.com.cn
Page 33

Wi reless Data Terminal User Guide
The received messages will be saved in the Data Terminal In-box. After the Data Terminal In-box
is full, the system will automatically move the messages in the Data Terminal In-box to the PC
In-box, and clean out the Data Terminal In-box.
You could copy the messages from the Data Terminal In-box to PC In-box by selecting Copy or
Copy All; you could also copy the messages from PC In-box to the Data Terminal In-box by
selecting Copy.
The sent messages and unsent but saved messages will be all saved in the Out-box.
Take Data Terminal In-box as an example:
Reply
Click
to reply to the sender.
Forward
Click
to forward this message to other recipients.
Dial Sender’s Number
Click
to dial the sender’s phone number.
Save Sender’s Number
Click
to save the sender’s number into phone book.
Delete
ZTE Corporation http://www.zte.com.cn
Page 34

Wi reless Data Terminal User Guide
Click to delete your selected records.
Clear
Click
Copy
Click
Copy All
Click
to delete all the records in the inbox..
to copy your selected record into PC.
to copy all the records from the data terminal to PC.
ZTE Corporation http://www.zte.com.cn
Page 35

Wi reless Data Terminal User Guide
11. Phone Book
Click
to view the Phone book. You could select to save the contacts either in the data
terminal or in the computer. Click the pull-down menu to select the storage location.
You could copy the contacts from the data terminal to your computer or from the computer to the
data terminal by clicking
or .
Add
Click
then input the conten ts and select “OK” to add a new contact.
Modify
Click
then modify the contents and select “OK” to modify the contact
information.
Dial from the phone book
Click
to dial your selected phone number.
Send messages from the phone book
Click
to compose the text. You could send the message to multiple
recipients.
ZTE Corporation http://www.zte.com.cn
Page 36

Wi reless Data Terminal User Guide
Search for contacts
Click
Delete
Click
Delete All
Click
Copy
Click
Copy All
Click
to search for the contacts by name or number.
to delete your selected contact.
to delete all the contacts.
to copy your selected contacts to other storage location.
to copy all contacts to other storage location.
ZTE Corporation http://www.zte.com.cn
Page 37

Wi reless Data Terminal User Guide
12. Setting
Click
to enter the setting interface.
Network Connection Setting
Set up the relevant parameters on the “Network” interface.
After the setting, click “Apply” button to save the settings on the current interface.
Click “Default” button and then “Apply” button to restore the settings on the current
interface to factory default.
Note:
The default network setup parameters are as below. Different regions may have different network
setup parameters, so please consult your local telecom operator.
Phone: #777
User: card
Password: card
ZTE Corporation http://www.zte.com.cn
Page 38

Wi reless Data Terminal User Guide
Other Setting:
Click “Options” to switch the interface, and you could set URL and select the skin,
language, etc. If you want to use conference call, please select “Show 3 way call button
during calling”;
After the setting, click “Apply” button to save the settings on the current interface.
Click “Change Password” button to set lock device. The password is required when you
start the application. The setting has nothing to do with "Default" button.
If your data terminal needs R-UIM card, please click the button “Enable Pin”. PIN code
is needed when the application is started. The setting has nothing to do with "Default"
button.
Click “Default” button and then “Apply” button to restore the settings on the current
interface to factory default.
ZTE Corporation http://www.zte.com.cn
Page 39

Wi reless Data Terminal User Guide
Select ring tone
After clicking “Ring”, you could set different ring tones for Ca ll coming, New message,
Call connected, Call disconnected and Waiting call.
After the setting, click “Apply” button to save the settings on the current interface.
Click “Default” button and then “Apply” button to restore the settings on the current
interface to factory default.
Supplementary Services
After clicking “Service”, you could set “Unconditional forwarding”, “Bu sy Forwarding”,
“No answer forwarding”, “Call waiting”, etc. Double-click the selected option to modify
the service number and forwarding number.
ZTE Corporation http://www.zte.com.cn
Page 40

Wi reless Data Terminal User Guide
After the setting, click button to send the corresponding request to the
network system.
After the setting, click “Apply” button to save the settings on the current interface.
Click “Default” button and then “Apply” button to restore the settings on the current
interface to factory default.
13. Help
Click
Click “Help” button to view the relevant help file; click “Online service
You could view the software version information under “About”.
button to view the help file.
” to enter our
company’s website.
14. Connect to the Website
Click button to directly connect the website you set. For details on the website setting,
please refer to Chapter 12 “Se tt in g”.
ZTE Corporation http://www.zte.com.cn
Page 41

Wi reless Data Terminal User Guide
15. Trouble-shooting
After the installation, go to device manager and find “ZTE USB Modem 3197” under “Modem”
and “ZTE Diagnostics Interface 3197” under “Port”. If they are not found, please remove the
software and reinstall.
ZTE Corporation http://www.zte.com.cn
Page 42

Wi reless Data Terminal User Guide
Common Failures Table:
Failures Causes Solutions
Error occurs when running
setup.exe file.
Open port failed.
No R-UIM card.
No signal indicated.
Dialing failed
Internet connection failure.
The driver might be unable
to work and the application
is unable to run normally if
the terminal is pulled out
and plugged in again when
the application is being used
under Win2000 operating
system (SP4).In this case,
the device in device
manager will be marked
with yellow exclamation
mark, and the system must
be restarted to run normally.
Please download the program on
The setup file may be damaged.
Directly run the software before the Data
Terminal is plugged in.
The port is occupied by other applications,
such as “Hyper terminal”, or the software is
already run.
R-UIM card is not inserted. Insert R-UIM card.
R-UIM card isn’t inserted properly.
Sometimes the front side and back side are
confused.
R-UIM card is damaged. Validate by using
a CDMA term i nal .
Antenna is not connected to the Access
Box.
Out of the network service area. Make sure it is in the CDMA
The antenna or RF component is damaged. Replace relevant damaged parts.
Wrong setting of parameters (Phone, User,
Password)
Not enough money in R-UIM card. Consult your service provider for
Network congestion or failure. Try again later.
The Data Terminal is being connected. (It
usually occurs when the Internet connection
is immediately made after the call is dialed)
Poor network signal. View signal strength indication
The operating system needs installing
Update Roll 1 patch for Win2K SP4.
our website WWW.ZTEMT.COM
and reinstall it.
Close the software, plug in the
Data Terminal and run it again.
Close relevant software and run
the software again.
Please refer to section 3.2.
Properly insert R-UIM card.
Replace R-UIM card.
Insert the antenna into the Data
Terminal.
network service area.
Correct the parameter settings.
Consult your service provider for
details.
details.
Reconnect.
and check if the antenna is
properly inserted.
Please download the patch from
the following web site and install
it.
http://www.microsoft.com/do
wnloads/details.aspx?familyi
d=B54730CF-8850-4531-B5
2B-BF28B324C662&display
lang=en
If the problems cannot be solved after the above handling, please call 86-755-26010555 or feed
back your information directly by sending emails to zte_mobile@zte.com.cn for customer service.
We will reply to you as soon as possible and provide you with high quality after-sales services.
ZTE Corporation http://www.zte.com.cn
Page 43

Wi reless Data Terminal User Guide
16. Health and Safety Information – RF Exposure Information
THIS DEVUCE MEETS THE GOVERNMENT’S REQUIREMENTS
FOR EXPOSURE TO RADIO WAVES.
This device is a radio transmitter and receiver. It is designed and manufactured not to exceed the
emission limits for exposure to radio fr equency (RF) energy set by the Federal Communications
Commission of the U.S. government. These limits are part of comprehensive guidelines and
establish permitted levels of RF energy for the general population. The guidelines are based on
standards that were developed by independent scientific organizations through periodic and
thorough evaluation of scientific studies. The standards include a substantial safety margin
designed to assure the safety of all persons, regardless of age and health.
The exposure standard for wireless mobile phones employs a unit of measurement known as the
Specific Absorption Rate, or SAR. The SAR limit set by the FCC is 1.6 W/kg. Tests for SAR are
conducted using standard operating positions accepted by the FCC with the phone transmitting at
its highest certified power level in all tested frequency bands.
Before a mobile phone is available for sale to the public, it must be tested and certified to the FCC
that it does not exceed the limit established by the government adopted requirement for safe
exposure. The tests are performed in positions and locations (e.g., at the ear and worn on the body)
as required by the FCC.
While there may be differences between the SAR levels of various devices and at various
positions, they all meet the government requirement. The FCC has granted an Equipment
Authorization for this mobile phone with all reported SAR levels evaluated as in compliance with
the FCC RF exposure guidelines. SAR information on the mobile phone is on file with the FCC
and can be found under the Display Grant sect ion of http://www.gov/oet/fccid after searching on
FCC ID stock on the label on the device.
Note: In the United States and Cana da, th e SAR limit recommended by international guidelines
for mobile phones used by the public is 1.6 watts/kilogram (W/kg) averaged over one grams of
tissue. The limit incorporates a substantial margin for safety to give additional protection for the
public and to account for any variations in measurements.
ZTE Corporation http://www.zte.com.cn
 Loading...