

Page 1

ZTE F188
HSDPA Dual band 3G Mobile Phone
User Manual
Page 2

Declaration
We, ZTE Corporation, declared that:
z The product is installed with battery separately in the box. The FCC ID
label is placed on the mobile phone clearly visible to all persons at the time
of purchase.
z The user is cautioned that changes or modifications not expressly
approved by the manufacturer could void the user’s authority to operate
the equipment.
z This device complies with part 15 of the FCC Rules. Operation is subject to
the following two conditions:
(1) This device may not cause harmful interference, and
(2) this device must accept any interference received, including
interference that may cause undesired operation.
z Do not attempt to disassemble the mobile phone and battery by yourself.
Non-expert handling of the devices may damage them.
z Your wireless phone is a radio transmitter and receiver. It is designed and
manufactured not to exceed limits for exposure to radio frequency (RF)
energy set by the Federal Communications
z Commission (FCC) of the U.S. Government. These limits are part of
comprehensive guidelines and establish permitted levels of RF energy for
the general population. The guidelines are based on standards that were
developed by independent scientific organizations through periodic and
thorough evaluation of scientific studies. The standards include a
substantial safety margin designed to assure the safety of all persons,
regardless of age or health. The exposure standard for wireless fixed
phoned employs a unit of measurement known as the Specific Absorption
Rate, or SAR. The SAR limits set by the FCC are 1.6W/kg. Tests for SAR
are conducted using standard operating positions accepted by the FCC
Page 3

with the phone transmitting as its highest certified power level in all tested
frequency bands. Although the SAR is determined at the highest certified
power level, the actual SAR level of the phone while operating can be well
below the maximum value. This is because the phone is designed to
operate at multiple power levels so as to use only the power required to
reach the network. In general, the closer you are to a wireless base station,
the lower the output power.
z The Highest SAR Values for this model phone when tested for use on the
flat head 0,5cm were 1.26W/Kg .
z While there may be differences the SAR levels of various phones and at
various positions they all meet the government requirement for RF
exposure. For body-worn operation, the phone meets FCC RF exposure
guidelines provided that it is used with a non-metallic accessory with the
handset at least 1.5 cm form the body. Use of other accessories may not
ensure compliance with FCC RF exposure guidelines.
Page 4

PC Software Requirements
Join Me PC Software included supports Microsoft Vista (only 32 bit), Windows 2000 with
Service Pack 4 or Windows XP with Service Pack 2 only. 64 Bit systems are NOT supported.
Warnings and Safety Notices
Please read all the safety notices before using this device
Copyright©2007 ZTE Corporation
All rights reserved.
1st Edition April 2008
No part of this publication may be excerpted, reproduced, translated or utilized in any form or by
any means, electronic or mechanical, including photocopying an d microfilm, without the prior
written permission of ZTE Corporation.
ZTE Corporation operates a policy of continuous development. ZTE Corporation reserves the
right to make changes and improvements to any of the products described in this document
without prior notice.
For this product's Recycling Manual based on WEEE directive, please send email to inquiry or
visit the website below to download:
WWW: http://ensupport.zte.com.cn
E-mail: weee@zte.com.cn
Limitation of Liability
ZTE shall not be liable for any loss of profits or indirect, special, incidental or consequential
damages resulting from or arising out of or in connection with using this product, whether or not
ZTE had been advised, knew or should have known the possibility of such dam ages. The user
should refer to the enclosed warranty card for full warranty and service information.
Page 5

For your safety................................................................................................................................8
General Care .............................................................................................................................8
Aircraft Safety...........................................................................................................................9
Hospital Safety..........................................................................................................................9
General Safety.........................................................................................................................10
Road Safety.............................................................................................................................11
Vehicles equipped with an air bag...........................................................................................11
Third party equipment.............................................................................................................11
Radio frequency energy..........................................................................................................11
Exposure to radio frequency energy........................................................................................12
Emergency Services................................................................................................................12
Declaration of Conformity......................................................................................................12
Information on the privacy......................................................................................................13
Copyright Notice.....................................................................................................................13
Phone overview............................................................................................................................14
Idle screen icons......................................................................................................................17
Getting started ..............................................................................................................................18
Installing the (U)SIM card......................................................................................................18
Installing the battery................................................................................................................19
Removing the battery..............................................................................................................19
Charging the battery................................................................................................................20
MicroSD card................................................................................................................................21
Inserting the MicroSD card.....................................................................................................21
Removing the MicroSD card ..................................................................................................21
Access the MicroSD card on the phone:.................................................................................22
Switching the phone on/off.....................................................................................................22
Switching the phone on...............................................................................................22
Standby mode...............................................................................................................22
Signal strength..............................................................................................................23
Emergency Call (SOS)................................................................................................23
Switching the phone off...............................................................................................23
General instructions.....................................................................................................................24
Navigating the menus..............................................................................................................24
Security...................................................................................................................................24
Text entry .......................................................................................................................................26
Changing the input method.....................................................................................................26
eZiText....................................................................................................................................26
Multitap ABC/abc...................................................................................................................26
Numeric...................................................................................................................................27
Inserting symbols....................................................................................................................27
Calling............................................................................................................................................28
Making a voice call.................................................................................................................28
Making a video call.................................................................................................................28
Page 6

Making international calls.......................................................................................................28
Calling an extension number...................................................................................................28
Making a call from Contacts...................................................................................................28
Dialing a previous number......................................................................................................29
Calling a speed dial number....................................................................................................29
Setting speed dial............................................................................................................29
Listening to voicemail.............................................................................................................29
Setting volume........................................................................................................................ 29
Answering a voice call............................................................................................................29
Answering a video call............................................................................................................30
Ending a call ...........................................................................................................................30
Rejecting a call........................................................................................................................30
Call options.............................................................................................................................30
USB Connection...........................................................................................................................31
Mass storage............................................................................................................................31
Menus ............................................................................................................................................32
Extras ......................................................................................................................................32
Connect..........................................................................................................................32
Time................................................................................................................................33
Other...............................................................................................................................34
Internet....................................................................................................................................34
Home..............................................................................................................................35
Go to...............................................................................................................................35
Bookmarks.....................................................................................................................35
History............................................................................................................................35
Page memo...................................................................................................................35
Push messages............................................................................................................35
Options...........................................................................................................................35
Entertainment..........................................................................................................................36
Download applications.................................................................................................36
Contacts...................................................................................................................................36
All....................................................................................................................................36
(U)SIM, Mates,Family, Friends, Work, VIP, Unclassified.....................................37
Messages.................................................................................................................................37
Message ........................................................................................................................37
E-mail.............................................................................................................................40
Calls ........................................................................................................................................41
Call log...........................................................................................................................41
Calls info........................................................................................................................42
Settings....................................................................................................................................42
Screen............................................................................................................................42
Handset..........................................................................................................................43
Profiles...........................................................................................................................45
Security..........................................................................................................................45
Page 7

Call..................................................................................................................................46
Multimedia..............................................................................................................................48
Camera ..........................................................................................................................48
Video Camera...............................................................................................................48
Media Player.................................................................................................................49
Voice recorder...............................................................................................................50
Playlist............................................................................................................................50
Slide show.....................................................................................................................51
Streaming URL..............................................................................................................52
File manager............................................................................................................................52
Questions & Answers...................................................................................................................53
Annex Glossary ............................................................................................................................58
Declaration of RoHS Compliance..............................................................................................59
INFORMATION ON PRODUCTS DISPOSAL .........................................................................60
Page 8

For your safety
General Care
A handset contains delicate electronic circuitry, magnets and battery systems. You should treat it
with care and give particular attention to the following points:
z Do not allow the handset, battery or
accessories to come into contact with
liquids or moisture at any time. Do not
immerse in any liquid.
z Do not place anything in the folded
handset.
z Do not leave the handset or the battery in
places where the temperature could exceed
60 °C, e.g. on a car dashboard or a
windowsill, behind glass in direct sunlight,
etc.
z Take care not to allow metal objects, such
as coins or key rings to contact or
short-circuit the battery terminals.
z Do not put the handset’s battery in your
mouth, as battery electrolytes may be toxic
if swallowed.
z This equipment is fitted with an internal
battery that can only be replaced by a
qualified service engineer.
z Do not put a battery into a microwave
oven, dryer, or high-pressure container.
z Do not pierce battery with a sharp object
such as a needle.
z Do not disassemble or modify the battery. z Do not drop, throw, or subject the handset
z Stop using the battery if abnormal heat,
odor, discoloration, deformation, or
abnormal condition is detected during use,
charge, or storage.
z Do not place the handset alongside
computer disks, credit cards, travel cards
and other magnetic media. The
information contained on disks or cards
may be affected by the handset.
z Do not paint the handset.
z Do not remove the handset’s battery while
the handset is switched on.
z Do not dispose of battery packs in a fire.
The handset’s Li-ION batteries may be
safely disposed of at a Li-ION recycling
point.
z Do not attempt to dismantle the handset or
any of its accessories.
z There is a risk of explosion if the battery is
replaced with an incorrect battery type.
Dispose of the used battery in accordance
with the manufacturer’s instructions.
z Do not contact battery directly to an
electric outlet or cigarette lighter charger.
Use only authorized charger units.
z When the battery is thrown away, be sure
it is non-conducting by applying vinyl tape
to the (+) and (-) terminals.
to rough treatment.
z In the unlikely event of a battery leak, take
care to keep the battery discharge away
from your eyes or skin. If the leakage does
come into contact with the eyes or skin,
please flush thoroughly in clean water and
consult with a doctor.
Page 9

z Do not use with a damaged or deformed
battery.
z Remove the battery whose life cycle has
expired from equipment immediately.
z When a handset is set to Vibration mode,
the vibration can sometimes cause the
MD-2 handset to move.
z Use a damp or anti-static cloth to clean the
handset. Do not use an ordinary dry cloth
or electrostatically charged cloth. Do not
use chemical or abrasive cleaners as these
could damage the case.
z Remember to make backup copies of all
important data on your handset.
Note:
Caution risk of explosion if battery is replaced by an incorrect type. Dispose of used batteries
according to the instructions.
z Do not solder a battery directly
z The earpiece may become warm during
normal use. Also, the handset itself may
become warm while the battery is being
charged.
z Be careful not to place the handset near
heat sources (such as a heater) or too close
to the edge of the table.
z Third party equipment: The use of third
party equipment, cables or accessories, not
made or authorized by manufacturer, may
invalidate the warranty of your cellphone
and also adversely affect the phone’s
safety/operation.
z Remember to recycle: the cardboard
packing supplied with this handset is ideal
for recycling.
Aircraft Safety
z Switch off your phone when inside or near
aircraft. The use of handsets in aircraft is
illegal. It may be dangerous to the
operation of the aircraft and it may disrupt
the cellular network. Failure to observe
this instruction may lead to suspension or
denial of cellphone service to the offender,
or legal action, or both.
z Do not use the handset on the ground
without the permission of the ground staff
Hospital Safety
z Switch off your phone and remove its battery in areas where the use of handsets is prohibited.
Follow the instructions given by the respective medical facility regarding the use of handsets
on their premises
Page 10

General Safety
z In some countries national law prohibits
private copying of copyrighted material.
Please check the national legislation of the
applicable country concerning the use of
such material.
z Please check roaming agreement
availability with your network operator.
z Observe "Turn off mobile" signs, such as
those near petrol stations, or explosives
and turn off handset/device.
z Do not allow children to play with the
handset, charger or batteries.
z Don’t try to make a call or conversation
while the temperature of charging battery
is above 50°C.
z The operation of some medical electronic
devices, such as hearing aids and
pacemakers, may be affected if a handset
is used next to them. Observe any Note
signs and the manufacturer’s
recommendations.
z Your phone contains metal, which may
cause you an itch, a rash or eczema
depending on your constitution or physi cal
condition.
z Many jurisdictions have laws and
regulations about taking pictures in public
or private areas and regarding the
processing and further use of such
pictures. The manufacturer encourages its
customers to obey all laws and to honor
the personal rights of others.
z The use of Mobile Phones is not allowed
in some radiation sensitive areas, such as
hospitals, research centers and airplanes.
The user is responsible to power-off the
device. If there is any uncertainty, the
battery shall be removed.
z If you have a heart condition, be careful
with the settings of call vibration or tone
volume.
z Do not use the handset where blasting is in
progress.
z Take care not to put your phone in the
back pocket of your trousers or skirt and
then sit on it. Also, do not put your phone
at the bottom of bag where it may subject
to excessive weight or pressure. Doing so
may damage the LCD and camera lens and
cause them malfunction.
z Do not leave the battery pack empty or
disconnected for a long time, otherwise
some data may be initialized.
Page 11

Road Safety
z You must exercise proper control of your
vehicle at all times. Give your full
attention to driving.
z Pull off the road and park before making
or answering a call, if driving conditions
so require.
z Check if local laws and/or regulations
restrict the use of handsets while driving.
z Switch off your handset at a refueling
point, such as a petrol station, even if you
are not refueling your own car.
z Electronic vehicle systems, such as anti-lock brakes, speed control and fuel injection systems
are not normally affected by radio transmissions. The manufacturer of such equipment can
advise if it is adequately shielded from radio transmissions. If you suspect vehicle problems
caused by radio transmissions, consult your dealer and do not switch on the handset until it
has been checked by qualified approved installers.
z Observe all of the recommendations
contained in your local traffic safety
documentation.
z You MUST NOT stop on the hard
shoulder of a motorway to answer or make
a call, except in an emergency.
z Do not store or carry flammable or
explosive materials in the same
compartment as a radio transmitter.
Vehicles equipped with an air bag
An air bag inflates with great force. Do not place objects, including either installed or portable
wireless equipment, in the area over the air bag or in the air bag deployment area. If in-vehicle
wireless equipment is improperly installed and the air bag inflates, serious injury could result.
Third party equipment
The use of third party equipment, cables or accessories, not made or authorized by the
manufacturer, may invalidate the warranty of your handset and also adversely affect the handset’s
operation. For example, use only the manufacturer mains cable supplied with the AC charger.
Radio frequency energy
Your handset is a low-power radio transmitter and receiver. When it is turned on, it intermittently
receives and transmits radio frequency (RF) energy (radio waves). The system that handles the
call controls the power level at which the handset transmits.
Page 12

Exposure to radio frequency energy
Radio wave exposure and Specific Absorption Rate (SAR) information
The handset is designed to comply with safely, requirements for exposure to radio waves.
This requirement is based on scientific guidelines that include safety margins designed to
assure the safety of all persons, regardless of age and health.
The radio wave exposure guidelines employ a unit of measurement known as the Specific
Absorption Rate, or SAR. Tests for SAR are conducted using a standardized method with the
phone transmitting at its highest certified power level in all used frequency bands.
While there may be differences between the SAR levels of various the manufacturer phone
models, they are all designed to meet the relevant guidelines for exposure to radio waves.
The SAR limit recommended by the International Commission on Non-lonizing Radiation
Protection( ICNIRP), is 2W/kg averaged over ten(10) grammes of tissue.
The highest SAR value for this model phone tested for use at the ear is 0.646 W/kg(10g)
Emergency Services
To make an emergency call in any country:
1 Ensure that your handset is on and in service.
2 Press as many times as needed to clear the display and ready the device for calls.
3 Enter the official emergency number for your present location.
4 Press to dial the number. Follow instructions received and do not end call until told to
do so.
When the USIM card is not inserted or when the dial lock function is on, Press (SOS)
and then enter the official emergency number for your present location. Press or to
dial the number.
Note:
Tell the operator which service you require: Police, Ambulance, Fire Brigade, Coastguard or
Mountain Rescue Service. Give your position and, if possible, remain stationary to maintain
contact.
Due to the nature of the cellular system, the connection of emergency calls cannot be
guaranteed. You should never rely solely on any wireless device for essential
communications like medical emergencies.
Declaration of Conformity
We declare under our sole responsibility that the product(s) detailed in this manual, and in
combination with our accessories, conform with the essential requirements of European Union
Directive 1999/5/EC Radio and Telecommunications Terminal Equipment Directive requirements
3.1(a), 3.1(b), 3.2.
Page 13

Information on the privacy
Camera usage and photo/audio/video recordings carried out with the phone can offend the
confidentiality of the subjects. The user therefore is held to respect legislation in confidentiality
matter and remains the only responsible subject in case of eventual violations of the enforced
norm.
Copyright Notice
The video/audio recordings you make/download are protected by copyright laws. They are for
personal use only and must not be otherwise used without the permission of the copyright owner.
Page 14
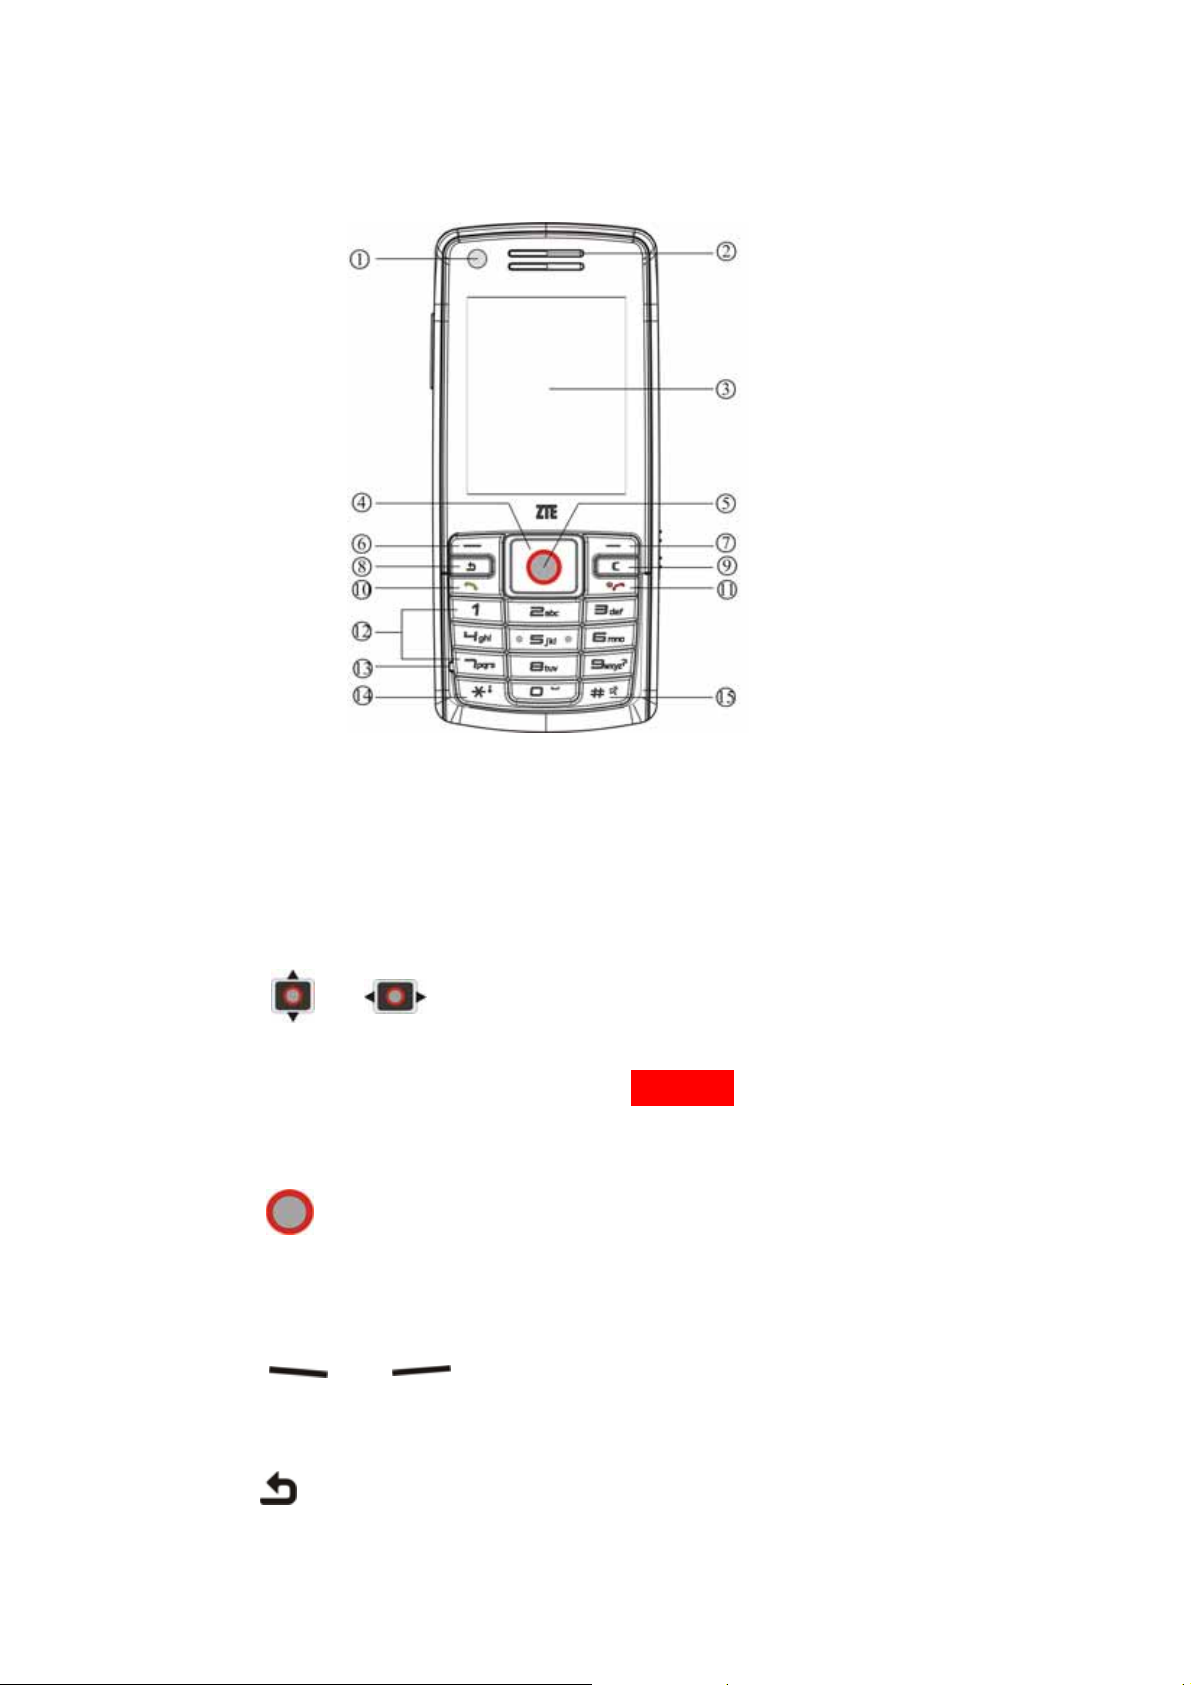
Phone overview
1 Front camera lens
○
2 Earpiece
○
3 TFT Display
○
4 / Navigation key
○
• In idle screen: Used as hot keys to enter the designated functions. To designate the
functions to be accessed by the navigation keys, see page 42.
• In lists, messages and menus: Scroll up, down, left and right.
5 Ok key
○
• In idle screen: Press to open the main menu.
• In lists and menus: Start an application/function.
6 /
○
The current functions of these keys are shown in the bottom line of the display.
8 Back key
○
7 Soft keys
○
Page 15
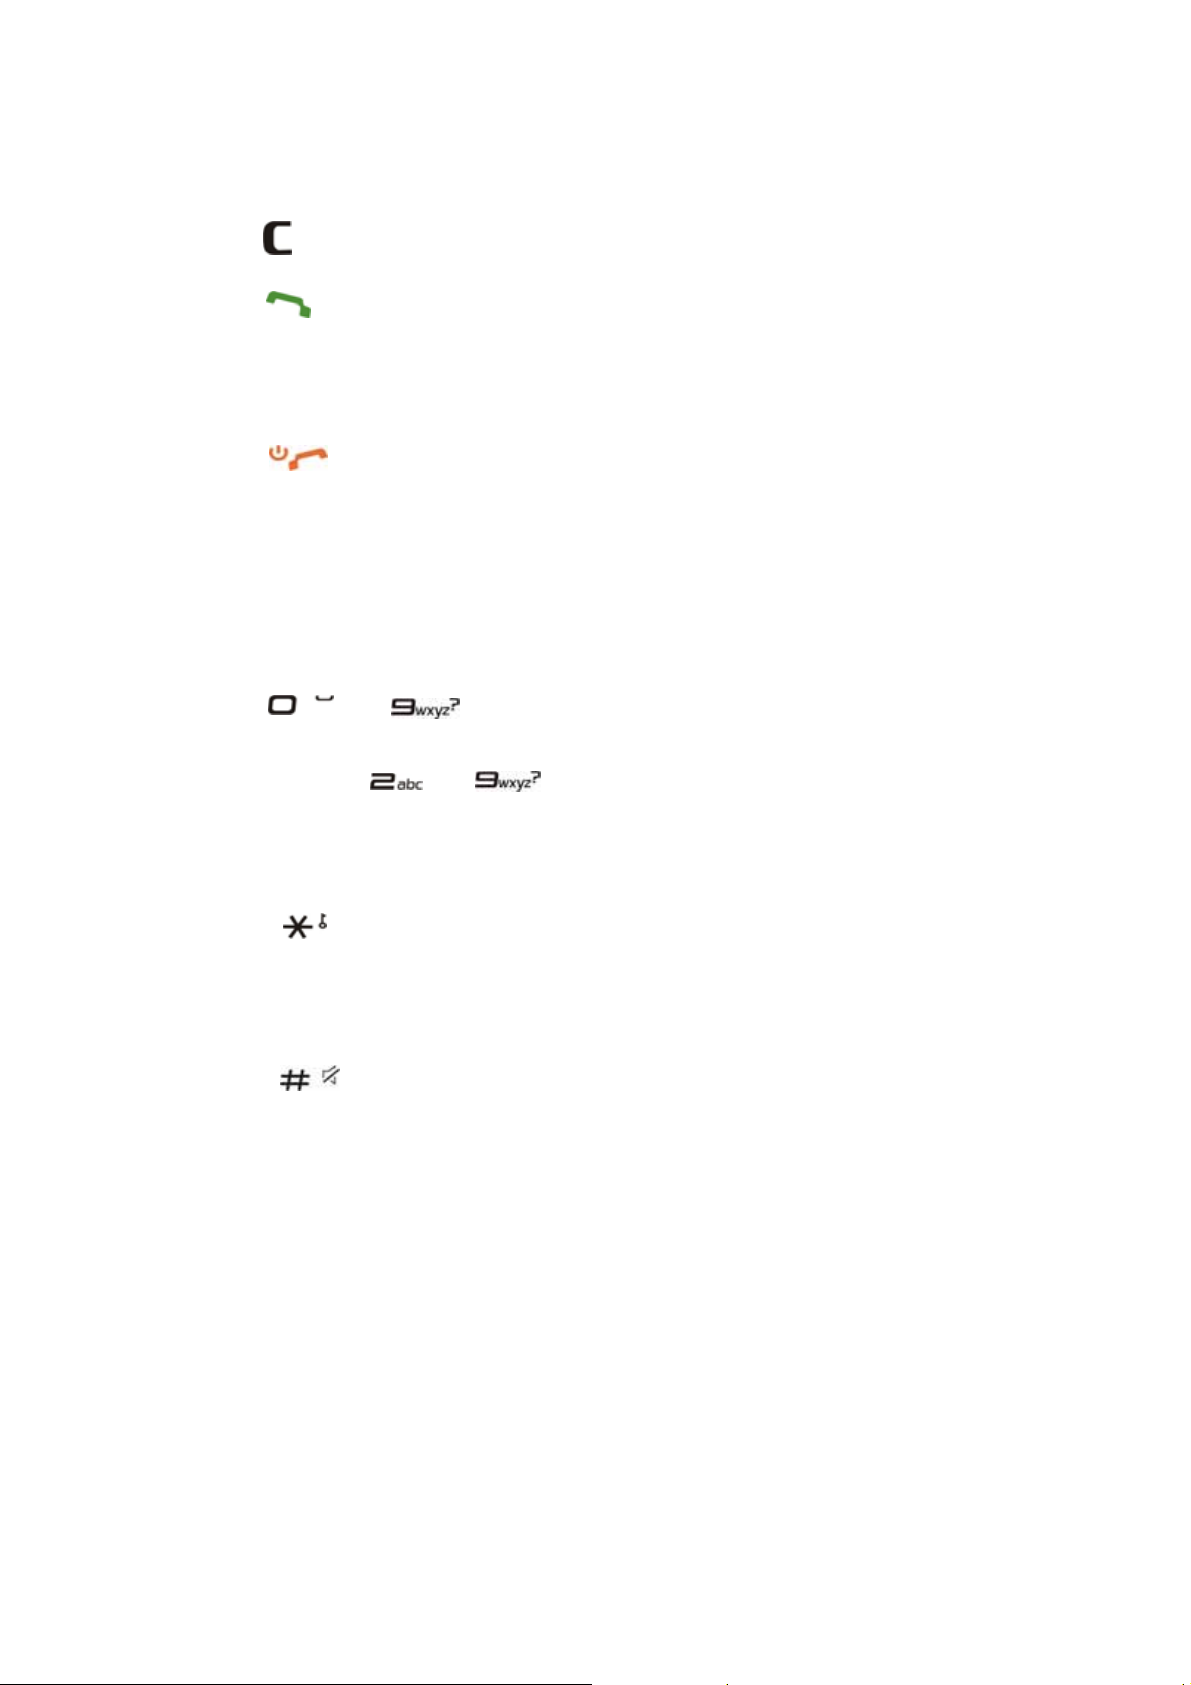
Press to the upper menu.
9 Clear key
○
10 Call key
○
• Press to send or answer calls.
• In idle screen: Press to show all calls.
11 Power on/ off/ End key
○
• Press and hold to turn the phone on/off.
• Press to end a call.
• Press to reject an incoming call.
• Press to cancel dialing.
• Press to return to idle screen.
12 ~ Number keys
○
• Press to enter numbers.
• Press and hold ~ Start speed dial.
13 Microphone
○
14 Asterisk key
○
• Press to enter "*".
• Press and hold to activate/deactivate Silent mode.
15 Pound key
○
• Press to enter "#".
• In an editing screen: Press to change the input method.
Page 16
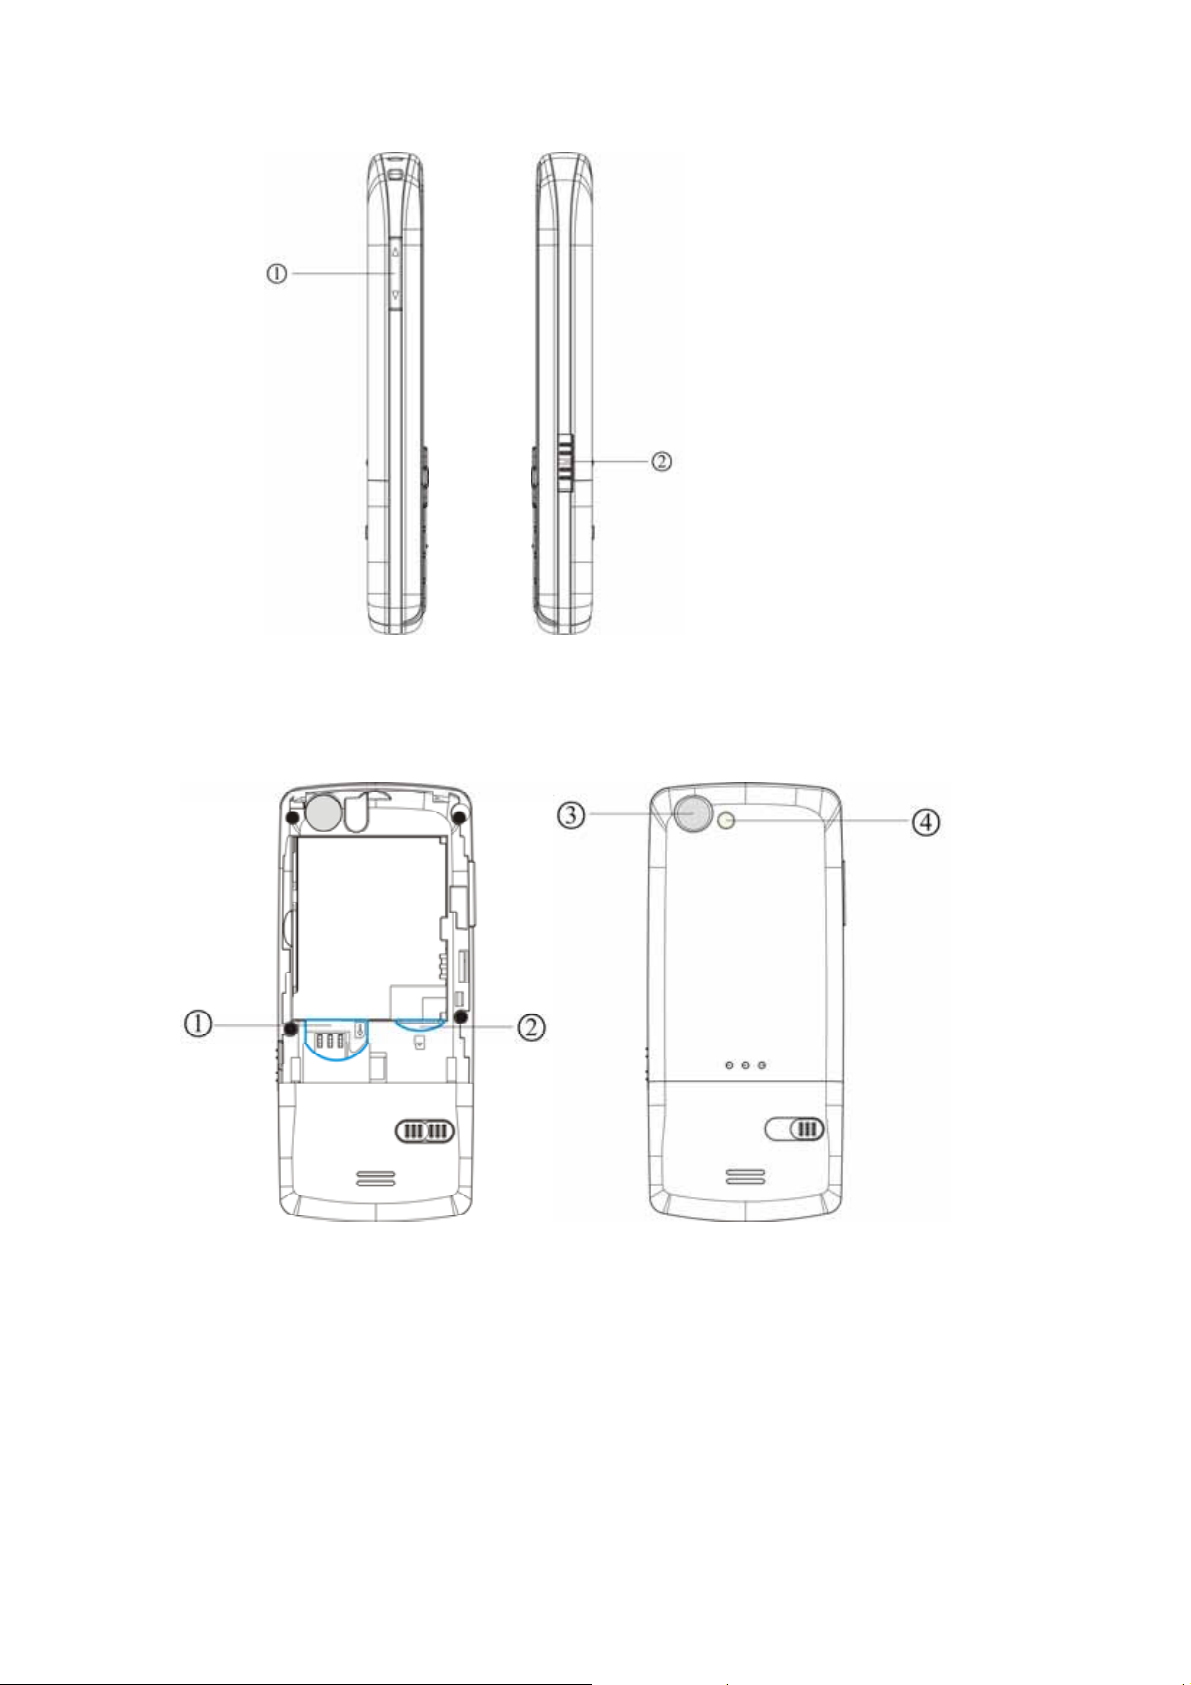
1 Volume keys
○
2 Charger/ USB connection jack and Headset port
○
1 (U)SIM card holder
○
2 MicroSD card slot
○
3 Back camera lens
○
4 Mirror
○
Page 17
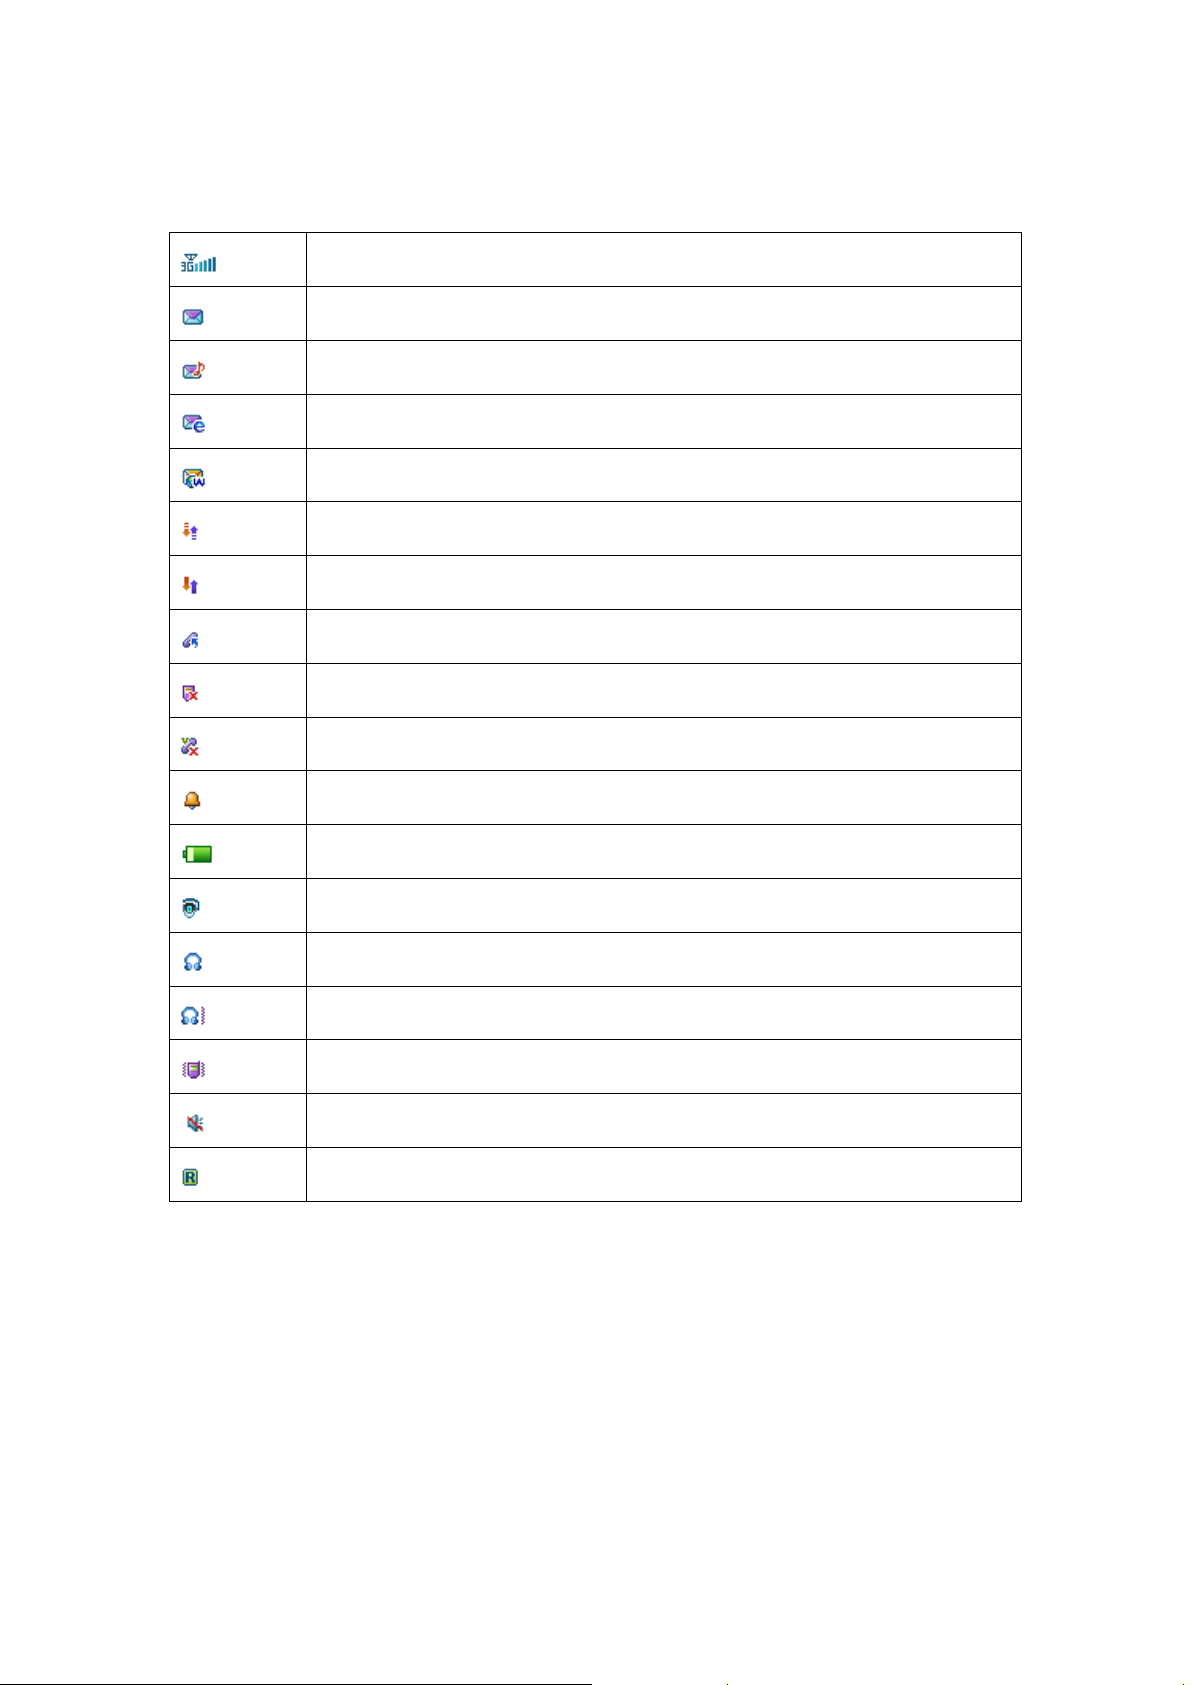
Idle screen icons
3G Network Signal Strength
New SMS
New MMS
New E-mail
New Wap Push Message
GPRS attach
GPRS in use
All calls divert
Missed voice call
Missed video call
Alarm
Battery status
Bluetooth on
Headset mode
Headset and vibrate mode
Vibrate mode
Silent mode
Roaming
Page 18
Getting st arted
Installing the (U)SIM card
You can obtain a (U)SIM card from a mobile phone se rvice provider whe n you sign on as a subscriber.
A (U)SIM card can be easily damaged if its metal contacts becom e scratched. Therefore, ta ke special
care when holding or inserting it.
1. Press and hold to turn off the phone.
2. Slide down the cover and remove the battery.
3. Insert the (U)SIM card into the card holder, with the metal contacts facing downward and the cut
corner at the bottom right. Make sure it is pushed all t he way to the down as shown below.
4. Place the battery cover onto the back of your phone.
• Make sure to disconnect the charger and other accessories from y our phone and remove t he battery
before inserting and removing your (U)SIM card.
• Don’t touch the metal surface of the (U)SIM card in case that information in the card may be lost or
destroyed.
• Do not bend or scratch your (U)SIM card. Keep the card away from electricity and magnetism.
Page 19

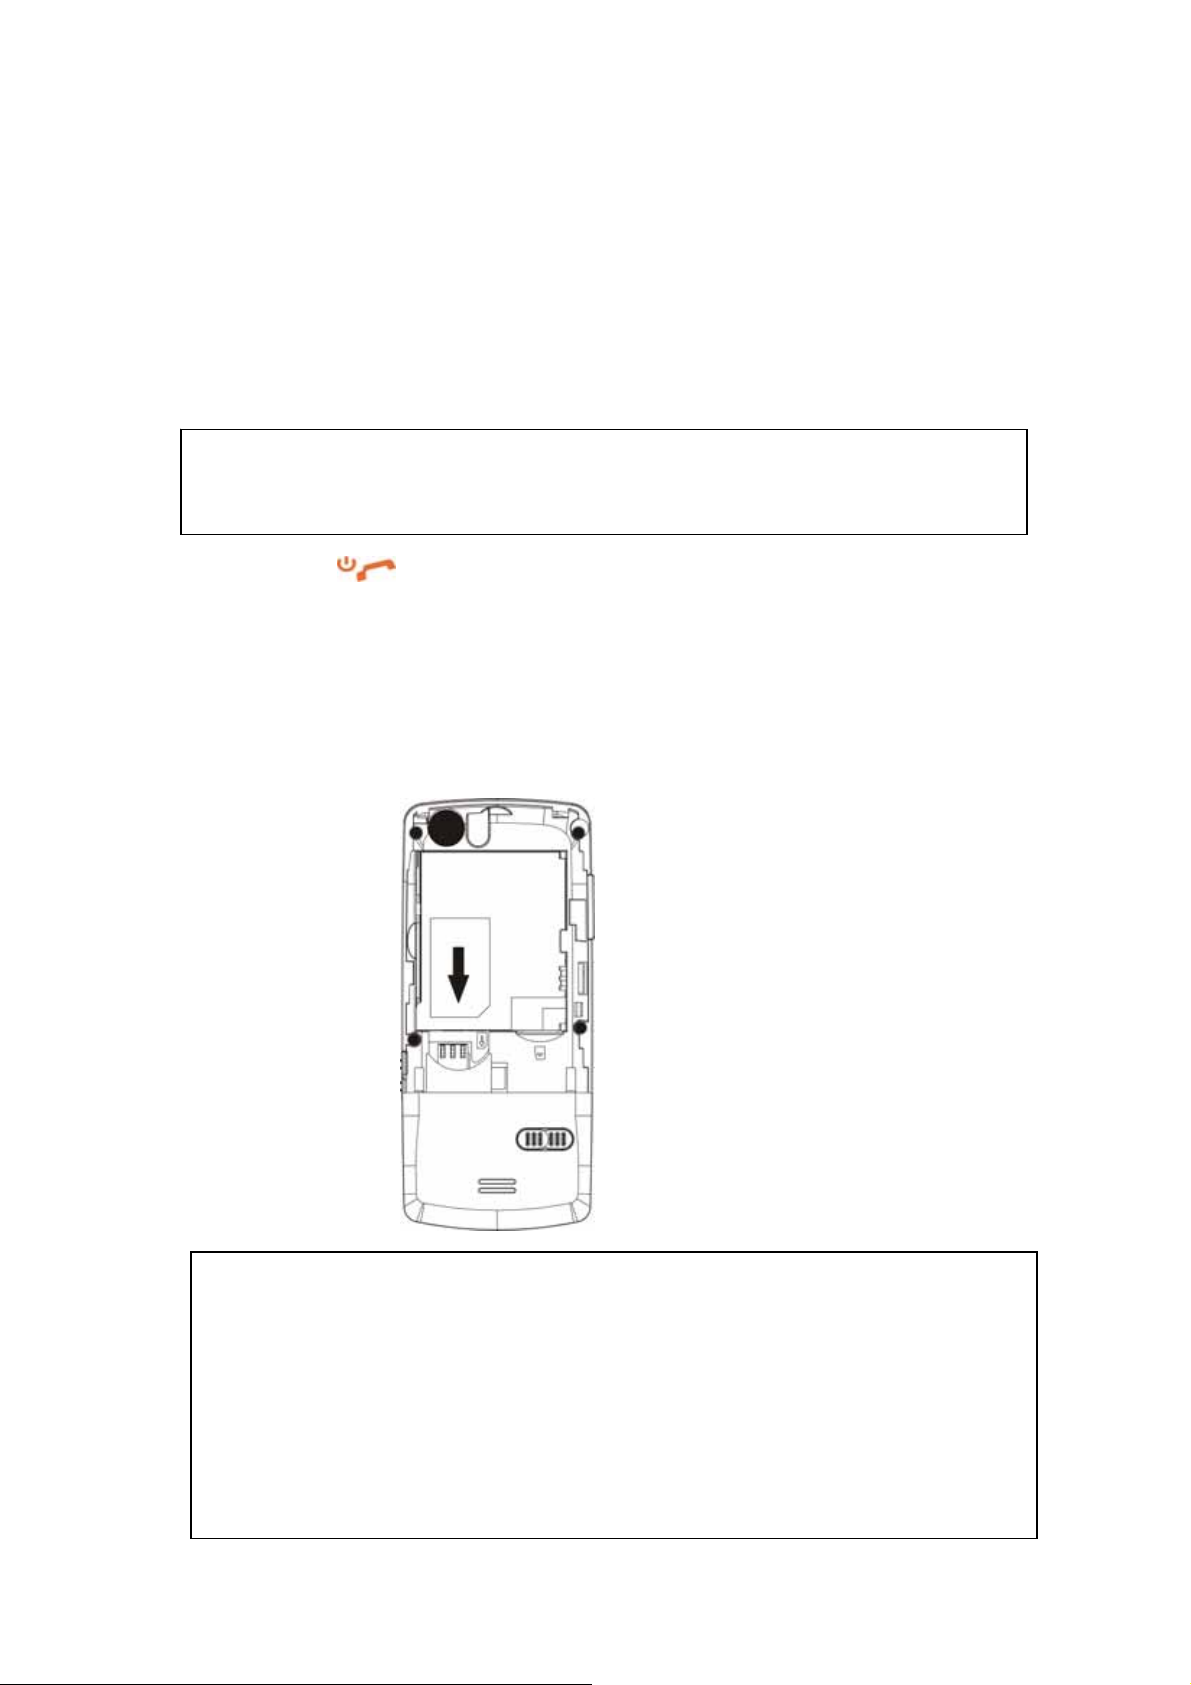
Installing the battery
You should slide down the battery cover first before y ou install battery.
1 Insert the battery carefully with the contacts located against the gold springs. The ba ttery will only fit
one way.
2. Push down the battery until it clicks into place and then install ba ttery cover.
Do NOT force the cover down by pressing on it. This will d amage the cover .
• The phone automatically switches off if the battery voltage is too low.
• When not using the battery for a long period, remove it from the pho ne and store it in a cool dry
place.
Removing the battery
Ensure that your phone is switched off. Then slide down the cover board of the battery and lift the battery
away from the phone.
Page 20

Charging the battery
The battery is not fully charged when first unpac ked and should be used up com pletely before charging
the battery for the first time. While charging the batt ery, charge it for eight hours for the first time and
afterwards at least two hours each time to reach its optim um performance.
To charge the battery, you can use the provided charger or the USB data cable.
Once the charging is complete, remove the charger from both the power outlet a nd the phone.
1 With the battery in position on the phone connect t he lead
from the charger to the right side of the phone. Check that
the arrow on the lead connector is facing towards to the
front of the phone.
2 Connect the charger to a standard AC wall outlet.
3 When charging, ensure the power cabl e is kept clear of
walkways and does not cause a hazard.
Charging is only possible within a temperature range of 0°C to 45°C.
Page 21

MicroSD card
The MicroSD card gives your phone a very large memory capacity. This allows you to save multimedia
data, including images, photos, MP3 a udio files, and ring tones. You can also use th is memory card to
store any other files.
Your phone can support a MicroSD card with capacity up to 2GB.
Inserting the MicroSD card
1. Press and hold to turn off the phone.
2. Slide down the cover and remove the battery.
3. Handle the card by the edges and carefully insert the card with the metal contacts fac ing up.
4. Push the card until it clicks into position.
Removing the MicroSD card
1. Press and hold to turn off the phone.
Page 22

2. Slide down the cover and remove the battery.
3. Push the card so it clicks out.
4. Gently slide down and remove the card from the slot.
Access the MicroSD card on the phone:
1. Press (Menu) in idle screen to open the main menu.
2. Select File Manager to open File Manager.
3. Press to get to the MicroSD card interface.
4. Then you can view the contents of MicroSD card on the phone.
Switching the phone on/off
Switching the phone on
Press and hold to turn the phone on. When being as ked, enter your PIN code and confirm with
pressing .
The PIN (Personal Identification Number) is the password provided by your networ k operator. You need
this password in order to use the (U)SIM card.
When the PIN code entered has been accepted, the phone will autom atically search for the designated
network. This search process may take a few seconds. For details on the PIN code, se e page 23.
Standby mode
The phone is in idle screen and is ready for use when the name of the s ervice provider is displayed on the
idle screen.
Press to return to main menu from any situation.
Page 23

Signal strength
The signal strength is indicated in the top l eft corner of the display. More ba rs indicate a stronger signal.
Strong signal.
If the phone is not able to detect the des ignated networ k, or links to a network that you are not aut horized
to use, the signal strength meter will show no bars. You will only be able to make em ergency calls.
Emergency Call (SOS)
You can make an emergency call even if your phone is l ocked or ca nnot access your netw ork, or if there i s
no (U)SIM card inserted, as long as you are within range of a network of the ty pe supported by your hone.
1. If there is no (U)SIM card loaded, press (SOS).
2. Enter the emergency number, for exam ple, 112 (the intern ational emergency number).
3. Press or (Call) to call.
Switching the phone off
Press and hold to turn the phone off.
Page 24

General instructions
Navigating the menus
The phone features various functions and sett ings organized in menus and s ubmenus. To select a function
from menus:
1. Press (Menu) in idle screen to open the main menu.
2. Use or to scroll up, down, right or left through the main menu. For example, scrol l to
Settings.
3. Press to enter the menu. At this time, you are in Screen tab.
4. Press to scroll to a submenu, for example Set backlight duration.
5. Press (OK) to confirm selection.
6. Press to scroll to the desired option, for example, Screen halflight.
7. Press to scroll to the desired option, for example, 15 seconds.
7. Press (Ok) to confirm selection.
• If a number is shown before an option in menu list, you ca n access the opt ion quickly by pressing the
corresponding number key.
• In this user manual, the steps needed to reach a menu are shown in a condensed form, for example:
Settings > Set backlight duration > Screen halflight>10 seconds
Some options are organized in tabs. Press to switch to different tabs.
Security
The phone and (U)SIM card are protected against m isuse by several security codes. Keep these
confidential numbers in a safe place where you can access them again if required. For m ore security setup,
see page 44 Settings > Security.
Page 25

• If you enter the PIN incorrectly three times in a row, the SIM card will be locked. You have to enter t he
PUK for that SIM card in order to unlock it. Please contact your network op erator to obtain a PUK.
• If the PUK has been lost, please contact your network operator.
Handset lock code
If the phone lock is activated, the phone lock password is requested when the phone is switche d on. The
default password is 0000.
When the phone is locked, only emergency calls can be made.
PIN code
The PIN is the password provided by your network oper ator and is usua lly requeste d each time the phone
is switched on. You can deactivate this featur e but you ris k unauthorized us e of the phone. Some network
operators do not permit deactivating the control.
PIN2 code
PIN2 is needed for some settings. Proceed as with PIN code.
PUK code
PUK (Personal Unblocking Key, 8-digits) unlocks a locked PIN. If you ent er the PUK incorrectly ten
times in a row, the (U) SIM card will become invali d. Please contact your ne twork operator for a new (U)
SIM card.
Page 26

Text entry
Your mobile phone provides the following in put met hods: eZi Text input, Multit ap input, and numeric
input.
When you are in a field that allows characters to be ent ered, you will no tice the text inp ut mode indicat or
in the upper right corner of the display.
Changing the input method
Press repeatedly to select an input method.
eZiText
eZiText a predictive text method. It is based on a built-in dictionary and generates words from the
combination of letters pressed.
1. Press each key associated with the letter you want to enter only once. The letters you have
entered appear on the display. The candidate words change with each key you press.
2. When the candidate word is displayed, press to highlight the desired candidate words and
press (OK) to confirm.
3. Press to insert space. Or press to select symbols.
4. Press to delete the letter left of the cursor. Press and hold to delete all entered text.
Multit ap ABC/abc
• Press a number key ( ~ ) repeatedly until the required letter appears in the
text. Press once to input the first letter on the keypad , press twice quickly to input the second
letter, and so on.
• Press to insert a space.
• Press twice to enter 0.
Page 27

Numeric
When the input method icon is shown as "123", input numbers directly with number keys.
While using Numeric input, you need to switch to other text input methods in order to insert a
space by pressing .
Inserting symbols
1.
Press
.
Use
or
2.
Press
3.
(Ok)
to select symbol.
to confirm.
Page 28

Calling
Making a voice call
• In idle screen, enter a phone number and press .
• Press to end a call.
Making a video call
• In idle screen, enter a phone number and press (Call).
• Select Video call and press (OK) to make a video call.
• Press to end a call.
The called party as well as the network have to be cable of handling video calls. If you are
calling a number that does not meet these requirements, the phone will stop dialing the number.
Making international calls
1. Press twice to enter "+".
2. Enter country code, area code, and the phone number.
3. Press .
Calling an extension number
Enter the number, and
1. Press three times to enter "P".
2. And then enter the extension number.
Making a call from Contacts
1. In idle screen, press the corresponding key for Contacts
2. Use or to select a contact person.
Page 29

3. Press for a voice call.
Dialing a previous number
1. In idle screen, press to display all calls.
2. Press to select a number.
3. Press for a voice call.
Calling a speed dial number
In idle screen, press and hold the corresponding number ( ~ ) in the speed dial list
to make the call.
Please note that is reserved for the voicemail number.
Setting speed dial
1. Edit the speed dial numbers in Contacts > Options > Set speed dial.
2. Press (Setup), then press or to complete the setting and return to the idle
screen.
Listening to voicemail
Press and hold .
Setting volume
During a call, press Volume keys (See page 10) to adjust the call volume.
Answering a voice call
• Press or (
Loudsp.
).
Page 30

You can use the microphone on the headset to talk if there is an incoming call.
Press the button on the headset to answer the call.
Answering a video call
• Press or (
Loudsp.
).
Ending a call
Press
Rejecting a call
Press
or
(
Reject
).
Call options
Press (Options) during a call for more options. Options vary depending on the current
situation.
• Hold /Active:
Put the current call on hold or retrieve the call.
• End call: End current call.
• Record/Stop recording:
• DTMF Off/On:
• SMS:
• Contacts:
• Browser: You can browse internet by this option while talking.
Switch to SMS editing interface during a call.
Enable or disable sending DTMF tone.
Switch to Contacts interface during a call.
Record the current call or stop recording.
Page 31

USB Connection
For data exchange with the MicroSD card you have to insert the card (pa ge 19) before
connecting the phone to the computer.
Connect the phone and the computer with the provided USB data cable. Plug the smaller end of
the cable into the connection jack at the right side of the phone, and the bigger end into the USB
port of the computer.
Mass storage
Before you use the MicroSD card as storage, you must install Join Me application software on
the provided CD.
1. Make sure your phone is switched on and connected to your PC, and Join Me application
software has been installed.
2. Double click the Join Me icon on the desktop.
3. Select “F188” and press Connect in Select phone type dialog box.
4. Press OK to download your Contacts and Messages (you can switch this off under Tools>
Settings).
A successful connection is indicated by the icon on the Windows status bar when the
program window is minimized. At this time, you can use MicroSD as mass storage.
When copying a file from your computer to the MicroSD card or the phone memory, you can
drag the file into the corresponding folder.
Page 32

Menus
r
Extras
Connect
Bluetooth
Your phone comes with built-in Bluetooth technology that lets you communicate with other
Bluetooth devices over a maximum of approximately 10 meters (30 feet).
Bluetooth manager
You can turn Bluetooth function on or off and make your phone visible or invisible in Bluetooth
manager
My devices
You can view the available Bluetooth devices list.
New device
You can search Bluetooth devices and create a Bluetooth connection.
1.
Turn the Bluetooth function on and make your phone visible in Bluetooth manager.
2.
Select New device to search for new Bluetooth devices.
3.
A list of available devices is displayed. Select a device and confirm with pressing .
.4.
When asked for permission to connect to the device, enter the pass code for the device, both in
the phone and in the device that you are connecting to.
The pass code is device-dependent. Please refer to the documentation of the Bluetooth device
fo
.
the pass code.
Help
Provide the help information of Bluetooth.
Syncml
You can use Syncml to enhance your Personal Information Management by synchronizing the
contacts and calendar information on your handset with those on a network server.
Page 33

Please contact your service provider for Sync settings before synchronizing the contacts and
calendar.
• You can select to use Two-way fast sync or Two-way slow sync.
• You can use Query log to view the Syncml info.
Time
Alarm
You can set the alarm to ring if required, and the icon will be displayed in idle screen .
Scroll to an alarm and select for settings.
The alarm will ring at the set time, even when the phone is switched off.
Calendar
You can enter events in the calendar. Time and date must be set for the calendar to work correctly.
• Press or to scroll to different dates.
• Press to add a Meeting, Memo or Anniversary.
• Press (Options) for more options:
Week view: View the schedule of the current week.
Go to date: Input a date and go to see the schedule of that day directly.
Delete entry: You can choose to delete the entry In this day, Before date or delete All entries.
Settings: You can set the Calendar alarm tone, Default view and Week starts on.
Memory Info.: Shows the current memory usage.
Stopwatch
You can measure times, e.g. for a sports game.
World Time
You can check the current local time and date for major cities around the world.
Page 34

To use World time, you must set your phone’s date and time correctly.
Other
Calculator
The phone provides simple calculating functions, such as addition, subtraction, multiplication and
division.
1. Press ~ key to enter numbers, press to enter the decimal point.
2. Press or to choose +, –, ×, ÷.
3. Press to clear last digit or results.
4. Press (Equal) to calculate. Press or or to exit the calculator.
Currency Conversion
This function allows you to convert foreign currency to local currency.
1. Set the exchange rate.
Press to enter the decimal point. Press to clear last digit or results.
2. Enter the amount to convert in Foreign,
Local automatically.
and the amount in the other currency is displayed in
STK
Shown only if it is provided by your (U)SIM card. For further details, please contact your network
operator.
Internet
Get the latest information from the Internet that is specifically adapted to the display options of
your phone. In addition, you can download games and applications to your phone. In ternet access
may require registration with the service provider.
The browser is activated with the preset option as soon as you call up the function. Browser
settings may be specified/pre-assigned by the service provider.
Page 35

Home
Select Home to connect browser to a homepage you set.
Go to
This function allows you to store and edit frequently accessed sites. Select Enter address to input
the special URL.
Bookmarks
Select Bookmarks to display a list of stored bookmarks.
To add a current page to bookmarks, go to Internet > Bookmarks > Options>Add.
History
This function allows you to check the visited pages.
Page memo
This function displays the list of pages saved as an off-line file.
Push messages
Push message is an application of WAP PUSH. It can guide you to access WAP site. This shows a
list of all the push messages delivered to your browser. Not all network providers use this feature
Options
You can set the internet settings in this Options menu.
Page 36

Entertainment
Download applications
Press (Go) to download the games or applications from the default website.
Contacts
All
You can store contacts with a variety of phone and fax numbers as well as additional address
details.
The phone can store up to 500 entries. The capacity of a phone book on your (U)SIM card depends
on the type of (U)SIM card provided by your network operator. When a contact is selected, press
(Options) for its options menu.
• shows beside the contacts stored in your phone memory.
shows beside the contacts stored on your USIM card.
•
Call
You can make a voice or video call.
New contact
You can add new contacts to the phone book on your phone or on the (U)SIM card.
Edit contact
Edit the information of contact.
Delete
Delete this contact or delete all the contacts saved in phone or SIM card.
Copy
Copy contacts stored in the phone to (U)SIM card, or vice versa.
Send Bus. Card
You can send the name and number of the record as SMS, MMS, E-mail and Bluetooth.
Page 37

Default Memory
You can select which location you want save the contact.
Service dial number
View some service numbers, you can not edit these numbers.
Set speed dial
You can set this contact as speed dial number. Please see page 27.
Manage Contact
You can set or check the following items:
Group: You can set voice call ring tones, video call ring tones, or pictures for the caller groups
stored in the phone.
Speed Dial info. : Check current list of Speed dial.
Memory info.: Show the capacity used and the total capacity of the phonebook in the phone and
the SIM/USIM card.
When you search contact, you can enter the first letter and the phone shows all contacts starting
with such a letter. Scroll to select a number and press for voice call.
(U)SIM, Mates,Family , Friends, W ork, VIP, Unclassified
These menus allow you to manage groups’ information. Records saved in the (U)SIM card are
sorted into an independent group. If the user doesn’t appoint the record to any group, the record
will be sorted into the Unclassified.
Messages
Message
Short Messaging Service (SMS) and Enhanced Message Service (EMS) allow you to send text
messages and manage the messages that you sent and received.
You can also send and receive Multimedia Message Service (MMS) messages. MMS enables you
Page 38

to send messages with images, sounds and texts. Ask your service provider whether this service is
available. You may need to register separately for this service.
New message
You can write a new message to be sent.
Writing SMS message
1. In idle screen, press (Menu) to select Messages > New message > Text message
2.
Enter the recipient(s) party’s number
, or
press (Contacts) to choose the recipient(s).
3.
Press
4.
5.
6.
Writing MMS messages
1. In idle screen, press (Menu) to select Messages > New message > Multimedia
2.
3.
4.
5.
6.
Or you can press
(Templat.) to insert templates.
After corresponding information is entered, press (Send) to send.
message.
Enter the recipient(s) party’s number
press (Contacts) to choose the recipient(s).
Press
Press
Or you can press
twice to the text field and write message.
(
twice to the title field and write subject.
to the text field and write message.
(
Options) and select My words you want to send or press
, or
Options) and select My words you want to send or press
(Insert) to insert image, audio or video.
After corresponding information is entered, press (Send) to send.
7.
Inbox
Incoming messages are saved here.
You cannot receive new messages if messages are full. Please delete unnecessary messages.
Page 39

Outbox
Messages failed and to be sent are saved here.
Drafts
You can save a message as draft while creating it.
Sent
Messages successfully delivered are saved here.
User folders
The User folders can save all messages moved from Inbox.
(U)SIM Inbox (Message only)
You can check the short messages saved in (U)SIM card.
Settings
You can change the MMS/ SMS / Templates settings.
Mul. Msg. Settings
Retrieval Settings: You have three choices:
Automatic: Retrieve the new multimedia message automatically without selecting the
notification message and receiving.
Manual:
Manual when roaming: when you are in roaming state, you will retrieve the new multimedia
Delivery mode: You can set immediate delivery or defer it for a specified period of time.
Delivery time: You can set a specified period of time to send MMS when you set After sending
Time per page: Set the play time of each page.
Delivery report: You can request delivery reports for messages you send. When the message is
Validity: You can configure the validity period of outgoing messages. Messages will be saved
Anonymous Msg: You can choose to accept or refuse anonymous message.
Retrieve the new multimedia message manually.
message manually.
in Delivery mode. The max delivery time is 99 hours.
delivered to the recipient, you will be notified with a popup message.
in the network for the time period specified
Connections: Please consult the service operator for detailed information.
PUSH Message:
Page 40

Text Msg. Settings
SMS center number:
Expired Time: The length of time in which the message center will attempt to deliver the
message until it is received.
Status report: The network informs you whether or not your message has been delivered when
this function is activated.
Template Settings
The phone has 10 templates for SMS / MMS / and you can edit them.
Service center number given to you by your service provider.
Memory info.
You can check the total amount of messages that has already been stored and the space which is
available in the (U)SIM card and the phone.
E-mail
New E-mail
1. In idle screen, press (Menu) to select Messages > E-mail > New E-mail
2.
Enter the recipient(s) party’s email address
Press (Contacts) to choose the recipient ( s).
3.
Press
4.
5.
6.
7.
8.
9.
Press
Press
Or you can press
My words
Press (Insert) to insert file, image, audio or video.
After corresponding information is entered, press (Send) to send.
twice to Copy To Field and enter the recipient(s) party’s email address.
twice to the Title field and write subject.
to the Text field and write message.
or
(
Options) and select Attachments/Templates/Insert signature or
.
Inbox
Incoming E-mails are saved here.
You cannot receive new E-mails if E-mails are full. Please delete unnecessary E-mails.
Page 41

Outbox
E-mails failed and to be sent are saved here.
Drafts
You can save an E-mail as draft while creating it.
Sent
E-mails successfully delivered are saved here.
User folders
The User folders can save all E-mails moved from Inbox.
Settings
You can set your mailbox. For more detailed information, please consult with your service
provider.
Memory info.
You can check the total amount of E-mails that has already been stored and the space which is
available for E-mails.
Calls
Call log
1. In idle screen, press .
Or you can select the desired list type:
Calls> All calls/Missed calls/ Received calls/Dialled calls.
2. Select a call from the list. When the call is displayed,
• press to call the number;
• press (View) to view the details of the call; or
• press (Options) for more options.
Save: Add new contact into Contacts or update the information in the Contracts
Page 42

Call: Make a voice call or video call to the number.
Send: Send text messages or multimedia messages to the number.
Delete: Delete the selected call log.
Delete all: Delete all call logs.
Calls info.
Call duration
You can monitor the approximate duration of your incoming and outgoing calls. You can check the
last call duration, all calls duration. And you can clear all the call duration timers by pressing
(Clear). To reset timers needs password. The default of password is 0000.
Settings
Screen
This setting allows you to configure screen display options.
Wallpaper
You can select your favorite wallpaper to display in idle screen.
Set backlight duration
You can set the duration of backlight.
Set brightness
You can adjust the brightness of the display.
Keyboard light
You can set the time for keyboard light duration.
Owner name
Set the owner name of the phone.
Page 43

Greeting
Set a message that is displayed when the phone is turned on..
Handset
Language
Set current display language.
Time and Data
Set the time and data.
Network settings
The network that your phone uses is configured automatically. When turned on, the phone
automatically connects to the designated network, or automatically connects to a roaming network
when you are outside the coverage of your regular network. When outside the coverage of your
regular network, you can manually select the local network system.
Preferred mode
Select the network operator in priority. The default is Automatic.
Preferred selection
• Automatic: The phone will scan for the available network when you are outside the home
network.
• Manual: The phone will list all networks for you to choose from when you are outside the
home network.
Own phone number
Set your own phone number to distinguish which (U)SIM card you are using.
Shortcut keys
You can assign the navigation key ( / / / ) as shortcuts to important
functions.
Press the corresponding key in idle screen to start the designated function.
Page 44

Modem setting
Set the parameters of modem. You can connect the phone and PC with data cable. Use the phone as
a modem. Configuration has been preset by your network provider. Please consult your service
provider on details.
Connection
You can create or edit connection data for service providers. For more details, please contact with
your service provider.
Access point settings
This menu shows the access point list. To modify these settings please call your service provider.
Restore default settings
Restore to original factory settings. Handset code is needed. The default code is 0000.
Keylock
Use the keypad lock to prevent the keys from being accidentally pressed.
You can lock the keypad manually by selecting no auto keyguard.
To lock, in idle screen, press and hold , then press (Lock). When the keys are
locked
You can set the keypad locking automatically as 10 seconds, 15 seconds, 30 seconds or 60
is shown on the display.
seconds.
When the keypad lock is on, calls may be possible to the official emergency number
programmed into your device.
Download location
You can use the phone memory or MicroSD card as downloaded files storage.
PC Connection
You can connect phone to PC via provided USB data cable or Bluetooth adapter.
Missed Calls Tone
Page 45

You can set ringtone notification for missed calls every 5 minutes, 10 minutes, 15 minutes or 30
minutes.
Profiles
Your phone provides several pre-defined user profiles that allow the phone’s operations to best
suit the environment you are in.
Supported profiles are: General, Meeting, Outdoor and Silent.
Customizing a profile
1. Press (Edit) to edit profile.
2. Press for Modify (see below).
Options for setting new profiles
Ringtune: Select the voice ringtone for incoming voice call notification.
Videocall ringtone: Select the voice ringtone for incoming video call notification.
Ring volume: Adjust the rin gtone vo lume level.
Ringing mode: Select the notification mode for incoming calls.
Message tone: Select the notification that sounds when a new message arrives.
Keytones: Select to turn on/off the keypad tone.
Warning tone: Select to turn on/off the warning tone.
Power on/off sound: Select to turn on/off the power on/off melody.
Earpiece volume: Adjust the volume of the earpiece.
Security
Security features protect the phone from unauthorized use.
Activate security codes
You can select to enable/disable the code protection in this submenu.
Change security codes
Page 46

You can change PIN code, PIN2 code and handset lock code.
Fixed dial numbers
You can define a list of numbers that can be dialed. This information is saved on the (U)SIM card.
Numbers not included in this list cannot be dialed.
• Requires entry of the PIN2 code.
• Once the PIN2 code is entered when the phone is turned on, it is no longer required until next
time the phone is turned on..
FDN list
List of the fixed dialed number.
• Requires entry of the PIN2 code when you add fixed dial number.
Call
Videophone setting
This service enables you to set parameters of the video phone, including VIG Number, UUS Type
and UUS String. Please consult service provider for detailed information.
Voice mail
This service enables you to set the Voice mail number. Please consult service provider for detailed
information.
Video Mail
Your Video mail number is preset to +61101. You can access your Video mail by using the Speed
dial 2 key.
Call divert
You can specify the conditions under which the call types should be diverted to your voicemail
box or another number.
Page 47

All calls diverted: Divert all incoming calls unconditionally.
When busy: Divert incoming calls when the line is busy.
When no reply: Divert calls when there is no answer.
When unreachable: Divert calls when the phone is turned off or the phone is not in an area
covered by service network.
Cancel all call diverts: Cancel all forwarding services.
Call waiting
If there is an incoming call while you are on another call, the phone notifies you with a call
waiting tone. The number /name of the waiting call is displayed.
Call barring
Restrict the dialing or receiving of certain calls. To activate or cancel call barring, you have to
enter the network password provided by your network operator.
Bar all outgoing calls: Calls can not be made.
Bar outgoing calls (international): International calls can not be made.
Outgoing international calls except for calls to the home country:
When abroad, calls can be made only to numbers within the current country and to your home
country, where your home network operator is located.
Barring all incoming calls: Calls cannot be received.
Barring incoming calls when international roaming:
Calls cannot be received when you are using your phone outside your home service area.
Cancel all call barring: Cancel all settings about barring.
Change password: Change password.
Send my number
This function allows subscribers to send or hide their numbers when making calls. You can also let
network to make the choice when selecting Set by network. This function needs network support.
Page 48

Multimedia
Camera
The phone is provided with an integrated digital camera.
Starting camera
• In main menu, select Entertainment>Camera to active camera.
Taking pictures
1. Aim the camera lens at the place/object.
2. Take the photo by pressing (Capture).
3. Press (Save) to save the picture just taken in My Pictures. The file will be in *.jpg
format.
Options for camera mode
While in camera mode, press (Options) for more options. Different options will be offered
depending on the current situation.
Photo Size: Set the size of an image.
Photo quality: Set the quality standard of an image.
Brightness: Set the brightness of an image.
Contrast: Set the contrast of an image.
Effect:
Shutter sound: Select the sound when the shutter is pressed
Save to: You can select MicroSD card or phone memory for pictures to store
Use front camera:
Switch to video camera: Access the interface to record a video clip.
Set the effect of an image.
Video Camera
You can activate video camera to shoot video clips.
Page 49

Shooting videos
1. Press
2. Press (Pause) to pause and then press (Continue) to resume recording.
3. Press (Stop) to stop recording.
4. Press (Send) to send a message with the video record and you can select to send via
(
MMS, Email or Bluetooth.
Once you have stopped recording you press
Videos. The file will be in *.3gp format. Or press
Record) to start recording.
(
Save) to save the video just taken in My
(
Discard) to discard it.
Options for video camera
While in video mode, press for more options.
Video Size: Set the recording time. The length of th e video reco rding is re stricted by the avail able
space on your memory card.
Video quality: Set the quality standard of a video clip.
Brightness: Set the brightness of a video clip.
Contrast: Set the contrast of a video clip.
Effect: Set the effect of a video clip.
Video sound: Select Off to mute the sound during the video record.
Video format: Define the format of the video record.
Save to: You can select MicroSD card or phone memory for videos to store
Use front camera:
Switch to camera: Switch to the camera mode.
Media Player
This application plays slideshow, video (3gp or MPEG4 files) and audio files in your phone or
connects to a Streaming URL.
When you enter Media player, Press (Help) to display the help information.
Press (Options) for more options.
Page 50

Open: You can open files, URL, slide or play list to play
Network settings: Set the parameters of streaming media server. Please consult the network
operator for detailed information.
Voice recorder
This function allows you to record a voice memo. When you enter Voice recorder, press
My auds) to play the audios in My Audios.
(
Press
(
Duration:
Save to: Select phone memory or MicroSD card as storage.
Options) for more options:
Set the recording time to 1minute, 5 minutes,10 minutes or 30 minutes. Default setting
is 5 minutes.
Start recording
1. Press (Start) to start recording your voice memo.
2. Press (Pause) to pause and then press (Contin.) to resume recording.
Stop recording
Press (Stop) stop recording.
Once you have stopped recording you can save it by pressing
pressing
Press
Send: Send the memo via MMS, Email or Bluetooth
Replay: Replay the audio.
(
(
Discard
Options) for more options:
).
(
Save) or discard it by
Playlist
When you have some audio files stored on your phone you can create a playlist to play your audio
files in the preferred order.
Page 51

1. If there is no playlists, please press (Add) to create a new playlist.
You can select the audio files from Audios /Others folder or MicroSD card. Press to
highlight an audio file and press (Mark) to select it, and press to save the audio
to the playlist.
2. Press (Play) to play the audio files in the playlist.
3. When you create a playlist, press (Options) for more options:
New Playlist: Create a new playlist file.
Rename: Rename the selected playlist file.
Delete: Delete the selected file.
Delete all: Delete all files.
Info.: View the information of the selected playlist.
Slide show
When you have some image files stored on your phone you can create a slideshow to play your
images in the preferred order.
1. Press (Add) to create a new slide.
You can select an image from Photos /Others folder or MicroSD card. Press to
highlight a image file and press (Mark) to select it, and press to save the pictures
to the slide.
2. Press (Play) to play the slide show.
3. When you create a slide, press (Options) for more options:
New slide: Add a new slide.
Rename: Rename the selected slide.
Delete: Delete the selected slide.
Delete all: Delete all the slides in the filet.
Page 52

Info.: View the information of the selected slide.
Streaming URL
TV channels are links to audio or video streaming content available through the browser (like
bookmarks). The streaming content is only available while you are connected to the server and
depends on your network operator or suitable content.
Press (Add) to add a new streaming file, input the Title and URL and then press to
complete setting.
In the Streaming URL list interface, you can press (Open) to open the URL, or press the
(Edit) to edit the setting. You can press (Options) for more options:
New Bookmark: Add a new bookmark to the Streaming URL list.
Send: Send the URL via SMS, MMS or Email.
Delete: Delete the URL from the Streaming URL list.
Delete all: Delete all the URLs in the Streaming URL list.
Info.: View the information about the bookmark.
File manager
You can use File manager to organize your files in folders.
If the MicroSD card is inserted, folders/files stored in it are organized separately.
Select a save location/folder and press (Options) to browse the folders/files.
Page 53

Questions & Answers
,
If you encounter problems while using the phone, or if it performs erratically, you can consult
the information in the chart below. If your particular problem cannot be resolved using the
information in the chart
Problem Possible causes Possible solution
contact the dealer where you purchased the phone.
Poor reception
Echo or noise
• The network signal is too weak at your
current location, for example, in a
basement or near a tall building,
because wireless transmissions can not
effectively reach it.
• The network is busy at the current time
(for example, during peak times, there
may be too much network traffic to
handle additional calls).
• You are too far away from a base station
for your service provider.
• Poor network trunk quality on the part
Move to a location where the
network signal can be properly
received.
Avoid using the phone at such
times, or try again after
waiting a short time.
You can request a service area
map from your service
provider.
Press and dial again.
Unable to select
certain features.
of your service provider.
• Poor local telephone line quality.
Your service provider does not support
these features, or you have not applied
for services that provide these features.
You may be switched to a
better-quality network trunk or
phone line.
Press and dial again.
You may be switched to a
better-quality network trunk or
phone line.
Contact your service provider.
Page 54

Problem Possible causes Possible solution
Battery will not
charge.
• The phone's temperature is below 0°C
• Poor contact between the battery and
Shortened
standby time
• The battery or battery charger is
damaged.
or higher than 45 °C.
charger.
• The standby time is related to your
service provider system
configuration. The same phone used
with different service providers’
Contact the dealer.
Adjust the battery charging
environment to avoid extremes
of temperature
Check all connectors to make
sure all connections have been
properly made.
If you are located in an area
where signaling is weak,
temporarily switch off the
phone.
systems will not provide exactly the
same length of standby time.
• The battery is depleted. In
high-temperature environments,
battery life will be shortened.
• If you are not able to connect to the
network, the phone will continue to
send out signals as it attempts to
locate a base station. Doing so
consumes battery power and will
consequently shorten standby time.
Use a new battery.
Change your location to one
where the network is
accessible, or temporarily
turn off your phone.
You cannot switch
Battery power has been depleted. Recharge the phone's battery.
Page 55

your phone on.
Problem Possible causes Possible solution
(U)SIM card error
• (U)SIM card inserted improperly. Insert the (U)SIM card
• Debris on the (U)SIM card contacts. Use a soft, dry cloth to clean
Unable to connect
to the network.
• You are not within the network's
• Poor signal.
• (U)SIM card malfunction or damage. Take the (U)SIM card to your
service provider for testing.
properly.
th e (U)SIM card contacts.
• (U)SIM card invalid. Contact your service provider.
Check the service area with
service area.
your service provider.
Move to an open space, or if
you are inside a building,
move closer to a window.
You cannot answer
incoming calls.
You cannot
make outgoing calls.
PIN Code is
blocked.
You have activated the Call Barring
feature.
• You have activated the Call Barring
feature.
• You have activated the Fixed Dial
Number feature.
You have entered an incorrect PIN code
three consecutive times.
Go to Settings > Call > Call
barring, and then select
Cancel all call barring.
Go to Settings > Call > Call
barring, and then select
Cancel all call barring.
Go to Settings > Security >
Fixed dial numbers and select
Off to turn this feature off.
Contact your service provider.
If the service provider
provides the (U)SIM card's
Page 56

PUK code, use the PUK code
to unlock the (U)SIM card.
Unable to enter
information into the
phone book.
The phone book's memory is already
full.
Delete unnecessary data from
the Contacts.
Page 57

Page 58

Annex Glossary
1. 2G - Second Generation wireless communication system. 2G system supports low
quality voice and low-rate packet-data service. 2G refers to GSM in European countries, and
CDMA in America.
2. 3G - Third Generation wireless communication system. 3G is the next generation
wireless communication system that offers real-time video streaming services and high-rate
packet-data service. 3G is also known as UMTS (Universal Mobile Telephony System).
3. Access point - Access point refers to a point through which users can connect to the
network so that the users can use the network services.
4. MMS (Multimedia Message Service) - A message service for the handset environment,
that allows videos, pictures, audio files and text to be sent between phones and dependent on
network provider support, to email addresses
5. Roaming - Use of your phone when you are outside your home area, when traveling for
example.
6. USIM - Universal Subscriber Identity Module. Your USIM is provided by network
operator. It carries the authentication and service grade data for the network operator as well
as user-specific data such as Contacts and SMS.
7. Vid eo ca ll - A communications service that enables users to communicate with video
instead of normal voice. Video calling is only supported by 3G network providers
8. Voice/Video mail - An answering service that automatically answers your calls when
you are not available. Others can leave either voice or video messages for you with this
service.
Page 59

Declaration of RoHS Compliance
To minimize the environmental impact and take more responsibility to the earth we live, this
document shall serve as formal declaration that the MD-2 are in compliance with the Directive
2002/95/EC of the European Parliament - RoHS (Restriction of Hazardous Substances) with
respect to the following substances:
(1)Lead (Pb)
(2)Mercury (Hg)
(3)Cadmium (Cd)
(4)Hexavalent Chromium (Cr (VI))
(5)Polybrominated biphenyls (PBB’s)
(6)Polybrominated diphenyl ethers (PBDE’s)
Page 60

INFORMATION ON PRODUCTS
DISPOSAL
The symbol brought back on the equipment indicates that the refusal must be object of
“separate collection”.
Therefore, the customer will have to confer (or to make to confer) the refusal to the centers of
differentiated collection predisposed from the local administrations, or to deliver it to the retailer
in exchange of one new equipment purchased.
The differentiated collection of the refusal and the successive operations of treatment, recovery
and waste help the production of equipment with recycle material and limit the hazardous effects
on the atmosphere and the health eventually caused from one improper management of the refusal.
The illicit disposal of the product by the customer involves the application of the administrative
endorsements of which to article 254 and following of the D.Lgs. 152, April 3rd 2006.
According to of art. the 13, D.Lgs. 25th July 2005, n. 151 “Performance of the Directives
2002/95/CE, 2002/96/CE and 2003/108/CE, relative to the reduction of the use of dangerous
substances in the equipment electronic electrical workers and, let alone to the disposal of the
refusals”.
 Loading...