

Page 1

F151
UMTS 850MHz Mobile Phone
User Manual
1
Page 2

Edition: 1st edition, Dec., 2006
Copyright © 2006 by ZTE Corporation
All rights reserved.
No part of this publication may be excerpted, reproduced, translated or utilized in any form or by any means, electronic
or mechanical, including photocopying and microfilm, without the prior written permission of ZTE Corporation.
ZTE Corporation operates a policy of continuous development. ZTE Corporation reserves the right to make changes
and improvements to any of the products described in this document without prior notice.
PC Software Requirements
The Join Me PC Software support s Windows 2000 with Servi ce Pack 4 or Wi ndows X P wi th Service P ack 2 only . Please
install the CD before connecting your handset to your PC. See the Read Me fil e on the CD for full instru c ti o ns.
2
Page 3

Contents
1 For your safety......................................................................................................................................7
General Safety..........................................................................................................................................................7
Hospital Safety..........................................................................................................................................................9
Efficient use..............................................................................................................................................................9
Radio Frequency Energy........................................................................................................................................10
Emergency Services............................................................................................................................................... 10
Declaration of Conformity ........................................................................................................................................11
Copyright No tice......................................................................................................................................................11
Limited Warranty.....................................................................................................................................................12
Limitation of Liability................................................................................................................................................12
2 Getting Started ....................................................................................................................................13
Overview................................................................................................................................................................. 13
Key Definition.......................................................................................................................................................... 14
Display Symbols .....................................................................................................................................................17
Installing the USIM Card......................................................................................................................................... 18
Battery Installation, Charging and Care .................................................................................................................. 19
Powering Your Phone On and Off........................................................................................................................... 23
3 Basic Operation ..................................................................................................................................24
Making a Voice Call................................................................................................................................................24
Making a Call from Contacts................................................................................................................................... 25
Receiving a Voice Call............................................................................................................................................ 25
General Navigation.................................................................................................................................................28
3
Page 4

4 Tools (Shortcut = Menu, 1).................................................................................................................29
File Manager...........................................................................................................................................................29
Photos...............................................................................................................................................................30
Audios............................................................................................................................................................... 31
Videos............................................................................................................................................................... 32
Others ............................................................................................................................................................... 33
Time........................................................................................................................................................................ 34
Alarm.................................................................................................................................................................34
Calendar............................................................................................................................................................35
Stopwatch..........................................................................................................................................................36
Calculator ...............................................................................................................................................................36
Currency Conversion ..............................................................................................................................................37
World Time..............................................................................................................................................................37
5 Messages (Menu, 2)............................................................................................................................38
Create a New SMS Message..................................................................................................................................38
Create a New Multimedia Message........................................................................................................................39
Inbox.......................................................................................................................................................................40
Outbox....................................................................................................................................................................40
Drafts......................................................................................................................................................................41
Sent........................................................................................................................................................................41
User folders............................................................................................................................................................ 41
(U)SIM box ............................................................................................................................................................. 41
Multimedia Message Settings.................................................................................................................................42
Text Message Settings............................................................................................................................................ 43
Templates Settings ................................................................................................................................................. 43
Memory info............................................................................................................................................................43
E-mail.....................................................................................................................................................................44
4
Page 5

6 Games & Applications (Menu, 3).......................................................................................................45
Applications............................................................................................................................................................ 45
Settings................................................................................................................................................................... 45
7 Contacts (Menu, 4) ..............................................................................................................................46
All Records............................................................................................................................................................. 46
Groups.................................................................................................................................................................... 47
Create New Contact................................................................................................................................................ 47
Copy Contacts from USIM Card to Phone...............................................................................................................48
8 Telstra Services (Menu, 5)..................................................................................................................49
9 Calls (Menu, 6).....................................................................................................................................51
Call log.................................................................................................................................................................... 51
Calls info................................................................................................................................................................. 51
10 Settings (Menu, 7).............................................................................................................................52
Screen....................................................................................................................................................................52
Handset..................................................................................................................................................................53
Profiles....................................................................................................................................................................54
Security................................................................................................................................................................... 55
Call......................................................................................................................................................................... 56
Call Divert..........................................................................................................................................................56
Call Waiting ....................................................................................................................................................... 57
Call Barring........................................................................................................................................................57
Send my number...............................................................................................................................................58
Any Key to Answer ............................................................................................................................................58
11 Multimedia (Menu, 8).........................................................................................................................59
5
Page 6

Media player...........................................................................................................................................................59
Favorites................................................................................................................................................................. 60
12 Browser (Menu, 9).............................................................................................................................62
Home......................................................................................................................................................................62
Go to.......................................................................................................................................................................62
Bookmarks..............................................................................................................................................................63
History....................................................................................................................................................................63
Page memo............................................................................................................................................................63
Push messages......................................................................................................................................................64
Options...................................................................................................................................................................64
13 Text Input ...........................................................................................................................................65
ABC and abc mode................................................................................................................................................. 65
123 mode................................................................................................................................................................65
Predictive Tex t (En).................................................................................................................................................66
Special Characters..................................................................................................................................................66
14 Troubleshooting................................................................................................................................68
15 Glossary.............................................................................................................................................69
16 Technical Parameters .......................................................................................................................70
17 Environmental St atement.................................................................................................................72
6
Page 7

1 For your safety
General Safety
The handset contains delicate electronic circuitry, magnets and battery systems. You should treat it with care and pay
attention to the fo llowing points:
z Do not allow the handset, battery or accessories to
come into contact with liquids or condensing
moisture at any time. Do not immerse in any liquid.
z Do not leave the handset or battery in direct
sunlight or near other heat sources where the
temperature could exceed 60 °C
z Take care not to allow metal obj ects, such as coins
or key rings, to come into contact with the battery
terminals.
z Do not put the battery in your mouth. z Do not attempt to dismantle the handset or any of
z Only use original replacement batteries from your
dealer.
z Do not place the handset near computer disks,
credit cards, and other magnetic media. The
information contained on disks or cards may be
erased or damaged.
z Keep the handset, battery, charger and any other
accessories away from children.
z Do not dispose of battery packs in a fire. The
handset’s Li-ion batteries may be safely disposed
of at a Li-ion recycling point.
its accessories.
z Do not place the handset close to the edge of a
table in case it moves when set on vibration mode.
7
Page 8

z Do not put the handset into a microwave oven,
z Do not connect the handset to any other chargers
dryer, or high-pressure container.
z Be careful not to pierce the battery with sharp
objects and do not use a battery that is da maged in
any way.
z Do not disassemble or modify the battery. z Do not drop, throw, or subject the handset to rough
z Stop using the battery if abnormal heat, odour,
discolouration, deformation, or abnormal condition
is detected during us e, charge, or storage.
z Remove the battery at the end of its life and
dispose of safel y.
z Observe and obey warning signs at petrol stations,
z When the battery is thrown away cover the
z In the unlikely event of a battery leak, take care to
z It is normal for the handset to b ecome warm wh ile
z Do not use the handset where blasting is in
or cigarette lighter chargers. Only use the suppl ied
charger.
terminals with insulating tape. Please recycle (see
last page).
treatment.
keep the batt er y disc h ar ge aw ay fr om you r ey es or
skin. In the event of conta ct please flush thoroughl y
with clean water and consult a doctor.
the battery is being charged.
airports and hospitals.
z Do not leave your handset at the bottom of a bag
where it may be damaged by excessive weight or
sharp objects.
progress.
z Take care not to put your phone in your back
pocket and then sit on it.
8
Page 9

z Do not leave the handset discharged or
z Remember to make backup copies of all important
disconnected for a long time, otherwise your
personal data may be lost.
z Do not use your handset while driving or operating
other machinery.
z Please recycle the packaging.
data on your handset.
Hospital Safety
z Switch your phone off in areas where the u se of hands ets is prohibited. Al ways obey the warning signs and follow
the instructions given.
z The operation of some medical electronic devices, such as hearing aides and pacemakers, may be affected by
the handset. Observe and obey all warning signs.
Efficient use
The handset has an internal antenna located at the top of the phone. For optimum performance with minimum power
consumption do not cover the antenna area with your hand. Covering the antenna affects call quality, may cause the
handset to operate at higher power level than needed, and may shorten talk and idle times.
9
Page 10

Radio Frequency Energy
Your handset is a low-power radio tra nsmitter an d receiv er. When switched on it intermittentl y transmits radio frequ ency
(RF) energy (radio waves). The transmit power level is optimized for best performance and automatically reduces when
there is good quality reception. Maximum power is only used at the edge of network coverage, so under most
circumstances the power output is very low.
Emergency Services
To make an emergency call in any country:
1 Ensure that your handset is switched on and in service.
2 Press
3 Enter the emergency number for your present location using the keypad. (eg 000 or 112)
4 Press
key as many times as needed to clear the display and return to the idle scree n.
key to call the number. Follow instructions received and do not end the call until told to do so.
10
Page 11

To make an emergency call without a USIM card
When the USIM card is not inserted enter the emergency number and press
You can also activate the emergenc y call with a single key-press by pressing the SOS soft key button.
Note:
Tell the operator which service you re quire. Gi ve you r po sition a nd, i f possibl e, r emain statio nary to maintain be st
contact.
Due to the nature and coverage of the cellular syst em the c onn ec t ion of emergency calls cannot be guaranteed.
You should never rely solely on any wireless device for essential communications like medical emergencies.
or OK key to make the call.
Declaration of Conformity
We declare under our sole responsibility that the product(s) detailed in this manual, and in combination with our
accessories, conform with the essential requirements of The Radio Communications Standard (Electro-magnetic
Radiation Human Exposure) 2003 and the Australian Communications and Media Authority Section 376 of the
Telecommunications Act 1997. The Product is compliant with IMEI INTEGRITY requirements as defined in GSM
standards:2.07/02.09/02.16/02.30/03.0304.08, 3GPP standard:22.016/23.003
Copyright Notice
The video/audio recordings you transfer or download may be prot ected by copyright laws. They are for personal use
only and must not be otherwise used without the permission of the copyright owner.
11
Page 12

Limited Warranty
The warranty does not apply to defect s or errors in the product caused by:
(a) Reasonable abrasion
(b) Misuse includ ing mishandling, physical damage, improper installation, unauthorized disassembly of the product
(c) Water or any other liquid damage
(d) Any unauthorized repair or modification
(e) Power surges, lightning damage, fire, flood or other event s outside ZTE’ s reasonable control
(f) Use of the product with any unauthorized third party products such as generic chargers
(g) Any other cause beyond the range of normal usage for Products.
The End User shall have no right to reject, return, or receive a refund for any Product from ZTE under the
above-mentioned situations.
Limitation of Liability
ZTE shall not be liable for any loss of profits or indirect, special, incidental or consequential damages resulting from or
arising out of or in connection with using this product, whether or not ZTE had been advised, knew or should have
known the possibility of such damages.
The user should refer to the enclosed warranty card for full warranty and service information.
12
Page 13

2 Getting Started
Overview
Thank you for purchasing the F151 UMTS Mobile Phone. The F151 is capable of operating in UMTS (Universal Mobile
Telecommunication System) mode, also k nown as 3G, GSM (Global System for M obile Communi cations) o r 2G, and
13
Page 14
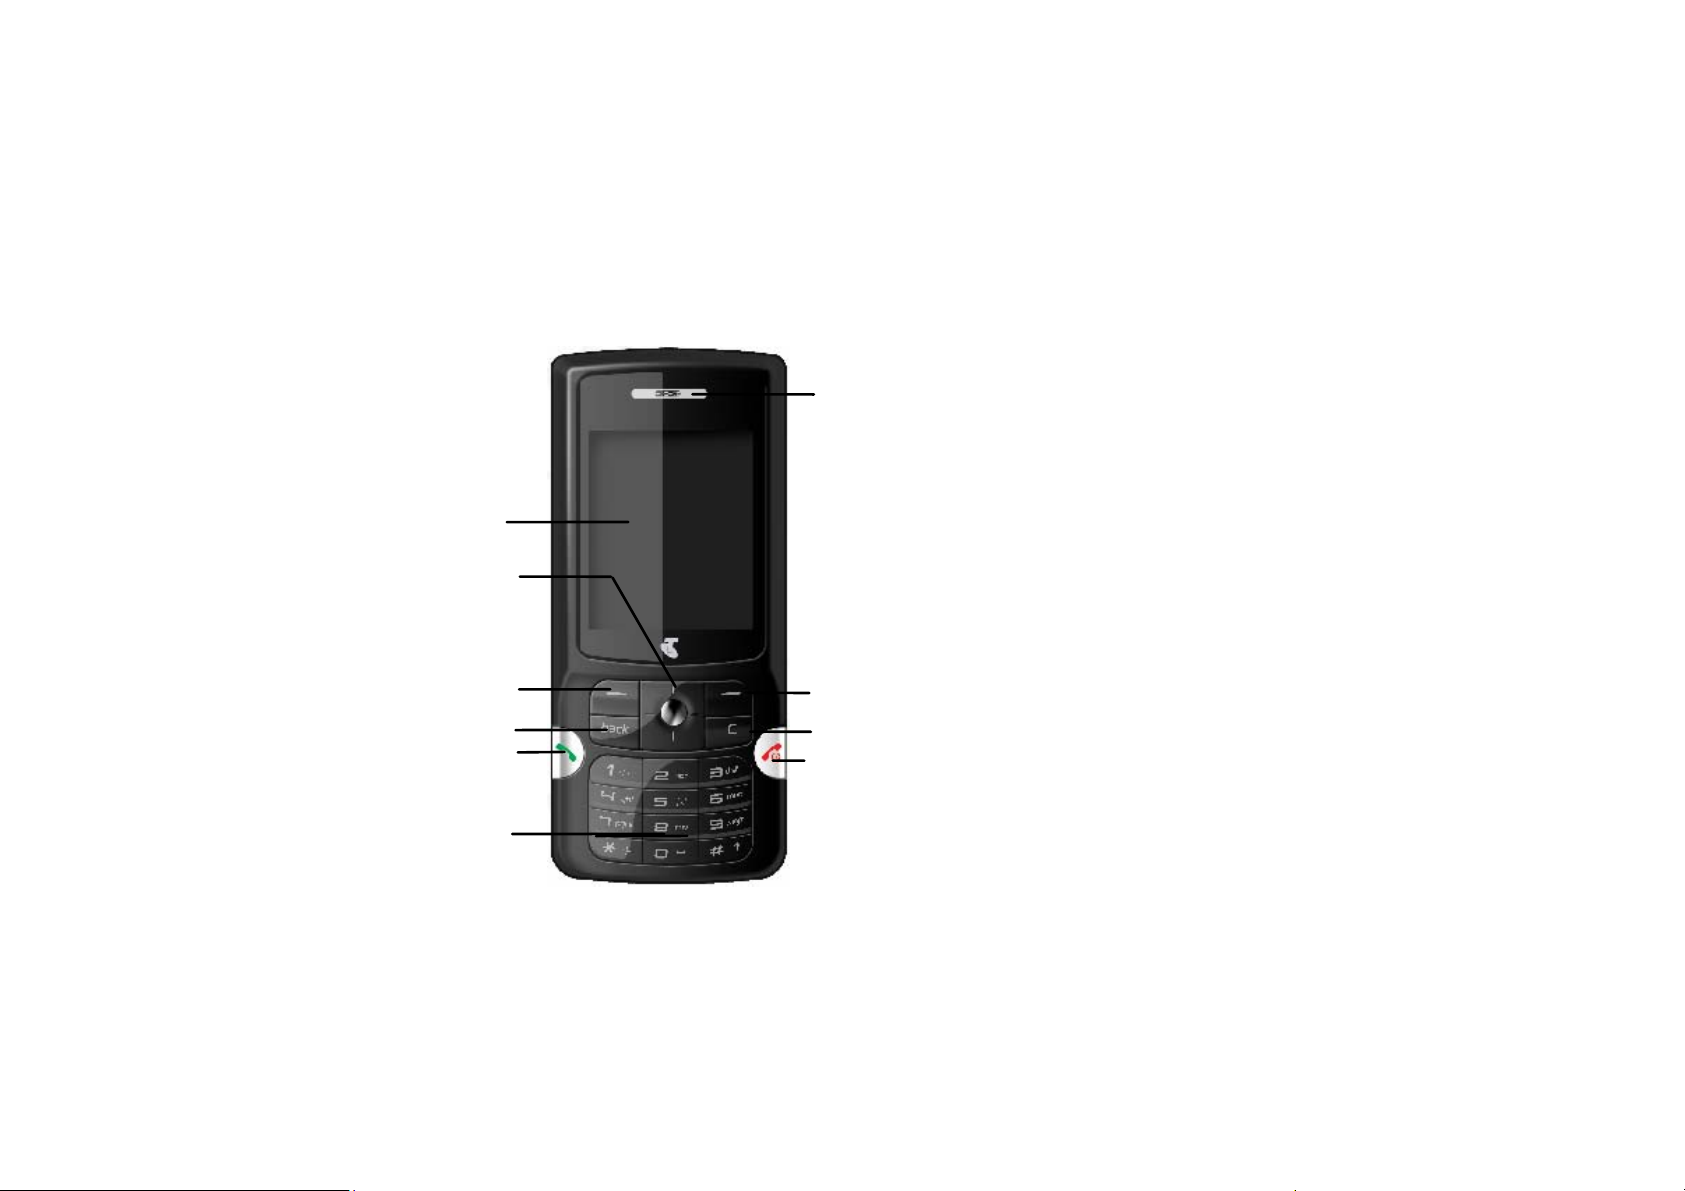
Key Definition
LCD
Arrow Keys
(Left/Right/Up/Down/OK)
Left select key
Back key
Call key
Keypad
Earpiece
Right select key
Clear key
End key
14
Page 15

Left select key
Execute prompts that appear at the lower left corner of the screen. Shortcut to Contacts.
Right select key
Execute prompts that appear at the lower right corner of the screen. Shortcut to Telstra Business
web site (BIZ)
Call key
Make and answer calls. Show All calls logs in idle state.
End key
End a call, reject a call, exit applications. Power on/off – hold for 4 seconds.
Clear key
Delete characters when editing.
Back key
Returns you to the previous screen.
15
Page 16

Up: Scroll up. Shortcut to My Place. Move cursor to previous field.
Down: Scroll down. Shortcut to Contacts. Move cursor to next field.
Left: Scroll left. Shortcut to Calendar. Move left on tabs.
Right: Scroll right. Shortcut to Multimedia. Move right on tabs.
OK key: Confirm actions, make selec tions. Execute prompts that appear in the lower middle of the
screen.
0~9 Number key
Dial numbers. Enter numbers and characters. Press and hold for speed dialing. Select items on
menu lists. Shortcut to functions through th e menu system.
Long press (press and hold) on Key 1 goes direct to Voicemail (#101#)
# key: Switch between different text inpu t modes: Predictive Text, ABC, abc or 123
Long press to activate key lock. Press and hold the # key then follow the prompts
* key: Enter symbols mode when editing. In idle states press twice for + symbol for international
dialing prefix.
16
Page 17

Display Symbols
Signal Strength of the GPRS Network
Signal Strength of the 3G Network
No signal
New Message
New E-mail
New Wap Push Message
Message Memory is Full
E-mail Memory is Full
Wap Push Message Memory is Full
Roaming
Alarm
Battery Level Indicator
Missed Call
Call Forward (All Calls) is Active
Silent Mode
Vibration Mode
Headset Mode
Headset and Vibration Mode
GPRS Attach
PDP Context Estab l ished
17
Page 18

Installing the USIM Card
The USIM card stores your network connection authority, service details, phonebook and text messages. It must be
inserted into your phone prior to use.
First disconnect the charger and other accessories. Remove the back panel and the battery (as described below).
Handle the USIM card with care and avoid static electricity and magnetism. Do not bend or scratch your USIM card.
If the USIM card is removed or damaged then the handset becomes unusable except for emergency calls.
The USIM card is installed in a holder underneath the battery. Insert the card into the holder as shown with the gold
contacts on th e USIM c ard fac ing down and th e beve led cor ner faci ng to t he top left. E nsure t he USIM card i s pushe d
all the way to the base of the phone.
18
Page 19
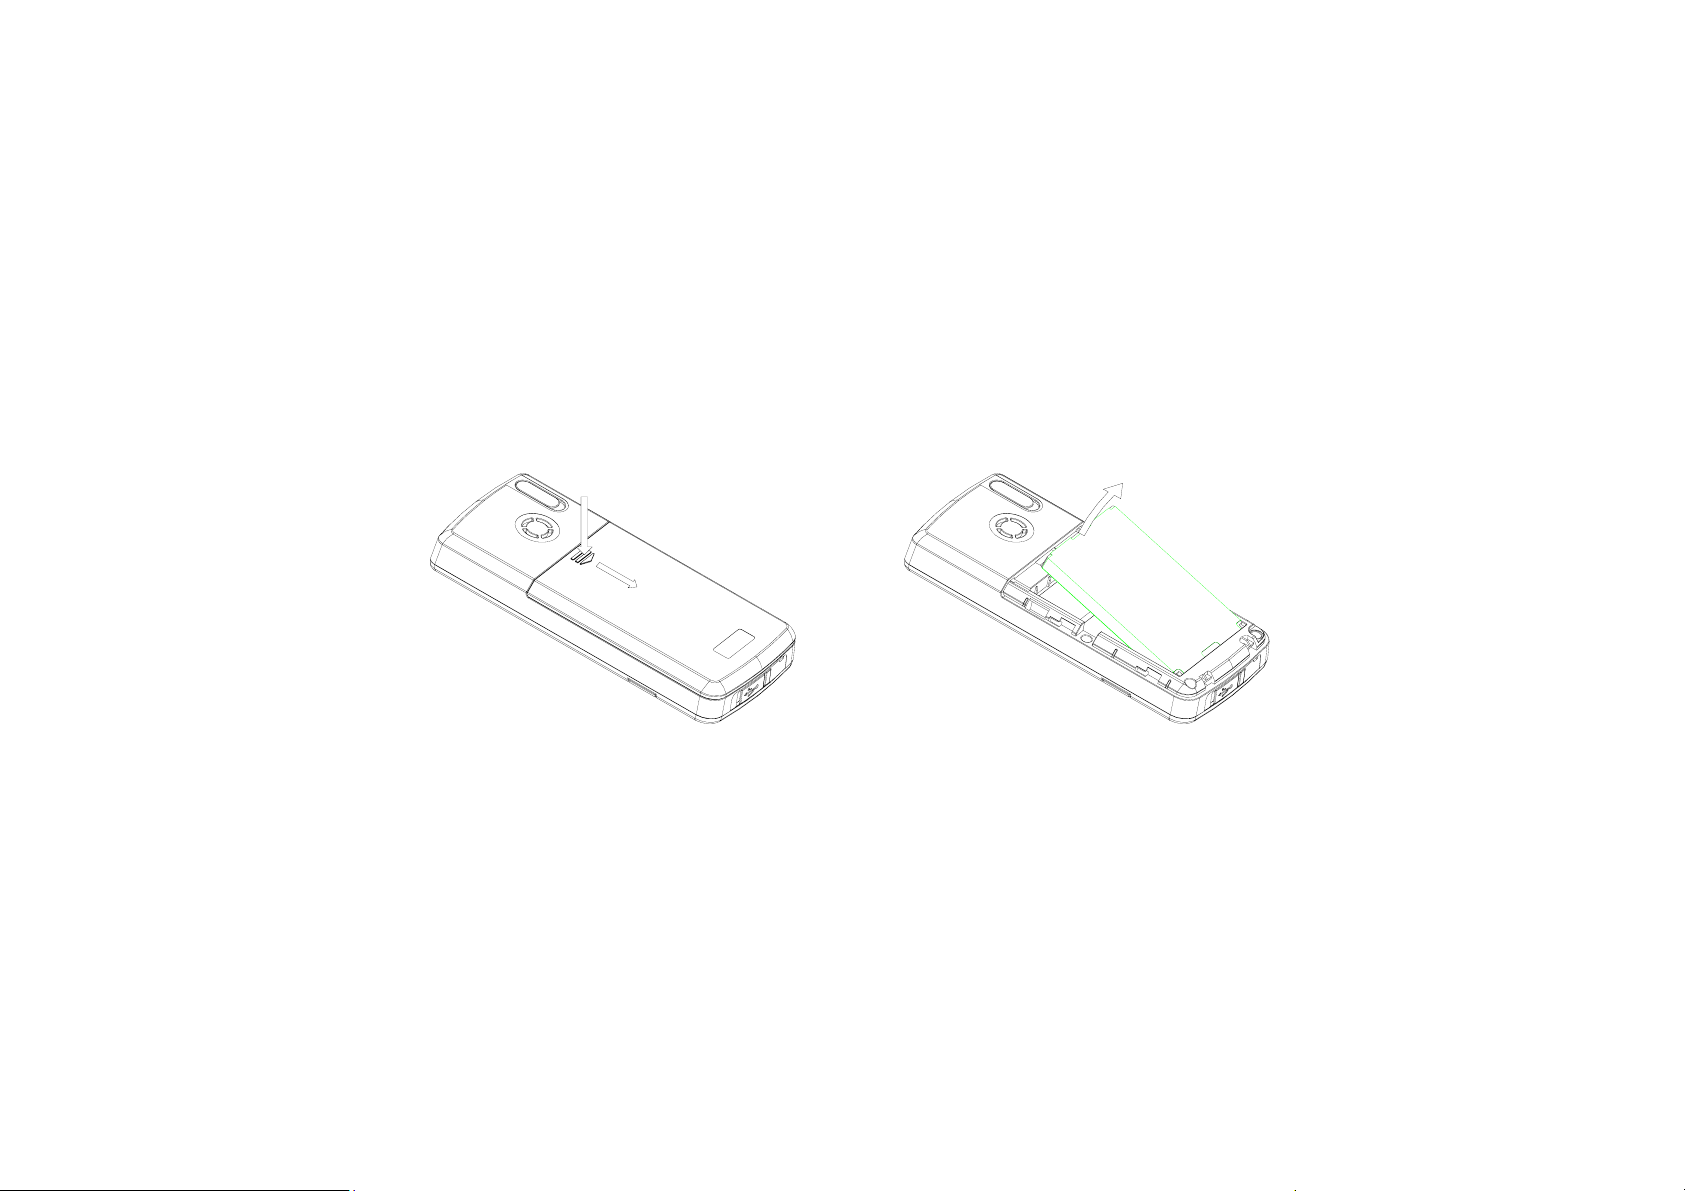
Battery Installation, Charging and Care
1. Removing the Battery
Switch off the handset. Find and press the release button in the upper middle of the back panel and gently slide the
panel down to reveal the battery compartment. Find the groove on the top of the battery and lift the battery up and out.
1
2
2. Installing the Battery
Locate the contacts on the battery. Insert the battery so the contacts line up with the terminals on the phone. The
battery can only be inserted one way. Replace the back cover by locating the cover flat within 5mm of the closed
position and slide the cover up to lock it. Do not force the cov er down at an angle as this will damage the lugs.
19
Page 20

2
1
The battery is not fully charged when you buy your phone but there may be enough power in the battery to turn the
phone on. A battery that has not been used for a long period of time needs to be completely discharged and then
recharged two or three times before reaching full capacity.
Note:
z The F151 auto ma tically switches off if the battery voltage is too low.
z Batteries have a limited life span. If the battery does not last as long as it used to, the battery may be
coming to the end of its life. Replace the battery with a new one of the same type.
z When not using the battery for a long period remove it from the F151 and store it in a cool dry place.
z Do not leave the phone connected to the charger for extended periods of time eg > 24 hrs.
20
Page 21
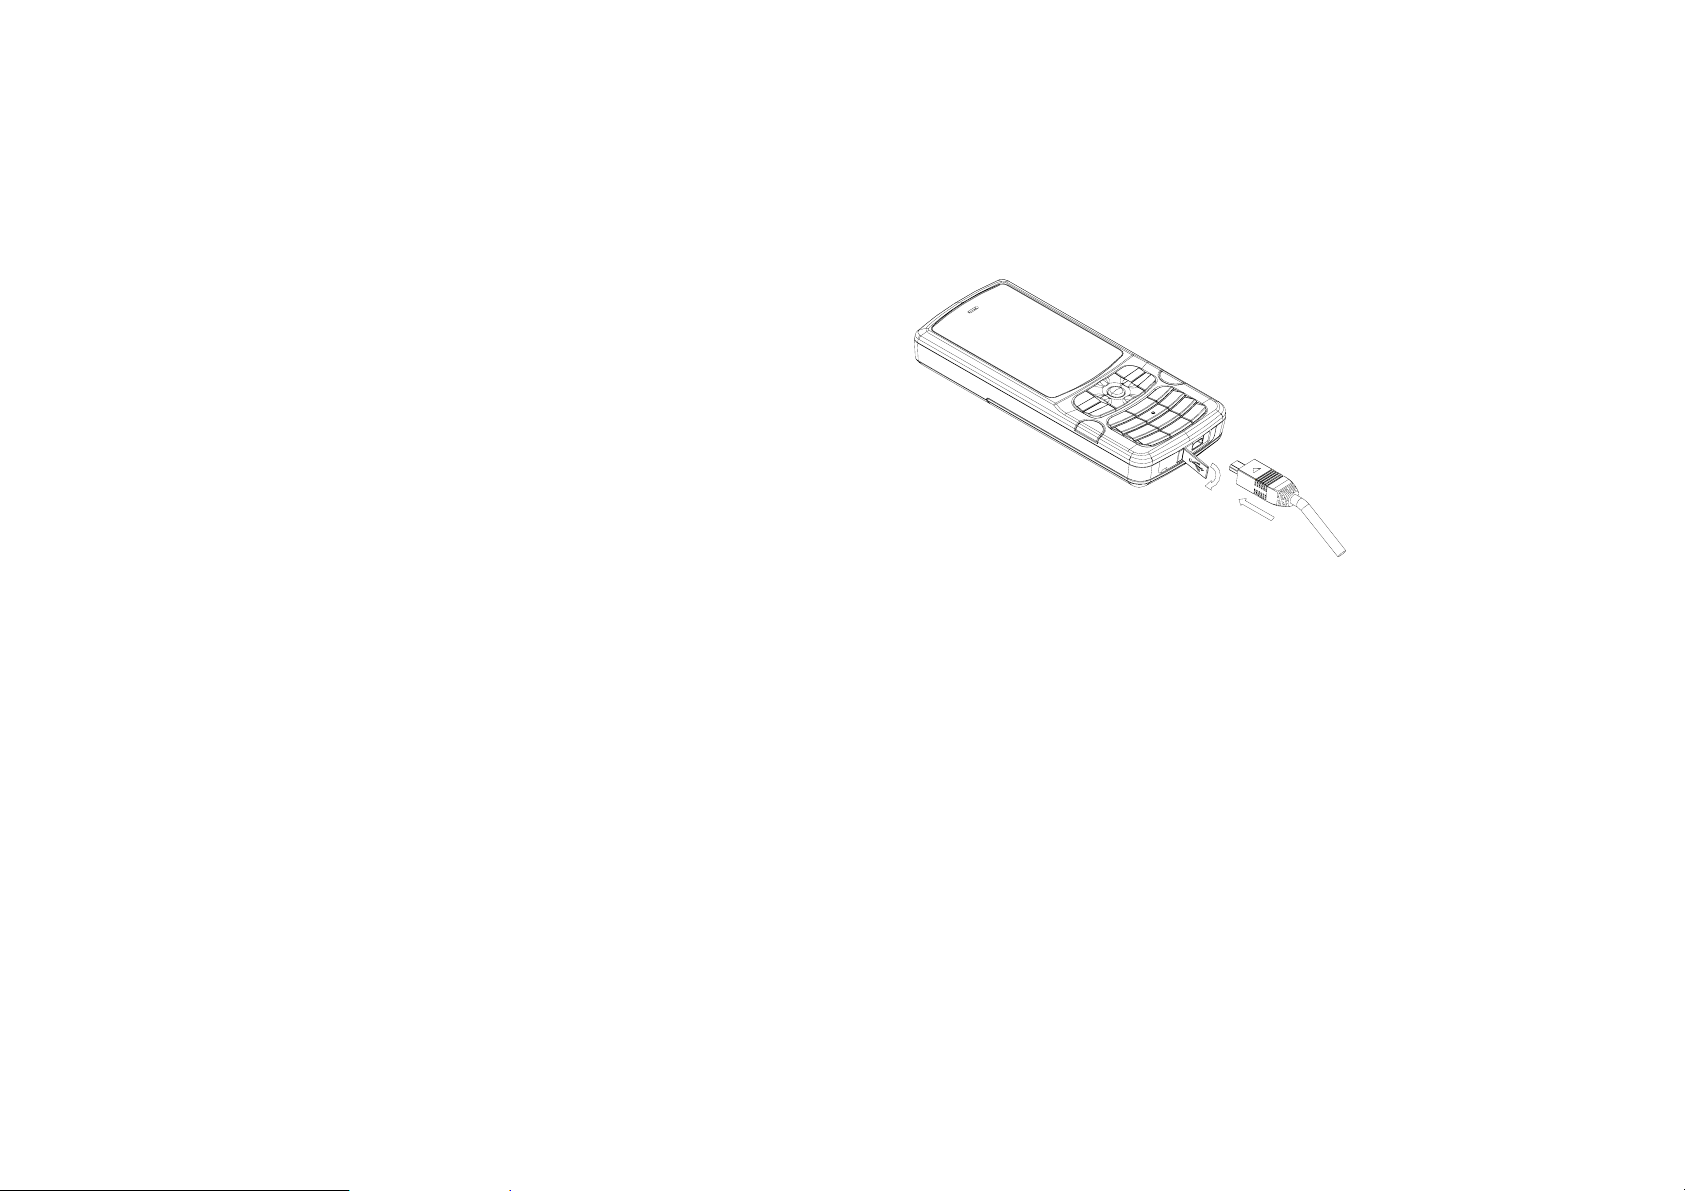
3. Charging the battery
• Open the rubber port cover and connect the charger
to the socket on the bottom of the phone.
• The charger plug will only fit one way into the phone.
• Connect the charger to a standard AC wall socket
and switch on.
• The phone will show a charging animation on the
display. If the phone is not used for a long time or the
battery is completely flat it may take a few minutes
before this indicator appears.
• When charging, ensure the power cable is kept clear
of walkways and does not cause a hazard.
1
2
21
Page 22

4. Battery Information and Care:
Only use the supplied charger. Use of an unauthorized charger may damage the phone and invalidate the
warranty.
Charge the battery promptly when it is flat.
Charge the battery between 0°C~50°C. If the temperature of the handset is too high, switch it off and let it cool.
If the battery is not fully charged after 5 hours charging, please stop charging.
Do not connect the battery directly to an electrical outlet or cigarette lighter charger.
Stop using the battery if abnormal heat, odour, discolouration, deformation, or abnormal condition is detected
during use, charge, or storage.
Keep the battery’s metal contacts clean.
Do not leave a loose battery in your pocket or handbag where metal objects could short the terminals. This could
be a fire or injury hazard.
Battery life can be maximized by regularly allowing the phone to fully discharge before recharging the battery.
When the battery voltage is low the phone will alert and may have limited functionality.
22
Page 23

Powering Your Phone On and Off
Ensure that your USIM card is fitted properly and the battery is charged. Press and hold the key to power on the
phone. The screen will display the following prompts in turn (depending on your security settings):
Enter the unlock code
Enter PIN code
Once the security conditions have been met and the USIM is correctly installed the handset will automatically register
with the network and the network service provider’s name or logo appears on the display.
See the chapter on Settings – Security for more details.
If handset lock code has been activated.
The default password is 0000
As provided by Telstra.
23
Page 24

3 Basic Operation
Making a Voice Call
1. Make sure your handset is on and connected to the network.
2. Enter the phone number using the keypad.
3. Press Call key
4. Press the End Key
General Usage Notes
Use clear key to delete a digit or press and hold the clear key to delete all digits.
Use the arrow buttons (left, right, up, down) to edit the number or move the cursor.
To make an international call, press the * key twice for the international prefix ”+”.
to make a voice call.
to end the call.
24
Page 25

Making a Call from Contacts
You can also make a call using a name in your Contacts.
1. Enter Contacts list, Scroll to a record or type the first few letters and select the correct contact name.
2. Press the Call key to make a voice call.
3. Press End key to end the call.
Receiving a Voice Call
When you receive a call, the ring tone, illumination and vibrate function will activate (depending on your current profile
setting).
1. Press Call key or OK key to answer an incoming call.
Note: When Any key to answer function is activated you can press any key except the Left select key, Right select
key, Back
answer the call.
key and End key to answer the call. With the headset is connected, pressing the headset switch will also
25
Page 26

2. Press Right Select Key or End Key to reject a call.
Press Left Select Key for further options during a voice call:
z Hold: Puts the current call on hold. You can then dial a third party independently and can switch between your
two calls by pressing Hold again.
z End call: End current call.
z DTMF Off/On: Enable or disable sending DTMF tones.
z SMS: Switch to SMS interface during a call.
z Contacts: Switch to Contacts interface during a call.
3. Press End Key . The call is disconnected and the call duration is displayed.
Notes: The F151 supports multi-party conferencing depending on network support. Use Left/Right Key to toggle
between connected parties.
26
Page 27

Useful Tips
Useful tips for receiving a call are shown below:
Operation Procedure
Turning off the Ring
tone
Rejecting a call
When you miss a call
z When your phone is ringing, press Left Select Key (Options)-Mute.
z In idle state, select Settings-Profiles-Edit-Ring volume-Silent.
z Press End Key.
z Press Right Select Key [Reject].
The Missed Call icon
saved to the Missed calls list.
Press OK Key to view the details.
Once you’ve viewed the Missed Call details, the icon disappears.
will show in the idle state and the number will be
27
Page 28

General Navigation
The normal background screen is called the idle screen. Press OK to access the main menu, the Left Select Key to
access Contacts or the Right Select Key to access the Telstra Business web site, BIZ
Idle Screen
Pressing the Menu button takes you to the Main Menu. Navigate round the main menu by using the arrow keys.
Main Menu
28
Page 29

4 Tools (Shortcut = Menu, 1)
From the idle state press Menu →1, or move the cursor to select Tools.
File Manager
Press OK to open File Manager which opens further menu choices of Photos, Audios,
Videos, and Others.
29
Page 30

Photos
Pictures
In this menu press Connect to connect to a web site to download pictures and ringtones.
My Pictures
This application enables you to view still images. In the My Pictures folder, highlight the desired picture, press OK key
to Open the image; press Mark to mark the file; Press Options to access submenu:
z Send: Send the image via MMS or E-mail.
z Set as wallpaper: Set the picture as wallpaper.
z Add to slide: Add this picture to the slide show.
z Move to: Move the picture to another folder.
z Copy to:Copy the picture to another folder.
z Rename: Change the name of the picture.
z Delete: Delete this picture.
z Delete all: Delete all files in My Picture folder.
z Mark all files: Mark all files in My Picture folder.
z File information: Show information about the file size and created time.
z Space information: Show the used space in each folder and the total available space.
z New folder: Create a new folder in my picture folder.
30
Page 31

Wallpapers
In the wallpapers list, press Open to view the picture; press Mark to mark the file; press Options to enter the submenu.
The submenu is similar to that of My Pictures.
Audios
Select Audios to connect to a web site to download audio files.
Ring
In the ring tones list, press Open to play the file, press Mark to mark the file; press Options to enter the submenu:
z Send: Send the file via MMS/E-mail.
z Set as ring tone: Set the file as your ring tone.
z Add to playlist: Add the file to the play list.
z Mark all files: Mark all files in the ring tones folder.
z File information: Show information about the file size and created time.
z Space information: Show the space information for each folder and total available space.
31
Page 32

My Audios
In file list press OK Key to play the selected files, press Mark to mark the highlighted file. Press Options to enter
submenu. The submenu is similar to those above and contains options already discussed.
During playback, you can press Mute to mute the sound and use the Up / Down keys to adjust the volume.
Videos
Select Videos to connect to a web site to download video files.
32
Page 33

My Videos
In my videos list press OK key to play the selected files, press Mark to mark a highlighted file. Press Options to display
the following menu.
z Send: Send the file via MMS or E-mail.
z Rename: Rename the file.
z Move to: Move the file to another folder.
z Copy to: Copy the file to another folder.
z Delete: Delete the selected file.
z Delete all: Delete all the files in My Videos folder.
z Mark all files: Mark all video files.
z File information: Show information about the selected video file.
z Space information: Show the space information for each folder and total available space.
z New folder: Create a new video folder.
Others
You can save other files here.
33
Page 34

Time
In the Tool s menu you can scroll Right to select the Time tab to access the Alarm, Calendar and Stopwatch settings.
Alarm
Press Options to display the following popup menu items:
z Edit alarm: Allows you to set the alarm type, date, time, ringtone and subject. Use
Up and Down keys to navigate and Left and Right Keys to change the settings or
edit. When complete press OK key to save.
z Set rest days: Press Up/Down key to highlight the day. Press Select/Cancel
then OK key to change the rest day. The alarm type Workday will not ring on the
defined rest day(s).
z Delete all: Delete all the alarm settings.
Note: Schedules and Alarms still work when the handset is switched off.
34
Page 35

Calendar
The cursor appears on the current date. You can move the cursor to the desired location using
the Up/Down/Left/Right keys. If any schedule or reminder is set, a small dot appears on the
bottom right corner of the date.
1. Press Add to add a new schedule item.
Select schedule type, Subject, Start time, End time, date, Alarm set, etc. Press Up/Down key to
select options, press Left/Right key to change. Press OK key to save.
2. Press Open→View to view the schedule item.
3. Press Options to display the following popup menu items:
z Week view: Enter weekly calendar.
z Go to date: View the date information.
z Delete entry: Delete schedule items.
z Settings: Settings for individual schedule item, such as alarm tone, default view etc.
z Memory Info.: Shows the current memory usage.
Note: Schedules and Alarms still work when the handset is switched off.
35
Page 36

Stopwatch
Calculator
The phone has a built in stopwatch accessible through the T ools menu.
1. Press OK key to start timin g.
2. Press OK key to stop timing. The screen will show the event time.
3. Press OK key to continue timing.
4. Press Right select key to reset.
The phone provides a simple calculator accessible through the Tools menu.
1. Press 0~9 key to enter numbers, Decimal to enter the decimal point.
2. Press Up/Down/Left/Right key to choose +, –, ×, ÷.
3. Press Clear key to clear last digit and results.
4. Press OK key to get results. Press End key or Back to exit the calculator.
36
Page 37

Currency Conversion
This function allows you to quickly compare foreign currency to your local currency.
1. Press Left select key to input a currency exchange Rate. Press Right select key to input the decimal.
2. Enter Foreign amount or Local amount and the result is shown automatic ally.
World Time
The world time function provides time infor mation on majo r citie s worldwide.
1. You can scroll to the desired city by using Left/Right key.
2. Press Setting, select your city and then press OK key to save the selected city as your
home time zone. (Note changing time zones changes the current time settin g)
3. Press End key or Back
key to quit.
37
Page 38

5 Messages (Menu, 2)
In idle state, press Menu, select Messages and then press the OK key to access the
Messages interface.
Create a New SMS Message
1. Select New message and then Text message.
2. Enter the recipient’s number or press Contacts and choose the recipient.
3. Press the Down key twice to move the cursor to the text field. Enter text using the keypad,
press the # key to toggle between different text modes (eg Predictive Text, ABC, abc, 123)
4. Characters and punctuation can be shown by pressing the
insert.
38
* key. Choose the desired symbol and press OK key to
Page 39

5. Press Send to send the message and save it in Sent. If the message fails to send it is stored in the Outbox.
6. Press Save to save the message to Drafts.
Create a New Multimedia Message
1. Select New message then select Multimedia message.
2. Enter recipient number or pr es s Contacts and choose the recipient.
3. Press Down key to move cursor to the title field.
4. Press Down key to move cursor to the text field.
5. Press Insert to attach an Image, Audio or Video file from your data folder.
6. Press Options for additional menu:
z
z Add page: Add a new page.
z Delete page: Delete current page.
z Preview: Preview the attached file, Press Left/Right key to page down.
z Previous page /Next page: View the previous page or next page.
z Templates: Open the templates list etc.
Delete image/ Delete audio file/Delete video file: Delete current file.
39
Page 40

z Save : Save the message to Drafts.
7. Press Send to send the message. If the message fails to send it is stored in the Outbox.
Inbox
Enter the message list. Use the Up/Down key to scroll through the list and press OK key to
view the details.
From the Inbox press Options for more menu items as in the picture below.
The menu items are self explanatory and are used to perform the operations to the selected
message. Press the Back Key to navigate to the previous screen.
Multimedia Messages (MMS)
The MMS messages presents a similar menu structure with additional options for pictures such as Set as wallpaper.
Outbox
Outbox contains all the messages that failed to send. Press Edit to edit and send the message.
40
Page 41

Drafts
If you select Save the message will be saved in the Drafts folder.
Sent
The Sent folder contains all successfully sent messages. Press Edit to edit and send the
message.
User folders
You can move received messages from the Inbox to a specific user folder. Press View to view messages in this folder.
Press Rename to rename the folder.
(U)SIM box
Select (U)SIM box to check the text messages saved in the USIM card. The Options are identical to previous menus.
41
Page 42

Multimedia Message Settings
z Retrieval Settings: You have three choices:
Manual - retrieve the MMS manually.
Automatic - retrieve the MMS automatically.
Manual in roaming - when you are roaming on a different network you can decide whether to accept the MMS.
z De livery mode: You can set immediate delivery or defer it for a specified period of time.
z Time per page: Set MMS time per page.
z Delivery report: You can request delivery reports for sent messages. You receive a confirmation from the
network when the message is delivered to the recipient.
z Validity: Y ou can set the validity period of ou tgoing me ssages. Messages are sa ved on the networ k for this p eriod
or until the message is delivered.
z An onymous ms g.: You can choose to accept or reject anonymous messages.
z APN: Access Point Name. Preset by your network provider.*
z Server address: Set the server address for MMS.*
z Pr oxy ser ver address: Set the proxy server address. Preset by your network provider.*
z Pr ox y se r v er port: Set the proxy server port. Preset by your network prov ider.*
* Changing these settings will af fect your browsing and client software.
42
Page 43

Text Message Settings
z SMS center number: Set the messaging gateway.
z Voice mail number: Set the voice m a il number.
z Expired Time: Select the period over which the message centre will attempt to deliver the message.
z Status report: The network informs you when your message has been delivered.
Templates Settings
Edit the templates for quick pre-defined messages and frequently-used phrases.
Memory info.
Check the used, available and total amount of memory on the handset.
43
Page 44

E-mail
From the idle state press Menu, select Messages and then t he right key to Email.
New E-mail
Select New Email. Enter destination address, or select it from your contacts. Use the
down button to move between fields. When complete press Send.
Mail Box
The Mail Box is self explanatory. Inbox contains received E-mails. Outbox contains E-mails that failed to send. Drafts
contains unsent E-mails.
The Options submenu is similar to that for text messages, please refer above to that section for any guidance.
Settings
Your E-mail parameters are preset by your network provider and should not be changed.
Memory info.
Displays the available and used memory.
44
Page 45

6 Games & Applications (Menu, 3)
Applications
1. Start the browser, display the Java MIDlet downloaded to the applications list.
2. Press Select to run the file, press Options for more choices eg Delete.
The F151 supports Java downloads for games and applications. You can download new
applications from your service provider or other spec ialist portals. Your handset supports HTTP
and WAP+HTTP.
Note: Press Property to view file informa t ion, author, version, size etc.
Settings
Bookmarks: Store web site addresses for frequently visited sites.
Proxy settings :Are preset by your network provider and should not be changed.
45
Page 46

7 Contacts (Menu, 4)
Press Menu, Contacts and then press OK key to access the Contacts menu interface.
The Contacts menu allows you to save and manage contacts information. You can add a new
address or search saved contacts by name. You can also add a personal ring tone or an avatar
image to a contact.
All Records
1. In Contacts, use the Up/Down key to select a reco rd and press OK key to view the detailed information. Press
Edit to edit the information, press OK key to save.
2. In Contacts, press Send to send SMS, MMS or E-mail.
3. In Contacts, select Options to display further menu choices.
46
Page 47

Groups
The default Contacts list has groups such as All, Mates, Family, Friends, Work, VIP, Unclassi fy and (U)SIM. You can
move contacts into specific groups or leave them in the default group.
Create New Contact
Enter the name and number that you wish to save with your contact information. Yo u can save
different ring tones for voice calls, add an avatar, E-mail address and other deta ils.
From the Contacts list you can edit an existing contac t to update the details as above.
Set Speed Dial
From your Contacts l ist, highlight the chosen contact. Press Options 3 for Set Speed Dial then c hoose an available
empty number and press OK to Setup. To use your Speed Dial keys long press the relevant key. Eg From the idle
screen press and hold key 1 and the phone calls your V oicemail number. Key 1 is preset to access MessageBank whilst
in Australia and key 3 is preset to access International MessageBank whilst oversea s.
47
Page 48

Copy Contacts from USIM Card to Phone.
Insert your old SIM card. Switch the phone on and then select Contacts from the main menu.
Press the Right button until you see USIM with the list of Contacts from your old SIM card.
Press Options, More, Copy all, and then press Yes to confirm.
Import contacts from Microsoft Outlook
Through the use of the Join Me software it is possible to import contacts from Outlook or similar applications. You can
import CSV files or VCF (Vcard) files into the Join Me application and then download them onto your phone. For further
information please see our FAQ section on http://www.zte.com.au/support/faq.htm.
48
Page 49

8 Telstra Services (Menu, 5)
From the idle screen press OK to see the main menu then OK again to see the Telstra
Services menu, My Place, as below.
Telstra Services Menu- My Place
49
Page 50

BigPond Launches the BigPond web browser
FOXTEL Launches FOXTEL services
Yellow search Launches Sensis search application fo r Yellow Pages
BigPond Music Connects to the Telstra Music web site
My Email Connects to BigPond.com E-mail URL
Call 1234 info Connects to Sensis 1234 Information Service
BigBlogs&Photos Download wallpapers and other pictures for your phone
Whereis Maps Launches Whereis on line search facility for directions and maps
Downloads Launches phone download applications for games and accessories
My Account View your mobile phone account details
50
Page 51

9 Calls (Menu, 6)
From the idle screen press Menu, select Calls and then press OK to access the Calls lists.
Call log
Stores details of All calls, Missed calls, Received calls, Dialled calls.
From the main view you can Save the number and add details or from Options you can Send
SMS, Send MMS, make a Voice call, Delete the record, or Clear the call logs.
Calls info.
Call duration: Y ou can re view the approx imate duration o f your incoming and outgoing calls. You can che ck the la st call
duration and all calls duration. Clear the call duration timers by pressi ng Clear. The default code to reset the timers is
0000.
51
Page 52

10 Settings (Menu, 7)
From the idle state press Menu select Settings, then press OK key to access the Settings
interface.
Screen
In this menu you can configure the Screen options:
Set wallpaper, Set backlight duration, Set brightness, Set owner name, Set phone
greeting.
52
Page 53

Handset
Scroll right to access the Handset settings.
1. Language: Set the language used in the handset.
2. Set time: Use Arrow keys to move between time and date.
3. Network settings:
z Preferred Mode: You can select GSM only , WCDMA only or Automatic.
z Preferred Selection:On Automatic the handset will register with any available
network. On Manual, you can specify which network to register with from a list of available networks.
4. Own phone number: Add / Edit / Delete your own phone number.
5. Shortcut keys: Set the shortcut menu item corresponding to each Arrow key.
6. Modem Settings: Set the phone modem settings such as username and passwo rd.
7. Access point settings: This menu shows the access point list.
8. Restore default settings: Restore to original factory settings. (Default handset lock code = 0000)
9. keylock: Set the time for the auto keylock.
10. Network time: Automatically updates the handset time for Daylight Savings etc.
53
Page 54

Profiles
Scroll right for the Profiles Menu. The current profile is shown with a red dot.
1. Press Up/Down key to select a profile and press OK key to activate.
2. Press Right select key to edit the settings, press OK key to modify:
z Ringtone: Select your desired ring tone for incoming calls.
z Ring volume: Adjust the ring volume level.
z Ringing type: vibration mode etc.
z Message tone: Set the tone that sounds when a new message arrives.
z Keytones: Turn the keypad tones on or off.
z Warning tone: Turn the warning tones on or off.
z Power on/off tone: Turn the power-up melody on or off.
z Earpiece volume: Adjust the volume of the earpiece.
54
Page 55

Security
Scroll right for the Security menu.
Activate security codes:
Change security codes: You can change PIN code, PIN2 code and Handset lock code.
Fixed dial numbers: If it is On you can only dial the numbers in the list. This information is
saved on the USIM card. You must enter your PIN2 to unlock this feature.
FDN list :Fixed Dial Number – restricts outgoing calls. Press Add to add numbers. Use PIN2
to unlock.
Note: Personal Identification Numbers (PIN and PIN2) codes protec t your USIM card against unauthorized use. The
PIN codes are usually supplied with the USIM card. Af ter 3 con secutive in correct entries your USIM will be blocked (PIN
locked). Personal unblocking keys (PUK) will then be required to unlock your phone– talk to your service provider for
more details and to get your PUK code.
Set the PIN code and Hands et lock (default = 0000) .
55
Page 56

Call
Call Divert
This service enables you to divert incoming calls to other numbers.
After choosing one of the following o p tions, you can enable or disable a divert service to your chosen number:
z All calls diverted: Divert all incoming calls unconditionally.
z When busy: Divert incoming calls when the line is busy.
z When no reply: Divert incoming calls when there is no answer.
z When unreachable: Divert incoming calls when the phone is unavailable.
z Cancel all call diverts: Cancel all forwarding serv ices.
In each menu you can Activate, Erase or Check status.
56
Page 57

Call Waiting
Notifies you of an incoming call while you already have a call in progress. Select
Activate/Erase
function.
to enable/disable this function, Check status to query the current status of this
Call Barring
You can restrict making and receiving calls. You will need the barring password from your network provider.
z Bar all outgoing calls: Calls can not be made.
z Bar outgoing calls (international): International calls can not be made.
z International calls barred when roaming: When abroad, calls can only be
made to numbers wi thi n the current country.
z Bar all incoming calls: Calls cannot be received.
z Bar incoming call when international roaming: Calls cannot be received when you are
overseas.
57
Page 58

Select Activate/Erase to enable/disable this function; select Check status to query the current status of this function.
z Cancel all call bars: Cancel all call barring you have activated.
z Change password: Change the barring password. It is needed when you active or erase the call barring.
Send my number
This function allows you to send or hide your number when making calls.
Any Key to Answer
If “On” you can answer an incoming call by pressing any key except End key, Back key and Left /Right select keys.
58
Page 59

11 Multimedia (Menu, 8)
In idle state press Menu, select Multimedia and then press OK key to access the
Multimedia interface.
Media player
Your phone can play multimedia (audio or video) files. The player defaults to the last file accessed. Press Options:
z Open: Open files from Files, URL, Slide or Play list.
z Send: Send the file as a message or E-mail.
z Mute(#)/ Mute off -#:Mute/Unmute the video files when they are playing.
z Set as ringtone / wallpaper: Set the file as ring tone or wallpaper.
z File info.: View the file size and time information.
59
Page 60

z Network settings: Set corresponding network parameters.
z Help: Get help about how to use media player.
Favorites
Play list
This function enables you to create a list of your fav orite audio files. Press Add to create a new play list. Use Mark to
mark the audio file and OK to save the marked files. In play list,
1. Press Play to play the files. Adjust volume using the Up/Down key.
2. Press Edit to display the list. Then press Add to add new files; Press Options→ Remove to delete the file; Press
Options→ Change Order to move the file. Press Save to save the changes.
3. Press Options for submenu:
• New Play list: Create ne w play list.
• Rename: Change the lis t name.
• Delete: Delete this play list.
• Delete all: Delete all play lists.
• Info. : View the music file amount and time information.
60
Page 61

Slide Show
Add your pictures by pressing Add, browsing to My Pictures and Marking the pictures you want. Press Options for:
• New slide: Create new slide.
• Rename: Change the slide name.
• Delete: Del e te this slide.
• Delete all: Delete all slides.
• Info. : View the image info details.
Streaming URL
Strea ming URL are links to audio or video conten t availabl e through the bro wser. The content is only available while you
are connected to the server and depends on your network provider. Press New to add a new streaming URL. Enter the
title and URL address and then Save the URL.
When you have saved the URL details you can edit or choose Options for the submenu:
• New Bookmark: Create a new bookmark.
• Send: Send the URL address as a message or E-mail.
• Delete: Dele te the address etc.
• Delete all: Delete all the URL addresses.
• Info.: View title and URL address.
61
Page 62

12 Browser (Menu, 9)
Your handset has a built-in web browser and 3G opens up a world of communication,
information and entertainment services. You can ask for directions within major cities, get the
latest news, sports, weather and much more.
Press Menu, select Browser and then press OK key to access the browser interface.
Home
Takes you to the BigPond web site.
Go to
This funct ion allows you t o store and edit frequently accessed sites. Select Enter address to
input a new URL, or select the Last address, or Recent addresses then press OK.
62
Page 63

Bookmarks
All accessed page addresses can be saved as bookmarks in your phone.
Under Options you can:
z Add: Add a new site to the bookmark list.
z View: Load the current page again.
z Address: Show current addres s.
z Edit: Edit and save the title and address of the selected bookmark.
z Delete: Delete the selected bookmarks.
z Delete all: Delete all bookmarks.
History
This function allows you t o check the web si tes you have alr eady visited.
Page memo
This function displays the list of pages saved as an off-line file.
63
Page 64

Push messages
This shows a list of all the messages pushed to your browser. Not all network providers use this feature.
Options
You can set the Browser settings in this options menu.
z Home: Input the homepage of the browser.
z View: Change the settings relating to animations, images, tables and scripting.
z Proxy: Select to use the proxy or not and set the proxy server address, port, username and password.
z Cache: Set the browser cache parameters.
z Cookies: Set cookies parameters – cookies can be helpful to remember your own web preferences.
z Certificates: View the certificates provided in the browser.
z Push settings: Set to receive push messages.
z APN settings: Access Point Name. Preset by your Network Provider.
z Background music: Set the background music when browsing.
z Reset: Restore the original Browser settings.
z About browser: View browser information such as version, etc.
64
Page 65

13 Text Input
Use the # key to switch between different text modes AB C, abc, 123 or Predictive Text (En).
ABC and abc mode
1. Press the key labelled with the required letter, (2 = a,b,c)
z Once for the first letter
z Twice for the second letter, etc.
z Press and hold the key to enter the corresponding number.
2. To ins ert a space, press 0 key. To delete letters press the Clear key.
3. If the next letter is on the same key, wait until the cursor appears or press Right key to the move cursor on.
4. Press the 1 key repeatedly for common punctuation marks. Press
* key to open special characters.
123 mode
The 123 mode enables you to enter numbers in a text message. Press the # key to switch into number mode.
65
Page 66

Predictive Text (En)
Predictive text is based on a built-in dictionary and generates words from the combination of
letters pressed.
1. Press the letter keys once for each letter. For example to write “set”, press
2. When you finish writing the word and it is correct, press OK key to confirm or 0 (space).
3. If the word is not correct use the
4. If your word is not available in the dictionary the n enter it manually by using conventional
abc text mode as above.
Special Characters
Special character s are selected by pressing the * key during any text mode. Move the cursor to
the required symbol and select OK.
7, 3, 8.
* key to toggle between different available words.
66
Page 67

Character Chart
Key Corresponding Characters
1 1 and some common punctuation characters eg . , ? ! @ ‘
2 ABCabc2
3 DEFdef3
4 GHIghi4
5 JKLjkl5
6 MNOmno6
7 PQRSpqrs7
8 TUVtuv8
9 WXYZwxyz9
0 Space 0
* key Press * key for character set. Press twic e for International Prefix ”+”
# key Toggl e different text modes.
Up/Down key Move the cursor up/down. Move along Tabs
Left/Right key Move the cursor left/right. Toggle various options
End key Exit
67
Page 68

14 Troubleshooting
Please check the manual thoroughly before contacting your service provider.
Symptom Resolution
“Enter PIN code” is show n
No USIM detected” is shown
”
”Enter the unlock code” is shown
(No) key tone when pressing keys
No incoming ring tone
No alarm tone
A phone number cannot be dialed
Short message cannot be sent
The battery discharges quickly The battery life is expired. Purchase a new battery from your dealer.
The handset gets very warm. It is normal for phone to get warm during long calls, when using the browser
Input the correct PIN number. See Settings-Security.
Check you have inserted a valid USIM card . See Installing the USIM Card.
Enter the unlock code. Default is 0000. See Settings, Security.
Check the Keytones settings in the current profile.
Check the ring tone and ringing volume settings in the profile.
Check the profile setting (silent) and the alarm ring setting.
Check whether any call restrictions are set. See Call Barring.
Check the SMS centre setting in the SMS-Settings menu. Restore defaults.
and when charging the battery.
68
Page 69

15 Glossary
• Avatar – is a small bit-map cartoon style picture.
• 2G - Second Generation wireless communication system.
• 3G - Third Generation wireless communication system. 3G is the next generation wireless communication
system th at offers rea l-time v ideo streaming services and high-rate packet-data service. 3G is also known
as UMTS (Universal Mobile Telecommunications System).
• Access point - Access point gives users access to enhanced services.
• MMS (Multimedia Message Service) - A message service for the handse t en vironment, that allows video s,
pictures, audio files and text to be sent betw een phones and to E-mail addresses.
• Roaming - Use of your phone when you are outside your home area, when traveling for example.
• USIM - Universal Subscriber Identity Module. Your USIM is provided by network operator. It carries the
authentication and serv i ce data for the network operator as well as use r -specific da ta such as Contacts and
SMS.
• Voice mail - An answering service that automatically answers your calls when you are not available. Others
can leave voice messages for you with this service.
69
Page 70

16 Installing the Join Me PC Software
Install the CD Software before plugging your phone into your PC. If your phone has already been plugged in, the
correct drivers will not install automati cally. See below to re-install the drivers through the Windows Device Manager.
Please follow the installa tion guide carefully by reading the Quick Start Guide provided and the Read Me file on the CD.
The process is to run the Setup File in the Join Me folder on the CD, then plug in your handset. Windows will install
three sets of dr ivers. O nce this is do ne, you ca n run the Joi n Me software. If the installation fails then you will need to
access Device Manager to re-install the drivers. Please see our FAQ section on www.zte.com.au
To access Device Manager, right click My Computer, select Properties, the Hardware tab, then Device Manager or go
through the Control Panel, System. Failed Driver installation is shown by yellow ‘!’ or ‘?’ marks. Right-click to re-install
the driver and follow the Found New Hardware Wizard choosing the default options. If the driver still fails to install, go
back and select “Install from a li st or speci fic location” the n sele ct “Don’ t Sear ch I will choose ”. S elect the driver from the
list and complete the installation. See www.zte.com.au
for screen shots and complete instructions.
70
for full instructions.
Page 71

17 Technical Parameters
Handset F151 Universal Mobile Telecommunications System, with Tri Band GSM
Dimensions(W×L×H) Approx 48mm × 109mm × 16mm
Weight Approx 90g (Including standard battery)
Frequency Standards WCDMA 850 MHz, GSM 900M Hz, GSM 1800 MHz , GS M 1900MHz.
Features MP4 video, MP3 audio, 146MHz Processor, MIDP 2.0 JAVA, 262K Colour Screen, MMS
Video, MMS Picture, E-mail, Calendar, Speakerphone, USB PC Connectivity., Compatible
with ZTE CK150 Carkit (sold separately).
Battery 800 mA hours, Lithium ion (Li-ion)
Continuous idle time* 200 hours in GSM mode, 300 hours in WCDMA mode.
Continuous talk time* 200 minutes on GSM network, 95 minutes on WCDMA network.
Charge time Approx 3 hours
Battery Li fe Approx 10,000 charge cycles.
*The phone’s talk time and idle time are based on ideal working environments. The use of extended backlighting,
browser, and network conditions can reduce battery life and talk/idle time.
71
Page 72

18 Environmental Statement
Your F151 UMTS handset is made using the latest manufacturing techniques and environmental standards to reduce
waste and hazards to the environment. However at the end of life of the equipment the manufacturer recommends that
you return the handset and accessories to your nearest re-cycling depot or send it to our recycling agent below.
Valuable materials such as gold, silver, and copper can be recovered from the handset. Any toxic materials will be
prevented from entering the environment and the waste materials will be recycled.
At the end of life of the equipment you can send your handset, batter y and charger to:
MRI (Australia) Pty Ltd
20-24 Dennis S t
Campbellfield
VIC 3061
www.mri.com.au
MRI Australia recycles every part of the equipment and diverts over 90% of the materials from landfill for re-use.
72
 Loading...