

Page 1

1
User guide.
Page 2

2
Page 3

1
About This Manual
Thank you for choosing t his ZTE mobile d evice. In order
to keep your device i n its best condition, pl ease read thi s
manual and keep it for future reference.
Copyright
Copyright © 2017 ZTE CORPORATION
All rights reserved.
No part of th is pu blicatio n may be quoted, reprodu ced,
translated or used in any form or by any means, electronic
or mech anic al, incl uding ph otoco pying and mi crofil m,
without the prior written permission of ZTE Corporation.
Notice
ZTE Corporation reserves the right to make modifications
on pr int er rors o r u pdat e spec ifi cati ons in t his gu ide
without prior notice. This manual has been designed
wi th t he u tmo st c are to e nsu re t he a ccu rac y of its
co nt ent . Ho we ver, all sta te men ts , in for ma ti on a nd
recommendati ons contai ned therein do not constitute a
warranty of any kind, either expressed or implied. We offer
self-s ervice for our smart termina l devic e user s. Plea se
visit the ZTE official website (at ww w.zteusa.com) for
more information on self-service and supported product
models. Information on the website takes precedence.
Disclaimer
ZTE Corporation expressly disclaims any liability for faults
and damages caus ed by unautho rized m odificat ions of
the software.
Page 4

2
Images and screens hots us ed in this manual may differ
from the actual product. Content in this manual may differ
from the actual product or software.
Trademarks
Z TE an d th e ZT E lo g os ar e tr ad e ma r ks of Z TE
Corporation.
Google and Android are trademarks of Google, Inc.
The Bluetoot h® trad emark and l ogos a re owne d by the
Bluet ooth SIG, Inc. and any use of su ch t rademark s by
ZTE Corporation is under license.
microSDHC Logo is a trademark of SD-3C, LLC.
Qualcomm® Snapdragon™ processors are products of
Qualcomm Technologies, Inc.
Q ua l co m m a n d S n ap d ra g on a re t ra d em a rk s of
Qualcomm Incorporated, registered in the United States
and other countries. Used with permission.
Other tradem arks a nd tra de na mes are the propert y of
their respective owners.
Version No.: R1.0
Edition Time: July 22, 2017
Page 5

3
Contents
About This Manual ............................................................................1
Getting Started ........................................................ 7
Getting to Know Your Phone .....................................................7
Knowing the Keys ............................................................................9
Installing the micro-SIM Card and microSDHC
Card (Not Included)........................................................................11
Removing the micro-SIM Card and microSDHC
Card .......................................................................................................12
Charging the Battery ....................................................................13
Extending the Battery Life.........................................................14
Powering On/Off ............................................................................14
Setting Up for the First Time ....................................................15
Getting to Know the Home Screen ......................................15
Personalizing ......................................................... 16
Changing the System Language...........................................16
Setting the Date and Time .........................................................16
Changing Ringtone and Notification Sound ...................16
Turning On/Off System Sound ..............................................17
Adjusting Volume ............................................................................17
Switching to Silent or Vibration Mode ................................18
Applying New Wallpapers ......................................................... 18
Changing Screen Brightness .................................................. 19
Protecting Your Phone With a Screen Lock....................19
Knowing the Basics ............................................. 20
Monitoring the Phone Status ................................................. 20
Checking Notification Icons ..................................................... 21
Page 6

4
Checking External Screen Icons ..........................................21
Entering Text .................................................................................... 22
Opening and Switching Apps ................................................23
Connecting to Networks and Devices ............ 25
Connecting to Mobile Networks ..........................................25
Connecting to Bluetooth Devices .......................................26
Connecting to Your Computer via USB ............................29
Phone Calls ............................................................. 31
Placing and Ending Calls ............................................................ 31
Answering or Rejecting Calls .................................................32
Working With the Call History ................................................33
Calling Your Contacts .................................................................34
Checking Voicemail .....................................................................34
Using Options During a Call.....................................................35
Managing Multi-party Calls .....................................................35
Adjusting Your Call Settings ....................................................37
Contacts .................................................................. 41
Checking Contact Details .........................................................41
Searching for a Contact .............................................................41
Adding a New Contact ................................................................41
Setting Up Your Own Profile ....................................................42
Importing, Exporting, and Sharing Contacts .................42
Editing Contacts ............................................................................43
Working With Groups..................................................................45
Messages ................................................................47
Opening the Messages Screen ............................................47
Sending a Message .....................................................................47
Replying to a Message ...............................................................48
Page 7

5
Forwarding a Message ..............................................................48
Copying a Message .....................................................................49
Changing Message Settings ..................................................49
Calendar ................................................................. 50
Viewing Your Calendars and Events ................................. 50
Creating an Event ........................................................................... 51
Editing, Deleting or Sharing an Event .................................. 51
Changing Calendar Settings ...................................................51
Web Browser ..........................................................52
Opening the Browser .................................................................52
Setting the Homepage ...............................................................52
Adding a Website to Bookmarks ..........................................53
Viewing the Browsing History ................................................53
Changing Browser Settings ....................................................53
Camera ................................................................... 54
Capturing a Photo .........................................................................54
Recording a Video ........................................................................55
Customizing Camera/Camcorder Settings ..................56
Gallery ......................................................................57
Opening Gallery .............................................................................57
Working With Albums .................................................................57
Working With Pictures ................................................................58
Playing Videos .................................................................................59
Music ...................................................................... 60
Viewing Your Music Library .................................................... 60
Playing Music .................................................................................. 60
Managing Playlists ........................................................................ 62
Page 8

6
Video Player .......................................................... 63
Opening the Video Library .......................................................63
Playing and Controlling Videos .............................................63
Managing Video Files ..................................................................64
Sound Recorder ................................................... 65
Recording a Voice Memo .........................................................65
Playing a Voice Memo .................................................................65
More Apps .............................................................. 66
Clock ................................................................................................... 66
Calculator ..........................................................................................67
Weather ..............................................................................................67
Downloads .......................................................................................68
File Manager ................................................................................... 68
Settings .................................................................. 69
Wireless & Networks .................................................................. 69
Accessibility .................................................................................... 69
Sound Settings ...............................................................................70
Display Settings .............................................................................70
Phone Settings ...............................................................................70
Call Settings .....................................................................................74
About Phone ....................................................................................74
Software Update ...........................................................................74
Troubleshooting ....................................................75
Specifications ........................................................79
Page 9
7
Getting Started
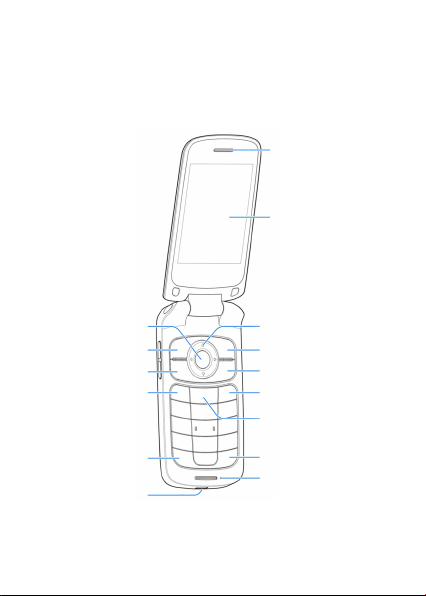
Getting to Know Your Phone
Earpiece
Internal screen
4-way navigation key
(Up/Down/Left/Right
key)
Right soft key
Power/end key
Clear key
Camera key
Vibration mode key
Main microphone
Charging/ micro-
USB jack
* key
Recent apps key
Send key
Left soft key
Center key
Getting Started
Page 10
8
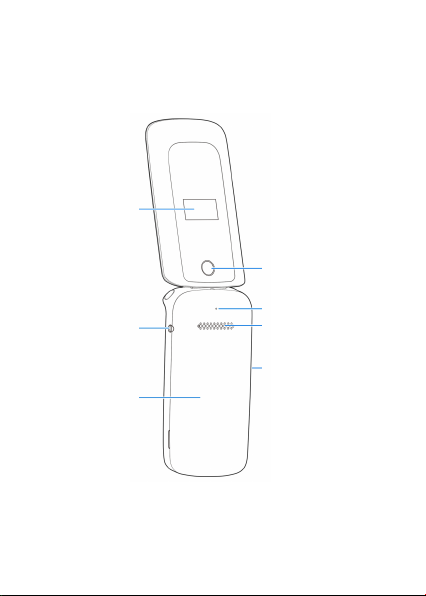
Camera
Auxiliary microphone
Speaker
Volume key
Back cover
Headset jack
External screen
Getting Started
Page 11

9
Knowing the Keys
Key Function
Power/end key
• Press and hold to turn on or
off airplane mode, power off or
restart the phone.
• Press to end a call, reject an
incoming call or cancel dialing.
• Press to return to the home
screen.
Left soft key /
Right soft key
Press to select the options at the
left/right corner of the bottom line
of the display. The options change
depending on the application/
function being used.
4-way navigation
key (Up/Down/
Left/Right key)
• Press in the home screen to
access designated functions.
• Press to navigate options on the
display or move the cursor in a
text field.
Center key
Press to make selections or
perform the command displayed at
the bottom center of the display.
Getting Started
Page 12

10
Send key
• Press in the home screen to
view recent calls.
• Press to place or answer a call.
Recent apps key
Press to see recently used
applications.
Camera key
Press in the home screen or app list
screen to activate the camera.
Clear key
Press or hold to delete characters
on the left of the cursor when
entering text or numbers.
Vibration mode
key (# key)
• Press and hold in the home
screen to activate/deactivate
vibration mode.
• In a text editing screen: press or
hold to change input mode.
* key
• Press and hold in the home
screen to enter +.
• In a text editing screen: press to
select symbols; press and hold
to change the input language.
Volume key
Press or hold either end of the key
to turn the volume up or down.
Getting Started
Page 13
11
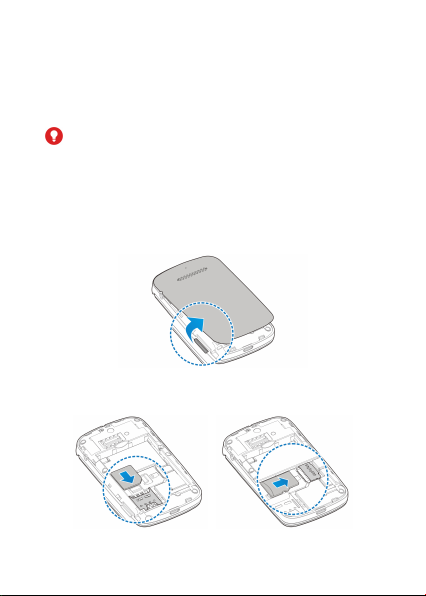
Installing the micro-SIM Card and microSDHC Card (Not Included)
Power off your phone before instal ling or rem oving the
micro-SIM card and microSDHC card.
WARNING!
To avoid damage to t he phone, do not use any other kind
of SIM cards, or any non-s tandard mic ro-SIM card cut
from a SIM card. You ca n get a standard mi cro-SIM card
from your service provider.
1. Insert your fingernail into the slot at the bottom left of
the back cover and lift it up gently.
2. Install the micro-SIM card and the microSDHC card
(optional) with the cut corner oriented as shown.
Getting Started
Page 14
12
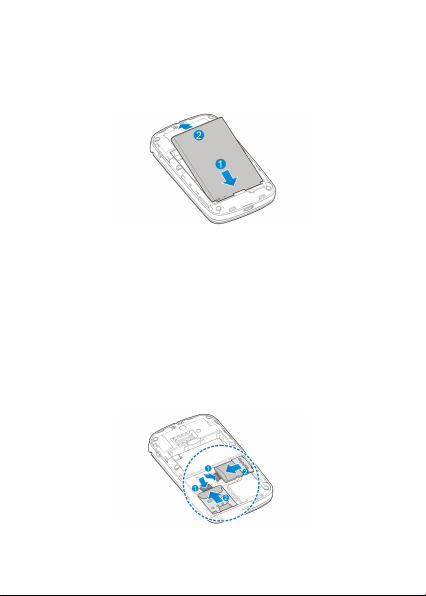
3. Insert the battery by aligning the metal contacts on
the battery with the metal contacts in the battery
compartment. Gently push down on the battery until it
clicks into place.
4. Replace the back cover.
Removing the micro-SIM Card and microSDHC Card
Power off your phone before instal ling or rem oving the
micro-SIM card and microSDHC card.
1. Open the back cover and remove the battery.
2. A soft block beside the card slot keeps the card in
place. Press the soft block down and slide the microSIM card or microSDHC card out.
Getting Started
Page 15
13
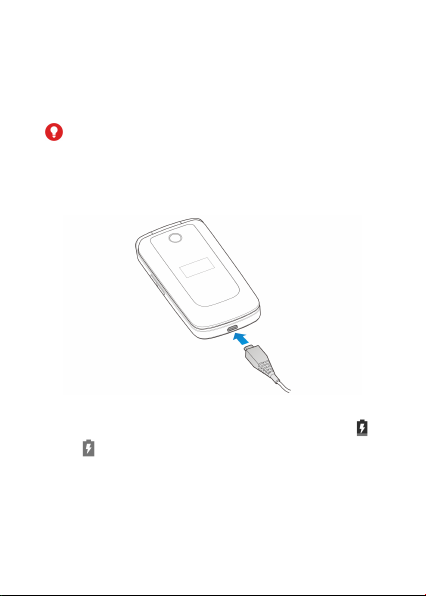
Charging the Battery
Your phone’s battery should have enough power for the
phone to turn on, find a sign al, and make a few calls. Yo u
should fully charge the battery as soon as possible.
WARNING!
Us e only a ppro ved c harg ers a nd cab les . The us e of
unapproved accessories could damage your phone or
cause the battery to explode.
1. Connect the adapter to the charging jack.
2. Connect the charger to a standard AC power outlet. If
the phone is on, you’ll see a charging icon, such as
or , appear on the status bar.
3. Disconnect the charger when the battery is fully
charged.
Getting Started
Page 16

14
NOTE:
If the battery is extremely low, you may be unable to power
on the phone even when it is being charged. I n this c ase,
try again after charging the phone for at least 20 minutes.
Contact the customer service if you still cannot power on
the phone after prolonged charging.
Extending the Battery Life
Active applicat ions, s creen b rightness levels, Bluetooth
usage and GPS function ality ca n drain your batte ry. You
can follow the helpful tips below to conserve your battery
power:
• Reduce the screen backlight time.
• Lower the screen brightness.
• Turn Bluetooth off when not in use.
• Disable the GPS function when not in use. Most
applications using this function will periodically query
the GPS satellites for your current location, and each
query drains your battery.
Powering On/Off
• Press and hold the Power/end key to turn on your
phone.
• To turn it off, press and hold the Power/end key to
open the options menu and then select Power off.
Getting Started
Page 17
15
Setting Up for the First Time
When you first power on your phone after you purchase it
or reset it to factory settings (see Reset), you need t o do
some settings before using it.
Select the language and then follow the prompts to set up
your phone.
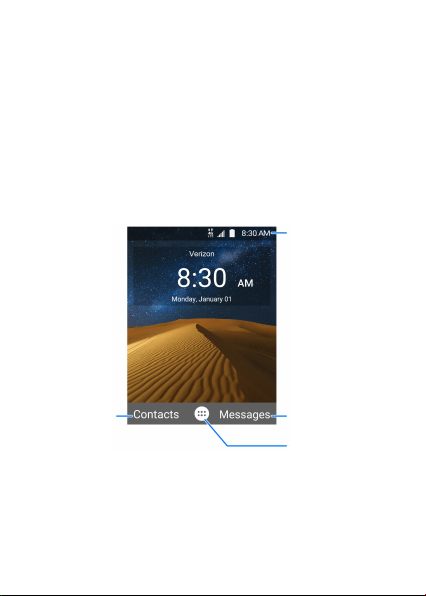
Getting to Know the Home Screen
The home scre en is the star ting point for your phon e’s
applications, functions, and menus.
Status bar
Right soft key
function
Center key
function (Apps)
Left soft key
function
Getting Started
Page 18

16
Personalizing
Changing the System Language
1. From the home screen, select > Settings > Phone
settings > Language & input > Language.
2. Select the language you need.
Setting the Date and Time
1. From the home screen, select > Settings > Phone
settings > Date & time.
2. Set the date, time, time zone, and time format.
X
To adjust the date and time automatically, turn on
Automatic date & time.
X
To adjust the date and time manually, turn off
Automatic date & time and select Set date / Set
time to change the date and time.
X
To adjust the time zone automatically, turn on
Automatic time zone.
X
To adjust the time zone manually, turn off
Automatic time zone and select Select time
zone to set the correct time zone.
X
To adjust the time format, turn on or off Use
24-hour format.
Changing Ringtone and Notification Sound
You can customize the default incoming call ringtone and
the default notification sound.
Personalizing
Page 19

17
1. From the home screen, select > Settings > Sound
settings.
2. Select General and press the Left soft key.
3. Select Phone ringtone or Default notification
ringtone and press the Center key.
4. Select the ringtone you want to use and press the
Center key.
5. Press the Left soft key to save the setting.
NOTE:
See Adding a New Contact for how to assign a special
ringtone to an individual contact.
Turning On/Off System Sound
1. From the home screen, select > Settings > Sound
settings.
2. Select General and press the Left soft key.
3. Select Key tone and press the Center key to turn on
or off the switch.
Adjusting Volume
1. From the home screen, select > Settings > Sound
settings.
2. Select General and press the Left soft key.
3. Select the slider below Media volume, Alarm
volume, Ring volume or Notification volume.
4. Press the Left/Right key to adjust the volume.
Personalizing
Page 20

18
NOTE:
You c an ad ju s t t he me d ia vo l um e w he n a m ed ia
application is in use by pressing the Vol um e key. If no
media application is active, press the Volu m e key to adjust
ringtone volume (or the call volume during a call).
Switching to Silent or Vibration Mode
You can set the phone to silent or vibration mode by using
one of the following methods.
• Press the Volume key when no media application is
active to show the volume management window. Keep
pressing the Volume down key to switch the phone to
vibration mode. Press the key again in vibration mode
to switch the phone to silent mode.
• From the home screen, select > Settings > Sound
settings and select Silent only or Vibrate only to
switch to silent or vibration mode.
• Press and hold the Vibration key in the home screen
to activate/deactivate vibration mode.
NOTE:
To rest ore no rma l sou nd se ttin gs, p res s or hol d the
Volume up key.
Applying New Wallpapers
You can set the wallpaper for the home screen.
1. From the home screen, select > Settings >
Display settings > Wallpaper.
2. Select Gallery or Wallpapers to choose the image
you want to use as the wallpaper.
Personalizing
Page 21

19
Changing Screen Brightness
1. From the home screen, select > Settings >
Display settings > Brightness level.
2. Press the Left/Right key to adjust the screen
brightness.
Protecting Your Phone With a Screen Lock
You ca n prot ect your phone by creatin g a scree n lo ck.
When it is e nabled, you need to enter a n umeric PIN to
unlock the phone’s screen and keys.
1. From the home screen, select > Settings > Phone
settings > Security > Screen lock.
2. Select None to disable the screen lock, or select PIN
to set a numeric PIN that you must enter to unlock the
screen.
CAUTION:
Rememb er the PIN you set. O therwise , you will have t o
cont act the cust omer serv ice and upgr ade the phon e
software to use the phone.
Personalizing
Page 22
20
Knowing the Basics
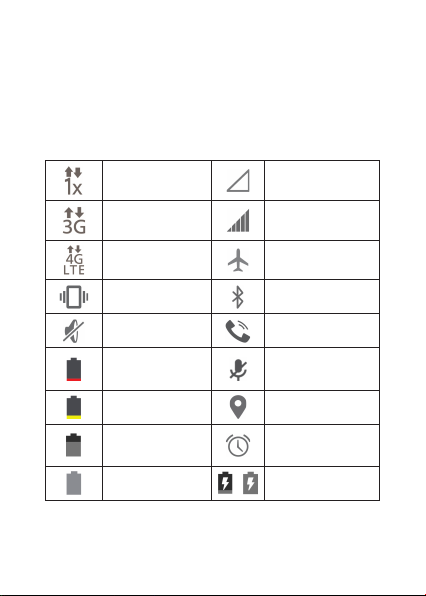
Monitoring the Phone Status
The statu s ba r at the top of the home scre en p rovides
phone and service status icons on the right side. B elow
are some of the icons you may see.
2G connected No signal
3G connected Signal strength
LTE connected Airplane mode
Vibration mode Bluetooth on
Silent mode Speaker on
Battery
extremely low
Phone
microphone off
Battery low GPS on
Battery partially
drained
Alarm set
Battery full / Battery charging
Knowing the Basics
Page 23
21
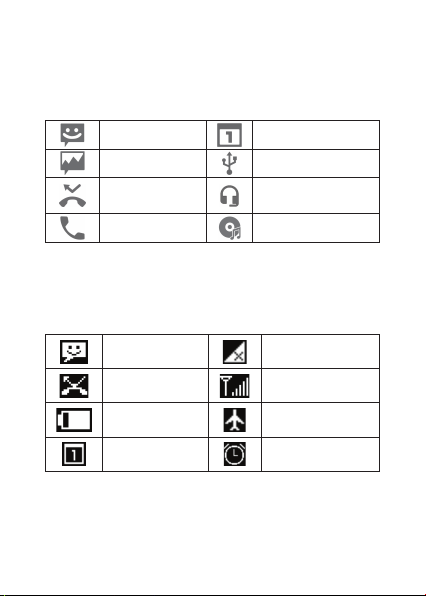
Checking Notification Icons
The statu s ba r at the top of the home scre en p rovides
notification icons on the left. Below are some of the icons
you may see.
New SMS Upcoming event
New MMS USB connected
Missed call
Wired headset
connected
Call in progress Song playing
Checking External Screen Icons
You c an also ch eck the ph one stat us and noti fica tion
alerts with d ifferent icons on the external screen. Below
are some of the icons and their meanings.
New message No signal
Missed call Signal strength
Battery level Airplane mode
New event Alarm set
Knowing the Basics
Page 24

22
Entering Text
Change Input Mode or Language
Wh en you a re in a fi eld t hat al low s char act ers to b e
enter ed, t he t ext in put mode indic ator is shown on the
right side of the status bar.
You can e nter text using the following input modes: T12
abc, T12 Abc, T12 ABC, abc, Abc, ABC, and number input.
To c h a n g e i n p u t m o d e , p r e s s a n d h o l d t h e Vi brat ion
mode key and select one mode.
To switch the input language, press and hold the * key.
Use Predictive Text Mode (T12 abc / T12 Abc / T12
ABC)
The predictive text mode (T12 abc / T12 Abc / T12 ABC) is
based on a built-in d ictionary a nd generates words from
the combination of letters pressed.
• Press each key once that corresponds to the letter
you want to enter. The letters are shown on the display
as they are entered. The list of candidate words
changes as each key is pressed. When the candidate
words are displ ayed, use the 4-way Navigation key to
highlight a candidate word and then press the Center
key.
• Press the 0 key to insert a space or press the * key to
select symbols.
• Press the Clear key to delete the letter to the left of
the cursor. Hold the Clear key to delete all entered
text to the left of the cursor.
Knowing the Basics
Page 25

23
Enter Letters (abc / Abc / ABC)
• Press a number key (2 ~ 9) multiple times until the
preferred letter is shown on the screen. Press once to
enter the first letter on the keypad; press twice quickly
to enter the second letter, and so on.
• Press the 0 key to insert a space or press the * key to
select symbols.
NOTE:
Wh en us in g "Ab c" mo de, onl y the fir st le tte r wi ll be
cap italiz ed. After ente ring the firs t c apita l le tter, "Abc"
mode will be changed to "abc" mode automatically.
Enter Numbers
In numeric mode (123) , you can enter numb ers d irectly
using the number keys.
Enter Symbols
1. Press the * key.
2. Use the 4-way navigation key to select a symbol.
3. Press the Center key.
Opening and Switching Apps
Open an App
1. Press the Power/end key if the current screen is not
the home screen.
2. Select by pressing the Center key.
3. Use the 4-way navigation key and the Center key to
select and open an app.
Knowing the Basics
Page 26

24
Switch Between Recently Opened Apps
1. Press the Recent apps key. The apps you’ve used
recently are displayed in a series of tabs. Use the
4-way navigation key to scroll up and down to see all
the tabs.
2. Select a tab and press the Center key to open that
app.
NOTE:
Select Clear all to remove all tabs.
Knowing the Basics
Page 27

25
Connecting to Networks and Devices
Connecting to Mobile Networks
Control Mobile Data Use
To enable or disable data access:
1. From the home screen, select > Settings >
Wireless & networks > Mobile networks.
2. Select Mobile Data and press the Center key to turn
on or off the switch.
To get data services when roaming:
1. From the home screen, select > Settings >
Wireless & networks > Mobile networks.
2. Select Data roaming and press the Center key to
turn on the switch if it is turned off.
NOTE:
Data roaming may incur significant roaming charges.
Set Access Point Names
To connect to the Internet you can use the default Access
Point Names (APN). And if y ou want to add a new APN,
please co ntact the serv ice provider to get the n ecessary
information.
1. From the home screen, select > Settings >
Wireless & networks > Mobile networks > Access
Point Names.
Connecting to Networks and Devices
Page 28

26
2. Use the 4-way navigation key to scroll up and down
to see all the APNs.
3. Select the circle to the right of the APN you want to
use and press the Center key.
NOTE:
To set the APN to default settings, select Options > Reset
to default.
Connecting to Bluetooth Devices
Bl uet ooth i s a sh ort- ran ge wi rel ess c omm uni cat ion
tec hno logy. P hone s or oth er dev ice s w ith B luet ooth
capabilities can exchange inform ation wirelessly within a
distance of about 30 feet. The Bluetooth devices must be
paired before the communication is performed.
Turn Bluetooth On/Off
1. From the home screen, select > Settings >
Wireless & networks > Bluetooth.
2. Select the Bluetooth switch and press the Center
key to turn it on or off.
When Bluetooth is on, the icon appears in the status bar.
Change the Device Name
1. From the home screen, select > Settings >
Wireless & networks > Bluetooth.
2. Turn on the Bluetooth switch if Bluetooth is off.
3. Select Options > Rename this device.
4. Edit the name and press the Center key.
Connecting to Networks and Devices
Page 29

27
Pair With Another Bluetooth Device
1. From the home screen, select > Settings >
Wireless & networks > Bluetooth.
2. Turn on the Bluetooth switch if Bluetooth is off.
Your phone automatically scans for and displays the
IDs of all available Bluetooth devices in range. You
could select Options > Refresh if you want to scan
again.
3. Select the device you want to pair with and press the
Center key.
4. Confirm that the Bluetooth passkeys are the same
between the two devices and press the Center key.
Alternately, enter a Bluetooth passkey and press the
Center key.
Pairing is successfully completed when the other
device accepts the connection or the same passkey
is entered.
NOTE:
The Bluetooth passkey may be fixed for certain devices,
such as hea dsets and han ds-fre e c ar k its. You can try
entering 0000 or 1234 (the most common passkeys), or
refer to the documents for that device.
Forget (Unpair With) a Bluetooth Device
You can make your phone forget its p airing connec tion
with another Blu etooth device. To con nect to the devic e
ag ain , you nee d to s ear ch it a nd e nte r or co nf irm a
passkey again.
Connecting to Networks and Devices
Page 30

28
1. From the home screen, select > Settings >
Wireless & networks > Bluetooth and ensure that
Bluetooth is turned on.
2. In the list of paired devices, select the icon beside
the Bluetooth device you want to forget, and then
press the Center key.
3. Press the Right soft key.
Send Data via Bluetooth
1. Open the appropriate application and select the file or
item you want to share.
2. Select the option for sharing via Bluetooth. The
method may vary by application and data type.
3. Select a Bluetooth device the phone has paired with
or wait for it to search for new devices and select one
of them.
4. Press the Center key to send the data.
Receive Data via Bluetooth
1. Turn Bluetooth on before trying to receive data via
Bluetooth.
2. When the phone prompts there is an incoming file,
press the Center key to start receiving the data.
De pe ndi ng o n yo ur s to rag e se tt ing and whe th er a
micr oSDHC ca rd is in stall ed, receiv ed files are stor ed
au to mat ic all y in a de dic at ed f old er ( Bl uet oo th, for
instance). You can access them with the Fi le Ma nager
app.
Connecting to Networks and Devices
Page 31

29
Connecting to Your Computer via USB
You can c onnect your p hone t o a computer with a US B
cable a nd transfer music, pictures, and other files in both
dire ction s. Yo ur phone sto res thes e fi les in the phon e
storage or on a removable microSDHC card.
Connect Your Phone to a Computer via USB
1. Connect your phone to the PC with a USB cable.
2. Choose one of the following options:
X
Charge only: Charge your phone via USB.
X
Install driver: Install the driver needed for some
USB connection modes (such as MTP). You only
need to install the driver on the same PC once.
NOTE:
You can also install the driver on PC by running the
executable file in the new CD-ROM drive.
X
Media device (MTP): Transfer files on Windows®
or Mac®.
NOTE:
For Windows XP, please install the drivers and
Media Player 11 (or later version) when you use
Media device (MTP) for the first time.
NOTE:
To ma k e y o ur p h on e c on n ec t t o t h e co m pu t e r
automatically using the selected c onnection type, select
Don’t ask me again and press the Center key to check it.
Connecting to Networks and Devices
Page 32

30
Disconnect Your Phone From the Computer
To d isc onn ect th e pho ne fro m the co mpu ter, si mpl y
unplug the USB cable when you’re finished.
Erase the microSDHC Card
1. From the home screen, select > Settings > Phone
settings > Storage.
2. Select Erase SD card > OK.
3. Select ERASE SD CARD > ERASE EVERYTHING.
CAUTION:
The formatting procedure erases all the data on the
mi cro SDH C car d, af ter w hic h the f ile s CAN NOT be
retrieved.
Connecting to Networks and Devices
Page 33

31
Phone Calls
You ca n pl ace cal ls f rom t he R ece nt C all s ap p, th e
Co nt ac ts ap p, o r ot he r a pp s t hat di sp la y co nt ac t
information.
Placing and Ending Calls
Place a Call by Dialing
1. Press the Power/end key to access the home screen.
2. Enter the phone number with the dialpad. The phone
will display matching information from your contact
list and call history. Press the Clear key to delete any
incorrect digits.
3. Press the Send key to call the number you entered. Or
select the matching record and press the Send key to
call the contact or history number.
NOTES:
• To make an international call, press and hold the * key
to enter the plus (+) symbol. Next, enter the country
code, followed by the city/area code and then the
phone number.
• To call an extension, enter the phone number first, and
then select Options > Add 2-sec pause or Options >
Add wait before entering the extension number.
End a Call
During a call, press the Power/end key.
Phone Calls
Page 34

32
Answering or Rejecting Calls
When you receive a phone call, you can answer or reject
the call, or reject it with a text message.
Answer a Call
When you receive a phone call, press the Send key or the
Center key to answer the call.
NOTE:
You can also answer a call by opening the phone flip. See
Set Phone Flip Action.
NOTE:
To silence the ringer before a nswering the c all, yo u can
press either end of the Volume key.
Reject a Call
When you receive a phone call, press the Power/end key
or the Right soft key to reject the call.
Select Options > Message reject t o reject the call and
send a text message to the caller.
NOTE:
You can also reject a call by closing the phone flip. See Set
Phone Flip Action.
NOTE:
To e d i t t h e p r e s e t t e x t r e s p o n s e , s e l e c t > Setting s >
Call settings > Quick responses from the home screen.
Phone Calls
Page 35

33
Working With the Call History
The c all hi stor y is a list of a ll the c alls yo u've p lace d,
received, or missed. It provides a convenient way to redial
a number, return a call, or add a number to your contacts.
To open the call history, select > Recent Calls or press
the Send key from the home screen.
Place a Call From the Call History
1. Open the call history.
2. Select a listing and press the Send key to call back.
NOTE:
Yo u c a n u s e t h e 4-way navigation key to select
(missed), (outgoing), or (inc omin g) to fil ter the
records by call type.
Add a Number From Call History as a Contact
1. Open the call history.
2. Select a phone number and press the Center key.
3. To add the number to an existing contact, select
Options > Update existing contact and choose
a contact in the list. To add a new contact, select
Options > Create new contact.
Take Other Actions on a Call History Entry
Open the c all hist ory, selec t a listing and the n press the
Center key to view more cal l informat ion. Wh ile viewi ng
the call details, you can:
• Select Options > Remove from call log to delete the
entry.
Phone Calls
Page 36

34
• Select Options > Edit number before call to edit the
number in the dialer before calling it.
• Select Options > Send Message to send a message
to the contact or number.
NOTE:
Select Options > Clear call log in the call history screen
to delete all history records.
Calling Your Contacts
1. From the home screen, select > Contacts.
2. Select the tab to view all your contacts.
3. Select a contact and press the Center key.
4. Select the contact number and press the Send key to
make a call.
Checking Voicemail
If you h ave set th e p hon e t o d iver t call s t o voice mai l,
callers can leave voicemail messages when they cannot
reach you. Here’s how to check the messages they left.
1. Press the Power/end key to access the home screen.
2. Press and hold the 1 key. If prompted, enter your
voicemail password.
3. Follow the voice prompts to listen to and manage your
voicemail messages.
NOTE:
See Set Voicemail for how to set your voi cemail se rvice.
For de tai led in form ati on, pl eas e cont act th e ser vic e
provider.
Phone Calls
Page 37

35
Using Options During a Call
During a call, the following options are available.
• Press the Center key to turn on or off the speaker.
• Press the Right soft key to mute or unmute your
microphone.
• Select Options > Add call to make another call
separately from the first call, which is put on hold.
• Select Options > Swap to put the caller you are
speaking to on hold, and switch to the other call that
has been put on hold.
• Select Options > Merge calls to merge the separate
calls into a single conference call.
• Select Options > End Call or press the Power/end
key to end the current call.
WARNING!
Because of higher volume levels, do not place the phone
near your ear during speakerphone use.
Managing Multi-party Calls
When the call waiting and three-way call features are
available, you can switch b etween two calls o r set u p a
conference call.
NOTE:
The call waiting and three-way call features need network
sup port a nd may res ult in ad diti onal ch arge s. Ple ase
contact your service provider for more information.
Phone Calls
Page 38

36
Switch Between Current Calls
When you’re on a call and another call comes in, your
phone screen informs you and displays the caller ID.
To respond to an incoming call while you’re on a call:
• Press the Send key or the Center key to answer the
call. (This puts the first caller on hold and answers the
second call.)
• Press the Power/end key or the Right soft key to
reject the second call.
• Select Options > Message reject to reject the
second call and send a text message to the caller.
To switch between two calls:
Select Options > Swap to switch back to the other call.
Set Up a Conference Call
With this feature, you c an talk to t wo people at the same
time.
1. Place the first call.
2. Once you have established the connection, select
Options > Add call and dial the second number. (This
puts the first caller on hold.)
3. When you’re connected to the second party, select
Options > Merge calls.
If on e o f the pe ople yo u cal led ha ngs up du ring y our
call, you a nd the remainin g calle r stay connected . If you
initiated the c all and are the first to hang up, all callers are
disconnected.
To end the conference call, press the Power/end key.
Phone Calls
Page 39

37
Adjusting Your Call Settings
Set Speed Dials
You can press and hold the 1 ~ 9 keys in the home screen
to call the corresponding speed dial number.
The number key 1 is reserved to speed dial your voicemail.
To assign a speed dial key:
1. From the home screen, select > Settings > Call
settings > Speed dial.
2. Select a speed dial key and press the Center key.
3. Select a contact number from the contact list and
press the Center key.
Set Voicemail
1. From the home screen, select > Settings > Call
settings > Carrier Setting > Voicemail.
2. Configure the following voicemail settings.
X
Service: Select the voicemail service provider.
Your carrier is the default.
X
Setup > Voicemail number: View or edit the
voicemail number.
X
Sound: Set the notification sound for new
voicemails.
X
Vibrate: Check to enable vibration for notification.
Forward Incoming Calls
Ca ll fo rw ard ing f eat ur e all ow s you t o fo rwa rd yo ur
incoming calls to another phone number.
1. From the home screen, select > Settings > Call
settings > Carrier Setting > Call forwarding.
Phone Calls
Page 40

38
2. Select an available option to enable it.
Other Options
1. From the home screen, select > Settings > Call
settings > Carrier Setting > Additional settings.
2. The following options are available.
X
Voice privacy: Enable or disable enhanced
privacy mode.
X
Plus code dialing setting: The phone can
automatically dial the international access code
for your location when you press and hold the
* key in the dialer. Check Setup Plus Code
Replacement to enable this feature, and select
Replace Code of Plus Code to change the code.
Set Phone Flip Action
You can answer or end/reject a call by opening or closing
the phone flip.
1. From the home screen, select > Settings > Call
settings.
2. Check Open to answer or Close to end call.
Set TTY Mode
Your p hone is a TT Y c ompati ble device. A TTY devi ce
can allow people who have hearing or speech disabilities
to c ommunicate by t elephone. Simply connect the TTY
device to the phone’s headset jack.
Selec t a TTY mode for your phone to work with a T TY
device, or turn TTY off.
1. From the home screen, select > Settings > Call
settings > TTY mode.
Phone Calls
Page 41

39
2. Select one of the following options. Consult your
teletypewriter manufacturer’s manual if necessary.
X
TTY Off: Users who can hear and talk can disable
TTY support.
X
TTY Full: Users who cannot talk or hear may use
this mode to send and receive text messages
through TTY device.
X
TTY HCO: Users who can hear, but cannot talk,
may use this mode to listen to conversation of the
other party, and respond via text messages.
X
TTY VCO: Users who can talk, but cannot hear,
may use this mode to talk through the phone and
receive responses via text messages.
Set Hearing Aids
Your phone supports the Hearing Aid Compatibility (HAC)
function. When you turn on th e hearing aid c ompatibility
and use a hearing aid with a telecoil to answer the phone,
it will help you hear more clearly during the phone call.
1. From the home screen, select > Settings > Call
settings.
2. Check Hearing aids to turn on hearing aid
compatibility.
CAUTION:
Do not turn on the Hear ing aids optio n un less you use
a h earing aid wi th a telecoil. Using this setting without a
hearing aid or with a hearing aid without a telecoil may be
harmful to your hearing.
Phone Calls
Page 42

40
Enable Auto Answer
You can s et you r phon e to ans wer th e inc omin g cal l
au tom atic all y whe n a wir ed or B luet oot h hea dse t is
connected to the phone.
1. From the home screen, select > Settings > Call
settings > Auto answer.
2. Switch on Auto answer.
3. Select Call duration and press the 4-way navigation
key to set the wait time before the phone answers the
call automatically. Press the Center key to confirm the
selection. Select Auto answer conditions and press
the Center key to set the auto answer condition for
your wired or Bluetooth headset.
Edit Quick Response to Rejected Callers
1. From the home screen, select > Settings > Call
settings > Quick responses.
2. Select a text message and press the Center key to
edit it.
Phone Calls
Page 43

41
Contacts
To s e e y o u r c o n t a c t s , s e l e c t > Contacts from the
home s creen. From there, you can s elect the tabs on t he
top of the screen to quickly switch to contact groups.
Checking Contact Details
1. From the home screen, select > Contacts and
select the tab to access your contact list.
2. Scroll through the list to view all your contacts.
3. Select a contact and press the Center key to view its
details.
Searching for a Contact
1. From the home screen, select > Contacts and
select the tab to access your contact list.
2. In the search field below, input the contact name,
phone number or any information the contact has to
search for it. The contacts matched will be listed.
Adding a New Contact
1. From the home screen, select > Contacts and
select the tab to access your contact list.
2. Select Options > New contact to add a new contact.
If the contacts list is empty, select CREATE A NEW
CONTACT.
3. Enter the contact name, phone number and other
information.
Contacts
Page 44

42
NOTE:
Yo u c a n s e l e c t below RINGTONE or NOTIFICATION
RIGNTONE t o set a s pec ial r ing ton e or no tif ica tio n
ringtone to the contact.
4. Select ADD ANOTHER FIELD at the bottom and
press the Center key to enter more information.
5. Select Save to save the contact.
Setting Up Your Own Profile
You can create your own name card in your phone.
1. From the home screen, select > Contacts and
select the tab to access your contact list.
2. Select Set up my profile and press the Center key.
3. Edit your profile information.
4. Select Save.
Importing, Exporting, and Sharing Contacts
You ca n imp or t/exp ort c ont ac ts fr om/t o th e pho ne
storage or the microSDHC card. This is especially useful
when you need to transfer contacts between different
devices. You can also quickly share contacts using
messages or Bluetooth.
Impor t Cont acts From th e Phon e Stora ge or the
microSDHC Card
1. From the home screen, select > Contacts.
2. Select Options > Import/Export > Import from
storage.
Contacts
Page 45

43
3. If prompted, choose to import one, multiple, or all
vCard files in the microSDHC card or the phone
storage.
4. If prompted, press the Center key to import the
contacts.
Ex por t Con tac ts t o the P hon e Sto rage o r th e
microSDHC Card
1. From the home screen, select > Contacts.
2. Select Options > Import/Export > Export to
storage.
3. The phone will prompt you with the name of the vCard
file and the directory in which the file will be saved.
Press the Center key to create the file.
Share Contacts
1. From the home screen, select > Contacts.
2. Select Options > Import/Export > Share visible
contacts.
3. Choose to share the contacts via messages or
Bluetooth. The phone will export all your visible
contacts into a vCard file.
4. Follow the onscreen prompts to send the vCard file.
Editing Contacts
Edit Contact Details
1. From the home screen, select > Contacts.
2. Select a contact you need to edit and press the
Center key.
3. Press the Center key.
Contacts
Page 46

44
4. Edit the contact and select Save.
Delete Contacts
1. From the home screen, select > Contacts and
select the tab to access your contact list.
2. Select Options > Multi-Select.
3. Check the contact you want to remove and then
select Options > Delete.
4. Press the Center key to confirm.
Join Contacts
Yo u c a n m e r g e a l l t h e s e p a r a t e i n f o r m a t i o n o f a c o n t a c t
into one entry in the contacts list.
1. From the home screen, select > Contacts.
2. Select a contact you need to edit and press the
Center key.
3. Press the Center key.
4. Select Options > Join.
5. Select the contact whose information you want to join
with the first entry and press the Center key.
6. Select Save.
The in forma tion fro m t he seco nd conta ct is adde d t o
the fi rst conta ct, and the s econd co ntact is no lon ger
displayed in the contacts list.
Yo u c a n r e p e a t t h e s e s t e p s t o j o i n a n o t h e r c o n t a c t t o t h e
main contact.
Separate Contact Information
If contact information from different sources was joined in
error, you can separate the information back into individual
contacts on your phone.
Contacts
Page 47

45
1. From the home screen, select > Contacts.
2. Select a contact you have merged and want to
separate, and then press the Center key.
3. Press the Center key.
4. Select Options > Separate.
5. Press the Center key to confirm.
Working With Groups
View Your C ontact Groups
1. From the home screen, select > Contacts and
select the tab.
2. Scroll through the list to view the preset groups and
any groups you have created.
3. Select a group and press the Center key to view its
members.
NOTE:
To send a message to all or some of the group members,
you c an select Options > Send Group message after
you open the group.
Set Up a New Group
1. From the home screen, select > Contacts and
select the tab.
2. Select Options > Create group to create a new group.
3. Select the Group’s name field and enter the group
name.
4. Select below MEMBER and press the Center key,
and then check the contacts you wish to be the group
members.
Contacts
Page 48

46
5. Select Options > Add member to group.
6. Select below RINGTONE and press the Center
key.
7. Select the ringtone for incoming calls from the group
members and press the Left soft key.
8. Select Options > Save to save the group.
Delete a Group
1. From the home screen, select > Contacts and
select the tab.
2. Select a group and press the Center key.
3. Select Options > Delete Group.
4. Press the Center key to disband the group. The
contacts in the group will not be deleted.
Edit a Group
1. From the home screen, select > Contacts and
select the tab.
2. Select a group and press the Center key.
3. Select Options > Edit group.
4. Select the group name to edit it, or select below
MEMBER or RINGTONE to add more members or
change the ringtone.
5. Select Options > Save.
NOTE:
To r e m o v e g r o u p m e m b e r s , o p e n a g r o u p i n t h e tab
and select Options > Multi-Select to choose members.
Then select Options > Delete member > OK.
Contacts
Page 49

47
Messages
You can use Messages to exchange text messages (SMS)
and multimedia messages (MMS).
Opening the Messages Screen
From the home screen, select > Messages.
The Messages scree n ope ns, where you can create a
new message or open an ongoing message thread.
• Select Options > New message to write a new text or
multimedia message.
• Open an existing message thread to view the
conversation you’ve had with a certain number.
Sending a Message
1. On the Messages screen, select Options > New
message.
2. Add recipients by one of the following ways.
X
Select the To field and manually enter the
recipient’s number or the contact name. If the
phone presents a few suggestions, select the one
you want to add.
X
Select the To field and press the Center key to
select recipients from your contacts, call history,
or contact groups.
NOTE:
To remove a recipient, press the Clear key.
3. Select the text box at the bottom and enter the
content of your text message.
Messages
Page 50

48
4. If you want to send a multimedia message, select
Options > Insert attach or Options > Add subject to
attach a file or subject to the message.
5. Press the Center key to send the message.
NOTE:
Do not ad d a ny attac hment if yo u w ant to send a text
message. Otherwise you may be charged for a multimedia
message.
Replying to a Message
Messages you receive are appended to existing threads
of the sa me nu mber. If the new m essage comes from a
new number, a new thread is created.
1. On the Messages screen, open the thread that has
the message you want to reply to.
2. Type your reply in the text box at the bottom. You can
select Options > Insert attach or Options > Add
subject if you want to reply with an MMS.
3. Press the Center key.
Forwarding a Message
1. On the Messages screen, open the thread that has
the message you want to forward.
2. Select the message and press the Center key.
3. Select Forward in the menu that opens and press the
Center key.
4. Enter a recipient for the message and edit the content
if you want.
5. Press the Center key.
Messages
Page 51

49
Copying a Message
You can copy text me ssages from t he micro-SIM card to
the phone storage.
1. On the Messages screen, select Options > Settings
> Text message(SMS) > Manage SIM card
messages.
2. Select a message and select Options > Copy to
phone memory.
Changing Message Settings
Select Options > Settings in the Messages screen to
change the message settings.
Messages
Page 52

50
Calendar
To o p e n C a l e n d a r , s e l e c t > Calendar from the h ome
screen. You can use the calendar, set appointments, and
view events.
Viewing Your Calendars and Events
Change Calendar Views
You can view your calendars in di fferent forms. The app
offers three view types: Month, Week and Agenda.
To c h a n g e c a l e n d a r v i e w s , s e l e c t Op tion s > Vi ew by
and se lect the view you p refer. You can a lso select a day
block in Month view and press the Center key to switch to
Agenda view.
• In Month view, scroll up and down to see previous and
future months.
• In Week or Agenda view, scroll left and right to see
previous and future weeks/days.
• When you are viewing past or future days, weeks, or
months, select Options > Today to quickly switch to
today.
View Event Details
In Agenda or Week vie w, select an event and p ress t he
Center key to view its details.
In Month view, select a day block and press the Center
key to switch to Agenda view. Then open an event to view
its details.
Calendar
Page 53

51
Creating an Event
1. In any Calendar view, select Options > New event.
2. Enter the event details and press the Left soft key.
Editing, Deleting or Sharing an Event
1. Find the event you want to edit, delete or share.
2. Open its details screen (see View Event Details in this
chapter).
3. Do one of the following as you need.
X
To edit the event, select Options > Edit. Press the
Left soft key to save your changes.
X
To delete the event, select Options > Delete and
press the Center key.
X
To share the event, select Options > Share and
choose how to share.
Changing Calendar Settings
To chang e the cal endar settings , ope n a calen dar vi ew
(Week, Month or Agenda), and select Options > Settings
> General settings.
Calendar
Page 54

52
Web Browser
Use Browser to view web pages and search for
information.
Opening the Browser
From the home screen, select > Browser to launch the
web browser.
The browser a lso ope ns when you open a web li nk - for
example, in a text message.
To visit a website:
1. Open the Browser app.
2. Select Options > Type URL to highlight the address
box.
3. Enter the address (URL) of a web page or enter terms
you want to search for.
4. Press the Center key to open the web page or search
results.
NOTE:
Press the Right soft key if you want to stop openin g the
page. You can also press the Right soft key to go back to
the previous opened web page.
Setting the Homepage
Yo u r h o m e p a g e o p e n s w h e n y o u s t a r t Browser after
restarting your phone. You can also open the home page
by selecti ng Options > Homepage in the Browser screen.
1. Open the Browser app.
2. Select Options > Settings > Set homepage.
Web Browser
Page 55

53
3. Enter the URL and press the Center key to set it as
the homepage.
Adding a Website to Bookmarks
1. Open the Browser app.
2. Open the website you want to add to bookmarks.
3. Select Options > Add to bookmarks.
4. Edit the title and URL if needed.
5. Select Ok and press the Center key.
NOTE:
To v i e w t h e b o o k m a r k s , s e l e c t Options > Bookmarks in
the Browser screen.
Viewing the Browsing History
1. Open the Browser app.
2. Select Options > History to view all the websites you
have visited. You c an select one and press the Center
key to open it.
Changing Browser Settings
Yo u c a n c o n f i g u r e a n u m b e r o f s e t t i n g s t o c u s t o m i z e t h e
way you browse the web.
To o p e n t h e B r o w s e r s e t t i n g s s c r e e n , s e l e c t O ptions >
Settings in the browser screen.
Web Browser
Page 56

54
Camera
You can use your phone to take photos and record videos.
Photos and videos are stored on the microSDHC card you
have installed or in the phone storage. You can copy them
to your computer or access them in the Gallery app.
Capturing a Photo
1. From the home screen, press the Camera key or
select > Camera.
2. Aim the camera at the subject and make any
necessary adjustment.
Camera
Page 57

55
X
To use the filter, s elect Options > Filter and
choose one.
X
To change white balance scenario, photo
brightness or ISO, select Options > White
balance/Brightness/ISO and make the
adjustment.
X
To set the camera and camcorder options, select
Options > Settings.
X
To view pictures and videos you have taken, press
the Right key.
X
To switch between the camera and camcorder,
press the Left key.
NOTE:
Yo u c a n p r e s s t h e Vo lu m e key to zoom in or out befo re
taking pictures.
3. Press the Center key or the Camera key to take a
picture.
Recording a Video
1. From the home screen, press the Camera key or
select > Camera.
2. Press the Left key to switch to the camcorder. The
shutter button at the bottom of the display turns
red.
3. Aim the camera at the subject.
NOTE:
Yo u c a n p r e s s t h e Vo lu m e key to zoom in or out befo re
and during recording.
Camera
Page 58

56
4. Press the Center key or the Camera key to start
recording. You can als o press the Left soft key to
pause or resume recording.
5. Press the Center key or the Camera key again to stop
recording.
Customizing Camera/Camcorder Settings
Be fore c apt uri ng a pho to or a v ide o, you c an se lec t
Options > Settings to s et the fo llow ing c amer a and
camcorder options.
• Picture size: Set the image size for your photo.
• Video quality: Set the quality for your video.
• Shutter tone: Turn on or off the shutter sound.
• Photo auto review: Select whether to review the
picture after you shot it.
Camera
Page 59

57
Gallery
Opening Gallery
From the hom e s creen, se lect > Gallery to vi ew
albums of your pictures and videos.
Working With Albums
When you open the Gallery, all pictures and videos on your
phon e are dis played in a number of album s by defa ult.
Scroll up and down to see them all.
To view album contents:
Select an album and press the Center key to view the
pictures and videos it contains.
To share pictures or videos:
1. Open an album.
2. Select Options > Multi-select.
3. Select the pictures or videos you want to share and
press the Center key to highlight them.
4. Select Options > Share and select how you want to
share them.
To delete albums, pictures, or videos:
1. Open the Gallery to view the albums or open an album.
2. Select Options > Multi-select.
3. Select the items you want to delete and press the
Center key to highlight them.
4. Select Options > Delete.
5. Press the Center key to confirm.
Gallery
Page 60

58
Working With Pictures
Select a picture in an album and press the Center key to
view it.
Wh en v iew in g a pi ctu re , the fol low in g fea tu res a re
available.
• Press the Center key to view the picture in full screen.
• Press the Left key or the Right key to see more
pictures or videos.
• Select Options > Delete to delete the picture.
• Select Options > Share to share the picture.
• Select Options > Set as use the picture for contact
photo or wallpaper.
• Select Options > Details to check file details.
• Select Options > Slideshow to browse the album
contents in a slideshow.
Gallery
Page 61

59
Playing Videos
1. Open an album in the Gallery.
2. Select the thumbnail of a video and press the Center
key.
3. Press the Center key again to start playing.
Gallery
Page 62

60
Music
From th e home s cree n, sel ect > Multimedia > Music
to play audio files stored on your phone.
Viewing Your Music Library
From th e home s cree n, sel ect > Multimedi a > Musi c
and your music library is displayed. All your audio files are
cataloged according to the information stored in the files.
• Now Playing: If an audio file is being played, select
this option to open the playback screen.
• All Songs: View all music files on your phone.
• Playlists: View all music playlists you have created.
• Albums: Browse music files on your phone organized
by the album name.
Playing Music
Select a song in the music library and press the Center
key to open the playback screen and listen to it.
Music
Page 63

61
The play back scree n sh ows the track infor mation and
alb um a rtwor k ( if availa ble). The fo llowin g o ption s ar e
available.
• To pause or resume the playback, press the Center
key.
• To skip songs, press the Left key or the Right key.
• To rewind or fast forward, press and hold the Left key
or the Right key.
• To toggle repeat mode, select Options > Repeat and
choose one mode.
• To turn on or off shuffle, select Options > Shuffle and
select On or Off.
• To see the current playlist, select Options > Now
Playing List.
• To check the track information, select Options >
Track Info.
Music
Page 64

62
• To return to the music screen, press the Right soft
key.
• To close the Music app, select Options > Exit.
Managing Playlists
Create playlists to organize your m usic f iles in to sets of
songs, so that you can play the songs you like in the order
you prefer.
• Select a song and then select Options > Add to
playlist to add the song to a playlist or create a new
playlist.
• Select a playlist and then select Options > Delete to
delete it.
• Select a playlist and then select Options > Rename to
rename it.
• Open a playlist to view its content. You can select
Options > Add Songs to add more songs to the
playlist, or select a song and select Options >
Remove to delete it from the playlist.
Music
Page 65

63
Video Player
Use the Video app t o m anag e your vi deo li brar y a nd
watch videos.
Opening the Video Library
From th e home s creen , sel ect > Multimed ia > V ideo
to vi ew you r v ide o libr ary, wh ere you r vide o fil es are
displayed i n a list. Scroll up or down to find the video you
want.
Playing and Controlling Videos
Select a video in the video library and press the Center
key to play it. You can control the video or carr y out other
operations.
• To pause or resume the playback, press the Center
key.
• To skip to the previous or the next video, press the
Left key or the Right key.
• To rewind or fast forward, press and hold the Left key
or the Right key.
• To adjust the screen brightness, select Options >
Brightness and then press the Up key or the Down
key.
• To delete the video, select Options > Delete and
press the Center key.
• To share the video, select Options > Share and
choose a method.
• To view the file details, select Options > Details.
Video Player
Page 66

64
Managing Video Files
Delete Video Clips
1. Select Options > Multi-Select in the video library.
2. Check the videos you want to delete.
3. Select Options > Delete and press the Center key to
confirm.
Share Video Clips
1. Select Options > Multi-Select in the video library.
2. Check the videos you want to share.
3. Select Options > Share and choose how you want to
share them.
Video Player
Page 67

65
Sound Recorder
Sound Recorder en ables you to record voic e me mos
and listen to them whenever you like.
Recording a Voice Memo
1. From the home screen, select > Multimedia >
Sound Recorder.
2. Press the Center key to start recording. During
recording, press the Center key to pause or continue
the recording.
3. Press the Left soft key to stop recording. The memo
is automatically saved.
Playing a Voice Memo
1. Select Options > All Recordings from the Sound
Recorder screen to see all recordings.
2. Select a memo and press the Center key to play it.
NOTE:
Choose a memo and select Options > Sha re/ De lete/
Rename/ Deta ils to share, delete or rename it, or check
its file information.
Sound Recorder
Page 68

66
More Apps
Clock
From th e h ome sc reen, s elect > Tools > Clock. The
Clock app allows you to check local time in places around
the world, set alarms, and use timers.
Set a New Alarm
1. Select the tab in the Clock app.
2. Select an existing alarm and select Options > Edit to
configure it, or select Options > New alarm to create
a new alarm.
3. Set up the alarm options, such as time, alarm days,
repeat, snooze, and alarm ringtone.
4. Press the Left soft key to save and exit.
NOTE:
To enab le or dis able an existing alarm directly, select the
alarm and press the Center key to turn on or off the switch
on the right side.
Check World Time
Select the tab in the Clock app to check loca l tim e
around the world.
Select Options > Add City to add a new city or country.
Use the Stopwatch and Countdown
Select the or tab in the Clock app to use the
stopwatch or the countdown timer.
More Apps
Page 69

67
St o pwa tc h a l lo ws yo u t o re c or d l ap t i me s, wh il e
countd own a llows you to set a time and c ount d own to
zero.
Calculator
From the home screen, select > Tools > Calculator for
simple calculation. You can enter the operation for your
calculation by pressing the 4-way navigation key and
view the result by pressing the Center key.
NOTES:
• Press the Clear key to clear inputs and results.
• Press the Left soft key to reset all inputs and results.
• Press the * key to enter a decimal point.
• Press the Vibration mode (#) key to toggle the
number between positive and negative.
Weather
From th e h ome sc reen, s elec t > Tools > Weather to
check the weather of your city or around the world.
To let t he p hon e lo ca te yo ur G PS ci ty, y ou ne ed t o
turn GPS on. Open the Weather app, select Optio ns >
Settings > GPS and press the Center key to turn on the
switch.
To add a city:
1. Select Options > Manage city in the Weather app.
2. Select Options > Add city.
3. Enter the city name and press the Center key.
4. Select the city you need from the search results and
press the Center key.
More Apps
Page 70

68
5. If necessary, select the city and press Options >
Set as default to set the city as the default weather
forecast location.
NOTE:
In the main screen of Weather, scroll left or right to view
the weathe r of your city and all adde d cit ies. Press the
Center key to refresh the weather.
Downloads
The Downloads app keeps a record of the files you have
downloaded.
From the home screen, select > Tools > Downloads to
check the record.
File Manager
Qui ckly acce ss all of your imag es, vide os, audi o cl ips,
and other types of files on your phone storag e and the
microSDHC card.
From the h ome scre en, se lect > File Manager. You
can select the / tab to b rowse folde rs and files on
the phone storage and the microSDHC card.
• Select folders and files and press the Center key to
access stored items.
• Select an item and select Options to access more
options.
• Select Options > New folder to create a new folder in
the current directory.
More Apps
Page 71

69
Settings
From the home scr een, selec t > Settings. The
Settings app contains mo st of th e tools for customi zing
and configuring your phone.
Wireless & Networks
Airplane Mode
From th e home s cree n, sel ect > Settings > Wireless
& networks > Airplane mode and press the Center key
to turn airplane mode on or off. All the phone’s radios that
transmit voice or data are turned off when airplane mode
is on.
Bluetooth
From th e home s cree n, sel ect > Settings > Wireless
& networks > Bluetooth. You can tu rn Blu etoot h on
or off and con figur e yo ur Bluet ooth con necti ons. See
Connecting to Bluetooth Devices.
Mobile Networks
From th e home s cree n, sel ect > Settings > Wireless
& networks > Mobile networks to control mobile data
use or set access point names. See Connecting to Mobile
Networks.
Accessibility
From the home screen , select > Se t ti n gs >
Acces sibilit y t o c onfi gure ac cess ibil ity pl ug-i ns and
services on your phone.
Settings
Page 72

70
Sound Settings
You can set and edit an appropriate profile depending on
your current environment.
1. From the home screen, select > Settings > Sound
settings.
2. Select a profile and press the Center key to enable it.
If you select the General profile, you can edit it by pressing
the Left soft key. You can adjust different types of volume
(see Adjusting Volume), set up rington e and notificat ion
sound (see Cha nging Ring tone and Notification Sound),
or set system sound (see Turning On/Off System Sound).
Display Settings
From th e h ome sc reen, s elec t > Setting s > Display
settings to configure the following options.
• Brightness level: Set the brightness of the display.
• Wallpaper: Select a background image for the home
screen.
• Backlight: Set the length of time of inactivity before
the screen turns off automatically.
• Keypad light: Adjust how long the backlight for the
keypad remains on.
• Font size: Set the font size of the text on the screen.
Phone Settings
Language & Input
From the ho me scre en, sel ect > Settin gs > Ph one
settings > Language & input to configure options related
Settings
Page 73

71
to system language, input methods and speech output.
• Language: Select a language for your system.
• Keyboard & input methods: Configure text input
settings.
• Text-to-speech output:
X
Preferred engine: Select the speech synthesis
engine you want to use or change its settings.
X
Speech rate: Select how quickly you want the
synthesizer to speak.
X
Listen to an example: Play a brief sample of the
speech synthesizer, using your current settings.
X
Default language status: Check whether the
text-to-speech output feature supports the
current system language.
Navigation Key Shortcuts
From the ho me scre en, sel ect > Settin gs > Ph one
settings > Navigation key shortcuts to assign the Up/
Down/Left/Right key as a sh ortcut for a fu nction, s uch
as the calendar.
Data Usage
From the ho me scre en, sel ect > Settin gs > Ph one
settings > Data usage to manage mobile data use.
Check or uncheck Restrict background data to restrict
background data or not.
You c an che ck how muc h d ata has be en used du ring
the time cycle you set, set data usage warn ing and limit,
see what apps have been using mobile data, or restrict
background data for individual apps.
Settings
Page 74

72
NOTE:
The dat a u sage is mea sured by you r p hone, an d y our
carrier’s data usage accounting may differ.
Storage
From the ho me scre en, sel ect > Settin gs > Ph one
settings > Storage to view the memory information of the
internal phone storage and the microSDHC card.
• Save location: You c an choose the default location
for new data, such as photos captured and voice
recorded. Select Phone or SD card to store items in
the phone storage or the installed microSDHC card.
• Erase SD card: Format the installed microSDHC
card.
Location
From the ho me scre en, sel ect > Settin gs > Ph one
settings > Location to manage lo cation serv ices, which
help your pho ne a nd a pps determi ne y our locati on. To
use locatio n-related applications, you must have loc ation
services enabled on your phone.
Select the switch and press the Center key to t urn
location services on or off.
Connect to PC
From the ho me scre en, sel ect > Settin gs > Ph one
settings > Connect to PC to s elect your USB connection
type be tween you r ph one and PC. See Con necti ng t o
Your Computer via USB.
Settings
Page 75

73
Security
From the ho me scre en, sel ect > Settin gs > Ph one
settings > Security to configure options that help keep
your phone and data safe.
• Screen lock: Disable the screen lock or enable it with
PIN. See Protecting Your Phone With a Screen Lock.
• Automatically lock: Set the time needed for the lock
protection to be activated after the screen turns off.
This option is available when unlock PIN is set.
• Owner info: Set the text that you may display on the
lock screen.
• Set up SIM card lock:
X
Lock SIM card: Activate or deactivate the PIN
lock to require PIN before accessing the microSIM card.
X
Change SIM PIN: Change the PIN used to access
the micro-SIM card.
NOTE:
Put all yo ur c onfid entia l pa ssword s i n a saf e pl ace for
futu re u se. If y ou e nter the wrong SI M PI N mo re t imes
than allowed, your micro-SIM card will be locked and you
cannot access the mobile phone network. Contact your
operator for a PIN Unlock Key (PUK) to restore the microSIM card.
Settings
Page 76

74
Reset
From the ho me scre en, sel ect > Settin gs > Ph one
settings > Reset > Factory data reset t o r eset yo ur
pho ne to fact ory def ault se ttin gs. All yo ur data in t he
internal storage will be erased during the process. You c an
also erase the data on the microSDHC card.
Date & Time
From the ho me scre en, sel ect > Settin gs > Ph one
settings > Date & time to set date, time, tim e zone, and
the time format. You can also use network-provided data.
Call Settings
From the hom e s creen, se lect > S ett ing s > Cal l
settings to s et the call options. See Adjusting Your Call
Settings.
About Phone
From the ho me scre en, sele ct > S ettin gs > A bout
phone to view the phone status and other information.
Software Update
From th e home s cree n, se lect > Settings > Software
update to check for the phone software updates.
Settings
Page 77

75
Troubleshooting
If you enco unter prob lems wh ile usi ng the phone, or if it
perfo rms abnorma lly, yo u ca n refe r to the char t be low.
If your particular problem cannot be resolved using the
infor mation in the cha rt, contac t t he d ealer wher e you
purchased the phone.
Problem Possible causes Possible solution
Poor
reception
The network signal
is too weak at your
current location,
for example, in
a basement or
near a tall building,
because wireless
transmissions cannot
effectively reach it.
Move to a location
where the network
signal can be properly
received.
The network is busy
at the current time
(for example, during
peak times, there may
be too much network
traffic to handle
additional calls).
Avoid using the
phone at such times,
or try again after
waiting a short time.
You are too far away
from a base station
for your service
provider.
You can request a
service area map
from your service
provider.
Troubleshooting
Page 78

76
Echo or
noise
The network link
quality is poor on the
part of your service
provider.
End the call and dial
again. You may be
switched to a betterquality network link or
phone line.
The quality of the
phone line that you
are calling is poor
End the call and dial
again. You may be
switched to a betterquality network link or
phone line.
Unable
to select
certain
features
Your service provider
does not support
these features, or you
have not applied for
services that provide
these features.
Contact your service
provider.
Cannot
charge the
battery
The battery or
battery charger is
damaged.
Contact the dealer.
The phone’s
temperature is below
0 °C or higher than
45 °C.
Adjust the
battery charging
environment to
avoid extremes of
temperature.
The contact between
the battery and
charger is poor.
Check all connectors
to ensure that all
connections have
been properly made.
Troubleshooting
Page 79

77
Shortened
standby
time
The standby time
is related to your
service provider
system configuration.
The same phone
used with different
service providers’
systems will not
provide exactly
the same length of
standby time.
If you are located
in an area where
signaling is weak,
temporarily power off
the phone.
The battery is
depleted. In high
temperature
environments,
battery life will be
shortened.
Contact the dealer to
change a new battery.
If you are not able
to connect to the
network, the phone
will continue to
send out signals
as it attempts to
locate a base station.
Doing so consumes
battery power and
will consequently
shorten standby time.
Change your
location to one
where the network
is accessible, or
temporarily turn off
your phone.
Troubleshooting
Page 80

78
Cannot
turn your
phone on
Battery power has
been depleted.
Recharge the phone’
s battery.
micro-SIM
card error
The micro-SIM card
malfunctions or is
damaged.
Take the micro-SIM
card to your service
provider for testing.
The micro-SIM
card is inserted
improperly.
Insert the micro-SIM
card properly.
There is debris on
the micro-SIM card
contacts.
Use a soft dry cloth to
clean the micro-SIM
card contacts.
Unable to
connect
to the
network
The micro-SIM card
is invalid.
Contact your service
provider.
You are not within the
network’s service
area.
Check the service
area with your service
provider.
The signal is poor.
Move to an open
space, or if you are
inside a building, move
closer to a window.
PIN Code
blocked
You have entered an
incorrect PIN code
three consecutive
times.
Contact your service
provider. If the service
provider provides
the micro-SIM card’
s PUK code, use the
PUK code to unlock
the micro-SIM card.
Troubleshooting
Page 81

79
Specifications
Handset specifications are shown in the following table.
Handset standard LTE/CDMA
Dimensions 4.26" (H) x2.18" (W) x 0.73" (D)
Weight 4.59 oz. (with battery)
Display 2.8 inch 240×320
Camera 2 MP
Internal memory ROM: 4 GB, RAM: 512 MB
Removable memory
card
Supports microSDHC card up
to 32GB
Battery 1500 mAh
Continuous idle time Up to 12 days
Continuous talk time Up to 8 hours
WAP browser version 2.0
HAC M4/T4
Bluetooth 4.1
NOTE:
The pho ne’s ta lk time and idle ti me a re b ased on idea l
working environments. The use of extended backlighting,
browser, and network conditions can reduc e battery life
and talk/idle time.
Specifications
Page 82

80
 Loading...