

Page 1

ZTE Blade D, Chat 4G
(A460)
User Guide
For support contact ZTE Australia on Facebook, Google+ Twitter and Instagram
1
Page 2
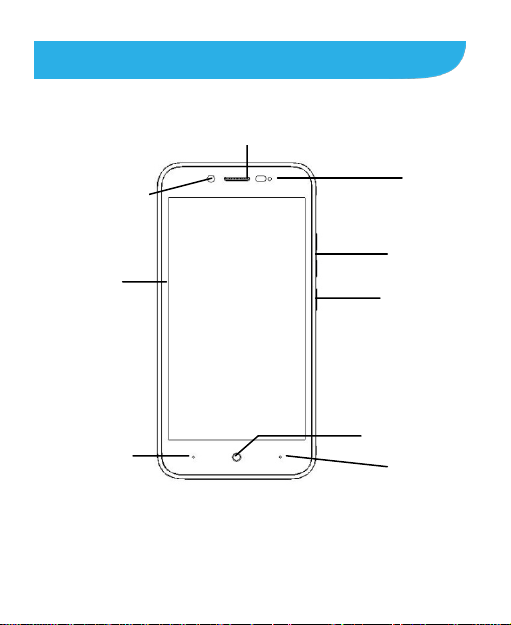
Earpiece
Front camera
Getting to Know Your Phone
Touch Screen
Back Key
Indicator
Volume Key
Power Key
Home Key
Menu Key
2
Page 3

Power Key
• Press and hold to power on, select phone modes, turn
airplane mode or on off, reboot your phone, or power off.
• Press to turn the display on or off
Home Key
Touch to return to the home screen from any application.
Menu Key
Touch to get the options for the current screen.
Touch and hold to see recently used applications.
Back Key
Touch to go to the previous screen.
Volume Key
Press or hold to turn the volume up or down.
Starting Up
Switch off your phone before installing or replacing the battery
or the SIM card. The microSDHC™ car d is o ptional extra and
can be use d f or additional storage of photos , videos an d
pictures.
1. Place yo ur thumb in the slot at the bottom of the back cover to
lift and remove the cover.
3
Page 4
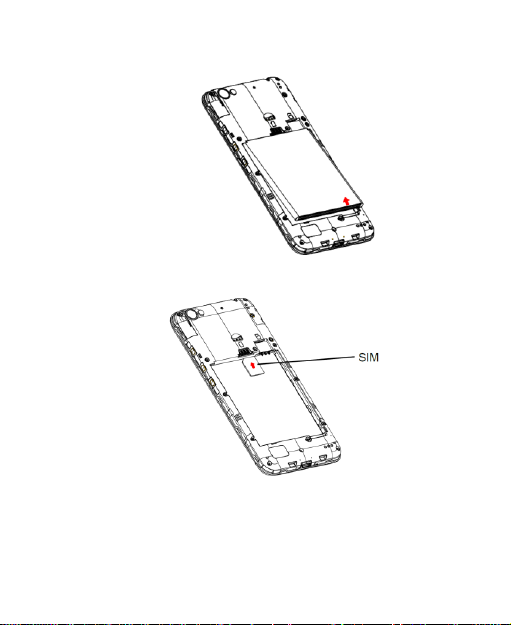
2. Hold the SIM card with its cut corner oriented as shown and
insert it fully into the card holder.
3. Align the gold connectors on the phone and the battery and
gently press the battery into place.
4. A microSD can be fitted into the slot to the right of the SIM card
if required.
5. Align the back cover with the back of the phone and press the
cover back into place.
4
Page 5
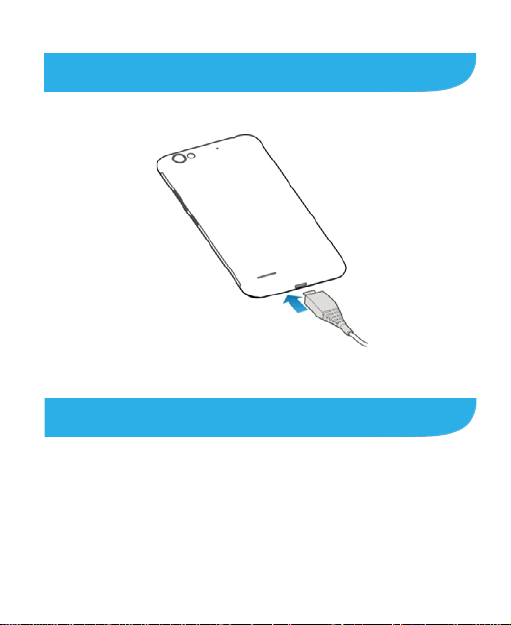
Charging the Battery
1. Insert the charging lead carefully with the correct orientation.
Do not force the connector into the charging jack.
2. Connect the charger to a standard AC power outlet.
3.Disconnect the charger when the battery is fully charged.
Powering On/Off Your Phone
• Press and hold the Power Key to turn on your phone.
• To turn it off, press an d hold the Power Key to o pen the
options menu. Touch Power off > OK.
5
Page 6
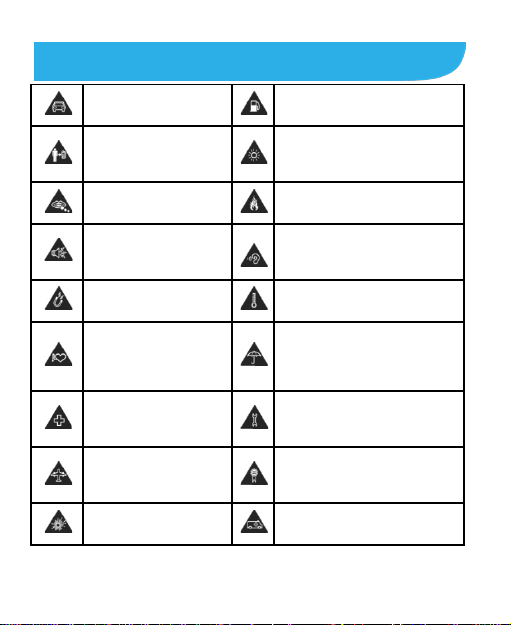
while driving
15 mm
This device may produce
magnetic media
devices
and medical facilities
and airports
environments
emergency communications
Product Safety Information
Do not use hand-held
For body-worn operation
maintain a separation of
Small parts may cause a
choki ng hazard
a loud sound
Avoid contact with
Keep away from
pacemakers and other
personal medical
Switch off when
instructed in hospitals
Switch off when
instructed in aircrafts
Switch off in explosive
Do not use while re-fuelling
This device may produce a
bright or flashing light
Do not dispose of it in a fire
To prevent possible hearing
damage, do not listen at high
volume levels for long periods.
Avoid Extreme Temperatures
Avoid any contact with liquid,
keep it dry
Do not attempt to disassemble
Only use approved accessories
Do not rely on this device for
6
Page 7
How to get to Settings
There are a few ways to get to the Settings menu:
1. Go to Apps > Sett ings
2. Pull the screen down twice and press
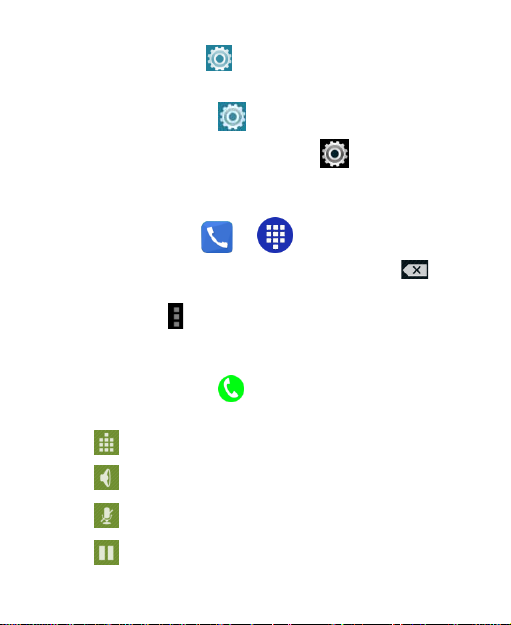
Making Calls
1. Touch Home Ke y > >
2. Ent er the phone number using the keypad. Touch to
delete wrong digits.
3. Press Options to add a Pause or Wait if required
4. Press and hold the 0 key to enter the plus (+) symbol for
international dialling.
5. Touch the Phone icon below the keypad to dial.
Options during a call
Press to open the number pad
Press t o use loudspeaker (Handsfree) m ode
Press to mute the microphone
Press to put the current call on hold
7
Page 8
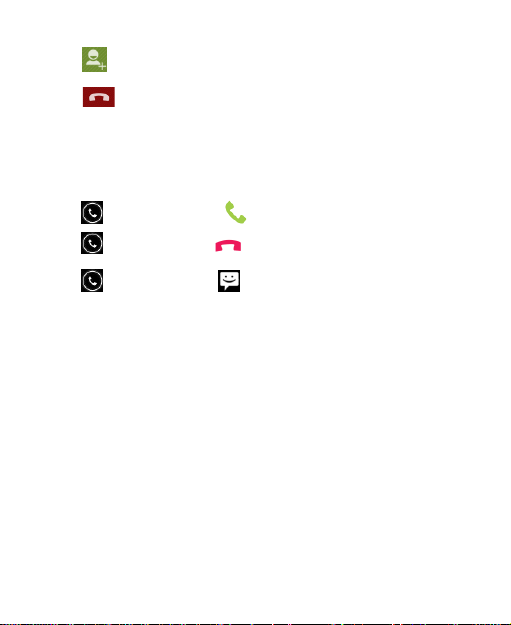
Press to dial in another party (Conference)
Press to End the call
When you receive a phone call
The display shows the caller ID and any additional information
about the caller saved in Contacts.
touch and slide right to to answer the call,
touch and slide left to to reject the call,
touch and slide up to to rejec t t he call and send an
SMS which is displayed on screen. Set the SMS at Dialler >
Options > Settings > General Settings > Quick responses
TIP: You can silence the incoming ring by pressing either of the
Volume keys.
Adjusting Volumes
The side volume keys work in three different ways:
1. When you are on a call use the volume keys to adjust the in
call volume.
2. When you are using a media application, such as music, video
or games, the volume keys adjust the media volume.
3. At other times when you are not in either of the above states,
8
Page 9
the volume keys set the ringtone volume or enable vibrate mode
at minimum volume.
Quick Enable Silent o r Vibrate mode
With the screen On, lo ng press the Power Key to see Silent,
Vibrate and Normal ring modes indicated by the icons at the
bottom of the panel.
Go to Apps > Settings > Audio Profiles > > Vibrate to enable
Vibrate on R ing.
Access the Quick Settings Panel
Swipe down from the top of the screen to view the Quick
Settings panel. Tap each ic on to switch O n or Off. Touch Wi-Fi
or Bluetooth (under the line) to configure those features.
Connect to a local Wi-Fi ne t w ork
1. Touch Home > A pps > Settin gs > Wi-Fi, switch to On.
2. T ap Wi-Fi to view available networks.
3. Touch a network name to connect to it.
Previously connected net wor ks will connect automatically. If the
network is secured enter the password.
Messaging
You can use Messaging to exchange text messages (SMS)
and multimedia messages (MMS).
9
Page 10
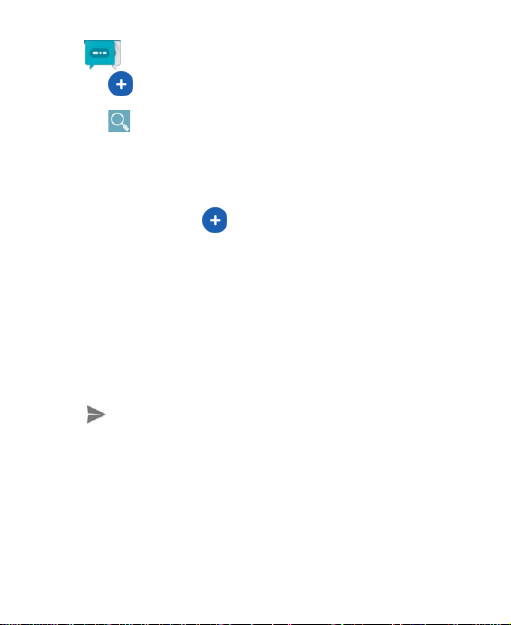
Touch on the Home screen to open Messaging
1. Touch to write a new message.
2. Touch to search within messages
3. Touch an existing message to open the thread.
Send a Text Message
From Messaging touch to create a new message.
Enter the recipient’s number or name if they are stored in your
Contacts. As matching contacts appear you can touch a
suggested recipient.
Touch the Type message field, and enter your message using
the keypad.
Touch to Send.
Reply to a Message
Messages y ou receiv e a re appended to existing threads of
the same number. A new thread is created for new numbers.
10
Page 11
1. On the Messaging screen, touch the thread that has the
message y ou want to rep ly to.
2. Type your rep ly in the text box at the bot tom . You can touch
the attach icon + if you want to reply with an MMS.
3. Touch to Send.
View Message Details
1. Touch and hold a message in a thread.
2. Touch View message details to se e the mes sa ge type ,
sender or receiver, time and date .
Send a Multimedia Message
From Messaging touch to create a new message.
Enter the recipient and the text of the message,
Touch attach to add an attachment from the following:
11
Page 12

Pictures Select a picture to add to your message.
Capture picture Take a photo and add to your message.
Videos Select a video clip to attach to your message.
Capture video Shoot a video clip and add to your message.
Audio Select an audio file to add to your message.
Record audio Record an audio file for your message.
Slideshow Add a series of pictures
Insert Contact
Contact vCard
Calendar
Event
Touch to Send.
Select a contact to add to your message as
an attachment
Add a Calendar event such as an
appointment or meeting (VCS).
12
Page 13

TIPS: The maximum MMS size is 300KB. Large images are
automatically re-sized but video files may be too large to send .
Send large Video files by email instead or share using Social
Media.
Forward a Message
In Messaging touch the thread to ope n the SMS.
1. Touch and hold the message.
2. Touch Forward in the menu that opens.
3. Enter a recipient for the message and edit the content if
you want.
4. Touch to Send.
Delete an individual message:
1. On the Messaging screen, touch the message to delete
2. Press for Opti ons > Delete
13
Page 14

Delete message threads:
1. On the Messaging screen, touch and hold the thread to
delete.
2. Touch to delete.
Message Settings From the Messaging screen touch > Settings
Open/Close the Notification Pane l
Notifications report the arrival of new messages, calendar events,
and alarms, as well as ongoing events, such as when you've
configured your phone as a Wi-Fi hotspot. Y ou can open the
notification panel to view the details of notifications.
• To open the notification panel, swipe your finger down from
the top of the screen.
• To close the notification panel, swipe your finger up from the
bottom of the screen or touch the Back Key.
14
Page 15

Respond to or Remove a Notification
In the notification panel, y ou can respond to a notif ication or
remove the notifications.
• To respon d to a notifi c ation, jus t touch it.
• To remove a notification, swipe it sideways.
• To dismis s all notifications touch
• Most apps t hat send not ifications, such as Gm ail and
Hangouts, have notification settings that you can adjust.
• From the lock screen you can double tap the notifcation to
open it
Apps drawer
Touch Hom e Key > Apps to open the Apps menu. Slide left
or right to view more.
15
Page 16

Connectivity
Your phone can connect to the Internet via your mobile
phone operator or over a Wi-Fi network. When A Wi-Fi
network is configured and available the device will
automatically choose the Wi-Fi connection to reduce your
mobile data usage.
GSM/WCDMA data connection
Different locations may have different mobile networks
available. Initially, your phone is configured to use the
fastest mobile network available for data.
The icons on the Status bar indicate which kind of data
network you’re connected to.
In the All apps screen, touch Settings > More… > Mobile
networks to perform relevant settings.
Turn Data Off
Pull down twice for the Quick Settings Panel. Tou ch the
Network signal icon (Telstra). Touch the Cellular data
switch to switch off.
Or the same setting is also available from Settings > Data
usage > Cellular
16
Page 17

Wi-Fi
Turn on/off Wi-Fi
1. In the All apps screen, touch Settings > WIFI.
2. T ouch the switch to turn it ON or OFF
3. You can also pull down the Quick Settings Panel and
touch the Wi-Fi icon to switch Wi-Fi on or off.
Connect to Wi-Fi
1. In the All apps screen, touch Settings.
2. Turn on Wi-Fi.
3. Your phone will automatically search for all nearby Wi-Fi
networks.
4. Select the network you would like to connect to from the
list.
- If you’ve selected an open network, your phone will
automatically connect to it.
- If you’ve selected a security network, you need to input
the password.
17
Page 18

Bluetooth®
Via the Bluetooth® function, you can exchange data with
other Bluetooth devices that are within a short distance.
Turn on/off Bluetooth®
1. On the home screen, touch and then touch
Settings.
2. Touch Bluetooth
it on or off.
Pairing
1. T ouch Bluetooth® when it is on to automatically search
for devices. Your phone will scan for and display all
Bluetooth
2. Touch the ID of the desired device.
®
devices it finds.
Send files via Bluetooth®
To send files via Bluetooth®, do as follows:
1. Select a file or item, such as a contact or a media file
from an appropriate application or File manager.
2. Open it, choose then touch the icon.
3. Search for and pair with a Bluetooth
Change your phone’s Bluetooth® name
1. On the home screen, touch and then touch
®
, and slide the ON/OFF button to turn
®
-enabled device.
18
Page 19

Settings > Wireless & networks.
2. If the Bluetooth
3. T ouch Bluetooth
®
function is not turned on, turn it on.
®
, then touch > Rename this
device to edit the name of your device, then touch
Rename.
4. T ouch the name of the phone to toggle it to Visibility
timeout so that other Bluetooth devices can find your
device.
Bluetooth Low Energy (Bluetooth Smart)
Bluetooth LE is an optimised standard of Bluetooth that
uses less power and is generally used to connect to
personal wearable devices such as fitness monitor wrist
bands and watches. The 3
controls the connection to your phone so traditional pairing
and password exchange is not required as it is controlled
using a secure key exchanged between your personal
device and your handset. The need for manual pairing
(using a PIN) is reduced. Follow your device instructions to
connect it to your handset.
rd
party module and software
19
Page 20

Connect to a Computer to transfer files
Transfer audio, video and picture files between your
handset and your computer.
PC
Connect your handset using the USB data lead supplied.
First time, select Install driver on the handset notifications
window.
On your PC, use Windows Explorer to open the CD Drive:
USB_Driver, then double click Setup to install the handset
drivers.
Subsequently, select Media Device (MTP) from the
notifications window, which will open the handset in
Windows Explorer.
MAC
On your MAC, download and install Android File Transfer.
Connect your handset using the USB data lead supplied.
Select Media Device (MTP) from the notifications window,
which will open the handset on your MAC.
20
Page 21

Settings
Airplane mode
In areas where the use of mobile devices is restricted, you
can activate the Airplane mode to disable phone function
but still use other functions of your phone such as calendar,
music and games. You will not be able to make/answer
calls, send/receive messages in Airplane mode.
1. On the home screen, touch and then touch
Settings > More.
2. Check the box for Flight mode. The phone will turn off
all wireless connections when Airplane mode is enabled.
Tip:
On the home screen, you can press and hold the Power
key, then select Airplane mode.
Device
Audio profiles
Touch and then touch Settings > Sound&
notification > .
Phone ringtone: Select the ringtone to sound when you
receive a call.
21
Page 22

Default notification sound: Select your default
notification ringtone.
Vibrate: Set the phone to vibrate and play a ringtone for
incoming calls.
Dial pad touch tones: Check to play a sound when you
touch dial pad.
Touch sounds: Check to play a sound when you touch
buttons, icons and other onscreen items.
Screen lock sounds: Check to play sounds when locking
and unlocking the screen.
Vibrate on touch: Check to vibrate when touching soft
keys and on certain user interface interactions.
Display
Touch Settings > Display.
Brightness level: Adjust the brightness of the screen.
Wallpaper: Choose a wallpaper.
Sleep: Choose the delay before the screen automatically
turns off.
Using micro SD Storage
To copy files between a PC and your phone’s SD card, you
should set the SD card as USB mass storage.
1. Connect your phone to your PC with the USB cable.
2. Turn on USB storage.
22
Page 23

During this time, you can’t access the SD card from your
phone, so you can’t use applications that rely on the SD
card, such as Camera, Gallery and Music.
Check space on the SD card
1. On the home screen, touch and then touch
Settings.
2. T ouch Storage.
Erase the SD card
1. On the home screen touch and then touch
Settings.
2. T ouch Storage > Erase SD card.
Accounts and sync
Adding your accounts
1. T ouch Settings > Accounts > Add account.
2. Touch the account type you want to add.
3. Follow the onscreen instructions to enter your account
information.
Most accounts require a username and password, but the
details depend on the kind of account and the configuration
of the service you're connecting to.
Depending on the kind of account, you may be asked to
configure what kinds of data you want to sync, name the
23
Page 24

account, and other details.
When you're finished, the account is added to the list in
Accounts & sync. Depending how you configured the
account, email, contacts, and other information may start
syncing to your device.
Language
You can choose the language your phone displays.
On the home screen, touch and then touch S ettings >
Language & input > Language.
Date & time
You can set the format of date and time.
On the home screen touch and then t ouch Settings >
Date & time.
About phone
You can check the phone’s status, battery use, software
version, etc.
On the home screen touch and then t ouch Settings >
About phone.
24
Page 25

Experiencing Multimedia
Camera
Your phone has a camera, which can be used to take
photos. You can set the photo you’ve just taken as
wallpaper, a contact photo or send it through
MMS/Bluetooth or Gmail.
Ta ke photos
1. In the All Apps screen, touch the Camera icon to open
the camera.
2. Aim the camera lens at the subject and make any
necessary adjustments.
Touch the icon to make the following settings:
- Touch the icon to change White balance.
Touch the icon to set Scene mode.
-
- Touch the icon to set Color effect.
3. Touch where you want to focus on the preview screen.
The focus frame moves to the place you touched and
changes to green when the subject is in focus.
4. T ap the icon to take photos after the view is
satisfactory.
25
Page 26

To view it, just tap the picture in the corner of the screen.
Or touch Gallery on the home screen to view all your
pictures.
Camcorder
Your phone can record video clips.
1. In the All Apps screen, touch the Camera icon to open
the camera.
Touch the icon to make the following settings:
- Touch the icon to set Time lapse interval.
- Touch the icon to change White balance.
- Touch the icon to set the Color effect.
2. Focus your lens on the object, touch the
start recording and touch the ic on to end.
After a video is recorded, you can slide to the left to view it.
icon to
Gallery
The Gallery categorizes your pictures and videos by
storage location and stores these files in folders. Tap a
folder to view the pictures or videos inside.
26
Page 27

Music Player
You can listen to music saved on the memory card with the
music player.
Open the music player
First copy music files to a mounted memory card.
In the All Apps screen, touch Music to open.
Listen to music
Touch the Song you want to play to start playing it.
Sound Recorder
You can record audio files through sound recorder.
Open the sound recorder
Before opening the sound recorder, please insert a
memory card.
In the All Apps screen, touch the Sound Recorder icon to
open it.
Record audio files
1. Put the microphone close to your mouth and touch
to start recording.
2. T ouch to stop recording.
3. T ouch the name of the recording to play back the
recording.
27
Page 28

FM radio
With the FM Radio, you can search for radio channels,
listen to them, and save them on your phone.
Note that the quality of the radio broadcast depends on the
coverage of the radio station in your area.
The wired headset that comes with your phone works as
an antenna, so always connect the headset when using the
radio. When you receive an incoming call while listening to
the radio, the radio will be turned off.
To tune in, plug your headset into your phone.
In the All Apps screen, press the FM Radio icon to open it.
The FM radio scans and saves available stations
automatically.
-Slide left or right to change the frequency.
-Tap or to scan for available FM channels.
-Tap / to change the frequency by +/–0.1 MHz.
- Press the Volume Keys to adjust the volume.
- Touch to select preset list or add new list.
- Touch to switch off the radio.
- Touch to add to favorites/remove from favorites.
28
Page 29

More Applications
Chrome
Use the Chrome browser to view web pages and to search
for information on the web.
Open Chrome
1. On the home screen or in the All Apps screen, touch the
icon.
2. First time you need to Accept and Continue, and can
add an account if you want to sync and share your
browsing Bookmarks and History between different
devices.
3. Touch the text field at the top to input a web address and
search directly from the URL field.
You can touch the > Bookmarks to select the
bookmark you want to open.
Browse web
After opening a web page, you could slide your finger on
the screen to view other parts of the page.
Zoom in or out
You can use two fingers to zoom in or out. Spread your
fingers apart or pinch them together to zoom in or out.
29
Page 30

Browse options
When you’re browsing web pages, touch the to select:
You can perform more operations such as Bookmarks,
Save to bookmarks, Share page, Find on page,
Request desktop site, etc.
Settings
You can choose settings that will affect how page content
is displayed and privacy and security preferences to suit
your browse style.
In Chrome touch the > Settings to enter the settings
interface.
File manager
In the All Apps screen, touch the File Manager icon. You
can view all files saved in the phone or on the memory
card.
Example, Copy a file or Folder to a different location
Press the All folder to view the traditional folder structure
for Android.
Open the source folder and find the file or folder to copy. .
Select the file (or folder) using the check box.
Then navigate to the required destination.
Then press Options, Move selection, or Copy selection to
drop the contents in the chosen destination.
30
Page 31

Clock
In the All Apps screen, touch the Clock icon to set Alarms,
World time, Stopwatch and Timer functions.
When Clock is running, it switches to screen saver mode
after a few minutes. Simply tap the screen or a phone
button to wake the phone up again.
To return to the home screen, touch the Home key.
Adding an Alarm
1. T ouch .
2. T ouch the icon at the top of the screen.
3. T ouch Add alarm.
Turning on/off an Alarm
To turn it on, touch OFF and slide it to the right. Touch ON
and slide to the left to turn it off.
World Time
Press the Globe icon to add a new world time location
(City)
Timer
Select the Timer function. Touch Play to start the timer.
Press Stop to stop the alert. Press +1 to add 1 minute,
press + to add a new timer event.
31
Page 32

Stopwatch
Select the Stopwatch function. Touch Play to start the
Stopwatch. You can Record the time, Pause the time or
Share the results.
Calculator
In the All Apps screen, touch the Calculator icon.
On the Calculator screen, slide the screen to the right or
left to switch between Advanced panel and Basic panel.
Calendar
Touch the Calendar icon in the All Apps screen.
Creating a new Event
1. On the calendar screen, touch and then touch New
event.
2. Enter the event name and location.
3. To set the duration for the event, touch From and To.
4. Enter the event time zone and description.
5. If you have more than one calendar, select the calendar
where you want to save the event.
6. Select the Repetition.
7. Set the time of the reminder in Reminders.
8. T ouch Done.
On the calendar screen, touch an event to view its details.
32
Page 33

Changing your calendar view
On the calendar screen, touch the date at the top and
choose Day, Week, Month, or Agenda.
Swipe to scroll vertically or horizontally. In the Day or Week
views, spread your fingers apart or pinch them together to
zoom in or out.
Displaying and synchronizing cal endars
Initially, all calendars that you create or subscribe to in
TM
Google
synchronize and display in Calendar on your phone. You
can select which Google calendars to keep synchronized
and which to show.
1. On the calendar screen, touch and then touch
Calendars to display.
2. Touch which calendars you would like to be displayed.
3. If you have more calendars you would like to
synchronize and display, touch Calendars to sync, then
touch the checkbox next to the calendar(s) you would like
to synchronize, touch OK, and then you are returned to the
Calendars to display screen where what you chose is now
displayed and where you can choose which to display in
the calendar.
Calendar on the web are available to
Downloads
With Downloads, you can manage logs of files you have
downloaded from the web.
33
Page 34

Touch the Downloads icon in the All Apps screen.
Manage applications
You can view and manage applications installed in your
phone.
Install new applicatio ns
You can install applications from the Play Store or from
elsewhere. When installing applications that are not from
the Play Store, make sure the software is suitable f or your
phone.
Installing applications from the Play Store
1. On the home screen or in the All Apps screen, touch the
Play Store icon.
2. Search for the applications you want to install.
3. Select Install (for free items) or Buy.
4. If you select Install, the item will start downloading
immediately.
5. If you select Buy, enter your credit card information.
Follow the on-screen instructions.
Installing applications n ot in the Play Store
1. Copy the application to the SD card and find the file from
File manager.
2. Check Unknown sources.
34
Page 35

3. Touch the file and complete the installation according to
the wizard.
Uninstall applications
Uninstall applications in the Play Store
1. On the Play Store screen.
2. Touch the application to uninstall.
3. T ouch Uninstall and complete the uninstall process
according to the wizard.
Uninstall applications not in the Play Store
1. On the home screen, touch and then select
Settings > Apps.
2. Scroll the list and touch the application you want to
uninstall.
35
 Loading...