

Page 1

ZTE Blade A570
Quick Start Guide
1
Page 2

LEGAL INFORMATION
Copyright © 2015 ZTE CORPORATION.
All rights reserved.
No part of this publication may be quoted, reproduced, translated or
used in any form or by any means, electronic or mechanical, including
photocopying and microfilm, without the prior written permission of ZTE
Corporation.
Notice
ZTE Corporation reserves the right to make modifications on print errors or
update specifications in this guide without prior notice.
We offer self-service for our smart terminal device users. Please visit the
ZTE official website (at www.ztedevice.com) for more information on
self-service and supported product models. Information on the website
takes precedence.
Visit http://www.ztedevice.com
Support > Manuals from the home page and then select your location,
product type, and name to search for related support information.
Disclaimer
ZTE Corporation expressly disclaims any liability for faults and damages
caused by unauthorized modifications of the software.
Images and screenshots used in this guide may differ from the actual
product. Content in this guide may differ from the actual product or
software.
Trademarks
to download the user manual. Just click
2
Page 3

h
d
d
m
e
N
N
a
e
e
o
s
r
a
s
2
T
h
o
r
D
u
Q
e
e
r
t
ZTE and t
Google an
trademark
of such tra
Qualcomm
Technologi
Qualcomm
registered
permission
Other trad
owners.
Version
Edition Ti
Manual
e ZTE logos are tr
Android are trad
and logos are own
emarks by ZTE C
icroSDHC Logo i
®
Snapdragon™ p
es, Inc.
and Snapdragon
in the United State
.
marks and trade n
o. : R1.0
me :August 30,
o. :
demarks of the Z
marks of Google, I
d by the Bluetoot
rporation is unde
a trademark of S
ocessors are prod
re trademarks of
and other countri
ames are the prop
015
3
E Corporation.
nc. The Bluetooth
SIG, Inc. and any
license.
-3C, LLC.
cts of Qualcomm
ualcomm Incorpo
s. Used with
ty of their respec
®
use
ated,
ive
Page 4
g
p
g
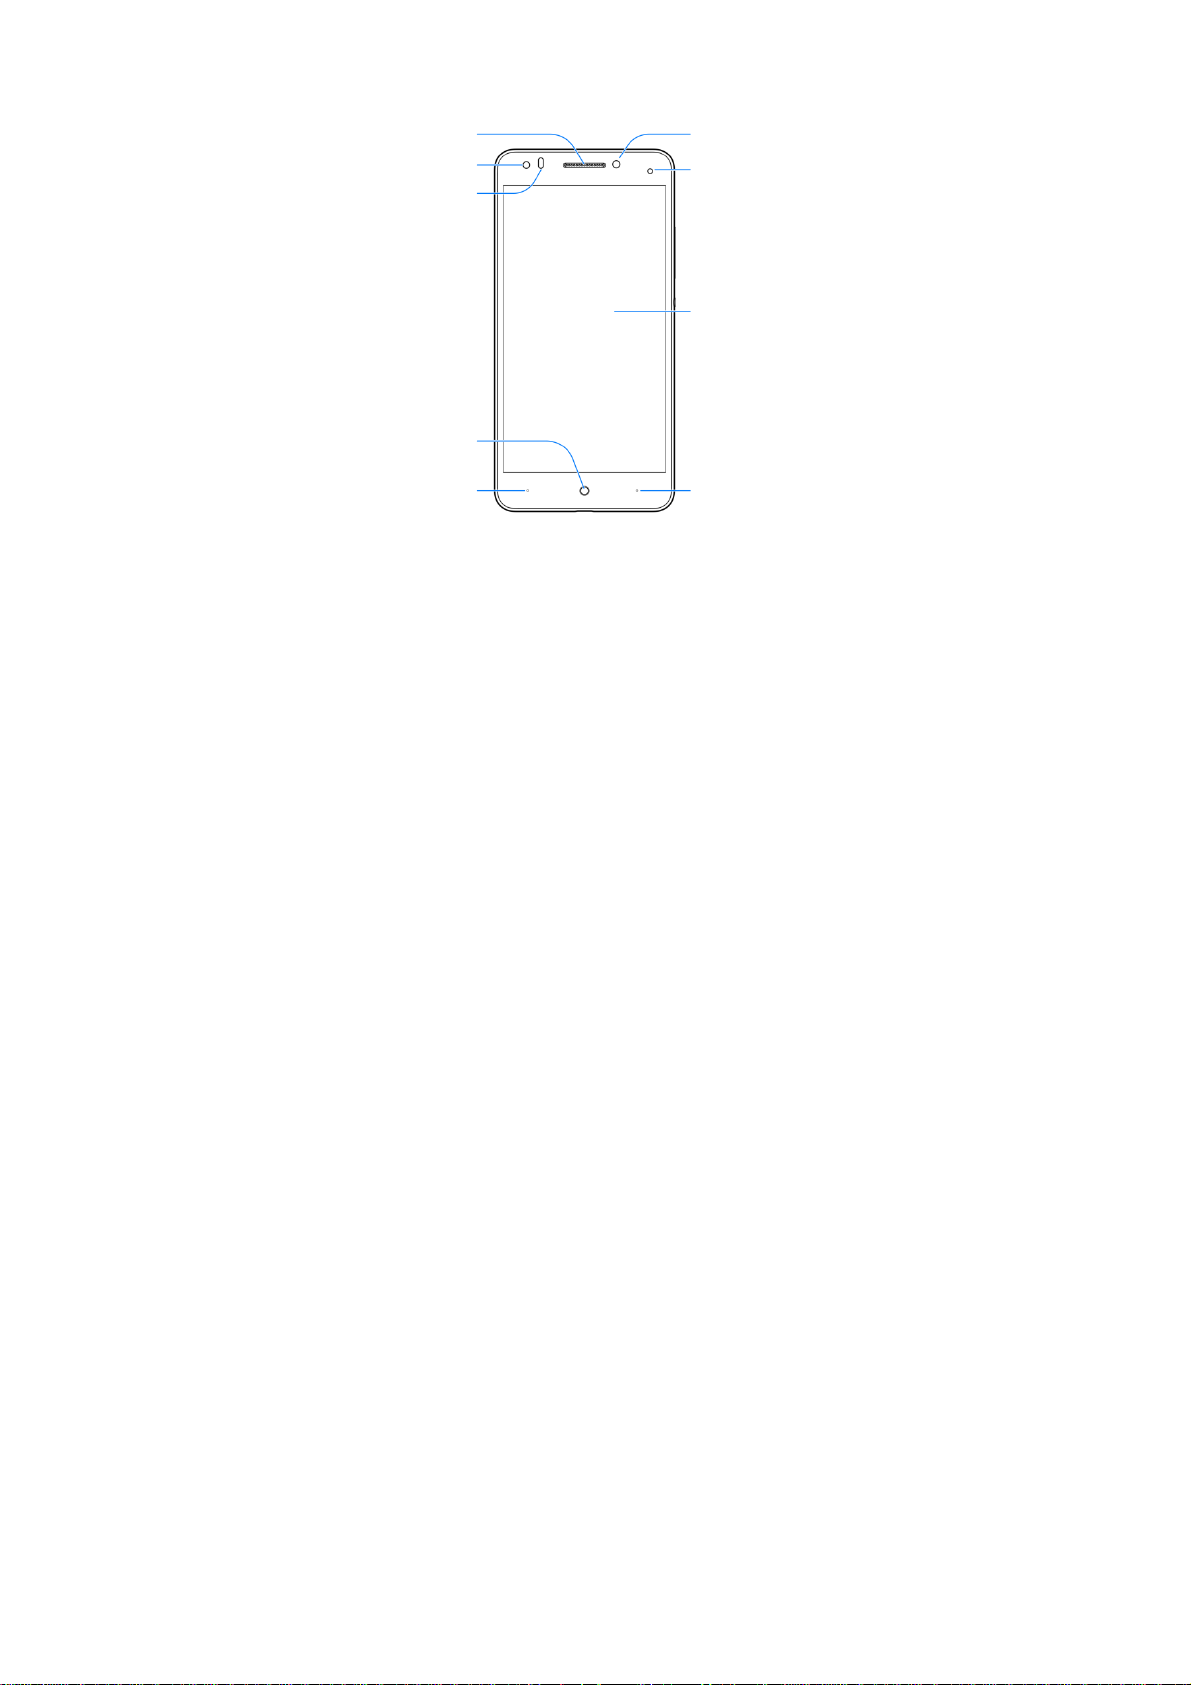
Getting to Know Your Phone
iece
Ear
Front camera
Proximity &
ht sensor
li
Home key
Front flash
Indicator li
Touch screen
ht
Back key
Menu key
4
Page 5

E
o
e
cBac
w
S
y
b
y
y
b
c
j
Back
Volu
NOT
The positi
through S
amera
k flash
me ke
er key
Po
peaker
:
ns of the Menu ke
ttings > Custom
and the Back ke
ottom key.
5
Headset ja
Charging/
micro-USB
are interchangea
ack
le
Page 6

Key Function
Power Key • Press and hold to turn on or off airplane
Home Key • Touch to return to the home screen.
Back Key Touch to go to the previous screen.
Menu Key • Touch to view the options for the current
Volume Key Press or hold either end of the key to turn the
mode, enable no interruptions mode,
priority interruptions only mode, silent mode
with vibration, disable silent mode, power
off or reboot the phone.
• Press to turn off or on the screen display.
• Touch and hold to open Google Search.
screen.
• Touch and hold to see recently used
applications.
volume up or down.
Installing the micro-SIM cards
Switch off your phone before installing or replacing the battery or the
micro-SIM cards. You phone has two micro-SIM card slots. You can install
one or both micro-SIM cards into the slots.
1. Insert your fingernail into the slot at the bottom left of the back cover
and lift it up gently.
6
Page 7
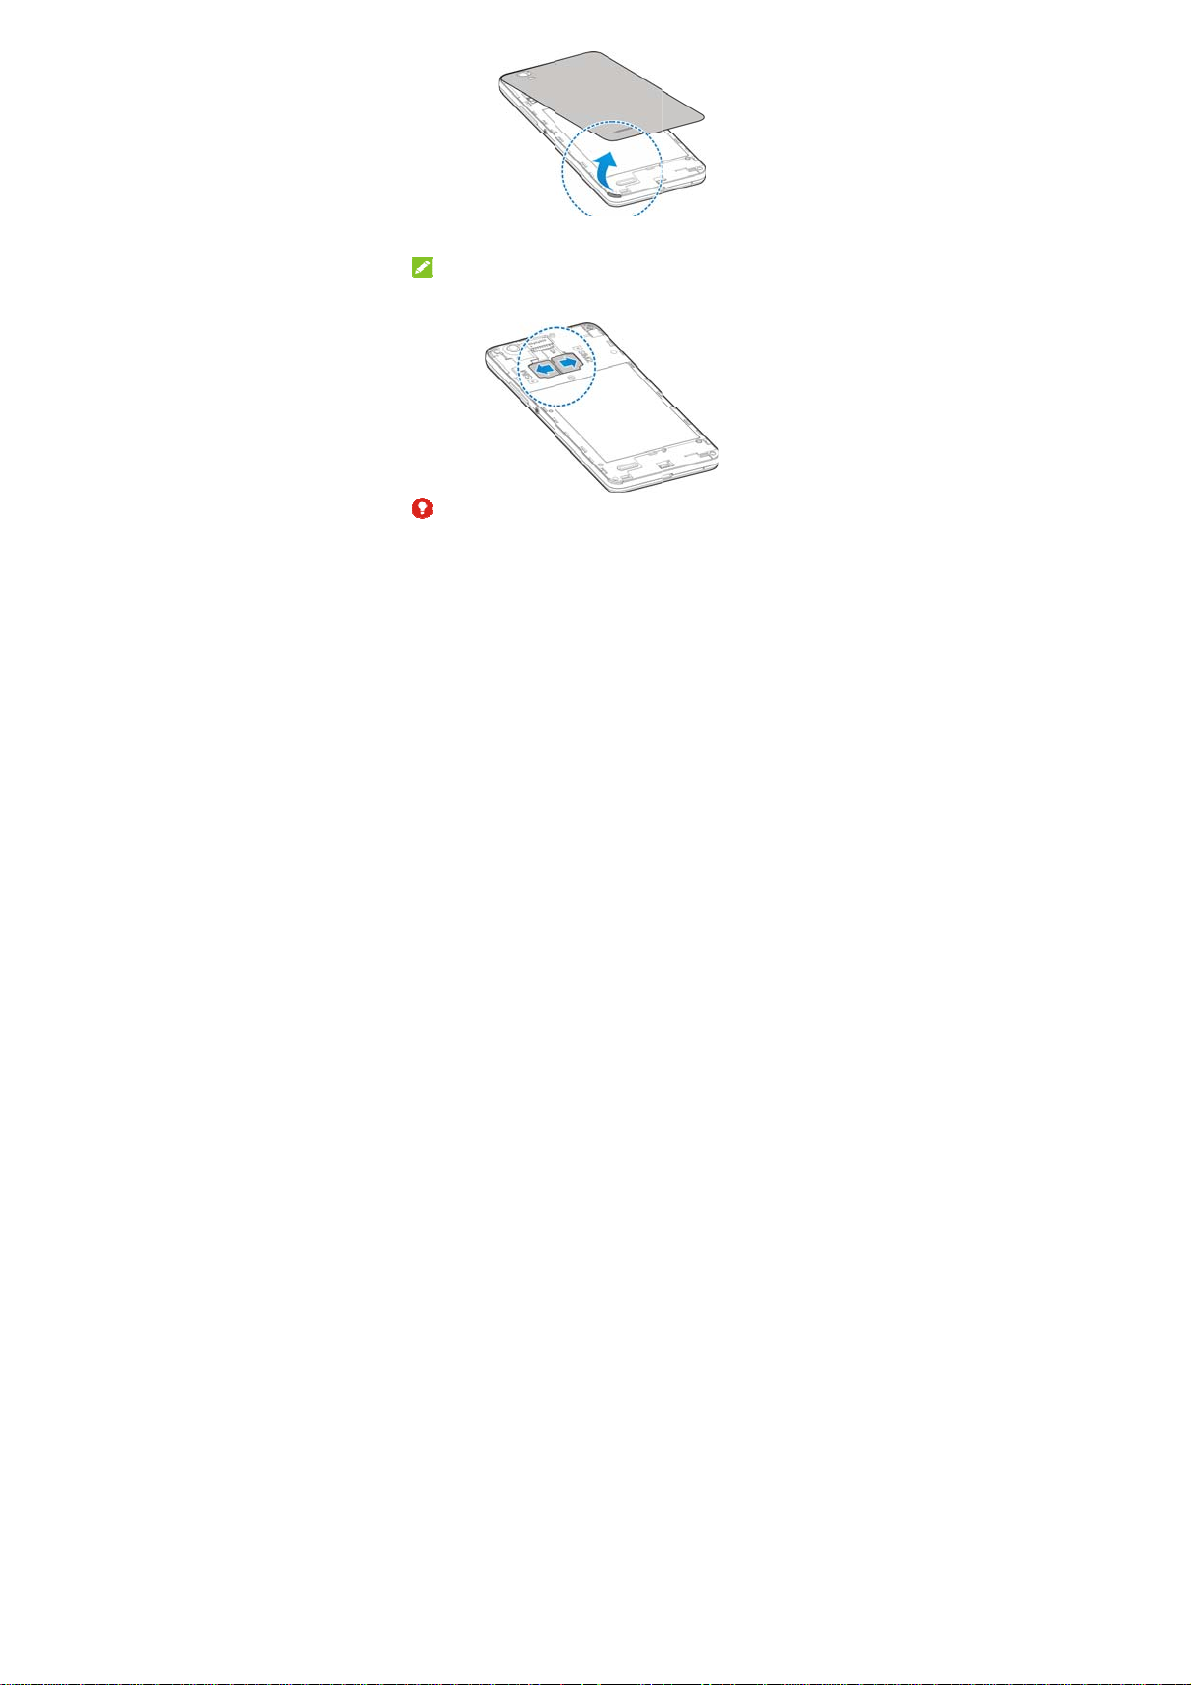
h
e
N
i
W
o
d
s
1
r
o
r
r
e
n
S
M
2. Hold t
slip th
The m
cards,
To av
or any
a stan
e micro-SIM card
m into the card ho
OTE:
cro-SIM card tray
while tray 2 suppo
ARNING!
id damage to the p
non-standard micr
ard micro-SIM ca
with the cut corne
lders.
supports GSM/W
ts GSM micro-SIM
hone, do not use a
-SIM cards cut fro
d from your servic
7
oriented as show
CDMA/LTE micro cards.
ny other kind of SI
m a SIM card. You
provider.
and
IM
cards,
can get
Page 8

e
o
o
i
D
n
u
p
p
s
i
h
t
i
s
e
r
s
a
t
e
e
e
e
a
3. Align th
back int
gaps ar
back cover with t
place. Ensure tha
und the cover.
e back of the phon
all the tabs are s
e and press the co
cure and there ar
ver
no
Install
The microS
turned on. U
1. Remove
2. Hold yo
slide it in
NO
Some a
data on i
you kee
unneces
3. Replace
Charg
ng the m
HC card can be in
mount the microS
the back cover.
r microSDHC card
.
TE:
plications may req
t and to work prop
a microSDHC ca
arily.
the back cover.
ng the B
croSDHC
talled and remov
DHC card before r
with the metal con
uire a microSDHC
rly. Therefore, it is
d installed and not
ttery
8
™ Card
d while the phone
moving it.
tacts facing down
card to store certai
recommended tha
remove or replace
is
nd
n
t
it
Page 9

When you
n
R
T
y
T
hphocha
p
w
g
o
h
g
r
o
f
h
n
E
e
t
e
y
r
o
e
o
e
this:
1. Conne
2. Conne
3. Disco
WA
Use only Z
accessorie
CAU
Do not cha
The batter
provider.
NO
If t
first get your new
ct the adapter to th
ct the charger to a
nect the charger
NING!
TE-approved char
s could damage y
ION:
nge the built-in rec
can only be chan
E:
e battery is extrem
ne even when it is
rging the phone fo
hone you’ll need t
e charging jack.
standard AC powe
hen the battery is
ers and cables. T
ur phone or cause
argeable battery i
ed by ZTE or ZT
ely low, you may b
being charged. In
at least 30 minut
9
charge the batter
outlet.
ully charged.
e use of unapprov
the battery to expl
your phone by yo
authorised servic
unable to power
his case, try again
s. Contact custom
like
ed
de.
urself.
n the
after
r
Page 10

service if you still cannot power on the phone after prolonged
charging.
The battery is not removable, do not remove the rear cover
please.
Press and hold the power key for about 10 seconds to force the
mobile phone restart.
Powering On/Off Your Phone
Ensure that the battery is charged.
● Press and hold the Power Key to turn on your phone.
● To turn it off, press and hold the Power Key to open the options menu.
Touch Power off and then touch OK.
You can also press and hold the Power Key for about 10 seconds to turn
off your phone.
Waking Up Your Phone
Your phone automatically goes into sleep mode when it is not in use for some
time. The display is turned off to save power and the keys are locked to
prevent accidental operations.
You can wake up your phone by turning on the display and unlocking the keys.
1. Press the Power Key to turn the screen on.
2. Swipe up any blank area of the screen to unlock.
NOTE:
If you have set an unlock pattern, a PIN or a password for your phone,
you’ll need to draw the pattern, or enter the PIN/password to unlock your
phone.
10
Page 11

Using the Touch Screen
Your phone’s touch screen enables you to control actions through a variety
of touch gestures.
Touch
When you want to type using the onscreen keyboard, select items
on the screen such as the application and settings icons, or press
the onscreen buttons, simply touch them with your finger.
Touch and Hold
To open the available options for an item (for example, a message or
link in a web page), touch and hold the item.
Swipe or Slide
To swipe or slide means to quickly drag your finger vertically or
horizontally across the screen.
11
Page 12

Drag
To drag, press and hold your finger with some pressure before you
start to move your finger. While dragging, do not release your finger
until you have reached the target position.
Pinch
In some apps (such as Maps, Browser, and Gallery), you can zoom
in and out by placing two fingers on the screen at once and pinching
them together (to zoom out) or spreading them apart (to zoom in).
12
Page 13

Rotate the screen
For most screens, you can automatically change the screen
orientation from portrait to landscape by turning the phone sideways.
13
Page 14

c
o
m
o
ovo
v
ede
u
u
u
I
v
a
d
h
n
n
c
o
e
t
o
e
s
o
r
a
x
m
Produ
t Safety
D
on’t make or recei
w
hile driving.
F
r body-worn oper
S
all parts may cau
Y
ur phone can pro
T
prevent possible
lume levels for lo
A
oid contact with a
K
ep away from pa
vices.
T
rn off when asked
T
rn off when told t
T
rn off when near
D
on’t use at gas sta
nformati
e phone calls whil
tions, maintain a
se choking.
uce a loud sound.
earing damage, d
g periods.
ything magnetic.
emakers and othe
to in hospitals and
on aircraft and at
xplosive materials
ions.
14
n
driving. Never te
eparation of 15 m
not listen at high
electronic medica
medical facilities.
irport.
or liquids.
t
.
l
Page 15

Your phone may produce a bright or flashing light.
Don’t dispose of your phone in fire.
Avoid extreme temperatures.
Avoid contact with liquids. Keep your phone dry.
Do not attempt to disassemble your phone.
Only use approved accessories.
Don’t rely on your phone as a primary device for emergency
communications.
15
Page 16

Radio Frequency (RF) Exposure
General Statement on RF Energy
Your phone contains a transmitter and a receiver. When it is ON, it
receives and transmits RF energy. When you communicate with your
phone, the system handling your call controls the power level at which
your phone transmits.
Body Worn Operation
Important safety information regarding radio frequency radiation (RF)
exposure:
To ensure compliance with RF exposure guidelines the phone must be
used with a minimum of 15 mm separation from the body.
Failure to observe these instructions could result in your RF exposure
exceeding the relevant guideline limits.
Limiting Exposure to Radio Frequency (RF) Fields
For individuals concerned about limiting their exposure to RF fields, the
World Health Organization (WHO) provides the following advice:
Precautionary measures: Present scientific information does not indicate
the need for any special precautions for the use of mobile phones. If
individuals are concerned, they might choose to limit their own or their
children’s RF exposure by limiting the length of calls, or using
‘hands-free’ devices to keep mobile phones away from the head and
16
Page 17

body.
Further information on this subject can be obtained from the WHO home
page http://www.who.int/peh-emf (WHO Fact sheet 193: June 2000).
Regulatory Information
The following approvals and notices apply in specific regions as noted.
Please find the section Declaration of RoHS Compliance and CE DOC in
the end of this manual.
Distraction
Driving
Full attention must be given to driving at all times in order to reduce the
risk of an acc ident. Using a phone while driving (even with a hands free kit)
can cause distraction and lead to an ac cid ent. Yo u m ust co mpl y with
local laws and regulations restricting the use of wireless devices while
driving.
Operating Machinery
Full attention must be given to operating machinery in order to reduce
the r isk of a n accident.
17
Page 18

Product Handling
General Statement on Handling and Use
You alone are responsible for how you use your phone and any
consequences of its use.
You must always turn off your phone wherever the use of a phone is
prohibited. Use of your phone is subject to safety measures designed to
protect users and their environment.
Always treat your phone and its accessories with care and keep it in a
clean and dust-free place.
Keep the screen and camera lens clean. Unclean screen or camera
lens may slow down the phone's reaction to your operations or lower
image quality.
Clean the device and its accessories with a soft material such as
cleaning cloth for eyeglass lenses. Do not use alcohol or other
corrosive substances for cleaning or allow them to get inside.
Do not expose your phone or its accessories to open flames or lit
tobacco products.
Do not expose your phone or its accessories to liquid, moisture or high
humidity.
Do not drop, throw or try to bend your phone or its accessories.
Do not paint your phone or its accessories.
Do not attempt to disassemble your phone or its accessories. Only
authorized personnel can do so.
Do not expose or use your phone or its accessories in a environment
with or that can reach extreme temperatures, minimum - [5] and
maximum + [50] degrees Celsius.
18
Page 19

Do not place your phone inside or near heating equipments or high
pressure containers, such as water heaters, microwave ovens, or hot
cooking utensils. Otherwise, your phone may be damaged.
Please check local regulations for disposal of electronic products.
Do not carry your phone in your back pocket as it could break when
you sit down.
Small Children
Do not leave your phone and its accessories within the reach of small
children or allow them to play with it.
They could hurt themselves or others, or could accidentally damage the
phone.
Your phone contains small parts with sharp edges that may cause an injury
or may become detached and create a choking hazard.
Demagnetization
To avoid the risk of demagnetization, do not allow electronic devices or
magnetic media to be close to your phone for a long time.
Electrostatic Discharge (ESD)
Do not touch the micro-SIM card’s metal connectors.
Antenna
Do not touch the antenna unnecessarily.
19
Page 20

Normal Use Position
When placing or receiving a phone call, hold your phone to your ear, with
the bottom towards your mouth.
Air B ags
Do not place a phone in the area over an air bag or in the air bag
deployment area as an airbag inflates with great force and serious injury
could result.
Store the phone safely before driving your vehicle.
Seizures/Blackouts
The phone can produce a bright or flashing light. A small percentage of
people may be susceptible to blackouts or seizures (even if they have
never had one before) when exposed to flashing lights or light patterns
such as when playing games or watching video. If you have experienced
seizures or blackouts or have a family history of such occurrences, please
consult a physician.
Repetitive Strain Injuries
To minimize the risk of Repetitive Strain Injury (RSI) when texting or playing
games with your phone:
Do not grip the phone too tightly.
Press the buttons lightly.
Use the special features which are designed to minimize the times of
pressing buttons, such as Message Templates and Predictive Text.
Take many breaks to stretch and relax.
20
Page 21

Emergency Calls
This phone, like any wireless phone, operates using radio signals, which
cannot guarantee connection in all conditions. Therefore, you must never
rely solely on any wireless phone for emergency communications.
Loud Noise
This phone is capable of producing loud noises, which may damage your
hearing. Turn down the volume before using headphones, Bluetooth stereo
headsets or other audio devices.
Phone Heating
Your phone may become warm during charging and during normal use.
Electrical Safety
Accessories
Use only approved accessories.
Do not connect with incompatible products or accessories.
Take care not to touch or allow metal objects, such as coins or key rings, to
contact or short-circuit in the battery terminals.
Never puncture the surface of the battery with sharp objects.
Connection to a Car
Seek professional advice when connecting a phone interface to the vehicle
21
Page 22

electrical system.
Faulty and Damaged Products
Do not attempt to disassemble the phone or its accessories.
Only qualified personnel can service or repair the phone or its accessories.
If your phone (or its accessories) has been submerged in water,
punctured, or subjected to a severe fall, do not use it until you have taken
it to be checked at an authorized service center.
Radio Frequency Interference
General Statement on Interference
Care must be taken when using the phone in close proximity to personal
medical devices, such as pacemakers and hearing aids.
Pacemakers
Pacemaker manufacturers recommend that a minimum separation of 15
cm be maintained between a mobile phone and a pacemaker to avoid
potential interference with the pacemaker. To achieve this, use the phone
on the opposite ear to your pacemaker and do not carry it in a breast
pocket.
Hearing Aids
People with hearing aids or other cochlear implants may experience
interfering noises when using wireless devices or when one is nearby.
22
Page 23

The level of interference will depend on the type of hearing device and the
distance from the interference source. Increasing the separation between
them may reduce the interference. You may also consult your hearing aid
manufacturer to discuss alternatives.
Medical Devices
Please consult your doctor and the device manufacturer to determine if
oper ati on of your phone may interfere with the operation of your medical
device.
Hospitals
Turn off your wireless device when requested to do so in hospitals,
clinics or health care facilities. These requests are designed to prevent
possible interference with sensitive medical equipment.
Aircraft
Turn off your wireless device whenever you are instructed to do so by
airport or airline staff.
Consult the airline staff about the use of wireless devices onboard the
aircraft. If your device offers a ‘flight mode’, this must be enabled prior to
boarding an aircraft.
Interference in Cars
Please note that because of possible interference with electronic
equipment, some vehicle manufacturers forbid the use of mobile phones
in their vehicles unless a hands-free kit with an external antenna is
23
Page 24

included in the installation.
Explosive Environments
Gas Stations and Explosive Atmospheres
In locations with potentially explosive atmospheres, obey all posted signs to
turn off wireless devices such as your phone or other radio equipment.
Areas with potentially explosive atmospheres include fueling areas, below
decks on boats, fuel or chemical transfer or storage facilities, and areas
where the air contains chemicals or particles, such as grain, dust, or metal
powders.
Blasting Caps and Areas
Power off your mobile phone or wireless device when in a blasting area
or in areas posted power off “two-way radios” or “electronic devices” to
avoid interfering with blasting operations.
Declaration of RoHS Compliance
To minimize the environmental impacts and take more responsibilities to
the earth we live on, this document shall serve as a formal declaration
that ZTE Blade A570 manufactured by ZTE CORPORATION is in
compliance with the Directive 2011/65/EU of the European Parliament -
RoHS (Restriction of Hazardous Substances) with respect to the
following substances:
1. Lead (Pb)
24
Page 25

r
u
a
o
o
n
o
o
s
e
E
u
c
e
o
a
o
o
c
e
f
c
R
w
c
e
o
f
c
n
y
n
u
e
o
1
d
f
n
2. Mercu
3. Cadmi
4. Hexav
5. Polybr
6. Polybr
ZTE Blade
requireme
Disp
For this pr
send an e-
y (Hg)
m (Cd)
lent Chromium (C
minated biphenyl
minated diphenyl
A570 manufactur
ts of EU 2011/65/
sal of Yo
1.
Whe
atta
cov
2. All el
disp
stre
app
auth
3. The
help
the
duct’s recycling in
mail to weee@zte.
r (VI))
(PBBs)
ethers (PBDEs)
d by ZTE CORPO
U.
r Old Ap
n this crossed-out
hed to a product,
red by the Europ
ectrical and electr
sed of separately
m via designated
inted by the gover
rities.
orrect disposal of
prevent potential
nvironment and h
ormation based on
om.cn
25
ATION, meets th
pliance
heeled bin symb
it means the produ
an Directive 2012/
nic products shoul
rom the municipal
ollection facilities
ment or the local
our old appliance
egative conseque
man health.
WEEE directive, p
l is
ct is
9/EU.
be
waste
will
ces for
lease
Page 26

Labeling requirements
This device complies with part 15 of the FCC Rules. Operation is subject
to the following two conditions: (1) This device may not cause harmful
interference, and (2) this device must accept any interference received,
including interference that may cause undesired operation.
Information to user.
Any Changes or modifications not expressly approved by the party
responsible for compliance could void the user's authority to operate the
equipment.
Information to the user.
Note: This equipment has been tested and found to comply with the
limits for a Class B digital device, pursuant to part 15 of the FCC Rules.
These limits are designed to provide reasonable protection against
harmful interference in a residential installation. This equipment
generates uses and can radiate radio frequency energy and, if not
installed and used in accordance with the instructions, may cause
harmful interference to radio communications. However, there is no
guarantee that interference will not occur in a particular installation. If this
equipment does cause harmful interference to radio or television
reception, which can be determined by turning the equipment off and on,
the user is encouraged to try to correct the interference by one or more
26
Page 27

of the following measures:
-Reorient or relocate the receiving antenna.
-Increase the separation between theequipment and receiver.
-Connect the equipment into an outlet on a circuit different from that to
which the receiver is connected.
-Consult the dealer or an experienced radio/TV technician for help.
Specific Absorption Rate (SAR)
information:
This wireless phone meets the government's requirements for exposure
to radio waves. The guidelines are based on standards that were
developed by independent scientific organizations through periodic and
thorough evaluation of scientific studies. The standards include a
substantial safety margin designed to assure the safety of all persons
regardless of age or health.
FCC RF Exposure Information and Statement The SAR limit of USA
(FCC) is 1.6 W/kg averaged over one gram of tissue. Device types:
mobile phone (FCC ID: SRQ-BLADEA570) has also been tested against
this SAR limit. The highest SAR value reported under this standard
during product certification for use close to head is 1.306W/kg and close
to human body is 1.412W/kg. This device was tested for typical body
operations at 1.0cm from the body. The use of accessories that do not
satisfy these requirements may not comply with FCC RF exposure
requirements, and should be avoided.
27
Page 28

Body Operation
This device was tested for typical body-worn operations. To comply with
RF exposure requirements, a minimum separation distance of 1.0cm
must be maintained between the user’s body and the device, including
the antenna. Third-party belt-clips, holsters, and similar accessories
used by this device should not contain any metallic components. Body
accessories that do not meet these requirements may not comply with
RF exposure requirements and should be avoided. Use only the
supplied or an approved antenna.
28
 Loading...