

Page 1

HC4900 Load Moment Indicator
User Manual
Edition 6 / Aug, 2014
For Zoomlion RT Crane
With 5-section boom
Page 2

Copyright
©2010 by Hirschmann Electronics
(
Shanghai)Co., Ltd
This document contains propriety information which is protected by copyright
law. All rights reserved. The manual may not be copied, reproduced or
translated into another language, neither whole nor in part, without advance
written authorization from Hirschmann.
Edition 6 on Aug 2014
Reproductions must abide by the copyright law.
Declaration
The manufacturer reserves the right to modify the contents of this manual without
notice.
Hirschmann offers no guarantee whatsoever for this material, including guarantees with
reference to commercial availability and suitability for particular applications.
Hirschmann shall not be liable for errors contained herein or for identical or
consequential damages in connection with the furnishing, performance, or use of this
manual.
Hirschmann Electronics(Shanghai)Co., Ltd
Suite 10K, Huamin Empire Plaza, No.728, West Yan An Road, Shanghai, P.R.China
Tel: 021-51082780
Fax: 021-52375899
Zip code: 200050
Website: http://www.hirschmann-ac.com
Page 3

Catalogue
1. GENERAL INFORMATION ............................................................................ - 1 -
2. WARNING.......................................................................................................... - 2 -
3. SYSTEM CONFIGURATION .................................................................................. - 3 -
3.1 HC4900 C
3.2 IC4600 C
3.3 DAVS P
ONTROLLER
ONSOLE
RESSURE TRANSDUCER
.................................................................................... - 4 -
........................................................................................... - 4 -
.......................................................................... - 5 -
3.3.1 Technical data ................................................................................... - 5 -
3.3.2 Installation ........................................................................................ - 5 -
3.4 LWG208 L
ENGTH/ANGLE SENSOR
........................................................... - 6 -
3.4.1 Technical data ................................................................................... - 6 -
3.4.2 Installation ........................................................................................ - 6 -
3.5 A
NTI-TWO BLOCK SWITCH
........................................................................ - 8 -
3.5.2 Installation..................................................................................... - 9 -
4
....
OPERATION AND DISPLAY INTERFACE ............................................................ - 10 -
4.1 D
ATA DISPLAY INTERFACE
4.2 U
TILIZATION DISPLAY (BAR GRAPH
4.3 I
NDICATOR LIGHT
..................................................................................... - 13 -
((((
VALUES ARE NOT REAL
)......................................................... - 13 -
))))
........................... - 11 -
5. OPERATION METHOD ...................................................................................... - 15 -
Page 4

5.1 F
UNCTION SETTING
.................................................................................. - 16 -
5.2 OM S
5.3 R
5.4 E
5.5 B
5.6 C
ETUP
.............................................................................................. - 19 -
EEVING SETUP
RROR CODE REFERENCE TABLE
UZZER STOPPING
HANGE CYLINDER
...................................................................................... - 20 -
.................................................................................. - 22 -
................................................................................. - 22 -
........................................................... - 21 -
6. LMI SYSTEM FUNCTIONS ................................................................................. - 24 -
6.1 W
6.2 P
ARNING
ROHIBITION
................................................................................................ - 24 -
........................................................................................... - 24 -
7 DAILY MAINTENANCE AND CALIBRATIONS ....................................................... - 25 -
7.1 M
AINTENANCE
7.2 L
ENGTH SENSOR ADJUSTMENT
7.3 A
NGLE SENSOR ADJUSTMENT
7.4 B
UZZER ALARMING
......................................................................................... - 25 -
............................................................... - 25 -
................................................................. - 26 -
.................................................................................. - 26 -
7.5 L
ENGTH CABLE RETRACT UN-SMOOTHLY
7.6 Q
UESTION AND ANSWER
......................................................................... - 27 -
................................................ - 27 -
8. HINTS AND TROUBLE SHOOTING ..................................................................... - 29 -
9. HC4900 CONNECTING DIAGRAM ..................................................................... - 35 -
10. OM LIST .............................................................................................. - 36 -
Page 5

1. GENERAL INFORMATION
HC4900 Load Moment Indicator (LMI) provides effective information to
operators, which will assist an operator maintain a machine to work within its
design parameters. LMI provides the operator with the information of the length
and angle of the boom, tip height, working radius, rated load and the actual
load weight and so on.
Using various sensing devices, the load moment indicator monitors machine’s
various operational functions and provides the operator with a continuous
reading of the machine’s capacity. The readings change continuously in
response to the different operations of the machine.
If forbidden conditions are approached, the HC4900 Load Moment Indicator will
warn the operator by sounding an audible alarm, lighting a warning light and
locking out those functions that may aggravate the machine’s condition.
This user manual is used for Zoomlion RT crane with a 4-section boom.
- 1 -
Page 6
Caution
Warning
Warning
Caution
2. WARNING
The LMI control system is used to assist in the safe operation of the crane by
warning crane operator of approaching overload conditions and of over-hoist
conditions that could cause damage to equipment and personnel.
The device is not, and shall not, be a substitute for good operator judgment,
experience and use of accepted safe machine operating procedures.
Safe operation is the responsibility for every machine operator. Every
machine operator must ensure that they read all warnings and
instructions carefully and fully understand the contents. Correct operation
depends on daily careful checking and serious study of the Manual.
The LMI is not able to provide aid to the machine operator unless it has
been properly adjusted and unless the correct load capacity chart and
the correct operating code have been entered for the respective rigging
configuration. The correctness of the LMI setups must be ensured before
beginning machine work in order to avoid damage to property and severe
or even fatal injuries to personnel
If the LMI fails or is not functioning properly, stop the operation of the
crane immediately and contact an expert service engineer. Hirschmann
Electronics Co., Ltd. does not assume any responsibility for undesirable
consequences resulting from continued use of the crane if the LMI is not
functioning!
Hirschmann Electronics Co.,Ltd. shall not be liable for damages caused
by welding crane without power off the controller.
Hirschmann Electronics Co.,Ltd. shall not be liable for damages caused
by power on the controller at a thunderstorm weather.
- 2 -
Page 7
3. SYSTEM CONFIGURATION
HC4900 LMI System configuration
Cable
Connection
HC4900 LMI system comprises a HC 4900 central unit with an IC 4600 console
together with various sensors to record the measured values.
The system operates on the principle of reference/real comparison. The actual
value is compared with the calculated reference values and evaluated by the
system. An overload warning signal is triggered on the display and operating
console once limit values are reached. All machine movements that increase
the load moment are switched off at the same time.
The crane-specific data specified by the manufacturer, such as load capacity
charts, boom weights, centers of gravity and dimensions, are stored in the
central data memory. This data is the reference information used to calculate
the operating conditions. The boom angle and length is measured by means of
length and angle sensors that are mounted on the boom. The crane load is
determined indirectly with the aid of pressure transducers.
- 3 -
Page 8
3.1 HC4900 Controller
HC4900 controller features high-performance, precise and limiting load
moment function in harsh environment.
Technical data
::::
System clock: 40MHz
Program memory: 16MB Flash
Protection class: IP65
Communication interface:
1×CANopen1×RS232
Operating voltage: 12V~30VDC
Operating temperature: -20°C
~
+70°C
HC4900 controller dimension Storing temperature:-30°C
~
+80°C
3.2 IC4600 Console
IC 4600 monochrome console is designed for outdoor construction vehicles
and mobile machinery. It complies with international standards for
environmental testing, EMC testing, and CE certification. Its easy programming,
convenient online debugging, and rich paint library functions (point, line, arc,
rectangle, progress bar, virtual instrument panel, such as function) help you to
more efficiently understand and utilize the LMI system.
Technical data:
Operating voltage: 12~36VDC
Operating temperature: -20°C~+70°C
Storing temperature: -30°C~+80°C
Resolution: 320*240(monochrome)
Communication interface: 1×RS232,
1×CANopen
Protection class: Front IP65 Back IP44
IC4600 Console dimension
- 4 -
Page 9

3.3 DAVS Pressure transducer
DAVS pressure transducers measure high static and dynamic pressure
values of liquids or gases in rough operating environment. Measurement
precision is maintained even during continuous operation at extremely dynamic
pressure. The oil pressure transducer comes with a pressure connector with
standardized G1/4 thread or other hydraulic connectors.
3.3.1 Technical data
Operating voltage: 8~32VDC
Signal: CANopen
Operating temperature:-40°C~+85°C
Storing temperature: -40°C~+100°C
Protection class: IP67
Life expectancy: >10 million cycles
Hysteresis tolerance: 〈±0.1%FS max.
DAVS Dimension
3.3.2 Installation
Please notice the location of hydraulic piping and valve when installing the
pressure transducer. By thread connection (such as follow graph), screw the
pressure transducer in the hydraulic piping or seat of the balancing valves or
hydraulic valves. Add the appropriate seal to the display to prevent oil leakage.
Guarantee the installation position is safe and easy for cable connecting. Make
sure the pressure sensor and hydraulic adaptor connect tightly. The tightening
moment of G1/4 connector is 20Nm
Pressure transducer installation Connector pin assignment
- 5 -
Page 10
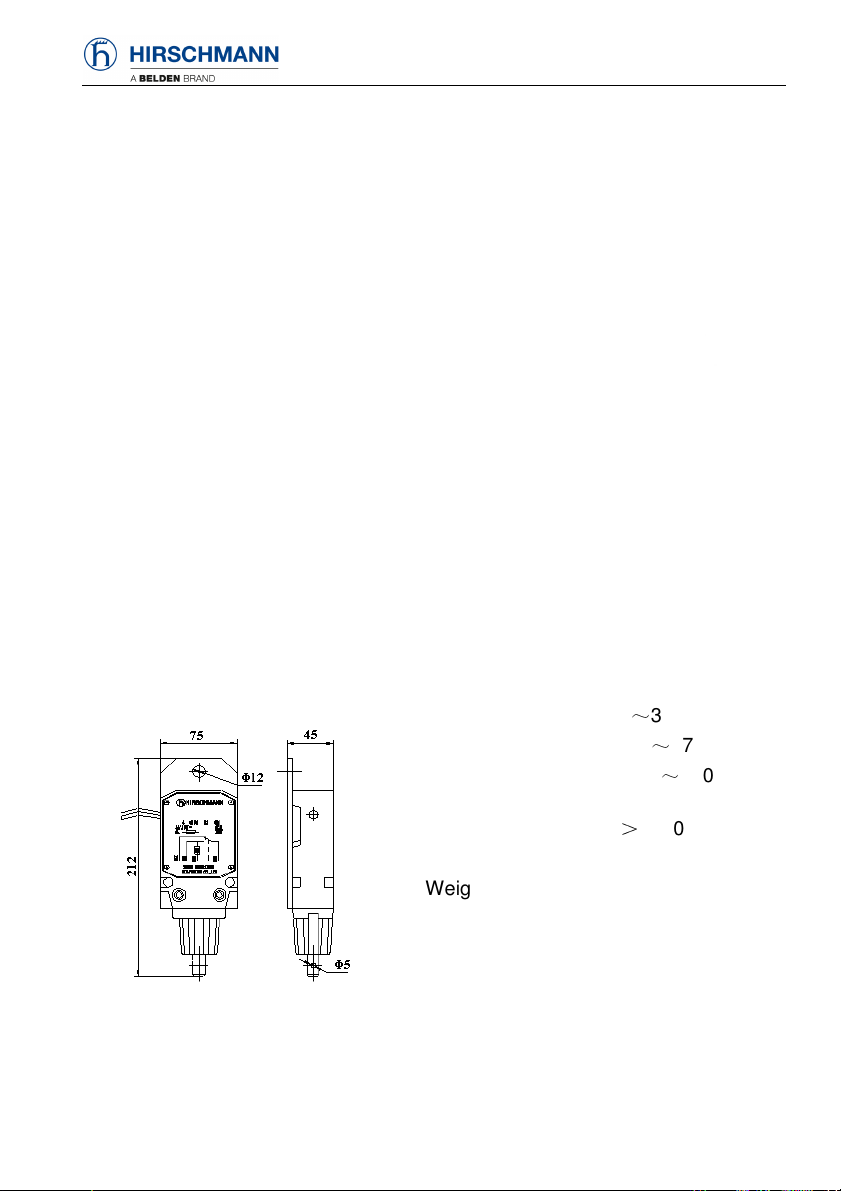
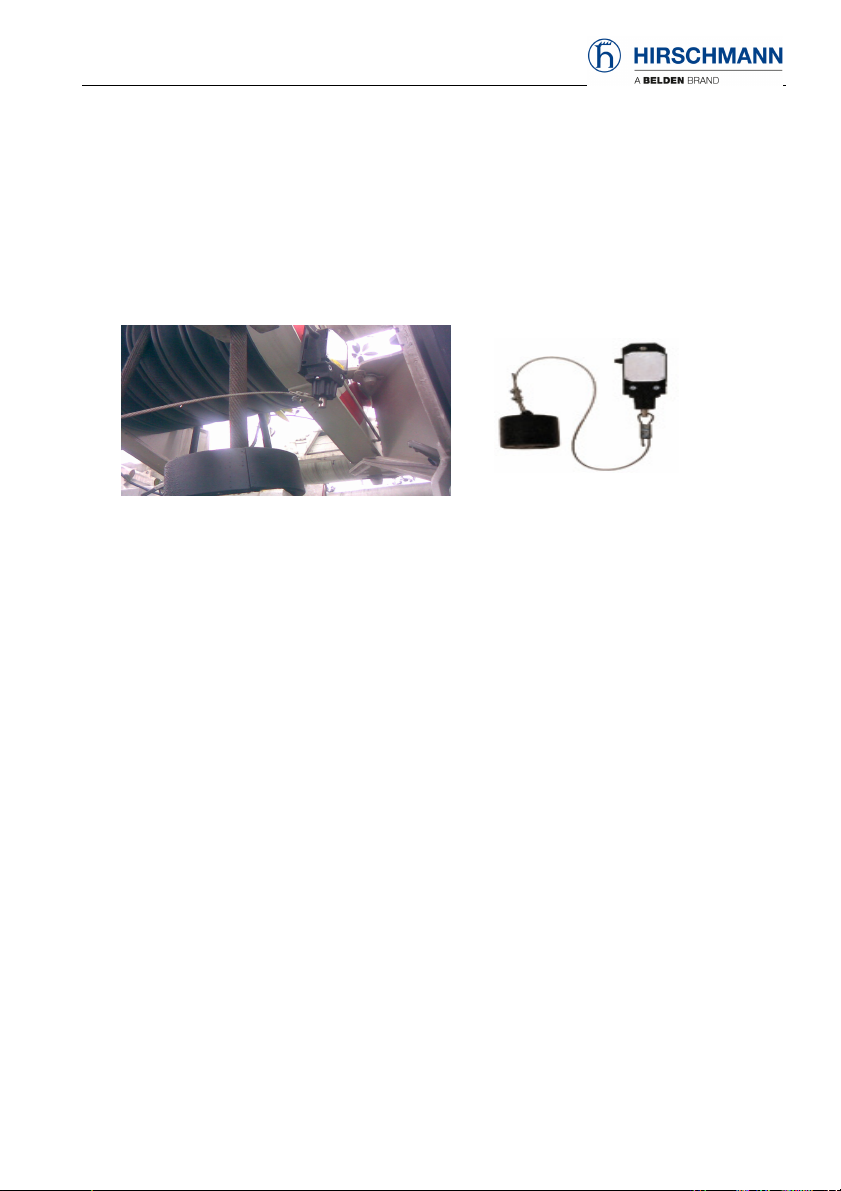
3.4 LWG208 Length/Angle sensor
LWG series Length/Angle sensor can be directly installed and can precisely
measure the angle and the length of boom with largest measurement length of
fifty meters. The sealed housing protects the inside components from water
inclusion, humidity etc.
3.4.1 Technical data
Operating voltage:
Operating temperature
15~30VDC
: -25
°C
~
+75°C
Storing temperature
: -40
°C
~
+80°C
Protection class
Linearity tolerance
: IP65
: 〈±0.2°
Resolution: 〈±0.1°
Hysteresis tolerance:
LWG208 Length/angle sensor dimension
〈
±0.1°
3.4.2 Installation
Length/Angle sensor is installed on the main boom. Manufacturers can fix the
bracket of the sensor to the crane boom by welding tap blocks and bolting it in
place. When installing the sensor, the position shall be well considered, generally
along the foot points of boom to the top direction. The sensor (left type) is typically
installed on the left of the boom (aligned with the cab) to leave room for the fly (jib)
on the right side of the boom. The sensor can be located on the right side as
required. The cover can be turned 180° to put the PAT name facing upward.
- 6 -
Page 11
A
Bracket
LWG208 Length/angle sensor installation
Length/Angle sensor consists of housing, a spring-loaded cable drum with
measuring cable and mounting equipment.
Make the boom horizontal. Make sure the sensor is parallel with the main
boom and the bracket is straight before fixing the bracket by bolts.
Make sure there are at least two turns measuring cable in the drum when
the cable is pulled out. The recommended length of the cable = effective
needed measure length + two turns cable+ about 1 meter cable for
connection.
The cable drum of the sensor must rotate following the direction of the
cable being pulled out. Rotate the cable drum 4 to 5 turns to pre-tighten
the drum and then pull out the cable to the tip of the boom for connection.
Use the guiding wheel to keep the measuring cable at the same level.
Place guiding wheels so as to prevent cable deflection, which will result in
the cable being difficult to pull out and to retract smoothly:
o Make sure the first guiding wheel A is in front of the sensor center
1.5m~2m. Ensure the guiding wheel turn width is slightly less than or
equal to the cable drum turn width.
o Make sure the center of the cable guiding wheel A and other wheels
are in alignment and also parallel with the main boom.
The measuring cable should be fixed to the tip of the boom tightly and the
- 7 -
Page 12
fixed point should be at the same level with the sensor center to guarantee
the cable is parallel with the boom.
The Length/Angle sensor sometimes needs to be adjusted. Press the
cable drum line to make the cable drum plane parallel with the boom plane.
Rotate the cable drum and observe until the swing get smaller amplitude.
If the cable drum swing too much because of the shape distortion and
can’t be adjust, please stop the installation and repair or replace the
Length/Angle sensor.
Make sure the spring force of the measuring cable is sufficient and the
cable drum is rotating smoothly after installation is completed.
If the measuring cable is already at the pre-tighten length when boom is
retracted, the pre-tighten turns can be reduced.
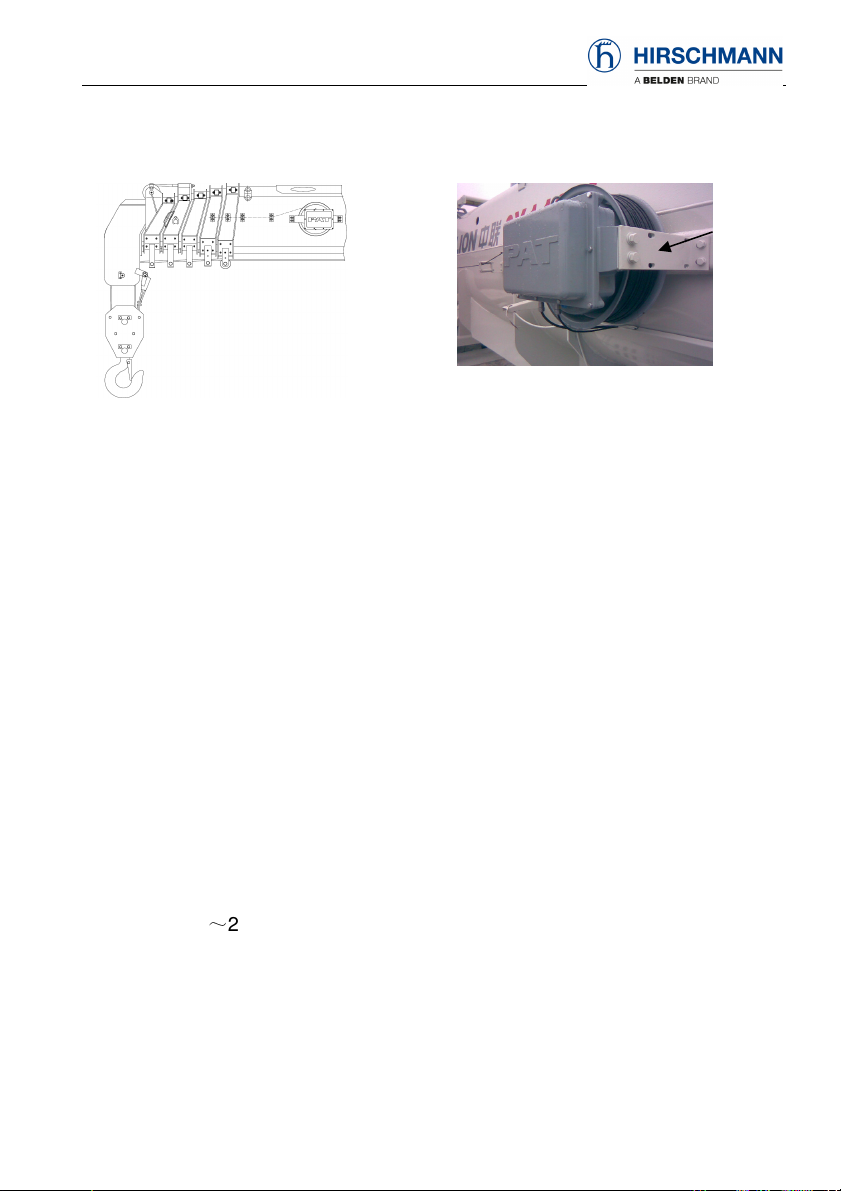
3.5 Anti-two Block Switch
Anti-Two Block Switch is a normally open limit switch for winches, lifting devices
and cranes. It is a simple, direct installation and compact design. The sealed
housing protects the inside components from water inclusion, humidity etc.
3.5.1 Technical data
Operating voltage: 15~30V
Operating voltage: -25V~+70V
Storing temperature: -40℃~+70 ℃
Protection class: IP67
Life expectancy: >5×10⁶ times
Housing: aluminum
Weight: 1.2kg
A2B Switch dimension
- 8 -
Page 13
3.5.2 Installation
The switch should be installed on the side of boom head where the beginning of
the lifting rope is fixed. Make sure the hammer is connected to the lifting rope and
is free to actuate the switch.
The signal connector and cable must be waterproof and connected correctly.
A2B Switch installation diagram
- 9 -
Page 14

4
1 2
3
5
4....OPERATION AND DISPLAY INTERFACE
1. Data display(background lit)
2. Bar graph(utilization)
3. Indicator light (refer to 4.3)
4. Function keys:Function keys F1-F5 are related to the key symbols
which present on the display
5. Numerical keys:They can be used to input values or select function
items in accordance with the number on the display.
Note
::::
At the main interface, numerical key 1 and 3 can calibrate the
brightness of the console.
Operation notice:
1. OM can only be switched when the boom is fully retracted.
- 10 -
Page 15

1
5
11
4
6
7
2
3
14
13
9
1
6
18
15
8
10
12
19
a
b
c
d
e
2.
Under the load lifting status of the RT crane, the OM switch between
360 lifting and front lifting is automatically done by the LMI based on
the rotating field of the boom.
3. LMI bypass icon will be displayed on main interface if bypass switch
is activated. The status will be displayed for 30 minutes and then
automatically close. To cancel the LMI bypass condition, deactivate
the bypass signal.
4.1 Data display interface(values are not real)
The Data display (320×240) is an LED display with background illumination and
extended temperature range, on which essential data are displayed. The data
is dependent on the operating mode, such as load values, geometry and crane
data, symbols, etc.
17
Main interface
(values shown are for illustration):
- 11 -
Page 16

Data display:
1. Load moment percentage bar graph
2. Load moment percentage displayed value
3. OM code
4. Reeving
5. Rotary angle
6. Outrigger mode
7. Rid pressure
8. Piston pressure
9. Operating height
10. Time (error code will be displayed when defect)
11. Wind speed
12. Fixed jib boom length
13. Main boom length
14. Main boom angle
15. Fixed jib boom angle
16. Rated load capacity
17. Actual load
18. Working radius
19. Enforced icon (OEM special requirement)
Icon Key symbols definition:
a. Function setting key (refer to 5.1)
b. OM setting key (refer to 5.2)
c. Reeving setting key (refer to 5.3) OM setting key
d. Error code information key (refer to 5.4)
e. Alarm off key (refer to 5.5)
- 12 -
Page 17

4.2 Utilization display (bar graph)
The Utilization display (bar graph) indicates how much of the admissible load
moment (rated moment) is used. As the rated moment changes constantly
during load operation, the load moment display also changes constantly.
The utilization display is marked with differently colored fields:
Green: "Safe” operation (0...90% of rated moment)
Yellow: “Pre-warning range” (90...100% of rated moment)
Red: “Overload range” (> 100% of rated moment
)
4.3 Indicator light
Pre-warning lights
This yellow pre-warning light comes up when the load on the
machine amounts to more than 90% of the respective maximum
carrying capacity, which indicates that an overload situation is
immediately pending.
For the operator, this means that the machine work can
continue only with the greatest amount of caution.
Overload warning light
This red Overload warning light indicates to the machine
STOP
STOP
STOPSTOP
A2B switch lamp (if the machine need)
operator that an overload condition has occurred. It lights up
when the crane load has reached 100% of maximum load
carrying capacity permitted for the current operating status.
The acoustic alarm sounds. The load-moment-increasing crane
movements are switched off at the same time
This red warning light lights up when the A2B (hoist limit) switch
contacts open, i.e. when a hoist limit situation has occurred. The
- 13 -
Page 18

acoustic alarm sounds and load-moment-increasing machine
movements are switched off at the same time.
An A2B (hoist limit) situation occurs when the hook block comes into contact
with the boom head. The danger exists in such situations that the hoist rope
will break, causing the load to fall. A hoist limit situation could arise from the
load being pulled against the boom head or from the boom being extended or
lowered without the hoist rope having been allowed to slacken.
Test method as below
::::
Manually lifting the weight attached to the A2B switches, then the audible
alarm sound and the A2B alarm light will light.
Slowly raise the hook or lower the boom or extend (telescope) the boom to
create a potential two-block condition, when the hook lifts the weight, the
audible alarm sound, the A2B alarm light will light and the crane movement
such as hoist up, luffing down, telescopic out will be stopped.
If the light and audible alarm does not function as described and the crane
movements are not stopped, the system is not working properly. The
malfunction shall be corrected before operating the crane.
- 14 -
Page 19

5. Operation method
With proper adjustments, the LMI will start to work automatically. The crane
operator must be very familiar with the operation of LMI system and correctly
adjust it before operating the crane. Below is a diagram of the startup screens.
Power On
If all system checks are okay, then after pushing Y (F5 button), the Set
Operating Mode screen will come up.
If OM is set correctly, push Y (F3 button) to confirm, then ◄┘(F5 button) to
return to main screen. Otherwise set OM according to section 5.2.
Push Y to
continue
- 15 -
Page 20

5.1 Function setting
Press F1 key at the main display to enter into Function setup display
F3
:
Switch between Metric and
Imperial units
F4
:
Switch between English and
Chinese language
F5:Back to the main interface
Numerical key 1:Time setting
Numerical key 2:CANbus status
query
Numerical key 3:OM code query
Function setting interface Numerical key 4:Oil pressure node
setting
In the metric display, the unit of length is “m” (meters) and the unit of weight is
“t” (metric ton). In the imperial display, the unit of length is “ft” (feet) and the unit
of weight is “kips” (lbs. x 1000). Metric and Imperial conversion relationship: 1
m = 3.2808 feet; 1 kg = 2.20462 pounds
:
- 16 -
Page 21

Time and date setup
Press numerical key 1 at the Function setup display to enter into time and date
setup display:
F1: Cursor up to select year month
date hour and minute items.
F2: Cursor down to select year month
date hour and minute items.
Input correct value of selected
items by “numerical keys”
F3: Confirm all entres (The current
time and date would change into
the new setting ones)
F4: Reset the selected item zero
Time and date interface F5: Back to the previous interface
CAN bus status query
Press numerical key 2 at the Function setup display to enter into CANbus
status overview display:
The “CAN bus status display” show
CAN communication status of all the
LMI components and the meanings of
the status symbol. When any node is
fault, Operators can quickly find out
the defective node and defective
reasons.
CAN bus status query interface
F5:Back to the previous interface
- 17 -
Page 22

OM code query
Press numerical key 3 at the Function setup display to enter into OM code
information display (please use the displayed actual data on console
Operators can find OM code
information in accordance with every
different crane operating mode, which
offer great help for OM setup.
F1: Enter into OM setup display
(refer to 5.2)
F5: Back to the previous interface
OM code query interface
The OM Code is comprised of four digits – ABCD
A – Outrigger and Tire Configuration – number is automatically assigned
during OM Setup (refer to section 10 for OM List).
B – Swing Angle – number is automatically assigned based on input
from swing angle sensor.
0 – Swing angle is greater than 3° but less than 357°
1 – Swing angle is between 357° and 3°
NOTE: Number in B position will automatically change based on swing
angle.
C&D – Boom Configuration (refer to section 10 for OM List
)
):
- 18 -
Page 23

5.2 OM Setup
Since the working conditions of the crane are different, the LMI must be set up
to represent the actual configuration of the crane. To do that, the LMI must be
configured into a reprentative Operating Mode (OM) code. Before operating the
crane, find out the matched OM code according to the crane type and the
actual configuration, then enter the appropriate information into the LMI for: A)
outrigger configuration, B) parts of line of the hookblock being used and C)
boom configuration.
WARNING
Correctly setting the OM guarantees the proper function of the system and
the crane. Only operators who are thoroughly familiar with the crane and the
operation of the system are qualified for the setting the OM codes. Improperly
setting the OM code in the LMI will result in false readings being displayed,
which can lead to a serious accident occuring.
F1: Select outrigger / tire
configuration
F2: Select static load lifting or creep
on tires
F3: Confirm OM code (After
confirmation Current OM will
change to Set OM)
F4: Reset the OM code to zero
F5: Back to the main display
OM setup interface
Push N (F4 button) to reset the OM code. Push Y (F3 button) once the proper
configuration has been selected. See following page for outrigger / tire
configuration & static load lifting or creep on tires setup. Refer to section 10 for
- 19 -
Page 24

OM code table to look up proper code to enter for the boom configuration.
Outrigger / Tire Configuration
Push F1 to scroll through and select appropriate outrigger and tire
configurations.
∗ On tires (No need for outriggers)
NOTE: F2 must be set for either static lifting or creep, if “On tires”
configuration is selected.
∗ On outriggers, extend to 0% (fully retracted)
∗ On outriggers, extend for 50% (half extended)
∗ On outriggers, extend for 100% (fully extended)
Static Load Lifting or Creep on Tires
Push F2 to scroll to either Static Load Lifting or Creep on Tires.
NOTE: If an incorrect OM code is entered, Current OM code will change to
BBBB. If this occurs, push N (F4 button) and enter a permissible code. An
example of this is if On Tires and Creep are selected, but the swing angle is
not ±3°, then Current OM will change to BBBB and error message will occur.
5.3 Reeving setup
Reeving setting is to adjust the LMI reeving eaqul to the lifting cable of the cane.
Operators shall carefully adjust the displayed reeving equal to the actual
reeving before start to work.
The Reeving must be set equal to the actual Reeving, otherwise the LMI
may not be able to work properly.
- 20 -
WARNING
Page 25

Press F4 key at the main display to enter into Reeving setup display.
F3:Confirm Reeving (After
confirmation, Current REEV will
change to New Reev setting)
F4:Reset the Reeving to zero.
F5:Back to the main display
Reeving setup interface
Set Reev interface
To change reave setting (parts of line of chosen hookblock), push N (F4 button)
to reset. Then enter the proper parts of the line of the chosen hookblock (using
numeric keys). Press Y (F3 button) to confirm change. NOTE: Current REEV
will change to New Reev setting. Push ◄┘ (F5 button) to return to screen.
5.4 Error Code Reference Table
When the system is malfunction, the error code will appear at the main
display.Through the error code information in the table, crane operators and
service engineers can better understand what the error code stands for, and
quickly find out the fault reasons and suggested solutions.
Press F4 key at the main display to enter into error code informatoin display
F3
:
Scroll up for the previous error
code information
F4:
Scroll down for the next error
code information
F5
:
Back to the main interface
Error code query interface
:
- 21 -
Page 26

5.5 Buzzer stopping
The buzzer of HC4900 console will alarm at the following situation:
Actual load exceeds the max. rated load moment
The hook is approaching height limitation (A2B fault)
Exceed the operating range of the crane
LMI system defective
Operation fault
Press F5 to stop the buzzer alarming
temporarily
Main interface
。
5.6 Change Cylinder
When the first cylinder extends to the maximum length, the following page is
displayed.
F2
:
Confirm changing the cylinder
F4
:
Cancel changing the cylinder
F5:
Stop the buzzer alarming
temporarily
- 22 -
Page 27

The audible alarm is only temporarily silenced. The fault that caused the
CAUTION
alarm to go off still exists and should be corrected immediately. The alarm
will sound again if fault is not corrected or if a new fault is detected.
- 23 -
Page 28

6. LMI System Functions
6.1 Warning
Under any below conditions, HC4900 LMI system will light up and send out
alarm for warning.
The crane is overload or exceed operating range
The hook approaching height limitation
Malfunction
6.2 Prohibition
If a fault occurs, the LMI system will send alarm warning and all of the following
crane’s movements will be prohibited:
Boom luffing down
Telescope out
Hoist up
At this moment only the movements toward safe direction are allowed:
Boom luffing up
Boom retract
Hoist down
When the cut-off device is activated this cut-off signal will always keep
be out. Functions such as “dangerous direction operation is not allowed”,
“only safe direction operation is allowed” is realized by cooperating with
the crane’s electronics system which including “ safe direction inspect
switch”, “safe overflow solenoid valve” etc. The LMI system cannot judge
the operation is safe or dangerous itself.
- 24 -
CAUTION
Page 29

7 Daily maintenance and calibrations
Please maintain and adjust as follows and contact us if you have any
questions.
7.1 Maintenance
Maintenance items listed below should be done daily.
Check all components of the LMI system to make sure no cable is
damaged or broken.
Check the insulating layer of all the cables. If the insulating layer or the
wire inside damaged, please replace new one immediately.
Check the pressure transducers at the luffing cylinder and the connection
hoses for oil leakage.
Check the cable reel wire for sufficient tension.
Check the cable reel mounting & torsion spring for proper function.
Check the angle transducer for oil leakage.
7.2 Length sensor adjustment
When the displayed boom length is not correct (exceed the permitted error
ranges), please adjust as follows:
Retract the boom to the basic boom condition and check the pre-stressing force
of the cable reel (cable must be tight)and then open the cover of the
length/angle sensor (cable reel) and turn the axle of the length potentiometer
slowly( see arrow mark) till the displayed value to be the same with the actual
length.
Length sensor adjustment
((((
see arrow above
))))
- 25 -
Page 30

7.3 Angle sensor adjustment
The angle sensor is installed in the same house with the length sensor.
First, retract the boom and make sure the length displayed is equal to the
actual. Use the angle instrument to measure if the displayed value is the same
when the actual angle is between 0°and 70° whether the displayed value is the
same or use the tape to measure the working radius. If the displayed value or
radius is not the same with the actual value, operators should adjust the angle
sensor. Lose the 3 bolts (see the following pic.). Slowly turn the angle sensor till
the displayed value accords with the actual value and then tight the 3 bolts
again.
Angle sensor adjustment
((((
see arrows above
))))
7.4 Buzzer alarming
After start up the system, there’s no error code displayed at the console, but the
buzzer keeps sound with no interruption. Please check if the length cable is fine,
the A2B switch is normal, the connection of A2B switch and boom head
connecting box is OK or the A2B connector is short circuit for water in.
- 26 -
Page 31

7.5 Length cable retract un-smoothly
Sometimes when the boom is retracted, the length cable cannot return to the
original position naturally or retract not smoothly. This is because that the
coil-spring pre-tension is too low or the length cable in the cable reel has fallen
off.
Please pre-tighten the length cable several circles to solve the problem:
1) Retract the boom and put it on the rack
2) Draw back the tip of the cable from the tip of the boom and retract to the
cable reel.
3) Pre-tight the cable reel (turn the cable reel to the cable out direction, the
length cable and the cable reel shall turn together) and make sure the
cable can be pulled out and retracted smoothly.
4) Pull out the cable and fix it on the tip of the boom at the original place.
5) After pre-tight the cable reel the display of the boom length will be affected,
please adjust the length sensor till the displayed value equal to the actual
length.
CAUTION
Operators shall be very cautious for the above adjustment. Any incorrect
action may seriously affect the crane and the operation. And after finish the
adjustment, please confirm once again before start to work.
7.6 Question and Answer
1. Why the OM setting is correct but the current rated load is different with
the performance diagram of manufacture (the parameter are all normal)?
Answer: Possible reason is your reeving setting is different with actual
data. E.g. current performance shows the rated load is 20T and
reeving setting is 1. But because the largest load for single steel
cable is 4T, the rated load displayed on central unit is 4T.
- 27 -
Page 32

2. When the outriggers are fully extended, current rated load is not same with
performance diagram?
Answer: 1) maybe you have forgot to open the switch of outrigger fully
extended on operation panel, 2) forgot to confirm the operation of
outrigger fully extended during console OM setting of console.
3. Why does the system show E04?
Answer:OM setting is wrong, please set OM correctly.
4. When system has no mistake but the display parameter of crane are all
wrong?
Answer: The measurement units of parameters (metric or imperial) may
be set incorrectly. Go to set up and change.
5. Why the empty hoist load is wrong after boom extended?
Answer:Confirm whether the boom extend order is correct, please
correctly use extend and restrict switch.
NOTE: This situation is only for cranes with multiple extend modes.
6. Why the LMI is warning and load percentage exceeded 100% while the
crane still operation to dangerous direction?
Answer: 1) please check whether the enforce switch is open or not, 2)
external circuit is open.
7. Why the load shows extremely large at some large angle?
Answer:Maybe under current boom length the largest angle has been
reached, hydraulic pressure of luffing hydraulic cylinder raise to
high point causing the above phenomenon.
8. Why current load is much small, the displayed percentage status bar show
bigger number? The percentage calculation is not correct?
Answer: Our products are LMI protection equipment, percentage status
bars means percentage of actual load and rated load, not
percentage for displayed load and rated load.
NOTE: All above answer are possible reasons but not the only reason for
the system errors. Please contact service engineer for further assistance.
- 28 -
Page 33

Fallen below the
8. Hints and Trouble Shooting
Any improper operation or LMI malfunction will cause an alarm and an error
code to be displayed. The errors are caused by operations outside allowable
parameters, by incorrect inputs or by other factors.
The following codes are displayed on the main screen when the system is in
error condition. The list can be an aid in diagnosing the fault condition of the
LMI system and can help in troubleshooting.
Error
code
E01
E02
E04
E11
Error Cause Solutions
Due to the too much
radius range or
angle range
exceeded .
Exceed the max.
radius or lower
than the min.
angle.
OM not exist or
exceed the
motion of rotary
range
Fallen below
lower limit value
for measuring
channel "length
main boom"
hoist up of the boom
which result in lower
than the min. radius or
exceed the max. angle
in the capacity chart.
Due to the too much
hoist down which result
in exceed the max.
radius or lower than he
min. angle.
·OM code not exist
·Main boom operating
area is not permitted
Length potentiometer
is defective PDB
variable for analog
value not supported
Electronic component
in the measuring
channel is defective
Boom down to a
permitted radius or
angle in the load
chart.
Boom up to a
permitted radius or
angle in the load
chart.
Properly choose the
OM according to
actual operation and
slew back to a
permitted range.
Replace length
potentiometer Setup
of correct PDB
variable for analog
value in DGA6.i.3
Replace sensor unit
- 29 -
Page 34

Error
code
E12
E13
E15
E21
E22
Error Cause Solutions
Fallen below the
lower limit value
in the measuring
channel
"pressure piston
side"
Pressure transducer is
defective. PDB
variable for analog
value not supported
Electronic component
in the measuring
channel is defective.
Replace pressure
transducer Setup of
correct PDB
variable for analog
value in DGA6.i.3
Replace sensor unit
Fallen below
lower limit value
in the measuring
channel
• Refer to E12 • Refer to E12
"pressure rod
side
Fallen below
lower limit value
in measuring
channel "angle
main boom"
Angle potentiometer
defective PDB variable
for analog value not
supported Electronic
component in the
measuring channel
defective. CAN Circuit
board defective Length
sensor unit defective
Replace angle
sensor Setup of
correct PDB
variable for analog
value in DGA6.i.3
Replace sensor unit
Replace CAN board
Replace length
sensor
“Length sensor
channel” voltage
exceed the max.
• Refer to E11 • Refer to E11
limitation.
“Piston-side
pressure
channel” voltage
exceed the max.
• Refer to E12 • Refer to E12
limitation
.
- 30 -
Page 35

Error
•
•
•
•
•
code
E23
E25
E32
E37
E38
E39
E43
Error Cause Solutions
“Rod-side pressure
channel” voltage
exceed the max.
limitation.
“Main boom bottom
angle sensor
channel” voltage
exceed the
limitation.
Power supply defect
Logical
programming fault
System program
does not comply
with crane data file
System program
does not comply
with performance
table
RAM fault
• Refer to E12 • Refer to E12
• Refer to E15 • Refer to E15
+UB System and
• +UB system not
exist at the system
start
• +UB system
not exist at the
system finish
• +UB
connect/break fault
+UB Power must be
wired separately:
+UB System
connected direct with
the crane battery.
+UB Power for
switch on/off
• Re-connect/break
+UB
• Programming
file fault
• Flash-EPROM
fault
The LMI system
program is different
from crane data file
The LMI system
program is different
from performance
table
• RAM or controller
fault
Update effective
software of the
system
• Change
controller
Update effective
system software or
crane data file
• Update effective
system program or
performance table
• Change controller
- 31 -
Page 36

Error
•
•
•
•
•
•
•
code
Error Cause Solutions
Error in the monitored
write/ read memory.
The CRC verification
E47
of the monitored
write/read memory
provides an
incoherent result
E51 Crane data file fault
E52
Loading curvilinear
figure
Wrong setting of
E53
min. analogue
length1, angle1 and
pressure1
E56
E57
Crane data file fault
Crane serial data file
fault
The CRC sign
of
the monitored
write/read memory
is wrong
• Buffering
battery is tested no
current (1kOhm,<
2V).
• Controller
defect
No readable
crane data file
• Flash-EPROM
defect
No readable
crane performance
table
• Flash-EPROM
defect
• Not support
analogue output
No effective
data file during
adjustment
• Flash-EPROM
defect
No effective
data file in the
adjusting data file
• Flash-EPROM
defect
• Re-start LMI
• Change the
buffering battery of
controller
• Change controller
Up date crane
data file
• Change
Flash-EPROM
• Update effective
crane data file
• Change controller
• Set correct Flag
at DGA 6.i.2
• Resume and
update effective
crane data file
• Change controller
Update effective
data file by changing
and saving
datas((OM, limits)
• Change controller
- 32 -
Page 37

Error
code
E61
E62
E63
E64
E84
E85
E89
E94
Error Cause Solutions
CAN-bus data
communication
fault
CAN-bus data
communication of
pressure sensor
fault
Can-bus pressure
sensor fault
• CAN-bus cable
between controller
and sensor defective
or unconnected
• Controller
CAN-bus port fault
• CAN-bus cable
shortcircuit
• cable between
controller and sensor
defective
• Controller
CAN-bus port fault
• Sensor defect
• Uneffective
analogue value of
sensor unit
• Check the
connecting cable
between controller
and sensor
• Change controller
• Change Can-bus
cable
• Check the
connecting cable of
sensor
• Change controller
• Change sensor
• Change sensor
LWG Can-bus data
transforming of
• Refer to E62 • Refer to E62
fault
• Choose another
OM
• Check the
program of the crane
Wrong OM code
• OM selected not
is included in the
crane data file
data file
Wrong judgement
of range
OM code divert as
the loading
changes
Communication
between
controller and
console is fault
• Range counted is
too small (negative
deflection)
• OM code of
controller divert as
the loading changes
• Console or cable
of console fault
• CAN
communication fault
• Check the
program of the crane
data file
• Select OM code
when without
mainboom loading
• Change console
or cable of the
console
- 33 -
Page 38

Error
•
•
•
•
•
•
code
E98
Error Cause Solutions
LMI watch dog open
A2B switch
shortcircuit
EAB
(A2B without
wireless
communication)
A2B switch break
EAC
( A2B without
wireless
communication)
EAD
EDB
EDC
A2B switch defect
Data logger setting
fault
Watch dog software
of data logger open
EDD No battery
• LMI watch dog
operated overtime
Cable of A2B
switch shortcircuit
• Cable to A2B
switch shortcircuit
• Cable of A2B
switch break
• Cable to A2B
switch break
• Sensor function
fault
• Can-bus delay
• Wireless teleport
delay processing
module (wireless
A2B)
• Uneffective
wireless teleport ID
Setting of data
logger is eliminated
(crane data file or
buffering battery
fault)
• LMI processing
data logger
over-time
Voltage of
battery is test low
• Re-start the
system
• Connect PC final
port and observe
wrong information
• Change A2B
switch
• Change the cable
of A2B switch
Connect or
change the cable of
A2B switch
• Connect or
change the cable to
A2B switch
Change A2B
switch
• Change the cable
of A2B switch
• Replace battery
of wireless
processing module
(wireless A2B)
• Set ID at
DGA12.9
• Re-send data
and set data logger
Re-start the system.
• Connect PC final
port and observe
wrong information
Replace battery
and set RTC
- 34 -
Page 39

9. HC4900 Connecting Diagram
- 35 -
Page 40

10. OM List
OM
Main boom OM
Strength mode
Main boom OM
Stability Mode
Tip boom OM
Strength mode
Tip boom OM
Stability Mode
Operating
area
360° Fully extend
360° Half extend 1001
360° Fully retract 2001
360° Fully extend
360° Half extend 1003
360° Fully retract 2003
360°
Front None 3103
Creep
360° Fully extend
360° Half extend 1002
360° Fully retract 2002
360° Fully extend
360° Half extend 1004
360° Fully retract 2004
360°
Front None 4004
Outrigger
status
None
None
None
Code of
setting
1
1
2
1
Displayed
code
0001
0003
3003
4103
0002
0004
3004
Creep
1st auxiliary boom
0°
1st auxiliary
boom20°
1st auxiliary
boom40°
2nd auxiliary boom 21 0021
- 36 -
360°
operation
None
11 0011
12 0012
Fully extend
13 0013
4104
Page 41

0°
2nd auxiliary
boom20°
2nd auxiliary
boom40°
22 0022
23 0023
∗ Code of setting refers to the number required to be inputted during OM
Setup to set the code for the respective OM listed in the table.
- 37 -
 Loading...