


X7N
USER MANUAL

NOTICE
This document contains proprietary information protected
by copyright, and this Manual and all the accompanying
hardware, software, and documentation are copyrighted.
No part of this document may be photocopied or
reproduced by mechanical, electronic, or other means in
any form.
The manufacturer does not warrant that the hardware will
work properly in all environments and applications, and
makes no warranty or representation, either expressed or
implied, with respect to the quality, performance,
merchantability, or fitness for a particular purpose of the
software or documentation. The manufacturer reserves the
right to make changes to the hardware, software, and
documentation witho u t obligation to notify any person or
organization of the revision or change.
All brand and product names are the trademarks of their
respective owners.
© Copyright 2011
All rights reserved.

Contents
Contents............................................................................3
Overview............................................................................6
Installation Instructions...................................................7
Package Contents........................................................7
Before You Begin.........................................................8
Installing the X7N..........................................................10
Installing the X7N on a Windows Computer using the
Install Assistant..........................................................10
Installing your X7N on a Macintosh or other computer
(does not use Install Assistant)..................................11
Establishing Communication......................................13
Setting Up a Network .....................................................18
Setting Up Your Wireless Network ...............................21
Connecting a Windows 7 Computer with Built-in
Wireless Capabilities..................................................23
Connecting a Windows Vista Computer with Built-in
Wireless Capabilities..................................................26
Connecting a Windows XP Computer with Built-in
Wireless Capabilities..................................................27
Connecting a Wireless-enabled Computer or Device
(including the iPhone or other cellular phones, the iPod
Touch, etc.) to the X7N.............................................29
Connecting a Computer with a Wireless adapter to the
X7N............................................................................31
Checking Your Settings .............................................33
Setting Wireless Security ..............................................35
Overview....................................................................35
Setting Up Security Manually.....................................37
Setting Up Security Using Mixed WPA2 / WPA mode37
Setting Up Security Using WEP.................................39
Online Gaming................................................................42
Status Monitoring...........................................................44
3

Why Monitor Status?.....................................................44
Monitoring ADSL Status................................................44
Advanced X7N Setup Options.......................................46
Viewing the Advanced Setup Options...........................47
Changing Your WAN Settings.......................................50
Changing Your LAN Settings ........................................53
Configuring Fixed DHCP Mapping................................54
Creating a Virtual Server...............................................55
DMZ ..............................................................................56
Port Triggering...............................................................57
Using IP Filters..............................................................57
Using MAC Filtering ......................................................58
Setting Up a Time Restrictions......................................59
Setting Up a Static Routing Table.................................60
Adding a DNS Server Name .........................................61
Using the ADSL Settings...............................................62
Enabling or Disabling UPnP..........................................62
Wireless Options............................................................64
Wireless MAC Filtering..................................................64
WDS..............................................................................65
Management and Diagnostics.......................................66
Backing Up Your Configuration.....................................69
Resetting Default Settings.............................................70
Remote Access to Your Modem Configuration Settings71
TR-069 ..........................................................................72
Changing User Names and Passwords ........................72
Diagnostics....................................................................73
Appendix A: Troubleshooting Tips...............................74
Appendix B: ADSL Internet Settings Tables................85
Appendix C: Top and Back Panels ...............................91
Appendix D: TCP/IP Network Settings .........................93
Macintosh TCP/IP Settings........................................93
Windows TCP/IP Settings..........................................95

Appendix E: Configuring Your Web Browser..............99
Appendix F: Wireless Channels by Country..............105
Appendix G: Getting Help............................................106
Appendix H: Regulatory Information..........................107
5

Overview
This User Manual provides instructions for setting up your X7N,
connecting the
devices on a network, and securing your network. There are also
instructions for setting up the
For most customers, Chapter 1 covers what you need to get
connected to the Internet. Chapter 2 applies if you want to set up a
network. Chapters 3 and 4 help you set up and secure your X7N
wireless network, and Chapter 5 provides what you need for
online gaming.
Chapters 6-9 provide advanced information that is primarily for
System Administrators. These chapters explain how to use
advanced features of the
firewall filtering, backing up and restoring the
updating the
status, and management and diagnostic features of your X7N.
X7N to wired and wireless computers or other
X7N for gaming.
X7N such as adding extra security with
X7N configuration,
X7N firmware, creating a fixed IP address, monitoring

1
Installation Instructions
This chapter covers the basic instructions needed to
install your X7N and connect to the Internet. These
instructions can be used by those with a Windows®,
Macintosh®, or Linux operating system.
If you already installed and connected your X7N (by,
for instance, using the separate Quick Start), you can
skip this chapter and begin with Chapter 2: Setting up
a Network on page 18.
Package Contents
Your package contains the following items:
• Zoom X7N ADSL modem
• Ethernet cable
• Power cube
• CD
• One long phone cord
• A splitter to enable you to use a single ADSL wall jack for
both an Internet connection and for telephone service (certain
countries only). Some splitters ship with a small phone cord
attached to the splitter, others ship with a separate small
phone cord.
7

The CD contains the installation software, documentation,
warranty, and Customer Support information.
If anything is missing or damaged, please contact Zoom Customer
Support or whoever sold you the modem.
In addition, the package may include:
• Phone-jack adapter to adapt the phone cord to a particular
phone jack (certain countries only)
• ADSL line filter(s) (certain models only)
Before You Begin
Before you begin installing the X7N modem using this manual, you
must have the following available to you:
• ADSL service enabled on your telephone line. To do this, you
need to sign up with an ADSL service provider. Once this
service is enabled, you should have an ADSL-enabled
telephone wall jack to plug the
service provider may refer to ADSL service as DSL service).
• If ADSL service was working at your location and you
are replacing an ADSL modem, read this.
It’s important to know whether your ADSL service requires
the modem to have a User Name and Password to access and
browse the Internet. This User Name and Password may be
different from the User Name and Password used to access a
service provider’s email or to log in to the modem’s
Configuration Manager.
If your ADSL service DOES require a User Name and
Password, be sure to write down the ones you’ve been using.
They will be useful when you install your Zoom modem.
If your ADSL service DOES NOT require a User Name and
Password, please be aware that some of these services require
you to disconnect your “old” modem for at least 2 hours
before installing a new modem including your Zoom modem.
• At least one computer for setting up the X7N. The X7N
supports Macintosh, Linux, and Windows operating systems.
Chapter 1: Installation Instructions X7N User Manual
X7N modem into. (Your

You may also want to have these available to you:
• Any computer or other device that you want to connect
without wires to your network. These must have built-in
wireless capabilities or be equipped with a wireless adapter .
The X7N works with 802.11b, 802.11g, and 802.11n
compatible adapters.
• Any computer or other device that you want to physically
connect to your X7N
ETHERNET port. The X7N has four
ETHERNET ports to which you can connect devices. The
computer or other device must have an Ethernet port to
make these connections.
• Additional Ethernet cables. If you plan to connect more than
one computer directly
to the modem, you will need additional
Ethernet cables to make the connection. The modem
supports up to four direct connections with its four
ETHERNET ports.
9

Installing the X7N
Important! The X7N should be installed near a phone jack with
ADSL service. Ideally it should be located so that it’s not too far
from any wireless devices that will communicate with the X7N.
Sometimes it’s helpful to set up the X7N at one location, and to
then move it to a location that gives better wireless performance.
Important Safety Measures
To reduce the risk of fire, use the supplied phone cord.
Do not use this product near water — for example, in a
wet basement or next to a swimming pool.
¾ Macintosh and Linux users: please go to page 11.
Installing the X7N on a Windows
Computer using the Install
Assistant
1 Turn on the Windows computer that you will use for setup.
This can be any Windows 7, Vista™, XP, 2000, Me or 98
computer with an available Ethernet port.
2 Insert the supplied CD into the CD drive of your computer.
The CD should start automatically.
3 Follow the on-screen prompts for the Install Assistant.
4 If you are prompted to enter your ADSL provider User Name
and Password, remember that these terms are case-sensitive.
Pay careful attention to whether you’re using a capital or small
letter, a zero or the letter O, and so on. Clearly write down
and store the User Name and Password, perhaps on the
bottom of your modem and in a ModemSettings document.
Chapter 1: Installation Instructions X7N User Manual
Note: Windows 7 users, you may see a message box that says your
software might not have installed correctly. You can safely ignore
this message box.
Now check that your installation worked by opening a Web
browser and connecting to your favorite web site. If you cannot
connect to the Web, please refer to Appendix A:
Troubleshooting Tips
If you want to connect other computers or other devices to the
X7N, continue with Chapter 2: Setting Up a Network
18.
Now continue with the next section: Establishing
Communication.
.
on page
Installing your X7N on a
Macintosh or other computer
(does not use Install Assistant)
1 Shut down the computer that you want to connect to the X7N.
2 Connect an Ethernet cable into any one of the X7N’s
ETHERNET ports and any of the computer’s or other device’s
Ethernet ports. Then turn on the computer or game station.
One Ethernet LED on your modem’s top panel should turn on.
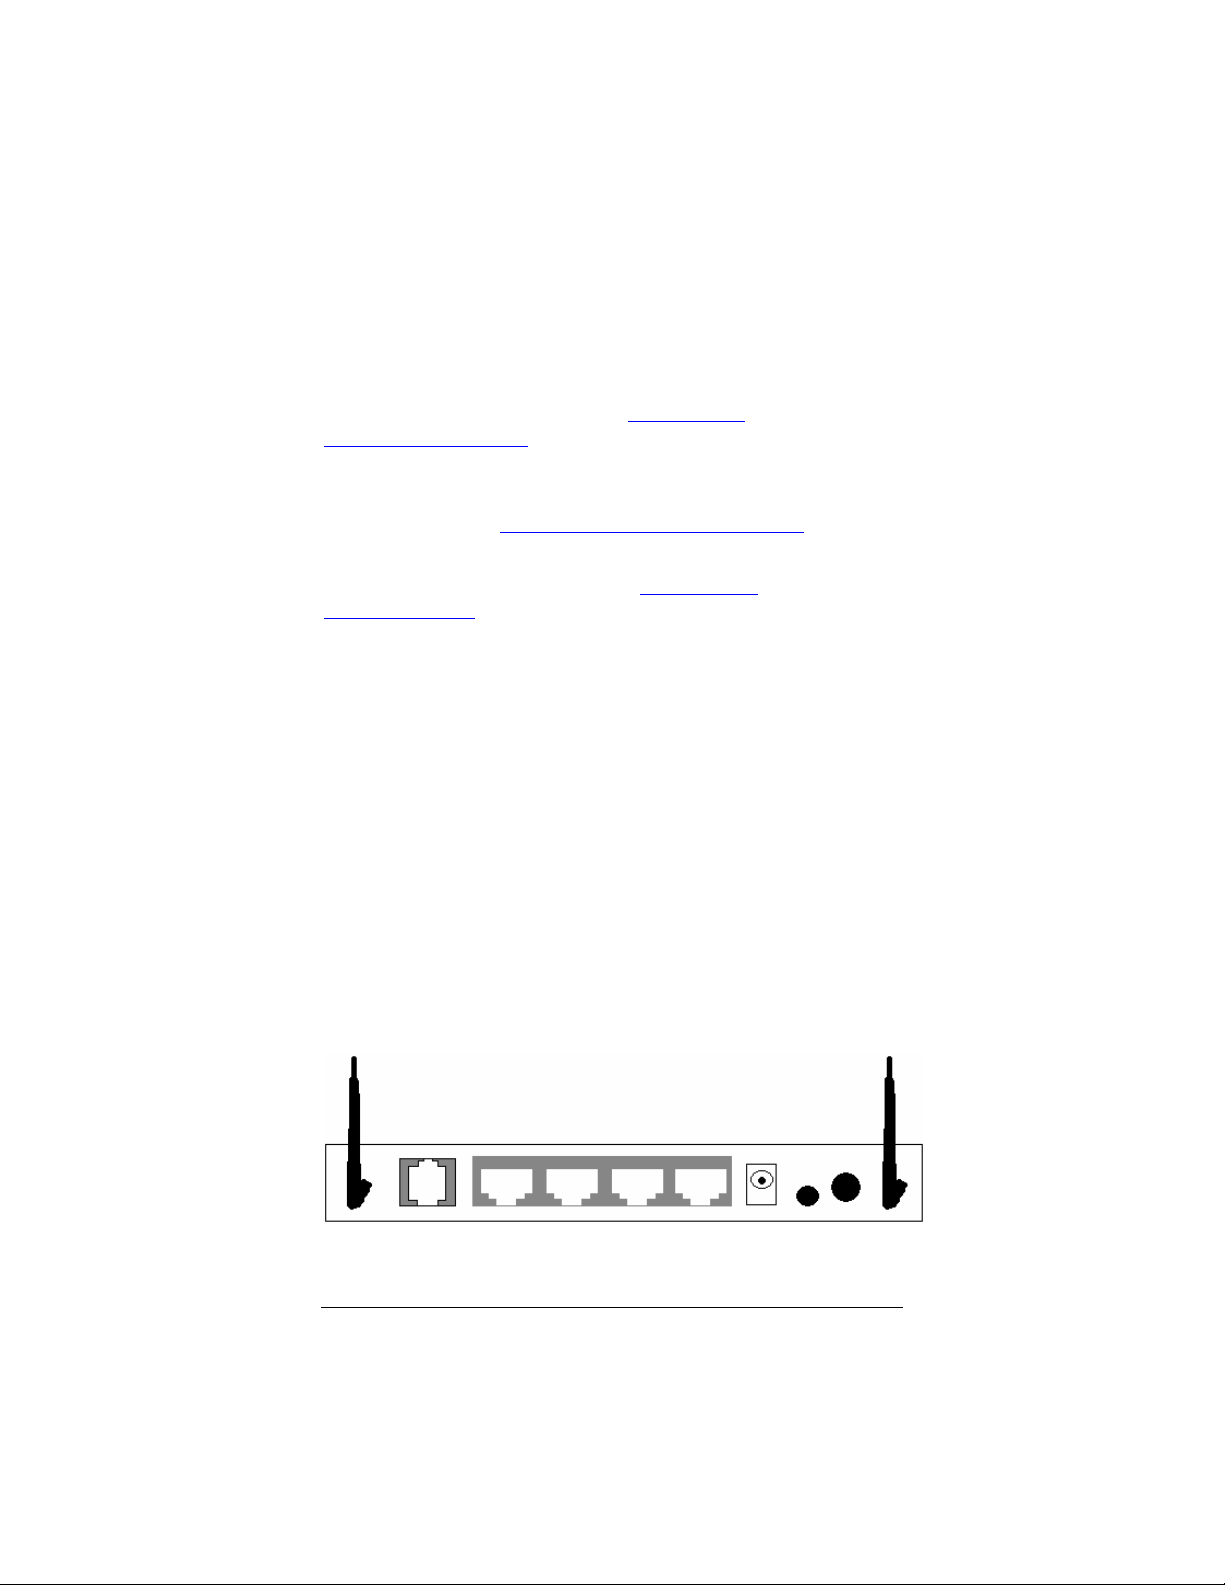
X7N Back Panel Diagram
ANTENNA DSL ETH 4 ETH 3 ETH 2 ETH 1 POWER RESET/WPS ON/OFF ANTENNA
11
3 Connect the supplied phone cord between your modem’s DSL
jack and a phone jack with ADSL service.
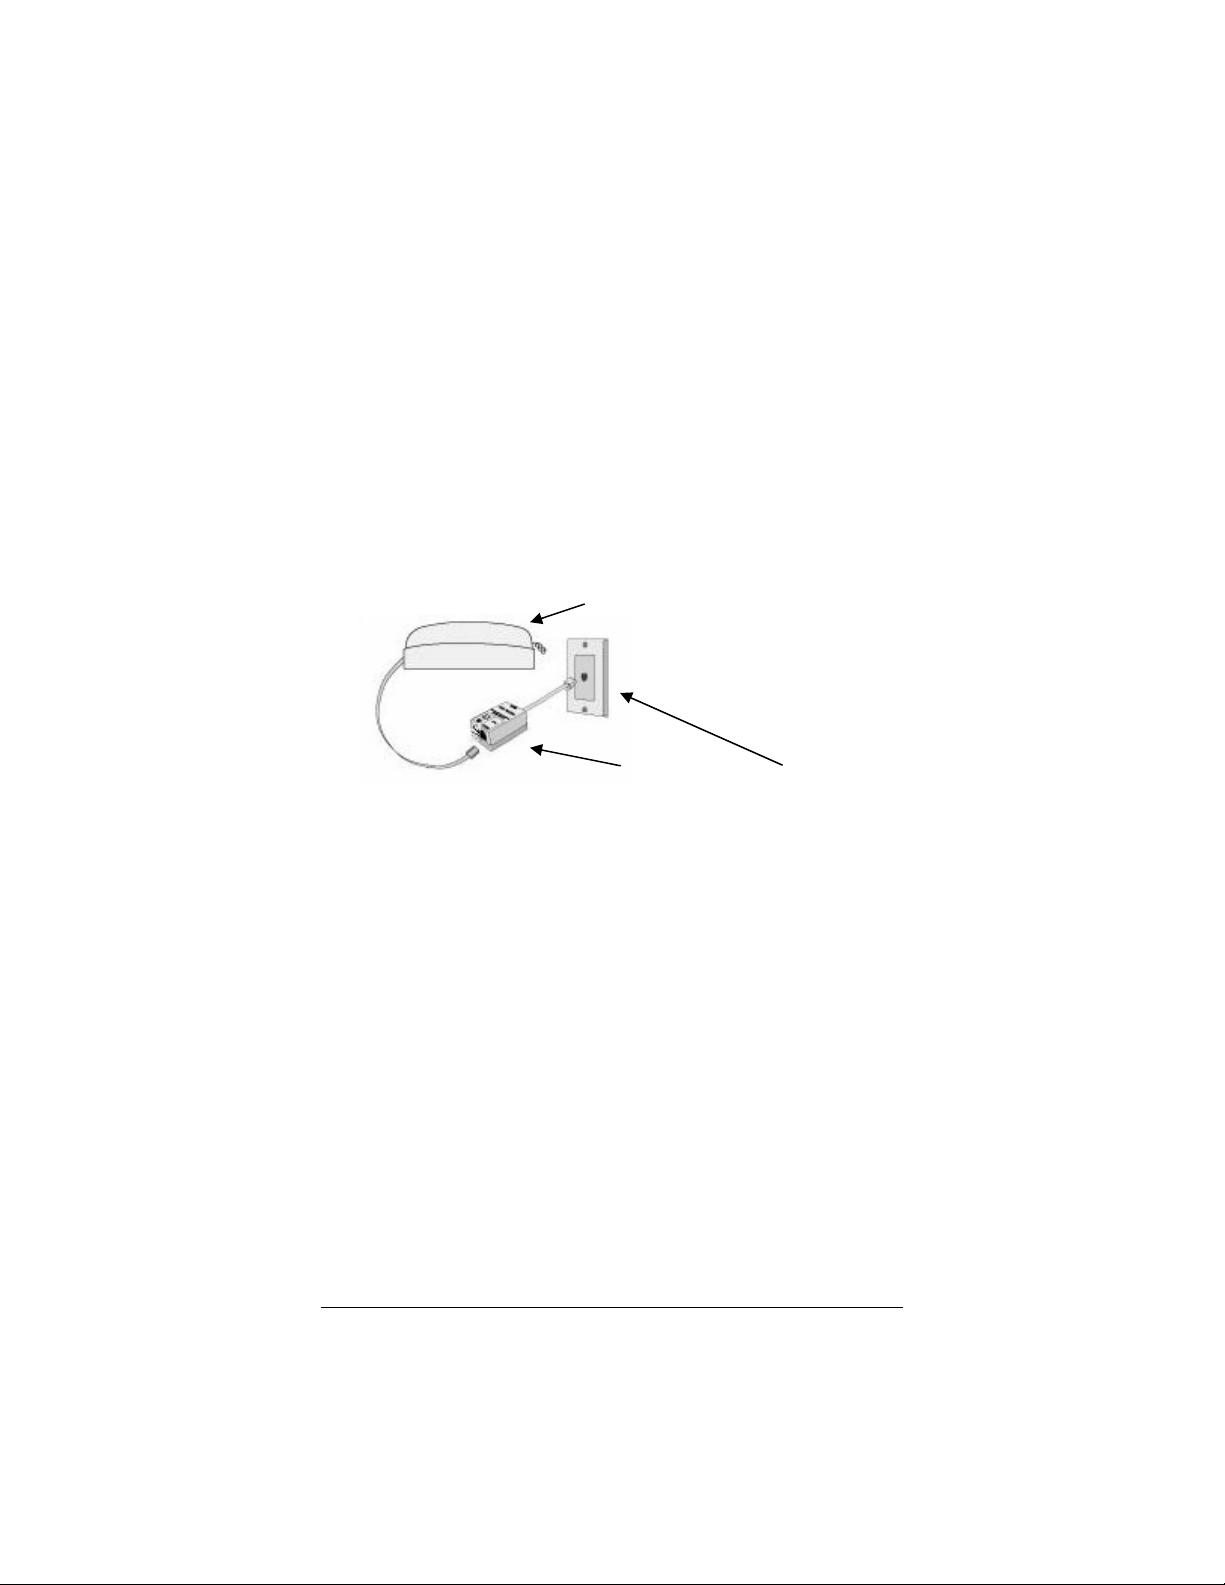
Note: If you are using your ADSL modem on the same phone
line where you’re also using other equipment such as telephones
or fax machines, you should put an ADSL filter between each
phone and the wall jack where the phone was connected. This
filter prevents interference between the modem and the phone
or other equipment. Your modem may have come with a filter,
and filters are also available from retailers of phones, modems,
and other electronics. DO NOT put a filter between the X7N
and the wall jack that it is connected to.
Phone
Filter Wall telephone jack
One form of filter is a splitter. Many X7Ns include a splitter,
typically one with three female jacks. To use this splitter, first
connect one end of the included phone cord into the splitter’s
LINE jack and the other end into a telephone wall jack. Plug the
modem into the splitter’s MODEM jack. If you’d like, plug a
phone, fax, or other telephone device into the PHONE jack.
Note: Some splitters come with a short phone cord instead of a
line jack. If you have one of these splitters, plug the short phone
cord into the telephone wall jack and plug the other cords in as
described above.
4 After a few seconds, your DSL LED will begin blinking, then
become solid. If it does not become solid, please refer to the
Troubleshooting Tips in the User Manual on your CD.
5 Refer to Logging into the Configuration Manager on page
13 and then continue with Step 6.
6 Go to the Configuration Manager’s Basic Setup page. Under
Automatic Configuration, click Start.
Chapter 1: Installation Instructions X7N User Manual

7 If the X7N finds a PPPoE or PPPoA connection, on the Basic
Setup page enter the User Name and Password for your
Internet Service Provider, then click Save. (You should have a
User ID or User Name, which is often your email address or
the characters preceding the @ sign in your email address. You
should also have a password. The PPPoE or PPPoA User
Name and Password are NOT the User ID and Password that
you used to get into the Basic Setup menu.)
Now check that your installation worked by opening a Web
browser and connecting to your favorite web site. If you cannot
connect to the Web, please refer to Appendix A:
Troubleshooting Tips
If you want to connect other computers or other devices to the
X7N, continue with Chapter 2: Setting Up a Network
18.
.
on page
Now continue with the next section: Establishing
Communication.
Establishing Communication
Important!
Macintosh and Linux users must make sure that the computer’s
TCP/IP settings are configured properly BEFORE starting this
section. See Macintosh TCP/IP Settings on page 93 for
instructions.
You must set up the X7N so that it can communicate with your
Internet service provider. To do this, you use the Zoom
Configuration Manager.
1 Log into the Zoom Configuration Manager:
13

a Open your Web browser and, in its address bar, type
http://192.168.1.1 and then press the Enter key on your
keyboard.
b In the Enter Network Password dialog box, type the
following user name and password in lowercase, then click
OK. (The X7N User Name and Password you enter here
are not the same as the User Name and Password that
your Internet service provider may have given you.)
User Name: admin
Password: zoomadsl
If you are not prompted for a User Name and Password,
do the following in this order: Recheck all connections;
restart the modem and computer; and reset the modem by
pressing the RESET button on the modem’s back panel
for 5 seconds.
Important:
For security, you may want to choose your own X7N password
after the setup is complete. See Changing User Names and
Passwords on page 66.
2 After you log in, use the Basic Setup page to configure the
modem so it can connect with your Internet service provider.
• To use Automatic Configuration (recommended):
a Under Automatic Configuration, click Start.
b In the "Settings successfully detected" message box,
click OK to return to the Basic Setup page.
c If the X7N finds a PPPoE or PPPoA connection, on
the Basic Setup page enter the user name and
password given to you by your Internet Service
Provider. (Your provider should have given you a
User ID or User Name, usually your email address
or the characters preceding the @ sign in your email
address, and a Password. These are NOT the User
ID and Password that you used to get into the Basic
Setup menu.)
Chapter 1: Installation Instructions X7N User Manual

If the X7N finds a 1483 Bridged or 1483 Routed
connection, you have the option of using either
dynamic or static IP addressing. Depending on your
situation, select the appropriate option button:
− [MOST USERS] Ensure that Obtain an IP
address Automatically is selected if you are
using Dynamic Host Configuration Protocol (also
known as DHCP or dynamic IP addressing). This
option is selected by default because most Internet
service providers use DHCP.
− Select Use the following IP Address only if you
are using a static IP address. (You should know if
you are using static IP addressing. There is
typically an extra charge for a static IP address and
you usually have to make special arrangements
with your Internet service provider to get one.)
Then enter the IP Address, Subnet Mask,
Default Gateway, and DNS that you plan to use.
Click Save/Reboot. Continue with step 3 to test
your network.
• To configure your settings manually if Automatic Configuration does
not work, follow these instructions:
a On the Basic Setup page, enter your Protocol,
Encapsulation, VPI, and VCI settings in the
appropriate boxes. Your service provider should
supply these values. If you do not know these settings,
refer to the tables starting on page 73.
b NAT (Network Address Translation) is Enabled by
default. This feature lets multiple users access the
Internet sharing a single IP address. Enabled is
typically the right setting. Select Disable in the
unlikely event that you want to assign different public
IP addresses to each network user.
c Depending on the Protocol setting you selected the
bottom half of the page will change so that you can
enter additional information.
If you selected PPPoA or PPPoE, enter your
ADSL User Name and Password in the
appropriate boxes. Your Internet service provider
should have given this information to you. (Your
15

User Name is typically your email address or the
characters preceding the @ sign in your email
address. This is NOT the same User Name and
Password that you used earlier to open the Zoom
Configuration Manager.)
If you selected 1483 Bridged or 1483 Routed,
you have the option of using either dynamic or
static IP addressing. Depending on your situation,
select the appropriate option button:
− [MOST USERS] Ensure that Obtain an IP
address Automatically is selected if you are
using Dynamic Host Configuration Protocol
(also known as DHCP or dynamic IP
addressing). This option is selected by default
because most Internet service providers use
DHCP.
− Select Use the following IP Address only if
you are using a static IP address. (You should
know if you are using static IP addressing.
There is typically an extra charge for a static
IP address and you usually have to make
special arrangements with your Internet
service provider to get one.)
Then enter the IP Address, Subnet Mask,
Default Gateway, and DNS that you plan to
use. Click Save/Reboot.
3 Verify that you Internet connection is working. Open your
Web browser (for instance, Internet Explorer, Firefox, or
Chrome) and try to connect to a familiar Web address. If you
connect successfully, you are ready to set up the rest of your
network.
(If you do not connect, see Appendix A: Troubleshooting Tips
on page 73.)
Chapter 1: Installation Instructions X7N User Manual

Tip!
If you configured the X7N using a notebook computer, you can
keep it plugged in or you can disconnect it from the unit’s
ETHERNET port. As long as the X7N remains plugged into an
ADSL wall jack and a power source, the X7N can function as a
stand-alone device. You can then make the notebook part of your
wireless network.
Congratulations! You have established communication and your
computer is connected to the Internet.
If you wish to add additional devices to your X7N, continue with
Chapter 2: Setting Up a Network
on page 18.
If you do not wish to add additional devices to your X7N, you are
ready to start using your X7N. If you want additional information
on how to use your X7N, you may choose to continue with:
¾ Chapter 5
to learn about using the X7N with
online gaming.
¾ Chapter 6
to learn about monitoring your ADSL
Status. (Most users will not need to use status
monitoring.)
¾ Chapter 7
to learn about the advanced features of
the X7N. (Most users will not need to change
advanced features.)
17

2
Setting Up a Network
Once a computer that is directly connected to the X7N modem is
able to browse the Internet, you know for certain that your ADSL
Internet connection is working. Now you can set up the rest of
your network.
It is up to you whether you want to have some computers
connected directly to the X7N and others connected wirelessly.
The X7N supports both wired and wireless connections. You can
have up to 253 connections, four of which can be wired directly
through the X7N
network device (such as a hub, switch, router, or Homeplug
adapter) into one of the ETHERNET ports.
To set up your network, you can do any or all of the following, in
any order that you choose:
• If you want to connect additional computers directly to the
X7N, see To Connect Additional Wired Computers below.
• If you want to connect a hub, switch, router or other device
directly to the
page 19.
• If you want to connect additional computers or other devices
using a wireless network, see Chapter 3: Setting Up Your
Wireless Network on page 21.
’s four ETHERNET ports. You can also plug a
X7N, see To Connect a Network Device on
Chapter 2: Setting Up a Network X7N User Manual

To Connect Additional Wired
Computers
You can connect up to four computers that have Ethernet ports
directly to the
1 Shut down and power of the computer you want to connect to
the
the correct IP address for the modem. This is done when the
computer is turned back on in step 3 below.)
2 Plug one end of an Ethernet cable into one of the modem’s
ETHERNET ports and plug the other end into the computer’s
Ethernet port.
3 Turn on the computer.
4 Verify that your Internet connection is working. Open your
Web browser (for instance, Internet Explorer, Firefox, or
Chrome) and try to connect to a familiar Web address.
X7N.
X7N. (This is important because the computer must locate
5 Repeat steps 1–4 for each computer you want to add.
To Connect a Network Device
You can use one of the ETHERNET ports on the X7N to plug
in a network device (for example, a hub, switch, router, or
Homeplug adapter).
1 Plug one end of an Ethernet cable into one of the modem’s
ETHERNET ports and the other end into the network
device’s Ethernet port. (For a hub or a switch, this is typically
called an Uplink or Expansion port. For a router, this is
typically called a WAN port.)
2 Set up your network and/or device. Refer to the
documentation provided with your particular network device
for instructions on how to do this.
3 Once your network and/or device is set up, reboot any
computer that is part of the network.
4 Verify that your Internet connection is working. Open the
Web browser (for instance, Internet Explorer, Firefox, or
19

Chrome) on each computer and try to connect to a familiar
Web address.
Congratulations! You have set up your wired devices. If you
have wireless devices that you want to add to your network, go to
Setting Up Your Wireless Network on page 21.
Chapter 2: Setting Up a Network X7N User Manual

3
Setting Up Your Wireless
Network
This chapter discusses how to set up a wireless
network using computers and/or other devices that
have built-in wireless capabilities and/or a wireless
adapter. Chapter 4
implementing wireless security.
provides information about
Note that for each computer or other device added to your
wireless network, you will need to take appropriate steps for setting
up that computer or other device. To do that, select one of the
possibilities for that computer or other device below:
¾ If all the wireless devices you plan to connect to your network
support push button Wi-Fi Protected Setup (WPS), you can
use WPS to connect and secure your devices in one step.
Follow the instructions below. If your devices only support
using a PIN code, then you must configure security manually.
Refer to Setting Up Security Manually on page 37.
If all the wireless devices you plan to connect to your network
do not support WPS, skip this bullet point and continue with
the next bullet point.
Note: WPS configures one client device at a time. Please
repeat the configuration method for each client on your
wireless network that supports WPS security.
Chapter 3: Setting Up Your Wireless Network
21

The X7N supports Push Button WPS configuration. This
button can be either a physical button on the unit or a
software button in its application.
1 Press the WPS button on your Router and hold it in for
seven (7) seconds until the Wireless LED starts blinking
rapidly.
Important! The Registrar (the device configuring the
WLAN,) goes into the WPS mode and the Enrollee (the
device joining the WLAN) then looks for it. You should
always start the Registrar first. The X7N is configured as
a Registrar so you should put it into WPS mode first..
2 Click or press the WPS button on the client device. This
button may be a physical button on the unit or a software
button in its application.
3 Refer to your client device's documentation for further
instructions, if necessary.
Open your Web browser (for instance, Internet Explorer,
Firefox, or Chrome) and try to connect to a familiar Web
address.
If you connect successfully, you are ready to browse the Web!
If it fails to connect, refer to Appendix A:
Troubleshooting Tips on page 73.
If you want additional information on how to use your
X7N, you may choose to continue with:
o Chapter 5 to learn about using the X7N
with online gaming.
o Chapter 6
to learn about monitoring your
ADSL Status. (Most users will not need
to use status monitoring.)
o Chapter 7
to learn about the advanced
features of the X7N.(Most users will not
need to change advanced features.)
Chapter 3: Setting up Your Wireless Network X7N User Manual

¾ Many newer Windows 7, Vista, and XP computers have
built-in wireless networking capabilities and do not require
the installation of a wireless component. If this is the case, you
should set up that computer’s wireless connection using the
Windows 7, Vista, or XP connect utility. See the sections
below on connecting Windows 7 (page 23) , Vista (page 23),
or XP (page 27) computers with built-in wireless capabilities.
¾ Some computers may have built-in wireless networking
capabilities, but do not use the Windows 7, Vista, or XP utility to
configure their device. If this is so, set up your computer’s wireless
connection using the instructions on page 28 for Connecting a
Wireless-enabled Computer or Device to the X7N.
¾ If you have a non-computer wireless device like an iPhone or
other cellular phone, iPod Touch, etc., see the instructions on
page 28 for Connecting a Wireless-enabled Computer or
Device to the X7N.
¾ Some computers may need a wireless network adapter installed.
This can be a USB adapter, PC Card adapter, or PCI adapter. When
you install the adapter, make sure that it is set to infrastructure or
access point mode (NOT ad-hoc or peer-to-peer mode). If you
need help installing your wireless adapter or setting its mode, refer
to the documentation that came with it. After you install the adapter,
see the instructions on page 28 for Connecting a Computer with
a wireless adapter to the X7N.
Connecting a Windows 7
Computer with Built-in Wireless
Capabilities
1 From the taskbar, click on the wireless symbol.
Chapter 3: Setting Up Your Wireless Network
23
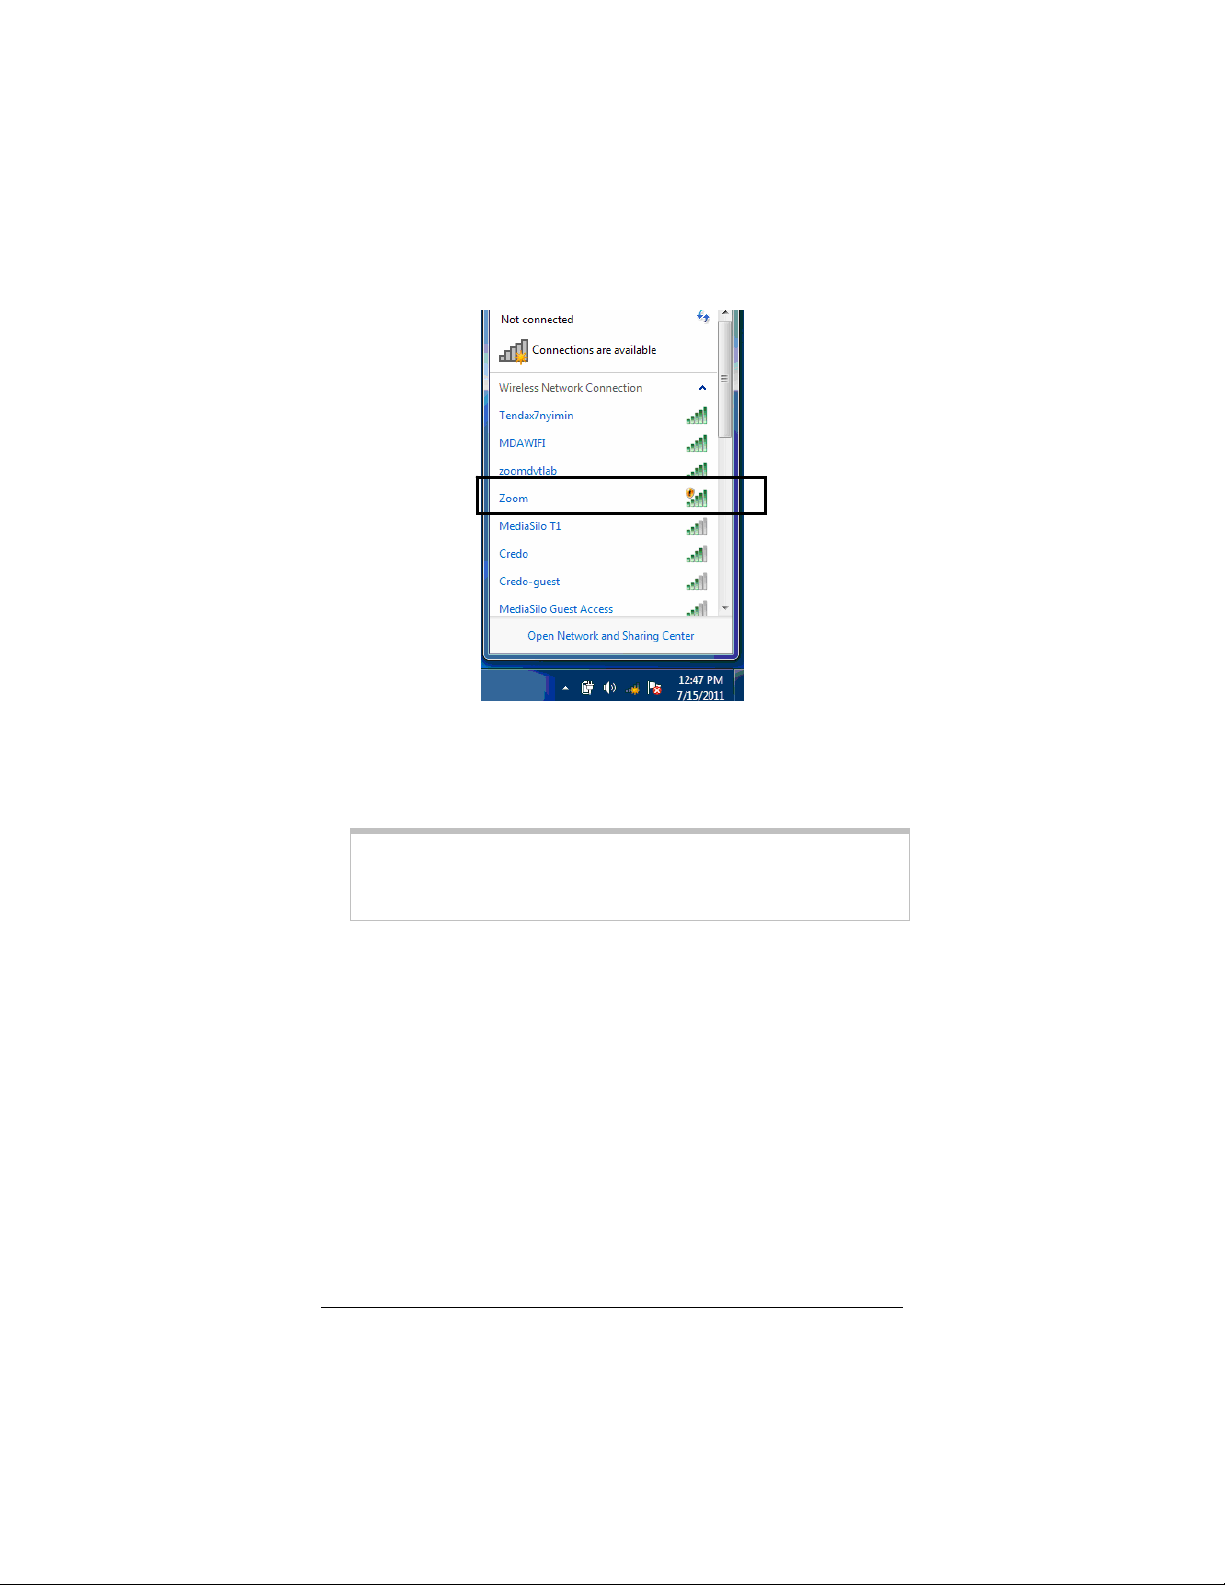
2 In the wireless network options box, highlight Zoom and click
Connect.
• If your desired network is secured, in the next dialog box
enter the security key or password and click Connect.
• If your desired network is unsecured, in the message box
select Connect Anyway.
Note: We strongly recommend that you set up a secured
network. For information on wireless security, see Setting
Wireless Security on page 35.
¾ When you click on the wireless network option box,
Windows will scan for available networks. More than one
wireless network may appear in the list. These are other
wireless networks that are within range of your network.
Your neighbors, for instance, may be within range of your
network. Each wireless network has a channel associated
with it. We recommend there be at least a five-channel
difference between your network and those of your
neighbors. Having less than a five-channel difference may
result in interference with your connection. By default, the
X7N uses channel 10. If you need to change this channel,
you must do so using the Wireless Setup page of the
Zoom Configuration Manager. For instructions on how
to log in to the Zoom Configuration Manager, see page
13. After logging in, select Wireless from the left-hand
Chapter 3: Setting up Your Wireless Network X7N User Manual

menu. On the Wireless page you can select a new channel
from the drop-down menu.
If you have difficulty connecting, make sure you have entered
the correct password (if security is enabled). Otherwise refer to
Appendix A: Troubleshooting Tips
3 In the Successfully connected to [desired network] dialog
on page 73.
box, you have three options. You can:
• Select Save the network and Start this connection
automatically if you always want to connect to the same
network. Then click Close. The next time you start your
computer you will automatically connect to the selected
network.
• Select Save the network and clear the Start this
connection automatically check box if you don't want to
automatically connect to this network every time you start
your computer but you will want to connect in the future.
Click Close to display the Select a location . . . dialog box
where you choose a location. Windows 7 automatically
applies the correct network security settings.
If the User Account Control dialog box appears, click
Continue.
• Click Close to complete the connection procedure. Select
this option if you are connecting to this network only one
time.
To disconnect from the current network:
1 Right-click the wireless network icon in the notification area of
the Windows taskbar.
2 Right-click Zoom and select Disconnect.
Chapter 3: Setting Up Your Wireless Network
25

Connecting a Windows Vista
Computer with Built-in Wireless
Capabilities
1 From the Start menu select Connect to.
2 In the Connect to a network dialog box, highlight Zoom and
click Connect.
• If your desired network is secured, in the next dialog box
enter the security key or password and click Connect.
• If your desired network is unsecured, in the message box
select Connect Anyway.
Note: We strongly recommend that you set up a secured
network. For information on wireless security, see Setting
Wireless Security on page 35.
¾ When you click on the wireless network option box,
Windows will scan for available networks. More than one
wireless network may appear in the list. These are other
wireless networks that are within range of your network.
Your neighbors, for instance, may be within range of your
network. Each wireless network has a channel associated
with it. We recommend there be at least a five-channel
difference between your network and those of your
neighbors. Having less than a five-channel difference may
result in interference with your connection. By default, the
X7N uses channel 10. If you need to change this channel,
you must do so using the Wireless Setup page of the
Zoom Configuration Manager. For instructions on how
to log in to the Zoom Configuration Manager, see page
13. After logging in, select Wireless from the left-hand
menu. On the Wireless page you can select a new channel
from the drop-down menu.
If you have difficulty connecting, make sure you have entered
the correct password (if security is enabled). otherwise refer to
Appendix A: Troubleshooting Tips
Chapter 3: Setting up Your Wireless Network X7N User Manual
on page 73.

3 In the Successfully connected to [desired network] dialog
box, you have three options. You can:
• Select Save the network and Start this connection
automatically if you always want to connect to the same
network. Then click Close. The next time you start your
computer you will automatically connect to the selected
network.
• Select Save the network and clear the Start this
connection automatically check box if you don't want to
automatically connect to this network every time you start
your computer but you will want to connect in the future.
Click Close to display the Select a location . . . dialog box
where you choose a location. Windows Vista automatically
applies the correct network security settings.
If the User Account Control dialog box appears, click
Continue.
• Click Close to complete the connection procedure. Select
this option if you are connecting to this network only one
time.
To disconnect from the current network:
1 From the Start menu, select Connect to.
2 In the Disconnect or Connect to another network dialog
box, select the current network and click Disconnect.
3 In the Are You Sure? message box, click Disconnect again.
4 In the next dialog box, you can connect to another network or
click Close to complete the disconnect procedure.
Connecting a Windows XP
Computer with Built-in Wireless
Capabilities
1 On your Windows desktop, click the Start button then click
SettingsÆControl Panel.
2 Double-click the Network Connections icon.
Chapter 3: Setting Up Your Wireless Network
27

3 Right-click the Wireless Network Connection icon, then
select Properties.
4 On the Wireless Network Connection Properties dialog
box, select the Wireless Networks tab. Windows will
automatically scan for available wireless networks in your area.
Any compatible networks within range will appear in the
Available networks list. It should find the wireless network of
the
X7N—named Zoom. (The scan is done automatically
because the Use Windows to configure my wireless
network settings check box is selected by default).
5 Select Zoom from the Available networks list, then click the
Configure button to add it to the Preferred networks list.
The notebook will try to connect to the Internet using the
wireless networks listed here, in the order in which they appear.
(If you already have networks listed here, we recommend you
either remove them or use the Move up button to move
Zoom to the top of the list.)
6 Click OK.
7 Test your wireless connection. From the computer or
notebook that you set up, open your Web browser (for
instance, Internet Explorer or Firefox) and try to connect to a
familiar Web address.
If you connect successfully, your notebook’s wireless
capability is configured and you are ready to browse the Web!
Important!
If you want to add security to your network, please see Setting
Wireless Security on page 35.
¾ When you click on the wireless network option box,
Windows will scan for available networks. More than one
wireless network may appear in the list. These are other
wireless networks that are within range of your network.
Your neighbors, for instance, may be within range of your
network. Each wireless network has a channel associated
with it. We recommend there be at least a five-channel
difference between your network and those of your
neighbors. Having less than a five-channel difference may
result in interference with your connection. By default, the
X7N uses channel 10. If you need to change this channel,
you must do so using the Wireless Setup page of the
Chapter 3: Setting up Your Wireless Network X7N User Manual

Zoom Configuration Manager. For instructions on how
to log in to the Zoom Configuration Manager, see page
13. After logging in, select Wireless from the left-hand
menu. On the Wireless page you can select a new channel
from the drop-down menu.
To disconnect from the current network:
1 On your Windows desktop, click the Start button then click
SettingsÆControl Panel.
2 Double-click the Network Connections icon.
3 Right-click the Wireless Network Connection icon, then
select View Available Wireless Networks and click Zoom.
Click Disconnect in the wireless connection window.
4 Close the window by clicking on the X at the top of the
window.
Connecting a Wireless-enabled
Computer or Device
iPhone or other cellular phones, the iPod
Touch, etc.)
1 Go to the wireless-enabled computer or device that you want
to add to the network. The device should have software that
will let it perform a site search to scan for available wireless
networks in your area. You may have to click on something
like Settings and then Wi-Fi. When the SSID (Service Set
Identifier) of your
the default SSID is Zoom—select it as the network you want
to use to connect to the Internet.
Tip!
If you need help, refer to the documentation that came with
your wireless device.
to the X7N
X7N wireless network appears in the list—
(including the
Chapter 3: Setting Up Your Wireless Network
29

There are several site scan issues you should be aware of:
¾ More than one wireless network may appear in the list.
These are other wireless networks that are within range of
your network. Your neighbors, for instance, may be within
range of your network. Each wireless network has a
channel associated with it. We recommend there be at least
a five-channel difference between your network and those
of your neighbors. Having less than a five-channel
difference may result in interference with your connection.
By default, the
X7N uses channel 10. If you need to change
this channel, you must do so using the Wireless Setup
page of the Zoom Configuration Manager. For
instructions on how to log in to the Zoom Configuration
Manager, see page 13. After logging in, select Wireless
from the left-hand menu. On the Wireless page you can
select a new channel from the drop-down menu.
¾ If you want to secure your wireless network so it won’t be
accessible by others, you should specify security settings.
To learn how, see Setting Wireless Security on page 35.
(By default, the wireless connections provided by the
X7N
do not have any security applied.)
2 Test your wireless connections. From each computer or device
that you set up, open your Web browser (for instance, Internet
Explorer, Firefox, or Chrome) and try to connect to a familiar
Web address.
If you connect successfully, you are ready to browse the Web!
Important!
To add security to your network, see Setting Wireless Security on
page 35.
To disconnect from the current network:
1 On your wireless device or computer, find the wireless
network connection option (similar to the process of adding
your device or computer to the network).
2 Click or highlight Zoom.
3 Select or click on Disconnect or similarly-named button.
Chapter 3: Setting up Your Wireless Network X7N User Manual
 Loading...