

Page 1
This Quick Start describes how to connect the X7N to one or more computers or other devices. First the X7N is configured using a
computer; and then the X7N is connected to one or more computers or other devices. More detailed information, including information
using the X7N for online gaming, is in the User Manual on the CD.
Package Contents
Zoom X7N ADSL modem Ethernet cable Power cube One long phone cord
A splitter to enable you to use a single ADSL wall jack for both an Internet connection and for telephone service (certai n countries
only). Some splitters ship with a small phone cord attached to the splitter, others ship with a separate small phone cord.
CD (contains the installation software, documentation, warranty, and Customer Support information)
If ADSL service was working at your location and you are replacing an ADSL modem, read this.
It’s important to know whether your ADSL service requires the modem to have a User Name and Password to access and browse the
Internet. This User Name and Password may be different from the User Name and Password used to access a service provider’s email
or to log in to the modem’s Configuration Manager.
If your ADSL service DOES require a User Name and Password, be sure to write down the ones you’ve been using. They will
be useful when you install your Zoom modem.
If your ADSL service DOES NOT require a User Name and Password, please be aware that some of these services require
you to disconnect your “old” modem for at least 2 hours before installing a new modem including your Zoom modem.
To Install the X7N on a Windows Computer, use the Install Assistant.
1 Turn on the Windows computer that you will use for setup. This can be any Windows 7, Vista™, XP, 2000, Me or 98 computer with
an available Ethernet port.
2 Insert the supplied CD into the CD drive of your computer. The CD should start automatically.
3 Follow the on-screen prompts for the Install Assistant.
Note to Windows 7 users: You may see a message box that says your soft ware may n ot have installed
correctly. You can safely ignore this message box.
Now check that your installation worked by opening a Web browser and connecting to your favorite web site. If you ca nnot connect to
the Web, please refer to the Troubleshooting Tips in this Quick Start or the User Manual on your CD.
For Advanced Setup options such as setting up your X7N for online gaming, please refer to the User Manual on the CD.
If you would like to connect additional computers or other devices to your X7N by using a wired Ethernet connection, please go to
Connecting additional computers or other devices to the X7N.
Installing your X7N on a Macintosh or other computer (does not use Install Assistant)
1 Shut down the computer that you want to connect to the X7N.
2 Connect the power adapter to the receptor on the back panel of your X7N and plug the ot her end of the power adapter into a wall
outlet or power strip.
3 Press the Power button on the back panel of your X7N to power ON the modem.
4 Connect an Ethernet cable between any one of the X7N’s ETHERNET ports and an y of the computer’s or other device’s Ethernet
ports. Then turn on the computer or game station. One Ethernet LED on your modem’s top panel should turn on.
X7N QUICK START
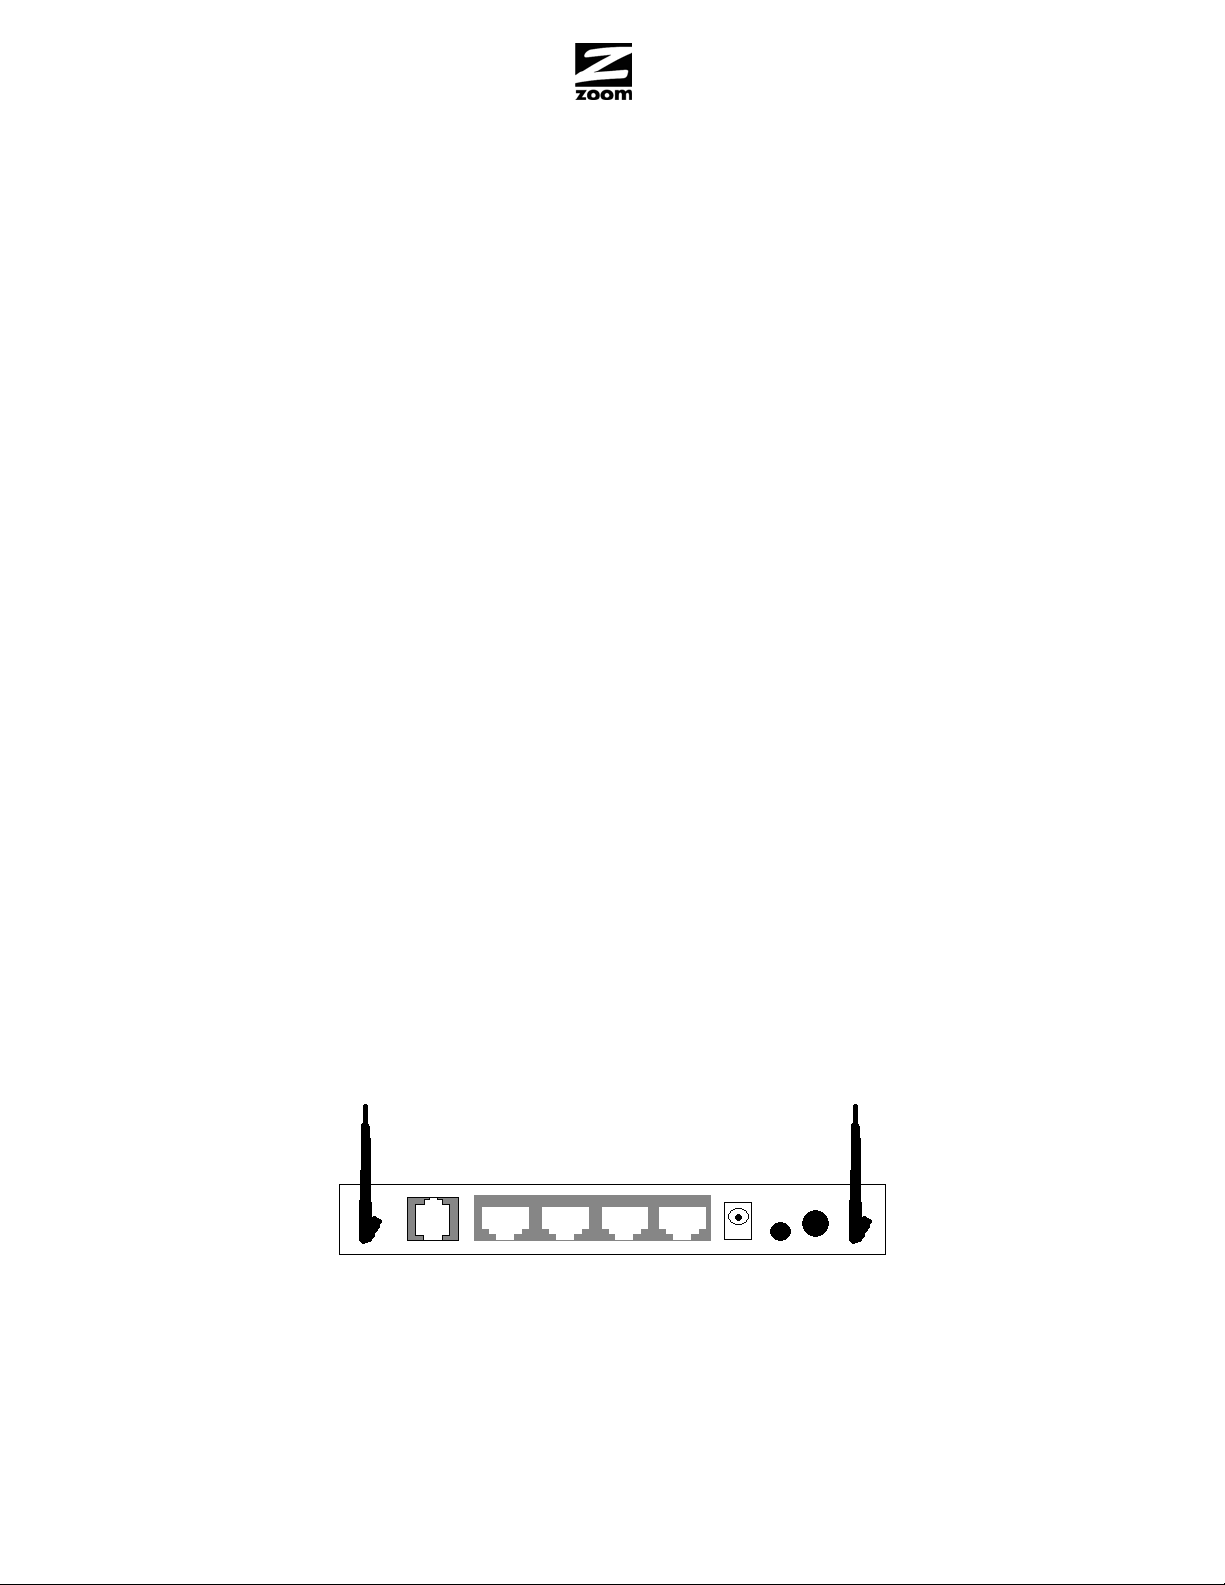
X7N Back Panel Diagram
5 Connect the supplied phone cord between your modem’s DSL jack and a phone jack with ADSL service
ANTENNA DSL ETH 4 ETH 3 ETH 2 ETH 1 POWER RESET/WPS ON/OFF ANTENNA
Note: Many X7N models include a filter/splitter. This can be used if you want to use a phone near the modem. A filter/splitter or
ADSL filter should also be used with phones not located near the modem, to prevent interference between the modem and phone
when the phone is off-hook.
To use a filter/splitter with a modem and a phone, connect the filter/splitter’s LINE or PHONE LINE jack to a phone jack in the
wall, plug the supplied phone cord between your modem’s DSL jack and the filter/splitter’s MODEM jack, and plu g the phone into
the filter/splitter’s PHONE jack. (Some but not all filter/splitters require you to use a short phone cord to connect the filter/splitter
to a phone jack in the wall.)
Page 2

Note that the filter/splitter is NOT required if you simply want to plug your modem into a phone jack in the wall, without sharing
that jack with a telephone.
If you are using a filter/splitter with a phone only and not a modem, connect the filter/splitter’s LINE or PHONE LINE jack to a
phone jack in the wall, then plug the phone into the filter/splitter’s PHONE jack. (Some but not all filter/splitters require you to use
a short phone cord to connect the filter/splitter to a phone jack in the wall.)
6 After a few seconds, your DSL LED will begin blinking, then become solid. If the DSL LED does not become solid, please refer to
the Troubleshooting Tips in the User Manual on your CD.
7 Follow the steps in this Quick Start’s Logging into the Configuration Manager and then continue with Step 6.
8 Go to the Configuration Manager’s Basic Setup page. Under Automatic Configuration, click Start.
9 If the X7N finds a PPPoE or PPPoA connection, on the Basic Setup page enter the User Name and Password for your Internet
Service Provider, then click Save. (You should have a User ID or User Name, which is often your email address or the characters
preceding the @ sign in your email address. You should also have a password. The PPPoE or PPPoA User Name and Password
are NOT the User ID and Password that you used to get into the Basic Setup menu.)
If the X7N finds a 1483 Bridged or 1483 Routed connection, you won’t need a User Name or Password.
If the X7N does not detect your connection, please refer to the Troubleshooting Tips in the User Manual on your CD.
Now check that your installation worked by opening a Web browser and connecting to your favorite web site. If you ca nnot connect to
the Web, please refer to the Troubleshooting Tips in the User Manual on your CD.
For Advanced Setup options such as setting up your X7N for online gaming, please refer to the User Manual on the CD.
If you would like to connect additional computers or other devices to your X7N, either with a cable or wirelessly, please continue below
with Connecting additional computers or devices to the X7N.
Connecting additional computers or other devices to the X7N
You can connect additional computers to the X7N in two ways. You can use a wired Ethernet connection by connecting an
Ethernet cable between the Ethernet port of your computer or other device and any one of the X7N’s four Ethernet ports, or you can
establish a
wireless connection.
Wired Ethernet Connection
1 Shut down and power off the computer you want to connect to the X7N. (This is important because the computer must locate the
correct IP address for the modem. This is done when the computer is turned back on in step 3 below.)
2 Plug an Ethernet cable between any one of the modem’s available ETHERNET ports and any of the computer’s available Ethernet
ports. Then turn on the computer or game station. An Ethernet LED on your modem’s top panel should turn on, corresponding to
the Ethernet port you used.
3 Verify that your Internet connection is working for that computer. Open your Web browser (for instance, Internet Explorer, Firefox,
or Chrome) and try to connect to a familiar Web address.
4 Repeat steps 1–3 for each computer you want to add.
Wireless Connection
First, determine whether the computer or other device has built-in WiFi®-compatible wireless capability. (This is also call ed 802.11 or
wireless LAN capability.) Most current notebooks and laptops do; most desktops don’t. If your compute r or other device doesn’t have
WiFi-compatible wireless capability, you will need to add that capa bility. The lo west cost way to do this for a computer is usually with a
WiFi-compatible USB adapter. You may want to use a WiF i-compatible Ethernet client inst ead if yo u want to give yo ur computer lo nger
range, or if you are using a computer or other device that doesn’t run a Windows or Macintosh operating system.
Once you have WiFi-compatible wireless capability, connect to the X7N’s wireless network. Many computers will display a message
such as: “Wireless network detected. Click here for available networks.” The X7N network is named Zoom unless you changed the
name. The X7N wireless network comes with security OFF to simplify installation. We recommend that you turn wireless security ON as
discussed below.
Setting Up Wireless Security
While configuring wireless security, we strongly recommend that you connect your computer to the X7N using an Ethernet cable.
We include instructions here for setting up a net work that supports devices that use either WPA2 or W PA security. Most devices support
one of these methods. You can check the manual that came with each device to confirm that all of your wireless devices support WPA2 or
WPA security.
Note: Older devices may not support WPA2 or WPA in which case you can use WEP (Wired Equivalent Privacy) 64-bit security, because
WEP-64 works with most wireless equipment. If you want to use WEP, please see the User Manual on the CD for instructions.
To set wireless security, follow these steps:
Refer to Logging into the Configuration Manager section and follow the steps to login to the Zoom Configuration Manager and
1
then continue with Step 2.
2 Click Wireless on the left-side menu of the Configuration Manager.
3 Then click Security on the left-side menu and from the drop-down menu for Select SSID, select Zoom.
4 From the Network Authentication drop-down menu, select Mixed WPA2 / WPA.
5 In the WPA Pre-Shared Key text box, enter a passphrase of your choice.
Page 3

6 Write down this passphrase and put it where you can find it – on the bottom of the X7N case, for instanc e, and in a M odemSettin gs
file.
7 Click Save/Apply.
8 Now you need to set up each of your wireless devices with the SSID and security key.
a. First, make sure that the device's wireless capability is switched on. (Many notebooks have a button for wireless, for
instance.)
b. Next go to the device’s area for configuring a wireless network connection.
c. Select the Site Sur vey, Scan or similarl y named option to see a list of the wireless access points in your area. That
list should include the SSID Zoom unless you changed the name to something else.
d. Select the X7N’s network (for instance, Zoom) and enter the WPA2 key that you just wrote down in Step 6.
e. Save your settings.
f. Check that you can now browse the Internet.
Your security setup is now complete for this computer or other device. If you don’t have other devices to set up, you’re done!
Logging into the Configuration Manager
1 Open the Zoom Configuration Manager by entering the following in your Web browser's address bar: http://192.168.1.1
2 In the Enter Network Password dialog box, type the following User Name and Password in lower case, then click OK.
User Name: admin
Password:
(The User Name and Password entered here are not the same as the User Name and Password that your Internet service prov ider
may have given you.)
zoomadsl
Setting Advanced Features
The options that are set by default when your X7N is installed are sufficient for most users. However, those who want or need to
change the X7N’s settings can do so using the Advanced Setup page in the Zoom Configuration Manager. For detaile d information
about using the Advanced features, please see the User Manual on the CD.
Troubleshooting Tips
For additional Troubleshooting Tips, please consult the User Manual on the CD.
My DSL Connection requires a User Name and Password but I don’t know where to find this information.
If you are replacing a modem, use the same User Name and Password that you used for the modem you're repl acing. If you don’t
remember your User Name and Password you may be able to change or retrieve them using either a software tool from yo ur provider
or online at your provider’s support website. If your provider does not offer these options, then you may need to speak to the provider to
get your User Name and/or Password.
I am unable to connect to the Internet.
Try the simplest connection, connecting a computer to one of the X7N Ethernet ports. Verify that the PWR light on the modem is on and
that your cable connections are correct. Most computers have a power light next to the Ethernet jack (to indicate the Ethernet cable is
properly connected). Verify that this light is on and that the Ethernet light on the front of the X7N is on. If the Ethernet light is off on
either the X7N or on the computer, verify that the cable is properly pushed in. If the light still doesn’t turn on you shoul d try another
Ethernet cable. Next, try turning your computer off and then on. This ensures that your computer gets a correct IP address from the
X7N.
To check your phone cable, replace it with a tested working phone cable. If you have installed a splitter between the X7N and the
phone jack, remove this filter. If this solves the problem you may need to replace this splitter. When testing the X7N make sure that the
telephones in your house are not in use. If the problem only exists when a particular phone is in use, then you ma y need to install a
filter on that phone; or if there is an existing filter, you should replace it.
If none of these steps corrected your problem, please refer to the full length User Manual for a more extensive list of Troubleshooting
Tips; or contact your service provider or Zoom’s support team as described below.
My computer/devices are not connecting wirelessly to the X7N.
Try the following:
Reorient the X7N antennas and/or the receiving antenna. Vertical antennas are usuall y best but you can try a horizontal orientation
for an X7N antenna.
Move the X7N to an area closer to your wireless devices.
Change the wireless channel. In the unlikely event that you experience performance issues with your wireless network, you may want
to set your network up on a channel that’s different from the factory-set channel of 10. For instructions on changing the wireless
channel, please refer to the full length User Manual on the CD.
Page 4

To Register Your Product Or Get Assistance
We can support you best if you register your product at www.zoomtel.com/register
We have many ways to assist you, and you can see them at
www.zoomtel.com/techsupport
Tech Support Numbers:
US: (617) 753-0961
UK (London): +44 2033180660
UK (Manchester): +44 1618840074
Regulatory Notices for X7N Router with Wireless-N
(Regulatory Notices also apply to ADSL Splitter Model TD-1301)
Operation is subject to the following two conditions: (1) this device may not cause harmful interference, and (2) this device must accept any interferen ce received,
including interference that may cause undesired operation.
WARNING!
IC Radiation Exposure Statement:
This equipment complies with IC’s RF radiation exposure limits set forth for an uncontrolled environment under the following conditions:
1. This equipment should be installed and operated su ch tha t a minimum separation distance of 20cm is maintained betwee n the radiator (antenna) &
user’s/nearby person’s body at all times.
2. This transmitter must not be co-located or operating in conjunction with any other antenna or transmitter.
CE Declaration of Conformity
This equipment complies with the requirements relating to electromagnetic compatibility, EN 55022/A1 Class B.
Zoom Telephonics, Inc. hereby declares that this router is in compliance with the essential requirements and other relevant provisions of Directive 1999/5/EC. The
complete Declaration of Conformity is available in the full length User Manual on the CD or at www.zoomtel.com/compliance
FCC Interference Statement
Note: This equipment has been tested and found to comply with the limits for a Class B digital device, pursuant to part 15 of the FCC Rules. These limits are
designed to provide reasonable protection against harmful interference in a residential installation. This equipment generates, uses and can radiate radio
frequency energy and, if not installed and used in accordance with the instructions, may cause harmful interference to radio communications. However, there is no
guarantee that interference will not occur in a particular installation. If this equipment does cause harmful interference to radio or television reception, which can be
determined by turning the equipment off and on, the user is encouraged to try to correct the interference by one or more of the following measures:
Additional regulatory and compliance information can be found on the included CD.
• Reorient or relocate the receiving antenna.
• Increase the separation between the equipment and receiver.
• Connect the equipment into an outlet on a circuit different from that to which the receiver is connected.
• Consult the dealer or an experienced radio/TV technician for help.
Page 5

GUIA DE INICIO RAPIDO X7N
Esta Guía de Inicio Rápido describe como conectar el X7N a uno o más computadores u otros dispositivos. En primer lugar se
configura el X7N utilizando un computador y luego se conecta el X7N a uno o más computadores u otro s dispositivos. Para
información más detallada incluyendo la información de cómo usar el X7N para jueg os en línea, esta se encuentra en el CD del
Manual del Usuario.
Contenido del Paquete
Zoom X7N módem ADSL un cable Ethernet un adaptador de poder Un cable largo de teléfono
Un “splitter” que le permite usar el mismo conector de ADSL en la pared, tanto para la conexión de Internet como para el servicio
telefónico (solo en algunos países). Algunos “splitters” se despachan con un pequeño cable telefónico conectado. Otros “splitters” se
despachan con un cable separado.
CD (contiene el “software” de instalación, documentación, garantía e información de Servicio al Cliente)
Si el servicio ADSL estaba funcionado en su ubicación y usted va a reemplazar un módem ADSL, lea esto.
Es importante saber si su servicio ADSL necesita que su módem tenga un Nombre de Usuario y una Contraseña par a acceder y
navegar en Internet. Este Nombre de Usuario y Contraseña pueden ser diferentes del Nombre de Usuario y Contraseña que usa para
ceder al correo electrónico del proveedor de servicios o para acc ed er a l Administrador de Configuración del módem. ac
Si su servicio ADSL SI necesita un Nombre de Usuario y Contraseña asegúrese de anotar las que ha estado usando. Le
serán útiles cuando usted instale el módem de Zoom.
Si su servicio ADSL NO necesita un Nombre de Usuario y Contraseña, por favor tenga en cuenta que algunos de estos
servicios requieren que se desconecte su “antiguo” módem por lo menos 2 horas antes de instalar un nuevo módem
incluyendo su módem de Zoom.
Para instalar el X7N en un computador Windows, use el Asistente de Instalación.
1 Encienda el equipo con Windows que va a utilizar para la configuración. Puede ser cualq uier computador con Windows 7, Vista™,
XP, 2000, Me o 98 con un puerto Ethernet disponible.
2 Inserte el CD suministrado en la unidad de CD de su equipo. El CD deberá ejecutarse automáticamente.
3 Siga las instrucciones en pantalla para el Asistente de Instalación.
Nota: Usuarios de Windows 7, es posible que aparezca un cuadro de men s aje que dice que su software no se ha instalado
correctamente. Pueden ignorar este mensaje con toda seguridad.
Ahora compruebe que su instalación funciona abriendo un navegador web y conectándose a su sitio web favorito. Si no puede
conectarse a la web, por favor, consulte la sección Consejos para la Solución de Problemas de esta Guía de Inicio Rápido o el
Manual del Usuario en el CD.
Para las opciones de Configuración Avanzada como la configuración de su X7N para juegos en línea, por favor consulte el Manual
del Usuario en el CD.
Si usted desea conectar computadores adicionales u otros dispositivos a su X7N, con cable, por favor vaya a la sección Como
conectar computadores adicionales u otros dispositivos a X7N.
Como instalar su X7N en un Macintosh u otro computador (sin utilizar el Asistente de Instalación)
1 Apague el equipo que desea conectar al X7N.
2 Conecte el adaptador de energía al receptor en el panel posterior de su X7N y conecte el otro extremo del adaptador al
tomacorriente de pared o a la multi-toma.
3 Presione el botón de Encendido en el panel posterior de su X7N para prender el modem.
4 Conecte un cable Ethernet en cualquiera de los puertos ETHERNET del X7N y cualquiera de los puertos Ethernet del computador o
del otro dispositivo. A continuación encienda el computador o la estació n de juegos. Un in dicador LE D Ethernet en el panel su perior
de su módem se debe encender.
Diagrama del Panel Posterior del X7N
ANTENA DSL ETH 4 ETH 3 ETH 2 ETH 1 POWER RESET/WPS ENCENDER/APAGAR ANTENA
5 Conecte el cable telefónico que se incluye, entre el puerto DSL de su módem y un puerto telefónico con servicio ADSL en la pared.
Page 6

Nota: Muchos modelos del X7N incluyen un filtro/splitter. Este se puede usar si usted quiere usar un teléfono cerca del módem.
Un filtro/splitter o filtro ADSL debe ser también usado con teléfonos no localizados cerca del módem, para prevenir inter f erencia
entre el módem y el teléfono cuando el teléfono esta descolgado.
Para usar un filtro/splitter con un módem y un teléfono, primero conecte el puerto LINE o PHONE LINE del filtro/splitter en la
pared, luego conecte el cable telefónico que se incluye entre el puerto DSL del módem y el puerto MODEM del filtro/sp litter.
Finalmente conecte el teléfono en el puerto PHONE del filtro/splitter. (Algunos, pero no todos los filtros/splitters requieren que
usted use un cable telefónico corto para conectarlo al puerto en la pared)
Note que el filtro/splitter NO se necesita si usted simplemente quiere conectar su módem a la pared, sin compartir el puerto con un
teléfono.
Si usted está usando un filtro/splitter solo con un teléfono y no con un módem, conecte el puerto LINE o PHONE LINE del
filtro/splitter en la pared, luego conecte el teléfono en el puerto PHONE del filtro/splitter. (Algunos, pero no todos los
filtros/splitters requieren que usted use un cable telefónico corto para conectarlo al puerto en la pared)
6 Después de unos segundos el LED DSL empezará a titilar, luego quedara fijo. Si no queda fijo, por favor, consulte los Consejos
para la Solución de Problemas en el Manual del Usuario en su CD.
7 Siga los pasos en Como Registrarse en el Administrador de Configuración de esta Guia de Inicio Rápido y luego continúe con
el Paso 6.
8 Vaya a la página Configuración Básica del Administrador de Configuración. Debajo de Configuración Automática, haga clic en
Inicio.
9 Si el X7N encuentra una conexión PPPoE o PPPoA, en la página Configuración Básica ingrese el Nombre de usuario y la
Contraseña para su Proveedor de Servicio de Internet, luego haga clic en Guardar. (Usted debe tener un ID de Usuario o Nombre
de Usuario, que por lo general es su dirección de correo electrónico o los caracteres que preceden el signo @ en su dirección de
correo electrónico. Usted también debe tener una contraseña. El Nombre de Usuario y la Contraseña PPPoE o PPPoA NO son el
ID de Usuario y la Contraseña que usted usa para ingresar el menú de Configuración Básica).
Si el X7N encuentra una conexión 1483 Bridged o 1483 Routed, no necesitará un Nombre de Usuario o Contraseña.
Si el X7N no detecta su conexión, por favor consulte los Consejos para la Solución de Problemas en el Manual del Usuario en su
CD.
Ahora compruebe que su instalación funciona abriendo un navegador Web y conectándose a su sitio web favorito. Si no puede
conectarse a la Web, por favor, consulte la sección Consejos para la Solución de Problemas en el Manual del Usuario en su CD.
Para las opciones de Configuración Avanzada como la de configurar su X7N para juegos en línea, por favor, consulte el Manual del
Usuario en el CD.
Si desea conectar computadores adicionales u otros dispositivos a su X7N, ya sea con cable o inalámbricamente, por favor siga
adelante con Como conectar computadores adicio nales o dispositivos al X7N.
Como conectar computadores adicionales o dispositivos al X7N
Usted puede conectar computadores adicionales al X7N de dos formas. Puede utilizar la Conexión Ethernet de Cable conectando
un cable Ethernet entre el puerto Ethernet de su computador u otro dispositivo y uno cualquiera de los cuatro puertos Ethernet del
X7N, o puede establecer una conexión inalámbrica.
Conexión Ethernet de Cable
1 Apague el computador que desea conectar al X7N.
2 Conecte un cable Ethernet en cualquiera de los puertos ETHERNET del X7N y cualquiera de los puertos Ethernet del computador
o del otro dispositivo . Luego encienda el computador o la estación de juegos. La Luz LED Ethernet en el panel superior de su
módem deberá encenderse, la correspondiente al puerto Ethernet que usted utilizó.
3 Confirme que ya puede conectar este computador u otro dispositivo a la Web.
Conexión Inalámbrica
En primer lugar, determine si el computador u otro dispositivo tiene capacidad inalámbrica incorporada compatible con WiFi
también se llama capacidad 802.11 o capacidad LAN inalámbrica). La mayoría de los notebo oks y portátiles actuales la tienen, pero la
mayoría de los equipos de escritorio no. Si su computador u otro dispositivo no tienen capacidad inalámbrica compatible con WiFi
usted tendrá que agregar esa capacidad. La manera menos costosa de hacer esto para un computador es por lo general con un
adaptador USB compatible con WiFi. Es posible que desee utilizar un cliente Ethernet compati ble con WiFi si desea darle a su
computador un alcance más amplio o si está usando un computador u otro dispositivo que no funciona con un sistema operativo
Windows o Macintosh.
Una vez que tenga capacidad inalámbrica compatible con WiFi, conéctese a la red inalámbrica del X7N. Muchos computadores
desplegarán un mensaje como: “Red inalámbrica detectada. Haga clic aquí para ver las redes disponibles”. La red del X7N se llama
Zoom a menos que usted le haya cambiado el nombre. La red inalámbrica del X7N viene con la seguridad APAGADA para facilitar la
instalación. Recomendamos que PRENDA la seguridad inalámbrica tal como se discute abajo.
Como Configurar la Seguridad Inalámbrica
Mientras configura la seguridad inalámbrica le recomendamos que conecte su computador al X7N mediante un cable Ethernet.
Aquí se incluyen las instrucciones para conf igurar una r ed que sea com patible con l os dispositivos qu e usan ya sea l a seguridad WPA2 o
WPA. La mayoría de los dispositivos soporta uno de estos dos métodos. Usted puede consu ltar el manual que viene con cad a dispos itivo
para confirmar que todos sus dispositivos inalámbricos soportan la seguridad WPA2 o WPA.
®
. (Esto
Page 7

Nota: Es posible que los dispositivos más antiguos no soporten WPA2 o WPA en cuyo caso se puede usar la segurid ad WEP (Wired
Equivalent Privacy) de 64-bit, porque WEP-64 funciona con la mayoría de los equipos inalámbricos. Si desea uti lizar WEP, por favor,
consulte el Manual del Usuario en el CD para obtener instrucciones.
Para configurar la seguridad inalámbrica, siga estos pasos:
1 Consulte la sección Como registrarse en el Administrador de Configuración y siga los pasos para iniciar sesión en el
Administrador de Configuración de Zoom y continúe con el Paso 2.
2 Haga clic en Inalámbrica en el menú del lado izquierdo del Administrador de Configuración.
3 A continuación haga clic en Seguridad en el menú del lado izquierdo y en el m enú de la lista desplegable Seleccione SSID,
seleccione Zoom.
4 En el menú desplegable Autenticación de Red, seleccione Mixed WPA2 / WPA.
5 En la caja de texto WPA Pre-Shared Key, ingrese una contraseña de su elección.
6 Anote esta contraseña y colóquela donde la pueda encontrar con facilid ad – por ejemplo, en el fondo de la caja del X7N, y en un
archivo de “settings” del módem.
7 Haga clic en Guardar/Aplicar.
8 Ahora debe configurar cada uno de sus dispositivos inalámbricos con la SSID y la clave de seguridad.
a. En primer luga r, asegúrese de que la capacidad inalámbrica del dispositivo este encendida. (Por ejemplo, muchos
portátiles tienen un botón para redes inalámbricas).
b. Luego vaya a la zona del dispositivo para la configuración de una conexión de red inalámbrica.
c. Seleccione Site Survey, Scan o una opción con un nombre similar para ver una lista de puntos de acceso
inalámbricos en su área. Dicha lista debe i ncluir el SSID Zoom a menos que usted le haya cam biado el nombre a
algo diferente.
d. Seleccione la red del X7N (por ejemplo, Zoom) e ingrese la clave WPA2 que usted anoto en el Paso 6.
e. Guarde su configuración.
f. Compruebe que ahora puede navegar por Internet.
Su configuración de seguridad ya está completa para este comp utador u otro dispositivo. ¡Si no tiene otros dispositivos para
configurar, ya está listo!
Como Iniciar Sesión en el Administrador de Configuración 1 Abra el Administrador de Configuración de Zoom ingresando lo siguiente en la barra de direccio nes de su navegador web:
http://192.168.1.1
2 En la caja de diálogo Ingresar Contraseña de la Red, digite el siguiente Nombre de Usuario y Contraseña en minúsculas, luego
haga clic en OK.
Nombre de Usuario: admin
Contraseña: zoomadsl
(El Nombre de Usuario y la Contraseña aquí ingresados no son los mismos Nombre d e Usuario y Contraseña que su proveedor de
servicios de Internet le ha dado).
Configuración de funciones avanzadas
Las opciones que se configuran por defecto cuando se instala el X7N son suficientes para la mayoría d e los usu arios. Sin embargo,
aquellos que desean o necesitan cambiar la configuración d el X7N lo pueden hacer utilizando la página Configuración Avanzada en
el Administrador de Configuración de Zoom. Para obtener información detallada sobre el uso de las fu nciones Avanzadas, por favor,
consulte el Manual del Usuario en el CD.
Consejos para Solucionar los Problemas
Para obtener Consejos adicionales sobre la Solución de los Problemas, por favor, consulte el Manual del Usuario en el CD.
Mi conexión DSL necesita un Nombre de Usuario y Contraseña pero no sé dónde encontrar esta in formación.
Si está reemplazando un módem, utilice el Nombre de Usuario y la Contraseña que uso para el módem que está reemplazando. Si no
recuerda su Nombre de Usuario y la Contraseña usted puede cambiarlos o recuperarlos utilizando una herramienta de software de su
proveedor o en línea en el sitio web de soporte de su proveedor. Si su proveedor no le ofrece estas opciones, entonces es probable
que tenga que hablar con el proveedor para obtener su Nombre de Usuario y/o Contraseña.
Soy incapaz de conectarme a Internet.
Intente la conexión más sencilla, conectar un computador a uno de los puertos Ethernet del X7N. Compruebe que la luz PWR del
modem este encendida y que las conexiones de cable son correctas. La mayoría de los computadores tienen una luz de encendido
junto a la toma Ethernet (para indicar que el cable Ethernet está conectado correctamente). Compruebe que esta luz está encendida y
que la luz Ethernet en la parte delantera del X7N está encendida. Si la luz Ethernet está apagada ya sea en el X7N o en el computador
verifique que el cable está correctamente empujado. Si la luz todavía sigue sin encenderse usted debe p r obar con otro cable Ethernet.
A continuación, intente apagar y encender su computador. Esto asegura que el equipo reciba una d irección IP correcta del X7N.
Para comprobar su cable telefónico, reemplácelo con un cable de teléfono a prueba que esté funcionando. Si ha instalado un divisor
entre el X7N y la toma de teléfono, elimine el filtro. Si esto resuelve el problema, es necesario sustituir el divisor. Cuando pruebe el
X7N asegúrese de que los teléfonos de su casa no estén en uso. Si el problema solo existe cuando un teléfono en particular está en
uso, entonces debe instalar un filtro en ese teléfono; o si hay un filtro existente deberá reemplazarlo.
Si ninguno de estos pasos logra corregir su problema, por favor, consulte el Manual del Usuario en toda su extensión a ver si
encuentra una lista más amplia de Consejos para la Solución de los Problemas, o póngase en contacto con su proveedor de servicios
o con el equipo de soporte de Zoom como se describe a continuación.
Page 8

Mi computador/dispositivos no están conectando inalámbricamente al X7N.
Intente lo siguiente:
Reoriente las antenas y/o la antena receptora del X7N. Las antenas v erticales suelen ser las mejores pero puede intentar una
orientación horizontal para una antena del X7N.
Mueva el X7N a un área más cercana a sus dispositivos inalámbricos.
Cambie el canal inalámbrico. En el caso improbable de que surjan problemas de rendimiento con su red inalámbrica, es posible que
desee configurar su red en un canal diferente al canal por defecto de fábrica 10. Para obtener instrucciones sobre cómo cambiar el
canal inalámbrico, por favor, consulte el Manual del Usuario en el CD.
Para Registrar Su Producto o Recibir Asistencia
Le podremos soportar de mejor manera si registra su producto en www.zoomtel.com/register
Tenemos muchas formas para asistirlo, y las puede ver todas en www.zoomtel.com/techsupport
US: (617) 753-0961 UK (London): +44 2033180660 UK (Manchester): +44 1618840074
Información Reglamentaria por X7N y ADSL Splitter Model TD-1301
La operación está sujeta a las siguientes dos condiciones: (1) este dispositivo no puede cau sa r interferencias perjudiciales, y (2) este dispositivo debe aceptar
cualquier interferencia recibida, incluyendo interferencias que puedan provocar un funcionamiento no deseado.
¡ADVERTENCIA!
Declaración de Exposición a Radiación IC:
Este equipo cumple con los límites de exposición a la radiación IC de RF establecidos para un entorno no controlado bajo las siguientes condiciones:
1. Este equipo debe ser instalado y operado de tal manera qu e se mant eng a un a dist ancia mínima de separación de 20 cm. entre el radiador (anten a) y el
usuario/cuerpo de una persona cercana todo el tiempo.
2. Este transmisor no debe ser colocado o puesto en funcionamiento junto con ninguna otra antena o transmisor.
Declaración de Conformidad CE
Este equipo cumple con los requisitos en materia de compatibilidad electromagnética, EN 55022/A1 Clase B.
Zoom Telephonics, Inc., declara que este enrutador cumple con los requisitos esenciales y otras disposiciones pertinentes de la Directiva 1999/5/EC. La
Declaración de Conformidad completa está disponible en el Manual en el CD o en
Declaración de Interferencia de la FCC
Nota: Este equipo ha sido probado y cumple con los límites para un dispositivo digital de Clase B, de conformidad con la Parte 15 de las Reglas de la FCC. Estos
límites han sido diseñados para proporcionar una protección razonable contra interferencias perjudiciales en una instalación residencial. Este equipo genera, usa
y puede irradiar energía de radiofrecuencia y, si no se instala y utiliza de acuerdo con las instrucciones, puede causar interferencias perjudiciales en las
omunicaciones de radio. c
Sin embargo, no hay garantías de que no se produzcan interferencias en una instalación particular. Si este equipo causa interferencias perjudiciale s en la
recepción de radio o televisión, lo cual puede se r determinado apagando y encendiendo el equip o, se re comienda al usuario que intente corregir la interferencia
tomando una o varias de las s iguientes medidas:
• Reorientar o reubicar la antena receptora.
• Aumentar la separación entre el equipo y el receptor.
• Conectar el equipo a un tomacorriente en un circuito diferente al que está conectado el receptor.
• Consultar al distribuidor o a un técnico de radio/TV para obtener ayuda.
La información reguladora y de la conformidad adicional se puede encontrar en el CD incluido.
www.zoomtel.com/compliance
2731-A 27658-2 ©2011
 Loading...