

Page 1

A
S
6
USER GUIDE
ZOOM
D
L X
v
Page 2
Important Safety Measures
• To reduce the risk of fire, use the supplied phone cord or an AWG 26 or
larger UL-listed or CSA-certified phone cord.
• Do not use this product near water — for example, in a wet basement or
next to a swimming pool.
• Avoid using a telephone (other than a cordless phone) during an electrical
storm.
• Do not use the telephone to report a gas leak while you are in the vicinity of
the leak.
• WARNING: If your modem has a removable antenna, attach only the
antenna that was provided or an equivalent indoor antenna meeting local RF
transmission regulations. DO NOT attach any antenna or antenna cable that
has outdoor exposure.
Page 3

Contents
Contents............................................................................3
Overview............................................................................7
Installation Instructions...................................................8
Package Contents........................................................8
Before You Begin.........................................................9
Installing the X6v...........................................................10
Windows Installation ..................................................10
Macintosh and Linux Installation................................12
Installing the Hardware...........................................13
Establishing Communication......................................15
Setting Up a Network .................................................19
To Connect Additional Wired Computers ...............19
To Connect a Network Device................................20
Universal Plug and Play ................................................21
If You Need Help...........................................................21
Setting Up Your Wireless Network ...............................22
Connecting a Windows Vista Computer with Built-in
Wireless Capabilities..................................................23
Connecting a Windows XP Computer with Built-in
Wireless Capabilities..................................................25
Connecting a Wireless-Enabled Computer
to the X6v...................................................................26
Checking Your Settings .............................................28
Setting Wireless Security ..............................................29
Overview ....................................................................29
Setting Up Security Using WEP.................................29
Setting Up Security Using WPA2 or WPA .................33
802.1x Authentication .............................................35
Wireless Distribution System (WDS)
Configuration ..........................................................37
Wireless MAC Filtering ...........................................38
Table of Contents 3
Page 4

Setting Up VoIP Service.................................................39
Using the Zoom Configuration Manager to Set Up
VoIP Service .................................................................39
Changing Your VoIP Settings........................................44
Speed Dials................................................................44
Call Forwarding..........................................................45
Ringing Based on Caller ID........................................45
Do Not Disturb ...........................................................46
Call Waiting/Caller ID.................................................46
Incoming Call Blocking...............................................47
Outgoing Call Blocking...............................................48
Advanced VoIP Configuration .......................................49
VoIP System Settings ................................................50
Date/Time ...............................................................50
VoIP Subsystem Network Configuration.................51
Static IP / DNS Configuration .................................51
HTTP/Telnet/FTP Server........................................52
STUN Settings........................................................53
VoIP Parameters........................................................54
Audio Settings.........................................................54
RTP Protocol Parameters.......................................55
SIP Parameters..........................................................55
Regionalization Settings ............................................56
SLAC Configuration................................................56
CODEC Configuration ............................................57
Subscription Services ................................................58
Dialing Parameters .................................................58
Bridging from VoIP to PSTN...................................59
Bridging from PSTN to VoIP...................................64
Miscellaneous TELCO Parameters ........................68
Emergency Services...............................................68
Controlling the X6v from Your Phone............................70
Resetting Your VoIP Configuration ...............................71
4
ADSL X6v User Guide
Page 5

The X6v and Online Gaming..........................................72
Setting Up the X6v for Online Gaming ..........................73
Step 1: Choosing an IP Address for Gaming .............73
Step 2: Setting Up a Virtual Server or DMZ ...............77
Setting Up a Virtual Server or DMZ on Your
Computer................................................................78
Setting Up a DMZ on an Xbox or Xbox 360............81
Setting Up a DMZ on a PlayStation 2 or 3.............83
Using Router Setup........................................................85
Viewing the Router Setup Options ................................86
Configuration Options ................................................86
Status Options ...........................................................89
Administration Options...............................................89
Using the WAN Configuration Settings .........................91
Using the Ethernet Configuration Settings ....................97
Setting Up a Static Routing Table .................................98
Adding Extra Security with Advanced Firewall
Filtering .......................................................................100
Setting Security Logging .............................................105
Configuring Intrusion Detection...................................106
Adding a DNS Server Name .......................................109
Creating a Virtual Server or a DMZ.............................110
Using the ADSL Settings.............................................112
Changing Your LAN Settings ......................................113
Creating a Fixed (Static) IP Address...........................116
Assigning a Half Bridge Device...................................117
Enabling or Disabling UPnP........................................118
Assigning Ports to a PVC............................................119
Changing HTTP and Telnet Ports ...............................121
Filtering Out MAC Addresses......................................122
Managing Access to Services .....................................124
Configuring Quality of Service.....................................125
TR-069 ........................................................................129
Monitoring ADSL, Wireless, and Ethernet Status........132
Table of Contents 5
Page 6

Changing Your Password............................................135
Restore/Reset Factory Settings ..................................136
Backing Up and Restoring Your Configurations..........137
Updating Your Firmware .............................................138
Appendix A: ADSL Internet Settings Tables.............139
Appendix B: Front and Back Panels..........................143
Appendix C: TCP/IP Network Settings ......................146
Macintosh TCP/IP Settings ......................................147
Mac OS X .............................................................147
Mac OS 7.6.1 - 9.2.2.............................................148
Linux TCP/IP Settings..............................................149
RedHat..................................................................149
SuSE ....................................................................149
Debian ..................................................................149
Windows TCP/IP Settings........................................150
Windows XP .........................................................150
Windows 2000 ......................................................151
Windows 98/Me ....................................................152
Appendix D: Troubleshooting....................................153
Appendix E: Configuring Your Web Browser..........158
Configuring Internet Explorer ......................................159
Configuring Mozilla Firefox..........................................161
Appendix F: Wireless Channels by Country.............162
Appendix G: Regulatory Information.........................163
Declaration of Conformity ...........................................165
6
ADSL X6v User Guide
Page 7

Overview
This User Guide provides instructions for setting up your X6v,
connecting the X6v
securing your network, setting up a Voice over Internet Protocol
(VoIP) telephone service, and configuring the X6v
For most customers, Chapter 1 covers what you need to get
connected to the Internet. Chapter 2 applies if you want to set up a
network. Chapter 3 provides security information, Chapter 4
covers VoIP setup, and Chapter 5 provides what you need for
gaming.
Chapter 6, Router Setup, is primarily for System Administrators.
This chapter explains how to use features such as adding extra
security to the X6v with firewall filtering, backing up and restoring
the X6v
configuration, updating the firmware, and creating a fixed
IP address.
to wired and wireless computers on a network,
for gaming.
You can find the latest information about the X6v
at the Zoom
Web site:
http://www.zoom.com/products/adsl_overview.html
Overview
7
Page 8

1
Installation Instructions
This chapter includes the basic instructions needed to install
your X6v and connect to the Internet using a Macintosh
or Windows
Note to Windows users: If you did not successfully set up the
X6v using the Install Assistant, follow these instructions to install
the X6v manually. If you already installed and connected your
X6v (using the separate Quick Start booklet provided for
Windows users), you can skip this chapter and begin with
Chapter 2.
®
operating system.
®,
Linux,
Package Contents
Your package contains the following items:
•
Zoom ADSL X6v
•
Ethernet cable
Phone cord
•
•
Power cube
CD
•
The CD contains the installation software, documentation,
warranty, and Customer Support information.
modem
If anything is missing or damaged, please contact Zoom Customer
Support or whoever sold you the modem.
8
ADSL X6v User Guide
Page 9

9
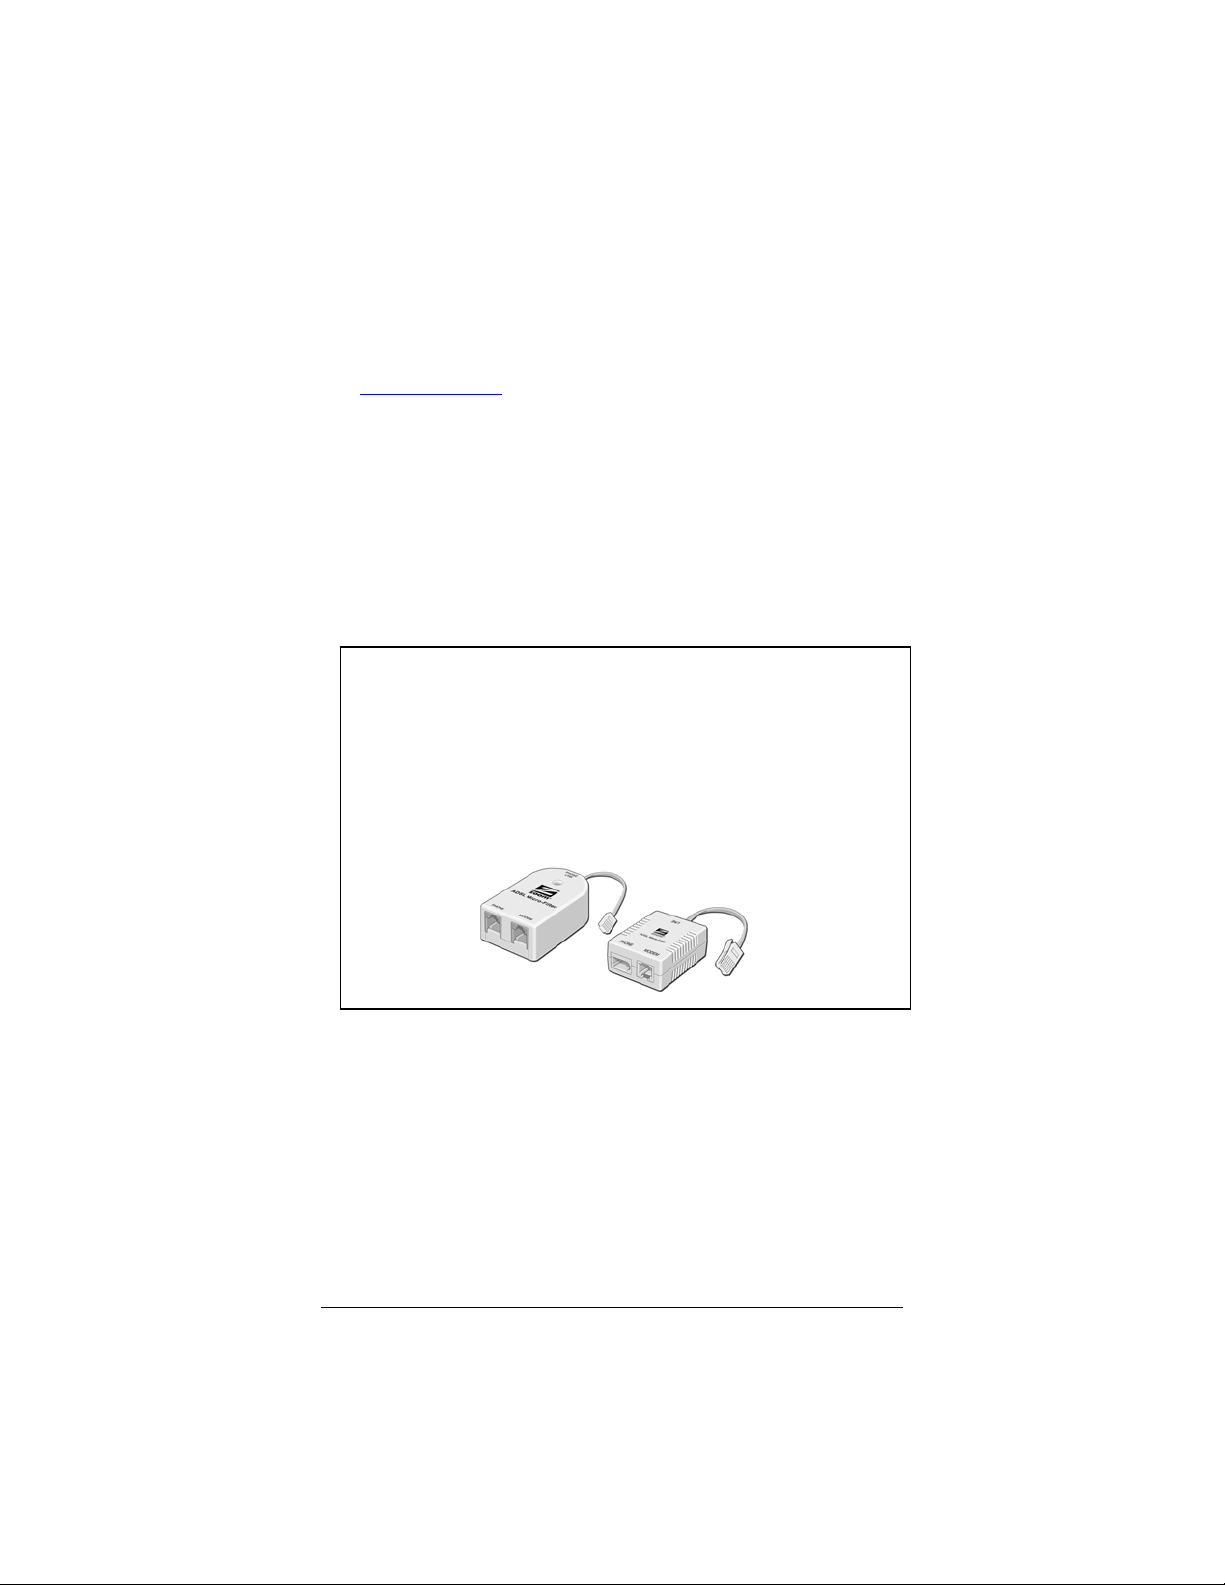
In addition, the package might include:
¾ A splitter to enable you to use a single ADSL wall jack for
both an Internet connection and for telephone service
(certain countries only)
¾ Phone-jack adapter to adapt the phone cord to a particular
phone jack (certain countries only)
¾ ADSL line filter(s) (certain models only)
Before You Begin
You will need the following:
¾ ADSL service enabled on your telephone line. If you
haven't already done so, you need to register with an
ADSL service provider.
¾ One or more computers or laptops that you want to
connect to the Internet. The X6v
Linux, and Windows Vista, XP, 2000, Me and 98 operating
systems.
¾ A Web browser. The minimum browser requirements on
Windows are Internet Explorer v6, Firefox v1.0.3,
Netscape v7.2, Opera v8.54, or Chrome v0.3.154.9; on
Macintosh, Safari v3.0.4 or Firefox v2.0.3.
¾ For wireless connections, the computer(s) must have built-
in wireless capability or be equipped with a wireless
adapter. The X6v
supports 802.11b and 802.11g
compatible adapters.
¾ For direct wired connections to the X6v's ETHERNET
ports, the computer(s) must have an Ethernet port.
¾ Additional Ethernet cables if you plan to connect more
than one computer directly to the modem. The X6v
supports up to four direct Ethernet connections.
¾ If you want to use your X6v’s Internet calling capabilities
but your unit does not include Voice over Internet
Protocol (VoIP) service, you will need to sign up with a
VoIP provider.
¾ For Internet calling you will also need a standard telephone
(or telephones).
supports Macintosh,
Chapter 1: Installation Instructions
Page 10

¾ If you want to be able to switch between Internet calling
and standard landline calls, you will need a traditional
landline telephone connection. This connection provides
emergency backup if you lose power.
Installing the X6v
¾ Macintosh and Linux users: please go to page 12.
Important! If possible, use a computer that is centrally located
in your home or office and that has easy access to an ADSL line. A
central location helps assure good wireless performance. If you do
not have a desktop computer located centrally in your home (if, for
example, the desktop is in the basement), or you only have
notebook computers, you should still directly connect this desktop
computer or one of your notebooks to the X6v to configure it.
Once the X6v is set up and your Internet connection is working,
you can unplug the computer from the unit and move the X6v to a
more central location.
Windows Installation
Windows users can quickly install the software and hardware then
configure the X6v using Zoom's Install Assistant on the CD. If you
have already run the Install Assistant, please go to
Network on page 19.
If you encountered a problem using the Install Assistant, follow the
instructions for Macintosh and Linux users starting on page
1 Choose the Windows computer that you will use for setup.
This can be any Windows Vista™, XP, 2000, Me or 98SE
computer with an available Ethernet port.
2 Switch off the computer. Wait a few seconds, then switch it
on. Wait until the computer completes its power-up process.
3 Close all open programs, including any anti-virus software or
pop-up blockers.
4 Insert the X6v CD into the computer's CD drive. The CD
should start automatically after a few seconds.
10
ADSL X6v User Guide
Setting Up a
12.
Page 11
If the CD does not start automatically, click the Windows Start
button (Windows Vista users: click All Programs, then
Accessories), click Run, and then type E:\setup.exe, where
E is the letter of your CD drive.
For Windows Vista only:
If the AutoPlay dialog box appears, click Run Setup.exe:
If a message appears stating that an unidentified program
wants access to your computer, click Allow.
5 When the Zoom ADSL Modems screen opens, select Install
Assistant from the menu.
The Install Assistant displays a series of screens that guide you
through the installation process.
For Windows Vista and XP users: If a message appears, telling
you that the Windows Firewall has blocked some features of
this program, select Unblock, and continue with the
installation.
6 On the Install Assistant screen, select your modem from the
list of Zoom ADSL modem models, then click Next.
7 Follow the on-screen prompts to plug in the required cables
and wired equipment, then set up the ADSL and VoIP service
connections.
Chapter 1: Installation Instructions
11
Page 12
8 If you are prompted to enter your user name and password,
remember that they are case-sensitive:
9 When you complete the installation and setup, click Finish to
update your modem and close the Install Assistant.
Congratulations! You have established communication and your
computer is now connected to the Internet.
If you will not be using the VoIP feature, and you want to connect
other computers to the X6v, continue with
starting on page
If you are or will be using the VoIP feature, first set up a network,
if desired (as described on page
Up VoIP Service on page 39.
19.
19), then go to Chapter 4: Setting
Setting Up a Network
Macintosh and Linux Installation
Windows users: If you did not run the Install Assistant on the CD,
follow these instructions to install the hardware and configure your
X6v.
12
ADSL X6v User Guide
Page 13
3
Installing the Hardware
1 Shut down and power off your computer.
(This can be any one of the computers that you plan to use
with the X6v
that is closest to your ADSL wall jack.)
2 Rotate the antenna on the back of the modem to a vertical
position.
3 Connect the modem to the computer’s Ethernet port.
. In a typical situation, this would be the computer
Plug one end of the Ethernet cable
modem’s ETHERNET ports (Ethernet 1, Ethernet 2,
X6v
into any one of the
Ethernet 3, or Ethernet 4) and plug the other end into your
computer’s Ethernet port.
4 Plug the power cube into a power strip or wall outlet and then
plug the power cube’s other end into the modem’s POWER
jack.
Important!
Only use the power cube shipped with the X6v. Other power
cubes might damage your hardware.
5 After you plug in the power cube, the POWER and WLAN
lights on the front panel of the modem should become steady
on, and the DSL light should flash. If the POWER light does
not turn on, press the
button on the modem's rear panel
and make sure that there is power at the wall outlet or power
strip where you plugged in the power cube.
Chapter 1: Installation Instructions
1
Page 14
6 Turn on the computer.
7 Plug one end of the supplied phone cord into the modem’s
DSL port and the other into the ADSL wall jack. The flashing
DSL light should become steady on. If it does not, refer to
Troubleshooting on page 153.
8 If you want to use the modem's VoIP capability, plug a phone
or cordless phone base station into the X6v's PHONE
connector.
To be able to switch between Internet and standard landline
phone service, plug one end of the supplied phone cord into
the X6v's TELCO (i.e., TELephone COmpany) connector and
the other end into the wall jack where you would normally plug
in a standard telephone.
We recommend that you put an ADSL filter on every
phone connected to the ADSL phone line. If you received a
filter or filter/splitter from Zoom, you can use that. You can
also purchase an ADSL filter from a retailer of telephone
accessories. ADSL filters and filter/splitters come in a variety
of styles and sizes and might not look identical to the
filter/splitters shown here.
a
Plug the LINE or PHONE LINE connector of the filter
into the wall jack that is enabled for DSL service.
Plug the X6v into the filter's MODEM connector.
b
Optionally, connect a phone cord between the filter's
c
PHONE connector and your X6v’s TELCO port.
Congratulations! You have installed the hardware. Now
continue with the next section, Establishing
Communication.
14
ADSL X6v User Guide
Page 15

5
Establishing Communication
Important!
Macintosh and Linux users must make sure that the computer’s
TCP/IP settings are configured properly BEFORE starting this
section. See Macintosh TCP/IP Settings on page 147 or Linux
TCP/IP Settings on page 149 for instructions.
You must set up the X6v so that it can communicate with your
Internet service provider. Follow these steps:
1 Close all programs including antivirus software and pop-up
blockers.
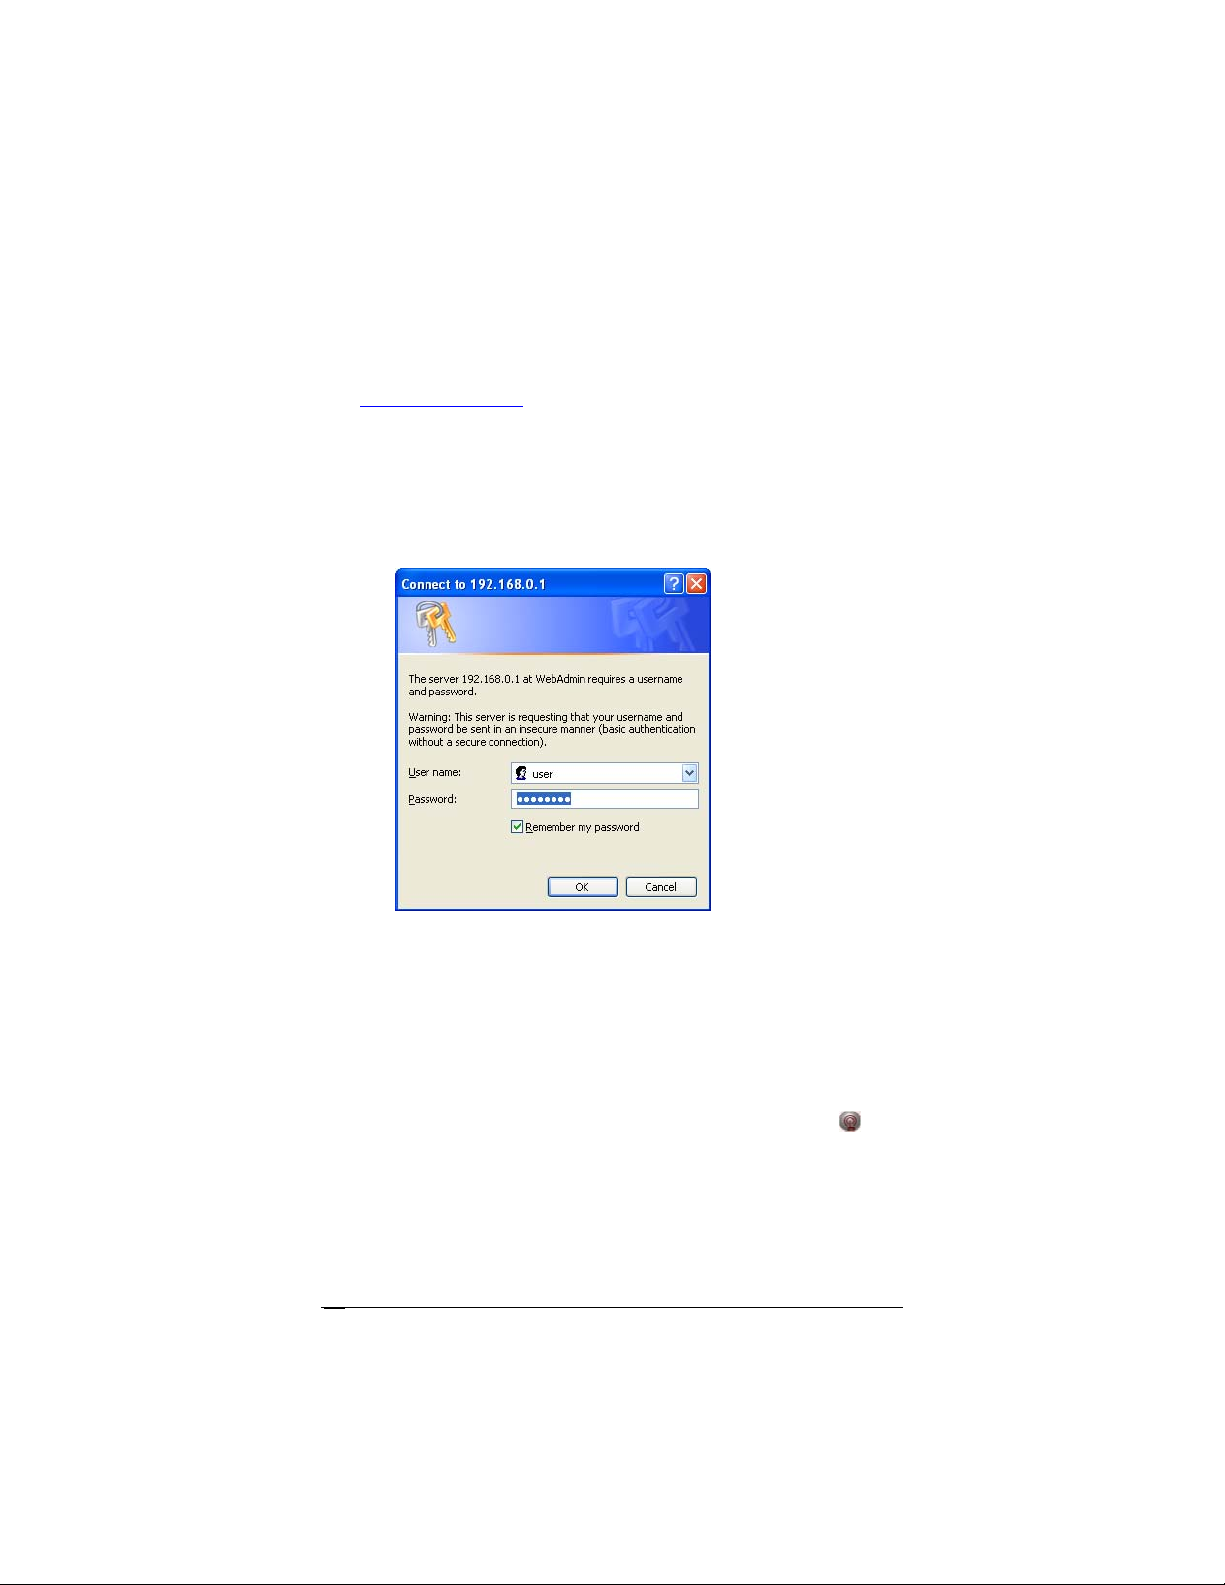
2 Log into the Zoom Configuration Manager:
a Open your Web browser and type http://192.168.0.1 in
the browser's address field.
b When the authentication dialog opens, type user in the
User Name field and password in the Password field, as
shown here.
User Name: user
Password: password
Note: The User Name (user) and Password (password)
that you type in this dialog are used by the Zoom
Configuration Manager for non-administrative users and
must be typed as shown, using lower-case characters. (The
User Name and Password for administrative users are
described in Using Router Setup on page 86.) These
identifiers are not the user name and password that your
Internet Service Provider might have given you nor are
they names that you choose.
If you are not prompted for a User Name and Password,
do the following, in this order: Recheck all connections;
restart the modem and computer; then reset the modem
by inserting a paper clip into the Reset pinhole in the
modem’s back panel and holding it for at least 3 seconds.
Important:
To protect your configuration, choose your own X6v password
after the setup is complete. See Changing Your Password on
page 135.
Chapter 1: Installation Instructions
1
Page 16
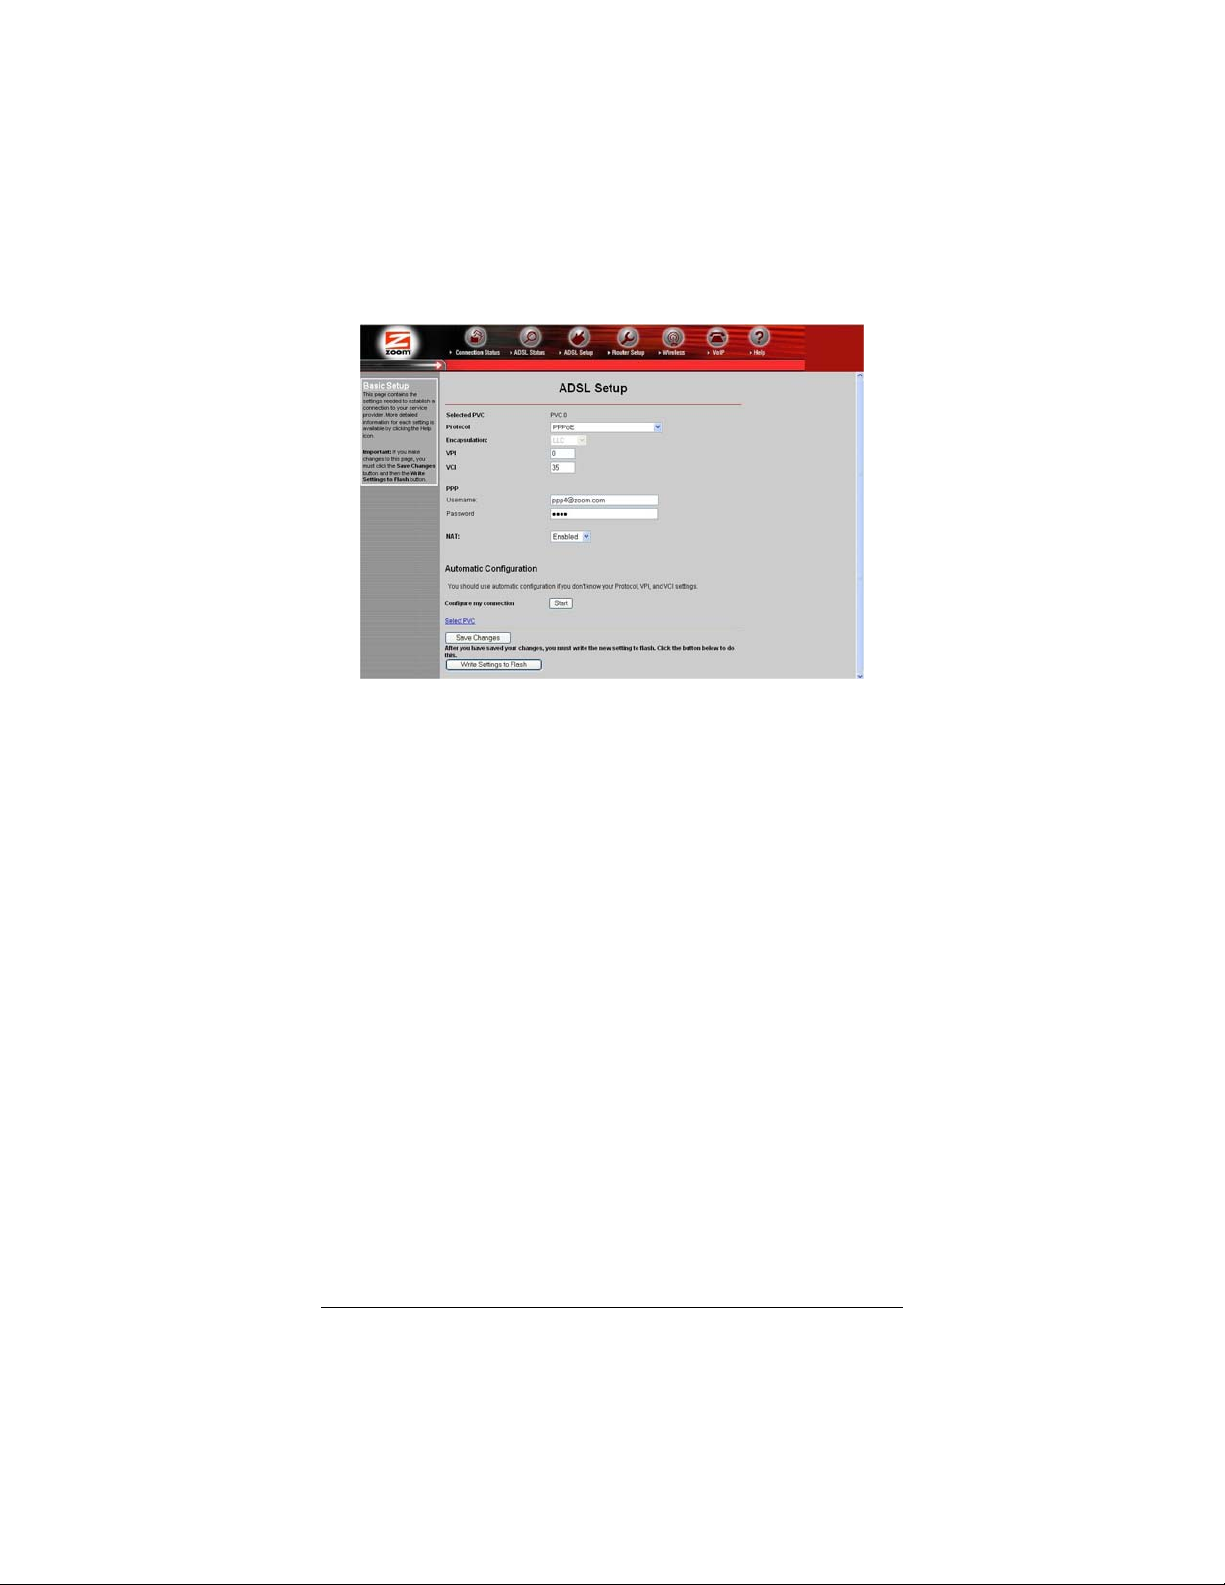
3 After you log in, use the ADSL Setup page to configure the
modem so it can connect with your Internet service provider.
• To use Automatic Configuration (recommended):
At Configure my connection, click Start.
On the Settings successfully detected dialog, click OK
to return to the ADSL Setup page.
If the X6v finds a PPPoE or PPPoA connection, on the
ADSL Setup page, enter the user name and password
given to you by your Internet Service Provider.
If the X6v finds a 1483 Bridged or 1483 Routed
connection, you have the option of using either dynamic
or static IP addressing. Depending on your situation, select
the appropriate option button:
− [MOST USERS] Ensure that Obtain an IP
address Automatically is selected if you are
using Dynamic Host Configuration Protocol (also
known as DHCP or dynamic IP addressing). This
option is selected by default because most Internet
service providers use DHCP.
− Select Use the following IP Address only if you
are using a static IP address. (You should know if
you are using static IP addressing. There is
typically an extra charge for a static IP address and
16
ADSL X6v User Guide
Page 17

7
you usually have to make special arrangements
with your Internet service provider to get one.)
Enter the IP Address, Subnet Mask, Default
Gateway, and DNS that you plan to use. Click
Save Changes, then click Write Settings to
Flash.
• To configure your settings manually if Automatic Configuration does
not work:
a
On the ADSL Setup page, enter your Protocol,
Encapsulation, VPI, and VCI settings in the
appropriate fields. Your service provider should
supply these values. If you do not know these settings,
refer to Appendix A on page 139.
b
NAT (Network Address Translation) is Enabled by
default. This feature lets multiple users access the
Internet sharing a single IP address. Enabled is
typically the correct setting. Select Disable in the
unlikely event that you want to assign different public
IP addresses to each network user.
c
Depending on the Protocol setting you selected, the
bottom half of the page will change so that you can
enter additional information.
If you selected PPPoA or PPPoE, enter your
ADSL Username and Password in the
appropriate boxes. Your Internet Service Provider
should have given this information to you. (Your
Username is typically your email address or the
characters preceding the @ sign in your email
address.) These entries are not the same
Username and Password that you used earlier to
open the Zoom Configuration Manager.
If you selected 1483 Bridged or 1483 Routed,
you have the option of using either dynamic or
static IP addressing. Depending on your situation,
select the appropriate option button:
− [MOST USERS] Ensure that Obtain an IP
address Automatically is selected if you are
using Dynamic Host Configuration Protocol
(also known as DHCP or dynamic IP
addressing). This option is selected by default
Chapter 1: Installation Instructions
1
Page 18

because most Internet service providers use
DHCP.
− Select Use the following IP Address only if
you are using a static IP address. (You should
know if you are using static IP addressing.
There is typically an extra charge for a static
IP address and you usually have to make
special arrangements with your Internet
service provider to get one.)
Enter the IP Address, Subnet Mask,
Default Gateway, and DNS that you plan to
use. Click Save Changes, then click Write
Settings to Flash.
4 Verify that your Internet connection is working. Open your
Web browser and try to connect to a familiar Web address. If
you connect successfully, you are ready to set up the rest of
your network.
If you cannot connect to the Internet, see
Troubleshooting on
page 153.
Tip!
If you configured the X6v using a notebook computer, you can
keep it plugged in or you can disconnect it from the unit’s
ETHERNET port. As long as the X6v remains plugged into an
ADSL wall jack and a power source, the X6v can function as a
stand-alone device. You can then make the notebook part of your
wireless network.
Congratulations! You have established communication and your
computer is connected to the Internet.
If you want to configure a VoIP account, first set up your network
- if desired - and then continue with
Chapter 4, Setting Up VoIP
Service on page 39.
If you want to connect other computers to the X6v, continue with
Setting Up a Network below.
18
ADSL X6v User Guide
Page 19

9
Setting Up a Network
When a computer that is directly connected to the X6v modem is
able to browse the Web, you know for certain that your Web
connection is working. Now you can set up the rest of your
network.
It is up to you to decide whether you want to have some
computers connected directly to the X6v
wirelessly. The X6v
You can have up to 253 connections, four of which can be wired
directly through the X6v’s four ETHERNET ports. You can also
plug a network device (such as a hub, switch, or router) into one of
the ETHERNET ports.
To set up your network, you can do any or all of the following, in
any order that you choose:
supports both wired and wireless connections.
and others connected
• If you want to connect additional computers directly to the
X6v
, see To Connect Additional Wired Computers
below.
• If you want to connect a hub, switch, or router directly to
the X6v, see
• If you want to connect additional computers using a
wireless network, see
Wireless Network on page 22.
To Connect a Network Device on page 20.
Chapter 2: Setting Up Your
To Connect Additional Wired Computers
You can connect up to four computers that have Ethernet ports
directly to the X6v
1 Shut down and power off the computer you want to connect
to the X6v
locate the correct IP address for the modem. This is done
when the computer is turned back on in step 3 below.)
2 Plug one end of an Ethernet cable into one of the modem’s
ETHERNET ports and plug the other end into the computer’s
Ethernet port.
.
. (This is important because the computer must
Chapter 1: Installation Instructions
1
Page 20

3 Turn on the computer.
4 Verify that your Internet connection is working. Open your
Web browser and connect to a familiar Web address.
5 Repeat steps 1 through 4 for each computer you want to add.
To Connect a Network Device
You can use one of the ETHERNET ports on the X6v to plug in
a network device (for example, a hub, switch, or router). If you
want to connect a game console, please see
Address for Gaming in Chapter 5, The X6v and Online
Gaming. And should the X6v's DHCP server become disabled,
the instructions starting on page
static IP.
73 will tell you how to configure a
Step 1: Choosing an IP
1 Plug one end of an Ethernet cable into one of the modem’s
ETHERNET ports and the other end into the network
device’s Ethernet port. (For a hub or a switch, this is typically
called an Uplink or Expansion port. For a router, this is
typically called a WAN port.)
2 Set up your network. Refer to the documentation provided with
your particular network device for instructions on how to do
this.
3 Once your network is set up, reboot any computer that is part
of the network.
4 Verify that your Internet connection is working. Open the Web
browser on each computer and connect to a familiar Web
address.
Congratulations! You have set up your wired devices. If you
have wireless devices that you want to add to your network, go to
Setting Up Your Wireless Network on page
22.
20
ADSL X6v User Guide
Page 21

Universal Plug and Play
The X6v supports Universal Plug and Play (UPnP™). This means
that other devices plugged into your computer or network (for
example, a gaming application, router, or stand-alone firewall) that
use UPnP should automatically detect the X6v
needed configurations for them to work together. There is no
setup for you to do.
and make the
If You Need Help
Zoom has many Technical Support services available to its
customers. You can access these services in a variety of ways:
• Visit our Web site at
Support. From there, you can register your X6v, contact our
technical support experts, use our intelligent database,
SmartFacts
Tip:
From time to time, Zoom may release improved firmware.
This is also available at www.zoom.com, along with upgrade
instructions. We recommend that you check our Web site
periodically for updates.
• Call our support office. The appropriate number depends on
your country:
US: (617) 753-0961
(617)753-0968 for VoIP product assistance
UK: 0870 720 0090
Other country (US number): (617) 753-0967
For more information about Zoom's Technical Support
services, go to
• Some retailers of Zoom products provide support or can
recommend a convenient support center.
tm,
and get warranty information.
www.zoom.com and select Technical
http://www.zoom.com/techsupport/.
Chapter 1: Installation Instructions
21
Page 22

2
Setting Up Your Wireless
Network
This chapter discusses how to set up a wireless network using
computers that have built-in wireless capabilities and/or a
wireless adapter. Chapter 3 provides information about
implementing network security.
Note that for each computer added to your wireless network, you
will need to take appropriate steps for setting up that computer. To
do that, select one of the three possibilities for that computer
below:
1 Some newer Windows Vista and XP notebooks and desktops
have built-in wireless networking capabilities and do not
require the installation of a wireless component. If this is the
case, you should set up that computer’s wireless connection
using the Windows Vista or XP connect utility. See the
sections below on connecting Windows Vista (page
25) computers with built-in wireless capabilities.
(page
2 Some desktop and notebook computers may have built-in wireless
networking capabilities, but do not use the Windows Vista or XP
utility to configure their device. If this is so, set up your computer’s
wireless connection using the instructions on page
Connecting a Wireless-Enabled Computer to the X6v.
3 Some desktop and notebook computers may need a wireless
network adapter installed. This can be a USB adapter, PC Card
adapter, or PCI adapter. When you install the adapter, make sure
that it is set to infrastructure or access point mode (NOT ad-hoc
or peer-to-peer mode). If you need help installing your wireless
adapter or setting its mode, refer to the documentation that came
with it. After you install the adapter, see Connecting a Wireless-
Enabled Computer to the X6v on page
26.
23) or XP
26 for
22
ADSL X6v User Guide
Page 23
Connecting a Windows Vista Computer with Built-in Wireless Capabilities
1 From the Start menu select Connect to.
2 In the Connect to a network dialog, highlight the desired
network and click Connect.
• If your desired network is secured, in the next dialog box
enter the security key or password and click Connect.
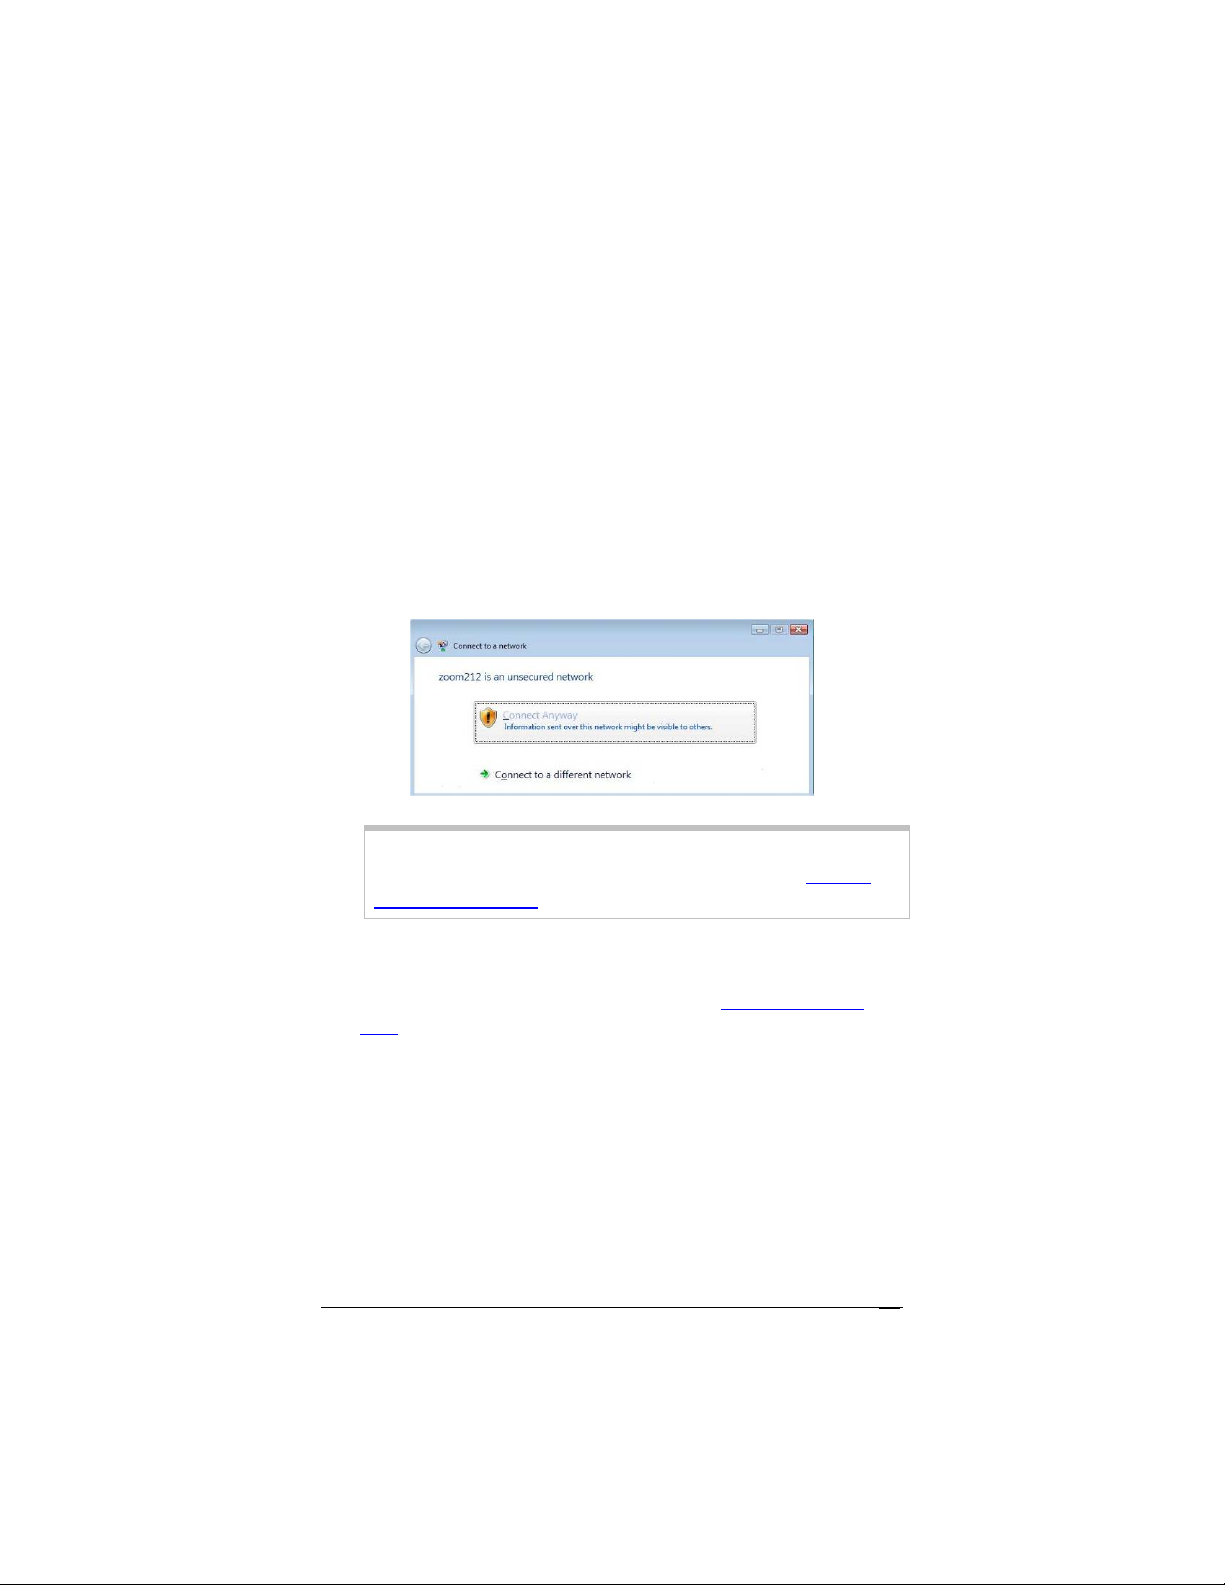
• If your desired network is unsecured, in the message box
select Connect Anyway.
Note: We strongly recommend that you set up a secured
network. For information on wireless security, see Setting
Wireless Security on page 29.
If you have difficulty connecting, make sure you have entered
the correct password. Then perform a power cycle on your
computer and the X6v as described in the
Tips on page 153.
3 In the Successfully connected to [desired network] dialog,
you have three options. You can:
• Select Save the network and Start this connection
automatically if you always want to connect to the same
network. Then click Close. The next time you start your
computer you will automatically connect to the selected
network.
• Select Save the network and clear the Start this
connection automatically check box if you don't want to
Chapter 2: Setting Up Your Wireless Network
Troubleshooting
23
Page 24

automatically connect to this network every time you start
your computer but you will want to connect in the future.
Click Close to display the Select a location . . . dialog box
where you choose a location.
If the User Account Control dialog box appears, click
Continue.
• Click Close to complete the connection procedure. Select
this option if you are connecting to this network only one
time.
To disconnect from the current network:
1 From the Start menu, select Connect to.
2 In the Disconnect or Connect to another network dialog,
select the current network and click Disconnect.
3 In the Are You Sure? message box, click Disconnect again.
4 In the next dialog, you can connect to another network or click
Close to complete the disconnect procedure.
24
ADSL X6v User Guide
Page 25

Connecting a Windows XP Computer with Built-in Wireless Capabilities
1 On your Windows desktop, click the Start button then click
Control Panel.
2 Double-click the Network Connections icon.
3 Right-click the Wireless Network Connection icon, then
select Properties.
4 On the Wireless Network Connection Properties dialog,
select the Wireless Networks tab. Windows will automatically
scan for available wireless networks in your area. Any
compatible networks within range will appear in the Available
networks list. It should find the wireless network of the
X6v—named zoom. (The scan is done automatically because
the Use Windows to configure my wireless network
settings check box is selected by default).
5 Select zoom from the Available networks list, then click the
Configure button to add it to the Preferred networks list.
The notebook will try to connect to the Internet using the
wireless networks listed here, in the order in which they
appear. (If you already have networks listed here, we
recommend you either remove them or use the Move up
button to move zoom to the top of the list.)
6 Click OK.
7 Test your wireless connection. From the computer or
notebook that you set up, open your Web browser (for
instance, Internet Explorer or Netscape Navigator) and try to
connect to a familiar Web address.
If you connect successfully, your notebook’s wireless
capability is configured and you are ready to browse the Web!
Important!
If you want to add security to your network, please see Setting
Wireless Security on page 29.
Chapter 2: Setting Up Your Wireless Network
25
Page 26

Connecting a Wireless-Enabled Computer to the X6v
1 For a new wireless network, go to the wireless-enabled
computer that you want to add to the network. The computer
should have software that will scan for available wireless
networks in your area. When the Service Set Identifier (SSID)
of your X6v
zoom—select it as the network you want to use to connect to
the Internet.
Tip!
For most wireless adapters, you will use their wireless
configuration manager software and click a Scan button or
select a Site Scan, Scan Networks, or other similarly named
tab to scan for wireless signals. If you need help, refer to the
documentation that came with your wireless adapter.
wireless network appears in the list—the SSID is
There are several site scan issues you should be aware of:
• If you installed a wireless adapter on a Windows XP
computer, Windows XP may try to automatically
configure the adapter (rather than let you use the
software provided with the wireless adapter). You will
know this is happening because you will be prompted
with a message about one or more wireless networks
being available. You will also be able to click a link to
open the Wireless Network Connection Properties
dialog. If this happens, click the link, clear the Use
Windows to configure my wireless network
settings check box, and then click OK. You can then
use the software provided with your wireless adapter
without interruption from Windows.
• More than one wireless network might appear in the
list. These are other wireless networks that are within
range of your network. Each wireless network has a
channel associated with it. We recommend that there
be at least a five-channel difference between your
network and neighboring networks with strong signals.
Having less than a five-channel difference may result
in interference with your connection. By default, the
26
ADSL X6v User Guide
Page 27

X6v uses channel 10. If you need to change this
channel, do so using the Wireless Setup page of the
Zoom Configuration Manager.
• If you want to secure your wireless network so it won’t
be accessible by others, you should specify security
settings. To learn how, see
29. (By default, the wireless connections
page
provided by the X6v
Setting Wireless Security on
do not have any security applied.)
2 Test your wireless connections. From each desktop or
notebook computer that you set up, open your Web browser
(for instance, Internet Explorer or Mozilla Firefox) and try to
connect to a familiar Web address.
If you connect successfully, you are ready to browse the Web!
Important!
To add security to your network, see Setting Wireless Security
on page 29.
Chapter 2: Setting Up Your Wireless Network
27
Page 28

Checking Your Settings
If you ever need to check your wireless settings, you can do so
from the Wireless Setup page. This page is available in the Zoom
Configuration Manager by clicking the Wireless icon.
The following table explains the settings.
This setting… Lets you specify…
Wireless Status Enable shows that your wireless network is up.
Disable indicates that your wireless network is
down.
SSID The Service Set Identifier for your wireless
network. By default, the SSID for the X6v is
zoom. You can change the SSID to any name
that you want.
Hide SSID Lets you specify whether or not to broadcast
the SSID of your network. If you do not want
to broadcast the SSID, set this option to True.
Default
Channel
Profile The standard used by your wireless adapters.
Encryption The type of encryption used for your wireless
Region If your country is not listed, select Other.
The channel your wireless connection uses by
default for your wireless connection. The X6v is
set for channel 10.
This drop-down list contains 802.11b Only,
802.11g Only, or Mixed Long.
The default is Mixed Long, (800.11b+g) which
allows you to mix both b and g wireless
adapters.
Internet signal. This drop-down list contains
None, WEP-64 bit, WEP 128 bit, WPA and
WPA2.
The default is None, meaning that no security
is enabled.
28
ADSL X6v User Guide
Page 29

3
Setting Wireless Security
When you first set up your X6v wireless network, security is turned off
by default. This means that your wireless signal is not encrypted and
that anyone with compatible wireless technology can access your
computer network and the Internet using your wireless connection.
This chapter explains how to set up wireless security to protect your
network and Internet connection.
Overview
To set up wireless security on a new wireless network, you will
create and enter a unique passphrase or an alphanumeric key. Once
entered, only devices with the proper key or passphrase will be
allowed to establish a connection to the network.
There are two basic ways to configure and implement a passphrase
or key. They are WEP (Wired Equivalent Privacy) and WPA™
(WiFi® Protected Access™) or WPA2™. WPA2 is the most
secure, but you can use it only if all your wireless devices support
the 802.11g profile.
If you are replacing an existing wireless router with the X6v, you
might want to retain whatever security settings you use on your
network. Enter your previously defined settings when instructed.
Setting Up Security Using WEP
WEP can be configured two ways: 64-bit and 128-bit. 128-bit WEP
provides a bit more security than 64-bit, but 128-bit WEP also tends
to diminish network performance. We recommend that you use WEP
64-bit security, because WEP-64 works with most 802.11 wireless
equipment.
Chapter 3: Setting Wireless Security
29
Page 30
To set WEP security, follow these steps:
1 Verify that your modem's Ethernet connection is active.
2 Open the Zoom Configuration Manager by typing the
following in your Web browser's address bar:
http://192.168.0.1
3 In the authentication dialog, type the following User Name and
Password in lower case, then click OK.
User Name: user
Password: password
You can safely ignore the warning message. It is for
informational purposes only.
(The User Name and Password entered here are for the
Configuration Manager only, and are not the same as the user
name and password that your Internet service provider might
have given you.)
4 On the X6v ADSL Setup page, click the Wireless icon
at
the top of the screen to open the Wireless Setup page:
30
ADSL X6v User Guide
Page 31

5 In the SSID box, enter a NEW name for your network, such as
sarahsecure. DO NOT use zoom as the SSID.
6 Normally you should not change the Hide SSID and Default
Channel settings.
7 Go to Encryption and select WEP-64 bit from the drop-
down menu. Several new boxes open directly below the
Encryption box:
8 If you are replacing an existing wireless router with the X6v,
you might want to retain whatever security settings you use on
your network. Enter the SSID, encryption type, and the
security key or passphrase that you previously defined for your
network. You must enter a dash (–) between each pair of
characters in a security key.
9 If you are setting up a new wireless network, select the check
box marked Passphrase and then enter a word or phrase in
the Passphrase text box. For best security, enter a combination
Chapter 3: Setting Wireless Security
31
Page 32

of numbers and letters. The Passphrase should be at least eight
characters. Click Save Changes, then Write Settings to
Flash.
When the Wireless Setup page refreshes, note that your
passphrase is no longer displayed and that security keys 1-4
have been automatically generated.
10 Leave the Default Key as 1, and write down the 10 digits of
Key 1. Put this security key where you can find it — on the
bottom of the X6v case, for instance.
11 Now you need to set up each of your wireless devices with the
SSID and security key, as follows:
a First, make sure that the network device on which you are
setting security has its wireless capability turned on. (Many
notebooks have a hardware switch for wireless.)
b Next, go to the network device’s area for configuring a
wireless network connection.
c For a Windows computer, click the Wireless Networking
icon at the lower right corner of the screen.
d Select the Site Survey or Scan option to see a list of the
access points in your area. That list should include the
SSID that you just set up on the X6v.
e Select that SSID and enter the WEP-64 Key 1 that you just
wrote down in step 10. Omit the hyphens when entering
the key.
f Save your settings.
g Repeat substeps a through f for all wireless devices on
your network.
That’s it! Your security setup is now complete!
In the unlikely event that you experience performance issues with
your wireless network, you might want to set up your network on a
channel that’s different from the factory-set channel of 10. To do
that, follow these steps:
1 Open the Zoom Configuration Manager by typing
http://192.168.0.1 in your Web browser's address bar:
2 In the authentication dialog, type your User Name and your
new Password (or, if you haven't yet changed your password,
32
ADSL X6v User Guide
Page 33

type user for User Name and password for Password, each in
lower-case letters). Click OK.
3 On the ADSL Setup page, click the Wireless icon at the
top of the screen to open the Wireless Setup page.
4 On the Wireless Setup page, enter a new channel. If possible,
this channel should be 5 channels away from other strong
channels in use in your area. The default channel is 10.
5 Be sure to click Save, then Write Settings to Flash after you
change the channel. All devices connecting wirelessly to the
X6v will automatically switch to the new channel.
Your basic security setup is complete. Please see the following
sections to configure 802.1x Authentication, a Wireless
Distribution System, and Wireless MAC Filtering.
Setting Up Security Using WPA2 or WPA
WPA2 and WPA use a passphrase that you choose and enter on
the X6v and other wireless devices on the network to set up
security. To use WPA2 or WPA, all of the wireless devices on your
network must support that encryption method.
1 Check to make sure that all other clients that you plan to put on
the network support WPA2 or WPA. If they do not, return to
Setting Up Security Using WEP on page 29 and follow the
instructions.
2 Click the Wireless icon
Manager to open the Wireless Setup page. Go to Encryption
and select WPA2 or WPA from the drop-down menu. A new
field labeled WPA Passphrase will open directly below the
Encryption box.
in the Zoom Configuration
Chapter 3: Setting Wireless Security
33
Page 34

3 Normally you should not change the Hide SSID and Default
Channel settings.
4 If you are replacing an existing wireless router with the X6v,
you may want to retain whatever security settings you use on
your network. Enter the SSID, encryption type, and the
passphrase that you previously defined for your network.
5 If you are setting up a new wireless network, choose and enter
a Passphrase. You can enter a word or phrase, or for greater
security you can enter a combination of numbers and letters.
The passphrase that you enter is case-sensitive.
6 Every wireless network client needs to be set individually by
entering the Passphrase on all wireless devices on the
network. Open the software that came with the device, which
should be running on the computer where the device is
installed. Find the configuration menu for security, choose
WPA2 or WPA, and enter the Passphrase, exactly as you
entered it on the X6v
Wireless Setup page.
Your basic WPA or WPA2 security setup is complete. Please
refer to the following sections for information on 802.1x
Authentication, WDS (Wireless Distribution System) configuration,
and Wireless MAC Filtering.
.
34
ADSL X6v User Guide
Page 35

802.1x Authentication
The IEEE 802.1x standard can authenticate requests to use your
wireless network, and can dynamically update your encryption keys.
On the Wireless Setup page, click 802.1x Authentication to open
the 802.1x Authentication page:
The following table describes the values that you can select or
enter.
Setting Description
Auth Server Local - No external Radius Server is
used, 802.1x not being used
RADIUS - External (LAN) Radius
Server is used for authentication
RADIUS server IP If you selected RADIUS, enter the
server's IP address.
Chapter 3: Setting Wireless Security
35
Page 36

Setting Description
Shared Secret If you selected RADIUS. Shared secrets
are used to verify that RADIUS
messages, with the exception of the
Access-Request message, are sent by a
RADIUS-enabled device that is
configured with the same shared secret.
You must use the same case-sensitive
shared secret on both RADIUS devices
(Client and Server).
Auth Control
Enabled
Enable or disable Authentication
Control which allows AP to act as
802.1x Authenticator for wireless
devices
Identity String Identity String or IP address of the
802.1x Authentication Server (Radius
Server)
Rekey Timeout Default is 600 seconds. Specifies time in
which WEP keys for the current session
will timeout and new ones are issued as
a deterrent to any attacker.
Key Transmission
Enabled
Determines whether or not the
Authenticator (AP) is configured to
send WEP keys to supplicants (WL
Clients)
Entropy Pool Can manually enter in “pool” of
characters. WEP keys dynamically
generated will be automatically
generated at random from this pool.
After you enter your values, click` Save Changes and then Write
Settings to Flash.
36
ADSL X6v User Guide
Page 37

Wireless Distribution System (WDS) Configuration
A Wireless Distribution System (WDS) expands a wireless network
by using multiple Access Points connected wirelessly.
To set up a Wireless Distribution System, make the following
entries:
Setting Description
WDS Status Select Enable to configure WDS.
AP 1, AP2, AP3,
AP4
After you enter your values, click Save Changes and then Write
Settings to Flash.
Chapter 3: Setting Wireless Security
Enter the 12-digit MAC address of each
Access Point (AP) that you want to
include in the Wireless Distribution
System.
37
Page 38

Wireless MAC Filtering
This page lets you grant or deny network access to devices with the
listed MAC addresses.
Setting Description
MAC Address Auth
Select Disabled, White List or Black
List.
White List allows network access only to
the devices in the Existing Wireless
MAC Filtering list.
Black List allows network access to all
devices except those in the Existing
Wireless MAC Filtering list.
Existing Wireless
MAC Filtering
Add Wireless MAC
Filtering
List of devices currently authenticated
by MAC address
Enter the 12-digit MAC address of the
device you want to add to your network,
and click Add.
Click Save Changes, then Write Settings to Flash.
38
ADSL X6v User Guide
Page 39

4
Setting Up VoIP Service
This chapter covers the setup of the X6v for Internet telephone
service, using the X6v’s built-in VoIP capabilities.
To complete the installation, you need the following:
• An account set up with a VoIP service provider. If your X6v
did not come with an account set up, go to your service
provider’s Web site and sign up for service if you have not
already done so.
• A telephone so you can place and receive phone calls.
Using the Zoom Configuration Manager to Set Up VoIP Service
You may want to connect the X6v to your landline. If you connect
the X6v’s TELCO (i.e., Telephone Company) port to a landline
telephone service, you can choose to make some calls through your
landline and other calls over the Internet. If the landline is also set
for DSL service, be sure to connect an ADSL filter between the
telephone line and the X6v’s TELCO jack. Then follow these
steps:
1 To log into the Zoom Configuration Manager, follow these
steps:
a Open your Web browser and, in its address bar, type
http://192.168.0.1, then press the Enter key on your
keyboard.
Chapter 4: Setting Up VoIP Service
39
Page 40

b In the authentication dialog, type the following user
name and password in lower-case letters, then click OK.
(The User Name and Password you enter here are not
the same as the User Name and Password that your
Internet service provider may have given you.)
User Name: user
Password: password
You can safely ignore the warning message.
If you are not prompted for a User Name and Password,
do the following in this order: Recheck all connections;
restart the modem and computer; and reset the modem by
inserting a paper clip into the lower Reset pinhole in the
modem’s back panel and pressing it three times.
Important:
To protect your configuration, choose your own password
after the setup is complete. See Changing Your Password on
page 135.
40
ADSL X6v User Guide
Page 41

2 At the top of the ADSL Setup page, click the VoIP icon:
The My VoIP Account Status page will open. Click VoIP
Express Setup to display the parameters for your account on
the My VoIP Account Express page:
Make the following entries.
Setting Description
Turn my VoIP
Click the On button to enable VoIP.
service . . .
Chapter 4: Setting Up VoIP Service
41
Page 42

Setting Description
My VoIP provider's
name
My Caller ID when
I call someone
Type your provider's name for
reference.
Type your name or the ID that people
see in the Caller ID display when you
call them. Your VoIP provider might
have assigned this identifier. If not, you
can enter your name or another
identifier for your account.
My VoIP phone
number (SIP User
ID)
My VoIP Service
Authentication ID
Assigned by your VoIP provider. This is
usually the number that people use to
call you. Do not change this number.
The ID (often the same as your VoIP
phone number) that your VoIP provider
might have assigned. Enter the ID if it
does not appear in the field.
My VoIP Service
Authentication
Password
The password that your VoIP provider
might have assigned. Enter the
password if it does not appear in the
field.
If My Call Starts
With ...
Specifies when to use the landline
(TELCO) connection when you connect
the X6v's TELCO port to a standard
telephone service jack.
Enter area codes, city and/or country
codes, or entire numbers. Include any
required prefixes such as 011, 00, or 1.
Separate the entries with a comma or a
comma and a space.
The numbers that you enter will be
dialed on your TELCO line. All other
numbers will be dialed over your VoIP
connection.
There is a limit of 18 entries.
42
ADSL X6v User Guide
Page 43

Setting Description
Auto-add this Area
Code...
Number of digits I
will dial for Local
Calls
Type the area or city code that the X6v
will automatically add to local calls.
If you entered an area or city code in the
previous field, specify the number of
additional digits for local calls. For
example, if local calls have this format:
555-1234, type 7. (Ignore the dash.)
If I normally want
Select Enable (the default) or Disable.
Auto-Add Area
Code calls...
Route VoIP calls
Select Enable (the default) or Disable.
via my TELCO line
if...
The X6v automatically sends all emergency calls (911, 999, 100,
and 11x numbers) over your landline.
Another advantage of connecting the TELCO port to your
landline is that if the X6v’s Internet connection is disrupted, by
default your phone calls are automatically switched to your
landline service. (You can disable this feature on the My VoIP
Account Express page.)
3 Click Save These Settings to save the account information
and write it to flash memory.
Note: The only time you need to click Reboot VoIP is when you
change an IP address.
Chapter 4: Setting Up VoIP Service
43
Page 44

Changing Your VoIP Settings
The User Configuration link on the Your VoIP Account page
lets you add or change settings such as Speed Dials, Call
Forwarding, and Call Waiting/Caller ID. Click the Help button
on each page for configuration tips.
On each page, when you complete your changes, click Save These
Settings to save your information and write it to flash memory.
Note: Many VoIP settings can be controlled from your telephone
keypad. See Controlling the X6v from Your Phone on page 70.
Speed Dials
To open the Speed Dials page, where you can enter up to 28
numbers into your speed dial list, click User Configuration:
Enter a complete phone number opposite a Speed Dial number.
For example, opposite *20 enter (123) 456-7890. Save your
changes. The next time you want to call (123) 456-7890, for
example, just dial *20.
Calls will be placed via VoIP or via your standard telephone service
according to the settings you entered on the My VoIP Account
page. In other words, if you configured calls starting with (456) to
go to your landline service, if you enter (456) 123 4567 as a Speed
Dial, that number will be dialed out over your TELCO line when
you invoke it through the Speed Dial feature.
44
ADSL X6v User Guide
Page 45

Call Forwarding
On the User Configuration menu, click Call Forwarding to
enable or disable Call Forwarding parameters and enter up to 30
priority call forwarding numbers.
Ringing Based on Caller ID
On the User Configuration menu, click Ringing Based on
Caller ID to specify distinctive ring tones for up to 30 phone
numbers:
Click Enable to turn on the distinctive ring feature, and enter the
numbers to which you want to assign a distinctive ring. The ring
patterns are the Bellcore-r1 through Bellcore-r8 tones.
Chapter 4: Setting Up VoIP Service
45
Page 46

Do Not Disturb
Note: This feature applies to VoIP calls only.
On the User Configuration menu, click Do Not Disturb to
enable or disable this feature, which allows you to block all calls
except those from the phone numbers on the Do Not Disturb
Exceptions list:
Your phone will not ring unless you get a call from one of the
phone numbers that you enter on the Exceptions list.
Call Waiting/Caller ID
This feature applies to VoIP calls only.
On the User Configuration menu, click Call Waiting/Caller ID
to configure Call Waiting, Inbound and Outbound Caller ID, and
Call Waiting Caller ID:
46
ADSL X6v User Guide
Page 47

There are two cases where you should disable Call Waiting:
• If you have enabled Call Forward on Busy on the Call
Forwarding page. (See page
• If you have configured a Fax Transmission Mode on the
Audio Settings page. (See page
45.)
54.)
Incoming Call Blocking
This feature applies to VoIP calls only.
On the User Configuration menu, click Incoming Call
Blocking to enable or disable blocking of anonymous calls (calls
that do not provide Caller ID) and specify phone numbers from
which you will not accept calls:
You can enter up to 30 phone numbers that will be blocked by the
X6v.
By default, Block Anonymous Calls and Block Listed
Incoming Calls are both disabled.
Chapter 4: Setting Up VoIP Service
47
Page 48

Outgoing Call Blocking
This feature applies to both VoIP and standard telephone calls.
On the User Configuration menu, click Outgoing Call
Blocking to prevent certain phone numbers from being dialed
from the X6v.
At the Block Listed Outgoing Numbers option, select the
Enable check box. In the Blocked Call List, enter up to 30
complete numbers or numbers starting with particular digits. For
example, to block all 900 numbers, enter 900x.7. This will block all
numbers that start with 900 followed by 7 digits.
To remove a number from the Blocked Numbers List, delete it.
To remove all entries from the list, at the Block Listed Outgoing
Numbers option, select the Disable check box.
48
ADSL X6v User Guide
Page 49

Advanced VoIP Configuration
On any VoIP system page, click the Advanced VoIP Setup icon
to display the full VoIP user configuration menu in the left pane.
Basic read-only system information is displayed in the main
window:
(There are a number of highly technical Advanced VoIP Setup
parameters that are available to VoIP providers only. For
information, please see the
Reference.)
Note: The discussion of advanced VoIP configuration uses the
term PSTN (Public Switched Telephone Network), which is also
described in this User Guide as TELCO or landline service.
Chapter 4: Setting Up VoIP Service
X6v VoIP Features Technical
49
Page 50

VoIP System Settings
Click VoIP System to select a parameter from this menu:
Date/Time
The date and time are set automatically by the time server, and the
Daylight Savings adjustment is enabled by default.
You may need to change your Time Zone relative to Greenwich
Mean Time. For help, please see
http://wwp.greenwichmeantime.com/info/timezone.htm
50
ADSL X6v User Guide
Page 51

VoIP Subsystem Network Configuration
The VoIP names are informational only.
You can change the network MTU (Maximum Transmission Unit)
value if you are instructed by your system administrator or by
Zoom Customer Support.
Static IP / DNS Configuration
Setting Description
Static IP Address The VoIP System IP Address
must always be in the same subnet
as the modem/router LAN IP
Address. The Host ID must
always be 234 . These are last
three digits in the dotted-decimal
entry: x.x.x.234. The default value
is 192.168.0.234.
Chapter 4: Setting Up VoIP Service
51
Page 52

Setting Description
Subnet Mask The default value of
255.255.255.0 defines a class C
network that will support up to
254 devices connected to your
LAN.
Gateway IP Address This is the LAN IP Address
assigned to your modem/router.
By default it is 192.168.0.1 .
Primary DNS Server This must always be the same as
the Gateway IP Address.
HTTP/Telnet/FTP Server
Setting Description
HTTP Server Port
Telnet Server Port
FTP Server Port
The default is 8080.
The default is 8023.
The default is 8021.
52
ADSL X6v User Guide
Page 53

STUN Settings
This page lets you configure STUN (Simple Traversal of UDP
through NATs), which helps the X6v route VoIP packets through
the NAT firewall.
Setting Description
STUN Enable STUN permits discovery of Network
Address Translation (NAT) mapping. If
your VoIP service uses Outbound
Proxy, disable STUN (your provider will
tell you to do this). Generally, you
should leave STUN enabled (the
default).
STUN Server
Address
Enter the Domain Name or IP address
of your VoIP provider's STUN server.
By default, the Zoom STUN server
address is displayed here.
STUN Symmetric
Not applicable.
Deterministic
Enable
Save These Settings Click to save your changes to flash
memory.
Chapter 4: Setting Up VoIP Service
53
Page 54

VoIP Parameters
Click the VoIP Parameters menu to display the Audio Settings
and RTP Protocol Parameters configuration pages.
Audio Settings
Setting Description
Preferred Codecs Lets you arrange the Codec names in
order of preference. The default
sequence is G.711u, iLBC, G.729B,
G.711A.
If your upstream bandwidth is ≤256
kbps, set your first preference for
G.729B or iLBC. Otherwise, for better
voice quality, use G.711u or G.711A.
Silence Suppression
Enable
Prevents audio frames from being sent
during periods of silence, thus reducing
the network traffic necessary for making
calls. (Note: This feature is useful only
with G.729B.) The default is Disabled.
Fax Transmission
Mode
Select the FAX processing method: Off,
μLaw Passthrough or ALaw
Passthrough. The default is Off.
DTMF
Transmission
Method
Select the DTMF processing method:
Off, Audio Passthrough, RTP Out-ofBand, SIP Out-of-Band. The default is
RTP Out-of-Band.
Save These Settings Click to save your changes to flash
memory.
54
ADSL X6v User Guide
Page 55

RTP Protocol Parameters
This page displays the VoIP system's Real-time Transport Protocol
jitter buffer parameters. The page is informational only.
SIP Parameters
1 Select the SIP (Session Initiation Protocol) Parameters menu
to display the SIP Protocol Parameters configuration page.
2 Change the SIP Local Port setting only if you have a conflict –
for example, if you have multiple VoIP devices on your Local
Area Network.
If this is the case, change the port in even-numbered
increments: 5062, 5064, etc.
3 Click Save These Settings.
Chapter 4: Setting Up VoIP Service
55
Page 56

Regionalization Settings
Select the Regionalization menu to display the following two
configuration pages.
SLAC Configuration
Use the SLAC (Subscriber Line Audio-processing Circuit)
Configuration page to support the Caller ID mode required by
your phone.
The defaults shown in the illustration are for North America.
Different Caller ID defaults will appear according to the X6v's
region.
Setting Description
Caller ID Type 1
Mode
Select the on-hook mode: None,
Belcore MDMF, Belcore SDMF, ETSI
WINK, ETSI RING, DTMF. The
default is Belcore MDMF.
Caller ID Type 2
Mode
Select the off-hook mode: None,
Belcore MDMF, Belcore SDMF, ETSI
WINK, ETSI RING, DTMF. The
default is Belcore MDMF. The default
is Belcore MDMF.
Message Waiting
Mode
Select None, Belcore MDMF, Belcore
SDMF, ETSI. The default is Belcore
MDMF.
Save These Settings Click this button to save your settings to
flash memory.
56
ADSL X6v User Guide
Page 57

CODEC Configuration
Use the CODEC (COde/DECode) Configuration page to
support the Caller ID modes used by your PSTN service provider
on the line connected to the X6v's TELCO port.
The defaults shown in the illustration are for the United States. In
other regions, the appropriate defaults will appear.
Setting Description
Caller ID Type 1
Mode
Select the on-hook mode: None,
Belcore MDMF, Belcore SDMF, ETSI
WINK, ETSI RING, DTMF. The
default is Belcore MDMF.
Caller ID Type 2
Mode
Select the off-hook mode: None,
Belcore MDMF, Belcore SDMF, ETSI
WINK, ETSI RING, DTMF. The
default is Belcore MDMF.
Message Waiting
Mode
Select None, Belcore MDMF, Belcore
SDMF, ETSI. The default is Belcore
MDMF.
Save These Settings Click this button to save your settings to
flash memory.
Chapter 4: Setting Up VoIP Service
57
Page 58

Subscription Services
When you select this item from the VoIP system menu, the
Dialing Parameters page appears.
Dialing Parameters
In a given location, normally only a few types of dialed numbers
need to be defined. There is dialing for local calls, there is dialing
for domestic toll calls, and there is dialing for international toll
calls. In addition, there are specific short strings that are set aside
for emergency dialing, and there may be other special strings that
invoke telephone features.
By default, the X6v is configured to handle number patterns in
every country in the world. Emergency calls are by default routed
to the PSTN, and all other calls are routed via VoIP.
To change which calls are sent to the PSTN, your first option is to
open the My VoIP Express page, where you can simply define
most numbers that you want to send to the PSTN.
If you want to use the Dialing Parameters page to tailor a dial
pattern to precisely reflect the format of telephone numbers in
your location, please see the discussion of dial patterns in the
VoIP Features Technical Reference.
X6v
58
ADSL X6v User Guide
Page 59

Bridging from VoIP to PSTN
The VoIP bridge modes let you use the X6v as a mini telephone
switch. You are probably familiar with telephone switches at
companies, government offices and the like. When you call a main
number, the telephone switch (or switchboard) answers, and you
can typically dial any extension you want inside the office.
When you make a VoIP call to the X6v in VoIP to PSTN bridge
mode, you are connected to the landline that is plugged into the
X6v. This is like being connected to a switchboard when you call a
company or government office. Unlike the case of a company or
government office switchboard, however, you are not limited to
dialing extensions within the office. You can dial any call that the
PSTN line supports.
This can be useful and convenient if people you know or work
with have a way to make free or low cost VoIP calls to your X6v. If
they can do this, then they can make PSTN calls from your X6v.
Often this will save considerable amounts of money relative to
making the call directly.
• Suppose you are in Los Angeles, and you have a friend in
Hong Kong who needs to make frequent calls to local
numbers in L.A. Your friend can make free or very low
cost VoIP calls to your X6v. Once she has connected to
your X6v, she can make local PSTN calls from your X6v
to anywhere in L.A.
• Suppose your company has offices in L.A. and in
Frankfurt. You can sign up for a VoIP number that is local
to Frankfurt. Now when colleagues in Frankfurt want to
call local numbers in L.A., they can do so for the price of a
local call in Frankfurt: they can call the local Frankfurt
number that is assigned to your X6v, and when they
connect to your X6v in bridge mode, they can dial local
PSTN calls to anywhere in L.A.
• Some cell or mobile phone plans offer free or reduced rate
calling to particular numbers. If you designate your X6v’s
VoIP number under such a plan, then you can make calls
under that plan from your cell phone to your X6v. Once
you connect to the X6v, you can make a bridge call to
Chapter 4: Setting Up VoIP Service
59
Page 60

anywhere in L.A. You can do this when you travel
anywhere within the area covered by your cell phone plan.
• You can enable single-step dialing, which allows people to
dial just the destination number when they make a VoIP to
PSTN bridge call. (Enable this feature only if your VoIP
service provider tells you to do so.)
There are many more permutations that this feature lets you take
advantage of. (For example, see
Bridging from PSTN to VoIP for a
description of how to set up pairs of devices in bridge mode in two
different locations to facilitate low cost calling between those
locations using standard local phones, including cell/mobile
phones).
There are several options you can set when you configure a VoIP
to PSTN bridge. You can control which callers can access bridge
mode:
• You can allow all callers to access bridge mode.
• You can restrict access only to callers with Caller ID.
• You can restrict access only to particular callers based on
their Caller ID.
• For whichever callers you allow, you can require that they
enter a security code.
If you activate a security code, callers who enter an incorrect code
will ring through to the phone that is connected to the X6v. This is
convenient for someone who is traveling, and who may some of
the time want to use the bridge feature to make local calls, but who
other times may want to reach someone in their home or office.
60
ADSL X6v User Guide
Page 61

To configure a bridge from VoIP to PSTN, in the VoIP area of the
Configuration Manager, click the Advanced VoIP Setup icon
,
in the left menu pane select Subscription Services, and then select
Bridging from VoIP to PSTN:
Setting Description
Bridge from VoIP
to PSTN
Auto-Answer VoIP
Bridge Calls
VoIP Bridge
Accept Any Call
VoIP Bridge
Accept Anonymous
Enables or disables the bridge. The
default is Disabled.
Enables auto-answer of VoIP calls. The
default is Disabled.
Enables answering calls with or without
Caller ID. The default is Disabled.
Enables answering calls without Caller
ID. The default is Disabled.
Calls
Caller Password Enables a security code for access to the
bridge. The default is Disabled.
Password Dial
String
Enter any sequence of up to 24
telephone keypad digits and special
characters:
1 2 3 4 5 6 7 8 9 0 # À
Chapter 4: Setting Up VoIP Service
61
Page 62

Setting Description
VoIP Bridge
Accept Only These
Enter up to 10 phone numbers that can
access the bridge feature
Numbers (01 to 10)
VoIP Bridge Billing
Delay Duration (10
ms)
VoIP Bridge
Security Entry
Time after auto-answer that X6v sends
indication to server. The default is 10 x
10 ms = 100 ms.
Timeout for entry of security code. The
default is 1000 x 10 ms = 10 seconds.
Duration (10 ms)
Quick setup tips
To quickly set up a VoIP to PSTN bridge:
1 At Bridge from VoIP to PSTN, select Enable.
2 At Auto-Answer VoIP Bridge Calls, select Enable.
3 At VoIP Bridge Accept Any Call, select Enable.
4 Click Save These Settings.
With these settings, if you call the X6v's VoIP account, the X6v
will answer the call and play the PSTN dial tone. When you hear
this tone, you can call any number supported by your standard
telephone service, and the call will be bridged to the PSTN.
To add security to a VoIP to PSTN Bridge:
1 At Bridge from VoIP to PSTN, select Enable.
2 At Auto-Answer VoIP Bridge Calls, select Enable.
3 In the VoIP Bridge Accept Only These Numbers list, enter
numbers authorized to make bridge calls.
4 If you want to accept anonymous calls in addition to the
numbers you list, at VoIP Bridge Accept Anonymous Calls,
select Enable.
5 Click Save These Settings.
62
ADSL X6v User Guide
Page 63

To add a security code for making a bridge call (you can add
this feature whether or not you list numbers that you will accept):
1 At Bridge from VoIP to PSTN, select Enable.
2 At Auto-Answer VoIP Bridge Calls, select Enable.
3 At Caller Password, select Enable.
4 At Password Dial String, enter any sequence of up to 24
telephone keypad digits and special characters:
1 2 3 4 5 6 7 8 9 0 # À
5 Click Save These Settings.
Once the security code is enabled, callers who dial into your
X6v will hear a special tone prompting them to enter the
security code. When they successfully enter the security code,
they will receive a regular TELCO dial tone, and they can dial
the number they want to call over the VoIP network.
To enable single-stage dialing to a VoIP to PSTN bridge:
If your service provider supports single-stage dialing, when the remote caller
dials a PSTN number, the VoIP service will direct that call to your
X6v. Your X6v will answer the call. The service provider will
include in a message to your X6v the PSTN number that the
remote caller originally dialed. Your X6v will bridge the call by
dialing that PSTN number out its TELCO port.
Follow these steps:
1 At Bridge from VoIP to PSTN, select Enable.
2 At Auto-Answer VoIP Bridge Calls, select Enable.
3 At VoIP Bridge Accept Any Call, select Enable.
4 At VoIP Bridge Single Stage Dialing, select Enable.
5 Click Save These Settings.
Chapter 4: Setting Up VoIP Service
63
Page 64

Bridging from PSTN to VoIP
When you make a PSTN (TELCO) call to the X6v in PSTN to
VoIP bridge mode, you are connected to the VoIP service that is
connected to the X6v. This is like being connected to a
switchboard when you call a company or government office.
Unlike the case of a company or government office switchboard,
however, you are not limited to dialing extensions. You can dial any
call that your VoIP service supports.
This can offer a useful and convenient way to make free or low
cost VoIP calls from your X6v even if you are out of your home or
office. For example, you can make a local PSTN call to your X6v
from your cell or mobile phone, and bridge the call to a low-cost
long distance or international call via VoIP. Often this will save
considerable amounts of money compared to making the call
directly.
• Suppose you live in London, and you have friends and
family in Calcutta. You don’t have to be at home in order
to call them. You can call your X6v's PSTN phone number
from any standard phone including your cell phone, and
make a low-cost VoIP call to Calcutta.
• Suppose your company has offices in Dubai and in Buenos
Aires. You can set the X6v so that when customers call the
Dubai office after hours, the X6v automatically bridges the
call to Buenos Aires, and staff can answer the call in that
office.
• Again, if your company has offices in Dubai and Buenos
Aires, you can set up an X6v in bridge mode in each
location. Staff off site in Buenos Aires can call into the
PSTN number of the X6v in the Buenos Aires office and
make a VoIP bridge call to the VoIP number of the X6v in
Dubai. Once connected to the X6v in Dubai, they can
bridge to the PSTN connection in Dubai, and contact
customers and vendors outside the office in Dubai, all for
the cost of a local call in Buenos Aires. You can set up a
double bridge in each direction. In this way, calls can also
be made in the opposite direction, from Dubai to Buenos
Aires.
64
ADSL X6v User Guide
Page 65

There are several options you can set when you configure a PSTN
to VoIP bridge.
• You can control which callers can access bridge mode.
• You can allow all callers to access bridge mode.
• You can restrict access only to callers with Caller ID.†
• You can restrict access only to particular callers based on
their Caller IDs.
†
• For the callers you allow, you can require that they enter a
security code.
If you activate a security code, callers who enter an incorrect code
will ring through to the phone that is connected to the X6v. This is
convenient for someone who is traveling, and who may some of
the time want to use the bridge feature to make local calls, but who
other times may want to reach someone in their home or office.
To configure a bridge from PSTN to VoIP, in the VoIP area of the
Configuration Manager, click the Advanced VoIP Setup icon
,
in the left menu pane select Subscription Services, and then select
Bridging from PSTN to VoIP:
Note: To use this feature, your PSTN service must include Caller
ID Display.
Chapter 4: Setting Up VoIP Service
65
Page 66

Setting Description
Bridge from PSTN
to VoIP
PSTN Caller ID
Forward to VoIP
Enable or disable the bridge
Your X6v normally forwards your VoIP
account Caller ID on any VoIP calls you
make, including PSTN to VoIP calls. If
you enable ‘PSTN Caller ID Forward to
VoIP,’ then your X6v will forward to
the VoIP leg of the call the Caller ID of
the PSTN line that originated the bridge
call.
Auto-answer PSTN
(TELCO) calls
TELCO Port
Accept Any Call
TELCO Port
Accept Anonymous
Enables/disables entrance to bridge
mode. Set this to Enable.
Enables/disables answering calls with or
without Caller ID
Enables/disables answering calls
without Caller ID
Calls
Caller Password
Enables/disables security code to access
bridge feature
Password Dial
String
Enter any sequence of up to 24
telephone pad digits and special
characters:
1 2 3 4 5 6 7 8 9 0 # À
TELCO Port
Accept Only These
Enter up to 10 numbers that can access
the bridge.
Numbers (01 to 10)
Save These Settings Click this button to save your settings to
flash memory.
Quick setup tips
To quickly set up a PSTN to VoIP bridge:
1 At Bridge from PSTN to VoIP, select Enable.
2 At Auto-Answer PSTN Calls, select Enable.
3 At TELCO Port Accept Any Call, select Enable.
66
ADSL X6v User Guide
Page 67

4 Click Save These Settings.
With these settings, if you call the X6v's PSTN number, the X6v
will answer the call and play a dial tone. When you hear this dial
tone, you can call any number supported by your VoIP service, and
the call will be bridged to the Internet.
To add security to a PSTN to VoIP Bridge by accepting calls
only from authorized numbers:
1 At Bridge from PSTN to VoIP, select Enable.
2 At Auto-Answer PSTN Calls, select Enable.
3 At TELCO Port Accept Any Call, select Disable.
4 At TELCO Port Accept Only These Numbers, in the boxes
01 to 10 enter numbers authorized to make bridge calls.
5 Click Save These Settings.
To add a security code for making a bridge call
(you can add
this feature whether or not you list numbers that you will accept):
1 At Bridge from PSTN to VoIP, select Enable.
2 At Auto-Answer PSTN Calls, select Enable.
3 At Caller Password, select Enable.
4 At Password Dial String, enter any sequence of up to 24
telephone keypad digits and special characters:
1 2 3 4 5 6 7 8 9 0 # À
5 Click Save These Settings.
Once the security code is enabled, callers who dial into your X6v
will hear a special tone prompting them to enter the security code.
When they successfully enter the security code, they will receive the
VoIP dial tone, and they can dial the number they want to call over
the VoIP network.
Chapter 4: Setting Up VoIP Service
67
Page 68

To forward the Caller ID of the incoming PSTN number
when someone makes a bridge call:
At PSTN Caller ID Forward to VoIP, select Enable.
(If this parameter is disabled, the X6v will send its own VoIP
Caller ID as the Caller ID of the bridged call).
Miscellaneous TELCO Parameters
If you are having problems with your Caller ID display, Zoom
Customer Support may ask you to modify one or more of the
Caller ID settings on this page.
Emergency Services
68
ADSL X6v User Guide
Page 69

Setting Description
Emergency
Numbers Routed
via VoIP
Emergency
Numbers Routed
via the PSTN
Emergency
Numbers to be
Routed via VoIP if
Either the PSTN
Line is Unavailable
or These Numbers
Are Not
Configured to be
Routed on the
PSTN
Emergency
Numbers To Be
Routed via the
PSTN if the PSTN
is Available
(Display only) These numbers are
automatically routed via VoIP by your
VoIP service provider.
(Display only) These numbers are
automatically routed via the PSTN.
Enter emergency numbers here.
Enter emergency numbers here.
Chapter 4: Setting Up VoIP Service
69
Page 70

Controlling the X6v from Your Phone
Many VoIP features can be controlled from the phone plugged
into your X6v. For all these commands, pick up the receiver
and then enter the command.
(These commands do not apply to non-VoIP calls. Features for the
traditional phone network are normally available from your
traditional phone company.)
*55 Enable Call Waiting on all calls. When a call is waiting, you
will hear a tone. You can then press the Flash button on
your phone to go back and forth between your 2 callers.
*56 Disable Call Waiting on all calls.
*59 Disable Caller ID for call waiting calls.
*70 Turn off Call Waiting for the next call.
*71 Turn on Call Waiting for the next call.
*72 Forward all calls to <phone number>. After you dial *72,
dial 8, enter the phone number, then press #.
*73 Disable Call Forwarding.
*82 Enable Caller ID for all outbound calls.
*62 Block Caller ID on all outbound calls.
*65 Enable Caller ID on all inbound calls.
*85 Disable Caller ID for all inbound calls.
*67 Enable Caller ID for the next outbound call.
*68 Block Caller ID for the next outbound call.
*66 Redial the last number you dialed.
*69 Call the last person who called you.
70
ADSL X6v User Guide
Page 71

*77 Block all calls that don’t have a Caller ID.
*87 Stop blocking calls that don’t have a Caller ID.
*78 Do Not Disturb. Your phone won’t ring.
*79 Turn off Do not Disturb. Lets your phone ring.
Resetting Your VoIP Configuration
To reset the X6v to your most recently saved VoIP configuration,
put the end of a pin or paper clip into the VoIP RESET hole (the
top one of two reset holes) in the back panel and hold the button
down for 5 seconds or more.
To restore the X6v to the most recent settings given to you by your
VoIP service provider, press and hold the VoIP RESET button
for 5 seconds or more, and then release. Wait two minutes, then
press and hold the button for at least 5 more seconds.
To restore the factory default VoIP configuration, press and hold
the VoIP RESET button for 15 seconds.
Chapter 4: Setting Up VoIP Service
71
Page 72

5
The X6v and Online
Gaming
This chapter covers the setup of the X6v for online gaming with
a desktop, notebook, Xbox® or Xbox 360, or
PlayStation® 2 or 3.
Do I Need to Do Anything?
There are three cases where you need to set up your modem in
order to play online games:
• If you are using your computer to play a peer-to-peer or
head-to-head game over the Internet, you always have to
set up the modem unless you linked up to your partner by
going to a Web site. A peer-to-peer game is a game where
two players are competing directly against one another.
Popular peer-to-peer games include World in Conflict
Madden NFL 08, Counterstrike
Mythology®, and Unreal Tournament 2004®. If you
are unsure whether your game is a peer-to-peer game,
check the game instructions.
• If you are using your computer to play a multi-player
game. Popular multi-player games include StarCraft®,
Everquest® I and II, Diablo II®, Hexen II, the Myth
™, Age of
™,
72
ADSL X6v User Guide
Page 73

series, Quake II, Half-Life and Half-Life II, Warcraft®
II and III, World of Warcraft and Lord of the Rings.
• If you are playing an online game using Xbox or Xbox 360
Live or PlayStation 2 or 3.
In all three cases you will need to follow the steps described in
the next section,
Setting Up the X6v for Online Gaming.
Setting Up the X6v for Online Gaming
Setting up the X6v for online gaming involves two basic steps:
Choosing an IP Address for Gaming and Setting Up a Virtual
Server or DMZ. This section provides instructions for doing these
tasks on your computer, Xbox, or PlayStation.
Step 1: Choosing an IP Address for
Gaming
You need to make sure that the computer or gaming system you
use for playing games always has the same IP address. By default,
the X6v assigns addresses dynamically (using Dynamic Host
Configuration Protocol or DHCP) to the devices on the local area
network whenever they reboot. These addresses won’t necessarily
always be the same. Therefore, you need to assign a Static
(unchanging) IP address to every computer or gaming system in
the network.
• If you are using a computer for gaming, continue below.
• If you are using an Xbox or Xbox 360, go to page
• If you are using a PlayStation 2 or 3, go to page
If you are using a computer to play an online game:
1 If you know the name of your computer or if you have only
one computer connected, you can find the MAC address under
DHCP Clients at the bottom of the Create New DHCP
Server Fixed Host page. You can also find the MAC address
75.
76.
Chapter 5: The X6v and Online Gaming
73
Page 74

on the System Status page. Click the System Status icon and
scroll down until you see DHCP Client Status.
If you do not know the name of your computer or you have
more than one computer connected, follow these steps to find
the MAC address:
a
On the computer you want to use for gaming, click the
Start button (Windows Vista users: you must also click All
Programs, then Accessories) and select Run.
In the Run dialog box, type command and click OK to
b
open the Command or MS-DOS window
In the Command Prompt or MS-DOS window (after
c
C:\> or C:\WINDOWS>), type ipconfig, leave a space,
then type /all
It should look like this: ipconfig /all
Press Enter. The MAC address is displayed as the 12-digit
d
Physical Address or Internet Adapter address. Write
this address down and keep it handy.
2 Now that you have determined the MAC address, you can
assign your computer a Static IP address.
a In the Zoom Configuration Manager, click the Router
Setup button.
b On the Router Setup page, click the LAN Configuration
button.
c On the LAN Configuration page, click the Add DHCP
Fixed Host button. The Create New DHCP Server
Fixed Host page appears:
74
ADSL X6v User Guide
Page 75

Make these entries:
Setting Values
IP Address Enter 192.168.0.50. If you are setting up
more than one computer, use different IP
addresses. For example, enter 192.168.0.50
for the first computer and 192.168.0.51 for
the next computer.
MAC
Type the computer's MAC address.
Address
Maximum
Leave the default setting.
Lease Time
d Click Save Changes and then Write Setting to Flash to
save the IP address to permanent memory. Now your
computer will always be assigned this address.
e Now go to Setting Up a Virtual Server or DMZ on
Your Computer on page 78.
If you are using the Xbox or Xbox 360 to play an online game
Follow these steps to assign a static IP to the Xbox:
1 Turn on the Xbox.
2 In the System area of the Dashboard, select Network Settings,
then Edit Settings.
Chapter 5: The X6v and Online Gaming
75
Page 76

3 Select the IP Settings tab and then select Manual.
Enter a Static IP Address for the Xbox. Choose any
address from 192.168.0.101 to 192.168.0.233.
Enter the following Subnet Mask: 255.255.255.0
Enter the following Gateway (X6v) address: 192.168.0.1
Click Done.
4 Turn off the Xbox.
5 Connect the Xbox to the X6v.
6 Now go to page
81 for instructions on setting up a DMZ on the
Xbox. This will prevent the X6v's firewall from stopping
connections to the Xbox.
If you are using PlayStation 3 to play an online game
Follow these instructions to assign a Static IP address to your
PlayStation:
1 Insert your Network Access Disc into the PlayStation.
2 On the home menu, select Settings, then Network Settings.
3 Select Internet Connection Settings.
4 Select Yes to disconnect from the Internet.
5 For your network type, select Wireless.
6 Select Address Settings, then Custom.
76
ADSL X6v User Guide
Page 77

7 Under IP Address Setting, select Manual and enter the
following:
For IP Address, choose any address from 192.168.0.101
to 192.168.0.233.
For Subnet Mask, enter 255.255.255.0
For Default router (X6v) address, enter 192.168.0.1
8 Now go to page
the PlayStation 3. This will prevent the X6v's firewall from
stopping connections to the PlayStation.
83 for instructions on setting up a DMZ on
Step 2: Setting Up a Virtual
Server or DMZ
You set up either a virtual server or a DMZ (Demilitarized Zone)
so that the modem’s firewall won’t block the other players from
your system during your gaming. The main difference between the
virtual server and the DMZ is the amount of access someone has
to your system.
A virtual server will allow access to your computer on certain ports.
A port is like a channel that is used by applications (such as games)
to communicate on. For example, the directions for the game you
want to play over the Internet might tell you to open up port 6000.
A DMZ differs from a virtual server in that it allows access on all
ports to the computer. Because of this, DMZ's are less secure than
virtual servers and should be used with caution on your computer.
For Xbox Live and PlayStation 2, a DMZ is OK since security is
not as much of an issue as it is for your computer.
¾ If you are playing a peer-to-peer or multi-player game
on your computer, go to
DMZ on Your Computer on page 78.
Setting Up a Virtual Server or
¾ If you are using Xbox Live, go to
Xbox or Xbox 360 page 81.
¾ If you are using PlayStation 2, go to
a PlayStation 2 or 3 on page 83.
Chapter 5: The X6v and Online Gaming
Setting Up a DMZ on an
Setting Up a DMZ on
77
Page 78

Setting Up a Virtual Server or DMZ on Your Computer
Note: If you have third-party firewall software, such as the
Windows XP firewall, installed on your computer, you may need to
deactivate it before setting up the virtual server or DMZ.
Otherwise your computer may block the ports you want to open.
1 Click the Router Setup icon. Then, click the Virtual
Server/DMZ button to display this page:
2 On the Virtual Server/DMZ page, click the Add Virtual
Server/DMZ link to display the Add Virtual Server/DMZ
page:
78
ADSL X6v User Guide
Page 79

3 Make the following entries:
Setting Values
Internal IP
Address
Enter the IP address that you specified on
the Create New DHCP Fixed Host
Server page.
Protocol If you know your protocol (udp or tcp)
and port number(s) from your game
instructions, select the protocol from the
list.
If you do not know your protocol or port
number(s), you need to set up your
computer as a DMZ by selecting DMZ
from the Protocol list. This will open up all
ports on the computer to all
communication over the Internet.
Warning
: Setting up a DMZ removes the
protection provided by the ADSL
Ethernet’s firewall. We therefore
recommend that a DMZ be used only when
necessary.
Start Port
If you designated your computer as a
DMZ, you do not have to enter anything
here.
If you are playing another peer-to-peer
or multi-player game, your game
instructions should tell you what ports to
enter here. To enter a number, you must
enter tcp or udp in the Protocol box.
If you only need to open one port, enter the
same port number for both Start Port and
End Port. If you need to open a range of
ports, enter the starting port number of the
range here.
The highest supported port number is
65535.
Chapter 5: The X6v and Online Gaming
79
Page 80

Setting Values
End Port
If you designated your computer as a
DMZ, you do not have to enter anything
here.
If you are playing another peer-to-peer
or multi-player game, your game
instructions should tell you what ports to
enter here. To enter a number, you must
enter tcp or udp in the Protocol box.
If you only need to open one port, enter the
same port number for both Start Port and
End Port. If you need to open a range of
ports, enter the starting port number of the
range here.
The highest supported port number is
65535.
4 Click Save Changes and then Write Settings to Flash.
Important: If you have not already configured the computer for
wireless security, see page
page
33 for setting WPA.
29 for instructions on setting WEP or
If your security has been configured, your online gaming setup is
complete.
80
ADSL X6v User Guide
Page 81

Setting Up a DMZ on an Xbox or Xbox 360
1 Click the Router Setup icon. Then, click the Virtual
Server/DMZ button to display this page:
2 On the Virtual Server/DMZ page, click the Add Virtual
Server/DMZ link to display the Add Virtual Server/DMZ
page:
3 Make the following entries:
Setting Values
Internal IP
Address
Protocol Select DMZ to enable your Xbox as a
Start Port The field remains unavailable because
End Port The field remains unavailable because
Chapter 5: The X6v and Online Gaming
Enter the IP address that you specified
on the Xbox IP Settings screen.
DMZ.
you selected DMZ. No entry is required.
you selected DMZ. No entry is required.
81
Page 82

4 Click Save Changes and then Write Settings to Flash.
5 Update the Xbox Dashboard:
Make sure you have your Xbox Live Starter Kit at hand. Insert
the Xbox Live CD into your Xbox. When the update is
complete, the main menu will include an Xbox Live entry.
6 Insert the Xbox Communicator module into the Xbox
Controller expansion slot (top slot). Then insert the headset
plug into the Communicator module.
7 Activate your Xbox Live account:
The Xbox Live CD should still be in your Xbox. We
recommend that you watch a video that explains the
installation process: Select Xbox Live from the menu. Then
from the Dashboard, select Xbox Live and follow the
prompts. Note: You will need your subscription code to
activate your account—this number is located on the CD’s
sleeve. (If you require more detailed instructions, please refer
to your Xbox Live documentation.)
Important: If you have not already configured the Xbox for
wireless security, see page 29 for instructions on setting WEP or
page 33 for setting WPA.
If your security has been configured, your online gaming setup is
complete.
82
ADSL X6v User Guide
Page 83

Setting Up a DMZ on a PlayStation 2 or 3
1 Click the Router Setup icon. Then, click the Virtual
Server/DMZ button to display this page:
2 On the Virtual Server/DMZ page, click the Add Virtual
Server/DMZ link to display the Add Virtual Server/DMZ
page:
3 Make the following entries:
Setting Values
Internal IP
Address
Protocol Select DMZ to enable your PlayStation as a
Start Port The field remains unavailable because you
End Port The field remains unavailable because you
Chapter 5: The X6v and Online Gaming
Enter the IP address that you specified on
the PlayStation's IP Address setting screen.
DMZ.
selected DMZ.
selected DMZ.
83
Page 84

4 Click Save Changes and then Write Settings to Flash.
Important: If you have not already configured wireless security on
the PlayStation, see page 29 if your network uses WEP, or page 33
if your network uses WPA.
If your security has been configured, your online gaming setup is
complete.
84
ADSL X6v User Guide
Page 85

6
Using Router Setup
Router Setup is primarily for technically advanced users. For
most people, the options that are set by default when the X6v
installed are sufficient.
is
However, those who want or need to change the advanced X6v
settings can do so by logging in as admin and using the Router
Setup page in the Zoom Configuration Manager. This chapter
explains the advanced options and features of the
and how to apply them to your network.
The information in this chapter applies to you if:
•
Your Internet service provider instructs you to enable,
disable, or change the default settings for your X6v
•
You need to change your Wide Area Network settings
•
You want to change the default firewall settings to block
particular IP addresses and intrusive hosts
•
You want to change your ADSL password
•
You have customized your configuration and want to back
it up for future use or apply it to additional modems
You want to set up fixed IP addresses for your computer(s)
•
Note: Users who want to set up Quality of Service (described in
this section) can do so more easily using the Zoom Install
Assistant.
X6v modem
Chapter 6: Using Router Setup
85
Page 86

Viewing the Router Setup Options
You open the Router Setup page by clicking the Router Setup
icon at the top of the Zoom Configuration Manager page. The
page opens and displays buttons organized into three groups:
Configuration, Status, and Administration:
Configuration Options
When you click a Configuration button, a page opens to the
option you selected. The following table describes each option and
the tasks you can perform.
This button… Opens a page that lets you…
WAN
Configuration
86
ADSL X6v User Guide
Specify how the Wide Area Network (WAN)
setup is configured. Some of the values need
to be supplied by your ISP/ADSL provider.
Page 87

This button… Opens a page that lets you…
Advanced
Firewall Filter
Define an additional layer of security for the
computers in your network. For example, if
you create a DMZ interface using the Virtual
Server/DMZ page (see below), you can
enable the firewall filtering and add a security
policy that blocks certain protocols from
reaching the DMZ machine.
ADSL
Configuration
Adjust the ADSL settings on your modem.
Typically, you do not need to change these
ADSL settings unless instructed by your
service provider.
Ethernet
Configuration
View and change the settings on the Ethernet
ports on your X6v.Typically you should not
need to change these settings.
DNS Allows you to specify multiple DNS servers.
Typically, most users do not need to enter a
DNS server unless instructed by their ISP.
LAN
Configuration
Specifies the settings that control the
connection between the X6v modem and
your Ethernet jack. Sets a fixed IP address
for your computer. Do not change the LAN
configuration unless instructed to do so. See
the online Help for LAN configuration
details.
Routing
Table
Set up the routes on which you want the X6v
to send data that it receives on a particular
interface, such as a LAN or Ethernet
interface. Routes specify the IP address of
the next device, interface, or Internet
destination to forward data to, based on the
ultimate destination of the data.
Chapter 6: Using Router Setup
87
Page 88

This button… Opens a page that lets you…
Virtual
Server/DMZ
Open access to your computer by creating a
virtual server or a DMZ (Demilitarized
Zone). By default, your modem uses NAT
(Network Address Translation) to hide your
networked computers from users on the
Internet. However, there are times when you
may want to give outside access to the
computers in your network. If so, you can set
up a virtual server or DMZ to allow outside
users access to a computer on your network.
You may want to allow access, for example,
if a LAN computer is hosting Internet games
or running a Web server.
PPP Half
Bridge
Share the public IP address assigned by your
ISP with a single PC on the LAN. This
avoids problems caused by certain
applications having to work through NAT
(such as online games or FTP servers) and
avoids the need to run a PPP software stack
on the PC.
UPnP
(Universal Plug
and Play)
Connect automatically with other UPnPenabled software and hardware. The
Internet Gateway Device (IGD) protocol
makes it possible for applications running on
the network to automatically configure NAT
routing.
Per Port PVC Assign an Ethernet port to a Permanent
Virtual Circuit (PVC). This feature is
commonly used for delivering video.
Port Settings Conveniently change the default port
settings. You will need to use this feature if
the X6v is hosting a web or Telnet server.
MAC
Filtering
Prevent network devices with the specified
MAC addresses from accessing the Internet.
Management
Control
Enable or deny access to X6v services –
HTTP, Telnet, SNMP – to local network
devices and/or remote users.
88
ADSL X6v User Guide
Page 89

This button… Opens a page that lets you…
QoS (Quality
of Service)
Assign each port (ETHERNET ports 1-4
and the wireless port) a priority of High or
Medium. This lets you assure better
performance for gaming and VoIP, for
example.
TR 069
(Technical
Report 069)
Allow an Access Control Server (ACS) to
control and configure your X6v.
Status Options
The Status buttons open reports that provide real-time
information about your connections and networks. The reports
refresh themselves to give you the most current information.
Typically, these reports are used for maintenance purposes and
troubleshooting.
The following table describes each report in the Status group:
This
button…
ADSL Status View information, such as the ADSL Line
Wireless
Status
Opens a page that lets you…
State, and Upstream and Downstream speeds.
View information, such as your Link Speed,
SSID, Default Channel, and Mac Address of
your wireless computer.
Ethernet
Status
To see sample reports, go to page 129.
View information about Rx (Receive) and Tx
(Transmit) Packets.
Administration Options
The buttons in the Administration group are typically used for
administrative tasks, such as updating the modem’s firmware,
Chapter 6: Using Router Setup
89
Page 90

changing your Zoom Configuration Manager password, and
putting back your modem’s configuration file.
The following table lists each button in the Administration group
and gives a brief description of the things that you can do with that
feature.
This button… Opens a page that lets you…
Admin Password
Change the Admin password to the
Zoom Configuration Manager. The
original user name and password for
the administrator are:
User name: admin
Password: zoomadsl
Firmware Update Specify the path to the upgrade file you
need to update your firmware. Use the
Browse button on this page to navigate
to the file, then click the Upload button
to perform the firmware update.
System Log View data generated or acquired by
routine system communication with
other devices. This information does not
necessarily represent unexpected or
improper functioning and is not
captured by the system traps that create
alarms. You can save the system log to a
file.
Reboot/Restore
Router
Backup/Restore
Config
Reboot the X6v and reset its
configuration to the factory defaults.
Save your current configuration settings
so that they may be restored at a later
time.
90
ADSL X6v User Guide
Page 91

Setting Description
Diagnostic Tests Run a diagnostic test to help isolate any
problems you may be having.
Using the WAN Configuration Settings
When do I need the WAN Configuration page?
The WAN Configuration page contains critical information about
your Wide Area Network (WAN), ADSL setup, and Internet
access. Some of these values are provided by your ISP/ADSL
provider and need to be entered on this page. To determine if you
need to add other values, read the table descriptions that follow the
picture. Note that Protocol, Encapsulation, VPI, VCI, PPP, and
NAT also appear on the ADSL Setup page. Most likely you have
already entered values for these settings and only need the WAN
Configuration page for setting up an advanced feature such as
enabling a disconnect timeout on your PPP connection.
Chapter 6: Using Router Setup
91
Page 92

WAN Configuration Page
The following table describes the settings on the WAN
Configuration page and the values that you can enter. After you
enter your values, click Save Changes and then Write Settings to
Flash.
Note: The table shows settings in addition to the ones shown in
the picture. Depending upon your protocol setting, your WAN
configuration might have all or only some of the settings.
92
ADSL X6v User Guide
Page 93

Setting Description
Protocol (Internet
Connection type)
Your Internet Service Provider supplies
this value.
If your service provider instructs you to
use 1483 Bridged mode, select 1483
Bridged + NAT to take advantage of
your modem’s advanced routing and
firewall features.
Encapsulation The encapsulation value should match
your ADSL provider’s encapsulation.
The value refers to the way that data is
passed over the Internet. An example
value is LLC (Logical Link Control).
Your ADSL provider supplies this value
when you sign up for ADSL service.
VPI Virtual Path Identifier ranges from 0 –
256. Your ADSL provider supplies the
VPI when you sign up for ADSL.
VCI Virtual Circuit Identifier ranges from 0
– 65536. Your ADSL provider supplies
the VCI when you sign up for ADSL
service.
Username Your ADSL provider supplies this
username when you sign up for ADSL
service. (It is not the same as the
username and password for the Zoom
Configuration Manager.)
Password Your ADSL provider supplies this
password when you sign up for ADSL.
Chapter 6: Using Router Setup
93
Page 94

Setting Description
Service Name This is an optional value that your
service provider may ask you to enter.
Disconnect
timeout
The amount of time before the PPP
connection drops if there is no activity.
A value of 0 means stay connected even
if your network stays idle.
Authentication The type of authentication protocol
used during the negotiation of the PPP
connection. This protocol may be
specified by your ISP. One option,
CHAP (Challenge Handshake
Authentication Protocol), encrypts your
user name and password during the
negotiation. Password Authentication
Protocol does not.
NAT Network Address Translation. By
default, this setting is Enabled. NAT
keeps a table of individual private IP
addresses in your network and refers to
the table when incoming requests are
made. If no matches are found, the
incoming data cannot come into your
network. An Enabled setting keeps
your IP addresses hidden from outside
users. Disabled is some times used if
you want to use Public IP addresses.
MTU Maximum Transmission Unit. Largest
physical packet size, measured in bytes,
that the modem can send. Any messages
larger than the MTU have to be
fragmented before being sent.
Obtain IP Address Enable this button if your service
provider is using DHCP and you are
using the 1483 protocol. If you are
unsure of what your service provider is
using select this button.
94
ADSL X6v User Guide
Page 95

Setting Description
Specify an IP
Address
IP Address,
Subnet Mask,
Default Gateway,
and DNS
Ethernet Filter
Type
ATM
Traffic Class
Peak Cell Rate
Burst Tolerance
Max Cell Rate
Max Burst Rate
Sustainable Cell
Rate
Enable this button if you are using a
static IP address and you are using 1483
protocol. Typically you have to request
and pay extra for a static IP address.
If you are using a Static IP address,
enter the values for IP Address,
Subnet Mask, Default Gateway, and
DNS server that your service provider
gave you. You must also be using the
1483 protocol.
Specifies the type of Ethernet filtering
that is performed by the bridge
interface. All-Allows all types of
Ethernet packets through the port. Ip-
Allows only IP/ARP types of Ethernet
packets through the port. PPPoE-
Allows only PPPoE types of Ethernet
packets through the port.
These settings allow you to give priority
to data that is sent over the network.
Important! You must make
arrangements with your ADSL provider
to use anything except UBR
(Unspecified Bit Rate) in the Traffic
Class setting. Your service provider will
also supply you with the Cell, Burst, and
Tolerance Rates.
Chapter 6: Using Router Setup
95
Page 96

Setting Description
RIP RIP is an Internet protocol that you can
set up to share routing table information
with:
¾ LAN devices that support RIP
¾ Remote networks connected via
the ADSL line
¾ Your ISP’s location
Most small home or office networks do
not need to use RIP since they have
only one router and one path to an ISP.
In these cases there is no need to share
routes because all Internet data from the
network is sent to the same ISP gateway.
You may want to configure RIP if any
of the following circumstances apply to
your network:
¾ Your home network setup
includes an additional router or
RIP-enabled PC or device.
These routers will need to
communicate via RIP to share
their routing table information.
¾ Your network connects via the
ADSL line to a remote network,
such as a corporate network. In
order for your modem to learn
the routes used within your
corporate network, they should
both be configured with RIP.
¾ Your ISP requests that you run
RIP for communication with
devices on their network
Accept V1 Accept Version 1 of the RIP protocol.
Accept V2 Accept Version 2 of the RIP protocol.
96
ADSL X6v User Guide
Page 97

Setting Description
Sent V1 Send Version 1: Send RIP information
to other RIP-enabled devices.
Sent V2 Send Version 2: Send RIP Information
to other RIP-enabled devices.
Using the Ethernet Configuration Settings
Do I need to change my Ethernet settings?
The Ethernet Configuration page contains information about the
Ethernet ports on your ADSL modem. Typically you should not
need to change these settings. However, if you are having problems
establishing your Ethernet connection, you may need to change the
Speed/Duplex value to match that of the Ethernet NIC in your
computer. Here is a picture of the Ethernet Configuration page:
The following table describes the Ethernet Configuration settings.
If you change any of the settings, click Save Changes, and then
Write Settings to Flash.
Chapter 6: Using Router Setup
97
Page 98

Setting Description
Port The Ethernet Ports 1-4 on the back of
your modem.
Configuration Shows how your Ethernet ports are set
up.
Linked A check mark indicates that the
Ethernet port is connected.
Speed/Duplex If you are having problems establishing
your Ethernet connection, try setting the
Speed/Duplex value to match that of
the Ethernet NIC in your computer.
Setting Up a Static Routing Table
Do I need static routing?
Most users do not need to set up static routes. The default route
used in your modem will forward all packets correctly. However, if
you set up your network with different subnets, you can use static
routing to ensure your packets are handled correctly.
You can manually create a static route to tell the modem how to
reach a specific IP network. The route entry specifies a destination
network (or single host), together with a mask to indicate what
range of addresses the network covers, and a next-hop gateway
address or interface. If there is a choice of routes for a destination,
the route with the most specific mask is chosen.
To route to a destination that is not on any local network, a route
may be added via a gateway, for instance another router. The
gateway IP address must be on the same subnet as one of the
router's interfaces.
98
ADSL X6v User Guide
Page 99

Here is a picture of the Static Routes page:
The following table describes Routing Table settings. If you change
any of the settings, click Add, and then Write Settings to Flash.
Setting Description
Existing Routes This table shows the existing Static
routes set up on your ADSL Modem.
Destination Enter the Subnet IP address of the
destination.
Gateway Enter the Gateway IP address of your
destination’s subnet. The HOP gateway
must be on the same subnet as the
modem.
Mask Enter the subnet mask (range of IP
addresses) of the destination IP
addresses based on the above subnet IP
address of the destination.
Metric The number of hops. This should
usually be left at 1.
Advertise Enable this if you want to advertise this
route.
Chapter 6: Using Router Setup
99
Page 100

Adding Extra Security with Advanced Firewall Filtering
Do I need extra security?
Setting up advanced firewall security provides an additional layer of
security. For example, if you create a DMZ interface for gaming
using the Virtual Server/DMZ page, you can enable the firewall
filtering and add a security policy that blocks IP addresses, ports,
aliases, and certain protocols from reaching the DMZ machine.
When you use the Advanced Firewall Filtering feature, you will
move through multiple screens. Follow the steps below to set up
this feature.
1 Open the Advanced Firewall Filter page by clicking
Advanced Firewall Filter on the Router Setup page.
Important! Do not enable Advanced Firewall Filtering on the
Advanced Firewall Filter page until you create your security
policy. Otherwise, if you enable Advanced Firewall Filtering
before you create your policy, you will block all outgoing and
incoming traffic.
100
ADSL X6v User Guide
 Loading...