

Page 1
Thank you for selecting the ZOOM 503 (hereafter simply called the "503").
Please take the time to read this manual carefully so you can get the most out of
your 503 and ensure optimum performance and reliability.
Retain this manual for future reference.
ZOOM CORPORATION
NOAH Bldg., 2-10-2, Miyanishi-cho, Fuchu-shi, Tokyo 183-0022, Japan
PHONE: 0423-69-7116 FAX: 0423-69-7115
Printed in Japan 503-5000
• Compact multi-effect device convincingly recreates the sound of famous guitar or bass
amplifiers. This is ideal for line recordings to a tape recorder or when playing your
instrument via a hi-fi audio system. It also lets a fairly small guitar or bass amplifier
sound more powerful and dynamic.
• Integrated amp simulator gives a wide choice of guitar/bass amplifier characteristics.
Sophisticated cabinet simulator allows control over cabinet size, ringing, and even
simulated microphone position. This makes it easy to create exactly the sound you want.
• Two input jacks with different sensitivity enable optimum matching to any guitar or
bass, including instruments with single-coil magnetic pickups or active pickups.
• Ten types of high-quality effects such as chorus, delay, and reverb produce realistic
ambience.
• You can switch between 24 patches to store diverse settings based on your preference.
• Integrated auto-chromatic tuner for guitar. You can tune your instrument easily
anywhere, any time. You can also leave the tuning function disabled all the time.
• AUX input allows connecting the output of audio components such as a CD player, for
mixing with the instrument signal.
•
Dual power supply design allows the unit to be powered from a 9V alkaline battery
(6LR61) or an AC adapter.
USAGE AND SAFETY PRECAUTIONS
In this manual, symbols are used to highlight warnings and
cautions for you to read so that accidents can be prevented. The
meanings of these symbols are as follows:
Please observe the following safety tips and precautions to ensure
hazard-free use of the 503.
Since power consumption of this unit is fairly high, we
recommend the use of an AC adapter whenever possible.
When powering the unit from a battery, use only an alkaline
type.
AC adapter operation
• Be sure to use only an AC adapter which supplies 9 V DC,
300 mA and is equipped with a "center minus" plug (Zoom
AD-0006). The use of an adapter other than the specified type
may damage the unit and pose a safety hazard.
• Connect the AC adapter only to an AC outlet that supplies the
rated voltage required by the adapter.
• When disconnecting the AC adapter from the AC outlet,
always grasp the adapter itself and do not pull the cable.
• If the unit is not to be used for a long time, disconnect the AC
adapter from the outlet.
Battery operation
• Use only a 9 V (alkaline) battery (6LR61).
• The 503 cannot be used for recharging.
Pay close attention to the labelling of the battery to make sure
you choose the correct type.
• If the 503 is not to be used for an extended period of time,
remove the battery from the unit.
• If battery leakage has occurred, wipe the battery compartment
and the battery terminals carefully to remove all remnants of
battery fluid.
• While using the unit, the battery compartment cover should
be closed.
Avoid using your 503 in environments where it will be
exposed to:
• Extreme temperature
• High humidity or moisture
• Excessive dust or sand
• Excessive vibration or shock
• The 503 is a precision instrument. Except for the foot
switches, do not push other parts with your feet or subject
them to strong force.
• Take care that no foreign objects (coins or pins etc.) or liquids
enter the unit.
• Be sure to turn the power to all equipment off before making
connections.
• Before moving the unit, turn the power off and disconnect all
cables and the AC adapter.
Never open the case of the 503 or attempt to modify the
product in any way since this can result in damage to the unit.
Usage precautions
For safety considerations, the 503 has been designed to provide
maximum protection against the emission of electromagnetic
radiation from inside the device, and from external
interference.However, equipment that is very susceptible to
interference or that emits powerful electromagnetic waves
should not be placed near the 503, as the possibility of
interference cannot be ruled out entirely.
Whatever the type of digital control device, the 503 included,
electromagnetic damage can cause malfunctioning and corrupt
or destroy data. Since this is an ever-present danger, thorough
care should be taken to minimize the risk of damage.
Use a soft, dry cloth to clean the 503. If necessary, slightly
moisten the cloth. Do not use abrasive cleanser, wax, or
solvents (such as paint thinner or cleaning alcohol), since these
may dull the finish or damage the surface.
Connecting cables and input and output jacks
You should always turn off the power to the 503 and all other
equipment before connecting or disconnecting any cables. Also
make sure to disconnect all cables and the AC adapter before
moving the 503.
Features
Safety Precautions
Warning
This symbol indicates explanations about extremely
dangerous issues. If users ignore this symbol and handle
the device incorrectly, serious injury or death could
result.
Caution
This symbol indicates explanations about dangerous
issues. If users ignore this symbol and handle the
device the wrong way, bodily injury and damage to the
equipment could result.
Warning
About power
Caution
Environment
Caution
Handling
Caution
Alterations
Electrical interference
Cleaning
1
2
Operation Manual
Page 2
• PATCH
A group of the settings for a certain effect type is called a PATCH. The 503 comes with 24 preset
patches which can be changed (edited) by the user.
• BANK
The 503 calls up patches in sets of four, called a "bank".
The 503 has memory capacity
for 24 patches. At the factory,
these are programmed with
recommended settings.
The user can Edit and Store any
patch, and also restore the
factory settings.
* The patches of banks A and b
can be used for line playback
by setting the cabinet
simulator to ON.
* The ZNR (Zoom Noise
Reduction) parameter in each
patch should be adjusted for
optimum matching with your
guitar or bass.
What Are Banks and Patches? PATCH LIST
Configuration of Effects
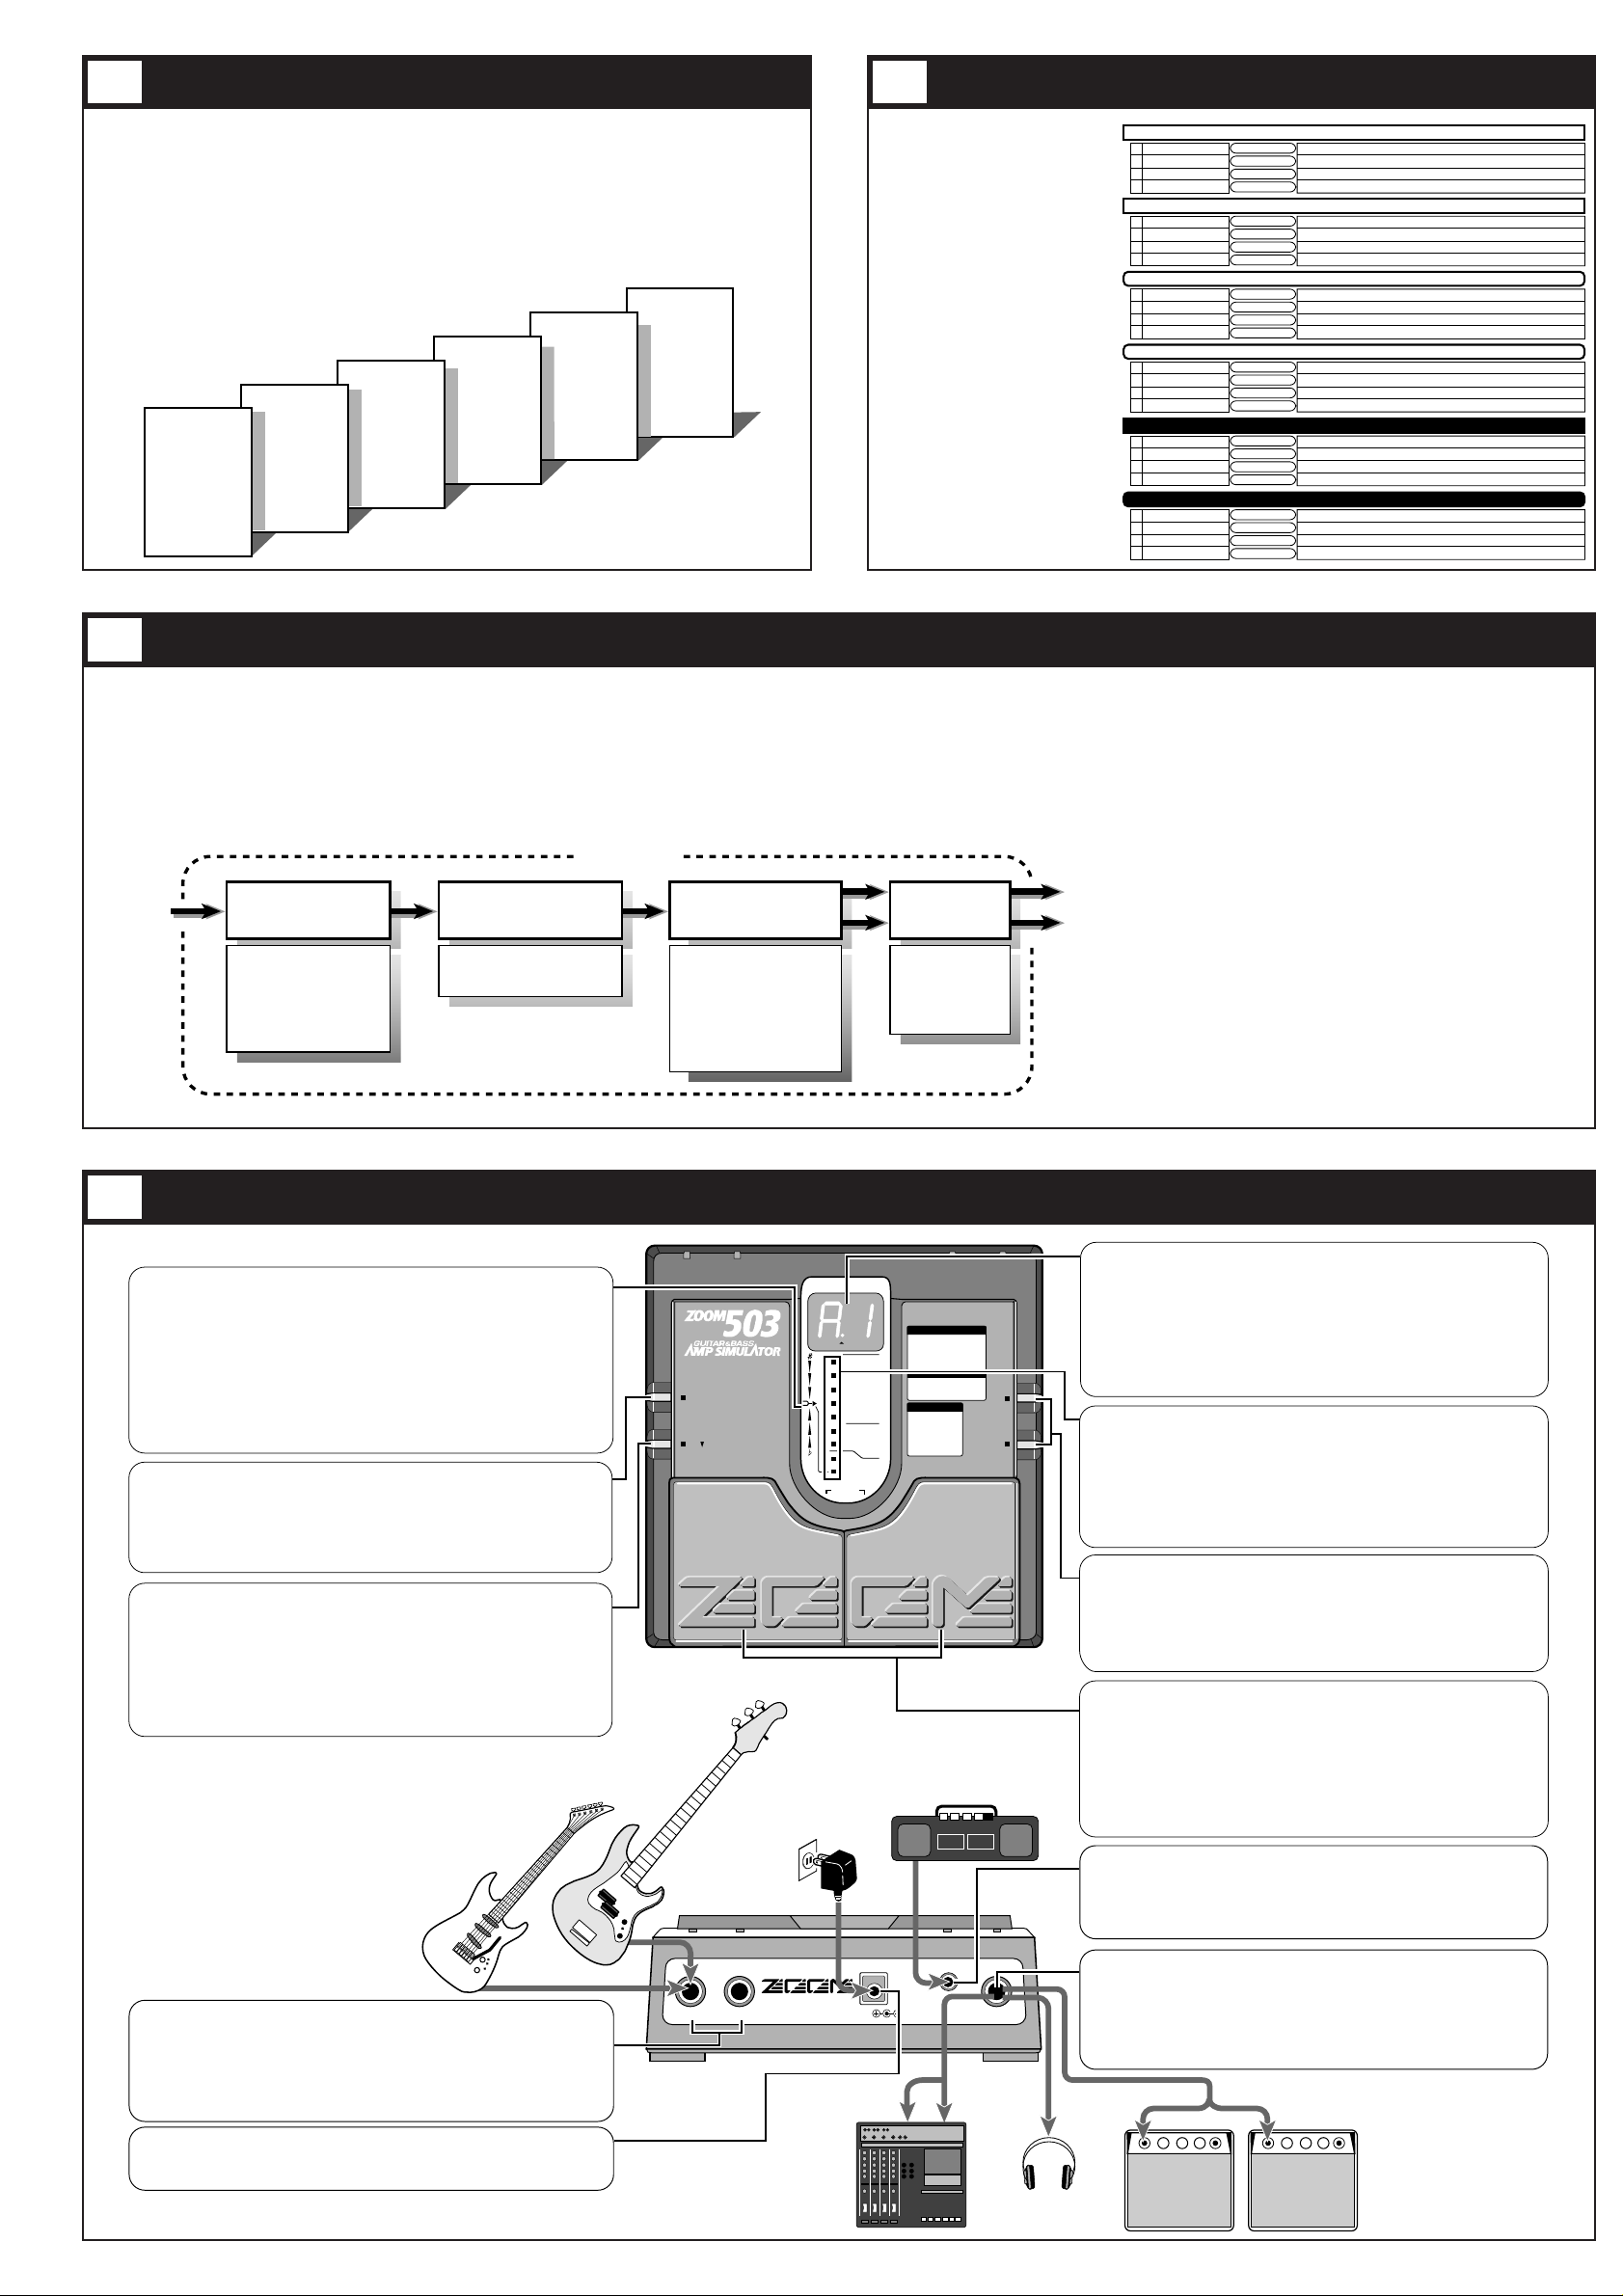
Controls, Functions and Connections
The patches of the 503 are created using the four modules (effects) listed below. You can imagine such a
module as a box containing various effect settings. Each module has several parameters which determine its
sound. The parameters can be adjusted, just as you can turn the knobs on a single compact effect device. A set
of changed parameters can be stored as a patch for later recall.
INPUT
HIGH LOW
DC 9V
AUX IN
OUTPUT
300mA
(PHONES)
STORE
TUNER CAL.
EDIT VAL.
BANK
OUTPUT
INPUT
EDIT
UP
DOWN
BYPASS
BANK HOLD(EDIT:LEVEL)
TYPE&DEPTH
BASS
REVERB
+
–
COMPACT MULTI EFFECTS PROCESSOR
G1: MS CRUNCH
G2: MS DRIVE
G3: F CLEAN
G4: F DRIVE
G5: BG DRIVE
G6: PV DRIVE
G7: J CLEAN
G8: VX CRUNCH
G9: CLEAN
b1: TE CLEAN
b2: F DRIVE
b3: SW CLEAN
b6: AC DRIVE
b7: CLEAN
GUITAR AMP
BASS AMP
GUITAR c : COMBO1
C : COMBO2
S : STACK
L : WALL
BASS b : COMBO1
B : STACK
GUITAR AMP
MIDDLE/ENHANCE
MIC POSITION&
CHORUS
/EFFECTS
GAIN/COMP
TREBLE
TYPE
AMP
CABINET
ZNR
Top Panel
Rear Panel
TUNER indicator
• Play mode:
Indicator lights up when the Reverb module is on for the currently selected patch.
• Bypass(Mute)/Tuner mode:
Indicator flashes to show that tuning function is active. It also serves as center
indicator for fine tuning.
• Edit mode:
Indicator flashes when REVERB parameter is selected.
• BATTERY EMPTY WARNING display
When the unit is powered from the battery and the battery is running low, this
indicator begins flashing at a faster rate than in Edit mode. In such a case, replace
the battery as soon as possible.
STORE key
When the contents of patches are to be stored, this key is used for putting the unit in
store standby status and to execute the store function.
• Setting of direct load function
When the STORE key is pressed for at least 1 second during Play mode (during
performance), the direct load function can be switched on or off. [For details, see 10
Patch Switching (Application: Direct Load OFF).]
EDIT key (for creating your own patches)
This key serves to toggle between the Play mode and Edit mode (mode for creating
patches to suit your taste).
In Edit mode, this key can be used to select the effect parameters you wish to
change. Also, when the effect parameter LEVEL is selected, press this EDIT key to
return from the Edit mode to the Play mode.
• Setting of bank hold function
When the EDIT key is held down for at least 1 second in Play mode, the bank hold
function is turned on or off. [For details, see 9 Patch Switching (Application: Bank
Hold ON).]
INPUT jacks
Serve for connection of the guitar or bass. Choose the HIGH or LOW input,
according to the output level of the instrument pickup. For instruments with active
pickups and built-in preamplifier and for humbucking type pickups, use the LOW
input. For other instruments, use the HIGH input.
When the unit operates on batteries, the INPUT jack doubles as a power switch.
Plugging in a shielded cable turns the 503 on. To prevent draining the battery,
unplug the cable when the unit is not in use.
DC IN (AC adapter) jack
Serves for connecting an AC adapter (Zoom AD-0006) which delivers 9 VDC, 300
mA with a "center minus" plug configuration. The 503 is powered on by plugging
an AC adapter into this jack.
AUX IN jack
The output connector (stereo mini phone jack) of an audio component can be
connected here. By connecting for example a portable CD player/cassette deck,
the sound can be mixed with the sound from the guitar or bass. The mixed signal
is supplied to the OUTPUT jack. Adjust the level of the mixed signal at the
output component.
DISPLAY
Displays information required to operate the 503.
• Play mode
Displays the selected bank (A-F) and patch (1-4).
• Edit mode
Displays the value of the selected effect parameter. In Edit mode, when the
LEVEL parameter (patch volume level) is selected, the dot (.) in the center of the
display flashes.
• Bypass(Mute)/Tuner mode
Shows the pitch of the input signal.
PARAMETER CURSOR indicator
• Play mode
The currently used effect module lights.
• Edit mode
The indicator lights up for the currently used effect module, and the indicator
flashes for the effect module that is turned off. Also, the indicator for the effect
module selected for editing flashes.
• Bypass(Mute)/Tuner mode
Indicators function as tuning meter.
VALUE +/- keys
• Play mode
The keys serve for bank switching.
• Edit mode
The keys serve for changing the effect parameter.
• Bypass(Mute)/Tuner mode
The keys serve for setting the tuner reference pitch (calibration).
PATCH UP (right)/DOWN (left) pedals
• Play mode
The pedals serve for patch switching. Pressing both pedals simultaneously
activates the Bypass(Mute)/Tuner mode.
• Edit mode
The pedals serve for selecting effect parameters. Pressing both pedals
simultaneously turns the currently selected effect module on or off.
• Bypass(Mute)/Tuner mode
Pressing either pedal cancels the Bypass(Mute)/Tuner mode to return to Play
mode.
OUTPUT jack
The output of the 503 is this jack. A shielded Y cable can be used for input to a
stereo component such as a tape recorder, or a stereo headphone can be
connected directly. A headphone will let you enjoy realistic guitar amp sound
even late at night. If the volume level from the headphones is low, use phones
with low impedance (32 ohms or less).
The output can of course also be connected to a guitar amplifier or bass amplifier
using a shielded mono cable.
ZOOM CORPORATION
MADE IN JAPAN
5
3 4
6
BANK A
PATCH 1
PATCH 2
PATCH 3
PATCH 4
BANK b
PATCH 1
PATCH 2
PATCH 3
PATCH 4
BANK C
PATCH 1
PATCH 2
PATCH 3
PATCH 4
BANK d
PATCH 1
PATCH 2
PATCH 3
PATCH 4
BANK E
PATCH 1
PATCH 2
PATCH 3
PATCH 4
BANK F
PATCH 1
PATCH 2
PATCH 3
PATCH 4
PATCH NAME AMP TYPE DESCRIPTION
1
2
3
4
900-DRIVE
TWIN-LEAD
BOX-BEAT
MKIII-CHORUS
Smooth distortion covers entire range from backing to lead play
Hard F-AMP sound suitable for blues leads
Liverpool sound at its best
Solid BG AMP distortion enhanced by a rich chorus
MS DRIVE
F DRIVE
VX CRUNCH
BG DRIVE
BANK A for GUITAR Settings for use with a guitar amplifier
1
2
3
4
ROCK LEAD
SWEET BOX
JETS
NUANCE CRUNCH
Rock lead sound with a powerful amplifier drive
Sweet sounding sound enhances any type of play
Jet sound with effective flanger action
Crunch sound ideally matched to single-coil pickups
PV DRIVE
BG DRIVE
MS DRIVE
MS CRUNCH
BANK b for GUITAR Settings for use with a guitar amplifier
1
2
3
4
WILD-DIST
STRAIGHT BACK
HARDIST
TREMOLO CLEAN
Wild and hard driving sound for heavy rock
Imposing crunch sound for a variety of styles
Rock lead sound tailored for line playback
Vintage amplifier style clean sound with tremolo
PV DRIVE
MS CRUNCH
MS DRIVE
F CLEAN
BANK C for GUITAR
Settings for creating a guitar amplifier sound in a line playback system
1
2
3
4
STUDIO LEAD
LIGHT CRUNCH
FUSION 335
BACK&SOLO
Simulates the lead sound of L.A. recording studios
Crunch sound varies with picking intensity
Fusion type sound simulates box ringing
Almighty clean sound with effective flavor
BG DRIVE
VX CRUNCH
BG DRIVE
J CLEAN
BANK d for GUITAR Settings for matching line playback to CD or synthesizer sources
1
2
3
4
ROCK BASS MAN
SW "SLAP" R
BASS BOOSTER
TRACE STANDARD
Bass amplifier drive sound simulation
Realistic sound suitable for stepping and finger sound
Lightly boosted refined sound
Standard type sound with a distinctive edge
F DRIVE
SW CLEAN
F DRIVE
TE CLEAN
BANK E for BASS Settings for use with a bass amplifier
1
2
3
4
LINE SLAP
SOLO PLAY
WALKING
MELODY
Slap sound suitable for line recording
Rich and savory sound for impressive solo playing
Professional sound for running bass lines
Mellow sound for melodious solos
SW CLEAN
AC DRIVE
TE CLEAN
TE CLEAN
BANK F for BASS Settings for line playback
• AMP SIMULATOR
Controls the amp simulator type, gain, and 3-band
equalization (TREBLE/MIDDLE/BASS). The
MIDDLE parameter can also be used to obtain an
enhancer effect.
• CABINET SIMULATOR & ZNR
Controls the cabinet simulator type, the simulated
mike position, and the ZNR (Zoom Noise Reduction)
settings.
• CHORUS/EFFECTS
Adds chorus, flanger, delay and other effects to
change the sound character.
• REVERB
Allows the choice between three types of reverb (hall,
room, spring), to create a feeling of ambience.
REVERB
HALL REVERB
ROOM REVERB
SPRING REVERB
LONG DELAY
MONO CHORUS
STEREO CHORUS
FLANGER
TREMOLO
DOUBLING
LONG DELAY
AMP TYPE
GAIN
TREBLE
MIDDLE / ENHANCE
BASS
CABINET TYPE & DEPTH
MIC POSITION & ZNR
OUTPUT
INPUT
CHORUS / EFFECTSAMP SIMULATOR
CABINET SIMULATOR
& ZNR
Patch
Page 3

The 24 patches can be easily selected by
pressing the patch pedals. The right patch
pedal switches to the next patch and the
left patch pedal switches to the previous
patch.
In the initial condition, the 503 is set up
so that the patch pedals select patches
continuously, but you can also set up the
unit so that patches are switched only
within a certain bank of four patches. [For
details, see section 9 Patch Switching
(Application: Bank Hold ON).]
Banks are selected with the VALUE +/keys. Press the VALUE+ key to select the
next bank, and the VALUE- key to select
the previous bank.
For example, to switch from Patch 2,
Bank A to Patch 3, Bank C, the patch
pedal would have to be pressed nine
times. Instead, you can press the
VALUE+ key twice to switch to Bank C,
and then press the patch pedal (UP) just
once to select Patch 3.
In the Bypass mode, the effects of the
503 are temporarily turned off, so
that the original sound of the
instrument only is heard. In this
mode, the auto-chromatic tuning
function is also active. It is also
possible to activate muting, to
prevent the tuning sound from being
sent to the output.
Bypass and mute condition
Pressing both patch pedals simultaneously activates the Bypass or Mute mode.
• For bypass mode: Press and immediately release the patch pedals.
• For mute mode: Press patch pedals for at least 1 second.
To cancel the bypass or mute condition, simply press one of the patch pedals. The unit then
reverts to the previously selected patch.
Tuner mode
The 503 is initially set so that the auto-chromatic tuning function for the guitar activates
automatically when the Bypass(Mute) mode is invoked. In Bypass(Mute) mode, pick an open
string to be tuned. The closest note will be shown on the display.
When the tuning function is active, the parameter cursor LEDs
serve as tuning meter, designed to enhance tuning precision during
fine adjustments.
Turning tuning function off
If you do not want to activate the tuning function in Bypass(Mute)
mode, press the STORE and EDIT keys simultaneously for more
than one second in Play mode. The tuning function will be turned
off, and this setting will be stored even when the power is turned off. When you turn the function
off, the display will show "tunEr oFF" (tuning function off).
To turn the tuning function on, press the same keys simultaneously again. The display will show
"tunEr on" (tuning function on).
NOTE: • Please note that the tuning function may not operate properly if other effect modules between the
guitar and the 503 are on.
• To tune a bass, use 12th-fret harmonics.
Selecting Patches
Using the Bypass (Mute)/Tuner Mode
A
1
PATCH
DOWN
PATCH
UP
Patch switching
24 patches are available
Bank switching
Banks A, b, C, d, E, F are available
A
1
A
1
BANK UP
BANK DOWN
BANK F
PATCH 1
PATCH 2
PATCH 3
PATCH 4
BANK E
PATCH 1
PATCH 2
PATCH 3
PATCH 4
BANK d
PATCH 1
PATCH 2
PATCH 3
PATCH 4
BANK C
PATCH 1
PATCH 2
PATCH 3
PATCH 4
BANK b
PATCH 1
PATCH 2
PATCH 3
PATCH 4
BANK A
PATCH 1
PATCH 2
PATCH 3
PATCH 4
Pitch is too high Correctly tuned Pitch is too low
7
8
Bank/patch switching
when Bank Hold is off
(initial setting)
A
1
Bypass (Mute)/Tuner mode ON
Pressing both patch pedals simultaneously turns
the Bypass (Mute)/Tuner mode on. To turn the
mode off, simply press one of the two patch pedals.
Press both
pedals together
Calibration
Select reference pitch for auto-chromatic
guitar tuner (calibration).
* The reference pitch (A) can be adjusted in the
rangefrom 435 to 445 Hz. When the BANK key
is pressed in Bypass (Mute)/Tuner mode, this is
shown as "35" to "45" on the display for a
second. Adjust to the suitable value. At poweron, the setting is 440 Hz (40).
Currently selected
patch is indicated
Press Release immediately Tuner mode
Currently selected
patch is indicated
Press for 1 s or more Release Mute mode
Input signal
standby condition
Do = C
Do# = C#
Regular tuning
Re = D
4th string
Re# = D#
Regular tuning
Mi = E
Fa = F
6th string
1st string
Fa# = F#
Regular tuning
So = G
So# = G#
3rd string
Regular tuning
La = A
La# = A#
Regular tuning
Si = B
5th string
2nd string
Page 4

In the initial setting, the patch
pedal switches all patches in
order, regardless of the bank
divisions.
The bank hold function limits
switching to the four patches
within a bank. When this
function is activated, the patch
pedals switch in order between
the patches in the current bank
only.
To activate this function, hold
the EDIT key down for at least
1 second in Play mode. The
BANK HOLD indicator will
light. To turn the function off,
again hold the EDIT key down
for at least 1 second. The
BANK HOLD indicator will go
off.
Banks can be switched using
the VALUE +/- keys.
In the default condition, the 503 is
set up in such a way that pressing a
patch pedal immediately switches
the patch and alters the output
sound. This is called Direct Load
ON. This switching principle is
most convenient when the desired
patches are adjacent or close to
each other. However, when
wanting to switch to a patch that is
further away, it may be desirable
not to activate the sound of the
other patches in between.
When this is desired, turn the
Direct Load function off as
follows. When Direct Load has
been turned off, switching banks
and patches has no effect until the
user confirms the selection.
For example, when going from
patch 1 to patch 4 with Direct Load active, patches 2
and 3 will briefly be heard when the patch UP pedal
is pressed three times. When Direct Load is off,
pressing the patch UP pedal will change the number
on the display (the number flashes), but until the
user confirms the choice, the sound remains that of
patch 1.
To turn Direct Load on or off, keep the STORE key
depressed for at least 1 second.
To confirm a choice after selecting a patch with
Direct Load off, press both patch pedals
simultaneously.
Patch Switching (Application: Bank Hold ON)
Patch Switching (Application: Direct Load OFF)
9
10
Bank/patch switching
when Bank Hold is on
Confirm
Example: Switching from patch 1 to patch 4
Patch switching completed
A
1
A
2
A
3
A
4
A
4
Bank Hold ON
Keeping the EDIT key depressed for at least 1 second activates Bank
Hold. To cancel Bank Hold, press the EDIT key again for 1 second.
A
1
Bank switching
Banks A, b, C, d, E, F
can be switched.
PATCH
DOWN
PATCH
UP
Patch switching
4 patches within bank can be switched.
BANK C
BANK b
BANK A
PATCH 1
PATCH 2
PATCH 3
PATCH 4
PATCH 1
PATCH 2
PATCH 3
PATCH 4
BANK d
PATCH 1
PATCH 2
PATCH 3
PATCH 4
BANK DOWN
BANK E
PATCH 1
PATCH 2
PATCH 3
PATCH 4
PATCH 1
PATCH 2
PATCH 3
PATCH 4
A
1
BANK F
PATCH 1
PATCH 2
PATCH 3
PATCH 4
BANK UP
A
1
A.1
BANK HOLD ON
A.1
BANK HOLD OFF
DIRECT LOAD OFF
Keeping STORE key depressed for 1 second
turns Direct Load off.
The same procedure serves to turn it on.
PATCH
DOWN
A
1
Bank switching
Banks A, b, C, d, E, F
can be switched.
PATCH
UP
Patch switching
Patches can be switched.
Confirming a patch
When display indication flashes, pressing
both patch pedals together confirms the
patch and switches the output sound.
A
4
Press both pedals together
Page 5

The 503 comes with 24 predefined patches. But the unit offers many more possibilities for combining effects in
innovative ways. To discover these possibilities, we recommend that you try changing the parameters (elements that
make up patches) to create your own patches. This operation is called editing, and is done in the Edit mode.
To switch from normal Play mode to Edit mode, press the EDIT
key briefly (for less than 1 second).
* Note that if the EDIT key is held down for 1 second or longer, the
Bank Hold mode will be activated.
Immediately after switching from Play mode to Edit mode, the
AMP TYPE parameter cursor is flashing, and the AMP TYPE
setting is shown on the display. This indicates that the AMP TYPE parameter is currently selected for editing.
In Edit mode, the EDIT key or PATCH UP/DOWN pedals are used to select the parameter for editing. The 503 has
the following parameters:
• AMP TYPE : Selects the simulated amp characteristics.
• GAIN : Adjusts the intensity of distortion and compressor/limiter effects.
• TREBLE : Adjusts the high-frequency range.
• MIDDLE/ENHANCE : Adjusts the middle frequency range or the enhancer effect.
• BASS : Adjusts the low-frequency range.
•
CABINET TYPE & DEPTH :
Adjusts the cabinet type and the depth of cabinet ringing.
• MIC POSITION & ZNR : Adjusts the simulated mike position and the ZNR (Zoom Noise Reduction) sensitivity.
• CHORUS/EFFECTS : Selects the chorus, flanger, tremolo, doubling, and delay effects.
• REVERB : Selects the reverb and delay effects.
• LEVEL : Adjusts the overall level of the patch.
Each push of the EDIT key moves the blinking parameter cursor indicator one step down. The TUNER indicator
serves as parameter cursor for the REVERB parameter, and the center dot (.) in the display for the LEVEL
parameter. When the EDIT key or PATCH DOWN pedal is pressed while the lowest indicator
(CHORUS/EFFECTS) is flashing, the TUNER indicator starts flashing and the REVERB parameter can be
adjusted. When the EDIT key or PATCH DOWN pedal is further pressed, the center dot (.) in the display starts
flashing and the LEVEL parameter can be adjusted.
The parameter value is changed using the VALUE +/- keys. For details on parameters, please refer to section "12.
Effect Parameters".
To terminate the Edit mode and return to the Play mode, press the EDIT key while the LEVEL parameter is
selected (center dot in the display is flashing). For information on how to store changed parameters, please refer to
section "13. Storing Patches".
When the PATCH DOWN pedal is pressed while the center dot in the display is flashing, the AMP TYPE
parameter is selected again and the unit stays in Edit mode.
Editing Patches
A
1
P
8
(1) While still in Play mode, select
the patch you wish to edit.
(2) Press the EDIT key to
activate the Edit mode.
1cc
8
A
1
S
r
(1) Use the EDIT key or
patch pedal to
select the
parameter you wish
to change.
(2) Use the VALUE
+/- keys to
adjust the
parameter.
(3) Press the EDIT key while the
LEVEL parameter is selected
(center dot in the display is
flashing).
c
11
Effect Parameters
12
Selection of parameters tochange
As described in 11. Editing Patches, parameters to be edited are selected by
repeatedly pressing the EDIT key, but you can also use the patch pedals for
this purpose.
Press the PATCH UP pedal (right patch pedal) to move the parameter
cursor from the bottom up.
Press the PATCH DOWN pedal (left patch pedal) to move the parameter
cursor from the top down.
Switching modules on and off
When a parameter included in the Amp Simulator, Cabinet Simulator &
MIC/ZNR, or Chorus/Effects module is selected, pressing the PATCH
UP/DOWN pedals simultaneously will turn that module on or off. The on/off
condition can also be stored as part of the patch.
• To switch the amp simulator on or off
In Edit mode, when any of the parameters AMP TYPE, GAIN, TREBLE,
MIDDLE/ENHANCE, or BASS is selected, pressing the PATCH
UP/DOWN pedals simultaneously turns the Amp Simulator module off.
The indication "oF" appears on the left side of the display, and "--" on the
right.
• To switch the Cabinet Simulator & ZNR module on or off
In Edit mode, when any parameter of CABINET TYPE & DEPTH or MIC
POSITION & ZNR is selected, pressing the PATCH UP/DOWN pedals
simultaneously turns the module off (ZNR remains unaffected). For
CABINET TYPE & DEPTH, the indication "oF" appears on the display.
For MIC POSITION & ZNR, "0" to "9" (ZNR setting only) is shown on the
display.
• To switch the Chorus/Effects module on or off
In Edit mode, when the parameter CHORUS or EFFECTS is selected,
pressing the PATCH UP/DOWN pedals simultaneously turns the
Chorus/Effects module off. The indication "oF" appears on the display.
• To switch the reverb module on or off
In Edit mode, when the REVERB parameter is selected, pressing the
PATCH UP/DOWN pedals simultaneously turns the Reverb module off.
The indication "oF" appears on the display.
* To turn any of the above modules on again, press the PATCH UP and
DOWN pedals together once more, or press one of the VALUE +/- keys.
The parameters return to their original setting.
Parameter setting shortcuts
Normally, parameter values are set by tapping the VALUE + or VALUE key once for each increment or decrement. For quick operation, you can use
the shortcut function. This is activated in the Edit mode by pressing both
VALUE keys together. For example, if the BASS parameter is set to "-4 and
you want to change it to "10", you would have to press the VALUE + key 14
times. Instead, you can achieve the same effect by using the shortcut
function: press the VALUE +/- keys simultaneously twice, which will change
the value to "10".
Master level adjustment
With the 503 you are also able to set the master level that governs the
overall output level. The master level is adjusted in Play mode. Hold the
VALUE +/- keys down simultaneously for at least 1 second. The current
master level will be displayed for 1 second.While the level is being
displayed, use the VALUE +/- keys to change it. The setting range is 0-50.
(Default value = 40)The unit does not store the setting for the master level.
Each time the power is turned on it has to be set again.
HINT
z
HINT
c
HINTvHINT
x
0 9
—
oF
oF
PARAMETER 1 : AMP TYPE
PARAMETER 2 : GAIN
Determines the simulated amplifier characteristics.
Settings G1 - G9 are guitar amplifier settings.
FL can be used both for guitar and bass amplifier simulation.
b1 - b5 are bass amplifier settings.
PARAMETER 3 : TREBLE
Adjusts the high-frequency sound character.
Adjusts the intensity of distortion, compressor, or limiter,
according to the AMP TYPE selection.
MIDDLE/ENHANCERPARAMETER 4 :
Adjusts the mid-frequency sound character or the enhancer effect.
Adjusts the low-frequency sound character.
PARAMETER 5 : BASS
Adjusts the distortion intensity when AMP TYPE is set to G1, G2, G4, G5, G6, or G8.
Adjusts the compressor intensity when AMP TYPE is set to G3, G7, or G9. Higher
values mean higher effect intensity. At a setting of "1", the effect is disabled.
Adjusts the compressor
intensity. Higher values
mean higher effect
intensity. At a setting of
"1", the effect is disabled.
TE CLEAN
F DRIVE
SW CLEAN
AC DRIVE
CLEAN
Clean sound with striking
midrange.
Vintage type drive sound.
Modern hi-fi type clean
sound.
Drive sound with prominent
mid and upper range.
Clean line sound for bass.
Flat setting in which only
the amp simulator
equalizer is used.
Suitable both for guitar
and bass.
Negative values cause a treble cut and positive values a treble boost.
130
—
10
—
G1
G2
G3
G4
G5
G6
G7
G8
G9
PARAMETER 7 : MIC POSITION & ZNR
Controls the position of the simulated microphone before the
cabinet and the ZNR (Zoom Noise Reduction) settings.
Selects modulation and spatial effects including chorus, flanger,
and delay.
Selects echo effects including reverb and long delay.
Adjusts the overall level of the patch.
The letter at the left of the display indicates the simulated mike position, and the number at the
right the ZNR sensitivity. The higher the number, the more thoroughly will the noise in breaks
during play be suppressed. Set the value as high as possible without causing the sound to
become unnatural.
PARAMETER 9 : REVERB
PARAMETER 10 : LEVEL
The higher the value, the higher the volume level of the patch.
130
—
PARAMETER 8 : CHORUS/EFFECTS
The letter at the left of the display indicates the effect, and the number at the right the effect intensity.
PARAMETER 6 : CABINET TYPE & DEPTH
This parameter adjusts both the cabinet simulator type and the
ringing depth.
The letter at the left of the display indicates the cabinet type, and the number at the right
the cabinet ringing depth. The higher the number, the stronger the ringing.
When the MIC POSITION & ZNR setting of parameter 7 is 0 - 9,
the CABINET TYPE & DEPTH parameter has no effect.
Simulates a combo type guitar amp
cabinet with one 12-inch speaker.
c1 c9
—
Simulates a combo type guitar amp
cabinet with two 12-inch speakers.
C1 C9
—
Simulates a stack type guitar amp
cabinet with four 10- inch speakers.
S1 S9
—
Simulates a stack of ten guitar amp
cabinets with 10-inch speakers.
L1 L9
—
Simulates a bass amp cabinet with
one 15-inch speaker.
b1 b9
—
Simulates a bass amp cabinet with
four 6.5-inch speakers.
B1 B9
—
Simulates sound as picked up by a
microphone close to the cabinet.
n0 n9
—
Mono chorus effect. Higher values
result in a stronger chorus effect.
c1 c9
—
Stereo chorus effect. Higher values
result in a stronger chorus effect.
C1 C9
—
Flanger effect. Higher values result
in faster modulation speed.
F1 F9
—
Tremolo effect. Higher values result
in faster tremolo.
t1 t9
—
The letter at the left of the display indicates the effect, and the number at the right the effect intensity.
Hall reverb effect. Higher values result in a
stronger hall reverb.
H1 H9
—
Room reverb effect. Higher values result in
a stronger room reverb.
r1 r9
—
Spring reverb effect. Higher values result in a
stronger string reverb.
S1 S9
—
Long delay effect. Higher values result in
longer delay time.
L1 L9
—
Doubling effect. Higher values
result in longer delay time for the
short delay.
d1 d9
—
Long delay effect. Higher values
result in longer delay time.
L1 L9
—
Simulates sound as picked up by a
microphone placed at an angle to
the cabinet.
S0 S9
—
Simulates sound as picked up by a
microphone placed at a distance
from the cabinet.
F0 F9
—
Negative values cause a midrange cut and positive values a midrange boost.
130
—
FL b1
b2
b3
b4
b5
Adjusts the limiter intensity
when AMP TYPE is set to b1,
b3, or b5. At a setting of "1",
the effect is disabled.
Adjusts the distortion intensity when AMP
TYPE is set to b2 or b4. Higher values mean
stronger distortion.
Pressing the PATCH UP and
DOWN pedals together causes the
display to show the "oF" indication.
The amp simulator module is now
switched off. Pressing the PATCH
UP and DOWN pedals together
once more turns the module back
on again.
--
Pressing the PATCH UP and
DOWN pedals together causes the
display to show the "--" indication.
The amp simulator module is now
switched off. Pressing the PATCH
UP and DOWN pedals together
once more turns the module back
on again.
oF
Pressing the PATCH UP
and DOWN pedals together
causes the display to show the "oF"
indication. The Cabinet Simulator
&ZNR module is now switched off.
Pressing the PATCH UP and DOWN
pedals together once more turns
the module back on again.
Pressing the
PATCH UP and
DOWN pedals together causes
the display to show "0" to "9". The
cabinet simulator is now switched
off. Pressing the PATCH UP and
DOWN pedals together once more
turns the module back on again.
Pressing the PATCH UP
and DOWN pedals together
causes the display to show
the "oF" indication.
The Chorus/Effects module is now
switched off. Pressing the PATCH
UP and DOWN pedals together
once more turns the module back
on again.
oF
Pressing the PATCH UP and
DOWN pedals together
causes the display to show
the "oF" indication. The REVERB
module is now switched off. Pressing
the PATCH UP and DOWN pedals
together once more turns the module
back on again.
130
—
* At the n0, S0, F0, and 0 settings, ZNR is off.
MS CRUNCH
MS DRIVE
F CLEAN
F DRIVE
BG DRIVE
PV DRIVE
J CLEAN
VX CRUNCH
CLEAN
Simulates the crunch sound of a tube stack amp in the British style.
Simulates the drive sound of a tube stack amp in the British style.
Simulates the clean sound of a built-in type tube amp.
Simulates the drive sound of a built-in type tube amp.
Simulates the drive sound of a tube combo amp with prominent midrange.
Simulates the drive sound of a high-gain tube stack amp, ideal for heavy metal.
Simulates a clean sounding combo amp, good for chorus effects.
Simulates the drive sound of a tube combo amp, well suited to blues numbers.
Clean line sound for guitar.
0 0
—
10
—
0 0
—
Determine the frequency for the enhancer effect which emphasizes a certain frequency range only.
E1 E9
—
Negative values cause a bass cut and positive values a bass boost.
10
—
0 0
—
WALL
STACK
COMBO 2
COMBO 1
STACK
COMBO
FLAT
F9
ZNRMIC POSITION
+
–
Pressing either the VALUE + or - key switches to the next higher or lower setting.
Pressing both VALUE +/- keys together skips to settings
in the following sequence: G1 – G9 ➔ FL ➔ b1.
+
–
+
–
Pressing the VALUE + or - key changes the setting by 1.
Pressing both VALUE +/- keys together skips as follows:
-10 – -1 ➔ 0, 0 – 9 ➔ 10
+
–
+
–
Pressing the VALUE + or - key changes the setting by 1.
Pressing both VALUE +/- keys together skips as follows:
-10 – -1 ➔ 0, 0 – 9 ➔ 10, 10 ➔ E1, E1 – E8 ➔ E9
+
–
+
–
Pressing the VALUE + or - key changes the setting by 1.
Pressing both VALUE +/- keys together skips as follows:
-10 – -1 ➔ 0, 0 – 9 ➔ 10
+
–
+
–
Pressing the VALUE + or - key changes the setting by 1.
Pressing both VALUE +/- keys together skips as follows:
c1 – c9 ➔ C1, C1 – C9 ➔ S1
+
–
+
–
Pressing the VALUE + or - key changes the setting by 1.
Pressing both VALUE +/- keys together skips as follows:
n0 – n9 ➔ S0, S0 – S9 ➔ F0
+
–
+
–
Pressing the VALUE + or - key changes the setting by 1.
Pressing both VALUE +/- keys together skips as follows:
c1 – c9 ➔ C1, C1 – C9 ➔ F1
+
–
+
–
Pressing the VALUE + or - key changes the setting by 1.
Pressing both VALUE +/- keys together skips as follows:
H1 – H9 ➔ r1, r1 – r9 ➔ S1
+
–
+
–
Pressing the VALUE + or - key changes the setting by 1.
Pressing both VALUE +/- keys together skips as follows:
1 – 9 ➔ 10, 10 – 19 ➔ 20
+
–
+
–
Pressing the VALUE + or - key changes the setting by 1.
Pressing both VALUE +/- keys together skips as follows:
1 – 9 ➔ 10, 10 – 19 ➔ 20 – 29 ➔ 30
+
–
REVERBLEVEL
CHORUS /EFFECTS
AMP SIMULATOR
CABINET SIMULATOR &ZNR
Page 6

If you have edited (altered) a patch and turn the 503 off without storing the patch, the patch will
revert to its old setting. To store an edited patch, use the following simple procedure.
Storing can be carried out in both Play mode and Edit mode.
After you have edited the patch, press the STORE key. If the unit is currently in Play mode,
release the key before 1 second has elapsed, otherwise the Direct Load function will be
activated.
The display starts to flash. This condition is called the store standby condition. If you wish,
you can abandon the store procedure at this point by pressing the EDIT key. If you press the
STORE key once more, the contents of the patch are updated.
You can also change the patch number before storing, so that the edited patch will be stored in
a different number.
In this case, the original patch that was used as a starting point for editing will not be changed.
If the tuning indicator flashes while the unit is being powered from the battery, the battery is
exhausted and should be replaced as described below.
Use only a 6LR61 9 V (alkaline) battery.
Using another kind of battery will result in shorter operation.
The 503 comes with 24 predefined patches that have been programmed at the factory. Also after
you have edited and stored your own patches, you can return to the factory default settings at any
time. This process is called "recalling". Returning all 24 patches to the original contents and
resetting the Bank Hold and Direct Load functions is called "all initialize".
The Recall mode is separate from the Play mode and Edit mode. You cannot switch directly to
Recall mode from these modes. The Recall mode can only be activated by turning the unit on in
a special way, as described below.
1. Turn the unit off by disconnecting the AC adapter or the guitar input cable.
2. Keep the STORE key depressed and turn the unit on.
3. The indication "AL" flashes on the display.
4. To perform "all initialize", press the STORE key once more in this condition. The
flashing rate increases and the initialization procedure is carried out. When it is
completed, the unit automatically enters the Play mode.
5. When wishing to recall only a particular patch, select the patch number in step 3,
using the same procedure as for normal patch selection.
6. When the desired patch has been selected, press the STORE key. The flashing rate
increases and the contents of the selected patch are recalled.
7. Recalling of individual patches can be carried out continuously. When you wish to
terminate the process, press the EDIT key. The unit then returns to the Play
mode. Turning the unit off also terminates the recall condition.
Effects: 32 effects
AMP TYPE
GUITAR AMP MS CRUNCH, MS DRIVE, F CLEAN, F DRIVE, BG DRIVE, PV DRIVE, J CLEAN,
VX CRUNCH, CLEAN,
FLAT
BASS AMP TE CLEAN, F DRIVE, SW CLEAN, AC DRIVE, CLEAN
CABINET TYPE GUITAR CABINET COMBO1, COMBO2, STACK, WALL
BASS CABINET COMBO, STACK
ZNR (ZOOM NOISE REDUCTION)
CHORUS/EFFECTS Chorus, Stereo Chorus, Flanger, Tremolo, Doubling, Long Delay
REVERB Hall, Room, Spring, Long Delay
Maximum simultaneous effecs: 5
Banks and Patches: 6 banks X 4 patches = 24 patches (edit + store possible)
Analog/Digital Conversion: 18 bit, 128 times oversampling
Digital/Analog Conversion: 16 bit, linear
Sampling Frequency: 31.25 kHz
Inputs: HIGH input (standard monaural phone jack) Input impedance: 470 kilohms
Rated input level: Electric Guitars and Basses with single-coil pick ups
LOW input (standard monaural phone jack) Input impedance: 470 kilohms
Rated input level: Electric Guitars and Basses with hum-bucking typ active type
AUX Input: Mini phone jack/stereo Input impedance: 10 kilohms
Output: Combined line/headphone output(standerd stereo phone jack)
Max. output level: +6 dBm Output load impedance: 10 kilohms or more
Display: 2-digit, 7-segment LED, tuning indicator, parameter cursor indicator
Power Requirements: Optional AC adapter 9 VDC ,300mA (ZOOM AD-0006)
Battery: 6LR61 9V (alkaline) battery X 1
Battery life: Approx. 4h continuous operation
Dimensions: 147(W) X 157(D) X 49(H) mm
Weight: 480 g (without batteries)
* 0 dBm = 0.775 Vrms
* Design and specifications subject to change without notice.
Storing Patches
Replacing the Battery
Returning Patches to Factory Settings
Specifications
13
14
15
16
1. Turn the 503 upside down and
open the cover of the battery
compartment. (Push the catch to
unlock the cover, then lift it up.)
2. Remove the battery from the
compartment and disconnect the
battery cable. (Grasp the
terminal strip and do not pull at
the cable.)
3. Connect the battery cable to the
new battery, taking care to
observe correct polarity (+/-).
Then insert the battery into the
battery compartment.
4. Close the battery compartment
cover, taking care not to pinch the
cable. (Make sure that the cover
is properly locked.)
(2) Press the STORE key.
(Unit enters store standby mode.)
A
A
1
1
b
4
(4) Press the STORE key once more.
(Store process is completed.)
b
4
b
4
(1) Edit the patch as desired.
(3) Select the patch for storing.
Cover
6LR61 9 V (alkaline) battery
Cable
 Loading...