

Zoom 4410B User Manual

Wireless-G
USB Adapter
USER GUIDE

2
Wireless-G USB Adapter

Contents
Overview .................................................................. 4
1. Installation Instructions ...................................... 5
Installing and Connecting the Adapter.................... 6
The Adapter LED.................................................... 9
2. Setting Security ................................................. 10
Accessing the Security Screen............................. 11
WPA2-PSK (Pre-Shared Key) .............................. 14
WPA-PSK (Pre-Shared Key) ................................ 15
WEP (Wired Equivalent Privacy) .......................... 16
WPA2 ................................................................... 18
WPA ..................................................................... 20
Certificate (WPA2 and WPA)................................ 23
WiFi™ Protected Setup (WPS) ............................ 24
Changing your Security Setting ............................ 26
3. Advanced Options............................................. 27
Creating Profiles................................................... 27
Monitoring Link Status.......................................... 30
Using Site Survey and Rescan............................. 31
Advanced Configuration ....................................... 33
Appendix A. TCP/IP Settings................................ 34
Appendix B. Troubleshooting .............................. 41
Appendix C. Technical Support ........................... 43
Appendix D. Regulatory Information ................... 47
Contents
3

Overview
The chapters in this User Guide describe how to:
®
• Install the Zoom Wireless-G USB adapter on a Windows
PC
• Connect to a wireless network
• Enable security on the Wireless-G USB adapter
• Use the advanced features of the Wireless-G USB
configuration software
Chapters 1 and 2 cover the basics – what you need to get
connected and to enable security.
If you are interested in the more advanced features of the
Wireless-G USB adapter, please see Chapter 3. This chapter
explains how to create profiles so you can switch your
connection from one network to another, monitor the strength of
your network connection, and scan a list of available networks.
4
Wireless-G USB Adapter

1
Installation Instructions
This chapter provides simple instructions for installing the
Wireless-G USB adapter on a Windows PC. If you have already
installed the adapter on a computer (using the separate Quick
Start guide), you can skip this chapter and begin with Chapter 2:
Setting Security.
What’s in the Package
The adapter package includes the following:
• Wireless-G USB adapter
• CD containing the
Installation Wizard and
documentation
• USB extension cable
• Quick Start manual
Before You Begin
Before you install the Wireless-G USB adapter, check that your
computer has the following:
• Available USB port
• Windows Vista, XP or
2000
Chapter 1: Installation Instructions
• CD drive
• 6 MB of free hard drive
space
5

Installing and Connecting
the Adapter
Important! Install the software BEFORE you plug the WirelessG USB adapter into your computer.
1 Insert the Wireless-G USB CD into the CD or DVD drive. The
CD should start automatically.
Windows Vista:
If the AutoPlay dialog box appears, click Run Setup.exe.
If a message appears saying An unidentified program wants
access to your computer, click Allow.
2 On the Language Selection screen, select your language.
3 On the next screen, select Installation Wizard, and then on
the following screen select USB.
4 On the Zoom Wireless-G USB Welcome screen, click Next
to install the adapter.
A Zoom Wireless-G USB Setup screen is displayed for a few
seconds while the installation proceeds.
6
Wireless-G USB Adapter

Windows Vista: If a message tells you that Windows can't
verify the publisher of the driver software, select Install this
driver software anyway.
5 At the prompt, click Finish and remove the CD.
If the Zoom installation menu remains on screen, click Exit.
6 Shut down the computer.
7 Plug in the USB Adapter and turn your computer back on.
To connect to a network
1 Double-click the Zoom Wireless-G USB icon on your
desktop to open the Zoom Wireless-G Configuration window.
Note that you also have a Zoom Wireless-G USB icon in your
Windows taskbar:
The color of this icon indicates the status of your network
connection:
Blue indicates an excellent or good link.
Yellow indicates a usable but weak link.
Red indicates no link or a very poor link.
Chapter 1: Installation Instructions
7
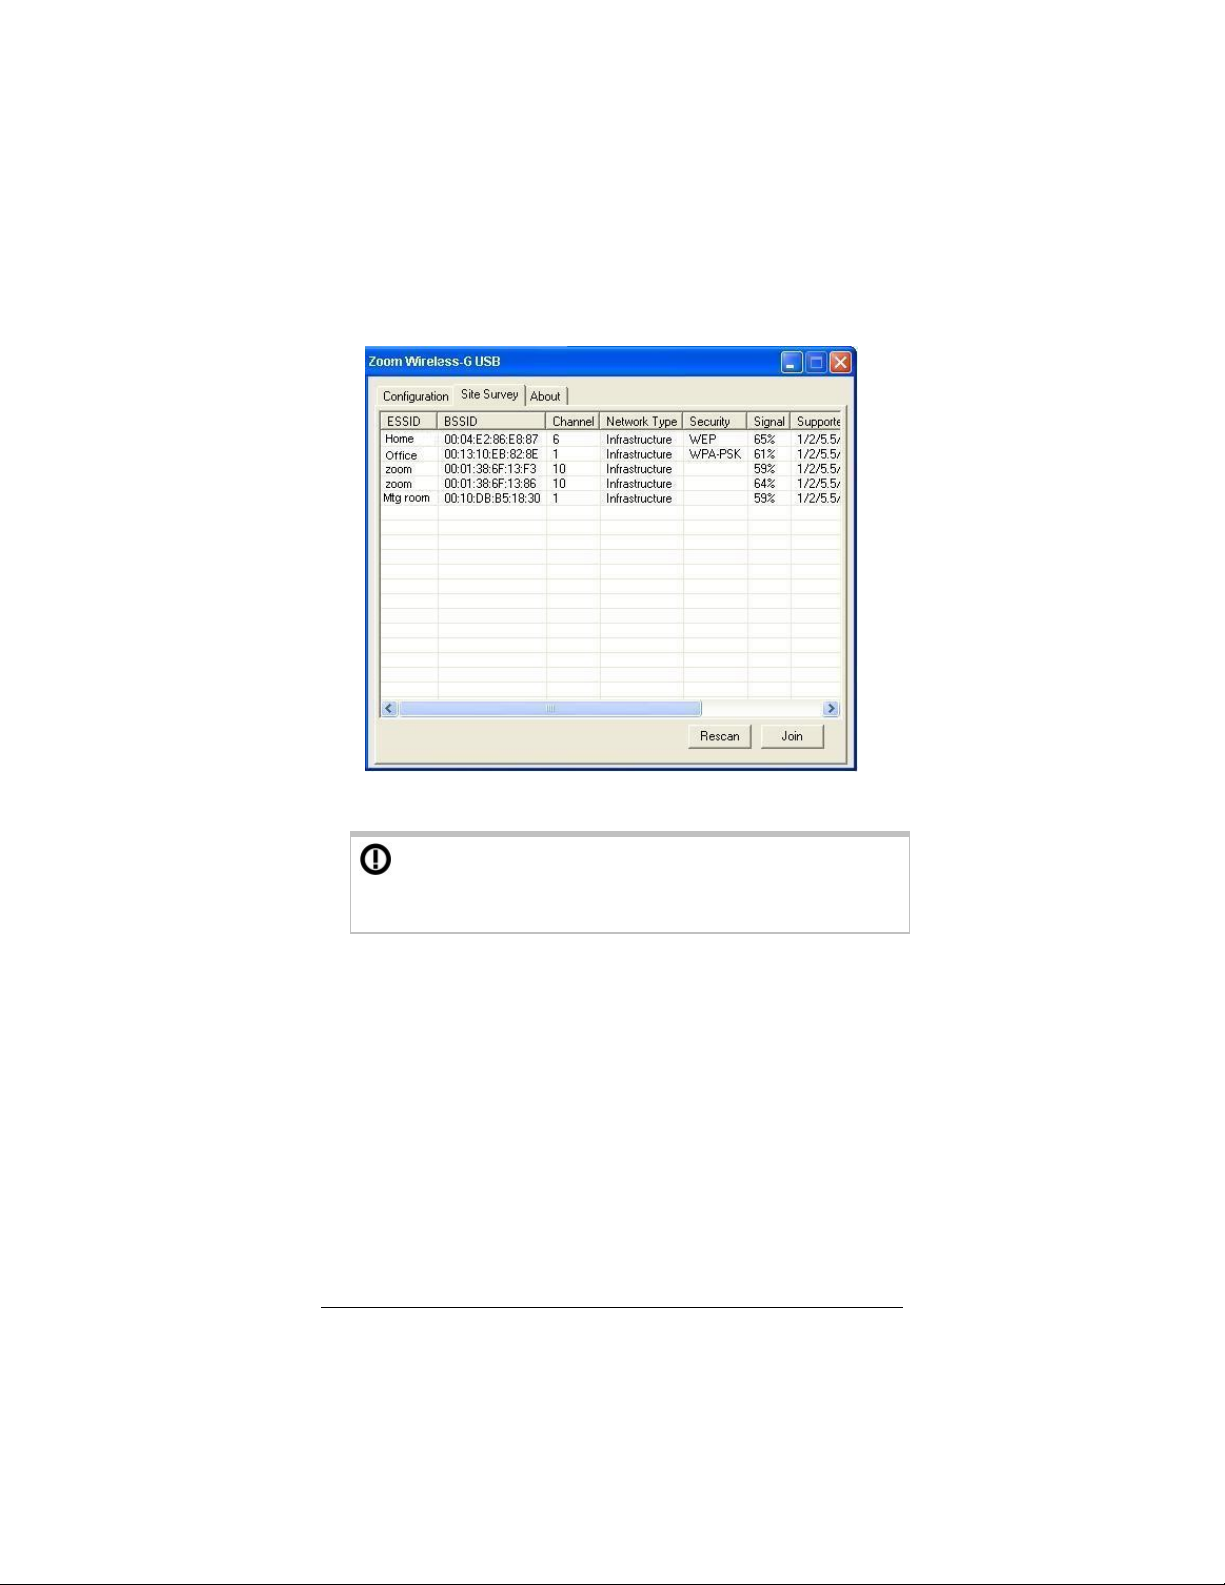
2 In the Zoom Wireless-G USB window, click the Site Survey
tab to see a list of available wireless networks.
3 Highlight the network you want and click Join.
If the network you select has security configured, you
must enable and configure security on your computer before
you can connect. See Chapter 2, Setting Security.
4 If you join a wireless network that does not have security, you
should now be connected. To check your connection, open
your Web browser and go to your favorite site.
We highly recommend security. Chapter 2, Setting Security on
10 has descriptions of the six security options and setup
page
instructions.
If you have difficulty accessing the Internet, follow the
suggestions in your browser’s “Page cannot be displayed”
message. You may need to adjust your LAN settings.
As you work online, you can monitor your connection easily
using the Link Status icon described in Step 1 above.
8
Wireless-G USB Adapter

The Adapter LED
The states of the LED on the Wireless-G USB adapter are
explained below.
LED Status Meaning
Flashing The Wireless-G USB adapter is attempting to
connect to a wireless network.
Steady The Wireless-G USB adapter is connected to a
wireless network and is transmitting or
receiving data.
Chapter 1: Installation Instructions
9
2
Setting Security
We strongly recommend security, although you do not need to
use it to get your wireless connection working.
Important! You must first enable security on the the wireless
access point. You then enable security on the adapter using the
same configuration that you used for the access point. For
example, if the wireless access point is configured for WPA2PSK, you must select WPA2-PSK security in the Wireless-G
USB configuration software and enter the same encryption key.
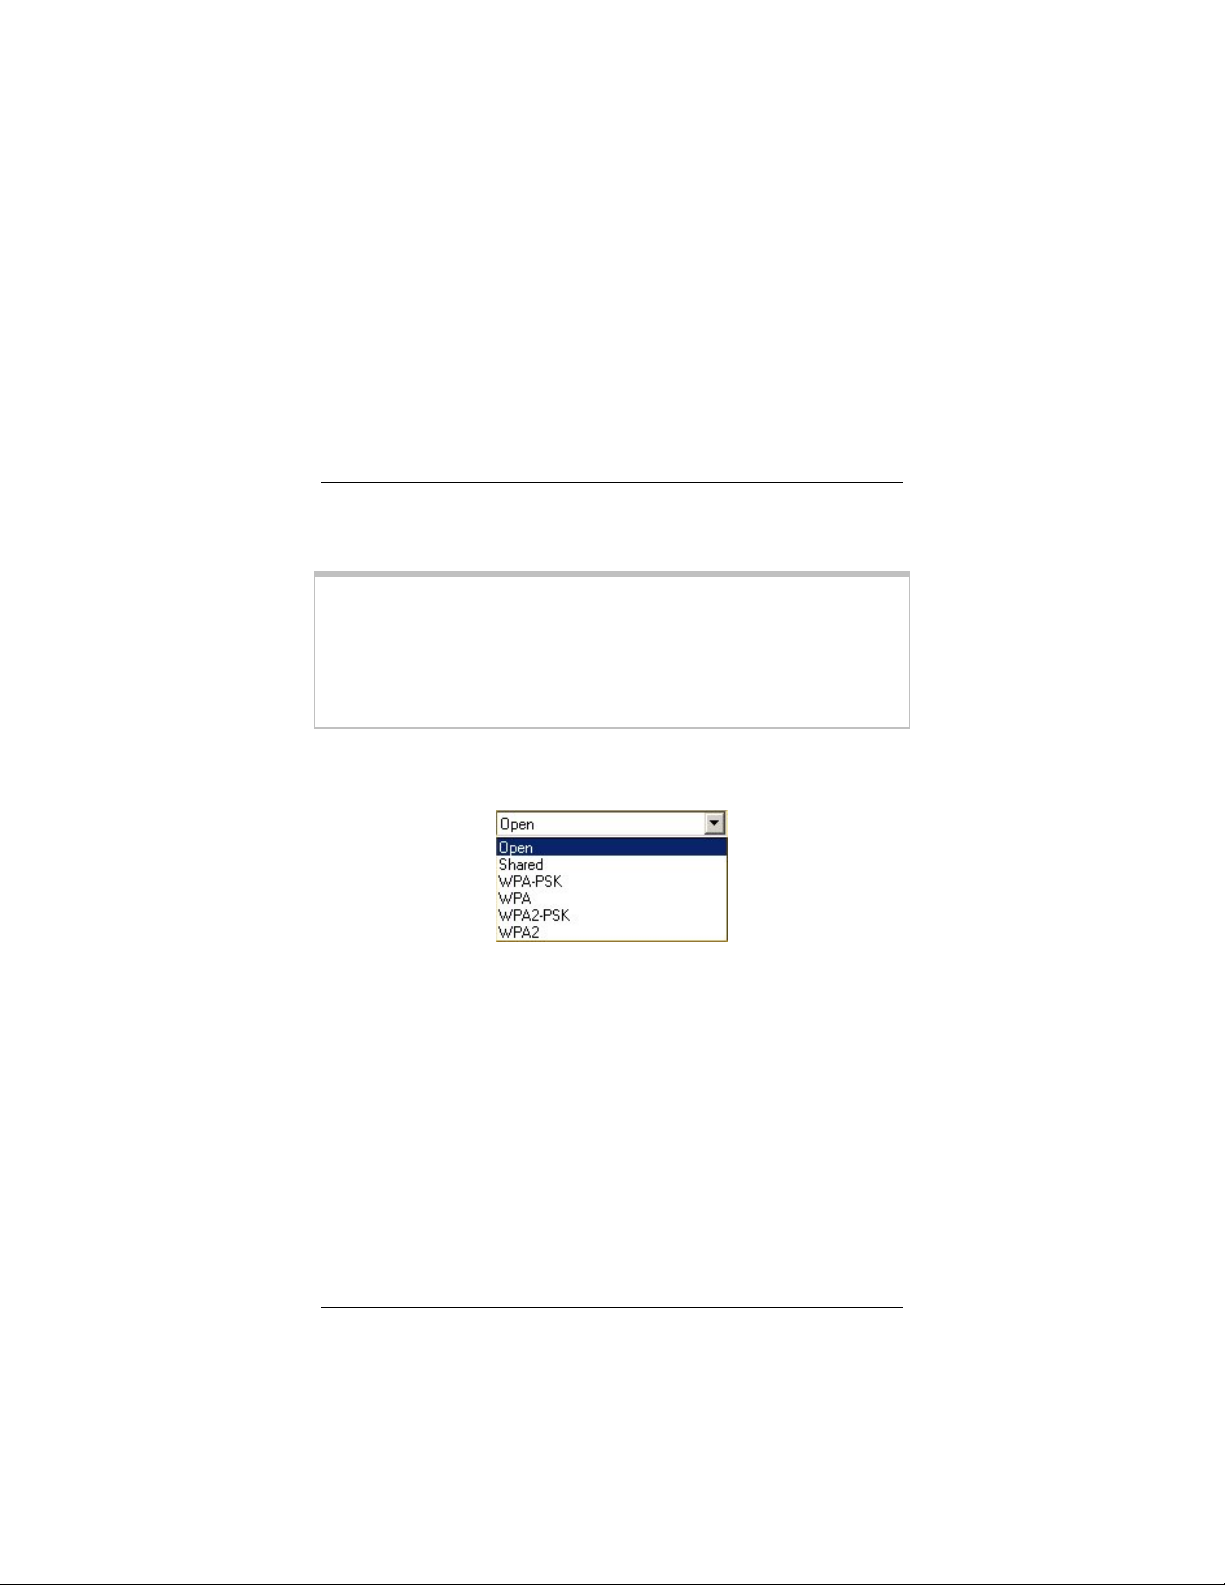
Select one of six ways to configure and implement security for
your wireless network:
• WPA2-PSK (WiFi ® Protected Access 2 Pre-Shared Key)
This is the option we recommend, if it is supported by the
access point and the devices in your network. WPA2-PSK
protects your communications with AES (Advanced
Encryption Standard). Some access points permit a “mixed
mode” network composed of both WPA and WPA2 wireless
clients.
WPA2-PSK requires you to enter an encryption key shared
by the access point.
• WPA PSK (WiFi ® Protected Access Pre-Shared Key)
If the devices in your network do not all support WPA2-PSK,
select WPA-PSK. WPA-PSK protects your communications
with TKIP (Temporal Key Integrity Protocol).
10
Wireless-G USB Adapter

This option requires you to enter an encryption key shared
by the access point.
• WEP (Wired Equivalent Privacy)
Both the Open and Shared Authentication modes require
WEP security. The most recent assessments of WEP advise
choosing Open rather than Shared.
If the devices in your network do not support WPA2-PSK or
WPA-PSK, select Open with WEP data encryption.
This method requires you to enter an encryption key. The
keys can be 64, 128 or 256 bits in length.
• WPA2
If you are linking to a corporate network that accesses a
RADIUS (Remote Authentication Dial-In User Service)
authentication server, and if the devices in the network
support WPA2, select WPA2. This option provides security
with AES (Advanced Encryption Standard). AES has a key
size of 128, 192, or 256-bits. In order for eavesdroppers to
decipher a message, they would have to try every possible
key.
• WPA is an option for corporate users who access a RADIUS
(Remote Authentication Dial-In User Service) authentication
server that does not support WPA2. WPA provides security
with TKIP (Temporal Key Integrity Protocol), which
dynamically changes keys as the system is used.
Accessing the Security Screen
1 On your desktop, double-click the Zoom Wireless-G USB
icon:
Chapter 2: Setting Security
11
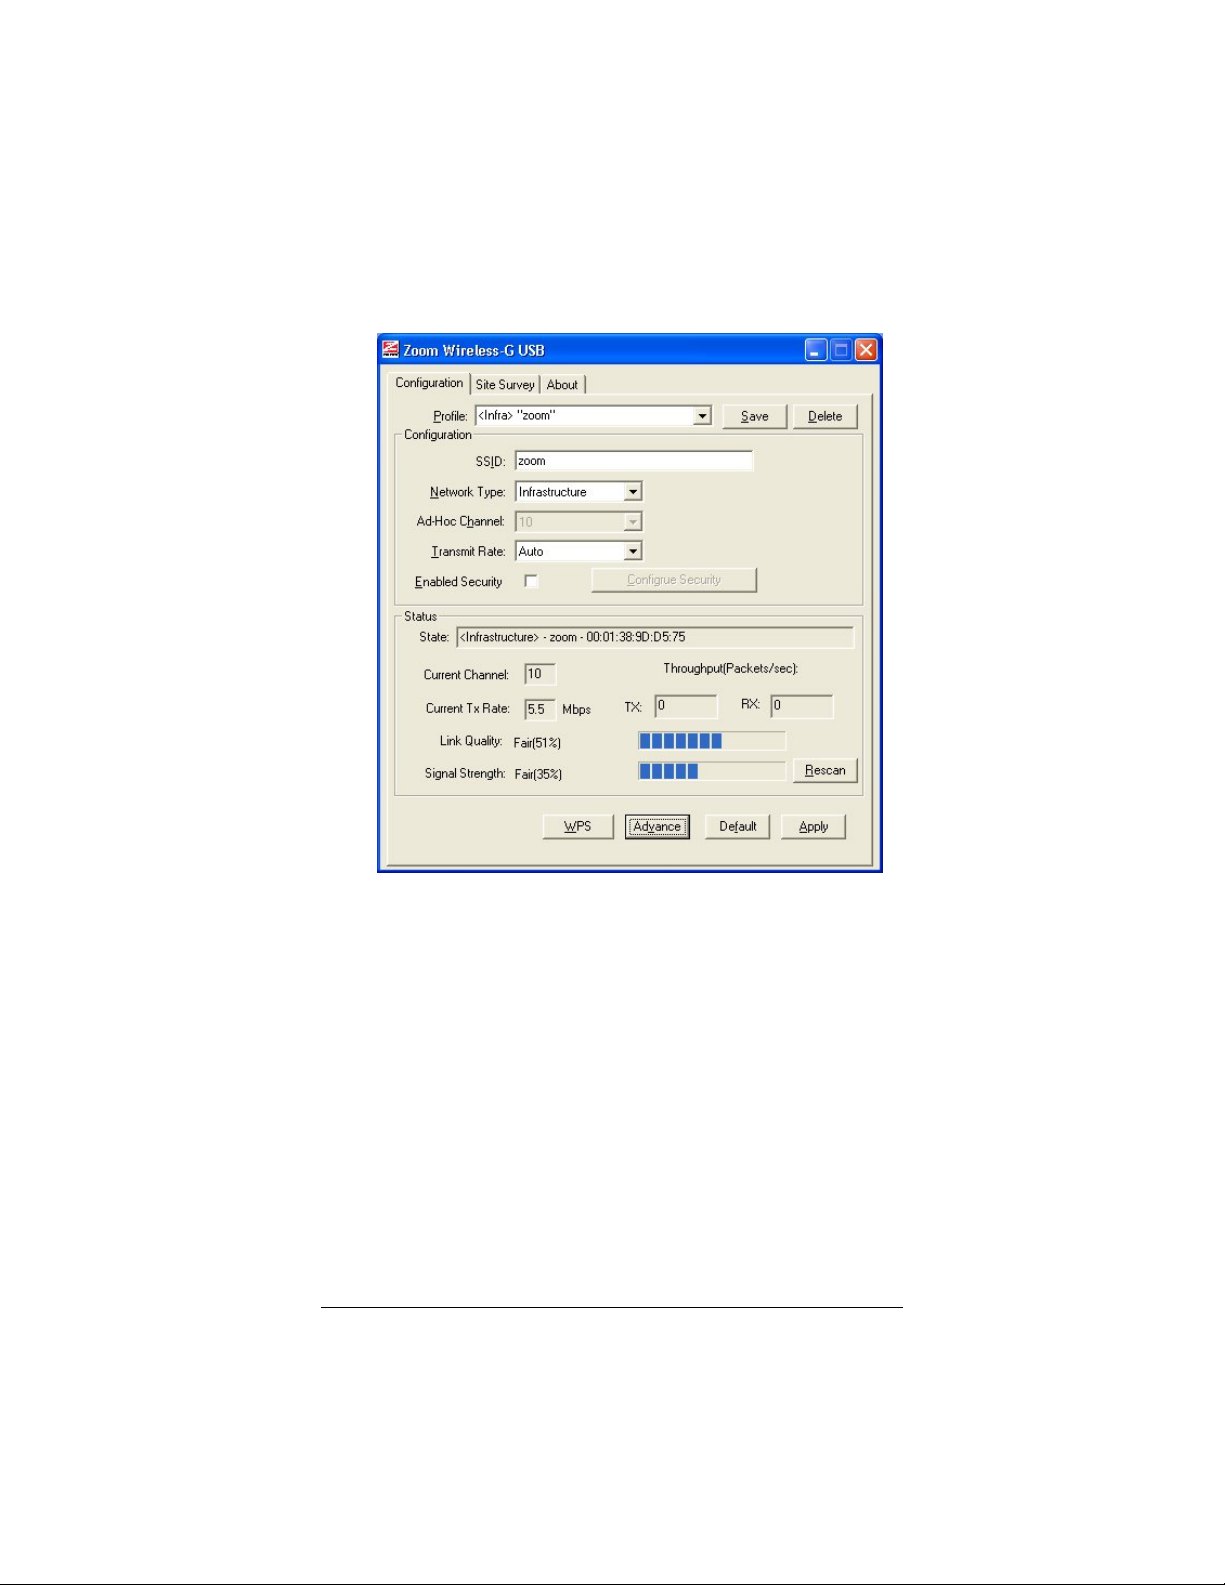
2 The Zoom Wireless-G USB configuration software opens to
display the configuration parameters:
3 Make sure that the desired wireless network is displayed in
the Profile and SSID text boxes (the term <Infra>
designates an Infrastructure network) and that the Network
Type is correct.
There are two types of wireless networks: Infrastructure and
Ad Hoc.
• In an Infrastructure network, wireless devices
communicate with each other via a wireless access
point, router, or ADSL modem with built-in wireless
technology.
• In an Ad Hoc network, a group of wireless devices
communicate directly with other “client” devices that are
using wireless adapters. The network does not include a
wireless access point or wireless router.
12
Wireless-G USB Adapter

• In the unlikely event that you use an Ad Hoc network,
you must set up Static IP addressing. See Appendix A:
TCP/IP Settings.
4 Select the Enable Security check box to open the Security
Configuration window. For configuration instructions,
consult this table:
To configure Go to page
WPA2-PSK 14
WPA-PSK 15
WEP 15
WPA2 18
WPA 20
Chapter 2: Setting Security
13
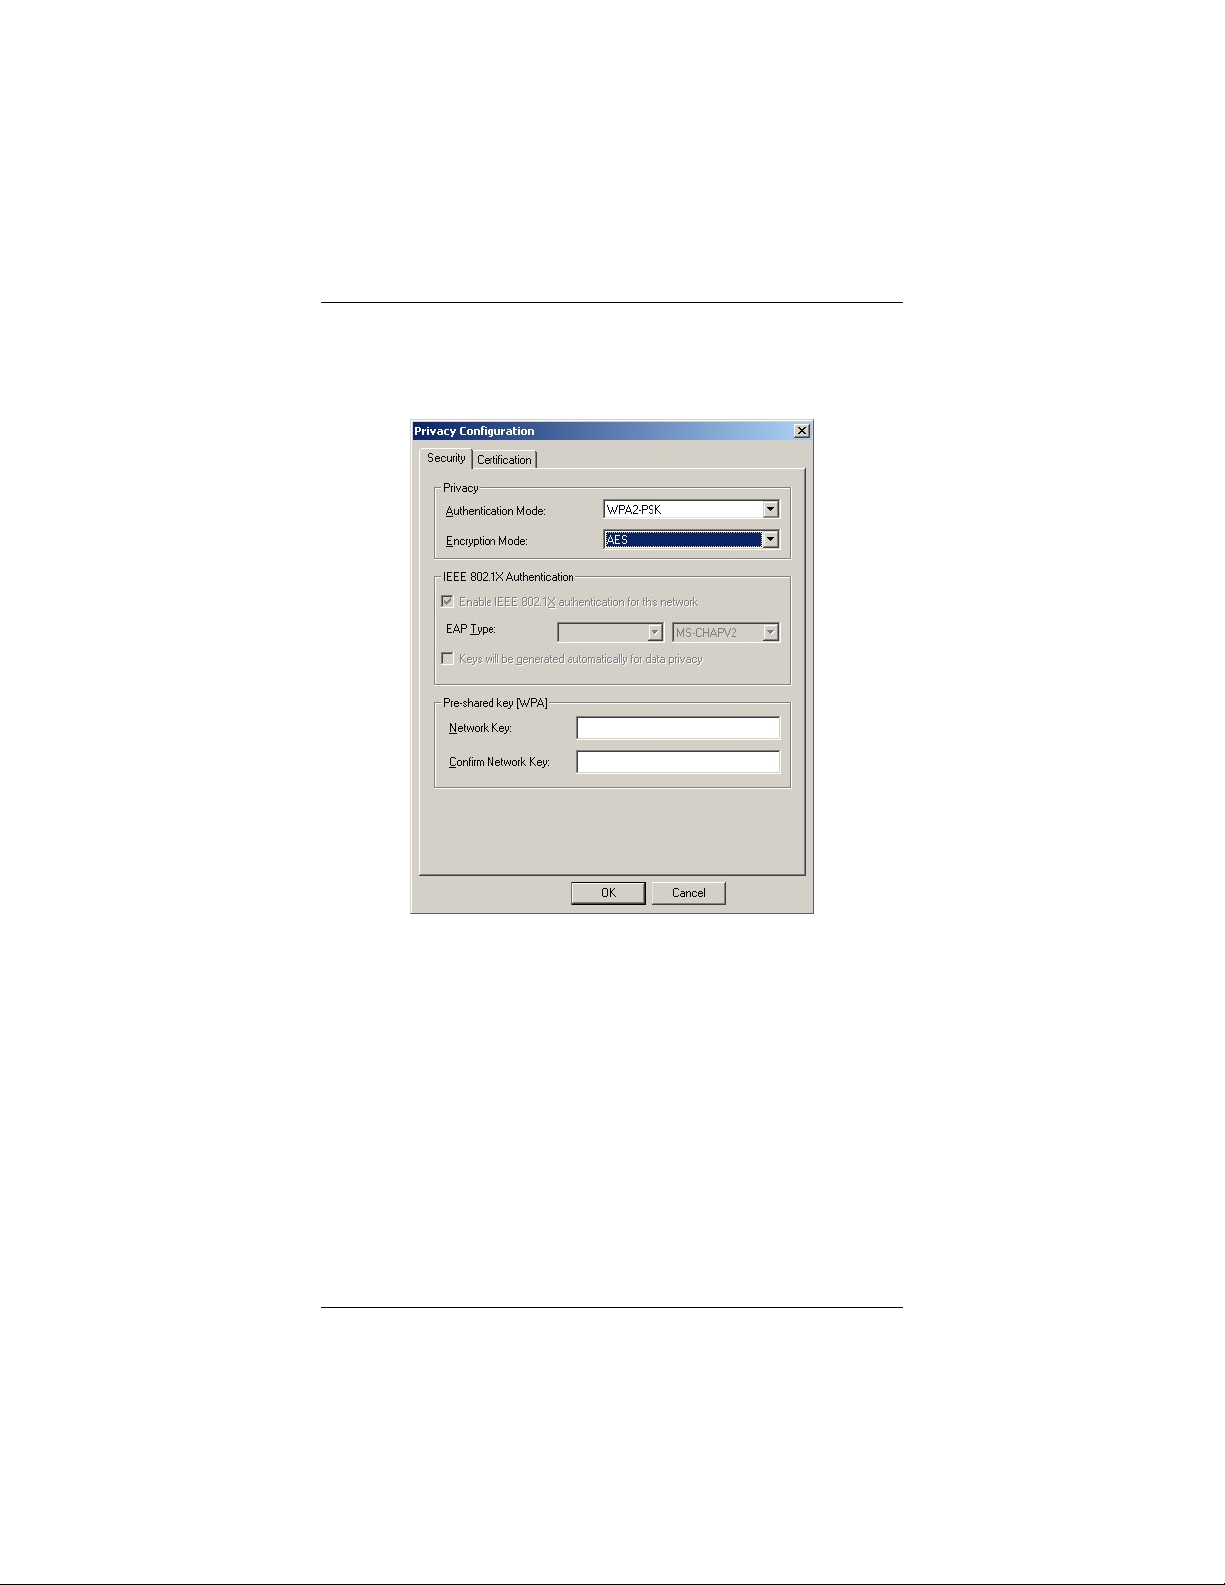
WPA2-PSK (Pre-Shared Key)
1 In the Privacy Configuration window, click the
Authentication Mode drop-down arrow and select WPA2PSK.
2 At Encryption Mode, accept the default: AES (Advanced
Encryption Standard).
3 In the Pre-shared key [WPA] area, enter the same network
key that is used on the wireless access point. We advise you
to enter a key with a minimum of 20 random characters.
4 Click OK to save your settings and return to the
Configuration tab.
5 On the Configuration tab, click Apply.
6 Click the Close box to exit the configuration software.
That’s it! You have configured WPA2-PSK security for your
wireless connection, and you’re ready to use the Internet.
14
Wireless-G USB Adapter
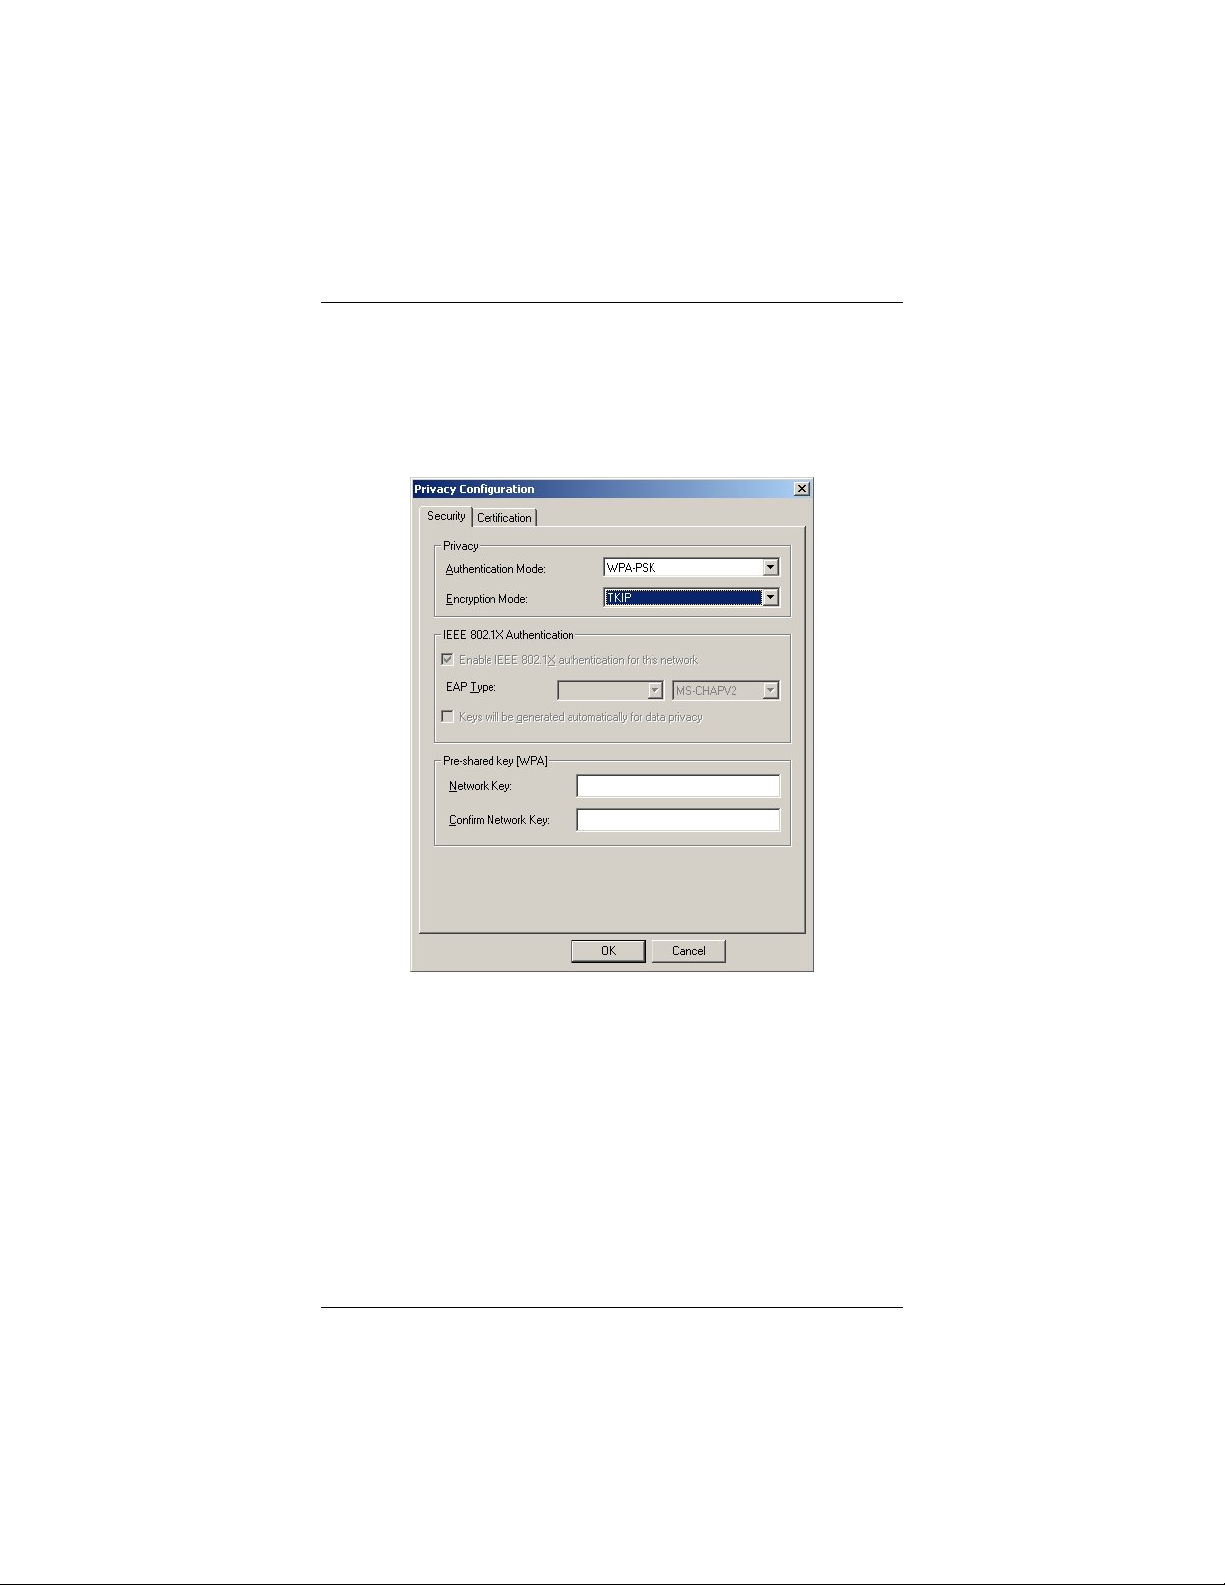
WPA-PSK (Pre-Shared Key)
If all of the wireless devices in your network DO NOT support the
recommended WPA2-PSK, select WPA-PSK.
1 In the Privacy Configuration window, click the
Authentication Mode drop-down arrow and select WPAPSK.
2 At Encryption Mode, accept the default: TKIP (Temporal
Key Integrity Protocol).
3 In the Pre-shared key [WPA] area, enter the same network
key that is used on the wireless access point. We advise a
key with a minimum of 20 random characters.
4 Click OK to save your settings and return to the
Configuration tab.
5 On the Configuration tab, click Apply.
6 Click the Close box to exit the configuration software.
Chapter 2: Setting Security
15
 Loading...