

Page 1

_English_
ESPRESSO AND CAPPUCCINO
COFFEE MAKER
MODEL: Z-1171-G
INSTRUCTION MANUAL
Read this booklet thoroughly before using the appliance for the first time
and save it for future reference!
Page 2

_English_
IMPORTANT SAFEGUARDS
Before using this electrical appliance, basic precautions should always be followed including the
following:
1. Read all instructions.
2. Before using check that the voltage of wall outlet corresponds to rated voltage marked on
the rating plate.
3. This appliance has been incorporated with a grounded plug. Please ensure the wall outlet
in your house is well earthed.
4. To protect against fire, electric shock and injury to persons do not immerse the appliance,
cord and plug in water or other liquid.
5. Remove plug from wall outlet before cleaning and when not in use. Allow appliance cool
down completely before taking off or attaching components or before cleaning.
6. Do not operate any appliance with a damaged cord or plug
or after the appliance
malfunctions, or is has been dropped or damaged in any manner. Return the appliance to
the nearest authorized service facility for examination, repair or electrical or mechanical
adjustment.
7. The use of accessory attachments not recommended by the appliance manufacturer may
result in fire, electric shock or injury to persons.
8. Place the appliance on flat surface or table, do not hang power cord over the edge of table
or counter.
9. Ensure the power cord do not touch hot surface of appliance.
10. Do not place the coffee maker on hot surface or beside fire in order to avoid to be
damaged.
11. To disconnect, remove plug from wall outlet. Always hold the plug, but never pull the
cord.
12. Do not use appliance for other than intended use and place it in a dry environment.
13. Close supervision is necessary when your appliance is being used near children.
14. Be careful not to get burned by the steam.
15. Do not touch the hot surface of appliance (such as steam wand, and the steel mesh). Use
handle or knobs.
16. Do not let the coffee maker operate without water.
17. Do not remove the metal funnel when appliance is brewing coffee or making steam.
18. Connect plug to wall outlet before using and turn any switch off before plug is removed
from wall outlet.
19. This appliance is not intended for use by persons (including children) with reduced
physical, sensory or mental capabilities, or lack of experience and knowledge, unless they
have been given supervision or instruction concerning use of the appliances by a person
responsible for their safety.
20. Children should be supervised to ensure that they do not play with the appliance.
21. Warning: The filling aperture must not be opened during use.
22. This appliance is intended to be used in household and similar applications such as:
a) Staff kitchen areas in shops, offices and other working environments;
b) Farm houses;
Page 3

_English_
c) By clients in hotels, motels and other residential type environments;
d) Bed and breakfast type environments.
23. Do not use outdoors.
24. Save these instructions.
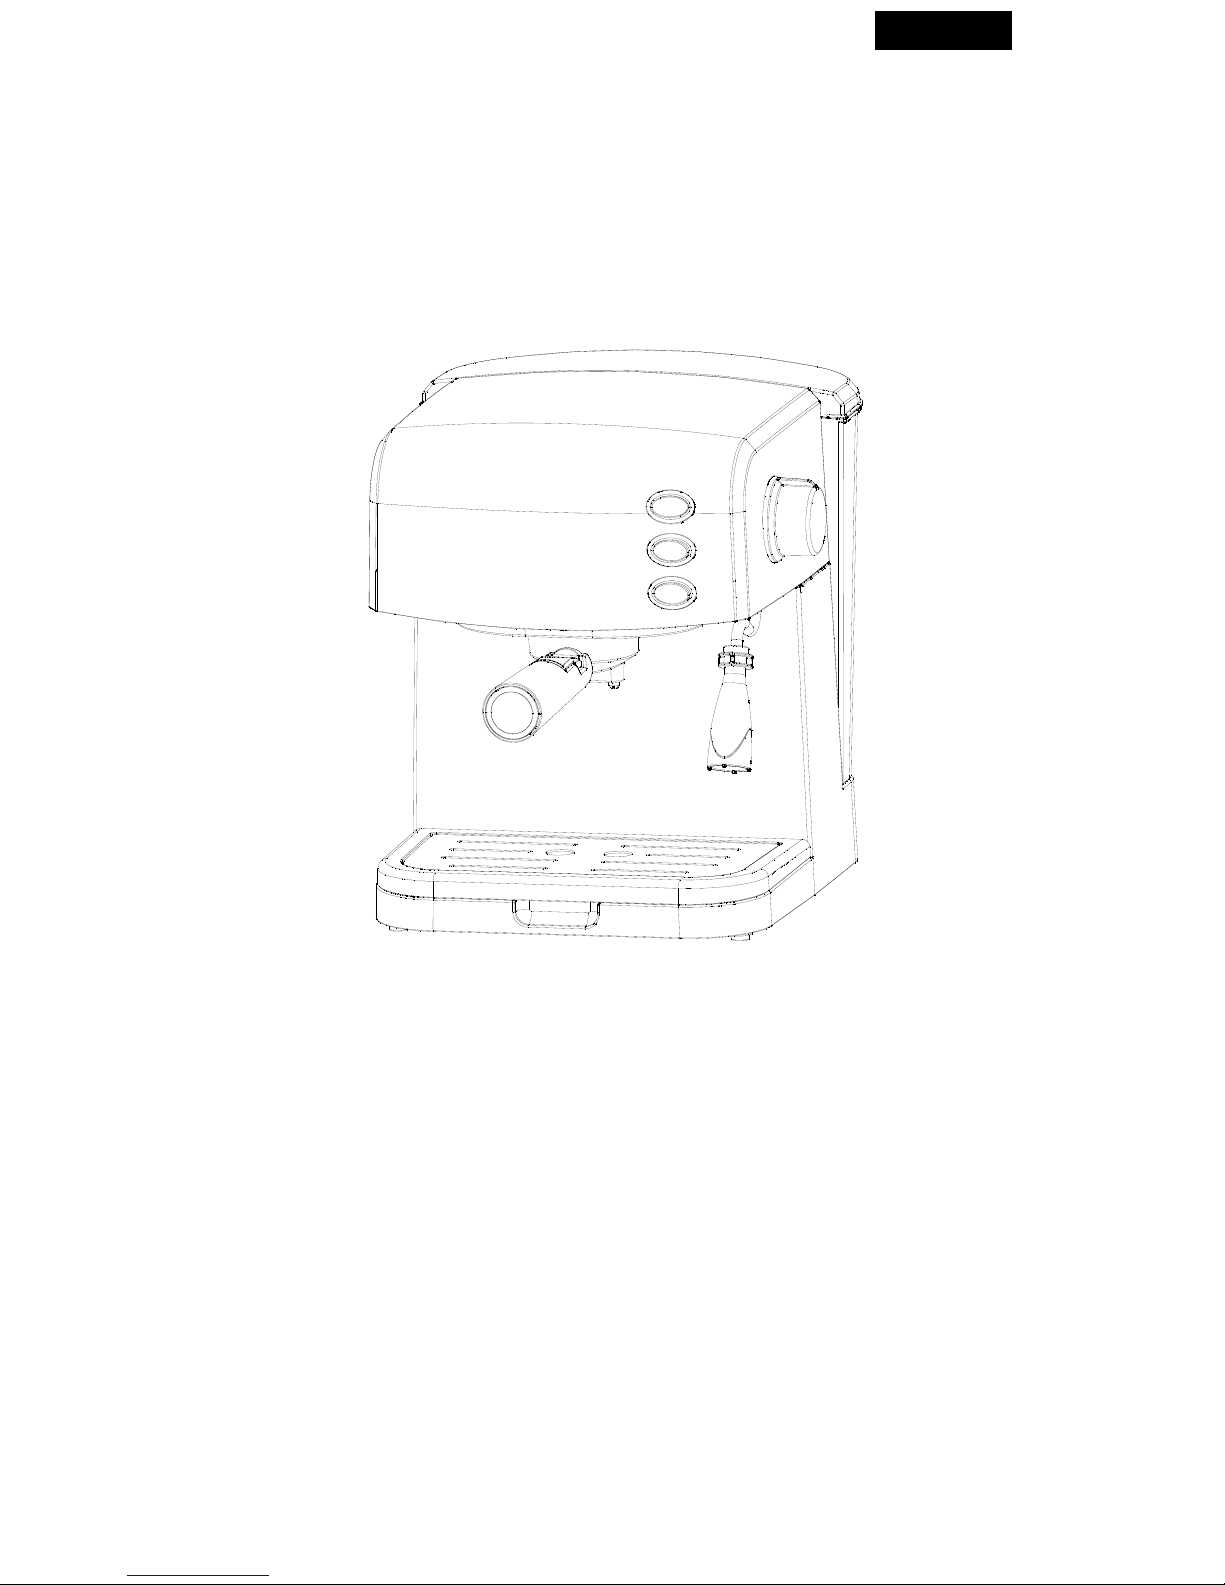
KNOW YOUR COFFEE MAKER
A. ON/OFF switch
G. Top cover
M. Metal funnel
B. Coffee/Steam selector
H. Steam wand
N. Drip tray
C. Pump control
I. Frothing device
O. Metal funnel handle
D. Steam control knob
J. Main body
P. Measuring spoon and tamper
E. Water tank cover
K. Removable shelf
F. Water tank
L. Steel mesh
A
B
C
E
F
L
M
O
D
G
H
I
J
K
N
P
BEFORE USING FOR THE FIRST USE
To ensure the first cup of coffee tastes excellent, you should rinse the coffee maker with warm
water as follows:
1. Pour water into water tank, the water level should not exceed the “MAX” mark in the tank.
Then replace the water tank cover.
Note: The appliance is supplied with a detachable tank for easy cleaning, you can fill the
tank with water firstly, and then put the tank into the appliance.
2. Set the steel mesh into the metal funnel (do not put coffee in the steel mesh).
3. Place a jug on the removable shelf. Make sure the steam control knob is in the OFF
Page 4

_English_
position.
Note: The appliance is not equipped with jug, please use your own jug or coffee cup.
4. Connect to power source, turn the ON/OFF switch to the “—” position. The ON/OFF
lamp will be illuminated.
5. Turn the pump control switch to the “—” position, the pump will pump water. When there
is water flowing out, close the pump by pressing the pump control switch to “O”. Press
the coffee/steam selector to the “O” position and wait for a moment, the appliance is being
pre-heated until the inner lamp of pump control switch is illuminated, it shows the
pre-heating is finish. Press the pump control switch to “—” position again, and water will
flow out.
6. Repeat the above steps until no water is left in the tank. Clean the jug. Now the coffee
maker is ready for brewing coffee.
Note: There may be noise when the machine is pumping water for the first time. It is
normal, the appliance is releasing the air in the system. After about 20 seconds the noise
will disappear.
PRE-HEATING
To make a cup of good hot Espresso coffee, we recommend you preheating the appliance
before making coffee, including the funnel, filter and cup, so that the coffee flavour cannot be
influenced by the cold parts.
1. Remove the detachable tank and open the tank cover to fill it with water, the water level
should not exceed the “MAX” mark in the tank. Then place the tank into the appliance
properly.
2. Select the two–cup mesh, set the steel mesh into the metal funnel, make sure the tube on
the funnel aligns with the groove in the appliance. Then insert the funnel into the
appliance from the “Insert” position, and you can fix it into the coffee maker firmly by
turning it anticlockwise until it is at the “Lock” position.
3. Place a cup (your own cup) on the removable shelf.
4. Plug-in the appliance to a power supply source. Make sure the steam control knob is on
5. the OFF position.
6. Press the ON/OFF switch to “—” position, the lamp will be illuminated. Press the
coffee/steam selector in the “O” position. Press the pump control button on the “—”
position. When there is water flowing out, close the pump immediately. The purpose of
the step is to evacuate the air out of the system.
7. When the lamp in pump control switch is illuminated, you should press the pump control
switch on the “—” position again, there will be hot water flowing out. When the lamp in it
is extinguished, close the pump. The pre-heating is finished.
Page 5

_English_
HOW TO MAKE ESPRESSO COFFEE
1. Remove the funnel by turning it clockwise. Add ground coffee to the steel mesh with
measuring spoon, one spoon of ground coffee is enough for a cup of top-grade coffee.
Then press the ground coffee powder tightly with the tamper.
2. Set the steel mesh into the metal funnel, make sure the tube on the funnel aligns with
groove in the appliance, then insert the funnel into the appliance from the “Insert” position.
You can fix it into coffee maker firmly by turning it anticlockwise until it is at the “Lock”
position.
3. Warm the cup with hot water. Then place the hot cup on the removable shelf.
4. At the time, the lamp in pump control switch shall be illuminated, if it is extinguished,
wait for a moment, once the lamp in it is illuminated, you should press the pump control
switch on the “—” position. Wait for a moment, there will be coffee flowing out.
Note: During operation, if the indicator is extinguished, you must close the pump and stop
making espresso coffee. After a few seconds, if the lamp is illuminated again, you can
continue making espresso coffee by pressing pump control switch to “—” position, the lamp
will cycle on and off to maintain the water temperature.
5. You should press ON/OFF switch to “O” position manually when desired coffee is
obtained or the colour of coffee changes weak obviously, all indicators go out and the
coffee maker stops working, your coffee is ready now.
WARNING: Do not leave the coffee maker unattended during making the coffee, as you need
to operate it manually sometimes!
6. After finishing making the coffee, you can take the metal funnel out by turning it
clockwise, then pour the coffee residue out.
7. Let the parts to cool down completely, then rinse under running water.
HOW TO MAKE CAPPUCCINO / FROTHING MILK
You get a cup of cappuccino when you top up a cup of espresso with frothed milk.
Note: During making steam, the metal funnel must be assembled in position.
1. Prepare espresso first with container big enough according to the part “HOW TO MAKE
ESPRESSO COFFEE”, make sure that the steam control knob is at the OFF position.
2. Press the coffee/steam selector to the “—” position, the lamp in the pump control switch
will be illuminated, wait until the indicator in the coffee/steam selector is illuminated.
Note: During operation, the indicator in the coffee/steam selector will be cycle on and off to
maintain to desired temperature.
3. Fill a jug with about 100 grams of milk for each cappuccino to be prepared, you are
recommended to use whole milk at refrigerator temperature (not hot!).
Note: In choosing the size of jug, it is recommended the diameter to be not less than 70±5mm,
and bear in mind that the milk increases in volume by 2 times, make sure the height of jug is
enough.
4. Turn the steam control knob slowly in anti-clockwise direction, steam will come out from
the frothing device.
Page 6

_English_
Note: Never turn the steam control button rapidly, as the steam will accumulate rapidly in
short time which may increase the potential of the risk of explosion.
5. Insert the frothing device into the milk about two centimetres, froth milk in the way
moving the vessel round from up to down.
6. When the required purpose is reached, you can turn the steam control knob to OFF
position.
Note: Clean the steam outlet with wet sponge immediately after steam stops generating, but
care not to hurt yourself!
7. Pour the frothed milk into the espresso prepared, now the cappuccino is ready. Sweeten to
taste and if desired, sprinkle the froth with a little cocoa powder.
8. Press the ON/OFF switch to the “O” position to cut the power source off. All indicators
will be off.
Note: We recommend you allowing the maker to cool down at least for 5 min before making
coffee again. Otherwise burnt odour may occur in your Espresso coffee.
PRODUCING STEAM TO HEAT LIQUIDS
The steam wand (without the frothing device) can be used to make hot beverages like
drinking chocolate, water or tea.
1. Open the top cover, remove the detachable tank and fill it with water, the water level
should not exceed the “MAX” mark in the tank. Then place the tank into the appliance
properly.
2. Replace the top cover, then connect the appliance to power supply source.
1. 3.Press the ON/OFF switch to the “—” position, the lamp in it is illuminated.
3. Make sure the coffee/steam selector is at “O” position, turn the pump control switch to the
“—” position, the pump will pump water, when there is water flowing out, close the pump
immediately. Press the coffee/steam selector to the “—” position and wait until the lamp
in coffee/steam switch is illuminated, it shows the heating is finish.
4. Remove the frothing device from the steam wand.
5. Dip the steam wand into the liquid to be heated. Turn the steam control knob in
anti-clockwise direction slowly to start making steam.
6. When the required temperature is reached, you can turn the steam control knob to the OFF
position.
7. Press the ON/OFF switch to the “O” position to cut off the power source.
AUTOMATIC POWER OFF FUNCTION
After 25 minutes of turning on the power switch, the unit will power off automatically.
Turn the power switch to OFF position if need to reactivate the appliance after powered off
automatically.
Page 7

_English_
CLEANING AND MAINTENANCE
1. Unplug the appliance and let the coffee maker to cool down completely before cleaning.
2. Clean the housing of coffee maker with damp cloth often and clean water the tank, drip
tray and removable shelf regularly and dry thoroughly.
Note: Do not clean with alcohol or solvent cleanser. Never immerse the housing in water for
cleaning.
3. Detach the metal funnel by turning it clockwise, get rid of coffee residue inside, then you
can clean it with cleanser, but at last you must rinse with clear water.
4. Clean all the attachments in water and dry thoroughly.
CLEANING MINERAL DEPOSITS
1. To make sure your coffee maker operates efficiently, the internal piping is clean and the
coffee flavor is great, you should clean away the mineral deposits left every 2-3 months.
2. Fill the tank with water and descaling agent to the MAX level. The ratio of water and
descaling agent is 4:1, for details refer to the instruction manual of the descaling agent.
Please use household descaling agent, you can use the citric acid (obtainable from
chemist’s or drug stores). The ratio of water and citric acid is 100:3.
3. According to the program of pre-heating, put the metal funnel (no coffee powder in it) and
carafe (jug) in place. Brew water by following the steps form “PRE-HEATING”.
4. Press the ON/OFF switch to “—” position, the lamp in it will be illuminated. Press the
pump control switch, make sure the coffee/steam selector is at “O” position. When there is
water flowing out, close the pump and wait for a moment, the coffee maker is being
pre-heated.
5. When the lamp in pump control switch is illuminated, that means the heating is finished.
Press the pump control switch to “—” position and make two cups of coffee (about 2Oz).
Then close the pump and wait for 5s.
6. Press the coffee/steam selector to the “—” position, the indicator in the pump control
switch will be off. Wait until the indicator in the coffee/steam selector is illuminated.
Make steam for 2min by turning the steam control knob, then turn the steam control knob
to OFF position to stop making steam. Press the ON/OFF switch to the “O” position to
stop the unit immediately. Leave the descaling agent in the unit for at least 15 minutes.
7. Restart the unit and repeat the steps 4 to 6 at least 3 times.
8. Then press the coffee/steam selector to “O” position, the lamp in pump control switch will
be illuminated. Then press the pump control switch to “—” position to brew until no
descaling agent is left.
9. Fill the tank with tap water to the MAX level. Then brew coffee (no coffee powder) with
all the water from the tank. Repeat the steps 4 to 6 at least 3 times (it is not necessary to
wait for 15 minutes in step of 6), then brew until no water is left in the tank.
10. Repeat the step 9 at least 3 times to make sure the piping is clean.
Page 8

_English_
TROUBLESHOOTING
Symptoms
Cause
Solution
The metal parts in the
tank have rust.
The used descaling agent was not of
recommended type. It may cause
corrosion of the metal parts in the
tank.
Use descaling agent
recommended by the
manufacturer.
Water leaks from the
bottom of coffee
ma ker.
There is a lot of water in the drip
tray.
Please clean the drip tray.
The coffee maker malfunctions.
Please contact the authorized
service facility for repairing.
Water leaks out of
outer side of filter.
There is some coffee powder on
filter edge.
Clean the filter edge.
Acid (vinegar) taste
exists in Espresso
coffee.
There is descaling agent left in the
piping.
Clean the machine by
repeating step 9 and 10 from
“CLEANING MINERAL
DEPOSITS”
The coffee powder is stored in a
hot, wet place for a long time. The
coffee powder turns bad.
Please use fresh coffee
powder, or store unused coffee
powder in a cool, dry place.
After opening a package of
coffee powder, reseal it tightly
and store it in a refrigerator to
maintain its freshness.
The coffee maker does
not work.
The power plug is not plugged well.
Plug the power cord into a
wall outlet correctly, if the
appliance still does not work,
please contact the authorized
service facility for repairing.
The steam cannot
froth.
The steam ready indicator is not
illuminated.
Only after the steam ready
indicator is illuminated, the
steam can be used to frothing.
The container is too big or the
shape is not fit.
Use high and narrow cup.
You have used skimmed milk
Use whole milk or
half-skimmed milk
Do not take apart the appliance by yourself. If the power cord is damaged or the
appliance malfunctions, contact the authorized service facility.
Page 9
_Polski_
ESPRESSO I CAPPUCCINO
EKSPRES CIŚNIENIOWY
MODEL: Z-1171-G
INSTRUKCJA OBSŁUGI
Przeczytaj dokładnie niniejszą instrukcję przed użyciem urządzenia po raz
pierwszy i zachowaj ją na przyszłość!
Page 10

_Polski_
WAŻNE ZASADY BEZPIECZEŃSTWA
Przed użyciem tego urządzenia elektrycznego zawsze muszą być zachowane podstawowe
środki ostrożności w tym następujące:
1. Przeczytaj całą instrukcję.
2. Przed podłączeniem proszę sprawdzić, czy napięcie w domu odpowiada napięciu
oznaczonemu na tabliczce znamionowej ekspresu do kawy.
3. Urządzenie zostało wyposażone we wtyczkę z uziemieniem. Należy upewnić się czy
gniazdko elektryczne w Twoim domu jest dobrze uziemione.
4. W celu ochrony przed pożarem, porażeniem prądem lub obrażeniami osób nie zanurzaj
urządzenia, przewodu i wtyczki w wodzie lub innej cieczy.
5. Przed przystąpieniem do czyszczenia lub kiedy urządzenie nie jest w użyciu wyjmij
wtyczkę z gniazdka ściennego. Pozostaw urządzenie do ostygnięcia przed wyjęciem lub
zamocowaniem komponentów lub przed rozpoczęciem czyszczenia.
6. Nie używaj urządzenia z uszkodzonym przewodem lub wtyczką lub kiedy urządzenie
pracuje nieprawidłowo, lub gdy zostało upuszczone lub uszkodzone w jakikolwiek inny
sposób. Dostarcz urządzenie do najbliższego autoryzowanego serwisu w celu zbadania,
naprawy lub regulacji elektrycznej lub mechanicznej.
7. Korzystanie z akcesoriów, które nie są zalecane przez producenta może spowodować
obrażenia lub uszkodzenie urządzenia.
8. Ustaw urządzenie na płaskiej powierzchni lub stole, nie pozwól aby przewód zasilający
zwisał z krawędzi stołu lub blatu.
9. Upewnij się, czy przewód zasilający nie dotyka gorących powierzchni urządzenia.
10. Nie stawiaj ekspresu na gorącej powierzchni lub obok ognia, unikniesz ryzyka
uszkodzenia.
11. Aby odłączyć, należy wyjąć wtyczkę z gniazdka. Zawsze trzymaj za wtyczkę, ale nigdy
nie należy ciągnąć za przewód.
12. Nie należy używać urządzenia do celów innych niż jest przeznaczone i należy umieścić go
w suchym środowisku.
13. Ścisły nadzór jest konieczny, gdy urządzenie jest używane w pobliżu dzieci.
14. Należy uważać, aby nie zostać poparzonym przez parę.
15. Nie należy dotykać gorących powierzchni urządzenia (takich jak dysza pary oraz sitko
stalowe). Używaj uchwytów lub gałek.
16. Nie pozwól na pracę ekspresu do kawy bez wody.
17. Nie należy wyjmować metalowego lejka, gdy urządzenie parzy kawę lub wyrzuca parę.
18. Podłącz wtyczkę do gniazdka w ścianie przed rozpoczęciem użytkowania i wyłącz
wszystkie przełączniki przed wyjęciem wtyczki z gniazdka.
19. Urządzenie nie jest przeznaczone do użytkowania przez osoby (w tym dzieci) o
ograniczonej sprawności fizycznej, sensorycznej czy umysłowej, lub którym brakuje
doświadczenia i wiedzy, chyba że będą one nadzorowane lub zostaną poinstruowane na
temat korzystania z urządzenia przez osobę odpowiedzialną za ich bezpieczeństwo.
20. Dzieci powinny być nadzorowane, aby nie bawiły się urządzeniem.
21. Ostrzeżenie: Otwór napełniania nie musi być otwarty podczas użytkowania.
22. Urządzenie jest przeznaczone do stosowania w gospodarstwie domowym i do podobnych
Page 11

_Polski_
zastosowań, takich jak:
a) Obszary aneksów kuchennych dla personelu w sklepach, biurach i innych
środowiskach pracy;
b) Pomieszczenia gospodarskie;
c) Przez klientów w hotelach, motelach i innych tego typu środowiskach mieszkalnych;
d) Pensjonaty typu nocleg ze śniadaniem.
23. Nie wolno używać urządzenia na zewnątrz.
24. Należy zachować broszurę instrukcji na przyszłość.
KNOW YOUR COFFEE MAKER
A. Przełącznik ON/OFF
G. Pokrywa górna
M. Metalowy lejek
B. Przełącznik kawa/para
H. Dysza pary
N. Tacka ociekacza
C. Sterowanie pompą
I. Urządzenie do spieniania
O. Uchwyt metalowego lejka
D. Pokrętło regulatora pary
J. Korpus główny
P. Łyżka pomiarowa i ubijak
E. Pokrywa zbiornika wody
K. Zdejmowana półka
F. Zbiornik wody
L. Stalowe sitko
A
B
C
E
F
L
M
O
D
G
H
I
J
K
N
P
PRZED PIERWSZYM UŻYCIEM
Aby otrzymać pierwszą filiżankę kawy, która smakuje doskonałe, należy przepłukać ekspres
do kawy ciepłą wodą w następujący sposób:
1. Wlej wodę do zbiornika wody, poziom wody nie powinien przekraczać znaku "MAX" w
zbiorniku. Następnie załóż pokrywę zbiornika wody.
Page 12

_Polski_
Uwaga: Urządzenie jest dostarczane z wyjmowanym zbiornikiem co ułatwia jego
czyszczenie, można więc wpierw napełnić zbiornik wodą, a następnie umieścić go w
urządzeniu.
2. Wstaw stalowe sitko do metalowego lejka (bez kawy w metalowym sitku).
3. Ustaw dzbanek na wyjmowanej półce. Upewnij się, że pokrętło pary jest na "OFF" lub w
pozycji "0".
Uwaga: Urządzenie nie jest wyposażone w dzbanek, skorzystaj więc ze swojego dzbanka
lub kubka do kawy.
4. Podłącz do gniazdka, ustaw przełącznik ON/OFF w pozycji “—”. Kontrolka ON/OFF
zaświeci się.
5. Naciśnij przycisk pary w pozycję “—” , pompa rozpocznie pompowanie wody. Kiedy
woda wypłynie, zamknij pompę naciskając przycisk w pozycję “O”. Naciśnij przełącznik
kawa/para w pozycję “O” i odczekaj moment, urządzenie rozpocznie wstępne
podgrzewanie, aż kontrolka wewnętrzna przełącznika sterującego pompą zaświeci się, to
oznacza, iż wstępne podgrzewanie zakończyło się. Naciśnij ponownie przełącznik
sterowania pompą w pozycję “—”, a woda zacznie wypływać.
6. Powtarzaj te kroki dopóki cała woda nie zostanie wypompowana ze zbiornika urządzenia,
można ją wylać z dzbanka. Wyczyść dzbanek dokładnie. Urządzenie jest gotowe do
parzenia kawy.
Uwaga: Podczas pompowania wody podczas pierwszego użycia może pojawić się hałas.
To jest normalna sytuacja, gdyż urządzenie uwalnia powietrze znajdujące się w systemie.
Po około 20s, hałas zniknie.
WSTĘPNE PODGRZANIE
Aby uzyskać filiżankę dobrej gorącej kawy Espresso, zalecamy wstępne podgrzanie
urządzenie przed rozpoczęciem parzenia kawy, w tym lejka, filtru i kubka, tak aby na smak
kawy nie miały wpływu zimne części.
1. Wyjmij zbiornik i otwórz pokrywę zbiornika, aby wypełnić go wodą, poziom wody nie
powinien przekraczać znacznika "MAX" w zbiorniku. Następnie umieść prawidłowo
zbiornik w urządzeniu.
2. Wybierz sitko na jedną lub dwie filiżanki, umieść sitko ze stali nierdzewnej w metalowym
lejku, przesuń do tyłu uchwyt lejka, upewnij się, że jest on w jednej linii z rowkiem na
urządzeniu, a następnie włóż lejek do urządzenie w pozycji "Insert" i zwolnij uchwyt.
Umocuj lejek w ekspresie do kawy mocno obracając go w kierunku przeciwnym do ruchu
wskazówek zegara, dopóki nie będzie on w pozycji zablokowanej „Lock”.
3. Umieść filiżankę (swoją własną filiżankę) na wyjmowanej półce.
4. Następnie należy podłączyć urządzenie do źródła zasilania. Upewnij się, że pokrętło pary
jest w pozycji "OFF".
5. Ustaw przełącznik ON/OFF w pozycji “—”, kontrolka zaświeci się. Ustaw przełącznik
kawa/ciepła woda w pozycji “O”. Naciśnij przycisk sterowania pompą w pozycję “—”.
Kiedy woda zacznie wypływać zamknij natychmiast pompę. Celem tego etapu jest do
usunięcia powietrza z układu kawiarki.
Page 13

_Polski_
6. Kiedy kontrolka optyczna pompy świeci się, należy nacisnąć przycisk sterujący pompy w
pozycję "-" ponownie, gorąca woda nie będzie wypływać. Kiedy lampka kontrolna
przestanie świecić zamknij pompę. Wstępne ogrzewanie zostało zakończone.
PRZYGOTOWANIE KAWY ESPRESSO
1. Usuń lejek, obracając go w kierunku ruchu wskazówek zegara. Nasyp mielonej kawy do
sitka stalowego łyżką miarki. Łyżka mielonej kawy wystarcza na filiżankę NAPARU
kawy najwyższej jakości. potem ubij ściśle zmieloną kawę ubijakiem.
2. Umieść sitko ze stali nierdzewnej w metalowym lejku, przesuń do tyłu uchwyt lejka,
upewnij się, że jest on w jednej linii z rowkiem na urządzeniu, a następnie włóż lejek do
urządzenie w pozycji “Insert”. Umocuj lejek w ekspresie do kawy mocno obracając go w
kierunku przeciwnym do ruchu wskazówek zegara, dopóki nie będzie on w pozycji
zablokowanej “Lock”.
3. Nagrzej filiżankę gorącą wodą. Potem umieść filiżankę na wyjmowanej półce.
4. W tym momencie kontrolka pompy powinna się świecić, jeśli nie świeci się, odczekaj
chwilę, gdy lampka zaświeci się, należy nacisnąć przycisk kawy/ciepłej wody w pozycję
“—”. Poczekaj chwilę, zanim kawa zacznie wypływać.
Uwaga: W czasie pracy, gdy kontrolka nie świeci się, należy zamknąć pompę i zatrzymać
przyrządzanie kawy espresso Po kilku sekundach, gdy kontrolka zaświeci się ponownie,
można kontynuować przygotowywania kawy espresso przez naciśnięcie przycisku w pozycję
“—”. Kontrolka będzie się cyklicznie włączać i wyłączać w celu utrzymania temperatury
wody.
5. Powinieneś ręcznie nacisnąć przycisk ON/OFF w pozycję “O” kiedy żądana kawa jest
gotowa lub kolor kawy słabnie, wszystkie kontrolki zgasły a ekspres zakończył pracę,
Twoja kawa jest już gotowa.
OSTRZEŻENIE: Nie należy pozostawiać ekspresu bez nadzoru podczas przygotowywania
kawy, gdyż czasem trzeba nim sterować ręcznie!
6. Po zakończeniu parzenia kawy, należy zdjąć metalowy lejek poprzez przekręcenie go w
lewo, a następnie wylać resztę kawy z lejka stalowego.
7. Następnie pozwól częściom całkowicie ostygnąć, a następnie opłucz je pod bieżącą wodą.
SPIENIANIE MLEKA/ PRZYGOTOWYWANIE CAPPUCCINO
Otrzymasz filiżankę cappuccino, kiedy uzupełnisz filiżankę espresso spienionym mlekiem.
Uwaga: Podczas wytwarzania pary metalowy lejek musi być zamontowany na swojej pozycji.
1. Proszę przygotować wpierw espresso w dużym pojemniku zgodnie z zaleceniami
“PRZYGOTOWYWANIE KAWY ESPRESSO”, upewnij się, że pokrętło pary jest w
pozycji "OFF".
2. Naciśnij przycisk kawa/para w pozycję “—”, kontrolka przełącznika pompy będzie się
świecić, poczekaj aż kontrolka kawa/para będzie się świecić.
Uwaga: Podczas pracy, kontrolka przełącznika kawa/para będzie cyklicznie włączać i
Page 14

_Polski_
wyłączać, aby utrzymać pożądaną temperaturę.
3. Napełnij dzbanek ok. 100 gramami mleka na każde przygotowane cappuccino, zaleca się
użycie mleka w schłodzonego w temperaturze lodówki (nie gorącego!).
Uwaga: : Przy wyborze rozmiaru dzbanka, zaleca się aby jego średnica była nie mniejsza niż
70 ± 5 mm, i pamiętać należy, że objętości mleka wzrasta 2 razy, tak więc upewnij się, że
pojemność dzbanka jest wystarczająca.
4. Obróć pokrętło kontroli pary w lewo, powoli. Para zacznie się wydobywać z urządzenia
do spieniania.
Uwaga: Nigdy nie obracaj szybko pokrętła pary, gdyż para wytworzona nagle w krótkim
czasie, może spowodować wzrost zwiększyć ryzyka wybuchu.
5. Włóż urządzenie spieniające do mleka na głębokość około dwóch centymetrów. Spieniaj
mleko przesuwając dzbanek dookoła z góry na dół.
6. Po osiągnięciu pożądanego efektu, można obrócić pokrętło regulacji pary w pozycję
"OFF".
Uwaga: Oczyść wylot pary mokrą gąbką natychmiast po zatrzymaniu pary, ale należy zadbać
o to, aby się nie poparzyć!
7. Wlej spienione mleko do przygotowanego espresso. Wtedy cappuccino jest gotowe.
Osłódź do smaku i ewentualnie posyp piankę odrobiną kakao w proszku.
8. Naciśnij przycisk ON/OFF w pozycję “0” aby odłączyć zasilanie. Wszystkie kontrolki
zgasną.
Uwaga: Pozostaw ekspres do kawy do ostygnięcia na co najmniej 5 minut przed ponownym
parzeniem kawy. W przeciwnym razie może wystąpić zapach palonej w Twojej kawie
espresso.
WYTWARZANIA PARY DO OGRZEWANIA PŁYNÓW
Dyszę pary (bez urządzenia do spieniania) można wykorzystać do przygotowywania gorących
napojów, takich jak czekolada, woda lub herbata.
1. Wyjmij zbiornik i otwórz pokrywę zbiornika, aby wypełnić go wodą, poziom wody nie
powinien przekraczać znacznika "MAX" w zbiorniku. Następnie umieść prawidłowo
zbiornik w urządzeniu.
2. Załóż górną pokrywę, a następnie podłącz urządzenie do źródła zasilania.
3. Naciśnij przycisk ON/OFF w pozycję “—”, kontrolka zaświeci się.
4. Upewnij się, że przycisk wyboru kawa/para jest w pozycji "O", obrócić przełącznik
sterujący pompy do w pozycję “—”, pompa będzie pompować wodę, gdy woda zacznie
wypływać natychmiast zamknij pompę. Naciśnij przycisk wyboru kawa/para w pozycję
“—” i poczekaj aż kontrolka przełącznika kawa/para będzie się świecić, co wskaże, że
grzanie jest zakończone.
5. Wyjmij urządzenie spieniające z dyszy pary.
6. Zanurz dyszę pary w płynie do ogrzania. Obróć pokrętło pary powoli w lewo powoli aby
rozpocząć wytwarzanie pary.
7. Po osiągnięciu żądanej temperatury, można obrócić pokrętło pary w pozycję "OFF".
8. Naciśnij przełącznik ON/OFF w pozycję “0” aby wyłączyć zasilanie.
Page 15

_Polski_
FUNKCJA AUTOMATYCZNEGO WYŁĄCZENIA ZASILANIA
Po 25 minutach od włączenia przełącznika zasilania urządzenie wyłączy się automatycznie.
Obróć pokrętło zasilania w pozycję OFF w razie potrzeby, aby ponownie włączyć urządzenie
po wyłączeniu automatycznym.
CZYSZCZENIE I KONSERWACJA
1. Odłącz urządzenie i pozwól aby ekspres do kawy całkowicie ostygnął przed rozpoczęciem
czyszczenia.
2. Czyść często obudowę ekspresu do kawy wilgotną gąbka oraz regularnie czyść zbiornik
wody wyjmowaną półkę, tackę na skropliny, poczym je osusz.
Uwaga: Nie czyść alkoholem ani rozpuszczalnikiem do czyszczenia. Nie wolno zanurzać
obudowy w wodzie w celu jej czyszczenia.
3. Odłącz metalowy lejek, obracając go w lewo. Pozbądź się pozostałości kawy z wnętrza,
następnie można oczyścić go z użyciem płynu do czyszczenia, a na końcu trzeba spłukać
czystą wodą.
4. Wyczyść wszystkie akcesoria w wodzie i osusz starannie.
CZYSZCZENIE OSADÓW MINERALNYCH
1. Aby być pewnym, że ekspres do kawy działa sprawnie, rurka wewnętrzna jest czysta a
smak kawy jest najlepszy, należy czyścić osady mineralne regularnie co 2-3 miesiące.
2. Napełnij zbiornik wodą i roztworem do usuwania kamienia do poziomu MAX (stosunek
wody i roztworu do odkamieniania wynosi 4:1, postępuj zgodnie z instrukcjami podanymi
przez producenta). Proszę używać odkamieniacza dla gospodarstw domowych. Możesz
także użyć kwasku cytrynowego (dostępnego w drogeriach) zamiast odkamieniacza (sto
części wody i trzy części kwasu cytrynowego)..
3. Zgodnie z programem wstępnego podgrzewania, zamontuj metalowy lejek (bez mielonej
kawy w nim) i karafkę (dzbanek). Podgrzej wodę postępując zgodnie z instrukcjami
zawartymi w rozdziale "Wstępne podgrzanie”.
4. Naciśnij przycisk ON/OFF w pozycję “—”, kontrolka zaświeci się. Naciśnij przycisk
kontroli pompy, upewnij się, że przełącznik kawa/para jest w pozycji “O”. Kiedy woda
zacznie wypływać, wyłącz pompę i odczekaj chwilę, kawiarka będzie wówczas wstępnie
podgrzana.
5. Kiedy kontrolka przełącznika kontroli pompy zaświeci się, oznacza to, że proces
podgrzewania został zakończony. Naciśnij przełącznik kontroli pompy w pozycję “—” i
zrób 2 filiżanki kawy (około 2Oz). Potem zamknij pompę na 5s.
6. Naciśnij przełącznik kawa/para w pozycję “—”, kontrolka przełącznika kontroli pompy
zgaśnie. Zaczekaj aż kontrolka przełącznika kawa/para zaświeci się. Rób parę przez 2min,
potem obróć pokrętło pary w pozycję “OFF” aby zatrzymać wytwarzanie pary. Naciśnij
przełącznik pary w pozycję "0", aby natychmiast wyłączyć urządzenie. Pozostaw ekspres
Page 16

_Polski_
w spokoju przez co najmniej 15 minut.
7. Uruchom ponownie urządzenie i powtórz kroki od 4 do 6 co najmniej 3 razy.
8. Potem naciśnij przełącznik kawa/para w pozycję “O”, kontrolka optyczna przełącznika
kontroli pompy zaświeci się. Potem naciśnij przycisk kontroli pompy w pozycję “—” aby
zaparzyć. aż żaden środek do usuwania kamienia nie pozostanie wewnątrz.
9. Potem zaparz kawę (bez kawy) napełniając wodą do poziomu MAX, powtórz kroki od 4
do 6 trzy razy (nie jest konieczne odczekanie 15 minut w kroku 6), następnie należy
kontynuować parzenie, aż zabraknie wody nie jest w zbiorniku.
10. Powtórz krok 9 co najmniej 3 razy aby upewnić się, że rurka jest czysta.
ROZWIĄZYWANIE PROBLEMÓW
Symptomy
Przyczyna
Rozwiązanie
Części metalowe w
zbiorniku są
zardzewiałe.
Użyty środek do usuwania
kamienia nie był typem zalecanym
Może on powodować korozję
metalowych elementów zbiornika.
Użyj czynnika do
odkamieniania zalecanego
przez producenta.
Woda przecieka ze
spodu kawiarki.
Jest dużo wody w tacce
ociekacza. Proszę oczyścić
tackę ociekacza.
Proszę oczyścić tackę
ociekacza.
Kawiarka działa w sposób
nieprawidłowy
Proszę skontaktować się z
autoryzowanym serwisem w
celu naprawy.
Wody wycieka z
zewnętrznej strony
filtru.
Na krawędziach filtru jest trochę
osadu kawy.
Proszę oczyść krawędzie
filtru.
Smak kwasu (octu)
występuje w kawie
espresso.
Wewnątrz pozostał środek
odkamieniający.
Oczyść urządzenie
powtarzając kroki 9 i 10 z
rozdziału “
CZYSZCZENIE
OSADÓW
MINERALNYCH”
Zmielona kawa jest
przechowywana w gorącym,
wilgotnym miejscu przez dłuższy
czas. Kawa mielona nie nadaje się
do użytku.
Proszę używać świeżej kawy
w proszku, a nieużywaną
kawę w proszku
przechowywać w chłodnym,
suchym miejscu. Po otwarciu
opakowania zmielonej kawy,
należy szczelnie je zamknąć i
przechowywać w lodówce,
aby utrzymać jej świeżość.
Kawiarka nie
funkcjonuje.
Wtyczka nie wetknięta prawidłowo.
Podłącz prawidłowo przewód
zasilający do gniazdka, jeżeli
urządzenie nadal nie działa,
należy skontaktować się z
autoryzowanym serwisem
sprzętu w celu naprawy.
Para nie może
spieniać.
Kontrolka gotowości pary nie
świeci się.
Dopiero gdy wskaźnik
gotowości pary świeci się,
para może być użyta do
spieniania.
Page 17

_Polski_
Pojemnik jest zbyt duży lub kształt
nie jest odpowiedni.
Użyj wysokiej i wąskiej
filiżanki.
Użyłeś mleka odtłuszczonego.
Użyj pełnego mleka lub
częściowo odtłuszczonego.
Nie rozbieraj urządzenia samodzielnie. Jeśli przewód zasilający jest uszkodzony lub
urządzenie działa nieprawidłowego należy skontaktować się z autoryzowanym serwisem.
Page 18

_Български_
КАФЕМАШИНА ЗА ЕСПРЕСО И КАПУЧИНО
МОДЕЛ: Z-1171-G
РЪКОВОДСТВО ЗА УПОТРЕБА
Прочетете внимателно ръководството за употреба преди да използвате
уреда за първи път и го запазете за бъдещи справки!
Page 19

_Български_
ВАЖНИ ИНСТРУКЦИИ ЗА БЕЗОПАСНОСТ
При употребата на този уред, трябва да се спазват основни мерки за безопасност,
включително следните:
1. Прочетете всички инструкции.
2. Преди да включите уреда в контакта, се уверете, че електрическото напрежение във
Вашия дом отговаря на това, описано върху уреда.
3. Този уред е оборудван с щепсел със заземителен контакт. Моля, уверете се, че
електрическият контакт във Вашия дом е правилно заземен.
4. За да се предпазите от електрически шок, наранявания и повреждане на имущество,
не потапяйте уреда и захранващия кабел във вода или други течности.
5. Изключвайте уреда от контакта, преди да го почистите и когато не го използвате.
6. Не използвайте уреда, ако захранващият кабел е повреден или самият уред не
работи коректно или е бил изпускан. Занесете уреда в оторизирания сервизен
център за проверка, настройка или ремонт.
7. Употребата на аксесоари и приставки, които не са одобрени от производителя, може
да доведе до пожар, електрически шок или наранявания на потребителя.
8. Поставяйте уреда на равна и стабилна повърхност, не оставяйте кабелът да виси от
ръба на масата или работния плот.
9. Не допускайте кабелът да се докосва до горещи повърхности.
10. Не поставяйте кафемашината върху горещи повърхности или в близост от открит
пламък, това ще я повреди.
11. За да изключите уреда от електрическата мрежа, хванете щепсела и го издърпайте от
контакта, никога не дърпайте кабела.
12. Използвайте уреда само по предназначение. Не го използвайте в помещения с
висока влажност.
13. Бъдете внимателни и не оставяйте уреда без надзор, докато се използва в
присъствието на деца.
14. Бъдете внимателни и се пазете от горещата пара.
15. Не докосвайте горещите повърхности на уреда (металната цедка, чучура за пара).
Използвайте дръжките и бутоните.
16. Не включвайте кафемашината, ако резервоарът за вода е празен.
17. Не махайте металната фуния, докато машината приготвя кафе или произвежда пара.
18. Преди да изключите уреда от контакта, се уверете, че всички бутони са на позиция
изключено.
19. Този уред не е предназначен за употреба от лица (включително деца) с намалени
физически, сетивни или ментални способности, или от такива без опит и знания,
освен ако не са надзиравани и напътствани от друго лице, отговорно за тяхната
безопасност.
20. Не допускайте деца да си играят с уреда.
21. Внимание: Капакът на резервоара за вода трябва да е затворен, докато машината
работи.
22. Този уред е предназначен за употреба в домашни условия или следните среди:
a) Кухненски помещения в магазини, офиси и други работни среди;
Page 20

_Български_
b) Ферми;
c) От клиенти в хотели, мотели и други сгради, предназначени за настаняване;
d) Хотели от типа „Нощувка и закуска“.
23. Не използвайте на открито.
24. Запазете ръководството за употреба.
ОПИСАНИЕ НА УРЕДА
A. Бутон за Вкл./Изкл.
G. Горен капак
M. Метална фуния
B. Бутон за избор на
кафе/пара
H. Чучур за пара
N. Отцедник
C. Бутон за управление
на помпата
I. Накрайник за
разпенване
O. Дръжка на металната фуния
D. Регулатор на парата
J. Корпус
P. Мерителна лъжичка и тампон
E. Капак на резервоара
за вода
K. Демонтираща се
поставка
F. Резервоар за вода
L. Метална цедка
A
B
C
E
F
L
M
O
D
G
H
I
J
K
N
P
ПРЕДИ ПЪРВОНАЧАЛНА УПОТРЕБА
За да бъде първата чаша кафе с отличен вкус, кафемашината трябва да се промие с
топла вода по следния начин:
1. Налейте вода в резервоара, нивото не трябва да е над маркера “MAX”. Затворете
капака на резервоара.
Page 21

_Български_
Забележка: Уредът е оборудван с демонтиращ се резервоар за лесно почистване.
Можете да напълните резервоара, след което да го поставите в машината.
2. Поставете металната цедка във фунията (не поставяйте кафе в цедката).
3. Поставете кана върху демонтиращата се поставка. Уверете се, че регулаторът за пара
е на позиция OFF.
Забележка: Комплектът не съдържа кана, моля, използвайте ваша.
4. Включете уреда в контакта и натиснете бутона за Вкл./Изкл. на позиция “—”.
Индикаторът ще светне.
5. Натиснете бутона за помпата на позиция “—”, тя ще започне да изпомпва вода от
резервоара. Щом от фунията започне да излиза вода, спрете помпата, като натиснете
бутона на позиция “O”. Натиснете бутона за избор на кафе/пара на позиция “O” и
изчакайте уредът да загрее, индикаторът на бутона за помпата ще светне. Натиснете
бутона за вкл./изкл. на позиция “—”, за да продължите изпомпването на водата.
6. Повторете горните стъпки до пълното изразходване на водата от резервоара.
Измийте каната. Кафемашината вече е готова за приготвяне на кафе.
Забележка: При първоначалното включване, машината може да издава неприятен
звук. Това е нормално, тъй като кафемашината се обезвъздушава. След около 20
секунди неприятният звук ще изчезне.
ПРЕДВАРИТЕЛНО ЗАГРЯВАНЕ НА МАШИНАТА
За приготвянето на чаша хубаво еспресо, се препоръчва предварително загряване на
машината, включително на фунията, цедката и чашата. Така вкусът на кафето няма да се
повлияе от студените части.
1. Налейте вода в резервоара, нивото не трябва да е над маркера “MAX”. Затворете
капака на резервоара.
2. Поставете металната цедка във фунията, тръбичката на фунията трябва да се
подравни с улея в машината. Поставете фунията в машината от позиция “Insert” и я
завъртете обратно на часовниковата стрелка до позиция “Lock”.
3. Поставете подходяща чаша под фунията.
4. Включете уреда в контакта. Уверете се, че регулаторът на парата е на позиция OFF.
5. Натиснете бутона за Вкл./Изкл. на позиция “—”, индикаторът ще светне. Натиснете
бутона за избор на кафе/пара на позиция “O”. Натиснете бутона за помпата на
позиция “—”. Щом от фунията започне да излиза вода, спрете помпата. Целта на
тази стъпка е евакуиране на въздуха от системата.
6. Щом индикаторът на бутона за помпата светне, натиснете бутона на позиция “—”
отново. Щом индикаторът изгасне, спрете помпата. Предварителното загряване е
завършено.
Page 22

_Български_
ПРИГОТВЯНЕ НА ЕСПРЕСО
1. Демонтирайте фунията, като я завъртите по часовниковата стрелка. Използвайте
мерителната лъжичка, за да поставите мляно кафе в металната цедка, една лъжичка
е достатъчна за приготвянето на една чаша кафе. Уплътнете кафето в цедката, като
използвате тампона.
2. Поставете металната цедка с кафето във фунията, уверете се, че тръбичката на
фунията се подравнява с улея на кафемашината. Монтирайте фунията към машината
от позиция “Insert”. Завъртете цедката обратно на часовниковата стрелка до
достигане на позиция “Lock”.
3. Затоплете с топла вода празна чаша за кафе. Поставете чашата на поставката под
фунията.
4. Светлинният индикатор на бутона за помпата трябва да свети. Ако е изгаснал,
изчакайте няколкото минути, докато светне отново. Щом индикаторът светне,
натиснете бутона за помпата на позиция “—”. След няколко секунди от фунията ще
започне да изтича горещо кафе.
Забележка: По време на работа, ако индикаторът изгасне, изключете помпата и спрете
приготвянето на кафе. Възстановете работата на помпата след като индикаторът светне
отново. Светлинният индикатор ще светва и изгасва, показвайки, че температурата на
водата се поддържа постоянна.
5. След като сте приготвили нужното количество кафе, натиснете бутона за Вкл./Изкл.
на позиция “O”, всички светлинни индикатори ще изгаснат и машината ще спре
работа.
ВНИМАНИЕ: Не оставяйте кафемашината без надзор, докато е включена, защото се
налага да я управлявате ръчно!
6. След като приключите с приготвянето на кафе, демонтирайте фунията от машината
и изхвърлете остатъците от кафето.
7. Оставете частите на уреда да изстинат напълно, след което ги изплакнете под
течаща вода.
ПРИГОТВЯНЕ НА КАПУЧИНО / РАЗПЕНВАНЕ НА МЛЯКО
Добавяйки разпенено мляко към прясно приготвено еспресо, Вие ще получите
капучино.
Забележка: При генериране на пара, металната фуния трябва да е монтирана на място.
1. Пригответе еспресо в достатъчно голяма чаша, като спазвате инструкциите от
“ПРИГОТВЯНЕ НА ЕСПРЕСО”, уверете се, че регулаторът на парата е на позиция
OFF.
2. Натиснете бутона за избор на кафе/пара на позиция “—”, светлинният индикатор на
бутона за помпата ще светне. Изчакайте светлинният индикатор на бутона за избор
на кафе/пара да светне.
Забележка: По време на работа, индикаторът на бутона за избор на кафе/пара ще светва
и изгасва, показвайки, че температурата се поддържа постоянна.
Page 23

_Български_
3. Налейте 100ml прясно мляко в подходяща чаша, препоръчително е да използвате
пълномаслено, охладено мляко (не горещо!).
Забележка: Изберете чаша с диаметър не по-малък от 70±5mm. Имайте предвид, че
млякото увеличава обема си до 2 пъти при затопляне, изберете чаша с подходящ обем.
4. Завъртете бавно регулатора на парата обратно на часовниковата стрелка, от чучура
за разпенване ще започне да излиза пара.
Забележка: Никога не завъртайте регулатора за пара бързо, защото това ще увеличи
налягането в машината много бързо и има риск от експлозия.
5. Потопете чучура за разпенване в млякото на около два сантиметра. Движете чашата
в кръг, нагоре и надолу, за да разпените млякото.
6. При достигане на желания ефект, спрете парата, като поставите регулатора на
позиция OFF.
Забележка: Почистете чучура с мокра гъба незабавно след спиране на парата.
Внимавайте да не се изгорите!
7. Излейте разпененото мляко в чашата с приготвеното еспресо. Подсладете на вкус и
по желание, поръсете с малко канела или какао.
8. Натиснете бутона за Вкл./Изкл. на позиция “O”. Всички индикатори ще изгаснат.
Забележка: Препоръчително е да оставите машината да изстине за около 5 минути,
преди да приготвите следващото кафе. В противен случай е възможно кафето да има
неприятен аромат на изгоряло.
ЗАТОПЛЯНЕ НА НАПИТКИ С ПАРА
Чучурът за пара (без приставката за разпенване) може да се използва за затопляне на
напитки, като горещ шоколад, вода или чай.
1. Отворете капака и налейте вода в резервоара, нивото не трябва да надвишава
маркера “MAX”. Затворете капака.
2. Включете уреда към електрическата мрежа.
3. Натиснете бутона за Вкл./Изкл. на позиция “—”, светлинният индикатор ще светне.
4. Уверете се, че бутонът за избор на кафе/пара е на позиция “O”, натиснете бутона за
помпата на позиция “—”. Щом от машината започне да изтича вода, спрете помпата.
Натиснете бутона за избор на кафе/пара на позиция “—” и изчакайте светлинният
индикатор на бутона да светне. Загряването на машината е завършено.
5. Демонтирайте приставката за разпенване от чучура.
6. Потопете чучура в течността, която искате да затоплите. Бавно завъртете регулатора
на парата обратно на часовниковата стрелка, от чучура ще започне излиза гореща
пара.
7. Щом желаната температура е достигната, можете да завъртите регулатора на парата
на позиция OFF.
8. Натиснете бутона за Вкл./Изкл. на позиция “O”, за да изключите машината.
Page 24

_Български_
АВТОМАТИЧНО ИЗКЛЮЧВАНЕ НА МАШИНАТА
Двадесет и пет минути след включване, кафемашината ще се изключи автоматично.
Превключите бутона за Вкл./Изкл., ако желаете да използвате машината след
автоматичното ѝ изключване.
ПОЧИСТВАНЕ И ПОДДРЪЖКА
1. Изключете кафемашината от контакта и я оставете да изстине напълно, преди да я
почистите.
2. Почистете корпуса на кафемашината с влажна кърпа. Редовно почиствайте
резервоара за вода, отцедника и поставката, подсушете добре.
Забележка: Не използвайте алкохол или разредители. Никога не потапяйте корпуса на
машината във вода или други течности.
3. Демонтирайте металната фуния и изхвърлете остатъците кафе. Измийте фунията и
металната цедка с препарат за чинии и топла вода. Изплакнете добре и подсушете.
4. Почистете всички приставки под течаща вода и подсушете добре.
ПОЧИСТВАНЕ НА МИНЕРАЛНИ ОТЛАГАНИЯ
1. За да сте сигурни, че кафемашината работи ефективно, вътрешните тръбопроводи са
чисти и кафето има най-добър вкус, трябва редовно да почиствате минералните
отлагания. Препоръчително е да ги почиствате на всеки 2-3 месеца.
2. Напълнете резервоара с разтвор на вода и преперат за почистване на варовик.
Съотношението на вода и препарат е 4:1. Следвайте инструкциите от опаковката на
препарата. Можете да използвате и лимонена киселина (от химически магазини или
дрогерии). Съотношението на вода и лимонена киселина е 100:3.
3. Следвайки инструкциите за предварително загряване на машината, поставете
металната фуния (без кафе в нея) в машината и сложете подходяща кана на
поставката. Следвайте инструкциите от “ПРЕДВАРИТЕЛНО ЗАГРЯВАНЕ НА
МАШИНАТА”.
4. Натиснете бутона за Вкл./Изкл. на позиция “—”, светлинният индикатор ще светне.
Натиснете бутона за помпата и се уверете се, че бутона за избор на кафе/пара е на
позиция “O”. Щом от фунията започне да тече вода, спрете помпата и изчакайте
машината да загрее.
5. Щом светлинният индикатор на бутона за помпата светне, предварителното
загряване на машината е приключило. Натиснете бутона на помпата на позиция “—”
и напълнете две чаши с гореща вода от машината (около 60ml). Спрете помпата и
изчакайте 5 секунди.
6. Натиснете бутона за избор на кафе/пара на позиция “—”, светлинният индикатор на
помпата ще е изгаснал. Изчакайте светлинният индикатор на бутона за избор на
кафе/пара да светне. Включете машината да произвежда пара за около 2 минути,
Page 25

_Български_
като завъртите регулатора за пара. След това спрете изпускането на пара, като
върнете регулатора на позиция OFF. Натиснете бутона за Вкл./Изкл. на позиция “O”,
за да изключите машината. Оставете машината в това състояние за около 15 минути.
7. Рестартирайте машината и повторете стъпки 4 до 6 поне 3 пъти.
8. След това натиснете бутона за избор на кафе/пара на позиция “O”, светлинният
индикатор на бутона за помпата ще светне. Натиснете бутона за помпата на позиция
“—” и оставете машината да изпомпа останалото количество разтвор от резервоара.
9. Напълнете резервоара с прясна вода до маркера MAX. След което пуснете машината
да приготвя кафе (без кафе в цедката), като използвате цялото количество вода от
резервоара. Повторете стъпки 4 до 6 поне 3 пъти (не се налага да чакате 15 минути
при стъпка 6), оставете машината да изпомпа цялото количество вода от резервоара.
10. Повторете стъпка 9 поне три пъти, за да сте сигурни, че тръбопроводите в машината
са чисти.
ОТСТРАНЯВАНЕ НА НЕИЗПРАВНОСТИ
Симптоми
Причина
Решение
Металните части в
резервоара са
корозирали.
Използваният препарат за
отстраняване на отлагания не е
бил подходящ. Възможно е той да
е причинил корозия на металните
части.
Използвайте препарат,
препоръчан от
производителя.
Теч на вода от
долната част на
кафемашината.
В отцедника има прекалено
много вода.
Излейте водата от отцедника
и го почистете.
Кафемашината е повредена.
Свържете се с оторизирания
сервизен център.
Теч на вода от ръба
на филтъра.
По ръба на филтъра има кафе. Почистете ръба на филтъра.
Кафето има кисел
вкус.
В тръбопровода на машината има
останал препарат за отстраняване
на отлагания.
Почистете машината, като
следвате стъпки 9 и 10 от
„ПОЧИСТВАНЕ НА
МЕНАРЛНИ ОТЛАГАНИЯ“
Кафето е съхранявано на горещо
и влажно място дълго време.
Кафето се е развалило.
Използвайте прясно смляно
кафе. Съхранявайте кафето
на хладно и сухо място.
След отваряне на пакета с
кафе, затворете го добре и го
съхранявайте в хладилник,
за да го запазите прясно за
по-дълго.
Кафемашината не
работи.
Захранващият кабел не е включен
добре в контакта.
Включете добре щепсела в
контакта. Ако машината
продължава да не работи,
моля, свържете се с
оторизирания сервизен
център.
Парата не може да
разпени млякото.
Индикаторът за парата не е
светнал.
Само след като индикаторът
за пара е светнал, можете да
използвате парата за
разпенване на мляко.
Page 26

_Български_
Контейнерът е твърде голям или
с неподходяща форма.
Използвайте висока и тясна
чаша.
Използвали сте обезмаслено
мляко.
Използвайте пълномаслено
мляко.
Не разглобявайте уреда. Ако захранващият кабел или уредът е повреден, свържете
се с оторизирания сервизен център.
 Loading...