

Page 1
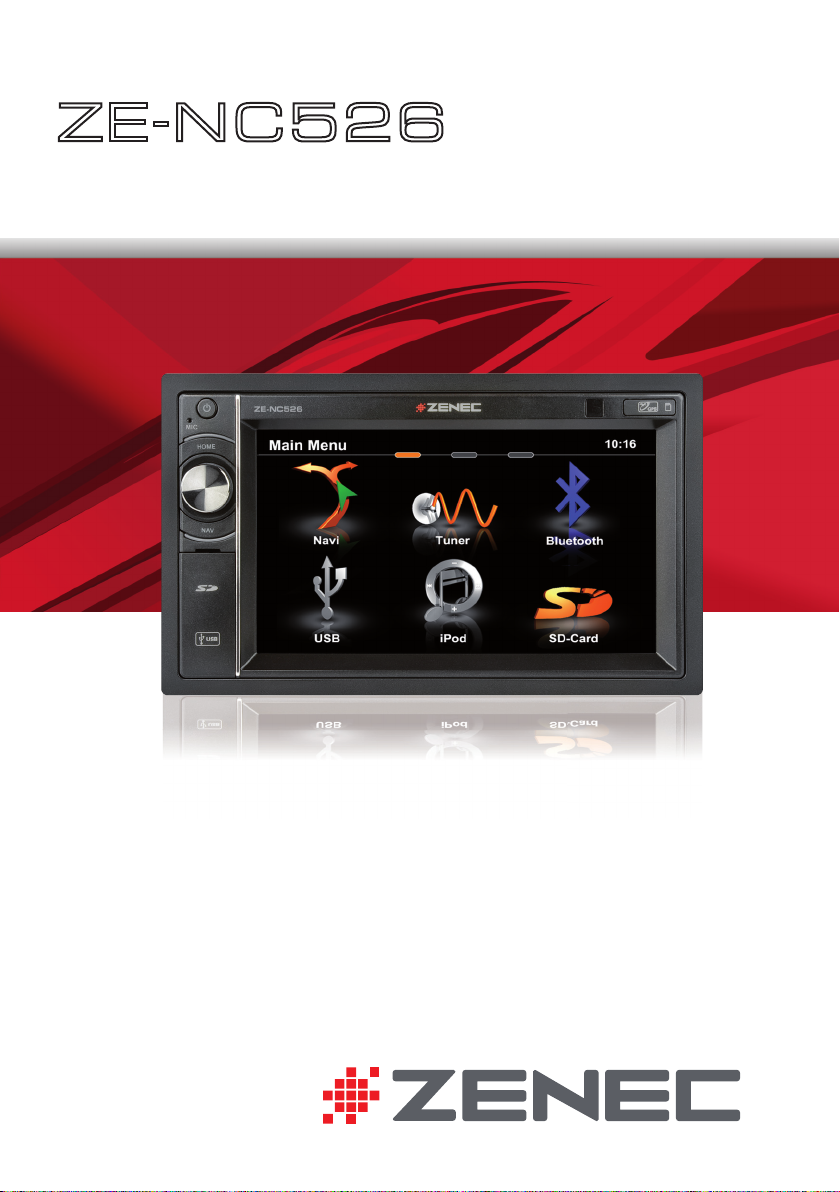
ZE-NC5 26
2-DIN NAVICEIVER
USER MANUAL
BEDIENUNGSANLEITUNG
Page 2

ABOUT THIS INSTRUCTION MANUAL
The instruction manual contains important information and warnings about the
operation of this unit. Please store it inside your vehicle to have access to it any time.
ZENEC reserves the right to revise this document at any time without prior notice.
CONTENTS
SAFETY INSTRUCTIONS .....................................................................................3
FRONT PANEL BUTTONS ................................................................................. 4-5
BASIC OPERATION ........................................................................................... 6-7
RADIO MODE ................................................................................................... 8-11
PLAYBACK/PLAYLIST AUDIO/VIDEO ..........................................................12-17
BLUETOOTH MODE ......................................................................................18-25
NAVIGATION MODE ...................................................................................... 26-27
SETUP ............................................................................................................. 28-35
REMOTE CONTROL ......................................................................................36-37
EXTERNAL PLAYBACK SOURCES .............................................................. 38-39
GLOSSARY..........................................................................................................40
TROUBLESHOOTING .................................................................................... 41-42
SPECIFICATIONS ................................................................................................ 43
WARRANTY .................................................................................................... 86-87
Navigation manual is separate.
2
Page 3

ZE-NC526
SAFETY INSTRUCTIONS
1. Read these instructions entirely.
2. Keep these instructions. Whoever uses the unit should have access to this manual.
3. Heed all warnings. Follow all instructions.
4. This unit is designed to be used in a vehicle with 12V DC battery and negative ground.
5. Do not operate the unit in any other way than described in this manual. Failure to follow the
instructions within this manual may void your warranty.
6. Do not disassemble or alter the unit in any way, because it will void your warranty. Do not attempt to
repair or to service the unit yourself, but contact an authorized ZENEC dealer instead.
7. Use only original accessories which are designed and manufactured for the unit, otherwise you
will risk damage. Install the unit according to the mounting manual by using the supplied mounting
accessories. The forces of acceleration for accidents are sometimes huge. Incorrectly mounted
units are a big risk for the driver and the car passengers, during an accident.
8. Protect the unit from water and other liquids, which can enter the casing. A short circuit or even fire
could be the result.
9. To prevent a short circuit, never insert or stick any metallic objects (such as coins or metal tools) into
the unit.
10. Before you replace a defective fuse, try to find the cause for the short circuit. Please pay attention
to the cables of the power supply! If the short circuit doesn't result from a failure of the power supply
or wiring, you can replace the defective fuse with a new one (same value). If the short-circuit is still
existing, please contact an authorized ZENEC dealer.
11. When connecting to any other device, read its user's guide for detailed safety instructions. Do not
connect incompatible products.
12. Be careful not to drain the car battery while using the unit when the car engine is turned off. Because
the unit uses a considerable amount of energy and the battery will be charged only while the engine
is running, it might happen that the battery will discharge to a point where it's not longer possible to
start the engine.
13. According to the traffic laws in different European countries, driving with monitors which are showing
movies in the viewing range of the driver is not allowed, because the driver might be distracted from
the traffic. Please respect the traffic regulations of your country, or you might face penalties in case
of an accident or even loose your insurance coverage. Please pay attention to the volume inside
your vehicle, because you are obliged to notice exterior sounds like police sirens etc.
14. Don't expose the unit to hard impacts. A mechanical or electrical malfunction of the unit could be the
result.
15. Should any problems or questions occur during installation, please consult your ZENEC dealer/
importer.
3
Page 4
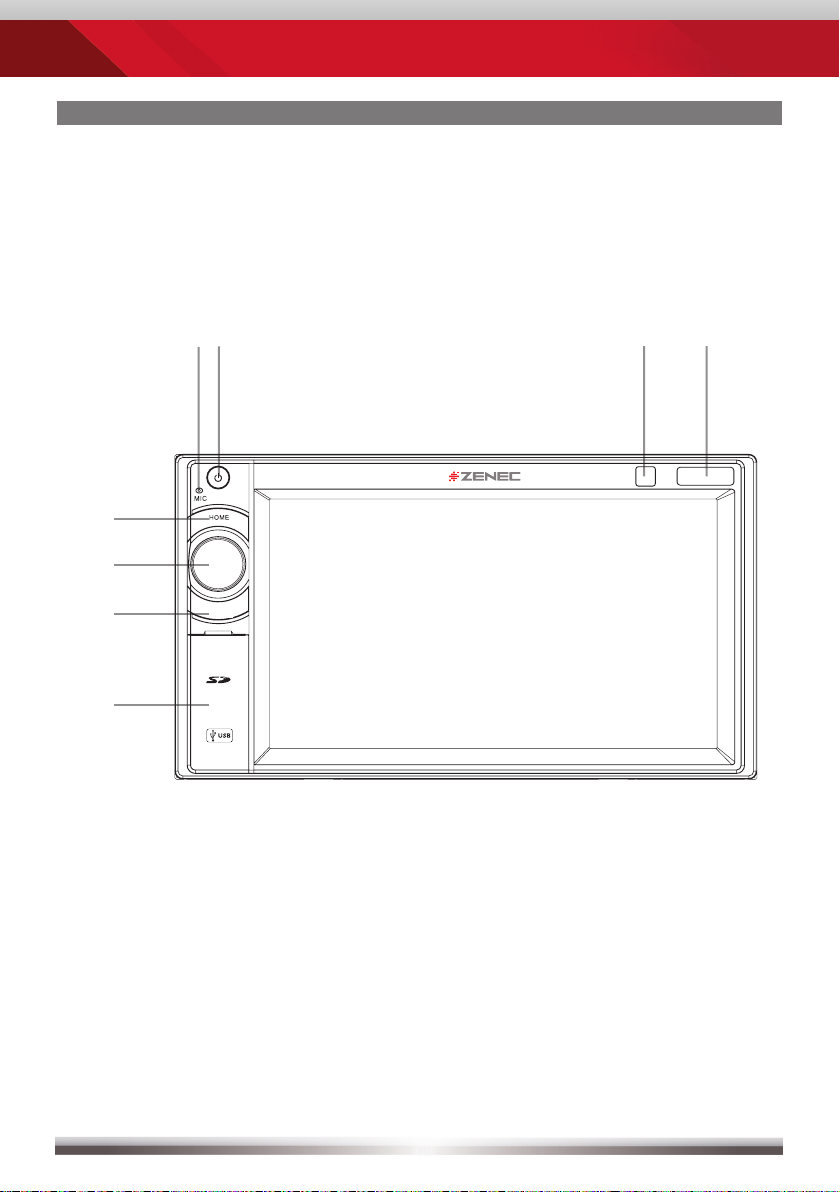
FRONT PANEL BUTTONS
Front Panel
NAV
ZE-NC526
4
Page 5

ZE-NC526
FRONT PANEL BUTTONS
1. INTERNAL MICROPHONE
2. POWER/MUTE
Press to switch device ON.
Press and hold to switch device OFF.
Short press to mute/unmute.
3. IR RECEIVER
4. NAVI-MAP & UPDATE SLOT
Separate Micro-SD slot (for software updates & navi files).
5. USB AND SD-CARD SLOT, RESET
Open the hatch to access the two slots and the RESET button.
Press to initiate a hardware reset.
6. NAV
Short press to start navigation.
Press and hold to adjust the TFT-screen brightness.
7. VOLUME/EQUALIZER
Rotate to increase/decrease volume.
Press to open Equalizer page.
8. HOME
Press to open main menu.
5
Page 6
BASIC OPERATION
POWER ON/OFF
Correctly installed, your device will power on together with the ignition. Ignition off:
Device does not receive power. When the ignition is activated, you may also switch
the device On and Off using the front panel power button.
SELECT A SOURCE
Enter main menu:
- Via Touchscreen:
Touch the icon in the upper left corner of the screen.
- Via "HOME" button:
Push "HOME" button to enter main menu.
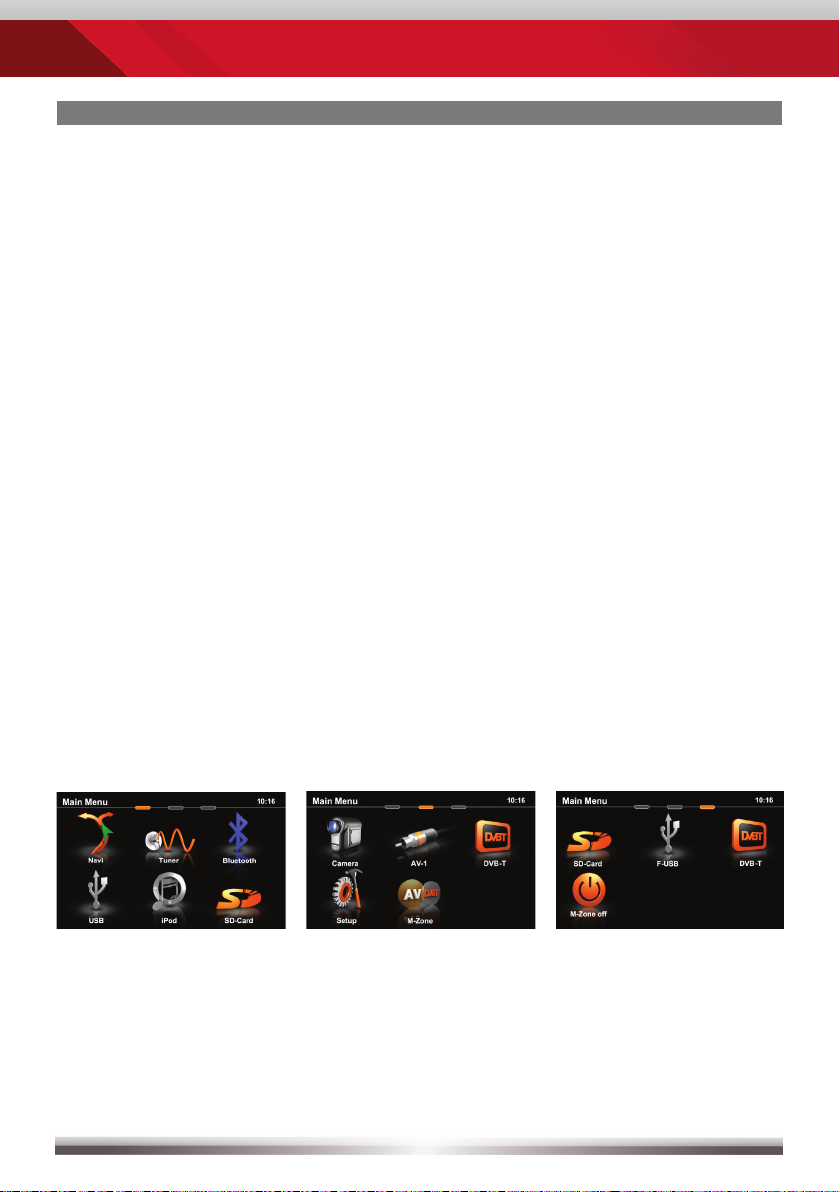
Operation at main menu:
The main menu consists of three pages: Two main pages and one M-Zone page.
There are two basic ways to get there:
- Slide You can slide the three pages back and forth.
Just slide your fingertip onscreen in the respective direction.
- Bar Tap on any of the three markers on top of the screen to
navigate through the main menu pages. M-Zone included.
Entering the main menu you have access to all playback sources and settings.
Main menu 1 Main menu 2 M-Zone page
ADJUST LOCAL LANGUAGE
Tap center header button or slide to second main menu page. Choose SETUP
> LANGUAGE and adjust to your likings. You might want to adjust some other basic
settings. See chapter "Setup".
6
Page 7
BASIC OPERATION
Basic elements (all playback sources)
ZE-NC526
Display & control elements:
Indicates current source
- Tap to enter main menu
Connected cellphone battery status.
Cellphone reception fi eld strength
7
Page 8
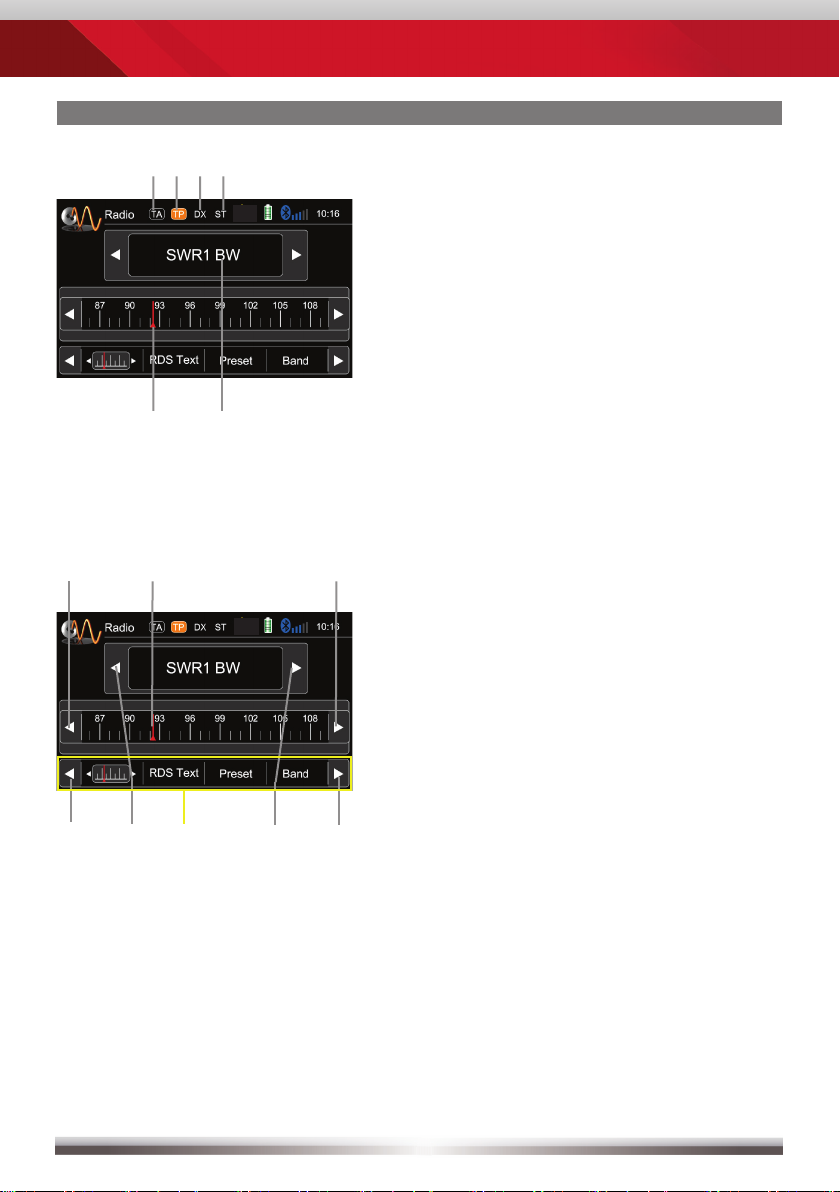
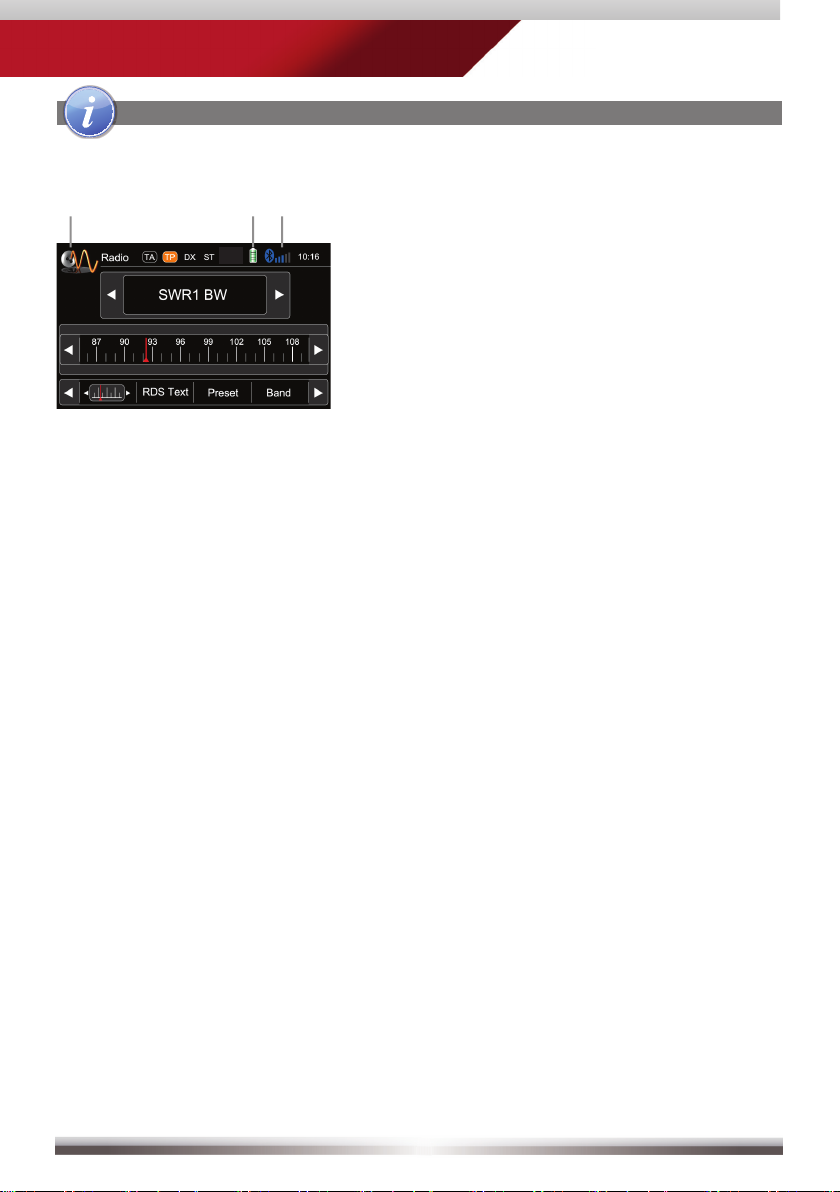
RADIO MODE
Display elements:
Red line marks current frequency
Frequency or station name
Traffi c announcement status
Traffi c announcements on carrier
LOC/DX status
Stereo reception status
Control elements:
Scroll left
Previous station
Tap to select center display content
Next station
Scroll right
100 kHz down
Drag to adjust frequency
100 kHz up
8
Page 9
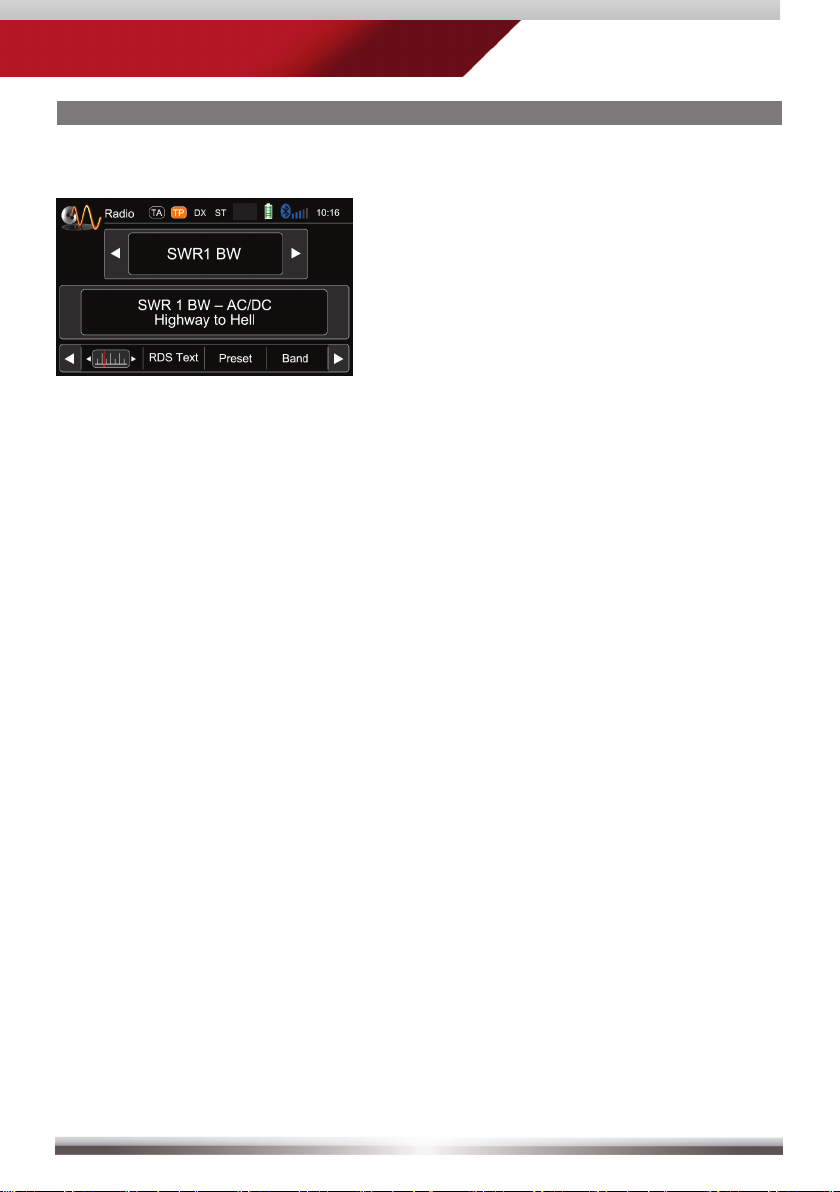
RADIO MODE
ZE-NC526
RDS text allows a radio station to transmit
free-form textual information that can be
either static e.g. station slogans or in sync
with the programming such as the title
and artist of the currently playing song or
even short ads. Availability depends on
region, reception quality and carrier.
9
Page 10
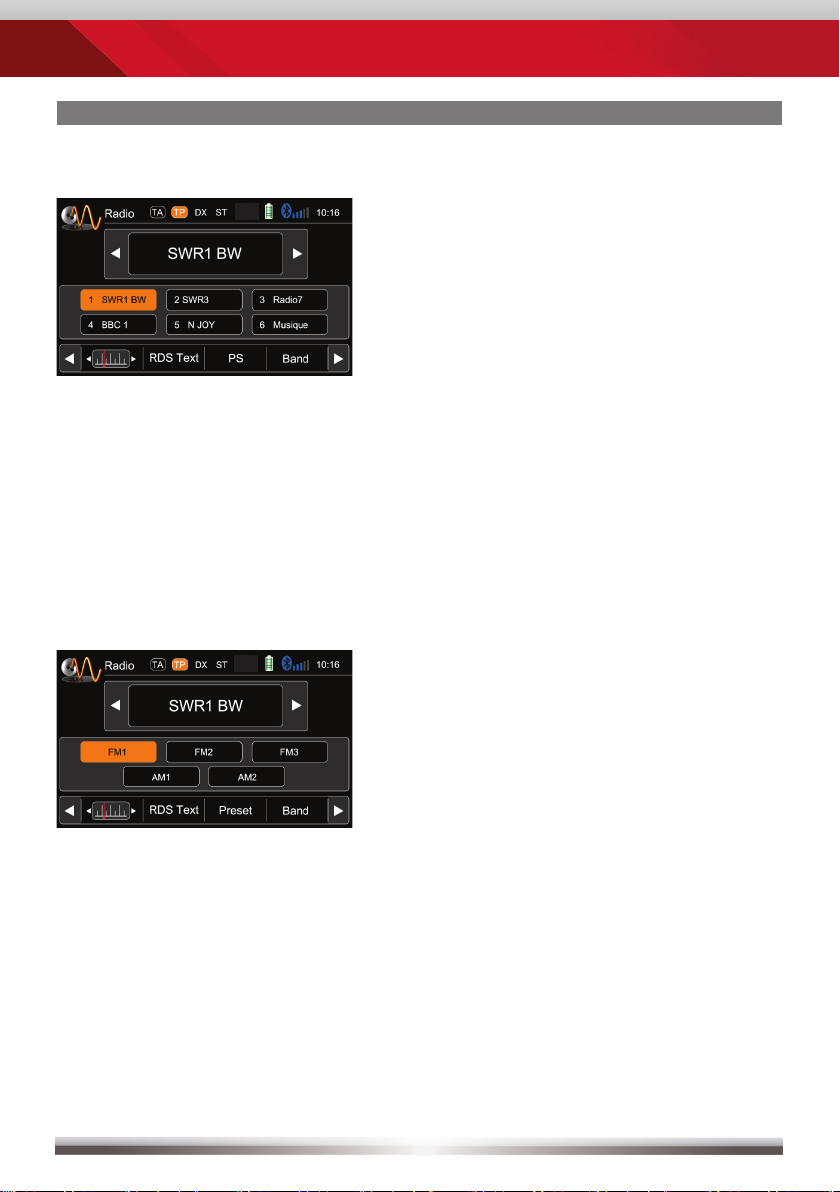
RADIO MODE
Select preset or save a preset. Press
and hold a center button to set a new
frequency as preset.
To select a radioband tap on a
center button.
10
Page 11

ZE-NC526
RADIO MODE
Lower bar options:
The selected item is highlighted in orange onscreen:
AF ON/OFF: When activated, AF function automatically switches to an alter-
native frequency (AF) of your chosen station, in order to always offer the
best possible reception quality.
TA ON/OFF: When activated, the radio temporarily switches, for the duration
of the traffi c announcement, to tuner mode.
AS Searches for the six strongest stations and saves them as preset.
SCAN Intro-scan of all stations in reception range. You can hear each station for
a short moment. Lock to the one you like by pressing scan again.
REG ON/OFF: At certain daytimes some stations divide their program into
regional subprograms. The REG function prevents your receiver from
switching to an alternative frequency with different content.
LOC Touch LOC/DX to omit or allow reception of stations with weak signals.
/DX If LOC is activated it will exclusively fi nd strong stations.
NOTE:
■ This unit features an RDS tuner. RDS is a system which transmits data
on top of the FM radio signal. Availability and content of the RDS data
depend on the respective broadcast station and its signal strength. RDS
does, for example, transmit alternative frequencies, which allow for
frequency changes without user interaction. AM band doesn´t support
RDS functions.
■ You need to have the AF function activated in order to use the RDS
feature. However, the AF function is deactivated ex factory. We recom mend to activate it directly after mounting/installation of your device.
11
Page 12
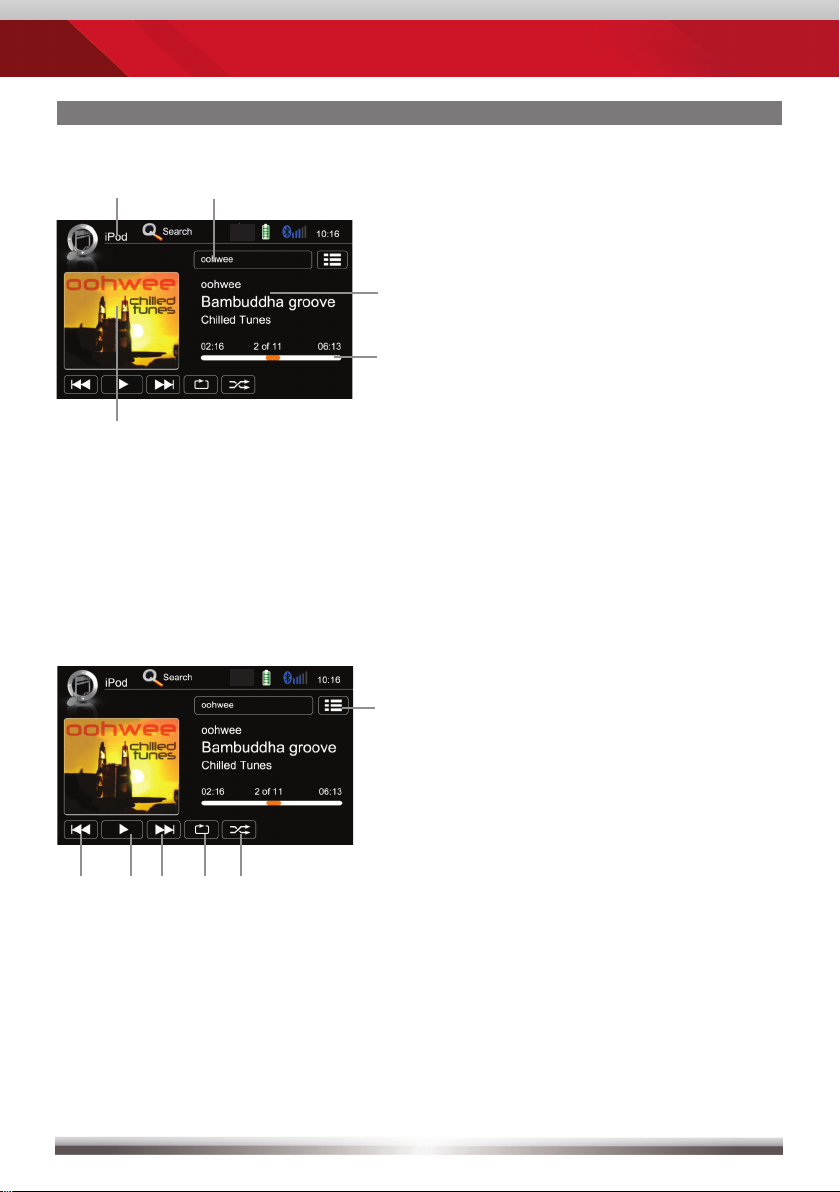
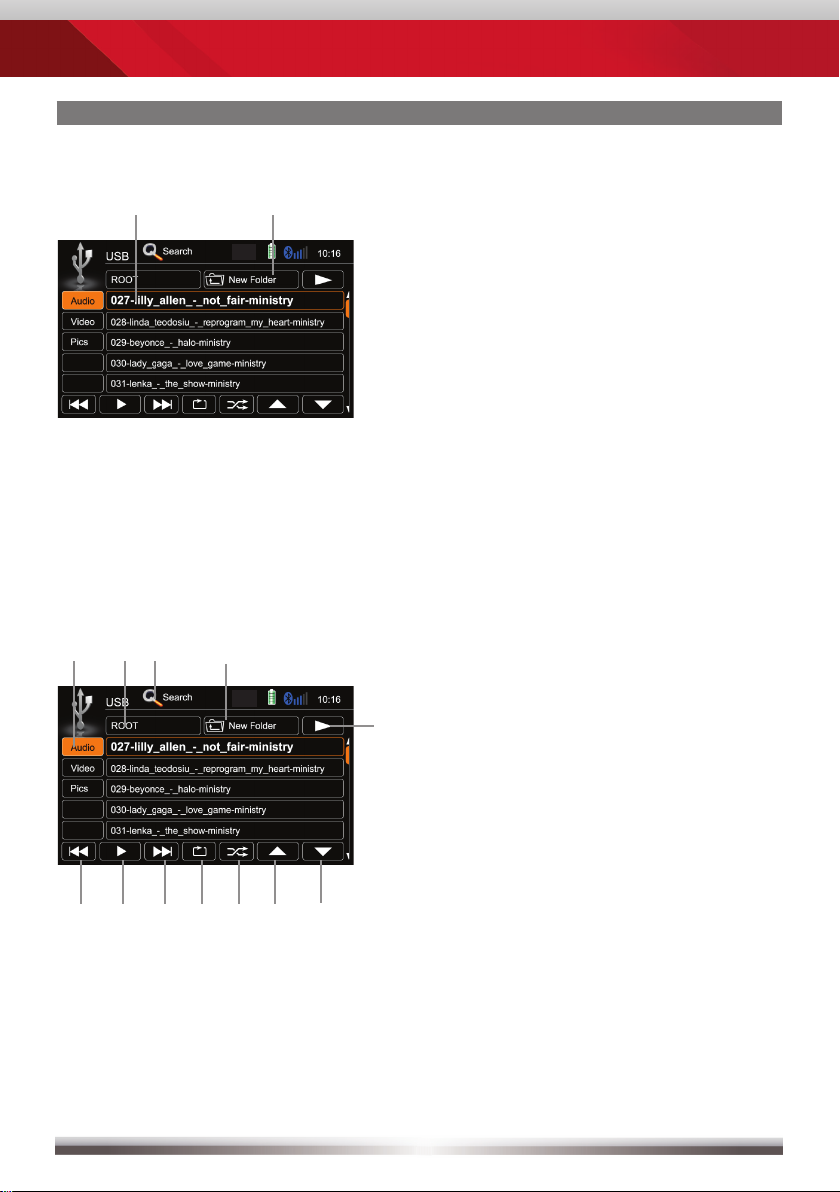
PLAYBACK IPOD/USB/SD
Playback page:
Display elements:
Source
Current folder/playlist
ID3 tag info
Progress bar
Album Art
Control elements:
Previous track
Play/Pause
Next track
Repeat
Shuffl e
Switch to playlist page
12
Page 13

ZE-NC526
PLAYBACK IPOD/USB/SD
Playlist page iPod:
Display elements:
i-Pod mode
Track/folder/playlist
Current folder
Control elements:
Previous track
Play/Pause
Next track
Repeat
Shuffl e
Cursor up
Cursor down
Switch to playback page
Switch to iPod audio mode
Switch to iPod video mode
Go to root directory
Search
Folder/playlist up
NOTE:
All fi les on the inserted media get sorted according to their fi le extension.
■ Types can be separately played/handled.
■ Directories containing a single fi le type only, are also displayed.
13
Page 14
PLAYBACK IPOD/USB/SD
Playlist page USB/SD:
Display elements:
Track/folder
Current folder
Control elements:
Previous track
Play/Pause
Next track
Repeat track
Shuffl e
Cursor up
Cursor down
Switch to playback page
Go to root directory
Search
Folder up
Select media fi le type
14
Page 15
ZE-NC526
PLAYBACK IPOD/USB/SD
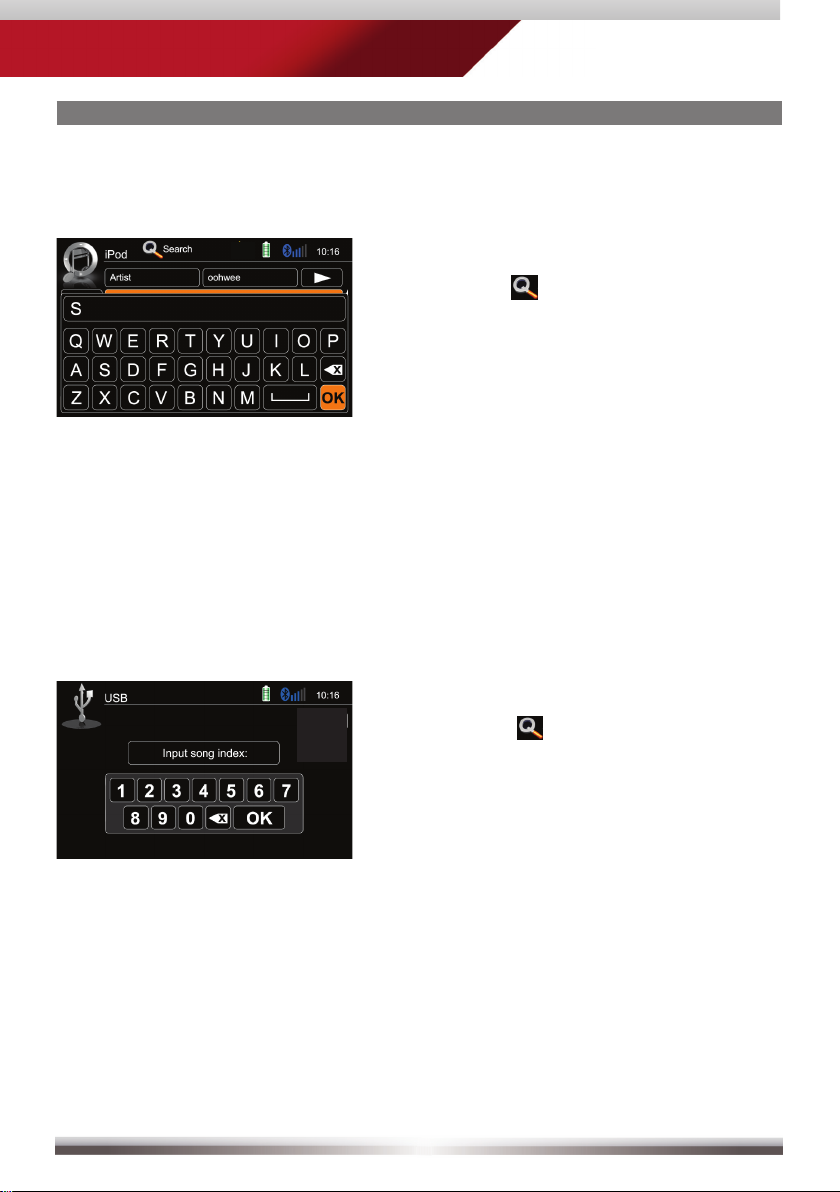
Search function:
iPod search:
Tapping on
alphabetic keyboard, allowing you
to enter an initial letter. Alphabetical
search is unique for iPod mode.
USB/SD modi search:
Tapping on
numeric keyboard, allowing you to
enter track numbers. Numeric search
is unique for USB/SD modi.
Search pops up an
Search pops up an
15
Page 16
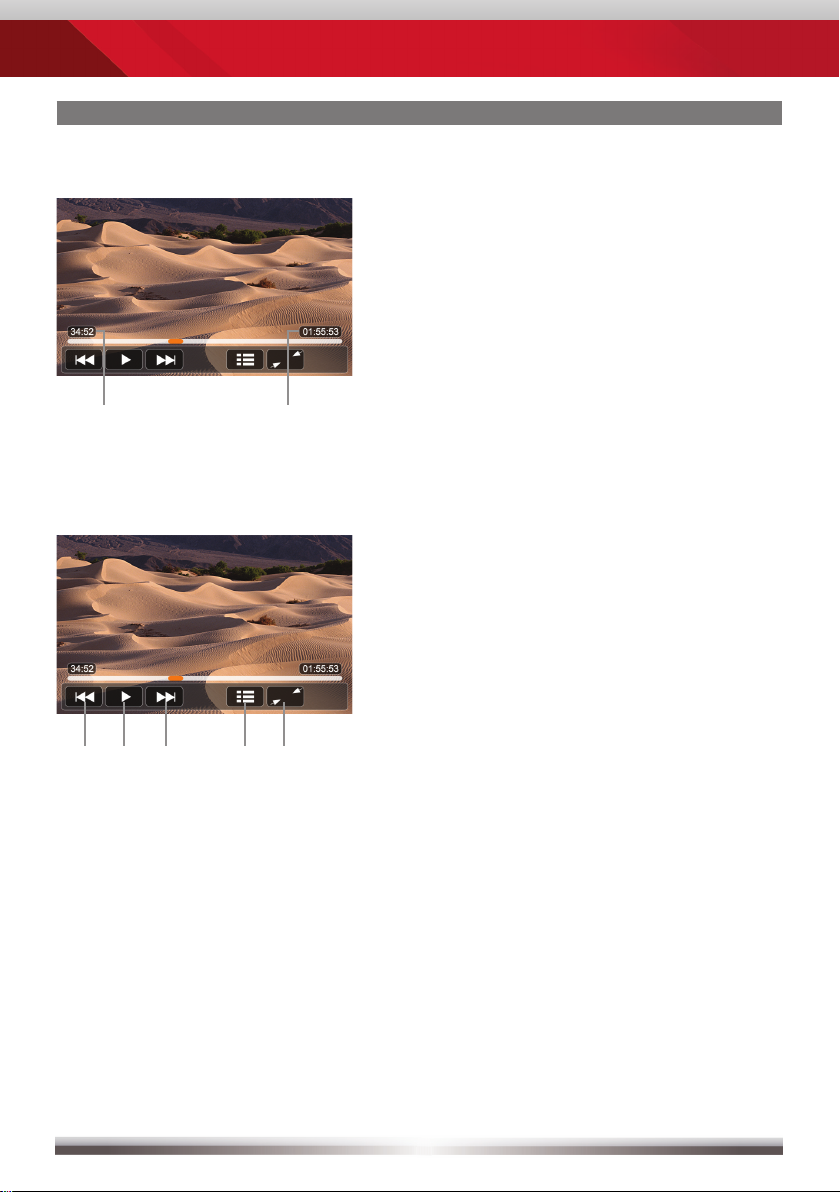
PLAYBACK IPOD/USB/SD
Elements to control playback of video fi les:
Display elements:
Current temporal position in track
Total duration of track
Elements to control playback of video and picture fi les:
Control elements:
Previous title/track/file
Play/Pause
Next title/track/file
To playlist/menu
Full screen mode
16
Page 17

ZE-NC526
PLAYBACK IPOD/USB/SD
USB/SD mode:
■ Make sure your mass storage device is FAT32 formatted.
■ Depending on directory structure and contents the total number of available
folders is limited.
■ Sorting and handling speed depends on speed and capacity of the mass
storage used, as well as on the amount of stored data.
■ Connected USB hard disks have to be formatted with FAT32 and are only
allowed to consume a maximum of 400mA (peak) current. Otherwise they
must be considered incompatible and can´t be used with the device.
■ The display of album covers depends on the used file format and may be
served delayed, depending on the file size.
iPod mode:
■ The device sports two USB ports. One port is located at the front panel and
the other at the rearside. They are generic USB ports which both allow
connection to USB data carriers as well as to iPod/iPhone. However, you
cannot connect two iPod/iPhone devices simultaneously.
■ Depending on the size of the search list, results may be delayed during first
search. That is due to the iPod, which takes a moment to setup and provide
the search index.
■ iPods/iPhones display, depending on content and sorting, an extended set of
information on the playlist page.
NOTE:
See www.zenec.com for:
■ Compatible fi le formats and their possible restrictions.
■ iPod/iPhone compatibility list.
17
Page 18
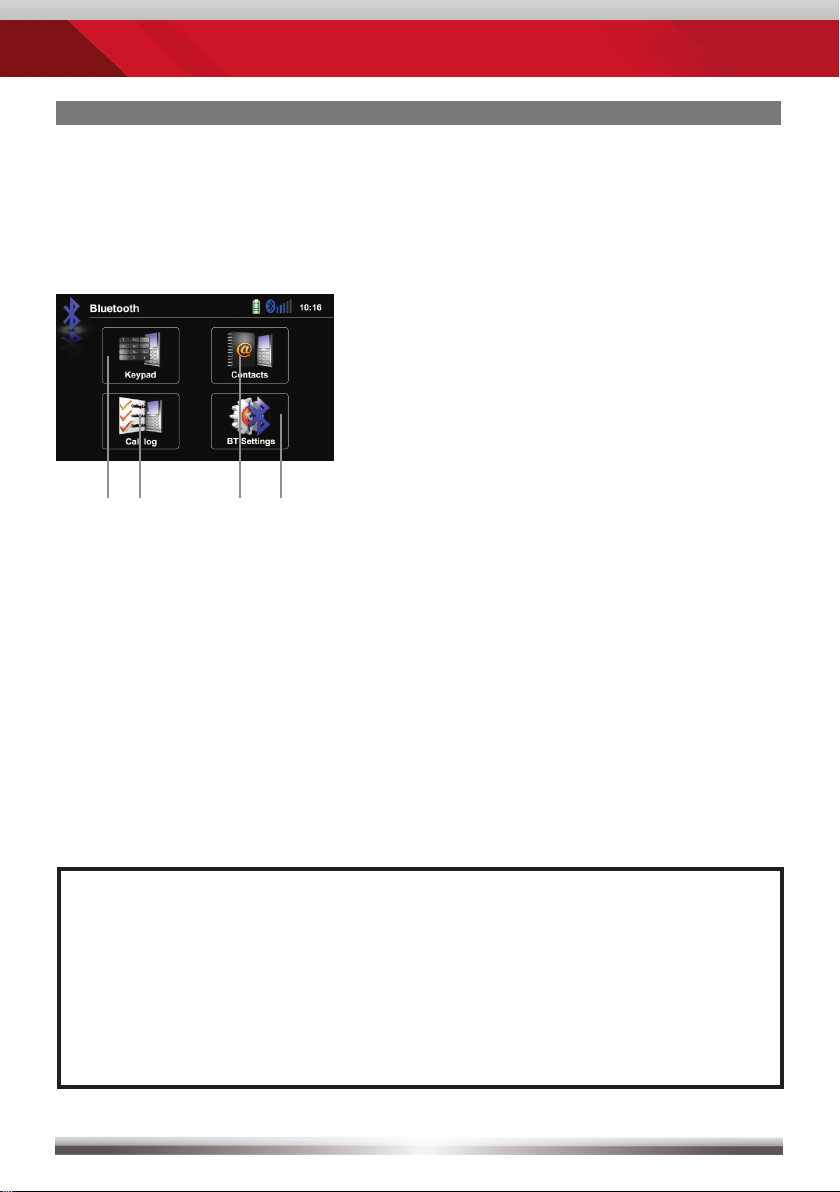
BLUETOOTH MODE
Bluetooth main menu:
Tap icon to enter
Control elements:
Onscreen keypad
Call Log
Contacts
Bluetooth settings
NOTE:
If you are trying to pair a cell phone:
■ Switch off the "auto connect" function while pairing additional mobile
phones with the device.
■ You may try to initiate pairing from your phone if the following
procedure fails.
18
Page 19
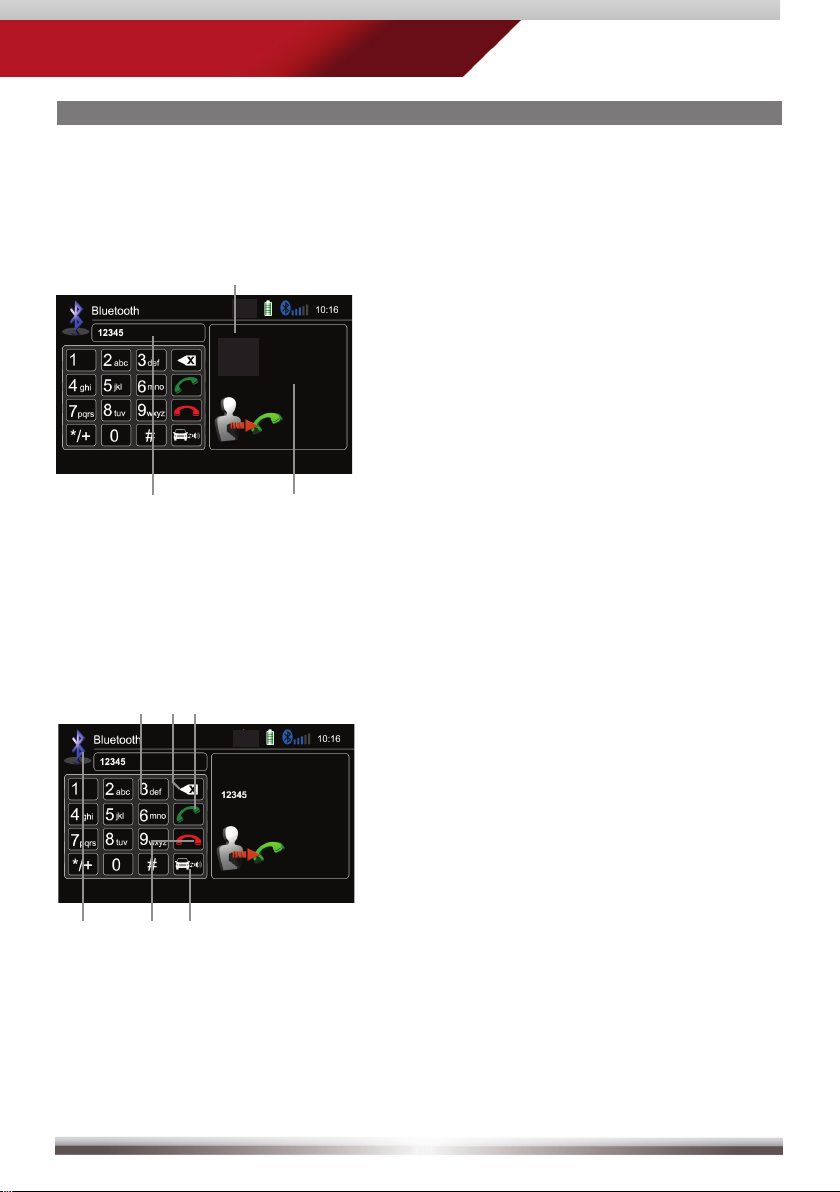
BLUETOOTH MODE
Accept call, dial, hang up, switch between calls:
Display elements:
ZE-NC526
Caller I
Caller II
First incoming call
Second incoming call
Dialled number
Control elements:
Keypad
Deletes last digit
Pick up call/Switch to second call
Toggle to shift call between handsfree
and mobile phone (privacy mode)
Hang up active call/Back to fi rst call
Back to BT main menu
19
Page 20
BLUETOOTH MODE
Pairing a mobile phone:
1
Enter BT settings > Device
Tap on "Add" to trigger a search for BT devices.
2
3
Choose your mobile phone from the list or retry searching. Press "Pair".
Control elements:
Pair a mobile phone and input PIN
for pairing
Back to BT settings
Pair
Tap to select mobile phone
Browse list (up/down)
20
Page 21
ZE-NC526
BLUETOOTH MODE
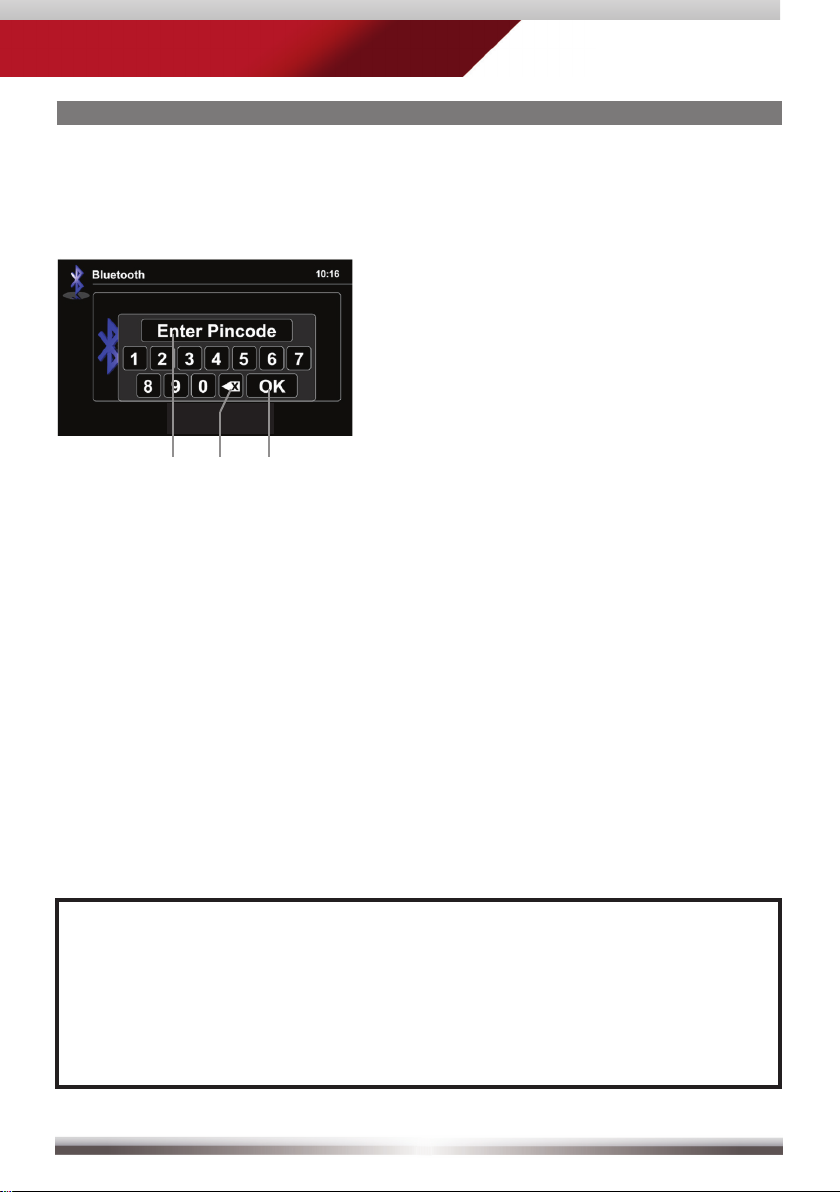
4
Enter pin code and tap OK or retry
Upon request enter identical pin code on your mobile and acknowledge.
5
You should now get a screen saying "Device paired successfully".
.
Pin code
Deletes the last digit
Acknowledge pincode and continue
NOTE:
If you are trying to pair more than one cell phone:
■ Switch off the "auto connect" function while pairing additional mobile
phones with the device.
■ Use different pin code twins for each paired cell phone.
21
Page 22
BLUETOOTH MODE
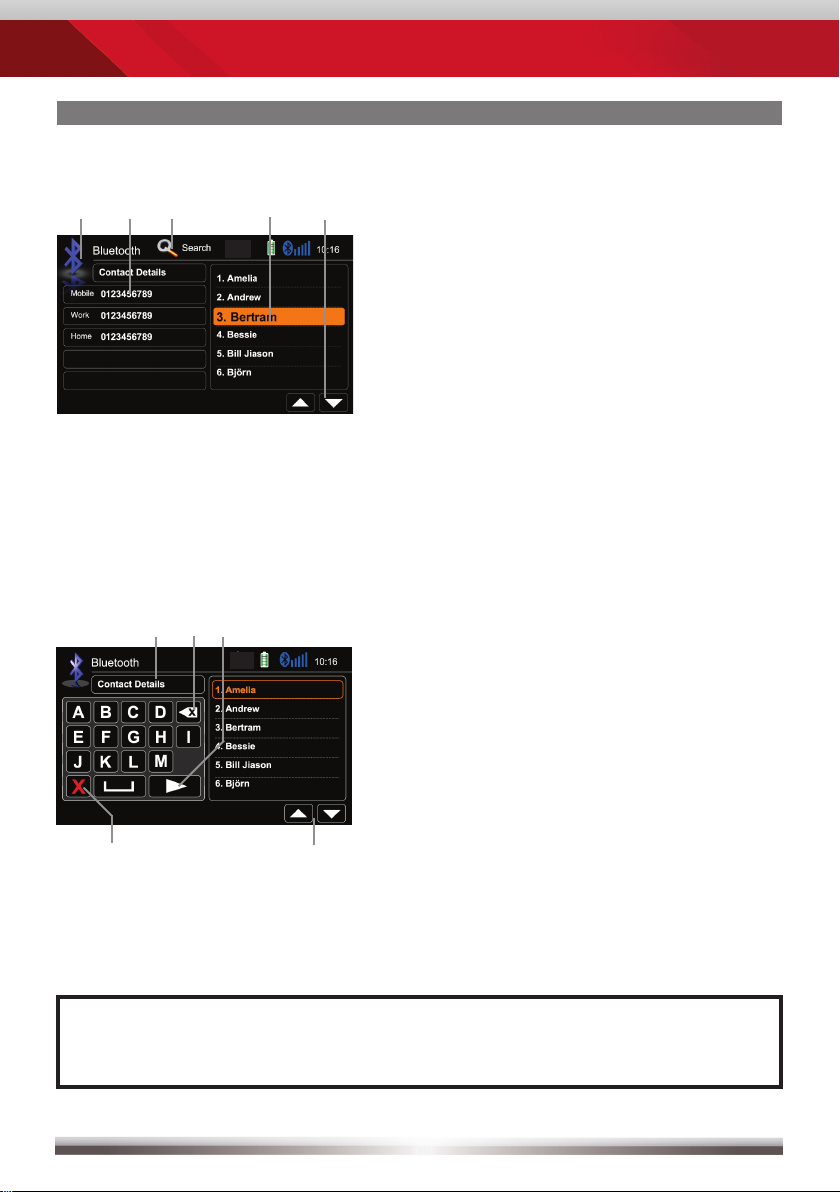
Contacts - Manage phonebook:
Search for an entry:
Control elements:
Back to BT main menu
Tap a contact number to start a call
Search
Choose contact name from list
Browse contact list up/down
No function, when keypad is active
Quit keypad
Display input
Tap to delete last character
Switch to next page of keypad
NOTE:
■ You may search for up to 15 leading characters.
22
Page 23
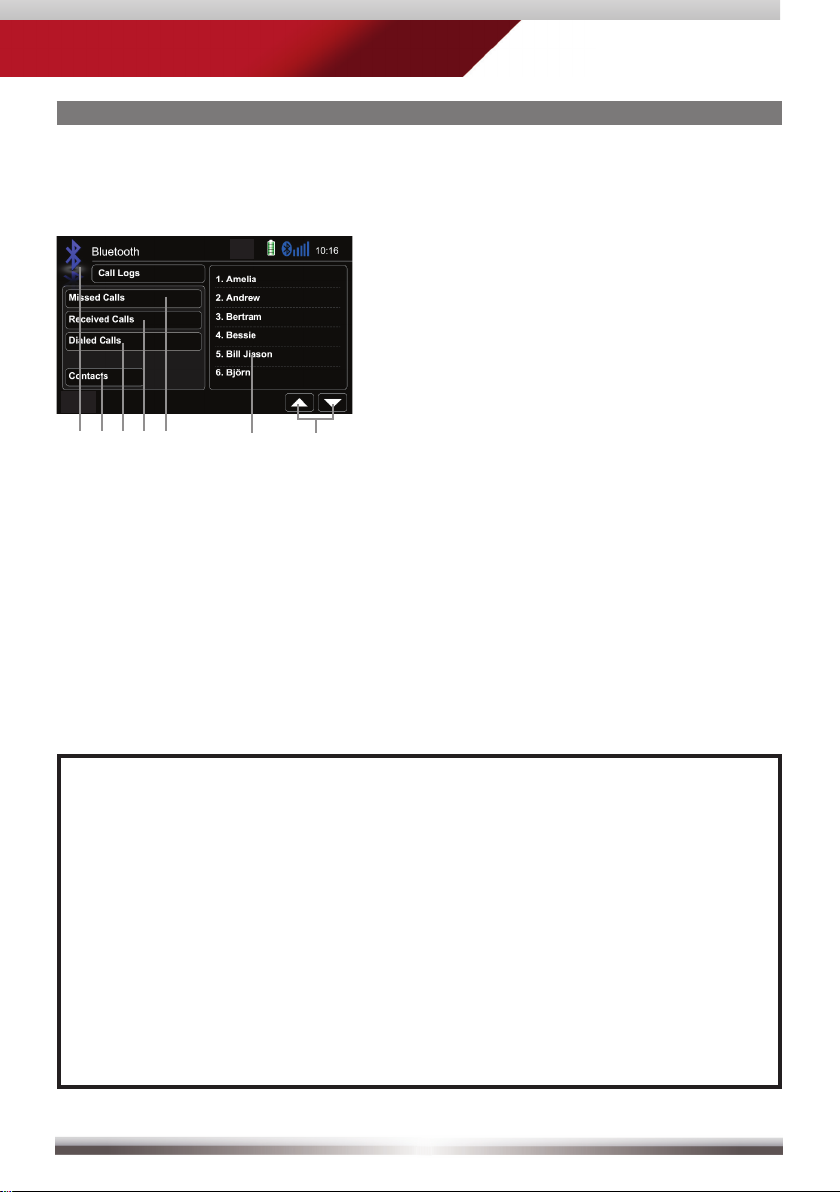
BLUETOOTH MODE
Manage phonebook:
ZE-NC526
Control elements:
Go back to BT main menu
Go to contacts page
Tap to display outgoing call list
Tap to display incoming call list
Tap to display missed call list
Tap on entry to call
Page up/down
NOTE:
■ The synchronisation, the transferring, the sorting as well as the display
of the phone book entries depend on the mobile phone brand and model.
If the synchronisation doesn't work properly, disconnect the cell phone
and repeat the pairing process.
■ If automatic phone book synchronisation does not work, consult the
manual of your mobile phone. Some mobile phones require explicit
activation of that function.
■ After entering the BT main menu press & hold either the Contacts or
Call-Log icon in order to force a resync of the entire phone book (if you
have experienced syncing problems).
23
Page 24
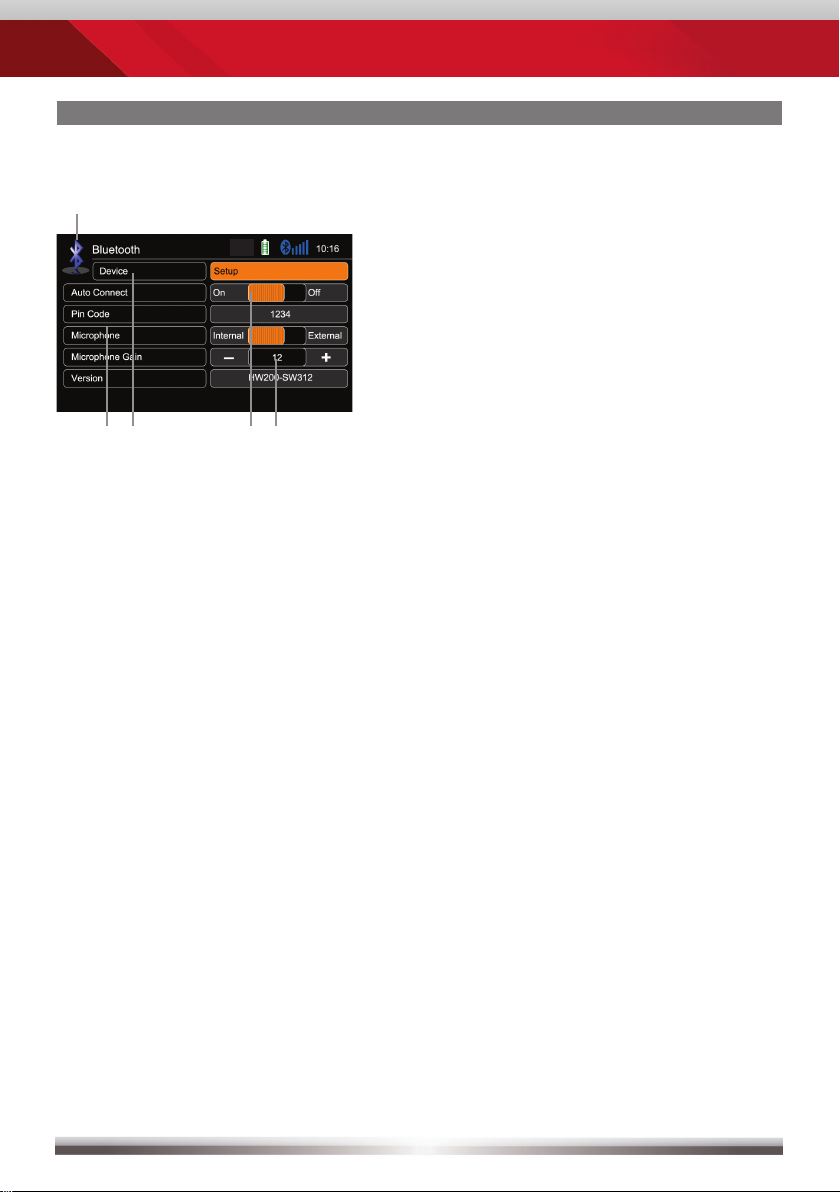
BLUETOOTH MODE
Setup settings:
Back to BT main menu
Options
BT device settings
Microphone selection
Tap +/- to adjust microphone gain
24
Page 25

BLUETOOTH MODE
ZE-NC526
NOTE:
■ If your mobile phone is compatible and still does not appear in the device
list, make sure Bluetooth is turned on and set to "visible for all devices".
■ Bluetooth connections usually work within a range of approx. 8 m.
Obstacles in the way may shorten the distance.
■ You can pair up to five cell phones, and synchronise up to a thousand
phonebook contacts each.
■ In order to use the built-in handsfree device you need to pair your
mobile phone first.
■ It cannot be guaranteed, that all mobile phones can be paired and
that all functions will work.
■ For the "BT compatibility list" of tested and compatible mobile phones
as well as the latest software updates look out on www.zenec.com.
25
Page 26
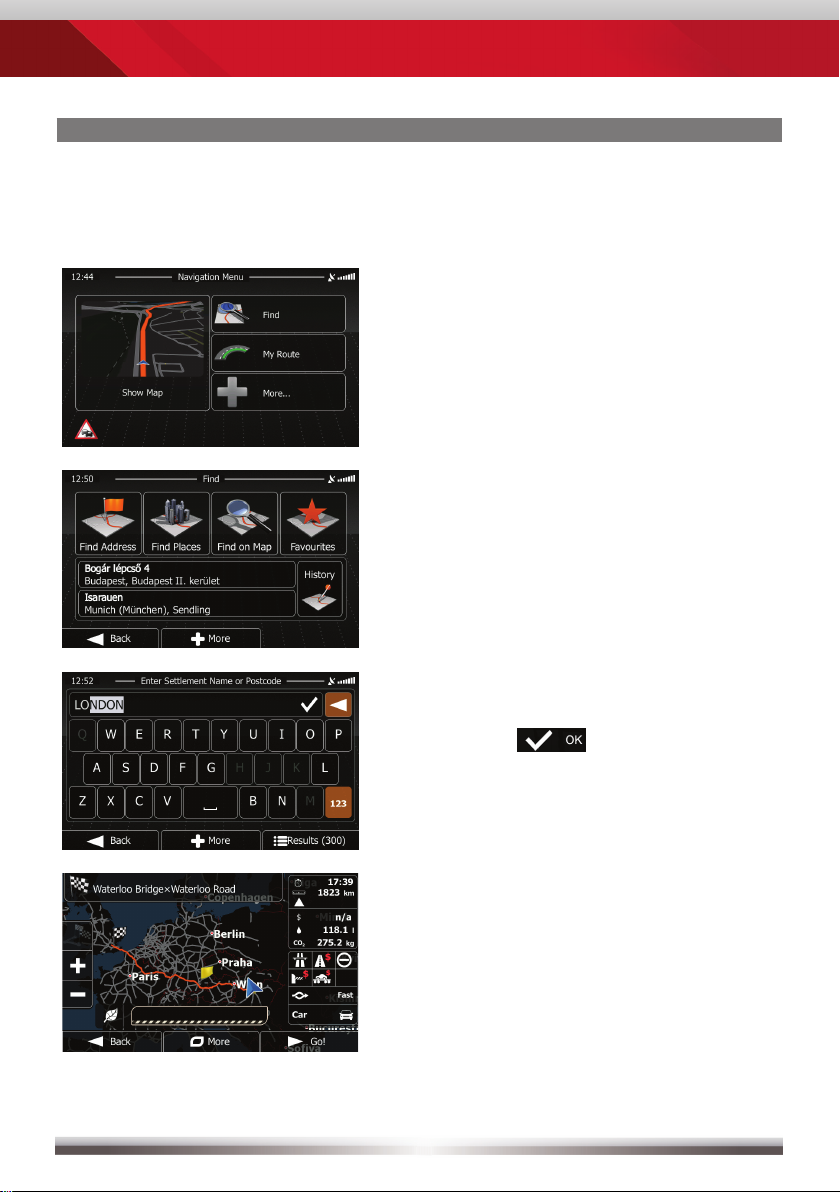
NAVIGATION MODE
How to input a destination and start a route guidance:
Tap on "Find".
Choose your preferred destination
search method. Here, in our example,
choose "Find address".
Type in a city, street name, house
number and confirm each step
by tapping
.
The program is now calculating the
desired route. Once route calculation
has completed just tap "GO!" to
start route guidance.
26
Page 27

NAVIGATION MODE
ZE-NC526
NOTE:
■ For operation and detailed description of navigation features, please
refer to the included, separate navigation manual.
■ You may listen to any playback source during navigating.
The navigation software automatically manages volume levels
during voice guidance.
■ If you change the volume level during voice guidance, the
chosen volume level gets stored for later route guidance.
■ Audio playback is, during voice guidance, capped to volume 10.
If the preset audio volume is below 10, it will be muted.
27
Page 28
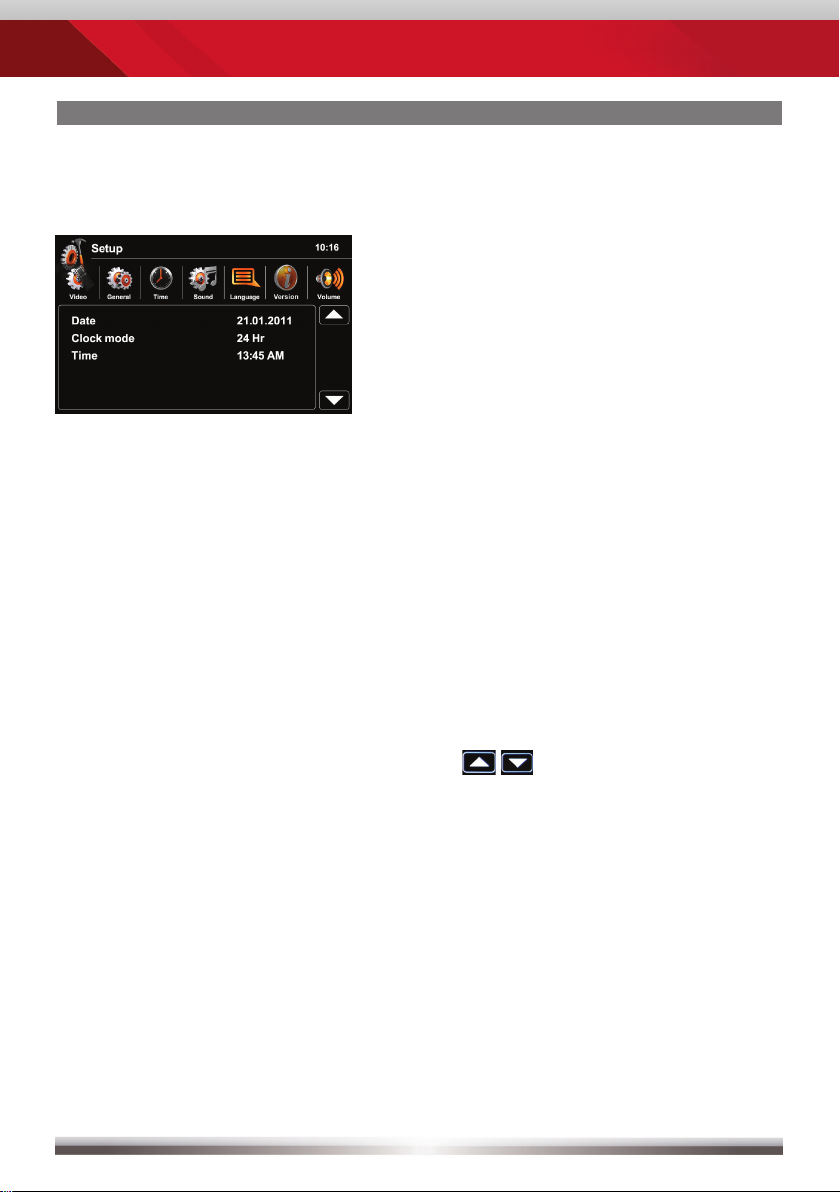
SETUP: MAIN / FIRST SETTINGS
Main setup screen:
Choose submenu:
Select and tap one of the icons in the
upper row.
Settings to be made directly after mounting and initial startup:
Set OSD language: Go to Setup>Language
to choose the desired OSD
language.
Set button background illumination: Go to Setup>General>Illumination
and select the desired color.
Set date and time:
Go to Setup>Time.
Tap
28
to adjust date and time.
Page 29

ZE-NC526
SETUP: VIDEO
Name Descriptor Function Choice/Range
Aspect ratio
A/V-In
Rear view
camera
Video display
setting
PAL/NTSC
adjustment
Signal will
be internally
mirrrored
TV-Shape
TV system setting
for A/V-In
Picture
mirroring
Normal
Full
Auto
NTSC
PAL
Normal
Mirror
29
Page 30

SETUP: GENERAL
Name Descriptor Function Choice/Range
Europe
Radio region Select area
Presets search
frequency
Asia
USA
Night
Dark
Normal
Dimmer-Mode
TFT
brightness
Stepwise
Bright
Red
White
Illumination
Beep
Key
illumination
Beep to ack-
nowledge
Choose between
different colors
Beep on touch
Wallpaper Preset only Select presets Various
Anti-theft
Anti-theft
function
De- or activate
code input
Standard-code"000000"
Use an arbitrary 6-digit
Password Code input Password
code. To reset the code
enter the "standard-code"
instead.
On
Off
On
Off
Calibration
Screen
calibration
Set points Start
Load factory Ex-factory Defaults set Reset
30
Page 31

ZE-NC526
SETUP: TIME
Name Descriptor Function Choice/Range
Date YYYY/MM/DD Sets date As usual
12 H
Clock mode Time format Set time display
24 H
Time Time display Set time As usual
31
Page 32

SETUP: SOUND
Name Descriptor Function Choice/Range
Subwoofer
Subwoofer
fi lter
Loudness
Subwoofer
output
Subwoofer
output
Spectral
adaption
De- or activate
subwoofer output
Sets low-pass fi lter
frequency
Spectral adaption
the acoustic range
of the ear
On
Off
80 Hz
120 Hz
160 Hz
On
Off
32
Page 33

ZE-NC526
SETUP: LANGUAGE
Name Descriptor Function Choice/Range
English
German
French
Italian
OSD
OSD
language
Selection
of the
OSD
language
Turkish
Dutch
Spanish
Czech
Serbian
Polish
33
Page 34

SETUP: VERSION
Name Descriptor Function Choice/Range
OS
Version
Installed soft-
ware versions
Display the in-
stalled software
versions
MPU
MCU
MPEG
34
Page 35

ZE-NC526
SETUP: VOLUME
Name Descriptor Function Choice/Range
USB 0...12
SD-Card 0...12
Radio 0...12
Volume
Level ad-
justment of
sources
Bluetooth 0...12
AV-In 0...12
DVB-T 0...12
Navigation 0...12
iPod 0...12
35
Page 36

REMOTE CONTROL
Remote Control Buttons
36
Page 37

REMOTE CONTROL
ZE-NC526
1 POWER
Device ON/OFF
2 SRC
Toggle main menu, selected source
3 VOL +
Increase volume
4 VOL -
Decrease volume
5 SETUP
Toggle setup menu,selected source
6 MENU
Toggle playlist, playback
7 DISP
Press and hold to switch TFT
into standby
8 STOP
Stop/Pause playback
9 WIDE
N/A
10 MUSIC
List music files only
11 PIC
TFT screen brightness
12 BAND
Tuner mode, next radio band
13 GOTO
Input and go to time index
14 PICK UP HANDSET
Accept incoming call
15 NAV
Switch between navigation and
playback mode
16 NUMERIC KEYPAD
Input track/title/time index
17 BT
Bluetooth main menu
18 FM/AM
Tuner mode, next radio band
19 RPT
Repeat track/title/folder
20 EQ
Open Equalizer
21 MUTE
Mute/Un-mute audio output
22 DIRECTIONAL PAD
Press to pause the playback
Cursor keys
23 FRONT REMOTE
Front operation mode
24 REAR REMOTE
M-Zone operation mode
25 PHOTO
List photo files only
26 VIDEO
List video files only
27 SKIP PREVIOUS
Jump to previous track/preset/title
28 SKIP NEXT
Jump to next track/preset/title
29 CLEAR
Clear input
30 HANG UP HANDSET
Hang up or deny an incoming call
NOTE:
■ Some functions may not be available; depending on your chosen mode
and type of media.
37
Page 38

EXTERNAL PLAYBACK & SOURCES
M-Zone
Control elements:
Direct access to M-Zone
M-Zone setup allows you to issue
different content to the front and head
rest monitors (optional).
Control elements:
Direct access to main menu
Choose DVB-T
Choose Front-USB
Choose SD-Card
Deactivate M-Zone signal
NOTE:
■ With deactivated M-Zone you will not see any signal on connected
M-Zone monitors (Blackscreen).
■ The M-Zone volume cannot be adjusted by the headunit. Use the control
elements of the connected peripherals (i.e. roof monitor) instead to adjust
the volume.
38
Page 39

EXTERNAL PLAYBACK & SOURCES
DVB-T
Control elements:
Tap into the upper right corner to
return to the main menu.
ZE-NC526
NOTE:
■ For DVB-T reception you need to connect an external ZENEC DVB-T
receiver. For a perfect compatibility match check out the manual and the
compatibility list in advance.
■ Compatible DVB-T devices provide easy operation by using the
touchscreen of the headunit.
39
Page 40

GLOSSARY
AUX In Auxiliary Input, Audio only Input
A/V In Audio-Video Input
CAN-Bus Controller Area Network-Bus; Automotive industrial standard
bus system
CAN/Stalk IF Interface to communicate with CAN-Bus
DVB-T Digital Video Broadcasting – Terrestrial; TV transmission standard
EQ Equalizer
FAT32 File allocation table 32-bit
GUI Graphical User Interface
HMI Human Machine Interface (graphical part = GUI)
ID3-Tag Format to display additional info together with MP3 audio files
M-Zone Rear seat entertainment area
OSD On Screen Display
40
Page 41

ZE-NC526
TROUBLESHOOTING
Problem Cause Solution
GENERAL
Radio fuse blown. Install new fuse with correct rating.
Unit will not
power on.
No/low audio output.
TFT MONITOR
Car battery fuse blown. Install new fuse with correct rating.
Illegal operation. Press the RESET button.
Improper audio output connection. Check wiring and correct.
Volume set too low. Increase volume level.
Speakers damaged. Replace speakers.
Only one channel is playing.
Speaker wiring is in contact with
metal part of car.
Mute is activated. Turn off the Mute function.
Speaker impedance rating not
compatible with unit.
Speaker is shorted. Check speaker connections.
The parking brake is not engaged.
Check the balance and fader
adjustments.
Insulate all speaker wiring
connections or replace the speaker
cable.
Connect proper speakers.
Stop vehicle in a safe place and
apply parking brake.
No image.
Prolonged image
or improper height/
width ratio.
The parking wire was wrong or not
connected.
The "Monitor off"-function is
activated.
Improper aspect ratio setup. Use correct aspect ratio setting.
41
Please connect the parking wire
correctly.
Touch the monitor to activate the
display.
Page 42

TUNER
Weak station searching.
MP3
The ID3 tags are shown
incorrectly.
Auto antenna not
properly connected.
REG function is activated. Turn REG function off.
The adapter with antenna power
supply is not connected.
The AF function is not activated. Activate the AF function.
Message is longer than LCD
can display or ID3 tag is not
compatible.
Connect the auto antenna
cable properly.
Connect the antenna power
supply adapter properly.
Use proper ID3 tag information.
42
Page 43

ZE-NC526
SPECIFICATIONS ZE-NC526
2-DIN NAVICEIVER:
GPS NAVIGATION SYSTEM
• 3D High-Definition navigation system
• TMC and TMC Pro receiver
• External GPS antenna
• 8 GB microSD card with map data for 43 Eastern and Western European countries and
Premium POI database
• Graphical user interface and voice guidance in 28 different languages
• 2D or 3D map view with auto-zoom and display of 3D terrains and 3D landmarks
• Eco and Smart Route Planning, Outlook address import, Real Junction View and Real
Signpost rendering etc.
• Text to Speech function
PARROT BLUETOOTH HANDS-FREE MODULE
• Synchronization of up to 1’000 contacts with max. 5 telephone numbers per contact
• Alphabetical search function for contacts
• Internal and external microphone
• Future-proof upgradable Bluetooth firmware
MULTIMEDIA PLAYER
• Front and rear USB 2.0 port
• SD/SDHC card reader (up to 32 GB)
• Made for iPod/Made for iPhone
• Playback SD/USB: MP3, WMA, AVI, Xvid and JPEG
GENERAL FEATURES
• Intuitive, user friendly HMI in 10 different languages
• 6.2“/15.7 cm 16:9 HD TFT-LCD display with 800x480 pixel resolution and touchscreen control
• RDS tuner with 30 preset stations (18 FM/12 AM)
• Multi zone function
• 4 x 50 watts class-D amplifier
• Bicolor key illumination (red/white)
• 1 x IR-remote control
A/V-CONNECTIONS
• 4.1-CH preamp line outputs
• 2-CH preamp line outputs without volume adjustment
• 2 x composite video outputs (NTSC)
• 1 x A/V-input
• 1 x video input for rear view camera with switching function
• Connectivity for compatible external DVB-T or DAB+ receivers
NOTE: SPECIFICATIONS AND DESIGNS OF THIS MODEL ARE NECESSARILY SUBJECT
TO CHANGE WITHOUT NOTICE.
43
Page 44

ÜBER DIESES HANDBUCH
Diese Bedienungsanleitung enthält wichtige Informationen und Warnungen zum
Umgang mit diesem Gerät. Halten Sie sie deswegen bitte stets griffbereit. ZENEC
behält sich vor, die Informationen, die in diesem Handbuch enthalten sind, jederzeit
ohne vorhergehende Hinweise zu ändern.
INHALTSVERZEICHNIS
SICHERHEITSHINWEISE .................................................................................... 45
TASTEN DES BEDIENTEILS ......................................................................... 46-47
GRUNDLEGENDE BEDIENUNG ...................................................................48-49
RADIO MODUS ...............................................................................................50-53
WIEDERGABE ................................................................................................ 54-59
BLUETOOTH MODUS .................................................................................... 60-67
NAVIGATIONS MODUS .................................................................................. 68-69
SYSTEM SETUP / ERSTE EINSTELLUNGEN ..............................................70-77
FERNBEDIENUNG .........................................................................................78-79
EXTERNE WIEDERGABE UND QUELLEN .................................................. 80-81
GLOSSAR ............................................................................................................ 82
FEHLERSUCHE ..............................................................................................83-84
SPEZIFIKATIONEN ............................................................................................. 85
GARANTIE ...................................................................................................... 86-87
Die Bedienungsanleitung für die Navigationssoftware befindet sich in einem
separaten Handbuch.
44
Page 45

ZE-NC526
SICHERHEITSHINWEISE
1. Lesen Sie die Anleitung vollständig durch.
2. Bewahren Sie die Anleitung sorgfältig auf. Sie sollte jedem Benutzer dieses Gerätes frei zugänglich sein.
3. Beachten Sie sämtliche Warnungen. Befolgen Sie sämtliche Anweisungen.
4. Dieses Gerät ist nur für den Betrieb an einem Bordnetz mit +12V DC und Minus gegen
Masse geeignet.
5. Montieren und bedienen Sie das Gerät nur so, wie es in der Bedienungsanleitung beschrieben wird.
Alles andere kann zum Erlöschen Ihres Garantieanspruches führen.
6. Zerlegen oder modifizieren Sie das Gerät nicht. Ihr Garantieanspruch erlischt dadurch. Versuchen
Sie auch nicht das Gerät selbst zu reparieren oder zu warten, sondern wenden Sie sich an einen
autorisierten ZENEC-Fachhändler.
7. Benutzen Sie nur das Originalzubehör, um das Gerät zu installieren und zu betreiben, da ansonsten eine Beschädigung des Gerätes riskiert wird. Befestigen Sie das Gerät gemäß der
Installationsanleitung, unter Verwendung des mitgelieferten Montagezubehörs. Die bei Unfällen
auftretenden Beschleunigungskräfte sind teilweise enorm. Unsachgemäß montierte Geräte stellen
bei Unfällen ein großes Risiko für den Fahrer und die Insassen des Fahrzeuges dar.
8. Schützen Sie das Gerät vor Wasser oder anderen Flüssigkeiten, die in das Innere des Gerätes
eindringen können. Sonst könnte ein Kurzschluss mit Brandfolge daraus resultieren.
9. Zur Vermeidung eines Kurzschlusses achten Sie darauf, daß keine metallischen Gegenstände in
das Gerät gelangen.
10. Bevor Sie eine defekte Sicherung austauschen, sollten Sie erst überprüfen was der Grund für
den Kurzschluss war. Achten Sie dabei besonders auf die Kabel der Spannungsversorgung!
Wenn der Kurzschluss nicht durch einen Fehler in der Spannungsversorgung verursacht wurde,
müssen Sie die defekte Sicherung gegen ein neues Exemplar mit identischen Werten austauschen.
Sollte der Kurzschluss immer noch vorhanden sein, wenden Sie sich bitte an einen autorisierten
ZENEC-Fachhändler.
11. Lesen Sie die Bedienungsanleitung eines fremden Gerätes und versichern Sie sich, daß es
kompatibel ist, bevor Sie es anschliessen. Schliessen Sie keinesfalls inkompatible Geräte an.
12. Achten Sie darauf, dass bei ausgeschaltetem Motor die Batterie des Fahrzeuges nicht entladen
wird. Da es sich bei dem Gerät um einen Verbraucher handelt und die Batterie nur bei laufendem
Motor aufgeladen wird, kann es passieren, dass die Batterie tief entladen wird und das Fahrzeug
sich nicht mehr starten lässt.
13. Gemäß den in den verschiedenen Ländern der EU geltenden Verkehrsvorschriften, darf ein Monitor,
der in Sichtweite des Fahrers montiert ist, während der Fahrt, ausser zu Navigationszwecken, nicht
mit bewegten Bildern oder Filmen betrieben werden, da er den Fahrer vom Verkehrsgeschehen
ablenkt. Beachten Sie unbedingt die geltenden Vorschriften in Ihrem Land, da ansonsten bei einem
Unfall Regressansprüche von der Kfz-Versicherung geltend gemacht werden können. Achten Sie
zusätzlich darauf, dass die Lautstärke in Ihrem Fahrzeug nur so hoch ist, dass Sie Außengeräusche,
wie z.B. eine Polizeisirene, noch klar wahrnehmen können.
14. Setzen Sie das Gerät keinen harten Stößen aus. Eine mechanische und elektronische Beschädigung
des Gerätes könnte daraus resultieren.
15. Wenn Sie Fragen oder Probleme bei der Installation haben, wenden Sie sich bitte an einen
ZENEC-Händler oder den jeweiligen Landesvertrieb.
45
Page 46

TASTEN DES BEDIENTEILS
Bedienteil
NAV
ZE-NC526
46
Page 47

ZE-NC526
TASTEN DES BEDIENTEILS
1. INTERNES MIKROFON
2. POWER/STUMMSCHALTEN
Drücken zum Einschalten.
Drücken und halten zum Ausschalten.
Kurz drücken zum Stummschalten.
3. IR EMPFÄNGER
4. NAVI-MAP & UPDATE SLOT
Separater Micro-SD Slot, ausschliesslich für Software Updates & Navi-Daten.
5. USB und SD-KARTENSLOT, RESETKNOPF
Zugang durch Öffnen der Abdeckklappe.
Drücken Sie den Resetknopf um einen Hardware Reset durchzuführen.
6. NAV
Kurz drücken um zwischen Navigations- und Wiedergabeanzeige zu
wechseln.
Gedrückt halten zum Einstellen der Bildschirm-Helligkeit.
7. LAUTSTÄRKE/EQUALIZER
Drehen verändert die Lautstärke.
Drücken um das Equalizermenü zu öffnen.
8. HOME
Drücken um das Hauptmenü zu öffnen.
47
Page 48

GRUNDLEGENDE BEDIENUNG
EIN UND AUSSCHALTEN
Wenn Ihr Gerät ordnungsgemäß installiert wurde, so wird es mit der Zündung
zusammen ein- bzw. ausgeschaltet. D.h. ohne den Zündschlüssel gibt es auch
keinen Strom. Bei aktivierter Zündung können Sie das Gerät auch mit der EIN/AUS
Taste an der Gerätefront schalten.
QUELLE AUSWÄHLEN
Ins Hauptmenü:
- Via Touchscreen:
Berühren Sie das Icon in der oberen linken Ecke des Bildschirms.
- Via "HOME" Taste:
Drücken Sie die "HOME" Taste um ins Hauptmenü zu gelangen.
Das Hauptmenü besteht aus drei Seiten. 2 Hauptseiten und einer M-Zone Seite.
Dorthin navigieren können Sie auf zwei Arten:
- Slide Zwischen den beiden Hauptseiten können Sie einfach mittels
"Fingerslide" wechseln. Einfach den Bildschirm berühren
und mit der Fingerspitze in die entsprechende Richtung ziehen.
Dies funktioniert nicht mit dem M-Zone Bildschirm.
- Bar Berühren Sie eine der flachen Markierungen im oberen
Bildschirmbereich des Hauptmenüs. Sie gelangen von hier in alle
drei Seiten des Hauptmenüs, inklusive der M-Zone.
Vom Hauptmenü aus, haben Sie Zugriff auf sämtliche Wiedergabequellen und
Einstelllungen.
Hauptseite 1 Hauptseite 2 M-Zone Seite
LANDESSPEZIFISCHE SPRACHE EINSTELLEN
Tippen Sie auf die mittlere der drei flachen Markierungen oder "sliden" Sie auf die
zweite Hauptseite. Wählen Sie SETUP > LANGUAGE und dann die von Ihnen
gewünschte Sprache. Weitere Einstellungen finden Sie im Kapitel "Setup".
48
Page 49

GRUNDLEGENDE BEDIENUNG
Grundlegende Elemente (bei allen Wiedergabequellen)
Anzeige & Bedienelemente:
Momentan aktive Quelle
- Tippen Sie hier um ins Hauptmenü
zu gelangen.
Akkuzustand des gekoppelten
Mobiltelefons
Empfangsqualität des Mobilfunknetzes
ZE-NC526
49
Page 50

RADIO MODUS
Anzeigeelemente:
Rote Linie auf aktueller Frequenz
Frequenz bzw. Stationsname
Status der Verkehrsnachrichten (TA)
Sender trägt Verkehrsnachrichten
LOC/DX Status
Stereo-Empfangsstatus
Bedienelemente:
Nach Links scrollen
Vorherige Station
Inhaltsauswahl des mittleren Balkens
Nächste Station
Nach Rechts scrollen
100 kHz runter
Ziehen zur Frequenzeinstellung
100 kHz hoch
50
Page 51

RADIO MODUS
ZE-NC526
Der RDS Text übermittelt vom Sender frei
defi nierbare Zusatzinformationen, z.B.
den aktuellen Musiktitel und Interpreten
oder kurze Mitteilungen. Die Verfügbarkeit
hängt von der Empfangsqualität ab.
51
Page 52

RADIO MODUS
Preset auswählen oder speichern.
Wenn Sie eines der Preset-Felder
länger gedrückt halten, wird die
momentan eingestellte Frequenz dort
als neuer Preset abgespeichert.
Wählen Sie das gewünschte
Frequenzband durch Tippen auf
eines der mittleren Felder.
52
Page 53

ZE-NC526
RADIO MODUS
Weitere Optionen im Auswahlbereich:
Die jeweilige Auswahl ist hier orange hinterlegt, falls gerade aktiv (s. Kopfl eiste).
AF EIN/AUS: Nach Aktivierung schaltet das Gerät automatisch auf die am
besten zu empfangende Frequenz des Senders.
TA EIN/AUS: Automatische Umschaltung auf Sender mit Verkehrsdurch-
sagen. Das Gerät schaltet automatisch in den Tuner-Modus.
AS Automatische Suche und Abspeicherung der sechs stärksten Sender
als Preset.
SCAN Anspielen aller empfangbaren Sender. Durch ein nochmaliges Betätigen
wird der gerade angespielte Sender ausgewählt und wiedergegeben.
REG EIN/AUS: Einige Sender teilen gelegentlich ihr Programm in Regional programme mit verschiedenem Inhalt auf. Die REG-Funktion vermeidet,
dass der Empfänger auf alternative Frequenzen mit einem anderen
Programminhalt wechselt.
LOC LOC oder DX, um lokale oder entfernte Radiosender auszuwählen.
/DX LOC: Nur Stationen mit starkem Signal werden gefunden.
DX: Stationen mit starkem und schwachem Signal werden gefunden.
HINWEIS:
Das Gerät besitzt einen RDS Tuner. Ein System das zusätzlich zu den
■
Radiosendungen auch Daten über den Radiosender überträgt. Die Ver fügbarkeit der RDS-Daten und deren Verwendung hängt vom jeweiligen
Radiosender und dessen Empfangsqualität ab. Die RDS-Funktion steht
nicht für das Mittelwellen bzw. AM Frequenzband zur Verfügung.
■ Um RDS nutzen zu können, muss die AF-Funktion aktiv sein. Im
Auslieferungszustand ist die AF-Funktion deaktiviert. Achten Sie bei der
ersten Inbetriebnahme darauf, die AF-Funktion zu aktivieren. Die Ein stellung bleibt anschließend gespeichert.
53
Page 54

WIEDERGABE IPOD/USB/SD
Playback Seite:
Anzeigeelemente:
Wiedergabequelle
Aktuelles Verzeichnis/Playlist
ID3 Tag Info
Fortschrittsbalken
Album Art
Bedienelemente:
Track zurück
Wiedergabe/Pause
Track vor
Wiederholen
Shuffl e/Zufallswiedergabe
Zur Playlist Seite wechseln
54
Page 55

ZE-NC526
WIEDERGABE IPOD/USB/SD
Playlist Seite iPod:
Anzeigeelemente:
iPod Modus
Track/Ordner/Playlist
Aktuelles Verzeichnis
Bedienelemente:
Track zurück
Wiedergabe/Pause
Track vor
Wiederholen
Shuffl e/Zufallswiedergabe
Cursor hoch
Cursor runter
Zur Playback Seite wechseln
iPod Audio Modus
iPod Video Modus
Direktzugriff Hauptverzeichnis
Suchen
Ordner/Playlist: Ebene höher
HINWEIS:
Dateien des eingelegten Mediums werden nach der Dateierweiterung sortiert.
■ Musik, Bilder und Videos werden getrennt verwaltet/abgespielt.
■ Es werden Dateilisten mit nur einem Dateityp gefi ltert und dargestellt.
55
Page 56

WIEDERGABE IPOD/USB/SD
Playlist Seite USB/SD:
Anzeigeelemente:
Track/Verzeichnis
Aktuelles Verzeichnis
Bedienelemente:
Track zurück
Wiedergabe/Pause
Track vor
Wiederholen
Shuffl e/Zufallswiedergabe
Cursor hoch
Cursor runter
Zur Playback Seite wechseln
Direktzugriff Hauptverzeichnis
Suchen
Ordner/Playlist: Ebene höher
Medientyp auswählen
56
Page 57

ZE-NC526
WIEDERGABE IPOD/USB/SD
Suchfunktion:
iPod Suche:
Nach Tippen auf
eine alphabetische Tastatur zur Eingabe
des Anfangsbuchstabens. Nur der iPod
Modus bietet eine alphabetische Suche.
USB/SD Suche:
Nach Tippen auf
eine numerische Tastatur zur Eingabe
von Tracknummern. Die numerische
Suche steht nur in den USB/SD
Modi zur Verfügung.
Suche erscheint
Suche erscheint
57
Page 58

WIEDERGABE IPOD/USB/SD
Bedienelemente zum Video abspielen:
Anzeigeelemente:
Spieldauer aktuell
Spieldauer total
Bedienelemente um Video und Bilddateien abzuspielen/anzuzeigen:
Bedienelemente:
Titel/Track/Kapitel zurück
Wiedergabe/Pause
Titel/Track/Kapitel vor
Zur Playlist Seite/Hauptmenü
Vollbild
58
Page 59

ZE-NC526
WIEDERGABE IPOD/USB/SD
USB/SD Modus:
■ Stellen Sie sicher, dass Ihr Datenträger mit FAT32 formatiert wurde.
■ Je nach Ordnerstruktur und Inhalt ist die Anzahl der verfügbaren
Ordner begrenzt.
■ Beachten Sie, dass die Geschwindigkeit der Indizierung des Datenträgers
von Speicherkapazität, Zugriffsgeschwindigkeit, sowie der darauf befindlichen
Datenmenge abhängig ist.
■ Bei der Verwendung einer externen Festplatte achten Sie darauf, dass
diese mit FAT32 formatiert wurde und nicht mehr als max. 400 mA Strom
aufnimmt. Andernfalls kann diese nicht verwendet werden bzw. es ist mit
Funktionsstörungen zu rechnen.
■ Die Anzeige von Album Covers ist abhängig vom verwendeten Dateiformat
und kann je nach Dateigröße verzögert erfolgen.
iPod Modus:
■ Das Gerät verfügt über zwei USB-Anschlüsse, welche sich an der Vorderund Rückseite des Gerätes befinden. Beide können universell verwendet
werden, d.h. USB-Datenträger und iPod/iPhone Geräte können wahlweise
an beiden USB-Anschlüssen angeschlossen und betrieben werden. Mit
der Einschränkung, dass keine zwei iPod/iPhone Geräte gleichzeitig
angeschlossen werden können.
■ Abhängig von der zu durchsuchenden Datenmenge, kann es beim ersten
Zugriff zu Verzögerungen kommen. Der iPod muss beim ersten Mal den
Suchindex erstellen und übertragen.
■ iPods/iPhones stellen, abhängig von Inhalt und Sortierung, einen erweiterten
Informationsumfang auf der Playlist-Seite dar.
HINWEIS:
Auf www.zenec.com erhalten Sie zusätzliche Info zu:
■ Kompatible Dateiformate sowie mögliche Beschränkungen.
■ iPod/iPhone Kompatibilitätsliste.
59
Page 60

BLUETOOTH MODUS
Bluetooth Hauptmenü:
Tippen Sie auf ein Icon um es auszuwählen.
Bedienelemente:
Eingabetastatur
Anrufl iste
Telefonbuch
Bluetooth Einstellungen
HINWEIS:
Koppeln eines Mobiltelefons:
■ Achten Sie darauf, daß die "auto connect" Funktion ausgeschaltet ist, wenn
Sie versuchen weitere Mobiltelefone zu koppeln.
■ Falls der nachfolgend beschriebene Vorgang fehlschlägt, versuchen Sie
das Koppeln vom Mobiltelefon aus einzuleiten.
60
Page 61

BLUETOOTH MODUS
Anruf annehmen, wählen, aufl egen, makeln:
Anzeigeelemente:
ZE-NC526
Caller I
Caller II
Erster eingehender Anruf
Zweiter eingehender Anruf
Anzeige Nummerneingabe
Bedienelemente:
Eingabetastatur
Löscht die zuletzt eingeg. Ziffer
Anruf annehmen, Anrufe makeln
Schaltet Anruf zwischen Freisprech-
einrichtung und Mobiltelefon (Privat modus) um
Aktives Gespräch beenden ggf.
zum ersten Gespräch zurück
Zum BT Hauptmenü zurück
61
Page 62

BLUETOOTH MODUS
Mobiltelefon koppeln:
Tippen Sie auf BT Settings/Einstellungen > Devices/Geräte
1
Tippen Sie auf "Add/Hinzufügen" um nach Bluetooth Geräten zu suchen.
2
3
Wählen Sie Ihr Gerät aus der Liste. Bestätigen Sie mit "Pair/Hinzufügen".
Bedienelemente:
Gewähltes Mobiltelefon zwecks
Koppeln bestätigen
Zurück zu den Bluetooth Einstellungen
Pair
Tippen Sie auf das gewünschte Handy
In der Liste blättern
62
Page 63

ZE-NC526
BLUETOOTH MODUS
Geben Sie hier den Pin-Code ein und bestätigen mit "OK".
4
Pin Code
Löscht die zuletzt eingegebene Ziffer
Pin Code bestätigen
Auf Anfrage Ihres Mobiltelefons tippen Sie dort den identischen Code ein
5
und bestätigen. Die Meldung "Gerät erfolgreich verbunden" zeigt die
erfolgreiche Kopplung an.
HINWEIS:
Falls Sie mehrere Mobiltelefone verbinden möchten, beachten Sie bitte:
■ Schalten Sie die automatische Verbindungsfunktion aus, während Sie
weitere Mobiltelefone zum ersten Mal koppeln.
■ Verwenden Sie unterschiedliche Pin Code Paare für jedes neu
verbundene Mobiltelefon.
63
Page 64

BLUETOOTH MODUS
Kontaktmanagement:
Suche nach einem Eintrag:
Bedienelemente:
Zum BT Hauptmenü zurück
Tippen Sie auf die Telefonnummer
des Kontaktes um einen Anruf
zu tätigen
Suche
Wählen Sie hier den Namen aus
In der Liste blättern
Keine Funktion während der
Nummerneingabe
Eingabemaske beenden
Anzeige der Eingabe
Löscht den zuletzt eingegebenen
Buchstaben
Nächste Seite der Eingabemaske
(Keypad) aufrufen
HINWEIS
■ Es ist möglich mit bis zu 15 Anfangsbuchstaben zu suchen.
:
64
Page 65

BLUETOOTH MODUS
Telefonbuch verwalten:
ZE-NC526
Bedienelemente:
Zum BT Hauptmenü zurück
Springe zum Telefonbuch
Liste der ausgehenden Anrufe aufrufen
Liste der eingehenden Anrufe aufrufen
Liste der verpassten Anrufe aufrufen
Tippen zum Anrufen
In der Liste blättern
HINWEIS:
■ Synchronisierung, Übertragung, Sortierung und Anzeige der Mobilfunk-
einträge, sind auf die modell- und markenspezifi sche Unterstützung
Ihres Handymodells angewiesen. Bei Synchronisierungsproblemen
beenden Sie die Verbindung und wiederholen die Kopplung.
■ Der automatische Synchronisierungsvorgang erfordert bei manchen
Handys eine explizite Autorisierung. Beachten Sie hierzu die Hersteller angaben in der Betriebsanleitung des jeweiligen Handys.
■ Bei Synchronisierungsproblemen tippen Sie im Bluetooth Hauptmenü
entweder auf "Kontakte/Contacts" oder auf "Rufl iste/Call Log" und
halten die Taste gedrückt, um eine Neu-Synchronisierung des gesamten
Telefonbuches zu erzwingen.
65
Page 66

BLUETOOTH MODUS
Setup Einstellungen:
Zum BT Hauptmenü zurück
Optionen
BT Geräteeinstellungen
Auswahl Mikrofon
Auf +/- Tippen um die
Empfi ndlichkeit des Mikrofons
einzustellen
66
Page 67

BLUETOOTH MODUS
ZE-NC526
HINWEIS:
■ Falls Ihr Telefon nicht gefunden wird, stellen Sie sicher, dass die
Bluetooth Funktion auf Ihrem Handy eingeschaltet und im Modus
"Für andere Geräte sichtbar" ist.
■ Bluetooth Verbindungen funktionieren bis zu einem Umkreis von 8 m
normalerweise fehlerfrei. Hindernisse bzw. Sichtbarrieren können
diesen Abstand verringern.
■ Sie können bis zu fünf verschiedenen Telefone mit jeweils 1000
Telefonbuch-Kontakten koppeln und synchronisieren.
■ Zur Benutzung der Freisprecheinrichtung muss Ihr Handy vorher
gekoppelt und verbunden werden.
■ Leider kann der volle Funktionsumfang nicht für jedes Mobiltelefon
garantiert werden.
■ Auf www.zenec.com finden Sie eine aktuelle Liste der kompatiblen
Mobiltelefone, sowie aktuelle Software-Updates für Ihr ZENEC Gerät.
67
Page 68

NAVIGATIONS MODUS
So geben Sie ein Ziel ein und starten die Zielführung:
Tippen Sie auf "Suche".
Wählen Sie Ihre bevorzugte
Eingabemethode. Hier im
Beispiel: "Adresse suchen".
Ort, Strasse und Hausnummer
eingeben.
Jeden Schritt mit
bestätigen.
Das Programm berechnet nun
die geplante Route. Nach erfolgter
Berechnung brauchen Sie zum
Navigieren nur noch auf "Los!"
zu tippen.
68
Page 69

NAVIGATIONS MODUS
ZE-NC526
HINWEIS:
■ Für die Bedienung der Navigation lesen Sie bitte die ausführliche,
separate Bedienungsanleitung, welche im Lieferumfang enthalten ist.
■ Während der Navigation können Sie einen anderen Wiedergabemodus
wählen und wiedergeben. In diesem Fall verringert die Navigation die
Lautstärke des aktuellen Wiedergabemodus für die Dauer der
Navigationsdurchsage.
■ Die Lautstärke der Navigationshinweise lässt sich mit dem PWR/VOL
Regler während einer Navigationsdurchsage einstellen. Die eingestellte
Lautstärke bleibt gespeichert.
■ Die Audio-Wiedergabe wird, bei Navigationsansagen, auf Volume 10
heruntergeregelt. Bei einer voreingestellten Lautstärke von unter 10 wird
die Audiowiedergabe stummgeschaltet (Mute).
69
Page 70

SYSTEM SETUP/ERSTE EINSTELLUNGEN
Einstellungsmenü:
Untermenü auswählen:
Wählen Sie ein Icon in der oberen
Reihe durch antippen aus.
Empfohlene Einstellungen bei Inbetriebnahme:
OSD Sprache einstellen: Unter Setup>Language
wählen Sie die gewünschte OSD-Sprache
aus.
Tastenbeleuchtung einstellen: Unter Einstellungen>Generell>Beleuchtung
wählen Sie die gewünschte Farbe aus.
Datum und Uhrzeit einstellen:
Unter Setup>Zeit verwenden Sie die
Icons, um das Datum und die
Uhrzeit einzustellen.
70
Page 71

ZE-NC526
SETUP: VIDEO
Name Beschreibung Funktion Einstellbereich
Seiten-
verhältnis
Videoeingang
Rückfahr-
kamera
Videoanzeige
Einstellungen
PAL/NTSC
Anpassung
Signal wird in-
tern gespiegelt
Seitenverhältnis
Formateinstellung
Videoeingang
Bild spiegeln
Normal
Voll
Auto
NTSC
PAL
Normal
Gespiegelt
71
Page 72

SETUP: GENERELL
Name
Beschrei
bung Funktion Einstellbereich
Radio Gebiet Gebiet wählen
Dimmer-
Modus
Beleuchtung
Bildschirm-
helligkeit
Tastenbeleuchtung
Beep Tonsignal
Hintergrund-
bild
Gespeicherte
Voreinstellung des
Frequenzbereiches
Einstellung in vier
Stufen
Farbe
auswählen
Tastenton de-
oder aktivieren
Hintergrund
auswählen
Europa
Asien
USA
Nacht
Dunkel
Normal
Hell
Rot
Weiss
An
Aus
Diverse
Diebstahl-
schutz
Diebstahl-
schutzfunktion
De- oder
aktivieren
Passwort Eingabe Code Passwort
Kalibrierung Bildschirm
Werksein-
stellungen
Einstellungen Zurücksetzen Reset
Bildschirm
kalibrieren
72
An
Aus
Standard-code"000000"
Benutzen Sie einen
beliebigen 6-Pincode.
Zum Rückstellen geben
Sie statt dessen den
"Standard-code" ein.
Start
Page 73

SETUP: ZEIT
ZE-NC526
Name
Datum JJJJ/MM/TT Datum einstellen Diverse
Uhrzeit Modus Zeitformat
Zeit Zeitanzeige Uhr einstellen Diverse
Beschrei
bung Funktion Einstellbereich
Zeitformat
auswählen
12 Hr
24 Hr
73
Page 74

SETUP: SOUND
Name
Subwoofer
Subwoofer
Filter
Loudness
Beschrei
Subwoofer
Ausgang
Subwoofer
Ausgang
Frequenz-
anpassung
bung Funktion Einstellbereich
Subwoofer-
An
ausgang de- oder
aktivieren
Aus
80 Hz
Einstellung
der Tiefpass
120 Hz
Filterfrequenz
160 Hz
Frequenzan-
An
passung an das
Spektrum des
Hörbereiches
Aus
74
Page 75

SETUP: SPRACHE
ZE-NC526
Name
OSD
Beschrei
OSD-
Sprache
bung Funktion Einstellbereich
Englisch
Deutsch
Französisch
Italienisch
Auswahl
der OSD-
Sprache
Türkisch
Holländisch
Spanisch
Tschechisch
Serbisch
Polnisch
75
Page 76

SETUP: VERSION
Name
Version
Beschrei
Software-
Stand
bung Funktion Einstellbereich
OS
Anzeige der
installierten
Software
Versionen
MPU
MCU
MPEG
76
Page 77

SETUP: VOLUME
ZE-NC526
Name
Volume
Beschrei
Lautstärkean-
passung der
Audioquellen
bung Funktion Einstellbereich
USB 0...12
SD-Karte 0...12
Radio 0...12
Bluetooth 0...12
AV-In 0...12
DVB-T 0...12
Navigation 0...12
iPod 0...12
77
Page 78

FERNBEDIENUNG
Tastenanordnung:
78
Page 79

FERNBEDIENUNG
ZE-NC526
1 POWER
Gerät an-/ausschalten
2 SRC
Hauptmenü aufrufen
3 VOL +
Lautstärke erhöhen
4 VOL -
Lautstärke verringern
5 SETUP
Setup aufrufen
6 MENU
Wechsel Playlist <-> Playback
7 DISP
Drücken und halten für TFT
Standby Modus -> Bild dunkel
8 STOP
Abspielen anhalten/pausieren
9 WIDE
N/A
10 MUSIK
Zeige Liste aller Musikdateien
11 PIC
Bildschirmhelligkeit einstellen
12 BAND
Tuner Modus, nächstes Radioband
13 GOTO
Gehe zu Zeitindex
14 HÖRER ABNEHMEN
Gespräch beginnen oder annehmen
15 NAV
Zwischen Navigation und
Wiedergabequelle wechseln
16 NUMMERNTASTEN
Eingabe Track,Titel/Zeitindex
17 BT
Bluetooth Hauptmenü
18 FM/AM
Tuner Modus, nächstes Radioband
19 RPT
Track,Titel, Ordner wiederholen
20 EQ
Equalizer öffnen
21 MUTE
Audio Stummschalten AN/AUS
22 RICHTUNGSTASTEN
Drücken um die Wiedergabe zu
pausieren
Auswahl treffen; Cursor bewegen
23 FRONT REMOTE
Bedienung für Frontzone schalten
24 REAR REMOTE
Bedienung für M-Zone schalten
25 PHOTO
Zeige Liste aller Bilddateien
26 VIDEO
Zeige Liste aller Videos
27 SKIP PREVIOUS
Sprung zum vorherigen
Track,Titel/Zeitindex
28 SKIP NEXT
Sprung zum nächsten
Track,Titel/Zeitindex
29 CLEAR
Eingabe löschen
30 HÖRER AUFLEGEN
Gespräch beenden oder ablehnen
HINWEIS:
■ Die Verfügbarkeit einiger Funktionen hängt vom momentan ausgewählten
Modus sowie dem eingelegten Medientyp ab.
79
Page 80

EXTERNE WIEDERGABE & QUELLEN
M-Zone
Bedienelemente:
Direktwahl M-Zone
Die optionale M-Zone ermöglicht ihnen
die Ausgabe unterschiedlicher Inhalte
auf die Front und Kopfstützenmonitore.
Bedienelemente:
Direktwahl Hauptmenü
Auswahl DVB-T
Auswahl Front-USB
Auswahl SD-Karte
M-Zone deaktivieren
HINWEIS:
■ Ist die M-Zone deaktiviert, ist auf den angeschlossenen Monitoren kein
Bildinhalt zu sehen und das Bild bleibt schwarz.
■ Die Lautstärke des Stereo Audioausgangs der M-Zone kann mit dem
Gerät nicht verändert werden. Die gewünschte Lautstärke muss
direkt an der angeschlossenen Peripherie (Beispiel: Deckenmonitor)
eingestellt werden.
80
Page 81

EXTERNE WIEDERGABE & QUELLEN
DVB-T
Bedienelemente:
Berühren Sie die linke obere Ecke
um zum Hauptmenü zurückzukehren.
Siehe separates DVB-T Handbuch.
ZE-NC526
HINWEIS:
■ Es ist ein zusätzliches und externes ZENEC DVB-T Empfangsgerät
notwendig. Beachten Sie hierzu die Kompatibilitätsliste und die
Bedienungsanleitung des gewünschten ZENEC DVB-T Empfängers.
■ Kompatible DVB-T Empfangsgeräte lassen sich einfach und komfortabel
über den Touchscreen bedienen.
81
Page 82

GLOSSAR
AUX In Hilfseingang, nur Audio
A/V In Kombinierter Audio/Video Eingang
Button Engl. Knopf, (Bildschirm-) Taste
CAN-Bus Industrieller Steuergeräte-Kommunikationsstandard in KFZ
CAN/Stalk IF Schnittstelle/Interface um CAN Bus Daten mitzuschneiden/
zu verarbeiten
Cursor Engl. Eingabezeiger, oft blinkend, Positionsanzeiger
z.B. Mauszeiger
DVB-T Engl. Digital Video Broadcasting, Terrestrisch ausgestrahlter
TV-Standard
EQ Abkürzung für Equalizer
FAT32 File allocation table 32-bit, Dateizuordnungstabelle mit 32 bit
GUI Engl. Graphical User Interface, Graphische Benutzeroberfläche
HMI Engl. Human Machine Interface ‒ Schnittstelle Mensch Maschine
ID3-Tag Erweiterte Informationen eingebunden in MP3 Dateien
Icon Engl. Bildzeichen, Abbildung mit Funktion
Makeln beim Telefonieren: z.B. ein neues Gespräch annehmen, während
man das erste Gespräch vorrübergehend stummschaltet
M-Zone Back seat area ‒ Rücksitzbereich
OSD Engl. On-Screen-Display, Bildschirm-Menüs
Preset Speichern von Parametern zur Direktauswahl
Root Engl. Wurzel, Stammverzeichnis eines Dateisystems
Shuffle Engl. Mischen, Zufallswiedergabe
Slide Engl. Schieben, gleiten, Touchscreen-Menüs mit der
Fingerspitze wechseln
Slot Einschub für Speicherkarte
82
Page 83

ZE-NC526
FEHLERSUCHE
Problem Ursache Lösung
ALLGEMEIN
Durch eine Sicherung gleichen Typs
ersetzen.
Durch eine Sicherung gleichen Typs
ersetzen.
RESET drücken und Bedienungsanleitung noch einmal lesen.
Verbinden Sie die Audioausgänge
gemäss dem Anschlussdiagramm.
Erhöhen Sie die Lautstärke.
Das Gerät schaltet
nicht ein.
Radiosicherung defekt.
Hauptsicherung im Sicherungskasten des Radios defekt.
Falsche Bedienung.
Die Audioausgänge wurden nicht
richtig verbunden.
Die Lautstärke ist sehr leise
eingestellt.
Die Lautsprecher sind defekt. Überprüfen Sie die Lautsprecher.
Kein/sehr leise
Audiowiedergabe.
Schlechte
Audioqualität oder
Verzerrungen.
TFT MONITOR
Kein Bild.
Das Bild erscheint
zu gross.
Es funktioniert nur ein Kanal.
Die Lautsprecherkabel haben
eine Verbindung zur Fahrzeugmasse.
Die Audiowiedergabe (Mute)
wurde am Gerät stummgeschaltet.
Die Impedanz der Lautsprecher
passt nicht zum Gerät.
Die Lautsprecherkabel haben
eine Verbindung zur Fahrzeugmasse.
Die Handbremse ist nicht
angezogen.
Das Parking-Kabel wurde falsch
oder nicht angeschlossen.
Der Bildschirm wurde am Gerät
ausgeschaltet.
Falsches Bildformat gewählt.
Überprüfen Sie die Balance der
Audiokanäle.
Isolieren Sie die blanke Stelle
oder tauschen Sie das Lautsprecherkabel.
Schalten Sie die Audiowiedergabe
am Gerät wieder ein.
Verwenden Sie passende Lautsprecher.
Isolieren Sie die blanke
Stelle oder tauschen Sie das
Lautsprecherkabel.
Ziehen Sie die Handbremse an.
Schließen Sie das Parking-Kabel entsprechend der Montageanleitung an.
Schalten Sie den Bildschirm
wieder ein.
Benutzen Sie das richtige
Bildformat.
83
Page 84

TUNER
Die Fahrzeugantenne ist nicht
richtig mit dem Gerät verbunden.
Verbinden Sie die Antenne
gemäss dem Anschlussdiagramm.
Schlechter
Radioempfang.
MP3
Die ID3 Tags
werden falsch
angezeigt.
Die REG-Funktion ist aktiviert. Deaktivieren Sie die REG-Funktion.
Die Phantomspeisung wurde
nicht oder falsch angeschlossen.
Die AF-Funktion wurde nicht
aktiviert.
Das Dateiformat stimmt nicht
oder die ID3 Tags sind fehlerhaft.
Schließen Sie die Phantomspeisung richtig an.
Aktivieren Sie die AF-Funktion.
Verwenden Sie einen Datenträger
mit anderen MP3-Dateien.
84
Page 85

ZE-NC526
SPEZIFIKATIONEN ZE-NC526
2-DIN NAVICEIVER
GPS NAVIGATIONSSYSTEM
• 3D High-Definition Navigationssystem
• TMC und TMC Pro Empfänger
• Externe GPS Antenne
• 8 GB microSD-Karte mit Kartenmaterial für 43 ost- und westeuropäische Länder und
Premium POI Datenbank
• Menü und Sprachführung in 28 verschiedenen Sprachen
• 2D oder 3D Kartenansicht mit Auto-Zoom, realistischer 3D Geländedarstellung und
3D Sehenswürdigkeiten
• Eco und Smart Routenplanung, Import von Outlook Adressen, Autobahnfahrspurassistent
mit realistischer Anzeige von Autobahnschildern etc.
• Text-to-Speech Funktion
PARROT BLUETOOTH FREISPRECHEINRICHTUNG
• Synchronisation von bis zu 1000 Kontakten mit max. 5 Rufnummern pro Kontakt
• Alphabetische Kontakt-Suchfunktion
• Internes und externes Mikrofon
• Zukunftssichere aktualisierbare Bluetooth Firmware
MULTIMEDIA-PLAYER
• Front- und rückseitiger USB 2.0 Anschluss
• SD/SDHC Kartenleser (bis 32 GB)
• Made for iPod/Made for iPhone
• Wiedergabe SD/USB: MP3, WMA, AVI, Xvid und JPEG
GENERELLE MERKMALE
• Intuitiv bedienbare Bedienoberfläche in 10 verschiedenen Sprachen
• 6,2“/15,7 cm 16:9 HD TFT-LCD Display mit 800x480 Pixel
Auflösung und Touchscreen-Steuerung
• RDS-Tuner mit 30 Stationsspeicherplätzen (18 UKW/12 MW)
• Multi-Zone Funktion
• 4 x 50 Watt Digitalendstufe
• Bicolor Tastenbeleuchtung (rot/weiß)
• 1 x IR-Fernbedienung
A/V-ANSCHLÜSSE
• 4.1-CH Vorverstärkerausgänge
• 2-CH Vorverstärkerausgänge ohne Lautstärkeregelung
• 2 x Videoausgänge (NTSC)
• 1 x A/V-Eingang
• Separater Videoeingang für Rückfahrkamera mit Umschaltfunktion
• Anschlussmöglichkeit für kompatible externe DVB-T oder
DAB+ Empfänger
HINWEIS:
ÄNDERUNGEN AM GERÄT NACH DRUCK DIESES HANDBUCHS BLEIBEN VORBEHALTEN.
85
Page 86

WARRANTY 2 YEARS
Dear customer,
Thank you for purchasing this ZENEC product. It is advisable to keep the original packaging
material for any future transporting of the product. Should your ZENEC product require warranty
service, please return it to the retailer from whom it was purchased or the distributor in your
country. This ZENEC product is warranted against defective materials or workmanship for a
period of TWO years from date of purchase at retail to the original purchaser.
WARRANTY LIMITATIONS
This warranty does not cover any damage due to:
1. Improper installation, incorrect audio or mains connection(s).
2. Exposure to excessive humidity, fluids, heat sun rays or excessive dirt or dust.
3. Accidents or abuse, unauthorized repair attempts and modifications not explicitly
authorized by the manufacturer.
This warranty is limited to the repair or the replacement of the defective product at the manufacturer’s
option and does not include any other form of damage, whether incidental, consequential or
otherwise. The warranty does not cover any transport costs or damages caused by transport or
shipment of the product. Warranty work will not be carried out unless this warranty certificate is
presented fully completed with model, serial number, purchaser’s address, purchasing date and
dealer stamp together with the original sales slip!
2 JAHRE GARANTIE
Sehr geehrter Kunde,
Vielen Dank, dass Sie sich zum Kauf dieses Produktes von ZENEC entschlossen haben. Wir
bitten Sie, die Originalverpackung aufzubewahren, z.B. für den Transport im Garantiefall. Wenn
Sie Garantie-Leistungen für dieses ZENEC Produkt beanspruchen, wenden Sie sich bitte
direkt an den Händler, bei dem das Gerät gekauft wurde. Dieses ZENEC Produkt ist durch eine
Werksgarantie von 2 Jahren an den Erstkäufer ab Kaufdatum im Fachhandel gegen Material- bzw.
Herstellungsfehler geschützt.
GARANTIE-EINSCHRÄNKUNGEN
Nicht unter Garantie fallen Schäden infolge von:
1. Unsachgemässem Einbau oder inkorrektem Audio- oder Stromanschluss.
2. Einwirkung von übermässiger Feuchtigkeit, Flüssigkeit, Hitze, Sonneneinstrahlung
oder starker Verschmutzung.
3. Mechanischer Beschädigung durch Unfall, Fall oder Stoss, sowie Schäden durch nicht
autorisierte Reparaturversuche und/oder Modifikationen.
Die Garantie dieses Produkts bleibt in jedem Fall auf die Reparatur bzw. den Ersatz (Entscheidung
beim Hersteller) des ZENEC Produktes beschränkt. Transportschäden und die Kosten des
Rücktransportes sind durch diese Garantie nicht abgedeckt. Jeder über diese Garantie-Erklärung
hinausgehende Anspruch und Haftung für direkte/indirekte Folgeschäden werden ausdrücklich
abgelehnt. Garantie-Ansprüche können nur mit einer korrekt und vollständig ausgefüllten
Garantie-Karte und dem Original-Kaufbeleg geltend gemacht werden.
86
Page 87

ZE-NC526
ZENEC MODEL: ZE-NC526
Serial number: .................................................................................................................................
Date of purchase: ............................................................................................................................
Your name: ......................................................................................................................................
Your address: ..................................................................................................................................
City: .................................................................................................................................................
State: ................................... ZIP or postal code: ............................................................................
Country: ...........................................................................................................................................
Dealer’s address & stamp
■ If at any time in the future you should need to dispose this product, please note that waste electrical
products are not be disposed with the household waste. Please recycle where facilities exist.
Check with your Local Authority or retailer for recycling advice (Waste Electrical and Electronic
Equipment Directive).
■ Sollten Sie dieses Gerät eines Tages entsorgen müssen, beachten Sie bitte dass elektrische Geräte
nicht mit dem Haushaltsmüll entsorgt werden dürfen. Führen Sie das Gerät wenn möglich dem
Recycling zu. Ihre lokalen Behörden oder Ihr Händler können Sie dementsprechend informieren
(Richtlinie über die Entsorgung elektrischer und elektronischer Ausstattungen).
87
Page 88

LEGAL DISCLAIMERS
The packing material of this item and the finished product contained inside are fully compliant with RoHS directive. Halogenated flame
retardants are not used in any of the plastic injection parts of the product, nor for the printed circuit boards.
Die Verpackung und das darin enthaltene Produkt entsprechen den Richtlinien der RoHS Verordnung. Halogenierte Flammhemmer
werden weder in Kunststoffteilen des Produktes, noch für die Verpackung und Einlageteile verwendet.
Les matériaux utilisés pour l’emballage et pour le produit fini sont en conformité avec la directive RoHS. Les composants injectés en
matière plastique et les circuits imprimés du produit ne contiennent pas de substance organique anti-feu.
El material de embalaje de este producto y el producto final que contiene cumplen totalmente la directiva RoHS. Retardantes de fuego
halogenados no son usados en ninguna de las partes de plástico inyectado del producto, ni de las placas de circuito impreso.
La stessa confezione e il prodotto è incluso in conformità con le linee guida del decreto RoHS. Ritardanti di fiamma alogenati non sono
parte nelle materie plastiche del prodotto, né per il confezionamento e il deposito da parte utilizzati.
Este produto e a sua embalagem estão totalmente de acordo com a directiva RoHS. As partes plásticas injectadas e os circuitos impressos
não usam retardantes de fogo halogenados.
This item incorporates copy protection technology that is protected by U.S. patents and other intellectual party rights of Rovi corporation.
Reverse engineering and disassembly are prohibited.
Dieses Gerät enthält Kopierschutz-Technologie der Rovi Corporation, die durch U.S. Patente und weitere IP Rechte geschützt ist. Das
Reverse Engineering als auch die Zerlegung des Gerätes ist verboten.
Cet appareil incorpore une technologie anti-piratage qui dépend de certains brevets américains ou d’autres droits de propriété intellectuelle
de Rovi Corporation. Toute rétro-ingénierie ou tout démontage est interdit.
Este artículo incorpora tecnología anti copia, esta protegido por las patentes de los Estados Unidos y otros derechos intelectuales de la
corporación Rovi. Imitación y desmontaje están prohibidos.
Questo dispositivo include la tecnologia di protezione per copie di Rovi Corporation, che e protetta dai brevetti degli Stati Uniti e altri diritti
di proprietà intellettuale. Il Reverse Engineering e lo smontaggio del dispositivo è vietato.
Este equipamento incorpora tecnologia de protecção anti-cópia protegida por patentes americanas e outros direitos de propriedade
intectual de Rovi Corporation. Toda a retro engenharia ou desmontagem são interditas.
The Bluetooth word mark and logos are owned by the Bluetooth SIG, Inc. and any use of such marks by Parrot S.A. is under license. Other
trademarks and trade names are those of their respective owners.
Die Bluetooth Weltmarke und deren Logos sind Eigentum der Bluetooth SIG, Inc. und jeglicher Gebrauch dieser wurde von Parrot S.A.
lizenziert. Andere Marken und Markennamen sind Eigentum der entsprechenden Markeninhaber.
Le mot, la marque et le logo Bluetooth sont la propriété de Bluetooth SIG Inc. L’utilisation de cette marque par Parrot S.A. est faite sous
licence. Les autres noms de marques et noms commerciaux sont utilisés sous la responsabilité de leurs propriétaires respectifs.
All Rights reserved. The Parrot trademarks appearing on this giftbox artwork are the sole and exclusive property of Parrot S.A. All the
others trademarks are the property of their respective owners and are used under license by Parrot S.A.
Alle Rechte vorbehalten. Das Parrot Markenzeichen auf dieser Verpackung ist das alleinige und exklusive Eigentum von Parrot S.A.
Andere Marken und Markennamen sind Eigentum der entsprechenden Markeninhaber.
Tous droits réservés. La marque Parrot utilisée sur l’emballage est la propriété exclusive de Parrot S.A. Les autres marques sont propriétés
de leurs dépositaires respectifs et sont utilisées sous license par Parrot S.A.
“Made for iPod“ and “Made for iPhone“ mean that an electronic product has been designed to connect specifically to iPod or iPhone,
respectively, and has been certified by the developer to meet Apple performance standards. Apple is not responsible for the operation of
this device or its compliance with safety and regulatory standards. Please note that the use of this product with iPod or iPhone may affect
wireless performance.
Elektrische Produkte, welche mit „Made for iPod“ und „Made for iPhone“ ausgezeichnet werden, entsprechen den technischen Standards
von Apple und wurden speziell für den Gebrauch mit iPods oder iPhones entwickelt und zertifiziert.
Apple ist nicht für die Funktion oder das Einhalten rechtlicher Bestimmungen dieses Gerätes verantwortlich. Bitte beachten Sie, dass der
Gebrauch dieses Produktes mit einem iPod oder iPhone die Wireless Performance beeinträchtigen kann.
Les produits électroniques portant la mention “Made for iPod“ et “Made for iPhone“ ont été conçus pour fonctionner avec un iPod et sont
certifiés conformes aux exigences d’Apple par le fabricant.
Apple n’est pas responsable pour le fonctionnement de cet appareil ou de sa compatibilité avec les normes réglementaires et de sécurité.
Veuillez noter que l‘utilisation de ce produit avec iPod ou iPhone peut affecter la performance du réseau sans fil.
iPhone, iPod, iPod classic, iPod nano, iPod shuffle, and iPod touch are trademarks of Apple Inc., registered in the U.S. and other countries.
iPhone, iPod, iPod classic, iPod nano, iPod shuffle, und iPod touch sind eingetragene Marken von Apple Inc., registriert in den U.S.A und
anderen Ländern.
iPhone, iPod, iPod classic, iPod nano, iPod shuffle, et iPod touch des une marques commercial d´Apple Inc., enregistrée aux États-Unis
et dans d`autres pays.
88
Page 89

NOTES/NOTIZEN
ZE-NC526
89
Page 90

NOTES/NOTIZEN
90
Page 91

NOTES/NOTIZEN
ZE-NC526
91
Page 92

ZENEC by ACR AG · Bohrturmweg 1 · Bad Zurzach · Switzerland
www.zenec.com
Rev. B
 Loading...