

Page 1

ZMM5500
meat mincer
MASZYNKA DO MIELENIA
ZMM55...
INSTRUKCJA UŻYTKOWANIA
MASZYNKA DO MIELENIA
USER MANUAL
MEAT MINCER
BEDIENUNGSANLEITUNG
FLEISCHWOLF
INSTRUCŢIUNI DE UTILIZARE
DISPOZITV PENTRU TOCAT
7–13
14–19
20–26
27–33
ИНСТРУКЦИЯ ЗА УПОТРЕБА
МАШИНКА ЗА МЕЛЕНЕ
ИНСТРУКЦИЯ ПО ЭКСПЛУАТАЦИИ
МЯСОРУБКА
ІНСТРУКЦІЯ З ВИКОРИСТАННЯ
М’ЯСОРУБКА
PL BG
EN
RU
UA
DE
RO
34–40
41–47
48–54
Page 2

www.zelmer.com
meat mincer
MASZYNKA DO MIELENIA
ZMM55...
Multifunkcjonalna maszynka do mielenia.
Multifunction meat mincer.
Page 3
A
13
14
15
8
1
2
346
910
1a
1b
1 2 3
D
C
1
2
3
4
B
11
10
9
6
15
7
8
1c
11 12
7b
I
II
7a
5
Page 4
6a 6b
4 5
1 2 3
E
„click”
1 2 3
H
„click”
1 2 3
4 5
F
4 5 6
21a 1b 3
G
„click”
6a 6b
Page 5
9a 9b
56
1
3
9
2 11
10
3
4
I
J
1 2 3
4 5 6
7 8
10 11 12
12
13
„click”
„click”
1 2 3
K
7a
7b
8
I
II
Page 6
L M
8
1
2
764 53
9
N
1 2 3
4 5 6
1 2 3
4 5 6
„click”
„click”
4
3
2
1
O
3
2
1
STOP
Page 7
7
Szanowni Klienci!
Gratulujemy wyboru naszego urządzenia i witamy wśród
użytkowników produktów Zelmer.
W celu uzyskania najlepszych rezultatów rekomendujemy
używanie tylko oryginalnych akcesoriów rmy Zelmer.
Zostały one zaprojektowane specjalnie dla tego produktu.
Prosimy o uważne przeczytanie niniejszej instrukcji obsługi.
Szczególną uwagę należy poświęcić wskazówkom bezpieczeństwa. Instrukcję obsługi prosimy zachować, aby mogli
Państwo z niej korzystać również w trakcie późniejszego
użytkowania.
Wskazówki dotyczące bezpieczeństwa
iwłaściwego użytkowania urządzenia
Przed rozpoczęciem użytkowania urządzenia zapoznaj
się z treścią całej instrukcji obsługi.
Należy upewnić się, że poniższe wskazówki zostały
zrozumiane.
NIEBEZPIECZEŃSTWO! /
OSTRZEŻENIE!
Nieprzestrzeganie grozi
obrażeniami
● Nie uruchamiaj urządzenia, jeśli
przewód zasilający jest uszkodzony
lub obudowa jest w sposób widoczny
uszkodzona.
● Jeżeli przewód zasilający nieodłączany
ulegnie uszkodzeniu, to powinien on
być wymieniony u wytwórcy lub w specjalistycznym zakładzie naprawczym
albo przez wykwalikowaną osobę
w celu uniknięcia zagrożenia.
● Napraw urządzenia może dokony-
wać jedynie przeszkolony personel.
Nieprawidłowo wykonana naprawa
może spowodować poważne zagrożenia dla użytkownika. W razie
wystąpienia usterek zwróć się do
specjalistycznego punktu serwisowego ZELMER.
● Zachowaj szczególną ostrożność
podczas pracy z maszynką w obecności dzieci.
● Przed wymianą wyposażenia lub
zbliżaniem się do części poruszających się podczas użytkowania,
należy wyłączyć sprzęt i odłączyć od
zasilania.
● Zawsze odłączaj urządzenie od
zasilania gdy jest pozostawione bez
nadzoru, a także przed montażem,
demontażem lub czyszczeniem.
● Urządzenie nie powinno być uży-
wane przez dzieci. Przechowuj urządzenie wraz z przewodem przyłączeniowym poza zasięgiem dzieci.
● Urządzenie może być używane
przez osoby o ograniczonej zdolności zycznej, czuciowej i psychicznej, lub nie mające doświadczenia
lub znajomości sprzętu, ale wyłącznie pod nadzorem lub po wcześniejszym zrozumiałym objaśnieniu możliwych zagrożeń i poinstruowaniu
dotyczącym bezpiecznego korzystania z urządzenia.
● Należy zapewnić, aby dzieci nie
bawiły się urządzeniem.
● Urządzenie musi być używane tylko
z misą zasypową.
● Urządzenie wolno używać tylko
w pomieszczeniach, w temperaturze
pokojowej i na wysokości nie większej niż 2000 m n.p.m.
UWAGA!
Nieprzestrzeganie grozi
uszkodzeniem mienia
●
Nie wyciągaj wtyczki z gniazdka sieci pociągając za
przewód.
●
Urządzenie zawsze podłączaj do gniazdka sieci elektrycznej (jedynie prądu przemiennego) o napięciu zgodnym z podanym na tabliczce znamionowej urządzenia.
●
Nie narażaj maszynki i wyposażenia na działanie temperatury powyżej 60°C. Możesz uszkodzić maszynkę.
PL
Page 8

8
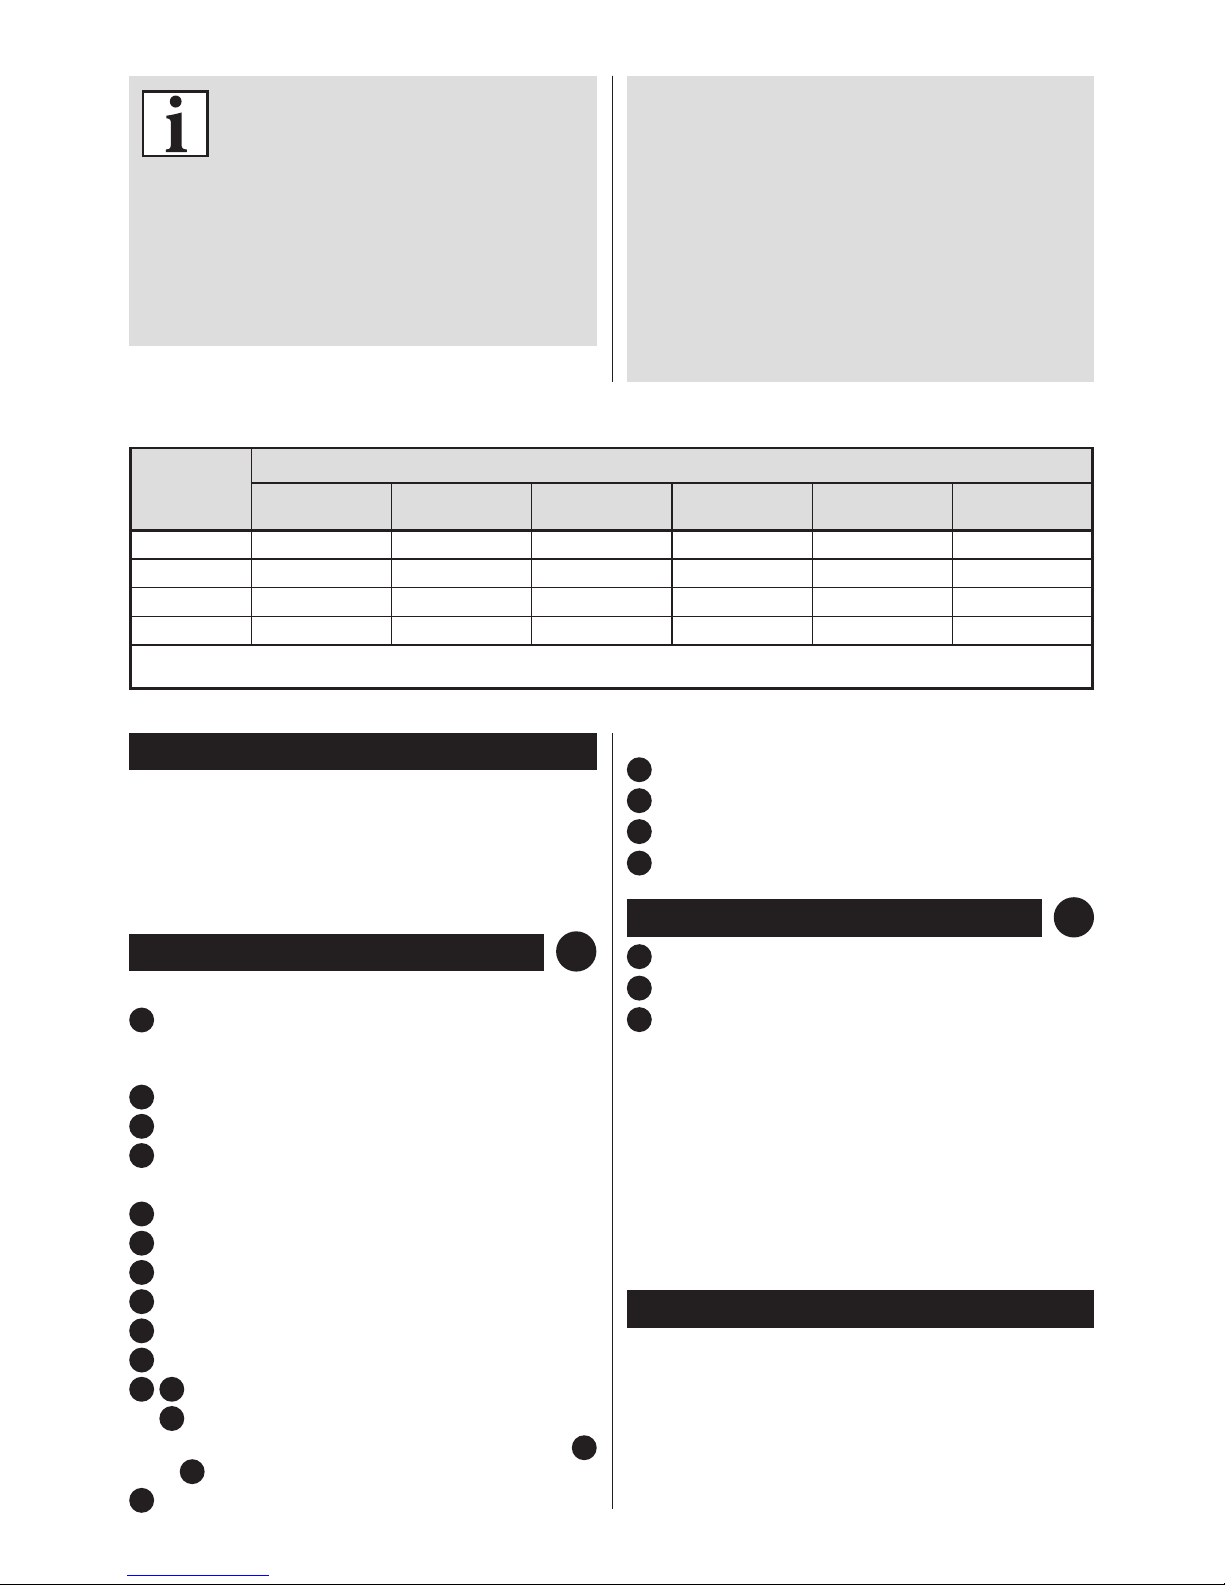
TYPY MASZYNEK ZELMER
VIB
Wyposażenie
Zespół mielący Cytrusiarka Szatkownica Krajarka do warzyw Wyciskarka Młynek żarnowy
ZMM5580*
● ● ● ○ ● ●
ZMM5548*
● ○ ● ○ ○ ○
ZMM5588*
● ○ ○ ○ ○ ○
ZMM5598*
● ○ ● ● ○ ○
* wersja kolorystyczna, ● – podstawowe wyposażenie, ○ – dodatkowe wyposażenie do nabycia w sklepach,
–
– wyposażenie niedostępne
w danym wykonaniu
●
Do popychania stosuj tylko popychacz. Używanie
innych przedmiotów grozi uszkodzeniem maszynki
i napędu.
●
Nie przeciążaj urządzenia nadmierną ilością produktu,
ani zbyt silnym jego popychaniem (popychaczem).
●
Dokładnie montuj zespół mielący, gdyż źle skręcony
zespół mielący powoduje niewłaściwą jakość mielenia, jak również może być przyczyną stępienia nożyka
i sitka. Stępiony nożyk i sitko wymień na nowe.
●
Podczas pracy maszynki nie zasłaniaj otworów wentylacyjnych w obudowie. Maszynki nie stawiaj na miękkim podłożu.
●
Nie zanurzaj napędu maszynki w wodzie, ani nie myj
go pod bieżącą wodą.
●
Nie myj wyposażenia zamontowanego na napędzie.
●
Do mycia obudowy nie używaj agresywnych detergentów w postaci emulsji, mleczka, past itp. Mogą one
między innymi usunąć naniesione informacyjne symbole graczne, takie jak: podziałki, oznaczenia, znaki
ostrzegawcze, itp.
WSKAZÓWKA
Informacje o produkcie i wskazówki dotyczące użytkowania
●
Po zakończeniu pracy wyjmij wtyczkę przewodu przyłączeniowego z gniazdka sieci. Schowaj przewód
lekko wysuwając go w otwór z którego jest wprowadzony, a wtyczkę przewodu włóż do schowka.
●
Gdy maszynka nie daje się uruchomić – oddaj ją do
serwisu.
●
Mięso przeznaczone do mielenia oddziel od kości,
ścięgien, chrząstek i żył.
●
Przed mieleniem większe produkty potnij na kawałki.
●
Nie miel suchego maku. Przed mieleniem mak musi być
wcześniej sparzony i namoczony – do kilkunastu godzin.
●
Do mycia metalowych części używaj miękkiej szczoteczki.
●
Nie myj metalowych części w zmywarkach. Agresywne
środki czyszczące stosowane w tych urządzeniach
powodują ciemnienie w/w części. Myj je ręcznie, z użyciem tradycyjnych płynów do naczyń.
Dane techniczne
Parametry techniczne podane są na tabliczce znamionowej
wyrobu.
Dopuszczalny czas nieprzerwanej pracy 15 minut.
Czas przerwy przed ponownym użyciem 30 minut.
Hałas urządzenia (LWA) 77 dB/A.
MBP – Moc zablokowania silnika 2000 W
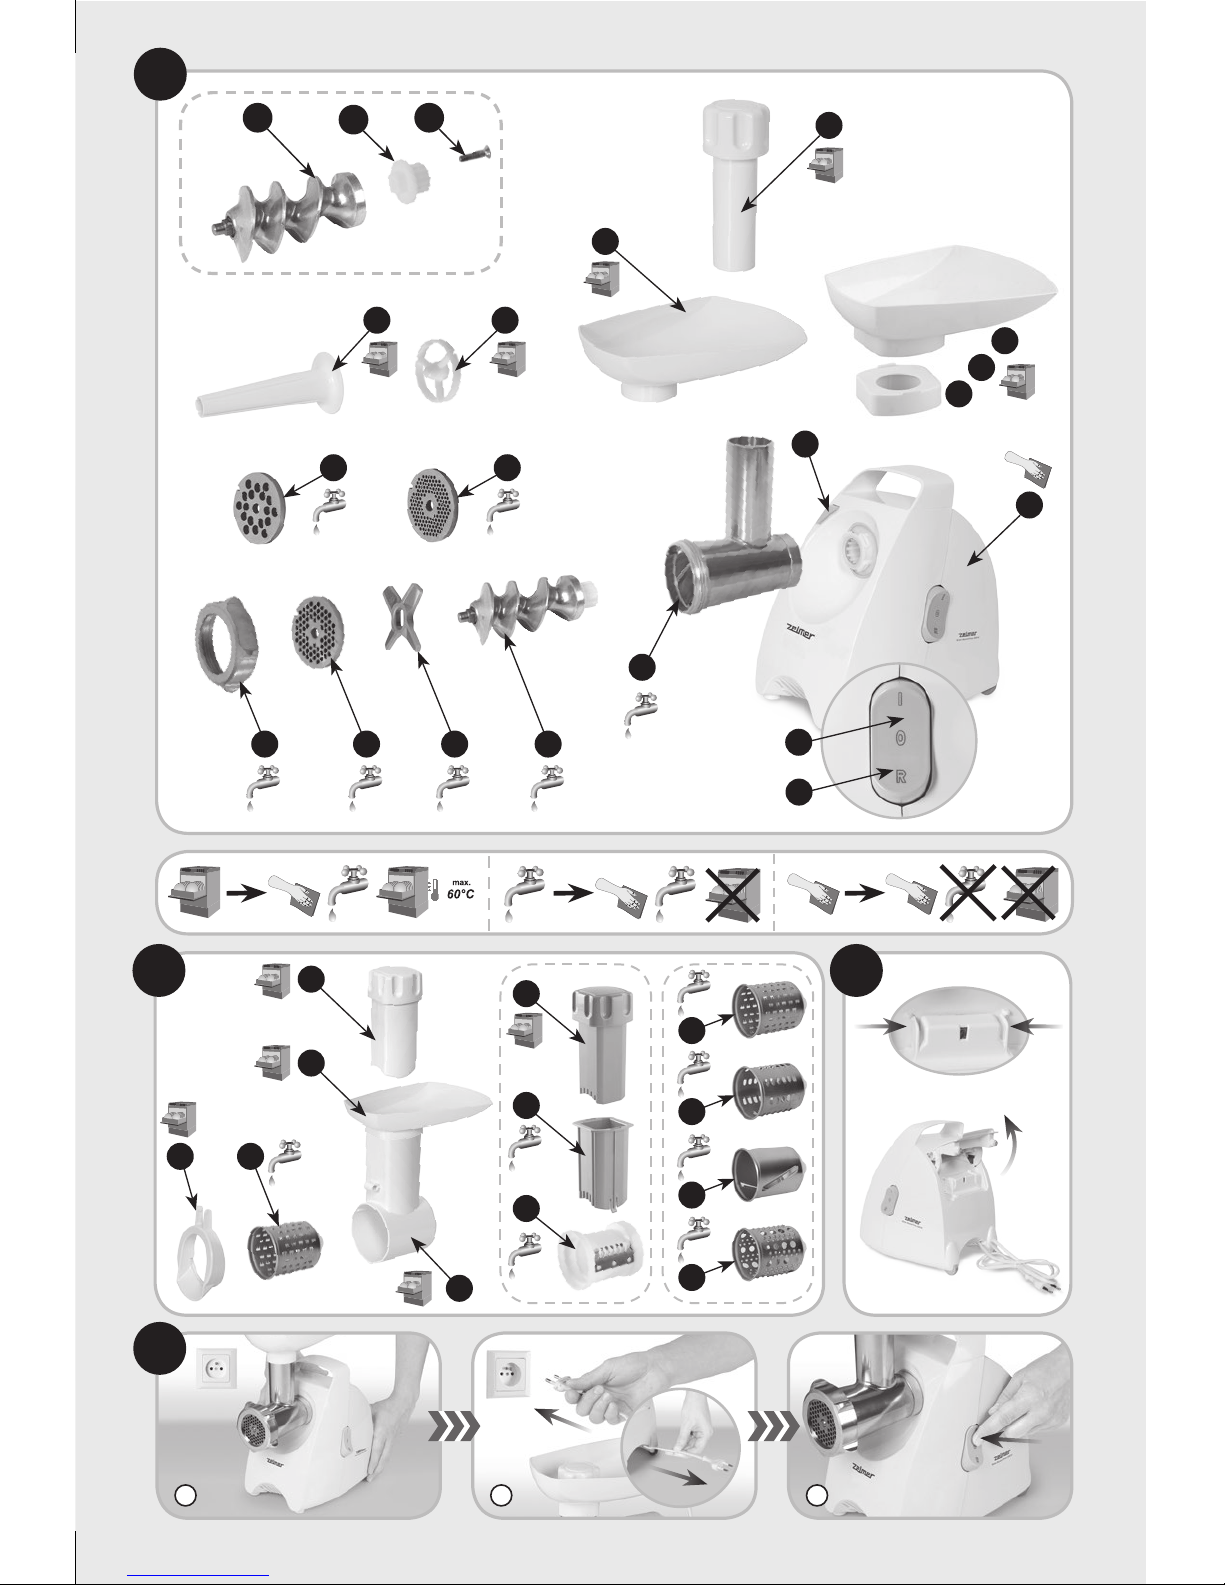
Opis urządzenia
Maszynka do mielenia produktów spożywczych składa się z:
1
Napędu maszynki – każdy napęd maszynki przysto-
sowany jest do montażu każdego zespołu mielącego,
cytrusiarki, wyciskarki do owoców, młynka do kawy
i szatkownicy produkcji ZELMER.
1a
Przycisk wyłącznika
1b
Przycisk „Rewers”
1c
Przycisk blokady
A
Zespołu mielącego, w którego skład wchodzi:
2
Komora mielenia
3
Ślimak z zamontowanym sprzęgłem
4
Nożyk dwustronny
5
Sitko z otworami 4 mm
6
Nakrętka
7a
Miska
7b I
Adapter
II
Misa szatkownicy
(maszynka może być wyposażona w jeden zestaw mis
7a
lub 7b)
8
Popychacz
Oraz wyposażenia dodatkowego:
9
Wkładka dystansowa
10
Nasadka masarska
11
Sitko z otworami 8 mm
12
Sitko z otworami 2,7 mm
Page 9
9
Mechaniczne zabezpieczenie silnika
13
Ślimak
14
Sprzęgło
15
Wkręt M4x20
Maszynka posiada mechaniczne zabezpieczenie, które
chroni silnik przed zniszczeniem – zęby sprzęgła napędowego ślimaka wyłamują się, gdy maszynka jest przeciążona
(np. gdy do środka dostały się kości).
Zniszczone sprzęgło wymień na nowe:
●
w ślimaku ze zniszczonym sprzęgłem odkręć wkręt (15),
●
usuń uszkodzone sprzęgło (14),
●
załóż nowe sprzęgło i dokręć je wkrętem (15).
Funkcja „Rewers”
Napęd maszynki posiada specjalną funkcję pozwalającą na
chwilową zmianę kierunku obrotu ślimaka, stosowana jest
w przypadku gdy zauważalne jest znaczne ograniczenie
mielenia lub/i nadmiar produktu w komorze mielenia (slimak
nie zabiera dozowanego produktu). W takim przypadku wciśnij na krótki czas przycisk „R” – wyłącznika, zostaną wtedy
wycofane z wnętrza komory produkty. Następnie ponownie
włącz przycisk „I” i kontynuuj dalszą pracę.
Jeżeli w dalszym ciągu ślimak blokuje się nadmiarem produktu, należy ponownie użyć przyciku „R”, wycofać produkt
z komory i usunąć z produktu części utrudniające mielenie
(np. ścięgna itp.). W niektórych sytuacjach należy rozkręcić
komorę i całkowicie usunąć w/w przeszkody.
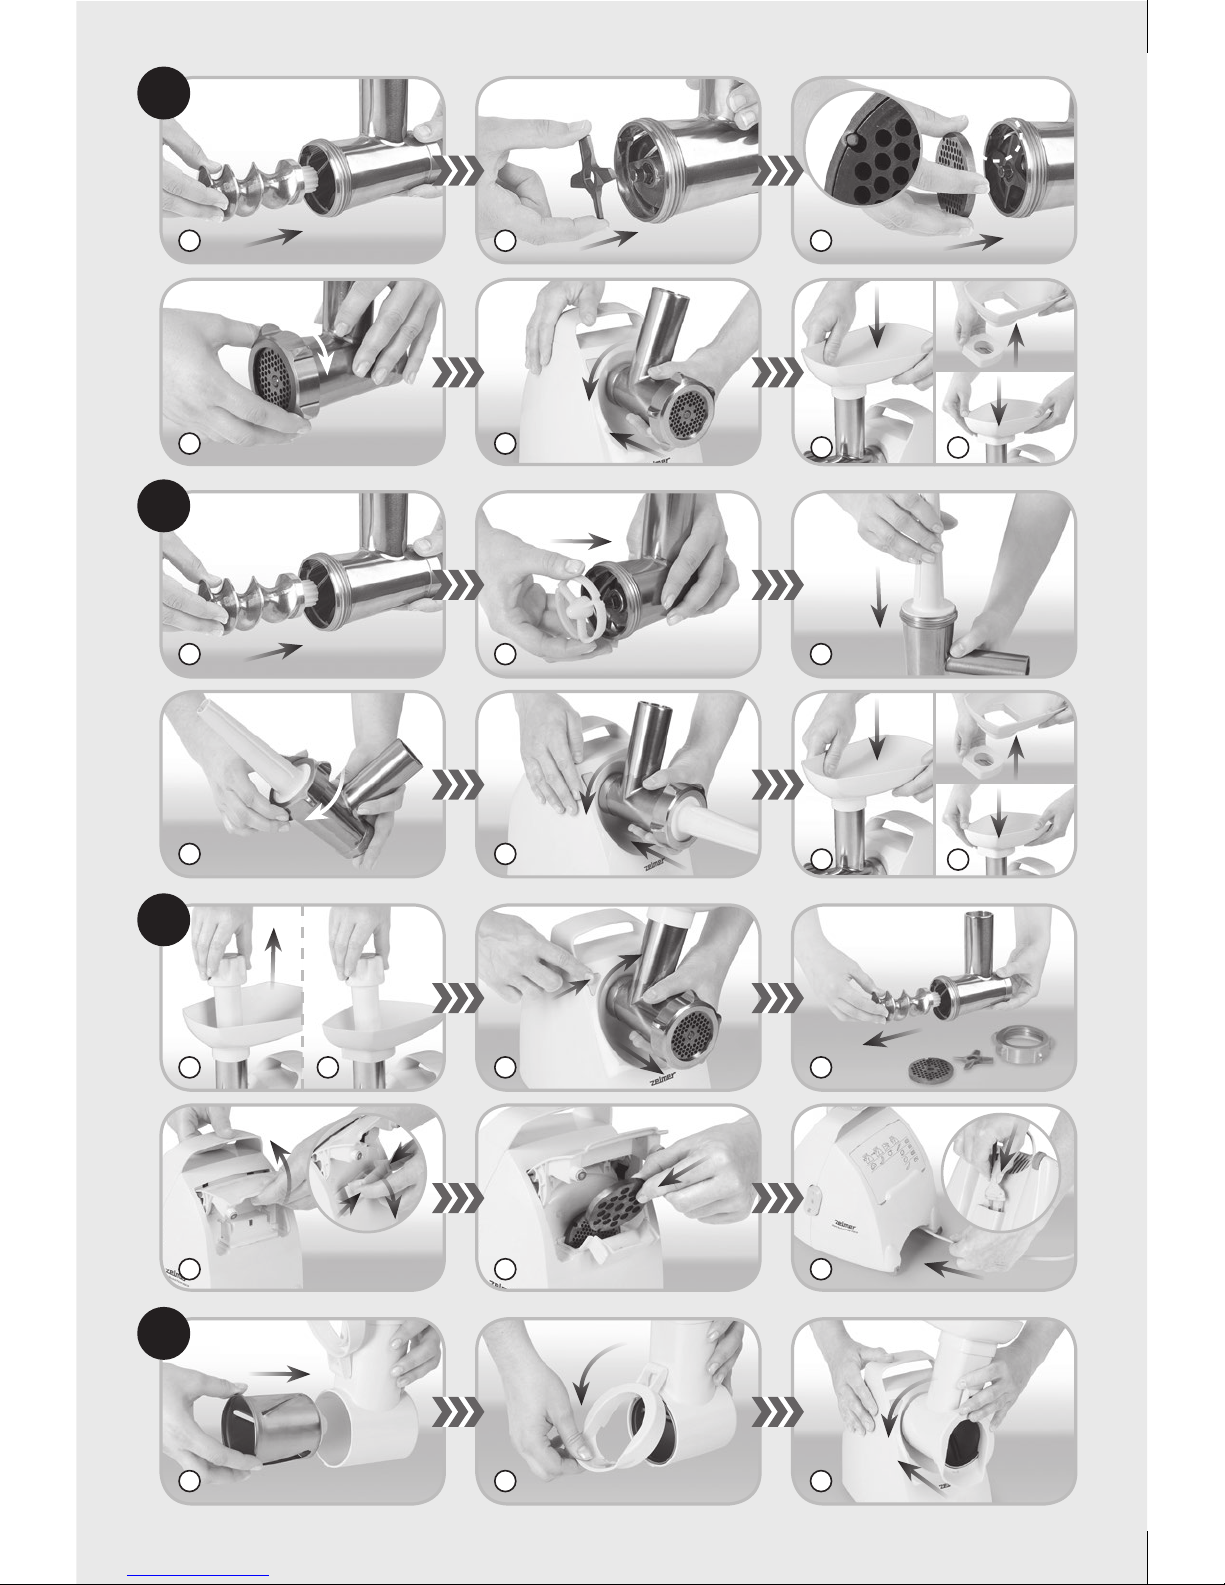
Praca z zespołem mielącym
Do komory mielenia (2) włóż kolejno:
1
Ślimak (3) sprzęgłem do środka.
2
Na trzpień ślimaka (3) nożyk (4).
3
Sitko (np. 5) tak, aby występ komory wszedł w rowek na
obwodzie sitka.
4
Dokręć wszystkie elementy zespołu mielącego – mocno
do oporu.
5
Załóż zmontowany zespół mielący, na napęd (1) i obróć
do pozycji, przy której usłyszysz „click” blokady. Oznacza to,
że komora została właściwie zamontowana.
6a
Nałóż miskę (7a) na komorę mielenia (2).
6b
Włóż adapter I do misy II. Nałóż misę wraz z adapte-
rem (7b) na komorę mielenia (2).
Przygotowanie maszynki do pracy i jej
uruchomienie
●
Wyciągnij ze schowka napędu odpowiednią długość
przewodu przyłączeniowego i odpowiednie akcesoria.
1
Napęd (1) postaw w pobliżu gniazdka sieci na twardym
stabilnym podłożu tak, aby nie zasłaniać otworów wentylacyjnych w obudowie.
●
Otwórz schowek w tylnej części obudowy i wyjmij odpowiednie sitko (Rys. C).
A
E
D
Standardowo sitko z otworami 4 mm zmonto-
wane jest w komorze mielenia.
●
Przed pierwszym użyciem maszynki dokładnie umyj elementy wyposażenia.
●
Zmontuj odpowiednie wyposażenie i dołącz do napędu.
2
Włóż przewód przyłączeniowy do gniazdka sieciowego.
3
Przyciskiem „I” wyłącznika (1a) uruchom maszynkę
(urządzenie startuje po około 2 sekundach).
Praca z nasadką masarską
Do komory mielenia (2) włóż kolejno:
1
Ślimak (3) sprzęgłem do środka.
2
Na trzpień ślimaka (3) wkładkę dystansową (9).
3
Nasadkę masarską (10).
4
Dokręć wszystkie elementy nakrętką (6) – mocno do
oporu.
5
Załóż zmontowany zespół mielący, na napęd (1) i obróć
do pozycji, przy której usłyszysz „click” blokady.
6a
Nałóż miskę (7a) na komorę mielenia (2).
6b
Włóż adapter I do misy II. Nałóż misę wraz z adapte-
rem (7b) na komorę mielenia (2).
Przed nałożeniem kiełbaśnicy (osłonki z jelita) namocz ją
w ciepłej wodzie przez ok. 10 min.
●
Na nasadkę masarską nałóż mokrą kiełbaśnicę.
Zwróć uwagę, aby nie zatkać otworów odpo-
wietrzających w nasadce.
Masa mięsna wypełniająca jelito nie może być
„zbyt rzadka”. Duża zawartość płynów może
spowodować ich wyciek i przedostawanie się
do wnętrza maszynki.
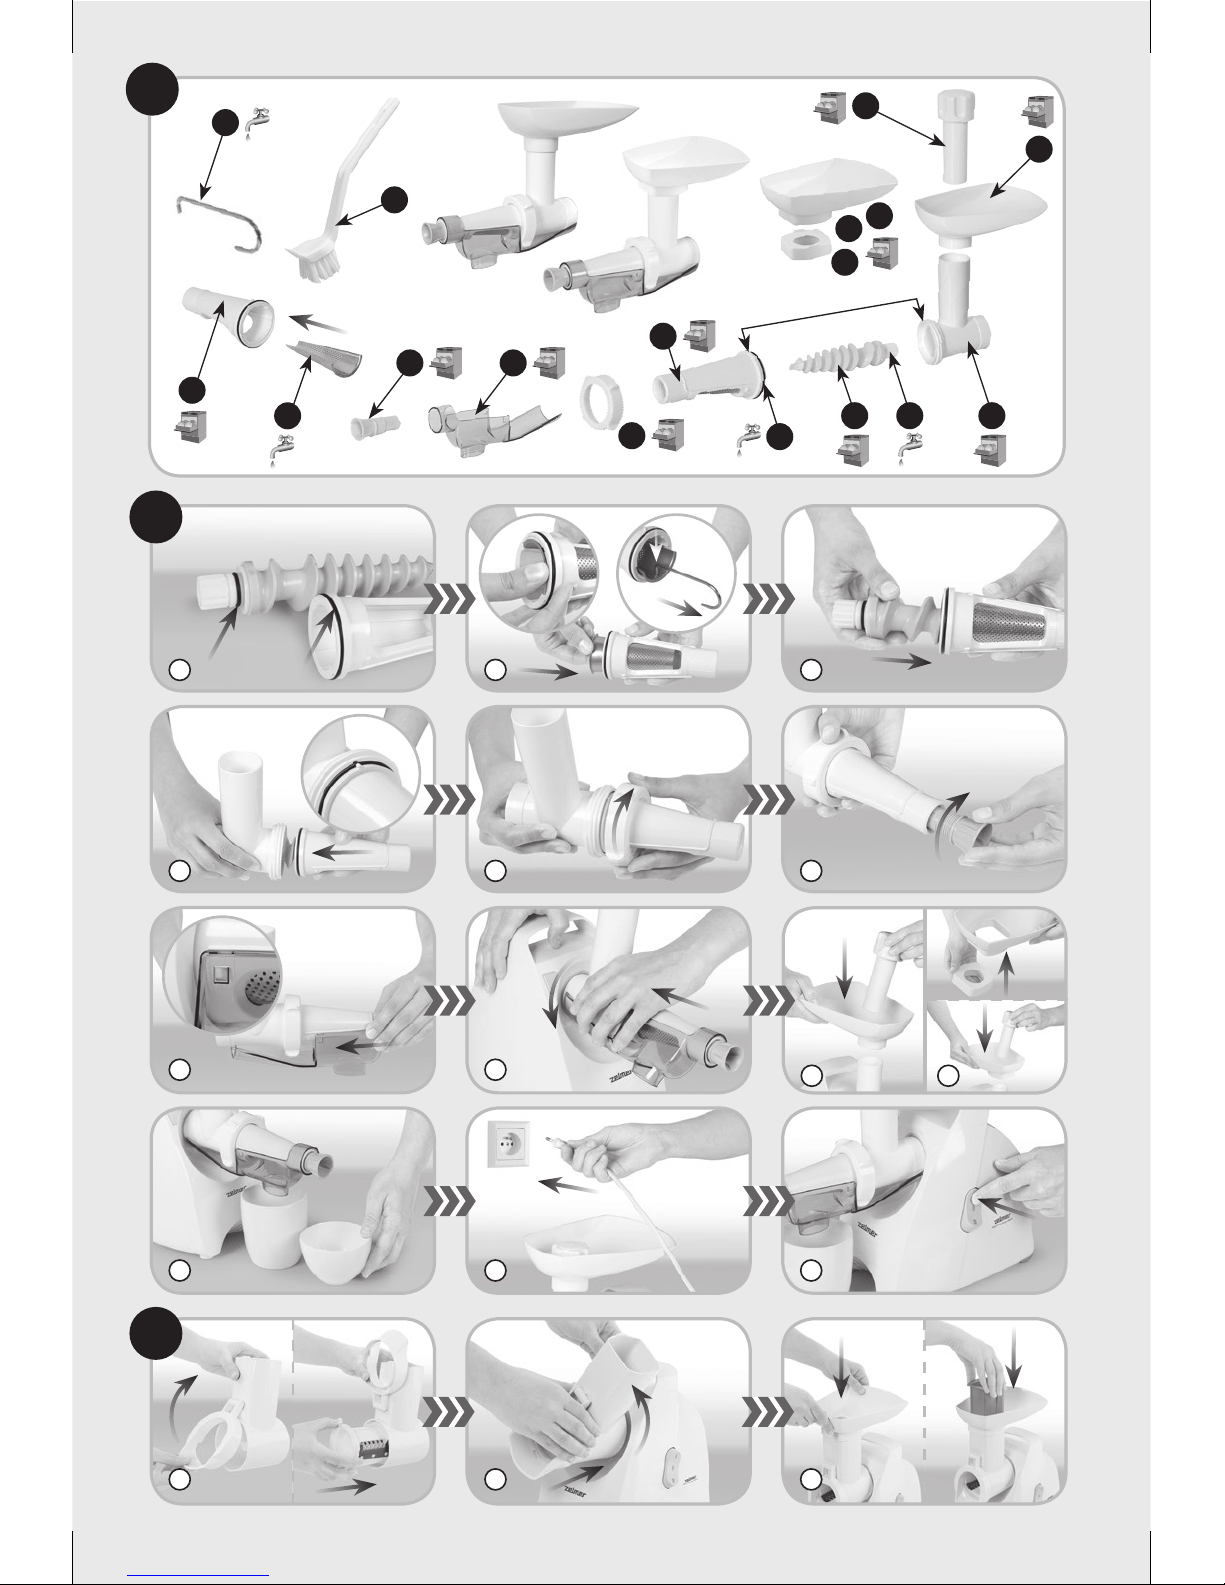
Wyciskarka do owoców
Wyciskarka jest wyposażeniem w niektórych typach
maszynek do mielenia. Pozwala wyciskać sok z owoców
takich, jak: maliny, porzeczki, truskawki, agrest oraz dodatkowo z winogron i pomidorów. Owoce jagodowe takie, jak
porzeczki można wyciskać wraz z szypułkami. W wyciskarce
nie można stosować owoców z dużymi pestkami np. śliwy,
wiśnie, itp. bez ich wcześniejszego wydrylowania (usunięcia).
Elementy wyciskarki:
1
Komora wyciskarki
2
Ślimak
3
Korpus
4
Nakrętka
5
Rynienka odprowadzająca sok
6
Śruba regulacyjna
7a
Miska
F
I
Page 10
10
7b I
Adapter
II
Misa szatkownicy
(maszynka może być wyposażona w jeden zestaw mis
7a
lub 7b)
8
Popychacz (z zespołu mielącego)
9
Sitko – 2 szt.
Nr 1 – otwory mniejsze
Nr 2 – otwory większe
10
Pierścień uszczelniający duży na korpus (3)
11
Pierścień uszczelniający mały na ślimak (2)
12
Haczyk
13
Szczotka
Do popychania owoców używaj wyłącznie
popychacza (8).
PRZYGOTOWANIE DO PRACY I OBSŁUGA
WYCISKARKI
1
Upewnij się, że na korpusie (3) i ślimaku (2) są założone
pierścienie uszczelniające (10) i (11). W razie ich braku
koniecznie włóż je we głębienia tych elementów (korpusu
i ślimaka).
2
Do korpusu (3) włóż i dociśnij sitko (9) do oporu.
Do usunięcia sitka (9) z korpusu (3) bardzo
przydatne jest użycie haczyka (12). Haczyk
(12) krótszym końcem włóż w otwór sitka (9)
i pociągnij sitko (9) na zewnątrz.
3
Do komory wyciskarki (1) włóż ślimak (2).
4
Nałóż korpus z sitem na ślimak zwracając uwagę, aby
sitko było zwrócone ku dołowi, a rowek pozycjonujący trał
na występ komory wyciskarki.
5
Tak ustawiony korpus przykręć nakrętką (4) do komory
wyciskarki (1).
6
Wkręć śrubę regulacyjną (6) w korpus (3).
7
Nasuń na niego rynienkę odprowadzająca sok (5) do
momentu zatrzaśnięcia na korpusie (3) – „click”.
8
Zmontowaną wyciskarkę zamocuj na napęd, postępując
identycznie jak w opisie komory mielącej.
9a
Na gardziel zasypową nałóż miskę (7a) i popychacz (8) –
od zespołu mielącego.
9b
Włóż adapter I do misy II. Na gardziel zasypową
nałóż miskę (7b) i popychacz (8) – od zespołu mielącego.
10
Pod otwór wylotowy rynienki (5) i śruby regulacyjnej (6)
ustaw odpowiednie naczynia na sok oraz wytłoczyny.
11
Włącz przewód przyłączeniowy maszynki do gniazdka
sieci.
12
Uruchom maszynkę przyciskiem wyłącznika (1a), następnie dozuj odpowiednio owoce popychając popychaczem.
J
Aby proces wyciskania owoców przebiegał pra-
widłowo, nie wkręcaj zbyt głęboko śruby regulacyjnej w początkowej fazie pracy. Dopiero po
ocenie stopnia zawartości soku w wytłoczynach, skoryguj odpowiednio stopień wkręcenia
tak, aby uzyskać wystarczającą efektywność
i uniknąć zatkania wyciskarki.
●
W trakcie wyciskania obserwuj suchość wytłoczyn. Gdy
robią się nadmiernie suche, wykręć śrubę (6), aby uniknąć zatkania wyciskarki wytłoczynami.
Stopień wkręcenia śruby zależy od rodzaju
i gatunku przetwarzanych owoców, dla owoców soczystych i bardzo dojrzałych – śrubę
wkręć głębiej, a dla owoców mało soczystych
– śrubę wkręć nieco mniej.
Gdy regulacja śrubą nie zapewni dostatecznej
skuteczności wyciskania, można wytłoczyny
ponownie przepuścić przez wyciskarkę.
Zablokowanie wylotu komory (w śrubie regu-
lacyjnej (6)) wytłoczynami z owoców o dużej
zawartości soku grozi zalaniem napędu
maszynki.
●
W razie zablokowania wylotu komory wytłoczynami
wyłącz maszynkę. Zwróć szczególną uwagę na proces
wyciskania soku np. czy nie nastąpiło zatkanie otworów sita. Odłącz wyciskarkę od napędu (identycznie jak
w przypadku komory mielącej), rozmontuj wyciskarkę,
oczyść (wymyj) elementy wyciskarki. Do mycia, szczególnie sita, używaj dołączonej szczoteczki.
Szatkownica z krajarką do warzyw
1
Tarka do drobnych wiórek
2
Tarka do grubych wiórek
3
Tarka do plastrów
4
Tarka do przecierania
5
Zatrzask
6
Komora
7
Miska zasypowa
8
Popychacz
W przypadku korzystania z szatkownicy zdej-
mij adapter.
Szatkownica ma dwie tarki do rozdrabniania na drobne (1)
i grube (2) wiórki (sera żółtego, marchwi, selerów, gotowanych buraków, itp.). Tarka (3) służy do krojenia warzyw na
plastry (ziemniaków, ogórków, cebuli, itp.). Tarka (4) służy do
przecierania ziemniaków, buraków, owoców itp.
9
Bęben krajarki
10
Wkładka krajarki
11
Popychacz krajarki
EB
Page 11
11
Krajarka do warzyw stanowi dodatkowe wyposażenie szatkownicy. Służy do krojenia w kostkę tylko gotowanych
warzyw: ziemniaków, buraków ćwikłowych, marchewki,
selera, pietruszki itp. Przed rozpoczęciem użytkowania należy
warzywa ugotować. Po ugotowaniu duże warzywa należy
wstępnie pokroić aby mieściły się wewnątrz wkładki (10).
PRACA Z SZATKOWNICĄ
1
Odchyl zatrzask (5) i włóż jedną z tarek sprzęgłem do
środka komory.
2
Zatrzaśnij zatrzask (5).
3
Połącz komorę szatkownicy (6) tak, jak komorę mielenia
maszynki.
●
Produkty duże pokrój wcześniej na kawałki, które bez
trudu włożysz do komory.
●
Nie rozdrabniaj miękkich owoców zawierających twarde
pestki.
●
Po zakończeniu pracy wyłącz maszynkę i wyjmij przewód przyłączeniowy z gniazdka sieci.
●
Usuń drewnianą łyżką resztki produktów pozostałe
wewnątrz tarki lub w komorze.
Ostrza tarek nie wymagają regeneracji.
PRACA Z KRAJARKĄ DO WARZYW
Ostrza bębna krajarki są bardzo ostre, należy
zachować ostrożność.
1
Odchyl zatrzask (5) i włóż bęben (9) sprzęgłem do
środka komory.
●
Zatrzaśnij zatrzask.
2
Załóż komorę szatkownicy na napęd maszynki i obróć
do pozycji, przy której usłyszysz „click” blokady.
3
Zamontuj misę zasypową (7) i włóż wkładkę krajarki (10).
●
Po włożeniu warzywa należy dociskać popychaczem (11).
Popychacz nr 11 stosuj tylko z wkładką kra-
jarki. Zabronione jest używanie popychacza
nr 11 bez umieszczonej wkładki krajarki (10)
w komorze (6).
Produkty duże pokrój wcześniej na kawałki,
które bez trudu włożysz do wkładki krajarki (10).
●
Po zakończeniu pracy wyłącz maszynkę i wyjmij przewód przyłączeniowy z gniazdka sieci.
●
Usuń drewnianą łyżką resztki produktów pozostałe
wewnątrz bębna krajarki lub we wkładce.
●
Rozłóż elementy krajarki.
Wkładkę krajarki (10) wyciągniesz demontując
misę zasypową (7).
Zabronione jest krojenie surowych warzyw.
H
K
Przy zastosowaniu zbyt miękko ugotowanych
produktów efekt krojenia w kostkę może być
mniej zadowalający.
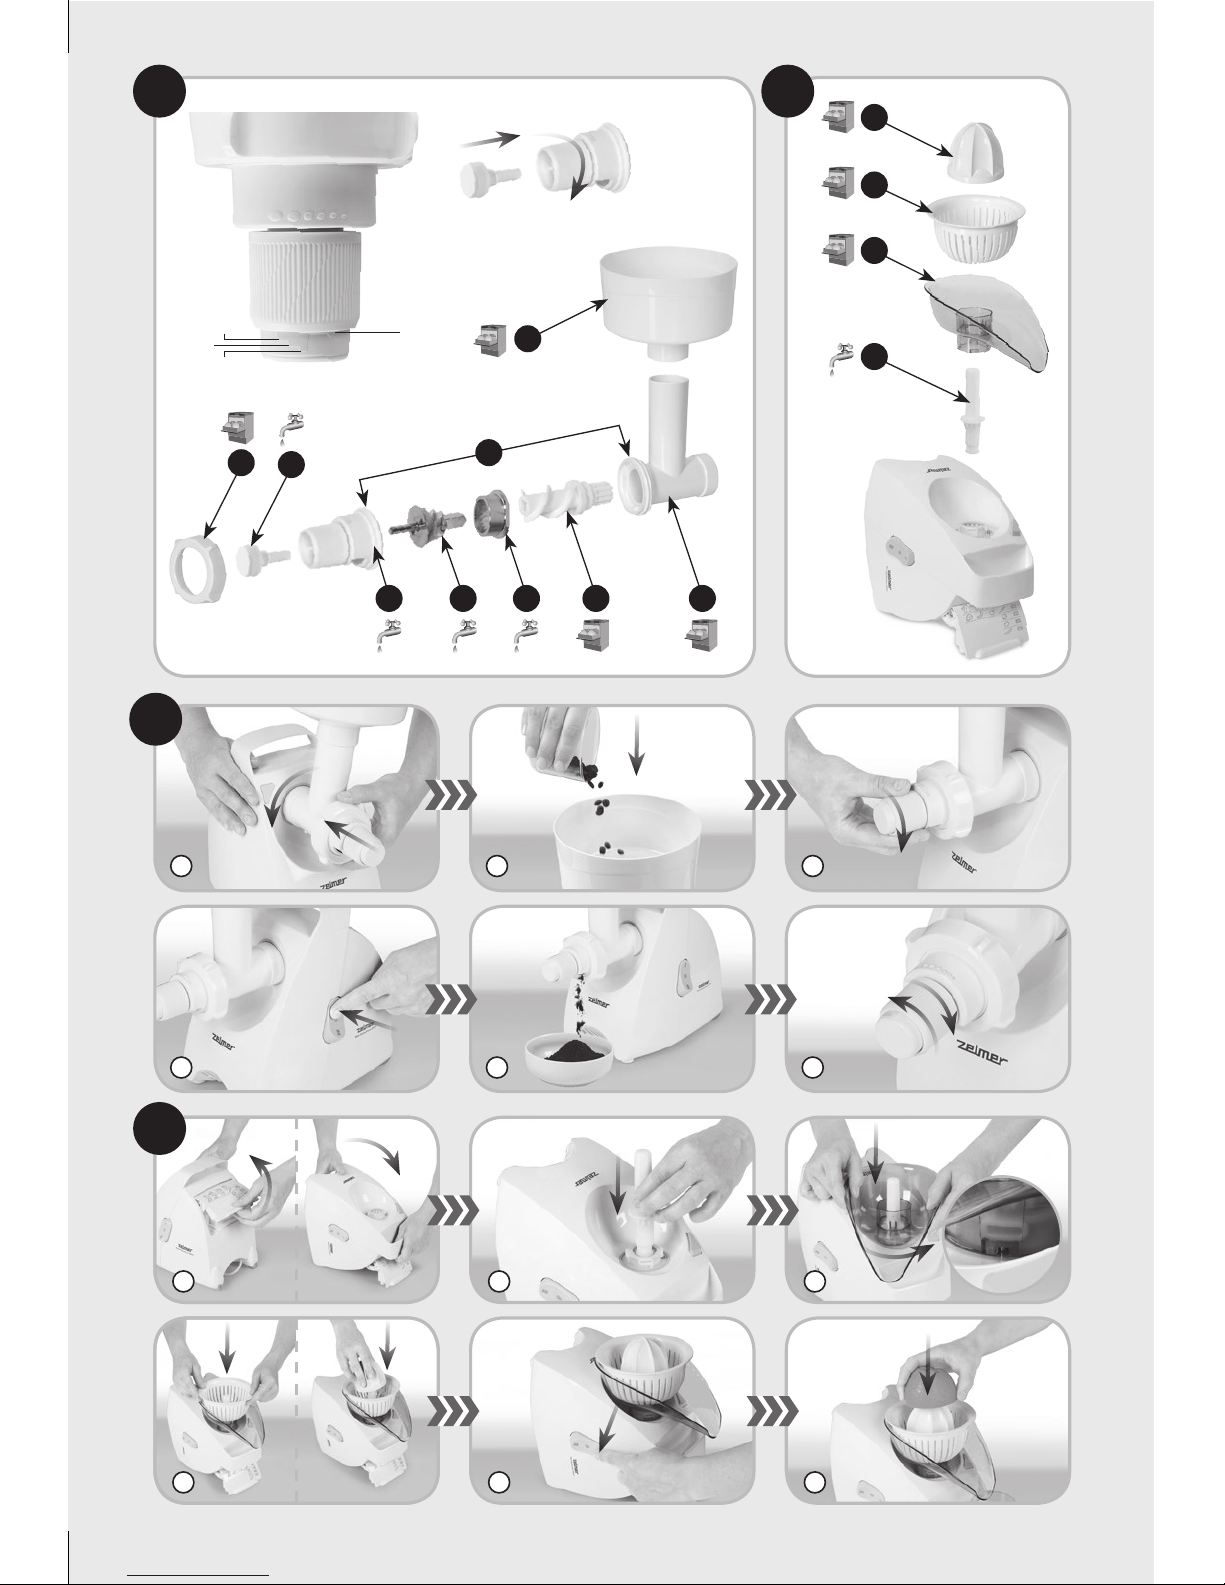
Młynek żarnowy
1
Nakrętka
2
Nastawiak żaren
3
Korpus z pokrętłem
4
Żarno wewnętrzne
5
Żarno zewnętrzne
6
Ślimak
7
Komora młynka
8
Miska
9
Rowek korpusu musi trać na występ komory młynka
OPIS URZĄDZENIA
Przystawka ta może być stosowana do mielenia zbóż,
nasion oleistych oraz suchych produktów spożywczych.
Młynek żarnowy pozwala na mielenie takich produktów jak:
pszenica, żyto, owies, ryż, kawa ziarnista, cukier, kasza gryczana, pieprz czarny ziarnisty, ziele angielskie, gorczyca,
orzechy włoskie, orzechy laskowe, suszone grzyby, migdały,
soja, siemię lniane, łuskane ziarna słonecznika itp.
Produktów oleistych nie miel na minimalnym
nastawieniu granulacji. Urządzenie do mielenia
może się zakleić lub zablokować.
Urządzenie nie nadaje się do mielenia produk-
tów bardzo twardych np. suszony groszek,
kukurydza popcorn.
MONTAŻ MŁYNKA NA MASZYNCE
1
Gdy komora młynka (7) jest obrócona o kąt ok. 45°
w prawo, załóż zmontowany młynek na napęd poprzez
włożenie występów komory młynka (7) w wycięcia napędu,
a następnie obróć go w lewo do pozycji, przy której usłyszysz „klik” blokady. Oznacza to, że młynek został właściwie
zamontowany.
UŻYTKOWANIE I REGULACJA MŁYNKA
Przed pierwszym użyciem umyj (patrz „CZYSZCZENIE”)
i wysusz rozłożony na części młynek, a następnie zmiel ok.
50 g produktu (np. zboża) przy ustawieniu urządzenia na
mielenie ze średnim rozdrobnieniem. Zmielony produkt nie
nadaje się do dalszego wykorzystania, jest bowiem zanieczyszczony i należy go wyrzucić.
Maksymalny czas nieprzerwanej pracy młynka
wynosi 15 minut. Warunek ten jest powiązany
z maksymalnym czasem pracy maszynki, dla
której po 15 min pracy powinno nastąpić ok. 45
min przerwy.
L
N
N
Page 12

12
Cytrusiarka
Cytrusiarka jest dodatkowym urządzeniem, które pozwala
wycisnąć z owocu cytrusowego sok wraz z miąższem.
Budowa cytrusiarki:
1
Sprzęgło
2
Miska
3
Sitko
4
Wyciskacz
PRACA Z CYTRUSIARKĄ
1
Otwórz klapkę schowka w tylnej części obudowy, która
umożliwia pracę w pozycji pionowej. Ustaw ją w takiej pozycji kładąc na twardym, równym podłożu.
2
Na napęd nałóż sprzęgło.
3
Nałóż miskę na napęd i obróć ją w lewo do pozycji,
przy której usłyszysz „click” blokady. Oznacza to, że miska
została właściwie zamontowana.
4
Na wystającą część z miski zamontuj sitko oraz wyciskacz.
●
Przygotuj odpowiednio owoce, przekrawając je na pół.
●
Włącz przewód przyłączeniowy maszynki do gniazdka
sieci.
5
Uruchom maszynkę przyciskiem „I” (1a) następnie
nałóż owoc miąszem na wyciskacz.
6
Dociśnij odpowiednią siłą, która spowoduje zasprzęglenie się mechanizmu i rozpocznie proces wyciskania.
W razie zablokowania sitka miąższem wyci-
skanych owoców należy maszynkę zatrzymać,
odłączyć sitko a następnie opróżnić je z miąższu, gdyż jego nadmiar może doprowadzić do
zalania komory napędu maszynki.
Cytrusiarka podczas pracy obraca sie. Podczas
dociskania owoców do wyciskacza zachowaj
ostrożność i zwróć szczególną uwagę na palce.
Po zakończeniu pracy
●
Wyłącz maszynkę i wyjmij wtyczkę przewodu przyłączeniowego z gniazdka sieci.
1a
Wyjmij popychacz i zdejmij miskę (7a) z komory mielenia, komory wyciskarki (w przypadku cytusiarki wcześniej
zdejmij wyciskacz i sitko) lub misę szatkownicy z komory
szatkownicy.
1b
Wyjmij popychacz i zdejmij misę szatkownicy wraz
z adapterem (7b) z komory mielenia, komory wyciskarki
(w przypadku cytusiarki wcześniej zdejmij wyciskacz i sitko)
(adapter zdemontuj w odwrotnej kolejności do jego montażu)
lub misę szatkownicy z komory szatkownicy.
2
Naciśnij przyciski blokady, zespół, mielący, komorę szatkownicy (lub miskę cytrusiarki) obróć w prawo i zdejmij ją.
●
W przypadku cytrusiarki wyjmij sprzęgło z napędu.
3
Rozłóż elementy zespołu mielącego, komory z nasadką
masarską, komory wyciskarki lub szatkownicę.
M
O
G
Urządzenie nie może pracować bez obciążenia.
Zawsze przed uruchomieniem napełnij je produktem.
2
Wsyp ziarna do miski (8).
3
Ustaw pokrętło korpusu (3) na grubsze mielenie.
4
Włącz silnik maszynki.
5
Zmielony produkt zacznie wysypywać się przez otwór.
6
W zależności od żądanego stopnia zmielenia lub użytych
ziaren, za pomocą pokrętła korpusu (3), wyreguluj nastawiak
żaren (2) tak, aby uzyskać produkt o odpowiedniej granulacji. Przekręcając go w kierunku zgodnym do ruchu wskazówek zegara uzyskasz produkt drobniej zmielony, a przy kręceniu w kierunku przeciwnym do ruchu wskazówek zegara
– produkt grubiej zmielony.
Najdrobniejszy (minimalny) stopień zmielenia uzyskuje się
przy ustawieniu pokrętłem na linii 1, a największy (maksy-
malny) przy ustawieniu pokrętła na linii STOP. Patrz graka
na korpusie (3) i nastawiaku żaren (2).
Zbyt mocne skręcenie lub wykręcenie pokrętła
poza linię STOP podczas pracy może spowodować uszkodzenie urządzenia.
Zaleca się, aby podczas pracy młynka nasta-
wiak żaren (II) ustawiony był pomiędzy linią 1,
a linią STOP.
Przy założonym młynku NIE WOLNO używać
w maszynce funkcji REVERSE.
Pamiętaj o dokładnym umyciu młynka przed
mieleniem różnych produktów. Pozwoli to uniknąć wzajemnego przenikania zapachów.
Dla bardziej miękkich zbóż takich jak owies czy
siemię lniane należy wybrać ustawienie gruboziarniste.
Nie zaglądaj do wnętrza komory podczas miele-
nia, gdyż wyskakujące czasem ziarna mogą Cię
zranić (np. w oko).
CZYSZCZENIE I KONSERWACJA
Młynek nie wymaga czyszczenia po każdym użyciu (jeśli
mielony jest jeden rodzaj produktu), ponieważ ślimak (6)
zapobiega zaleganiu pozostałości ziaren w młynku. Żarna
stalowe (4, 5) osusz ściereczką po umyciu, aby nie doszło
do ich korozji. W przypadku długotrwałego przechowywania
żaren, zakonserwuj je poprzez natłuszczenie (możesz w tym
celu użyć np. oleju jadalnego). Żaren nie należy zanurzać we
wrzącej wodzie. Części z tworzywa sztucznego (niezawiera-
jące graki) możesz myć w zmywarce (max. 60°C).
Page 13
13
Umyte i wysuszone sitka z otworami włóż do schowka,
w tym celu:
4
Otwórz schowek w tylnej części obudowy.
●
Naciśnij z dwóch stron blokadę schowka i pociągnij go
do siebie (tak jak pokazano wcześniej).
5
Schowaj maksymalnie dwa sitka z otworami, następnie
zamknij schowek i tylną klapkę.
6
Schowaj przewód lekko wsuwając go w otwór z którego
jest wyprowadzony.
●
Schowaj wtyczkę przewodu do schowka.
Czyszczenie i konserwacja
●
Napęd przetrzyj wilgotną szmatka zwilżoną płynem do
mycia naczyń.
●
Części z tworzywa myj w ciepłej wodzie z dodatkiem
płynu do mycia naczyń lub wg oznaczeń w zmywarce.
●
Części metalowe myj w gorącej wodzie z dodatkiem
płynu do mycia naczyń.
●
Dokładnie wysusz umyte części.
●
Suche części komory mielenia lub szatkownicy zmontuj
w całość.
Ekologiczna utylizacja
To urządzenie jest oznaczone zgodnie z Dyrektywą Europejską 2012/19/UE oraz polską
Ustawą z dnia 11 września 2015 r. „O zużytym
sprzęcie elektrycznym i elektronicznym” (Dz.U.
z dn. 23.10.2015 poz. 1688) symbolem przekreślonego kontenera na odpady. Takie oznakowanie informuje, że sprzęt ten, po okresie jego użytkowania nie może być umieszczany łącznie z innymi odpadami
pochodzącymi z gospodarstwa domowego. Użytkownik jest
zobowiązany do oddania go prowadzącym zbieranie zużytego sprzętu elektrycznego i elektronicznego. Prowadzący
zbieranie, w tym lokalne punkty zbiórki, sklepy oraz gminne
jednostka, tworzą odpowiedni system umożliwiający oddanie
tego sprzętu. Właściwe postępowanie ze zużytym sprzętem
elektrycznym i elektronicznym przyczynia się do uniknięcia szkodliwych dla zdrowia ludzi i środowiska naturalnego
konsekwencji, wynikających z obecności składników niebezpiecznych oraz niewłaściwego składowania i przetwarzania
takiego sprzętu.
Producent nie odpowiada za ewentualne szkody spowodowane
zastosowaniem urządzenia niezgodnie z jego przeznaczeniem lub
niewłaściwą jego obsługą.
Producent zastrzega sobie prawo modykacji wyrobu w każdej chwili,
bez wcześniejszego powiadamiania, w celu dostosowania do przepisów prawnych, norm, dyrektyw albo z przyczyn konstrukcyjnych,
handlowych, estetycznych i innych.
Page 14
14
Dear Customer!
Congratulations on your choice of our appliance, and
welcome among the users of Zelmer products.
In order to achieve best possible results we recommend
using exclusively original Zelmer accessories. They have
been specially designed for this product.
Please read this user manual carefully. Pay special attention
to important safety instructions. Keep this user manual for
future reference.
Safety instructions and instructions
concerning the proper use of the appliance
Before starting to use the appliance, become familiar
with the whole content of this user manual.
Make sure that you understand the instructions given
below.
EN
DANGER! / WARNING!
Risk of injury
● Do not operate the appliance when
the power cord is damaged or the
housing shows visible damage.
● If the non-detachable power cord
is damaged, it should be replaced
by the manufacturer or at specialist
service centre or by a qualied
person in order to avoid any hazards.
● The appliance may only be repaired
by qualied service personnel.
Improper servicing may cause
a serious hazard to the user.
In case of defects contact ZELMER
specialist service centre.
● Take special care when operating
the appliance in the presence of
children.
● Turn off and unplug the appliance
before replacing accessories or
approaching its movable parts.
● Always unplug the appliance from
the electrical outlet when it is left
unattended and before assembling,
disassembling and cleaning.
● This product is not intended for use by
children. Keep the appliance and the
power cable out of reach of children.
● Appliances can be used by persons
with reduced physical, sensory
or mental capabilities or lack of
experience and knowledge if they
have been given supervision or
instruction concerning use of
the appliance in a safe way and
understand the hazards involved.
● Children shall not play with the
appliance.
● The appliance must only be used
with the feeder tray.
● Only use the appliance indoors at
room temperature and up to 2000 m
above sea level.
WARNING!
Risk of property damage
●
Do not disconnect the plug from the socket by pulling
the power cord.
●
Always plug the appliance to the mains (AC only) with
voltage corresponding to that indicated on the rating
plate.
●
Do not expose the appliance to temperatures above
60°C. The appliance can be damaged.
●
Use the pusher only when pushing the food. Using
objects other than the pusher may cause damage to
the mincer and the motor.
●
Do not overload the appliance with too much product
or by pushing too hard with the pusher.
●
Carefully assemble the mincer unit, as the improper
assembly results in poor mincing quality and may
cause the knife and the screen to blunt. Replace the
blunt cutter or screen with the new ones.
●
Do not obstruct the ventilation openings in the housing
during operation.
●
Do not place the appliance on a soft surface.
●
Do not immerse the appliance drive unit in water and
do not wash it under running water.
●
Do not wash accessories when mounted on the
drive unit. Do not use abrasive cleaning agents such
as emulsions, creams, pastes, etc. for cleaning the
appliance housing. They may remove graphical
symbols, such as scales, markings, warning signs, etc.
Page 15
15
TYPES OF ZELMER MINCERS
VIB
Accessories
Mincing unit Citrus juicer Shredder
Vegetable cube
cutter
Juicer Quern grinder
ZMM5580*
● ● ● ○ ● ●
ZMM5548*
● ○ ● ○ ○ ○
ZMM5588*
● ○ ○ ○ ○ ○
ZMM5598*
● ○ ● ● ○ ○
*appliance colour, ● – basic accessories, ○ – additional equipment, which you can buy in shops,
–
– unavailable accessories
HINT
Information on the product and
hints on its use
●
Unplug the appliance after you nish using it. Put away
the cord, pushing it gently through the opening and
place the plug in the compartment.
●
If the appliance cannot be switched on, bring it to
a service centre.
●
Separate the meat to be minced from bones, sinews,
gristles and veins.
●
Cut large portions of the product into smaller pieces
before mincing.
●
Do not grind dry poppy seed. The poppy seed must
be scalded and soaked for dozen or so hours before
mincing.
●
Use a soft brush for cleaning the metal parts.
●
Do not wash the metal parts in dishwashers. Abrasive
detergents used in dishwashers may cause the metal
parts to become dark. Wash them manually using
traditional washing-up liquids.
Technical parameters
The technical parameters are indicated on the rating label.
Permissible duration of uninterrupted operation 15 minutes.
Break before the next use 30 minutes.
Noise level (LWA) 77 dB/A.
MBP – Motor Blocked Power 2000 W
Description
The food mincer consists of:
1
Mincer motor – each motor is adapted to install each
ZELMER mincing unit, citrus juicer, juicer, coffee grinder
and shredder.
1a
On/Off button
1b
„Reverse” switch
1c
Lock button
The mincer unit consists of:
2
Mincer body
3
Scroll with clutch
4
Double-side cutter
5
Mincer screen with 4 mm openings
6
Ring nut
7a
Food tray
7b I
Adaptor
II
Shredder bowl
(the mincer may be equipped with one set of bowls 7a
or 7b)
8
Pusher
A
And additional accessories:
9
Base plate
10
Sausage ller nozzle
11
Mincer screen with 8 mm openings
12
Mincer screen with 2,7 mm openings
Mechanical safety device for the motor
13
Scroll
14
Clutch
15
Screw M4x20
The mincer is equipped with a mechanical safeguard, which
protects the motor against damage – the teeth in the clutch
break when the mincer is overloaded (e.g. when bones get
inside).
Replace the damaged clutch:
●
twist off the screw (15) from the scroll with the damaged
clutch,
●
remove the damaged clutch (14),
●
attach the new clutch and tighten it with the screw (15).
„Reverse” function
The motor has a special function allowing to temporarily
change the direction of the scroll. It is used if mincing is
limited and/or if there is too much product in the mincer body
(the scroll does not take the product). Press the „R” switch
for a short period of time, the product will be removed from
the inside of the mincer body. Press the „I” button once
again to continue operation.
A
Page 16
16
If the scroll is still blocked by the excess of product, use the
„R” switch once again, remove the product from the mincer
body and next remove product parts which make it difcult to
mince (e.g. sinews, etc.).
In some cases it is necessary to dismantle the mincer body
and remove the above-mentioned obstacles.
Working with the mincer unit
Insert the following parts into the mincer body (2):
1
Insert the scroll (3) with the coupling facing inside.
2
Fit the knife (4) onto the pin of the scroll (3).
3
Place the screen (e.g. 5) over the knife so that the
protrusion in the mincer body will t into the groove in the
circumference of the screen.
4
Tightly t all the elements of the mincer unit.
5
Fit the assembled mincer unit onto the drive unit (1) and
turn it until you hear a click of the lock. It means that the body
has been properly installed.
6a
Place the tray (7a) on the mincer body (2).
6b
Insert the adaptor I into the bowl II. Mount the bowl
and the adaptor (7b) on the mincing chamber (2).
Preparing the appliance for operation
and switching on the appliance
●
Take out a sufcient length of the supply cord and the
appropriate accessories from the compartment.
1
Place the motor (1) near the socket, on a hard, stable
surface. Do not cover the ventilation openings of the housing.
●
Open the compartment on the back of the housing and
take out an appropriate screen (Fig. C).
A screen with 4 mm openings is installed in the
mincer body as a standard.
●
Wash all accessories thoroughly before the initial use.
●
Assemble the appropriate accessories and install them
on the motor.
2
Plug in the appliance.
3
Switch on the appliance using the „I” switch (1a)
(the appliance starts to operate after about 2 seconds).
Operation with the sausage ller nozzle
Insert the following parts into the mincer body (2):
1
Insert the scroll (3) with the coupling facing inside.
2
Fit the insert (9) onto the pin of the scroll (3).
3
Fit the sausage stufng tube (10).
4
Tightly t all the elements with the threaded ring (6).
5
Fit the assembled mincer unit onto the drive unit (1) and
turn it until you hear a click of the lock.
6a
Place the tray (7a) on the mincer body (2).
6b
Insert the adaptor I into the bowl II. Mount the bowl
and the adaptor (7b) on the mincing chamber (2).
E
D
F
Soak the casing for about 10 minutes before tting.
●
Fit the wet casing on the sausage ller nozzle.
Make sure the not to block the ventilation
openings on the nozzle.
The meat cannot be „too thin”. A large liquid
content may cause its leakage to the inside of
the mincer.
Juicer
The juice squeezer is an equipment included to some
types of mincers. It allows to squeeze juice from fruits such
as: raspberries, currants, strawberries, gooseberry and
additionally from grapes and tomatoes. Berry fruits such
as currants can be squeezed with stalks. Fruits with large
stones for example plums, cherries etc can be squeezed in
the appliance after removing the stones.
Appliance elements:
1
Chamber
2
Worm
3
Body
4
Nut
5
Juice channel
6
Adjusting screw
7a
Food tray
7b I
Adaptor
II
Shredder bowl
(the mincer may be equipped with one set of bowls 7a
or 7b)
8
Pusher (from the mincer unit)
9
Screen – 2 pieces
No. 1 – smaller openings
No. 2 – larger openings
10
Large sealing ring for the body (3)
11
Small sealing ring for the worm (2)
12
Hook
13
Brush
Use only the pusher to push fruits (8).
PREPARING THE JUICER FOR OPERATION
AND ITS OPERATION
1
Make sure that the sealing rings (10) and (11) are tted
onto the body (3) and the worm (2). If not, insert them into
the sealing grooves in these elements (the body and the worm).
2
Insert the screen (9) into the body (3) and press rmly
home.
In order to remove the sieve (9) out of the body
(3), it is helpful to use the hook (12). Put the
shorter end of the hook (12) into the hole of the
sieve (9), and pull the sieve (9) outside.
I
J
Page 17
17
3
Insert the worm (2) into the chamber (1).
4
Insert the body with the screen onto the worm making
sure that the sieve faces downwards , and the positioning
slot ts into the protrusion in the chamber.
5
Screw on the nut (4) to attach the body to the chamber (1).
6
Screw the adjusting screw (6) into the body (3).
7
Slide the juice channel (5) over the adjusting screw until
it snaps on the body (3) – “click”.
8
Attach the assembled juicer to the drive unit in the same
way as the mincer body.
9a
Insert the bowl (7a) and the pusher (8) – from the mincer
unit – onto the feeding tube.
9b
Insert the adaptor I into the bowl II. Insert the bowl
(7b) and the pusher (8) – from the mincer unit – onto the
feeding tube.
10
Place the appropriate dishes for the juice and pomace
under the outlet of the juice channel (5) and the adjusting
screw (6).
11
Plug in the appliance.
12
Turn the appliance on by means of the switch button
(1a), and then feed the fruit, pushing with the pusher.
In order for the juice squeezing process to run
properly do not screw the adjustment screw
too deeply in the initial operation phase. After
assessing the amount of juice in the processed
fruits, adjust the screw in order to obtain an
adequate effectiveness and to avoid clogging
the appliance.
●
Observe the pomace dryness during squeezing. If it
is too dry, unscrew the adjusting screw (6), to avoid
clogging the appliance with the pomace.
The screw adjustment depends on the type of
processed fruits, in case of juicy and ripe fruits
adjust the screw deeper, and for fruits that
are not as juicy, the level of screw adjustment
should be lower.
If the screw adjustment does not provide an
adequate squeezing effectiveness, you can
process the pomace once again.
The clogging of the chamber outlet (in the
adjustment screw (6)) with the pomace of juicy
fruits can cause the ooding of the drive unit.
●
Unplug the appliance if the chamber outlet becomes
clogged. Pay special attention on the juice squeezing
process, make sure the screen openings are not
clogged. Disconnect the juicer from the drive unit (as in
the case of the mincer body), dismantle the juicer, clean
(wash) the juicer elements. Use the included brush to
clean the appliance, especially the screen.
Shredder with vegetable cutter
1
Fine grating disc
2
Coarse grating disc
3
Slicing disc
4
Pureeing disc
5
Locking tab
6
Body
7
Tray
8
Pusher
Remove the adaptor when using the shredder.
The shredder is equipped with two grating discs for
ne (1) and coarse (2) grates (cheese, carrot, celery,
cooked beetroots etc.). The slicing disc (3) is used to slice
vegetables (potatoes, cucumbers, onions, etc.). The purée
disc (4) is used to purée potatoes, beetroots, fruits, etc.
9
Drum
10
Dicing insert
11
Pusher
The vegetable cube cutter is the shredder’s additional
accessory. It is used for dicing cooked vegetables, such as
potatoes, beetroots, carrots, celery, parsley, etc. Cook all
vegetables before dicing. When cooked, cut large vegetables
into smaller pieces so that they t into the dicing insert (10).
WORKING WITH THE SHREDDER
1
Pull the locking tab (5) and place one of the discs with
the clutch facing the inside of the body.
2
Snap the tab shut (5).
3
Assemble the shredder body (6) in the same way as the
mincer body.
●
Cut larger products into pieces.
●
Do not grind soft fruits with hard stones.
●
Switch off and unplug the appliance after operation.
●
Remove the remaining products from the inside of the
disc or body using a wooden spoon.
The blades of the discs do to require
renovation.
VEGETABLE CUTTER OPERATION
The blades of the cube cutter drum are
extremely sharp. Handle carefully.
1
Release the locking tab (5) and t the drum (9) with the
coupling facing the inside of the body.
●
Snap the locking tab.
2
Fit the shredder body onto the mincer drive and turn until
it clicks into place.
3
Fit the feed tray (7) and the dicing insert (10).
●
Guide the vegetables through the feed tube using the
pusher (11).
B
H
K
Page 18

18
The pusher (11) is intended for use only with the
dicing insert. Never use the pusher (11) without
the dicing insert (10) placed on the body (6).
Cut large products into smaller pieces that can
easily t into the dicing insert (10).
●
When nished, turn off and unplug the appliance.
●
Remove any food remaining in the drum or dicing insert
using a wooden spoon.
●
Disassemble the cube cutter.
To remove the dicing insert (10) rst pull out
the feed tray (7).
Never use the appliance for dicing any raw
vegetables.
If the products are too soft (overcooked), they
may not be diced as well as intended.
Quern grinder
1
Nut
2
Quern regulator
3
Body with handle
4
Internal quern
5
External quern
6
Worm
7
Grinder chamber
8
Pan
9
The groove of the body has to hit the protrusion of the
grind chamber
DEVICE DESCRIPTION
Presented device can be used to grinding such products as:
corns, oily seeds and the dry comestibles.
The quern grinder enables grinding of such products as:
wheat, oat, rice, granular coffee, all-spice, charlock, walnuts,
hazel-nuts dried mushrooms, almonds, soya. linseed,
buckwheat groats, peeled sunower seeds etc.
Don`t grind the oily products by the minimal
granulation set up. Grinding device can be
glued or blocked.
Device is not dedicated for grinding the very
hard products as f. e. dried pea, maize, popcorn.
THE INSTALLATION OF THE GRINDER
ON THE DEVICE
1
When the grinder chamber is turned right through the
angle of 45, put the assembled grinder on the drive by putting
the protrusions of grinder chamber (VII) on the recesses of
the drive, and then, turn left to the position in which you will
hear “clicking” of the blocking. It means that the grinder has
been assembled correctly.
L
N
USAGE AND REGULATION OF THE GRINDER
Before the rst use, wash (see “CLEANING”) and dry
a disassembled grinder, and then grind around 50 grams of
product (f. e. corns) - set-up the grinding option of the device
with the medium comminute. The grinded product is not t
to use cause it` s polluted and its necessary throw it away.
Maximal time of uninterrupted work is around
15 minutes. This condition is connected with
maximal work time of machine, for which it
should be done the 45 minutes of pause after
15 minutes of operation.
The devices cannot operate without loading.
Each time before staring the device, ll it up
with product.
2
Fill the pan (8) with grain.
3
Set the body handle (3) to coarse grinding.
4
Turn on the mincer motor.
5
The ground product will pour out through the opening.
6
Depending on the desired grinding level or the type of
grain, adjust the burr regulator (2) with the body handle in
order to obtain the product with the adequate granulation
level. By turning it clockwise you will obtain a ner ground
product, by turning it counter-clockwise – coarser ground
product.
The nest (minimum) grinding level is achieved by setting
the handle to line 1, and the coarsest (maximum) grinding
level by setting it to the STOP line. See the graphic on the
body (3) and burr regulator (2).
By attempting to twist or turn the handle
beyond the STOP line during the operation you
can damage the device.
It` s recommended to set the quern regulator
during the grinder work time between the line
1 and STOP line.
It`s FORBIDDEN to use the REVERSE function
in the machine when the grinder is installed.
Remember about the accurate washing
the grinder before grinding of the different
products. It will permit to avoid the mutual
penetration of odors.
For the soft corns as oat or linseed it`s
necessary to select the coast-grained set up.
Do not look into the grinding chamber during
operation, as the beans which pop out
sometimes, can hurt you (i.e. your eye).
N
Page 19

19
1b
Remove the pusher (8) and remove the shredder bowl
with an adaptor (7b) from the mincer body or the juicer body
(in case of the citrus juicer separately remove the squeezer
and screen) (disassemble the adapter in the reverse order
in which it was assembled) or the shredder tray off the
shredder chamber.
2
Press the lock button, turn the mincing unit, the shredder
body (or the citrus juicer bowl) to the right and remove it.
●
In case of the citrus juicer take out the clutch from the
motor.
3
Dismantle the elements of the mincing unit, the body with
the sausage ller nozzle, the juicer body or the shredder.
Store the clean and dry screens in the compartment. In order
to do so:
4
Open the compartment on the back of the housing.
●
Press the compartment lock on both sides and pull
(as shown earlier).
5
Store up to two screens and close the compartment and
the back lid.
6
Put away the cord, pushing it gently through the opening.
●
Place the plug in the compartment.
Cleaning and maintenance
●
Wipe the motor with a damp cloth with dishwashing
liquid.
●
Wash plastic elements in warm soapy water or in the
dishwasher according to the denotations.
●
Wash metal elements in hot soapy water.
●
Dry all elements thoroughly.
●
Assemble dry elements of the mincer body or the
shredder.
Disposal
Dispose of packaging in an environmentallyfriendly manner. This appliance is labelled
in accordance with European Directive
2012/19/EU concerning used electrical and
electronic appliances (waste electrical and
electronic equipment – WEEE). The guideline
determines the framework for the return and recycling of
used appliances as applicable throughout the EU. Please
ask your specialist retailer about current disposal facilities.
The manufacturer does not accept any liability for any damages
resulting from unintended use or inappropriate handling.
The manufacturer reserves his rights for modifying the product any
time in order to adjust it to law regulations, norms, directives, or due
to construction, trade aesthetic or other reasons, without notifying it
in advance.
CLEANING AND MAINTENANCE
The grinder does not requires the cleaning after each
operation (if it`s grinded one kind of product), cause the
worm prevents falling the seeds residues into grinder. Dry
the steel quern (4, 5) using a soft cloth after cleaning to
prevent corrosion. In case of long-term storage, conserve
the quern by greasing them (you can use edible oil). Do not
immerse the quern into boiling water. The part of plastic
(don`t containing the graphic) can be washed in the dishwasher (max. of 60°C).
Citrus juicer
The citrus juicer is an additional appliance, which enables to
squeeze juice from citrus fruits together with the pulp.
Construction of the appliance:
1
Clutch
2
Bowl
3
Screen
4
Squeezer
USING THE APPLIANCE
1
Open the lid of the compartment on the back of the
housing, which enables to operate the appliance in a vertical
position. Place the appliance on a hard, even surface.
2
Slide the coupling onto the drive.
3
Fix the bowl to the motor and turn left until you hear
a click. It means that the bowl has been properly installed.
4
Attach the screen and the squeezer to the protruding
part of the bowl.
●
Prepare the fruits by cutting them into halves.
●
Plug in the appliance.
5
Switch on the appliance using the „I” switch (1a) and
place the fruit on the squeezer with the pulp facing the
squeezer.
6
Push to start the squeezing process.
In case the sieve is blocked with the pulp of
extracted fruit, it is necessary to switch off the
appliance, disassemble the sieve and empty it,
as the excess of the pulp can cause leakage to
the motor chamber of the appliance.
The citrus juicer spins during operation. Pay
special attention to your ngers while pushing
the fruits on the squeezer.
After operation
●
Switch off and unplug the appliance.
1a
Remove the pusher (8) and take out the tray (7a) from
the mincer body or the juicer body (in case of the citrus juicer
separately remove the squeezer and screen) or the shredder
tray off the shredder chamber.
M
O
G
Page 20

20
Sehr geehrte Kunden!
Wir gratulieren Ihnen zur Wahl unseres Produktes und heißen Sie im Kreise der Benutzer von Zelmer Produkten willkommen.
Um das beste Ergebnis zu erzielen, sollten Sie nur das Originalzubehör der Firma Zelmer verwenden. Das Zubehör
wurde speziell für dieses Produkt entwickelt.
Lesen Sie bitte diese Gebrauchsanweisung aufmerksam
durch. Achten Sie dabei insbesondere auf die Sicherheitshinweise. Bewahren Sie bitte die Bedienungsanleitung auf,
damit Sie im Laufe des späteren Gebrauchs auf sie zurückgreifen können.
Hinweise für einen sicheren und richtigen
Gebrauch des Geräts
Lesen Sie vor dem Gebrauch der Maschine die
Gebrauchsanleitung vollständig durch.
Es muss sichergestellt sein, dass die nachfolgenden
Hinweise verstanden wurden.
GEFAHR! / WARNUNG!
Bei Nichtbeachtung
der Hinweise besteht
Verletzungsgefahr
● Das Gerät nicht in Betrieb nehmen,
wenn das Netzkabel beschädigt oder
das Gehäuse sichtbar beschädigt sind.
● Sollte das nicht abtrennbare Netzka-
bel beschädigt werden, muss es vom
Hersteller, einer spezialisierten Reparaturwerkstatt oder von einer qualizierten Person ausgetauscht werden,
um eine Gefährdung zu vermeiden.
● Die Reparaturen dürfen nur durch
geschultes Personal durchgeführt
werden. Nicht ordnungsgemäß
durchgeführte Reparaturen können eine ernsthafte Gefahr für den
Benutzer darstellen. Wenden Sie
sich bei Defekten an einem autorisierten ZELMER Kundendienst.
● Seien Sie bei der Anwesenheit von Kin-
dern bei der Arbeit besonders vorsichtig.
● Vor dem Wechsel von Zubehörteilen
oder in der Nähe von beweglichen
Elementen das Gerät ausschalten
und vom Netz trennen.
● Bevor Sie das Gerät ohne Aufsicht
lassen, zusammensetzen, auseinandernehmen oder reinigen, muss es
von der Stromversorgung abgetrennt
werden.
● Das Gerät darf nicht von Kindern
bedient werden. Bewahren Sie das
Gerät sowie das Netzkabel außerhalb der Reichweite von Kindern auf.
● Das Gerät darf von Personen mit
körperlichen, sensorischen oder psychischen Einschränkungen, oder von
Personen ohne Erfahrung oder Kenntnis des Geräts ausschließlich dann
verwendet werden, wenn dies unter
Aufsicht geschieht oder wenn zuvor
die möglichen Gefahren erklärt wurden
und eine Unterweisung in der sicheren
Benutzung des Geräts erfolgt ist.
● Es muss sichergestellt werden, dass
Kinder nicht mit dem Gerät spielen.
● Das Gerät darf ausschließlich zusam-
men mit der Vorratsschale verwendet
werden.
● Das Gerät nur in Innenräumen bei
Raumtemperatur und bis zu 2000 m
über Meereshöhe verwenden.
ACHTUNG!
Eine Nichtbeachtung der
Hinweise kann zu Sachschäden
führen
●
Den Netzstecker nicht am Kabel aus der Steckdose
ziehen.
●
Das Gerät darf nur an eine (Wechselstrom-)Steckdose
mit einer Spannung angeschlossen werden, die der
auf dem Typenschild des Geräts angegebenen Spannung entspricht.
●
Setzen Sie das Gerät und dessen Ausrüstung keinen
Temperaturen vom mehr als 60 °C aus.
DE
Page 21

21
ZELMER MASCHINENTYPEN
VIB
Ausstattung
Zerkleinerungs-
einheit
Zitronenpresse Gemüsehobel Gemüseschneider Saftpresse Getreidemühle
ZMM5580*
● ● ● ○ ● ●
ZMM5548*
● ○ ● ○ ○ ○
ZMM5588*
● ○ ○ ○ ○ ○
ZMM5598*
● ○ ● ● ○ ○
* Farbausführung, ● – Standardausstattung, ○ – Im Einzelhandel erhältliche Zusatzausstattung,
–
– In dieser Ausführung nicht verfügbare
Ausstattung
●
Dadurch kann die Maschine beschädigt werden.
Bei Verwendung anderer Gegenstände können die
Maschine oder der Antrieb beschädigt werden.
●
Überlasten Sie das Gerät nicht durch eine zu große
Menge an zu verarbeitendem Produkt oder durch zu
starkes Drücken mit dem Stopfer.
●
Die Zerkleinerungseinheit muss richtig zusammengesetzt werden, da eine falsch zusammengesetzte
Zerkleinerungseinheit zu einer schlechten Zerkleinerungsqualität führt und zu einem Stumpfwerden
des Messerkopfs und der Lochscheiben führen kann.
Stumpfe Messerköpfe und Lochscheiben müssen
gegen neue ausgewechselt werden.
●
Während des Betriebs der Maschine dürfen die Belüftungsöffnungen im Gehäuse nicht verdeckt sein. Die
Maschine muss auf einem stabilen und festen Untergrund stehen.
●
Der Antrieb der Maschine darf nicht in Wasser getaucht
und nicht unter ießendem Wasser gereinigt werden.
●
Die Ausrüstung darf nicht gewaschen werden, wenn
diese am Antrieb befestigt ist.
●
Für die Reinigung des Gehäuses dürfen keine aggressiven Reinigungsmittel in Form von Emulsion, Scheuermilch, Scheuerpaste usw. verwendet werden. Dadurch
können unter anderem die Hinweissymbole wie die Skala,
Beschriftungen, Warnhinweise usw. entfernt werden.
HINWEIS
Angaben zum Produkt und
Gebrauchshinweise
●
Nach Abschluss der Arbeit den Stecker aus der Steckdose ziehen. Verstauen Sie das Kabel, indem Sie es
vorsichtig in die Öffnung einführen, aus der es herausgeführt wird. Legen Sie den Stecker in das Fach.
●
Wenn sich die Maschine nicht einschalten lässt, geben
Sie sie bitte an einen Kundendienst.
●
Das zu zerkleinernde Fleisch muss frei von Knochen,
Sehnen, Knorpeln usw. sein.
●
Vor dem Zerkleinern müssen größere Stücke in kleinere Stücke geschnitten werden.
●
Es darf kein trockener Mohn zerkleinert werden. Vor
dem mahlen muss der Mohn abgebrüht und mehrere
Stunden eingeweicht werden.
●
Für die Reinigung der Metallteile eine weiche Bürste
verwenden.
●
Reinigen Sie die Metallteile nicht in der Spülmaschine.
Die in diesen Geräten verwendeten aggressiven Reinigungsmittel bewirken ein dunkel werden der oben
genannten Teile. Reinigen Sie diese Teile von Hand
mit herkömmlichen Geschirrspülmittel.
Technische Daten
Die technischen Daten sind auf dem Typenschild des Produkts angegeben.
Zulässige Dauerbetriebszeit 15 Minuten.
Dauer der Unterbrechung vor erneutem Einschalten
30 Minuten.
Geräuschpegel des Geräts (LWA) 77 dB/A.
MBP – Sperrleistung des Motors 2000 W
Gerätebeschreibung
Die Maschine zur Zerkleinerung von Lebensmitteln setzt sich
wie folgt zusammen:
1
Antrieb der Maschine – Jeder Antrieb der Maschine ist
auf die Montage aller Zerkleinerungseinheiten, Zitruspressen, Saftpressen, Kaffeemühlen und Gemüsehebel
aus der Produktion ZELMER ausgelegt.
1a
Netzschalter
1b
„Rückwärts“ Taste
1c
Entriegelungstaste
Die Zerkleinerungseinheit setzt sich wie folgt zusammen:
2
Zerkleinerungskammer
3
Förderschnecke mit montierter Kupplung
4
Doppelseitige Messerscheibe
A
Page 22

22
5
Lochscheibe mit 4 mm Öffnungsdurchmesser
6
Befestigungsring
7a
Schale
7b I
Adapter
II
Schale für den Gemüsehobel
(die Maschine kann mit dem Schalensatz 7a oder 7b
ausgestattet sein)
8
Stopfer
Zusatzausstattung:
9
Abstandhalter
10
Wurstaufsatz
11
Lochscheibe mit 8 mm Öffnungsdurchmesser
12
Lochscheibe mit 2,7mm Öffnungsdurchmesser
Mechanischer Motorschutz
13
Förderschnecke
14
Kupplung
15
Schraube M4x20
Die Maschine verfügt über einen mechanischen Motor-
schutz, der den Motor vor Beschädigungen schützen soll.
Die Zähne der Antriebskupplung brechen bei einer Überlastung der Maschine (z. B. wenn beim Zerkleinern Knochen in
die Zerkleinerungskammer gelangt sind)
Die zerstörte Kupplung kann gegen eine neue ausgewechselt werden:
●
An der Förderschnecke mit der zerstörten Kupplung die
Schraube (15) herausschrauben,
●
Die zerstörte Kupplung (14) entfernen,
●
Eine neue Kupplung aufsetzen und mit der Schraube
(15) befestigen.
„Rückwärts“ Funktion
Der Antrieb der Maschine verfügt über eine spezielle Funktion, die eine vorübergehende Änderung der Drehrichtung
der Förderschnecke ermöglicht. Diese Funktion kann
genutzt werden, wenn ein deutlicher Rückgang der Zerkleinerungsleistung festgestellt wird oder/und wenn sich
zu viel Produkt in der Zerkleinerungskammer bendet (die
Förderschnecke fördert das Produkt nicht). In solch einem
Fall kann für einen kurzen Moment die „R“ Taste gedrückt
werden. Das sich im Innern der Kammer bendende Produkt
wird aus der Kammer entfernt. Anschließend erneut die „I“
Taste betätigen und die Arbeit fortsetzen.
Wenn die Förderschnecke weiterhin durch zu viel Produkt
blockiert wird, die „R“ Taste erneut drücken, das Produkt
aus der Kammer entfernen und aus dem Produkt den die
Zerkleinerung störenden Teil (z. B. Sehnen usw.) entfernen.
In einigen Fällen muss die Kammer vollständig auseinandergenommen und das Hindernis entfernt werden.
Bedienung der Zerkleinerungseinheit
In die Zerkleinerungskammer (2) nacheinander folgendes
einsetzen:
1
Förderschnecke (3) mit Kupplung.
A
E
2
Auf den Vierkantstift (3) der Förderschnecke das Messer
(4) aufsetzen.
3
Die Lochscheibe (z. B. 5) so einsetzen, dass der Vor-
sprung in der Kammer in die Nut am Umfang der Lochscheibe greift.
4
Alle Elemente der Zerkleinerungseinheit ordentlich bis
ein deutlicher Widerstand zu spüren ist festziehen.
5
Die zusammengesetzte Zerkleinerungseinheit auf den
Antrieb (1) aufsetzen und soweit drehen, bis das „Klick“ der
Verriegelung zu hören ist. Dies bedeutet, dass die Zerkleinerungseinheit richtig befestigt ist.
6a
Die Schale (7a) auf die Zerkleinerungskammer (2) auf-
setzen.
6b
Den Adapter I für die Schale II einsetzen. Befestigen
Sie die Schale mit dem Adapter (7b) auf der Zerkleinerungskammer (2).
Vorbereitung der Maschine für den
Betrieb und Inbetriebnahme
●
Ziehen Sie aus dem Fach im Antrieb so viel vom Netzkabel heraus, wie Sie benötigen und nehmen Sie die
gewünschten Zubehörteile heraus.
1
Stellen Sie den Antrieb (1) in der Nähe einer Steckdose
auf einem festen, stabilen Untergrund so auf, dass die Belüftungsöffnungen nicht verdeckt werden.
●
Öffnen Sie das Fach auf der Rückseite des Gehäuses
und nehmen Sie die gewünschte Lochscheibe (Abb. C)
heraus.
Für die meisten Arbeiten wird die 4 mm Loch-
scheibe in die Zerkleinerungskammer eingesetzt.
●
Waschen Sie vor dem ersten Gebrauch der Maschine
die Elemente der Ausrüstung gründlich.
●
Setzen Sie die gewünschte Ausrüstung zusammen und
schließen Sie sie an den Antrieb an.
2
Stecken Sie den Stecker in die Steckdose.
3
Schalten Sie die Maschine ein, indem Sie den Schalter
in die Position „I“ (1a) stellen (das Gerät startet nach circa
2 Sekunden).
Arbeiten mit dem Wurstaufsatz
In die Zerkleinerungskammer (2) nacheinander folgendes
einsetzen:
1
Förderschnecke (3) mit Kupplung.
2
Auf den Vierkantstift der Förderschnecke (3) den
Abstandhalter (9) aufsetzen.
3
Wurstaufsatz (10).
4
Alle Elemente der Zerkleinerungseinheit mit dem Befe-
stigungsring (6) ordentlich bis ein deutlicher Widerstand zu
spüren ist festziehen.
5
Die zusammengesetzte Zerkleinerungseinheit auf den
Antrieb (1) aufsetzen und soweit drehen, bis das „Klick“ der
Verriegelung zu hören ist.
D
F
Page 23

23
6a
Die Schale (7a) auf die Zerkleinerungskammer (2) aufsetzen.
6b
Den Adapter I für die Schale II einsetzen. Befestigen
Sie die Schale mit dem Adapter (7b) auf der Zerkleinerungskammer (2).
Vor dem Aufziehen des Darms muss dieser circa 10 Minuten
in warmem Wasser eingeweicht werden.
●
Ziehen Sie den nassen Darm auf den Wurstaufsatz.
Achten Sie darauf, die Belüftungsöffnungen im
Aufsatz nicht zu verschließen.
Die Fleischmasse, mit der der Darm gefüllt
wird, darf nicht zu „dünn“ sein. Ein zu hoher
Flüssigkeitsgehalt kann dazu führen, dass die
Flüssigkeit ins Innere der Maschine gelangt.
Saftpresse
Die Saftpresse gehört zur Ausstattung bestimmter Fleischwolftypen. Mit der Saftpresse kann der Saft aus Obst wie
Himbeeren, Johannisbeeren, Erdbeere, Stachelbeeren
sowie aus Weintrauben und Tomaten ausgepresst werden.
Beerenfrüchte wie Johannisbeeren können zusammen mit
den Stilen ausgepresst werden. Vor dem Auspressen von
Obst mit großen Kernen wie z. B. Paumen, Kirschen usw.
müssen diese Früchte entkernt werden.
Elemente der Saftpresse:
1
Saftpressenkammer
2
Förderschnecke
3
Gehäuse
4
Befestigungsring
5
Saftablaufrinne
6
Einstellschraube
7a
Schale
7b I
Adapter
II
Schale für den Gemüsehobel
(die Maschine kann mit dem Schalensatz 7a oder 7b
ausgestattet sein)
8
Stopfer (aus der Zerkleinerungseinheit)
9
Siebe 2 Stck.
Nr. 1 mit kleineren Öffnungen
Nr. 2 mit größeren Öffnungen
10
Großer Dichtungsring für das Gehäuse (3)
11
Kleiner Dichtungsring für die Förderschnecke (2)
12
Haken
13
Bürste
Zum Hineindrücken der Früchte darf nur der
Stopfer (8) verwendet werden.
I
VORBEREITUNG UND BEDIENUNG DER
SAF PRESSE
1
Vergewissern Sie sich, dass am Gehäuse (3) und an der
Förderschnecke (2) die Dichtungsringe (10) und (11) eingelegt sind. Falls dies nicht der Fall ist, müssen sie unbedingt
in die Vertiefungen dieser Elemente (Förderschneckengehäuse) eingelegt werden.
2
In das Gehäuse (3) das Sieb (9) einlegen und bis zum
Anschlag festdrücken.
Zum Herausnehmen des Siebes (9) aus dem
Gehäuse (3) dient der Haken (12). Den Haken
(12) mit dem kürzeren Ende in eine Öffnung des
Siebes (9) einführen und das Sieb (9) herausziehen,
3
In die Saftpressenkammer (1) die Förderschnecke (2)
einsetzen.
4
Setzen Sie das Gehäuse mit dem Sieb auf die Förderschnecke, wobei darauf zu achten ist, dass das Sieb nach
unten zeigt und die Positionierungsnut auf den Vorsprung in
der Saftpressenkammer ausgerichtet ist.
5
Das derart ausgerichtete Gehäuse mit dem Befestigungsring (4) an der Saftpressenkammer (1) festschrauben.
6
Die Einstellschraube (6) in das Gehäuse (3) einschrauben.
7
Die Saftablaufrinne (5) auf das Gehäuse (3) schieben,
bis es mit einem Klickgeräusch einrastet.
8
Die zusammengebaute Saftpresse genauso wie in der
Anleitung für die Zerkleinerungskammer beschrieben am
Antrieb montieren.
9a
Die Schale (7a) an der Einfüllöffnung befestigen und den
Stopfer (8) aus der Zerkleinerungseinheit einsetzen.
9b
Den Adapter I für die Schale II einsetzen. Die Schale
(7b) an der Einfüllöffnung befestigen und den Stopfer (8) aus
der Zerkleinerungseinheit einsetzen.
10
Stellen Sie unter die Abussöffnung der Rinne (5) und
die Einstellschraube (6) geeignete Gefäße für den Saft und
die Obstrückstände.
11
Schließen Sie das Netzkabel an die Steckdose an.
12
Schalten Sie die Maschine mit dem Schalter (1a) ein und
dosieren Sie anschließend die Früchte mithilfe des Stopfers.
Damit das Auspressen der Früchte richtig
ablaufen kann, darf die Einstellschraube zu
Beginn nicht zu tief hineingeschraubt werden.
Beurteilen Sie zuerst den Saftgehalt in den
Obstrückständen und korrigieren Sie die Einstellung entsprechend, um eine optimale Effektivität zu erreichen und das Verstopfen des Siebes zu verhindern.
●
Während des Auspressens muss die Feuchtigkeit der
Obstrückstände beobachtet werden. Wenn die Rückstände zu trocken werden, muss die Schraube (6) herausgedreht werden, um ein Verstopfen der Saftpresse
zu vermeiden.
J
Page 24

24
Wie weit die Schraube hineingedreht werden
muss, hängt von der Art der verarbeiteten Früchte
ab. Bei saftigen /sehr reifen Früchten muss die
Schraube tiefer hineingeschraubt werden und für
weniger safthaltige Früchte die Schraube ein bisschen weniger tief hineinschrauben.
Wenn mithilfe der Einstellschraube kein befriedi-
gendes Ergebnis erreicht wird, können die Obstrückstände noch einmal ausgepresst werden.
Wenn der Ablauf aus der Kammer (in der Ein-
stellschraube (6) mit Rückständen von Früchten mit hohem Saftgehalt verstopft wird, kann
es dazu kommen, dass der Saft ins Innere des
Antriebs gelangt.
●
Wenn der Ablauf aus der Kammer mit Obstrückständen
verstopft ist, muss die Maschine ausgeschaltet werden.
Beobachten Sie den Prozess des Auspressens und achten Sie z. B. darauf, dass die Öffnungen des Siebs nicht
verstopft sind. Entfernen Sie die Saftpresse genauso
vom Antrieb wie die Zerkleinerungskammer, zerlegen
Sie die Saftpresse und reinigen (waschen) Sie die Elemente der Saftpresse. Verwenden Sie zum Reinigen,
insbesondere des Siebs; die mitgelieferte Bürste.
Gemüsehobel mit Gemüseschneider
1
Raspeltrommel fein
2
Raspeltrommel grob
3
Schneidetrommel
4
Reibetrommel
5
Verschluss
6
Kammer
7
Vorratsschale
8
Stopfer
Wenn der Gemüsehobel verwendet wird, muss
der Adapter entfernt werden.
Der Gemüsehobel verfügt über zwei Raspeltrommeln für
feine (1) und grobe (2) Raspeln (Käse, Möhren, Sellerie,
gekochte Rote Bete usw.). Die Schneidtrommel (3) dient
zum Schneiden von Gemüse in Scheiben (Kartoffeln, Gurken, Zwiebeln usw.). Die Reibetrommel (4) dient zum Reiben
von Kartoffeln, Rote Bete, Obst usw.
9
Trommel des Gemüseschneiders
10
Gemüseschneideeinsatz
11
Stopfer für den Gemüseschneider
Der Gemüseschneider ist eine Zusatzausstattung für den
Gemüsehobel. Er kann dazu verwendet werden, ausschließlich gekochtes Gemüse wie Kartoffeln, Rote Bete, Möhren,
Sellerie, Petersilienwurzel usw. in Würfel zu schneiden. Vor
dem Zerschneiden muss das Gemüse gekocht werden.
Nach dem Kochen muss großes Gemüse in kleinere Stükken zerschnitten werden, damit es in den Einsatz (10) passt.
B
ARBEITEN MIT DEM GEMÜSEHOBEL
1
Den Verschluss (5) öffnen und eine der Trommeln mit
der Kupplung zuerst in die Kammer einlegen.
2
Den Verschluss (5) schließen.
3
Die Kammer des Gemüsehobels (6) so anschließen, wie
die Zerkleinerungskammer.
●
Große Stücken vorher in Stücke schneiden, sodass sie
problemlos in die Kammer eingeführt werden können.
●
Zerkleinern Sie keine weichen Früchte mit harten Kernen.
●
Nach Beendigung der Arbeit die Maschine ausschalten
und den Netzstecker aus der Steckdose ziehen.
●
Mit einem Holzlöffel die in der Trommel oder der Kammer zurückgebliebenen Reste entfernen.
Die Schneiden der Trommeln müssen nicht
geschärft werden.
ARBEITEN MIT DEM GEMÜSESCHNEIDER
Seien Sie vorsichtig. Die Schneiden des Gemü-
seschneiders sind sehr scharf.
1
Öffnen Sie den Verschluss (5) und legen Sie die Trommel (9) mit der Kupplung zuerst in die Kammer.
●
Verschließen Sie den Verschluss.
2
Setzen Sie den Gemüsehobel auf den Antrieb der
Maschine und drehen Sie ihn solange, bis das „Klicken“ der
Verriegelung zu hören ist.
3
Befestigen Sie die Vorratsschüssel (7) und legen Sie den
Gemüseschneideeinsatz (10) ein.
●
Das zu schneidende Gemüse muss mit dem Stopfer (11)
nach unten gedrückt werden.
Der Stopfer (11) darf nur zusammen mit dem
Gemüseschneideeinsatz verwendet werden.
Es ist verboten, den Stopfer (11) zu benutzen,
wenn der Gemüseschneideeinsatz (10) nicht in
die Kammer (6) eingelegt ist.
Große Stücken vorher in kleine Stücke schnei-
den, sodass sie problemlos in Gemüseschneideeinsatz eingeführt werden können.
●
Nach Beendigung der Arbeit die Maschine ausschalten
und den Netzstecker aus der Steckdose ziehen.
●
Mit einem Holzlöffel die in der Gemüseschneidetrommel
oder im Einsatz zurückgebliebenen Reste entfernen.
●
Zerlegen Sie den Gemüseschneider in seine Einzelteile.
Der Gemüseschneideeinsatz (10) können Sie
nach dem Entfernen der Vorratsschale (7) herausnehmen.
Es darf kein rohes Gemüse geschnitten werden.
Zu weich gekochtes Gemüse eignet sich nur
bedingt, um es in Würfel zu schneiden.
H
K
Page 25

25
2
Schütten Sie die Körner in die Schale (8).
3
Stellen Sie den Drehregler am Gehäuse (3) auf groberes
Mahlen ein.
4
Schalte Sie die Maschine ein.
5
Das gemahlene Produkt beginnt an der Öffnung auszutreten.
6
Je nach gewünschtem Mahlgrad oder verwendeten
Körnern kann mithilfe des Drehreglers am Gehäuse (3) der
Korngrößeneinsteller (2) so eingestellt werden, dass ein
Produkt mit dem gewünschten Körnung erreicht wird. Durch
Drehen im Uhrzeigersinn erhalten Sie ein feiner gemahlenes, und durch Drehen im entgegengesetzten Uhrzeigersinn
ein grober gemahlenes Produkt.
Das feinste Mahlgut erhalten Sie, wenn der Drehregler auf
die Linie 1 zeigt und das grobste bei einer Einstellung des
Drehreglers auf die Linie STOP. Siehe Aufdruck auf dem
Gehäuse (3) und am Korngrößeneinsteller (2).
Ein zu starkes Hineindrehen oder Herausdre-
hen über die Linie STOP während des Betriebs
kann die Maschine beschädigen.
Es wird empfohlen, dass während des Betriebs
der Mühle der Korngrößeneinsteller (2) zwischen die Linie 1 und die Linie STOP eingestellt
wird.
Bei angebauter Mühle darf UNTER KEINEN
UMSTÄNDEN die REVERSE Funktion verwendet werden.
Vergessen Sie nicht, vor dem Mahlen verschie-
dener Produkte die Mühle gründlich zu reinigen. Dadurch wird der Übergang von Gerüchen
vermieden.
Für weicheres Getreide wie Hafer oder Lein-
samen muss eine gröbere Einstellung gewählt
werden.
Während des Mahlens nicht in die Maschine
gucken, da durch herausspringende Körner
Verletzungen (z. B. am Auge) hervorgerufen
werden können.
REINIGUNG UND PFLEGE
Die Mühle muss nicht nach jedem Gebrauch gereinigt werden (wenn Produkt von der gleichen Sorte gemahlen wird),
da die Förderschnecke (6) die Ablagerung von Kornrückständen in der Mühle verhindert. Die beiden Mahleinsätze
aus Stahl (4, 5) nach dem Waschen mit einem Tuch abtrocknen, um die Entstehung von Rost zu vermeiden. Wenn die
Mahleinsätze für längere Zeit nicht genutzt werden sollen,
können sie durch einfetten konserviert werden (dafür kann
Speiseöl verwendet werden). Die Mahleinsätze dürfen nicht
in kochendes Wasser getaucht werden. Kunststoffteile
(ohne Aufdruck) können in der Spülmaschine (bei max.
60 °C) gereinigt werden.
Getreidemühle
1
Befestigungsring
2
Korngrößeneinsteller
3
Gehäuse mit Drehknopf
4
Innerer Mahleinsatz
5
Äußerer Mahleinsatz
6
Förderschnecke
7
Mahlkammer
8
Schale
9
Der Vorsprung der Mahlkammer muss sich in der Nut
des Gehäuses benden
GERÄTEBESCHREIBUNG
Dieser Vorsatz kann zum Mahlen von Getreide, ölhaltigen
Samen und trockenen Lebensmitteln verwendet werden.
Die Mühle kann zum Mahlen solcher Produkte wie Weizen,
Roggen, Hafer, Reis, Kaffeebohnen, Zucker, Buchweizen,
Pfefferkörnern, Piment, Senfkörner, Walnüsse, Haselnüsse,
getrocknete Pilze, Mandeln, Soja, Leinsamen Sonnenblumenkernen usw. verwendet werden.
Ölhaltige Produkte dürfen nicht in der kleinsten
Korngrößeneinstellung gemahlen werden. Die
Mühle kann verkleben oder sich blockieren.
Die Mühle eignet sich nicht zum Mahlen von
sehr harten Produkten wie z. B. getrockneten
Erbsen, Mais oder Popcorn.
ANBAU DER MÜHLE AN DER MASCHINE
1
Die Mahlkammer (7) in einem Winkel von 45° nach
rechts gedreht festhalten und die zusammengesetzte Mühle
so auf den Antrieb setzen, dass die Vorsprünge der Mühle
(7) in die Aussparungen im Antrieb greifen und anschließend
nach links drehen bis das „Klicken“ der Verriegelung zu
hören ist. Dies bedeutet, dass die Mühle richtig befestigt ist.
BEDIENUNG UND EINSTELLUNG DER MÜHLE
Vor der ersten Benutzung muss die Mühle gereinigt
(siehe „REINIGUNG“) und die in ihre Einzelteile zerlegte
Mühle getrocknet werden. Mahlen Sie anschließend ca. 50 g
Produkt (z. B. Getreide) bei mittlerem Zerkleinerungsgrad.
Das gemahlene Produkt eignet sich durch seine Verunreinigung nicht für eine weitere Verwendung und muss weggeworfen werden.
Der maximale Dauerbetrieb der Mühle beträgt 15
Minuten. Diese Bedingung steht mit der maximalen Betriebsdauer der Maschine in Verbindung,
auf die nach einem Betrieb von 15 Minuten eine
Pause von 45 Minuten folgen sollte.
Das Gerät darf nicht ohne Belastung betrieben
werden. Bevor die Mühle eingeschaltet wird,
muss sie mit Produkt gefüllt werden.
L
N
N
Page 26

26
Zitronenpresse
Die Zitronenpresse ist ein Zusatzgerät, mit dem der Saft aus
Zitrusfrüchten zusammen mit dem Fruchteisch ausgepresst
werden kann.
Aufbau der Zitruspresse:
1
Kupplung
2
Schale
3
Sieb
4
Presskegel
ARBEITEN MIT DER ZITRONENPRESSE
1
Öffnen Sie die Klappe des Fachs im hinteren Teil des
Gehäuses, die das Arbeiten in senkrechter Position ermöglicht. Stellen Sie die Maschine senkrecht auf einem festen
und ebenen Untergrund auf.
2
Setzen Sie die Kupplung auf den Antrieb.
3
Setzen Sie die Schale auf den Antrieb und drehen Sie
sie nach links, bis ein „Klicken“ zu hören ist. Dies bedeutet,
dass die Schale richtig befestigt ist.
4
Befestigen Sie an dem aus der Schale herausragenden
Teil das Sieb und den Presskegel.
●
Schneiden Sie die Früchte in zwei Teile.
●
Schließen Sie das Netzkabel an die Steckdose an.
5
Schalten Sie die Maschine mit dem Schalter „I“ (1a) ein
und legen Sie die Frucht mit dem Fruchteisch auf den Presskegel.
6
Drücken Sie die Frucht herunter, bis der Schaltmechanismus reagiert und der Pressvorgang beginnt.
Wenn das Sieb durch das Fruchteisch aus
den ausgepressten Früchten verstopft ist, die
Maschinen anhalten, das Sieb herausnehmen
und das Fruchteisch entfernen, da ein verstopftes Sieb dazu führen kann, dass der Saft
in den Antrieb der Maschine läuft.
Die Zitronenpresse dreht sich während des
Betriebs. Seien Sie beim Auspressen der
Fürchte vorsichtig und achten Sie insbesondere auf Ihre Finger.
Nach Beendigung der Arbeit
●
Schalten Sie die Maschine aus und ziehen Sie den Stekker aus der Steckdose.
1a
Ziehen Sie den Stopfer heraus und nehmen Sie die
Schale (7a) von der Zerkleinerungskammer bzw. der Saftpresse (bei der Zitronenpresse müssen zuvor der Presskegel und das Sieb entfernt werden) oder die Schale des
Gemüsehobels von der Kammer des Gemüsehobels ab.
1b
(1b) Nehmen Sie den Stopfer heraus und nehmen Sie
die Schale zusammen mit dem Adapter (7b) von der Zerkleinerungskammer bzw. der Kammer der Saftpresse (bei der
Zitronenpresse müssen zuvor der Presskegel und das Sieb
entfernt werden) (der Adapter muss in umgekehrter Einbau-
M
O
G
reihenfolge ausgebaut werden) oder die Schale des Gemüsehobels von der Kammer des Gemüsehobels ab.
2
Drücken Sie die Verriegelungstaste, drehen Sie die Zerkleinerungseinheit, die Kammer des Gemüsehobels (oder
die Schale der Zitronenpresse) nach rechts und nehmen Sie
sie von der Maschine.
●
Bei der Zitronenpresse muss die Kupplung vom Antrieb
entfernt werden.
3
Zerlegen Sie die Zerkleinerungseinheit, die Kammer mit
dem Wurstaufsatz, die Kammer der Saftpresse oder des
Gemüsehobels in ihre Einzelteile.
Die sauberen und trockenen Lochscheiben in das Fach einlegen:
4
Öffnen Sie das Fach am hinteren Teil des Gehäuses.
●
Drücken Sie von beiden Seiten auf den Verschluss des
Fachs und ziehen Sie ihn zu sich heran (so wie weiter
oben gezeigt).
5
Legen Sie maximal zwei Lochscheiben ein und schließen Sie das Fach und die hintere Klappe.
6
Verstauen Sie das Netzkabel, indem Sie es in die Öffnung aus der es herausgeführt wird hineinschieben.
●
Verstauen Sie den Netzstecker in seinem Fach.
Reinigung und Pege
●
Wichen Sie den Antrieb mit einem mit Geschirrspülmittel
befeuchtetem Tuch ab.
●
Die Kunststoffteile in warmen Wasser mit Geschirrspülmittel oder gemäß Kennzeichnung im Geschirrspüler
waschen.
●
Metallteile in heißem Wasser mit Geschirrspülmittel reinigen.
●
Die gewaschenen Teile müssen gründlich getrocknet
werden.
●
Die trockenen Teile der Zerkleinerungskammer oder des
Gemüsehobels zusammensetzen.
Entsorgung
Entsorgen Sie die Verpackung um weltgerecht.
Dieses Gerät ist ent sprechend der europäischen Richtlinie 2012/19/EU über Elektround
Elektronikaltgeräte (waste electrical and electronic equipment – WEEE) gekennzeichnet.
Die Richtlinie gibt den Rahmen für eine EUweit gültige Rücknahme und Verwertung der Altgeräte vor.
Über aktuelle Entsorgungswege bitte beim Fachhändler
informieren.
Der Hersteller haftet nicht für eventuelle Schäden, die durch einen
bestimmungswidrigen Gebrauch oder durch eine nicht sachgerechte
Bedienung des Gerätes entstanden sind.
Der Hersteller behält sich vor, jederzeit Änderungen ohne vorherige Ankündigung zwecks Anpassung an die geltenden Rechtsvorschriften, Normen und Richtlinien oder aus konstruktionsbedingten,
geschäftlichen, ästhetischen oder anderen Gründen vorzunehmen.
Page 27

27
Stimaţi Clienţi!
Vă felicităm pentru că aţi ales aparatul nostru şi vă urăm bunvenit în rândul utilizatorilor de produse ale rmei Zelmer.
Pentru a obţine cele mai bune rezultate vă recomandăm să
folosiţi doar accesoriile originale fabricate de rma Zelmer.
Accesoriile au fost proiectate special pentru acest produs.
Vă rugăm să citiţi cu atenţie aceste instrucţiuni. O atenţie
deosebită trebuie acordată indicaţiilor privind siguranţa folosirii aparatului. Vă sfătuim să păstraţi instrucţiunile de utilizare, pentru a le putea folosi şi mai târziu, în cursul utilizării
ulterioare a aparatului.
Indicaţii privind siguranţa şi utilizarea
adecvată a aparatului
Înainte de a începe utilizarea dispozitivului citiţi cu
atenţie întregul manual de instrucţiuni de deservire.
Asiguraţi-vă că toate indicaţiile au fost foarte bine înţelese.
RO
PERICOL! / ATENŢIONARE!
Ne-respectarea regulilor poate
provoca răni
● Nu porniţi dispozitivul dacă, conduc-
torul de alimentare este deteriorat
sau carcasa este deteriorată în mod
vizibil.
● În cazul în care cablul de alimen-
tare ne-decuplabil, este deteriorat,
acesta trebuie înlocuit la producător
sau într-un atelier de reparaţii specializat de către o persoană calicată,
cu scopul de a evita pericolul.
● Dispozitivul poate reparat numai de
către persoane special şcolarizate în
acest domeniu. Reparaţia care este
realizată incorect poate cauza un
pericol serios pentru utilizator.
● În cazul în care aţi observat defecţi-
uni luaţi legătura cu punctul de service specializat ZELMER.
● Păstraţi o deosebită prudenţă atunci
când folosiţi dispozitivul în prezenţa
copiilor.
● Înainte de a înlocui echipamentul sau
înainte de a vă apropia de piesele
care sunt în mişcare în timpul utilizării, dispozitivul trebuie oprit şi, de asemenea, trebuie decuplat de la sursa
de alimentare cu curent electric.
● Întotdeauna deconectaţi dispozitivul
de la reţeaua de alimentare cu curent
electric atunci când acesta este lăsat
fără supraveghere, sau înainte de
montarea acestuia, demontare sau
curăţare.
● Dispozitivul nu trebuie să e folosit
de către copii. Depozitaţi dispozitivul
împreună cu cablul de alimentare cu
curent electric într-un loc care nu se
găseşte la îndemâna copiilor.
● Acest dispozitiv poate folosit de
persoane cu capacităţi zice, senzoriale şi mentale limitate şi de către
persoanele fără experienţă care nu
cunosc dispozitivul, dar numai sub
supraveghere sau dacă înainte de
folosire le-au fost explicate în mod
foarte clar pericolele şi au fost instruite cu privire la modul de folosire în
siguranţă a dispozitivului.
● Dispozitivul trebuie asigurat în aşa
fel încât copii să nu aibă posibilitatea
de a se juca cu acesta.
● Dispozitivul poate folosit numai
împreună cu recipientul de umplere
conductor.
● Folosiţi aparatul numai în spaţii inte-
rioare, la temperatura camerei şi la
o altitudine de până la 2000 m deasupra nivelului mării.
Page 28

28
ATENŢIE!
Ne-respectarea poate provoca
pagube materiale
●
Nu scoateţi ştecherul din priza reţelei de alimentare cu
curent electric trăgând de cablu.
●
Dispozitivul trebuie conectat întotdeauna la priza reţelei electrice (numai cea cu curent alternativ) cu tensiune care este în conformitate cu cea menţionată pe
plăcuţa de fabricaţie a dispozitivului.
●
Nu supuneţi dispozitivul şi echipamentul acestuia la
acţiunea unei temperaturi mai mari de 60°C. Puteţi
deteriora dispozitivul.
●
Pentru împingerea produselor folosiţi numai accesoriul
de împingere. Folosirea altor obiecte pentru împingerea produselor poate cauza deteriorarea dispozitivului
şi a sistemului de propulsie.
●
Nu supraîncărcaţi dispozitivul cu o cantitate excesivă
de produse şi nici prin împingerea prea puternică
a produselor (cu ajutorul accesoriului de împingere).
●
Montaţi cu exactitate ansamblul de tocare, deoarece
atunci când acesta este montat incorect poate conduce la o tocare de calitate proastă, şi, de asemenea,
poate cauza deteriorării cuţitului şi a sitei. În cazul
în care cuţitul de tocare şi sita s-au deteriorat acestea
trebuiesc imediat înlocuite cu unele noi.
●
În cazul în care dispozitivul este în stare de funcţionare nu acoperiţi oriciile de aerisire de pe carcasă.
În timpul funcţionării dispozitivul nu trebuie amplasat
pe o suprafaţă moale.
●
Sistemul de propulsie a dispozitivului nu trebuie scufundat în apă şi nici spălat sub jet de apă.
●
Nu spălaţi piesele care fac parte din sistemul de propulsie.
●
Pentru curăţarea carcasei nu folosiţi detergenţi agresivi sub forma unor emulsii, loţiuni, paste etc. Acestea
pot printre altele, să conducă la eliminarea simbolurilor
informative grace, cum ar : gradaţii, indicaţii, semne
de avertizare, etc.
TIPURILE DE MAŞINI ZELMER
VIB
Accesorii
Ansamblu de
tocare
Storcător de
citrice
Tăietor
Dispozitiv pentru
mărunţit legume
Storcător Râşniţa poate
ZMM5580*
● ● ● ○ ● ●
ZMM5548*
● ○ ● ○ ○ ○
ZMM5588*
● ○ ○ ○ ○ ○
ZMM5598*
● ○ ● ● ○ ○
* versiunea coloristică, ● – accesorii de bază, ○– echipament suplimentar care poate cumpărat în magazine,
–
– accesoriu inaccesibil
în această realizare
INDICAŢII
Informaţii despre produs şi indicaţii referitoare la utilizarea acestuia
●
După ce utilizarea dispozitivul aluat sfârşit scoateţi
ştecherul conductorului de racordare din priza reţelei
cu curent electric. Ascundeţi cablul prin introducerea
delicată a acestuia în oriciul special prevăzut, iar ştecherul cablului introduceţi-l în locul special pregătit.
●
În cazul în care dispozitivul nu porneşte - transmiteţi-l
către service.
●
Carnea destinată pentru tocare trebuie separată de
oase tendoane, cartilaje şi vene.
●
Înainte de a începe tocarea bucăţile mai mari de produse tăiaţi-le în bucăţi mai mici.
●
Nu treceţi prin maşina de tocat mac uscat. Înainte de
tocare macul trebuie să e opărit şi înmuiat – chiar şi
peste douăsprezece ore.
●
Pentru curăţarea pieselor metalice folosiţi o periuţă
moale.
●
Nu spălaţi piesele metalice în maşinile de spălat vase.
Detergenţii agresivi folosiţi în timpul funcţionării unor
astfel de dispozitive pot cauza schimbarea culorii pieselor sus menţionate. Spălaţi aceste piese manual cu
ajutorul detergenţilor tradiţionali folosiţi pentru spălarea
vaselor.
Date tehnice
Parametrii tehnici sunt înscrişi pe eticheta cu specicaţii tehnice a produsului.
Timpul permis de funcţionare fără întrerupere 15 minute.
Durata pauzei înainte de următoarea utilizare 30 minute.
Zgomotul aparatului (LWA) 77 dB/A.
MBP – Protecţie blocare motor 2000 W
Page 29

29
Descrierea aparatului
Maşina de tocat produse alimentare se compune din:
1
Unitatea motor a maşinii – ecare unitate motor este
adaptată pentru montarea ecărui ansamblu de tocare,
a storcătorului de citrice, a storcătorului, a râşniţei de
cafea şi a tăietorului de fabricaţie ZELMER.
1a
Buton de pornire/ oprire
1b
Buton „Revers”
1c
Butonul blocadei
Ansamblul de tocare este compus din:
2
Compartiment de tocare
3
Spirală cu cremalieră montată
4
Cuţit cu două tăişuri
5
Sită cu ochiuri de 4 mm
6
Capac de înletare
7a
Vasul
7b I
Adaptor
II
Vasul dispozitivului pentru tăiat felii
(maşina poate dotată cu un set de vase 7a sau 7b)
8
Dispozitiv de presare
Şi accesorii suplimentare:
9
Arnitură de distanţare
10
Accesoriu pentru umplerea cârnaţilor
11
Sită cu ochiuri de 8 mm
12
Sită cu ochiuri de 2,7 mm
Sistem mecanic de siguranţă al motorului
13
Spirală
14
Cremalieră
15
Şurub M4x20
Maşina este prevăzută cu dispozitiv mecanic de siguranţă,
care protejează motorul de avariere – dacă cremaliera spiralei montate la blocul motor se strică, când maşina este supraîncărcată (de ex. atunci când ajung oase în interiorul ei).
Cremaliera deteriorată trebuie să e schimbată cu una nouă:
●
deşurubaţi şurubul (15) de la spirala cu cremaliera deteriorată,
●
înlăturaţi cremaliera (14) deteriorată,
●
montaţi cremaliera nouă şi înşurubaţi şurubul (15).
Funcţia „Revers”
Motorul maşinii posedă o funcţie specială care permite
schimbarea temporară a direcţiei de mişcare a spiralei, utilizată în cazul în care se sesizează o tocare destul de redusă
sau/ şi că s-a acumulat produs în exces în compartimentul de
tocare (spirala nu preia produsul dozat). Într-un astfel de caz,
apăsaţi pentru puţin timp butonul „R” – al potenţiometrului,
atunci produsele vor deplasate în interiorul compartimentului de tocare. Apăsaţi mai departe butonul „I” şi continuaţi
utilizarea maşinii.
A
A
Dacă în continuare spirala se blochează de cantitatea în
exces a prosusului, trebuie să utilizaţi din nou butonul „R”,
să scoateţi produsul din compartimentul de tocare şi să
scoateţi din el părţile care îngreunează tocarea (de ex. tendoanele ş.a.).
În unele situaţii, trebuie să desfaceţi compartimentul pentru
tocare şi să îndepărtaţi complet elementele care blochează
tocarea.
Folosirea ansamblului de tocat
În camera de tocat (2) introduceţi pe rând:
1
Melcul (3) cu ambreiajul spre interior.
2
Pe axul melcului (3) cuţitul (4).
3
Sita (de ex. 5) astfel încât proeminenţa camerei să intre
în şanţul care se aă pe circumferinţa sitei.
4
Înşurubaţi toate elementele ansamblului de tocat – tare
şi până la capăt.
5
Introduceţi ansamblul de tocat pe sistemul de propulsie
(1) şi rotiţi-l până în poziţia în care veţi auzi „click”-ul blocadei.Acest lucru înseamnă că a fost corespunzător montat
compartimentul.
6a
Montaţi vasul (7a) pe camera de tocat (2).
6b
Introduceţi adaptorul I în vasul II. Aşezaţi vasul cu
adaptor (7b) pe compartimentul de tocare (2).
Pregătirea maşinii pentru utilizare şi
punerea ei în funcţiune
●
Scoateţi din compartimentul maşinii cablul de alimentare
(lungimea necesară) şi accesoriile adecvate.
1
Aşezaţi unitatea motor (1) în apropierea prizei reţelei
electrice, pe o suprafaţă tare, stabilă, astfel încât să nu e
acoperite oriciile de ventilare din carcasă.
●
Deschideţi compartimentul din partea din spate a carcasei şi luaţi sita adecvată (Desen C).
Sita standard cu ochiuri de 4 mm este montată
în compartimentul pentru tocat.
●
Înainte de prima utilizare a maşinii, spălaţi cu grijă elementele accesoriilor.
●
Montaţi în mod corespunzător accesoriile şi branşaţi
maşina la reţeaua de energie electrică.
2
Introduceţi ştecărul cablului de alimentare în priza electrică.
3
Apăsând butonul „I” (1a), puneţi în mişcare maşina de
tocat (aparatul se pune în funcţiune după circa 2 secunde).
Utilizarea cu accesoriu pentru
umplereacârnaţilor
În camera de tocat (2) introduceţi pe rând:
1
Melcul (3) cu ambreiajul spre interior.
2
Pe axul melcului (3) element de distanţare (9).
3
Accesoriu umplere cârnaţi (10).
E
D
F
Page 30

30
4
Înşurubaţi toate elementele cu ajutorul piuliţei (6) – tare
şi până la maxim.
5
Montaţi ansamblul de tocat pe sistemul de propulsie (1)
şi rotiţi-l până în poziţia în care veţi auzi „click”-ul blocadei.
6a
Montaţi vasul (7a) pe camera de tocat (2).
6b
Introduceţi adaptorul I în vasul II. Aşezaţi vasul cu
adaptor (7b) pe compartimentul de tocare (2).
Înainte de a xa maţul pentru cârnaţi, ţineţi-l în apă caldă
cca. 10 minute.
●
Fixaţi pe accesoriul pentru umplerea cârnaţilor maţul
care a stat în apă.
Aveţi grijă să nu acoperiţi oriciile de aerisire
din accesoriu.
Tocătura care umple maţul nu trebuie să e
„prea subţire”. Dacă este prea mult lichid,
acesta se poate scurge şi poate să ajungă în
interiorul maşinii de tocat.
Storcător de fructe
Storcătorul pentru fructe este un accesoriu pentru unele
tipuri de maşini de măcinat. Permite stoarcerea sucului din
fructe precum: fragii, anele, căpşunile, agrişele şi, în plus,
din struguri şi roşii. Fructele precum anele pot stoarse
împreună cu codiţele lor. Nu pot stoarse în acest storcător
fructele cu sâmburi mari, cum ar prunele, vişinele ş.a., făra
ca, în prealabil, să scos sâmburii.
Elementele storcătoruluide fructe:
1
Compartimentul storcătorului de fructe
2
Tăietorul spiralat
3
Corpul storcătorului
4
Capacul pentru înşurubare
5
Jgheabul pentru scurgerea sucului
6
Şurubul de reglare
7a
Vasul
7b I
Adaptor
II
Vasul dispozitivului pentru tăiat felii
(maşina poate dotată cu un set de vase 7a sau 7b)
8
Dispozitivul pe presare (cu ansamblul de măcinare)
9
Sitele – 2 buc.
Nr 1 – oricii mai mici
Nr 2 – oricii mai mari
10
Inelul mare care xează ermetic la corpul storcătorului (3)
11
Inelul mic care xează ermetic la tăietorul spiralat (2)
12
Cârligul
13
Peria
Pentru presarea fructelor folosiţi numai dispo-
zitivul de presare (8).
I
PREGĂTIREA PENTRU UTILIZARE ŞI ÎNTREŢINEREA STORCĂTORULUI PENTRU FRUCTE
1
Asiguraţi-vă că pe corp (3) şi pe melc (2) sunt amplasate
inelele de etanşare (10) şi (11). În cazul în care acestea lipsesc, trebuie neapărat să le introduceţi în şanţurile acestor
elemente (corpul şi melcul).
2
În corp (3) introduceţi şi apăsaţi sita (9) până la maxim.
Pentru a scoate sita (9) din carcasă (3) este
foarte util să folosiţi cârligul (12). Introduceţi
cârligul (12) cu capătul mai scurt în oriciul din
sită (9) şi trageţi sita (9) spre exterior.
3
În camera storcătorului (1) introduceţi melcul (2).
4
Puneţi corpul cu sită pe melc asigurându-vă că sita este
îndreptată în jos, iar şanţul de poziţionare a intrat pe proeminenţa camerei storcătorului.
5
Corpul astfel amplasat prindeţi-l cu ajutorul piuliţei (4) de
camera storcătorului (1).
6
Înşurubaţi şurubul de reglare (6) în corp (3).
7
Amplasaţi jgheabul de scurgere a sucului (5) pe corp şi
aşteptaţi până ce pe veţi auzi (3) – „click”.
8
Storcătorul gata montat trebuie amplasat pe sistemul de
propulsie, idem cu descrierea camerei de tocat.
9a
Pe gâtul de umplere puneţi vasul (7a) şi accesoriul de
împingere (8) – de la ansamblul de tocat.
9b
Introduceţi adaptorul I în vasul II. Pe gâtul de
umplere puneţi vasul (7b) şi accesoriul de împingere (8) – de
la ansamblul de tocat.
10
Sub oriciul de ieşire a jgheabului (5) şi a şurubului de
reglare (6) amplasaţi vasele corespunzătoare pentru suc şi
pulpă.
11
Introduceţi cablul de racordare a dispozitivului în priza
reţelei de alimentare cu curent electric.
12
Porniţi dispozitivul cu ajutorul butonului întrerupătorului
(1a), şi apoi introduceţi pe rând fructele folosind accesoriul
pentru împingere.
Pentru ca procesul de stoarcere a fructelor să
se desfăşoare în mod corespunzător, nu strângeţi prea tare şurubul de reglare în faza de început. Abia după ce aţi evaluat cantitatea de suc
din pasta rezultată în urma stoarcerii fructelor,
ajustaţi în mod corespunzător gradul de strângere, pentru a obţine o ecienţă mulţumitoare şi
a evita înfundarea storcătorului de fructe.
●
În timpul stoarcerii sucului, observaţi cât lichid conţine
pasta de legume/fructe. Dacă observaţi că aceasta
e prea uscată, răsuciţi şurubul (6), pentru a evita înfundarea storcătorului de fructe/ legume cu resturi.
Gradul de strângere a şurubului de reglare
depinde de tipul, de soiul de fructe de prelucrat; pentru fructele foarte coapte şi zemoase
– strângeţi mai tare şurubul de reglare; pentru
fructele puţin zemoase – strângeţi şurubul de
reglare ceva mai puţin.
J
Page 31

31
Atunci când strângerea şurubului de reglare nu
asigură ecienţa stoarcerii sucului, puteţi trece
încă o dată pasta rezultată prin storcătorul de
fructe.
Blocarea oriciului de scurgere (în şurubul de
reglare (6)) cu pasta de fructe cu un conţinut
mare de suc poate conduce la scurgerea sucului în unitatea-motor a maşinii.
●
Dacă oriciul de scurgere a compartimentului se blochează cu pasta de fructe, trebuie să opriţi maşina. Fiţi
deosebit de atent(ă) în timpul procesului de stoarcere
a sucului din fructe, vericaţi dacă nu s-au înfundat oriciile sitei. Storcătorul de fructe se scoate de la maşină
(se procedează ca în cazul compartimentului de măcinare), se demontează; se curăţă (spală) elementele sale.
Dispozitiv pentru tăiat felii cu accesoriu
pentru mărunţit legume
1
Cilindrul pentru bucăţi ne
2
Cilindrul pentru bucăţi mai mari
3
Cilindru pentru feliere
4
Cilindru pentru răzuire
5
Element de închidere
6
Compartiment
7
Vas de umplere
8
Dispozitiv de presare
În cazul în care folosiţi tocătorul daţi jos adap-
torul.
Tocătorul are două cilindre de mărunţire – în bucăţi ne (1) şi
mai mari (2) (pentru brânză galbenă, morcovi, ţelină, sfeclă
artă etc.). Cilindrul (3) serveşte la tăierea legumelor în felii
(pentru carto, castraveţi, ceapă etc.). Cilindrul (4) serveşte
la răzuirea cartolor, sfeclei, fructelor etc.
9
Tamburul dispozitivului pentru mărunţit
10
Accesoriul dispozitivului pentru mărunţit
11
Accesoriul de împingere al dispozitivului pentru mărunţit
Dispozitivul pentru mărunţit legume este un accesoriu suplimentar al dispozitivului pentru tăiat felii. Este destinat pentru
tăierea sub formă de cuburi a legumelor erte: carto, sfeclă
roşie, morcov, ţelină, pătrunjel etc. Înainte de a începe folosirea legumele trebuiesc erte. După ce au fost erte legumele
mari trebuiesc tăiate în prealabil pentru ca acestea să poată
introduse în accesoriul pentru mărunţit (10).
ÎNTREBUINŢAREA RĂZĂTOAREI
1
Înclinaţi elementrul de xare (5) şi introduceţi unul dintre
cilindrele cu cremalieră în interiorul compartimentului.
2
Închideţi elementul de închidere (5).
3
Montaţi compartimentul (6) tocătorului la fel cum se mon-
tează compartimentul pentru tocarea cărnii.
●
Tăiaţi în prealabil produsele mai mari în bucăţi pe care
să le puteţi introduce fără efort în compartiment.
B
H
●
Nu mărunţiţi fructe moi care au sâmburi tari.
●
După încheierea utilizării, opriţi maşina şi scoateţi ştecărul cablului de alimentare din priza reţelei electrice.
●
Îndepărtaţi cu o lingură de lemn resturile de produse
rămase în interiorul cilindrelor sau în compartiment.
Părţile ascuţite ale cilindrelor nu necesită ascu-
ţire ulterioară.
LUCRUL CU DISPOZITIVUL PENTRU
MĂRUNŢIT LEGUME
Lamele tamburul dispozitivului pentru mărun-
ţit sunt foarte ascuţite de aceea trebuie să ţi
foarte atenţi.
1
Deschideţi clema (5) şi introduceţi tamburul (9) cu
ambreiajul direcţionat către centrul camerei.
●
Închideţi clema.
2
Montaţi camera dispozitivului pentru tăiat pe transmisia
maşinii de tocat şi rotiţi-o până în poziţia în care veţi auzi
sunetul „click” al blocadei.
3
Montaţi recipientul de umplere (7) şi xaţi accesoriul dispozitivului pentru mărunţit legume (10).
●
După ace aţi introdus legumele acestea trebuiesc
împinse cu ajutorul accesoriului pentru împingere (11).
Accesoriul pentru împingere nr. 11 poate folo-
sit numai cu accesoriul pentru mărunţit al dispozitivului pentru mărunţit legume. Se interzice
folosirea accesoriului pentru împingere nr 11 în
cazul în care n u aţi montat accesoriul pentru
mărunţit legume (10).
Produsele care sunt mari trebuiesc tăiată în bucăţi
mai mici pentru ca acestea să poată introduse
în accesoriul pentru mărunţit legume (10).
●
În cazul în care nu veţi mai folosi dispozitivul opriţi
maşina de tocat şi scoateţi cablul de alimentare din priza
reţelei de alimentare cu curent electric.
●
Cu ajutorul unei linguri de lemn scoateţi resturile de produs care au rămas în interiorul dispozitivului de mărunţit
legume sau în accesoriul pentru mărunţit legume.
●
Demontaţi toate elementele dispozitivului de mărunţit
legume.
Accesoriul pentru mărunţit legume al dispoziti-
vului (10) poate scos după ce a fost demontat
recipientul de umplere (7).
Se interzice mărunţirea legumelor crude.
În cazul în care veţi dori să folosiţi produse
care sunt prea moi efectul mărunţirii sub formă
ce cuburi poate să nu e satisfăcător.
K
Page 32

32
3
Setaţi butonul corpului (3) la poziţia unei măcinări mai
groase.
4
Porniţi motorul dispozitivului.
5
Produsul măcinat va începe să iasă prin oriciu.
6
În funcţie de gradul de măcinare dorit sau produsul măcinat, cu ajutorul mânerului cu rotitor (3), xaţi regulatorul râşniţei (2) astfel încât să obţineţi granulajul dorit. Rotindu-l în
direcţia acelor de ceasornic veţi obţine un produsul măcinat
mai n, iar dacă rotiţi în sens invers acelor de ceasornic veţi
obţine un produsul măcinat mai gros.
Cel mai n grad de măcinare (minimal) îl veţi obţine xând
mânerul cu rotitor pe linia 1, iar cel ma gros (maximal) îl veţi
obţine xând mânerul cu rotitor pe linia STOP. Vedeţi semnele de pe mânerul cu rotitor (3) şi regulatorul râşniţei (2).
Dacă în timpul întrebuinţării veţi roti mânerul
cu rotitor prea tare peste linia STOP dispozitivul se poate defecta.
Este indicat ca în timpul întrebuinţării dispozi-
tivului regulatorul râşniţei (II) să e xat între
linia 1 şi linia STOP.
Când râşniţa este folosită NU PUTEŢI întrebu-
inţa funcţia REVERSE a dispozitivului.
Ţineţi minte să spălaţi exact râşniţa înainte să
măcinaţi produse diferite. În acest fel veţi evita
ca produsele măcinate să îşi impregneze mirosul.
Pentru cereale mai moi cum ar ovăzul sau
inul trebuie să alegeţi conguraţia pentru granulaj gros.
Nu priviţi în interiorul camerei în timpul măci-
nării. Boabele care sar din când în când pot să
vă rănească (de ex. în ochi).
CURĂŢARE ŞI PĂSTRARE
Râşniţa nu necesită să e curăţată după ecare întrebuinţare (dacă măcinaţi acelaş fe l de produs), deoarece melcul
(6) împiedică ca resturile produselor să rămână în râşniţă.
După spălare, uscaţi râşniţele din oţel (4, 5) cu o cârpă, ca
să nu corodeze. Dacă nu veţi folosi râşniţele mai mult timp,
conservaţi-le prin ungere (de exemplu cu ulei). Nu scufundaţi
râşniţele în apa clocotită. Părţile din material din plastic (care
nu posedă semne indicatoare) le puteţi spăla în maşina de
spălat vase (max 60°C).
Râşniţa poate
1
Brăţară
2
Regulatorul râşniţei
3
Mânerul cu rotitor
4
Râşniţa interioară
5
Râşniţa exterioară
6
Melcul
7
Dispozitivul râşniţei
8
Vasul
9
Marginea zimţată a mânerului trebuie să se compună cu
maginea zimţată a dispozitivului pentru tocare
DESCRIEREA DISPOZITIVULUI
Acest accesoriu poate întrebuinţat pentru a măcina cereale, seminţe uleioase şi produse alimentare uscate.
Râşniţa poate întrebuinţată pentru a toca produse cum ar
: grâu, secară, ovăz, orez, boabe de cafea, zahăr, arpacaş,
hrişcă, boabe de piper negru, cuişoare englezeşti, muştar,
nuci, alune, ciuperci uscate, migdale, soia, in, seminţe de
oarea soarelui etc.
Nu măcinaţi produsele uleioase folosind gradul
minim de granulare. Râşniţa se poate în acest
fel înfunda sau bloca.
Nu întrebuinţaţi dispozitivul pentru a măcina
produse foarte tari cum ar mazăre uscată,
porumb popcorn.
MONTAREA RÂŞNIŢEI PE MAŞINA DE TOCAT
1
Când dispozitivul râşniţei (7) este rotit cu 45 de grade
la dreapta, xaţi râşniţa deja montată în sistemul de propulsie introducând marginea zimţată a dispozitivului râşniţei (7)
în marginea zimţată a sistemului de propulsie, iar apoi rotiţi
spre stânga până veţi auzi sunetul de blocare „clic”. În acest
fel veţi siguri că râşniţa a fost montată corect.
ÎNTREBUINŢAREA ŞI REGLAREA RÂŞNIŢEI
Înainte de prima întrebuinţare spălaţi (vezi „CURĂŢE-
REA”) şi lăsaţi la uscat toate elementele râşniţei, iar apoi
tocaţi aprox. 50 g produs (de ex. grâu) xând dispozitivul de
tocare la gradul mediu de granulaj. Produsul tocat nu poate
întrebuinţat deoarece este contaminat şi trebuie aruncat.
Timpul maxim de întrebuinţare a râşniţei fără
pauze este de 15 minute. Această condiţie are
legatură cu timpul maxim de întrebuinţare al
râşniţei, pentru care după 15 minute de întrebuinţare trebuie făcută o pauză de aprox. 45 de
minute.
Râşniţa nu poate funcţiona fără încărcătură.
Întotdeuna înainte de întrebuinţare introduceţi
produsul în râşniţă.
2
Introduceţi boabele în vas (8).
L
N
N
Page 33

33
2
Apăsaţi butonul sistemului de blocare, iar ansamblul
pentru tocare, compartimentul tocătorului (sau vasul storcătorului de citrice) se rotesc spre dreapta şi se detaşează.
●
În cazul storcătorului de citrice, scoateţi cremaliera din
unitatea motor.
3
Demontaţi elementele ansamblului de tocare, ale compartimentului cu accesoriul pentru umplerea cârnaţilor, compartimentul storcătorului sau al tocătorului.
Puneţi sitele spălate şi uscate în compartimentul de păstrare.
Pentru aceasta:
4
Deschideţi compartimentul din partea din spate a carcasei.
●
Apăsaţi pe ambele părţi sistemul de blocare al compartimentului şi trageţi-l spre dumneavoastră (după cum s-a
arătat mai devreme).
5
Introduceţi în compartiment cel mult două site, pe urmă
închideţi compartimentul şi clapa din partea din spate.
6
Introduceţi cablul de alimentare în compartiment, împingându-l uşor prin oriciul prin care iese.
●
Introduceţi şi ştecărul cablului de alimentare în compartiment.
Curăţare şi păstrare
●
Ştergeţi unitatea motor cu o cârpă umezită şi detergent
lichid pentru vase.
●
Spălaţi componentele din materiale plastice cu apă caldă
şi detergent lichid pentru vase sau, în funcţie de semnele
indicatoare, în maşina de spălat.
●
Componentele de metal spălaţi-le în apă caldă, cu detergent lichid pentru vase.
●
Lăsaţi să se usuce bine componentele spălate.
●
Montaţi componentele uscate ale compartimentului pentru tocat sau tăietorul în ansamblu.
Reciclare
Reciclarea trebuie realizată într-un mod ecologic. Acest dispozitiv este marcat în conformitate cu Directiva Europeană 2012/19/EU cu
privire la echipamentul electric şi electronic
uzat (waste electrical and electronic equipment – WEEE – echipament electric şi electronic uzat). Indicaţiile cuprinse în Directivă cuprind reguli cu
privire la returnări şi reciclarea echipamentului uzat în conformitate cu legislaţia în vigoare în UE. Trebuie luată legătura cu magazinul de specialitate de vânzare cu amănuntul,
care va oferi informaţii despre locurile unde acest echipament poate reciclat.
Storcătorul de citrice
Storcătorul de citrice este un dispozitiv suplimentar care
permite stoarcerea sucului din citrice, împreună cu pulpa
fructelor.
Construcţia accesoriului pentru stors citrice:
1
Cremaliera
2
Vasul
3
Sita
4
Elementul pentru stoarcere
MODUL DE FOLOSIRE A ACCESORIULUI
PENTRU STORS CITRICE
1
Deschideţi clapa compartimentului din partea din spate
a carcasei, care face posibilă utilizarea maşinii în poziţie verticală. Aşezaţi-o în această poziţie, punând-o pe o suprafaţă
tare, plană.
2
Pe transmisie puneţi ambreiajul.
3
Fixaţi vasul la unitatea motor şi rotiţi-l spre stânga, până
în poziţia în care auziţi un „clic” de blocare. Acest lucru
înseamnă că vasul a fost montat în mod corespunzător.
4
Pe componeta verticală cu vas, montaţi sita şi storcătorul.
●
Pregătiţi fructele adecvate, tăiaţi-le în jumătate.
●
Introduceţi ştecărul cablului de alimentare în priza reţelei
electrice.
5
Puneţi în funcţiune maşina apăsând butonul „I” (1a) şi,
pe urmă, aşezaţi citricele cu miezul pe storcător.
6
Apăsaţi cu forţa care este necesară pentru a produce
rotirea mecanismului şi începerea procesului de stoarcere.
În cazul blocării sitei cu pulpa din fructe
stoarse, opriţi aparatul, scoateţi sita, curăţaţi-o,
indcă excesul pulpei poate duce la inundarea
camerei de propulsie a aparatului.
Storcătorul de citrice se roteşte în timpul func-
ţionării; aveţi o deosebită grijă la degete în timpul presării fructelor pe storcător.
După încheierea utilizării
●
Opriţi maşina şi scoateţi ştecărul cablului de alimentare
din priza reţelei electrice.
1a
Scoateţi împingătorul şi daţi la o parte castronul (7a) din
compartimentul de tocare, compartimentul storcătorului (în
cazul accesoriului pentru stors citrice scoateţi preliminar dispozitivul de stoarcere şi sita) sau recipientul dispozitivului pentru
mărunţit din compartimentul dispozitivului pentru mărunţit.
1b
Scoateţi împingătorul şi daţi la o parte castronul împreună cu adaptorul (7b) din compartimentul de tocare (adaptorul trebuie demontat în ordine inversă montajului), compartimentul storcătorului (în cazul accesoriului pentru stors citrice
scoateţi preliminar dispozitivul de stoarcere şi sita) sau
recipientul dispozitivului pentru mărunţit din compartimentul
dispozitivului pentru mărunţit.
M
O
G
Producătorul nu este responsabil pentru eventualele daune cauzate
de o întrebuinţare necorespunzătoare sau de nerespectarea regulilor
de întrebuinţare.
Producătorul are dreptul să modice produsul în orice moment, fără
un anunţ prealabil, în scopul adaptării lui la noile ordonanţe, norme,
directive sau din motive de construcţie, comerciale, estetice sau alte
motive.
Page 34

34
Уважаеми Клиенти!
Поздравяваме Ви за избора и добре дошли сред потребителите на продукти Zelmer.
За постигане на най-добри резултати Ви препоръчваме
да използвате само оригинални аксесоари от фирмата
Zelmer. Те са проектирани специално за тези продукти.
Моля прочетете внимателно тази инструкция за употреба. Особено внимание обърнете на препоръките за
безопасност. Моля запазете инструкцията за употреба,
за да можете да я ползвате и по време на по-нататъшното използване на уреда.
Препоръки за безопасност и правилно
използване на уреда
Преди да започнете да използвате уреда, прочетете съдържанието на тази инструкция за
обслужване.
Уверете се дали добре сте разбрали съветите
описани по-долу.
BG
ОПАСНОСТ!/
ПРЕДУПРЕЖДЕНИЕ!
Опасност от телесни повреди
вследствие на неспазването
● Не използвайте това устройство,
ако захранващия кабел е повреден или на корпуса има някакви
видими повреди.
● Ако захранващия кабел се
повреди, то трябва да бъде заменен от производителя или в специализиран сервиз, или ремонтиран от квалифицирано лице, за да
се избегне опасност.
● Ремонтите на уреда могат да се
провеждат само от обучен персонал. Неправилно извършени
ремонти могат да доведат до
сериозна опасност за потребителя. В случай на неизправност,
обърнете се към специализиран
сервиз на Zelmer.
● Бъдете особено внимателни при
работа с машинката в присъствието на деца.
● Преди да сменяте оборудване или
да се приближите към движещи се
части на уреда, изключете уреда
и извадете щепсела от контакта.
● Винаги изключвайте уреда от елек-
трозахранването, когато е оставен
без надзор и преди монтиране,
демонтиране или почистване.
● Устройството не трябва да се
използва от деца. Съхранявайте
уреда и захранващия кабел на
място недостъпно за деца.
● Устройството може да се използва
от лица с намалени физически,
сетивни или психически способности, или с липса на опит и знания за
уреда, но само под надзор, или след
като по-рано са разбрали обясненията за възможните рискове и указанията и инструкциите за безопасно
използване на уреда.
● Уверете се, че децата не си играят
с уреда.
● Уредът трябва да се използва
само с купата за зареждане.
● Уредът може да се използва само
вътре в помещенията при стайна
температура и на височина не
надвишаваща 2000 метра над
морското равнище.
ВНИМАНИЕ!
Опасност от имуществени вреди
вследствие на неспазването
●
Не изваждайте щепсела от контакта чрез издърпване за захранващия кабел.
●
Винаги включвайте уреда към контакт на електрическата мрежа (само променлив ток) с напрежение
съгласно с данните намиращи се върху табелката
на уреда.
●
Не излагайте уреда и оборудването на температура над 60°C. По този начин можете да увредите
уреда.
Page 35

35
●
За натискане използвайте само буталото. Използването на други предмети може да предизвика
повреда на уреда или мотора.
●
Не претоварвайте уреда с обилно количество продукти за мелене, не натискайте твърде силно буталото (тласкача).
●
Внимателно монтирайте комплекта за мелене,
затова защото лошо монтирано оборудване за
мелене може да доведе до лошо качество на
мелене или също може да предизвика притъпяване
на острието и ситото. Тъпите ножче и сито сменете
с нови.
●
По време на работа на машинката за мелене не
блокирайте вентилационните отвори в корпуса.
Не поставяйте машинката на меки повърхности.
●
Не слагайте мотора на уреда във вода и други течности и не го мийте под течаща вода.
●
Не мийте оборудването, монтирано на мотора.
●
За почистване на корпуса не използвайте агресивни препарати под формата на емулсии, лосиони, кремове и т.н. Те могат да премахнат маркираните информационни символи и графики, като
деления, указания, знаци за предупреждение и т.н.
ТИПОВЕ МАШИНКИ ZELMER
VIB
Принадлежности
Мелещ
механизъм
Цитрус преса
Машинка за
рязане
Уред за рязане
на зеленчуци
Сокоизстисквачка
Мелничка
с хромел
ZMM5580*
● ● ● ○ ● ●
ZMM5548*
● ○ ● ○ ○ ○
ZMM5588*
● ○ ○ ○ ○ ○
ZMM5598*
● ○ ● ● ○ ○
* цветова версия, ● – основни принадлежности, ○ – допълнителни принадлежности, които могат да се купят отделно в магазините
–
– принадлежности, които не са предвидени за дадения модел
УКАЗАНИЕ
Информация за продукта и указания относно ползването му
●
Когато приключите да работите, извадете щепсела на захранващия кабел от контакта. Поставете
кабела в уреда като го плъзгате по-малко в отвора,
от който се извежда, а щепсела поставете в предвиденото за това място.
●
Когато машинката не може да бъде задействана дайте я за ремонт в сервиз.
●
Месото предназначено за мелене, отделете от костите, сухожилията и хрущялите.
●
Преди смилане на голямо количество продукти,
нарежете ги на парчета.
●
Не мелете сух мак. Преди смилане на макови
семена, залейте ги с вряла вода и оставете във
водата повече от десет часа.
●
За почистване на металните части, използвайте
мека четка.
●
Не мийте металните части в съдомиялна машина.
Агресивните почистващи препарати, използвани
в тези устройства предизвикват потъмняване на
тези части. Измийте ги ръчно, използвайки традиционни миещи течности.
Технически данни
Техническите параметри са дадени на информационната
табелка на уреда.
Допустимо време на непрекъсната работа 15 минути.
Почивка преди повторно използване 30 минути.
Ниво на шум (LWA) 77 dB/A.
MBP – Мощност блокираща двигателя 2000W
Описание на уреда
Машинката за мелене на хранителни продукти се състои от:
1
Двигател на машинката – всеки двигател на машин-
ката е пригоден за монтаж на всеки мелещ механизъм, цитрус преса, сокоизстисквачка, кафемелачка
и машинка за рязане, произведени от ZELMER.
A
1a
Бутон на превключвателя
1b
Бутон „Reverse”
1c
Бутон за блокада
Мелещ механизъм, който се състои от:
2
Камера за мелене
3
Шнек с монтиран съединител
4
Двустранно ножче
5
Решетка с отвори 4 мм
6
Гайка
7a
Тарелка
7b I
Адаптер
II
Тава за рендето
(машинката може да бъде снабдена в един от ком-
плектите с тави 7a или 7b)
Page 36

36
8
Бутало
И допълнителни принадлежности:
9
Разделяща вложка
10
Приставка за колбаси
11
Решетка с отвори 8 мм
12
Решетка с отвори 2,7 мм
Механична защита на мотора
13
Шнек
14
Съединител
15
Винт M4x20
Машинката има механична защита, която предпазва дви-
гателя от повреда – зъбците на задвижващия съединител на шнека се чупят, когато машинката е претоварена
(напр. ако в нея са попаднали кости).
Сменете повредения съединител с нов:
●
развъртете винта (15) в шнека с повреден съединител,
●
отстранете повредения съединител (14),
●
поставете нов съединител и го затегнете с винт (15).
Функция „Reverse”
Задвижващият механизъм на машинката има специална
функция, която дава възможност за временна промяна
на посоката на завъртане на шнека, която се използва
в случай, че забележите значително ограничаване на
меленето или/и излишно количество продукти в камерата за мелене (шнекът не поема дозирания продукт).
В такъв случай натиснете за малко бутона „R” – превключвателя, продуктите ще се върнат от вътрешността
на камерата. След това отново включете бутона „І”
и продължете работа.
Ако шнекът продължи да се блокира от излишно количество продукти, натиснете отново бутона „R”, върнете
продуктите от камерата и отстранете от тях частите,
които затрудняват меленето (напр. сухожилията и др.).
В някои ситуации е необходимо да разглобите камерата
и изцяло да отстраните всички пречки.
Работа с комплекта за мелене
В камерата за мелене (2) въведете последователно:
1
Червяк (3) със съединител навътре.
2
На шнека червяка (3) нож (4).
3
Сито (например 5), така че елемента на камерата да
влезе в жлеба на обиколката на ситото.
4
Затегнете всички елементи на комплекта за мелене –
силно, до голямо съпротивление.
5
Поставете сглобения комплект за мелене на диска
(1) и завъртете на позицията, на която ще чуете “клик”
на блокадата. Това означава, че камерата е правилно
монтирана.
6a
Поставете купата (7a) при камерата за мелене (2).
A
E
6b
Сложете адаптера I в отвора на тавата II. Сложете
тавата заедно с адаптера (7b) на камерата за мелене (2).
Подготовка на машинката за работа
ивключване
●
Извадете от корпуса захранващия кабел на подходяща дължина и съответните принадлежности.
1
Поставете двигателя (1) близо да електрически кон-
такт върху твърда, стабилна повърхност така, че да не
покривате вентилационните отвори в корпуса.
●
Отворете капачето в задната част на корпуса и извадете подходяща решетка (Рис. C).
Стандартно в камерата за мелене е мон-
тирана решетката с отвори 4 мм.
●
Преди първото използване на машинката внимателно измийте принадлежностите.
●
Сглобете съответните принадлежности и ги монтирайте към двигателя.
2
Включете захранващия кабел в електрическия кон-
такт.
3
С помощта на бутона „І” на превключвателя (1a) пус-
нете машинката (уредът ще започне работа след около
2 секунди).
Работа с приставката за колбаси
Към камерата за мелене (2) поставете по ред:
1
Червяк (3) със съединител към вътрешността.
2
На шнека (3) вмъкнете лагера (9).
3
Приставка за колбаси (10).
4
Затегнете всички елементи с гайката (6) – до силно
съпротивление.
5
Сложете така монтирания комплект за мелене на
задвижващата основа (1) и завъртете на позицията на
която ще чуете “клик”(„click”) блокада.
6a
Поставете купата (7a) при камерата за мелене (2).
6b
Сложете адаптера I в отвора на тавата II. Сложете
тавата заедно с адаптера (7b) на камерата за мелене (2).
Преди да поставите червото, накиснете го в топла вода
за около 10 мин.
●
Сложете мокрото черво на приставката за колбаси.
Обърнете внимание да не са запушени
отворите за излизане на въздуха в приставката.
Месната маса за пълнене в червото не
бива да бъде прекалено рядка. Прекалено
голямото съдържание на течност може
да доведе до изтичане и проникване във
вътрешността на машинката.
D
F
Page 37

37
Сокоизстисквачка за плодове
Сокоизстисквачката е приставка към някои типове месомелачки. Дава възможност за изстискване на сок от
плодове като: малини, касис, ягоди, цариградско грозде
и освен това от грозде и домати. Семчестите плодове
като например касис могат да се изстискват заедно
с дръжките. В сокоизстисквачката не бива да се използват плодове с големи костилки, напр. сливи, вишни и др.
без предварителното им изваждане (отстраняване).
Елементи на сокоизстисквачката:
1
Камера на сокоизстисквачката
2
Шнек
3
Корпус
4
Гайка
5
Улей за изтичане на сока
6
Регулационен болт
7a
Тарелка
7b I
Адаптер
II
Тава за рендето
(машинката може да бъде снабдена в един от ком-
плектите с тави 7a или 7b)
8
Бутало (от мелещия механизъм)
9
Цедка – 2 бр.
№ 1 – по-малки отвори
№ 2 – по-големи отвори
10
Голям уплътняващ пръстен на корпуса (3)
11
Малък уплътняващ пръстен на шнека (2)
12
Кукичка
13
Четка
За натъпкване на плодовете използвайте
само буталото (8).
ПОДГОТОВКА ЗА РАБОТА И УПОТРЕБА
НА СОКОИЗСТИСКВАЧКАТА
1
Уверете се, че на корпуса (3) и червяка (2) са сложени уплътняващите пръстени (10) и (11). В случи на
тяхното отсъствие задължително ги сложете във вдлъбнатините на тези елементи (корпуса и червяка).
2
На корпуса (3) сложете и натиснете цедката (9),
докато не почувствате съпротивление.
За премахване на ситото (9) от корпуса
(3) много удобна е употреба на кукичката
(12). Сложете кукичката (12) с по-къс край
в отвор на ситото (9) и дръпнете ситото
(9) навън.
3
В камерата на сокоизстисквачката (1) поставете
шнека (2).
4
Поставете корпуса с цедката на шнека, обърнете
внимание цедката да е насочен надолу а прикрепващата
бразда да е на съответното място на корпуса на сокоизстисквачката.
I
J
5
При така поставения корпус, затегнете винта (4) към
камерата на сокоизстисквачката (1).
6
Затегнете регулиращия болт (6) в корпуса (3).
7
Поставете на него улея за изтичане на сок (5), докато
не щракне на корпуса (3) – “клик”.
8
Сглобената сокоизстисквачка поставете на устройството, по същият начин, както при слагането на камерата за смилане.
9a
При отвора за подаване поставете купата (7a) и буталото (8) – от комплекта за смилане.
9b
Сложете адаптера I в отвора на тавата II. При
отвора за подаване поставете купата (7b) и буталото (8)
– от комплекта за смилане.
10
на изхода на улея за изтичане на сок (5) и регулиращия болт (6) поставете подходящите съдове за сок
и отпадъци.
11
Включете захранващия кабел към контакта на
захранващата мрежа.
12
Включете уреда с помощта на бутона за включване
(1a), след което дозирайте съответните плодове, натискайки с буталото.
За да може процесът на изстискване на
плодовете да протича правилно, не навивайте прекалено дълбоко регулационния
болт в началния етап на работа. Едва
след като прецените съдържанието на сок
в отпадъците, коригирайте съответно
степента на навиване така, че да постигнете достатъчно добра ефективност
и да избегнете запушването на сокоизстисквачката.
●
По време на изстискване на сока наблюдавайте степента на влажност на отпадъците. Ако станат прекалено сухи, разхлабете болта (6), за да избегнете
запушването на сокоизстисквачката с отпадъци.
Степента на затягане на болта зависи
от вида и качеството на преработваните
плодове, ако плодовете са сочни и добре
узрели, затегнете болта по-дълбоко, а ако
плодовете имат малко сок, затегнете
болта по-малко.
Ако регулирането с помощта на болта не
осигури достатъчно ефективно изстискване, можете отново да прекарате отпадъците през сокоизстисквачката.
Блокирането на изходящия отвор на каме-
рата (в регулационния болт (6)) с отпадъци от плодове с голямо съдържание на
сок има опасност от проникване на течност в двигателя на машинката.
Page 38

38
●
В случай на блокиране на изхода на камерата с отпадъци машинката трябва да се изключи. Обърнете
особено внимание на процеса на изстискване на
сок, напр. дали не са запушени отворите на цедката.
Изключете сокоизстисквачката от двигателя (както
при камерата за мелене), разглобете сокоизстисквачката, изчистете (измийте) елементите на сокоизстисквачката. За миене, особено на цедката, използвайте четката в комплекта.
Ренде с резачка за зеленчуци
1
Ренде за ситни стърготини
2
Ренде за едри стърготини
3
Ренде за резени
4
Ренде за пасиране
5
Прикрепващ механизъм
6
Камера
7
Купа за подаване
8
Бутало
В случаите на използване на рендето сва-
лете адаптера.
Машината за рязане има две рендета за ситно настъргване (1) и едро настъргване (2) (за кашкавал, моркови,
целина, варено червено цвекло и др.). Рендето (3) служи
за нарязване на зеленчуци на резени (картофи, краставици, лук и др.). Рендето (4) служи за пасиране на картофи, червено цвекло, плодове и др.
9
Барабан на резачката
10
Съд за зеленчуци
11
Бутало
Уредът за рязане на зеленчуци резачка е допълнителен
аксесоар към рендето. Той се използва за рязане на
кубчета само на варени зеленчуци: картофи, цвекло,
моркови, целина, магданоз и др. Преди да започнете да
режете зеленчуците, най-напред ги сварете. След сваряване, големите зеленчуци предварително нарежете, за
да се поберат в съда на резачката (10).
PАБОТА С РЕЗАЧКА
1
Наклонете прикрепващия механизъм (5) и поставете
едно от рендетата със съединителя му навътре към
камерата.
2
Затворете прикрепващия механизъм (5).
3
Съединете камерата на машината за рязане (6) по
същия начин като камерата на мелене на машинката.
●
Нарежете големите продукти предварително на
парчета така, че да можете лесно да ги сложите
в машинката.
●
Не пасирайте меки плодове, съдържащи твърди костилки.
●
След приключване на работата изключете машинката и изключете захранващия кабел от електрическия контакт.
●
Отстранете с дървена лъжица остатъците от продуктите от рендетата и камерата.
B
H
Остриетата на рендетата не се регенери-
рат.
РАБОТА С РЕЗАЧКА ЗА ЗЕЛЕНЧУЦИ
Остриетата на барабана на резачката са
много остри, запазете особено внимание.
1
Вдигнете скобата (5) и поставете барабана (9), със
съединителя към центъра на камерата.
●
Затворете скобата.
2
Сложете камерата на рендето на задвижващия блок
на машинката, завъртете докато не чуете звука “Click” на
блокадата.
3
Прикрепете купата (7) и поставете съда на резачката (10).
●
След като сложите зеленчуците, натискайте ги само
с буталото (11).
Буталото № 11 използвайте само до съда
на резачката. Забранява се използването
на буталото № 11 без да сте сложили вложите на резачката (10) в камерата (6).
Големите продукти нарежете по-рано на
по-малки парчета, които без проблем ще
се съберат в съда на резачката (10).
●
След като завършите работа изключете машинката
и извадете щепсела от захранващия контакт.
●
Премахнете с дървената лъжица остатъците от продуктите от вътрешността на барабана на резачката.
●
Разглобете елементите на резачката.
Съда за зеленчуци (10) се изважда след
демонтаж на купата на машинката (7).
Не се позволява рязането на сурови зелен-
чуци.
Ако продуктите са прекалено дълго варени
и са много меки, ефекта на рязането няма
да е задоволителен.
Мелничка с хромел
1
Гайка
2
Регулатор за хромели
3
Корпус с върток
4
Вътрешен хромел
5
Външен хромел
6
Червяк
7
Камера на мелничката
8
Тарелка
9
Улей на корпуса следва да попадне в издатината на
камера на мелничката
K
L
Page 39

39
OПИСАНИЕ НА УСТРОЙСТВОТО
Тази приставка може да се използва за мелене на зърнени храни, семена на маслени растения и на сухи хранителни продукти.
Мелничка с хромел позволява мелене на такива продукти като: жито, ръж, овес, ориз, кафе на зърна, захар,
семена на елда, чер пипер на зърна, карамфил, горчица, орехи, лешници, сушени гъби, бадеми, соя, ленени
семена, белени слънчогледови семена и др.
Не мелете маслените продукти при мини-
мално поставена зърнистост. Устройството за мелене може да се слепи или
блокира.
Устройството не е пригодно за мелене на
много твърди продукти, напр: сушен грах,
царевица, пуканки.
MOНТАЖ НА МЕЛНИЧКА В МАШИНАТА
1
Когато камера на мелничката (7) е обърната с ъгъл
ок. 45° надясно, сложете монтираната мелничка върху
задвижващия възел, като сложите издатините на камера
на мелничката (7) в прорези на задвижващия възел,
a след това я обърнете наляво до положение, при което
ще чуете едно «
клик
» на блокировката. Това означава,
че мелничката е монтирана правилно.
УПОТРЕБА И РЕГУЛАЦИЯ НА МЕЛНИЧКАТА
Преди първа употреба измийте (виж «ПОЧИСТВАНЕ»)
и изсушете разглобената мелничка, а след това смелете
ок. 50 г продукт (напр. зърно) при поставяне на устройството за мелене на средно раздробяване. Мляният продукт не е пригоден за по-нататъшна употреба, тъй като
той е замърсен и следва да се изхвърли.
Maксималното време на непрекъснатата
работа на мелничката съставя 15 минути.
Това условие е свързано с максималното
време на работа на машината, за която след
15 мин. работа се налагат ок. 45 мин. пауза.
Устройството не може да работи без
натоварване. Преди задвижване винаги го
напълнете с продукт.
2
Сипете зърната на тарелката (8).
3
Настройте бутона на корпуса (3) на грубо мелене.
4
Включете мотора на машинката.
5
Смленият продукт ще започне да излиза през отвора.
6
В зависимост от желателната степен на смилане или
от употребените зърна регулирайте с помощта на върток
на корпуса (3) регулатор за хромели (2) така, че да получите продукт със съответна зърнистост. Като го завъртите по посока на часовниковата стрелка, ще получите
по-дребно млян продукт, а при въртене по посока срещу
часовниковата стрелка – по-едро млян продукт.
N
N
Най-дребната (минимална) степен на смилане се получава при поставяне на въртока до линия 1, а най-едрата
(максимална) при поставяне на въртока до линия STOP.
Виж графика върху корпуса (3) и регулатора за хромели (2).
Много силно завъртане или отвинтване
на въртока извън линия STOP по време
на работа може да предизвика повреда на
устройството.
Препоръчва се по време на работа на мел-
ничката регулатор на хромелите (II) да
е поставен между линия 1 и линия STOP.
При сложената мелничка НЕ МОЖЕ да се
използва функция REVERSE в машината.
Помнете щателно да измиете мелничката
преди да мелете различни продукти. Това
ще позволи да избегнете взаимно проникване с миризми.
За по-меки зърна, като овес или лен, следва
да изберете регулация за по-едро смилане.
Не поглеждайте във вътрешността по
време на мелене, тъй като зърната кафе
могат понякога да изскочат и да предизвикат нараняване (напр. на очите).
ПОЧИСТВАНЕ И ПОДДРЪЖКА
Мелничката не изисква почистване след всяка употреба (ако се меле един и същи вид продукт), тъй като
червякът (6) предотвратява залягане на остатъци от
зърна в мелничката. Подсушете стоманените мелещи
елементи (4, 5) с кърпа след измиването им, за да не
корозират. В случай че мелещите елементи ще бъдат
дълго съхранявани, намажете ги с мазнина (можете да
използвате за тази цел напр. олио). Мелещите елементи
не бива да се потапят във вряща вода. Частите от пластмаса (несъдържащи графика) можете да миете.
Цитрус преса
Цитрус пресата е допълнителен уред, който дава възможност за изстискване на сок с пулпа от цитрусови плодове.
Елементи на цитрус пресата:
1
Съединител
2
Купа
3
Цедка
4
Преса
МОНТИРАНЕ НА ЦИТРУС ПРЕСАТА
1
Отворете капачето в задната част на корпуса, което
дава възможност за работа при вертикално положение.
Поставете уреда в такова положение върху твърда,
равна повърхност.
M
O
Page 40

40
4
Отворете капачето в задната част на корпуса.
●
Натиснете от двете страни блокировката на капачето
и я дръпнете към себе си (както е показано по-горе).
5
Приберете максимум две решетки с отвори, след
това затворете задното капаче.
6
Приберете кабела, като леко го напъхате в отвора,
от който излиза.
●
Приберете щепсела на кабела на мястото му.
Почистване и поддръжка
●
Претрийте двигателя с влажна кърпа с препарат за
миене на съдове.
●
Пластмасовите части мийте с топла вода с препарат
за миене на съдове или съгласно обозначенията –
в съдомиялна машина.
●
Металните елементи мийте с гореща вода с препарат за миене на съдове.
●
Внимателно изсушете измитите части.
●
Сглобете сухите части на камерата за мелене или
машинката за рязане.
Утилизация
Утилизируйте упаковку с использованием
экологически безопасных методов. Данный
прибор имеет отметку о соответствии европейским нормам 2012/19/EU утилизации
электрических и электронных приборов
(waste electrical and electronic equipment –
WEEE). Данные нормы определяют действующие на
территории Евросоюза правила возврата и утилизации
старых приборов. Информацию об актуальных возможностях утилизации Вы можете получить в магазине,
в котором Вы приобрели прибор.
2
Поставете съединителния диск.
3
Поставете купата върху двигателя и я завъртете
наляво до положението, при което ще чуете щракване
на блокировката. Това означава, че купата е правилно
монтирана.
4
На издадената част на купата монтирайте цедката
и пресата.
●
Пригответе плодовете по подходящ начин, като ги
разрежете наполовина.
●
Включете захранващия кабел на машинката към
електрическия контакт.
5
Включете машинката с помощта на бутона „І” (1a),
а след това сложете плода с отрязаната му част върху
пресата.
6
Натиснете с подходяща сила, което ще доведе до
задвижване на механизма и ще се започне процесът на
изстискване.
Когато се блокира цедката с месеста част
на изтискваните плодове следва да се спре
машинката, да се отдели цедката и да се
изчисти от тази месеста част, тъй като
нейният излишък може да доведе до заливане на камерата за задвижване на машинката.
Цитрус пресата се върти по време на
работа, пазете пръстите си при натискане на плодовете върху пресата.
След приключване на работа
●
Изключете машинката и извадете щепсела на
захранващия кабел от ел. контакта.
1a
Извадете тласкача и свалете тавата (7a) от камерата
за мелене, от камерата на сокоизстисквачката (в случай
на сокоизстисквачка за цитруси първо свалете изстисквача и ситото) или тавата за рендето от камерата на рендето.
1b
Извадете тласкача и свалете тавата за рендето
заедно с адаптера (7b) от камерата за мелене (адаптера
трябва да се демонтира по обратен начин на неговия
монтаж), от камерата на сокоизстисквачката (в случай на
сокоизстисквачка за цитруси първо свалете изстисквача
и ситото) или тавата за рендето от камерата на рендето.
2
Натиснете бутоните на блокировката, завъртете
надясно мелещия механизъм, камерата на машинката за
рязане (или купата на цитрус пресата) и я свалете.
●
При цитрус пресата извадете съединителя от двигателя.
3
Разглобете елементите на мелещия механизъм,
камерата с приставката за колбаси, камерата на сокоизстисквачката или машинката за рязане.
Измитите и изсушени решетки с отвори приберете на
мястото им в корпуса, за тази цел:
G
Производителят не носи отговорност за каквито и да е повреди,
които са резултат от неволна или неправилна употреба.
Производителят си запазва правото да видоизменя продукта по всяко време, за да отговори на законовите регулации,
норми, директиви или поради конструктивни, търговски,
естетически или други основания, без да съобщава за това
предварително.
Page 41

41
Уважаемые Клиенты!
Поздравляем Вас с выбором нашего изделия и приветствуем среди пользователей продуктов Zelmer.
Чтобы достичь наилучших результатов, рекомендуем
использовать только оригинальные аксессуары компании Zelmer. Они разработаны специально для этого продукта.
Просим внимательно прочитать настоящее руководство
по эксплуатации. Особое внимание необходимо обратить на правила техники безопасности. Просим сохранить Руководство, чтобы Вы могли пользоваться им
в ходе дальнейшей эксплуатации техники.
Указания по технике безопасности
иправильной эксплуатации мясорубки
Перед тем как приступить к эксплуатации оборудования, ознакомьтесь с содержанием настоящего руководства.
Следует убедиться, что Вы поняли нижеследующие указания.
RU
ОПАСНОСТЬ! / ВНИМАНИЕ!
Несоблюдение правил грозит
травмами
● Не запускайте оборудование, если
кабель питания поврежден или
видны повреждения корпуса.
● Если кабель питания будет
поврежден, его необходимо заменить у производителя или в специальном сервисном центре
либо квалифицированным лицом,
чтобы избежать опасности.
● Ремонт оборудования может осу-
ществлять только квалифицированный персонал. Неправильный
ремонт может вызвать серьезную
угрозу для пользователя. В случае
возникновения неполадок обратитесь в специализированный сервисный центр ZELMER.
● Соблюдайте особую осторожность
во время работы в присутствии
детей.
● Перед заменой оборудования
или приближением к движущимся
деталям во время использования
необходимо выключить прибор
и отключить от питания.
● Всегда отключайте устройство от
электросети, когда оно остается без
присмотра, а также перед монтажом, демонтажем или его чисткой.
● Устройство не должно использо-
ваться детьми. Храните устройство с кабелем в месте недоступном для детей.
● Устройством могут пользоваться
лица с ограниченными физическими, сенсорными и психическими
возможностями, а также не имеющие опыта работы с устройством,
при условии, что они будут это
делать исключительно под присмотром либо после предварительного
понятного объяснения возможных
угроз и инструктажа по безопасному пользованию устройством.
● Необходимо проследить, чтобы
дети не играли с устройством.
● Оборудование можно использо-
вать только с миской (чашей) для
загрузки.
● Используйте прибор только вну-
три помещений при комнатной
температуре на высоте не выше
2000 м над уровнем моря.
ВНИМАНИЕ!
Несоблюдение грозит
повреждением имущества
●
Нельзя тянуть за кабель, чтобы отсоединить вилку
питания от электросети.
●
Прибор всегда подключайте к розетке электросети
(только переменного тока) с напряжением, соответствующим напряжению, указанному на щитке
прибора.
Page 42

42
●
Нельзя подвергать мясорубку и оборудование действию температуры свыше 60°C. Иначе Вы можете
повредить мясорубку.
●
Для проталкивания используйте только толкатель.
Применение других предметов может привести
к повреждению мясорубки и кабеля.
●
Не перегружайте прибор чрезмерным количеством
продукта или слишком сильным его проталкиванием (толкателем).
●
Тщательно смонтируйте агрегат рубки, иначе это
приведет к несоответствующему качеству перемалывания, а также может стать причиной притупления ножа и сита. Тупой нож и сито нужно заменить
на новые.
●
Во время работы мясорубки нельзя прикрывать
вентиляционные отверстия в корпусе. Мясорубку
нельзя устанавливать на мягкой основе.
●
Не погружайте привод мясорубки в воду, не мойте
его под проточной водой.
●
Не мойте оборудование, установленное на приводе.
●
Для мытья корпуса не используйте агрессивные
моющие средства типа эмульсии, молочка, пасты
и др. Они могут удалить нанесенные информационные графические символы, как например, деления, обозначения, знаки предупреждения и др.
TИПЫ МЯСОРУБОК ZELMER
VIB
Принадлежности
Режущий узел
Соковыжималка
для цитрусовых
Шинковка Резка для овощей
Соковыжималка
универсальная
Мельничка
с жерновами
ZMM5580*
● ● ● ○ ● ●
ZMM5548*
● ○ ● ○ ○ ○
ZMM5588*
● ○ ○ ○ ○ ○
ZMM5598*
● ○ ● ● ○ ○
* вариант цвета, ● – основное оснащение, ○ – дополнительное оснащение, которое можно приобрести в магазине
–
– принадлежности, которые недоступны для данного типа
СОВЕТЫ
Информация о продукте
и советы по эксплуатации
●
После окончания работы выньте штепсель кабеля
питания из электросети. Спрячьте кабель, слегка
всовывая его в отверстие, из которого он выходит,
а штепсель кабеля вложите в отсек.
●
Если невозможно запустить мясорубку – сдайте ее
в сервис.
●
Мясо, предназначенное для перемалывания, необходимо отделить от костей, сухожилий, хрящей
и жил.
●
Перед перемалыванием крупные продукты необходимо порезать на куски.
●
Нельзя перемалывать сухой мак. Перед тем, как
перемалывать мак, его нужно заранее пропарить
и размочить – за несколько часов.
●
Для мытья металлических частей используйте мягкую щеточку.
●
Не мойте металлические части в посудомоечных
машинах. Агрессивные средства для чистки оборудования, приводят к потемнению выше перечисленных частей. Мойте их вручную, используя для
этого традиционные жидкости для посуды.
Техническая характеристика
Технические параметры указаны на заводском щитке
прибора.
Допустимое время непрерывной работы 15 минут.
Интервал между очередным включением 30 минут.
Уровень шума (LWA) 77 dB/A.
MBP – Блокирующая мощность двигателя 2000 Вт
Oписание мясорубки
Мясорубка для пищевых продуктов состоит из:
1
Привода – к приводу каждой мясорубки можно под-
соединить любой режущий узел, соковыжималку для
цитрусовых, унисерсальную соковыжималку, кофемолку и шинковку производства ZELMER.
A
1a
Кнопка выключателя
1b
Кнопка «Реверс»
1c
Кнопка блокировки
Режущего узла, в состав которого входит:
2
Рабочая головка
3
Шнек с редуктором
4
Двусторонний ножик
5
Решетка с отверстиями 4 мм
6
Крепежное кольцо
7a
Миски
7b I
Адаптер
II
Чаша шинковки
(мясорубка может быть оснащена одним комплектом
чаш 7a или 7b)
Page 43

43
8
Толкатель
И дополнительных приспособлений:
9
Дистанционной прокладки
10
Насадки для набивки колбас
11
Решетки с отверстиями 8 мм
12
Решетки с отверстиями 2,7 мм
Механическая защита двигателя
13
Шнек
14
Редуктор
15
Болт M4x20
Mясорубка имеет защиту двигателя от механических
повреждений – пластиковые шестерни редуктора на
шнеке, которые должны сломаться первыми при жестком блокировании шнека (напр., если вместе с мясом
в мясорубку попадает кость).
Испорченную пластмассовую шестерню замените новой:
●
отвинтите болт (15) на шнеке с испорченной шестерней редуктора,
●
снимите поврежденную шестерню (14),
●
вставьте новую и привинтите болтом (15).
Функция «Реверс»
Реверс – система, позволяющая проворачивать шнек
мясорубки в обратном направлении в случае, если
заметно снижается эффективность измельчения продукта или если продукт скапливается в горловине (шнек
не забирает продукт). В таком случае достаточно нажать
на кнопку «R» и на некоторое время включить систему
обратной прокрутки. Причина засорения сама выйдет
из загрузочной горловины. Затем нажмите на кнопку «I»
и продолжайте работу.
Если шнек снова блокируется, нужно еще раз нажать
на кнопку «R» и очистить шнек от жил, затрудняющих
работу мясорубки.
В некоторых случаях необходимо разобрать мясорубку
и вручную освободить шнек от жил.
Работа с системой перемалывания
В камеру перемалывания (2) вставьте по очереди:
1
Шнек (3) редуктором вовнутрь.
2
На стержень шнека (3) ножик (4).
3
Сито (напр., 5) таким образом, чтобы выступ камеры
попал в вырез на окружности сита.
4
Докручиваете все элементы системы перемалывания – крепко до момента сопротивления.
5
Установите смонтированную систему перемалывания на привод (1) и обратите в позицию, когда услышите
«клик» блокировки. Это значит, что головка установлена
правильно.
6a
Установите рабочую чашу (7a) на камеру перемалывания (2).
A
E
6b
Вставьте адаптер I в чашу II. Закрепите чашу вме-
сте с адаптером (7b) на камере измельчения (2).
Подготовка мясорубки к работе
ипервое включение
●
Извлеките из отсека на приводе питающий провод на
соответствующую длину и выберите необходимые
приспособления.
1
Установите прибор (1) на ровную сухую поверхность.
Убедитесь в том, что вентиляционные отверстия на корпусе не закрыты.
●
Oткройте отсек в задней части корпуса и выньте нужную Вам решетку (Рис. C).
Стандартно, решетка с отверстиями
4 мм фабрично установлена в головке
мясорубки.
●
Перед первым включением мясорубки тщательно
промойте все съемные детали.
●
Подсоедините нужное Вам приспособление к приводу.
2
Вложите вилку электропровода в розетку.
3
Нажмите на кнопку «I» (1a), чтобы включить мясо-
рубку (устройство включается через ок. 2 секунды).
Работа с насадкой для
набивки колбас
В камеру перемалывания (2) вставьте по очереди:
1
Шнек (3) редуктором вовнутрь.
2
На стрежень шнека (3) дистанционный вкладыш (9).
3
Насадку для приготовления колбас (10).
4
Докрутите все элементы гайкой (6) – крепко до
момента сопротивления.
5
Установите смонтированную систему перемалыва-
ния на привод (1) и поверните до момента «клика» блокировки.
6a
Установите рабочую чашу (7a) на камеру перемалы-
вания (2).
6b
Вставьте адаптер I в чашу II. Закрепите чашу вме-
сте с адаптером (7b) на камере измельчения (2).
Если решите использовать натуральную оболочку для
колбас, дайте ей отмокнуть в теплой воде ок. 10 минут.
●
Натяните мокрую колбасную оболочку на насадку
для набивки колбас.
Следите за тем, чтобы вентиляционные
отверстия в насадке не были закрыты.
Мясной фарш для наполнения натуральных
колбасных оболочек не может быть слишком жидким. В противном случае может
вытекать и попасть внутрь мясорубки.
D
F
Page 44

44
Соковыжималка
Соковыжималка прилагается в качестве дополнительного
прсипособления к некоторым типам мясорубок. Позволяет отжимать сок из таких ягод и овощей как: малина,
смородина, клубника, крыжовник, а также из винограда и помидоров. Сок из ягод можно отжимать вместе
с черенками. В соковыжималке нельзя отжимать сок
из фруктов с крупными косточками, например, из слив,
вишни и т.п. Косточки нужно предварительно удалить.
Элементы соковыжималки:
1
Головка соковыжималки
2
Шнек
3
Корпус
4
Крепежное кольцо
5
Лоточек для слива сока
6
Регулировочный болт
7a
Миски
7b I
Адаптер
II
Чаша шинковки
(мясорубка может быть оснащена одним комплектом
чаш 7a или 7b)
8
Толкатель (от мясорубки)
9
Сита – 2 шт.
№ 1 – мелкие отверстия
№ 2 – крупные отверстия
10
Уплотнительная прокладка большая для корпуса (3)
11
Уплотнительная прокладка маленькая для шнека (2)
12
Крючок
13
Щеточка
Для проталкивания фруктов всегда
используйте толкатель (8).
ПОДГОТОВКА СОКОВЫЖИМАЛКИ
К РАБОТЕ И ЕЕ ОБСЛУЖИВАНИЕ
1
Убедитесь, что на корпусе (3) и в шнеке (2) установлены уплотняющие прокладки (10) и (11). В случае их
отсутствия обязательно вставьте их в углубления для
этих элементов (корпуса и шнека).
2
В корпус (3) вставьте сито и прижмите (9) до момента
сопротивления.
3
В камеру соковыжималки (1) вставьте шнек (2).
Для удаления сита (9) из корпуса (3)
очень удобно использовать крючок (12).
Вставьте короткий конец крючка (12)
в отверстие сита (9) и потяните сито (9)
наружу.
4
Установите корпус с ситом, следя за тем, чтобы сито
было обращено вниз, а вырез попал в выступ камеры
соковыжималки.
I
J
5
Корпус, установленный таким образом, докручивайте
с помощью крепежного кольца (4) к камере соковыжималки (1).
6
Вкрутите регулировочный болт (6) в корпус (3).
7
Поместите на него лоточек для слива сока (5) до
момента звука клика на корпусе (3) – «клик».
8
Смонтированную соковыжималку установите на
привод аналогичным способом, как в описании камеры
перемалывания.
9a
На отверстие загрузки установите лоток для загрузки
продукта (7a) и толкатель (8) – от системы перемалывания.
9b
Вставьте адаптер I в чашу II. На отверстие
загрузки установите лоток для загрузки продукта (7b)
и толкатель (8) – от системы перемалывания.
10
Под отверстие лотка для слива сока (5) и регулировочного болта (6) установите соответствующие емкости
для сока и мякоти.
11
Вставьте кабель питания мясорубки в розетку электросети.
12
Запустите мясорубку с помощью кнопки выключателя (1a), а затем соответственно дозируйте количество
фруктов с помощью толкателя.
Для правильного прохождения процесса
выжимания фруктов нельзя закручивать
регулировочный болт слишком глубоко
на начальном этапе работы. Только после
оценки степени содержания мякоти в соке
можно отрегулировать степень вкручивания таким образом, чтобы получить
достаточную эффективность и избежать закупоривания соковыжималки.
●
Во время выжимания следите за консистенцией мякоти.
Если она слишком сухая, открутите болт (6), чтобы
избежать закупоривания соковыжималки мякотью.
Степень вкручивания болта зависит от
вида и типа перерабатываемых фруктов:
для сочных и зрелых фруктов болт необходимо вкручивать поглубже, для малосочных фруктов – болт вкручивать меньше.
Если с помощью регулировочного болта
не будет достигнута необходимая эффективность выжимания, мякоть следует
еще раз пропустить через соковыжималку.
Закупоривание отверстия камер (в регули-
ровочном болте (6)) мякотью с большим
содержанием сока может приводить к тому,
что сок попадет в привод мясорубки.
●
В случае скопления мякоти в головке соковыжималки
необходимо выключить мясорубку. В процессе выжимания сока обращайте особое внимание на то, чтобы
не допустить засорения мякотью отверстий сита.
Page 45

45
Если это произойдет, отключите соковыжималку от
сети (идентично, как в случае мясорубки), разберите
соковыжималку и промойте (очистите) ее части. Для
мытья, особенно ситечка, рекомендуется использовать приложенную в комплект щеточку.
Шинковка с овощерезкой
1
Мелкая терка
2
Крупная терка
3
Tерка для ломтиков
4
Tерка для протирания
5
Держатель
6
Головка
7
Лоток для загрузки продуктов
8
Толкатель
В случае использования шинковки, сни-
мите адаптер.
Шинковка имеет две терки: мелкую терку (1) и крупную
терку (2) (для сыра, моркови, сельдерея, вареной красной свеклы и т.п.) Tерка (3) предназначена для нарезки
овощей ломтиками (картофеля, огурцов, лука и т.п.).
Tерка (4) предназначена для протирания картофеля,
красной свеклы, фруктов и т.п.
9
Барабан резки
10
Вкладыш резки
11
Толкатель резки
Резка для овощей является дополнительным оборудованием для овощерезки. Служит для нарезки кубиками
только вареных овощей: картофеля, свеклы, моркови,
сельдерея, петрушки и т.п. Перед началом эксплуатации
следует овощи отварить. После варки большие овощи
следует разрезать, чтобы они помещались внутри вкладыша (10).
РАБОТА С ШИНКОВКОЙ
1
Раскройте держатель (5) и вставьте одну из терок
таким образом, чтобы конец редуктора вошел в паз
в корпусе мясорубки.
2
Защелкните держатель (5).
3
Соберите рабочую головку шинковки (6) также, как
рабочую головку мясорубки.
●
Крупные продукты порежьте на кусочки, чуть меньшие по размеру, чем отверстие в лотке.
●
Не измельчайте мягкие плоды с косточками.
●
Окончив работу, выключите мясорубку и выньте
вилку питающего электропровода из розетки.
●
При помощи деревянной лопатки следует очистить
терку и рабочую головку от остатков продукта.
Режущие кромки терок не требуют реге-
нерации.
B
H
КАК РАБОТАТЬ С ОВОЩЕРЕЗКОЙ
Лезвия барабана измельчителя очень
острые, необходимо соблюдать осторожность.
1
Откройте защелку (5) и вложите барабан (9) винтом
к средине камеры.
●
Зафиксируйте защелку.
2
Вложите камеру овощерезки на привод мясорубки
и оберните до позиции, при которой услышите «клик»
блокировки.
3
Вложите засыпную миску (7) и вложите вкладыш
резки (10).
●
После вложения овощей следует дожать толкателем (11).
Толкатель № 11 используйте только
с вкладышем резки. Запрещается использовать толкатель № 11 без размещенного
вкладыша измельчителя (10) в камере (6).
Большие продукты разрежьте заранее на
куски, которые без труда можно вложить
во вкладыш резки (10).
●
После окончания работы выключите мясорубку
и выньте кабель питания из гнезда сети.
●
Удалите деревянной ложкой остатки продуктов, которые остались внутри барабана резки или во вкладыше.
●
Разложите элементы резки.
Вкладыш резки (10) выньте, демонтируя
засыпную миску (7).
Не допускается нарезка сырых овощей.
При использовании слишком проваренных
мягких продуктов эффект нарезки кубиками может быть менее удовлетворительным.
Мельничка с жерновами
1
Гайка
2
Задатчик жерновов
3
Корпус с регулировочной ручкой
4
Внутренний жернов
5
Внешний жернов
6
Шнек
7
Камера мельнички
8
Рабочая чаша
9
Канавка корпуса должна попасть на выступ камеры
мельнички
K
L
Page 46

46
так, чтобы получить продукт с соответствующей грануляцией. Покрутив регулировочную ручку по направлению часовой стрелки, Вы получите (2) продукт мелкого
помола, а покрутив по направлению против часовой
стрелки, - продукт грубого помола.
Наиболее мелкая (минимальная) степень помола получается при установке регулировочной ручки на линии
1, а наиболее крупная (максимальная) – при установке
регулировочной ручки на линии STOP. Смотрите графические обозначения на корпусе (3) и на регуляторе степени помола (2).
Слишком сильное закручивание или откру-
чивание регулировочной ручки за линию
STOP во время работы может привести
к повреждению устройства.
Рекомендуется, чтобы во время работы
мельнички задатчик жерновов (II) был
установлен между линией 1 и линией STOP.
При надетой мельничке НЕЛЬЗЯ исполь-
зовать в мясорубке функцию РЕВЕРС
(REVERSE).
Помните о тщательной мойке мельнички
перед перемалыванием разных продуктов.
Это позволит избежать взаимного проникновения запахов.
Для более мягких зерновых культур, таких
как овёс или семена льна, следует выбрать
установку грубозернистого помола.
Запрещается заглядывать в камеру кофе-
молки в процессе помола кофе, поскольку
выскакивающие иногда зерна могут Вас
поранить (напр., глаз).
ОЧИСТКА И КОНСЕРВАЦИЯ
Мельничка не требует чистки после каждого использования (если мелется один вид продукта), поскольку шнек
(6) предотвращает залегание остатков зёрен в мельничке. После промывки стальные жернова (4, 5) нужно
осушить тряпочкой, чтобы не допустить до их коррозии.
В случае длительного хранения кофейных зерен законсервируйте их путем промасливания (для этой цели
можно использовать, например, растительное масло).
Не рекомендуется погружать жернова в кипящую воду.
Части из пластмассы (на которых нет графических
обозначений) можно мыть в посудомоечной машине
(макс. 60°C).
Соковыжималка для цитрусовых
Соковыжималка для цитрусовых является дополнительным приспособлением, которое позволяет отжимать сок
из цитрусовых вместе с мякотью.
M
ОПИСАНИЕ УСТРОЙСТВА
Эта насадка может быть использована для перемалывания зерна, семян маслянистых культур, а также сухих
продуктов питания.
Мельничка с жерновами позволяет молоть такие продукты, как: пшеница, рожь, овёс, рис, зёрна кофе, сахар,
гречневая крупа, чёрный перец, душистый (гвоздичный)
перец, горчица, грецкие орехи, лесные орехи, сушёные
грибы, миндаль, соя, семена льна, чищеные семечки
подсолнечника и др.
Маслянистые продукты не мелите на
минимальной установке гранулирования.
Устройство для перемалывания может
заклеиться или заблокироваться.
Устройство не пригодно для перемалыва-
ния очень твёрдых продуктов, например,
сушённого горошка, кукурузы-попкорн.
УСТАНОВКА МЕЛЬНИЧКИ НА МЯСОРУБКЕ
1
Когда камера мельнички (7) повёрнута под углом
ок. 45° вправо, наденьте смонтированную мельничку
на привод, вставив выступы камеры мельнички (7)
в вырезы привода, а затем поверните её влево до позиции, при которой услышите «клик» блокировки. Это
значит, что Мельничка установлена правильно.
ЭКСПЛУАТАЦИЯ И РЕГУЛИРОВАНИЕ
МЕЛЬНИЧКИ
Перед первым использованием помойте (смотрите
«ЧИСТКА») и высушите разобранную на части мельничку, а затем смелите ок. 50 г продукта (например,
зерна) при установке устройства на перемалывание со
средним размельчением. Смолотый продукт не пригоден
к дальнейшему использованию, поскольку он загрязнён
и следует его выбросить.
Максимальное время беспрерывной
работы мельнички составляет 15 минут.
Это условие связано с максимальным временем работы мясорубки, для которой
после 15 минут работы должен наступить ок. 45 – минутный перерыв.
Устройство не может работать без
нагрузки. Всегда перед включением наполните его продуктом.
2
Всыпьте зерна в чашу (8).
3
Установите рычаг корпуса (3) на крупный помол.
4
Запустите двигатель мясорубки.
5
Перемолотый продукт станет высыпаться через
отверстие.
6
В зависимости от требуемой степени помола или
используемых зерен, с помощью регулировочной ручки
корпуса (3) отрегулируйте регулятор степени помола (2)
N
N
Page 47

47
●
В случае соковыжималки для цитрусовых извлеките
шнек из корпуса привода.
3
Разберите режущий узел, насадку для наполнения
колбас, головку соковыжималки или шинковку.
Вымойте решетки и дайте им обсохнуть. Затем уберите
их в предназначенный для них отсек. Для этого:
4
Oткройте отсек в задней части корпуса.
●
Нажмите с двух сторон на блокировку и откройте
откидную крышку (как было показано выше).
5
Уберите максимально две решетки, затем закройте
крышку.
6
Спрячьте электропровод в предназначенное для
него отделение.
●
Уберите вилку в отсек.
Очистка и консервация
●
Корпус привода мясорубки рекомендуется протирать
влажной тряпочкой с добавлением жидкости для
мытья посуды.
●
Пластиковые детали можно мыть вручную теплой
водой с добавлением моющих средств или в посудомоечной машине, но следует убедиться в этом по
маркировке.
●
Металлические элементы мойте в горячей воде
с добавлением жидкости для мытья посуды.
●
Чистые детали следует тщательно просушить или
вытереть насухо.
●
Соберите просохшие элементы рабочей головки или
шинковки.
Утилизация
Утилизируйте упаковку с использованием
экологически безопасных методов. Данный
прибор имеет отметку о соответствии европейским нормам 2012/19/EU утилизации
электрических и электронных приборов
(waste electrical and electronic equipment –
WEEE). Данные нормы определяют действующие на
территории Евросоюза правила возврата и утилизации
старых приборов. Информацию об актуальных возможностях утилизации Вы можете получить в магазине,
в котором Вы приобрели прибор.
Устройство соковыжималки для цитрусовых:
1
Переходник
2
Чаша
3
Ситечко
4
Конусообразная насадка
РАБОТА С СОКОВЫЖИМАЛКОЙ ДЛЯ
ЦИТРУСОВЫХ
1
Oткройте откидную крышку в задней стенке корпуса
и поставьте мясорубку вертикально на стабильную, ровную и плоскую поверхность.
2
Наложите на привод сцепление.
3
Установите на привод чашу и поверните влево до
положения, в котором услышите щелчок блокировки. Это
значит, что чаша установлена правильно.
4
Закрепите чашу и конусообразную насадку на выступающий из чаши конец переходника.
●
Подготовьте фрукты, разрезая их пополам.
●
Подсоедините мясорубку к сети.
5
Нажмите на кнопку «I» (1a), чтобы включить мясорубку и «наденьте» половинку фрукта на конусообразную насадку соковыжималки.
6
Сильно придавите фрукт рукой, чтобы начать вращение соковыжималки и отжим сока.
Не допускайте до засорения мякотью
отверстий ситечка. Если это произойдет, отключите мясорубку от сети, снимите ситечко и очистите (промойте)
от мякоти, поскольку мякоть засоряет
отверстия и сок может попасть в привод
мясорубки.
Соковыжималка вращается во время
работы. Во избежание травмирования при
выдавливании сока обращайте особое внимание на пальцы.
Окончание работы
●
Выключите мясорубку и выньте вилку питающего
электропровода из розетки.
1a
Вынуть толкатель и снять лоток (7a) с камеры рубки,
камеры выжимания (в случае цитрус-пресса предварительно снять выжиматель и сетчатый фильтр) или лоток
шинковки с камеры шинковки.
1b
Вынуть толкатель и снять лоток шинковки (7b) вместе с адаптером камеры рубки (адаптер демонтировать
в порядке, обратном его монтажу), камеры выжимания
(в случае цитрус-пресса предварительно снять выжиматель и сетчатый фильтр) или лоток шинковки с камеры
шинковки.
2
Нажмите на кнопку блокировки, поверните вправо
и снимите режущий узел, головку шинковки (или чашу
соковыжималки для цитрусовых).
O
G
Изготовитель не несет ответственности за возможный
ущерб, причиненный в результате использования устройства
не по назначению или неправильного обращения с ним.
Изготовитель сохраняет за собой право на модификацию
устройства в любой момент без предварительного уведомления, с целью соблюдения правовых норм, нормативных актов,
директив или введения конструкционных изменений, а также
по коммерческим, эстетическим и другим причинам.
Page 48

48
Шановні клієнти!
Вітаємо Вас із вибором нашого пристрою та ласкаво просимо до спільноти користувачів товарів Zelmer.
З метою отримання найкращих результатів рекомендуємо використовувати лише оригінальні аксесуари компанії Zelmer. Вони спроектовані спеціально для цього
продукту.
Просимо уважно прочитати цю інструкцію з використання. Особливу увагу слід звернути на вказівки з безпеки. Інструкцію просимо зберегти, щоб при необхідності
скористатися нею у майбутньому.
Вказівки з безпеки і відповідного
користування обладнанням
Перед початком використання приладу ознайомтесь із змістом усієї інструкції з використання.
Слід пересвідчитися, що усі подані нижче вказівки
зрозумілі.
UA
НЕБЕЗПЕКА! /
ПОПЕРЕДЖЕННЯ!
Недотримання загрожує
травмами
● Не вмикайте прилад, якщо кабель
живлення пошкоджений або корпус видимо пошкоджений.
● Якщо кабель живлення буде
пошкоджений, він повинен бути
замінений у виробника або в спеціалізованому сервісному центрі
чи кваліфікованим працівником
з метою уникнення загрози.
● Ремонт приладу може бути вико-
наний виключно кваліфікованим
персоналом. Неправильно виконаний ремонт може спричинити
серйозну загрозу для користувача.
У випадку появи несправностей
зверніться до спеціалізованого
сервісного центру ZELMER.
● Дотримуйтесь особливої уваги під
час роботи з м’ясорубкою у присутності дітей.
● Перед заміною обладнання або
наближенням до рухомих частин під
час використання слід виключити
прилад та відключити від живлення.
● Завжди відключайте пристрій від
електромережі, коли він залишається без нагляду, а також перед
монтажем, демонтажем або його
чищенням.
● Пристрій не повинен використову-
ватися дітьми. Зберігайте пристрій
з кабелем у місці недоступному
для дітей.
● Пристроєм можуть особи з обме-
женими фізичними, сенсорними
й психічними можливостями,
а також ті, хто має досвіду роботи
із пристроєм, за умови, що вони
будуть робити це виключно під
наглядом або після попереднього
зрозумілого пояснення можливих
загроз та інструктажу з безпечного
використання пристрою.
● Необхідно прослідкувати, щоб діти
не бавилися з пристроєм.
● Прилад повинен використовува-
тись лише із засипною чашою.
● Використовуйте прилад лише все-
редині приміщень при кімнатній
температурі на висоті не вище
2000 м над рівнем моря.
УВАГА!
Недотримання загрожує
пошкодженням майна
●
Не витягайте вилки з гнізда електромережі, смикаючи за кабель.
●
Завжди підключайте прилад до гнізда електромережі
(виключно змінного струму) із напругою, що відповідає вказаній на інформаційному щитку приладу.
●
Не піддавайте м’ясорубку і обладнання впливові
температури понад 60°C. Це може пошкодити
м’ясорубку.
Page 49

49
●
Для проштовхування використовуйте лише штовхач. Використання інших предметів загрожує
пошкодженням м’ясорубки і двигуна.
●
Не перевантажуйте прилад надмірною кількістю
продукту або занадто сильним його проштовхуванням (штовхачем).
●
Старанно монтуйте частину, призначену для перемелювання, оскільки, погано зібрана, вона спричиняє невідповідну якість перемелювання і може бути
причиною затуплення ножа і сита. Затуплені ніж
і сито замініть на нові.
●
Під час роботи машини не затуляйте вентиляційних отворів у корпусі. Не ставте машину на м’які
поверхні.
●
Не занурюйте привод машини у воду і не мийте під
проточною водою.
●
Не мийте обладнання, змонтованого на приводі.
●
Для миття корпусу не використовуйте агресивних
миючих засобів у вигляді емульсій, молочка, паст
тощо. Вони можуть, між іншим, усунути нанесені
інформаційні графічні символи, такі як: поділки,
позначення, знаки застереження і т.д.
ТИПИ М’ЯСОРУБОК ZELMER
VIB
Оснащення
Камера
перемелювання
Цитруспрес Шинковки Різка для овочів Соковижималка Млинок
ZMM5580*
● ● ● ○ ● ●
ZMM5548*
● ○ ● ○ ○ ○
ZMM5588*
● ○ ○ ○ ○ ○
ZMM5598*
● ○ ● ● ○ ○
* варіант кольору, ● – основне оснащення; ○ – додаткове оснащення, можна купити в магазинах електропобутової техніки
–
– оснащення недоступне у цьому виконанні
ВКАЗІВКА
Інформація про продукт та
вказівки щодо використання
●
Після закінчення роботи вийміть вилку кабелю живлення з розетки електромережі. Сховайте кабель,
легко втискаючи його в отвір, з якого він був витягнутий, а вилку гнізда покладіть до сховища.
●
Якщо машину не вдається включити – віддайте до
сервісного центру.
●
М’ясо, призначене для перемелювання, відділіть
від кісток, сухожиль, хрящів та жил.
●
Перед перемелюванням більші продукти подрібніть
на частини.
●
Не перемелюйте сухий мак. Перед перемелюванням
він повинен бути завчасно пропарений і розмочений.
●
Для миття металевих частин використовуйте м’які
щіточки.
●
Не мийте металеві частини у посудомийній машині.
Агресивні засоби, що використовуються в цих приладах, спричиняють потемніння вищезгаданих частин. Мийте їх вручну, із використанням традиційних
засобів для миття посуду.
Технічні дані
Технічні параметри вказані на щитку продукту.
Допустимий час безперервної праці 15 хвилин.
Тривалість перерви перед повторним використанням
30 хвилин.
Шум обладнання (LWA) 77 dB/A.
MBP – Блокуюча потужність двигуна 2000 Вт
Характеристика обладнання
М’ясорубка для подрібнення харчових продуктів складається з:
1
Привід м’ясорубки – кожен привід м’ясорубки присто-
сований до монтажу будь-якого блоку: камери перемелювання, цитруспресу, соковижималки, млинка та
шинковок фірми ZELMER.
1a
Кнопка вимикача
A
1b
Кнопка «Rewers»
1c
Кнопка блокування
Блок для роздрібнення, до складу якого входить:
2
Камера перемелювання
3
Подаючий шнек зі встановленою муфтою
4
Двосторонній ніж
5
Сито з отворами 4 мм
6
Гайка
7a
Чаша
7b I
Адаптер
II
Чаша шатківниці
(м’ясорубка може бути оснащена одним комплектом
чаш 7a або 7b)
8
Проштовхувач
Page 50

50
Та додаткового оснащення:
9
Дистанційна вкладка
10
Насадка для наповнення ковбас
11
Сито з отворами 8 мм
12
Сито з отворами 2,7 мм
Механічний захист двигуна
13
Шнек
14
Муфта
15
Гвинт M4x20
Прилад має механічне забезпечення, що захищає двигун
від пошкодження – зубці привідної муфти шнека виламуються, якщо прилад перевантажений (напр. якщо усередину потрапили кості).
Пошкоджену муфту замініть новою:
●
у шнеку з пошкодженою муфтою відгвинтіть гвинт (15),
●
видаліть пошкоджену муфту (14),
●
установіть нову муфту i затягніть її гвинтом (15).
Функція «Rewers»
Привід приладу має спеціальну функцію, що надає
можливість накоротко змінити напрямок обороту шнеку,
застосовується у випадку, якщо помічається значне
обмеження дроблення або/i надмір продукту у камері
дроблення (шнек не забирає дозований продукт).
У такому випадку натисніть накоротко кнопку «R» – вимикача, тоді продукти будуть повернені назад із середини
камери. Далі знов включіть кнопку «I» для продовження
роботи.
Якщо у подальшому шнек блокується надміром продукту,
потрібно натиснути кнопку «R», повернути продукт назад
із камери i видалити з продукту частини, що перешкоджають роздрібненню (напр. сухожилля та ін.).
У деяких ситуаціях потрібно провести демонтаж камери
і повністю усунути вищевказані перешкоди.
Робота з камерою для перемелювання
До камери перемелювання (2) вкладіть почергово:
1
Шнек (3) муфтою досередини.
2
На стержень шнека (3) ножик (4).
3
Сито (напр. 5) так, щоб виступ камери увійшов
у заглиблення на периметрі сита.
4
Докрутіть всі елементи камери для перемелювання –
міцно до упору.
5
Вкладіть ззмонтовану камеру для перемелювання
на привід (1) і поверніть до позиції, при якій почуєте клацання блокування. Це позначає, що камера була встановлена належним чином.
6a
Вкладіть чашу (7a) в камеру для перемелювання (2).
6b
Вставте адаптер I в чашу II. Закріпіть чашу разом
з адаптером (7b) на камері подрібнення (2).
A
E
Підготування м’ясорубки до праці та
його запуск
●
Витягніть зі сховища приводу відповідну довжину
приєднувального кабелю та відповідні аксесуари.
1
Привід (1) встановіть поблизу розетки на твердій ста-
більній основі, щоб не закривати вентиляційних отворів
у корпусі.
●
Відкрийте сховище у задній частині корпусу і вийміть
відповідне сито (Мал. C).
Переважно сито з отворами 4 мм встанов-
люється у камері роздрібнювання.
●
Перед першим користуванням кухонним комбайном
старанно вимийте елементи оснащення.
●
Установіть відповідне оснащення і додайте до приводу.
2
Вставте вилку приєднувального кабелю до розетки.
3
Кнопкою «I» вимикача (1a) запустіть м’ясорубку
(обладнання запускається через бл. 2 секунди).
Робота з насадкою для наповнення
ковбас
До камери для перемелювання (2) вкладіть почергово:
1
Шнек (3) муфтою досередини.
2
На стержень шнека (3) дистанційну прокладку (9).
3
Насадку для наповнення ковбас (10).
4
Докрутіть усі елементи гвинтом (6) – міцно до упору.
5
Вкладіть ззмонтованц камеру для перемелювання
на привід (1) і поверніть до позиції, при якій почуєте клацання блокування.
6a
Вкладіть чашу (7a) в камеру для перемелювання (2).
6b
Вставте адаптер I в чашу II. Закріпіть чашу разом
з адаптером (7b) на камері подрібнення (2).
Перед накладанням натуральної ковбасної оболонки
намочіть її у теплій воді протягом приблизно 10 хв.
●
На ковбасну насадку накладіть мокру ковбасну оболонку.
Зверніть увагу, щоб не закрити отворів
для видалення повітря у насадці.
М’ясна маса, що наповнює кишкову обо-
лонку не може бути «надто рідкою». Великий вміст рідин може привести до їхнього
витікання і попадання усередину комбайну.
Соковижималка
Соковижималка є оснащенням деяких типів м’ясорубок.
Дозволяє витискати сік з фруктів, напр.: малини, смородини, полуниці, аґрусу та додатково з винограду і помідорів. Ягідні фрукти, тобто смороидина можна витискати
разом з квітконіжками. У соковижималці не можна застосовувати фрукти з великим кісточками, напр. сливи, вишні
та ін. без їхнього попереднього очищення (усування).
D
F
I
Page 51

51
Частини соковитискача:
1
Камера соковижималки
2
Шнек
3
Корпус
4
Гвинт
5
Желоб для відведення соку
6
Регулюючий болт
7a
Чаша
7b I
Адаптер
II
Чаша шатківниці
(м’ясорубка може бути оснащена одним комплектом
чаш 7a або 7b)
8
Штовхач ( з блоку роздрібнювання)
9
Сито – 2 шт.
№ 1 – отвори менші
№ 2 – отвори більші
10
Ущільнююче кільце велике на корпус (3)
11
Ущільнююче кільце мале на шнек (2)
12
Гачок
13
Щіточка
Для проштовхування фруктів користуй-
тесь тільки штовхачем (8).
ПІДГОТОВКА ДО РОБОТИ ТА ОБСЛУГОВУВАННЯ СОКОВИЖИМАЛКИ
1
Переконайтеся, що на корпусі (3) і шнекові (2) вкладені ущільнюючі кільця (10) i (11). У випадку їх відсутності
обов’язково вкладіть їх у заглиблення цих частин (корпусу та шнеку).
2
У корпус (3) вставте та дотисніть сито (9) до упору.
Для усунення сита (9) з корпусу (3) доцільно
скористатися гачком (12). Гачок (12)
коротшим кінцем вставте в отвір сита (9)
і витягніть сито назовні.
3
До камери соковижималки (1) вкладіть шнек (2).
4
Накладіть корпус із ситом на шнек, звертаючи увагу,
щоб сито було розвернуте донизу, а рівець позиціонування потрапив на виступ камери соковижималки.
5
Таким чином виставлений корпус закрутіть гвинтом
(4) до камери соковижималки (1).
6
Вкрутіть регуляційний болт (6) в корпус (3).
7
Накладіть на нього желоб для відведення соку (5) до
моменту фіксації на корпусі (3) – «клацання».
8
Змонтовану соковижималку закріпіть на привід, діючи
так само, як в описі камери для перемелювання.
9a
На отвір для засипання вкладіть чашу (7a) і штовхач
(8) – від камери для перемелювання.
9b
Вставте адаптер I в чашу II. На отвір для засипання вкладіть чашу (7b) і штовхач (8) – від агрегату для
рубки.
J
10
Під вихідний отвір желоба (5) і регуляційного болта
(6) поставте відповідні ємності для соку, а також м’якоті.
11
Вкладіть кабель живлення до розетки електромережі.
12
Включіть соковижималку кнопкою вимикача (1a),
потім дозуйте відповідно фрукти проштовхуючи їх штовхачем.
Щоб процес витискання фруктів проходив
правильно, надто глибоке загвинчування
регулюючого болту не допускається
у початковій фазі роботи. Щойно після
оцінки ступеня вмісту соку у м’якоті,
скоректуйте відповідно ступінь загвинчування, щоб отримати достатню ефективність і уникнути закупорення соковижималки.
●
Під час витискання спостерігайте за сухістю м’якоті.
Якщо вона надмірно суха, вигвинтіть болт (6) для
попередження закупорення соковижималки м’якотю.
Ступінь загвинчування болта залежить
від виду і сорту фруктів, що переробляються, для соковитих і дуже зрілих – закрутіть болт більш глибоко, а для малосоковитих фруктів – закрутіть болт дещо
менше.
Якщо регулювання болтом не забезпе-
чить достатньої ефективності витискання, м’якоть можна повторно піддати дії
витискача.
Закупорка виходу камери (у регулюючому
болті (6)) м’якотю із фруктів з великим
вмістом соку несе ризик залиття приводу
соковижималки.
●
У разі закупорки виходу камери м’якотю потрібно
виключити соковижималку. Зверніть особливу увагу
на процес витискання соку, напр., чи не відбулась
закупорка отворів сита. Відключіть соковижималку
від приводу (ідентично, як у випадку змішувальної
камери), виконайте демонтаж соковижималки, очистіть (вимийте) частини соковижималки. Для миття,
особливо сита, необхідно застосовувати щітку, що
додається.
Шатківниця з овочерізкою
1
Дрібна терка
2
Звичайна терка
3
Шатківниця
4
Терка для натирання
5
Защіпка
6
Камера
7
Засипна чаша
8
Штовхач
B
Page 52

52
У разі використання шатківниці, зніміть
адаптер.
Шинковка оснащена двумя тертками для роздрібнювання
на дрібні (1) і звичайні (2) стружки (жовтий сир, морква,
селера, зварені буряки та ін.). Шатківниця (3) служить
для різання овочів на шматки (картопля, огірки, цибуля
та ін.). Четверта тертка (4) служить для протирання картоплі, буряків, фруктів та ін.
9
Барабан різки
10
Вкладиш різки
11
Штовхач різки
Різка для овочів належить до додаткового обладнання
овочерізки. Служить для нарізки кубиками лише варених
овочів: картоплі, буряка, моркви, селери, петрушки і т.п.
Перед початком експлуатації слід овочі відварити. Після
варки великі овочі слід розрізати, щоб вони помістились
всередині вкладиша (10).
РОБОТА З ШИНКОВКОЮ
1
Відхиліть затиск (5) i установіть одну з терток муфтою
усередину камери.
2
Защеміть защіпку (5).
3
Підключіть камеру шинковки (6) так, як камеру
м’ясорубки.
●
Більші за розміром продукти поріжте раніше на
шматки, які легко покладаються у камеру.
●
Не роздрібнюйте м’які фрукти, що містять тверді кісточки.
●
Після закінчення роботи, виключіть прилад і вийміть
приєднувальний кабель з розетки.
●
Видаліть дерев’яною ложкою рештки продуктів, що
залишилися усередині терки або в камері.
Леза терок не вимагають відновлення.
ЯК ПРАЦЮВАТИ З ОВОЧЕРІЗКОЮ
Леза барабана подрібнювача дуже гострі,
необхідно зберігати обережність.
1
Відкрийте фіксатор (5) і вкладіть барабан (9) муфтою
у середину камери.
●
Зафіксуйте фіксатор.
2
Вкладіть камеру овочерізки на привід м’ясорубки
і оберніть до позиції, при якій почуєте «клік» блокування.
3
Вкладіть засипну миску (7) і вкладіть вкладиш
різки (10).
●
Після вкладання овочів слід дотиснути штовхачем (11).
Штовхач № 11 використовуйте лише із
вкладишем різки. Забороняється використовувати штовхач № 11 без розміщеної
вкладки подрібнювача (10) у камері (6).
H
K
Великі продукти розріжте заздалегідь на
шматки, які без труднощів можна вкласти
у вкладиш різки (10).
●
Після завершення роботи вимкніть м’ясорубку
і від’єднайте кабель живлення від розетки.
●
Видаліть дерев’яною ложкою залишки продуктів, які
залишились всередині барабану різки або у вкладиші.
●
Розкладіть елементи різки.
Вкладиш різки (10) вийміть, демонтуючи
засипну миску (7).
Неприпустима нарізка сирих овочів.
При використанні занадто проварених
м’яких продуктів ефект нарізки може бути
менш задовільним.
Млинок
1
Гайка
2
Задатчик жорен
3
Корпус з регулювальною ручкою
4
Внутрішнє жорно
5
Зовнішнє жорно
6
Шнек
7
Камера млинка
8
Робоча чаша
9
Рівчак корпусу повинен потрапити на виступ камери
млинка
ОПИС ПРИСТРОЮ
Ця насадка може бути використана для перемелювання
зерна, насіння масляних культур, а також сухих продуктів
харчування.
Млинок дозволяє молоти такі продукти, як: пшениця,
жито, овес, рис, зерна кави, цукор, гречана крупа, чорний
перець, духмяний (гвоздичний) перець, гірчиця, грецькі
горіхи, лісові горіхи, сушені гриби, мигдаль, соя, насіння
льону, лущене насіння соняшника та ін.
Маслянисті продукти не перемелюйте на
мінімальній установці гранулювання. Пристрій для перемелювання може заклеїтися
або заблокуватися.
Пристрій не придатний для перемелю-
вання дуже твердих продуктів, наприклад,
сушений горошок, кукурудза – поп корн.
L
Page 53

53
При надітому млинку НЕ МОЖНА викорис-
товувати у м‘ясорубці функцію РЕВЕРС
(REVERSE).
Пам‘ятайте про ретельне миття млинка
перед перемелюванням різних продуктів.
Це дозволить уникнути взаємного проникнення запахів.
Для більш м‘яких зернових культур, таких
як овес або насіння льону, слід вибрати
установку грубозернистого помолу.
Не заглядайте усередину камери під час
мелення, тому що зерна, що іноді вискакують можуть Вас поранити (напр. око).
ОЧИЩЕННЯ І ЗБЕРІГАННЯ
Млинок не потребує чищення після кожного використання (якщо мелеться один вид продукту), оскільки шнек
(6) запобігає заляганню залишків зерен у млинку. Сталеві
жорна (4, 5) осушіть ганчіркою після миття, щоб не допускати їхньої корозії. У випадку довготривалого зберігання
жорен, забезпечіть їхню консервацію шляхом змащування (з цією метою можете застосувати напр. масло).
Не занурюйте жорна у киплячу воду. Частини з пластмаси (на яких немає графічних позначень) можна мити
в посудомийці (макс. 60°C).
Цитруспрес
Цитруспрес є додатковим оснащенням, що надає можливість витиснути з фруктів сік разом з м’якотю.
Частини цитруспресу:
1
Муфта
2
Чаша
3
Сито
4
Витискач
РОБОТА З ЦИТРУСПРЕСОМ
1
Відкрийте клапан сховища у задній частині корпусу,
що надає можливість праці у вертикальному положенні.
Установіть його у такому положенні, покладаючи на твердій рівній основі.
2
Установіть клапан на муфту.
3
Установіть чашу на привід і поверніть її вліво у положення, у якому почуєте «click» блокади. Це позначає, що
чаша була встановлена належним чином.
4
На частину чаши, що виступає установіть решітку та
витискач.
●
Підготуйте відповідні фрукти, розрізаючи їх на дві
частини.
●
Уставте вилку приєднувального кабелю до розетки.
5
Запустіть комбайн кнопкою «I» (1a), а потім покладіть
фрукти м’якотю на витискач.
M
O
МОНТАЖ МЛИНКА НА М’ЯСОРУБЦІ
1
Коли камера млинка (7) повернута під кутом біля
45° вправо, надіньте змонтований млинок на привід,
вставивши виступи камери млинка (7) у вирізи приводу,
а потім поверніть його вліво до положення, при якому
почуєте «клік» блокади. Це означає, що млинок установлений правильно.
ЕКСПЛУАТАЦІЯ ТА РЕГУЛЮВАННЯ
МЛИНКА
Перед першим використанням помийте (дивіться
«ЧИЩЕННЯ») та висушіть розібраний на частини млинок, а потім перемоліть біля 50 г продукту (наприклад,
зерна) при установці пристрою на перемелювання
з середнім роздрібненням. Змолотий продукт не придатний до подальшого вживання, оскільки він забруднений
і його слід викинути.
Максимальний час безперервної роботи
млинка становить 15 хвилин. Ця умова
пов‘язана з максимальним часом роботи
м‘ясорубки, для котрої після 15 хвилин
роботи повинна наступити біля 45-хвилинна перерва.
Пристрій не може працювати без наванта-
ження. Завжди перед вмиканням наповніть
його продуктом.
2
Насипте зерна до чаши (8).
3
Поставте регулювальну ручку корпусу (3) на більш
грубе перемелювання.
4
Включіть двигун машини.
2
Перемелений продукт почне висипатися через отвір.
6
У залежності від потрібного ступеня помолу або
використаного зерна за допомогою регулювальної ручки
корпусу (3), відрегулюйте задатчик жорен (2) так, щоб
отримати продукт з відповідною грануляцією. Покрутивши регулювальною ручкою у напрямку за рухом
годинникової стрілки, Ви отримаєте продукт дрібного
помолу, а покрутивши у напрямку проти руху годинникової стрілки, - продукт грубого помолу.
Найбільш дрібний (мінімальний) ступінь помолу отримується при встановленні регулювальної ручки на лінії
1, а найбільш грубий (максимальний) при встановленні
регулювальної ручки на лінії STOP. Див. графічне позначення на корпусі (3) та задатчику жорен (2).
Занадто сильне закручування чи відкручу-
вання регулювальної ручки за лінію STOP
під час роботи може призвести до пошкодження пристрою.
Рекомендується, щоб під час роботи
млинка задатчик жорен (II) був установлений між лінією 1 та лінією STOP.
N
N
Page 54

54
6
Дотисніть відповідною силою, що приведе до зче-
плення механізму і запустить процес витискання.
У разі закупорки сита м’якотю вижатих
фруктів слід припинити роботу, відключити сито, а потім спорожнити його від
м’якоті, тому що її надмірна кількість
може привести до залиття камери приводу м’ясорубки.
Цитруспрес під час праці повертається,
будьте обережними, звертаючи особливу
увагу на пальці під час притискання фруктів на витискачі.
Після закінчення роботи
●
Виключіть м’ясорубку і вийміть вилку приєднувального кабелю з розетки.
1a
Вийняти штовхач і зняти лоток (7a) з камери рубки,
камери вичавлювання (у разі цитрус-пресу попередньо
зняти вичавлювач і сітчастий фільтр) або лоток шинкування з камери шинкування.
1b
Вийняти штовхач і зняти лоток шинкування разом
з адаптером (7b) камери рубки (адаптер демонтувати
в порядку, зворотному його монтажу), камери вичавлювання (у разі цитрус-пресу попередньо зняти вичавлювач
і сітчастий фільтр) або лоток шинкування з камери шинкування.
2
Натисніть кнопки блокади, блок роздрібнювання,
шинковка (або чаша блоку для цитрусів) поверніть
вправо і зніміть її.
●
У випадку блоку для цитруспресу, вийміть муфту
з приводу.
3
Зніміть елементи блоку роздрібнювання, камери
з насадкою для виготовлення ковбас, камери соковижималки та шинковки.
Вимиті і висушені сита з отворами покладіть у сховище,
з цією метою:
4
Відкрийте сховище у задній частині корпусу.
●
Натисніть з обох боків блокаду сховища і потягніть до
себе (як це вказано раніше).
5
Сховайте максимально два сита з отворами, потім
закрийте сховище і задній клапан.
6
Сховайте кабель легко всуваючи його в отвір, з якого
він виходить.
●
Сховайте вилку кабелю до сховища.
Очищення і зберігання
●
Привід протріть зволоженою ганчіркою з доданням
засобу для миття посуди.
●
Пластмасові частини мийте у теплій воді з доданням
засобу для миття кухонної посуди або за позначеннями у посудомийній машині.
●
Металеві частини мийте у гарячій воді з доданням
засобу для миття кухонної посуди.
G
●
Старанно осушіть умиті частини.
●
Сухі частини камери для перемелювання або шинковки зберіть у ціле.
Утилізація
Цей прилад маркіровано згідно положень
європейської Директиви 2012/19/EU стосовно електронних та електроприладів, що
були у використанні (waste electrical and
electronic equipment – WEEE). Директивою
визначаються можливості, які є дійсними
у межах Європейського союзу, щодо прийняття назад та
утилізації бувших у використанні приладів. Про актуальні
можливості для видалення можна дізнатися в спеціалізованому магазині.
Транспортування і зберігання
●
Транспорутвання виробу може здійснюватись усіма
видами транспорту відповідно до вимог та правил які
діють на конкретному виді транспорту.
●
Під час перевезення повинна бути усунена можливість переміщенння виробів всередині тарнспорного
засобу.
●
Під час транспротування залізницею перевезення
повинно здійснюватися у критих вагонах або контейнерах дрібними чи повагонними відправками.
●
Під час транспортування виробів на пласких піддонах вимоги до транспортування повинні відповідати
ГОСТ 26663, або ГОСТ 19848 – в разі завстосування
ящикових піддонів.
●
Способи і засоби кріплення, схеми рзміщення упкованих виробів (кількість ярусів, рядів) у транспортних
засобах зазначені на упаковці.
●
Вироби повинні зберігатися у опалювальних складских приміщеннях при температурі +5°С – +40°С.
Умови зберігання повинні видповідати – 1(Л) ГОСТ
15150.
●
Умови складування виробів зазначені у технічних
умовах.
Виробник не відповідає за можливі пошкодження, cпричинені
застосуванням приладу не за призначенням або неправильною
експлуатацією.
Виробник залишає за собою право у будь-який момент, без
попереднього повідомлення, змінювати конструкцію приладу
з метою забезпечення його відповідності нормативним актам,
стандартам, директивам, а також з конструкційних, комерційних та інших причин.
Page 55

www.zelmer.com
PL
EN
DE
RO
BG
RU
UA
1. Szatkownica w komplecie z tarkami na cienkie, grube wiórka,
krojenie w plasterki i przecieranie ziemniaków 2. Cytrusiarka –
zdrowe soki każdego dnia 3. Możliwość podstawienia do
cytrusiarki wysokiej szklanki XL 4. Wyciskarka do miękkich
owoców i warzyw – domowe przetwory
1. Shredder attachments with barrels in the set for cutting into thin
or thick chips, and slicing or grating potatoes 2. Citrus press –
healthy juice every day 3. Possible to use with citrus press high
– XL glass 4. Juicer for soft fruits and vegetables – homemade
preserves
1. Gemüseschneider im Set mit Aufsätzen zum groben und feinen
Raspeln, Schneiden in feine Scheiben sowie Reiben von Kartoeln
2. Fruchtpresse – gesunde Säfte jeden Tag 3. Platz für hohe
XL-Gläser 4. Presse für weiches Obst und Gemüse –
für Eingemachtes
1. Răzătoarea în set cu cilindru pentru bucăți ne, mari, felierea și
carto dați pe rozătoare 2. Storcător – suc sănătos în ecare zi
3. Posibilitatea de a pune un pahar înalt XL 4. Storcătorul pentru
legume și fructe moi – preparatelor de casă
1. Ренде в комплект с режещи приставки за рендосване на
дребни и едри стърготини, рязане на резени и настъргване на
картофи 2. Приставка за изстискване на цитрусови плодове –
здравословни сокове всеки ден 3. Възможност за използване на
висока чаша XL 4. Изстисквачка за меки плодове и зеленчуци
– домашно приготвени пюрета
1. Шинковка комплектуется терками для тонкой, крупной
шинковки, нарезки ломтиками, а также мелкой теркой для
картофеля 2. Насадка-пресс для цитрусовых – здоровые соки
ежедневно 3. Возможность использования высокого стакана XL
4. Соковыжималка для мягких фруктов и овощей – домашние
заготовки
1. Шатківниця комплектується терками для тонкого, крупного
шаткування, нарізання скибочками, а також натирання картоплі
2. Насадка-прес для цитрусових – здорові соки щодня
3. Можливість використання високого стакана XL
4. Соковижималка для м’яких фруктів та овочів – домашні
заготівки
1
3
2
4
BSH Sprzęt Gospodarstwa Domowego Sp. z o.o.
Al. Jerozolimskie 183, 02-222 Warszawa, POLAND
Zelmer dba o środowisko. Ta instrukcja użytkowania została wydrukowana na papierze pochodzącym w100% z recyklingu.
Компания «Zelmer» заботится об окружающей среде. Данная инструкция напечатана на бумаге, которая на 100% состоит
изматериалов вторичной переработки.
Zelmer takes care of the environment. This user manual has been printed on 100% recycled paper.
 Loading...