

Z-edge Z3G User Manual

Z3G
USER GUIDE
BEDIENUNGSANLEITUNG

CONTENTS / INHALTSVERZEICHNIS
English 1
Deutsch 21
Table of Contents
1 Introduction .................................................................................................................................... 2
1.1 Features ................................................................................................................................. 2
1.2 What's in the Box .............................................................................................................. 2
1.3 Product Overview ............................................................................................................. 3
2 Getting Started .............................................................................................................................. 4
2.1 Inserting the Memory Card ......................................................................................... 4
2.2 Installation ............................................................................................................................ 5
2.3 Adjust Device Position ................................................................................................... 6
2.4 Connecting to Power ...................................................................................................... 7
2.5 Set Date & Time ................................................................................................................ 8
2.6 Default Settings ................................................................................................................. 8
2.7 Factory Reset ....................................................................................................................... 8
3 Using the Car
3.1 Recording Videos ............................................................................................................. 9
3.2 Recording Screen ............................................................................................................. 9
3.3 Adjusting the Settings ................................................................................................. 10
3.4 Loop Recording .............................................................................................................. 10
3.5 Emergency Video Protection ................................................................................... 10
3.6 Motion Detection ........................................................................................................... 11
3.7 Vibration Detection ....................................................................................................... 11
3.8 Parking Monitoring ....................................................................................................... 11
3.9 Taking a Snapshot ......................................................................................................... 11
3.10 Playback Videos & Photos ...................................................................................... 11
3.11 Managing Video & Photo Files ............................................................................ 12
3.12 GPS ...................................................................................................................................... 12
4 Menu Overview
5 FAQs
Customer Support .................................................................................................................... 17
6
Warranty ........................................................................................................................................ 17
7
8
Product Specifications ............................................................................................................ 18
Dash Cam .......................................................................................................... 9
.......................................................................................................................... 14
................................................................................................................................................. 16
-1-

1 Introduction
Welcome to buy the Z3G car dash cam. Protect you and your vehicle with r
eal-time video and audio recording whilst you're driving.
Please read this manual carefully before using this product. We hope you enjoy
using this product.
1.1 Features
• 2560x1440P resolutions
• 2.7" LCD Color screen
• Up to 150-degree wide angle lens
• Built-in G-Sensor
• Motion Detection
• Parking Mode
• Audio Recording
• GPS
1.2 What's in the Box
Car Dash Cam Car Mount with Built-in GPS
Car Charger with
USB Cable
User GuideUSB Cable
-2-
Warranty Card
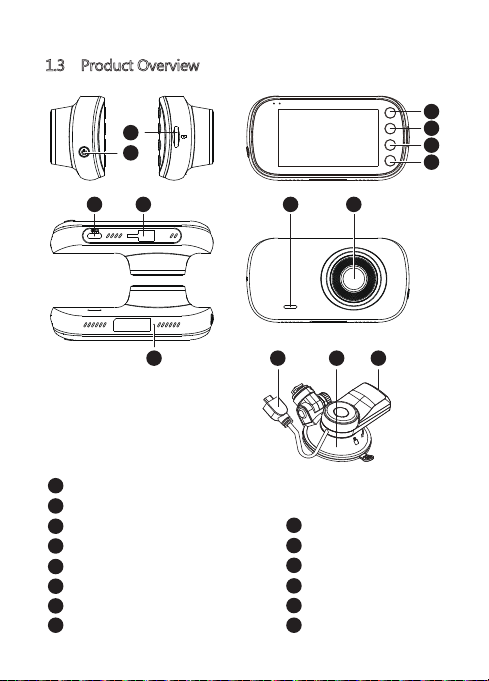
1.3 Product Overview
2
1
3
4
5
6
7 8
Power Button
1
TF/MicroSD Card Slot
2
ESC/Menu Button
3
Up Button
4
Down Button
5
OK/Record Button
6
Micro USB Port
7
8
Suction Mount Slot
9 10
11
12 13 14
9
10
11
12
13
14
-3-
Speaker
Front-View Lens
Mic
USB cable
Suction Cup Mount
USB connector
2 Getting Started
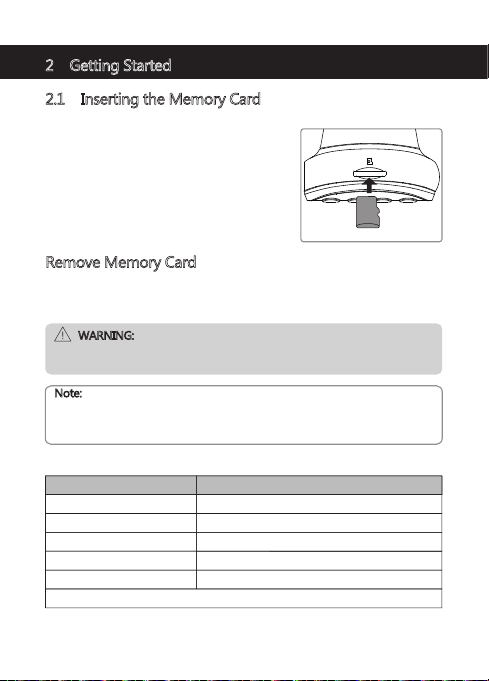
2.1 Inserting the Memory Card
Insert the memory card, with the pins facing
towards the back of the device, until it clicks
into place.
Remove Memory Card
Push the edge of the memory card inward until you feel it click, then allow it to
push out until you can remove it from the slot.
WARNING:
It is recommended to format the memory card before initial use. Please note
that all data saved on the memory card will be erased after formatting.
Note:
• Supports Micro SDXC cards up to 128GB.
• Do not remove or insert memory card whilst the device is powered on -
this may damage the memory card.
Storage Capacity Video Recording Time
8GB
16GB
32GB
64GB
128GB
For reference only
53min
106min
212min
424min
848min
-4-
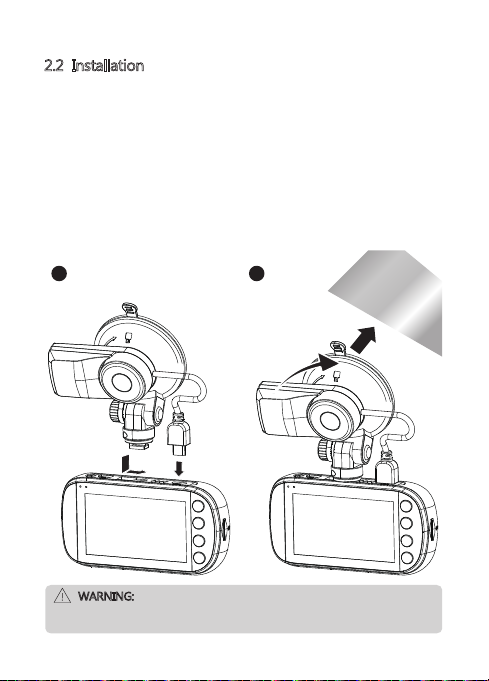
2.2 Installation
Please follow the below instructions for mounting your dash cam to your
vehicles windshield:
1. Slide the car mount into the slot on top of the device until a click sound is
heard.
2. Peel off the protective plastic backing from the suction-cup.
3. Press the suction-cup firmly against your windshield, and rotate the lever
clockwise (12 o'clock) to secure.
1 2
WARNING:
Do not install the device on a tinted window - doing so may damage the tint
film.
-5-

2.3 Adjust Device Position
1. Loosen the nut to swivel the device vertically. Click into place and secure by
tightening the nut.
2. Swivel the device horizontally for a clear view.
1 2
-6-

2.4 Powering the Dash Cam
Use only the supplied car charger to power the dash cam and charge the
built-in battery.
1. Plug the USB cable (12) on the
car mount into the car
dash cam's USB connector (7).
2. Plug one end of the USB
charging cable into the USB
Connector on the car mount (14).
3. Plug the other end into the car
charger, and insert that into
your vehicles lighter socket.
Automatic Power
• Once the vehicle's engine is switched on, the dash cam will automatically
power on.
• When the vehicle engine is switched off, the dash cam will automatically
save the recording and power off within 10 seconds.
Manual Power
• To manually turn the power on, press and hold
the 'Power' Button (1) for up to 3 seconds.
• To manually turn the power off, press and hold
the 'Power' Button (1) for 3 seconds.
WARNING:
If the environment reaches 115-degrees Fahrenheit or above, the car charger
may stop charging the dash cam battery. This is characteristic of a Lithium
Polymer battery and is not a malfunction.
-7-

2.5 Set Date & Time
Before using the device, we recommend you set the correct date and time:
1. If the device is recording, short press the 'OK/REC' button (6) to stop and
enter Standby Mode.
2. Press the 'Esc/Menu' button (3) to enter the General Settings menu.
3. Press the 'Up' and 'Down' buttons (4 & 5) to select Date/Time and press
'OK/REC' button (6) to confirm.
4. Press the 'Up' and 'Down' buttons (4 & 5) to adjust the value and then press
'OK/REC' button (6) to confirm and move to the next field.
5. With all fields correct, press the 'OK/REC' button (6) to save and exit the menu.
WARNING:
Date/Time settings may automatically reset themselves if the battery is
allowed to completely drain. To ensure the correct time you must set the
time to your local time zone.
2.6 Default Settings
Default Settings
Resolution 1080P 30
Loop Recording
Motion Detect
Voice Setup
Date Stamp
G-Sensor sensitivity
3 mins
OFF
ON
ON
Normal
Button Beep
Language
Frequency
LCD auto Off
Auto Power Off
Parking monitoring
ON
English
60 Hz
3 Minutes
OFF
OFF
2.7 Factory Reset
To reset the dash cam to factory default settings long press the 'Power'
button (1) for 7 seconds.
-8-

3 Using the Car Dash Cam
3.1 Recording Videos
With an SD card inserted and the device connected to power, when the car
engine is switched on the dash cam will automatically power on and start
recording. When the vehicle engine is switched off, the dash cam will
automatically save the recording and power off within 10 seconds.
Alternatively, short press the 'OK/REC' button (6) to stop/start video recording
manually.
3.2 Recording Screen
1 2 3 4 5 6
7
8
9
10
14
No. Item Description
Recording
1
2
Resolution Indicates current resolution settings.
3
Loop Recording Indicates loop recordings length 1, 2 or 3 minutes.
4
GPS Indicates if the GPS is connected.
5
Motion Detection Indicates if motion detection on/off.
6
Parking Monitor
7
Video Protection
Camera button
8 Press 'Up' button (4) to enter camera mode.
Audio recording
9
Flashing red light indicates device is recording with
time showing current duration of recording.
Indicates if parking monitor is on/off.
Indicates if video protection is active. Press
'Esc/Menu' button (3) to activate when recording.
Indicates if audio recording active, press 'Down'
button (5) to turn on/off when recording.
-9-
11
12
13

No. Item Description
10/
Record / Stop
13
Menu Press 'Esc/Menu' button (3) to enter menu.
11
Preview Press 'Down' button (5) to preview video/photo.
12
Time Stamp Time and date
14
Indicates if device is recording, press 'OK/REC'
button (6) to start/stop recording.
3.3 Adjusting the Settings
Customize the video recording and other general settings via the on-screen
display (OSD) menus:
If the device is recording, short press the 'OK/REC' button (6) to stop and enter
Standby Mode.
1. Press the 'Esc/Menu' button (3) to enter the General Settings menu.
2. Press the 'Up' and 'Down' buttons (4 & 5) to select a menu option and press
the 'OK/REC' button (6) to enter the selected menu.
3. Press the 'Up' and 'Down' buttons (4 & 5) to select the desired setting and
press the 'OK/REC' button (6) to confirm the setting.
4. From the General Settings menu Press the 'Esc/Menu' button (3) to enter the
Feature Settings menu.
5. Press the 'Up' and 'Down' buttons (4 & 5) to select the desired setting and
press the 'OK/REC' button (6) to confirm the setting.
3.4 Loop Recording
Videos are recorded and saved to the memory card in set intervals. Once the
memory card is full, Loop Recording automatically overwrites the earliest
unprotected saved file. This prevents long duration video clips from being lost
in a single overwrite.Video files can be saved to the memory card in 1, 2 or 3
mins intervals. General Settings > Loop Recording
3.5 Emergency Video Protection
If Vibration Detection is enabled and senses an unusual impact or collision the
dash cam will automatically protect the currently recorded video file from
being overwritten. A icon appears top left to signify the current recording is
protected.To manually protect a video file during a recording, short press the
'Esc/Menu' button (3).
-10-
3.6 Motion Detection
With Motion Detection enabled, video recording is automatically started when
movement is detected by the camera lens. After approximately 10 seconds with
no movement detected, video recording is automatically paused.
Enable/disable feature: Feature Settings > Motion Detect
3.7 Vibration Detection
The Vibration Detection feature senses for unusual impacts or collisions
detected by the built-in G-Sensor. It automatically triggers the Emergency
Video Protection and Parking Mode features.
Set the sensitivity to automatically trigger these features with smaller or larger
vibrations (feature can also be turned Off): Feature Settings > G-Sensor
Sensitivity
3.8 Parking Monitoring
Enable Parking Monitoring for the dash cam to continue monitoring your
vehicle for unusual impact or collision when the engine is turned off and parked.
If a vibration is detected, the device will automatically turn on and begin
recording. Approximately 20 seconds after the motion or vibration is finished,
the device will automatically return to monitoring mode. All recordings are
automatically protected from being overwritten.
Enable/disable feature: Feature Settings > Parking Monitoring
Please note: When protection space (30% TF card capacity)is full,The protected
files will be overwritten with newly recorded protected files
3.9 Taking a Snapshot
1. If the device is recording, short press the 'OK/REC' button (6) to stop and
enter Standby Mode.
2. Short press the 'Up' button (4) to enter Photo Mode.
3. Press the 'Up' button (4) to take a snapshot.
3.10 Playback Videos & Photos
1. If the device is recording, short press the 'OK/REC' button (6) to stop and
enter Standby Mode.
2. Press the 'Down' button (5) to enter Playback Mode.
-11-
3. Press the 'Up' and 'Down' buttons (4 & 5) to select between Normal Video,
Emergency Video or Photo. Press the 'OK/REC' button (6) to select or press
the 'ESC/Menu' button (3) to return to standby mode.
4. Press the 'Up' and 'Down' buttons (4 & 5) to choose the file to preview and
'OK/REC' button (6) to select.
5. Press the 'OK/REC' button (6) to preview the file.
6. Press the 'ESC/Menu' button (3) to return to the playlist menu.
3.11 Managing Video & Photo Files
1.Go to the Playlist menu (see 3.10).
2. Navigate to the file you wish to manage and press the 'OK/REC' button (6) to
select.
3. Press the 'Up' button (4) to delete the file.
4. Press the 'Up' and 'Down' buttons (4 & 5) to select between Yes and No.
5. Use the 'OK/REC' button (6) to confirm choice.
WARNING:
Deleted files cannot be recovered. Please ensure you backup important files
before deleting them.
3.12 GPS
Integrated into the car mount suction cup is a GPS receiver which can pinpoint
the location of your car dash cam anywhere on Earth. Video recordings include
GPS tracking data which records location, speed, time and other variables that
can be viewed on a GPS Multimedia Player.
1. Ensure the car mount USB cable is plugged into the car dash cams' USB
connector to enable GPS tracking.
2. Go to http://zeroedgetechnology.com/downloads/
compatible GPS Multimedia Player.
3. Install GPS Multimedia Player on your laptop or computer.
4. Run the program and click 'Open File' to search and playback a video
recording.
Note:
• GPS Multimedia Player compatible with Microsoft Windows and Apple Mac.
• GPS tracking data may not be viewable using other GPS Players.
• Car dash cam videos can be played from the SD card or from the car
dash cam when connected to a computer via the USB port.
-12-
to download the
 Loading...