


3
X3
USER GUIDE


CONTENTS
INTRODUCTION ...........................................................................
PRODUCT OVERVIEW ................................................................
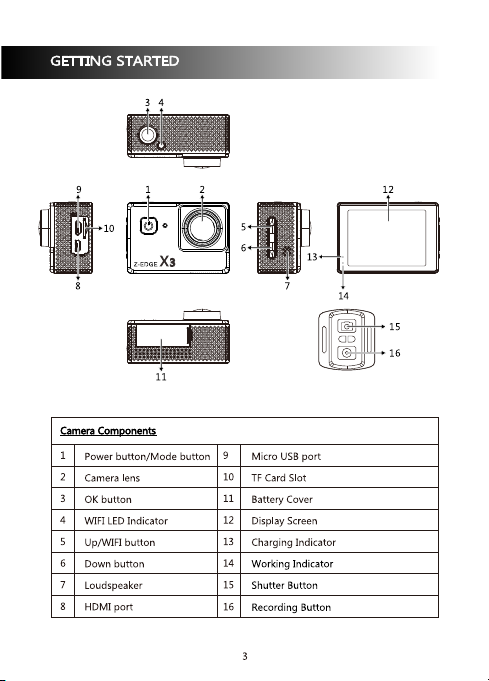
GETTING STARTED ......................................................................
NAVIGATION .................................................................................
PERSONALIZED SETTINGS.........................................................
VIDEO RECORDING MODE ......................................................
PHOTO CAPTURE MODE ..........................................................
ALL MODES & GENERAL ..........................................................
COMMON FUNCTIONS ............................................................
MOUNTING GUIDELINES .........................................................
TECHNICAL SPECIFICATIONS .................................................
1
2
2
3
5
7
7
9
10
11
12
14

INTRODUCTION
Thank you for purchasing the X3 High Definition Sports / Action Camera by Z-Edge .
A waterproof, 4K ready portable camera for recording indoors and outdoors. Please
read this manual carefully before using this product. We hope you enjoy using this
product.
PRODUCT OVERVIEW
2.0 inch LCD TFT touch screen allows you to view HD recordings and images ·
before downloading them.
Wide 170-degree field of view for recording more of your surroundings.·
Download our app to operate and view recordings wirelessly over WiFi.·
· Support TF/MicroSD cards up to 64GB.
2
®
3

Charging the Battery
Charge the battery by connecting the camera to a computer or other USB charging
adapter with the Micro USB cable included.
Power On
Press and hold the (1) Power/Mode button for 3 seconds. The (14) Status LED
Indicator lights will flash, the display screen will turn on and a rising sound indicator
chord will be heard.
Power Off
Press and hold the (1) Power/Mode button for 3 seconds. The (14) Status LED
Indicator lights will flash, the display screen will turn off and a descending sound
indicator chord will be heard.
Storage
The X3 Camera is compatible with TF/microSD memory cards up to 64GB capacity.
Please use TF/microSD cards of class 10 and above for optimal performance and
reliability. Format memory cards the first time you use them.
Inserting Card
Slide the TF/microSD cards into the card slot (10), when fully inserted the card clicks
into place.
Removing Card
To remove, place your fingernail against the edge of the memory card and lightly
press it further into the camera. The memory card will spring out for removal.
Connecting via WiFi
Connect the X3 Camera to a mobile device via WiFi using the ‘Z-VergeX3’ app.
Control the camera shutter and change basic settings remotely via the app (effective
range up to 33 feet / 10 meters), or download video and photo files directly to your
mobile device. To setup a connection please follow the steps below:
1. Download and install the ‘Z-VergeX3’ app from your mobile device’s app store.
4

2. Power on your X3 Camera. Press the (5) WiFi Connect/Up button to enable WiFi
on your camera. The indicator light on top of the camera will flash yellow yellow
when WiFi is enabled. Your camera's unique WiFi Information including network
name (SSID) and password will display on the LCD screen (12).
3. Enable WiFi on your mobile device and select the cameras WiFi network, entering
the password when prompted.
4. Once your mobile device is connected to the cameras WiFi, open the ‘Z-VergeX3’
app on your mobile device and select ‘Connect.’
5. The app will automatically connect to the camera and open the app home page.
6. If connection fails please check your device is still connected to the camera
network or repeat steps 2 to 5.
NAVIGATION
Power/Mode Switch Button (1)
Power ON/OFF:· Press and hold for 3 seconds to turn device ON/OFF.
· In standby mode (camera inactive, not recording or capturing images) Switch Modes:
short press button to switch between:
Cam era Mod es
Vid eo Reco rding
Pho to Capt ure
Slo w Motio n
Pla yback
Set tings
Set tings > V ideo
Set tings > P hoto
Set tings > A ll Mode s
Set tings > G enera l
Set tings > E xit
Def ault Se tting s
4K 30 FPS
16M
108 0P 60FP S
-
-
See ‘ Video R ecord ing’ mo de
See ‘ Photo C aptur e’ mode
See ' All Mod es & Gene ral'
See ' All Mod es & Gene ral'
-
5

Shutter/Select Button (3)
· While browsing short press button to select or confirm highlighted Select/Confirm:
item.
· In Video Recording and Slow Motion modes short press Start/Stop Video Recording:
button to start/stop video recording.
· In Photo Capture mode short press button to capture a photo.Shutter:
· In Playback mode short press button to start/stop video playback.Video Playback:
WiFi Connect/Up Button (5)
WiFi Connect:· In Video Recording, Photo Capture or Slow Motion modes press
button to enable WiFi on your camera to connect to a device.
· Short press button to navigate to upper or Navigate to Upper/Previous Item:
previous item whilst browsing the system menu or playback files.
· In Video Recording, Photo Capture or Slow Motion modes long press Zoom In:
button zoom in.
· In playback mode press and hold button to fast rewind video being Fast Rewind:
played.
Down Button (6)
Enable/Disable Sound Recording:· In Video Recording or Slow Motion modes press
button to enable/disable Sound Recording feature.
· Short press button to navigate to lower or next item Navigate to Lower/Next Item:
whilst browsing the system menu or playback files.
· In Video Recording, Photo Capture or Slow Motion modes long press Zoom Out:
button to zoom out.
· In playback mode press and hold button to fast rewind video being Fast Forward:
played.
Remote Control
Shutter button (15):· Short press button to take a photo. The X3 Camera will
automatically switch from Video Recording or Slow Motion modes to Photo Capture
mode.
· Short press button to take a video recording. The X3 Camera Recording button (16):
will automatically switch from Photo Capture or Slow Motion modes to Video
Recording mode. The X3 Camera can simultaneously record a video and take photos
during that recording using the remote control shutter button.
6

Ind icato r Light s Expla ined
Charging Indicator: Charging: Red,
Full Charge: Red light off
Working Indicator: Working: Blue
Standby: Blue
PERSONALIZED SETTINGS
VIDEO RECORDING MODE
Vid eo Reso lutio n
Set the resolution of the X3 Camera as per the list below. All video is captured at an
ultra wide 170-degree field of view which provides immersive video quality and best
image stability.
Vid eo Reso lutio n
UHD 4 K
UHD 2 .7K
FHD 1 080P
FHD 1 080P
HD 72 0P
HD 72 0P
HD 72 0P
FPS
30
30
60
30
120
60
30
Scr een Res oluti on
384 0x216 0, 16:9
268 8x152 0, 16:9
192 0x108 0, 16:9
192 0x108 0, 16:9
128 0x720 , 16:9
128 0x720 , 16:9
128 0x720 , 16:9
7

Ultra HD 4K and 2.7K resolutions are the highest available producing stunning detail ·
and video quality.
Full HD 1080P is best for handheld shots of others and can be used for recording in ·
slow motion and body or gear mounted shots.
HD 720P is best for recording in slow motion and body or gear mounted shots.·
See Slow Motion for recording in higher frame rates.·
Video resolution can be changed inside Settings > Video Recording > Video
Resolution.
Slo w Motio n
Slow-motion effects are created by recording more frames per second and then
playing the same frames back at a slower rate. The higher the frame rate the more
detail can be slowed down to show detailed moments that would otherwise
appear as a blur. Set the resolution of the X3 Camera as per the list below:
Vid eo Reso lutio n
FHD 1 080P
HD 72 0P
FPS
60
120
Scr een Res oluti on
192 0x108 0, 16:9
128 0x720 , 16:9
Slow Motion can be set inside Settings > Video Recording > Slow Motion.
Tim e-lap se
Time-lapse effects are perfect for shooting at much lower frame rates over long
periods of time. The X3 Camera can capture images between 0.5 to 60 second
intervals. The recording starts and stops by pressing the Shutter button in Video
Recording mode. The time-lapse is saved as a video. Time-lapse intervals can be set
inside Settings > Video Recording > Time-lapse.
Sou nd Reco rding
With Sound Recording enabled the device will record audio for the current video clip
via the integrated microphone. Features enabled/disabled inside Settings > Video
Recording > Sound Recording.
Loo p Recor ding
With Loop Recording enabled video clips are recorded and saved to the memory card
in set durations. Once the memory card is full, the Loop Recording feature
automatically overwrites the earliest unprotected video clip. This prevents long
8

duration video clips from being lost in a single overwrite. Set video clip durations
between 2,3 or 5 minutes. Video clip duration set inside Settings > Video Recording >
Loop Recording.
Car Mode
The X3 Camera can operate like a car dash camera in Driving Mode. The camera will
automatically power on and begin video recording when connected to power.
Once disconnected from power it will stop recording and automatically shut down
after a period of time. If operating as a car dash camera, Driving Mode is best used
alongside Loop Recording for the most efficient storage of video clips. Feature
enabled/disabled inside Settings > General Settings >Car Mode.
PHOTO CAPTURE MODE
Photo Resolution
Set the Photo Resolution of the X3 Camera inside Settings > Photo Capture > Photo
Resolution.
Timer
Delay the capture of a single photo by up to 20 seconds after pressing the Shutter
button. Self-Timer can be set inside Settings > Photo Capture > Self-Timer.
Auto
Capture photos at set intervals in a continuous loop using Auto-Shoot. Set the interval
timer for capturing photos between 3, 10, 15, 20 and 30 seconds. The first photo will
be captured the selected interval time after pressing the Shutter button in Photo
Capture mode. An audible beep indicates each second passed between photos being
captured. The X3 Camera will continue to take photos until the Shutter button is
pressed again. Auto-Shoot intervals set inside Settings > Photo Capture >
Auto-Shoot.
Burst Mode
The X3 camera will capture several photos in quick succession in burst mode. Set
between 3, 5 and 10 photos taken continuously after pressing the Shutter button in
Photo Capture mode. Burst can be set inside Settings > Photo Capture > Burst Mode.
9

ALL MODES & GENERAL
Image Rotation
If you mount your X3 Camera upside down, select Image Rotation to automatically
flip the image vertically, saving you time editing video files later. Feature set inside
Settings > General Settings > Image Rotation.
WiFi
To enable a connection with your device select WiFi in the menu (press the Up button
on the camera).
Auto Screensaver
Automatically turn off the LCD display screen after 10, 20 or 30 seconds. Turn on the
display screen again by pressing any button. Feature set inside Settings > General
Settings > Auto Screensaver.
Auto Shutdown
Automatically turn off the X3 Camera after 1, 3 or 5 minutes in standby mode
(camera inactive, not recording or taking photos). Feature set inside Settings >
General Settings > Auto Shutdown.
Language
Change the language of the X3 Camera by using the Up and Down buttons to
navigate options. Short press the Shutter/Select button to confirm device language.
Feature set inside Settings > General Settings > Language.
Date-Time
Change the date and time of the X3 Camera by using the Up and Down buttons to
change each data entry (YYYY-MM-DD HH-MM-SS). Short press the Shutter/Select
button to confirm data and move to the next entry. Short press the Mode switch
button to save and exit menu. Feature set inside Settings > General Settings >
Date-Time.
10

COMMON FUNCTIONS
Connecting to a Computer
Connect the X3 Camera to a computer using the Micro USB cable included. Power on
the camera and select from the following options:
· In this mode the contents of the memory card will appear as a regular USB Mode:
disk drive on your computer, as if it was a USB flash drive. Browse, play, manage and
download saved files as normal. Compatible with Windows (XP and later) and Mac
(OS X and later).
· Select this mode for using your X3 Camera as an external computer PC Camera:
webcam.
· Solely for charging your camera.Charging Mode:
File Management
Recorded video and photo files are saved in the following date + time format:
YYYYMMDD_HHMMSS (year, month, day_hour, minute, second)·
Files are then classified and grouped into different folders:
Video: All saved video files.·
Photo: All saved photo files.·
Choosing a MicroSD Card
A memory card with larger storage space can be used to store longer individual
video clips or a longer total duration of saved files. This device supports TF/MicroSD
cards with a storage space of up to 64GB.
Use memory cards of class 10 and above for optimal performance. Format Note:
memory card the first time you use it.
Please note "exFAT" formatted TF/MicroSD cards are not supported by this camera
(commonly used for 64GB or larger memory cards). Please ensure your TF/MicroSD
card is formatted to the supported "FAT32" format. To reformat a TF/MicroSD card
simply enter it into the X3 Camera card slot and format by navigating to Settings >
General Settings > Format. Please ensure you save any important files stored on your
memory card before formatting it.
11

MOUNTING GUIDELINES
Typ es of Mou nts
Cam era
Joi nts
1x Camera Housing
Mou nts
1x Straight Joint 2x 90-degree
1x Handlebar
Mount
Joints (Long &
Short)
1x Helmet
Mount
2x Adhesive
Mounts (Flat &
Curved)
12
1x 360degree Joint
1x Tripod Mount

Note: To securely attach a mount please ensure you read the following instructions
below:
Attach adhesive mounts 72 hours before use (24 hours minimum) to ensure a strong ·
bond.
Adhesive mounts must be mounted on smooth surfaces to ensure a proper bond.·
Apply adhesive mounts to clean surfaces only - wax, oil or dirt will weaken the bond.·
Firmly press adhesive mounts into place and ensure full contact over the entire ·
surface.
Attach adhesive mounts in room temperature conditions.·
Loop the circular ring of the Tether over the thumbscrew of the camera housing and ·
attach the other end to a secure anchor point. This will help prevent losing the
camera if it accidentally releases. To avoid injury do not use tether if attaching
camera to a helmet or other personal protective gear.
Mounting Accessories
· 2x Velcro Straps
2x Buckle Straps·
4x Cable Ties·
1x Tether·
2x Replacement Adhesive Pads·
1x Cleaning Cloth·
1X Clip Mount·
13

TECHNICAL SPECIFICATIONS
Pro duct Di mensi on
Wei ght
Dis play Sc reen Di mensi on
Len s
Vid eo Reso lutio n
Vid eo Form at
Sti ll Pict ure/P hoto Re solut ion
Sti ll Pict ure/P hoto Fo rmat
Ext ernal S torag e Card Ty pe
Ext ernal S torag e Suppo rt
Mic ropho ne/Lo udspe aker
Lig ht Freq uency
USB P ort
HDM I
Ext ernal P ower Su pply
Bat tery
Com puter S ystem R equir ement
Lan guage S elect ion
2.4 inch x 1. 6inch x 1 .24in ch
(60 mm x41m m x 31.5m m) (LxW xH)
Abo ut 2.12 o z(60g )
2.0"HD screen(16:9)
170-DEGREE, 6G A+ HD fish-eye lens
4K 30 FPS (38 40x21 60 30FP S)
2.7 K 30FPS ( 2688x 1520, 30FPS )
108 0P 60FP S (1920 x1080 P 60FPS )
108 0P 30FP S (1920 x1080 P 30FPS )
720 P 120FP S (1280 x720, 120FP S)
720 P 60FPS ( 1280x 720,6 0FPS)
720 P 30FPS ( 1280x 720,3 0FPS)
MP4
2M 16 00x12 00
5M 25 92x19 36
8M 32 64x24 48
12M 4 000x3 000
16M 4 608x3 456
JPE G
TF/ Micro S D
Up to 6 4GB
Bui lt-in
50H z/60H z
Mic ro USB
Sup port
DC5 V 1A
100 0mAH in terna l Li-io n batte ry
PC: W indow s XP and ab ove
MAC : OS X and ab ove
Sim plifie d Chine se, Tra ditio nal Chi nese,
Eng lish, R ussia n, Japa nese, K orean ,
Rus sian, F rench , Itali an, Spa nish, P olish ,
Dut ch, Por tugue se, Tha i
14

Note: Android version supports 4.4.2 or above versions IOS8.0 or higher version is
compatible with iPhone5s or above models.
The design and specifications of this product could be amended at any time without
prior notifications. There might be some differences between the product and the
description in this manual.
15


X3Z1 8UM- 01
 Loading...