

Model: T4
USER GUIDE
BEDIENUNGSANLEITUNG

CONTENTS / INHALTSVERZEICHNIS
English 1
Deutsch 22
TABLE OF CONTENTS
1 INTRODUCTION ........................................................................................................................... 2
1.1 Features ................................................................................................................................. 2
1.2 What's in the Box .............................................................................................................. 2
1.3 Product Overview ............................................................................................................. 3
2 GETTING STARTED
2.1 Inserting the TF/Micro SD card ................................................................................. 4
2.2 Front Lens Installation .................................................................................................... 4
2.3 Adjust Device Position ................................................................................................... 5
2.4 Connecting to Power ...................................................................................................... 6
2.5 Powering the Dash Camera ......................................................................................... 6
2.6 Rear Lens Installation ...................................................................................................... 7
3 NAVIGATION
3.1 Home Screen ...................................................................................................................... 8
3.2 Shortcuts ............................................................................................................................... 8
3.3 Main Menu .......................................................................................................................... 9
3.4 Settings ............................................................................................................................... 10
4 OPERATION
4.1 Set Date & Time ............................................................................................................. 10
4.2 Recording Videos ........................................................................................................... 11
4.3 Mode .................................................................................................................................... 11
4.4 Adjusting the Settings ................................................................................................. 12
4.5 Loop Recording .............................................................................................................. 12
4.6 G-Sensor ............................................................................................................................. 12
4.7 Emergency Video Protection ................................................................................... 13
4.8 Parking Mode .................................................................................................................. 13
4.9 Taking a Snapshot ......................................................................................................... 13
4.10 WDR ..................................................................................................................................... 13
5 COMMON FUNCTIONS
5.1 Playback Videos .............................................................................................................. 14
5.2 Preview Snapshots ........................................................................................................ 14
5.3 Managing Video & Photo Files .............................................................................. 15
5.4 Reset ..................................................................................................................................... 15
6 SETTINGS OVERVIEW
................................................................................................................................................ 18
7 FAQs
8 TECHNICAL SPECIFICATIONS
9 IMPORTANT SAFETY PRECAUTIONS
10 CUSTOMER SUPPORT
11 WARRANTY
...................................................................................................................... 4
.................................................................................................................................. 8
.................................................................................................................................. 10
......................................................................................................... 14
............................................................................................................. 16
............................................................................................. 19
.............................................................................. 20
............................................................................................................ 21
.................................................................................................................................. 21
-1-
1 INTRODUCTION
Thank you for purchasing the T4 High Definition Car DVR / dash cam by
Z-Edge ®. Featuring a 4-inch touchscreen display and dual lenses for
simultaneous recording, front, and back. Please read this manual carefully
before using this product. We hope you enjoy using this product.
1.1 Features
• Full HD 1920 x 1080P Dual Recording
• 4.0" TFT LCD Color touchscreen
• Up to 155-degree wide angle lens
• Dual lenses for simultaneous front and rear recording
• Built-in G-Sensor
• Motion Detection
• Parking Mode
• Audio Recording
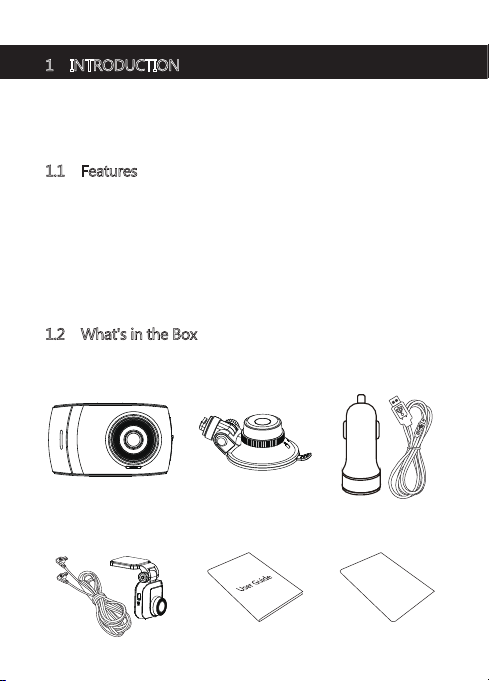
1.2 What's in the Box
T4 Dash Camera Car Charger with
Car Mount
USB Cable
Rear Camera with 26-foot
USB Cable
User Guide
-2-
Warranty Card
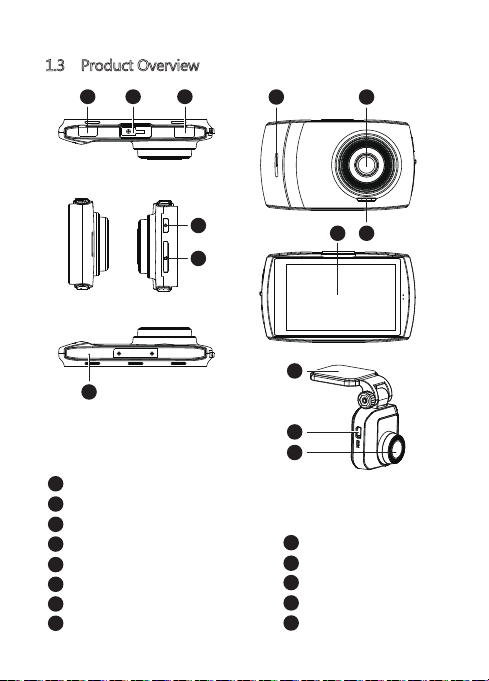
1.3 Product Overview
1
32
8 7
6
Micro USB Connector (Charging)
1
Car Mount Slot
2
Mini USB Connector (Rear Camera)
3
Power Button
4
TF/Micro SD Card Slot
5
Microphone
6
Front Camera
7
8
Indicator Light
4
5
11
12
13
9
10
11
12
13
-3-
910
Speaker
Display Screen
Adhesive Mount
Mini USB Connector
Rear Camera
2 GETTING STARTED
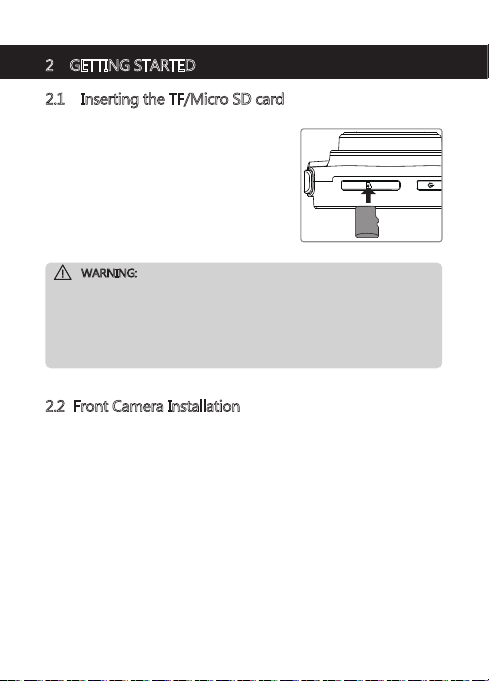
2.1 Inserting the TF/Micro SD card
• Insert a TF/Micro SD card into the TF/Micro
SD Card Slot (5), with the pins facing towards
the back of the device, until it clicks into
place.
• To remove, push the edge of the TF/Micro
SD card inward until you feel it click, then
allow it to push out until you can remove it
from the slot.
WARNING:
• It is recommended to format the TF/Micro SD card before initial use.
• Please note that all data saved on the TF/Micro SD card will be erased
after formatting.
• Do not remove or remove or insert the TF/Micro SD card whilst the device
is powered on - this may damage the TF/Micro SD card.
• Supports up to 128GB (Class 10 or above).
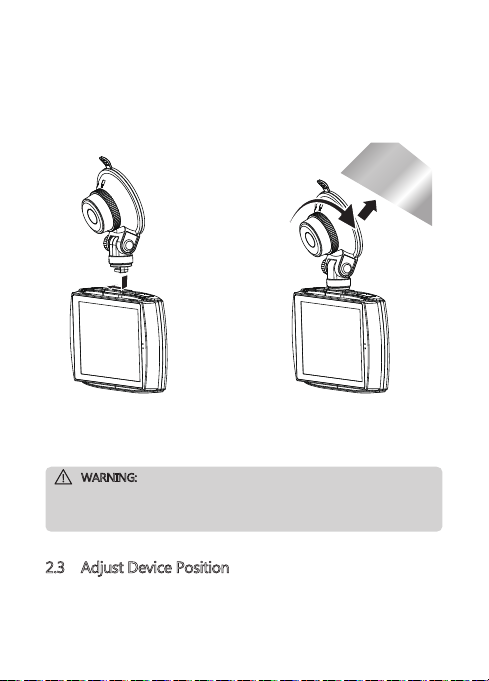
2.2 Front Camera Installation
1. Slide the car mount into the slot on top of the device until a click sound is
heard.
2. Turn the camera on (see 2.4 & 2.5 for more details). Whilst looking at the
display screen find a suitable location for installing your dash cam on your
front windshield. Please note:
a. This position should neither distract the driver nor block the driver's view
whilst driving. We recommend locating it towards the top of the windshield,
behind the rear-view mirror and positioned slightly closer to the driver's side.
Find a position that provides an unrestricted and full viewing angle for the
camera.
b. This position should be clean so that the suction cup mount can attach to the
surface firmly. If not, please clean the surface using water if necessary and
wait until dry.
-4-
c. This position should be close to the cigarette lighter (power) in the car to
ensure charging whilst recording.
3. Having found a suitable location on your windshield, peel off the protective
plastic backing from the suction-cup.
4. Press the suction-cup firmly against your windshield, and rotate the lever
clockwise (12 o'clock) to secure.
5. For a more organized car environment, the mini USB cable can be routed as
indicated by the dashed line in the diagram (See 2.4).
WARNING:
• Do not install the device on a tinted window - doing so may damage the
tint film.
• Ensure the dash camera is orientated correctly before installing.
2.3 Adjust Device Position
1. Loosen the nut to swivel the device vertically. Click into place and secure by
tightening the nut.
2. Swivel the device horizontally for a clear view.
-5-

2.4 Connecting to Power
1. Plug one end of the Micro USB
charging cable into the Micro
USB Connector (1) on the dash
camera.
2. Plug the other end into the car
charger, and insert that into
your vehicles lighter socket.
WARNING:
• Use only the supplied car charger to power the dash cam and charge the
built-in battery.
• Some car models supply power from the cigarette lighter even when the
vehicle's engine is switched off. We recommend you always unplug the
USB charger manually before leaving the vehicle to avoid any unwanted
car battery drainage.
• If the environment reaches 115-degrees Fahrenheit or above, the car
charger may stop charging the dash cam battery. This is characteristic of
a Lithium Polymer battery and is not a malfunction.
2.5 Powering the Dash Camera
Automatic Power
• Once the vehicle's engine is switched on, the dash cam will automatically
power on.
• When the vehicle's engine is switched off, the dash cam will automatically
save the recording and power off within 10 seconds.
Manual Power
• To manually turn power on, press and hold the Power Button (4) for up to 3
seconds.
• To manually turn the power off, press and hold the Power Button (4) for 3
seconds.
-6-
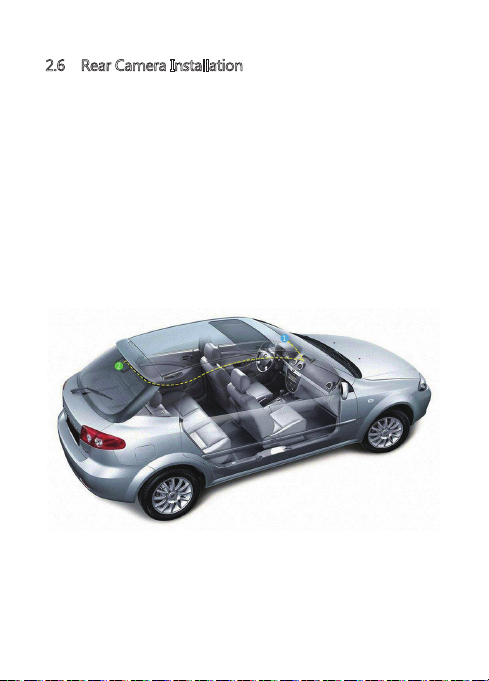
2.6 Rear Camera Installation
1. Connect one end of the Mini USB cable into the Mini USB Connector (3) on
the dash camera. Connect the other end into the Mini USB Connector (12)
on the rear camera.
2. Turn the camera on. The rear-lens view will automatically appear on the
display screen (10) in Dual (PiP) format.
TIP: To view full-screen, tap the Home Screen to reveal the Shortcuts menu,
then tap the View icon (H) on the right-hand side and select Rear Only.
3. Whilst looking at the display screen and without removing the adhesive
backing, find a suitable location for installing your rear-lens camera on your
rear windshield.
4. Having found a suitable location on your rear windshield, peel off the
protective plastic backing from the adhesive mount (11). Press firmly against
your rear windshield to secure.
5. For a more organized car environment, the micro USB cable can be routed
as indicated by the dashed line in the diagram.
-7-
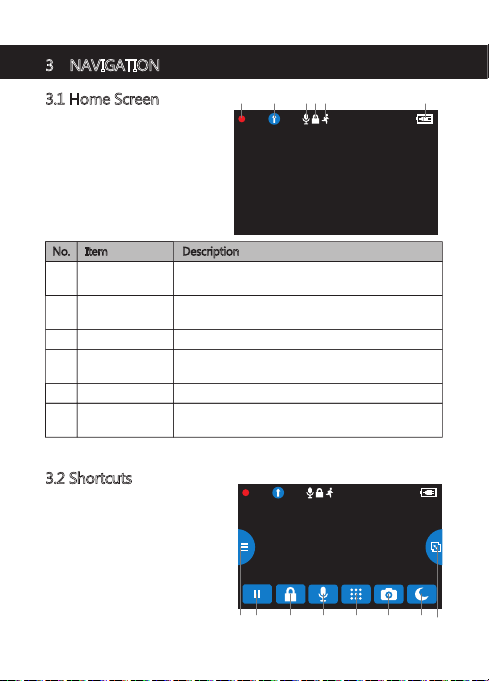
3 NAVIGATION
3.1 Home Screen
The Home Screen is the default
screen after powering on the dash
camera, for recording video and
capturing snapshots.
1
2 3 4 5 6
00:28 2018/01/01 01:28:52
No. Item Description
1 Recording
2 Mode
3 Audio Recording Indicates if the microphone is On or Off.
Emergency Video
4
Protection
5 Indicates if motion detection is enabled.
Motion Detection
6 Battery
3.2 Shortcuts
Tap anywhere on the Home Screen
whilst recording or in standby mode
to reveal the Shortcuts. Select one
of the following options:
A flashing red dot indicates the camcorder is
currently recording.
Indicates current Mode (e.g. Drive, Scenic, Park or
WDR).
A lock icon indicates the current recording file is
protected.
Indicates the estimated remaining battery power /
if the device is being charged.
00:28 2018/01/01 01:28:52
BA C D E GF H
-8-
No. Item Description
A Mode
B Play/Pause
C Video Protect
D Microphone On/Off Switch audio recording on/off.
E Main Menu
F Snapshot
G Display Off Turn display screen off.
H View
Switch between Drive, Scenic , Park and WDR
modes (see 4.3 for more details).
Play or pause video recording.
Protect the currently recorded video file from
being overwritten (see 4.7 for more details).
Go to Main Menu.
Instantly take a snapshot whilst recording or in
standby mode.
Switch between Front Only, Rear Only and Dual
(PiP) camera views with rear camera connected.
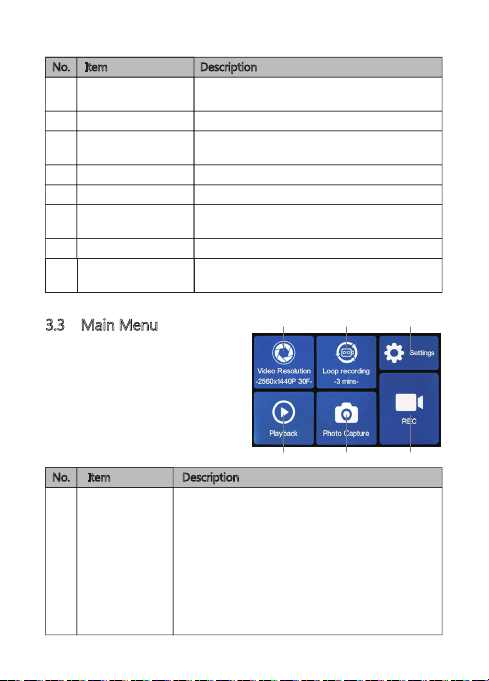
3.3 Main Menu
Tap anywhere on the Home Screen to
reveal the Shortcuts. Tap on the Main
Menu icon (E) to view the Main Menu.
Select one of the following options:
No. Item Description
I Video Resolution
Front camera and rear camera connected:
1920x1080P 30FPS +1920x1080P 30FPS
Front camera only:
2560x1440P 30FPS
2304x1296P 30FPS
1920x1080P 60FPS
1920x1080P 30FPS
1280x720P 60FPS
1280x720P 30FPS
I J K
L M N
-9-
No. Item Description
J Loop Recording
K Settings View the full list of settings that can be customized.
L Playback
M Photo Capture
N REC Exit Main Menu to Home Screen (starts recording).
Switch between 1, 3 or 5-mins recording intervals
(see 4.5 for more details).
Playback 'Normal' and 'Emergency' video recordings.
Preview saved photos.
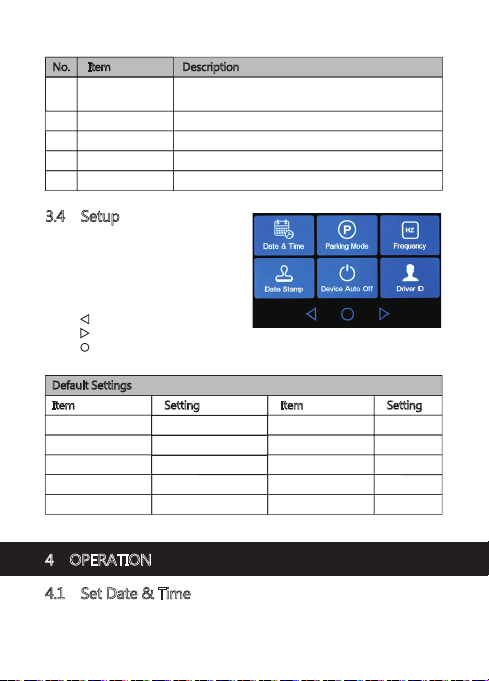
3.4 Setup
From the Main Menu screen, tap on
Settings (K) to go to the full list of
settings that can be customized.
• Tap on a feature to customize it.
• Tap ' ' icon for previous page.
• Tap ' ' icon for next page or screen.
• Tap ' ' icon to exit and return to home screen.
• Please find below the full list of Default Settings for this camcorder:
Default Settings
Item Setting
Resolution 1920x1080P 30FPS
Audio Recording ON
G-Sensor Normal
Choose language English
LCD Off Off
Item Setting
Loop Recording 3 mins
Date Stamp ON
Key Tone ON
Frequency 60 Hz
4 OPERATION
4.1 Set Date & Time
Before using this device, we recommend you set the correct date and time:
-10-
1. Tap anywhere on the Home Screen to reveal the Shortcuts.
2. Tap on the Main Menu icon (E), and select Settings (K) from the menu.
3. Search and tap on the Date & Time option to customize.
4. Select a field to customize, then tap above or below it (on the arrows) to
increase or decrease the number.
5. With all fields correct, tap the OK icon to save and exit the menu.
WARNING:
Date & Time settings may automatically reset itself if the battery is allowed
to completely drain.
4.2 Recording Videos
With a TF/Micro SD card inserted and the device connected to power, when the
car engine is switched on the dash cam will automatically power on and start
recording. When the vehicle engine is switched off, the dash cam will
automatically save the recording and power off after the time set in Device
Auto Off setting.
Alternatively, tap the Play/Pause icon (B) in the Shortcuts menu to stop/start
video recording manually.
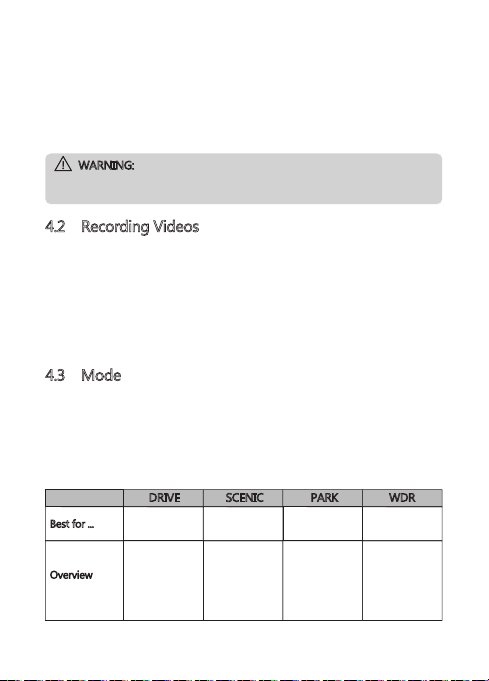
4.3 Mode
Instantly optimize the dash camera by selecting one of four video recording
modes. Selecting a mode automatically optimizes four features with preset
values designed to best suit your environment, saving you time having to
customize each individually.
To change modes, tap anywhere on the Home Screen to reveal the Shortcuts.
Select the Mode icon (A) on the left-hand side. From here, switch between:
DRIVE SCENIC PARK WDR
Best for ...
Overview
Everyday
Driving
Optimizes
recording
settings
for regular use
Scenic Driving
Records longer
video clips for
easier post
processing
Monitoring a
Parked Vehicle
Increases
G-Sensor
sensitivity and
optimizes
battery
efficiency
WDR Driving
Optimizes low
light image
quality and
minimizes
screen glare
-11-
G-Sensor
Loop Recording
Parking Mode
Screen Auto Off
Note:
• After selecting a mode, you can still customize any of the four settings
inside the Main Menu or Setup menus.
• Each and every time a new mode is selected, all four settings will change
to their preset values, overwriting any customizations you may have made.
Normal
3 mins
On
1 min
Low
5 mins
On
Off
High
1 min
On
1 min
-
-
-
-
4.4 Adjusting the Settings
If you'd prefer to customize each dash cam setting yourself, you can do so in
the Settings menu:
1. Tap anywhere on the Home Screen
2. Tap on the Main Menu icon (E), and select Settings (K) from the menu.
• Scroll the menus by tapping the ' ' or ' ' icons.
• Tap on a feature to enter and customize it.
• Make a selection to automatically save and return to the Settings menu.
• From the Settings menu tap ' ' icon to return to the Main Menu.
• Tap ' ' icon to exit and return to the Home Screen.
to reveal the Shortcuts.
4.5 Loop Recording
Videos are recorded and saved to the TF/Micro SD card at set intervals. Once
the TF/Micro SD card is full, Loop Recording automatically overwrites the
earliest unprotected saved file. This prevents long duration video clips from
being lost in a single overwrite.
Video files can be saved to the TF/Micro SD card in 1, 3 or 5 min intervals:
Main Menu > Loop Recording
4.6 G-Sensor
The built-in G-Sensor monitors and detects unusual impacts or vibrations. It
automatically triggers the Emergency Video Protection and Parking Mode
features.
Set the sensitivity to automatically trigger these features with smaller or larger
vibrations (feature can also be turned Off): Main Menu > Settings > G-Sensor
-12-
4.7 Emergency Video Protection
If G-Sensor is enabled and senses an unusual impact or collision the dash cam
will automatically protect the currently recorded video file from being
overwritten. A lock icon appears top left to signify the current recording is
protected.
To manually protect a video file during a recording, tap anywhere on the Home
Screen to reveal the Shortcuts and select the Video Protect icon (C).
4.8 Parking Mode
Enable Parking Mode for the dash cam to continue monitoring your vehicle for
unusual impact or collision when the engine is turned off and parked. If a
vibration is detected, the device will automatically turn on and begin recording.
Approximately 30 seconds after the motion or vibration is finished, the device
will automatically return to monitoring mode. All recordings are automatically
protected from being overwritten.
Enable/disable feature: Main Menu > Settings > Parking Mode
Note:
• In Parking Mode the device is powered by the internal rechargeable battery.
• Parking Mode is not recommended for long-term parking situations due to
the devices limited battery life.
• When your vehicle is parked facing forward, turn the dash camera around
so the lens is facing the rear window of the vehicle for optimal monitoring.
4.9 Taking a Snapshot
Tap anywhere on the Home Screen whilst recording or in standby mode to
reveal the Shortcuts, and tap the Snapshot icon (F) to take an instant photo.
4.10 WDR
Wide dynamic range (WDR) technology compensates for extreme light and
dark spots, balancing exposure to produce a clear image. This feature is
particularly useful for night driving where an image can include both dark spots
and extreme light spots produced by street lamps or headlights.
Enable/disable feature: Mode>WDR
-13-

5 COMMON FUNCTIONS
5.1 Playback Videos
1. Tap anywhere on the Home
Screen to reveal the Shortcuts.
2. Tap on the Main Menu icon (E),
and select Playback from the
menu.
3. Select either 'Normal' or
'Emergency' to preview relevant
video files.
4. Tap on a video clip to start
previewing it.
No. Item Description
O Back Return to browse other videos.
P Previous Playback previous video.
Q Play/Pause Play or pause the current video.
R Next
S Delete Delete current file.
WARNING:
Deleted files cannot be recovered. Please ensure you backup important files
before deleting them.
Playback next video.
O P Q R S
5.2 Preview Snapshots
1. Tap anywhere on the Home
Screen to reveal the Shortcuts.
2. Tap on the Main Menu icon (E),
and select Photos from the menu.
3. Tap on a snapshot to preview it.
T U V W
-14-

No. Item Description
T Back Return to browse other snapshots.
U Previous Tap to view previous saved snapshot.
V Next Tap to view next saved snapshot.
W Delete Delete current file.
5.3 Managing Video & Photo Files
Connecting to a computer
Connect the device to a computer using the micro USB cable. The dash cam
will automatically power on and a USB icon will be displayed on the display
screen. The contents of the TF/Micro SD card will appear as a regular disk drive
on your computer as if it were a USB flash drive. Browse as normal to view,
play, copy and delete saved files.
Recorded videos and photo files are classified and grouped into different
folders:
• CARDV>EMERGENCY: Emergency videos automatically protected by Collision
detection, Parking mode or manually.
• CARDV>VIDEO: Normal videos.
• CARDV>PHOTO: Saved snapshots.
Recorded video and photo files are saved using the following naming rules:
• Date + time + index
Note:
Compatible with Windows (XP and later) and Mac (OSX and later).
5.4 Reset
In the event of a software crash you can reset the dash camera. To reset the
dash camera press and hold the power button (4) for 7 seconds.
WARNING:
Press reset button only when the device crashes. Under normal
circumstances, please do not reset.
-15-

6 SETTINGS OVERVIEW
Menu Feature Description Available option
Video
Resolution
Main
Menu
Loop Recording 1 min / 3 mins / 5 mins
Date/Time
Parking Mode On / Off
Frequency 50Hz / 60Hz
Settings
Date Stamp
Device Auto Off
Driver ID
Set the resolution of the
videos to be recorded.
Set the duration of each
video file (see 4.5).
Set the date/time
(see 4.1).
Enable/disable to protect
your vehicle from hit-and
-run incidents when the
engine is off (see 4.8).
Set the display frequency
of the video recording.
Add/remove a date and
time stamp, visible on
saved video recordings
and photos.
Select time delay for dash
camera to automatically
turn off after loss of
external power.
Enable/disable a Driver
ID stamp, visible on
saved video recordings
and photos.
-16-
Front camera and rear
camera connected:
1920x1080P 30FPS +
1920x1080P 30FPS
Front camera only:
2560x1440P 30FPS
2304x1296P 30FPS
1920x1080P 60FPS
1920x1080P 30FPS
1280x720P 60FPS
1280x720P 30FPS
DD / MM / YYYY
HH : MM
On / Off
Off / 1 min / 3 mins /
5 mins
On / Off

Menu Feature Description Available option
Format SD Card
G-Sensor
Key Tone On / Off
Choose
language
Settings
Logo Stamp On / Off
Startup Chime On / Off
Screen Auto Off
Motion
Detection
Theme
Default
Set the exposure levels.Exposure -2.0 to +2.0
Format the TF/Micro SD
card.
Warning: ALL content on
the TF/Micro SD card will
be deleted and CANNOT
be restored or recovered.
Adjust the sensitivity of
the G-Sensor (see 4.6).
Enable/disable the sound
effect when tapping
screen.
Preset the language of
the user interface.
Add/remove logo
watermark, visible on
saved video recordings
and photos.
Enable/disable the power
on/off sound effect.
Select time taken for
display screen to
automatically turn off
during operation.
Enable/disable motion
detection function .
Select a light or dark
menu color theme.
Reset all options to the
factory default settings.
Firmware version.Version
OK / Cancel
Off / High / Normal /
Low
English / French /
German / Dutch /
Portugese / Polish
Off / 1 min / 3 mins /
5 mins
On / Off
Light / Dark
OK / Cancel
-17-

7 FAQs
Where should I place the Camcorder?
• We recommend that you mount the dash camera as close to the center of
the windshield as possible. This should neither distract the driver nor block
the drivers view (see 2.2).
Why does the dash cam stop recording after some time?
• Your micro SD card may be full and need to be formatted before using again.
1080P HD videos are big in size and G-sensor locked videos cannot be erased
automatically. We recommend formatting your TF/Micro SD card every 14
days.
Why do you recommend Class 10 micro SD card or above?
• 1080P HD video has a bigger data flow and hence requires a micro SD card
with faster writing speed. If TF/Micro SD cards below Class 10 are used, they
may cause the dash cam to freeze or other related video recording/erasing
issues.
How do I turn off the screen/audio during recording?
• To turn off the screen, tap the screen to reveal the Shortcuts and select the
Display Off icon (G).
• To turn off audio recording, tap the screen to reveal the Shortcuts and select
the Audio Recording icon (D).
How long will my battery last after a full charge?
• The dash cam battery usually takes 2-3 hours to fully charge. This can happen
simultaneously whilst the dash cam is plugged into your car and recording.
The battery can last 5-10 mins on a full charge depending on the model and
environmental temperature.
How do I record videos?
• All dash cams are programmed to automatically record when there is power
connected and a TF/Micro SD card inserted. When the engine is turned off,
or power is disconnected, the dash cam will stop recording approximately
after 10 secs.
-18-

8 TECHNICAL SPECIFICATIONS
Item Description
Image Sensor
Effective Pixels
Storage Media
LED Display
Lens
Focus Range
Movie Clip
Still Image (Snapshot)
G-Sensor
Microphone
Speaker
Battery
Operating Temperature
Storage Temperature
Dimensions
Weight
Car Charger
Note:
The design and specifications of this product could be amended at any time
without prior notifications. There might be some differences between the
product and the description in this manual
CMOS sensor
2560x1440P (Front camera only)
Supports up to 128GB Class 10 or above
4.0” TFT LCD Touch Panel
Viewing angle 155°, F2.0 ;
1.5m~Infinity
WQHD 1440P (2560 x 1440);
FHD 1080P (1920 x 1080); HD (1280 x 720)
MP4
2-Megapixel
JPEG
Yes
Yes
Yes
Built-in Li-polymer rechargeable (NOT replacable)
14° ~ 140°F
-4° ~ 158° F
121 x 72 x 31mm
Approx. 175g (6.17oz)
INPUT: DC 12-24V, OUTPUT: DC 5V 2.4A
-19-

9 IMPORTANT SAFETY PRECAUTIONS
The content in this document is for information purpose and is subject to
change without prior notice. We made every effort to ensure that this User
Guide is accurate and complete. However, no liability is assumed for any errors
and omissions that may have occurred. The manufacturer reserves the right to
change the technical specifications without prior notice.
Notes on Installation
1. Install the device near the rear-view mirror to obtain the best open-field view.
Do NOT install the Dash Cam in a location that will obstruct your required
driving view.
2. Make sure that the lens is within the wiping range of the windscreen wiper to
ensure a clear view even when it rains.
3. Do not touch the lens with your fingers. Finger grease may be left on the lens
and will result in unclear videos or snapshots. Clean the lens on a regular basis.
4. Do not install the device on a tinted window. Doing so may damage the tint
film.
5. Make sure that the installation position is not hindered by the tinted window.
Caution
• Use the authorized charger only.
• Never disassemble or attempt repair of this product. Doing so may damage
the Dash Cam, cause electric shock and void your product warranty.
• Never short-circuit the battery.
• Exposing the Dash Cam to open flames can cause an explosion.
• Due to local laws and vehicles safety considerations, do not manually operate
the device while driving.
• Z-Edge is NOT responsible for the loss of any data/content during operation.
• Before mounting, please check with the local DMV for the traffic laws of the
location/method to mount appropriately.
• Audio recorded with the video may not be valid jurisdictional evidence, and it
may be illegal to present such audio to the jury in some states.
For some vehicles, DC power socket will keep the supply of power after the
engine is turned off. To avoid car battery drain, please manually unplug the
Dash Cam when the engine is turned off.
IMPORTANT:
Before you start using the Car Camcorder it is assumed that you agree to
the above statements.
-20-

FCC Statement
This equipment has been tested and found to comply with the limits for a Class
B digital device, pursuant to Part 15 of the FCC Rules. These limits are designed
to provide reasonable protection against harmful interference in a residential
installation. This equipment generates, uses and can radiate radio frequency
energy and, if not installed and used in accordance with the instructions, may
cause harmful interference to radio communications. However, there is no
guarantee that interference will not occur in a particular installation. If this
equipment does cause harmful interference to radio or television reception,
which can be determined by turning the equipment off and on, the user is
encouraged to try to correct the interference by one or more of the following
measures:
• Reorient or relocate the receiving antenna.
• Increase the separation between the equipment and receiver.
• Connect the equipment into an outlet on a circuit different from that to which
the receiver is connected.
• Consult the dealer or an experienced radio/TV technician for help.
This device complies with Part 15 of the FCC Rules. Its operation is subject to
the following two conditions: (1) This device may not cause harmful interference,
and (2) this device must accept any interference received, including interference
that may cause undesired operation.
FCC Caution: Any changes or modifications not expressly approved by the party
responsible for compliance could void the user's authority to operate this
equipment.
10 CUSTOMER SUPPORT
For customer support inquiries please contact:
support@zeroedgetechnology.com
Or visit our website: www.zeroedgetechnology.com
11 WARRANTY
We provide a 30-day money-back guarantee and an 18-month replacement
warranty for our products, except for certain products with specified different
warranty policies.
-21-

INHALTSVERZEICHNIS
1 EINLEITUNG ................................................................................................................................. 23
1.1 Eigenschaften .................................................................................................................. 23
1.2 Lieferumfang .................................................................................................................... 23
1.3 Produkt Übersicht ......................................................................................................... 24
2 ANFANG
2.1 Einsetzen der Speicherkarte ..................................................................................... 25
2.2 Installation der Frontkamera .................................................................................... 25
2.3 Einstellen der Position des Geräts ......................................................................... 26
2.4 An die Stromversorgung anschließen ................................................................. 27
2.5 Ein- und Ausschalten ................................................................................................... 27
2.6 Installation der Heckkamera .................................................................................... 28
3 MENÜ NAVIGATION
3.1 Hauptbildschirm ............................................................................................................. 29
3.2 Tastenkürzel ...................................................................................................................... 29
3.3 Hauptmenü ....................................................................................................................... 30
3.4 Einstellen ............................................................................................................................. 31
4 KAMERABETRIEB
4.1 Datum & Uhrzeit Einstellen ...................................................................................... 32
4.2 Videoaufnahmen ............................................................................................................ 32
4.3 Modus .................................................................................................................................. 32
4.4 Einstellungen Anpassen .............................................................................................. 33
4.5 Loop-Aufnahme ............................................................................................................. 34
4.6 G-Sensor ............................................................................................................................. 34
4.7 Notfall-Video Schutz .................................................................................................... 34
4.8 Parküberwachung .......................................................................................................... 34
4.9 Schnappschuss Aufnehmen ..................................................................................... 35
4.10 WDR ...................................................................................................................................... 35
5 GEMEINSAME FUNKTIONEN
5.1 Videowiedergabe ........................................................................................................... 36
5.2 Schnappschuss Vorschauen ..................................................................................... 36
5.3 Video- und Fotodateien Verwalten ...................................................................... 37
5.4 Neustart .............................................................................................................................. 37
6 EINSTELLUNGEN ÜBERSICHT
7 FAQs
8 SPEZIFIKATIONEN
9 WICHTIGE WARNMELDUNGEN
10
11 GARANTIE
........................................................................................................................................ 25
............................................................................................................... 29
....................................................................................................................... 32
.............................................................................................. 36
............................................................................................. 38
................................................................................................................................................. 40
..................................................................................................................... 41
........................................................................................ 42
KUNDENDIENST ........................................................................................................................ 44
..................................................................................................................................... 44
-22-

1 EINLEITUNG
Vielen Dank für den Einkauf der Z-EDGE T4 HD Autokamera. Ausgestattet mit
einem 4-Zoll-Touchscreen-Bildschirm und zwei Linsen für gleichzeitige
Aufnahme, Front- und Rückseite. Bitte lesen Sie diese Bedienungsanleitung
aufmerksam durch und bewaren Sie diese zum nachschlagen in der Zukunft auf.
1.1 Eigenschaften
• Full HD 1920 x 1080P Dual-Aufnahme
• 4,0 Zoll TFT LCD Farb-Touchscreen
• Bis zu 155 Grad Weitwinkelobjektiv
• Dual-Objektiv für gleichzeitige Aufnahme von vorne und hinten
• Eingebauter G-Sensor
• Bewegungserkennung
• Parkmodus
• Audioaufnahme
1.2 Lieferumfang
T4 Autokamera Auto Ladegerät
Saugnapf-Halterung
mit USB Kabel
8 Meter USB Kabel
BedienungsanleitungHeckkamera mit
-23-
Garantiekarte

1.3 Produkt Übersicht
1
32
8 7
4
5
6
Micro USB Anschluss (aufladen)
1
Saugnapf Halterung Anschluss
2
Mini USB Anschluss (zur Heckkamera)
3
Einschalttaste
4
TF/Micro SD Kartenschlitz
5
Mikrofon
6
Frontlinse
7
8
Anzeigeleuchte
-24-
11
12
13
9
Lautsprecher
10
Bildschirm
11
Klebehalterung
12
Mini USB Anschluss
13
Hecklinse
910

2 ANFANG
2.1 Einsetzen der TF/MicroSD Karte
• Setzen Sie die TF/MicroSD-Karte mit den
Goldkontakten zur Rückseite des Geräts
ein. Schieben Sie die Speicherkarte so weit
in den Schlitz(5), bis sie einrastet.
• Entnehmen der TF/MicroSD-Karte: Drücken
Sie zuerst auf die TF/MicroSD Karte und
nehmen Sie sie anschließend heraus.
WARNUNG
• Es wird empfohlen, die TF/MicroSD Karte vor der ersten Benutzung zu
formatieren.
• Bitte beachten Sie, dass alle auf der TF/MicroSD Karte gespeicherten Daten
nach dem Formatieren gelöscht werden.
• Entfernen oder legen Sie die TF/MicroSD Karte nicht ein, während das
Gerät eingeschaltet ist. Das könnte die Speicherkarte beschädigen.
• Unterstützt bis zu 128 GB (Klasse 10 oder höher)
2.2 Installation der Frontkamera
1. Bringen Sie die Halterung am Gerät an. Schieben Sie ihn in dem Anschluss,
bis diese einrastet.
2. Schalten Sie das Gerät ein(siehe 2.4 & 2.5 für weitere Details). Wählen Sie eine
gewünschte Position an der Innenseite der Windschutzscheibe, um die
Kamera zu fixieren. Bitte achten Sie:
a. Diese Position sollte weder den Fahrer ablenken noch die Sicht des Fahrers
blockiert während der Fahrt. Wir empfehlen, das Gerät an der Oberseite der
Windschutzscheibe und hinter dem Rückspiegel zu positionieren, und etwas
näher an der Fahrerseite positioniert. Suchen Sie nach einer Position, die
einen uneingeschränkten und vollen Betrachtungswinkel für die Kamera
anbieten kann.
b. Diese Position sollte sauber sein, damit der Saugnapf an der Oberfläche fest
befestigen kann. Wenn nicht, reinigen Sie bitte die Oberfläche mit Wasser
und warten bis trocken.
-25-

c. Diese Position sollte in der Nähe der Zigarettenanzünder (Strom) im Auto
sein, um das Aufladen während der Aufnahme zu gewährleisten.
3. Nachdem Sie eine geeigneten Position an der Windschutzscheibe gefunden
haben, ziehen Sie die Schutzfolie vom Saugnapf ab.
4. Drücken Sie den Saugnapf fest gegen die Windschutzscheibe und drehen
Sie den Hebel im Uhrzeigersinn, um ihn fest zu befestigen.
5. Für eine besser organisierte Autoumgebung kann das Micro-USB Kabel so
verlegt werden, wie es durch die gestrichelte Linie im Diagramm angezeigt
wird (siehe 2.4).
WARNUNG
• Installieren Sie das Gerät nicht an einer getönten Windschutzscheibe.
Dadurch könnte die Tönungsfolie beschädigt werden.
• Stellen Sie sicher, dass die Autokamera vor der Installation korrekt
ausgerichtet ist.
2.3 Einstellen der Position des Geräts
1. Lösen Sie die Kunststoffmutter, um das Gerät zu schwenken. Wenn die
Position fixiert werden soll, muss die Mutter einfach wieder festgeschraubt
werden.
2. Schwenken das Gerät horizontal für eine klare Sicht.
-26-

2.4 An die Stromversorgung anschließen
1. Verbinden Sie die Micro USB
Schnittstelle des Ladekabels
mit dem Micro USB
Anschluss(1) am Gerät.
2. Verbinden Sie den USB
Anschluss des Ladekabels mit
dem Autoladegerät und stecken
Sie das Autoladegerät in die
Zigarettenanzünder Buchse
Ihres Fahrzeugs.
WARNUNG
• Verwenden Sie nur das mitgelieferte Autoladegerät, um das Gerät mit
Strom zu versorgen und den eingebauten Akku aufzuladen.
• Einige Automodelle liefern auch nach dem Ausschalten des Motors
weiterhin Strom aus dem Zigarettenanzünder. Wir empfehlen Ihnen, das
Kfz-Ladegerät immer manuell zu entfernen, bevor Sie Ihr Auto verlassen,
um einen unnötigen Stromverbrauch zu vermeiden.
• Wenn die Kabinentemperatur 115 Grad Fahrenheit oder höher erreicht,
stoppt das. Autoladegerät möglicherweise, den Akku der Kamera
aufzuladen. Dies ist eine der. Eigenschaften von Lithium-Polymer-Batterie
und ist keine Fehlfunktion.
2.5 Ein- und Ausschalten
Automatisch
• Wenn der Fahrzeugmotor eingeschaltet ist, schaltet sich die Kamera
automatisch ein.
• Wenn der Fahrzeugmotor ausgeschaltet wird, speichert die Kamera die
Aufnahme automatisch und schaltet sich innerhalb von 10 Sekunden ab.
Manuell
• Um das Gerät manuell einzuschalten, drücken und halten Sie die
Einschalttaste(4) für bis zu 3 Sekunden.
• Um das Gerät manuell auszuschalten, halten Sie die Einschalttaste(4) 3
Sekunden lang gedrückt.
-27-

2.6 Installation der Heckkamera
1. Verbinden Sie eine Mini USB Schnittstelle des Ladekabels mit dem Mini USB
Anschluss(3) am Gerät. Verbinden Sie die andere Mini USB Schnittstelle des
Ladekabels mit dem Mini USB Anschluss(12) an der Heckkamera.
2. Schalten Sie die Kamera ein. Die Rückansicht wird automatisch auf dem
Bildschirm (10) im Dual (PiP)-Format angezeigt.
TIPP: Um den Vollbildmodus anzuzeigen, tippen Sie auf den Hauptbildschirm,
um das Tastenkürzel-Menü anzuzeigen. Tippen Sie dann auf das Ansicht
Symbol (H) auf der rechten Seite und wählen Sie Nur Hinten.
3. Entfernen Sie nicht die Halterung Schutzfolie der Heckkamera. Schauen Sie
auf den Bildschirm und suchen Sie nach einer gewünschte Position für die
Montage der Heckkamera an der Heckscheibe.
4. Nachdem Sie eine geeigneten Position an der Heckscheibe gefunden haben,
ziehen Sie die Schutzfolie von der Klebehalterung ab. Drücken Sie die
Klebehalterung fest gegen die Heckscheibe, um die Heckkamera fest zu
befestigen.
5. Für eine besser organisierte Autoumgebung kann das Mini-USB Kabel so
verlegt werden, wie es durch die gestrichelte Linie im Diagramm angezeigt
wird.
-28-

3 MENÜ NAVIGATION
3.1 Hauptbildschirm
Der Hauptbildschirm ist die
Standardanzeige nach dem
Einschalten der Autokamera,
indem für Videoaufnahmen und
Fotoaufnahmen.
1
2 3 4 5 6
00:28 2018/01/01 01:28:52
Nr. Name Beschreibung
1 Videoaufnahme
2 Modus
3 Audioaufnahme Mikrofon ein- oder ausgeschaltet.
Notfall-Video
4
Schutzn
Bewegungs-
5
erkennung
6 Akku
3.2 Tastenkürzel
Tippen Sie während der Aufnahme
oder im Standby-Modus auf eine
beliebige Stelle auf dem
Hauptbildschirm, um die
Tastenkürzel aufzurufen. Wählen
Sie eine der folgenden Optionen:
Ein blinkender roter Punkt zeigt an, dass die
Kamera jetzt aufnimmt.
Aktuellen Modus anzeigen (zB. Fahren, Szenisch,
Parken oder WDR)
Ein Schloss-Symbol zeigt an, dass die aktuelle
Aufnahmedatei geschützt ist.
Es zeigt an, ob die Bewegungserkennung aktiviert
ist.
Die geschätzte verbleibende Akkuleistung / ob das
Gerät geladen ist.
00:28 2018/01/01 01:28:52
BA C D E GF H
-29-

Nr. Name Beschreibung
A Modus
B Wiedergabe/Pause
C Video Schutz
D Mikrofon an/aus Die Audioaufnahme ein-/ausschalten.
E Hauptmenü
F Fotoaufnahme
G Bildschirm aus Schalten Sie den Bildschirm aus.
H Ansicht
Zwischen den Modi Fahren, Szenisch, Parken und
WDR wechseln. (siehe 4.3 für weitere Details).
Videoaufnahme starten oder pausen.
Zum Schützen des aktuell aufgezeichneten
Videos gegen Überschreiben (siehe 4.7 für
weitere Details).
Zum Hauptmenü.
Drücken Sie im Videoaufzeichnung- oder
Standby-Modus kurz die Taste, um
Schnappschuss aufzunehmen.
Wechseln Sie zwischen den Ansichten Nur
Front, Nur Heck und Dual(PiP) mit
angeschlossener Heckkamera.
3.3 Hauptmenü
Tippen Sie auf eine beliebige Stelle
auf dem Hauptbildschirm, um die
Tastenkürzel aufzurufen. Tippen Sie
auf das Hauptmenü-Symbol(E), um
das Hauptmenü aufzurufen. Wählen
Sie eine der folgenden Optionen:
-30-
I J
L M
K
N

Nr. Name Beschreibung
I Video Auflösung
J Loop-Aufnahme
K Einstellen Alle Einstellungen anzeigen.
L Wiedergabe
M Fotoaufnahme
N Videoaufnahme
Frontkamera und Heckkamera angeschlossen:
1920x1080P 30FPS +1920x1080P 30FPS
Nur Frontkamera: 2560x1440P 30FPS
2304x1296P 30FPS
1920x1080P 60FPS
1920x1080P 30FPS
1280x720P 60FPS
1280x720P 30FPS
Zum Wechseln der Aufzeichnungsintervallen zwischen
1, 3 oder 5 Minuten (siehe 4.5 für weitere Details).
Wiedergabe von normalen und Notfall Videos.
Gespeicherte Fotos vorschauen.
Zum Hauptbildschirm zurückkehren und beginnt der
Videoaufnahme.
3.4 Einstellen
Tippen Sie im Hauptmenü auf Einstellen
(K), um alle Einstellungen aufzurufen.
• Tippen Sie auf eine Option, um sie
anzupassen.
• Tippen Sie auf das Symbol " " für
die vorherige Seite
• Tippen Sie auf das Symbol " " für die nächste Seite.
• Tippen Sie auf das Symbol " " zum Verlassen und zum Hauptmenü zurückkehren.
• Hier finden Sie eine vollständige Liste der Standardeinstellungen für diese Kamera:
Standardeinstellungen
Name Einstellung
Auflösung 1920x1080P 30FPS
Audio Aufnahme An
G-Sensor Normal
Sprache Englisch
LCD auto aus Aus
Name Einstellung
Loop-Aufnahme 3 Minuten
Datumsstempel An
Tastenton An
Frequenz 60 Hz
-31-

4 KAMERABETRIEB
4.1 Datum & Uhrzeit Einstellen
Bevor Sie dieses Gerät verwenden, empfehlen wir Ihnen, das richtige Datum und
die richtige Uhrzeit einzustellen:
1. Tippen Sie auf eine beliebige Stelle auf dem Hauptbildschirm, um die
Tastenkürzel aufzurufen.
2. Tippen Sie auf das Hauptmenü-Symbol(E) und wählen Sie Einstellen(K) im
Menü.
3. Suchen Sie und tippen Sie auf die Option Datum/Uhrzeit, um sie anzupassen.
4. Wählen Sie ein Feld aus, das angepasst werden soll, und tippen Sie darüber
oder darunter (auf den Pfeilen), um die Zahl zu erhöhen oder zu verringern.
5. Wenn alle Felder korrekt sind, tippen Sie auf das OK-Symbol, um das Menü
zu speichern und zu verlassen.
WARNUNG
Die Datum/Uhrzeit Einstellungen können sich automatisch zurücksetzen,
wenn die Batterie vollständig entladen ist.
4.2 Videoaufnahmen
Wenn eine TF/MicroSD-Karte eingelegt hat und das Gerät an die
Stromversorgung angeschlossen ist, schaltet sich das Gerät beim Einschalten
des Automotors automatisch ein und beginnt mit der Videoaufnahme. Wenn
der Automotor ausgeschaltet wird, speichert das Gerät automatisch die Videos
und schaltet sich nach Ablauf der Zeit aus, die in der Einstellung "Gerät auto
aus" eingestellt hat.
Oder tippen Sie auf das Wiedergabe/Pause-Symbol(B) im Tastenkürzel-Menü,
um die Videoaufnahme manuell zu starten / zu beenden.
4.3 Modus
Optimieren Sie die Autokamera sofort, indem Sie einen von vier VideoAufnahmemodi auswählen. Wenn Sie einen Modus auswählen, werden
automatisch acht Einstellungen mit voreingestellten Werten optimiert, die für
Ihre Umgebung am besten geeignet sind, so sparen Sie Zeit, die Sie im
Einstellungsmenü anpassen müssen.
Um den Modus zu ändern, tippen Sie auf eine beliebige Stelle auf dem
Hauptbildschirm, um die Tastenkürzel aufzurufen. Tippen Sie das ModusSymbol (A) auf der linken Seite. Wechseln Sie von hier zwischen:
-32-

Fahren Szenisch Parken WDR
Geeignet für...
Beschreibung
G-Sensor
Loop-Aufnahme
Parküberwachung
LCD auto aus
Hinweis:
• Nachdem Sie einen Modus ausgewählt haben, können Sie weiterhin alle
Einstellungen im Hauptmenü oder im Einstellung-Menü anpassen.
• Jedes Mal, wenn ein neuer Modus ausgewählt wird, ändern sich alle acht
Einstellungen auf die voreingestellten Werte und überschreiben alle von
Ihnen vorgenommenen Anpassungen.
Tägliches
Fahren
Die Aufnahme
Einstellungen
für den
regelmäßigen
Gebrauch
optimieren
Normal
3 Min.
1 Min.
An
Besichtigungs-
fahrt
Längere
Videoclips zur
einfache
Nachbearbeitung
aufnahmen
Niedrig
5 Min.
An
Aus
Überwachung
beim Parken
Die
Empfindlichkeit
des G-Sensors
erhöhen und
die
Akkuleistung
optimieren
Hoch
1 Min.
An
1 Min.
WDR Fahren
Die Bildqualität
bei schlechten
Lichtverhältnissen
optimieren und
die Blendwirkung
des Bildschirms
minimieren
-
-
-
-
4.4 Einstellungen Anpassen
Wenn Sie es vorziehen, jede Einstellung selbst anzupassen, können Sie dies im
Einstellung-Menü tun:
1. Tippen Sie auf eine beliebige Stelle auf dem Hauptbildschirm, um die
Tastenkürzel aufzurufen.
2. Tippen Sie auf das Hauptmenü-Symbol(E) und wählen Sie Einstellen(K) im
Menü.
• Blättern Sie durch die Menüs, indem Sie auf die Symbole " " oder " " tippen.
• Tippen Sie auf eine Option, um sie einzugeben und anzupassen.
• Treffen Sie eine Auswahl, um automatisch zu speichern und zum Einstellung-
Menü zurückzukehren.
• Tippen Sie im Einstellung-Menü auf das Symbol " ", um zum Hauptmenü
zurückzukehren.
• Tippen Sie auf das Symbol " ", um den Bildschirm zu verlassen und zum
Hauptbildschirm zurückzukehren.
-33-

4.5 Loop-Aufnahme
Die Videos werden aufgezeichnet und in festgelegten Intervallen auf der
TF/MicroSD Karte gespeichert. Sobald die TF/MicroSD Karte voll ist, überschreibt
die Schleifenaufnahme automatisch die früheste ungeschützte gespeicherte
Datei. Dies verhindert, dass lange Videoclips bei einem einzigen Überschreiben
verloren gehen. Die Videodateien können in Intervallen von 1, 3 oder 5 Minuten
auf der Speicherkarte gespeichert werden: Hauptmenü > Loop-Aufnahme
4.6 G-Sensor
Der eingebaute G-Sensor überwacht und erkennt ungewöhnliche Erschütterung
oder Vibrationen. Sie löst automatisch die Funktionen Notfall-Video-Schutz und
Parkmodus aus.
Stellen Sie die Empfindlichkeit ein, dass diese Funktionen automatisch mit
kleineren oder größeren Vibrationen ausgelöst werden (Funktion kann auch
ausgeschaltet werden): Hauptmenü > Einstellen > G-Sensor
4.7 Notfall-Video Schutz
Wenn G-Sensor aktiviert ist und ungewöhnliche Vibration oder Kollisionen
erkennt, schützt die Kamera die aktuell aufgezeichnete Videodatei automatisch
davor, überschrieben zu werden. Ein Schloss-Symbol erscheint oben links auf
dem Bildschirm, um zu signalisieren, dass die Datei erfolgreich geschützt wurde.
Um eine Videodatei während einer Aufnahme manuell zu schützen, tippen Sie
auf eine beliebige Stelle auf dem Hauptbildschirm, um die Tastenkürzel
aufzurufen, wählen Sie das Videoschutz Symbol(C)
4.8 Parküberwachung
Aktivieren Sie den Parkmodus, damit das Gerät Ihr Fahrzeug weiterhin auf
ungewöhnliche Vibrationen oder Kollisionen überwachen kann, wenn Ihr Auto
ausgeschaltet und geparkt ist. Wenn eine Vibration erkannt wird, schaltet sich
das Gerät automatisch ein und beginnt mit der Aufnahme. Etwa 30 Sekunden
nach Beendigung der Bewegung oder Vibration kehrt das Gerät automatisch in
den Überwachungsmodus zurück. Alle Videos werden automatisch vor dem
Überschreiben geschützt.
Funktion aktivieren/deaktivieren: Hauptmenü > Einstellen > Parküberwachung
-34-

Hinweis:
• Im Parkmodus wird das Gerät von der internen wiederaufladbaren Batterie
versorgt.
• Der Parkmodus wird aufgrund der begrenzten Batterielebensdauer des
Geräts nicht für das Langzeitparken empfohlen.
4.9 Schnappschuss Aufnehmen
Tippen Sie während der Videoaufnahme oder im Standby-Modus auf eine
beliebige Stelle auf dem Hauptbildschirm, um die Tastenkürzel aufzurufen,
und tippen Sie auf das Schnappschuss-Symbol(F), um ein Sofortbild
aufzunehmen.
4.10 WDR
Die WDR-Technologie (Wide Dynamic Range) kompensiert extreme helle
und dunkle Flecken und die Belichtung, verbessert die Bildqualität der Kamera
bei starken Lichtkontrasten wo gleichzeitig dunkle und helle Bereiche im
Sichtfeld auftreten. Diese Funktion ist besonders nützlich für Nachtfahrten.
Funktion aktivieren/deaktivieren: Modus > WDR
-35-

5 GEMEINSAME FUNKTIONEN
5.1 Videowiedergabe
1. Tippen Sie auf eine beliebige
Stelle auf dem Hauptbildschirm,
um die Tastenkürzel aufzurufen.
2. Tippen Sie auf das Hauptmenü Symbol (E) und wählen Sie
Wiedergabe im Menü.
3. Wählen Sie "Normal" oder
"Notfall", um eine Vorschau der
relevanten Videodateien
anzuzeigen.
4. Tippen Sie auf einen Videoclip, um die Vorschau zu starten.
Nr. Name Beschreibung
O
Zurückkehren
P
Vorherige
Q
Wiedergabe/Pause
R
Nächste
S
Löschen
WARNUNG
Die gelöschten Dateien können nicht wiederhergestellt werden. Bitte stellen
Sie sicher, dass Sie wichtige Dateien speichern, bevor Sie sie löschen.
Zurück zu anderen Videos zu sehen.
Vorheriges Video abspielen.
Das aktuelle Video spielen oder pausieren.
Nächstes Video abspielen.
Aktuelle Datei löschen.
O P Q R S
5.2 Schnappschuss Vorschauen
1. Tippen Sie auf eine beliebige
Stelle auf dem Hauptbildschirm,
um die Tastenkürzel aufzurufen.
2. Tippen Sie auf das Hauptmenü Symbol(E) und wählen Sie Foto
im Menü.
3. Tippen Sie auf ein Foto, um die
Vorschau zu starten.
T U V W
-36-

Nr. Name Beschreibung
T
U
V
W
Zurückkehren
Vorherige
Nächste
Löschen
Zurück zu anderen Fotos zu sehen.
Das vorherige Foto ansehen.
Das nächste Foto ansehen.
Aktuelle Datei löschen.
5.3 Video- und Fotodateien Verwalten
Mit einem Computer verbinden
Verbinden Sie das Gerät mit einem Micro USB-Kabel mit einem Computer. Die
Kamera schaltet sich automatisch ein und ein USB-Symbol wird auf dem
Bildschirm angezeigt. Der Inhalt der Speicherkarte wird als normales Laufwerk
auf Ihrem Computer angezeigt, als wäre es ein Wechsellaufwerk. Durchsuchen
Sie als normal, um gespeicherte Dateien anzusehen, abzuspielen, zu kopieren
und zu löschen.
Aufgenommene Videos und Fotos werden in verschiedene Ordner eingeteilt
und gruppiert:
• CARDV>EMERGENCY: Notfall-Videos, die automatisch durch
Kollisionserkennung, Parkmodus oder manuell geschützt werden.
• CARDV>VIDEO: Normale Videos.
• CARDV>PHOTO: Gespeicherte Fotos.
Die aufgezeichnete Video- und Fotodateien werden mit den folgenden
Benennungsregeln gespeichert:
• Datum + Uhrzeit + Index
Hinweis
Kompatibel mit Windows (XP und höher) und Mac (OS X und höher).
5.4 Neustart
Im Falle eines Softwarefehlers halten Sie die Einschalttaste(4) 7 Sekunden lang
gedrückt, bis das Gerät neu gestartet wird.
WARNUNG
Bitte starten Sie das Gerät nur neu, wenn das Gerät abstürzt. Unter normalen
Umständen bitte nicht neustarten.
-37-

6 EINSTELLUNGEN ÜBERSICHT
Menü Name Beschreibung Verfügbare Option
Video
Auflösung
Hauptmenü
Loop-Aufnahme 1 Min./3 Min./5 Min.
Datum /Uhrzeit
Parküberwachung An/Aus
Frequenz 50Hz / 60Hz
Datumsstempel
Einstellungen
Gerät auto aus
FahrerID
Belichtung -2.0 bis +2.0
Die Auflösung der
aufzuzeichnenden
Videos einstellen
Die Dauer Zeit jedes
Videos einstellen(siehe 4.5)
Das Datum / die Uhrzeit
einstellen(siehe 4.1).
Aktivieren/deaktivieren, um
Ihr Fahrzeug zu überwachen,
wenn Ihr Fahrzeug geparkt
ist (siehe 4.8).
Die Anzeige Frequenz der
Videoaufnahme einstellen.
Hinzufügen/Entfernen eines
Datums- und Zeitstempels,
sichtbar auf gespeicherten
Videos und Fotos
Die Zeitverzögerung für
die Autokamera auswählen,
um sich nach der
Ausschaltung der externen
Stromversorgung
automatisch auszuschalten.
Enable/disable a Driver ID
stamp, visible on saved video
recordings and photos.
Der Belichtungswert
einstellen.
-38-
Frontkamera und
Heckkamera
angeschlossen:
1920x1080P 30FPS +
1920x1080P 30FPS
Nur Frontkamera:
2560x1440P 30FPS
2304x1296P 30FPS
1920x1080P 60FPS
1920x1080P 30FPS
1280x720P 60FPS
1280x720P 30FPS
TT/MM/JJJJ
SS:MM
An/Aus
Aus/1 Min./3 Min. /
5 Min.
An/Aus

Menü Name Beschreibung Verfügbare Option
Formatierung
G-Sensor
Tastenton An/Aus
Sprache
Einstellungen
Logostempel An/Aus
Startton An/Aus
LCD auto aus
Bewegungs-
erkennung
Thema
Standard
Formatieren Sie die
Speicherkarte.
Warnung: Alle Inhalte der
Speicherkarte wird
gelöscht und kann NICHT
wiederhergestellt oder
wiederhergestellt werden.
Die Empfindlichkeit des
G-Sensors einstellen
(siehe 4.6).
Der Soundeffekt beim
Antippen des Bildschirms
aktivieren / deaktivieren.
Die Sprache der
Benutzeroberfläche
einstellen.
Hinzufügen / Entfernen eines
Logo Wasserzeichens, das
auf gespeicherten Videos
und Fotos sichtbar ist.
Der Soundeffekt durch
Ein-/Ausschalten
aktivieren/deaktivieren.
Die Zeit auswählen, um
den Bildschirm während
des Betriebs automatisch
auszuschalten.
Bewegungserkennung
aktivieren/deaktivieren.
Die Menü-Hintergrundfarbe
auswählen.
Alle Optionen auf die
Werkseinstellungen
zurücksetzen.
Firmware VersionVersion
OK/Abbrechen
Aus/Hoch/Normal
/Niedrig
Englisch/Deutsch/
Französisch/Polnisch/
Niederländisch/
Portugiesisch
Aus/1 Min./3 Min./
5 Min.
An/Aus
Weiß/Schwarz
OK/Abbrechen
-39-

7 FAQs
Wo sollte ich die Kamera installieren?
• Wir empfehlen, die Kamera so nahe wie möglich an der Mitte der
Windschutzscheibe zu montieren. Dies sollte weder den Fahrer ablenken noch
das Sichtfeld des Fahrers blockieren (siehe 2.2).
Warum stoppt die Kamera nach einiger Zeit die Aufnahme?
• Ihre Micro SD-Karte ist möglicherweise voll und muss vor der nächsten
Verwendung formatiert werden. Die 1080P HD-Videos sind groß und
geschützte Videos können nicht automatisch gelöscht werden. Wir empfehlen,
Ihre Speicherkarte alle 14 Tage zu formatieren.
Warum empfehlen wir eine Micro SD-Karte der Klasse 10 oder höher?
• Ein 1080P HD-Video hat einen größeren Datenfluss und erfordert daher eine
TF/Micro SD-Karte mit höherer Schreibgeschwindigkeit. Wenn die
Speicherkarten unter Klasse 10 verwendet werden, kann dies zum Aufhängen
der Kamera oder anderen damit verbundenen Problemen bei Aufnahme oder
Löschung führen.
Wie schalte ich den Bildschirm / Audio während der Aufnahme aus?
• Um den Bildschirm auszuschalten, tippen Sie auf den Bildschirm, um die
Tastenkürzel aufzurufen, und wählen Sie das Symbol ''Bildschirm Aus'' aus(G).
• Um die Audioaufnahme auszuschalten, tippen Sie auf den Bildschirm, um die
Tastenkürzel aufzurufen, und wählen Sie das Symbol ''Audioaufnahme''(D).
Wie lange hält der Akku nach einer vollen Ladung?
• Der Akku der Kamera benötigt normalerweise 2-3 Stunden zum vollständigen
Aufladen. Dies kann gleichzeitig erfolgen, während die Kamera mit Ihrem Auto
verbunden und aufgezeichnet wird. Der Akku kann bei voller Ladung je nach
Einstellungen und Umgebungstemperatur 5 bis 10 Minuten halten.
Wie nehme ich Videos auf?
• Alle Kameras sind so programmiert, dass sie automatisch aufzeichnen, wenn
die Stromversorgung angeschlossen und eine TF/MicroSD Karte eingesteckt
ist. Wenn der Motor ausgeschaltet oder die Stromversorgung unterbrochen
wird, stoppt die Kamera nach etwa 10 Sekunden die Aufnahme.
-40-

8 SPEZIFIKATIONEN
Name Beschreibung
Bildsensor
Auflösung
Speichermedium
Bildschirm
Objektiv
Fokusbereich
Video
Foto
G-Sensor
Mikrofon
Lautsprecher
Batterie
Betriebstemperatur
Lagertemperatur
Abmessungen
Gewicht
Autoladegerät
Hinweis:
Das Design und die Spezifikationen dieses Produkts können jederzeit ohne
vorherige Ankündigung geändert werden. Es könnte einige Unterschiede
zwischen dem Produkt und der Beschreibung in dieser Anleitung geben.
CMOS-Sensor
2560x1440P(nur Frontkamera)
Unterstützt bis zu 128 GB, Klasse 10 oder höher
4,0 Zoll TFT LCD Touchscreen
Betrachtungswinkel 155°, F2.0
1,5 Meter bis unendlich
WQHD 1440P (2560 x 1440);
FHD 1080P (1920 x 1080); HD (1280 x 720)
MP4
2 Megapixel
JPEG
Unterstützt
Integriert
Integriert
Eingebautes wiederaufladbare Li-Polymer
(NICHT austauschbar)
14° bis 140° F
-4° bis 158° F
121 x 72 x 31 mm
Ca. 175g
Eingang: DC 12-24V, Ausgang: DC 5V/2,4A
-41-

9 WICHTIGE WARNMELDUNGEN
Alle Informationen in diesem Dokument können ohne vorherige Ankündigung
geändert oder entfernt werden. Wir haben alle Anstrengungen unternommen,
um sicherzustellen, dass dieses Benutzerhandbuch korrekt und vollständig ist.
Der Hersteller behält sich das Recht vor, die technischen Daten ohne vorherige
Ankündigung zu ändern.
Hinweise zur Installation
1. Installieren Sie das Gerät in der Nähe des Rückspiegels, um das beste
Sichtfeld zu erhalten. Installieren Sie die Kamera NICHT an einer Stelle, die die
erforderliche Fahransicht behindert.
2. Stellen Sie sicher, dass das Objektiv im Wischbereich des Scheibenwischers
befindet, um auch bei Regen eine klare Sicht zu gewährleisten.
3. Berühren Sie das Objektiv nicht mit den Fingern. Die Fingerabdrücke können
auf dem Objektiv verbleiben und zu unscharfen Videos oder
Schnappschüssen führen. Reinigen Sie regelmäßig das Objektiv.
4. Installieren Sie das Gerät nicht an einer getönten Windscheibe. Dies könnte
die Tönungsfolie beschädigen.
5. Stellen Sie sicher, dass die Einbauposition nicht durch die getönte
Windscheibe behindert wird.
Vorsicht
• Verwenden Sie nur das autorisierte Ladegerät.
• Zerlegen Sie das Gerät niemals und versuchen Sie auch nicht, es zu reparieren,
da dies die Kamera beschädigen, einen Stromschlag verursachen und die
Produktgarantie ungültig machen kann.
• Schließen Sie die Batterie niemals kurz.
• Wenn Sie die Kamera offenen Flammen aussetzen, kann dies zu einer
Explosion führen.
• Bedienen Sie das Gerät aus Sicherheitsgründen nicht während der Fahrt.
• Z-EDGE haftet NICHT für den Verlust von Daten / Inhalten während des
Betriebs.
• Vor der Montage überprüfen Sie bitte mit dem lokalen DMV für die
Verkehrsregeln des entsprechenden Standortes / Verfahrens zu montieren.
• Das Audio, das mit dem Video aufgenommen wurde, ist möglicherweise kein
gültiger juristischer Beweis, und es kann illegal sein, in einigen Ländern den
zuständigen Gerichten solche Audiodaten vorzulegen.
Bei einigen Fahrzeugen hält die Steckdose die Stromversorgung nach dem
Ausschalten des Motors aufrecht. Um eine Autobatterie Entladung zu
vermeiden, ziehen Sie die Kamera bei ausgeschaltetem Motor manuell ab.
-42-

WICHTIG:
Bevor Sie die Kamera benutzen, wird vorausgesetzt, dass Sie den obigen
Aussagen zustimmen.
FCC-ERKLÄRUNG
Das vorliegende Gerät erfüllt die Grenzwertbestimmungen für digitale Geräte
der Klasse B nach Teil 15 der FCC-Regeln zur Funkentstörung. Ziel dieser
Bestimmungen ist es, beim Betrieb des Gerätes innerhalb einer
Wohnumgebung einen angemessenen Schutz gegen störende Interferenzen zu
gewährleisten. Dieses Gerät erzeugt und nutzt Hochfrequenzenergie und kann
diese auch ausstrahlen. Wird es nicht gemäß den hier gegebenen Anweisungen
angeschlossen und genutzt, kann das Gerät Funkübertragungen erheblich
stören. Es ist jedoch trotz Befolgen der Anweisungen möglich, dass bei
bestimmten Geräten Störungen auftreten. Sollten durch das Gerät Störungen
beim Radio- bzw. Fernsehempfang auftreten, was z.B. durch Ein- und
Ausschaltung des Geräts geprüft werden kann, versuchen Sie, diese durch
folgende Maßnahmen zu beheben:
• Richten Sie die Empfangsantenne neu aus.
• Erhöhen Sie den Abstand zwischen Gerät und Empfänger.
• Schließen Sie das Gerät an eine Netzquelle auf einem anderen Kreislauf an, als
dem, an den der Empfänger angeschlossen ist.
• Wenden Sie sich an Ihren Fachhändler oder einen erfahrenen Radio- und
Fernsehtechniker für Hilfe.
Dieses Gerät entspricht Teil 15 der FCC-Bestimmungen. Der Betrieb unterliegt
den folgenden zwei Bedingungen:
(1) Das Gerät darf keine Interferenzen verursachen, und (2) Das Gerät muss
nicht anfällig gegenüber beliebigen empfangenen Störungen sein, einschließlich
solcher, die einen unerwünschten Betrieb verursachen.
FCC Achtung: Änderungen oder Modifikationen, die nicht ausdrücklich von der
für die Konformität verantwortlichen Partei genehmigt wurden, können die
Berechtigung des Benutzers zum Betrieb dieses Geräts aufheben.
-43-

10 KUNDENDIENST
Für Support / technische Unterstützung kontaktieren Sie uns bitte unter
support@zeroedgetechnology.com
Oder besuchen Sie unsere offizielle Website: www.zeroedgetechnology.com
11 GARANTIE
Wir bieten eine 30-tägige Geld-zurück-Garantie und eine 18-monatige
Austauschgarantie für unsere Produkte, mit Ausnahme bestimmter Produkte
mit bestimmten unterschiedlichen Garantiebedingungen.
-44-


T4Z18UM-02
 Loading...