

F1(f610d)
USER GUIDE
BEDIENUNGSANLEITUNG

CONTENTS / INHALTSVERZEICHNIS
English 1
Deutsch 19
Table of Contents
1 Introduction .................................................................................................................................... 2
1.1 Features ................................................................................................................................. 2
1.2 What's in the Box ............................................................................................................. 2
1.3 Product Overview ............................................................................................................. 3
2 Getting Started .............................................................................................................................. 4
2.1 Inserting the Memory Card ......................................................................................... 4
2.2 Installation ............................................................................................................................ 5
2.3 Adjust Device Position ................................................................................................... 6
2.4 Connecting to Power ...................................................................................................... 6
2.5 Powering the dash cam ................................................................................................ 7
2.6 Set Date & Time ................................................................................................................ 7
3 Using the Car
3.1 Recording Videos ............................................................................................................. 8
3.2 Recording Screen ............................................................................................................. 8
3.3 Adjusting the Settings .................................................................................................... 9
3.4 Loop Recording .............................................................................................................. 10
3.5 Emergency Video Protection ................................................................................... 10
3.6 Motion Detection .......................................................................................................... 10
3.7 Vibration Detection ....................................................................................................... 10
3.8 Taking a Snapshot ......................................................................................................... 11
3.9 Playback Videos & Photos ........................................................................................ 11
3.10 Managing Video & Photo Files ............................................................................ 11
3.11 GPS ..................................................................................................................................... 12
3.12 Night Vision .................................................................................................................... 12
Menu Overview .......................................................................................................................... 13
4
FAQs ................................................................................................................................................. 15
5
6
Customer Support .................................................................................................................... 15
7 Warranty
8 Product Specifications
Dash Cam ........................................................................................................... 8
......................................................................................................................................... 16
............................................................................................................ 17
-1-
1 Introduction
Welcome to buy the F1 car dash cam. Protect you and your vehicle with
real-time video and audio recording whilst you're driving. Featuring a stealth
size design and dual-lens for recording front and back. Please read this manual
carefully before using this product. We hope you enjoy using this product.
1.1 Features
• Full HD 1920 x 1080P
• 2.7" LCD Color screen
• Up to 150-degree wide angle lens
• Built-in G-Sensor
• Motion Detection
• Audio Recording
• Night Vision
• GPS
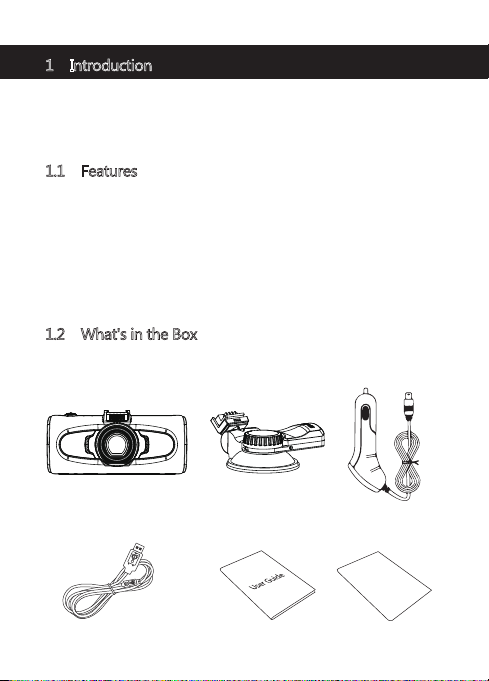
1.2 What's in the Box
Car Dash Cam Car ChargerCar Mount with
Built-in GPS
Mini-USB Data Cable
Warranty CardUser Guide
-2-
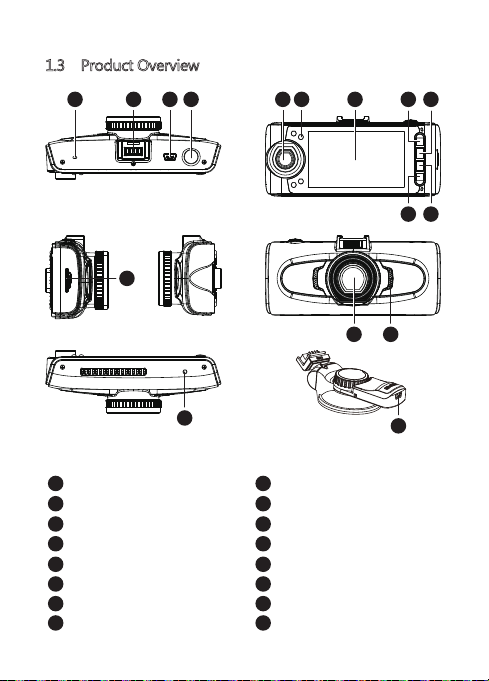
1.3 Product Overview
11 10
12
8 7 569
4 3
1 2
14 15
Power Button
1
Down
2
Up
3
Mode
4
Display Screen
5
IR LCDs
6
Rear-View Lens
7
8
OK Button
13
Mini USB Port
9
Suction Mount Slot
10
Mic
11
TF/Micro SD Card Slot
12
Reset
13
Front-View Lens
14
Speaker
15
16
GPS USB Port
-3-
16
2 Getting Started
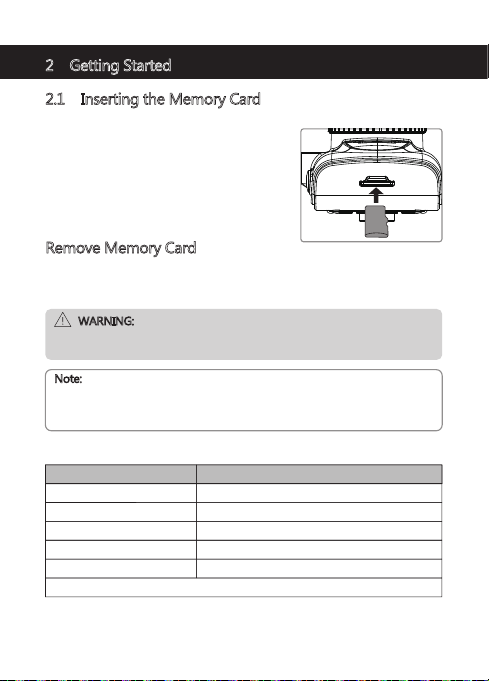
2.1 Inserting the Memory Card
Insert the memory card, with the pins facing
towards the display, until it clicks into place.
Remove Memory Card
Push the edge of the memory card inward until you feel it click, then allow it to
push out until you can remove it from the slot.
WARNING:
It is recommended to format the memory card before initial use. Please note
that all data saved on the memory card will be erased after formatting.
Note:
• Supports Micro SDXC cards up to 128GB .
• Do not remove or insert memory card whilst the device is powered on -
this may damage the memory card.
Storage Capacity Video Recording Time
8GB
16GB
32GB
64GB
125GB
For reference only
44min
88min
176min
352min
704min
-4-
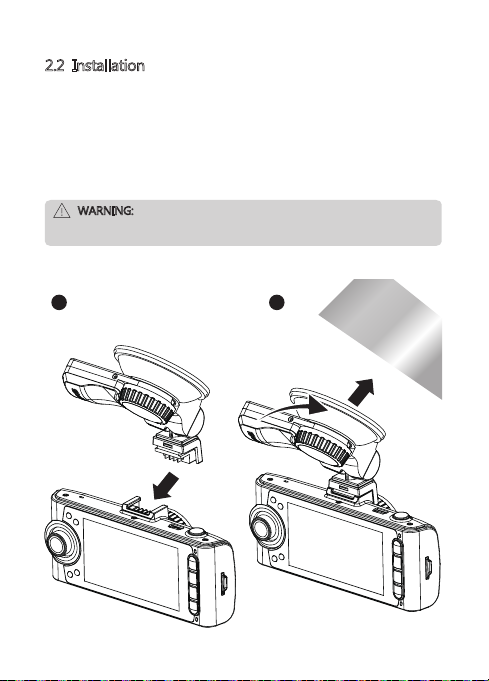
2.2 Installation
Please follow the below instructions for mounting your dash cam to your
vehicles windshield:
1. Slide the car mount into the slot on top of the device until a click sound is
heard.
2. Peel off the protective plastic backing from the suction-cup.
3. Press the suction-cup firmly against your windshield, and rotate the lever
clockwise (12 'clock) to secure.
WARNING:
Do not install the device on a tinted window - doing so may damage the tint
film.
1 2
-5-
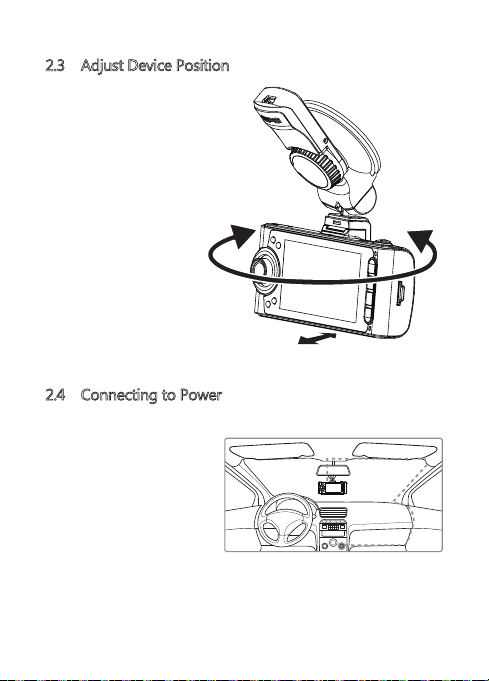
2.3 Adjust Device Position
Swivel the device vertically or
horizontally to adjust the position.
2.4 Connecting to Power
Use only the supplied car adapter to power the dash cam.
1. Plug one end of the car
charger into the USB
Connector of the dash cam.
2. Plug the other end into your
vehicles lighter socket.
3. For GPS, plug one end of the
car charger into the USB
connector on the car mount(16).
-6-
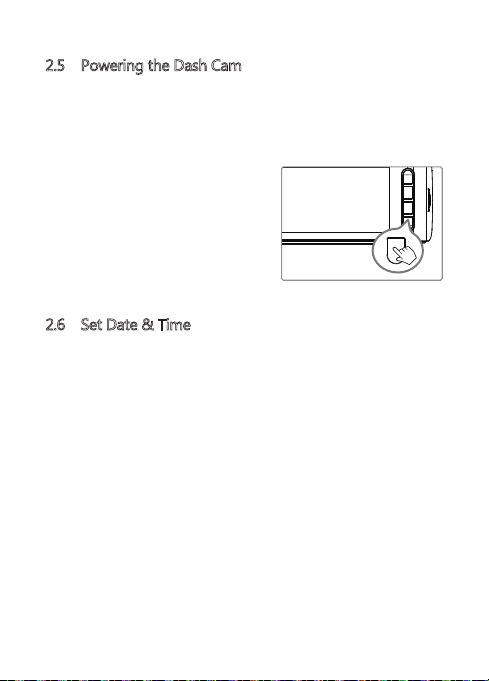
2.5 Powering the Dash Cam
Automatic Power
• Once the vehicle's engine is switched on, the dash cam automatically powers
on.
• When the vehicle's engine is switched off, the dash cam will automatically
save the recording and power off within 10 seconds.
Manual Power
• To manually turn the power on, short press
the 'Power' button (1).
• To manually turn the power off, press and
hold the 'Power' button (1) for 3 seconds.
2.6 Set Date & Time
• Before using the device, we recommend you set the correct date and time:
• If the device is recording, short press the 'OK' button (8) to stop and enter
video Mode.
• Press the 'Power' button (1) twice to enter the General Settings menu.
• Press the 'Up' and 'Down' buttons (2 & 3) to select Date/Time and press 'OK'
button (8) to confirm. Adjust the date and time settings using the 'Up' ,
'Down' and 'OK' buttons (2,3,8)
• With all fields correct, press the 'Power' button (1) to save and exit the menu.
-7-
3 Using the Car Dash Cam
3.1 Recording Videos
With an SD card inserted and the device connected to power, when the car
engine is switched on the dash cam will automatically power on and start
recording. When the vehicle engine is switched off, the dash cam will
automatically save the recording and power off within 10 seconds.
Alternatively, short press the 'OK' button (8) to stop/start video recording
manually.
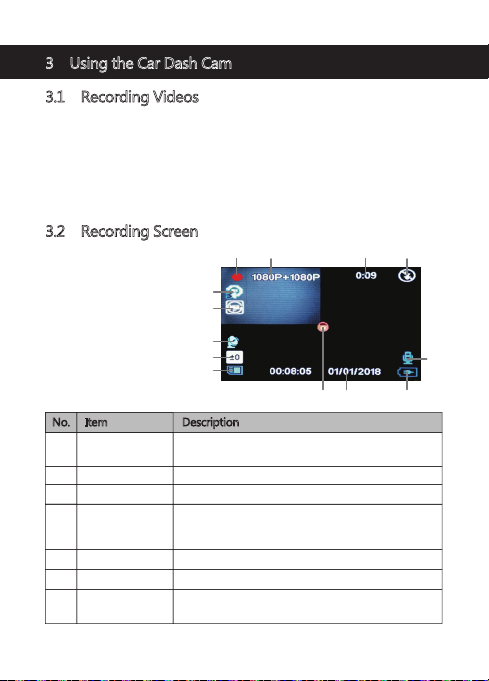
3.2 Recording Screen
1 2 43
5
6
7
8
9
10 12
11
No. Item Description
Recording
1
Resolution Indicates the current video resolution.
2
Recording Time
4
IR Mode
Loop Recording Loop Recording setting.5
Motion Detection Motion Detection : On/Off6
GPS
7
A flashing red dot indicates the Dash cam is
currentlyrecording.
Indicates the current video recording time.3
Indicates the IR night vision setting,On/Off/Auto,
press and hold the 'Up' button (3) for 4 seconds to
change the IR mode.
Blue: Searching for GPS signals.
Green: GPS working status.
13
-8-
No. Item Description
Exposure
Micro SD Card
Lock
Date and time
Power
Microphone Microphone ON/OFF.13
Showes current Exposure setting.8
Showes if TF/ micro SD card is present.9
Video protection.10
Indicates the current recording date and time.11
Power icon shows when connected to charger.12
3.3 Adjusting the Settings
Customize the video recording, photo and other general settings via the on
scree display (OSD) menus:
If the device is recording short press the 'OK' button (8) to stop and enter
recording mode. Press the 'Mode' button (4) to switch between recording,
Camera and preview modes.
From the recording mode:
• Press the 'Power' button (1) once to open the Record Setup Menu.
• Press the 'Power' button (1) twice to enter the General Settings menu.
• Press the 'Up' and 'Down' buttons (2 & 3) to select a menu option and press
the 'OK' button (8) to enter the selected menu.
• Press the 'Up' and 'Down' buttons (2 & 3) to select the desired setting and
press the 'OK' button (8) to confirm the setting.
• Press the 'Power' button (1) to exit the menu.
From the Camera Mode:
• Press the 'Power' button (1) once to open the Photo Menu.
• Press the 'Up' and 'Down' buttons (2 & 3) to select a menu option and press
the 'OK' button (8) to enter the selected menu.
• Press the 'Up' and 'Down' buttons (2 & 3) to select the desired setting and
press the 'OK' button (8) to confirm the setting.
• Press the'Power' button (1) to exit the menu.
-9-
3.4 Loop Recording
Videos are recorded and saved to the memory card in set intervals. Once the
memory card is full, Loop Recording automatically overwrites the earliest
unprotected saved file. This prevents long duration video clips from being lost
in a single overwrite.
Video files can be saved to the memory card in 1, 3 or 5 mins intervals: Video
Mode >Record Setup Menu > Loop Recording
3.5 Emergency Video Protection
If Vibration Detection is enabled and senses an unusual impact or collision the
dash cam will automatically protect the currently recorded video file from
being overwritten. A lock icon appears to signify the current recording is
protected. To manually protect a video file during a recording, short press the
'Mode' button (4).
3.6 Motion Detection
With Motion Detection enabled, video recording is automatically started when
movement is detected by the camera lens. After approximately 15 seconds with
no movement detected, video recording is automatically paused.
Enable/disable feature: Video Mode > Record Setup Menu > Motion Detection
WARNING:
Motion Detection requires the dash cam to be powered. For using this
feature whilst the vehicle is parked and the engine is off, you may need to
hardwire the dash cam to your vehicle. Please seek assistance from a
trained mechanic before attempting this installation.
3.7 Vibration Detection
The Vibration Detection feature senses for unusual impacts or collisions
detected by the built-in G-Sensor. It automatically triggers the Emergency
Video Protection Set the sensitivity to automatically trigger these features with
smaller or larger vibrations (feature can also be turned Off): Video Mode >
Record Setup Menu > G-Sensor
-10-

3.8 Taking a Snapshot
• If the device is recording, short press the 'OK' button (8) to stop and enter
Video Mode.
• Press the 'Mode' button (4) to enter Photo Mode, and short press the 'OK'
button (8) to take a snapshot.
• To take a photo while recording short press the 'Power' button (1)
3.9 Playback Videos & Photos
• If the device is recording, short press the 'OK' button (8) to stop and enter
Video Mode.
• Press the 'Mode' button (4) to twice to enter Playback Mode.
• Press the 'Up' button (3) to select the Previous file.
Press the 'Down' button (2) to select the Next file.
Press the 'OK' button (8) to Play/Pause a video file.
3.10 Managing Video & Photo Files
• Go to Playback Mode (see 3.9).
• Navigate to the file you wish to manage and press the 'Mode' button (4).
• Press the 'Up' and 'Down' buttons (2 & 3) to select either Delete or Protect,
then press the 'OK' button (8).
Delete
Delete the file by selecting Delete Current, or select Delete All to delete all
unprotected files saved to the memory card.
WARNING:
Deleted files cannot be recovered. Please ensure you backup important files
before deleting them.
Protect
Protect the file from being overwritten by the Loop Recording feature
(see 3.4 and 3.5).
-11-

3.11 GPS
Integrated into the car mount suction cup is a GPS receiver which can pinpoint
the location of your car dash cam anywhere on Earth. Video recordings include
GPS tracking data which records location, speed, time and other variables that
can be viewed on a GPS Player.
• Ensure the USB cable is plugged into the GPS suction mount’s USB connector
(16) to enable GPS tracking.
• Go to http://zeroedgetechnology.com/downloads/ to download the
compatible GPS Player.
• Install GPS Player on your laptop or computer.
• Run the program and click 'Import files' to search and playback a video
recording.
Note:
• GPS Player compatible with Microsoft Windows and Apple Mac.
• GPS tracking data may not be viewable using other GPS Players.
• Car Dash cam videos can be played from the SD card or from the car
Dash cam when connected to a computer via the USB port.
3.12 Night Vision
In Video Mode or while the device is recording press the the 'Up' button (3) for
4 seconds to switch Night Vision to Off, On or Auto.
-12-

4 Menu Overview
Menu Feature Description Available option
Resolution
Loop Recording 1Min / 3Min / 5Min
G-Sensor
Audio Recording On / Off
Video
Motion Detection On / Off
Mode
Exposure +2.0, +1.0, 0, -1.0, -2.0
Number Plate
Stamp
Rotate Display On / Off
Set the resolution of the
videos to be recorded.
Set the duration of each
video file recorded to the
memory card (see 3.4).
Adjust the sensitivity of
the G-Sensor (see 3.7).
Enable/disable audio
recording.
Enable/disable Motion
Detection.
Set the Exposure of the
videos to be recorded.
Use the numberplate
info.
Add/remove a date and
time stamp, logo stamp,
Number stamp, Speed
stamp, GPS location
stamp, visible on saved
video recordings and
photos.
Flip the display by 180
degrees.
-13-
Dual camera:
1920x1080P 30FPS+
1920x1080P 30FPS
Front camera only:
2560x1440P 30FPS
2304x1296P 30FPS
1920x1080P 60FPS
Off / High / Medium /
Low
Use ‘Up’ & ‘Down’
Buttons to select and
‘OK’ Button 8 to confirm
settings.
On / Off

Menu Feature Description Available option
Language
Format OK / Cancel
General
Settings
Auto LCD Off Off / 1Min / 3Min /
Device Sound On / Off
Non-Use Power
Off
Default Setting OK / Cancel
Resolution
Photo
Menu
Exposure +2.0, +1.0, 0, -1.0, -2.0
Time & Date
Stamp
Preset the language of
the user interface.
Format the memory card.
Warning: ALL content on
the memory card will be
deleted and CANNOT be
restored or recovered.
Set the date/time (see 2.5).Date/Time
Set the time zone.Time Zone / DST
Change from KMH to MPHSpeed Unit KMH / MPH
Adjust the Auto LCD Off
delay.
Enable/disable the sound
effect when pressing the
buttons.
Adjust the Non-Use
Power Off delay.
Adjust the light frequencyFrequency 50Hz / 60Hz
Display the system build infoSystem Info Firmware version
Reset all options to the
factory default settings
Set the resolution of the
pictures to be taken.
Set the Exposure of the
pictures to be taken
Enable or disable the Time
& Date Stamp for photos.
-14-
English, Polish, Danish,
German, Spanish, French,
Italian, Dutch, Norwegian,
Finnish, Swedish,
Portuguese, Chinese
(Simp.), Japanese, Chinese
(Trad.), Russian, Korean
YYYY / DD / MM
HH : MM : SS
GMT, GMT -12 to GMT +12
5Min
Off / 1Minute /
2Minutes / 3Minutes
12M 4032x3024
10M 3648x2736
8M 3264x2448
5M 2592x1944
4M 2304x1728
On / Off

5 FAQs
Where should I place the Dash Cam?
• We recommend that you mount the car dash cam as close to the center of
the windshield as possible. This should neither distract the driver nor block
the drivers view (see 2.2).
Why does the Dash cam stop recording after some time?
• If motion detection is enabled, the dash cam will automatically stop
recording when no movements is detected for more than 15 seconds (see 3.6).
• Your micro SD card may be full and need to be formatted before using again.
1080P HD videos are big in size and G-sensor locked videos cannot be erased
automatically. We recommend formatting your memory card every 14 days.
Why do you recommend Class 10 micro SD card or above?
• 1080P HD video has a bigger data flow and hence requires a micro SD card
with faster writing speed. If memory cards below Class 10 are used, they may
cause the Dash cam to freeze or other related video recording/erasing issues.
How do I turn off the screen/audio during recording?
• To turn off the screen, short press the 'Down' button (2) once during
recording. To turn off Audio Record, short press the ‘Up’ button (3) during
recording. (Please note: this does not interrupt the recording).
How do I record videos?
• All dash cams are programmed to automatically record when there is power
connected and a memory card inserted. When the engine is turned off, or
power is disconnected, the dash cam will stop recording approximately after
3-10 secs. Manually start/stop recording by pressing the 'OK' button (8).
6 Customer Support
For customer support inquiries please contact:
support@zeroedgetechnology.com
Or visit our website: www.zeroedgetechnology.com
-15-

7 Warranty
All Zero Edge customers have a 30-day money back guarantee, to make sure
your shopping experience is worry-free.
You also get a 12 month warranty; if you subscribe to our official website
(www.zeroedgetechnology.com/) you can extend the warranty to 18 months.
You will receive notifications and introductions about our new products before
they are released to the market. Additionally, you could be selected to enjoy a
special discount or coupon if purchasing our products for detailed evaluation.
Your opinion matters
Z-Edge is committed to improving our products to bring you the best user
experience. We value your feedback and encourage you to share your
experience with other shoppers.
You can also send us your thoughts and feedback on social media and follow us
on Facebook (www.facebook.com/zeroedgeGA/) & YouTube to get the latest
news, reviews, discounts and giveaways.
Thank you for choosing Z-Edge!
-16-

8 Product Specifications
Item Description
Image Sensor
Storage Media
LCD Display
Lens
Focus Range
Resolution
Still Image (Photo Mode)
G-Sensor
Microphone
Speaker
Interface
Battery
Operating Temperature
Storage Temperature
Dimensions
Weight
Car Charger
GPS Logger
1/3”CMOS sensor and 1/2.9 CMOS Sensor
Supports Micro SDHC, up to 128GB
2.7” LCD color TFT
Front Camera : 150°, 6G+1IR
Rear Camera : 150°, 6G+1IR
1.5m~Infinity
Dual camera:
1920x1080P 30FPS+1920x1080P 30FPS
Front camera only:
2560x1440P 30FPS
2304x1296P 30FPS
1920x1080P 60FPS
Resolution: 12M/10M/8M/5M/4M
Format: JPEG
Yes
Yes
Yes
Mini USB
Super Capacitor
14° ~ 158° F
-4° ~ 158° F
110x50x40 mm (4.33"x1.97"x1.57")
90g (3.17 oz)
INPUT: DC 12-24V, OUTPUT: DC 5V 2A
Built-in
-17-

FCC Statement
This equipment has been tested and found to comply with the limits for a Class
B digital device, pursuant to Part 15 of the FCC Rules. These limits are designed
to provide reasonable protection against harmful interference in a residential
installation. This equipment generates, uses and can radiate radio frequency
energy and, if not instal LCD and used in accordance with the instructions, may
cause harmful interference to radio communications. However, there is no
guarantee that interference will not occur in a particular installation. If this
equipment does cause harmful interference to radio or television reception,
which can be determined by turning the equipment off and on, the user is
encouraged to try to correct the interference by one or more of the following
measures:
• Reorient or relocate the receiving antenna.
• Increase the separation between the equipment and receiver.
• Connect the equipment into an outlet on a circuit different from that to which
the receiver is connected.
• Consult the dealer or an experienced radio/TV technician for help.
This device complies with Part 15 of the FCC Rules. Its operation is subject to
the following two conditions: (1) This device may not cause harmful interference,
and (2) this device must accept any interference received, including interference
that may cause undesired operation.
FCC Caution: Any changes or modifications not expressly approved by the party
responsible for compliance could void the user's authority to operate this
equipment.
-18-

Inhaltsverzeichnis
1 Einleitung ....................................................................................................................................... 20
1.1 Eigenschaften ................................................................................................................... 20
1.2 Lieferumfang .................................................................................................................... 20
1.3 Produktübersicht ............................................................................................................ 21
2 Anfang ............................................................................................................................................ 22
2.1 Speicherkarte einsetzen ............................................................................................. 22
2.2 Installation ......................................................................................................................... 23
2.3 Gerätsposition anpassen ........................................................................................... 24
2.4 An die Stromversorgung anschließen ................................................................ 24
2.5 Ein- und Ausschalten ................................................................................................... 25
2.6 Datum & Uhrzeit einstellen ...................................................................................... 25
3 Kamerabetrieb
3.1 Videoaufnahmen ........................................................................................................... 26
3.2 Aufnahmebildschirm ................................................................................................... 26
3.3 Einstellungen anpassen .............................................................................................. 27
3.4 Loop-Aufnahme ............................................................................................................. 28
3.5 Notfall-Video Schutz .................................................................................................... 28
3.6 Bewegungserkennung ................................................................................................ 28
3.7 Vibrationserkennung ................................................................................................... 28
3.8 Fotoaufnahmen .............................................................................................................. 29
3.9 Videos & Fotos ansehen ............................................................................................ 29
3.10 Video- und Fotodateien verwalten .................................................................... 29
3.11 GPS ..................................................................................................................................... 30
3.12 Nachtsicht ....................................................................................................................... 30
4 Menü-Üersicht
5 FAQs
6 Kundendienst
7 Garantie
8 Spezifikationen
............................................................................................................................ 26
............................................................................................................................ 31
................................................................................................................................................. 33
.............................................................................................................................. 34
........................................................................................................................................... 34
............................................................................................................................ 35
-19-

1 Einleitung
Willkommen bei Z-Edge F1 Autokamera. Schützen Sie sich und Ihr Fahrzeug
mit Echtzeit-Videoaufnahmen und Audioaufnahmen während der Fahrt.
Ausgestattet mit Stealth-Size-Design und einer Dual-Linse, um Vorder- und
Rückseite aufzunehmen. Bitte lesen Sie sich diese Bedienungsanleitung vor der
Benutzung dieses Produkts durch. Wir hoffen, dass Ihnen dieses Produkt gefällt.
1.1 Eigenschaften
• Full HD 1920 x 1080P
• 2,7" LCD Farbbildschirm
• Bis zu 150° Weitwinkelobjektiv
• Integrierter G-Sensor
• Bewegungserkennung
• Audioaufnahme
• Nachtsicht
• GPS
1.2 Was ist in der Verpackung
Autokamera Auto LadegerätSaugnapf-Halterung
mit GPS-Modul
BedienungsanleitungMini-USB Datenkabel Garantiekarte
-20-

1.3 Produktübersicht
12
4 51 32 8 9 1110
6 7
13
Innenkamera
1
IR LCDs
2
Bildschirm
3
Modus Taste
4
Aufwärtstaste
5
Abwärtstaste
6
Einschalttaste
7
8
Mikrofon
14 15
Saugnapfhalterung Anschluss
9
Mini-USB Anschluss
10
OK-Taste
11
Speicherkartenschlitz
12
Reset
13
Frontkamera
14
Lautsprecher
15
16
GPS USB-Anschluss
-21-
16

2 Anfang
2.1 Speicherkarte einsetzen
Setzen Sie die Speicherkarte so ein, dass die
Pins zum Display des Geräts weisen, bis sie
einrastet.
Speicherkarte entnehmen
Drücken Sie vorsichtig auf die Speicherkarte, die Karte wird freigegeben und
kann herausgezogen werden.
WARNUNG:
Es wird empfohlen, die Speicherkarte vor der ersten Benutzung zu
formatieren. Bitte beachten Sie, dass alle auf der Speicherkarte gespeicherten
Daten nach dem Formatieren gelöscht werden.
Hinweis:
• Unterstützt Micro-SDXC Karten bis zu 128 GB
• Entfernen oder legen Sie die Speicherkarte nicht ein, während das Gerät
eingeschaltet ist. Das könnte die Speicherkarte beschädigen.
Speicherkapazität Video-Aufnahmezeit
8GB
16GB
32GB
64GB
128GB
Nur als Referenz
44Minuten
88Minuten
176Minuten
352Minuten
704Minuten
-22-

2.2 Installation
Bitte befolgen Sie die folgenden Schritte zur Befestigung des Geräts an der
Windschutzscheibe Ihres Fahrzeugs:
1. Bringen Sie die Halterung am Gerät an. Schieben Sie ihn in dem Anschluss,
bis diese einrastet.
2. Ziehen Sie die Schutzfolie vom Saugnapf ab.
3. Drücken Sie den Saugnapf fest gegen die Windschutzscheibe und drehen
Sie den Hebel im Uhrzeigersinn(12 Uhr), um ihn fest zu befestigen.
WARNUNG:
Installieren Sie das Gerät nicht an einer getönten Windschutzscheibe.
Dadurch könnte die Tönungsfolie beschädigt werden.
1 2
-23-

2.3 Gerätsposition anpassen
Schwenken Sie das Gerät vertikal
oder horizontal, um die Position
einzustellen.
2.4 An die Stromversorgung anschließen
Verwenden Sie nur das mitgelieferte Autoladegerät.
1. Verbinden Sie das Ladekabel
mit dem Autoladegerät und
der Kamera.
2. Stecken Sie das Autoladegerät in
die Zigarettenanzünder Buchse
Ihres Fahrzeugs.
3. Für GPS schließen Sie das
Ladekabel an den USB-Anschluss
an der Saugnapfhalterung(16) an.
-24-

2.5 Ein- und Ausschalten
Automatisch
• Wenn der Fahrzeugmotor eingeschaltet ist, schaltet sich die Kamera
automatisch ein.
• Wenn der Fahrzeugmotor ausgeschaltet wird, speichert die Kamera die
Aufnahme automatisch und schaltet sich innerhalb von 10 Sekunden ab.
Manuell
• Um das Gerät manuell einzuschalten,
drücken und halten Sie die Einschalttaste(7).
• Um das Gerät manuell auszuschalten, halten
Sie die Einschalttaste(7) 3 Sekunden lang
gedrückt.
2.6 Datum & Uhrzeit einstellen
• Bevor Sie dieses Gerät verwenden, empfehlen wir Ihnen, das richtige Datum
und die richtige Uhrzeit einzustellen.
• Wenn das Gerät aufzeichnet, drücken Sie die OK-Taste, um Aufnahme zu
stoppen und in den Standby Modus einzugehen.
• Drücken Sie zweimal die Einschalttaste(7), um das Einstellung-Menü aufzurufen.
• Drücken Sie die Aufwärts- und Abwärtstaste (5 & 6), um Datum/Uhrzeit im
Menü auszuwählen, und bestätigen Sie durch Drücken der OK Taste (11).
Passen Sie die Datums- und Uhrzeiteinstellungen mit den Aufwärts-,
Abwärts- und OK Tasten an (5,6,11)
• Wenn alle Felder korrekt sind, drücken Sie die Einschalttaste (7), um die
Einstellung zu speichern und zu verlassen.
-25-

3 Kamerabetrieb
3.1 Videoaufnahmen
Wenn eine SD-Karte eingelegt hat und das Gerät an die Stromversorgung
angeschlossen ist, schaltet sich das Gerät beim Einschalten des Automotors
automatisch ein und beginnt mit der Videoaufnahme. Wenn der Automotor
ausgeschaltet wird, speichert das Gerät automatisch die Videos und schaltet
sich innerhalb von 10 Sekunden.Oder drücken Sie die OK Taste, um
Videoaufnahme manuell zu stoppen/starten.
3.2 Aufnahmebildschirm
1 2 43
5
6
7
8
9
10 12
11
Nr. Name Beschreibung
Videoaufnahme
1
Auflösung Die aktuelle Auflösung anzeigen
2
Aufnahmezeit
IR Modus
4
Loop-Aufnahme Loop-Aufnahme Einstellung.5
Bewegungs-
erkennung
7
GPS
Ein blinkender roter Punkt zeigt an, dass die Kamera
jetzt aufnimmt.
Die aktuelle Aufnahmezeit anzeigen.3
Zeigt die IR-Nachtsichteinstellung an, Ein / Aus /
Auto, drücken und halten Sie die Aufwärtstaste (5)
für 4 Sekunden, um den IR-Modus zu ändern.
Bewegungserkennung: An / Aus6
Blau: Nach GPS-Signalen suchen.
Grün: GPS-Arbeitsstatus.
-26-
13

Nr. Name Beschreibung
Belichtung
Micro SD Karte
Sperre
Datum & Uhrzeit
Aufladen
12
Mikrofon
Die aktuelle Belichtung anzeigen.8
Zeigt an, ob TF/Micro SD-Karte vorhanden ist.9
Videoschutz10
Das aktuelle Datum und die Uhrzeit anzeigen.11
Aufladung-Symbol zeigt an, wenn das Ladegerät
angeschlossen ist.
Mikrofon An/Aus.13
3.3 Einstellungen anpassen
Passen Sie die Videoaufnahme, die Fotofunktion und andere allgemeine
Einstellungen über die Menüs an:
Wenn das Gerät aufzeichnet, drücken Sie die OK-Taste(11), um die Aufnahme zu
stoppen und in den Standby Modus einzugehen. Drücken Sie die Modus-Taste(4),
um zwischen Videoaufnahme-, Fotoaufnahme- und Vorschaumodus zu wechseln.
Videoaufnahme Modus:
• Drücken Sie einmal die Einschalttaste(7), um das Menü 'Aufnahmeeinstellungen'
aufzurufen.
• Drücken Sie zweimal die Einschalttaste(7), um das Menü 'Generelle Einstellungen'
aufzurufen.
• Drücken Sie die Aufwärts- und Abwärtstaste (5 & 6), um eine Option im Menü
auszuwählen und drücken Sie die‚ OK-Taste (11) zum Aufrufen des ausgewählte
Menüs.
• Wählen Sie mit den Aufwärts- und Abwärtstaste (5 und 6) die gewünschte
Einstellung und drücken Sie die OK-Taste (11), um die Einstellung zu bestätigen.
• Drücken Sie die Einschalttaste (7), um das Menü zu verlassen.
Fotoaufnahme Modus:
• Drücken Sie einmal die Einschalttaste(7), um das Foto-Menü aufzurufen.
• Drücken Sie die Aufwärts- und Abwärtstaste (5 & 6), um eine Option im
Menü auszuwählen und drücken Sie die‚ OK-Taste (11) zum Aufrufen des
ausgewählte Menüs.
• Wählen Sie mit den Aufwärts- und Abwärtstaste (5 und 6) die gewünschte
Einstellung und drücken Sie die OK-Taste (11), um die Einstellung zu bestätigen.
• Drücken Sie die Einschalttaste (7), um das Menü zu verlassen.
-27-

3.4 Loop-Aufnahme
Die Videos werden aufgezeichnet und in festgelegten Intervallen auf der
Speicherkarte gespeichert. Sobald die Speicherkarte voll ist, überschreibt die
Schleifenaufnahme automatisch die früheste ungeschützte gespeicherte Datei.
Dies verhindert, dass lange Videoclips bei einem einzigen Überschreiben
verloren gehen. Die Videodateien können in Intervallen von 1, 3 oder 5 Minuten
auf der Speicherkarte gespeichert werden: Videoaufnahme Modus >
Video Einstellungen > Loop-Aufnahme
3.5 Notfall-Video Schutz
Wenn die Vibrationserkennung aktiviert ist und ungewöhnliche Vibration oder
Kollisionen auftreten, schützt die Kamera die aktuell aufgezeichnete Videodatei
automatisch davor, überschrieben zu werden. Ein Schloss-Symbol zeigt an, das
bedeutet, dass die Datei erfolgreich geschützt wurde. Um eine Videodatei
während einer Aufnahme manuell zu schützen, drücken Sie die Modus Taste(4).
3.6 Bewegungserkennung
Durch der Aktivieren der Funktion 'Bewegungserkennung' beginnt die Kamera
automatisch mit der Aufnahme, wenn eine Bewegung durch die Kamera
detektiert wurde. Nach ca. 15 Sekunden ohne Bewegung wird die Videoaufnahme
automatisch angehalten. Diese Funktion kann im Menü deaktiviert oder aktiviert
werden: Videoaufnahme Modus > Video Einstellungen > Bewegungserkennung
WARNUNG:
Die Bewegungserkennung erfordert, dass die Kamera mit Strom versorgt wird.
Um dieses Feature zu nutzen, während das Fahrzeug geparkt ist und der Motor
ausgeschaltet ist, müssen Sie die Kamera möglicherweise fest an Ihr Fahrzeug
anschließen. Bitte wenden Sie sich vor der Installation an einen ausgebildeten
Mechaniker.
3.7 Vibrationserkennung
Die Vibrationserkennung-Funktion erkennt durch den eingebauten G-Sensor
ungewöhnliche Vibrationen oder Kollision. Sie löst automatisch die Funktionen .
Stellen Sie die Empfindlichkeit ein, dass diese Funktionen automatisch mit
kleineren oder größeren Vibrationen ausgelöst werden (Funktion kann auch
ausgeschaltet werden): Videoaufnahme Modus > Video Einstellungen > G-Sensor
-28-

3.8 Fotoaufnahmen
• Wenn das Gerät aufzeichnet, drücken Sie die OK-Taste, um Aufnahme zu
stoppen und in den Standby Modus einzugehen.
• Drücken Sie die Modus Taste (4), um in den Fotomodus einzugehen, und
drücken Sie die OK-Taste (11), um ein Foto aufzunehmen.
• Um ein Foto während der OK aufzunehmen, drücken Sie kurz die
Einschalttaste (7).
3.9 Videos & Fotos ansehen
• Wenn das Gerät aufzeichnet, drücken Sie die OK-Taste, um Aufnahme zu
stoppen und in den Standby Modus einzugehen.
• Drücken Sie zweimal die Modus-Taste (4), um in den Wiedergabemodus
einzugehen.
• Drücken Sie die Aufwärtstaste (5), um die vorherige Datei auszuwählen.
Drücken Sie die Abwärtstaste (6), um die nächste Datei auszuwählen.
Drücken Sie die OK-Taste (11), um eine Videodatei zu spielen / zu pausen.
3.10 Video- und Fotodateien verwalten
• Zum Wiedergabemodus wechseln.(Siehe 3.9)
• Navigieren Sie zu der Datei, die Sie verwalten möchten, und drücken Sie die
Modus Taste (4).
• Benutzen Sie mit den Aufwärts- und Abwärts-Tasten (5 und 6) zum Löschen
oder Schützen und drücken Sie dann die OK-Taste (11).
Löschen
Löschen Sie die Datei, indem Sie "Aktuelle Datei löschen" auswählen, oder
wählen Sie "Alle löschen", um alle nicht geschützten Dateien zu löschen, die auf
der Speicherkarte gespeichert sind.
WARNUNG:
Gelöschte Dateien können nicht wiederhergestellt werden. Bitte stellen Sie
sicher, dass Sie wichtige Dateien vorher sichern.
Schützen
Schützen Sie die Datei davor, von der Loop-Aufnahme Funktion überschrieben
zu werden (Siehe 3.4 und 3.5).
-29-

3.11 GPS
In die Saugnapfhalterung ist ein GPS-Empfänger integriert, der den Standort
Ihrer Autokamera überall auf der Erde lokalisieren kann. Die Videoaufnahmen
umfassen GPS-Tracking-Daten, die Ort, Geschwindigkeit, Zeit und andere
Variablen aufzeichnen, die auf einem GPS-Multimedia-Player angezeigt werden
können.
• Stellen Sie sicher, dass das USB-Kabel an den USB-Anschluss (16) der
GPS-Saugnapfhalterung angeschlossen ist, um GPS-Tracking zu aktivieren
• Gehen Sie zu http://zeroedgetechnology.com/downloads/, um den kompatiblen
GPS Multimedia Player herunterzuladen.
• Installieren Sie den GPS Multimedia Player auf Ihrem Laptop oder Computer.
• Führen Sie das Programm aus und klicken Sie auf "Importieren Sie Dateien",
um Video abzuspielen.
Hinweis:
• Der GPS Multimedia Player ist mit Microsoft Windows und Apple Mac
kompatibel.
• GPS-Tracking-Daten sind möglicherweise mit anderen GPS-Playern nicht
sichtbar.
3.12 Nachtsicht
Drücken Sie im Standby Modus oder während der Aufnahme des Geräts die
Aufwärtstaste (5) für 4 Sekunden, um Nachtsicht auf Aus, An oder Automatisch
umzuschalten.
-30-

4 Menü-Üersicht
Menü Name Beschreibung Verfügbare Option
Die Auflösung der
Auflösung
Loop-Aufnahme 1Min / 3Min / 5Min
G-Sensor Aus/Hoch/Mittel/Niedrig
Audioaufnahme An/Aus
Bewegungserkennung
Video
modus
Fahrer-ID
Stempel An/Aus
Display drehen An/Aus
Einstell-
Sprache
ungen
aufzuzeichnenden Videos
einstellen.
Die Dauer Zeit jedes Videos
einstellen(Siehe 3.4)
Die Empfindlichkeit des
G-Sensors einstellen
(Siehe 3.7).
Audioaufnahme aktivieren/
deaktivieren.
Bewegungserkennung
aktivieren/ deaktivieren
Belichtungswert einstellen.Belichtung +2.0, +1.0, 0, -1.0, -2.0
Verwenden Sie die
Kennzeichen Informationen
Hinzufügen / Entfernen eines
Datums- und Zeitstempels,
Logo-Stempels, Zahlenstempels,
Geschwindigkeitsstempels,
GPS-Standortstempels,
sichtbar auf gespeicherten
Videoaufzeichnungen und Fotos.
Drehen Sie das Display um 180°.
Die Sprache der
Benutzeroberfläche
einstellen.
-31-
Dual Kamera:
1920x1080P 30FPS +
1920x1080P 30FPS
Nur Frontkamera:
2560x1440P 30FPS
2304 x 1296 P 30 FPS
1920x1080P 60FPS
An/Aus
Wählen Sie mit den
Aufwärts- und AbwärtsTasten, und drücken die
OK Taste (11), um
Einstellungen zu bestätigen.
Englisch, Dänisch, Deutsch,
Spanisch, Französisch,
Italienisch, Niederländisch,
Norwegisch, Finnisch,
Schwedisch, Portugiesisch,
Vereinfachtes Chinesisch,
Traditionelles Chinesisch,
Japanisch, Russisch,
Koreanisch

Menü Name Beschreibung Verfügbare Option
Formatieren OK/Abbrechen
Datum/Uhrzeit
Geschwindigkeitseinheit
Einstell-
Bildschirm
ungen
automatisch aus
Tastenton An/Aus
Gerät auto aus
Frequenz 50Hz / 60Hz
System Info Firmware Version
Standardeinstellungen
FotoMenü
Zeit- &
Datumsstempel
Formatieren Sie die
Speicherkarte. Warnung:
Alle Inhalte der Speicherkarte
wird gelöscht und kann NICHT
wiederhergestellt oder
wiederhergestellt werden.
Das Datum / die Uhrzeit
einstellen(siehe 2.5).
Zeitzone einstellenZeitzone / DST GMT, GMT -12 to GMT +12
Zwischen KMH und MPH
wählen
Die Zeit auswählen, um den
Bildschirm während des
Betriebs automatisch
auszuschalten.
Aktivieren / deaktivieren Sie
den Toneffekt mit Drücken
der Tasten.
Die Zeitverzögerung für
die Autokamera auswählen,
um sich nach der
Ausschaltung Ihres Fahrzeugs
automatisch auszuschalten.
Die Lichtfrequenz einstellen.
Version Information anzeigen
Alle Optionen auf die
Werkseinstellungen
zurücksetzen.
Fotoauflösung einstellen.Auflösung
Foto Belichtung einstellenBelichtung +2.0, +1.0, 0, -1.0, -2.0
Zeit- & Datumstempel
aktivieren/ deaktivieren
-32-
JJJJ/TT/MM
SS:MM:SS
KMH / MPH
Aus / 1Min / 3Min / 5Min
Aus / 1Minute / 2Minutes /
3Minutes
OK / Abbrechen
12M 4032x3024
10M 3648x2736
8M 3264x2448
5M 2592x1944
4M 2304x1728
An/Aus

5 FAQs
Wo soll ich den Dash cam platzieren?
• Wir empfehlen, die Kamera so nahe wie möglich an der Mitte der
Windschutzscheibe zu montieren. Dies sollte weder den Fahrer ablenken
noch das Sichtfeld des Fahrers blockieren (siehe 2.2).
Warum stoppt die Kamera nach einiger Zeit die Aufnahme?
• Wenn die Bewegungserkennung aktiviert ist, stoppt die Kamera automatisch
die Aufnahme, wenn länger als 15 Sekunden keine Bewegung erkannt wird
(Siehe 3.6).
• Ihre Micro SD-Karte ist möglicherweise voll und muss vor der nächsten
Verwendung formatiert werden. Die 1080P HD-Videos sind groß und
geschützte Videos können nicht automatisch gelöscht werden. Wir empfehlen,
Ihre Speicherkarte alle 14 Tage zu formatieren.
Warum empfehlen Sie eine Micro SD-Karte der Klasse 10 oder höher?
• Ein 1080P HD-Video hat einen größeren Datenfluss und erfordert daher eine
Micro SD-Karte mit höherer Schreibgeschwindigkeit. Wenn die Speicherkarten
unter Klasse 10 verwendet werden, kann dies zur Sperrung der Kamera oder
anderen damit verbundenen Problemen bei Aufnahme oder Löschung führen.
Wie schalte ich den Bildschirm / Ton während der Aufnahme aus?
• Um den Bildschirm auszuschalten, drücken Sie während der Aufnahme einmal
kurz die Abwärts-Taste (6). Um die Audioaufnahme auszuschalten, drücken
Sie während der Aufnahme kurz die Aufwärts-Taste (5). (Bitte beachten Sie:
Dies unterbricht die Aufnahme nicht).
Wie nehme ich Videos auf?
• Alle Kameras sind so programmiert, dass sie automatisch aufzeichnen, wenn
die Stromversorgung angeschlossen und eine Speicherkarte eingesteckt ist.
Wenn der Motor ausgeschaltet oder die Stromversorgung unterbrochen wird,
stoppt die Kamera nach etwa 10 Sekunden die Aufnahme. Starten/stoppen
Sie die Aufnahme manuell durch Drücken der OK Taste (11).
-33-

6 Kundendienst
Für Support / technische Unterstützung kontaktieren Sie uns bitte unter
support@zeroedgetechnology.com.
Oder besuchen Sie unsere offizielle Website: www.zeroedgetechnology.com
7 Garantie
Alle Zero Edge-Kunden erhalten eine 30-tägige Geld-zurück-Garanti, um
sicherzustellen, dass Ihr Einkaufserlebnis ist sorgenfrei.
Sie erhalten außerdem eine 12-monatige Garantie. Wenn Sie unsere offizielle
Website (www.zeroedgetechnology.com/) abonnieren, können Sie die
Garantie auf 18 Monate verlängern.
Sie erhalten Benachrichtigungen zu unseren neuen Produkten, bevor sie auf
den Markt gebracht werden. Außerdem können Sie einen speziellen Rabatt
oder Gutschein für unsere Produkte erhalten.
Ihre Meinung ist wichtig
Z-Edge ist bestrebt, unsere Produkte zu verbessern, um Ihnen die beste
Benutzererfahrung anzubieten. Wir schätzen Ihr Feedback und wir hoffen,
dass Sie Ihre Erfahrungen mit anderen Käufern teilen könnten.
Sie können uns auch Ihre Gedanken und Ihr Feedback zu sozialen Medien
senden und uns auf Facebook (www.facebook.com/zeroedgeGA/) & YouTube
folgen, um die neuesten Nachrichten, Rabatte und Gewinnspiele zu erhalten.
Vielen Dank, dass Sie sich für Z-Edge entschieden haben!
-34-

8 Produktspezifikationen
Name Beschreibung
Bildsensor
Speichermedium
Bildschirm
Objektiv
Fokusbereich
Auflösung
Foto
G-Sensor
Mikrofon
Lautsprecher
Schnittstelle
Batterie
Betriebstemperatur
Lagertemperatur
Abmessungen
Gewicht
Autoladegerät
GPS Empfänger
1/3” CMOS-Sensor und 1/2.9” CMOS Sensor
Unterstützt Micro SDHC, bis zu 128 GB, Klasse 10
oder höher
2,7 Zoll LCD Farb-TFT
Frontkamera : 150°, 6G+1IR
Innenkamera : 150°, 6G+1IR
1,5 Meter bis unendlich
Dual Kamera:
1920x1080P 30FPS + 1920x1080P 30FPS
Nur Frontkamera:
2560x1440P 30FPS
2304 x 1296 P 30 FPS
1920x1080P 60FPS
Entschließung: 12M / 10M / 8M / 5M / 4M
Format: JPEG
Integriert
Integriert
Integriert
Mini USB
Superkondensator
14° bis 158° F
-4° bis 158° F
110x50x40 mm
90g (3,7 oz)
Eingang: DC 12-24V, Ausgang: DC 5V/2A
Integriert
-35-

FCC-ERKLÄRUNG
Das vorliegende Gerät erfüllt die Grenzwertbestimmungen für digitale Geräte
der Klasse B nach Teil 15 der FCC-Regeln zur Funkentstörung. Ziel dieser
Bestimmungen ist es, beim Betrieb des Gerätes innerhalb einer Wohnumgebung
einen angemessenen Schutz gegen störende Interferenzen zu gewährleisten.
Dieses Gerät erzeugt und nutzt Hochfrequenzenergie und kann diese auch
ausstrahlen. Wird es nicht gemäß den hier gegebenen Anweisungen
angeschlossen und genutzt, kann das Gerät Funkübertragungen erheblich stören.
Es ist jedoch trotz Befolgen der Anweisungen möglich, dass bei bestimmten
Geräten Störungen auftreten. Sollten durch das Gerät Störungen beim
Radio- bzw. Fernsehempfang auftreten, was z.B. durch Ein- und Ausschaltung
des Geräts geprüft werden kann, versuchen Sie, diese durch folgende
Maßnahmen zu beheben:
• Richten Sie die Empfangsantenne neu aus.
• Erhöhen Sie den Abstand zwischen Gerät und Empfänger.
• Schließen Sie das Gerät an eine Netzquelle auf einem anderen Kreislauf an, als
dem, an den der Empfänger angeschlossen ist.
• Wenden Sie sich an Ihren Fachhändler oder einen erfahrenen Radio- und
Fernsehtechniker für Hilfe.
Dieses Gerät entspricht Teil 15 der FCC-Bestimmungen. Der Betrieb unterliegt
den folgenden zwei Bedingungen:
(1) Das Gerät darf keine Interferenzen verursachen, und
(2) Das Gerät muss nicht anfällig gegenüber beliebigen empfangenen Störungen
sein, einschließlich solcher, die einen unerwünschten Betrieb verursachen.
FCC Achtung: Änderungen oder Modifikationen, die nicht ausdrücklich von der
für die Konformität verantwortlichen Partei genehmigt wurden, können die
Berechtigung des Benutzers zum Betrieb dieses Geräts aufheben.
-36-


F1Z18UM-02
 Loading...